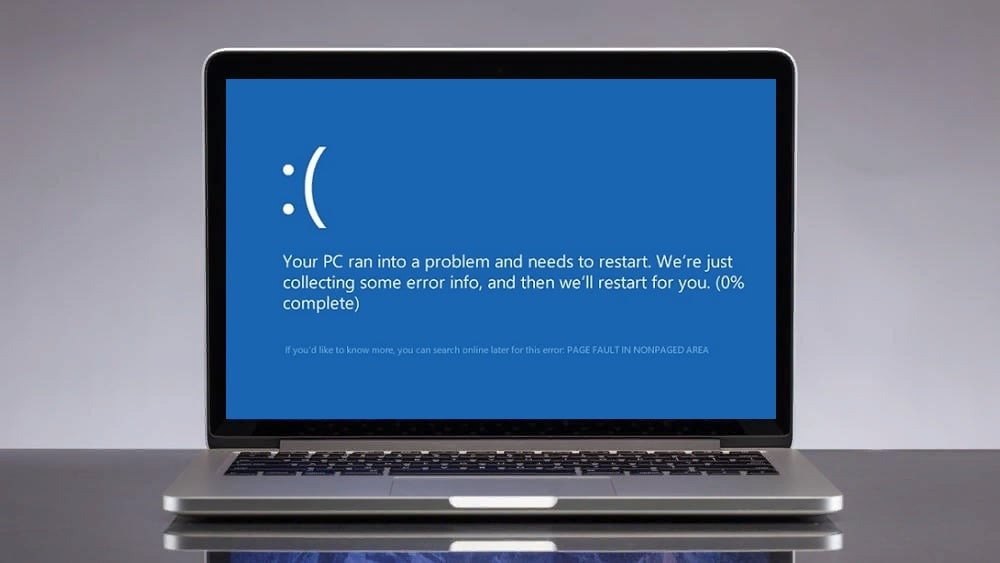
Do you encounter system crash, freeze, and lagging when trying to launch games like Destiny 2, Fortnite, R6 Siege, Dayz, or other through Battleye anti-cheat? Most of the time, blue screen error occurs with What failed: Fix BEDaisy.sys accompanied by Page_Fault_in_Nonpaged_Area, System_Scan_at_Raised_Irql_Caught_Improper_Driver_Unload, Attempted_Write_To_Readonly_Memory, Kernel_Security_Check_Failure, and System_Thread_Exception_Not_Handled in this case. When the error appears the computer might be stuck in reboot loop and the game frequently crashes.
What failed: BEDaisy.sys BSOD error commonly occurs because of incorrect installation of the game, Intel Turbo Boost Technology settings in BIOS, and Opera GX browser. Furthermore, obsolete Network adapter drivers, and corrupted system files, are occasionally reasons for this issue. The best part is the error is solvable only you need to follow the methods by turn. See: Fix Escape from Tarkov Blue Screen Error BSOD in Windows 11 or 10.
Here is how to fix BEDaisy.sys BSOD Blue Screen Error in Windows 11 or 10 –
Way-1: Uninstall and Properly Install the Game
The main cause of this error is the incorrect location of BEDaisy.sys and PUBG. Battleye or some other reasons changed the folder of the games you are playing. There are 2 solutions to this problem: if you have knowledge of where the game files are located manually place BEDaisy.sys in that one or fully uninstall Battleye and the game and then reinstall them.
System restore might also work to fix the BSOD if the restore point is created before the issue occurred. We will here provide the solution one by one, so follow the first one, it means uninstall and reinstall the Game and Battleye:
- Press – Winkey+R.
- Type – appwiz.cpl.
- Hit Enter to launch the Programs and Features window.
- Find the game creating the issue and right-click on it.
- Select Uninstall.
- Click on Yes.
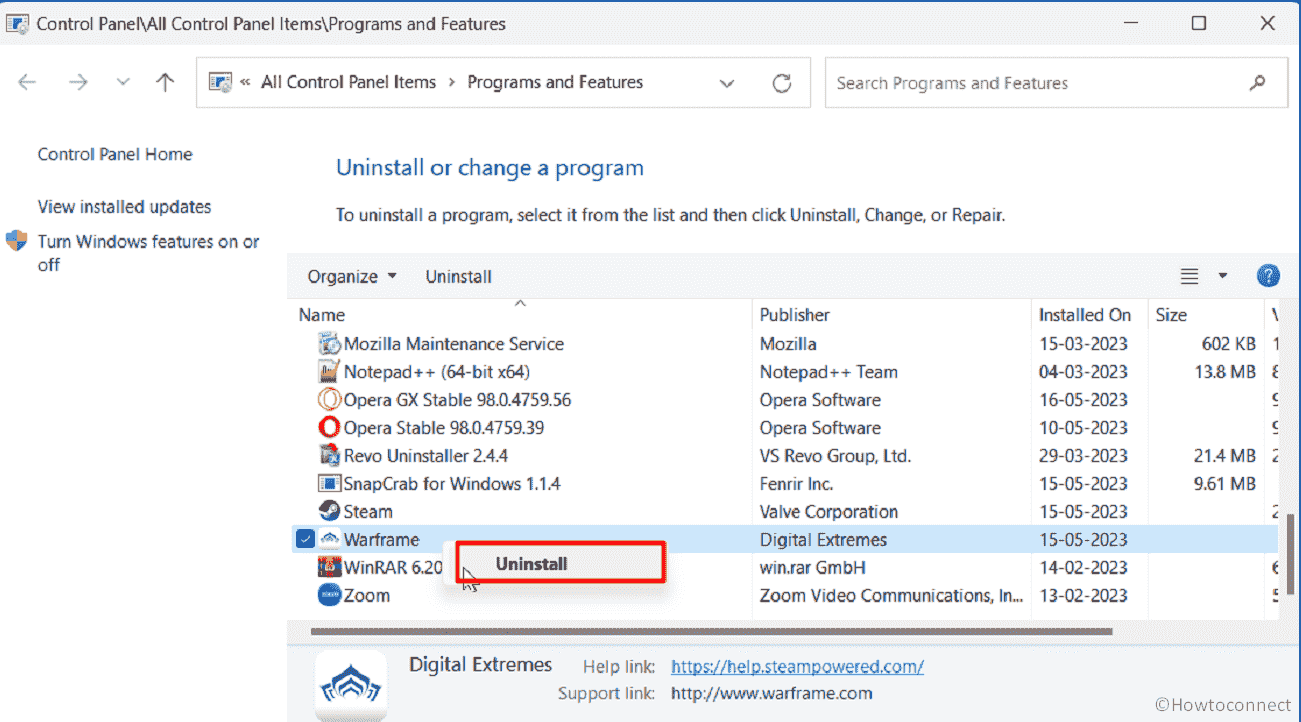
- In case, any uninstallation wizard appears follow the instructions.
- In the same way, uninstall Battleye.
- You can download Battleye uninstaller to completely remove the launcher.
- Then go to the respective websites and freshly install the games and Battleye.
Way-2: Perform System Restore
If a restore point is created before the start of BEDaisy.sys PUBG or any bug check then this method will make your life easy. System restore is a useful tool to have in your troubleshooting arsenal that can help you undo changes made to your computer and revert them back to a previous state where they were functioning properly.
This is a built-in feature that captures periodic snapshots of the system configuration and stows them as restore points. Using this you can bring back the system exactly in the condition when there was no error occurring.
- Click on Search.
- Type – rstrui.exe.
- Press – Enter.
- On the System Restore wizard, check the option – “Choose a different restore point” and click on Next.
- Select a date and time when BEDaisy.sys failed error did not start to appear.
- Click Next.
- Reanalyze your selections and click on Finish.
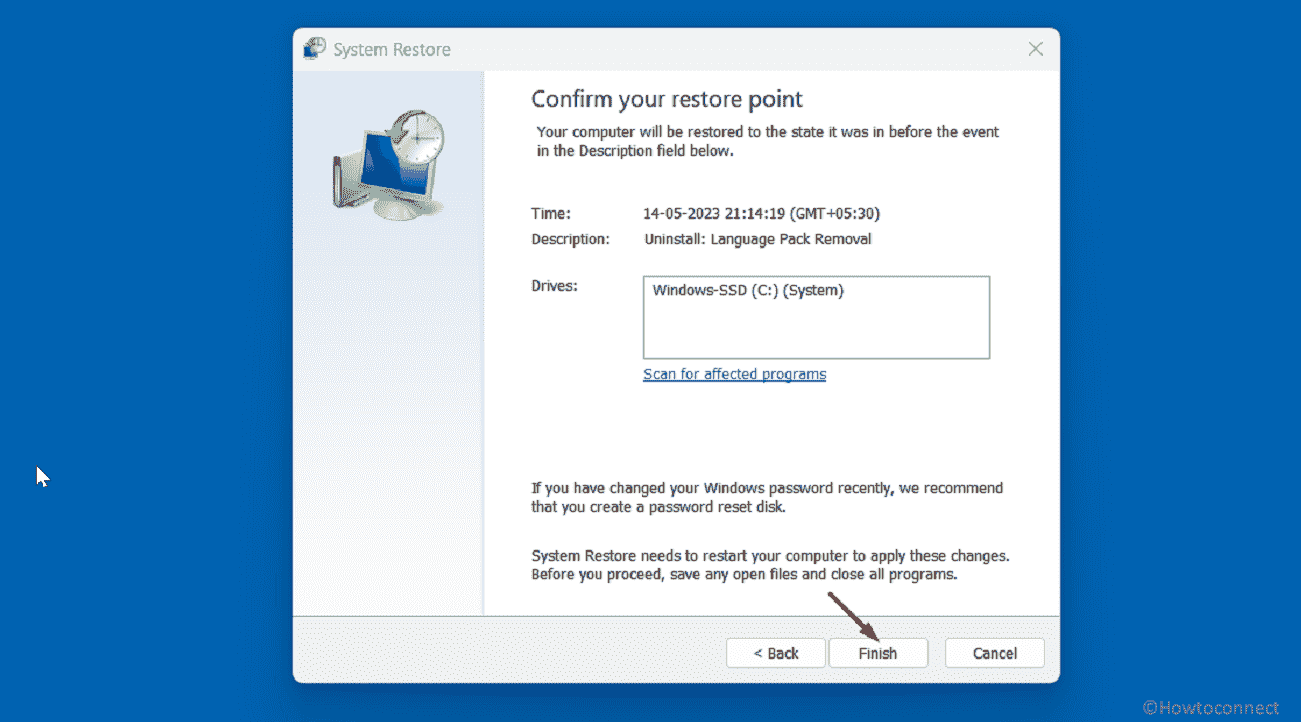
- When a warning popup shows, click on Yes.
- This process will take some time so stay patient and restart your device.
Way-3: Remove Opera GX
Opera GX is a web browser designed for gamers that can limit the amount of CPU and RAM and allow them to allocate more resources to their games. Several players use this application but it can trigger BEDaisy.sys blue screen Destiny 2 error in Windows 11 or 10.
To deal with this BSOD, remove the browser from your computer by heading to the instructions:
- Press Windows and S keys.
- Type Control and hit Enter.
- When the Control panel opens, click on Programs and Features.
- On the Control Panel\All Control Panel Items\Programs and Features window, right-click on Opera GX and select Uninstall.
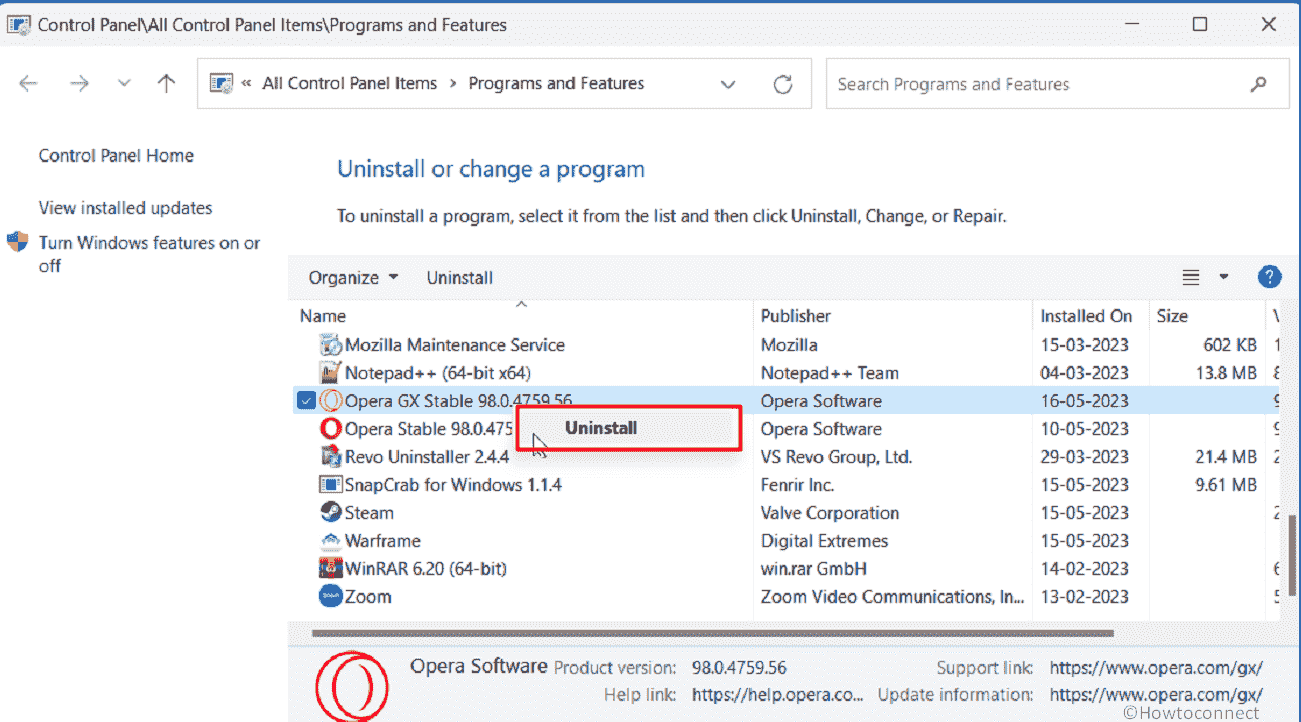
- Confirm the prompt.
- Restart the computer and check if the error is fixed.
Way-4: Disable Intel Turbo Boost Technology in BIOS
Intel Turbo Boost Technology is a powerful feature that can significantly improve the performance of Intel processors but it increases the temperature of the processor, which can cause the computer to become unstable or crash if it’s not adequately cooled.
Many users report that the system is heated before Battleye BEDaisy.sys BSOD appears. In this case, disabling Intel Turbo Boost Technology in BIOS is likely to fix the issue. Therefore, follow the steps:
- Shut down the computer and turn it on.
- Press Esc just after you have powered on the PC (or use function keys according to the manufacturer’s guidelines).
- Enter BIOS/Platform Configuration (RBSU).
- Select Performance Options.
- Make Intel (R) Turbo Boost Technology Disabled and press Enter.
- If BIOS does not provide this option use ThrottleStop software for the same.
Way-5: Use Command line utilities SFC and DISM to repair corrupted elements
SFC (System File Checker) and DISM (Deployment Image Servicing and Management) are two tools available in Windows that can help fix BEDaisy.sys blue screen error in Windows 11 or 10. SFC compares the system files to the original files and If it finds any corrupted or missing ones, it will replace them with a cached copy of the files stored on the computer or with the original installation media.
DISM, on the other hand, is a more powerful tool that can repair the Windows system image, which includes the operating system, device drivers, and other system components. Run both of them in the below manner:
- Click on Start and type cmd.exe.
- Select – Run as administrator.
- When the User account control dialog box appears, click on Yes.
- On the Administrator: Command Prompt, type
SFC /SCANNOWand press Enter. - Allow the process to complete and when you see “Windows Resource Protection did not find any integrity violations.” reboot the computer.
- See if the BSOD is solved then alright else open Administrator: Command Prompt again and run the following commands sequentially:
dism /online /cleanup-image /checkhealth
dism /online /cleanup-image /scanhealth
dism /online /cleanup-image /restorehealth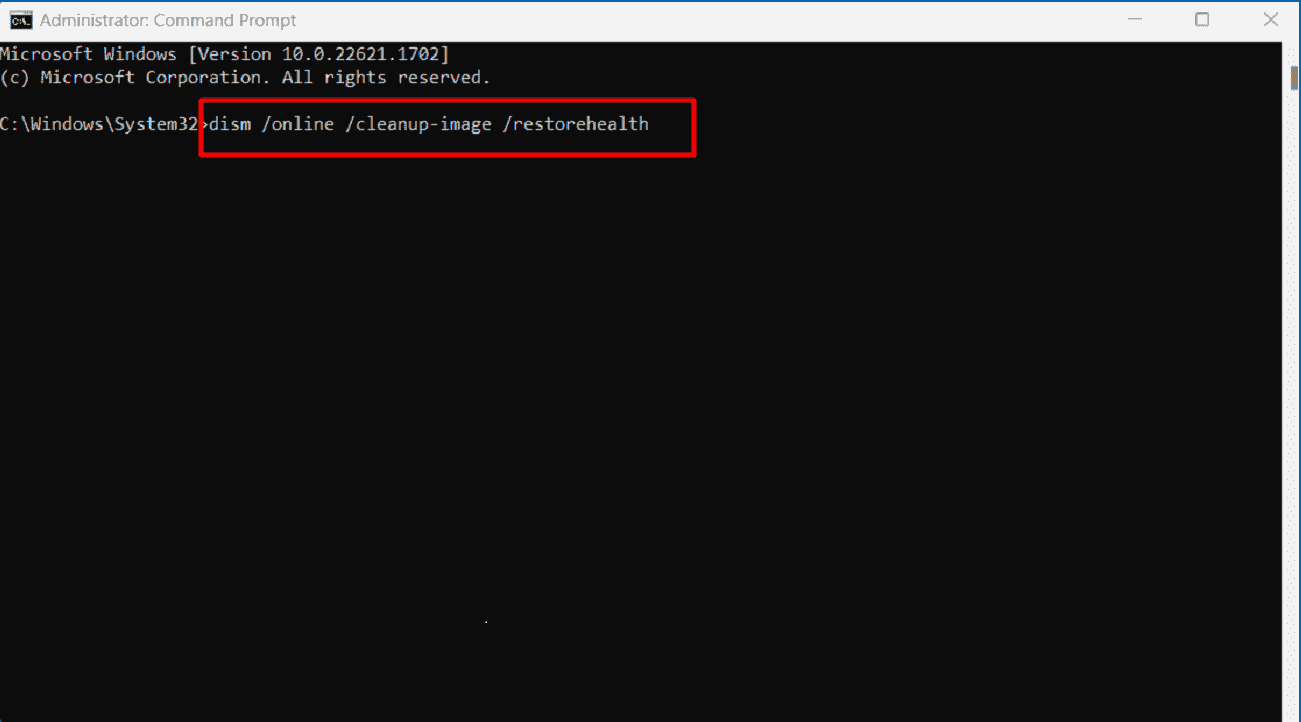
- When done with all 3 commands, restart your PC.
Way-6: Run the Windows Memory Diagnostic tool
Sometimes, Bad memory can generate BEDaisy.sys BSOD when launching games like Destiny 2, R6 Siege, Fortnite, and Dayz with Battleye. Fortunately, there is a utility that will quickly repair the problem if follow the instruction:
- Press Windows and R keys.
- Type mdsched.exe.
- Hit Enter to open Windows Memory Diagnostic tool.
- Once a wizard appears, click on Restart now and check for problems (recommended).
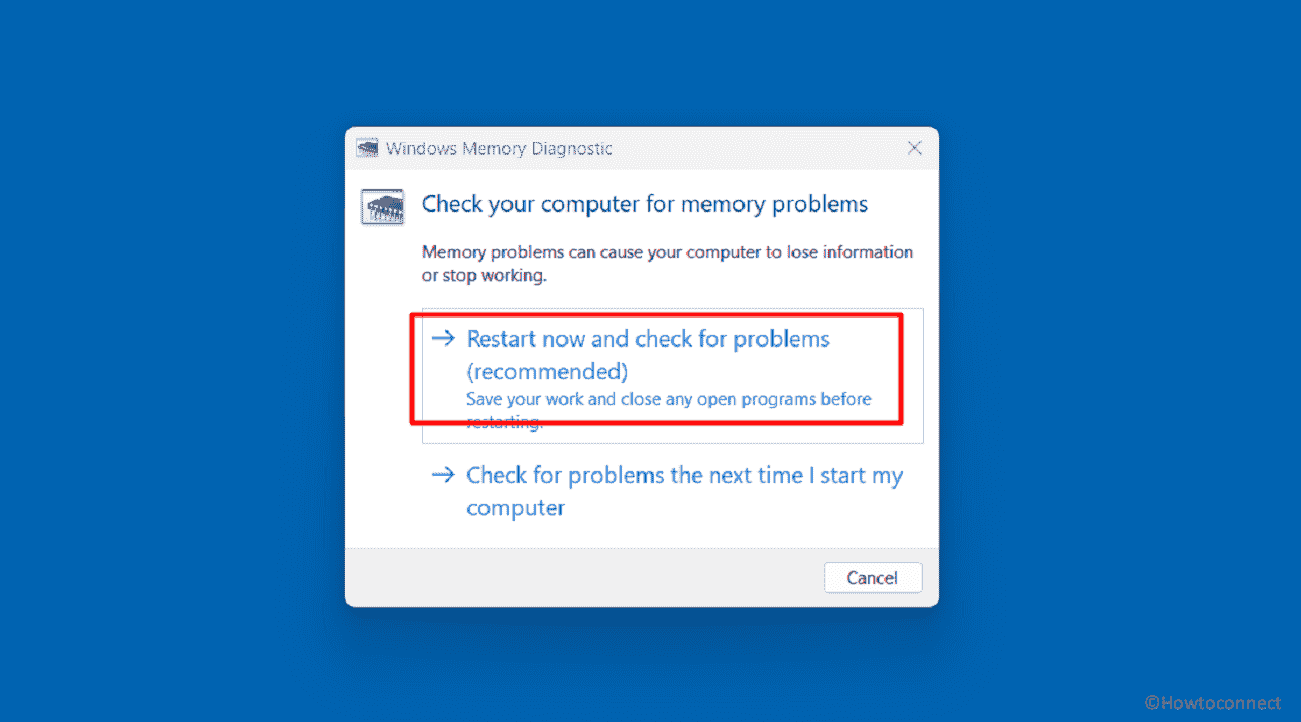
- The tool will reboot the device and repair the memory issues if finds any.
Way-7: Uninstall Network driver
In some cases, the outdated network driver is found culprit when BEDaisy.sys Battleye Blue Screen error appears. Driver establishes intercommunication between hardware and Windows operating and when there is any glitch occurs in it system may start crashing. Hence, update the driver using the following guidelines:
- First, download the latest version of Qualcomm Atheros driver from the manufacturer’s website
- Then, right-click on Start and select Device Manager.
- Double-click on Network adapters to expand the list of drivers.
- Right click on the Qualcomm Atheros driver and select Uninstall device.
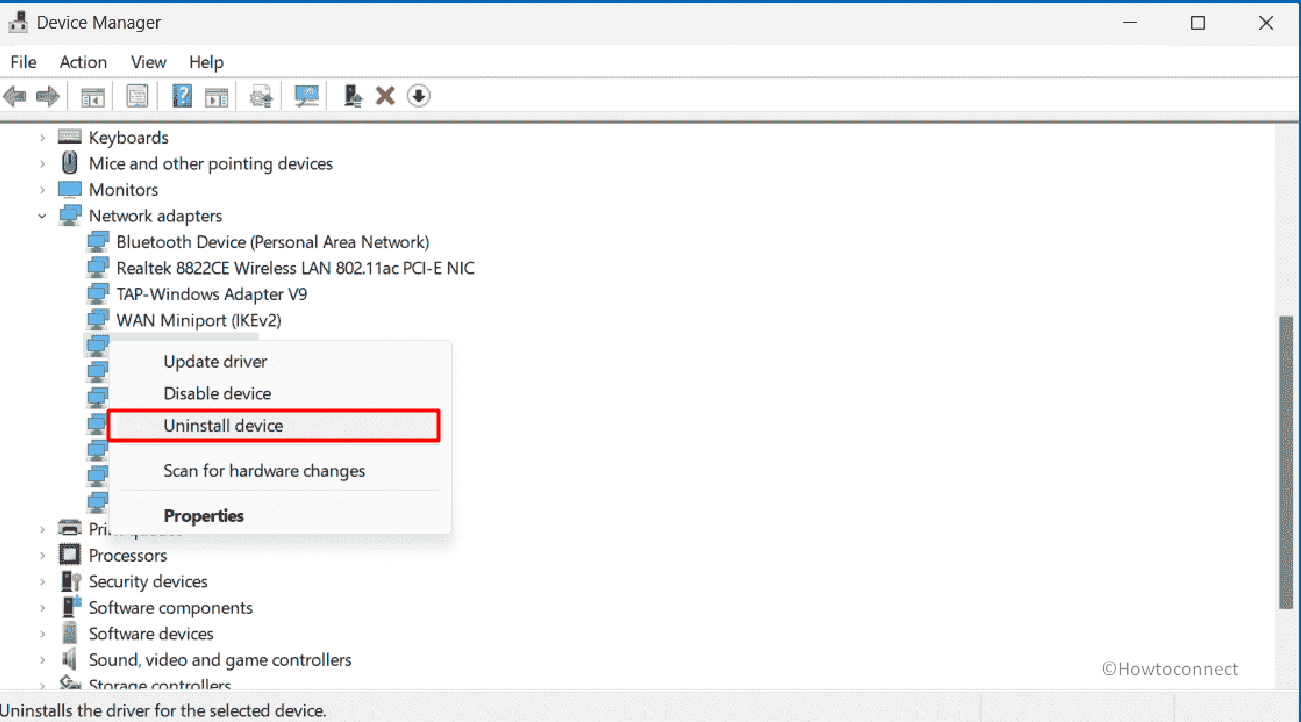
- On the warning pop-up, Check the box for Attempt to remove the driver for this device.
- Then, click on Uninstall.
- Reboot the computer and install the downloaded driver.
- Check if the issue still persists or if it is fixed.
Way-8: Execute clean install
If all the methods fail to work then Clean install is the last destination to fix BEDaisy.sys BSOD. Clean installing Windows 11/10 is the process of installing the operating system on a computer with a completely new installation, without keeping any previous files, programs, or settings. Follow the articles to clean install:
- How to install Windows 11 without TPM and Secure Boot
- How to Use Rufus to Install Windows 10
Methods:
Way-1: Uninstall and Properly Install the Game
Way-2: Perform System Restore
Way-3: Remove Opera GX
Way-4: Disable Intel Turbo Boost Technology in BIOS
Way-5: Use Command line utilities SFC and DISM to repair corrupted elements
Way-6: Run the Windows Memory Diagnostic tool
Way-7: Update Network driver
Way-8: Execute clean install
That’s all!!
Repair any Windows problems such as Blue/Black Screen, DLL, Exe, application, Regisrty error and quickly recover system from issues using Reimage.
PAGE_FAULT_IN_NONPAGED_AREA — распространенная проблема Windows, которая обычно связана со сбоями в работе ОЗУ. Её можно встретить во всех версиях Windows, таких как 10 / 8.1 / 8 и 7. Ошибка появляется в виде синего экрана смерти после сбоя системы. Выскакивающая ошибка означает, что ПК не смог запросить страницу памяти, что препятствовало правильной работе Windows. После этого Windows автоматически начнет сбор данных и устранение проблемы, что приведет к перезагрузке. К сожалению, процесс автоматического восстановления не всегда оказывается успешным. Вместо этого иногда люди не могут войти в систему, так как синий экран постоянно появляется при попытке запустить компьютер. Ошибка «PAGE_FAULT_IN_NONPAGED_AREA» часто связана со сбоями конфигурации памяти или повреждением оборудования. Однако, поскольку этот тип проблемы существует и затрагивает большинство пользователей Windows уже на протяжении длительного времени, мы собрали набор наиболее эффективных и проверенных инструментов, которые помогут вам устранить эту проблему в статье ниже.

Автоматическое восстановление
Скачать утилиту восстановления Windows
Скачать средство восстановления Windows

Существуют специальные утилиты для восстановления Windows, которые могут решить проблемы, связанные с повреждением реестра, неисправностью файловой системы, нестабильностью драйверов Windows. Мы рекомендуем вам использовать Advanced System Repair Pro, чтобы исправить ошибку «PAGE_FAULT_IN_NONPAGED_AREA» в Windows 10.
1. Проверьте диск на наличие повреждений.
Ошибки локальных дисков могут быть одной из самых серьезных причин всех проблем, возникающих при регулярном использовании. К счастью, Windows предоставляет встроенную возможность проверки диска на наличие ошибок и моментально их исправлять. Вот как это можно сделать:
- НАЙДЕМ Командная строка , введя
cmdво вкладку поиска. Затем щелкните на неё правой кнопкой мыши и выберите Запуск от имени администратора. - В черной консоли вы должны вставить
chkdsk /f /r C:команду и нажмите Enter. При необходимости замените «C» буквой вашего жесткого диска. - Система выполнит сканирование на правильность конфигурации и физические ошибки, после чего автоматически исправит их.
Скорее всего проблема будет исправлена. Если нет, следуйте приведенным ниже методам, чтобы избавиться от проблемы.
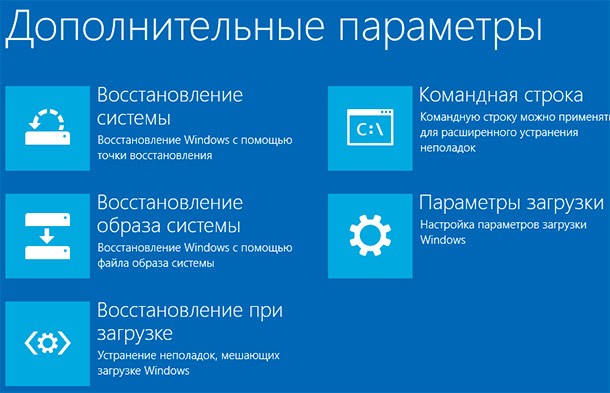
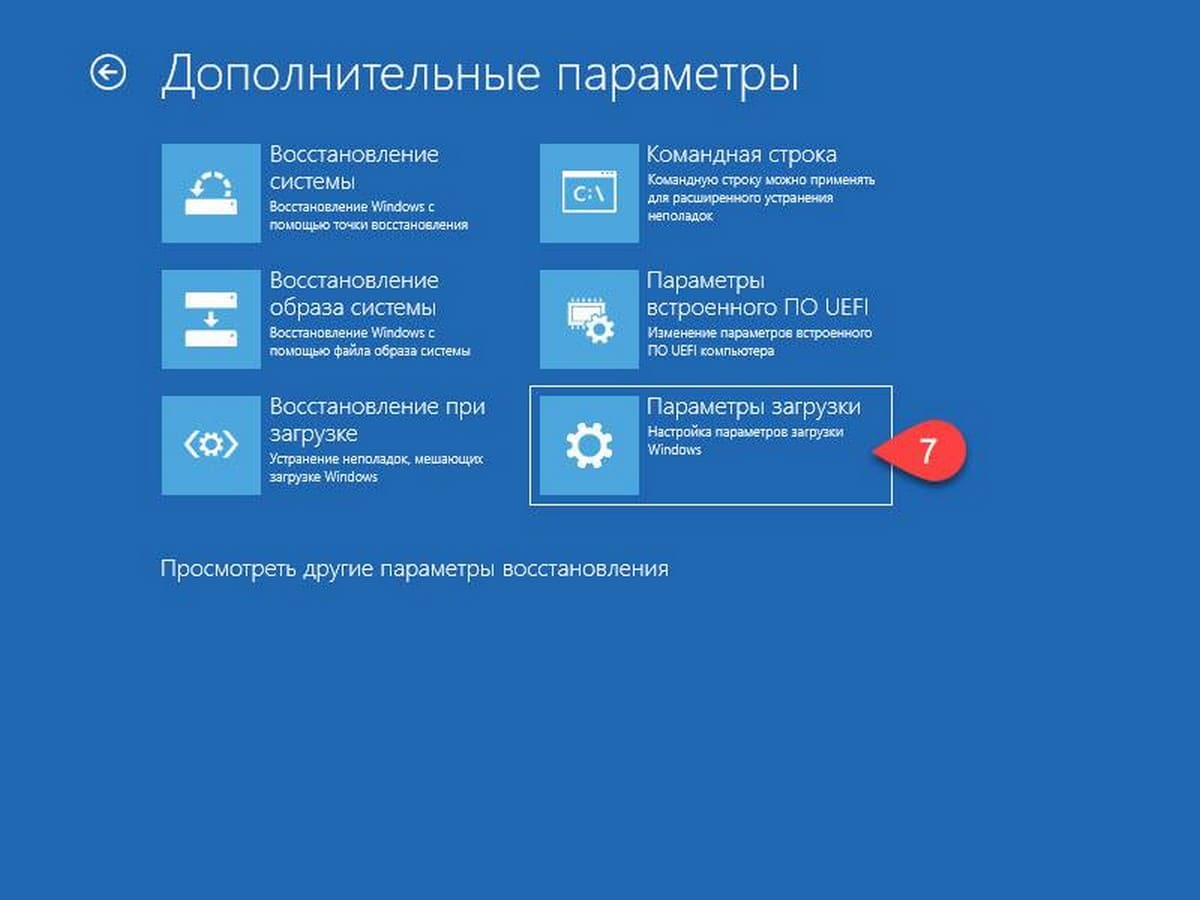
2. Откат к предыдущей конфигурации
Если вы начали сталкиваться с ошибкой «PAGE_FAULT_IN_NONPAGED_AREA» внезапно после новых обновлений системы или непреднамеренных изменений, которые привели к этой проблеме, вы можете попытаться вернуться к предыдущим настройкам, которые раньше работали без сбоев. Использование опции «Последняя удачная конфигурация» возможно только в Windows 7. Для этого мы собираемся использовать дополнительные параметры Windows, которые описаны ниже:
- Полностью выключите компьютер.
- Затем включите компьютер, нажмите и удерживайте F8 (или F2 если F8 не работает) сразу после того, как увидите черный экран в начале загрузки.
- После этого вы должны увидеть появившееся Дополнительные параметры Windows меню.
- В меню, используйте клавиши со стрелками на клавиатуре, чтобы найти Последняя удачная конфигурация и затем нажмите Enter.
В качестве альтернативы, если вы не можете нормально загрузить свой компьютер из-за вечно появляющейся ошибки, вы можете запустить его в безопасном режиме с настройками по умолчанию и попробовать запустить необходимые решения:
Для пользователей Windows 10:
- Полностью выключите компьютер. Затем нажмите на кнопку питания и нажмите F11 несколько раз, пока не увидите Среда восстановления Windows.
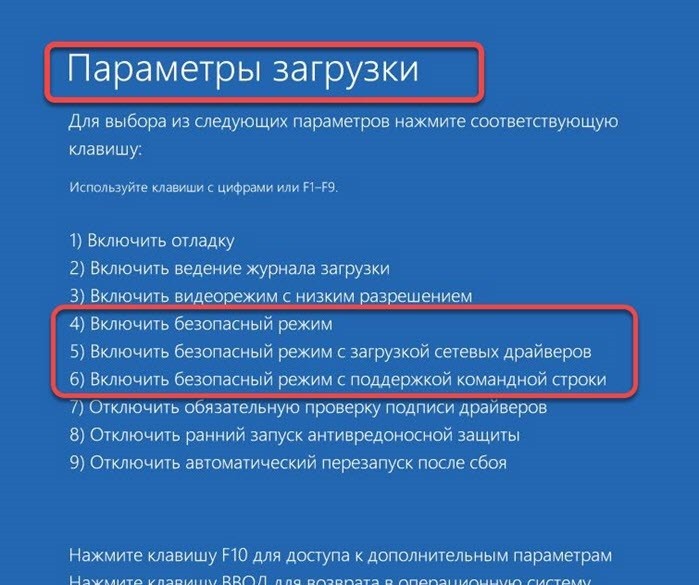
- Затем перейдите в Поиск и устранение неполадок и Дополнительные параметры и выберите Параметры загрузки опцию.
- После этого нажмите перезагрузить. Затем Windows перезагрузится и появится список параметров.
- Среди списка выберите Включить безопасный режим с помощью цифровых клавиш.
Для пользователей Windows 7 / 8 / 8.1:
- Как и выше, при перезагрузке ПК удерживайте F8 or F2 для входа в Дополнительные параметры Windows. Если вы используете Windows 8, попробуйте удерживать F8 Shift. Обратите внимание, что для этого может потребоваться несколько попыток.
- Затем выберите Безопасный режим вариант и нажмите Enter.
После этого вы сможете войти в систему со стандартной конфигурацией. Затем вы можете запустить сканирование диска через командную строку, как мы это делали ранее.
3. Запустите средство диагностики памяти Windows.
Ошибка «PAGE FAULT IN NONPAGED AREA» может быть спровоцирована неисправностью ОЗУ. Это не обязательно означает, что вам следует спешить с покупкой и заменой памяти. Вместо этого следует сначала попытаться просканировать свою оперативную память на предмет целостности и позволить Windows решить найденную проблему. Приведенные ниже инструкции доступны и идентичны для всех версий Windows:
- Тип
mdschedв строку поиска рядом с Меню Пуск. - После открытия вы увидите новую вкладку с двумя вариантами.
- В зависимости от того, какой из них вы выберете, Windows просканирует вашу оперативную память на наличие ошибок и мгновенно восстановит их.
Наконец, вы можете посмотреть, исчезла ли ошибка.
4. Обновите драйверы
Устаревшие или неисправные драйверы также считаются частыми причинами сбоев, связанных с памятью. Именно поэтому следует попытаться проверить драйверы на наличие новых обновлений и установить их последовательно.
Вы можете обновить их вручную или с помощью утилиты IObit Driver Booster, которая автоматически найдет устаревшие или отсутствующие драйверы и заменит их.
Скачать Driver Booster
Чтобы запустить обновление вручную, следуйте инструкциям, приведенным ниже:
- Щелкните левой кнопкой мыши на Меню Пуск и выберите Диспетчер устройств.
- Если вы не знаете, какой драйвер вызывает проблему, обновите их один за другим. Щелкните на каждый из них правой кнопкой мыши и выберите Обновить драйвер. Иногда неисправные драйверы помечаются желтым треугольником.
- Позвольте Windows найти новые драйверы и загрузить их, следуя инструкциям на экране.
Перезагрузите компьютер и посмотрите, не изменилось ли что-нибудь после обновления. Если нет, перейдите к следующему способу ниже.
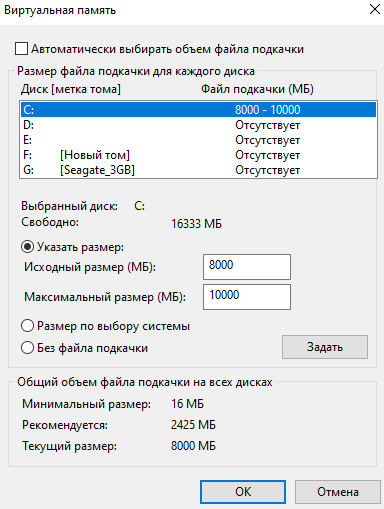
4. Отключите Автоматическое определение Файла подкачки
Если ни один из предыдущих методов не устранил проблему, то отключение автоматического определения файла подкачки может помочь в исправлении ошибки «PAGE_FAULT_IN_NONPAGED_AREA». И вот как это сделать:
- Какую бы версию Windows вы ни использовали, перейдите в Мой компьютер и щелкните правой кнопкой мыши в пустом месте.
- Затем выберите Объекты и перейти в Дополнительные параметры системы.
- Перейдите в Перфоманс настройки и выберите Передовые меню.
- В открывшемся окне выберите Изменить , а затем снимите флажок с Автоматически выбирать объем файла подкачки.
- В конечном итоге нажмите OK чтобы сохранить настройки и перезагрузите компьютер. Надеемся, проблема исчезнет.
Как видите, ошибку «PAGE FAULT IN NONPAGED AREA» можно легко устранить, следуя вышеупомянутым шагам. В других случаях вам следует разобрать компьютер и проверить жесткий диск на наличие физических повреждений. Если вы не уверены, повреждена ли оперативная память или жесткий диск, вам обязательно следует обратиться за дополнительной помощью к профессионалам, чтобы самостоятельно не повредить устройства.

Ошибка Page Fault In Nonpaged Area встречается в любых версиях операционной системы, в том числе в «десятке». Проблема чаще связана с неправильной работой драйверов, ОЗУ, жесткого диска. Неполадка отображается в виде синего экрана BSOD с соответствующим кодом, обозначающим, что устройству не удалось запросить страницу памяти. Рассмотрим основные причины появления ошибки Page Fault In Nonpaged Area и способы ее ликвидации в Windows 10.
Причины возникновения ошибки
Пользователь сталкивается с описываемой проблемой по причине аппаратного или программного сбоя на ПК.

Появление БСОД с этим кодом могут спровоцировать:
- неисправные, устаревшие драйверы;
- повреждение разделов реестра, возникших при установке или деинсталляции ПО, связанного с системой;
- вирусные программы, повредившие файлы Винды;
- конфликт встроенного или скачанного антивирусного ПО;
- конфликт драйверов при подключении нового оборудования;
- поврежденные файлы системы;
- неполадки, связанные с HDD;
- неполадки в ОЗУ;
- неисправность компонента материнской платы.
Перед устранением рассматриваемой ошибки юзеру необходимо изучить окно с уведомлением, в котором сообщается об источнике неполадки. В первую очередь система постарается самостоятельно решить проблему с синим «экраном смерти». Для этого ОС проводит сканирование и перезапуск. Если эти действия не помогли ликвидировать ошибку, пользователю предстоит устранить ее самому.

Что делать при «PAGE_FAULT_IN_NONPAGED_AREA»
Прежде чем приступать к устранению ошибки, рекомендуется отключить на компьютере антивирусные программы, так как они могут быть источником сбоя. Существует несколько вариантов решения проблемы, которые рассмотрим подробнее.
Перезагрузка файла подкачки
Файлом подкачки называется область на жестком диске, которая применяется при нехватке объема памяти ОЗУ. Пространство необходимо системе для быстрого доступа к часто используемым утилитам.

При повреждении компонентов Виндовс не может извлечь из них необходимые данные, и ПК завершает работу в аварийном режиме. В результате юзер видит на экране описываемую ошибку. Для решения задачи требуется создание нового файла подкачки. Операция выполняется по следующей схеме:
- Нажать: «Win + R».
- В окне «Выполнить» ввести: «SystemPropertiesAdvanced.exe».
- Нажать «Ok».
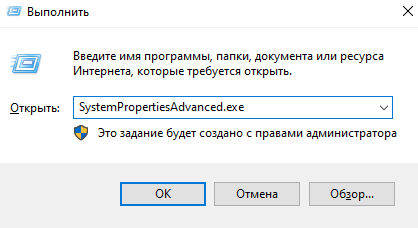
- Перейти в раздел «Быстродействие».
- Войти во вкладку «Дополнительно».
- Нажать на «Параметры».

- В «Виртуальной памяти» тапнуть по кнопке «Изменить».
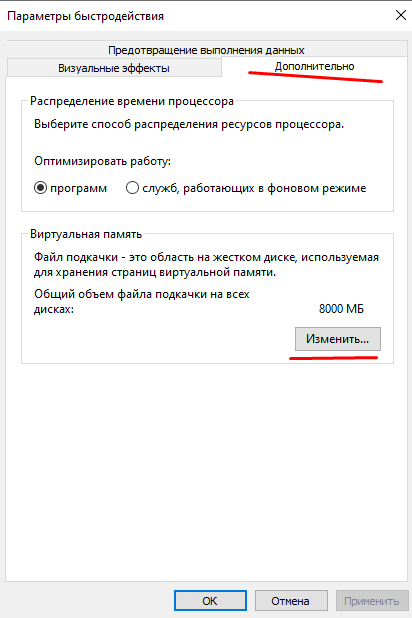
- Убрать маркер возле строки «Автоматически выбирать объем файла подкачки».
- Отметить строку «Без файла подкачки».
- Сохранить настройки.
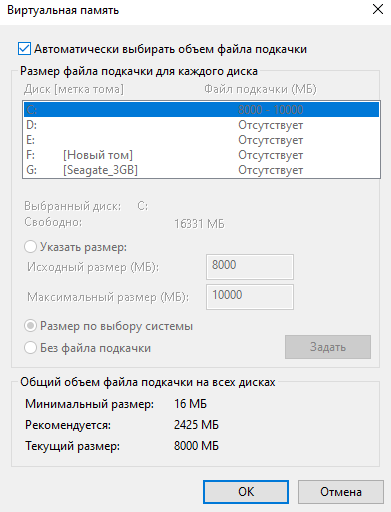
Пользователю понадобится перезагрузить гаджет. Затем снова вернуться во вкладку «Виртуальная память» и выполнить следующее:
- Пометить маркером строку «Размер по выбору системы».
- Кликнуть по кнопке «Задать».
- Вернуть отметку рядом со строкой «Автоматически выбирать объем подкачки».
- Нажать «Ok».
- Перезагрузить систему.
Если все действия выполнены правильно, поврежденный файл будет деинсталлирован. При повторном появлении синего «экрана смерти» БСОД, перейти к следующему варианту.
Проверка диска ChkDsk
Появление Page Fault In Nonpaged Area может быть спровоцировано скоплением поврежденных файлов в результате прерывания каких-либо процессов, происходящих на устройстве. Это может быть аварийное завершение работы системы, принудительная остановка загрузки приложения и другие действия. Устранить проблему поможет софт ChkDsk:
- Открыть «Пуск».
- Набрать в поисковой строке: «cmd».

- Выбрать КС с расширенными правами.
- Ввести в строке: «chkdsk /f /r». Нажать «Ok».
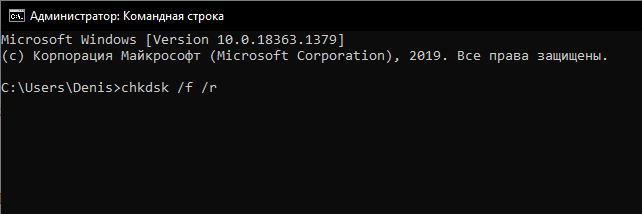
При появлении сообщения о том, что команда не может быть выполнена, юзеру потребуется перезапустить систему, так как в данный момент том используется другим процессором. При загрузке подтвердить действие нажатием «Yes».
Проверка памяти Windows
Данный метод не решает проблему, а помогает выяснить – присутствуют ли неполадки в ОЗУ. Для обнаружения сбоев в работе потребуется выполнить следующее:
- Вызвать окно «Выполнить» нажатием клавиш: «Win + R».
- Ввести в строку: «mdsched». Нажать «Ok».

- Перезагрузить устройство.

Начнется процесс сканирования, пользователю нужно дождаться его завершения. При обнаружении проблем нужно выключить ПК, извлечь планки оперативной памяти. Далее аккуратно протереть ластиком контакты и снова установить элементы в устройство. Необходимо проверить, плотно ли встали планки в разъем. После останется проверить, исчезла ли проблема. Если исправить ситуацию так и не удалось, придется заменить комплектующие на новые.
Запуск утилиты SFC
Повреждение файлов системы может спровоцировать появление БСОД с описываемой ошибкой. Для выявления и устранения неполадки нужно следовать инструкции:
- Открыть «Пуск».
- В строке поиска набрать: «cmd».
- Открыть КС с правами Администратора.
- Ввести команду: «Sfc /scannow».
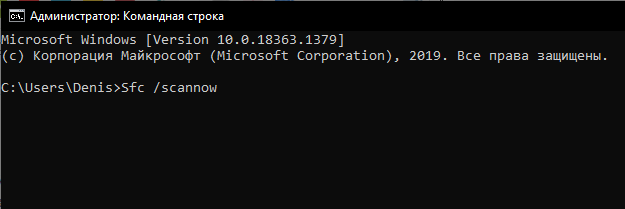
Запустится процесс сканирования, юзеру остается дождаться, когда он завершится. Напоследок перезапустить систему.
Другие способы решения проблемы
Если ошибка возникла после установки последних обновлений ОС или изменения настроек конфигураций, пользователь может откатить операционку до точки восстановления. Владельцам устройств с Виндовс 10 нужно следовать инструкции:
- Выключить ПК.
- Нажать на кнопку питания одновременно с клавишей «F11».
- Откроется среда восстановления Windows.

- Перейти в раздел «Поиск и устранение неполадок».
- Выбрать «Дополнительные параметры».
- Нажать на «Параметры загрузки».
- Выполнить перезагрузку ПК.
- После включения выбрать «Включить безопасный режим».
Причинами сбоев также выступают устаревшие, поврежденные драйверы. Для выяснения причины потребуется проверить ПО на наличие последних обновлений, при необходимости установить их. Облегчить задачу помогут сторонние утилиты, которые автоматически отыщут и инсталлируют необходимые программные обеспечения.
Ошибку Page Fault In Nonpaged Area легко устранить самостоятельно, используя выше перечисленные методы. Главное – найти источник проблемы. Возможно, разобраться со сбоем пользователю поможет банальная перезагрузка ПК или сканирование системы на вирусы. В крайнем случае, устранить неполадку, связанную с синим «экраном смерти», поможет откат системы до точки восстановления.
Ошибка PAGE_FAULT_IN_NONPAGED_AREA — довольно неприятная проблема, потому что за ней следует принудительная перезагрузка компьютера, без возможности сохранить открытые документы и файлы на рабочем столе. Она появляется, если Windows не может получить доступ к необходимым данным для выполнения какого-либо процесса, который уже запущен.
Как правило, переустановка драйверов устраняет сбой, но существуют и другие причины появления синего экрана, связанные с оперативной памятью. Это относительно старая проблема, так как она имела место и в предыдущих версиях Windows (7, 8, 8.1, Vista и XP). PAGE_FAULT_IN_NONPAGED_AREA означает, что система обратилась по несуществующему пути. Это происходит из-за неправильных адресов памяти или программных ссылок.
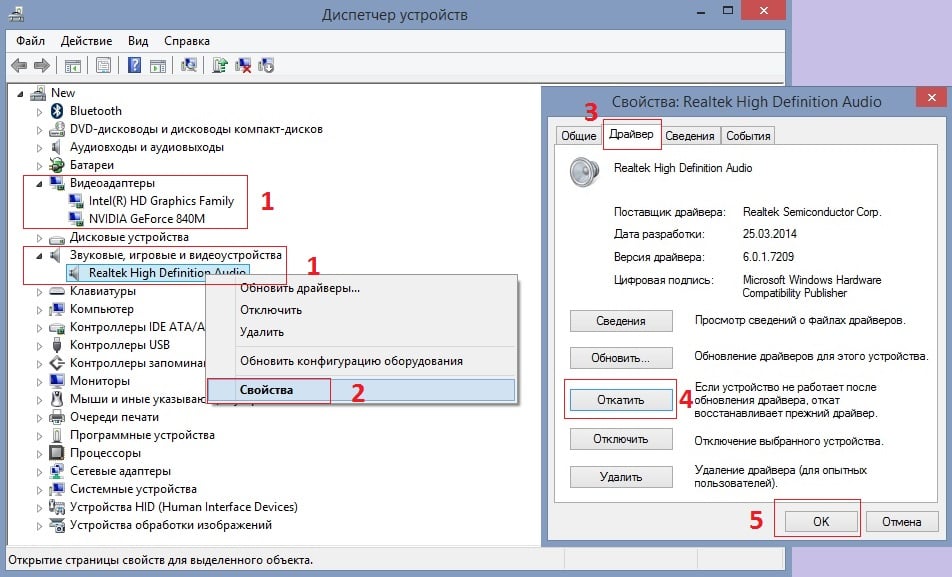
Решение 1: откат звуковых и видеодрайверов
Если ошибка стала появляться после недавних обновлений Windows или конкретных драйверов, то вероятно, проблема в совместимости, и есть смысл откатить программное обеспечение до предыдущих версий.
- Нажмите правой кнопкой мыши по значку Windows (нижний левый угол экрана).
- В открывшемся меню перейдите в раздел Диспетчер устройств.
- Разверните Видеоадаптеры и Звуковые, игровые и видеоустройства.
- Откатите драйверы, которые недавно были обновлены.
- Нажмите ПКМ по конкретному программному обеспечению и выберите Свойства.
- Перейдите во вкладку Драйверы и выберите опцию Откатить.
- Подтвердите действие во всплывающем окне и дождитесь отката.
- Затем перезагрузите компьютер.
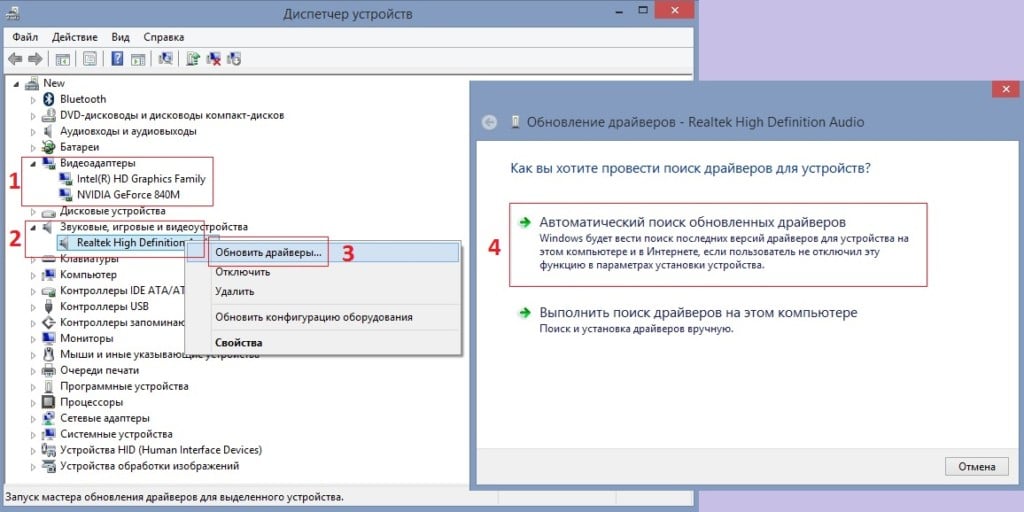
Решение 2: обновление драйверов
Вторым вариантом, из-за которого может появиться синий экран с вышеописанной ошибкой — это противоположная ситуация, когда Windows обновилась, а драйверы нет. В этом случае вместо отката следует обновить программное обеспечение.
- Зайдите в Диспетчер устройств, как описано в первом примере.
- Разверните те же разделы и обновите все драйверы.
- Щёлкните ПКМ по конкретному обеспечению и выберите обновить.
- Примените Автоматический поиск обновлённых драйверов.
- После установки обновлений перезагрузите систему.
Решение 3: отключение авто управления размером файла подкачки
Как выполнить:
- Нажмите сочетание клавиш Windows + E, чтобы открыть проводник.
- Щелкните правой кнопкой мыши Этот компьютер и выберите Свойства.
- В открывшемся окне перейдите в Дополнительные параметры системы.
- Среди свойств откройте вкладку дополнительно.
- В разделе Быстродействие нажмите Параметры.
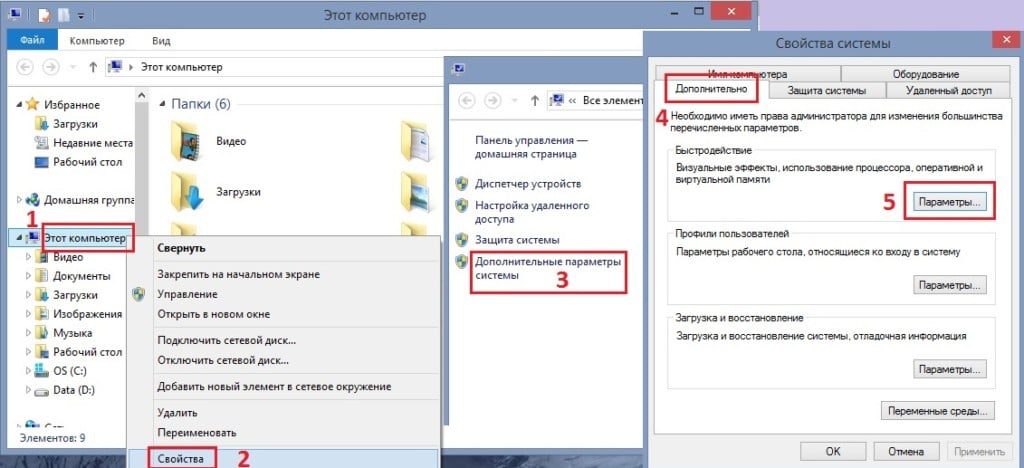
- В Параметрах быстродействия перейдите на вкладку Дополнительно.
- Посмотреть на Виртуальную память и нажмите Изменить.
- В новом окне снимите галочку с пункта Автоматически выбирать объём файла подкачки.
- Нажмите Ок и перезагрузите компьютер.

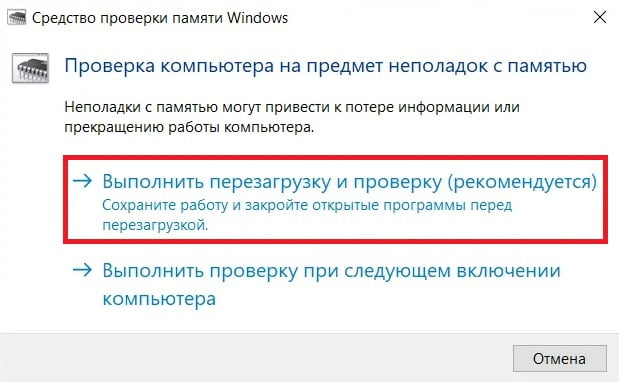
Решение 4: запустите средство диагностики памяти Windows
Инструкция:
- Введите в поиске Windows «Диагностика памяти Windows».
- Щёлкните Проверить проблемы с памятью моего компьютера.
- Диагностика Windows может помочь решить проблему, связанную с ошибкой PAGE_FAULT_IN_NONPAGED_AREA.
- Используйте средство просмотра событий для изучения результатов сканирования в системном журнале.
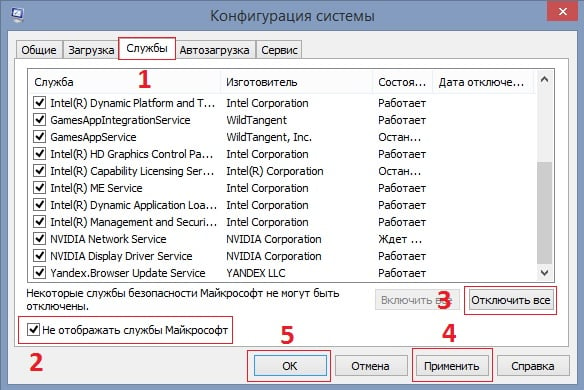
Решение 5: отключение сторонних служб
Пошаговая инструкция:
- Введите в поиске Windows msconfig и откройте Конфигурацию системы.
- Перейдите на вкладку Службы и отключите все службы сторонних разработчиков.
- Для простоты поставьте галочку Не отображать службы Microsoft, а затем завершите работу всех оставшихся служб.
- После этого проверьте, появляется ли синий экран с предупреждением об ошибке.
- Если он исчез, включайте службы сторонних разработчиков по одной или группами, чтобы определить, с какой именно возникает конфликт в системе.
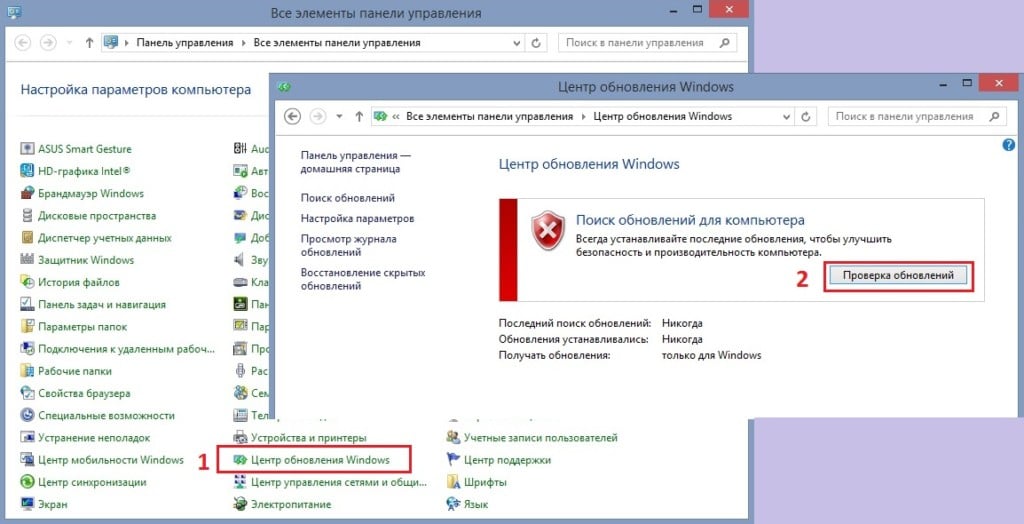
Решение 6: запустите обновления Windows
Как обновить Windows:
- Нажмите ПКМ по значку Windows и выберите Панель управления.
- Перейдите в раздел Центр обновления Windows.
- Нажмите Проверка обновлений, чтобы система проверила, отсутствуют ли какие-либо обновления.
- Если появился список устаревших драйверов, выберите Установить обновления.
- После завершения процесса перезагрузите компьютер.
Решение 7: отключите антивирус
В некоторых случаях ошибка PAGE_FAULT_IN_NONPAGED_AREA исчезает после отключения стороннего антивируса. Иногда он несовместим с программным/аппаратным обеспечением, вызывая ошибки, зависания и как следствие, аналогичные конфликты.
You should upgrade or use an alternative browser.
- Status
- Not open for further replies.
-
#1
I have scanned my computer for viruses, all came up clean, checked my RAM using Memory diagnostics, checked if all my drivers were updated, defragged and optimised my solid state and hard drive, ran cmd. Everything seemed fine.
I’ve known that this is a common problem in games that use the Battle eye launcher.
Here are the details :
On Mon 6/08/2018 3:58:03 AM your computer crashed or a problem was reported
crash dump file: C:\WINDOWS\Minidump\080618-107265-01.dmp
This was probably caused by the following module: ntoskrnl.exe (nt+0x198560)
Bugcheck code: 0x50 (0xFFFFF801AFCAA4A0, 0x10, 0xFFFFF801AFCAA4A0, 0x2)
Error: PAGE_FAULT_IN_NONPAGED_AREA
file path: C:\WINDOWS\system32\ntoskrnl.exe
product: Microsoft® Windows® Operating System
company: Microsoft Corporation
description: NT Kernel & System
Bug check description: This indicates that invalid system memory has been referenced.
This appears to be a typical software driver bug and is not likely to be caused by a hardware problem.
The crash took place in the Windows kernel. Possibly this problem is caused by another driver that cannot be identified at this time.
On Mon 6/08/2018 3:58:03 AM your computer crashed or a problem was reported
crash dump file: C:\WINDOWS\MEMORY.DMP
This was probably caused by the following module: bedaisy.sys (BEDaisy+0x24BEB8)
Bugcheck code: 0x50 (0xFFFFF801AFCAA4A0, 0x10, 0xFFFFF801AFCAA4A0, 0x2)
Error: PAGE_FAULT_IN_NONPAGED_AREA
Bug check description: This indicates that invalid system memory has been referenced.
This appears to be a typical software driver bug and is not likely to be caused by a hardware problem.
A third party driver was identified as the probable root cause of this system error. It is suggested you look for an update for the following driver: bedaisy.sys .
Google query: bedaisy.sys PAGE_FAULT_IN_NONPAGED_AREA
I run an ASUS ROG strix laptop —
GTX 1060
Core i7 6700 HQ processor
16GB RAM
1TB
Windows 10 Home
If I missed something, please ask me anything and I will reply asap, very much appreciated for all your answers, thankyou. ")
![]()
-

Colif
I am curious if you have Version V1.0.0050 of the ATK ACPI as the date of the installed version is July 2 2013 and the version of the web site is dated Oct 17 2016
there are newer versions of Audio drivers
there are newer LAN drivers (but the ones on Asus site older than the ones on next link) — http://www.realtek.com.tw/Downloads/downloadsView.aspx?Conn=4&DownTypeID=3&Langid=1&Level=5&PFid=5&PNid=13
https://www.asus.com/us/Laptops/ROG-GL502VM/HelpDesk_Download/
![]()
-
- Jun 12, 2015
-
- 62,834
-
- 5,630
-
- 168,090
-
#2
https://forums.playbattlegrounds.com/topic/101004-bedaisysys-bsod/
can you go to C:\windows\minidump
copy the minidumps from here to another folder
upload the copies from new folder to a file sharing web site and show a link here. I will ask someone to convert them into a file I can read which should show what other drivers were running at time.
-
#3
https://forums.playbattlegrounds.com/topic/101004-bedaisysys-bsod/
can you go to C:\windows\minidump
copy the minidumps from here to another folder
upload the copies from new folder to a file sharing web site and show a link here. I will ask someone to convert them into a file I can read which should show what other drivers were running at time. [/quotemsg]
Hey, thanks for replying!
Here are the 2 minidumps that I found, I’m pretty new to using Dropbox, but I hope this link shows it to you : https://www.dropbox.com/home/minidumps
-
- Apr 13, 2018
-
- 1,329
-
- 20
-
- 3,115
-
#4
https://www.epicgames.com/fortnite/forums/bug-reports/battle-royale-aa/505443-windows-bluescreen-at-launch?view=stream
![]()
-
- Jun 16, 2016
-
- 4,153
-
- 459
-
- 26,090
-
#5
https://www.dropbox.com/help/files-folders/view-only-access#link
-
#6
https://www.dropbox.com/help/files-folders/view-only-access#link[/quotemsg]
I’m sorry, I couldn’t understand how to work it on Dropbox so I added it onto Google Drive instead, hope this link works : https://drive.google.com/drive/folders/19-vPjE0B8gGAzcFqrQHF6obzmkqqjtdv?usp=sharing
-
#7
https://www.epicgames.com/fortnite/forums/bug-reports/battle-royale-aa/505443-windows-bluescreen-at-launch?view=stream
[/quotemsg]
Thanks for the reply! but unfortunately that didn’t fix the problem. I uninstalled and reinstalled the battle eye launcher and the computer blue screened again, this time showing the error : DRIVER_VERIFIER_DETECTED_VIOLATION. I doubt its got anything to do with Fortnite’s bugs, updates or patches, I think it’s more of a driver issue on my computer.
![]()
-
- Jun 16, 2016
-
- 4,153
-
- 459
-
- 26,090
-
#8
File: 080718-70015-01.dmp (Aug 7 2018 — 02:51:52)
BugCheck: [DRIVER_PAGE_FAULT_BEYOND_END_OF_ALLOCATION (D6)]
Probably caused by: memory_corruption (Process: System)
Uptime: 0 Day(s), 19 Hour(s), 56 Min(s), and 11 Sec(s)
File: 080618-107265-01.dmp (Aug 6 2018 — 04:58:03)
BugCheck: [PAGE_FAULT_IN_NONPAGED_AREA (50)]
*** WARNING: Unable to verify timestamp for BEDaisy.sys
Probably caused by: memory_corruption (Process: csrss.exe)
Uptime: 0 Day(s), 3 Hour(s), 16 Min(s), and 27 Sec(s)
File: 080918-128640-01.dmp (Aug 9 2018 — 03:04:10)
BugCheck: [DRIVER_VERIFIER_DETECTED_VIOLATION (C4)]
*** WARNING: Unable to verify timestamp for EasyAntiCheat.sys
Probably caused by: memory_corruption (Process: EACLaunch.exe)
Uptime: 2 Day(s), 0 Hour(s), 10 Min(s), and 47 Sec(s)
The overclocking driver «IOCBios2.sys» was found on your system.
Motherboard: https://www.asus.com/us/ROG-Republic-Of-Gamers/ROG-GL502VM/
It appears that you have the latest BIOS installed.
I can’t help you with this. Wait for additional replies. Good luck.
-
#9
File: 080718-70015-01.dmp (Aug 7 2018 — 02:51:52)
BugCheck: [DRIVER_PAGE_FAULT_BEYOND_END_OF_ALLOCATION (D6)]
Probably caused by: memory_corruption (Process: System)
Uptime: 0 Day(s), 19 Hour(s), 56 Min(s), and 11 Sec(s)
File: 080618-107265-01.dmp (Aug 6 2018 — 04:58:03)
BugCheck: [PAGE_FAULT_IN_NONPAGED_AREA (50)]
*** WARNING: Unable to verify timestamp for BEDaisy.sys
Probably caused by: memory_corruption (Process: csrss.exe)
Uptime: 0 Day(s), 3 Hour(s), 16 Min(s), and 27 Sec(s)
File: 080918-128640-01.dmp (Aug 9 2018 — 03:04:10)
BugCheck: [DRIVER_VERIFIER_DETECTED_VIOLATION (C4)]
*** WARNING: Unable to verify timestamp for EasyAntiCheat.sys
Probably caused by: memory_corruption (Process: EACLaunch.exe)
Uptime: 2 Day(s), 0 Hour(s), 10 Min(s), and 47 Sec(s)
The overclocking driver «IOCBios2.sys» was found on your system.
Motherboard: https://www.asus.com/us/ROG-Republic-Of-Gamers/ROG-GL502VM/
It appears that you have the latest BIOS installed.
I can’t help you with this. Wait for additional replies. Good luck.[/quotemsg]
Oh okay, I hope someone can help me fix this issue soon. I appreciate the help, Thankyou!
![]()
-
- Jun 12, 2015
-
- 62,834
-
- 5,630
-
- 168,090
-
#10
https://www.easy.ac/en-us/ = Easyanticheat
Already said what Bedaisy is.
what is Titan ARC Network Flow Control SDK WFP driver — https://www.isthisfilesafe.com/company/Titan%20ARC%20Corp._details.aspx
this is part of a netfilter program, — this could be triggering the two anti cheat drivers?
-
#11
https://www.easy.ac/en-us/ = Easyanticheat
Already said what Bedaisy is.
what is Titan ARC Network Flow Control SDK WFP driver — https://www.isthisfilesafe.com/company/Titan%20ARC%20Corp._details.aspx
this is part of a netfilter program, — this could be triggering the two anti cheat drivers?
[/quotemsg]
Yeah Fortnite was downloaded from Epic games and the other game that uses easyanticheat that also crashed my computer was Farcry 5, which is from steam.
And I have no idea what that driver is? Did it just suddenly slip into my computer and cause conflicts? And if so how do I remove it?
![]()
-
- Jun 12, 2015
-
- 62,834
-
- 5,630
-
- 168,090
-
#12
do you have Asus GameFirst IV installed? it appears its part of it. It is a network optimization for no-delay gameplay.
-
#13
do you have Asus GameFirst IV installed? it appears its part of it. It is a network optimization for no-delay gameplay.[/quotemsg]
Okay I just checked my computer for the program via checking apps and features and strange, I didn’t find it anyway. Should it be on my computer?
-
#14
do you have Asus GameFirst IV installed? it appears its part of it. It is a network optimization for no-delay gameplay.[/quotemsg]
Ah never mind what I said previously, I just searched it up on the search bar and it came up. Yes I have Asus Gamefirst IV installed.
I just had to type in ‘Gamefirst IV’ for it show up.
-
#15
do you have Asus GameFirst IV installed? it appears its part of it. It is a network optimization for no-delay gameplay.[/quotemsg]
So I opened the Gamefirst IV and once again the computer crashed, showing the DRIVER VERIFIER DETECTED VIOLATION error.
On Fri 10/08/2018 1:55:16 AM your computer crashed or a problem was reported
crash dump file: C:\WINDOWS\Minidump\081018-136796-01.dmp
This was probably caused by the following module: ntoskrnl.exe (nt+0x198560)
Bugcheck code: 0xC4 (0x2001B, 0xFFFFF80111CD1B50, 0x0, 0x0)
Error: DRIVER_VERIFIER_DETECTED_VIOLATION
file path: C:\WINDOWS\system32\ntoskrnl.exe
product: Microsoft® Windows® Operating System
company: Microsoft Corporation
description: NT Kernel & System
Bug check description: This is the general bug check code for fatal errors found by Driver Verifier.
This appears to be a typical software driver bug and is not likely to be caused by a hardware problem.
The crash took place in the Windows kernel. Possibly this problem is caused by another driver that cannot be identified at this time.
![]()
-
- Jun 12, 2015
-
- 62,834
-
- 5,630
-
- 168,090
-
#16
Instead of running who crashed each time, just upload the minidump if you continue to get BSOD after removing Gamefirst.
-
#17
Instead of running who crashed each time, just upload the minidump if you continue to get BSOD after removing Gamefirst.[/quotemsg]
Sorry for the late reply, so I got back onto my computer to unistall Gamefirst IV, once unistalled my computer had to restart. So after booting back into windows and running Fortnite, the computer crashed again. I tried the second time, same thing happened. I opened the Minidump folder and the recent minidump wasn’t found. I am very lost now and out of ideas.
![]()
-
- Jun 12, 2015
-
- 62,834
-
- 5,630
-
- 168,090
-
#18
why have you got mixed ram sticks? you have a micron & samsung ram stick in same channel, pretty sure thats not right. it could cause errors. try putting one of them in a different slot.
-
#19
why have you got mixed ram sticks? you have a micron & samsung ram stick in same channel, pretty sure thats not right. it could cause errors. try putting one of them in a different slot.
[/quotemsg]
Well it just freezes for a split second and then it crashes, but I think it just does that because it’s just loading the blue screen.
Also different RAM sticks? Well I’ve never opened my computer before but I think it’s time I do to take a look inside. I’ve never changed them before and it’s been like that since I got this laptop last year in May.
But to what I know, there’s one 8gb RAM stick that is soldered on board while there is space to add an extra. Not sure if you can remove the other one RAM module though.
![]()
-
- Jun 12, 2015
-
- 62,834
-
- 5,630
-
- 168,090
-
#20
Here shows how to take it apart — https://www.myfixguide.com/asus-rog-gl502vm-disassembly-and-ssd-hdd-ram-upgrade-options/ — See step 2, I don’t think you can remove the built in 8gb (since its soldered on) but should be able to remove the other to see if taking it out fixes anything (and run memtest on the ram that is there now). If the ram that is soldered on does have errors, you might need to get Asus to fix it
If you never taken it apart, I guess we blame the ram thing on Asus.
-
#21
Here shows how to take it apart — https://www.myfixguide.com/asus-rog-gl502vm-disassembly-and-ssd-hdd-ram-upgrade-options/ — See step 2, I don’t think you can remove the built in 8gb (since its soldered on) but should be able to remove the other to see if taking it out fixes anything (and run memtest on the ram that is there now). If the ram that is soldered on does have errors, you might need to get Asus to fix it
If you never taken it apart, I guess we blame the ram thing on Asus.[/quotemsg]
Yeah, I should just take it apart and have a look, it doesn’t have warranty on it anymore as it was for only 1 year (kinda wish it was 2) so I can’t really take it back.
The ram is detected on my computer and says it has no issues, it also seems to be working (like task manager percentage.) when I’m playing heavy games, but even any game I play nowadays, the FPS just stutters inconsistently which is probably related to the same issue. Everything just went downhill that day, crashes aren’t random and only are triggered by certain applications or plugging in a driver. (Xbox one controller.)
I have a computer repair shop in town, I just hope I can trust them enough to fix it for me. I’m going to try resetting windows soon because there isn’t really anything on this computer except games. I just hope it isn’t truly a faulty ram though as I still believe it’s a driver issue but it’s possible.
Thanks a lot for the help though, I really appreciate it, Colif.
![]()
-
- Jun 12, 2015
-
- 62,834
-
- 5,630
-
- 168,090
-
#22
I am curious if you have Version V1.0.0050 of the ATK ACPI as the date of the installed version is July 2 2013 and the version of the web site is dated Oct 17 2016
there are newer versions of Audio drivers
there are newer LAN drivers (but the ones on Asus site older than the ones on next link) — http://www.realtek.com.tw/Downloads/downloadsView.aspx?Conn=4&DownTypeID=3&Langid=1&Level=5&PFid=5&PNid=13
https://www.asus.com/us/Laptops/ROG-GL502VM/HelpDesk_Download/
- Status
- Not open for further replies.
Similar threads
![]()
- Advertising
- Cookies Policies
- Privacy
- Term & Conditions