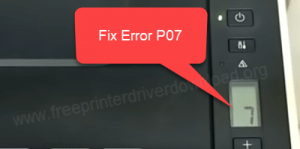
After Canon G2010 has printed a lot of pages, its users tend to encounter the error P07 and power and error light is flashing (blinking), which stops them from printing any new documents. This error is usually characterized by its users as a hardware related issue which requires the assistance of a service engineer, but this error can be easily fixed at home if you follow the right steps. Therefore, in this guide, we will describe a quick and easy solution of how to fix Canon G2010 error P07.
What Causes Canon G2010 Error P07?
Most users encounter error P07 on Canon G2010 printer after they have printed a lot of pages with their printer. This error is directly related to the flow of ink on their printer. The G2010 printer from Canon has integrated ink tanks, which makes the flow of ink highly abundant. Therefore, after printing a high volume of pages the ink in this printer starts to overflow, but the printer is unable to rectify this problem by itself, thus, it shows the error P07 and stops printing.
When you see P07 error code on your Canon printer, then you should know that it’s due to ink overflow issues. However, there is nothing to worry because your printer already has a system which you can use to clean the excess ink. Since, your printer can’t execute that system by itself, you will have to operate that system manually and once you do that properly, then you will be able to solve the Canon G2010 error P07. The clean-up process is easy to operate and anyone can do it at their home. We will describe the complete process below.
How to Fix Canon G2010 Error P07
Now that you know what caused error P07 on your Canon printer, it’s time to tell you the exact steps you need to follow to fix this problem. Before starting to implement the solution you must read all the steps carefully. This is because you will have to perform the same steps in succession with minor alterations. If you are not careful, then you will make some mistakes and eventually you won’t be able to fix this error on your Canon printer.
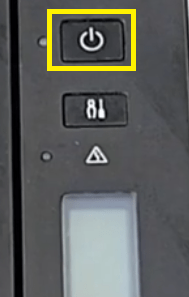
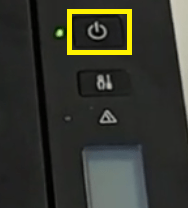
- Turn the printer off – Press the ‘Power’ button on the printer control panel to turn off the printer and then follow the following instructions. If your printer is already turned off then you can skip this step.

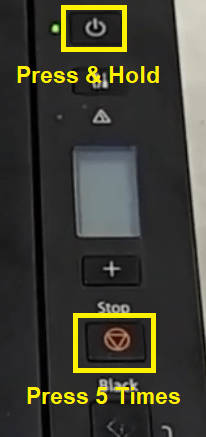
- Press and hold the ‘Power’ button for 5 seconds, then press the ‘Stop’ button five times while you are holding the ‘Power’ button.

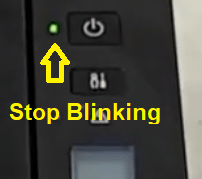
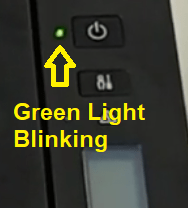
- The ‘Green’ power led will start blinking, wait for it to stop blinking before you move to the next step.

- When the green power led stops blinking its a sign that your printer has entered into repair mode. Now, all the commands you will give to your printer by pressing its control panel buttons will activate the automatic repair mechanism of your Canon Printer. Therefore, the steps given below needs to be carried our carefully and exactly as they have been described because you are working directly with the internal repair mechanism on your Canon printer.
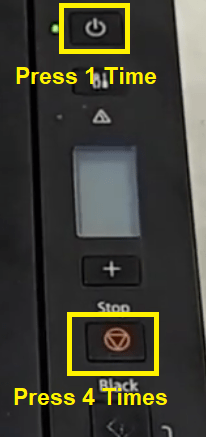
- Press the ‘Stop’ button four times and after that press the ‘Power’ button once.

- Now, press the ‘Stop’ button three times and after that press the ‘Power’ button once.

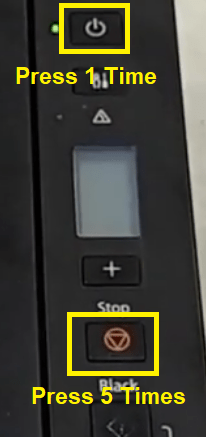
- Again, press the ‘Stop’ button five times and after that press the ‘Power’ button once.

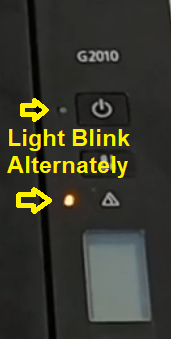
- ‘Green’ and ‘Red’ led lights will start to blink alternately. This is your printer performing the clean-up process as it will start the maintenance of the ink-flow mechanism. Wait for the process to finish and your printer will automatically stop making noises.

- That’s it, your printer has cleaned itself. Press the ‘Power’ button to switch-off the printer and wait for a few seconds. Doing this will bring your printer out of the repair mode.

- Press the ‘Power’ button on your printer control panel to switch-on your printer.

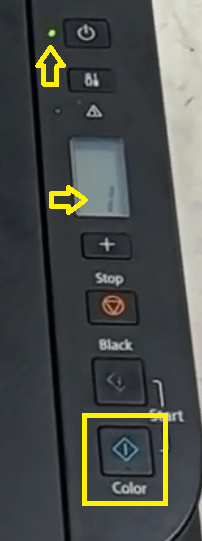
- Now, you will see a ‘Drop’ sign on the printer display screen. This drop sign is a confirmation that your printer is encountering ink overflow problem. The number ‘0’ signifies that the printer has zero documents on the print queue.

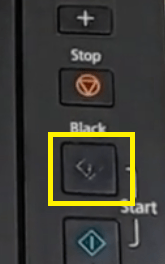
- Press the ‘Black’ button near the Start to give the print command to your printer.

- ‘Green’ led of Power button will start to blink. Again your printer is performing the cleaning which is required for the printing to begin. Wait for the process to complete.

- When the Green led stops blinking, you will see that display screen is showing ‘1’ number, which is a sign that your printer has one print in the queue. Now, press the ‘Color’ button near start to print a page.

- If your printer prints the page normally, then the error P07 has been fixed. However, if the printer prints a ‘Blank’ page, then don’t worry and follow the steps given below. Switch-off the printer by pressing the ‘Power’ button on the control panel.

- Switch-on the printer by pressing the ‘Power’ button.

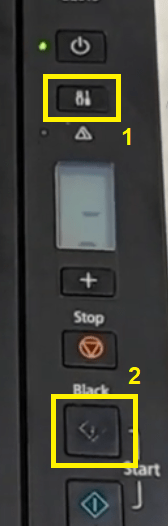
- After printer reboots, press the ‘Test page’ button, then the ‘Black’ button to give the print command.

- Now your printer will print the test page, which is a sign that your printer has started working normally.


That’s it, you have successfully fixed the Canon G2010 error P07 and your printer is ready to print, scan and copy documents just like before.
We have clearly explained in this guide how to fix Canon G2010 error P07. Our guide is really simple to understand and easy to execute, which means even a novice user can fix this error on their Canon printer. However, since some of the steps are repetitive you need to be careful while executing them so that the order of steps don’t get altered and you get proper results.
— Advertisement —
Are you unable to find the driver for your printer? Try DriverEasy, it will automatically download and update the driver, even for the discontinued
(old / not supported) printers. You must try it once.
Произошла ошибка
Если происходит ошибка печати (например, в принтере заканчивается бумага или происходит замятие бумаги), автоматически выводится сообщение с рекомендациями по устранению неполадок. Выполните соответствующие действия, указанные в сообщении.
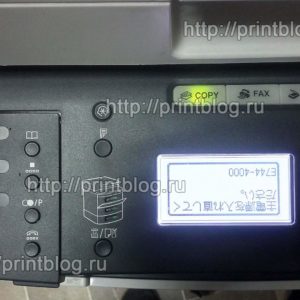
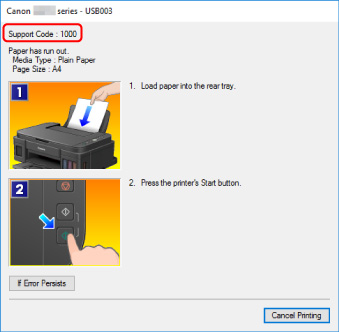
Если возникает ошибка, на экране компьютера появляется сообщение, а на ЖК-дисплее — код ошибки. Для некоторых ошибок отображается код поддержки (номер ошибки).
Если на экране компьютера отображается код поддержки и сообщение:
При отображении кода ошибки:
-
Горит индикатор Аварийный сигнал (Alarm) и отображается код ошибки.

-
Индикаторы ВКЛ (ON) и Аварийный сигнал (Alarm) мигают поочередно, отображается код ошибки.

Коды ошибок отображаются на ЖК-дисплее по очереди.
Если отображается код ошибки «E03»:

Проверьте код ошибки на ЖК-дисплее и соответствующий ему код поддержки. Подробные сведения см. в таблице ниже.
|
Код ошибки |
Код поддержки |
Причина |
Действие |
|---|---|---|---|
|
E02 |
1000 3442 3443 3444 3445 |
В принтере закончилась бумага. При двухсторонней печати вручную выполняется печать на одной стороне. |
|
|
E03 |
1300 |
Застряла бумага. |
|
|
E04 |
1470 |
Картридж установлен неправильно. |
|
|
E05 |
1403 1430 1471 1476 |
Картридж не определяется. |
|
|
E07 |
1474 1475 |
Соответствующий картридж не установлен. |
|
|
E08 |
1700 1701 |
Абсорбер чернил почти полон. |
|
|
E09 |
1890 |
На держателе картриджа FINE может оставаться защитный материал. |
|
|
E14 |
1473 |
Картридж не определяется. |
|
|
E15 |
1472 |
Картридж не определяется. |
|
|
E57 |
2900 |
Ошибка сканирования образца выравнивания печатающей головки. |
|
|
E60 |
1640 |
Возможно, уров. оставш. запаса чернил достиг ниж. предела, указ. на чернил. контейнере. |
|
|
P02 |
5100 |
Ошибка принтера. |
|
|
P07 |
5B00 5B01 |
Ошибка принтера. |
|
|
P08 |
5200 5205 5206 |
Ошибка принтера. |
|
|
P03 P05 P06 P09 P22 P27 P28 P29 |
5011 5012 5050 5400 5700 6000 6800 6801 6930 6931 6932 6933 6936 6937 6938 6940 6941 6942 6943 6944 6945 6946 |
Ошибка принтера. |
Выключите принтер и отключите его от сети питания. Снова подключите принтер к сети питания и включите его. Если проблема не устранена, обратитесь в ближайший сервисный центр Canon для ее устранения. |
|
P10 |
B202 B203 B204 B205 |
Ошибка принтера. |
Выключите принтер и отключите его от сети питания. Обратитесь в ближайший сервисный центр Canon для устранения этой проблемы. |
![]() Примечание.
Примечание.
-
Подробнее об устранении ошибок без кодов поддержки см. в разделе Отображается сообщение (код поддержки).
When the Canon PIXMA G2010 printer has been used to print a significant number of pages, its customers often experience the error P07, in addition to the power and error light blinking (blinking). This prevents them from printing any new file documents. In this procedure, we will describe a quick and easy solution of how to fix Canon PIXMA G2010 error P07 Light Blinking Error.
This error is usually characterized by its users as a hardware related issue which requires the assistance of a service engineer, but this error can be easily fixed at home if you follow the right steps.
This problem is often defined by its users as a hardware-related issue that needs the aid of a service expert; nevertheless, this mistake may be simply solved at home if you follow the appropriate step. All you need to do is make sure you are following the correct step.
FIND; How to Connect Canon PIXMA MG3620 to WiFi
What causes the Canon G2010 to display the error message P07?
Most user encounter error P07 on Canon G2010 printer devices after they have printer a lot of page with their printer. This error is directly related to the flow of ink on their printer.
After printing numerous page with the printer devices, most people experience error P07 here on Canon PIXMA G2010 series. This problem may be directly attributed to the way the ink flows through their printer. The Canon PIXMA G2010 printer includes integrated ink tanks, greatly increasing the amount of available ink.
The Canon PIXMA G2010 printer from Canon has integrated ink tanks, which makes the flow of ink highly abundant. Therefore, after printing a high volume of pages the ink in this printer starts to overflow, but the printer is unable to rectify this problem by itself, thus, it shows the error P07 and stop print document.
How to Fix Canon PIXMA G2010 Error P07 – Light Blinking?
Now that you’re aware of the root cause of error P07 on your Canon printer devices, it is time to explain the precise measures you must take to resolve this issue. Before you start putting the answer into action, you need to first thoroughly examine all of the steps.
This is because you must repeat the same actions with slight variations. If you are careless, you might commit some errors and ultimately be unable to resolve this error on your Canon printer.

How do I see the P07 error code on the Canon PIXMA G2010 device?
When you see P07 error code on your Canon printer devices, then you should know that it’s due to ink overflow issues.
However, there is nothing to worry because your printer already has a system which you can use to clean the excess ink.
Because your printer is unable to run that system on its own, you will need to run that system manually. Once you have done so in the correct manner, you will be able to fix the Canon PIXMA G2010 issue P07 and continue using your printer normally.
The procedure of cleaning is simple to carry out, and anybody may do it in the comfort of their own house. In the following paragraphs, we will detail the whole procedure.
Step 1;
Turn theyour printer off and Press the [Power] button on the printer control panel to turn off the printer. Then follow the following procedure. If your printer is already turned off then you can skip this method.

Step 2;
Press and hold the [Power] button for 5 sec, then press the [Stop] button five times while you are holding the [Power] button.

Step 3;
The [Green] power led will starting blinking, please wait for it to stop blinking before you move to the next method.

Step 4;
Your printer has entered repair mode when the green power led stops flashing. This indicates that the mode has been successfully entered.
Now, all the commands you will give to your Canon printer by pressing its control panel buttons will activate the automatic repair mechanism of your Canon printer devices.
The next steps given below needs to be carried our carefull and exactly as they have been described because you are working directly with the internal repair mechanism on your Canon printer.
Step 5;
Please; press the [Stop] button four times and after that press the [Power] button once again.
![Press the [Stop] button](https://i0.wp.com/canondriverseries.com/wp-content/uploads/2023/02/Canon-PIXMA-G2010-456.jpg?resize=226%2C400&ssl=1)
Step 6;
Next; press the [Stop] button three times and after that press the [Power] button once again.

Step 7;
You can again, press the [Stop] button five times and after that press the [Power] button once.

Step 8;
Next; [Green] and [Red] led lights will starting to blink alternately.
At this point, the cleaning procedure is being carried out by your printer before it begins the process of maintaining the ink-flow mechanism.
Wait for the process to finish and your printer will automatically stop making noises.

Step 9;
Your printer has cleaned itself on automatically. Now; Press the “Power” button to switch-off the printer and please – waiting for a few second. Doing this will bring your printer out of the repair mode.

Step 10;
This step; You can Press the “Power” button on your printer control panel to switch-on your printer devices.

Step 11;
Next; you will see a “Drop” sign on the printer display screen devices. The presence of this drop indicator indicates that your printer is experiencing an ink overflow issue.
The number “0” signifies that the printer has zero documents on the print queue.

Step 12;
Press the “Black” button near the Starting to give the print command to your printer devices.

Step 13;
“Green” led of Power button will start to blink. Once again, your printer is cleaning itself so that it can start printing. This step is necessary before printing can begin. Wait for the process to complete.

Step 14;
When the Green led stop blinking, you will see that display screen is show “1” number, which is a sign that your printer has one print in the queue. Now, press the “Color” button near starting to print a pages file document.

Step 15;
If your Canon printer print the page normally, then the error P07 has been fix. Now; if the printer prints a “Blank” pages, don’t worry and please follow the steps given below.
You can “Switch-off” the printer by pressing the “Power” button on the control panel.

Step 16;
Next; Please – Switch-on the printer by pressing the “Power” button.

Step 17;
After printer restart, you can press the “Test page” button, then the “Black” button to give the print command.

Now;
Your printer will print the test pages document, which is a sign that your printer has started work normally.
After completing the steps necessary to resolve the Canon PIXMA G2010 problem P07, your printer should now be able to print, scan, and copy documents and files as it did before.
Because our walkthrough is so straightforward and quick to implement, even a user with no prior experience should have no trouble correcting this problem on their Canon printer.
However, since some of the procedures are repeating, you will need to exercise caution when carrying them out in order to ensure that the sequence of the stages is not disrupted and that the desired outcomes are achieved.
These are the solutions that will helping you to troubleshoot the error code P07 in Canon PIXMA G2010 printer devices. You can also take the help of Canon printer support team members.
Fix Canon G2010 Error P07 (Light Blinking) Error:
After printing many pages, the Canon G2010’s users frequently experience the error P07 and the power or error light flashing (blinking), preventing them from publishing any additional papers.
Users generally describe this mistake as a hardware-related problem that needs a service engineer’s help, but if you take the proper steps, you may quickly solve it at home. As a result, we will discuss a quick and simple fix to Canon G2010 problem P07 throughout this post.
What Leads to Error P07 on a Canon G2010?
After printing numerous pages with the printer, most people experience error P07 here on Canon G2010. The ink flow on their printer is directly responsible for this issue. The Canon G2010 printer includes integrated ink tanks, greatly increasing the amount of available ink.
The ink inside this printer consequently begins to overflow after printing many pages. However, the printer cannot fix this issue on its own; as a result, it displays the error P07 and ceases printing.
You must be aware that ink overflow problems cause the P07 error code on your Canon printer. No panic, though, as your printer already contains a mechanism for removing the extra ink. You will need to operate that system manually because the printer cannot do so independently.
At first, when you do so correctly, you will be able to resolve the Canon G2010 error P07. Anybody can perform the clean-up procedure in their home because it is simple. Below, we’ll outline the entire process.
How to Fix Error P07 on a Canon G2010?
Now that you’re aware of the root cause of error P07 on your Canon printer, it is time to explain the precise measures you must take to resolve this issue. You should carefully study all the stages before beginning to execute the solution.
This is because you must repeat the same actions with slight variations. If you are careless, you might commit some errors and ultimately be unable to resolve this error on your Canon printer.
Step 1: Turn off the printer, then, when you have turned off the printer by pressing the ‘Power’ button on the control panel, proceed as directed. Skip this step if the printer has been switched off.
Step 2: Click or hold the «Power» button for over 5 seconds, then, even while pressing the «Power» button, press the «Stop» toggle five times.
Step 3: After pressing the «Stop» button four times press the «Power» button once.
Step 4: Click the «Stop» button three times now, then «Power» once to complete the process.
Step 5: Press the «Stop» button five more times, and then press the «Power» button one more time.
Led lights labeled «Green» and «Red» will flicker alternately. This is the printer cleaning itself up before maintaining the ink-flow system. Your device will automatically stop producing noises after the process is complete.
Сброс ошибки P07 (5B02, 5B00) в Canon Pixma MG2140, MG3100, MG3140, MG3200, MG3240, MG3540, MG4240, MG4250, MX394, MX494
22.06.2015
Ремонт принтеров
47
Если у вас принтер Canon Pixma MG3540, то подробнее о его сбросе в этой записи – “Canon PIXMA MG3540 сброс памперса (абсорбера). Код поддержки 5B00, обратитесь в сервисный центр”
Осуществить ремонт или прошивку вашего принтера в г. Симферополь вы можете в сервисном центре по ул. Старозенитная, д.9 (вход со стороны забора). Работаем с 9.00 до 18.00, понедельник – пятница, звоните по номеру +7 (978) 764-75-85
В случае остальных похожих моделей, делаем следующее…
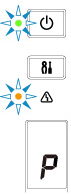
1. Отображается на дисплее принтера P07
2. Компьютер выдает сообщение
 в Canon Pixma MG3100, MG3140, MG3200, MG3240, MG3540, MG4240, MX494")
3. Для сброса ошибки необходимо выключить принтер кнопкой вкл.выкл. и запустить принтер в сервисном режиме.
4. Для запуска сервисного режима необходимо:
- Нажать и удерживать на принтере конпку СтопСброс
- Включить принтер кнопкой Вкл.Выкл. и держать нажатой
- 5 раз нажать кнопку СтопСброс
- Отпустить кнопку Вкл.Выкл.
Наглядно запуск сервисного режима в Canon Pixma MG3240 выглядит так:
Свидетельством успешного входа в сервисный режим будет постоянно горящий индикатор “А4 Обычная бумага” на принтере и на компьютере мастер нового оборудования предложит установить драйвер для нового устройства CanonDivice.
 в Canon Pixma MG3100, MG3140, MG3200, MG3240, MG3540, MG4240, MX494")
Драйвер устанавливать нет необходимости, просто нажать “Отмена” для закрытия Мастера нового оборудования.
5. Скачиваем программу Service Tool 3400
6. Запускаем программу.
 в Canon Pixma MG3100, MG3140, MG3200, MG3240, MG3540, MG4240, MX494")
 в Canon Pixma MG3100, MG3140, MG3200, MG3240, MG3540, MG4240, MX494")
7. Выбрать Clear Ink Counter -> All нажимаем Set -> Распечатается лист с сервисными данными.
 в Canon Pixma MG3100, MG3140, MG3200, MG3240, MG3540, MG4240, MX494")
 в Canon Pixma MG3100, MG3140, MG3200, MG3240, MG3540, MG4240, MX494")
8. Выключаем принтер.
Ошибка сброшена.
Не забудьте пожалуйста в комментариях отписаться на каком принтере у вас получилось сбросить ошибку!
Сюрприз!!! Видео: Сбрасываем ошибку 5B00, 5B02 (памперс, абсорбер) у принтеров Canon PIXMA MG3540, MG3240, MG4240, MX494.
Осуществить ремонт или прошивку вашего принтера в г. Симферополь вы можете в сервисном центре по ул. Старозенитная, д.9 (вход со стороны забора). Работаем с 9.00 до 18.00, понедельник – пятница, звоните по номеру +7 (978) 764-75-85
Не забывайте оценить запись и поделиться ей с друзьями в социальных сетях, нажав специальные кнопки ниже.
Не забудь оставить комментарий и подписаться на наш канал youtube ![]()
Рекомендуемые товары:
-

8 в наличии
Код: 41012
Перезаправляемые картриджи (ПЗК, ДЗК) для Epson XP-510, XP-520, XP-600, XP-605, XP-610, XP-615, XP-620, XP-625, XP-700, XP-710, XP-720, XP-800, XP-820
1 120.00 руб.
Купить -
В наличии
Код: 00021
Дамп микросхемы 25L1635 \ 25L3206E от принтера Canon IP2840
344.00 руб.
Купить -
В наличии
Код: 00017
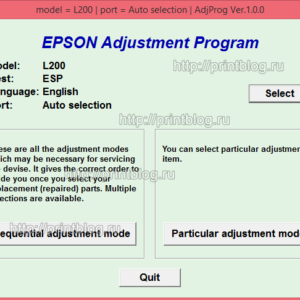
Adjustment program Epson L200
136.80 руб.
Купить -
0 в наличии
Код: 50019
Микросхема MX29LV160AT для Canon i-SENSYS MF5940dn
599.00 руб.
Купить