При запуске игр мы часто сталкиваемся с различными ошибками и сбоями, которые заставляют переключить нашу вовлеченность с игрового мира в процесс поиска способов их решения. Более того, некоторые из них не просто решить. В частности, к таким ошибкам при запуске Minecraft относится и «
Простые решения
В общем она может появиться по ряду причин и некоторые из них можно исправить простыми способами. Поэтому прежде чем перейти к более продвинутым решениям выполните следующие шаги.
Во-первых, попробуйте исправить ошибку Java.Io.Ioexception обычным перезапуском Minecraft. В противном случае перезапустите компьютер и роутер. Также нужно проверить состояние внешнего сервера Minecraft. Если эти методы не сработали, перейдите к следующим шагам.
Варианты запуска
Ошибка внутреннего исключения «internal exception java.io.ioexception удаленный хост принудительно разорвал существующее подключение» в основном происходит из-за проблем с Java. Даже если игра работает, сбой может произойти из-за проблем этой среды выполнения. Иногда программа запуска использует старую версию java, хотя в системе установлен последний ее выпуск.
В этом случае нужно заставить загрузчик Minecraft использовать последнюю версию программной среды. Для этого нужно перейти в параметры запуска и в профиле переключить путь с устаревшей версии на новую.
Отключение межсетевого экрана
Межсетевые экраны, включая брандмауэр Windows, могут сбросить подключение с внешним сервером Minecraft на этапе запуска игры. Чтобы узнать, не причастен ли он к этому событию, попробуйте отключить эту функцию безопасности.
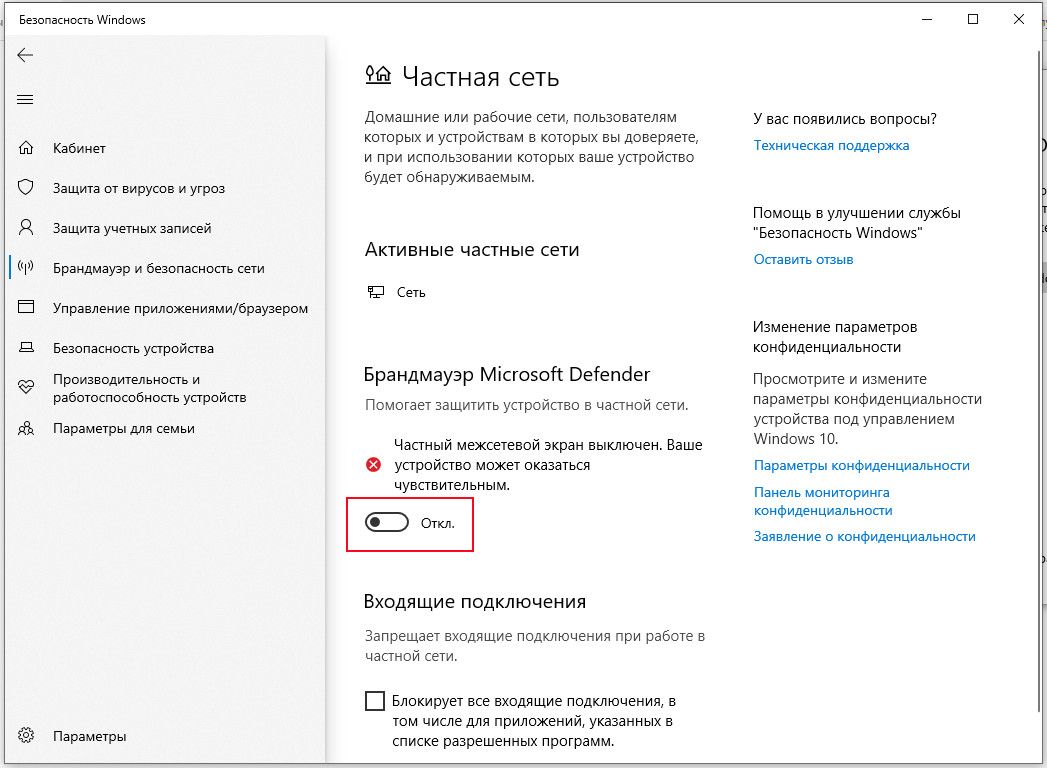
Откройте параметры Windows нажатием на Win + I и перейдите в раздел Обновление и безопасность. На вкладке Безопасность Windows выберите раздел Брандмауэр и защита сети.
Для активной частной сети переместите переключатель в положение «Отключено». После этого попробуйте запустить игру.
Установка разрешений в брандмауэре Windows
Если продолжаете сталкиваться с ошибкой внутреннего исключения java.io.ioexception, попробуйте добавить среду в список разрешений брандмауэра.
С помощью поискового запроса перейдите в брандмауэр. На панели слева перейдите на вкладку «Разрешение взаимодействия с приложением или компонентом в брандмауэре Windows». Затем щелкните на кнопку изменения параметров.

Найдите в списке файлы Java Platform SE и разрешите им доступ по частной сети.

После перезагрузки компьютера проблема должна быть решена.
Уменьшение глубины прорисовки
С ошибкой внутреннего исключения можно столкнуться, когда Minecraft не сможет отобразить всю картинку в целом из-за низкой скорости Интернета. В этом случае уменьшите глубину прорисовки в настройках до минимально допустимого.
В настройках Майнкрафт в разделе «Настройки графики» переместите ползунок прорисовки до минимального, например, до 2-х позиций.
Если ошибка исчезла, увеличьте этот показатель на единицу, пока не достигните оптимального значения.
При запуске игр мы часто сталкиваемся с различными ошибками и сбоями, которые заставляют переключить нашу вовлеченность с игрового мира в процесс поиска способов их решения. Более того, некоторые из них не просто решить. В частности, к таким ошибкам при запуске Minecraft относится и «internal exception java.io.ioexception», которая препятствует подключению ПК к внешнему серверу игры.
Содержание
- 1 Простые решения
- 2 Варианты запуска
- 3 Отключение межсетевого экрана
- 4 Установка разрешений в брандмауэре Windows
- 5 Уменьшение глубины прорисовки
Простые решения
В общем она может появиться по ряду причин и некоторые из них можно исправить простыми способами. Поэтому прежде чем перейти к более продвинутым решениям выполните следующие шаги.
Во-первых, попробуйте исправить ошибку Java.Io.Ioexception обычным перезапуском Minecraft. В противном случае перезапустите компьютер и роутер. Также нужно проверить состояние внешнего сервера Minecraft. Если эти методы не сработали, перейдите к следующим шагам.
Варианты запуска
Ошибка внутреннего исключения «internal exception java.io.ioexception удаленный хост принудительно разорвал существующее подключение» в основном происходит из-за проблем с Java. Даже если игра работает, сбой может произойти из-за проблем этой среды выполнения. Иногда программа запуска использует старую версию java, хотя в системе установлен последний ее выпуск.
В этом случае нужно заставить загрузчик Minecraft использовать последнюю версию программной среды. Для этого нужно перейти в параметры запуска и в профиле переключить путь с устаревшей версии на новую.
Отключение межсетевого экрана
Межсетевые экраны, включая брандмауэр Windows, могут сбросить подключение с внешним сервером Minecraft на этапе запуска игры. Чтобы узнать, не причастен ли он к этому событию, попробуйте отключить эту функцию безопасности.
Откройте параметры Windows нажатием на Win + I и перейдите в раздел Обновление и безопасность. На вкладке Безопасность Windows выберите раздел Брандмауэр и защита сети.
Для активной частной сети переместите переключатель в положение «Отключено». После этого попробуйте запустить игру.
Установка разрешений в брандмауэре Windows
Если продолжаете сталкиваться с ошибкой внутреннего исключения java.io.ioexception, попробуйте добавить среду в список разрешений брандмауэра.
С помощью поискового запроса перейдите в брандмауэр. На панели слева перейдите на вкладку «Разрешение взаимодействия с приложением или компонентом в брандмауэре Windows». Затем щелкните на кнопку изменения параметров.
Найдите в списке файлы Java Platform SE и разрешите им доступ по частной сети.
После перезагрузки компьютера проблема должна быть решена.
Уменьшение глубины прорисовки
С ошибкой внутреннего исключения можно столкнуться, когда Minecraft не сможет отобразить всю картинку в целом из-за низкой скорости Интернета. В этом случае уменьшите глубину прорисовки в настройках до минимально допустимого.
В настройках Майнкрафт в разделе «Настройки графики» переместите ползунок прорисовки до минимального, например, до 2-х позиций.
Если ошибка исчезла, увеличьте этот показатель на единицу, пока не достигните оптимального значения.
Ошибка «внутреннее исключение» или Internal Exception с io netty handler либо Java IO IOException в Minecraft случаются по причине того, что игра теряет подключение к серверу.
А вот сбоить подключение, как известно, может по самым разным причинам. Следовательно, в каждом отдельном случае устраняется проблема тоже разными способами, притом вполне себе стандартными.
О них и расскажем. Итак,..
что делать, когда в Minecraft отваливается подключение с ошибкой io netty handler или Java IO IOException
Значит, первым делом просто проверяем подключение (перезагружаем роутер, переподключаем комп к Wi-Fi заново, переподключаем его напрямую через кабель, перезагружаем, запускаем Minecraft от имени администратора, проверяем и отключаем родительский контроль и т.д.) далее действуем следующим порядком:
#1 — проверяем состояние сервера
… для того, чтобы определить где именно случился сбой подключения — на стороне сервера, или локально. А для того, чтобы оперативно проверить и текущее состояние сервера игры, и текущее состояние подключения со своей стороны, просто подключаемся к тестовому серверу с IP: test.prisonfun.com.
Не пропустите: ОШИБКА С КОДОМ 0X803F8001 В MINECRAFT: ЧТО ЗНАЧИТ И КАК УСТРАНЯТЬ
Если подключится получается без проблем, то с клиентом игры и с настройками компа все в порядке. Данный сервер поддерживает все версии Minecraft и обновляется регулярно, потому оптимально подходит для оперативного выявления любых потенциально возможных проблем с подключением.
В противном же случае, то есть, когда подключиться именно к этому серверу не получилось, то, вероятнее всего, сбой подключения случился на стороне пользователя. И надо его устранять. Потому идем дальше.
#2 — отключаем брандмауэр, антивирус и VPN
Мера это временная, но крайне необходимая в случае, когда нужно быстро определить и устранить причину ошибок io netty handler или Java IO IOException в Minecraft. Поэтому:
- отключаем брандмауэр Windows:
- жмем Win+R с клавиатуры, в строке «Выполнить» пишем control и жмем Enter;
- в окне Панели управления кликаем «Система и безопасность» и далее — «Брандмауэр Windows«;
- в следующем окне слева жмем «Включение и отключение брандмауэра Windows«;
- отключаем брандмауэр для обоих типов сети — для домашней и рабочей и для общественной;
- кликаем ОК.
После этого снова пробуем подключиться к IP: test.prisonfun.com. Если снова не получилось то:
- отключаем антивирус — через панель управления программы;
- отключаем VPN
И снова подключаемся тестовому IP: test.prisonfun.com.
Не пропустите: MINECRAFT RTX С ТРАССИРОВКОЙ ЛУЧЕЙ: ЕСЛИ НЕ ВКЛЮЧАЕТСЯ И ПРОЧИЕ ПРОБЛЕМЫ
Опять безрезультатно? Тогда..
#3 — обновляем Java
Minecraft без Java не работает (и не должен). Более того, во избежание проблем с игрой Java на компе желательно иметь в самой последней версии. Обновляется эта самая версия стандартно:
- идем на официальную страницу загрузки Java — [ССЫЛКА];
- качаем и устанавливаем самую свежую версию Java.
Попутно в случае с проблемкой «внутреннего исключения» (ошибка io.netty.handler и Java.IO.IOException) не лишним также будет включить функцию Java Native Sandbox, а для этого:
- жмем «Пуск«, в строке поиска системы пишем java и в результатах выше кликаем «Configure Java«;
- в открывшемся окне переходим во вкладку «Advanced«;
- список параметров прокручиваем до раздела «Advanced security settings» и активируем опцию «Enable the operating system’s restricted environment (native sandbox)«;
- жмем «Применить» и «ОК«.
После перерезагружаем комп (это важно!), запускаем Minecraft и подключаемся к IP: test.prisonfun.com. Снова никак?
Не пропустите: MINECRAFT CLASSIC В БРАУЗЕРЕ: ПОЧЕМУ ТОРМОЗИТ И КАК ПОДНЯТЬ FPS
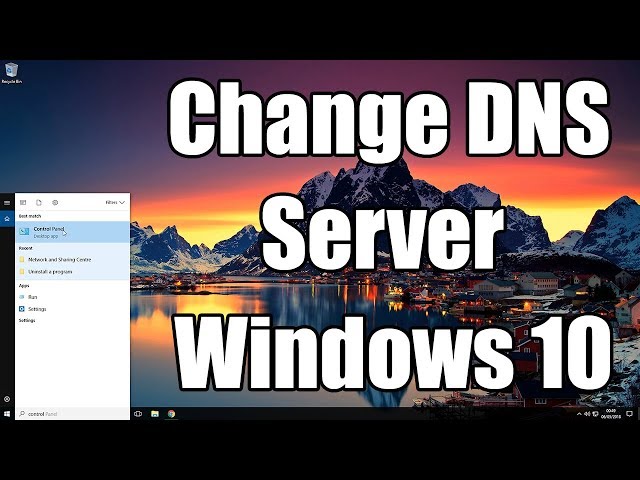
перенастраиваем DNS
Процедура тоже стандартная:
- жмем Win+R с клавиатуры, в строке «Выполнить» пишем control и жмем Enter;
- в окне Панели управления кликаем «Сеть и Интернет» и далее — «Центр управления сетями и общим доступом«;
- находим с списке сетей свое текущее подключение («Ethernet» или «WiFi») и кликаем ссылку «сетевое соединение«;
- в следующем окне жмем кнопку «Свойства» и далее в окне свойств подключения:
-
- двойным кликом кликаем по строке «Протокол интернета версии 4 (IPv4)» в компонентах;
- в открывшемся окошке активируем опцию «Использовать следующие адреса DNS-серверов» и ниже
- для «Предпочитаемый DNS-сервер» прописываем 8.8.8.8
- для «Альтернативный DNS-сервер» прописываем 8.8.4.4
- и жмем ОК.
Перезагружаем комп, запускаем Minecraft и пробуем подключиться к IP: test.prisonfun.com.
Не пропустите: КАК СОЗДАТЬ НАСТОЯЩИЙ КОМПЬЮТЕР В MINECRAFT: О ВОЗМОЖНОСТЯХ КРАСНОГО КАМНЯ
Если после перенастройки DNS (и всех предыдущих мер) устранить проблему не удалось, то, очень вероятно, что причина сбоя — в самой игре, а точнее в имеющейся сборке и/или в установленных модах. Поэтому
#4 — выполняем чистую переустановку Minecraft
То есть, качаем последнюю версию Minecraft с официального сайта и устанавливаем её безо всяких модов. Сделать нужно следующее:
- открываем официальный лаунчер Minecraft (либо сначала качаем его и устанавливаем — [ССЫЛКА] — и затем открываем);
- в главном меню открываем вкладку «Установки» (вверху) и жмем «Новая установка«;
- выбираем версию Minecraft (разработчик рекомендует ставить самую последнюю) и жмем «Загрузить«;
- далее проверяем, чтобы в меню лаунчера выбрана была именно нужная версия и жмем «Играть«;
- после запуска Minecraft проверяем подключение через IP: test.prisonfun.com.
Не пропустите: УСТАРЕВШИЙ КЛИЕНТ MINECRAFT: ПОЧЕМУ, И ЧТО С ЭТИМ ДЕЛАТЬ?
Ну а если игра снова выдает «внутреннее исключение» с io netty handler либо Java IO IOException (а такое тоже может быть), значит придется переустановить её в другое место. Для этого:
- открываем официальный лаунчер Minecraft (ссылку см. выше);
- в главном меню открываем вкладку «Установки» (вверху) и жмем «Новая установка«;
- выбираем самую новую (рекомендуется);
- жмем кнопку «Обзор» и указываем другое место установки игры (либо просто кликаем «Рабочий стол«) и жмем ОК;
- теперь кликаем «Загрузить«;
- далее проверяем, чтобы в меню лаунчера выбрана была именно нужная версия и жмем «Играть«.
После запуска Minecraft проверяем подключение через IP: test.prisonfun.com. Если опять никак, то тогда еще раз, еще внимательнее проверяем подключение, а также «родительский контроль«. Вероятно, дело как раз в последнем…
Многие пользователи Minecraft видят следующие ошибки при попытке запустить игру. И из-за этого они не могут играть в игру.
Соединение потеряно
Внутреннее исключение: java.io.IOException: существующее соединение было принудительно закрыто удаленным хостом.
В этой статье мы увидим, как решить эту проблему с помощью некоторых простых и простых в исполнении решений. Итак, если у вас возникла проблема с внутренним исключением Java.IO.IOException Minecraft, то это руководство для вас.
Как исправить внутреннее исключение Minecraft Java IO IOException Существующее соединение было принудительно закрыто удаленным хостом?
Ошибка внутреннего исключения Minecraft — это обычно ошибка или сбой, которые можно легко исправить с помощью некоторых решений. Это также может быть вызвано плохим подключением к Интернету. Если вы используете мобильную точку доступа или какой-либо другой режим подключения с медленным Интернетом, то, скорее всего, вы не собираетесь подключаться к серверу. Если проблема связана с ошибкой, единственный способ исправить ее — это если разработчик Minecraft выпустит обновление программного обеспечения. Если это сбой, вам необходимо проверить обходные пути, которые мы упоминали ниже, чтобы решить проблему.
Чтобы исправить ошибку Internal Exception Java.IO.IOException Minecraft, вам необходимо следовать данным решениям.
- Перезагрузите компьютер
- Обновить Майнкрафт
- Попросите администратора перезапустить сервер
- Очистить DNS и обновить IP
- Отключить пакет ресурсов сервера
- Устранение неполадок в чистой загрузке
- Проверьте подключение к Интернету
- Исправить Java
Поговорим о них подробнее.
1]Перезагрузите компьютер
Начнем с самого простого из решений. Перезагрузка ПК сработала для многих пользователей, поскольку в основном перезапускаются все службы, которые были запущены ранее, а также отключаются все ненужные процессы. Итак, перезагрузите компьютер и посмотрите, сохраняется ли проблема.
2]Обновить Майнкрафт
Обновление Майнкрафт имеет свойство убивать двух зайцев одним выстрелом. Это не только избавит вас от ошибки, которая могла быть причиной проблемы, но и в то же время заставит ваше клиентское приложение соответствовать версии сервера, к которому вы пытаетесь подключиться. Потому что вы не сможете подключиться к серверу, если есть несоответствие между версией приложения, которое вы оба используете.
Чтобы обновить Minecraft, вам необходимо выполнить следующие действия.
- Откройте Minecraft.
- Нажмите на Опции со страницы входа.
- Затем нажмите Принудительное обновление! > Применить.
Подождите, пока будет установлено обновление, и посмотрите, поможет ли это решить проблему.
3]Попросите администратора перезапустить сервер.
Проблема может возникнуть из-за сбоя на сервере. Вам следует связаться с администратором сервера и попросить его перезапустить сервер. Только они имеют право перезапустить его. Итак, сделайте это и посмотрите, сохраняется ли проблема.
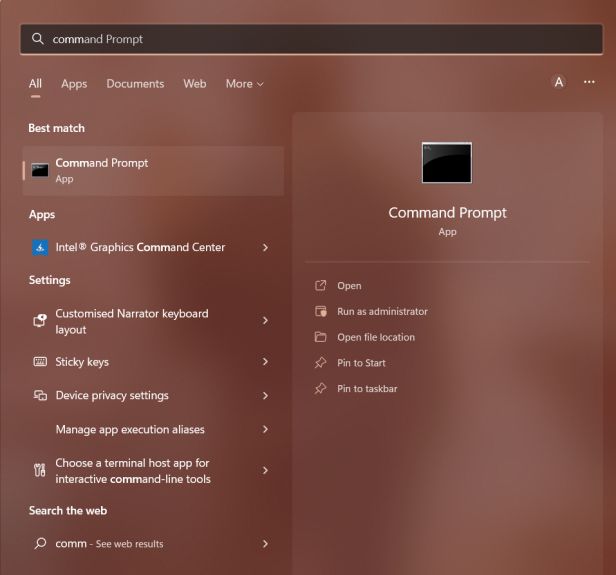
4]Очистить DNS и обновить IP
Проблема может быть из-за поврежденных DNS и IP-адресов. Хорошая новость в том, что вы можете легко очистить DNS и обновить IP и посмотреть, поможет ли это решить проблему. Для этого откройте командную строку от имени администратора из меню «Пуск» и выполните следующие команды.
ipconfig / flushdns ipconfig / release ipconfig / обновить
Наконец, перезагрузите компьютер, снова откройте Minecraft и посмотрите, поможет ли это решить проблему.
5]Отключить пакет ресурсов сервера
Многие пользователи склонны устанавливать Пакет ресурсов чтобы придать вашей игре немного размаха. Это позволяет вам создавать текстуры, музыку и другие вещи для игры. Но иногда он может запретить вам подключиться к серверу. Итак, эта ошибка может быть именно по этой причине. Вот почему мы собираемся отключить Server’s Resource Pack и посмотреть, поможет ли это.
- Запустите Minecraft.
- Перейти к Мультиплеер.
- Затем перейдите к Проблемный сервер и нажмите Редактировать.
- Наконец, щелкните Server Resource Packs и отключите его.
Затем проверьте, сохраняется ли проблема.
6]Устранение неполадок при чистой загрузке
Иногда причиной вашего раздражения может быть другое приложение. Однако нам не нужно, что это за приложение. Следовательно, вам следует устранить неполадки в чистой загрузке и посмотреть, какое приложение мешает работе вашей программы. Затем вы можете решить, что с ним делать.
7]Проверьте подключение к Интернету
Говорить о проблеме, которая мешает вам подключиться к серверу, и не проверять подключение к Интернету, было бы немного глупым решением. Вытащите средство проверки скорости Интернета и посмотрите, получаете ли вы достаточную пропускную способность. Если нет, проверьте, все ли устройства, подключенные к одной сети, имеют одинаковую пропускную способность. В случае, если ваше единственное устройство имеет медленный Интернет, попробуйте исправить медленный Интернет.
8]Исправить Java
Как вы могли заметить, увидев сообщение об ошибке, эта проблема как-то связана с Java. Итак, попробуйте обновить Java и посмотрите, работает ли это. Для этого выполните следующие действия.
- Нажмите Win + S, тип «Настроить Java » и нажмите ОК.
- Перейти к Вкладка «Обновить».
- Щелкните Обновить сейчас.
Таким образом ваша Java будет обновлена и посмотрите, сохраняется ли проблема.
Вот и все!
Также проверьте:
Средство запуска Minecraft может отображать проблему «Internal Exception Java.IO.IOException», если установка Minecraft повреждена или устарела. Более того, поврежденный кеш DNS системы или неправильная конфигурация Java также могут вызвать проблему.
Проблема возникает, когда пользователь пытается присоединиться к серверу или подключиться к нему, но встречает следующее сообщение:
«Внутреннее исключение при потере соединения: java.io.IOException: существующее соединение было принудительно закрыто удаленным узлом»
Прежде чем приступить к решениям по остановке внутренних исключений в Java IO IOException, проверьте, решает ли проблему попытка использования другого сетевого кабеля (при использовании соединения Ethernet).
Если у вас длинное имя пользователя (7+ символов), проверьте, решает ли проблему сокращение его до (7 или меньше символов). Также проверьте, соответствует ли скорость вашего интернета требованиям Minecraft к минимальной скорости.
Кроме того, убедитесь, что выйти из / отключить в Minechat (если используется) , а затем закройте его. Кроме того, проверьте, решает ли проблему запуск программы запуска Minecraft (или сервера) от имени администратора.
Вы можете столкнуться с проблемой внутреннего исключения, если программа запуска Minecraft в вашей системе устарела, поскольку это может создать несовместимость между программой запуска и сервером.
В этом контексте обновление средства запуска Minecraft до последней версии может решить проблему. Но прежде чем двигаться дальше, проверьте, настроено ли у вас более одной учетной записи с пусковой установкой Minecraft, если да, то удалите все остальные учетные записи, кроме одной.
- Откройте панель запуска Minecraft и рядом с именем пользователя нажмите Параметры.
- Затем нажмите кнопку «Принудительное обновление» и примените обновление средства запуска.
- После обновления перезапустите средство запуска Minecraft и проверьте, не возникла ли в нем ошибка IOexception.
- Если нет, проверьте, решает ли проблему использование другого средства запуска.
Решение 2. Очистите кеш DNS вашей системы
Ошибка Java.io может возникнуть, если кеш DNS вашей системы поврежден, поскольку это может привести к тому, что система не сможет разрешить доменное имя. В этом контексте очистка кеша DNS (что заставит систему повторно выбирать комбинации) может решить проблему.
- Кликните Windows, введите: Командная строка и кликните правой кнопкой мыши результат командной строки. Затем выберите «Запуск от имени администратора».
- Теперь выполните следующее одно за другим:
ipconfig /flushdns

ipconfig /release

ipconfig /renew
- Затем выйдите из командной строки и проверьте, решена ли проблема исключения Java.
Если проблема не исчезнет, проверьте, решает ли изменение DNS-сервера (например, Google DNS ) проблему внутреннего исключения.
Решение 3. Отключите пакет ресурсов сервера
Пакеты ресурсов позволяют игрокам выполнять множество настроек (например, текстуры, музыку, модели, тесты на всплески и т. д.), Но эта настройка может препятствовать обмену данными между клиентом и сервером и, таким образом, вызвать проблему исключения ввода-вывода. В этом сценарии отключение пакета ресурсов сервера может решить проблему.
- Откройте программу запуска Minecraft и выберите «Многопользовательская игра».
- Затем выберите проблемный сервер и нажмите «Изменить».
- Теперь нажмите Server Resource Packs, чтобы установить его в Disabled (если он включен), и нажмите Done.
- Затем проверьте, очищена ли программа запуска от проблемы Java.io.
Решение 4. Удалите конфликтующие приложения.
Вы можете столкнуться с проблемой Java.io, если приложение в вашей системе препятствует работе Minecraft. В этом случае удаление конфликтующего приложения может решить проблему.
Вы можете выполнить чистую загрузку своего ПК, чтобы определить проблемное приложение. Для иллюстрации мы обсудим процесс для Hamachi VPN (по сообщениям пользователей, вызывающий проблему).
- Кликните правой кнопкой мыши Windows и откройте «Приложения и компоненты».
- Теперь нажмите LogMeIn Hamachi, чтобы развернуть его, а затем нажмите Удалить.
- Затем следуйте инструкциям по удалению Hamachi и перезагрузите компьютер.
- После перезагрузки проверьте, решена ли проблема IOexception.
Решение 5.Уменьшите расстояние отрисовки в настройках Minecraft
Проблема с внутренним исключением может возникнуть, если Minecraft не может отобразить все видеоблоки сразу (из-за низкой скорости интернета). В этом контексте уменьшение расстояния рендеринга в настройках Minecraft до минимально возможного может решить проблему.
- Откройте Minecraft Launcher и откройте его Параметры (также будет хорошей идеей уменьшить Расстояние рендеринга в настройках сервера, если это возможно).
- Теперь выберите «Настройки видео» и сдвиньте расстояние рендеринга до минимально возможного (например, до 2).
- Затем проверьте, решена ли проблема с Java.io. Если да, то вы можете увеличить расстояние рендеринга на единицу, пока не достигнете желаемого расстояния рендеринга.
Решение 6. Измените настройки Java.
Ошибка Java.io может возникнуть, если установка Java в вашей системе настроена неправильно. В этом контексте изменение настроек Java (например, включение собственной песочницы) может решить проблему. Но прежде чем продолжить, убедитесь, что у вас только одна установка Java.
Обновите Java до последней сборки
- Кликните Windows, введите: Configure Java и затем откройте его.
- Теперь перейдите на вкладку «Обновить» и нажмите кнопку «Обновить сейчас».
- Если доступно обновление, примените обновление Java и проверьте, решена ли проблема с внутренним исключением.
Включить собственную песочницу
- Кликните Windows, введите: Configure Java & open it.
- Теперь перейдите на вкладку «Дополнительно» и установите флажок «Включить ограниченную среду операционной системы (собственная песочница)».
- Затем примените изменения и перезагрузите компьютер.
- После перезагрузки проверьте, решена ли проблема Minecraft IOexception.
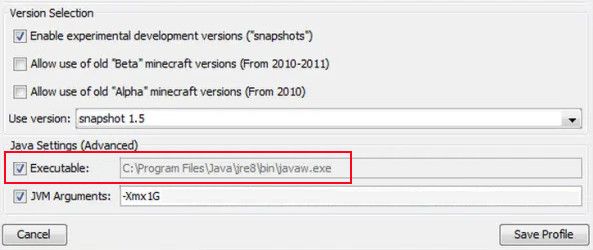
Отредактируйте путь к Java в настройках программы запуска
- Кликните правой кнопкой мыши Windows и откройте «Выполнить».
- Теперь перейдите по следующему пути:
Program Files (x86)
- Затем откройте папку Java и перейдите к последней версии установки Java (например, папке jre1.8.0_291).
- Теперь откройте папку Bin и скопируйте адрес из адресной строки.
- Затем откройте программу запуска Minecraft и выберите «Редактировать профиль».
- Теперь в разделе «Настройки Java» («Дополнительно») установите флажок «Исполняемый файл».
- Затем вставьте адрес (скопированный на шаге 4) в Bin, так что путь должен быть примерно таким:
C:Program Files (x86)Javajre1.8.0_291binjavaw.exe
- Теперь примените свои изменения и проверьте, решена ли проблема с внутренним исключением.
Если проблема не исчезнет, проверьте , решает ли переустановка Java проблему исключения ввода-вывода.
Решение 7. Ремонт / переустановка Minecraft
Проблема с Java.io может возникнуть, если установка Minecraft повреждена. В этом контексте его ремонт или переустановка могут решить проблему.
- Кликните Windows, введите: Панель управления и запустите.
- Теперь откройте Удаление программы и выберите Minecraft.
- Затем нажмите «Восстановить» и следуйте инструкциям по ремонту Minecraft.
- Теперь перезагрузите компьютер и проверьте, решена ли проблема IOexception.
- Если нет, удалите Minecraft и Java (обязательно сделайте резервную копию самого необходимого).
- Теперь перезагрузите компьютер и после перезагрузки кликните правой кнопкой мыши Windows и выберите «Выполнить».
- Затем перейдите по следующему пути (скопируйте и вставьте адрес):
AppData
- Теперь откройте каждый каталог (Local, LocalLow и Roaming) один за другим и удалите в них папки Minecraft.
- Затем загрузите последние версии Java и Minecraft.
- Затем установите Java от имени администратора и перезагрузите компьютер.
- После перезагрузки установите Minecraft от имени администратора и проверьте, решена ли проблема с внутренним исключением.
Решение 8. Измените параметры, связанные с сетью
Minecraft может отображать проблему внутреннего исключения, если сетевые настройки вашей системы не настроены должным образом (или ваш интернет-провайдер блокирует доступ к ресурсу, необходимому для работы Minecraft). В этом случае изменение настроек сети (или попытка использования другой сети / VPN) может решить проблему.
Попробуйте другую сеть или VPN
- Отключите вашу систему от текущей сети и подключитесь к другой сети, например, к точке доступа вашего телефона, чтобы проверить, решена ли проблема IOexception. Вы также можете проверить с помощью VPN. Кроме того, это будет идея хорошо переключаться между с Wi-Fi и локальных сетей связи.
- Если проблема не исчезнет, подключите систему к Интернету напрямую без маршрутизатора, чтобы исключить, не вызывает ли проблема его конфигурация.
Отключите ускорение NAT в настройках роутера.
- Запустите браузер и перейдите на страницу управления маршрутизатором.
- Теперь выберите LAN (на левой панели) и отключите аппаратное ускорение на вкладке Switch Control. Если аппаратное ускорение (функция фирменного маршрутизатора Asus) не отображается, ищите его с другими названиями, такими как CTF (сквозная пересылка) и FA (ускоритель потока).
- Затем примените свои изменения и проверьте, решена ли проблема с внутренним исключением.
Решение 9. Отредактируйте настройки брандмауэра
Вы можете столкнуться с проблемой внутреннего исключения, если брандмауэр вашей системы блокирует доступ к ресурсу, необходимому для работы Minecraft. В этом контексте изменение настроек брандмауэра (например, разрешение Java ™ Platform SE Binary в настройках брандмауэра) может решить проблему.
Прежде чем продолжить, рекомендуется проверить, решает ли проблему временное отключение брандмауэра вашей системы. Для иллюстрации мы рассмотрим процесс для брандмауэра Защитника Windows.
Предупреждение : продвигайтесь вперед на свой страх и риск, поскольку редактирование настроек брандмауэра — это умелая задача, и в случае неправильного выполнения вы можете подвергнуть свою систему / данные угрозам.
Установите Java (TM) Platform SE на Private в настройках брандмауэра
- Кликните Windows, введите: Разрешить приложению через брандмауэр Windows и откройте его.
- Теперь нажмите «Изменить настройки» и в списке приложений найдите Java (TM) Platform SE Binary. Если нет, то нажмите на Разрешить другой App & бычка в директорию установки Явы (обычно, каталог Java в Program Files и Program Files (X86) папки) и двойным щелчком по javaw.exe.
- Затем снимите отметку с опции Public и отметьте опцию Private для всех двоичных процессов Java (TM) Platform SE.
- Теперь выберите Java (TM) Platform SE Binary и нажмите Details.
- Затем откройте «Тип сети» и установите флажок «Частная».
- Теперь примените ваши изменения и перезагрузите компьютер.
- После перезагрузки проверьте, решена ли проблема IOexception.
Разрешить Minecraft через брандмауэр
- Кликните Windows, введите: Брандмауэр и откройте брандмауэр Защитника Windows.
- Теперь убедитесь, что правила для входящего и исходящего трафика, связанные с Minecraft, не установлены для блокировки подключения.
- Затем выберите «Правила для входящих подключений» и нажмите «Новое правило».
- Теперь выберите «Программа» и нажмите «Далее».
Выберите программу в окне нового правила - Затем нажмите «Обзор» и перейдите в каталог установки Minecraft.
- Теперь дважды кликните на Minecraft.exe и выберите Разрешить подключение.
- Затем нажмите «Далее» и выберите все три профиля (т. Е. «Общедоступный», «Частный» и «Доменный»).
- Теперь назовите правило и нажмите Готово.
- Затем повторите то же самое для правила исходящего трафика и перезагрузите компьютер.
- После перезагрузки проверьте, решена ли проблема Java.io.
Если проблема не устранена , проверьте, разрешает ли подключение Minecraft через брандмауэр маршрутизатора (если есть) проблему (особенно, если он использует некоторую функцию автоблокировки).
Если это не помогло, проверьте , не ограничивает ли родительский контроль доступ Minecraft. Кроме того, будет хорошей идеей убедиться, что порты правильно перенаправлены в брандмауэре системы / маршрутизатора в соответствии с требованиями Minecraft.
Если проблема не исчезнет, проверьте, решает ли проблему выделение для Minecraft дополнительной оперативной памяти . Если это не помогло, вы можете связаться с администраторами сервера, чтобы удалить данные вашего игрока или проверить наличие проблем на стороне сервера.
Если проблема до сих пор не решена, возможно, вам придется выполнить сброс настроек вашего компьютера до заводских настроек, и если это не помогло, проверьте свою систему (особенно жесткий диск и сетевую / Wi-Fi карту) на наличие аппаратной ошибки.
Содержание
- С помощью этого руководства вы можете узнать, как исправить внутреннее исключение java.net.socketexception при сбросе соединения в Minecraft.
- Как исправить сброс соединения с внутренним исключением java.net.socketexception в Minecraft
- Изменить настройки DNS-сервера
- Настройки брандмауэра Windows
- Настройки Java
С помощью этого руководства вы можете узнать, как исправить внутреннее исключение java.net.socketexception при сбросе соединения в Minecraft.
Хотя это одно из самых известных игры в жанре песочницы, Майнкрафту не чужды ошибки и проблемы. Несмотря на то, что классическая игра по подземельям по-прежнему высоко ценится и нравится игрокам, она сталкивается с множеством ошибок, которые расстраивают игроков. Тем не менее, природа и развлечения, которые он приносит своим поклонникам, скрывают это. Однако ошибки необходимо исправлять. Недавно игроки столкнулись с новой ошибкой Внутреннее исключение java.net.socketexception Connection Reset в Minecraft и ищут исправление. Если вы ищете то же самое, не смотрите дальше, так как это руководство уже рассмотрело вас.
Как исправить сброс соединения с внутренним исключением java.net.socketexception в Minecraft

Чтобы исправить сброс соединения Internal Exception java.net.socketexception в Minecraft, вам нужно будет попробовать и протестировать несколько вещей, которые могут сработать для вас. Кроме того, прежде чем начать, мы рекомендуем вам проверить подключение к Интернету. Поскольку ошибка связана со сбросом подключения, она может быть связана с вашим Интернетом.
Избегайте больших загрузок на любом другом устройстве, чтобы обеспечить достаточную пропускную способность для игры. Пока вы это делаете, вы также можете перезагрузить маршрутизатор и модем, чтобы очистить кеш и охладить их. Как только вы узнаете, что причина не в этом, перейдите к исправлению, которое мы предоставили для внутреннего исключения java.net.socketexception Connection Reset.
<р><сильный>Следующие методы требуют большого количества технических ноу-хау и могут изменить другие настройки на вашем устройстве. Мы рекомендуем вам сделать это тогда и только тогда, когда вы знаете, как вернуться к исходным настройкам.
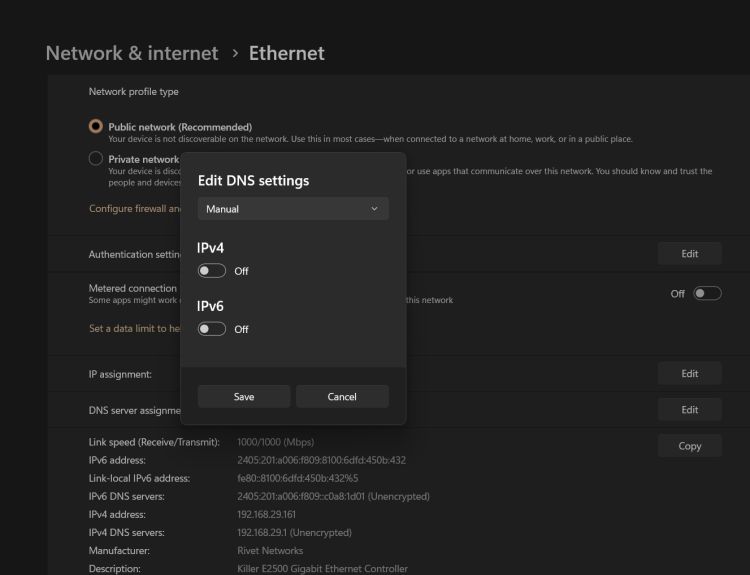
Изменить настройки DNS-сервера
Изменение вашего DNS-сервера может позволить вам исправить ошибку в майнкрафте. Поскольку это достаточно технический процесс, который изменяет другие настройки Интернета на ваших устройствах, запишите свои старые настройки куда-нибудь на память. Если вы уверены, что сможете это сделать, вот что вам нужно сделать:
- Откройте Настройки в меню «Пуск» и нажмите «Сеть и Интернет» .
- Находясь в новом окне, в разделе Дополнительные настройки сети нажмите Изменить параметры адаптера.
- Дважды щелкните свой Интернет. тип подключения (обычно Ethernet для ПК) и выберите Свойства.
- Как только появится новое окно, дважды щелкните Протокол Интернета версии 4 (TCP/IPv4) .
- Выберите параметр Использовать следующие адреса DNS-серверов.
- В поле предпочтительного DNS используйте 8.8.8.8, а в поле альтернативного DNS используйте 8.8.4.4.< /strong>
- Отметьте параметр Проверять настройки при выходе и сохраните изменения перед выходом.
Настройки брандмауэра Windows

Вы можете столкнуться с этой ошибкой, если Minecraft не добавлен в список приложений, разрешенных через брандмауэр. Вот что вам нужно сделать:
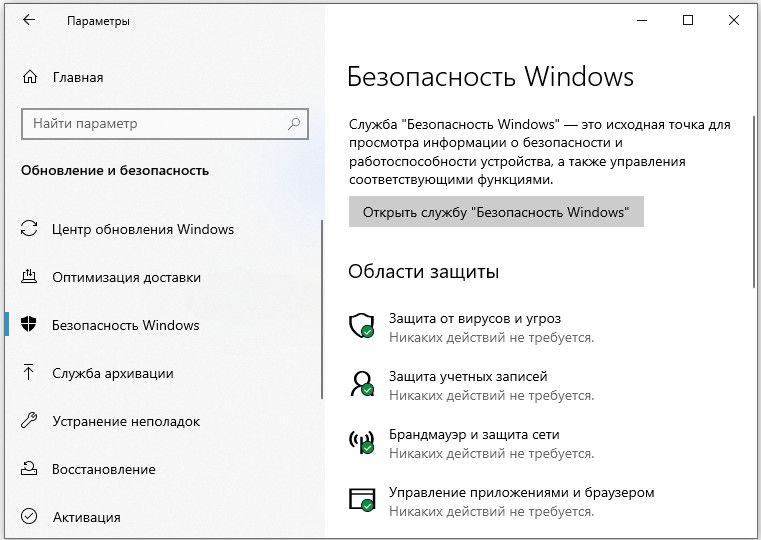
- Перейдите в Настройки из меню «Пуск» и нажмите Обновить и обновить. Безопасность.
- В новом окне найдите Безопасность Windows в параметрах слева.
- Нажав на него, перейдите и щелкните вкладку Открыть Настройки окна.
- Как только откроется новое окно, щелкните Брандмауэр и защита сети.
- Переключитесь на параметр Разрешить приложению проходить через брандмауэр и щелкните его, чтобы открыть новое окно.
- Нажмите Изменить настройки вверху, а затем нажмите Разрешить другое приложение.
- Найдите Minecraft в >просмотреть параметр и добавить его в брандмауэр.
Настройки Java
Поскольку версия Java добавляется с вашей установкой, начиная с версии Minecraft 1.12, вам может потребоваться обновить Java, чтобы продолжить. Вот что вам нужно сделать:
- Выполните поиск в Java и нажмите Проверить наличие обновлений.
- В новом окне откройте на вкладке Обновление.
- Находясь на новой вкладке, нажмите Проверить сейчас и установите любое обновление, если оно доступно.
- Перезапустите ваш компьютер после завершения процесса.
Если ничего из этого не работает, возможно, вам придется использовать VPN или прокси-сервер для игры. Хотя это не гарантирует исправления, вы можете решить эту проблему, переустановив игру. Но прежде чем вы это сделаете, обратитесь в Поддержку Minecraft, чтобы лучше понять проблему и получить шанс решить ее.
Это все, что вам нужно для решения проблемы. Внутреннее исключение java.net.socketexception Сброс соединения в Minecraft. Пока вы здесь, у нас есть другие руководства, советы и рекомендации по Minecraft, которые вы можете проверить на Guideer.
While Minecraft isn’t one of the most graphically intensive games, it can still cause problems for players; especially those trying to play Minecraft multiplayer on Minecraft servers.
For those facing the error with Internal Exception while trying to connect to a Minecraft server, it can be challenging to fix it. This can be due to several different reasons.
This guide will dive into the best ways players can hopefully fix the Internal Exception error when trying to play the game.
How do you fix the Minecraft Internal Exception (io.netty.handler) (Java.IO.IOException) errors?
Simply put, a connection problem causes this error. This could be due to several things. Players can try each of the standard solutions listed below to see if one happens to rectify the issue.
First, check if the server you are trying to join has an error
Players should first check whether the connection issue causing the Internal Exception error message is coming from the server or their side.
If the error is from the server-side, players can rest assured that nothing is wrong with their copy of Minecraft or their PC settings. It is simply a problem with the server itself.
The best way to check if the server has an error is by connecting to this testing server with IP: test.prisonfun.com
If the connection to this server is successful, there is no problem with the game client or PC settings. This particular server supports all versions of Minecraft and is always up to date, so it is the best place to test any potential connection problems.
If the connection to this server is unsuccessful, then there is an issue on the player’s side, not the server. Players can try the proposed solutions below to try and fix them.
Update Java
Minecraft is a Java application and needs Java to run. Players should ensure they have the latest official Java version:
- Go to the official Java Download found here
- Download the latest version of Java available
- Complete the installation
- Retry on Minecraft to join server IP: test.prisonfun.com
Turn off Firewall + Antivirus + VPN
Minecraft multiplayer is sensitive to specific Firewall rules, Antivirus settings and VPNs.
Players can try and disable all three of these and retry the connection:
Turn off firewall
- Press Windows Key + R (or type «run» in the start menu)
- Type «control» in the Run menu and hit enter
- Press «System and Security»
- Press «Windows Firewall»
- On the left-hand side, press «Turn windows defender firewall on or off»
- Turn off the firewall for both public and private network
- Retry on MC to join server IP: test.prisonfun.com
Turning off the antivirus and VPN is less straightforward than turning off the firewall. It will depend on the specific antivirus and VPN being used.
Turn off AntiVirus
If players are using a specific type of antiviruses such as Norton, McAffee, or Avast, they must be fully disabled in their control panels. After doing this, players can retry to connect to the server IP: test.prisonfun.com
Turn off VPN
If players are connected to any VPN, it should be turned off and disconnected. After doing this, players can retry their connection to the server IP: test.prisonfun.com
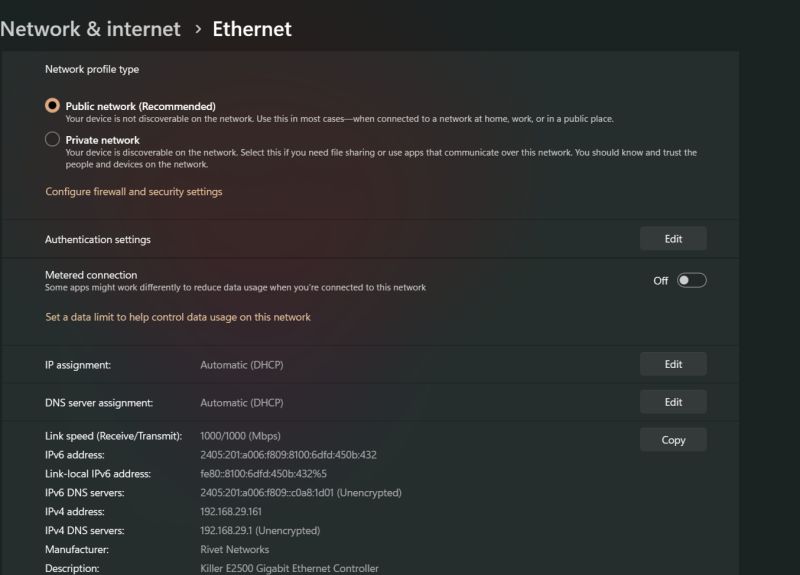
Change DNS Server Address
The DNS server can have an impact on failed connections. It is important to make sure it is up to date and accurate.
- Press Windows Key + R (or type «run» in the start menu)
- Type «control» in the Run menu and hit enter
- Navigate to the «Network and internet» tab
- Press «Network and sharing center»
- Select the connection (usually either «Ethernet» or «wifi»)
- Press «Properties»
- Click «Internet Protocol Version 4» (IPv4)
- Select «Use the following DNS server addresses»
- For the primary DNS server, use 8.8.8.8
- For an alternate DNS server, use 8.8.4.4
- Press «OK»
- Retry on Minecraft to join server IP: test.prisonfun.com
Users may want to watch this video below on how to change the DNS server (it works for Windows 10 and 11).
Re-download a fresh Installation of Minecraft
There may be something wrong with the Minecraft installation. Players should try to re-download a fresh copy with no modifications enabled.
- Open the official Minecraft launcher (download it here if you don’t have it)
- On the main launcher menu, click the «Installations» button (it should be at the top of the screen on the navbar)
- Press «New installation»
- Select the version of Minecraft you want to use (Latest release is recommended)
- Press the green «Create» button on the bottom right of the installation menu
- Make sure the newly created version is selected on the main launcher menu
- Hit the big green «Play» button on the main launcher menu
- Retry on Minecraft to join server IP: test.prisonfun.com
Install Minecraft to a new directory
If re-downloading a fresh installation of Minecraft is unsuccessful, players can try and install a new Minecraft directory altogether.
- Open the official Minecraft launcher (download it here if you don’t have it)
- On the main launcher menu, click the «Installations» button (it should be at the top of the screen on the navbar)
- Press «New installation»
- Select the version of the game you want to use (Latest release is recommended)
- For the «Game Directory» option, press «Browse» and select any place where you want to install the game on your PC if you don’t know where just press «Desktop» at the top.
- Hit OK
- Press the green «Create» button on the bottom right to create the new installation profile
- Make sure the newly created installation profile is selected on the main launcher menu before launching the game
- Hit the big green «Play» button on the main launcher menu
- Retry on MC to join server IP: test.prisonfun.com

Try VPN or a different wifi network
If nothing has worked so far, there might be an issue with the local network. Players can confirm if this is the case by connecting to a different wifi network or simply via a free VPN downloaded online.
Players are free to use their VPN, or they can try out the one in the video tutorial below.

After a VPN is connected to it, players can once again try and connect to the test server IP: test.prisonfun.com
Enable Java Native Sandbox
Enabling the Java Native Sandbox option has helped some users clear up their issues related to io.netty.handler and Java.IO.IOException.
- Press the Windows key (or click the start menu icon)
- Type Configure Java and press enter
- Navigate to the «Advanced» tab and scroll down to the «Advanced security settings» and enable the option «enable the operating system’s restricted environment (native sandbox).»
- Press Apply, then press OK
- Reboot the PC. This is very important.
- Retry on Minecraft to join server IP: test.prisonfun.com
Restart Router
Sometimes, the connection problem can originate from the local router needing a reboot. This is for various technical reasons, but restarting a router can assign a new IP and much more, which can help fix the underlying problem.
- Unplug the network router
- Wait a few minutes (restart your computer during this time)
- Plugin the network router
- Retry on MC to join server IP: test.prisonfun.com
Ensure there are no parental or admin restrictions on the PC/Network
Another major cause of the io.netty.handler and Java.IO.IOException problems is due to restrictions that are applied by parental control software (e.g., NetNanny, Norton Family, Qustodio, etc…) and network administrators.
Unfortunately, the only way to fix this is to turn them off entirely, which varies in each case due to different software being used.
Should players be aware that parental or admin restrictions are applied to the machine or network, these could most certainly be the underlying cause of the problems.
Once these restrictions are fully turned off, players can once again try and connect to the server with IP: test.prisonfun.com
For detailed guides, walkthroughs, tips & more, check out SK Minecraft Wiki
Edited by Srijan Sen
Thank You!
GIF
Cancel
![]() Reply
Reply
While Minecraft isn’t one of the most graphically intensive games, it can still cause problems for players; especially those trying to play Minecraft multiplayer on Minecraft servers.
For those facing the error with Internal Exception while trying to connect to a Minecraft server, it can be challenging to fix it. This can be due to several different reasons.
This guide will dive into the best ways players can hopefully fix the Internal Exception error when trying to play the game.
How do you fix the Minecraft Internal Exception (io.netty.handler) (Java.IO.IOException) errors?
Simply put, a connection problem causes this error. This could be due to several things. Players can try each of the standard solutions listed below to see if one happens to rectify the issue.
First, check if the server you are trying to join has an error
Players should first check whether the connection issue causing the Internal Exception error message is coming from the server or their side.
If the error is from the server-side, players can rest assured that nothing is wrong with their copy of Minecraft or their PC settings. It is simply a problem with the server itself.
The best way to check if the server has an error is by connecting to this testing server with IP: test.prisonfun.com
If the connection to this server is successful, there is no problem with the game client or PC settings. This particular server supports all versions of Minecraft and is always up to date, so it is the best place to test any potential connection problems.
If the connection to this server is unsuccessful, then there is an issue on the player’s side, not the server. Players can try the proposed solutions below to try and fix them.
Update Java
Minecraft is a Java application and needs Java to run. Players should ensure they have the latest official Java version:
- Go to the official Java Download found here
- Download the latest version of Java available
- Complete the installation
- Retry on Minecraft to join server IP: test.prisonfun.com
Turn off Firewall + Antivirus + VPN
Minecraft multiplayer is sensitive to specific Firewall rules, Antivirus settings and VPNs.
Players can try and disable all three of these and retry the connection:
Turn off firewall
- Press Windows Key + R (or type «run» in the start menu)
- Type «control» in the Run menu and hit enter
- Press «System and Security»
- Press «Windows Firewall»
- On the left-hand side, press «Turn windows defender firewall on or off»
- Turn off the firewall for both public and private network
- Retry on MC to join server IP: test.prisonfun.com
Turning off the antivirus and VPN is less straightforward than turning off the firewall. It will depend on the specific antivirus and VPN being used.
Turn off AntiVirus
If players are using a specific type of antiviruses such as Norton, McAffee, or Avast, they must be fully disabled in their control panels. After doing this, players can retry to connect to the server IP: test.prisonfun.com
Turn off VPN
If players are connected to any VPN, it should be turned off and disconnected. After doing this, players can retry their connection to the server IP: test.prisonfun.com
Change DNS Server Address
The DNS server can have an impact on failed connections. It is important to make sure it is up to date and accurate.
- Press Windows Key + R (or type «run» in the start menu)
- Type «control» in the Run menu and hit enter
- Navigate to the «Network and internet» tab
- Press «Network and sharing center»
- Select the connection (usually either «Ethernet» or «wifi»)
- Press «Properties»
- Click «Internet Protocol Version 4» (IPv4)
- Select «Use the following DNS server addresses»
- For the primary DNS server, use 8.8.8.8
- For an alternate DNS server, use 8.8.4.4
- Press «OK»
- Retry on Minecraft to join server IP: test.prisonfun.com
Users may want to watch this video below on how to change the DNS server (it works for Windows 10 and 11).
Re-download a fresh Installation of Minecraft
There may be something wrong with the Minecraft installation. Players should try to re-download a fresh copy with no modifications enabled.
- Open the official Minecraft launcher (download it here if you don’t have it)
- On the main launcher menu, click the «Installations» button (it should be at the top of the screen on the navbar)
- Press «New installation»
- Select the version of Minecraft you want to use (Latest release is recommended)
- Press the green «Create» button on the bottom right of the installation menu
- Make sure the newly created version is selected on the main launcher menu
- Hit the big green «Play» button on the main launcher menu
- Retry on Minecraft to join server IP: test.prisonfun.com
Install Minecraft to a new directory
If re-downloading a fresh installation of Minecraft is unsuccessful, players can try and install a new Minecraft directory altogether.
- Open the official Minecraft launcher (download it here if you don’t have it)
- On the main launcher menu, click the «Installations» button (it should be at the top of the screen on the navbar)
- Press «New installation»
- Select the version of the game you want to use (Latest release is recommended)
- For the «Game Directory» option, press «Browse» and select any place where you want to install the game on your PC if you don’t know where just press «Desktop» at the top.
- Hit OK
- Press the green «Create» button on the bottom right to create the new installation profile
- Make sure the newly created installation profile is selected on the main launcher menu before launching the game
- Hit the big green «Play» button on the main launcher menu
- Retry on MC to join server IP: test.prisonfun.com
Try VPN or a different wifi network
If nothing has worked so far, there might be an issue with the local network. Players can confirm if this is the case by connecting to a different wifi network or simply via a free VPN downloaded online.
Players are free to use their VPN, or they can try out the one in the video tutorial below.
After a VPN is connected to it, players can once again try and connect to the test server IP: test.prisonfun.com
Enable Java Native Sandbox
Enabling the Java Native Sandbox option has helped some users clear up their issues related to io.netty.handler and Java.IO.IOException.
- Press the Windows key (or click the start menu icon)
- Type Configure Java and press enter
- Navigate to the «Advanced» tab and scroll down to the «Advanced security settings» and enable the option «enable the operating system’s restricted environment (native sandbox).»
- Press Apply, then press OK
- Reboot the PC. This is very important.
- Retry on Minecraft to join server IP: test.prisonfun.com
Restart Router
Sometimes, the connection problem can originate from the local router needing a reboot. This is for various technical reasons, but restarting a router can assign a new IP and much more, which can help fix the underlying problem.
- Unplug the network router
- Wait a few minutes (restart your computer during this time)
- Plugin the network router
- Retry on MC to join server IP: test.prisonfun.com
Ensure there are no parental or admin restrictions on the PC/Network
Another major cause of the io.netty.handler and Java.IO.IOException problems is due to restrictions that are applied by parental control software (e.g., NetNanny, Norton Family, Qustodio, etc…) and network administrators.
Unfortunately, the only way to fix this is to turn them off entirely, which varies in each case due to different software being used.
Should players be aware that parental or admin restrictions are applied to the machine or network, these could most certainly be the underlying cause of the problems.
Once these restrictions are fully turned off, players can once again try and connect to the server with IP: test.prisonfun.com
For detailed guides, walkthroughs, tips & more, check out SK Minecraft Wiki
Edited by Srijan Sen
Thank You!
GIF
Cancel
![]() Reply
Reply
Last updated on January 2nd, 2023 at 05:19 pm
Create your universe in Minecraft, a role-playing video game based on Lego. You used to have to construct bricks to protect yourself against vermin, but the game has now expanded to incorporate a number of other chores.
Mojang’s creative sandbox game, Minecraft, has been in development for more than a decade and has an extraordinary collection of unique structures created by dedicated artists and architects.
You may take a trip to many different planets without having to worry about food and lodging costs when you build the best Minecraft large constructions.
This list includes Middle-earth, Tamriel, and Azeroth, yet you’ll still be able to get back home in time for tea.
The RMS Titanic and Europe’s Imperial Summer Palace have yet to be sunk by the ocean if you want to spend your time on Earth.
This is excellent news for fans of the popular sandbox game. You could accommodate yourself by checking out this list of 15 unique games like Minecraft, popular among elementary school youngsters.
Our collection of buildings includes something for everyone, much as our selection of the most fantastic Minecraft seeds and Minecraft skins.
Prepare to be amazed by some of the most beautiful brick-and-mortar combinations to grace Mojang’s pixel-perfect world!
The Internal Exception: java.net.SocketException: Connection Reset problem is a typical issue many people have in Minecraft today. Version 1.7 and later of Minecraft are affected by the same bug.
When this error warning shows on the screen, players are disconnected from the server and desist from playing the game.
The same problem might have a variety of origins, and a variety of remedies are possible. Minecraft Realms and even multiplayer servers are affected by the same problem.
If you are also suffering from the same condition, then you may count on this article to get rid of the issue effortlessly. Let’s take a look.
What does ‘Internal Exception Java.net.socketexception Connection Reset’ mean in Minecraft
Quick Answer: The java. net. SocketException: Connection reset error generally emerges whenever one of the sides in TCP link like client-side is attempting to interpret data, but other sides unexpectedly shut the linkage like it was crashed, ceased or ended.
According to the javadoc for SocketException, a protocol fault, such as a TCP problem, is to blame.
It would seem that the server end of the communication has terminated your connection. This might be a problem with the request you are submitting or a fault at their end.
Players have mentioned that they have been having this problem every time they attempt to log in or join any server on Minecraft.
We can appreciate how aggravating this specific problem might be for all the people out there.
But don’t be alarmed. Whatever the fundamental reason for the ‘internal exception java.net.socketexception connection reset’ problem in Minecraft, we have included all the potential remedies in the segments given below.
Stick until the conclusion of the post to have your difficulties fixed at the earliest.
Probable causes
One or more machines on the connection may send a Reset (RST) packet, which terminates any connections that have already been formed.
The transmitted RST packets may signal that the TCP packets sent are not recognized, a connection between the local and distant computer is broken, or a specific port is closed and is not allowed for communication.
The TCP (Transmission Control Protocol) socket is terminated since the socket got a close order from a distant system.
The other end has purposefully reset the connection. It seldom occurs, and is often improper, for client programs to do this. However, it is not uncommon for commercial software.
Occasionally this may also be due to severe load prompting Server to delay the communication, and before it could read the message, it was timed out at the client end.
Therefore you could also examine server health and log for heavy load creating this problem.
Fix “Internal Exception Java.net.socketexception Connection Reset” in Minecraft
Method 1: Using a Virtual Private Network
One approach to combat the Internal Exception: java.net.SocketException: Connection Reset Issue in Minecraft is utilizing the finest premium VPN services.
Changing your IP address is easy when you use a reputable VPN provider. In addition, consider a VPN that utilizes multiple server addresses.
For specific Minecraft games, speed and graphics clarity could suffer if you don’t access them using a quality VPN service like NordVPN.
Players may attempt to obtain the premium and high-quality VPNs such as NordVPN or Windscribe.
This should provide a solid connection continuously and you should be able to view your titles and enjoy them effortlessly.
The Java Socket Exception issue (connection lost) might arise even though your broadband connection is OK.
Presently, Microsoft is informed of the mistake. Unfortunately, they haven’t given a remedy to it yet. In fact, there isn’t a one-size-fits-all approach since each gadget is distinct.
Therefore, the best way ahead is to attempt each of the ways provided in this article to repair the issue. Free VPNs may cause Minecraft to lag, so keep that in mind.
If you really want better internet speed, you have to subscribe to a premium plan. Paying for a VPN service may entirely eliminate the “internal exception javanet.socketexception connection reset” problem. You’ll have to play Minecraft on a different device in the worst-case situation.
Method 2: Change DNS Server
One of the tricks to resolve the Internal Exception: java.net. SocketException: Connection Reset Issue in Minecraft involves updating the DNS server.
To begin, go to the bottom right corner of your desktop and choose Open Network and Internet options
-
Step 1: Click on the Start button and choose Control Panel.
You might also access the network settings through the control panel if it is convenient for you
In the newly created window, tap on the Network and Sharing Center button from the left pane menu.
-
Step 2: Choose the Properties option
Choose the Properties option for your Network connection in the next box
-
Step 3: Choose the internet protocol version
Within the Properties panel, double click on Internet Protocol Version 4 (TCP/IPv4).
-
Step 4: Then select the radio option beneath the Use the following DNS server addresses.
-
Step 5: Select the recommended DNS Servers
Now select the Recommended DNS server as 8.8.8.8 and the Alternative DNS server as 8.8.4.4
Eventually, check next to the Validate options before the exit check box, save the modifications, and view the outcome.
Restart your computer when you’ve finished, then try connecting to the Minecraft server once again.
Method 3: Uninstall Hamachi
Uninstall Hamachi if it’s already installed. A Reddit user figured out that Hamachi was producing the Java problem in Minecraft. The problem was resolved once they removed Hamachi.
To get rid of Hamachi, follow these steps:
-
Step 1: Go over to the Control Panel, look for Hamachi, and remove it.
-
Step 2: Open the Command Prompt with administrative privileges.
-
Step 3: When prompted, enter “netsh interface tcp show global.”
Check whether “Receive Window Auto-Tuning Level” is deactivated. To activate it, run the type “netsh interface tcp set global autotuninglevel=normal.”
-
Step 4: Lastly, write, “netsh interface tcp set global rss=enabled”.
Specify global autotuninglevel=normal and activate RSS on your network interface using the netsh interface tcp set global command and you’ll be good to go.
Your download speed would be improved as a result of this action.
Method 4: Check Internet Connection:
 Often the Java. Error might arise in Minecraft owing to a bad internet connection. In this circumstance, you need to examine your internet connection reliability and Wi-Fi router performance and guarantee everything is right.
If there is any trouble with the Wi-Fi router, then you may change to a cable network or notify your internet service provider.
Method 5: Flush your DNS settings
Poorly configured DNS settings might potentially create connection difficulties while linking to a Minecraft server. Try flushing it to see if it helps your issue.
To begin, press Windows key + R, type cmd, and then press enter to execute it.
Next, use ipconfig /flushdns to reset the DNS type to its default state.
If the above command fails to resolve the issue, try the following commands one at a time on the Command Prompt.
netsh winsock reset
netsh int ip reset
If you detect a problem with your router’s DHCP assignment, execute these instructions to drop your old IP and obtain a fresh one.
ipconfig /release
ipconfig /renew
If this doesn’t succeed, run the following instructions to restore your network stack.
ipconfig/flushdns
nbtstat -R
nbtstat -RR
netsh int ip reset C:resetlog.txt
netsh winsock reset
- Restart your computer and try again.
Method 6: Decrease Render Distance:
Last but just not least workaround to fix the Internal Exception: java.net.SocketException: Connection Reset Issue in Minecraft is limiting the Render distance. To this end,
-
Step 1: Firstly, start Minecraft, and you have to enter the single-player map.
Then, using the Esc key on your keyboard, pick Options from the drop-down menu.
-
Step 2: And click Video Settings, then Reduce the Render distance to 8 or below.
The Graphics option should be set to Fast and the Smooth lighting option should be disabled.
-
Step 3: At last, reload Minecraft and verify whether the issue is removed or not.
By doing this, Minecraft will be less sluggish and the “internal exception java.net.socketexception connection reset” problem will be addressed.
Method 7: Restore System IP Address:
Several afflicted people mentioned on the Social platform that they eventually escaped from the Internal Exception: java.net.
Using a fresh IP address will fix the Minecraft SocketException: Connection Reset problem. A similar method may be used in your situation as well. To this end,
Open the Command Prompt as Administrator by typing cmd into the search bar on your type.
- Then copy+ paste or type the following command in the Command Prompt window and hit Enter and each commands,
ipconfig/release
ipconfig/flushdns
ipconfig/renew
- Once you perform all these commands, shut the window, reopen Minecraft and run the game to verify improvement.
FAQs
1. What is SocketException connection reset?
This SocketException happens on the server-side when the client terminated the socket connection before the response could be provided via the socket.
By closing the browser window before the response has been retrieved, for example. Connection reset merely indicates that a TCP RST was received.
Follow us on Twitter & like our Facebook page for more post-updates
-
Top 14 Minecraft small island seed
-
Top 9 Flower forest Minecraft seed
-
How to battle in Pixelmon: Minecraft

Abhigyan identifies himself as a tech geek, gaming cognoscenti, and also a connoisseur of music. Unidentified and mysterious phenomena never fail to gather his undivided attention. When not reading about bizarre and perplexing entities across the Universe, he can often be found cheering for his favorite teams in Football.
Ошибка «внутреннее исключение» или Internal Exception с io netty handler либо Java IO IOException в Minecraft случаются по причине того, что игра теряет подключение к серверу.
А вот сбоить подключение, как известно, может по самым разным причинам. Следовательно, в каждом отдельном случае устраняется проблема тоже разными способами, притом вполне себе стандартными.
О них и расскажем. Итак,..
что делать, когда в Minecraft отваливается подключение с ошибкой io netty handler или Java IO IOException
Значит, первым делом просто проверяем подключение (перезагружаем роутер, переподключаем комп к Wi-Fi заново, переподключаем его напрямую через кабель, перезагружаем, запускаем Minecraft от имени администратора, проверяем и отключаем родительский контроль и т.д.) далее действуем следующим порядком:
#1 — проверяем состояние сервера
… для того, чтобы определить где именно случился сбой подключения — на стороне сервера, или локально. А для того, чтобы оперативно проверить и текущее состояние сервера игры, и текущее состояние подключения со своей стороны, просто подключаемся к тестовому серверу с IP: test.prisonfun.com.
Не пропустите: ОШИБКА С КОДОМ 0X803F8001 В MINECRAFT: ЧТО ЗНАЧИТ И КАК УСТРАНЯТЬ
Если подключится получается без проблем, то с клиентом игры и с настройками компа все в порядке. Данный сервер поддерживает все версии Minecraft и обновляется регулярно, потому оптимально подходит для оперативного выявления любых потенциально возможных проблем с подключением.
В противном же случае, то есть, когда подключиться именно к этому серверу не получилось, то, вероятнее всего, сбой подключения случился на стороне пользователя. И надо его устранять. Потому идем дальше.
#2 — отключаем брандмауэр, антивирус и VPN
Мера это временная, но крайне необходимая в случае, когда нужно быстро определить и устранить причину ошибок io netty handler или Java IO IOException в Minecraft. Поэтому:
- отключаем брандмауэр Windows:
- жмем Win+R с клавиатуры, в строке «Выполнить» пишем control и жмем Enter;
- в окне Панели управления кликаем «Система и безопасность» и далее — «Брандмауэр Windows«;
- в следующем окне слева жмем «Включение и отключение брандмауэра Windows«;
- отключаем брандмауэр для обоих типов сети — для домашней и рабочей и для общественной;
- кликаем ОК.
После этого снова пробуем подключиться к IP: test.prisonfun.com. Если снова не получилось то:
- отключаем антивирус — через панель управления программы;
- отключаем VPN
И снова подключаемся тестовому IP: test.prisonfun.com.
Не пропустите: MINECRAFT RTX С ТРАССИРОВКОЙ ЛУЧЕЙ: ЕСЛИ НЕ ВКЛЮЧАЕТСЯ И ПРОЧИЕ ПРОБЛЕМЫ
Опять безрезультатно? Тогда..
#3 — обновляем Java
Minecraft без Java не работает (и не должен). Более того, во избежание проблем с игрой Java на компе желательно иметь в самой последней версии. Обновляется эта самая версия стандартно:
- идем на официальную страницу загрузки Java — [ССЫЛКА];
- качаем и устанавливаем самую свежую версию Java.
Попутно в случае с проблемкой «внутреннего исключения» (ошибка io.netty.handler и Java.IO.IOException) не лишним также будет включить функцию Java Native Sandbox, а для этого:
- жмем «Пуск«, в строке поиска системы пишем java и в результатах выше кликаем «Configure Java«;
- в открывшемся окне переходим во вкладку «Advanced«;
- список параметров прокручиваем до раздела «Advanced security settings» и активируем опцию «Enable the operating system’s restricted environment (native sandbox)«;
- жмем «Применить» и «ОК«.
После перерезагружаем комп (это важно!), запускаем Minecraft и подключаемся к IP: test.prisonfun.com. Снова никак?
Не пропустите: MINECRAFT CLASSIC В БРАУЗЕРЕ: ПОЧЕМУ ТОРМОЗИТ И КАК ПОДНЯТЬ FPS
перенастраиваем DNS
Процедура тоже стандартная:
- жмем Win+R с клавиатуры, в строке «Выполнить» пишем control и жмем Enter;
- в окне Панели управления кликаем «Сеть и Интернет» и далее — «Центр управления сетями и общим доступом«;
- находим с списке сетей свое текущее подключение («Ethernet» или «WiFi») и кликаем ссылку «сетевое соединение«;
- в следующем окне жмем кнопку «Свойства» и далее в окне свойств подключения:
-
- двойным кликом кликаем по строке «Протокол интернета версии 4 (IPv4)» в компонентах;
- в открывшемся окошке активируем опцию «Использовать следующие адреса DNS-серверов» и ниже
- для «Предпочитаемый DNS-сервер» прописываем 8.8.8.8
- для «Альтернативный DNS-сервер» прописываем 8.8.4.4
- и жмем ОК.
Перезагружаем комп, запускаем Minecraft и пробуем подключиться к IP: test.prisonfun.com.
Не пропустите: КАК СОЗДАТЬ НАСТОЯЩИЙ КОМПЬЮТЕР В MINECRAFT: О ВОЗМОЖНОСТЯХ КРАСНОГО КАМНЯ
Если после перенастройки DNS (и всех предыдущих мер) устранить проблему не удалось, то, очень вероятно, что причина сбоя — в самой игре, а точнее в имеющейся сборке и/или в установленных модах. Поэтому
#4 — выполняем чистую переустановку Minecraft
То есть, качаем последнюю версию Minecraft с официального сайта и устанавливаем её безо всяких модов. Сделать нужно следующее:
- открываем официальный лаунчер Minecraft (либо сначала качаем его и устанавливаем — [ССЫЛКА] — и затем открываем);
- в главном меню открываем вкладку «Установки» (вверху) и жмем «Новая установка«;
- выбираем версию Minecraft (разработчик рекомендует ставить самую последнюю) и жмем «Загрузить«;
- далее проверяем, чтобы в меню лаунчера выбрана была именно нужная версия и жмем «Играть«;
- после запуска Minecraft проверяем подключение через IP: test.prisonfun.com.
Не пропустите: УСТАРЕВШИЙ КЛИЕНТ MINECRAFT: ПОЧЕМУ, И ЧТО С ЭТИМ ДЕЛАТЬ?
Ну а если игра снова выдает «внутреннее исключение» с io netty handler либо Java IO IOException (а такое тоже может быть), значит придется переустановить её в другое место. Для этого:
- открываем официальный лаунчер Minecraft (ссылку см. выше);
- в главном меню открываем вкладку «Установки» (вверху) и жмем «Новая установка«;
- выбираем самую новую (рекомендуется);
- жмем кнопку «Обзор» и указываем другое место установки игры (либо просто кликаем «Рабочий стол«) и жмем ОК;
- теперь кликаем «Загрузить«;
- далее проверяем, чтобы в меню лаунчера выбрана была именно нужная версия и жмем «Играть«.
После запуска Minecraft проверяем подключение через IP: test.prisonfun.com. Если опять никак, то тогда еще раз, еще внимательнее проверяем подключение, а также «родительский контроль«. Вероятно, дело как раз в последнем…
Содержание
- Error solution: “Internal Exception: io.netty.handler.codec.DecoderException:java.”
- Internal exception io netty handler codec decoderexception index 25 size 5 что делать
- Minecraft Forums
- HELP! I can’t connect to ANY servers! :((
- Io netty handler, Java IO IOException или внутреннее исключение в Minecraft: что делать
- что делать, когда в Minecraft отваливается подключение с ошибкой io netty handler или Java IO IOException
- перенастраиваем DNS
Error solution: “Internal Exception: io.netty.handler.codec.DecoderException:java.”

In this article we will give you the solution to the following Minecraft bug: Internal Exception: io.netty.handler.DecoderException: java.lang.IndexOutOfBoundsException: Index: 25, Size: 5
This error usually occurs when playing in multiplayer servers and the steps to solve it are the following:
1- The first thing to do is to go to your web browser, either Google Chrome, Mozilla or whatever you prefer and there we go to the “TLauncher” page. For your convenience here is the link to the official site.
2- Once here in the official site of “TLauncher” we must create a new account, because the error “Internal Exception: io.netty.handler.DecoderException: java.lang.IndexOutOfBoundsException: Index: 25, Size: 5” is an error in the account and has nothing to do with your computer or the installation of the game or its configuration. To create a new account you must look for the “Sign Up” button. You must enter a new email and a new password for this second account.You should choose a name that is not too long, as many users also have this problem when the username is too long.

3- Once the new account is created, you only have to open again the “TLauncher” to add the new account, just created. To add a new account you must go to the section that says accounts as shown in the following image.

Add the newly created account and the corresponding password. Save the username and start playing with the new account as the internal exception error will be fixed and you will be able to play in multiplayer mode.
Some users in addition to this step must enter the Aternos page and in “Whitelist” add you to the list of players, for this add the user name of the new account created.
Источник
Internal exception io netty handler codec decoderexception index 25 size 5 что делать
#A fatal error has been detected by the Java Runtime Environment:
#
# EXCEPTION_ACCESS_VIOLATION (0xc0000005) at pc=0x46bce470, pid=7616, tid=2432
#
# JRE version: Java(TM) SE Runtime Environment (8.0_65-b17) (build 1.8.0_65-b17)
# Java VM: Java HotSpot(TM) Client VM (25.65-b01 mixed mode windows-x86 )
# Problematic frame:
# C [awt.dll+0x1e470]
#
# Failed to write core dump. Minidumps are not enabled by default on client versions of Windows
#
# If you would like to submit a bug report, please visit:
# http://bugreport.java.com/bugreport/crash.jsp
# The crash happened outside the Java Virtual Machine in native code.
# See problematic frame for where to report the bug.
#
Current thread (0x45c63400): JavaThread «AWT-Windows» daemon [_thread_in_native, stack(0x46e60000,0x46eb0000)]
siginfo: ExceptionCode=0xc0000005, reading address 0x00000000
Registers:
EAX=0x46eaf4f4, EBX=0x000000c0, ECX=0x0000007e, EDX=0x000000c0
ESP=0x46eaf4dc, EBP=0x00000000, ESI=0x45cedc90, EDI=0x00000000
EIP=0x46bce470, EFLAGS=0x00010216
Top of Stack: (sp=0x46eaf4dc)
0x46eaf4dc: 46eaf4f4 00001000 00000000 00000001
0x46eaf4ec: 45c63df0 0010000f 46c968ca 46bc558b
0x46eaf4fc: 00000000 00000000 45c63df0 46bc566a
0x46eaf50c: 00000000 45c63df0 00000001 46bc576e
0x46eaf51c: 45c63df0 46bc1d90 45c1e288 00000000
0x46eaf52c: 46bc83fa 00000001 46ca6104 00000000
0x46eaf53c: 45c1e288 46bc98f2 46ca60fc 46bc9aeb
0x46eaf54c: 46ca60fc 46c55e99 00000000 c69d455a
Instructions: (pc=0x46bce470)
0x46bce450: d8 53 1b c0 57 8b be 10 a0 00 00 25 00 f0 ff ff
0x46bce460: 05 00 20 00 00 50 c1 e2 05 8d 44 24 14 50 8b da
0x46bce470: 8b 17 53 c1 e1 05 51 8b 4a 2c 57 ff d1 33 ff 3b
0x46bce480: c7 0f 8c 8f 00 00 00 8b 56 04 8b 4c 24 10 c1 e2
Register to memory mapping:
EAX=0x46eaf4f4 is pointing into the stack for thread: 0x45c63400
EBX=0x000000c0 is an unknown value
ECX=0x0000007e is an unknown value
EDX=0x000000c0 is an unknown value
ESP=0x46eaf4dc is pointing into the stack for thread: 0x45c63400
EBP=0x00000000 is an unknown value
ESI=0x45cedc90 is an unknown value
EDI=0x00000000 is an unknown value
Источник
Minecraft Forums
HELP! I can’t connect to ANY servers! :((


I’m using minecraft 1.7.4. So far the only versions I can play is 1.7.4 and 1.7.9.
Btw, is there any good virus scanners that you can introduce?

- Newly Spawned
- Join Date: 4/19/2014
- Posts: 1
- Member Details

- Out of the Water
- Join Date: 4/7/2014
- Posts: 7
- Member Details
- Out of the Water
- Join Date: 4/7/2014
- Posts: 7
- Member Details
- Out of the Water
- Join Date: 4/18/2014
- Posts: 3
- Member Details

- Coal Miner
- Join Date: 10/18/2013
- Posts: 109
- Minecraft: zeldalover52
- Xbox: NOPE
- PSN: NOPE
- Member Details
Notch just said creepers are ready to be able to live with humans!
WE’RE ALL GONNA DIE.
I told you you would be scared.

- Out of the Water
- Join Date: 6/10/2014
- Posts: 2
- Member Details

- Tree Puncher
- Join Date: 12/11/2011
- Posts: 38
- Minecraft: DragonZlayerX
- Member Details
- Out of the Water
- Join Date: 6/10/2014
- Posts: 2
- Member Details

- Out of the Water
- Join Date: 12/15/2014
- Posts: 8
- Member Details

- The Meaning of Life, the Universe, and Everything.
- Join Date: 1/25/2014
- Posts: 42
- Member Details
So I was playing minecraft earlier today but when I tried to connect to multiplayer servers, it keep saying the following:
Internal Exception: io.netty.handler.codec.DecoderException: java.util.zip.ZipException: invalid bit length repeat
Internal Exception: io.netty.handler.codec.DecoderException: java.util.zip.ZipException: Bad packet id **********
Internal Exception: io.netty.handler.codec.DecoderException: java.io.IOException: Bad compressed data format
Failed to login: Invalid session (Try restarting your game)
Источник
Io netty handler, Java IO IOException или внутреннее исключение в Minecraft: что делать
Ошибка «внутреннее исключение» или Internal Exception с io netty handler либо Java IO IOException в Minecraft случаются по причине того, что игра теряет подключение к серверу.
А вот сбоить подключение, как известно, может по самым разным причинам. Следовательно, в каждом отдельном случае устраняется проблема тоже разными способами, притом вполне себе стандартными.
О них и расскажем. Итак.
что делать, когда в Minecraft отваливается подключение с ошибкой io netty handler или Java IO IOException
Значит, первым делом просто проверяем подключение (перезагружаем роутер, переподключаем комп к Wi-Fi заново, переподключаем его напрямую через кабель, перезагружаем, запускаем Minecraft от имени администратора, проверяем и отключаем родительский контроль и т.д.) далее действуем следующим порядком:
#1 — проверяем состояние сервера
… для того, чтобы определить где именно случился сбой подключения — на стороне сервера, или локально. А для того, чтобы оперативно проверить и текущее состояние сервера игры, и текущее состояние подключения со своей стороны, просто подключаемся к тестовому серверу с IP: test.prisonfun.com.
Если подключится получается без проблем, то с клиентом игры и с настройками компа все в порядке. Данный сервер поддерживает все версии Minecraft и обновляется регулярно, потому оптимально подходит для оперативного выявления любых потенциально возможных проблем с подключением.
В противном же случае, то есть, когда подключиться именно к этому серверу не получилось, то, вероятнее всего, сбой подключения случился на стороне пользователя. И надо его устранять. Потому идем дальше.
#2 — отключаем брандмауэр, антивирус и VPN
Мера это временная, но крайне необходимая в случае, когда нужно быстро определить и устранить причину ошибок io netty handler или Java IO IOException в Minecraft. Поэтому:
- отключаем брандмауэр Windows:
- жмем Win+R с клавиатуры, в строке «Выполнить» пишем control и жмем Enter;
- в окне Панели управления кликаем «Система и безопасность» и далее — «Брандмауэр Windows«;
- в следующем окне слева жмем «Включение и отключение брандмауэра Windows«;
- отключаем брандмауэр для обоих типов сети — для домашней и рабочей и для общественной;
- кликаем ОК.
После этого снова пробуем подключиться к IP: test.prisonfun.com. Если снова не получилось то:
- отключаем антивирус — через панель управления программы;
- отключаем VPN
И снова подключаемся тестовому IP: test.prisonfun.com.
Опять безрезультатно? Тогда..
#3 — обновляем Java
Minecraft без Java не работает (и не должен). Более того, во избежание проблем с игрой Java на компе желательно иметь в самой последней версии. Обновляется эта самая версия стандартно:
- идем на официальную страницу загрузки Java — [ССЫЛКА];
- качаем и устанавливаем самую свежую версию Java.
Попутно в случае с проблемкой «внутреннего исключения» (ошибка io.netty.handler и Java.IO.IOException) не лишним также будет включить функцию Java Native Sandbox, а для этого:
- жмем «Пуск«, в строке поиска системы пишем java и в результатах выше кликаем «Configure Java«;
- в открывшемся окне переходим во вкладку «Advanced«;
- список параметров прокручиваем до раздела «Advanced security settings» и активируем опцию «Enable the operating system’s restricted environment (native sandbox)«;
- жмем «Применить» и «ОК«.
После перерезагружаем комп (это важно!), запускаем Minecraft и подключаемся к IP: test.prisonfun.com. Снова никак?
перенастраиваем DNS
Процедура тоже стандартная:
- жмем Win+R с клавиатуры, в строке «Выполнить» пишем control и жмем Enter;
- в окне Панели управления кликаем «Сеть и Интернет» и далее — «Центр управления сетями и общим доступом«;
- находим с списке сетей свое текущее подключение («Ethernet» или «WiFi») и кликаем ссылку «сетевое соединение«;
- в следующем окне жмем кнопку «Свойства» и далее в окне свойств подключения:
-
- двойным кликом кликаем по строке «Протокол интернета версии 4 (IPv4)» в компонентах;
- в открывшемся окошке активируем опцию «Использовать следующие адреса DNS-серверов» и ниже
- для «Предпочитаемый DNS-сервер» прописываем 8.8.8.8
- для «Альтернативный DNS-сервер» прописываем 8.8.4.4
- и жмем ОК.
Перезагружаем комп, запускаем Minecraft и пробуем подключиться к IP: test.prisonfun.com.
Если после перенастройки DNS (и всех предыдущих мер) устранить проблему не удалось, то, очень вероятно, что причина сбоя — в самой игре, а точнее в имеющейся сборке и/или в установленных модах. Поэтому
#4 — выполняем чистую переустановку Minecraft
То есть, качаем последнюю версию Minecraft с официального сайта и устанавливаем её безо всяких модов. Сделать нужно следующее:
- открываем официальный лаунчер Minecraft (либо сначала качаем его и устанавливаем — [ССЫЛКА] — и затем открываем);
- в главном меню открываем вкладку «Установки» (вверху) и жмем «Новая установка«;
- выбираем версию Minecraft (разработчик рекомендует ставить самую последнюю) и жмем «Загрузить«;
- далее проверяем, чтобы в меню лаунчера выбрана была именно нужная версия и жмем «Играть«;
- после запуска Minecraft проверяем подключение через IP: test.prisonfun.com.
Ну а если игра снова выдает «внутреннее исключение» с io netty handler либо Java IO IOException (а такое тоже может быть), значит придется переустановить её в другое место. Для этого:
- открываем официальный лаунчер Minecraft (ссылку см. выше);
- в главном меню открываем вкладку «Установки» (вверху) и жмем «Новая установка«;
- выбираем самую новую (рекомендуется);
- жмем кнопку «Обзор» и указываем другое место установки игры (либо просто кликаем «Рабочий стол«) и жмем ОК;
- теперь кликаем «Загрузить«;
- далее проверяем, чтобы в меню лаунчера выбрана была именно нужная версия и жмем «Играть«.
Источник

Хотя Minecraft не является одной из самых графически интенсивных игр, она все же может вызвать проблемы для игроки; особенно те, кто пытается играть в многопользовательскую игру Minecraft на серверах Minecraft.
Тем, кто сталкивается с ошибкой с внутренним исключением при попытке подключения к серверу Minecraft, может быть сложно исправить ее. Это может быть вызвано несколькими разными причинами.
В этом руководстве рассматриваются лучшие способы, с помощью которых игроки могут исправить ошибку внутреннего исключения при попытке играть в игру.
Как исправить внутреннее исключение Minecraft (io.netty.handler) (Java.IO.IOException) ошибки?
Проще говоря, проблема с подключением вызывает эту ошибку. Это может быть связано с несколькими вещами. Игроки могут попробовать каждое из перечисленных ниже стандартных решений, чтобы узнать, удастся ли решить проблему.
Сначала проверьте, нет ли ошибки на сервере, к которому вы пытаетесь присоединиться
Игроки должны сначала проверить, исходит ли проблема с подключением, вызывающая сообщение об ошибке внутреннего исключения, с сервера или с их стороны.
Если ошибка возникла на стороне сервера, игроки могут быть уверены, что с их копией Minecraft все в порядке. или их настройки ПК. Это просто проблема с самим сервером.
Лучший способ проверить, есть ли ошибка на сервере, — это подключиться к этому тестовому серверу с IP-адресом: test.prisonfun.comЕсли подключение к этому серверу прошло успешно, проблем с игровым клиентом или настройками ПК нет. Этот конкретный сервер поддерживает все версии Minecraft и всегда обновляется, поэтому это лучшее место для проверки любых потенциальных проблем с подключением.
Если подключение к этому серверу не удалось, значит проблема на стороне игрока. , а не сервер. Игроки могут попробовать предложенные ниже решения, чтобы попытаться исправить их.
Обновить Java
Minecraft — это приложение Java, и для его работы требуется Java. Игроки должны убедиться, что у них установлена последняя официальная версия Java:
- Перейдите на официальную страницу загрузки Java, которую можно найти здесь
- Загрузите последнюю доступную версию Java
- Завершите установку
- Повторите попытку в Minecraft, чтобы присоединиться к IP-адресу сервера: test.prisonfun.com
Отключить брандмауэр + антивирус + VPN
Многопользовательская игра Minecraft чувствительна к определенным правилам брандмауэра, настройкам антивируса и VPN.
Игроки могут попробовать отключить все три из них и повторить попытку подключения:
Отключить брандмауэр
- Нажмите клавишу Windows + R (или введите «Выполнить» в меню «Пуск»).
- Введите «control» в меню «Выполнить» и нажмите Enter.
- Нажмите «Система и безопасность».
- Нажмите «Брандмауэр Windows»
- Слева нажмите «Включить или отключить брандмауэр Защитника Windows»
- Отключить брандмауэр как для общедоступной, так и для частной сети
- Повторите попытку на MC, чтобы присоединиться к IP-адресу сервера: test.prisonfun.com
Отключить антивирус и VPN не так просто, как отключение брандмауэра. Это зависит от используемого антивируса и VPN.
Отключите антивирус
Если игроки используют определенный тип антивируса, например Norton, McAffee или Avast. , они должны быть полностью отключены в своих панелях управления. После этого игроки могут повторить попытку подключения к IP-адресу сервера: test.prisonfun.com
Отключить VPN
Если игроки подключены к какому-либо VPN, его следует выключить и отключить. После этого игроки могут повторить попытку подключения к IP-адресу сервера: test.prisonfun.com
Изменить адрес DNS-сервера
DNS-сервер может повлиять на сбой соединения. Важно убедиться, что она актуальна и точна.
- Нажмите клавишу Windows + R (или введите «выполнить» в меню «Пуск»).
- Введите «control » в меню «Выполнить» и нажмите Enter
- Перейдите на вкладку «Сеть и Интернет».
- Нажмите «Центр управления сетями и общим доступом».
- Выберите подключение (обычно «Ethernet» или «Wi-Fi»).
- Нажмите «Свойства».
- Нажмите «Протокол Интернета версии 4» (IPv4).
- Выберите «Использовать следующие адреса DNS-серверов».
- Для основного DNS-сервера , используйте 8.8.8.8
- Для альтернативного DNS-сервера используйте 8.8.4.4
- Нажмите «ОК»
- Повторите попытку в Minecraft, чтобы присоединиться к IP-адресу сервера: test.prisonfun.com
Пользователи могут посмотреть это видео ниже о том, как изменить DNS-сервер (это работает для Windows 10 и 11).
Повторно загрузите новую установку Minecraft
Возможно, что-то не так с установкой Minecraft. Игроки должны попытаться повторно загрузить свежую копию без включенных модификаций.
- Откройте официальную программу запуска Minecraft (загрузите ее здесь, если у вас ее нет)
- В главном меню лаунчера нажмите кнопку «Установки» (она должна быть вверху экрана на панели навигации)
- Нажмите «Новая установка»
- Выберите версию Minecraft которую вы хотите использовать (рекомендуется последняя версия).
- Нажмите зеленую кнопку «Создать» в правом нижнем углу меню установки.
- Убедитесь, что только что созданная версия выбрана на главном меню запуска
- Нажмите большую зеленую кнопку «Воспроизвести» в главном меню запуска
- Повторите попытку в Minecraft, чтобы присоединиться к IP-адресу сервера: test.prisonfun.com
Установите Minecraft в новый каталог
При повторной загрузке новой установки Minecraft не удается, игроки могут попробовать установить новый каталог Minecraft вообще.
- Откройте официальную программу запуска Minecraft (загрузите ее здесь, если у вас ее нет)
- На странице главное меню лаунчера, нажмите кнопку «Установки» (она должна быть вверху экрана на панели навигации)
- Нажмите «Новая установка»
- Выберите версию игры, которую вы хотите использовать (рекомендуется последняя версия).
- Для параметра «Каталог игр» нажмите «Обзор» и выберите любое место, куда вы хотите установить игру на своем ПК, если вы не знаете, где, просто нажмите «Рабочий стол» вверху.
- Нажмите «ОК».
- Нажмите зеленую кнопку «Создать» в правом нижнем углу, чтобы создать новый профиль установки
- li>
- Перед запуском игры убедитесь, что только что созданный установочный профиль выбран в главном меню программы запуска.
- Нажмите большую зеленую кнопку «Играть» в главном меню запуска.
- Повторите попытку на MC, чтобы присоединиться к IP-адресу сервера: test.prisonfun.com
Попробуйте VPN или другой Wi-Fi сеть
Если до сих пор ничего не сработало, возможно, проблема с локальной сетью. Игроки могут проверить, так ли это, подключившись к другой сети Wi-Fi или просто через бесплатный VPN, загруженный из Интернета.
Игроки могут свободно использовать свой VPN или попробовать тот, который показан в видеоруководстве ниже.< /p>
После VPN подключен к нему, игроки могут еще раз попытаться подключиться к IP-адресу тестового сервера: test.prisonfun.com
Enable Java Native Sandbox
Включение параметра Java Native Sandbox помогло некоторым пользователям устранить проблемы, связанные с io.netty.handler и Java.IO.IOException.
- Нажмите клавишу Windows (или щелкните значок меню «Пуск»).
- Введите Настроить Java и нажмите Enter.
- Перейдите на вкладку «Дополнительно», прокрутите вниз до «Дополнительных параметров безопасности» и включите параметр «Включить ограниченная среда операционной системы (собственная песочница).
- Нажмите «Применить», затем нажмите «ОК».
- Перезагрузите компьютер. Это очень важно.
- Повторите попытку в Minecraft, чтобы присоединиться к IP-адресу сервера: test.prisonfun.com
Перезагрузить маршрутизатор
Иногда проблема с подключением может быть вызвана необходимостью перезагрузки локального маршрутизатора. Это происходит по разным техническим причинам, но перезапуск маршрутизатора может назначить новый IP-адрес и многое другое, что может помочь решить основную проблему.
- Отключите сетевой маршрутизатор
- Подождите. несколько минут (за это время перезагрузите компьютер)
- Подключите сетевой маршрутизатор
- Повторите попытку на MC, чтобы присоединиться к IP-адресу сервера: test.prisonfun.com< /ли>
Убедитесь, что на ПК/в сети нет родительских или административных ограничений
. Другая важная причина проблем с io.netty.handler и Java.IO.IOException связана с ограничениями, применяемыми программным обеспечением родительского контроля (например, , NetNanny, Norton Family, Qustodio и т. д.), а также сетевых администраторов.
К сожалению, единственный способ исправить это – полностью отключить их, что зависит от используемого программного обеспечения.
p> Если игроки знают, что к машине или сети применяются родительские или административные ограничения, это, безусловно, может быть основной причиной проблем.
Также прочитайте статью, продолжение которой приведено ниже. Как исправить ошибку «время ожидания подключения истекло» в Minecraft Как исправить ошибку JNI в Java Edition при настройке сервера Minecraft Как исправить ошибку Minecraft GLFW 65542 (драйвер не поддерживает OpenGL) После полного отключения этих ограничений игроки могут еще раз попытаться подключиться к серверу по IP : test.prisonfun.com
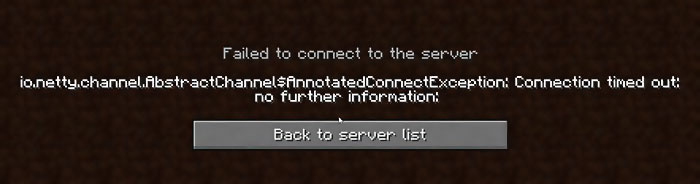
Почему появилась ошибка?
Тщательно проанализировав форумы, посвященные Minecraft, можно прийти к выводу, что преимущественно причиной появления программного сбоя становится антивирус или включенный брандмауэр Windows. Эти сервисы блокируют соединение, поэтому игрок лишается возможности подключиться к серверу. Когда появляется рассматриваемая ошибка, обязательно проверьте параметры безопасности, возможно, IP сервера придется добавить в исключения.
Еще одной причиной появления ошибки становится загрузка игры из непроверенных источников, например, малоизвестных torrent-трекеров. Программный сбой мог также возникнуть вследствие некорректной инсталляции мода. Не исключено, что вам удастся решить проблему путем переустановки.
Когда с причинами разобрались, можно переходить к поиску решения. Предлагаем вашему вниманию несколько действенных методов восстановить корректный запуск игры и подключение к серверу.
Предположим, что ошибка появляется на этапе подключения к сети. Это означает, что вам необходимо создать локальную сеть с помощью специального софта. Для этого подойдет следующий софт – Hamachi или Tunngle. Это проверенный способ, который помог игрокам. Предварительно отключите брандмауэр и антивирус, кстати возможно они и блокируют доступ к серверам.
Ошибка при запуске игры
Предположим, что вы скачали игру, но она не запускается. Что делать в такой ситуации? Придерживайтесь простой пошаговой инструкции:
- Загрузите игру с проверенного портала.
- Очистите кэш в игре с помощью специальной программы.
Скачивайте игры только с проверенных порталов.
Решение проблем с Java
- Сервер offline, отключен или на данный момент проводится профилактика.
- Файл, программа, служба блокирует коннект.
- Неправильные настройки портов или IP.
- Установленная версия Java устарела.

Появление ошибки из-за низкого пинга
Несколько дополнительных советов
Предложенные выше способы не помогли? Тогда воспользуйтесь одним из следующих советов:
- Перезапустите компьютер.
- Переустановите Minecraft.
- Почистите операционную систему с помощью CCleaner.
- Перезапустите игру.
- Установите актуальную версию Java.
Current thread (0x45c63400): JavaThread «AWT-Windows» daemon [_thread_in_native, >
siginfo: ExceptionCode=0xc0000005, reading address 0x00000000
Registers:
EAX=0x46eaf4f4, EBX=0x000000c0, ECX=0x0000007e, EDX=0x000000c0
ESP=0x46eaf4dc, EBP=0x00000000, ESI=0x45cedc90, EDI=0x00000000
EIP=0x46bce470, EFLAGS=0x00010216
Top of Stack: (sp=0x46eaf4dc)
0x46eaf4dc: 46eaf4f4 00001000 00000000 00000001
0x46eaf4ec: 45c63df0 0010000f 46c968ca 46bc558b
0x46eaf4fc: 00000000 00000000 45c63df0 46bc566a
0x46eaf50c: 00000000 45c63df0 00000001 46bc576e
0x46eaf51c: 45c63df0 46bc1d90 45c1e288 00000000
0x46eaf52c: 46bc83fa 00000001 46ca6104 00000000
0x46eaf53c: 45c1e288 46bc98f2 46ca60fc 46bc9aeb
0x46eaf54c: 46ca60fc 46c55e99 00000000 c69d455a
Instructions: (pc=0x46bce470)
0x46bce450: d8 53 1b c0 57 8b be 10 a0 00 00 25 00 f0 ff ff
0x46bce460: 05 00 20 00 00 50 c1 e2 05 8d 44 24 14 50 8b da
0x46bce470: 8b 17 53 c1 e1 05 51 8b 4a 2c 57 ff d1 33 ff 3b
0x46bce480: c7 0f 8c 8f 00 00 00 8b 56 04 8b 4c 24 10 c1 e2
Register to memory mapping:
EAX=0x46eaf4f4 is pointing into the stack for thread: 0x45c63400
EBX=0x000000c0 is an unknown value
ECX=0x0000007e is an unknown value
EDX=0x000000c0 is an unknown value
ESP=0x46eaf4dc is pointing into the stack for thread: 0x45c63400
EBP=0x00000000 is an unknown value
ESI=0x45cedc90 is an unknown value
EDI=0x00000000 is an unknown value
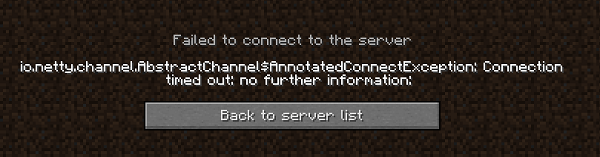
Что за ошибка io.netty.channel?
Обычно данная ошибка возникает в ситуации, когда ПК видит какое-либо устройство по предполагаемому адресу сервера, но не сам сервер Minecraft. Происходит попытка подключения на протяжении выделенного отрезка времени, которая оканчивается неудачей (Connection timed out). После этого ПК прекращает попытки подключения к серверу, а пользователь получает ошибку io.netty.channel.abstractchannel$annotatedconnectexception.
Причины для возникновения дисфункции могут быть следующими:
- Случайный сбой на серверах Майнкрафт;
- Антивирус или брандмауэр блокирует подключение к игровому серверу;
- ПК некорректно работает с серверами DNS;
- Неверно указан игровой порт (необходим порт 25565 в настройках сервера);
- Игровой сервер работает нестабильно;
- Сетевое подключение пользователя перегружено (к примеру, параллельно работает торрент-клиент);
- В игру установлен некорректный мод;
- Наблюдаются проблемы в работе роутера;
- Используется некорректная версия игры.
Давайте разберёмся, как можно исправить ошибку io.netty.channel.abstractchannel$annotatedconnectexception на вашем ПК.
Способ 1. Проверьте работоспособность игрового сервера
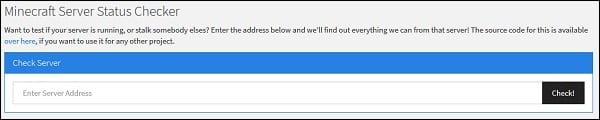
Проверьте работоспособность игрового сервера
Способ 2. Временно отключите антивирус и брандмауэр
Также рекомендуем временно отключить антивирус и брандмауэр на вашем ПК. Их работа по блокировке интернет-подключения становится частой причиной ошибки io.netty.channel.abstractchannel$annotatedconnectexception.
Если ошибка после этого перестанет появляться, создайте исключения в брандмауэре Виндовс для подключения к серверам Minecraft. Пользователям помогло создания соответствующего правила-исключения для файла 1.12.jar и (или) 1.13.jar .
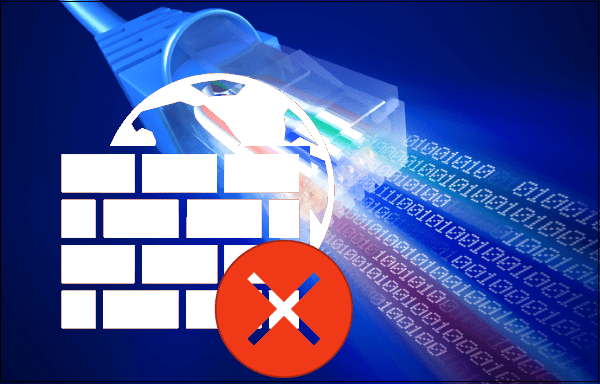
Временно отключите ваш антивирус и файервол
Способ 3. Измените настройки DNS
Запустите командную строку от имени администратора (Win+R – cmd), и в ней наберите:

После этого попробуйте запустить игру. Если это не поможет, тогда будет необходимо изменить настройки серверов ДНС на публичные от Гугл. Выполните следующее:
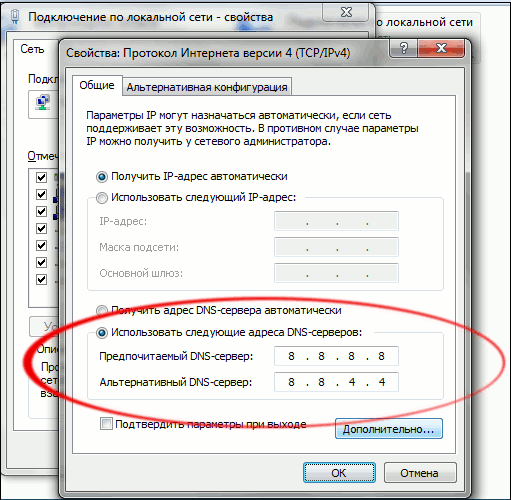
Используйте указанные настройки
Нажмите внизу на ОК, и перезагрузите вашу машину. Попробуйте вновь подключиться к нужному серверу Minecraft.
Способ 4. Перезагрузите ваш роутер
В некоторых случаях некорректная работа пользовательского роутера становилась причиной рассматриваемой дисфункции. Устранить ошибку io.netty.channel.abstractchannel$annotatedconnectexception. Поможет перезагрузка вашего роутера. Попробуйте также использовать альтернативный роутер, и понаблюдайте, поможет ли это решить возникшую проблему.
Способ 5. Используйте статистический IP адрес
Если ваш провайдер предоставляет возможность получения статистических IP адресов, постарайтесь получить такой адрес и используйте его для игр Minecraft.
Скачайте Minecraft с другого источника
В некоторых случаях ваша версия Minecraft может работать нестабильно. Это может быть вызвано установкой дополнительных модов или некорректной версией самой игры. Удалите игру с PC стандартным образом, а затем попробуйте поискать стабильную версию Minecraft на других ресурсах. Установите игру (без модов), и попробуйте подключиться к нужному серверу.
В общем разобрался с этой я проблемой, был конфликтный мод и криво установленный форж. Как только я все наладил появилась необходимость все снести нафиг и поставить ядро caildron так как нужны и плагины и моды.
Сервер без модов запускается на раз и два а вот как только втюхаешь моды то выдает ошибку в конце,
pw.mods.fml.common.launcher.FMLServerTweaker
[00:03:12] [main/INFO]: Using primary tweak class name cpw.mods.fml.common.launcher.FMLServerTweaker
[00:03:12] [main/INFO]: Calling tweak class cpw.mods.fml.common.launcher.FMLServerTweaker
[00:03:12] [main/INFO]: Forge Mod Loader version 7.10.114.1388 for Minecraft 1.7.10 loading
[00:03:13] [main/INFO]: Java is Java HotSpot 64-Bit Server VM, version 1.8.0_121, running on Windows 10:amd64:10.0, installed at C:Program FilesJavajre1.8.0_121
[00:03:13] [main/INFO]: [HOOKLIB] Obfuscated: true
[00:03:13] [main/WARN]: The following coremods do not have a @MCVersion annotation. They may cause problems if this is not the correct version of Minecraft for them.
[00:03:13] [main/WARN]: Missing @MCVersion: mods.battlegear2.coremod.BattlegearLoadingPlugin mixac1.dangerrpg.hook.RPGHookLoader
[00:03:13] [main/INFO]: Loading tweak class name cpw.mods.fml.common.launcher.FMLInjectionAndSortingTweaker
[00:03:13] [main/INFO]: Loading tweak class name cpw.mods.fml.common.launcher.FMLDeobfTweaker
[00:03:13] [main/INFO]: Calling tweak class cpw.mods.fml.common.launcher.FMLInjectionAndSortingTweaker
[00:03:13] [main/INFO]: Calling tweak class cpw.mods.fml.common.launcher.FMLInjectionAndSortingTweaker
[00:03:13] [main/INFO]: Calling tweak class cpw.mods.fml.relauncher.CoreModManager$FMLPluginWrapper
[00:03:15] [main/INFO]: Calling tweak class cpw.mods.fml.relauncher.CoreModManager$FMLPluginWrapper
[00:03:15] [main/INFO]: Calling tweak class cpw.mods.fml.relauncher.CoreModManager$FMLPluginWrapper
[00:03:15] [main/INFO]: [gloomyfolken.hooklib.asm.HookLogger$SystemOutLogger:debug:17]: [DEBUG] Parsing hooks contatiner gloomyfolken.hooklib.minecraft.SecondaryTransformerHook
[00:03:15] [main/INFO]: Calling tweak class cpw.mods.fml.common.launcher.FMLDeobfTweaker
[00:03:16] [main/INFO]: [gloomyfolken.hooklib.asm.HookLogger$SystemOutLogger:debug:17]: [DEBUG] Injecting hooks into class cpw.mods.fml.common.Loader
[00:03:16] [main/INFO]: [gloomyfolken.hooklib.asm.HookLogger$SystemOutLogger:debug:17]: [DEBUG] Successfully injected 1 hook to cpw.mods.fml.common.Loader
[00:03:16] [main/INFO]: [gloomyfolken.hooklib.asm.HookLogger$SystemOutLogger:debug:17]: [DEBUG] Methods dictionary loaded in 4 ms
[00:03:16] [main/INFO]: Calling tweak class cpw.mods.fml.relauncher.CoreModManager$FMLPluginWrapper
[00:03:20] [main/INFO]: Loading tweak class name cpw.mods.fml.common.launcher.TerminalTweaker
[00:03:20] [main/INFO]: Calling tweak class cpw.mods.fml.common.launcher.TerminalTweaker
[00:03:21] [main/INFO]: [gloomyfolken.hooklib.asm.HookLogger$SystemOutLogger:debug:17]: [DEBUG] Injecting hooks into class net.minecraft.entity.player.EntityPlayer
[00:03:21] [main/INFO]: [gloomyfolken.hooklib.asm.HookLogger$SystemOutLogger:debug:17]: [DEBUG] Successfully injected 3 hooks to net.minecraft.entity.player.EntityPlayer
[00:03:21] [main/INFO]: [gloomyfolken.hooklib.asm.HookLogger$SystemOutLogger:warning:22]: [WARNING] Can not found target method of hook AsmHook: net.minecraft.entity.player.EntityPlayer#getItemIcon(Lnet/minecraft/item/ItemStack;I)Lnet/minecraft/util/IIcon; -> mixac1.dangerrpg.hook.HookItemBow#getItemIcon(Lnet/minecraft/entity/player/EntityPlayer;Lnet/minecraft/item/ItemStack;ILnet/minecraft/util/IIcon;)Lnet/minecraft/util/IIcon;, ReturnCondition=ALWAYS, ReturnValue=HOOK_RETURN_VALUE, InjectorFactory: gloomyfolken.hooklib.asm.HookInjectorFactory$MethodExit
[00:03:21] [main/INFO]: M&B — Patching Class EntityPlayer (yz)
[00:03:21] [main/INFO]: Adding new fields to EntityPlayer
[00:03:21] [main/INFO]: Patching constructor in EntityPlayer
[00:03:21] [main/INFO]: Patching method onUpdate in EntityPlayer
[00:03:21] [main/INFO]: Patching method onItemUseFinish in EntityPlayer
[00:03:21] [main/INFO]: Patching method interactWith in EntityPlayer
[00:03:21] [main/INFO]: Patching method setCurrentItemOrArmor in EntityPlayer
[00:03:21] [main/INFO]: Creating new methods in EntityPlayer
[00:03:21] [main/INFO]: M&B — Patching Class EntityPlayer done
[00:03:21] [main/INFO]: [gloomyfolken.hooklib.asm.HookLogger$SystemOutLogger:debug:17]: [DEBUG] Injecting hooks into class net.minecraft.entity.EntityLivingBase
[00:03:21] [main/INFO]: [gloomyfolken.hooklib.asm.HookLogger$SystemOutLogger:debug:17]: [DEBUG] Successfully injected 1 hook to net.minecraft.entity.EntityLivingBase
[00:03:21] [main/INFO]: [gloomyfolken.hooklib.asm.HookLogger$SystemOutLogger:debug:17]: [DEBUG] Injecting hooks into class net.minecraft.entity.Entity
[00:03:21] [main/INFO]: [gloomyfolken.hooklib.asm.HookLogger$SystemOutLogger:debug:17]: [DEBUG] Successfully injected 1 hook to net.minecraft.entity.Entity
[00:03:21] [main/INFO]: Launching wrapped minecraft {net.minecraft.server.MinecraftServer}
[00:03:21] [main/INFO]: [gloomyfolken.hooklib.asm.HookLogger$SystemOutLogger:debug:17]: [DEBUG] Injecting hooks into class net.minecraft.item.Item
[00:03:21] [main/INFO]: [gloomyfolken.hooklib.asm.HookLogger$SystemOutLogger:debug:17]: [DEBUG] Successfully injected 4 hooks to net.minecraft.item.Item
[00:03:22] [main/INFO]: [gloomyfolken.hooklib.asm.HookLogger$SystemOutLogger:debug:17]: [DEBUG] Injecting hooks into class net.minecraft.entity.monster.EntityIronGolem
[00:03:22] [main/INFO]: [gloomyfolken.hooklib.asm.HookLogger$SystemOutLogger:debug:17]: [DEBUG] Successfully injected 1 hook to net.minecraft.entity.monster.EntityIronGolem
[00:03:22] [main/INFO]: [gloomyfolken.hooklib.asm.HookLogger$SystemOutLogger:debug:17]: [DEBUG] Injecting hooks into class net.minecraft.item.ItemBow
[00:03:22] [main/INFO]: [gloomyfolken.hooklib.asm.HookLogger$SystemOutLogger:debug:17]: [DEBUG] Successfully injected 1 hook to net.minecraft.item.ItemBow
[00:03:22] [main/INFO]: [gloomyfolken.hooklib.asm.HookLogger$SystemOutLogger:debug:17]: [DEBUG] Injecting hooks into class net.minecraft.entity.SharedMonsterAttributes
[00:03:22] [main/INFO]: [gloomyfolken.hooklib.asm.HookLogger$SystemOutLogger:debug:17]: [DEBUG] Successfully injected 1 hook to net.minecraft.entity.SharedMonsterAttributes
[00:03:22] [main/INFO]: [gloomyfolken.hooklib.asm.HookLogger$SystemOutLogger:debug:17]: [DEBUG] Injecting hooks into class net.minecraft.item.ItemStack
[00:03:22] [main/INFO]: [gloomyfolken.hooklib.asm.HookLogger$SystemOutLogger:debug:17]: [DEBUG] Successfully injected 2 hooks to net.minecraft.item.ItemStack
[00:03:22] [main/INFO]: M&B — Patching Class ItemStack (add)
[00:03:22] [main/INFO]: M&B — Patching Class ItemStack done
[00:03:23] [main/INFO]: [gloomyfolken.hooklib.asm.HookLogger$SystemOutLogger:debug:17]: [DEBUG] Injecting hooks into class net.minecraft.entity.projectile.EntityLargeFireball
[00:03:23] [main/INFO]: [gloomyfolken.hooklib.asm.HookLogger$SystemOutLogger:debug:17]: [DEBUG] Successfully injected 1 hook to net.minecraft.entity.projectile.EntityLargeFireball
[00:03:23] [main/INFO]: [gloomyfolken.hooklib.asm.HookLogger$SystemOutLogger:debug:17]: [DEBUG] Injecting hooks into class net.minecraft.entity.projectile.EntitySmallFireball
[00:03:23] [main/INFO]: [gloomyfolken.hooklib.asm.HookLogger$SystemOutLogger:debug:17]: [DEBUG] Successfully injected 1 hook to net.minecraft.entity.projectile.EntitySmallFireball
[00:03:23] [main/INFO]: [gloomyfolken.hooklib.asm.HookLogger$SystemOutLogger:debug:17]: [DEBUG] Injecting hooks into class net.minecraft.entity.projectile.EntityWitherSkull
[00:03:23] [main/INFO]: [gloomyfolken.hooklib.asm.HookLogger$SystemOutLogger:debug:17]: [DEBUG] Successfully injected 1 hook to net.minecraft.entity.projectile.EntityWitherSkull
[00:03:23] [main/INFO]: [gloomyfolken.hooklib.asm.HookLogger$SystemOutLogger:debug:17]: [DEBUG] Injecting hooks into class net.minecraft.entity.monster.EntitySkeleton
[00:03:23] [main/INFO]: [gloomyfolken.hooklib.asm.HookLogger$SystemOutLogger:debug:17]: [DEBUG] Successfully injected 1 hook to net.minecraft.entity.monster.EntitySkeleton
[00:03:23] [main/INFO]: [gloomyfolken.hooklib.asm.HookLogger$SystemOutLogger:debug:17]: [DEBUG] Injecting hooks into class net.minecraft.entity.monster.EntitySlime
[00:03:23] [main/INFO]: [gloomyfolken.hooklib.asm.HookLogger$SystemOutLogger:debug:17]: [DEBUG] Successfully injected 1 hook to net.minecraft.entity.monster.EntitySlime
[00:03:23] [main/INFO]: [gloomyfolken.hooklib.asm.HookLogger$SystemOutLogger:debug:17]: [DEBUG] Injecting hooks into class net.minecraft.entity.boss.EntityDragon
[00:03:23] [main/INFO]: [gloomyfolken.hooklib.asm.HookLogger$SystemOutLogger:debug:17]: [DEBUG] Successfully injected 1 hook to net.minecraft.entity.boss.EntityDragon
[00:03:23] [main/INFO]: [gloomyfolken.hooklib.asm.HookLogger$SystemOutLogger:debug:17]: [DEBUG] Injecting hooks into class net.minecraft.entity.passive.EntityWolf
[00:03:23] [main/INFO]: [gloomyfolken.hooklib.asm.HookLogger$SystemOutLogger:debug:17]: [DEBUG] Successfully injected 1 hook to net.minecraft.entity.passive.EntityWolf
[00:03:25] [server thread/INFO]: Starting minecraft server version 1.7.10
[00:03:25] [server thread/INFO]: Attempting early MinecraftForge initialization
[00:03:25] [server thread/INFO]: MinecraftForge v10.13.3.1388 Initialized
[00:03:25] [server thread/INFO]: Replaced 183 ore recipies
[00:03:25] [server thread/INFO]: Preloading CrashReport classes
[00:03:25] [server thread/INFO]: net.minecraft.world.World$1
[00:03:25] [server thread/INFO]: net.minecraft.world.World$2
[00:03:25] [server thread/INFO]: net.minecraft.world.World$3
[00:03:25] [server thread/INFO]: net.minecraft.world.World$4
[00:03:25] [server thread/INFO]: net.minecraft.world.chunk.Chunk$1
[00:03:25] [server thread/INFO]: net.minecraft.crash.CrashReportCategory$1
[00:03:25] [server thread/INFO]: net.minecraft.crash.CrashReportCategory$2
[00:03:25] [server thread/INFO]: net.minecraft.crash.CrashReportCategory$3
[00:03:25] [server thread/INFO]: net.minecraft.entity.Entity$1
[00:03:25] [server thread/INFO]: net.minecraft.entity.Entity$2
[00:03:25] [server thread/INFO]: net.minecraft.entity.EntityTracker$1
[00:03:25] [server thread/INFO]: net.minecraft.world.gen.layer.GenLayer$1
[00:03:25] [server thread/INFO]: net.minecraft.world.gen.layer.GenLayer$2
[00:03:25] [server thread/INFO]: net.minecraft.entity.player.InventoryPlayer$1
[00:03:25] [server thread/INFO]: net.minecraft.world.gen.structure.MapGenStructure$1
[00:03:25] [server thread/INFO]: net.minecraft.world.gen.structure.MapGenStructure$2
[00:03:25] [server thread/INFO]: net.minecraft.world.gen.structure.MapGenStructure$3
[00:03:25] [server thread/INFO]: net.minecraft.server.MinecraftServer$3
[00:03:25] [server thread/INFO]: net.minecraft.server.MinecraftServer$4
[00:03:25] [server thread/INFO]: net.minecraft.server.MinecraftServer$5
[00:03:25] [server thread/INFO]: net.minecraft.nbt.NBTTagCompound$1
[00:03:25] [server thread/INFO]: net.minecraft.nbt.NBTTagCompound$2
[00:03:25] [server thread/INFO]: net.minecraft.network.NetHandlerPlayServer$2
[00:03:25] [server thread/INFO]: net.minecraft.network.NetworkSystem$3
[00:03:25] [server thread/INFO]: net.minecraft.tileentity.TileEntity$1
[00:03:25] [server thread/INFO]: net.minecraft.tileentity.TileEntity$2
[00:03:25] [server thread/INFO]: net.minecraft.tileentity.TileEntity$3
[00:03:25] [server thread/INFO]: net.minecraft.world.storage.WorldInfo$1
[00:03:25] [server thread/INFO]: net.minecraft.world.storage.WorldInfo$2
[00:03:25] [server thread/INFO]: net.minecraft.world.storage.WorldInfo$3
[00:03:25] [server thread/INFO]: net.minecraft.world.storage.WorldInfo$4
[00:03:25] [server thread/INFO]: net.minecraft.world.storage.WorldInfo$5
[00:03:25] [server thread/INFO]: net.minecraft.world.storage.WorldInfo$6
[00:03:25] [server thread/INFO]: net.minecraft.world.storage.WorldInfo$7
[00:03:25] [server thread/INFO]: net.minecraft.world.storage.WorldInfo$8
[00:03:25] [server thread/INFO]: net.minecraft.world.storage.WorldInfo$9
[00:03:25] [server thread/INFO]: net.minecraft.server.dedicated.DedicatedServer$3
[00:03:25] [server thread/INFO]: net.minecraft.server.dedicated.DedicatedServer$4
[00:03:25] [server thread/INFO]: Completed early MinecraftForge initialization
[00:03:26] [server thread/INFO]: Searching C:UsersднсDesktopНовая папка (3)mods for mods
[00:03:27] [server thread/INFO]: Forge Mod Loader has identified 7 mods to load
[00:03:27] [server thread/ERROR]: The mod BiomesOPlenty (Biomes O’ Plenty) requires mod versions [Forge@[10.13.4.1566,)] to be available
[00:03:27] [server thread/ERROR]: Encountered an unexpected exception
cpw.mods.fml.common.MissingModsException:
Missing Mods:
Forge : [10.13.4.1566,)
at cpw.mods.fml.common.Loader.sortModList(Loader.java:244) ~[Loader.class:git-Cauldron-Reloaded-1.7.10-1.1388.1.0]
at cpw.mods.fml.common.Loader.loadMods(Loader.java:472) ~[Loader.class:git-Cauldron-Reloaded-1.7.10-1.1388.1.0]
at cpw.mods.fml.server.FMLServerHandler.beginServerLoading(FMLServerHandler.java:87) ~[FMLServerHandler.class:git-Cauldron-Reloaded-1.7.10-1.1388.1.0]
at cpw.mods.fml.common.FMLCommonHandler.onServerStart(FMLCommonHandler.java:318) ~[FMLCommonHandler.class:git-Cauldron-Reloaded-1.7.10-1.1388.1.0]
at net.minecraft.server.dedicated.DedicatedServer.func_71197_b(DedicatedServer.java:176) ~[lt.class:?]
at net.minecraft.server.MinecraftServer.run(MinecraftServer.java:620) [MinecraftServer.class:?]
at java.lang.Thread.run(Unknown Source) [?:1.8.0_121]
[00:03:27] [server thread/ERROR]: This crash report has been saved to: C:UsersднсDesktopНовая папка (3).crash-reportscrash-2017-03-09_00.03.27-server.txt
[00:03:27] [server thread/WARN]: Can’t revert to frozen GameData state without freezing first.
[00:03:27] [server thread/INFO]: Applying holder lookups
[00:03:27] [server thread/INFO]: Holder lookups applied
[00:03:27] [server thread/INFO]: The state engine was in incorrect state CONSTRUCTING and forced into state SERVER_STOPPED. Errors may have been discarded.
Нигде не могу найти однозначный ответ. В общем ошибка где то в ядре, как только я поставил сервер на форжу, моды работали и с ними можно было играть нормально. Провожу те же манипуляции уже на cauldrone и начинает материть.
Last updated on January 2nd, 2023 at 05:19 pm
Create your universe in Minecraft, a role-playing video game based on Lego. You used to have to construct bricks to protect yourself against vermin, but the game has now expanded to incorporate a number of other chores.
Mojang’s creative sandbox game, Minecraft, has been in development for more than a decade and has an extraordinary collection of unique structures created by dedicated artists and architects.
You may take a trip to many different planets without having to worry about food and lodging costs when you build the best Minecraft large constructions.
This list includes Middle-earth, Tamriel, and Azeroth, yet you’ll still be able to get back home in time for tea.
The RMS Titanic and Europe’s Imperial Summer Palace have yet to be sunk by the ocean if you want to spend your time on Earth.
This is excellent news for fans of the popular sandbox game. You could accommodate yourself by checking out this list of 15 unique games like Minecraft, popular among elementary school youngsters.
Our collection of buildings includes something for everyone, much as our selection of the most fantastic Minecraft seeds and Minecraft skins.
Prepare to be amazed by some of the most beautiful brick-and-mortar combinations to grace Mojang’s pixel-perfect world!
Article Contents
The Internal Exception: java.net.SocketException: Connection Reset problem is a typical issue many people have in Minecraft today. Version 1.7 and later of Minecraft are affected by the same bug.
When this error warning shows on the screen, players are disconnected from the server and desist from playing the game.
The same problem might have a variety of origins, and a variety of remedies are possible. Minecraft Realms and even multiplayer servers are affected by the same problem.
If you are also suffering from the same condition, then you may count on this article to get rid of the issue effortlessly. Let’s take a look.
What does ‘Internal Exception Java.net.socketexception Connection Reset’ mean in Minecraft
Quick Answer: The java. net. SocketException: Connection reset error generally emerges whenever one of the sides in TCP link like client-side is attempting to interpret data, but other sides unexpectedly shut the linkage like it was crashed, ceased or ended.
According to the javadoc for SocketException, a protocol fault, such as a TCP problem, is to blame.
It would seem that the server end of the communication has terminated your connection. This might be a problem with the request you are submitting or a fault at their end.
Players have mentioned that they have been having this problem every time they attempt to log in or join any server on Minecraft.
We can appreciate how aggravating this specific problem might be for all the people out there.
But don’t be alarmed. Whatever the fundamental reason for the ‘internal exception java.net.socketexception connection reset’ problem in Minecraft, we have included all the potential remedies in the segments given below.
Stick until the conclusion of the post to have your difficulties fixed at the earliest.
Probable causes
One or more machines on the connection may send a Reset (RST) packet, which terminates any connections that have already been formed.
The transmitted RST packets may signal that the TCP packets sent are not recognized, a connection between the local and distant computer is broken, or a specific port is closed and is not allowed for communication.
The TCP (Transmission Control Protocol) socket is terminated since the socket got a close order from a distant system.
The other end has purposefully reset the connection. It seldom occurs, and is often improper, for client programs to do this. However, it is not uncommon for commercial software.
Occasionally this may also be due to severe load prompting Server to delay the communication, and before it could read the message, it was timed out at the client end.
Therefore you could also examine server health and log for heavy load creating this problem.
Fix “Internal Exception Java.net.socketexception Connection Reset” in Minecraft
Method 1: Using a Virtual Private Network
One approach to combat the Internal Exception: java.net.SocketException: Connection Reset Issue in Minecraft is utilizing the finest premium VPN services.
Changing your IP address is easy when you use a reputable VPN provider. In addition, consider a VPN that utilizes multiple server addresses.
For specific Minecraft games, speed and graphics clarity could suffer if you don’t access them using a quality VPN service like NordVPN.
Players may attempt to obtain the premium and high-quality VPNs such as NordVPN or Windscribe.
This should provide a solid connection continuously and you should be able to view your titles and enjoy them effortlessly.
The Java Socket Exception issue (connection lost) might arise even though your broadband connection is OK.
Presently, Microsoft is informed of the mistake. Unfortunately, they haven’t given a remedy to it yet. In fact, there isn’t a one-size-fits-all approach since each gadget is distinct.
Therefore, the best way ahead is to attempt each of the ways provided in this article to repair the issue. Free VPNs may cause Minecraft to lag, so keep that in mind.
If you really want better internet speed, you have to subscribe to a premium plan. Paying for a VPN service may entirely eliminate the “internal exception javanet.socketexception connection reset” problem. You’ll have to play Minecraft on a different device in the worst-case situation.
Method 2: Change DNS Server
One of the tricks to resolve the Internal Exception: java.net. SocketException: Connection Reset Issue in Minecraft involves updating the DNS server.
To begin, go to the bottom right corner of your desktop and choose Open Network and Internet options
-
Step 1: Click on the Start button and choose Control Panel.
You might also access the network settings through the control panel if it is convenient for you
In the newly created window, tap on the Network and Sharing Center button from the left pane menu.
-
Step 2: Choose the Properties option
Choose the Properties option for your Network connection in the next box
-
Step 3: Choose the internet protocol version
Within the Properties panel, double click on Internet Protocol Version 4 (TCP/IPv4).
-
Step 4: Then select the radio option beneath the Use the following DNS server addresses.
-
Step 5: Select the recommended DNS Servers
Now select the Recommended DNS server as 8.8.8.8 and the Alternative DNS server as 8.8.4.4
Eventually, check next to the Validate options before the exit check box, save the modifications, and view the outcome.
Restart your computer when you’ve finished, then try connecting to the Minecraft server once again.
Method 3: Uninstall Hamachi
Uninstall Hamachi if it’s already installed. A Reddit user figured out that Hamachi was producing the Java problem in Minecraft. The problem was resolved once they removed Hamachi.
To get rid of Hamachi, follow these steps:
-
Step 1: Go over to the Control Panel, look for Hamachi, and remove it.
-
Step 2: Open the Command Prompt with administrative privileges.
-
Step 3: When prompted, enter “netsh interface tcp show global.”
Check whether “Receive Window Auto-Tuning Level” is deactivated. To activate it, run the type “netsh interface tcp set global autotuninglevel=normal.”
-
Step 4: Lastly, write, “netsh interface tcp set global rss=enabled”.
Specify global autotuninglevel=normal and activate RSS on your network interface using the netsh interface tcp set global command and you’ll be good to go.
Your download speed would be improved as a result of this action.
Method 4: Check Internet Connection:
Often the Java. Error might arise in Minecraft owing to a bad internet connection. In this circumstance, you need to examine your internet connection reliability and Wi-Fi router performance and guarantee everything is right.
If there is any trouble with the Wi-Fi router, then you may change to a cable network or notify your internet service provider.
Method 5: Flush your DNS settings
Poorly configured DNS settings might potentially create connection difficulties while linking to a Minecraft server. Try flushing it to see if it helps your issue.
To begin, press Windows key + R, type cmd, and then press enter to execute it.
Next, use ipconfig /flushdns to reset the DNS type to its default state.
If the above command fails to resolve the issue, try the following commands one at a time on the Command Prompt.
netsh winsock reset
netsh int ip reset
If you detect a problem with your router’s DHCP assignment, execute these instructions to drop your old IP and obtain a fresh one.
ipconfig /release
ipconfig /renew
If this doesn’t succeed, run the following instructions to restore your network stack.
ipconfig/flushdns
nbtstat -R
nbtstat -RR
netsh int ip reset C:\resetlog.txt
netsh winsock reset
- Restart your computer and try again.
Method 6: Decrease Render Distance:
Last but just not least workaround to fix the Internal Exception: java.net.SocketException: Connection Reset Issue in Minecraft is limiting the Render distance. To this end,
-
Step 1: Firstly, start Minecraft, and you have to enter the single-player map.
Then, using the Esc key on your keyboard, pick Options from the drop-down menu.
-
Step 2: And click Video Settings, then Reduce the Render distance to 8 or below.
The Graphics option should be set to Fast and the Smooth lighting option should be disabled.
-
Step 3: At last, reload Minecraft and verify whether the issue is removed or not.
By doing this, Minecraft will be less sluggish and the “internal exception java.net.socketexception connection reset” problem will be addressed.
Method 7: Restore System IP Address:
Several afflicted people mentioned on the Social platform that they eventually escaped from the Internal Exception: java.net.
Using a fresh IP address will fix the Minecraft SocketException: Connection Reset problem. A similar method may be used in your situation as well. To this end,
Open the Command Prompt as Administrator by typing cmd into the search bar on your type.
- Then copy+ paste or type the following command in the Command Prompt window and hit Enter and each commands,
ipconfig/release
ipconfig/flushdns
ipconfig/renew
- Once you perform all these commands, shut the window, reopen Minecraft and run the game to verify improvement.
FAQs
1. What is SocketException connection reset?
This SocketException happens on the server-side when the client terminated the socket connection before the response could be provided via the socket.
By closing the browser window before the response has been retrieved, for example. Connection reset merely indicates that a TCP RST was received.
Follow us on Twitter & like our Facebook page for more post-updates
-
Top 14 Minecraft small island seed
-
Top 9 Flower forest Minecraft seed
-
How to battle in Pixelmon: Minecraft
Abhigyan identifies himself as a tech geek, gaming cognoscenti, and also a connoisseur of music. Unidentified and mysterious phenomena never fail to gather his undivided attention. When not reading about bizarre and perplexing entities across the Universe, he can often be found cheering for his favorite teams in Football.
If you have been getting the “Internal Exception java.io.ioexception” error while trying to connect to a Minecraft server, you have come to the right place. In this article, we have gathered and listed all the solutions and fixes that you can implement to completely fix this issue. Therefore, make sure to follow the steps listed below carefully and stop only when a solution works for you.

Before You Start:
The initial troubleshooting steps towards resolving this error include simply restarting your computer and Minecraft both. Close the game and then shut down your PC as well as you do normally. After a while “Restart” your machine and then again launch the game. Hopefully, this simple “Restart” trick will get you out of the problem easily. If you do not succeed in it, then try implementing some advanced solutions listed below.
How to fix internal exception java.io.ioexception operation timed out error:
Solution 1: Power Cycle Your Router
Simply unplug the “Power Cable” from your router and let it turn OFF completely. Leave it unplugged for a few minutes and then plug it back in and “Restart” your router. This will potentially fix any internet issues, now start playing the game again and see if the error occurs again or not.
Solution 2: Enable Java Native Sandbox
Enabling the Java Native Sandbox will let you start all of the Java applications including Minecraft in a restricted environment which will bypass any sort of issues you might be encountering prior to enabling this option. In order to enable it, proceed with the below-mentioned steps:
- Press the “Window + R” keys together to open up the Run prompt, here type “Control Panel” in the dialog box, and hit the “Enter” button.

Open Control panel - In the Control Panel window proceed to click on the “Java” option.
- The Java Control Panel will appear up now, here proceed to the “Advanced” tab from the top and scroll down to locate the option of “Advanced Security Settings” and click on it.
- Now locate the option of “Enable the Operating Systems Restricted Environment (Native Sandbox)” and make sure it is check marked. Next, hit the “Apply” button and click “OK”.

Enable the system’s restricted environment - Finally, “Restart” your computer to let the changes have their effect and then see if the internal exception java.io.ioexception Minecraft realms error got resolved.


Solution 3: Switch DNS To Google DNS
- In the search bar near the Start menu type in “Control Panel” and hit the “Enter” key.
Open Control panel - In the pop-up window click on “Network & Internet > Network & Sharing Center > Change Adapter Settings” options respectively.
- In the following window right-click on the specific network connection you want to configure for “Google Public DNS” and select “Properties” from the context menu.
- After moving on to the next window, double-click on “Internet Protocol Version 4 (TCP/IPv4)” and next select the option of “Use the Following DNS Server Addresses”.

Use the following DNS server addresses - Now enter “8.8.8.8” and “8.8.4.4” in the Preferred DNS Server and Alternate DNS Server boxes respectively.
- After entering the above Google Public DNS Addresses (IPv4) “Restart” your PC and see if the error got removed.
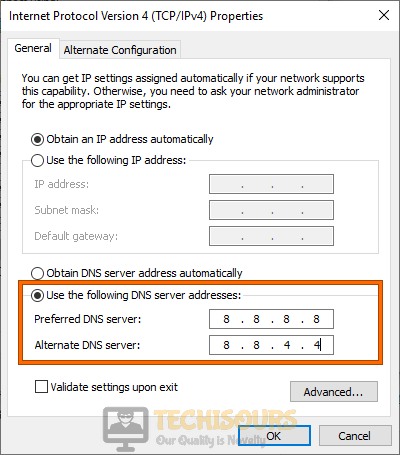
Solution 4: Update the Minecraft Launcher
This error might occur if the Minecraft launcher of your system is outdated which in turn can cause several compatibility issues between the server and the launcher. In order to remove this you need to update the Minecraft launcher to the latest version available, to do so follow the steps below:
- On your system open Minecraft Launcher and in front of the Username click on “Options”.
- Then click on the “Force Update” button and select “Done”.

Clicking on Force Update Option - Once updated, relaunch the Minecraft launcher and see if the internal exception java.io.ioexception error persists or not.

Solution 5: Flush the DNS Cache
If the DNS cache of your system gets corrupted it may also lead to the occurrence of this error, in such a case you need to try clearing out the DNS cache of your system. Follow the steps below in order to do so
- In the search bar near the Start menu type in “Command Prompt” and from the pop-up results right-click on it to select the “Run As Administrator” option.

Run command Prompt - In the Command Prompt window execute the following commands one by one:
ipconfig / flushdns

ipconfig / release

ipconfig / renew
- Once done close the Command Prompt window and see if the error exists or not.

Solution 6: Disable Server Resource Pack
Although using the resource pack the player can customize a lot many settings including music, textures, models, etc but it can also cause hindrance in the client-server communication thus giving rise to this error. Therefore, try disabling this option and then see if it resolves the problem. Proceed as below:
- Open your PC and launch “Minecraft Launcher”.
- Then select “MultiPlayer”, next click on the “Problematic Server” and after that hit the “Edit” button.
- Further click on the “Server Resource Packs” option in order to set them to “Disabled”. Then click on “Done” and check if the error gets rectified now.

Choose Server Resource Packs Option

Solution 7: Remove Any Conflicting Application
If your PC encounters any such application which is causing hindrance to the proper functioning of Minecraft this error may also appear. In such a case try uninstalling the conflicting app from your system. Initially, you may Clean Boot your PC in order to check out the problematic application and then proceed to uninstall it. In this particular case many users reported that Hamachi VPN was the one out there causing all of the trouble so here we will show you how to uninstall it:
- In the search bar near the Start menu type in “Settings” and press the “Enter” button.
- From the Settings window, locate the “Apps” option and click to select it.
- In the Apps & Features window find “LogMeIn Hamachi” and click to expand it.
- Next press the “Uninstall” button and follow the on-screen instructions to uninstall the app completely.

Uninstall Hamachi VPN - Afterwards “Restart” your PC and see if the problem got settled.

Solution 8: Reinstall Minecraft And Java
The problem can also arise due to the corrupt installation of Minecraft, in which case reinstallation of it will be the only solution. In order to repair/reinstall Minecraft proceed with the steps below:
- In the search bar near the Start menu type in “Control Panel” and press “Enter”.

Open Control Panel - Now click on the “Programs > Programs and Features” option respectively.
- In the following window go through the list of programs to find “Minecraft” and click on it.
- Then select “Repair” and follow the on-screen instructions to repair Minecraft.

Repair Minecraft Launcher - Restart your PC now and see if the error got removed and if the problem persists then try uninstalling both i.e. “Minecraft” and “Java”.
- Then Restart your PC finally and upon restart press the “Window + R” keys together to open up the Run prompt.
- Here enter “AppData” in the dialog box and in the pop-up window open each of the folders i.e. “Local”, “LocalLow” and “Roaming” and delete all of the Minecraft folders in them one by one.
- Once completed download the latest available version of both Java and Minecraft.
- Then install Java as an “Administrator” and afterward “Reboot” your PC.
- Upon Reboot again install Minecraft as an “Administrator” and later Restart your computer.
- Finally, proceed to see if the internal exception java.io.ioexception connection reset by peer Minecraft error got settled now.


Solution 9: Reduce the Render Distance In Minecraft
Decreasing the render distance in Minecraft might also help solve this error because if Minecraft isn’t able to render all of the video blocks due to some sort of network connection issues this error might pop up and in such a case cutting down the render distance can help fix problems. Follow the below-mentioned procedure in order to do so:
- Launch Minecraft on your desktop PC and open the “Options” window.
- Then select “Video Settings” from the menu and slide the “Render Distance” to the lowest possible value.

Decrease Render Distance - If it helps you remove the error then you can also increase the render distance to your desired value afterwards.

Solution 10: Update Java To Latest Version
- In the search bar near the Start menu type in “Control Panel” and press the “Enter” button.
- Look for the “Java” in the control panel window and click on it. Afterwards, proceed to the “Update” tab and click on the “Update Now” button.

Update Java - If an update is available “Apply” it and then see if the error gets resolved.

Solution 11: Edit the Java Path
- Press the “Window + R” keys simultaneously to open up the Run dialogue box.
- Here type in the following command in the dialogue box and press the “Enter” button:
\Program Files (x86)\
- In the pop-up Program Files window move to the “Java” folder and then head towards the latest version of Java installation folder.
- Next, open up the “Bin” folder and copy its address from the address bar.
- Now launch Minecraft and select the “Edit Profile” option.
- Then checkmark the option of “Executable” under Java Settings (Advanced) and afterwards paste that copied address in the dialogue box in front of it. The path should somewhat look like this:
C:\ Program Files (x86)\ Java\ jrel.8.0_291\bin\javaw.exe
- Lastly, apply the changes made and then see if the error persists or not.
Solution 12: Disable Firewall Temporarily
Sometimes this error may also occur if Windows Defender Firewall blocks access to a resource pack essential for the operation of Minecraft. In this scenario, the first thing you need to do is disable the Firewall temporarily. If it works you can skip a couple of next solutions otherwise move on to trying them as well in order to resolve the Firewall related issues. Proceed with the steps mentioned below to disable Windows Firewall temporarily on your system:
- Press the “Window + R” keys together to open up the Run prompt, here type “Control Panel” in the dialogue box, and hit the “Enter” button.
Open Control panel - Then alter the selection of View By located on the top-right of the screen to “Large Icons” and next select the “Windows Defender Firewall” option.
- In the following window select the “Turn Windows Defender Firewall On Or Off” option from the left menu.

Clicking on the “Turn Windows Defender Firewall On or OFF” option - Next in the Customize Settings window checkmark the box in front of “Turn Off Windows Defender Firewall” for both Private and Public Network Settings.
- Lastly hit the “OK” button, close the window and then check if the error got removed. If not, then move on to try the next solutions indexed below.

Solution 13: Tweak Java Platform SE Settings In Firewall
- Press the “Window + R” keys together to open up the Run prompt, here type “Control Panel” in the dialogue box, and hit the “Enter” button.
Open Control panel - Then alter the selection of View By located on the top-right of the screen to “Large Icons” and next select “Windows Defender Firewall”.
- In the pop-up window select “Allow An App Or Feature Through Windows Defender Firewall” from the menu at the left.

Allow an app or feature through Windows Defender Firewall - In the following window click on “Change Settings” and from the list of apps and features locate “Java ™ Platform SE Binary”. If you are unable to find it from the list click on “Allow Another App” at the bottom and then enter the “Installation Directory” of Java (usually it’s the Java directory of Program Files and Program Files (x86) folders), now double-click on “Java.exe”.
- In the next step, you need to uncheck the box of “Public” and checkmark the option of “Private” for all the Java ™ SE-related binary processes.
- Next, click on Java ™ SE Binary and hit the “Details” button. Afterwards, open the “Network Type” and tick mark the option of “Private”.
- Apply all the changes made and “Restart” your PC.
- Finally, check to see if the internal exception java.io.ioexception operation timed out problem got resolved.
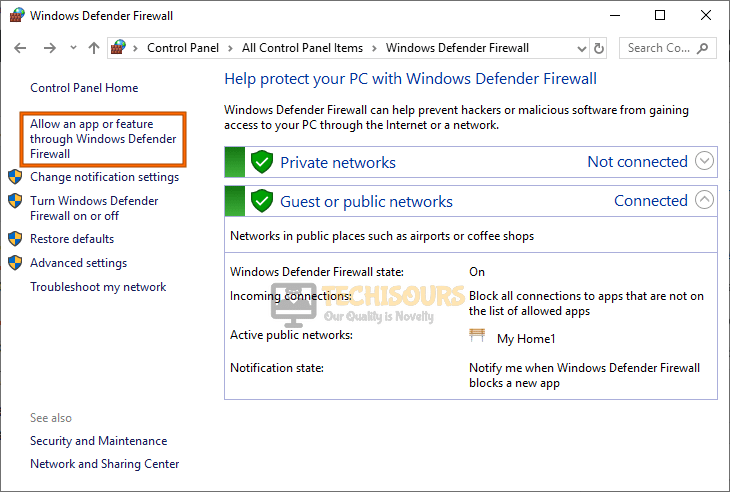
Solution 14: Bypass Minecraft Through Firewall
- In the search bar near the Start menu type in “Windows Defender Firewall With Advanced Security” and press the “Enter” button.

Typing Windows Defender Firewall With Advanced Security - Now select the option of “Inbound Rules” and “Outbound Rules” respectively, here find “Minecraft” from the list, double-click on it, and in the Services Properties window check to see if “Block the Connection” isn’t enabled for Minecraft.
- Again select Inbound Rules and select “New Rule” under Actions from the left.

Clicking on the “New Rule” option - In the New Inbound Rule Wizard select “Program” and hit the “Next” button.
- Now click on “Browse” and proceed to the “Installation Directory” of Minecraft.
- Here select “Minecraft.exe” and click on the “Allow the Connection” button.
- Click on “Next” and choose all three profiles i.e. “Public”, “Private”, and “Domain”.
- Next set the “Name” of the rule and click on the “Finish” button.
- Now repeat the steps “3 to 8” for “Outbound Rules” as well and afterwards “Restart” your PC.


Solution 15: Disable NAT Acceleration In Your Router
- On your PC open up the “Web Browser” and launch your “Router’s Control Page”.
- Then select “LAN” from the left menu and proceed to the “Switch Control” tab.
- Here disable “Hardware Acceleration” and if it does not show up you can look for it with different names such as “CTF (Cut Through Forwarding)” and “FA (Flow Accelerator)”.
- Apply the changes made, close the window and see if the problem got solved.
Solution 16: Try Using An Alternate Network
You can also try using another network to see if that helps, for this, you first need to disconnect from the current network and then reconnect to a new network. You can opt from among the various choices such as “Ethernet”, “LAN”, “Mobile Hotspot” etc. If all of these do not work then you can also consider using a “VPN” instead.
Solution 17: Run A Traceroute
If the above methods didn’t help you much you can try running a traceroute on your system which will help you troubleshoot the cause of the error. It works by tracking your connection straight through your system to Aternos (a remote server) and displays output in the form of useful information depicting the errors in that particular connection. This troubleshooting data will later help you identify the root cause of the problem thus making the error resolution easier.
Solution 18: Use A Different Launcher
There is a greater possibility that the game launcher you are using is a pretty old version of Java even if you have had installed the latest version of Java on your PC. Therefore this error might pop up due to the Java bug itself and not because of Minecraft. In this case, you need to use some different launchers whether it be a “.jar Minecraft launcher” or you forcibly configure the game launcher to use the latest version of Java installed on your system. For the latter option go to your Java settings and in the game launcher options alter the password of the older version of Java to the new version available with you.
WorkAround:
If none of the above-indexed solutions works for you then you can try implementing some of the other remedies listed below:
- Check to see if “Parental Controls” are not the ones blocking the Minecraft access.
- Try allowing the Minecraft connection through “Router’s Firewall”.
- Try allocating more “RAM” for Minecraft as it may also be helpful in solving the error.
- Perform a “Factory Reset” of your system, also try getting your system checked for any sort of “Hardware Error”.
- Also, verify if the “Ports” are forwarded properly in the system/router Firewall as needed for Minecraft.
- Check up with the server admin to either delete your “Player Data” or check for any “Server-Side” issues.
- Check if this fixes the internal exception java.io.ioexception issue on your computer.
Hopefully, by following the list of detailed fixes mentioned above you’d get through the error easily but in case you have any more queries regarding it feel free to reach us out here.