Иногда, сразу после установки Hamachi запустить программу не представляется возможным, на экране возникает ошибка «Не удалось загрузить конфигурацию Hamachi. Сейчас приложение закроется» и программа, как и обещала, закрывается.

Данная ошибка возникает чаще всего из-за того, что на компьютере ранее уже была установлена Хамачи и ее настройки остались прописаны в системе. Новая версия программы не смогла их затереть, возник конфликт конфигураций старой и новой версии.
Решение
Решение проблемы простое, как и все в этом мире. Полностью удалите Hamachi со всеми настройкам и записями в реестре (Инструкция по полному удалению). Перезагрузите компьютер, скачайте новую версию программы (с нашего сайта, к примеру) и заново установите.
Проблема с конфигурацией после этого должна пропасть.

Если в процессе запуска Hamachi перед вами предстанет сообщение вида «Статус службы (Service status): Остановлена (Stopped)», это означает отключение службы Logmein Hamachi Tunneling Engine по той или иной причине. Для этого потребуется последующий запуск.
Этап 1
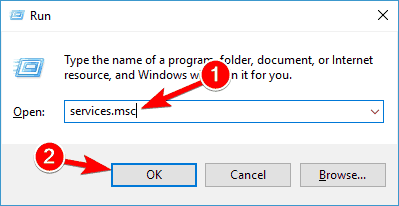
Вам потребуется открыть службы Windows. Для этого следует нажать комбинацию клавиш «Win + R». Перед вами появится окно, в котором следует вести «services.msc», после чего нажать «Enter».
Этап 2
Далее выберите из списка служб «Logmein Hamachi Tunneling Engine» посредством мышки, после чего перейдите по ссылке «Запустить».
Этап 3
Для того чтобы в будущем в момент отключения происходил перезапуск службы, следует открыть её свойства, а затем выбрать на вкладке «Восстановление» функции перезагрузки для первого и второго сбора, согласно скриншоту.
Этап 4
После того, как вы перезагрузите Hamachi, всё должно заработать как надо.
by Ivan Jenic
Passionate about all elements related to Windows and combined with his innate curiosity, Ivan has delved deep into understanding this operating system, with a specialization in drivers and… read more
Updated on
- If you’re a gamer, you probably use Hamachi to create a virtual LAN network and play with your friends. If it isn’t working, red our article below on how to fix it.
- Hamachi is a popular service so check our other articles about it and you might find usefull information or solutions to your problem.
- These days, the need for privacy started a real demand for VPN solutions. If you have more problems with it please visit our Fix VPN section.
- For other Windows 10 errors check out our Windows 10 errors hub.

Hamachi is a well-known virtual private network application, and it’s used for a variety of things.
For example, gamers often use Hamachi in order to create a virtual LAN network to play with their friends.
With Windows 10 release some users are complaining that Hamachi isn’t working, so let’s try to fix that.
Hamachi is a popular service, but sometimes issues with it can occur. Speaking of issues, in this article we’re going to cover the following topics:
- Hamachi network adapter error Windows 10 – This is a relatively common error with Hamachi, and it’s most likely caused by your driver. To fix it, you need to update or reinstall your Hamachi driver.
- Hamachi tunnel problem yellow triangle – Another common problem with Hamachi. To fix this issue, you might have to restart Hamachi or your PC and check if that fixes the problem.
- Hamachi service stopped – If you’re having this problem, you can easily fix it by manually starting the Hamachi service.
- Hamachi won’t connect, open – Many users reported that Hamachi won’t open or connect on their PC. This can be a problem, but you might be able to fix it simply by reinstalling Hamachi.
- Hamachi gateway not working – This is one of more serious Hamachi errors that you can encounter. However, you should be able to fix it by using one of our solutions.
Before we start trying to fix this issue make sure that you’ve downloaded the latest version of Hamachi.
If you’ve installed the latest version of Hamachi and the problem persists, uninstall it and try one of these solutions.
What can I do if Hamachi does not work in Windows 10?
Solution 1 – Disable Microsoft Network Adapter Multiplexor Protocol
According to users, Microsoft Network Adapter Multiplexor Protocol can often interfere with Hamachi.
In fact, this protocol can prevent Hamachi from working properly, but you can fix that by doing the following:
- In Control Panel go to Network Connections.
- Delete the Network Bridge.
- Find Local Area Connection and right-click it.
- Make sure that all items are checked except Microsoft Network Adapter Multiplexor Protocol.
- Restart your computer and install the latest version of Hamachi.
After doing that, check if the issue still appears.
If you have any Local Area Connection adapter driver errors, be sure to check out this detailed guide.
Solution 2 – Turn on LogMeIn Hamachi Tunneling Engine service
Hamachi requires certain services to be running in order to work properly. Sometimes these services can become disabled on your PC, but you can enable them with ease.
Make sure that you have the latest version of Hamachi installed before trying the following steps:
- Press Windows Key + R and type services.msc and press Enter to run it.

- In the Services window locate LogMeIn Hamachi Tunneling Engine. Double click the service to open its properties.
- Now in the Service Status click Start to start the service.

- Click Apply then OK to save changes.
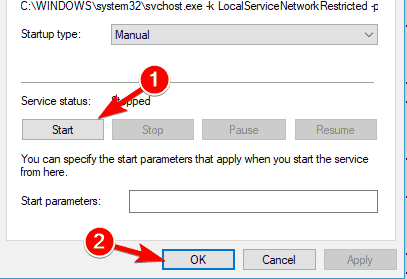
If the service is already running, stop it, wait for a couple of seconds and start it again. After restarting the service, the issue should be resolved completely.
Most users don’t know what to do when the Windows key stops working. Check out this guide and be a step ahead.
Solution 3 – Run Hamachi as administrator
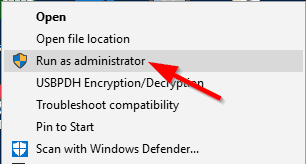
This is a pretty simple solution, but according to some users, it works. To run Hamachi as an administrator just do the following:
- Find Hamachi shortcut. Make sure that Hamachi isn’t running in the background.
- Right click it and choose Run as administrator.

If this method works, you might want to set Hamachi to always run with administrative privileges. To do that, follow these steps:
- Right click the Hamachi icon and choose Properties from the menu.

- Navigate to Compatibility tab. Check Run this program as an administrator and click on Apply and OK to save changes.

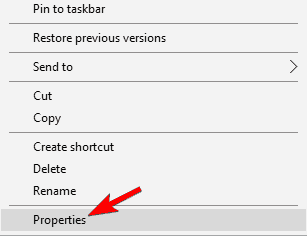
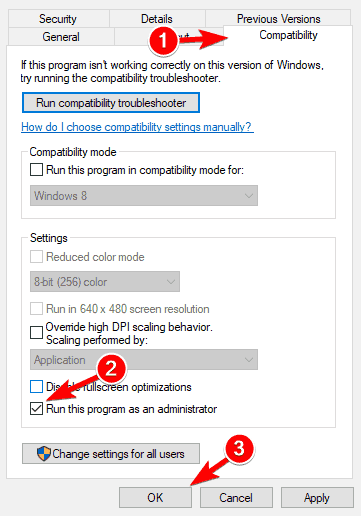
After doing that, Hamachi will always start with administrative privileges and your problem should be resolved.
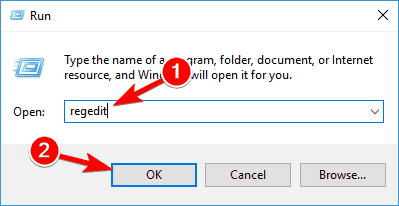
Solution 4 – Delete Hamachi registry entries and reinstall the application
First, you need to uninstall Hamachi from your computer. After doing that, you need to remove all Hamachi-related entries from your registry. To do that, follow these steps:
- Now you need to press Windows Key + R and type regedit to run Registry Editor.
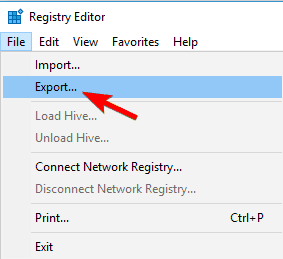
- Once the Registry Editor starts, it’s wise to create a backup of your registry just in case something goes wrong.
- Click File > Export and set the location where you wish to export your registry.

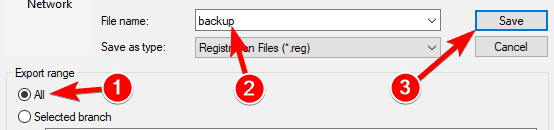
- In the Export range make sure you select All. Now click Save to export your registry. If something goes wrong you can just click this file and restore the registry to its current state.

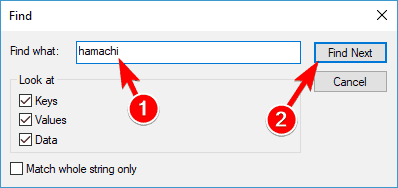
- Press Ctrl + F and type hamachi into the search field.

- Delete any keys that you find.
- Press F3 to search for the next Hamachi key.
- Repeat this until you’ve deleted all the Hamachi keys.
- After all the keys have been deleted, install the latest version of Hamachi.
If you can’t edit your Windows 10’s registry, read this handy guide and find the quickest solutions to the issue.
Solution 5 – Restart your PC
If you’re having problems with Hamachi, you might be able to solve them simply by restarting your PC. According to users, sometimes a simple restart can fix the problem, so be sure to try that.
We have to mention that restarting your PC might provide just a temporary solution, but if you’re looking for a quick fix, be sure to try it out.
If your PC gets stuck on restart, take a look at this step-by-step guide to get past the problem.
Solution 6 – Update Hamachi drivers
Hamachi comes with its own drivers, and if you’re having any problems with it, that might be because its drivers are out of date. However, you might be able to fix this problem simply by updating the necessary drivers. To do that, just follow these simple steps:
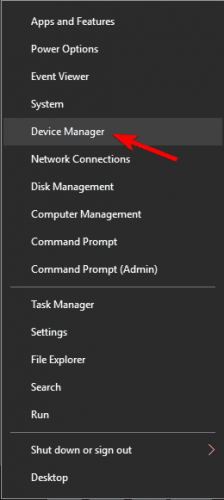
- Press Windows Key + X to open Win + X menu. Now select Device Manager from the list.

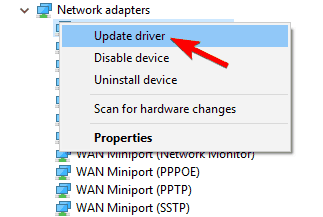
- Go to Network adapters section and right click your Hamachi adapter. Choose Update driver from the menu.

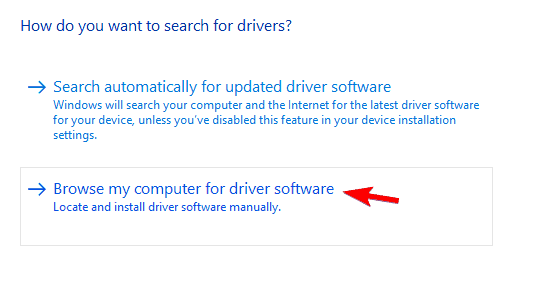
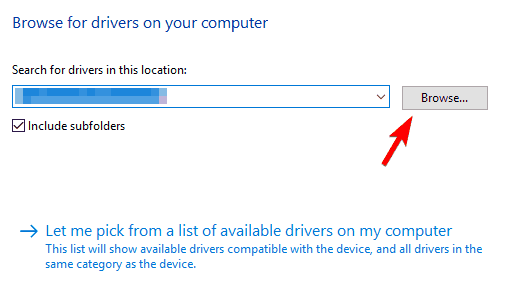
- Click on Browse my computer for driver software.

- Click on Browse button and choose your Hamachi installation directory. Once you select the desired directory, click on Next to continue.

Now Windows will try to install the driver. Once the driver is installed, check if the problem still persists.
Solution 7 – Install Hamachi as legacy hardware
If you have problems with Hamachi and its drivers, you might be able to fix the problem by installing Hamachi as legacy hardware.
Before we can install Hamachi as legacy hardware, we need to remove its driver by doing the following:
- Open Device Manager.
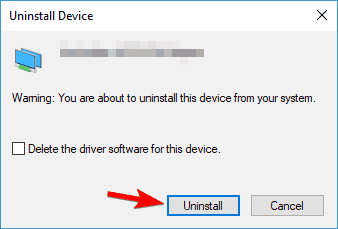
- Once Device Manager opens, locate your Hamachi Network Adapter, right-click it and choose Uninstall device from the menu.
- When the confirmation dialog appears, just click on Uninstall.

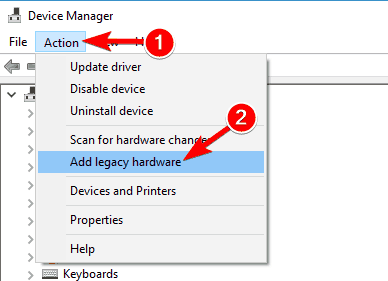
Once the driver is removed, we can add Hamachi as legacy hardware by doing the following:
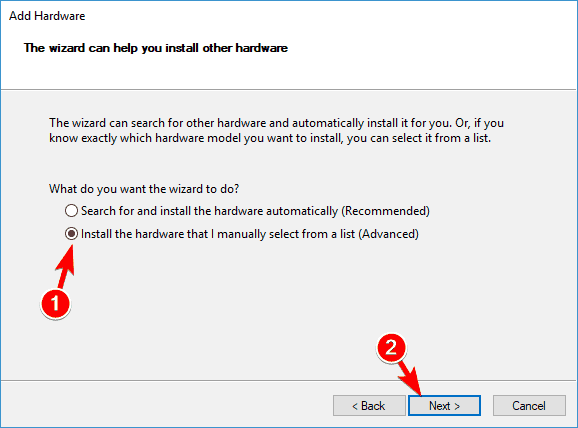
- Go to Action menu and choose Add legacy hardware.

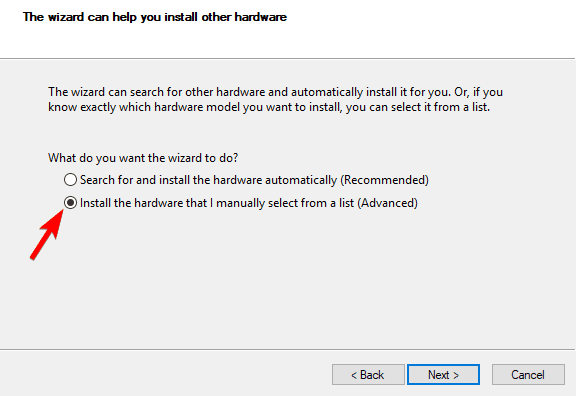
- When the Add Hardware wizard opens, click on Next.

- Select Install the hardware that I manually select from a list (Advanced) and click on Next.

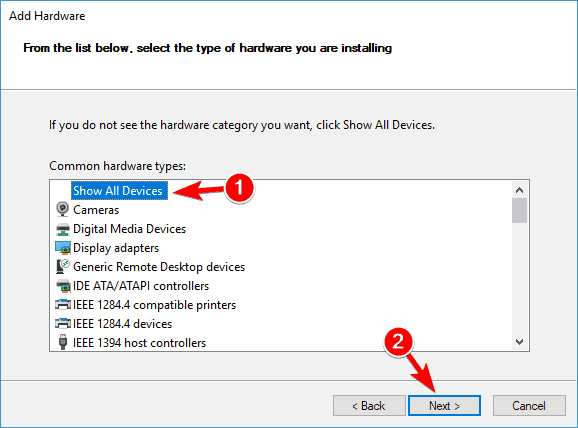
- Select Show All Devices and click Next.
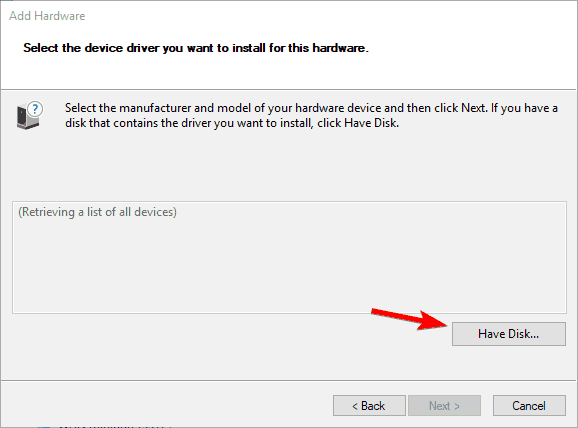
- Now click on Have Disk.
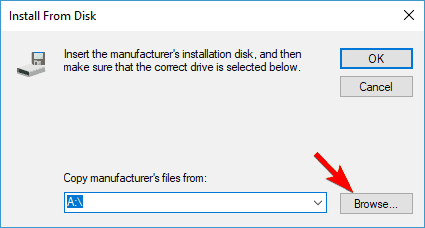
- Click the Browse button, locate Hamachi installation directory and select the Hamachi driver.

- Now just follow the instructions on the screen to install the driver.
Once the driver is installed, the problems with Hamachi should be fixed.
Solution 8 – Uninstall conflicting software
Several users reported that they were unable to run Hamachi on their PC due to their VPN client.
Hamachi is a network tool, so it’s not uncommon for other network applications, such as VPN, to have issues with it.
Users reported that uninstalling their VPN fixed the problem, so you might want to try that.
According to users, the issue was caused by the Dell VPN client, but after removing it, the problem was completely resolved.
After removing your VPN, the problem should be resolved and Hamachi will start working again. However, if you need a new VPN, you might want to switch to a different VPN software that will enhance security without sacrificing performance.
If you need more alternatives to completely remove Hamachi from your PC, be sure to check out this amazing list with the best uninstaller software you can use right now.
I hope at least one of these solutions helped you to solve the problem with Hamachi in Windows 10. If you have any questions or comments, just reach to the comments section below.
![]()
Программа Hamachi, несмотря на свой возраст, до сих поря является одной из самых распространенных утилит для создания виртуальных локальных сетей и не только. Однако, как и любой софт, она требует, чтобы система подходила под ее требования. Это касается не только аппаратной составляющей, но и настроек операционной системы. Часто пользователи сталкиваются с тем, что программа не запускается, а вместо этого открывается окно с самодиагностикой Hamachi. В этой статье показаны возможные причины и способы решения этой проблемы.

Многие, кто встречается с этим окошком, ругают его за бесполезность, проводя аналогию с средством устранения неполадок на Виндовс 10. Но стоит понимать, что самодиагностика Хамачи и не должна решать никаких проблем. Средство лишь помогает понять, что стало причиной ошибки и почему программа не хочет стартовать. И уже исходя из этого нужно предпринимать те или иные действия по ее устранению.
Причины появления ошибки и способы устранения
Причин может быть множество, начиная с неактивности нужной для работы Хамачи службы и заканчивая вирусами, которые мешают ее работе. Ниже рассмотрены основные варианты проблемы и способы борьбы с ними.
Отключена необходимая служба
Этот вариант встречается чаще всего и, как правило, окно диагностики сразу об этом оповещает. Если в центральном столбце есть текст: «Статус службы: Остановлена», то проблема точно в этом. Для ее решения достаточно просто запустить службу Hamachi:
- Нажать комбинацию клавиш Win + R. Win – это кнопка со значком Windows.
- Ввести «services.msc» в открывшемся окошке. Нажать Enter.
- В новом окне в столбце «Имя» нужно найти «LogMeIn Hamachi Tunneling Engine» – именно эта служба отвечает за работу утилиты. Стоит проверить, что указано в столбце «Состояние». Если там ничего нет, то переходим к следующему шагу.
- Запустить службу. Для этого кликнуть по ней правой кнопкой мыши и выбрать соответствующую опцию в контекстном меню.
Осталось только дождаться запуска службы и попробовать снова включить Хамачи.
Если проблема не исчезла или на 3-м шаге обнаружилось, что служба актина, то переходим к следующим способам.
Восстановление службы
Этот метод может помочь, если в службе случился какой-то сбой и она работает некорректно. В таком случае может помочь настройка перезапуска службы:
- Повторить первые 3 шага из предыдущей инструкции.
- Двойным кликом по названия открыть свойства.
- Перейти во вкладку «Восстановление».
- В первых трех опциях установить значение «Перезапуск службы». Следующим двум пунктам дать значения 0 и 1 соответственно.
- В нижнем правом углу кликнуть «Применить» и закрыть окно.
Теперь служба будет перезагружаться самостоятельно, что может решить проблему еще до вызова окна диагностики при запуске. Впрочем, если сбой вызван не самой службой, то вряд ли способ поможет исправить проблему.
Полная переустановка
Если ни один из способов выше не помог убрать окно самодиагностики, то стоит сделать полное удаление утилиты с чисткой данных из реестра. Процесс удаления выглядит следующим образом:
- Щелкнуть левой кнопкой мыши по кнопке «Пуск» в нижнем левом углу рабочего стола.
- Выбрать строку «Приложения и возможности». Обычно она самая первая.
- В открывшемся окне вписать в строку поиска «hamachi».
- Щелкнуть по найденном утилите один раз, а затем кликнуть клавишу «Удалить».
Теперь достаточно следовать инструкции матера удаления или же Windows сделает все автоматически.
Далее стоит очистить реестр от остаточных записей:
- Нажать комбинацию клавиш Win + R.
- Ввести «regedit» и кликнуть «Ок».
- Согласиться, если выскочит запрос на разрешение изменения настроек устройства.
- Щелкнуть комбинацию клавиш Ctrl + F. Откроется небольшое окошко поиска.
- В нем ввести «hamachi». Кликнуть «Найти далее».
- Удалить все записи, содержащие название софта.
Перед началом работы с реестром рекомендуется сделать резервную копию на случай, если что-то пойдет не так. Или хотя бы сохранить важные файлы на внешний носитель.
Все инструкции приведены для Windows 10 и в других версиях ОС действия могут отличаться.
После чистки реестра нужно скачать с официального сайта последнюю версию Хамачи и установить ее.
Как видно, избавиться от проблемы с самодиагностикой Hamachi не так сложно, как кажется. Главное – не забывать про резервные копии, если дело дойдет до чистки реестра, и следовать пошагово всем инструкциям.
 Как убрать самодиагностику хамачи? – Легко
Порой, установив клиент на персональный компьютер, пользователи не могут его запустить, поскольку на экране высвечивается ошибка следующего содержания – не удалось загрузить конфигурацию Hamachi. После этого программное обеспечение самопроизвольно закрывается и так происходит при каждой попытке его включить.

Решение проблемы
- Открываем панель управления через меню «Пуск».
- Выбираем «Удаление программ».
- Здесь мы видим все утилиты, установленные на ПК. Среди них необходимо найти нашу программу.
- Выделяем её и нажимаем «Удалить».
- Запустится процесс деинсталляции приложения, перед началом которого необходимо отметить пункт – Удалить все настройки пользователя.
- Также для надёжности почистите реестр, чтобы уничтожить любые следы софта.
- После этого вам нужно скачать самую наиболее актуальную версию Hamachi бесплатно и выполнить её установку.
Подобная ошибка появляется, когда вы хотите инсталлировать новую версию утилиты, но в системе ещё остались некоторые файлы и настройки прошлой программы, мешающие нормальному функционированию софта.