by Milan Stanojevic
Milan has been enthusiastic about technology ever since his childhood days, and this led him to take interest in all PC-related technologies. He’s a PC enthusiast and he… read more
Updated on
- Hamachi is a pretty good VPN but the various errors with this app can cause many PC problems.
- The elements causing these errors vary from antivirus settings to drivers or Windows Firewall.
- All you need to know about virtual private networks is in our VPN section.
- Our Tech Troubleshooting Hub can transform you into a computer wiz so take a look.

Hamachi is a useful tool, but many users reported various errors with this app on their PC. These errors can cause various problems, and in today’s article, we’ll show you how to fix them.
Hamachi errors can cause many issues on your PC. Here are some common issues that users reported:
- Hamachi network adapter error – Can occur if the necessary virtual network driver isn’t installed. Update the adapter driver.
- Hamachi VPN error Windows 10 – Can be caused by other VPN applications. You can fix the issue simply by removing the other VPN from your PC.
- Hamachi tunnel problem Windows 10, yellow triangle – Can occur if the necessary services aren’t running. Open the Services window and restart the required services.
- Hamachi error this network does not exist, failed to connect to network adapter – The issue is most likely your firewall, so be sure to check its configuration and make sure that Hamachi is allowed to go through it.
- Hamachi error 2503, 52, 1068, 2755, code 2502 – These errors can appear due to various reasons, but you should be able to fix them using one of our solutions.
How do I fix Hamachi errors on Windows 10?
- Check your antivirus
- Update the drivers automatically
- Make sure that Hamachi service is running
- Remove problematic applications
- Reinstall Hamachi
- Install the driver manually while Hamachi is installing
- Use a different installer
- Try using an older version of Hamachi
- Disable Windows Firewall
1. Check your antivirus
According to users, the cause for Hamachi errors can be your antivirus. Sometimes your antivirus can block the VPN, so be sure to check its settings and make sure that Hamachi is allowed to run.
If this isn’t the issue, you might want to try disabling certain features or disable your antivirus altogether.
In case the problem is still there, your last option would be to remove your antivirus completely from your PC.
Even if you remove your antivirus, your PC will remain protected by Windows Defender, so there’s no need to worry about your safety.
If removing the antivirus solves your problem, this might be a good time to consider switching to a different antivirus solution.
The market is full of reliable antivirus software options that do not interfere with other applications on your PC.
Look for an antivirus that has a comprehensive threat database, real-time browsing connection, and low CPU usage. These are the most important features and they are generally included in free antivirus tools.
Some antivirus tools include built-in VPN solutions. If that appeals to you, you can drop your Hamachi subscription and use one software both for threat protection and online privacy.
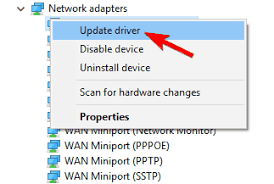
2. Update the drivers automatically
Sometimes Hamachi errors can be caused by missing drivers, and if you’re getting a tunneling problem or a VPN error, the issue might be the missing drivers.
You could try updating them manually by selecting every single one from Device Manager and selecting the Update driver option but that will take a lot of time and doesn’t guarantee perfect results.
The quickest and safest way to update your drivers is by using specialized software like Outbyte Driver Updater.
It’s very simple to use but first, you need to download and install the tool. It will run automatically and start scanning your PC for old, missing, or malfunctioning drivers.
Don’t go away because the process will only last for a couple of seconds and after that, you will receive a list with the recommended drivers to install.
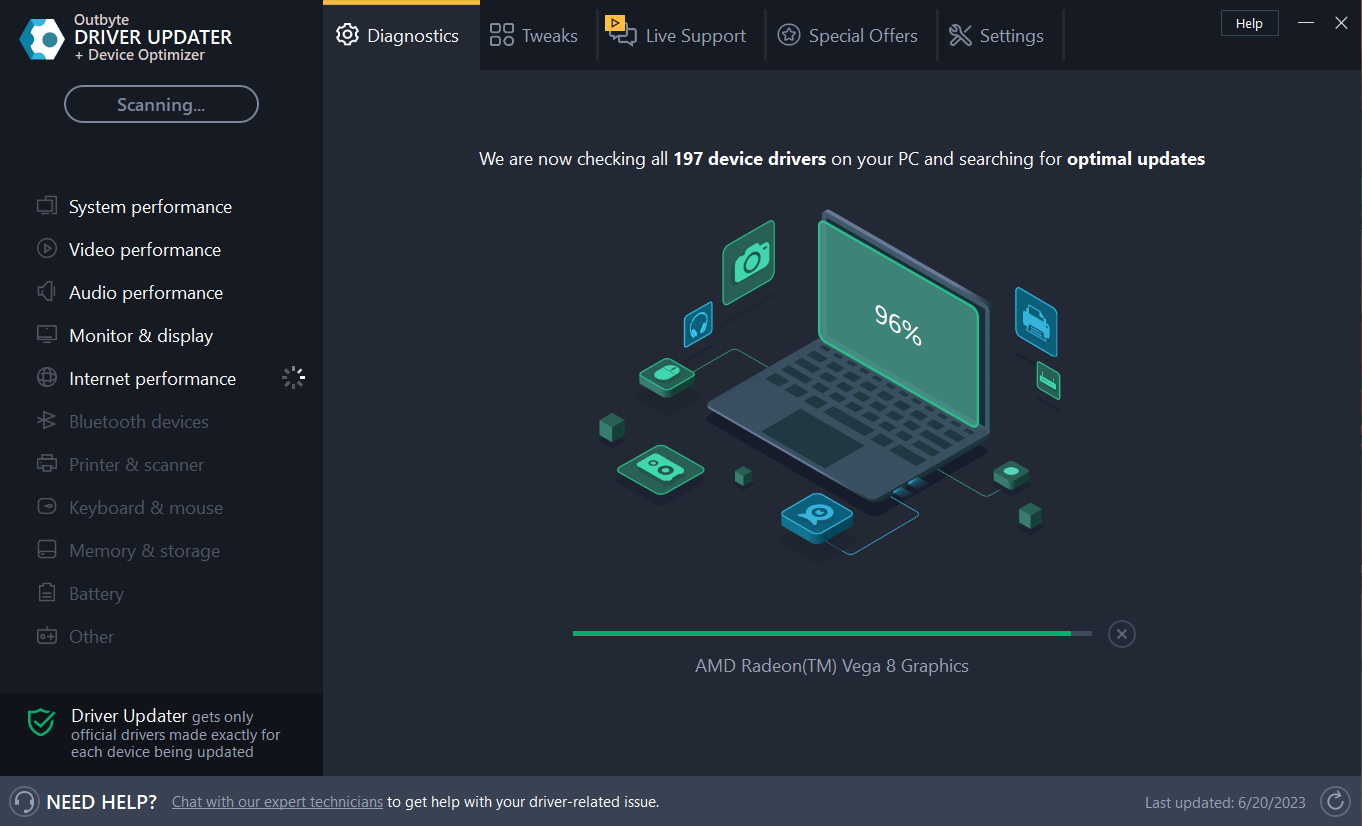
The last step is even easier because if you want to install all of them you just need to click on the Update All button.
Of course, you can also install only a few by checking their corresponding boxes and hitting their individual Update button from the right.
3. Make sure that Hamachi service is running
According to users, you can encounter various Hamachi errors simply if the required services aren’t running. Many users reported tunneling and VPN error in Hamachi, and in most cases you can fix these issues simply by restarting the Hamachi services. To do that, just follow these steps:
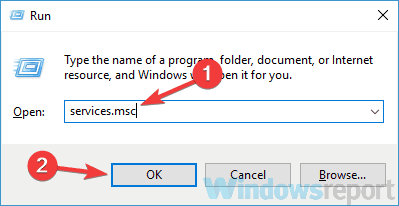
- Open the Services window. The fastest way to do that is to press Windows Key + R and enter services.msc. Now press Enter or click OK.

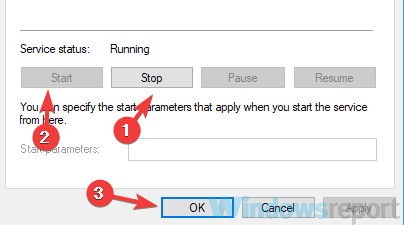
- When the Services window opens locate and double-click the Hamachi Tunneling Engine service.
- When the Properties window opens, click the Stop button to stop the service. Wait for a couple of moments and then click the Start button. Click Apply and OK to save changes.

According to users, this simple solution fixed the tunneling and VPN error with Hamachi, so we encourage you to try it out.
4. Remove problematic applications
If you’re having Hamachi errors, such as the tunneling problem or the VPN error, the issue might be caused by third-party software.
Sometimes VPN clients can interfere with Hamachi and that can lead to this and many other problems.
To fix the problem, it’s advised to find and remove your current VPN client. Users reported that Dell VPN client caused this problem to appear, but after removing it, the issue was resolved.
Bear in mind that other software can cause this issue to appear, and not just your VPN client.
If your VPN client was the problem, you should consider switching to a different one. The best VPNs for Windows 10 are reliable and user-friendly software that will not interfere with your system.
Consider software with a large number of servers across the globe, unlimited bandwidth, top-level encryption, and a very transparent privacy policy.
If the VPN was the cause of your problem, then the issue should be remediated. Check your PC for other problematic/malicious software as well. You can do that from the Add or remove the panel in Windows Settings.
5. Reinstall Hamachi
Sometimes Hamachi errors can be caused by a corrupted installation, and if that happens, the best course of action would be to reinstall Hamachi.
This is fairly simple to do, but in order to completely reinstall Hamachi, it’s advised that you use specialized uninstaller tools.
In case you don’t know, uninstaller software can completely remove the desired application from your PC.
Unlike the regular uninstall process, these dedicated tools will remove all files and registry entries associated with Hamachi.
After Hamachi is completely removed, it will be as if it was never installed on your PC. Now you just have to download and install the latest version and the issue should be completely resolved.
6. Install the driver manually while Hamachi is installing
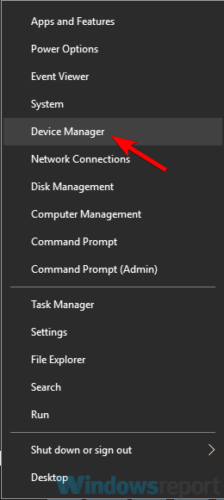
- Press Windows Key + X and choose Device Manager from the list.

- Locate LogMeIn Hamachi Virtual Ethernet Adapter, right-click it, and choose Update driver from the menu.
- Select Browse my computer for driver software.

- Now head over to the Hamachi installation directory, by default it should be:
C:Program Files (x86)LogMeIn Hamachi

Note: Once you select this directory, your PC should scan it and install the missing driver. Once that is done, the latest driver will be installed and the installation will complete successfully.
Bear in mind that you’ll need to update the driver quickly in order for this to work, so it might be a good idea to have the Device Manager open while installing Hamachi.
7. Use a different installer

According to users, sometimes Hamachi errors can be caused by your installer.
This is an unusual cause, but several users reported that they fixed the problem simply by removing Hamachi and using the different setup file to install it.
Users claim that they downloaded the installer from a different source that is not Hamachi’s official website, and by doing so the problem was resolved.
We don’t know how reliable this method is, but many users claim that it works, so feel free to try it out.
8. Try using an older version of Hamachi

In some instances, Hamachi errors can appear if you’re using the latest version. When it comes to software, usually it’s a good practice to use the latest software since it offers the latest features and updates.
However, sometimes certain features can be buggy, and that can lead to this and many other errors. To fix this problem, some users suggested rolling back to the older version of Hamachi and checking if that helps.
To do that, remove the current version and then download and install the older version. To find an older version, you might have to use third-party sources.
Once you download the older version, install it, and check if that solves your problem.
Bear in mind that Hamachi will check for the latest version once you install it, so be sure to prevent it from downloading the latest updates.
9. Disable Windows Firewall
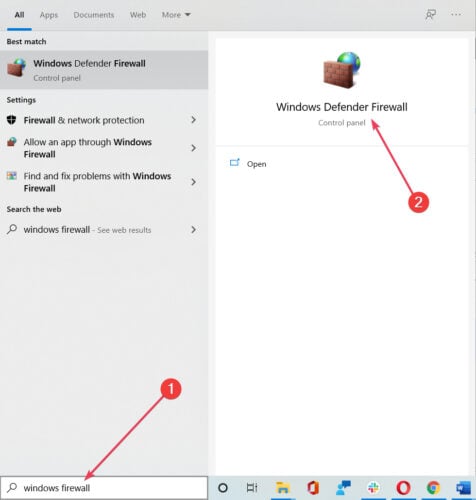
- Search for windows firewall and select Windows Defender Firewall from the list.

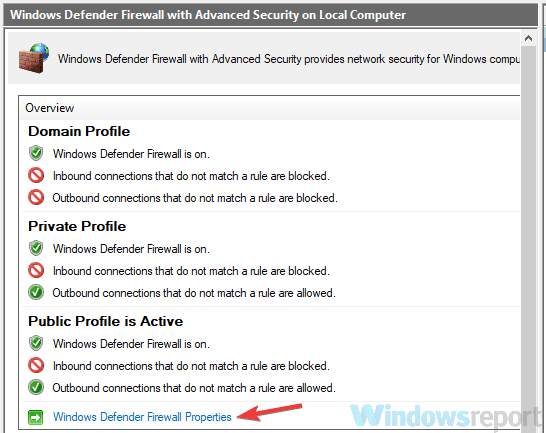
- Click on Advanced settings from the menu on the left.
- Select Windows Defender Firewall Properties.

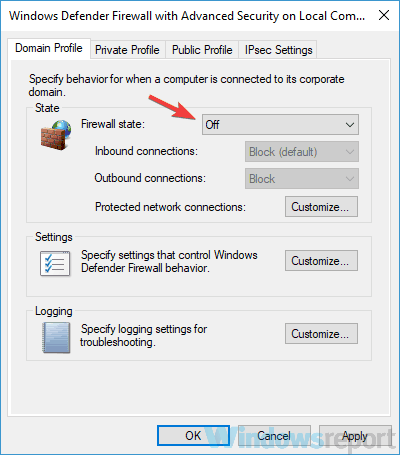
- Go to the Domain Profile tab and set Firewall state to Off.

- Go to the Private Profile and Public Profile tabs and do the same. Lastly, click Apply and OK to save changes
Note: Disabling the firewall isn’t the best choice in terms of safety, but if Hamachi works after you do that, the issue is probably related to one of your firewall settings, so you’ll need to manually find and change it.
Several users reported that port 25565 was the problem, so to fix this issue, be sure that port 25565 is open on the Incoming rules page. After making this change, the problem should be resolved and Hamachi will start working again.
Hamachi errors can cause many problems on your PC, but in most cases, these problems are caused by your firewall settings, corrupted installation, or other applications.
However, we hope that you managed to fix this problem by using one of our solutions and if you have any addition, leave us a note in the comments section below.
![]()
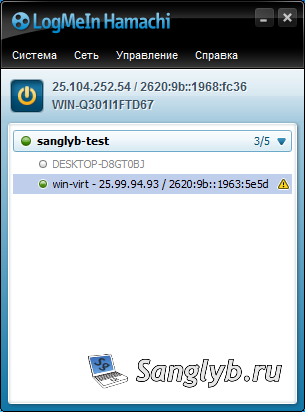
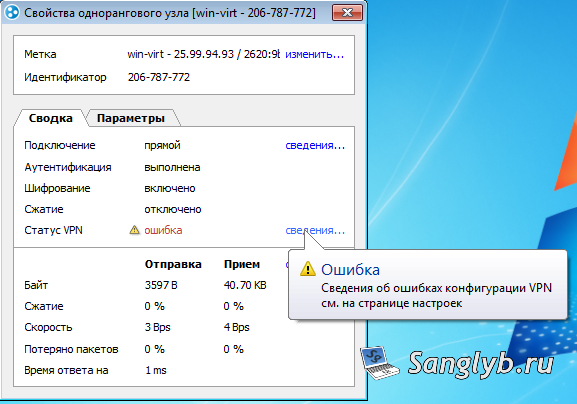
Привет, столкнулся с ситуацией — при подключении LogMeIn Hamachi, который установлен на Windows 7, к сети, компьютеры в сети не доступны, и на против них нарисован желтый треугольник с восклицательным знаком. Хочу показать, как можно исправить эту ошибку.
Если зайти в сведения подключения узла, то на против параметра статус VPN будет написано ошибка.
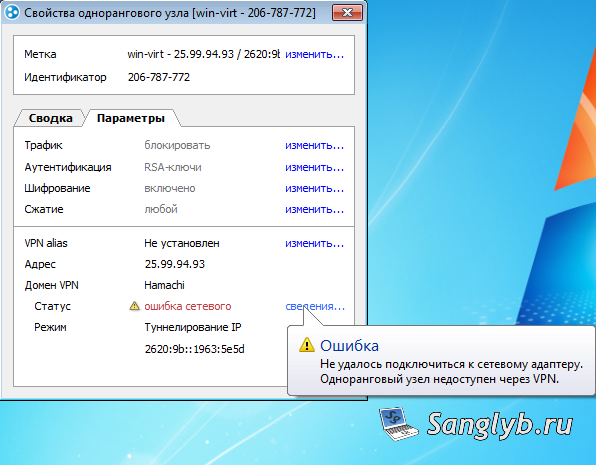
Если зайти в в параметры, в домене VPN в сведении статуса написана ошибка — Не удалось подключиться к сетевому адаптеру. Одноранговый узел не доступен через VPN.
В моем случае проблема была с установкой сетевого драйвера Hamachi. Если зайти в диспетчер устройств (свойства компьютера — диспетчер устройств), там можно увидеть восклицательный знак в желтом треугольнике у драйвера Hamachi Network Interface. Если зайти в свойства этого драйвера будет написано, что драйвер не имеет цифровой подписи.
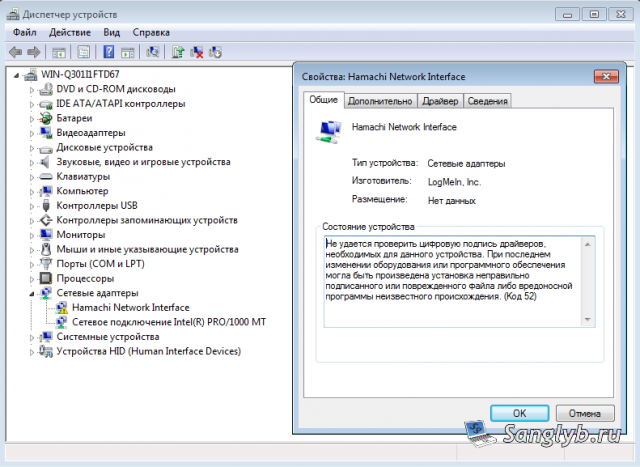
Из за этого в системе отсутствует сетевой интерфейс Hamachi, и Hamachi не может подключиться к компьютерам в сети.
Что бы это исправить можно пойти сложным и простым путем.
Сложный — перевести систему в тестовый режим и отключить в групповых политиках обязательную проверку цифровой подписи драйверов. Но я так не делал, и вам не советую.
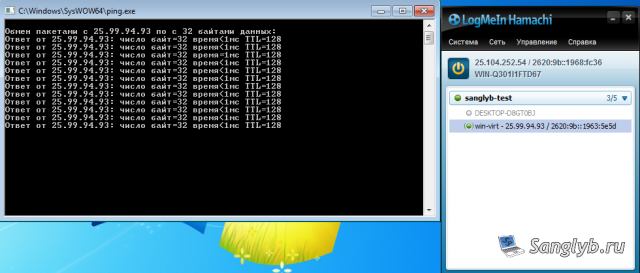
Простой — скачать Hamachi версии 2.2.0.328 — Hamachi 2.2.0.328
После того как Hamachi 2.2.0.328 будет скачан, нужно удалить версию которая установлена у вас. И просто поставить ту версию которая была скачана. В этой версии все нормально с цифровой подписью драйвера, и после ее установки у меня все заработало.
После запуска программы можно обновить ее из самой программы (справка — проверить обновления), либо можно скачать последнюю версию с сайта разработчиков. При запуске установщика программа будет обновлена. И проблем с драйвером и подключением к компьютерам быть не должно.
Кстати на Windows 10 я ставил последнюю версию программы, у меня она заработала нормально, но если вдруг у вас будет такая же проблема, о которой я написал выше, то вы можете попробовать установить версию 2.2.0.328.
С ней у меня возникла ситуация, что драйвер в диспетчере устройств работает нормально, ни каких восклицательных знаков нет, а сетевого интерфейса в центре управления сетями и общим доступом нет. Помогла простая переустановка LogMeIn Hamachi, то есть эту версию нужно ставить 2 раза. После чего все работает нормально.
The Hamachi VPN users have been getting the Hamachi Cannot Get Adapter Config error while trying to connect to the service and in this article, we have gathered some solutions that you can apply on your computer to get rid of this issue.

Make sure that you go through the reasons due to which the error message occurs and also implement the solutions one-by-one until one of them fixes the issue for you. Also, make sure to
What Causes the Hamachi Cannot Get Adapter Config?
After going through a certain set of instructions, we came to the conclusion that the following must be the most important reasons due to which it occurs.
- Admin Permissions: In certain conditions, it is required that the Admin permissions have been provided in order to ensure that the Hamachi Cannot Get Adapter Config error doesn’t occur. Therefore, it is recommended that you provide the VPN client with Admin permissions to ensure that the error is fixed.
- Antivirus/Firewall: The Antivirus or Firewall installed on the system might be preventing it from being able to properly connect to its services which can sometimes cause the Hamachi Cannot Get Adapter Config error. Therefore, we recommend that you try and fix it by disabling the Firewall or the Antivirus.
- Outdated Drivers: The Drivers installed on your computer might be missing or they might be outdated due to which the Hamachi Cannot Get Adapter Config error is being triggered. Therefore, we suggest that you try and update them to fix the issue.
- Legacy Drivers: In certain situations, we suggest that you try and install the Hamachi VPN as Legacy hardware in order to ensure that the Hamachi Cannot Get Adapter Config error doesn’t occur again.
Now that you have successfully gone through most of the reasons behind its occurrence, we can finally start implementing the solutions.
Before You Start:
To begin with, simply reboot your computer as some users have said that rebooting the system solved the problem effectively. To perform a reboot simply hold down the Power button on your PC for almost around 5-10 seconds until the computer turns off. Then wait for a while and turn on the computer again. Now check to see whether the error appears on your screen or not.
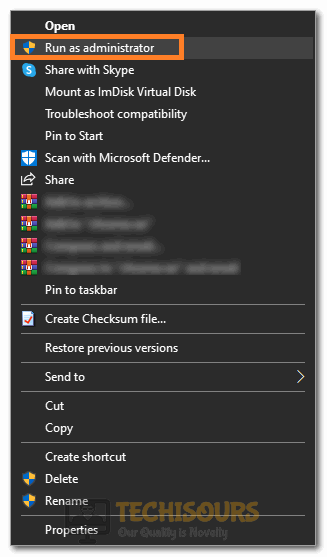
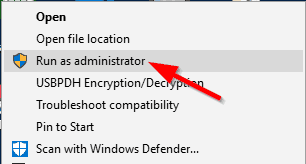
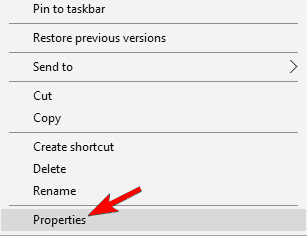
Solution 1: Run Hamachi With Admin Privileges
- Right-click on the “Hamachi” icon and click on “Run As Administrator”.

Clicking on the Run as Administrator option - If this solves the issue then it’s fine, or else try a few of the next steps listed below.
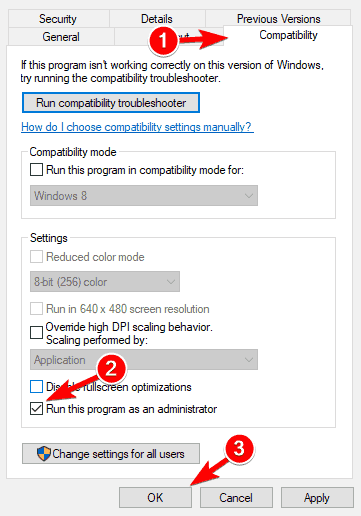
- Right-click on the “Hamachi” icon and select “Properties”. Go to the “Compatibility” tab and click on it. Now select “Run this program as an administrator”.

Running the Program as an Administrator - Click “Apply” and after that click on “OK” to save the changes. This will run the “Hamachi” with the admin rights.
- Check to see if doing so fixes the Hamachi Cannot Get Adapter Config error.

Solution 2: Disable Antivirus and Firewall
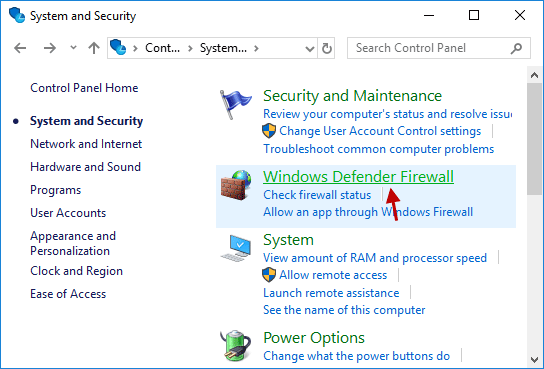
- Press “Windows” + “R” to open the Run prompt, type in “Firewall.cpl” and press “Enter”.
Typing in “firewall.cpl” - Click on the “Advanced Settings” from the left side and select the “Windows Defender Firewall Properties” option.
- Click on “Domain Profile” from the top and select “Customize” in front of the “Protected Network Connections” button.

Clicking on the Customize button - In here, uncheck the “Hamachi” button.
- Next click on “Apply” to save the changes and hit the “OK” button to close the Windows Defender Firewall window.
- Now check whether the error still persists or not.


Solution 3: Re-Enable the Hamachi Connection
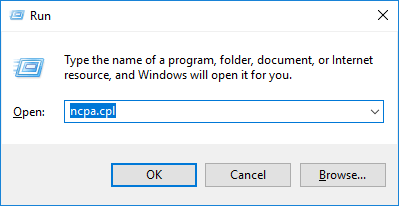
- Press “Windows” + “R” to open the Run prompt.
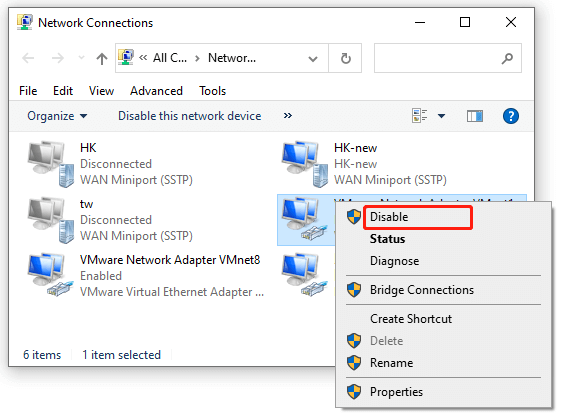
- Now in the text box type in, “ncpa.cpl” and press “Enter” to open “Internet Connection Settings” in the Control Panel.
ncpa.cpl - Now look for “Hamachi” and right-click on it and choose “Disable” for the drop-down menu. Wait for a couple of minutes and again right-click on “Hamachi” and this time select “Enable”.
- Now check if the issue is resolved or not.

Solution 4: Allow Hamachi On Kaspersky
- Press “Windows” + “R” to open the Run prompt, type in “Devmgmt.msc” and press “Enter” to launch into the device manager.

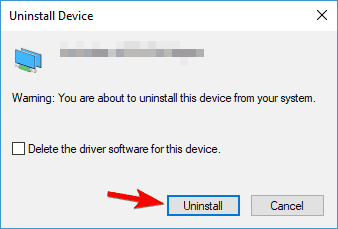
Typing devmgmt.msc in the Run prompt - Here navigate to “Network Adapters” and click to expand it. Now right click on “LogMeIn Hamachi Virtual Ethernet Adapter entry” and select “Uninstall Device”.

Clicking on the “Uninstall Device” option - Now open “Kaspersky” and go to “Settings”. After that go to “Protection” and navigate to “System Change Control”. It could be possibly blocking the “Hamachi Network” so disable it temporarily until we reinstall the “Himachi”.
- Now reinstall “Hamachi” and Kaspersky should detect a new network “Hamachi” and ask you about it. If it asks then click on “Trusted” so that it allows that network.
- Go to “Settings” and then “Firewall”. After that, navigate to “Networks” and make sure that the network type of “Hamachi” is “Trusted” or “Public”.
- Finally, proceed to check if the error gets settled or not.


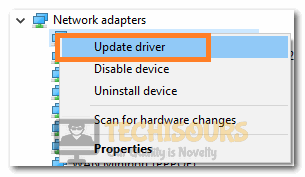
Solution 5: Update the Hamachi Drivers
- Press “Windows” + “R” to launch Run, type in “Devmgmt.msc” and press “Enter” open device manager.
Typing devmgmt.msc in the Run prompt - Navigate to the “Network Adapters” option and click to expand it. Now right click on “LogMeIn Hamachi Virtual Ethernet Adapter entry” and select “Update Drivers”.

Clicking on the Update Drivers option - Follow the instructions given on-screen to update the drivers.
- Once the drivers get updated successfully then proceed to check if the problem got fixed.
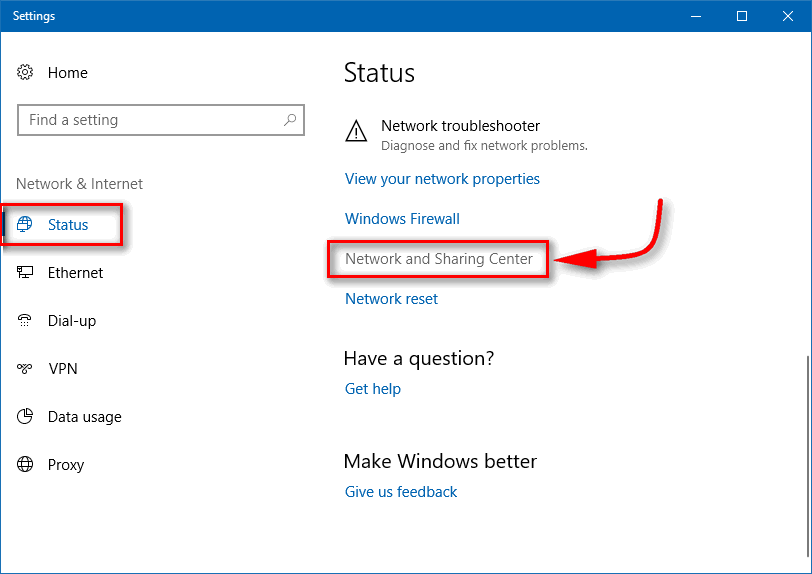
Solution 6: Microsoft Network Adapter Multiplexor Protocol Error
- Press “Windows” + “R” to open Run, type in “Control Panel” and press “Enter” to open it.

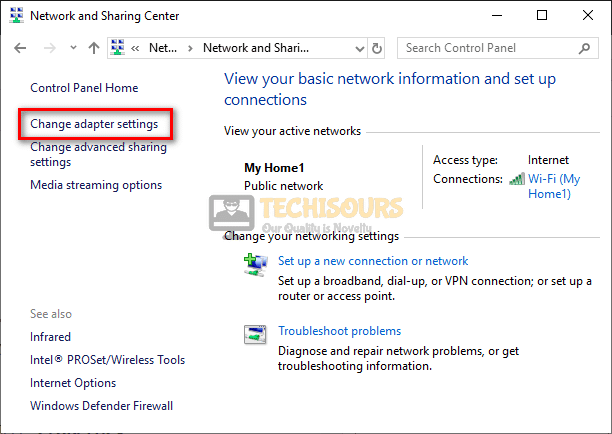
Typing in Control Panel - Then click on the “Network and Internet” section and next click on “Network and Sharing Center”.
- Next click on “Change Adapter Settings” which is on the left side of the window.

Change adapter settings - Now double click on “Hamachi” to open the “Properties” and navigate to “Microsoft Network Adapter Multiplexor Protocol” in the list of items.
- Make sure that it is unchecked. If it is checked then uncheck it. After that click on “OK”.
- Then check if the Hamachi Cannot Get Adapter Config error got resolved or not.


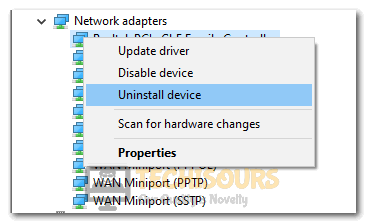
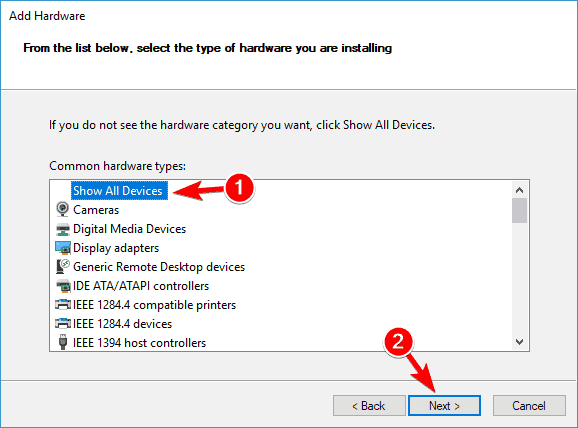
Solution 7: Install Hamachi As Legacy Hardware
- Press “Windows + R” to launch Run, type in “devmgmt.msc” and press “Enter” to launch it.
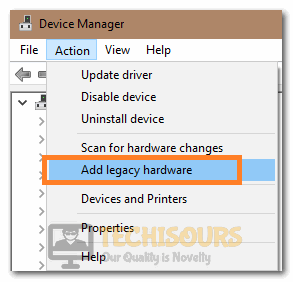
Typing devmgmt.msc in the Run prompt - Navigate to the “Network Adapters” option and click to expand it. Now right click on “LogMeIn Hamachi Virtual Ethernet Adapter entry” and select “Uninstall Device”.

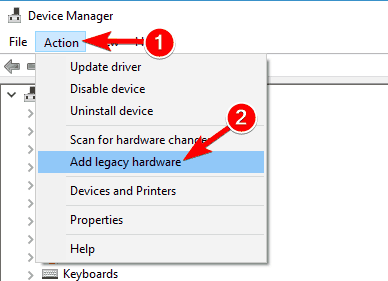
Clicking on the “Uninstall Device” option - Click on “Action” from the top and select the “Add legacy hardware” from the list.

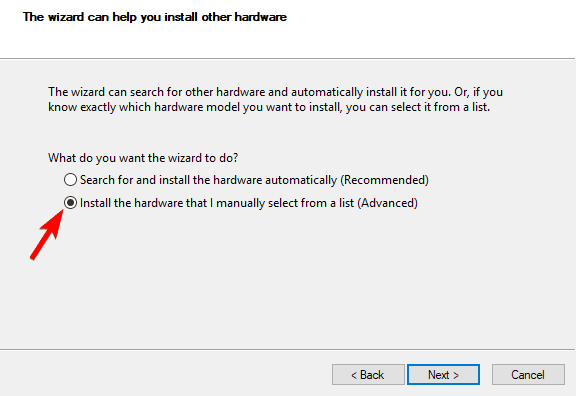
Selecting the “Add Legacy Hardware” option - After that, a window will open, here click on “Next”. Now select “Install the hardware that I manually select from a list (Advanced)” and click on “Next” again.
- Now click on “Show All Devices” and hit the “Next” button.
- Click on “Have Disk…” and the browser window will appear. Now browse the folder where you have installed “Hamachi” and select the “(.inf) driver file” from the folder.
- When completed with all of the above steps then check to see whether the Hamachi Cannot Get Adapter Config error still persists or not.
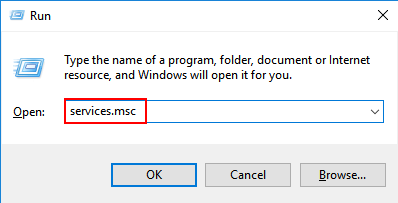
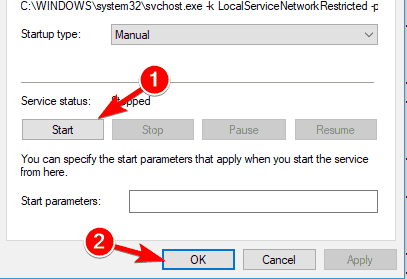
Solution 8: Start the LogMeIn Hamachi Tunneling Engine Service
- Press “Windows + R” to open Run.
- Type “services.msc” in the textbox and press the “Enter” key. Now in the list of services navigate to the “LogMeIn Hamachi Tunneling Engine Service” and right-click on it. After that select “Restart”.

Typing in “services.msc” - Now again right-click on it and select “Properties”. Go to the “General” tab and navigate to “Startup Type”. Set it to “Automatic”.
- Now check if the error got settled successfully.

Solution 9: Change the Priority Of Network Adapters
- Press “Windows + R” to open Run, type in “Control Panel” and press “Enter” to launch it.
Typing in Control Panel - Here click on the “Network and Internet” option and next select “Network and Sharing Center”.
- After that click on “Change Adapter Settings” which is on the left side of the window.

Change Adapter Settings - Now double click on “Hamachi” to open the “Properties”. Navigate to “Microsoft Network Adapter Multiplexor Protocol” in the list of items.
- Make sure that it is unchecked. If it is checked then uncheck it. After that click on “Properties”.
- Now click on “Advanced..” and go to the “IP Settings”. Here uncheck the “Automatic Metric” and type “9000” in the text box next to “Interface Metric”.
- Hit “OK” to save the changes and check if the error got fixed now.
Hopefully, you must have been able to fix the error until now but if it continues to stay then feel free to reach us out here for further assistance.

Alan is a hardcore tech enthusiast that lives and breathes tech. When he is not indulged in playing the latest video games, he helps users with technical problems that they might run into. Alan is a Computer Science Graduate with a Masters in Data Science.
Back to top button
Summary: Dealing with the ‘Hamachi cannot get adapter config’ error on your Windows 10 and 11 OS? Then in this article tutorial, you will get step-by-step instructions to fix the error.
Hamachi is considered a Desktop tool that can build and maintain virtual private networks (VPN) across numerous distant computers.
However, most users complained that they encountered the Hamachi cannot get adapter config error in their Windows 10 and 11 while attempting to connect to the Hamachi VPN service.
Luckily there are ways that help many users to get past f, but before heading towards the fixes here, look at some of the common reasons that trigger the error.
To fix common Windows PC Errors, we recommend Advanced System Repair:
This software is your one stop solution to fix Windows errors, protect you from malware, clean junks and optimize your PC for maximum performance in 3 easy steps:
- Download Advanaced System Repair rated Excellent on Trustpilot.
- Click Install & Scan Now to install & scan issues causing the PC problems.
- Next, click on Click Here to Fix All Issues Now to fix, clean, protect and optimize your PC effectively.
Why I am Getting the “Hamachi Cannot Get Adapter Config” Error?
- Outdated Drivers: There is a high scope that drivers you installed on your device might be updated or incompatible with your Windows system and causes the error. Updating or reinstalling your Hamachi driver can fix the error.
- Antivirus/Firewall: Another reason that causes the error on your device might be the Antivirus/Firewall you installed on your system as this conflicts with other application and start causing issues
- Missing Admin permission: In some cases, admin permission is required to run some functions and tools smoothly. So, if you are running as a user then you may see the error.
- Network Adaptor failure: Another common reason the Hamachi cannot get adapter config error is Hamachi failed to connect to the network failed and is unable to process the request.
So these are some of the top reasons that cause the error in your Windows 10 and Windows 11. Ensure to download and install the newest version of Hamachi to fix the error.
Now without further delay, follow the fixes given one by one to fix cannot get adapter config error on your Windows 10 and Windows 11.
How Do I Fix “Hamachi Cannot Get Adapter Config” Error?
Table of Contents
Solution 1 – Disable 3rd Party Antivirus & Firewall
To fix the’ Logmein Hamachi cannot get adapter config’ error, you temporarily need to disable your third-party antivirus and Windows Firewall.
For disabling antivirus, press and hold the right mouse button and select the stop or disable option.
To disable Firewall, you need to follow some simple steps-
- First, you need to search for Firewall and click on the first result.
- Then, Navigate to Advanced Settings and pick Windows Defender Firewall Properties.
- Now, select Customize in front of the Protected Network Connections button by clicking on Domain Profile from the top.
Finally, deselect the Hamachi option and then hit the Apply and OK buttons to save the changes. Ensure to restart your computer and check if you see the error.
Solution 2 – Run Hamachi as an Admin
Many users managed to solve the problem by running the application with administrative privilege.
So, here it is suggested to try running the program as an admin, below follow the steps given to do so:
- First, find the Hamachi shortcut, and select Run as Administrator by right-clicking it.
- If this works for you to fix then try running the application but still see the error then follow the next solution.
- Now, Select Properties by right-clicking on the Hamachi icon.
- Then, In the Properties window, go to the Compatibility tab and check the box that says Run this application as Administrator.
- Finally, click on the Ok button, then restart the Hamachi VPN application with Admin rights to save the modifications.
Solution 3 – Disable & Enable the Hamachi Connection
Sometimes the problem occurs due to internal glitches on the internet so, try disabling and enabling the Hamachi connection as this may work for you to solve the error:
Follow the steps to do so:
- First, to open Internet Connection Settings, press the Windows + R keys and type ncpa.cpl in the Run dialogue box then hit the Ok button.
- Then, Find and right-click Hamachi, then choose ‘Disable.’ Wait for a few minutes before right-clicking on it and selecting Enable. Please double-check to see if the problem has been resolved.
Solution 4 – Download & Update Hamachi Driver
If you are running an outdated Hamachi driver then this might be causing the error, so check for the incompatible or outdated Hamachi drivers and update them on your Windows 10 & 11 system.
Follow the steps to do so:
- First, on the keyboard, press the Windows + X button and choose Device Manager.
- Now, Expand Network Adapters, click on Virtual Ethernet Adapter Entry and choose Update Drivers.
- Finally, to complete the update process, follow the instructions shown on the screen. After that, restart your computer to see if the problem has been solved.
Solution 5 – Install Hamachi as Legacy Hardware
- First, Go to Network Adapters in Device Manager, click on Virtual Ethernet Adapter Entry, and choose Uninstall.
- Then after uninstalling, go to the top menu and click on Action, then click the Add Legacy Hardware option.
- Click Next and then choose the option Install the hardware that I manually select from a list (Advanced) in the newly opened window. Now, press the Next button.
- Open Show All Devices > Next > Have Disk…from the dropdown menu. Then, navigate to the location where Hamachi was installed and choose the .inf driver file from there.
Finally, once you’ve finished, double-check to see if cannot get adapter config Hamachi Error is resolved or else head to the next potential fix.
Solution 6 – Change your Network Adapter’s Priority
If the above solution won’t work for you then try changing the Network Adapter’s priority by following the steps given below.
This trick worked for many users to troubleshoot the cannot get adapter config hamachi error.
- Open Control Panel from the Windows start menu > then go to Network and Internet
- Then click Network and Sharing Center, and then Change Adapter Settings in the Control Panel.
- Then, Open Properties by double-clicking on Hamachi, then locate and untick the Microsoft Network Adapter Multiplexor Protocol.
- Now, Select Properties and then Advanced > IP Settings.
- Finally, Uncheck Automatic Metric, and in Interface Metric type 9000, and click the Ok button. Please double-check that the problem has been resolved.
Solution 7 – Disable Microsoft Network Adapter Multiplexor Protocol
Some users confirmed that the Microsoft Network Adapter Multiplexor Protocol option is conflicting with the Hamachi application, so try disabling it.
Follow the instructions given:
- Launch Control Panel, then go to Network and Internet > Network and Sharing Center in Windows 10 and 11’s Control Panel.
- Select Change Adapter Settings then double-click Hamachi to view its Properties.
- Then, launch Properties and untick the checkbox next to Microsoft Network Adapter Multiplexor Protocol to disable it.
- Finally, save the modifications and restart Hamachi VPN to see if the problem has been repaired.
Solution 8 – Enable LogMeIn Hamachi Tunneling Engine service
If you find the LogMeIn Hamachi Tunneling Engine service is not running then this might be blocking Hamachi and you see the Hamachi cannot get adapter config error.
Follow the steps to do so:
- First, to open the Services window, press the Windows + R keys on your keyboard, type services.msc in the opened Run dialog box, and then hit the Ok button.
- Then, right-click on LogMeIn Hamachi Tunneling Engine service and choose Restart.
- Then, right-click it and select Properties, select Automatic from the Startup Type dropdown in the General tab, and then hit Apply and OK to save the changes.
- Finally, restart your computer to see if the problem has been repaired once you’ve completed it.
Solution 9 – Delete Hamachi Registry Entries & Reinstall the Application
After trying all the solutions if you are facing the same problem then here it is suggested to clean the registry of your Hamachi application. Cleaning the application registry can solve numerous problems and give the Application a new start.
Here are the manual instructions from which you can clean your registry:
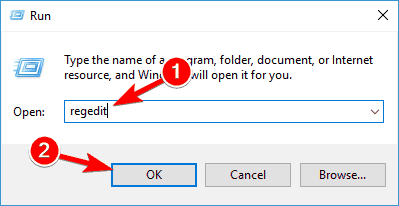
- First, click on Windows Key + R and in the search box type Regedit to start a Registry Editor.
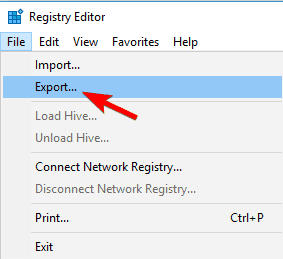
- Now it is recommended to create a backup of your registry after launching the Registry editor.
- After doing that, click on the files and click on the Export option and also select the location where you want to export your backfile of the registry.
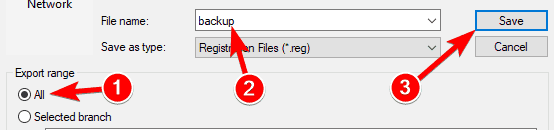
- While exporting make sure to click on ALL, and then click on the Save button to save the export of your registry. If in case something gets wrong then click on the file and then click on the Restore option to restore the registry folder back.
- Now click on the Ctrl + F key together and in the text box type hamachi and hit on the Enter button.
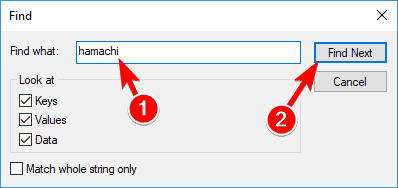
- If you get any key Delete it.
- Now press the F3 key to find the next Hamachi key. Repeat this step until you delete all.
- After deleting all the Hamachi keys now install the new Hamachi application.
Apart from this, if you don’t want to use this manual solution then I recommend you use CCleaner to clean the registry. This powerful tool not only cleans your registry but also creates a backup of your data automatically.
Get CCleaner to Clean Registry Entries & other Unnecessary Junk Files
Recommended Solution To Fix Windows Issues & Errors
Scan your Windows system with the PC Repair Tool, to optimize your Windows PC performance by regularly maintaining it automatically.
This is an advanced repair tool that just by scanning once detects and fixes various Windows problems and stubborn computer errors.
With this, you can fix various update errors, repair corrupted Windows system files, DLL errors, registry errors, prevent virus or malware infection, and much more.
This not only fixes errors but also optimizes your Windows PC performance like a new one to optimize the gaming performance.
Get PC Repair Tool to Optimize your Windows PC Performance
Conclusion
So, this is all about the Hamachi cannot get adapter config error on Windows 10 and Windows 11.
Here we tried to list down the best possible solutions that worked for several affected users. And it is estimated one of our solutions managed to circumvent the error Logmein Hamachi cannot get adapter config error.
So, make sure to follow the solutions given one by one till you find the one that works for you.
Feel free to connect with us on our Facebook page, if you are having any problems related to your Windows system, also don’t forget to hit the like and share button.
We will get back to you as soon as possible.
Good Luck..!

Hardeep has always been a Windows lover ever since she got her hands on her first Windows XP PC. She has always been enthusiastic about technological stuff, especially Artificial Intelligence (AI) computing. Before joining PC Error Fix, she worked as a freelancer and worked on numerous technical projects.
Чаще всего ошибка «статус VPN» в Hamachi возникает из-за недоступности или обрывов сетевого подключения. В сведениях об ошибке вы можете увидеть информацию, о том, что одноранговый узел недоступен через VPN (многие пользователи ошибочно называют узел «одноразовый») и напротив каждого соединения будет гореть желтый треугольник.


Что делать? Выполните следующую инструкцию по шагам.
Шаг 1
Проверьте, доступен ли интернет? Откройте любой известный сайт в браузере (Google или Яндекс), если все работает, двигаемся дальше.
Шаг 2
Откройте сетевые подключения. В Windows 10 достаточно прописать в поиске «сетев» и открыть «Просмотр сетевых подключений».

Найдите в списке адаптер Hamachi. Если он отключен – включите его.

Если адаптер отсутствует, то исправить статус vpn в Хамачи сможет только его установка. Подробнее читайте в инструкции.
Шаг 3
Отключите все файерволы и антивирусы.
Шаг 4
Откройте список служб операционной системы. В Windows 10 для этого в поиске достаточно набрать «службы» и открыть найденный одноименный пункт.

В службах найдите «Logmein Hamachi Tunneling Engine» и перезапустите ее.

После этого ошибка конфигурации vpn в Hamachi должна исчезнуть.
Похожая инструкция: Как убрать желтый треугольник в Hamachi.