- Руководство пользователя Photoshop
- Введение в Photoshop
- Мечтайте об этом. Сделайте это.
- Новые возможности Photoshop
- Редактирование первой фотографии
- Создание документов
- Photoshop | Часто задаваемые вопросы
- Системные требования Photoshop
- Знакомство с Photoshop
- Photoshop и другие продукты и услуги Adobe
- Работа с графическим объектом Illustrator в Photoshop
- Работа с файлами Photoshop в InDesign
- Материалы Substance 3D для Photoshop
- Работа со встроенным расширением Capture в Photoshop
- Photoshop на iPad (недоступно на территории континентального Китая)
- Photoshop на iPad | Общие вопросы
- Знакомство с рабочей средой
- Системные требования | Photoshop на iPad
- Создание, открытие и экспорт документов
- Добавление фотографий
- Работа со слоями
- Рисование и раскрашивание кистями
- Выделение участков и добавление масок
- Ретуширование композиций
- Работа с корректирующими слоями
- Настройка тональности композиции с помощью слоя «Кривые»
- Применение операций трансформирования
- Обрезка и поворот композиций
- Поворот, панорамирование, масштабирование и восстановление холста
- Работа с текстовыми слоями
- Работа с Photoshop и Lightroom
- Получение отсутствующих шрифтов в Photoshop на iPad
- Японский текст в Photoshop на iPad
- Управление параметрами приложения
- Сенсорные ярлыки и жесты
- Комбинации клавиш
- Изменение размера изображения
- Прямая трансляция творческого процесса в Photoshop на iPad
- Исправление недостатков с помощью восстанавливающей кисти
- Создание кистей в Capture и их использование в Photoshop
- Работа с файлами Camera Raw
- Создание и использование смарт-объектов
- Коррекция экспозиции изображений с помощью инструментов «Осветлитель» и «Затемнитель»
- Веб-приложение Photoshop (недоступно на территории континентального Китая)
- Общие вопросы
- Системные требования
- Сочетания клавиш
- Поддерживаемые типы файлов
- Общие сведения о рабочей среде
- Открытие облачных документов и работа с ними
- Функции генеративного ИИ
- Основные понятия редактирования
- Быстрые действия
- Работа со слоями
- Ретуширование изображений и удаление дефектов
- Быстрое выделение областей
- Улучшения изображений с помощью корректирующих слоев
- Перемещение, преобразование и кадрирование изображений
- Рисование и раскрашивание
- Работа с текстовыми слоями
- Работа с другими пользователями в веб-приложении
- Управление параметрами приложения
- Photoshop (beta-версия) (недоступно на территории континентального Китая)
- Начало работы с Beta-версиями приложений Creative Cloud
- Photoshop для настольных ПК (beta-версия)
- Генеративный ИИ (недоступно на территории континентального Китая)
- Часто задаваемые вопросы о генеративном ИИ в Photoshop
- Генеративная заливка в Photoshop для настольных ПК
- Генеративное расширение в Photoshop для настольных ПК
- Функции генеративного ИИ в веб-приложении Photoshop
- Генеративные варианты в Photoshop на iPad
- Подлинность содержимого (недоступно на территории континентального Китая)
- Учетные данные для содержимого в Photoshop
- Идентичность и происхождение токенов NFT
- Подключение учетных записей для творческой атрибуции
- Облачные документы (недоступно на территории континентального Китая)
- Облачные документы Photoshop | Часто задаваемые вопросы
- Облачные документы Photoshop | Вопросы о рабочем процессе
- Работа с облачными документами и управление ими в Photoshop
- Обновление облачного хранилища для Photoshop
- Не удается создать или сохранить облачный документ
- Устранение ошибок с облачными документами Photoshop
- Сбор журналов синхронизации облачных документов
- Приглашение других пользователей к редактированию облачных документов
- Общий доступ к файлам и комментирование в приложении
- Рабочая среда
- Основные сведения о рабочей среде
- Установки
- Более быстрое обучение благодаря панели «Новые возможности» в Photoshop
- Создание документов
- Помещение файлов
- Комбинации клавиш по умолчанию
- Настройка комбинаций клавиш
- Галерея инструментов
- Установки производительности
- Использование инструментов
- Наборы настроек
- Сетка и направляющие
- Сенсорные жесты
- Работа в Photoshop с использованием Touch Bar
- Возможности работы с сенсорными жестами и настраиваемые рабочие среды
- Обзорные версии технологии
- Метаданные и комментарии
- Возможности работы с сенсорными жестами и настраиваемые рабочие среды
- Помещение изображений Photoshop в другие приложения
- Линейки
- Отображение или скрытие непечатных вспомогательных элементов
- Указание колонок для изображения
- Отмена и история операций
- Панели и меню
- Позиционирование элементов с привязкой
- Позиционирование с помощью инструмента «Линейка»
- Разработка содержимого для Интернета, экрана и приложений
- Photoshop для дизайна
- Монтажные области
- Просмотр на устройстве
- Копирование CSS из слоев
- Разделение веб-страниц на фрагменты
- Параметры HTML для фрагментов
- Изменение компоновки фрагментов
- Работа с веб-графикой
- Создание веб-фотогалерей
- Основные сведения об изображениях и работе с цветом
- Изменение размера изображений
- Работа с растровыми и векторными изображениями
- Размер и разрешение изображения
- Импорт изображений из камер и сканеров
- Создание, открытие и импорт изображений
- Просмотр изображений
- Ошибка «Недопустимый маркер JPEG» | Открытие изображений
- Просмотр нескольких изображений
- Настройка палитр цветов и образцов цвета
- HDR-изображения
- Подбор цветов на изображении
- Преобразование между цветовыми режимами
- Цветовые режимы
- Стирание фрагментов изображения
- Режимы наложения
- Выбор цветов
- Внесение изменений в таблицы индексированных цветов
- Информация об изображениях
- Фильтры искажения недоступны
- Сведения о цвете
- Цветные и монохромные коррекции с помощью каналов
- Выбор цветов на панелях «Цвет» и «Образцы»
- Образец
- Цветовой режим (или режим изображения)
- Цветовой оттенок
- Добавление изменения цветового режима в операцию
- Добавление образцов из CSS- и SVG-файлов HTML
- Битовая глубина и установки
- Слои
- Основные сведения о слоях
- Обратимое редактирование
- Создание слоев и групп и управление ими
- Выделение, группировка и связывание слоев
- Помещение изображений в кадры
- Непрозрачность и наложение слоев
- Слои-маски
- Применение смарт-фильтров
- Композиции слоев
- Перемещение, упорядочение и блокировка слоев
- Маскирование слоев при помощи векторных масок
- Управление слоями и группами
- Эффекты и стили слоев
- Редактирование слоев-масок
- Извлечение ресурсов
- Отображение слоев с помощью обтравочных масок
- Формирование графических ресурсов из слоев
- Работа со смарт-объектами
- Режимы наложения
- Объединение нескольких фрагментов в одно изображение
- Объединение изображений с помощью функции «Автоналожение слоев»
- Выравнивание и распределение слоев
- Копирование CSS из слоев
- Загрузка выделенных областей на основе границ слоя или слоя-маски
- Просвечивание для отображения содержимого других слоев
- Выделенные области
- Начало работы с выделенными областями
- Выделение областей в композициях
- Рабочая среда «Выделение и маска»
- Выделение при помощи инструментов группы «Область»
- Выделение при помощи инструментов группы «Лассо»
- Настройка выделения пикселей
- Перемещение, копирование и удаление выделенных пикселей
- Создание временной быстрой маски
- Выбор цветового диапазона в изображении
- Преобразование между контурами и границами выделенной области
- Основы работы с каналами
- Сохранение выделенных областей и масок альфа-каналов
- Выбор областей фокусировки в изображении
- Дублирование, разделение и объединение каналов
- Вычисление каналов
- Коррекция изображений
- Замена цветов объекта
- Деформация перспективы
- Уменьшение размытия в результате движения камеры
- Примеры использования инструмента «Восстанавливающая кисть»
- Экспорт таблиц поиска цвета
- Корректировка резкости и размытия изображения
- Общие сведения о цветокоррекции
- Применение настройки «Яркость/Контрастность»
- Коррекция деталей в тенях и на светлых участках
- Корректировка «Уровни»
- Коррекция тона и насыщенности
- Коррекция сочности
- Настройка насыщенности цвета в областях изображения
- Быстрая коррекция тона
- Применение специальных цветовых эффектов к изображениям
- Улучшение изображения при помощи корректировки цветового баланса
- HDR-изображения
- Просмотр гистограмм и значений пикселей
- Подбор цветов на изображении
- Кадрирование и выравнивание фотографий
- Преобразование цветного изображения в черно-белое
- Корректирующие слои и слои-заливки
- Корректировка «Кривые»
- Режимы наложения
- Целевая подготовка изображений для печатной машины
- Коррекция цвета и тона с помощью пипеток «Уровни» и «Кривые»
- Коррекция экспозиции и тонирования HDR
- Осветление или затемнение областей изображения
- Избирательная корректировка цвета
- Adobe Camera Raw
- Системные требования Camera Raw
- Новые возможности Camera Raw
- Введение в Camera Raw
- Создание панорам
- Поддерживаемые объективы
- Виньетирование, зернистость и удаление дымки в Camera Raw
- Комбинации клавиш по умолчанию
- Автоматическая коррекция перспективы в Camera Raw
- Инструмент «Радиальный фильтр» в Camera Raw
- Управление настройками Camera Raw
- Обработка, сохранение и открытие изображений в Camera Raw
- Совершенствование изображений с улучшенным инструментом «Удаление точек» в Camera Raw
- Поворот, обрезка и изменение изображений
- Корректировка цветопередачи в Camera Raw
- Версии обработки в Camera Raw
- Внесение локальных корректировок в Camera Raw
- Исправление и восстановление изображений
- Удаление объектов с фотографий с помощью функции «Заливка с учетом содержимого»
- Заплатка и перемещение с учетом содержимого
- Ретуширование и исправление фотографий
- Коррекция искажений изображения и шума
- Основные этапы устранения неполадок для решения большинства проблем
- Улучшение и преобразование изображения
- Замена неба на изображениях
- Трансформирование объектов
- Настройка кадрирования, поворотов и холста
- Кадрирование и выпрямление фотографий
- Создание и редактирование панорамных изображений
- Деформация изображений, фигур и контуров
- Перспектива
- Масштаб с учетом содержимого
- Трансформирование изображений, фигур и контуров
- Рисование и живопись
- Рисование симметричных орнаментов
- Варианты рисования прямоугольника и изменения обводки
- Сведения о рисовании
- Рисование и редактирование фигур
- Инструменты рисования красками
- Создание и изменение кистей
- Режимы наложения
- Добавление цвета в контуры
- Редактирование контуров
- Рисование с помощью микс-кисти
- Наборы настроек кистей
- Градиенты
- Градиентная интерполяция
- Заливка и обводка выделенных областей, слоев и контуров
- Рисование с помощью группы инструментов «Перо»
- Создание узоров
- Создание узора с помощью фильтра «Конструктор узоров»
- Управление контурами
- Управление библиотеками узоров и наборами настроек
- Рисование при помощи графического планшета
- Создание текстурированных кистей
- Добавление динамических элементов к кистям
- Градиент
- Рисование стилизованных обводок с помощью архивной художественной кисти
- Рисование с помощью узора
- Синхронизация наборов настроек на нескольких устройствах
- Перенос наборов, операций и настроек
- Текст
- Добавление и редактирование текста
- Универсальный текстовый редактор
- Работа со шрифтами OpenType SVG
- Форматирование символов
- Форматирование абзацев
- Создание эффектов текста
- Редактирование текста
- Интерлиньяж и межбуквенные интервалы
- Шрифт для арабского языка и иврита
- Шрифты
- Поиск и устранение неполадок, связанных со шрифтами
- Азиатский текст
- Создание текста
- Фильтры и эффекты
- Использование фильтра «Пластика»
- Использование эффектов группы «Галерея размытия»
- Основные сведения о фильтрах
- Справочник по эффектам фильтров
- Добавление эффектов освещения
- Использование фильтра «Адаптивный широкий угол»
- Фильтр «Масляная краска»
- Использование фильтра «Пластика»
- Эффекты и стили слоев
- Применение определенных фильтров
- Растушевка областей изображения
- Сохранение и экспорт
- Сохранение файлов в Photoshop
- Экспорт файлов в Photoshop
- Поддерживаемые форматы файлов
- Сохранение файлов в других графических форматах
- Перемещение проектов между Photoshop и Illustrator
- Сохранение и экспорт видео и анимации
- Сохранение файлов PDF
- Защита авторских прав Digimarc
- Управление цветом
- Основные сведения об управлении цветом
- Обеспечение точной цветопередачи
- Настройки цвета
- Дуплексы
- Работа с цветовыми профилями
- Управление цветом документов для просмотра в Интернете
- Управление цветом при печати документов
- Управление цветом импортированных изображений
- Выполнение цветопробы
- Разработка содержимого для Интернета, экрана и приложений
- Photoshop для дизайна
- Монтажные области
- Просмотр на устройстве
- Копирование CSS из слоев
- Разделение веб-страниц на фрагменты
- Параметры HTML для фрагментов
- Изменение компоновки фрагментов
- Работа с веб-графикой
- Создание веб-фотогалерей
- Видео и анимация
- Видеомонтаж в Photoshop
- Редактирование слоев видео и анимации
- Общие сведения о видео и анимации
- Предварительный просмотр видео и анимации
- Рисование кадров в видеослоях
- Импорт видеофайлов и последовательностей изображений
- Создание анимации кадров
- 3D-анимация Creative Cloud (предварительная версия)
- Создание анимаций по временной шкале
- Создание изображений для видео
- Печать
- Печать 3D-объектов
- Печать через Photoshop
- Печать и управление цветом
- Контрольные листы и PDF-презентации
- Печать фотографий в новом макете раскладки изображений
- Печать плашечных цветов
- Печать изображений на печатной машине
- Улучшение цветной печати в Photoshop
- Устранение неполадок при печати | Photoshop
- Автоматизация
- Создание операций
- Создание изображений, управляемых данными
- Сценарии
- Обработка пакета файлов
- Воспроизведение операций и управление ими
- Добавление условных операций
- Сведения об операциях и панели «Операции»
- Запись инструментов в операциях
- Добавление изменения цветового режима в операцию
- Набор средств разработки пользовательского интерфейса Photoshop для внешних модулей и сценариев
- Устранение неполадок
- Исправленные ошибки
- Известные проблемы
- Оптимизация производительности Photoshop
- Основные методы устранения неполадок
- Устранение неполадок при аварийном завершении работы или зависании
- Устранение программных ошибок
- Устранение ошибок «Рабочий диск переполнен»
- Устранение неполадок, связанных с графическим процессором и графическим драйвером
- Поиск отсутствующих инструментов
- 3D в Photoshop | Часто задаваемые вопросы об упраздненных функциях
Прекращение поддержки 3D-функций в Photoshop
3D-функции Photoshop будут удалены в будущих обновлениях. Пользователям, работающим с 3D-функциями, рекомендуется ознакомиться с новой коллекцией Adobe Substance 3D, которая представляет собой новое поколение 3D-инструментов от Adobe. Дополнительная информация о прекращении поддержки 3D-функций в Photoshop представлена здесь: Photoshop 3D | Распространенные вопросы о прекращении поддержки 3D-функций в Photoshop.
Узнайте, как исправить ошибку Photoshop could not complete your request because of a program error (Photoshop не может выполнить запрос из-за программной ошибки), отображающуюся при открытии или сохранении файлов
При открытии или сохранении файлов изображений, выдается одна из следующих ошибок:
- «Ваш запрос не выполнен из-за программной ошибки».
- Could not save as «yourfilename.psd» because of a program error (Не удалось сохранить как имя_файла.psd, так как произошла программная ошибка).
Программная ошибка во время сохранения файлов
Ошибка Photoshop could not save as «yourfilename.psd» because of a program error (Photoshop не может сохранить файл как имя_файла.psd из-за программной ошибки) может возникнуть по разным причинам, от композиции слоя до неправильных системных разрешений.
Следуйте представленным ниже рекомендациям для устранения программных ошибок при сохранении файлов в Photoshop.
-
Предоставьте Photoshop права «Полный доступ к диску» в системный настройках macOS
Чтобы изменить соответствующую настройку на Mac, в меню Apple выберите «Системные настройки» > «Безопасность и конфиденциальность», затем нажмите «Конфиденциальность».
См. раздел Изменение настроек конфиденциальности на компьютере Mac -
Скройте все слои на панели «Слои» и выполните сохранение еще раз
Нажмите или нажмите и перетащите значок видимости каждого слоя, чтобы скрыть их.
Можно также использовать устаревший API сохранения macOS для использования ранних, устаревших методов сохранения.
Программная ошибка во время открытия файлов
Ошибка Photoshop could not complete your request because of a program error (Photoshop не может выполнить запрос из-за программной ошибки) может возникать по разным причинам, от повреждения файла установок Photoshop до несовместимости системного аппаратного или программного обеспечения.
Следуйте представленным ниже рекомендациям для устранения программных ошибок при открытии файлов в Photoshop.
-
Проверьте системные требования
- Убедитесь, что ваша система соответствует минимальным требованиям последней версии Photoshop.
См. раздел Системные требования Photoshop - Если ваше графическое оборудование не поддерживается, возможно, вам потребуется обновить его до более современного.
См. раздел Минимальные требования к графическому процессору
- Убедитесь, что ваша система соответствует минимальным требованиям последней версии Photoshop.
-
- Перейдите в раздел Установки > Внешние модули
- Снимите флажок Включить Генератор
-
Переустановите графический драйвер
-
Восстановите установки Photoshop по умолчанию
-
Выключите ускорение графического процессора
Внешний модуль диагностики программных ошибок
-
Загрузите и распакуйте файл user-diagnostics.zip в локальной папке, к которой вы сможете получить доступ
-
Распаковав архив zip, скопируйте папку user-diagnostic в папку внешних модулей Photoshop по следующему пути:
- macOS: Application Folder > Adobe Photoshop 2022 > Plug-Ins
- Windows: Program Files > Adobe > Adobe Photoshop 2022 > Plug-Ins
Копирование папки user-diagnostics в папку Plug-ins -
Запустите приложение Photoshop
-
Выберите Photoshop User Diagnostics (Пользовательская диагностика Photoshop) в меню «Внешние модули».
-
На появившейся панели установите флажок copy error stacks to clipboard (копировать стеки ошибок в буфер обмена).
-
Выполните действия для воспроизведения программной ошибки
-
Когда возникнет программная ошибка, нажмите кнопку «ОК». После закрытия диалогового окна дополнительные сведения об ошибке копируются в буфер обмена, чтобы их проще было вставлять.
a) Unfortunately the version 22.1 has even MORE problems in this regard. ;-/
b) Yes, I agree, for some the deactivation of GPU is a viable workaround. For others, who have to do productive work under time constraints a photoshop version without GPU is like another program, practically not usable.
b) BTW, it’s no surprise that disabling GPU solves some bugs/errors, which are basically a result of an aged program core and sloppy programming, investing more in shiny new features instead of fixing problems and modernizing the core component code.
A large portion of the more advanced and demanding (from the programmer’s perspective) functions/filters/etc. in PS are related to GPU-acceleration tasks. That’s what used to make PS the tool for pro work with high-resolution high-bit-depth data in the first place. In other words, looking onto it from the persective of a software developer: GPU-support is not a nice-to-have add-on making PS a bit faster on slow machines; it’s a core component for demanding work.
(BTW, there a gazillion other graphic programs on the market for basic photo editing… Many ppl who use PS actually don’t NEED the more advanced features…
In other words: For most ppl the mentioned PS-errors are just an annoying nuisance. But there are also a few ppl out there, who — in their daily work — heavily rely on a prof and fast software and advanced features. For them the increasing number of issues and bugs in every of the last updates, that is, the almost total absence of any quality control (using us CC-users as beta-testers) is just a desaster.)

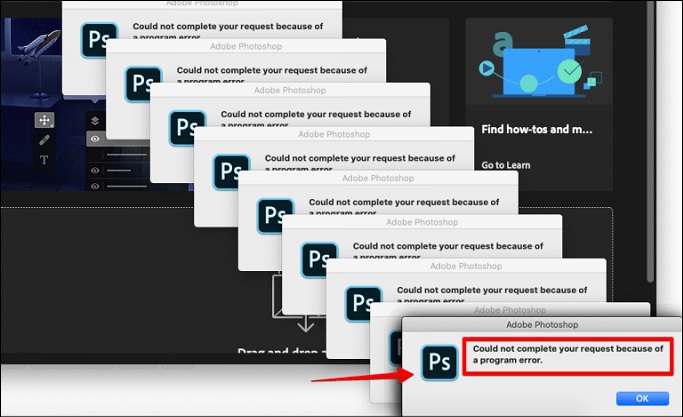
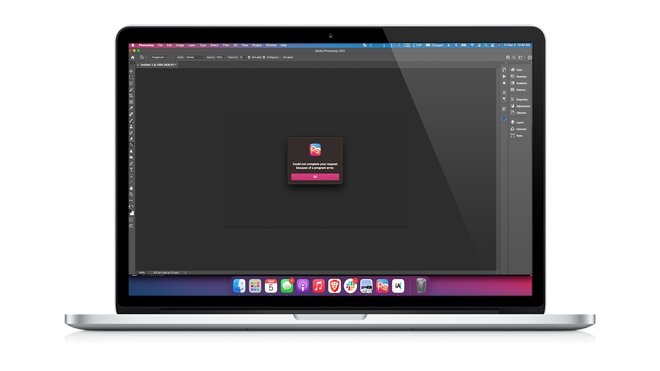
If Photoshop seems to be fighting you at every turn, and you keep getting told that it «could not complete your request because of a program error,» here’s how to fix some common problems to help get it running smoothly again.
Maybe it happened suddenly after an update, or perhaps it’s been happening for a while now. You go to open a file in Photoshop, but instead, the program spits out an error that reads, «Photoshop could not complete your request because of a program error.» If this sounds familiar, don’t worry — you’re hardly alone. As it turns out, plenty of users have noticed this problem cropping up in recent years.
One of the most frustrating parts of this error is that it is entirely nondescript, and doesn’t really tell the user anything. As it turns out, it can be caused by one — — or more — of several problems.
Here’s a few culprits as to why photoshop is acting up:
- Conflicting settings and customizations
- Outdated version of Photoshop
- Insufficient GPU resources
- GPU instability
- Corrupted program files
The error can occur on any Mac but seems to happen more often on a Mac that runs macOS Catalina or macOS Big Sur. This problem is also not unique to macOS, either — as it turns out, Windows users are suffering too.
For both Windows and macOS users, the error often occurs when users attempt to create a new file or open an existing one. However, some users note that it has happened when performing certain functions in Photoshop, such as merging layers or applying filters, as well.
The problem is so common, in fact, that many people have learned to live with it, assuming that it’s just part of the way Photoshop functions now.
You can tell things are back to normal because Photoshop is giving me the «Could not complete request due to a program error» message again
— Erik of the Web (@torgospizza) January 20, 2021
Fortunately, it doesn’t have to be that way. For macOS users, we’re here to show you some of the most common solutions to this problem, as well as explain what causes them.
An immediate, temporary, quick fix
If you see the issue crop up when you need to open or create a new file, restarting your Mac should be enough to solve the problem, albeit temporarily. This is only a quick fix, and when you get a chance, you should take the time to try some of the solutions listed below.
Below are several fixes that could eliminate the problem, especially if you’re running an older machine.
Double check your system requirements
Chances are, you probably already know if you meet the minimum requirements for Photoshop or not, but it never hurts to make sure.
| Minimum | Recommended | |
|---|---|---|
| Processor | Intel processor with 64-bit support; 2 GHz or faster processor with SSE 4.2 or later | Same as minimum |
| Operating System | macOS Mojave (version 10.14) or later | macOS Big Sur (version 11)
macOS Catalina (version 10.15) |
| RAM | 8 GB | 16 GB or more |
| Graphics Card |
|
|
| Hard disk Space | 4 GB of available hard-disk space; additional space is required for installation | Same as minimum |
Your version of Photoshop is outdated
Adobe Photoshop can be a bit fickle, and one of the best ways you can keep it running smoothly is to make sure that you are running the most current version of Adobe Photoshop. The easiest way to do that is to utilize the Adobe Creative Cloud app, which you likely have used to install Adobe Photoshop.
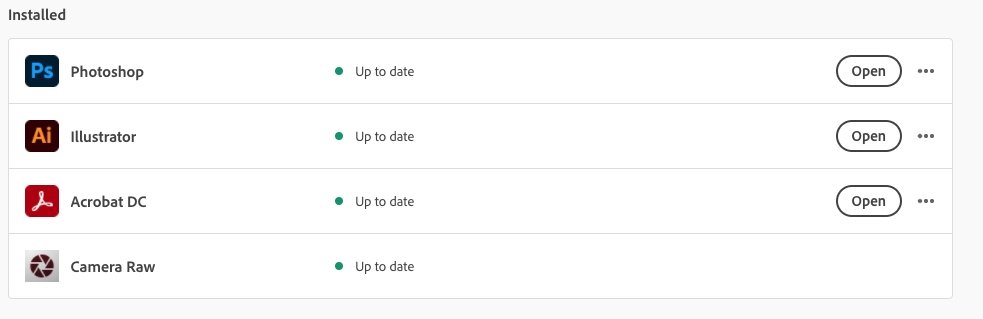
- Close Photoshop
- Open Adobe Creative Cloud
- In the sidebar, click All Apps
- Verify that Photoshop is up to date
- If it isn’t, click Update
- Restart your Mac
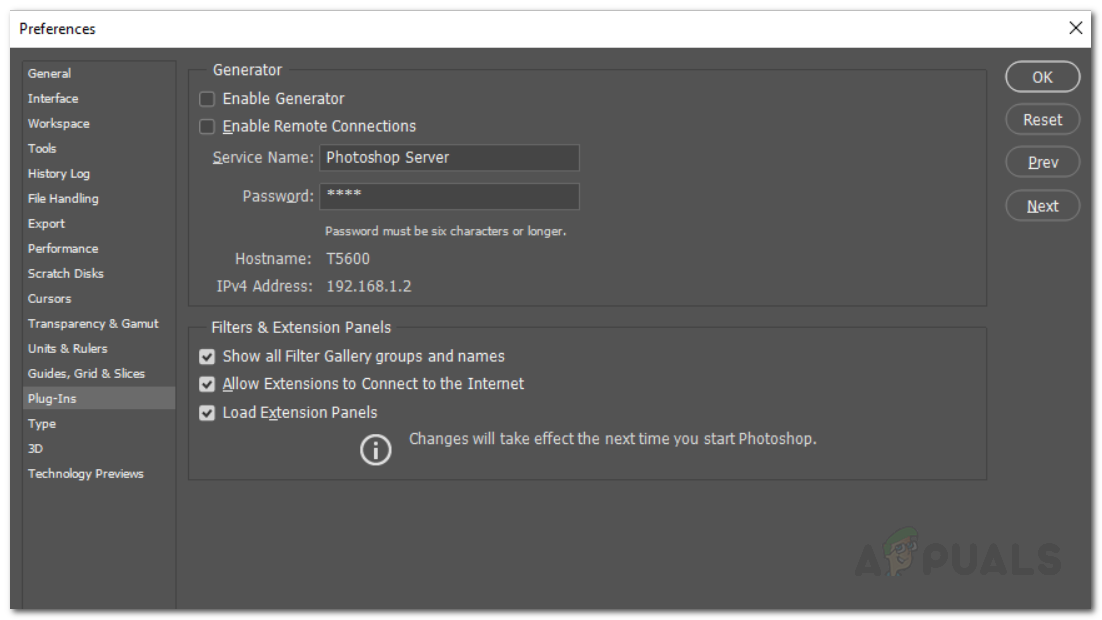
Disabling the Generator
The Generator plugin allows users to create image assets in real-time as you work, avoiding the need to copy, slice, and export each layer manually. Unfortunately, sometimes the Generator can cause Photoshop to behave erratically, especially on systems with older GPUs.
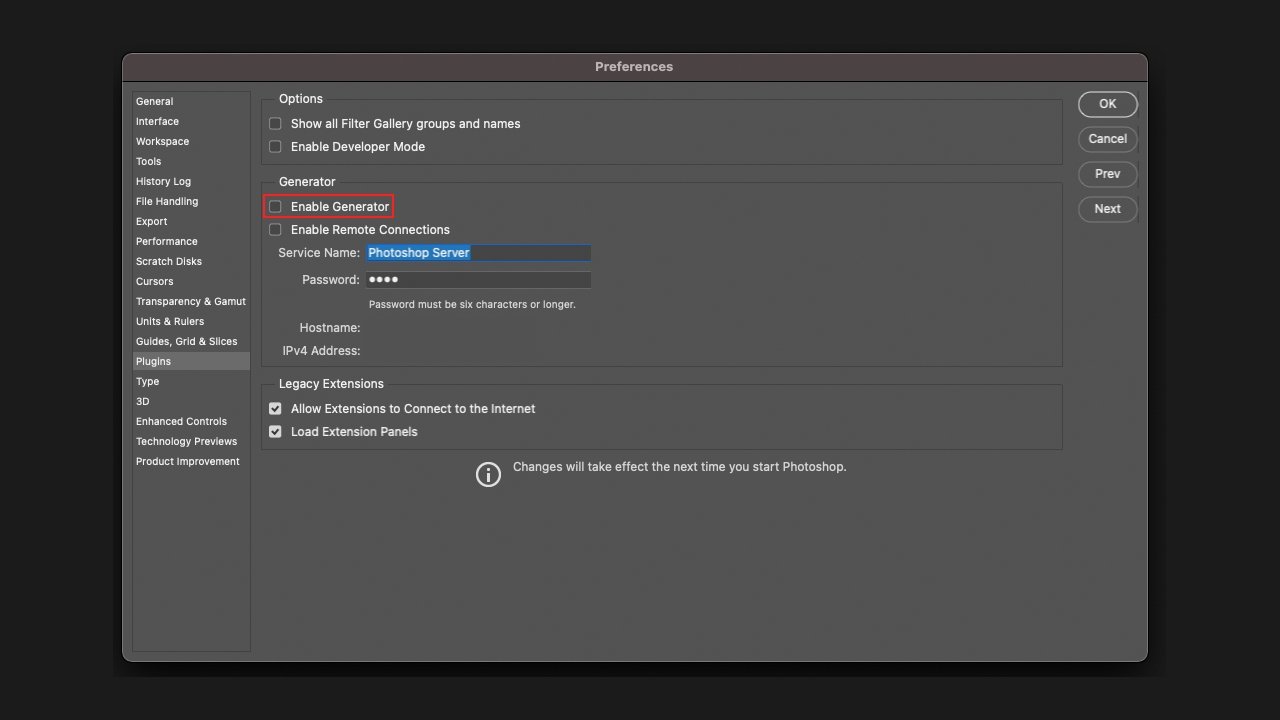
Disabling the Generator plugin feature
How to disable the Photoshop Generator plugin
- Open Photoshop
- In the top menu bar, click Photoshop
- Click Preferences
- Click Plug-Ins
- Uncheck Enable Generator
- Click OK
- Restart Photoshop
Properly set your Cache Levels
If you’ve changed your Cache levels in Photoshop, you may have put undue strain on your graphics processor — most notably if your Cache is set to 1. Resetting them to the default can help eliminate issues.
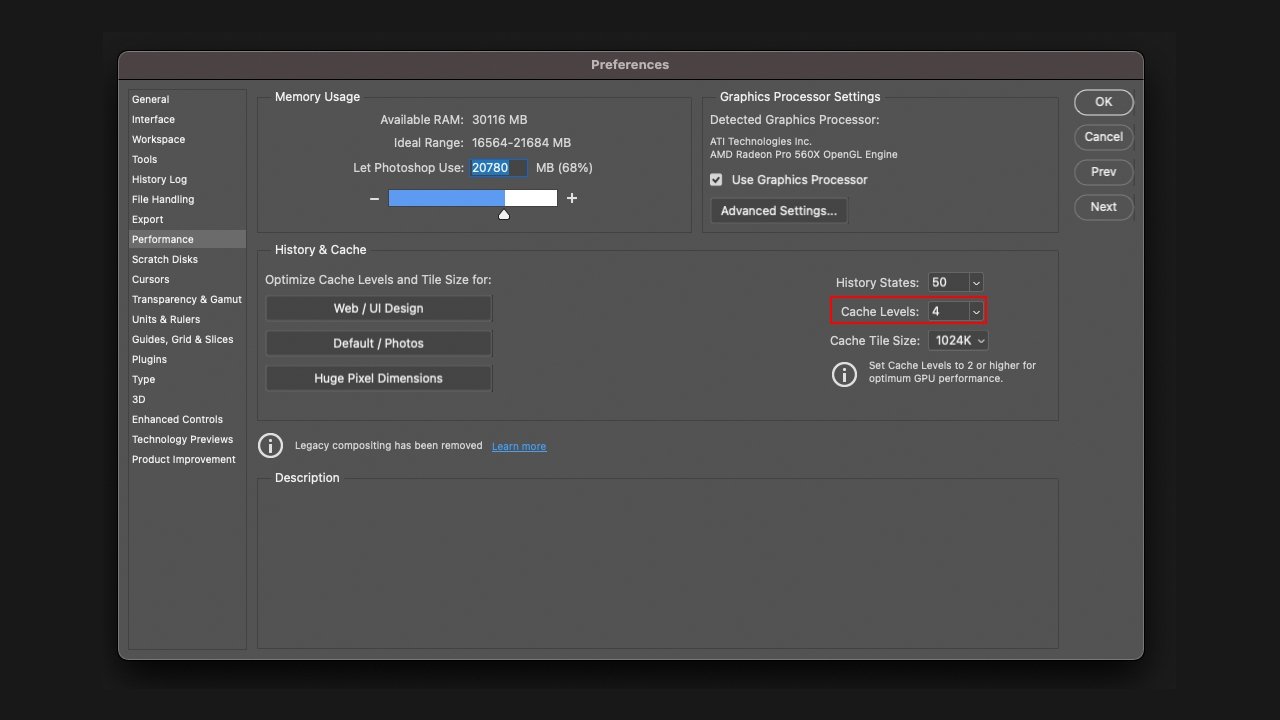
Photoshop’s default cache level is «4»
How to reset your Cache Levels to default in Photoshop
- Open Photoshop
- Click Photoshop in the top menu bar
- Click Preferences
- Click Performance
- Set Cache Levels to 4
- Click OK
- Restart Photoshop
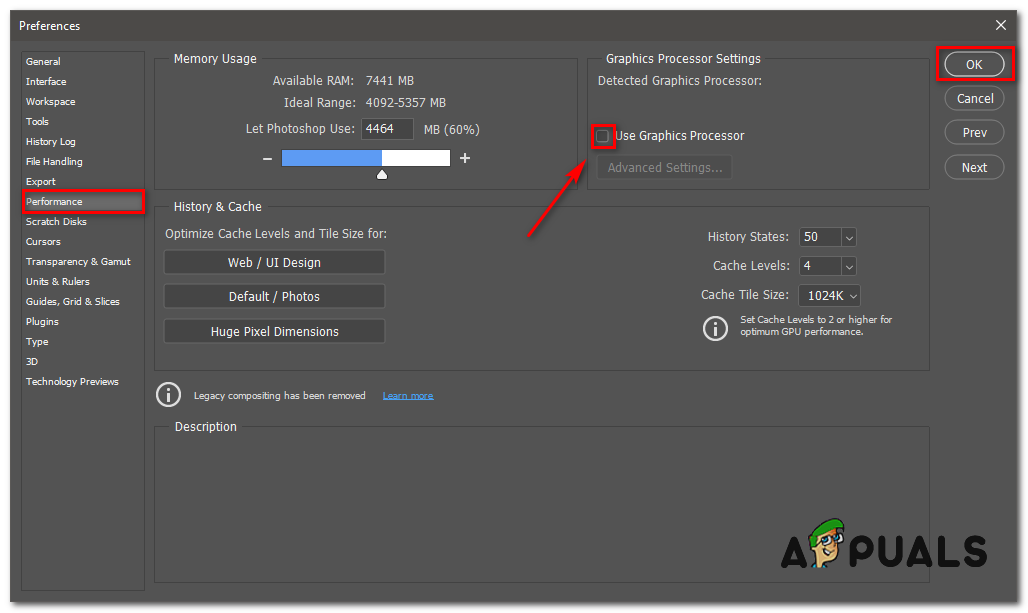
Disable GPU acceleration
GPU acceleration can make Photoshop run better on newer systems, but when enabled on older systems can cause instability, preventing the program from creating or opening new files.
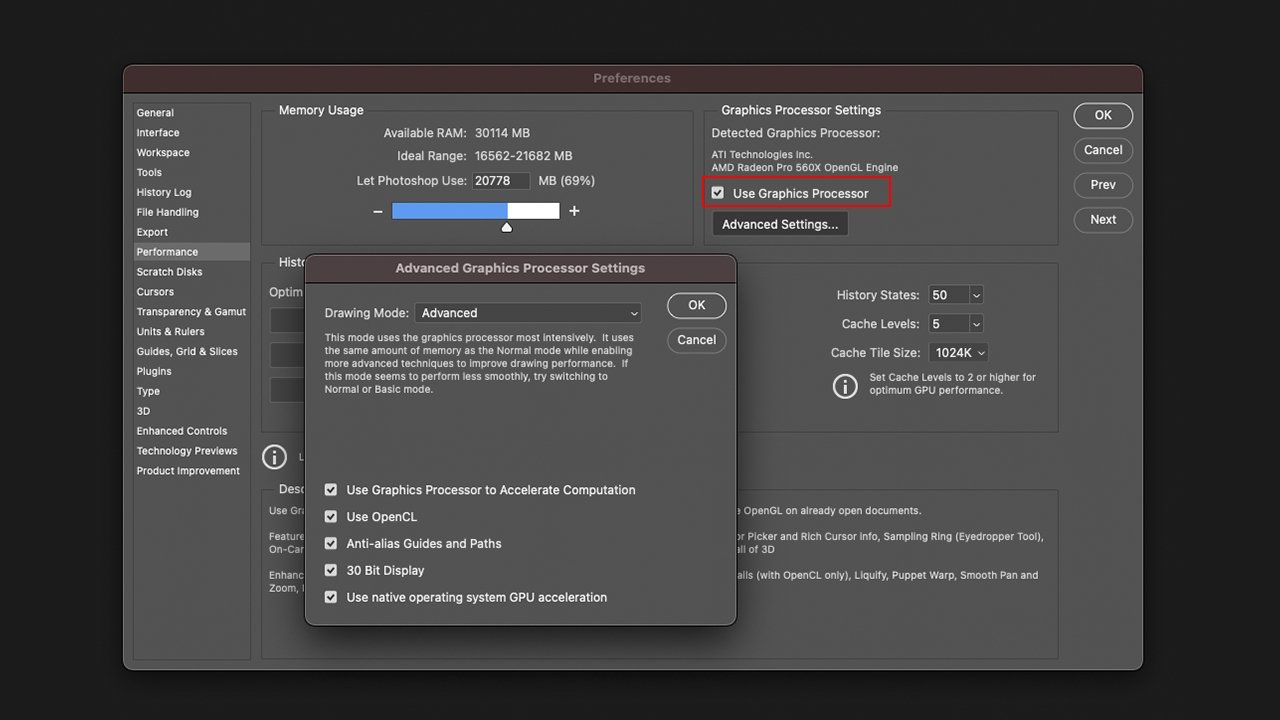
How to turn off GPU acceleration in Photoshop
- Open Photoshop
- Click Photoshop in the top menu bar
- Click Preferences
- Click Performance
- Uncheck Use Graphics Processor
- Click OK
- Restart Photoshop
If this fixes the problem, you may be able to re-enable GPU acceleration and use a less intense drawing mode, which allows you to take advantage of GPU acceleration but is not as physically demanding on your system.
How to change your Drawing Mode in Photoshop
- Open Photoshop
- In the top menu bar, click Photoshop
- Click Preferences
- Click Performance
- Check Use Graphics Processor
- Click Advanced Settings
- In the dropbox that appears, select Basic or Normal, and then click OK
- Click OK
- Restart Photoshop
Resetting Photoshop’s Preferences
The easiest and most effective way to reset Photoshop’s preferences is to remove the user preference folders and force Photoshop to recreate them upon the next launch. This will reset your preferences, which may be annoying, but is likely to fix any user-error-caused issues.
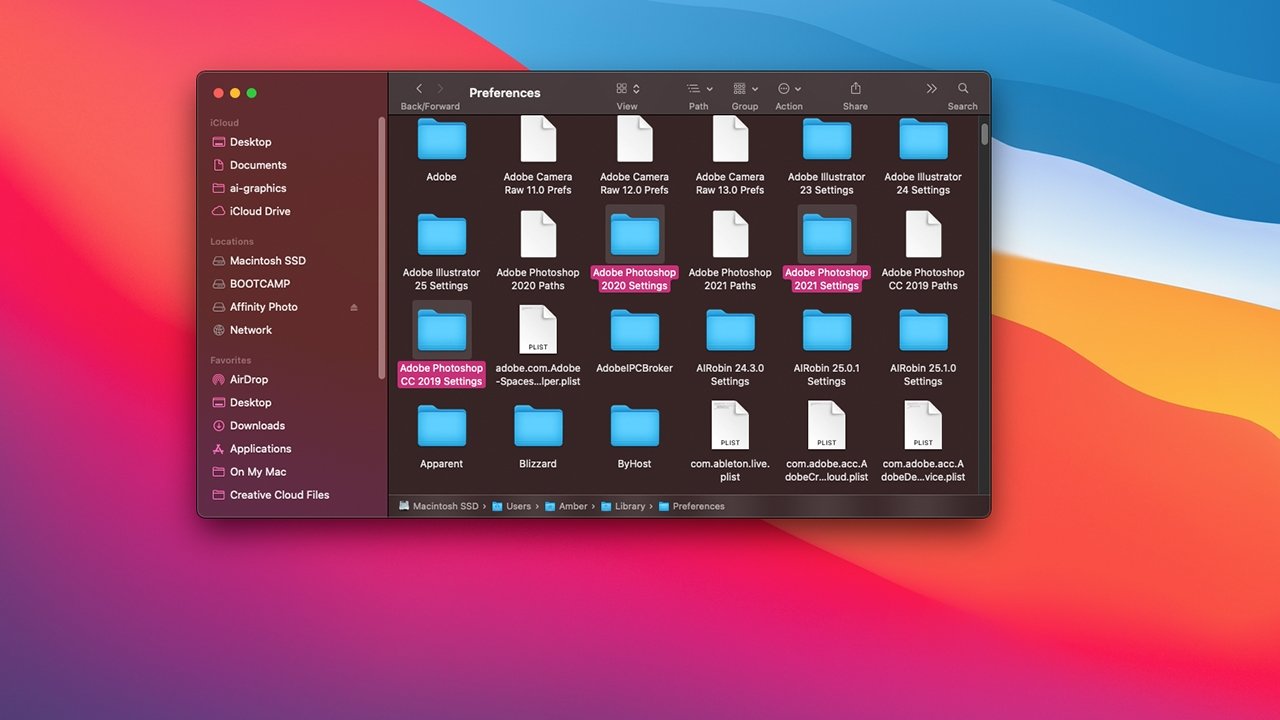
Dragging these folders out of your Preferences folder will reset Photoshop’s preferences
How to reset all user preferences to default in Photoshop
- Quit Photoshop
- Open Finder
- In the top menu bar, click Go
- Click Library
- Navigate and enter the folder named Preferences
- Locate all labeled Photoshop [Version] Settings
- Drag these folders to your Desktop, if you wish to back them up, or the Trash if you decide not to
- Restart your Mac
- Open Photoshop
Uncommon situations
There are a couple of uncommon situations that we’d like to address in this tip as well. This includes those who have kept the same install across the 32-bit to 64-bit change introduced with macOS Catalina and those running pre-Creative Suite versions of Adobe Photoshop.
A note for previous Mojave users
If you haven’t reinstalled Photoshop since switching from Mojave to Catalina or Big Sur, you may be able to save yourself plenty of problems by simply deleting and reinstalling Photoshop. As it turns out, the jump from one operating system to the next can cause some settings issues. If you’ve got the time and effort to do this, it may be worth trying out first.
A note for those using much older versions of Photoshop
If you are running Photoshop CS6 or earlier, odds are, there’s not much to be done for your program. Photoshop CS6 was released in 2012 and was sunset in 2016. Photoshop CS6 is a 32-bit program, so anyone running any macOS operating system from Catalina forward wouldn’t be able to use it anyway. There have been some savvy macOS Mojave users that have managed to install and keep Photoshop CS6 running on their machines, though, so it is possible — at least for now.
| Workable Solutions | Step-by-step Troubleshooting |
|---|---|
| 1. Change the File Extension | Using Adobe Photoshop’s Export feature, adjust the file type to .jpeg or .png…Full steps |
| 2. Unlock Photoshop Library Folder | Go to your personal directory after starting the Finder. You may find it by typing /Library/…Full steps |
| 3. Disable the Generator | Activate Adobe Photoshop. Preferences can be selected by clicking the Edit drop-down…Full steps |
| 4. Disable Graphics Processor | Hit the Edit function after opening Photoshop’s recent version. Select Preferences…Full steps |
| 5. Reset Photoshop Preferences | Click the Windows and R keys to launch the Run box. Type %appdata% and press Enter…Full steps |
Could Not Complete Your Request Because of a Program Error
While using Photoshop, you might encounter the issue «Photoshop could not complete your request because of a program error«. So, what is this error about? Per the user report, this error ensues out of the blue while trying to save or open a PSD file. Typically, one of the below-mentioned glitches accompanies the incident.
- Could not complete your request because of a program error Photoshop
- Due to a programming mistake, the file «yourfilename.psd» could not be saved
How can I efficiently correct this unpleasant error? Finding the potential reasons for the «couldn’t accomplish your request because of a program issue Photoshop» error is the preliminary step towards achieving that. As this error text is inconsistent, it could appear because:
- Image file extension
- Photoshop preferences
- Generator plugin
- Secured library folder
Without delay, let’s find out the best methods to fix this Photoshop could not complete your request because of a program error issue.
Bonus Tip: Export/Restore Photoshop Images in Advance
Data loss is a common scenario nowadays. Are you thinking of exporting and retrieving Photoshop files without the hassles of data loss? Customers should export or recover their Photoshop files to another place as they cannot finish the request to prevent data theft.
As a professional data recovery software for Windows 11/10/8/7, EaseUS Data Recovery Wizard can retrieve unlimited files and folders with a 99.7% success record! The best features of EaseUS are the following:
EaseUS PSD Data Recovery Software
- It can recover deleted files or permanently deleted videos, images, audio files, documents, and other archives with a few clicks.
- This software recover deleted files from SD cards, memory cards, USB flash drives, PC, external hard drives, etc.
- It helps recover files from a damaged hard drive, formatted hard drive, and even a crashed hard drive.
Fix Could Not Complete Your Request Because of a Program Error
As incompatible system hardware and corrupted Photoshop preference folders give rise to «Could not complete your request because of a program error Photoshop«, it can be fixed by eliminating the preference files and restarting photoshop.
In this part, we will discuss different methods to fix this error. But before that, some key pointers from a YouTube video will be discussed to fix «Photoshop could not complete your request because of a program error». The highlights of this video are the following:
- 0:00 Introduction
- 0:27 Could not complete your request because of a program error Photoshop
Method 1. Change the File Extension of the PSD Fils
Altering the image file’s extension should be your initial test before moving on to more technical aspects. As we previously indicated, this is advised when the error notice appears for a particular picture file. If the other image data loads without any issue, consider altering the PSD or faulty image file’s extension to .jpeg or .png. Generally, images are stored in these categories since they are pretty universal.
These are the two leading ways to alter the file extension:
While modifying the file, you can make arbitrary changes. Using Adobe Photoshop’s Export feature, adjust the file type to .jpeg or .png in the topmost window; this should solve the problem if the previous method fails. After that, select «Save».
Can you fix corrupted Photoshop files without effort? You may quickly and easily retrieve lost, damaged, or even corrupted PSD files on every Windows platform (Windows 10/8/7, etc.) by utilizing the robust PSD repair tool. Using our file retrieval software, you may rescue all of your missing Adobe Photoshop CC 2019/2018/2017/2016 files, as well as photographs, video files, audio recordings, and documents.
If you still notice «Photoshop couldn’t finish your request due to a software issue» persists, try opening the damaged picture file again.
Method 2. Unlock the Photoshop Library Folder
The error notice may also display if the Library folder is disabled. You must unlock the Library folder if this happens. It’s easy to accomplish this. Follow the steps below:
Step 1. Go to your personal directory after starting the Finder. You may find it by typing /Library/ into the search bar.
Step 2. To display the drop-down option, right-click the Library folder or click it while holding down the Ctrl key.
Step 3. Select the Get Info button.
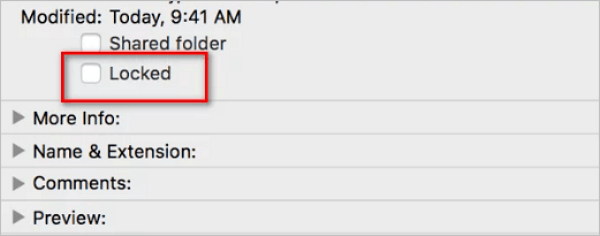
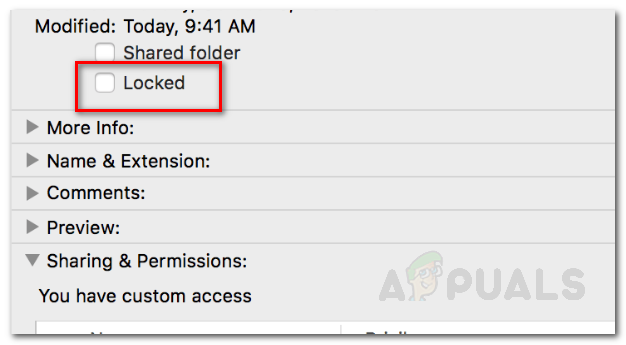
Step 4. Underneath the folder information, deselect «Locked».
Method 3. Disable the Generator to Fix Could Not Complete Your Request
The generator plugin, located in the Preferences box, should be disabled as the next step involves fixing the Photoshop could not complete your request because of a program error. Some people claim that this has resolved their problem. The steps are the following:
Step 1. Activate Adobe Photoshop.
Step 2. Preferences can be selected by clicking the Edit drop-down option.
Step 3. The «Enable Generator» checkbox can be removed by switching to the Plug-ins tab.
Step 4. Click «OK» after finishing that.
Step 5. If the problem still exists, relaunch Photoshop.

Method 4. Fix Could Not Complete Your Request by Disabling Graphics Processor
The «Photoshop could not finish your request due to a software error» problem can also be resolved by deactivating the graphic processor. To achieve it, follow these instructions.
Step 1. Hit the Edit function after opening Photoshop’s recent version.
Step 2. Select Preferences from the menu that is presented.
Step 3. Click OK after disabling the Use Graphics Processor option in the Preferences panel.
Method 5. Reset Photoshop Preferences to Fix Could Not Complete Your Request
These instructions will show you how to reconfigure Photoshop settings if preferences are to blame for the «Photoshop couldn’t finish your request» issue.
Step 1. Click the Windows and R keys to launch the Run box. Type %appdata% and press Enter to continue.
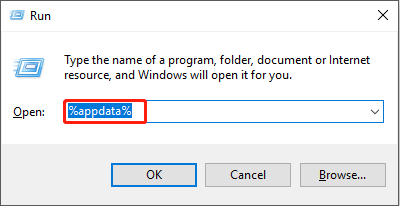
Step 2. Use the route outlined below in the expanded panel to find your way there.
Step 3. Find Adobe Photoshop CS6 Prefs.psp and Adobe Photoshop X64 Prefs.psp, and transfer them to the PC.

Step 4. Launch Photoshop now to see that its Settings have been reset.
Photoshop Preferences may be quickly reconfigured for Windows. Double-click the Photoshop application while holding the Alt, Ctrl, and Shift keys. To acknowledge the action, click Yes on the pop-up box.
Conclusion
Although the problem message «Photoshop could not finish your request because of a software fault» seems perplexing, the methods offered in this article will assist you in fixing it. If this error causes serious concern, you should choose a fix from the list of possibilities.
Before continuing, you should check out any apparent causes. Moreover, data loss may ensue anytime, which can be eliminated with the help of professional software, EaseUS data recovery software. So, install this now!
Could Not Complete Your Request Photoshop FAQs
Follow the below-mentioned questions and answers to get a better understanding of this article:
1. How to fix unexpected end-of-file photoshop errors?
The unanticipated end of a file in Photoshop typically indicates that the data has been damaged on disk. At the same time, it might also suggest that the file has the incorrect extension and cannot be read correctly. In your situation, a server mistake caused the file to get corrupted. The majority of the time, the files cannot be recovered.
Changing the PSD file’s extension is an easy workaround for the Photoshop end-of-file problem. If you have trouble accurately saving Photoshop files, try this approach.
2. How do I recover a corrupt file?
You can recover files from a corrupted hard drive by deploying a top-notch file repair software, EaseUS Data Recovery Wizard. Being a powerful data retrieval and repair software, it lets you mend and restore lost or corrupted documents, including videos, photos, PowerPoint, and other file formats.
3. Why won’t my Photoshop let me export?
One of the most familiar reasons for not being able to export your Photoshop file is an unsupported file format. However, other probable reasons might be the files having several layers or being extra large, or consisting of an alpha channel.
4. How to fix Photoshop could not complete your request because of a program error?
You may disable the generator in order to fix this Photoshop program error. Follow the steps below to disable the generator:
- Search for the Edit option, and select Preferences.
- Visit the Plug-ins and untick the Enable Generator icon on the upper side.
- Hit the OK button, and notice if it resolves this error completely.
Прекращение поддержки 3D-функций в Photoshop
3D-функции Photoshop будут удалены в будущих обновлениях. Пользователям, работающим с 3D-функциями, рекомендуется ознакомиться с новой коллекцией Adobe Substance 3D, которая представляет собой новое поколение 3D-инструментов от Adobe. Дополнительная информация о прекращении поддержки 3D-функций в Photoshop представлена здесь: Photoshop 3D | Распространенные вопросы о прекращении поддержки 3D-функций в Photoshop.
Узнайте, как исправить ошибку Photoshop could not complete your request because of a program error (Photoshop не может выполнить запрос из-за программной ошибки), отображающуюся при открытии или сохранении файлов
При открытии или сохранении файлов изображений, выдается одна из следующих ошибок:
- «Ваш запрос не выполнен из-за программной ошибки».
- Could not save as «yourfilename.psd» because of a program error (Не удалось сохранить как имя_файла.psd, так как произошла программная ошибка).
Программная ошибка во время сохранения файлов
Ошибка Photoshop could not save as «yourfilename.psd» because of a program error (Photoshop не может сохранить файл как имя_файла.psd из-за программной ошибки) может возникнуть по разным причинам, от композиции слоя до неправильных системных разрешений.
Следуйте представленным ниже рекомендациям для устранения программных ошибок при сохранении файлов в Photoshop.
-
Предоставьте Photoshop права «Полный доступ к диску» в системный настройках macOS
Чтобы изменить соответствующую настройку на Mac, в меню Apple выберите «Системные настройки» > «Безопасность и конфиденциальность», затем нажмите «Конфиденциальность».
См. раздел Изменение настроек конфиденциальности на компьютере Mac -
Скройте все слои на панели «Слои» и выполните сохранение еще раз
Нажмите или нажмите и перетащите значок видимости каждого слоя, чтобы скрыть их.
Можно также использовать устаревший API сохранения macOS для использования ранних, устаревших методов сохранения.
Программная ошибка во время открытия файлов
Ошибка Photoshop could not complete your request because of a program error (Photoshop не может выполнить запрос из-за программной ошибки) может возникать по разным причинам, от повреждения файла установок Photoshop до несовместимости системного аппаратного или программного обеспечения.
Следуйте представленным ниже рекомендациям для устранения программных ошибок при открытии файлов в Photoshop.
-
Проверьте системные требования
- Убедитесь, что ваша система соответствует минимальным требованиям последней версии Photoshop.
См. раздел Системные требования Photoshop - Если ваше графическое оборудование не поддерживается, возможно, вам потребуется обновить его до более современного.
См. раздел Минимальные требования к графическому процессору
- Убедитесь, что ваша система соответствует минимальным требованиям последней версии Photoshop.
-
- Перейдите в раздел Установки > Внешние модули
- Снимите флажок Включить Генератор
-
Переустановите графический драйвер
-
Восстановите установки Photoshop по умолчанию
-
Выключите ускорение графического процессора
Внешний модуль диагностики программных ошибок
-
Загрузите и распакуйте файл user-diagnostics.zip в локальной папке, к которой вы сможете получить доступ
-
Распаковав архив zip, скопируйте папку user-diagnostic в папку внешних модулей Photoshop по следующему пути:
- macOS: Application Folder > Adobe Photoshop 2022 > Plug-Ins
- Windows: Program Files > Adobe > Adobe Photoshop 2022 > Plug-Ins
Копирование папки user-diagnostics в папку Plug-ins -
Запустите приложение Photoshop
-
Выберите Photoshop User Diagnostics (Пользовательская диагностика Photoshop) в меню «Внешние модули».
-
На появившейся панели установите флажок copy error stacks to clipboard (копировать стеки ошибок в буфер обмена).
-
Выполните действия для воспроизведения программной ошибки
-
Когда возникнет программная ошибка, нажмите кнопку «ОК». После закрытия диалогового окна дополнительные сведения об ошибке копируются в буфер обмена, чтобы их проще было вставлять.
The ‘Photoshop could not complete your request because of a program error’ error message is often caused by the generator plugin or the settings of Photoshop along with the file extension of the image files. The error message appears when you are trying to open a PSD file. The said error message, in rare situations, can be very difficult to solve as the application throws the said error message whenever something or anything is wrong. This could refer to the preferences of the application, or maybe even some corruption in the image file.
In some scenarios, the error message can be restricted to only a specific image file while other image files load perfectly fine. Nonetheless, we will be discussing the various causes of the said error message in detail down below. So let us get into it.
Since the error message is arbitrary, it can often be caused due to the following factors:
- Photoshop Preferences: This is the most common cause of the error message. The issue is, in most cases, caused due to the preferences of your Photoshop. This happens when the error message appears on every image file you try to open.
- Image File Extension: Another cause of the said error message can be the extension of the image file. This can be easily identified when the error message pops up on an individual image file. In such a case, changing the extension of the image file from .psd to .jpeg or .png often fixes the issue. Otherwise, the image file is corrupt.
- Locked Library Folder: A locked Library folder can also result in the said error message. This can be easily rectified by unlocking the Library folder.
- Generator Plugin: In some cases, the generator plugin found in the Preferences window can also cause the said error message. Turning it off can often resolve the issue.
Now that we are done with that, let us get into the solutions and get your issue resolved.
Solution 1: Change the Extension of the Image File
Before we get into the more technical stuff, the first thing you should try out is changing the extension of the image file. This is suggested, as we have mentioned earlier when the error message pops up on a specific image file. If all of the other image files load smoothly, you should try changing the extension of the troublesome image file to .jpeg or .png. These formats are pretty generic and usually, pictures are saved in this format.
If manually changing the extension does not fix the issue, you can try using the Export option in Adobe Photoshop. Before hitting save, make sure that the file format is either .jpeg or .png, and then hit Save.
If the issue persists even after changing the image format, then that means the image file is corrupt and you will have to give it up or use a backup copy if it is important.
Solution 2: Disabling Graphics Processor Option
This option might make your Photoshop work and render photos a little bit slower than usual because you are basically disabling Hardware acceleration for Photoshop however most people have reported that it can fix this problem.
-
- Open Adobe Photoshop.
- Once Adobe Photoshop is opened, press the “Control + K” keys together to open Preferences.
- Head over to the “Performance” section and Untick option “Use Graphics Processor”

Unticking “Use Graphics Processor” - Now restart your Adobe Photoshop and you should be good to go. If the issue still persists check out the other solutions.
Solution 3: Disable Generator
The next step to solving the issue would be disabling the generator plugin which is found in the Preferences window. This has reportedly fixed the issue for a few users. Here’s how to do it:
- Open up Adobe Photoshop.
- Click on the Edit drop-down menu and then choose Preferences.
- Switch to the Plug–ins tab and uncheck the ‘Enable Generator’ checkbox.

Disabling Generator - Once you have done that, click OK.
- Restart Photoshop and see if it fixes the issue.
Solution 4: Unlock the Library Folder
A locked Library folder can also cause the error message to appear. In such a scenario, you will have to unlock the Library folder. This can be done pretty easily. Here’s how to do it:
- Open up the Finder and then navigate to your user directory. You can do this by searching for ~/Library/ in the search box.
- Once you see the Library folder, right-click on it or just hold the Ctrl key while clicking on the folder to show the drop-down menu.
- Click on the Get Info option.
- Uncheck the ‘Locked’ option under folder details.

Unlocking Folder - See if this fixes the issue for you.
Solution 5: Reset Photoshop Preferences
If the above solutions do not work for you, then, you will have to reset the Preferences of the Photoshop application as a final resort. Resetting the Preferences usually fix weird issues with the application so this is very likely to solve the issue for you as well. Doing this manually is suggested as it does not affect your color and workspace settings. However, if you reset the Preferences using the keystrokes method, that will reset the color and workspace settings along with a few more as well.
Therefore, the manual way is the way to go. Here’s how to do it:
If you are using macOS, this is pretty simple:
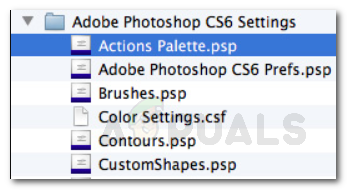
- Just navigate to the ~/Library/Preferences/Adobe Photoshop CSx Settings/ directory.
- Once you are there, move the CS6 Prefs.psp file to your Desktop. Here, CS6 is the version so it might be different in your case but you get the idea.

Photoshop Preferences File - That’s it.
For Windows users, do the following:
- Press the Windows Key + R to open up the Run dialogue box.
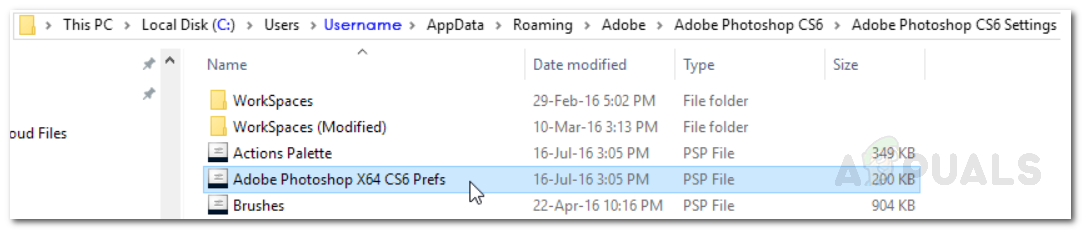
- Type in %AppData% and hit Enter. This will take you to the AppData directory.
- There, navigate to Roaming/Adobe/Adobe Photoshop CSx/Adobe Photoshop Settings/ directory.
- Once you are there, move both the Adobe Photoshop CS6 Prefs.psp and Adobe Photoshop CS6 X64 Prefs.psp files to your Desktop.

Photoshop Preferences File
Once you have done that, run Adobe Photoshop again and see if your issue has been solved.

Kevin Arrows
Kevin is a dynamic and self-motivated information technology professional, with a Thorough knowledge of all facets pertaining to network infrastructure design, implementation and administration. Superior record of delivering simultaneous large-scale mission critical projects on time and under budget.
There are numerous potential causes for file damage:
- A crash when saving a file, especially to network or external drives; sudden power outages
- Damaged cables
- Network transmission issues
- Software bugs
- Problems with hard disks or RAM modules
Still, file damage is rare. If you determine one or more of your files is corrupted, determine the cause to prevent further issues, while you try to recover your file.
Determine the cause
The first thing to determine is if the corruption is limited to one file or occurs with several, so you can limit the potential damage. If it’s one file, the cause could be a glitch with the computer that you haven’t noticed, or thought wasn’t connected.If it’s more than one file, look for patterns:
- Did it occur with files that are in the same location (folder, hard disk, network, or removable drive)?
- Were they created or modified around the same time?
- Did anything change on or with the computer around the time the files were last edited?
- Are the images displaying corruption when you print them as well as when you view them on screen?
If you can find a pattern that indicates they shared common hardware, test your cables, try a different port, or use a different hard disk or use a hard disk instead of a network drive. If files were corrupted recently and they don’t have a time limitation, you could have a malfunctioning RAM module. If you’ve added any software to your computer around the time the images were corrupted, there could be an issue with that application or update. Check for software updates or determine if your applications have recently been updated, or disable the application. Although rare, virus protection software, backup software, and font management software can try to write to files before they’re saved, causing damage. If your images are only corrupted on screen (the damage does not print), update your video driver. If that doesn’t solve the problem, contact your video card manufacturer.In Windows, see the Windows General Troubleshooting guide for instructions on removing temporary files and turning off all OS startup items and services. It also tells you how to turn off third-party plug-ins in Photoshop by immediately holding down the Shift key after you start Photoshop. On Mac OS, use the Mac OS General Troubleshooting guide for instructions on repairing disk permissions and turning off OS startup items. It also tells you how to turn off third-party plug-ins in Photoshop by immediately holding down the Shift key after you start Photoshop.
Recover the file
When a file has been corrupted, you can sometimes get the file back with its layers or as a composite (a composite is a flattened file). The appearance of the file is maintained, but the layers are lost. Or the file could be damaged beyond repair. Regular backups can allow you to salvage a version of your file that you saved before the corruption. Note: A composite file cannot be recovered from a file when the option to maximize PSD and PSB file compatibility is turned off in Photoshop’s preferences. To make sure that your files always save with a composite, do the following:
- Choose Photoshop > Preferences > File Handling (Mac OS) or Edit > Preferences > File Handling (Windows).
- Choose Always in the pop-up menu next to Maximize PSD and PSB File Compatibility.
- Click OK to close Preferences.
Try any or all of these options to recover your file:
- Use Save As to save the file to a new name in a different location. (For example, use an internal hard disk or a drive that is not a removable or network drive.)
- Open any backed-up copies of your image to determine if one was saved before the corruption occurred.
- If you’ve had one of these error messages, your filename extension may not match your file format:
- Could not complete your request because it is not a valid Photoshop document.
- Could not complete your request because an unknown or invalid JPEG marker type is found.
- Could not complete your request because the file-format module cannot parse the file.
- This is not a valid Portable Document File (PDF) document. It cannot be opened.
See Invalid JPEG marker error for the solution.
- To open an image that contains damaged layer data with its composite, press Shift+Opt (Mac OS) or Shift+Alt (Windows) while your file is being opened. This solution doesn’t work on all files.
- Customers have suggested these recovery utilities. Adobe does not support them, and has not tested with them. However, we hope that they help recover your file.
- www.telegraphics.com.au/psdparse-online/
- www.telegraphics.com.au/sw/product/PSDRecover
Содержание
- Способ 1: Настройки производительности
- Способ 2: Изменение параметров файла
- Способ 3: Сброс настроек
- Способ 4: Переустановка программы
- Вопросы и ответы
Способ 1: Настройки производительности
При работе в программе Adobe Photoshop иногда могут возникать различного рода ошибки, начинающиеся со строки «Невозможно выполнить запрос». И хотя вариантов такой проблемы весьма много, включая «Произошел программный сбой», «Ошибка диска» или «Обнаружен неизвестный маркер», решения практически всегда сводятся к одним и тем же действиям, в первую очередь связанным с настройками производительности.
Читайте также: Правильная настройка Adobe Photoshop
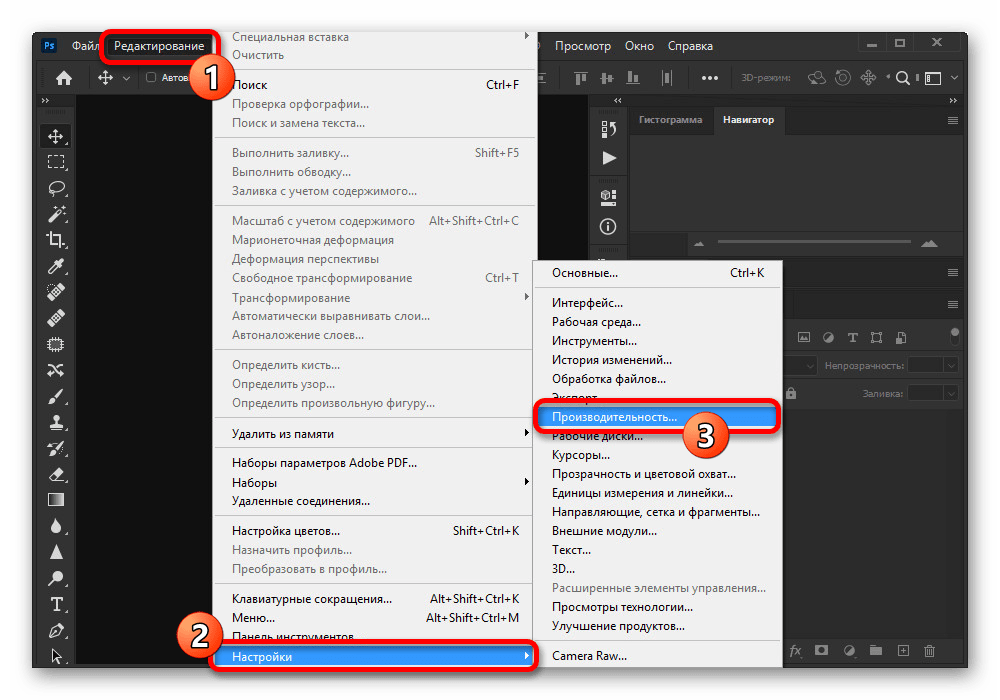
- Чтобы избавиться от рассматриваемой проблемы, на верхней панели Фотошопа разверните список «Редактирование», перейдите в раздел «Настройки» и откройте «Производительность». Также можете воспользоваться сочетанием клавиш «CTRL+K» и уже через меню в новом окне перейти к нужным параметрам.
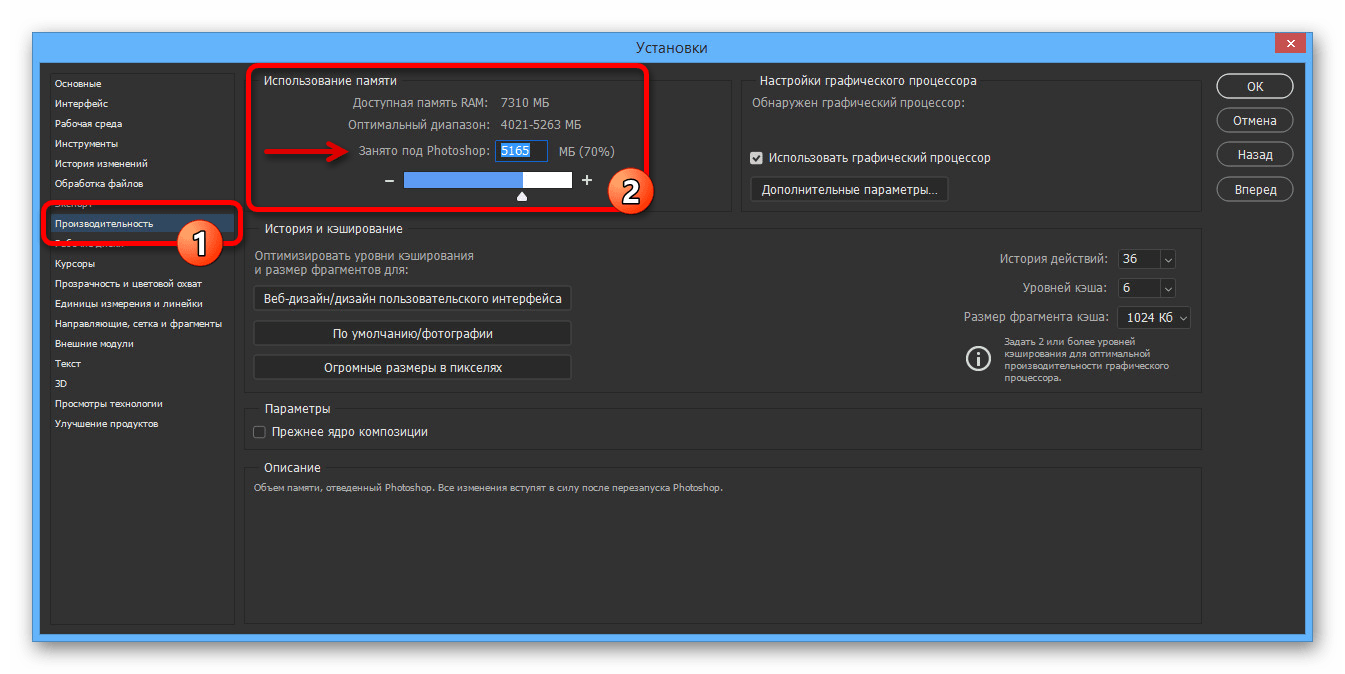
- Находясь на указанной выше вкладке, в блоке «Использование памяти» измените значение «Занято под Photoshop» в соответствии с рекомендациями из строки «Оптимальный диапазон», но при этом учитывайте, что слишком высокое значение может привести к другим проблемам. Как правило, для стабильной работы софта с большими файлами будет достаточно от 5 до 6 Гб оперативной памяти.
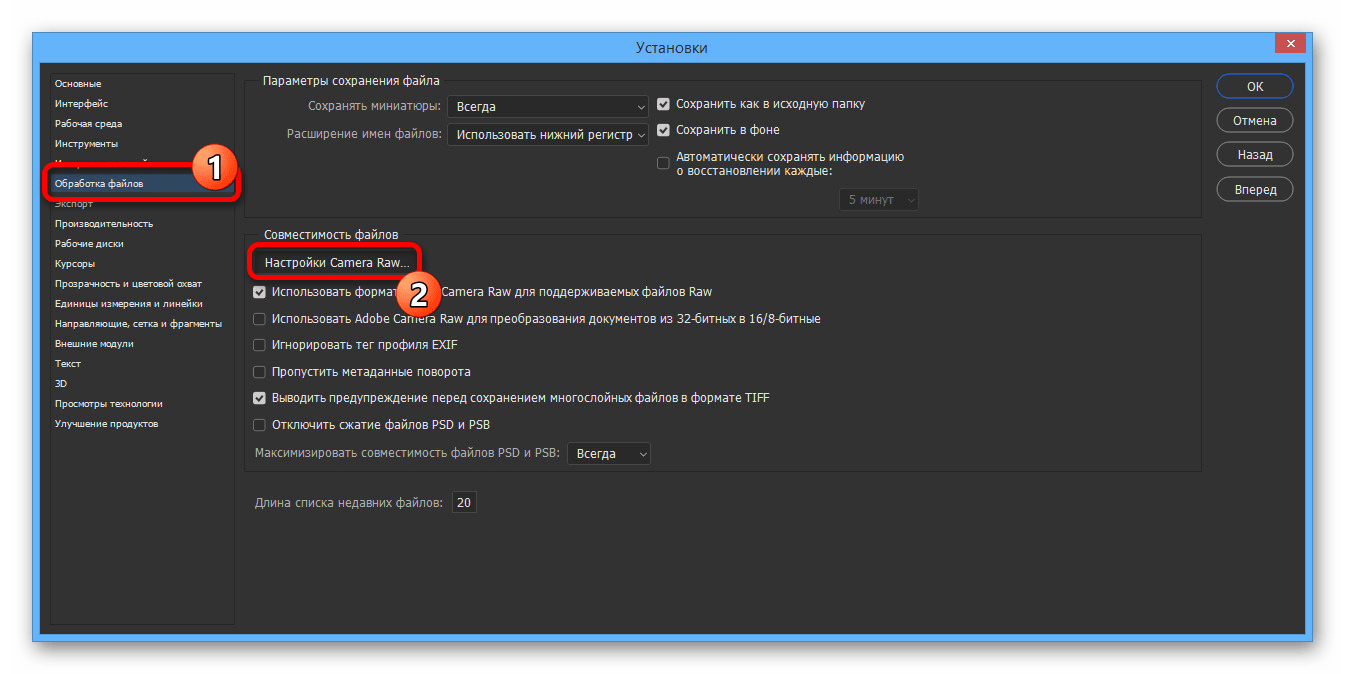
- Если ошибка «Невозможно выполнить запрос» возникает во время открытия каких-либо файлов, что в особенности относится к изображениям с камеры, может помощь изменение параметров Camera Raw. Для этого переключитесь на вкладку «Обработка файлов» через навигационное меню и в блоке «Совместимость файлов» воспользуйтесь кнопкой «Настройки Camera Raw».

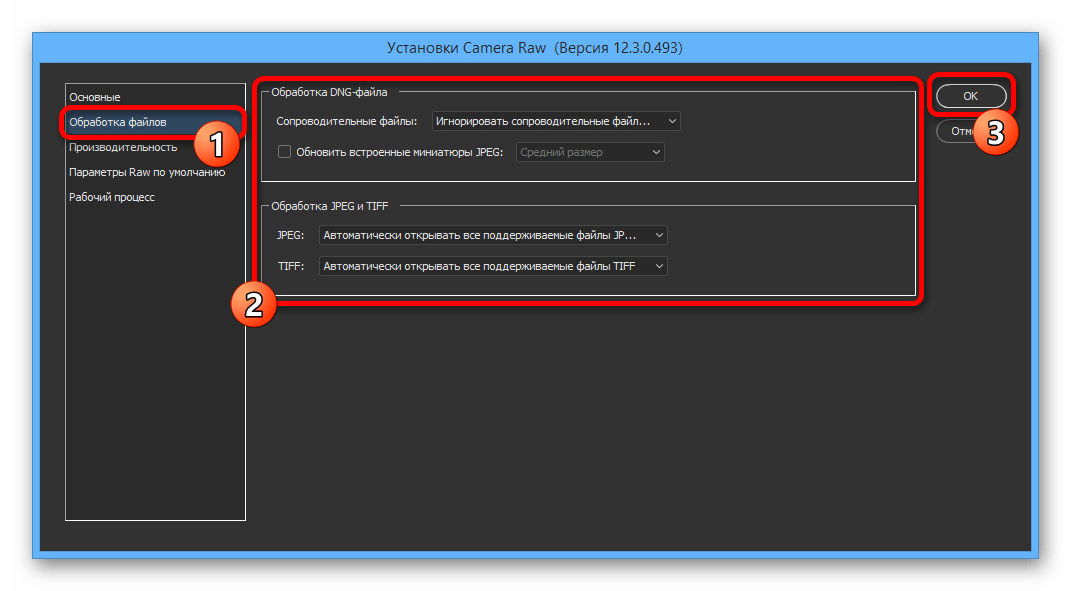
Здесь на вкладке «Обработка файлов» установите параметры так же, как представлено на скриншоте ниже. После этого выполните сохранение с помощью кнопки «ОК», перезапустите Фотошоп и проверьте проблемный документ.
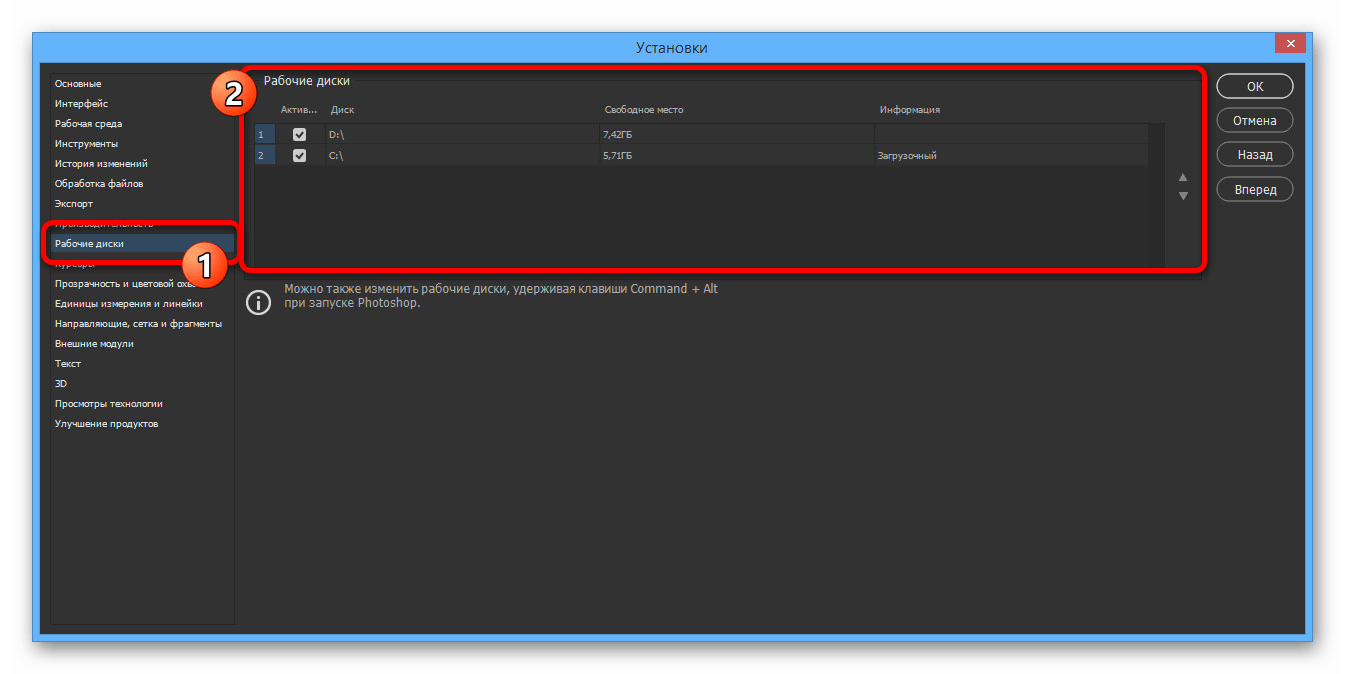
- В некоторых случаях причиной ошибки может выступать нехватка свободного пространства на компьютере. Исправить это довольно легко с помощью параметров «Рабочих дисков» в настройках программы, руководствуясь другой нашей инструкцией.
Подробнее: Устранение проблем с нехваткой места в Adobe Photoshop
Обратите внимание, что если на вашем компьютере слишком мало оперативной памяти, лучше всего произвести модернизацию, а также воспользоваться файлом подкачки. Кроме того, должен помочь переход на более раннюю версию ПО, требованиям которого соответствует ваше железо.
Способ 2: Изменение параметров файла
Чаще всего при правильных настройках производительности и обработки файлов ошибка «Невозможно выполнить запрос» возникает во время сохранения документов, вне зависимости от расширения. Связано это с неправильными параметрами разрешения, изменение которых, скорее всего, станет решением практически без вреда для изображения.
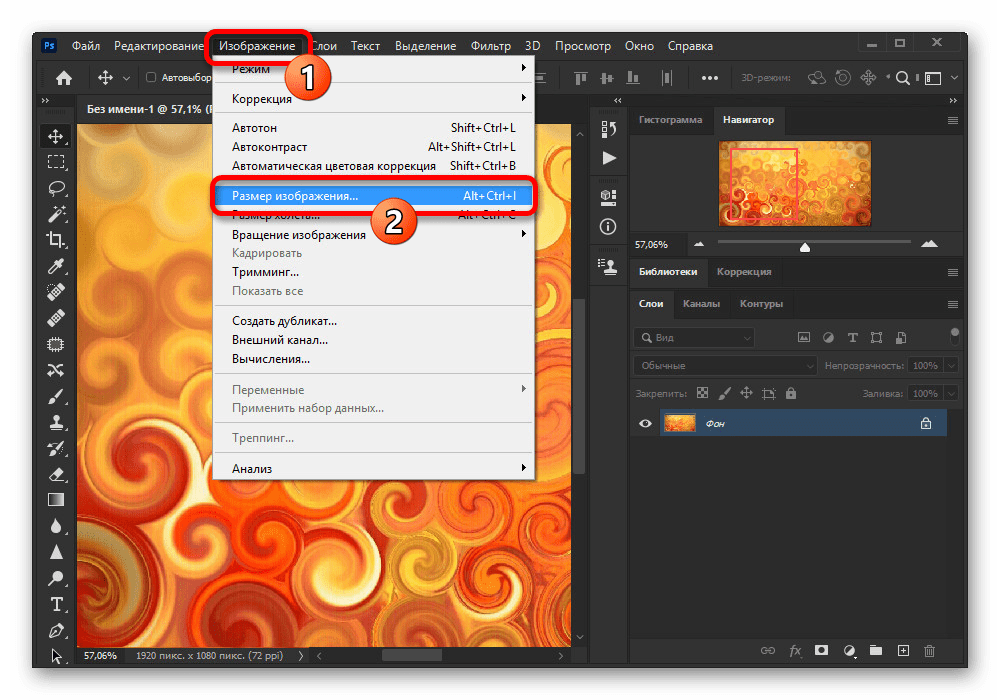
- На верхней панели программы откройте раздел «Изображение» и выберите «Размер изображения». В качестве альтернативы можно воспользоваться стандартной комбинацией клавиш «CTR+SHIFT+I».
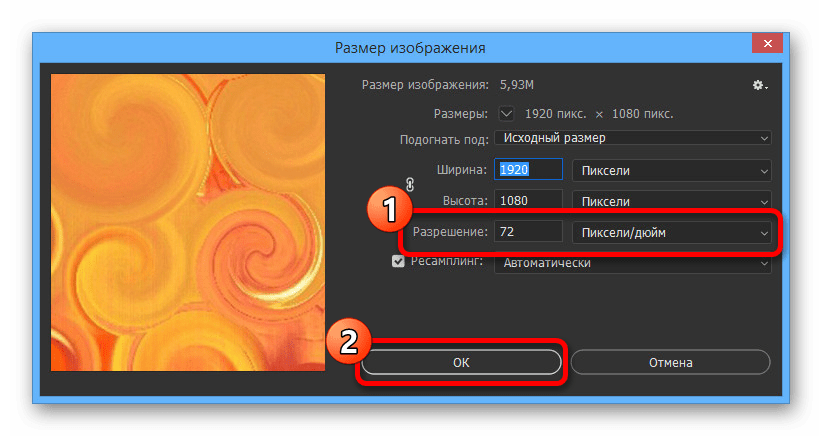
- Измените значение в текстовом поле «Разрешение» таким образом, чтобы оно было меньше установленного изначально. При этом учитывайте, что слишком низкий параметр может сильно испортить качество изображения.

Выполнив данное действие, закройте окно с помощью кнопки «ОК» на нижней панели. Можете попробовать произвести сохранение стандартным образом.
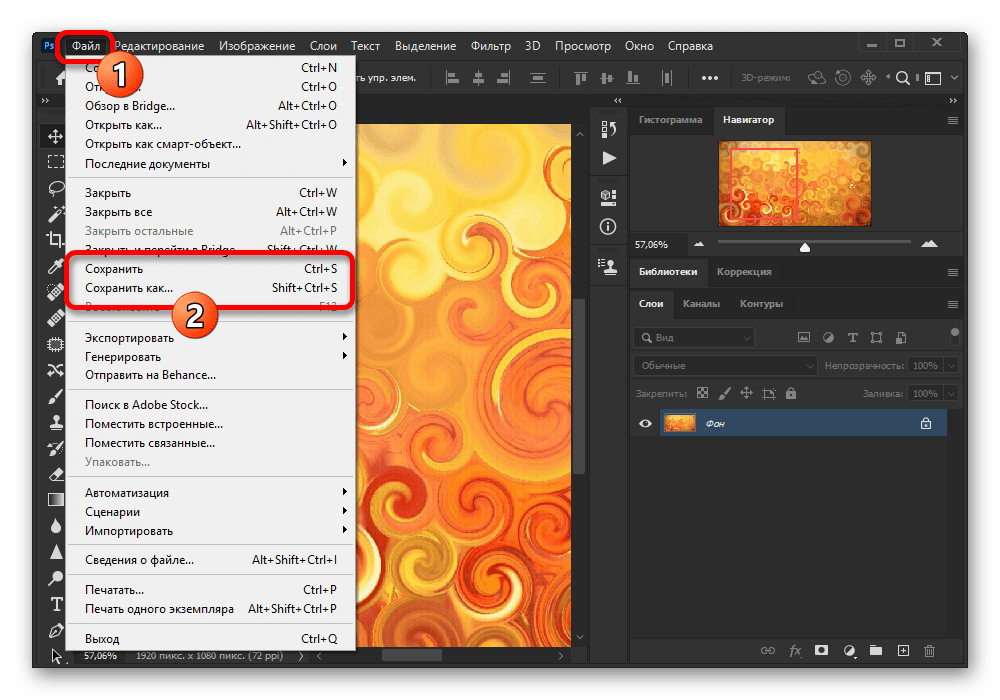
Обязательно пытайтесь комбинировать разные варианты данного параметра, в особенности если количество оперативной памяти в настройках производительности сильно ограничено. По необходимости отменить все внесенные изменения можно путем одновременного нажатия клавиш «CTRL+Z» или через меню «Редактирование».
Способ 3: Сброс настроек
В случае отсутствия результатов после выполнения вышеописанных действий причиной рассматриваемой ошибки может быть повреждение важных файлов программы, в том числе отвечающих за конфигурацию. Чтобы избавиться от проблемы, для начала стоит произвести откат настроек до изначального состояния с помощью внутренних параметров.

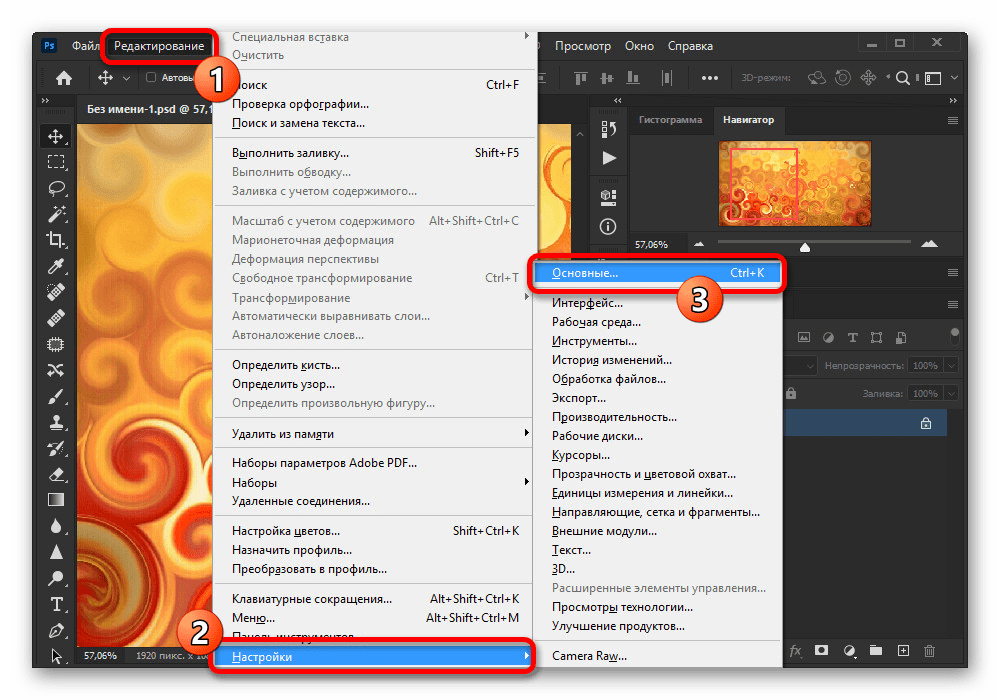
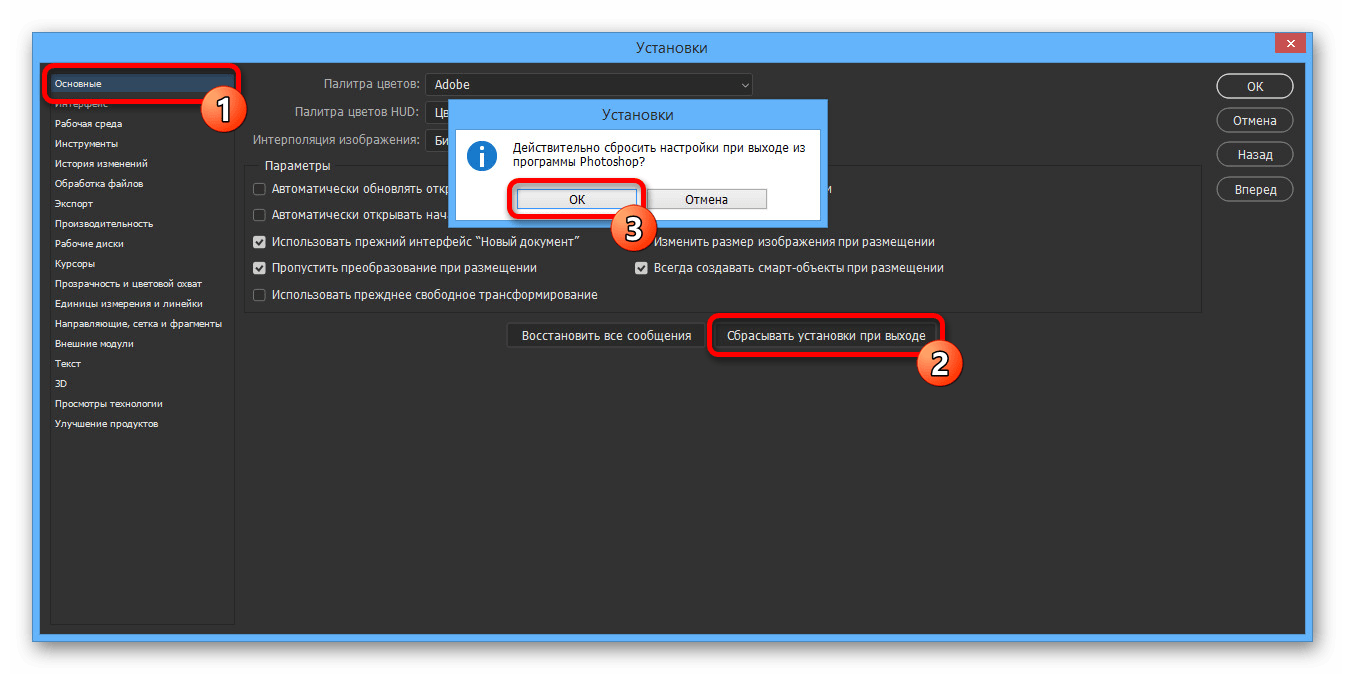
- Находясь в Adobe Photoshop, откройте список «Редактирование» и выберите пункт «Основные». Сюда же можно перейти с помощью сочетания клавиш «CTRL+K».
- Щелкните левой кнопкой мыши по кнопке «Сбрасывать установки при выходе» и во всплывающем окне нажмите «ОК». После этого можете закрыть программу через меню «Файл» или крестик в правом верхнем углу и произвести повторное открытие с последующей проверкой ранее неработающих возможностей.
При успешном устранении проблемы, можете смело использовать Фотошоп, не опасаясь за работоспособность и редактируя сброшенные ранее параметры на свое усмотрение.
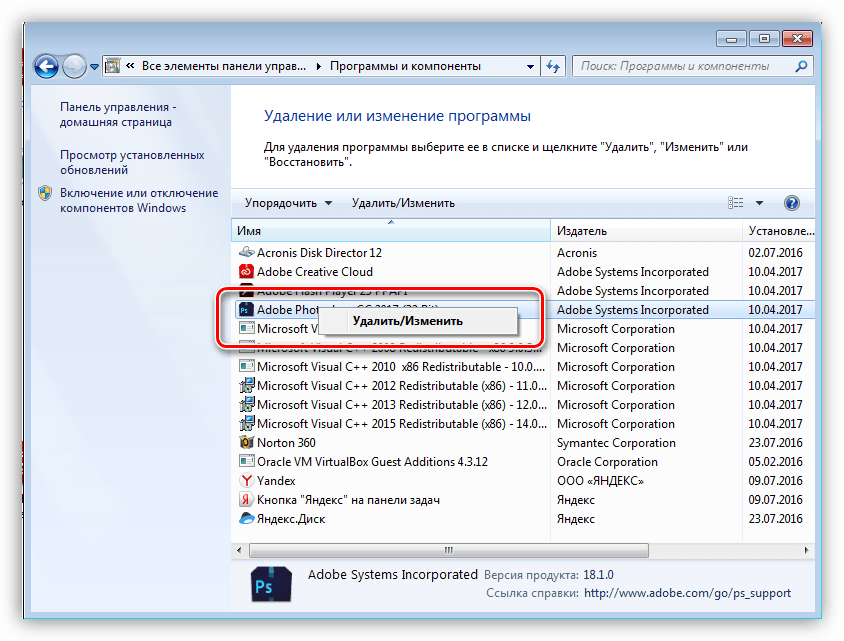
Способ 4: Переустановка программы
Если сброс настроек Photoshop не принес желаемых результатов, скорее всего, причиной ошибки «Невозможно выполнить запрос» является повреждение основных файлов. В таком случае единственным решением будет полное удаление и повторная установка софта с использованием не только стандартных средств операционной системы, но и вспомогательного ПО вроде CCleaner, автоматически очищающего диск от прошлой версии и удаляющего ненужные ключи реестра.
Подробнее: Правильное удаление и установка Adobe Photoshop на ПК
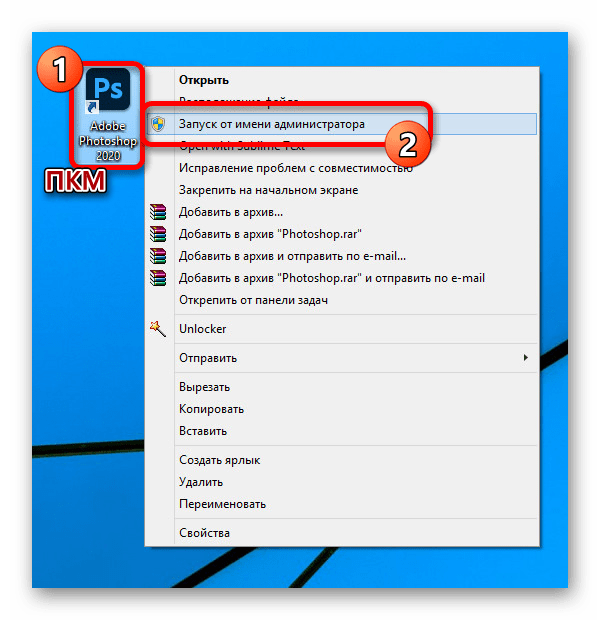
Бывает и такое, что проблему вызывает не сама программа, а используемая система, по тем или иным причинам блокируя доступ к рабочим файлам. При появлении ошибки попробуйте кликнуть правой кнопкой мыши по ярлыку программы и выбрать «Запуск от имени администратора».
В качестве последнего решения стоит также отметить удаление софта с локального диска «C» и установку на любой другой не системным раздел. Это же можно сделать сразу после первой попытки переустановки.
По ходу инструкции нами были рассмотрены способы исключительно для официальной версии Фотошопа, загруженной и обновленной с веб-сайта компании Adobe. В этом же может заключаться и решение, так как различные репаки не всегда работают должным образом.
Еще статьи по данной теме:
Помогла ли Вам статья?

Несколько пользователей сообщают, что получили «Не удалось выполнить ваш запрос, потому что это недопустимый документ Photoshop.”Ошибка при попытке открыть PSD и PDF файлы с фотошопом. Сообщается, что проблема возникает как на компьютерах Windows, так и на Mac.

Что вызывает ошибку «Не удалось выполнить ваш запрос, потому что это недопустимый документ Photoshop»?
Мы исследовали эту конкретную проблему, просмотрев различные отчеты пользователей и стратегии восстановления, которые они успешно использовали. Исходя из того, что мы собрали, существует несколько распространенных сценариев, которые приведут к появлению именно этого сообщения об ошибке. Вы также можете ознакомиться с нашим руководством по ошибкам программы Photoshop здесь.
Вот список потенциальных виновников, которые могут вызвать проблему:
- Файл сохранен с другим расширением — Наиболее частая причина возникновения этой ошибки — сохранение файла с расширением.PSD расширение, даже если это действительно другой тип файла (TIFF, JPG, GIF, png «> Hex Fiend для Mac и HXD для Windows.
Как только вы откроете файл в шестнадцатеричном редакторе, сравните его со списком ниже и посмотрите, есть ли у вас совпадение среди наиболее распространенных типов файлов:
JPEG: ff d8 ff e0 00 10 4a 46 TIF, TIFF: TIFF: 49 49 2a PNG: 89 50 4e 47 BMP: 42 4д 38 GIF: 47 49 46 38 39 61 PSD: 38 42 50 53 PDF: 25 50 44 46 2d 31 2e 36 0d 25 e2 e3 ср d3

Как только вы обнаружите правильное расширение, пора внести необходимые изменения. Но имейте в виду, что шаги по изменению файла на правильное расширение будут отличаться в зависимости от вашей операционной системы, поэтому, пожалуйста, следуйте соответствующему руководству в зависимости от вашей ОС.
Изменение типа расширения в Windows
- Откройте файл в проводнике и перейдите в Посмотреть (используя ленту) вверху. Затем убедитесь, что поле, связанное с Расширения имени файла проверено.
- Затем щелкните правой кнопкой мыши файл PSD, в котором отображается ошибка, и выберите Переименовать. Затем измените расширение на правильное.
Примечание: Если вы не использовали шестнадцатеричный редактор для определения правильного типа расширения, измените расширение на каждое из следующих расширений, пока не найдете совпадение: jpeg, tif, tiff, png «>
- Когда появится сообщение о том, что файл может стать непригодным для использования, щелкните да чтобы подтвердить изменение расширения.
- В конечном итоге вы должны натолкнуться на расширение, которое позволит вам открыть файл в Photoshop, не сталкиваясь сНе удалось выполнить ваш запрос, потому что это недопустимый документ Photoshop.» ошибка.
Изменение типа расширения на Mac
- Перейдите к расположению файла и выберите его. Выбрав файл, нажмите Command + I открыть Информационное окно файла.
- в Информация окна, просто измените расширение на правильное (в Название &Расширение).
Примечание: Если вы не использовали шестнадцатеричный редактор для определения правильного типа расширения, измените расширение на каждое из следующих расширений, пока не найдете совпадение: jpeg, tif, tiff, png «>
- Снова откройте файл в Photoshop и посмотрите, решена ли проблема.
Метод 2: повторное сохранение файла PSD с помощью GIMP
GIMP — это программа для обработки изображений с открытым исходным кодом, которую некоторые затронутые пользователи использовали для открытия файлов PSD, в которых отображался значок «Не удалось выполнить ваш запрос, потому что это недопустимый документ Photoshop.”Ошибка из-за повреждения.
GIMP обычно используется для сохранения файлов PSD, которые не полностью совместимы с Photoshop. Но некоторые затронутые пользователи также использовали его для открытия и повторного сохранения файлов PSD, которые Photoshop не смог обработать.
Примечание: Если файл сильно поврежден, вы можете заметить отсутствие некоторых пикселей и общую потерю качества.
Вот краткое руководство по установке и использованию GIMP для решения проблемы «Не удалось выполнить ваш запрос, потому что это недопустимый документ Photoshop.» ошибка:
- Перейдите по этой ссылке (здесь) и загрузите исполняемый файл установки GIMP в соответствии с вашим предпочтительным способом загрузки.
Примечание: Помните, что GIMP также доступен для OS X и Linux, на случай, если вы столкнетесь с проблемой на другой платформе.
- После завершения загрузки откройте исполняемый файл установки и следуйте инструкциям на экране, чтобы установить GIMP на свой компьютер.
- После завершения установки щелкните правой кнопкой мыши файл PSD, в котором отображается ошибка, и выберите Редактировать с помощью GIMP.
- После открытия файла PSD в редакторе GIMP перейдите в Файл> Экспортировать как.
- Выберите место, в котором вы хотите повторно сохранить файл, затем щелкните значок плюса, связанный с Выберите Тип файла (по расширению). Затем прокрутите список типов файлов и выберите Фотошоп изображение и нажмите Экспорт.
- После повторного сохранения файла откройте его снова в Photoshop и проверьте, не отображается ли значок «Не удалось выполнить ваш запрос, потому что это недопустимый документ Photoshop.»Ошибка устранена.
- Откройте файл в проводнике и перейдите в Посмотреть (используя ленту) вверху. Затем убедитесь, что поле, связанное с Расширения имени файла проверено.


AppleInsider may earn an affiliate commission on purchases made through links on our site.
If Photoshop seems to be fighting you at every turn, and you keep getting told that it «could not complete your request because of a program error,» here’s how to fix some common problems to help get it running smoothly again.
Maybe it happened suddenly after an update, or perhaps it’s been happening for a while now. You go to open a file in Photoshop, but instead, the program spits out an error that reads, «Photoshop could not complete your request because of a program error.» If this sounds familiar, don’t worry — you’re hardly alone. As it turns out, plenty of users have noticed this problem cropping up in recent years.
One of the most frustrating parts of this error is that it is entirely nondescript, and doesn’t really tell the user anything. As it turns out, it can be caused by one — — or more — of several problems.
Here’s a few culprits as to why photoshop is acting up:
- Conflicting settings and customizations
- Outdated version of Photoshop
- Insufficient GPU resources
- GPU instability
- Corrupted program files
The error can occur on any Mac but seems to happen more often on a Mac that runs macOS Catalina or macOS Big Sur. This problem is also not unique to macOS, either — as it turns out, Windows users are suffering too.
For both Windows and macOS users, the error often occurs when users attempt to create a new file or open an existing one. However, some users note that it has happened when performing certain functions in Photoshop, such as merging layers or applying filters, as well.
The problem is so common, in fact, that many people have learned to live with it, assuming that it’s just part of the way Photoshop functions now.
You can tell things are back to normal because Photoshop is giving me the «Could not complete request due to a program error» message again
— Erik of the Web (@torgospizza) January 20, 2021
Fortunately, it doesn’t have to be that way. For macOS users, we’re here to show you some of the most common solutions to this problem, as well as explain what causes them.
An immediate, temporary, quick fix
If you see the issue crop up when you need to open or create a new file, restarting your Mac should be enough to solve the problem, albeit temporarily. This is only a quick fix, and when you get a chance, you should take the time to try some of the solutions listed below.
Below are several fixes that could eliminate the problem, especially if you’re running an older machine.
Double check your system requirements
Chances are, you probably already know if you meet the minimum requirements for Photoshop or not, but it never hurts to make sure.
| Minimum | Recommended | |
|---|---|---|
| Processor | Intel processor with 64-bit support; 2 GHz or faster processor with SSE 4.2 or later | Same as minimum |
| Operating System | macOS Mojave (version 10.14) or later | macOS Big Sur (version 11)
macOS Catalina (version 10.15) |
| RAM | 8 GB | 16 GB or more |
| Graphics Card |
|
|
| Hard disk Space | 4 GB of available hard-disk space; additional space is required for installation | Same as minimum |
Your version of Photoshop is outdated
Adobe Photoshop can be a bit fickle, and one of the best ways you can keep it running smoothly is to make sure that you are running the most current version of Adobe Photoshop. The easiest way to do that is to utilize the Adobe Creative Cloud app, which you likely have used to install Adobe Photoshop.
- Close Photoshop
- Open Adobe Creative Cloud
- In the sidebar, click All Apps
- Verify that Photoshop is up to date
- If it isn’t, click Update
- Restart your Mac
Disabling the Generator
The Generator plugin allows users to create image assets in real-time as you work, avoiding the need to copy, slice, and export each layer manually. Unfortunately, sometimes the Generator can cause Photoshop to behave erratically, especially on systems with older GPUs.
Disabling the Generator plugin feature
How to disable the Photoshop Generator plugin
- Open Photoshop
- In the top menu bar, click Photoshop
- Click Preferences
- Click Plug-Ins
- Uncheck Enable Generator
- Click OK
- Restart Photoshop
Properly set your Cache Levels
If you’ve changed your Cache levels in Photoshop, you may have put undue strain on your graphics processor — most notably if your Cache is set to 1. Resetting them to the default can help eliminate issues.
Photoshop’s default cache level is «4»
How to reset your Cache Levels to default in Photoshop
- Open Photoshop
- Click Photoshop in the top menu bar
- Click Preferences
- Click Performance
- Set Cache Levels to 4
- Click OK
- Restart Photoshop
Disable GPU acceleration
GPU acceleration can make Photoshop run better on newer systems, but when enabled on older systems can cause instability, preventing the program from creating or opening new files.
How to turn off GPU acceleration in Photoshop
- Open Photoshop
- Click Photoshop in the top menu bar
- Click Preferences
- Click Performance
- Uncheck Use Graphics Processor
- Click OK
- Restart Photoshop
If this fixes the problem, you may be able to re-enable GPU acceleration and use a less intense drawing mode, which allows you to take advantage of GPU acceleration but is not as physically demanding on your system.
How to change your Drawing Mode in Photoshop
- Open Photoshop
- In the top menu bar, click Photoshop
- Click Preferences
- Click Performance
- Check Use Graphics Processor
- Click Advanced Settings
- In the dropbox that appears, select Basic or Normal, and then click OK
- Click OK
- Restart Photoshop
Resetting Photoshop’s Preferences
The easiest and most effective way to reset Photoshop’s preferences is to remove the user preference folders and force Photoshop to recreate them upon the next launch. This will reset your preferences, which may be annoying, but is likely to fix any user-error-caused issues.
Dragging these folders out of your Preferences folder will reset Photoshop’s preferences
How to reset all user preferences to default in Photoshop
- Quit Photoshop
- Open Finder
- In the top menu bar, click Go
- Click Library
- Navigate and enter the folder named Preferences
- Locate all labeled Photoshop [Version] Settings
- Drag these folders to your Desktop, if you wish to back them up, or the Trash if you decide not to
- Restart your Mac
- Open Photoshop
Uncommon situations
There are a couple of uncommon situations that we’d like to address in this tip as well. This includes those who have kept the same install across the 32-bit to 64-bit change introduced with macOS Catalina and those running pre-Creative Suite versions of Adobe Photoshop.
A note for previous Mojave users
If you haven’t reinstalled Photoshop since switching from Mojave to Catalina or Big Sur, you may be able to save yourself plenty of problems by simply deleting and reinstalling Photoshop. As it turns out, the jump from one operating system to the next can cause some settings issues. If you’ve got the time and effort to do this, it may be worth trying out first.
A note for those using much older versions of Photoshop
If you are running Photoshop CS6 or earlier, odds are, there’s not much to be done for your program. Photoshop CS6 was released in 2012 and was sunset in 2016. Photoshop CS6 is a 32-bit program, so anyone running any macOS operating system from Catalina forward wouldn’t be able to use it anyway. There have been some savvy macOS Mojave users that have managed to install and keep Photoshop CS6 running on their machines, though, so it is possible — at least for now.
The “Could not complete your request because of a program error” error message in Photoshop is often caused by the generator plugin or the settings related to the image file extension. Below are various solutions to resolve this error message.
“Could not complete your request because of a program error” Error in Adobe Photoshop
To recover damaged Photoshop graphic projects, you can use the last backup or return to the previous stable copy of the PSD file, or try to use Recovery Toolbox for Photoshop. With a high probability, Recovery Toolbox for Photoshop can restore data from incorrect .psd files to their original state before damage if the first two options are not available for you.
Content Summary
Potential Causes
Solution 1: Change Image File Extension
Solution 2: Disable Generator
Solution 3: Unlock the Library Folder
Solution 4: Reset Photoshop Preferences
Potential Causes
- Photoshop Preferences if this happens when the error message appears on every image file you try to open
- Image File Extension if the error message pops up on an individual image file
- Locked Library Folder
- Generator Plugin
Solution 1: Change Image File Extension
If the error message only pops up when you open a specific image file, you can change the extension of the image file from .psd to .jpeg or .png often fixes the issue. Otherwise, the image file is corrupt. Alternatively, you can try to use the Export option in Adobe Photoshop, save as other file formats such as .jpeg or .png.
Solution 2: Disable Generator
Step 1: Open Adobe Photoshop.
Step 2: Click Edit > Preferences > click on the Plug-Ins tab on the left pane.
Step 3: Uncheck the Enable Generator checkbox.
Step 4: Click OK.
Step 5: Restart Photoshop.
Uncheck the Enable Generator checkbox
Solution 3: Unlock the Library Folder
Step 1: Open Finder.
Step 2: Navigate to user directory or search for ~/Library/ in the search box.
Step 3: Right-click on the Library folder or hold the Ctrl key while clicking on the Library folder to show the drop-down menu. Click on the Get Info option.
Step 4: Uncheck the Locked option under folder details.
Uncheck the Locked option under folder details.
Solution 4: Reset Photoshop Preferences
For Mac
Step 1: Navigate to ~/Library/Preferences/Adobe Photoshop CSx Settings/ directory.
Step 2: Move CS6 Prefs.psp file to Desktop.
Step 3: Open Adobe Photoshop.
For Windows
Step 1: Press Windows Key + R to open Run dialogue box.
Step 2: Type %AppData% in the Run dialogue and press Enter to access to AppData directory.
Step 3: Navigate to Roaming/Adobe/Adobe Photoshop CSx/Adobe Photoshop Settings/ directory.
Step 4: Move both Adobe Photoshop CS6 Prefs.psp and Adobe Photoshop CS6 X64 Prefs.psp files to Desktop.
Step 5: Open Adobe Photoshop.
Reference:
Adobe Support Community > Photoshop > “Could not complete your request because of a program error” upon Open
Photoshop Family > Photoshop: Could not complete your request because of a program error.
Adobe Photoshop – графический редактор, разработанный Adobe Systems для Windows и Mac OS. Ведущее программное обеспечение, используемое миллионами профессионалов по всему миру. Фотошоп имеет множество функций с частыми обновлениями.
Пользователи жалуются на невозможность импортировать изображение с рабочего стола. Ошибка сопровождается сообщением: “Не удалось выполнить ваш запрос из-за проблемы с анализом данных JPEG”. Текст сообщения указывает на проблему в расширении приложения. Никакие настройки программы не избавят от ошибки. Вместо этого мы будем использовать стороннее ПО и попытаемся разобраться с самим файлом.
Решение этой проблемы не ограничивается форматом JPEG и подойдет для аналогичных проблем с GIF, PNG и другими файлами.

Используйте Paint
Обходной путь заключается в использовании стандартного пейнта. Paint автоматически скорректирует любые неправильные конфигурации файла и сохранит копию в нужном вам формате.
- В меню Пуск и напишите “Paint”.

- Нажмите “Файл”(верхний левый угол) -> “Открыть”.

- Выберите проблемный документ -> кликните “ОК”.
- После нажмите “Сохранить как…”, выбрав правильный формат(JPEG) и место на диске.
- Запустите полученный документ Фотошопом.
Используйте Picture Viewer
Второй способ обойти неполадку – использование стандартной утилиты Picture Viewer. Простое открытие документа, “поворот” -> закрытие, исправило проблему у многих пользователей.
- Откройте проблемный док. в стандартном просмотрщике (разном для каждой версии) Виндовс.
- После этого поверните изображение, используя значок поворота.

- Кликните еще несколько раз, чтобы вернуть в первоначальное положение.
- Закройте просмотрщик и запустите изображение Фотошопом.
Сделайте скриншот снимок экрана
Если вышеперечисленные методы не сработали, сделайте снимок области экрана и сохраните в требуемом формате. Несомненно это ухудшит качество, но таким образом вы временно избавитесь от назойливой неполадки.
- Откройте изображение любым средством для просмотра.
- Нажмите клавишу PrintScreen.
- Вставьте ваше изображение в любой редактор.
- Сохраните в любом удобном формате.
Откройте при помощи Flash Editing Software (только для GIF)
Если проблема касается анимированных картинок, откройте их в
Flash Editing Software
. Существует множество программ аналогичных по функционалу этой.
Метод внесения изменений в изображение принципиально не отличается от описанных ранее в этой статье, измените формат и откройте Фотошопом готовый рисунок картинку.