Some users reported that they ran into BUGCODE_USB_DRIVER blue screen normally once per day. This blue screen error code is rather irritating. But please do not worry. In this post, MiniTool guides you in the right direction to get rid of blue screen code.
BUGCODE_USB_DRIVER
Most users prefer connecting USB to their computers when they need to transfer files between these two devices. However, some users reported that they ran into BUGCODE_USB_DRIVER accompanied by 0x000000FE after connecting USB to the computer. What’s worse, their computer crashed many times with this error code.
Why does BUGCODE_USB_DRIVER happen? The reason for this blue screen error is various. The following content will explain the most possible reasons one by one and shows you the corresponding solutions.
How to Fix BUGCODE_USB_DRIVER
To fix BUGCODE_USB_DRIVER blue screen, you can try the following ways.
- update USB driver.
- update your Windows 10 to the latest version.
- remove improper software and services.
- modify power settings.
- scan your PC thoroughly.
- check your hard drive health and repair the found issues.
- check your RAM.
- update BIOS.
Way 1: Update USB Driver
Have you noticed one message on the blue screen when BUGCODE_USB_DRIVER occurs? The message is: The problem seems to be caused by the following file: usbhub.sys. Apart from this file, usbport.sys and winusb.sys also appear with the blue screen code.
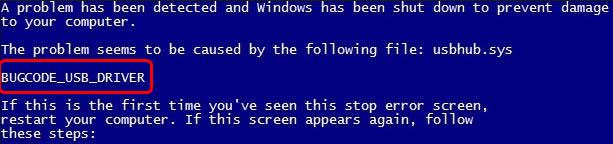
The three files are system driver files. When you run into the BUGCODE_USB_DRIVER error code and one of the three files is listed in the error message, this indicates that the USB driver goes wrong, being old or corrupted.
In this situation, you need to update the USB driver to solve BUGCODE_USB_DRIVER. This way is most successful from users’ feedback.
How to update the problematic USB driver? The tutorial is below.
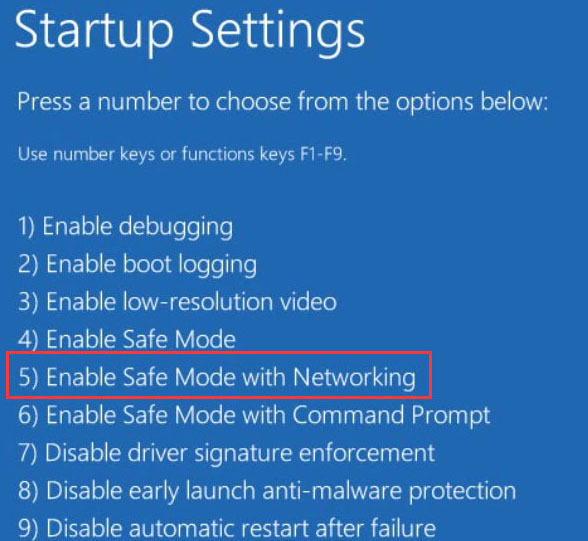
Step 1: Boot into Safe Mode if your computer cannot reboot.
- Shut down your computer and then turn on it. Repeat that until the Preparing Automatic Repair message appears on your computer screen.
- When Windows finishes diagnosing your computer, please click Advanced options > Troubleshoot > Advanced options > Startup settings > Restart.
- Hit 5 on the keyboard to enable the Safe Mode with Networking
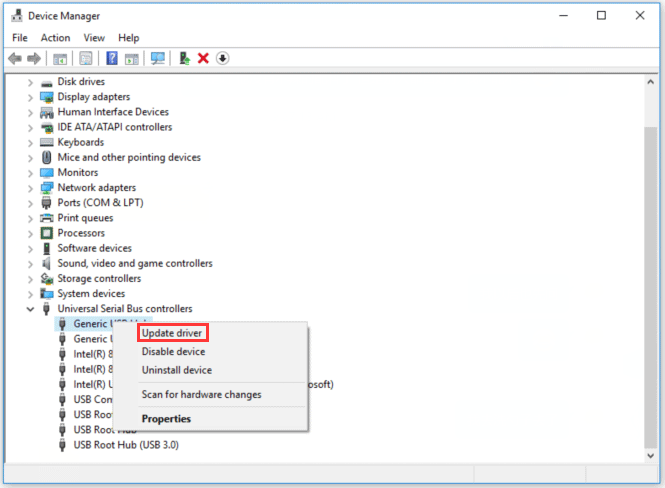
Step 2: Open Device Manager.
- Press Windows + R to call out the Run
- On the Run window, type msc and then click OK.
Step 3: On the Device Manager window, find Universal Serial Bus controllers and then double-click it. Right-click all the drivers related to USB and then click Update driver.
Step 4: Once you finish updating all USB-related drivers, please restart your computer to see if BUGCODE_USB_DRIVER blue screen appears again.
Way 2: Update Your Windows 10 to the Latest Version
As we know, Windows update always includes bug fixes and adds new features. Updating Windows 10 to the latest version can be helpful to get rid of BUGCODE_USB_DRIVER Windows 10.
To update Windows OS to the latest version, please refer to the following tutorial.
Step 1: Open Settings and then click Update & security.
Step 2: On the Update & security page, highlight the Windows Update section on the left pane and then click the Check for updates buttons from the right pane.
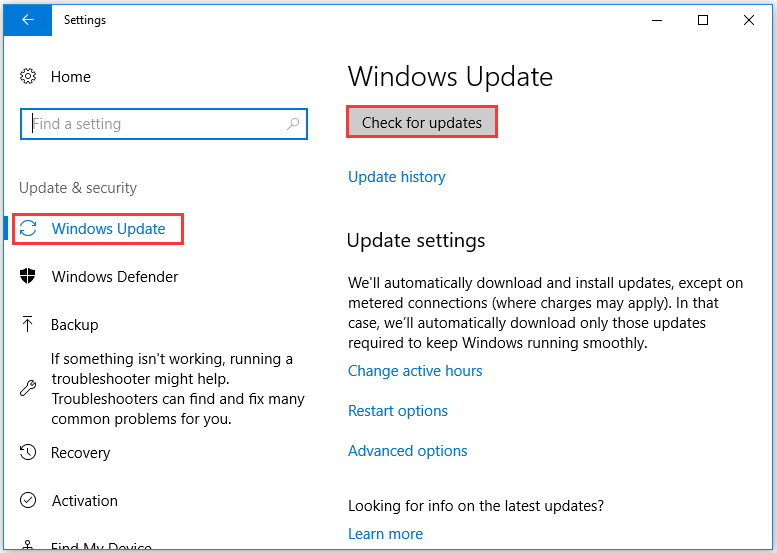
After clicking the Check for updates button, your Windows will start checking for the available Windows 10 updates and then download them automatically. If the checking result says that your PC is up to date, you should try the following ways to get rid of BUGCODE_USB_DRIVER.
Way 3: Remove Improper Software and Services
The BUGCODE_USB_DRIVER error can be also ascribed to the improper software that you have installed recently. The possible software and services include VMWare, Virtual Box, and Hyper-V Virtualization services.
If that is in the case, you need to uninstall the software that you have installed recently to see if the error is eradicated.
Way 4: Modify Power Settings
Apart from the improper software and service, the improper power settings can also lead to BUGCODE_USB_DRIVER blue screen.
To adjust the improper power settings, please follow the steps below.
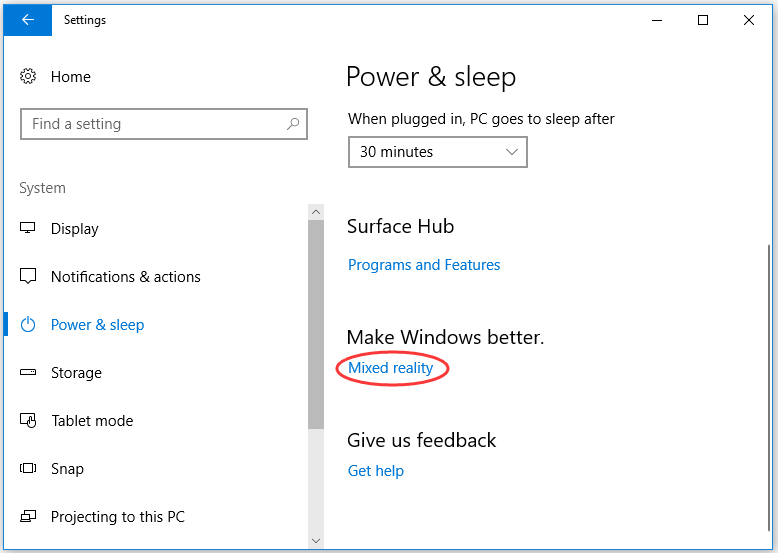
Step 1: Open Settings again and then select System.
Step 2: On the System window, please highlight the Power & sleep section and then find Mixed reality or Additional power settings on the right pane.
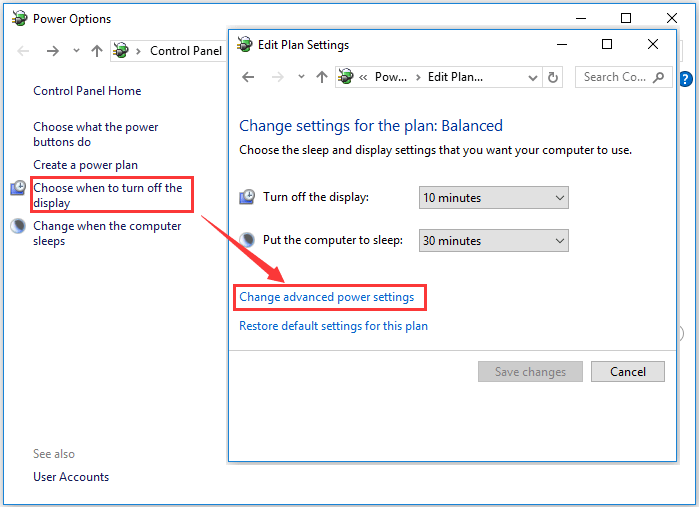
Step 3: On the newly popping-up window, please click Choose when to turn off the display on the left pane and then click Change advanced power settings on another window.
Step 4: On the new window, double-click USB settings > USB selective suspend setting. Then modify the setting of USB selective setting by choose Disable from the drop-down menu and click Apply > OK to save this change.
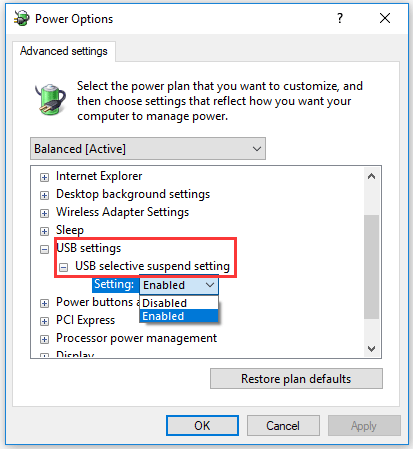
After changing the setting of USB selective suspend setting, restart you PC to see if the blue screen error related to usbhub.sys has been removed.
Way 5: Scan Your PC Thoroughly
This winusb.sys blue error can be also caused by the malware attacks that corrupt the Window files. Therefore, try scanning your PC via some antivirus programs (such as Avast and Avira) that will remove the malicious bugs affecting the system files.
Way 6: Check Hard Drive Health and Repair Found Issues
Damaged or corrupted hard drive is also one of the factors of 0x000000FE. To check whether the hard drive is responsible for the BSOD error, please go on reading.
Windows allows its users to use the chkdsk /f command to check the hard drive health. Apart from running this command, you can also try the third-party program MiniTool Partition Wizard to diagnose your hard drive health.
The tutorials on checking hard drive health via the CHKDSK command and MiniTool Partition Wizard are both displayed below.
# 1: Run CHKDSK Command
Note: You need to back up the data on the hard drive as the following command can cause data loss before running this command.
Step 1: Run Command Prompt as administrator.
- Type cmd on the Cortana’s search bar.
- Right-click the best-matched result to select Run as administrator.
Step 2: Type chkdsk /f /r on the new window and then hit the Enter key to run this command.
# Way 2: Utilize MiniTool Partition Wizard
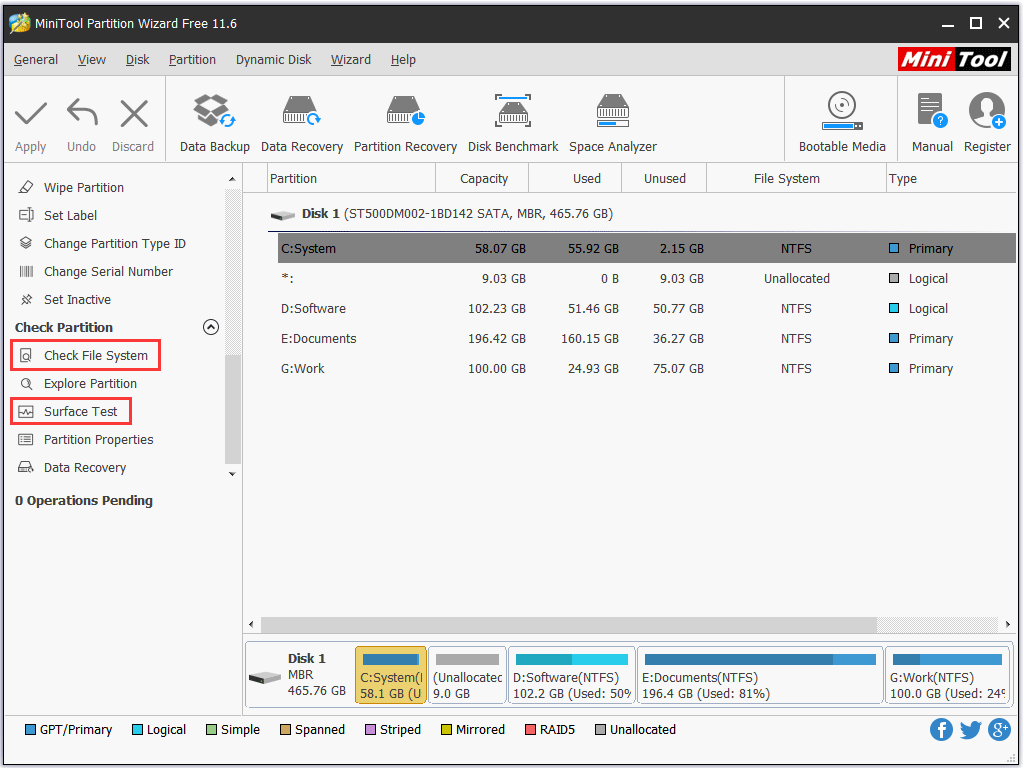
MiniTool Partition Wizard offers you two features to check the hard drive health and they are Check File System and Surface Test. The Check File System feature helps to check the integrity of your files and the other feature helps you to intuitively see the bad sectors on your hard drive.
Let’s see how to use MiniTool Partition Wizard to check whether there is something wrong on your hard drive when you ran into BUGCODE_USB_DRIVER blue screen.
Note: If your computer can boot, you can directly carry out the following steps. If not, you need to make a MiniTool bootable media to complete this checking.
Step 1: Download MiniTool Partition Wizard by clicking the following downloadable button. After that, install this program and launch it to get its main interface.
MiniTool Partition Wizard FreeClick to Download100%Clean & Safe
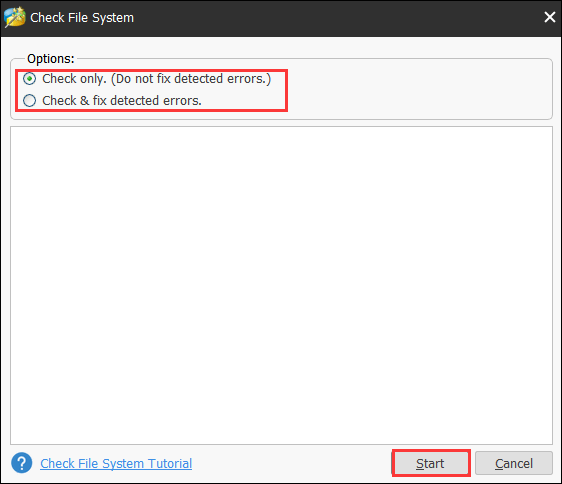
Step 2: Check the integrity of system partition.
- Highlight the system partition on the Disk Map and then choose Check File System from the left pane.
- On the new window, select Check only or Check & fix the detected errors (recommended) and then click the Start button. This feature starts to detect the errors on your hard drive.
- View the information on the window when the checking process comes to an end.
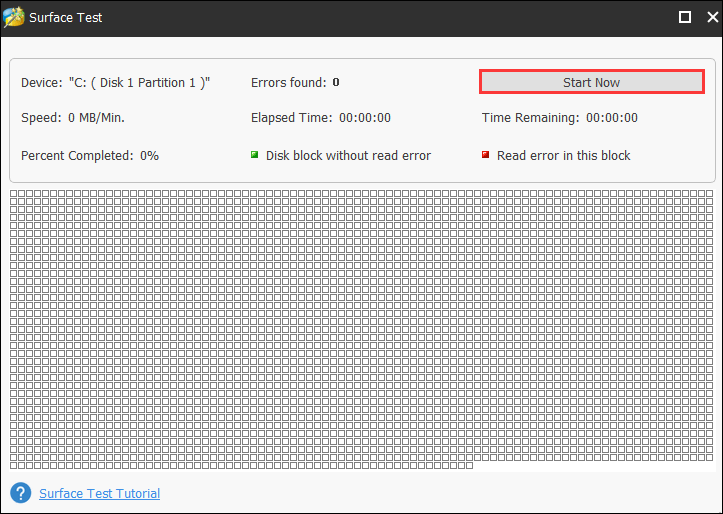
Step 3: Check if there are bad sectors on your system partition.
- Highlight the system partition again (to check the whole hard drive, just highlight the disk) and then select Surface Test from the left pane.
- Click the Start Now The Surface Test starts detecting the bad sectors.
- View the checking result. Red squares represent the bad sectors and green hard drive means sectors on hard drive are healthy.
If there are too many errors, you might need to replace the problematic hard disk with a good one.
How to check whether the corrupted hard drive is the culprit of BUGCODE_USB_DRIVER blue screen? You can run chkdsk /f command or utilize MiniTool Partition Wizard.Click to Tweet
Way 7: Check Your RAM
Another hardware issue that can cause BUGCODE_USB_DRIVER is the corrupted RAM. If that is the case, please try to check whether your RAM has gone wrong.
To test your RAM, please read the post Here Are Free RAM Test Programs to Check Your Computer’s RAM. From this post, you can know how to conduct RAM test with different 4 ways.
Way 8: Update BIOS
BUGCODE_USB_DRIVER blue screen can be due to the fault in your motherboard. If that is in the case, you can try updating BIOS to correct the fault as updating BIOS unlocks new features of the motherboard and it allows the motherboard to work with different hardware.
Note: Since any mistake made during the BIOS upgrade may cause system unbootable, I list this way as the last resort to the BSOD issue. Furthermore, in case something goes wrong when updating BIOS, it is highly recommended you to back up the important files and the current BIOS files.
Here is the tutorial on updating BIOS. Carry out the steps below carefully.
Step 1: Check your BIOS version.
- Press Windows + R to call out the Run window.
- Type msinfo32 on the Run window and click OK.
- On the new window, find BIOS Version/Date to check your BIOS version.

Step 2: Download the BIOS files.
- Head to the motherboard manufacturer’s website and find the Downloads or Support page for your specific model of motherboard. A list of available BIOS should be displayed here.
- Download the BIOS version to which you want to update from the list, normally the newest one.
- After downloading, unzip the BIOS update file and then transfer the file onto a blank USB flash drive.
Step 3: Update BIOS.
- Restart your computer into the UEFI control panel.
- Launch the UEFI firmware update tool or the flashing tool and back up your PC’s existing firmware to your flash drive.
- Use the same firmware update utility to select the BIOS update files you have saved on the flash drive (warning: do not shun off your PC during the process).
- When the flashing process finishes, restart your computer. Your updated PC BIOS is ready to rock.
I have gotten rid of the BUGCODE_USB_DRIVER blue screen issue by using the solutions mentioned in this article. If you are stuck in the same issue, please have them try.Click to Tweet
We Want Your Voice
This article comes to an end. Have the mentioned ways successfully helped you get rid of ‘BUGCODE_USB_DRIVER Windows 10’?
If you have any doubts about the mentioned ways, please leave a comment in the following comment zone or you can also contact us directly via [email protected]. We will reply to you as soon as possible.
USB_Driver.exe file information

The process known as TightVNC Win32 Server belongs to software TightVNC Win32 Server by .
Description: USB_Driver.exe is not essential for the Windows OS and causes relatively few problems. USB_Driver.exe is located in the «C:\Program Files» folder or sometimes in the C:\Windows\System32\drivers folder.
The file size on Windows 10/11/7 is 577,536 bytes. ![]()
The file is not a Windows core file. The program has no visible window. The software starts upon Windows startup (see Registry key: Run).
The program listens for or sends data on open ports to a LAN or the Internet.
USB_Driver.exe is able to record keyboard and mouse inputs and hide itself.
Therefore the technical security rating is 56% dangerous.
Recommended: Identify USB_Driver.exe related errors
Important: Some malware camouflages itself as USB_Driver.exe, particularly when located in the C:\Windows or C:\Windows\System32 folder. Therefore, you should check the USB_Driver.exe process on your PC to see if it is a threat. We recommend Security Task Manager for verifying your computer’s security. This was one of the Top Download Picks of The Washington Post and PC World.
Best practices for resolving USB_Driver issues
A clean and tidy computer is the key requirement for avoiding problems with USB_Driver. This means running a scan for malware, cleaning your hard drive using 1cleanmgr and 2sfc /scannow, 3uninstalling programs that you no longer need, checking for Autostart programs (using 4msconfig) and enabling Windows’ 5Automatic Update. Always remember to perform periodic backups, or at least to set restore points.
Should you experience an actual problem, try to recall the last thing you did, or the last thing you installed before the problem appeared for the first time. Use the 6resmon command to identify the processes that are causing your problem. Even for serious problems, rather than reinstalling Windows, you are better off repairing of your installation or, for Windows 8 and later versions, executing the 7DISM.exe /Online /Cleanup-image /Restorehealth command. This allows you to repair the operating system without losing data.
To help you analyze the USB_Driver.exe process on your computer, the following programs have proven to be helpful: ASecurity Task Manager displays all running Windows tasks, including embedded hidden processes, such as keyboard and browser monitoring or Autostart entries. A unique security risk rating indicates the likelihood of the process being potential spyware, malware or a Trojan. BMalwarebytes Anti-Malware detects and removes sleeping spyware, adware, Trojans, keyloggers, malware and trackers from your hard drive.
Other processes
nomadbranch.exe iuregistryfilter.sys pythonservice.exe USB_Driver.exe flashplayerplugin_20_0_0_286.exe aviraspeedup.exe smartcopy.exe mxmon.exe nlagentprosvc.exe flashutil32_11_2_202_235_activex.exe intere~1.dll [all]
Проблемы с USB-накопителями могут приносить множество неудобств. Сегодня мы разберем простые способы решения неполадок флешек, которые некорректно работают, не отображаются или не определяются Windows.

Содержание
- Как определить проблему с флешкой?
- Проблема с драйверами
- Нераспределенный диск
- Не назначена буква диска
- Полная очистка флешки
- Восстановление данных с флешки, которую не видит Windows
USB-накопители – удобные, вместительные и компактные устройства, предназначенные для хранения и передачи различных файлов. К сожалению, нередко возникают проблемы с определением съемного накопителя, что приводит к неправильному пониманию флешки системой. Результатом этого стает то, что флешка не отображается в Windows, на неё невозможно произвести запись или скачать файлы.
Сегодня мы разберемся с основными проблемами флешек, а также подберем лучшие способы их устранения.
Как определить проблему с флешкой?
Правильное определение флешки операционной системой зависит от многих факторов, которые необходимо проверить для выявления и устранения проблемы. Именно поэтому следует использовать комплексный подход диагностики накопителя.
Для начала следует проверить флешку в сервисе «Управление дисками». Для этого необходимо нажать правой клавишей мыши по кнопке «Пуск» и выбрать пункт «Управление дисками».

Другим способом, подходящим для пользователей старых версий Windows, является вызов утилиты «Управления дисками». Для этого следует нажать правой клавишей мыши по кнопке «Пуск», выбрать пункт «Выполнить» и в открывшемся окне ввести diskmgmt.msc.

В открывшемся окне утилиты можно обнаружить все подключенные накопители. Среди них должен находится диск, соответствующий по размеру с флешкой. Данный диск может отображаться даже если не происходит автозапуск, а также отсутствует его отображение в каталоге «Мой компьютер».

Отсутствие отображения флешки в «Управлении дисками» является свидетельством того, что с накопителем могли случиться следующие неполадки:
- Сломан USB порт компьютера. Чтобы выявить это, необходимо воспользоваться другим портом или вставить флешку в другой компьютер.
- На носитель не подается питание. Иногда флешки могут иметь внутренние повреждения, ограничивающие подачу питания. Помимо этого, существуют носители, требующие внешнего источника питания. В этом случае следует проверить кабель.
- Проблемы с накопителем, аксессуарами или компьютером. Чтобы исключить все проблемы, следует попробовать подключить флешку напрямую к материнской плате в разные порты. Явным признаком скорой поломки материнской платы являются выходящие из строя мосты, которые подключены к USB-входам. Чтобы убедиться в поломке флешки, ее можно проверить на другом компьютере.
Проблема с драйверами
Если Windows просит отформатировать флешку после подключения, то проблема заключается в невозможности распознания файловой системы накопителя. Флешка начнет работать после форматирования, но это удалит с нее все данные. Выявить проблему можно подключением проблемной флешки на другом компьютере. Если другая система будет читать флешку, проблема конфликта накопителя и компьютера заключается в драйверах.
Для исправления неполадок с драйверами необходимо:
Шаг 1. Открыть диспетчер устройств, нажав правой кнопкой мыши по «Пуск» и выбрав соответствующий пункт.

Шаг 2. В открывшемся окне переходим в пункт «Дисковые устройства». В данном разделе необходимо найти нужный накопитель. Некорректно работающая флешка может быть выделана желтым восклицательным знаком.

Шаг 3. Нажимаем по флешке правой кнопкой мыши и выбираем пункт «Свойства».

Шаг 4. В открывшемся окне выбираем вкладку «Драйвер», где необходимо нажать по кнопке «Обновить драйвер».

Нераспределенный диск
Одной из проблем понимания флешки системой является распределение накопителя. Нераспределенный диск не будет отображаться в папке «Мой компьюетр», но его можно увидеть в меню «Управление дисками». Чтобы восстановить накопитель достаточно выполнить следующее:
Заходим в «Управление дисками» и нажимаем по накопителю правой кнопкой мыши. В выпадающем меню необходимо выбрать функцию «Создать простой том». В настройках создания тома достаточно выбрать максимально возможный объем тома и дождаться завершения создания.

Не назначена буква диска
В некоторых случаях флешка может отображаться в меню «Управление дисками» без присвоенной буквы. Из-за этой проблемы носитель не отображается и не происходит автозагрузка.
Чтобы исправить это, необходимо проследовать следующим шагам:
Шаг 1. Заходим в «Управление дисками» и находим накопитель без буквы.

Шаг 2. Нажимаем ПКМ по флешке и выбираем пункт «Изменить букву диска…».

Шаг 3. Выбираем пункт «Изменить», назначаем букву в выпадающем столбце и подтверждаем действие «Ок».

После присвоения буквы, флешка будет работать в нормальном режиме.
Полная очистка флешки
Также с флешкой случаются такие неприятности, как невозможность форматирования. В таком случае к флешке нет доступа, помимо этого, ее невозможно отформатировать простыми способами.
Чтобы восстановить работоспособность накопителя следует воспользоваться встроенной утилитой diskpart.
Для этого следует:
Шаг 1. Нажимаем правой клавишей мыши по «Пуск», выбираем пункт «Выполнить» и в открывшемся окне вводим команду cmd.

Шаг 2. В командной строке вводим команду diskpart и подтверждаем действие Enter.
Шаг 3. Теперь следует ввести команду list disk для отображения списка носителей. После этого следует найти проблемную флешку, ориентируясь по её размеру, и запомнить её обозначение. В нашем случае флешке было присвоено название «Диск 1».

Шаг 4. Выбираем требуемый носитель командой select disk 1 и подтверждаем действие Enter. После этого очищаем носитель командой clean.

Шаг 5. Создаем на очищенном носителе новый раздел командой create partition primary. После этого достаточно отформатировать флешку командой format fs=fat32 quick. Если флешке требуется файловая система ntfs, следует воспользоваться командой format fs=ntfs quick.

Завершаем работу с утилитой diskpart командой exit.
Чистая флешка готова к использованию.
Восстановление данных с флешки, которую не видит Windows
В том случае, если в утилите Windows «Управление Дисками«, компьютер определяет флешку, но в состоянии «Не опознан», «Не инициализирован», а раздел на флешке — «Не распределен» или требует форматирование флешки, то восстановить данные с флешки вполне возможно, для это потребуется воспользоваться программой для восстановлением данных.
Шаг 1.
Установите и запустите программу
RS Partition Recovery.
Шаг 2.
Выберите диск или раздел, с которого вы хотите восстановить данные.

Шаг 3.
Выберите тип анализа.

Быстрое сканирование, которое следует использовать в случае недавней потери файла. Программа быстро просканирует диск и покажет файлы, доступные для восстановления.
Функция Полный анализ позволяет вам найти потерянные данные после форматирования, изменения размера диска или повреждения файловой структуры (RAW).
Шаг 4.
Предварительный просмотр и выбор файлов для восстановления.

Шаг 5.
Добавьте файлы, которые хотите сохранить, в «Список восстановления» или выберите весь раздел и нажмите Восстановить.


Следует отметить, что лучше сохранить восстановленный файл на внешний жесткий диск или USB-накопитель.
Часто задаваемые вопросы
Наиболее часто флэшка не определяется Windows по следующим причинам: проблемы с драйверами, диск не распределен, не назначена буква диска или же диск был полностью очищен?
Прежде всего следует проверить отображается ли накопитель в утилите «Управление дисками». Если нет — значит с диском проблемы физического характера, если да — проверьте корректность файловой системы, присвоена ли буква вашему диску, установлены ли драйвера.
Программа RS Partition Recovery без проблем справиться с этой задачей. Просто подключите вашу флэшку к компьютеру и выполните инструкцию восстановления данных, описанную на нашем сайте.
Для того чтобы определить проблему с драйверами щелкните правой кнопкой мышки по «Пуск» и выберите «Диспетчер устройств». В открывшемся окне проблемный диск будет отображаться с желтым знаком восклицания. Если такое не наблюдается значит с драйверами все в порядке
Чтобы полностью очистить флэшку откройте командную строку и выполните по очереди следующие команды: diskpart —> list disk — select disk 1 (где «1» — это номер нужного диска) —> clean