Как исправить ошибку ERR_CONNECTION_TIMED_OUT?
Одной из самых распространённых ошибок, с которой вы можете столкнуться в интернете, является «Превышено время ожидания ответа от сайта».
В этой статье вы узнаете, каковы причины этой проблемы, что именно представляет собой ошибка и как её устранить различными методами.
Что такое ошибка «Время ожидания ответа истекло»?
Не пугайтесь, если у вас раз за разом появляется ошибка «Время ожидание ответа истекло», и уж точно не спешите звонить своему знакомому программисту. Дело вовсе не в опасном вирусе или серьёзной поломке вашего компьютера или роутера. Это сообщение лишь предупреждает вас о том, что системе не удалось установить сетевое соединение с сервером.
Код ошибки ERR_CONNECTION_TIMED_OUT («Нет ответа. Время ожидания ответа истекло», «Превышено время ожидания от сайта») появляется, когда что-то происходит при попытке посетить тот или иной веб-сайт. В частности, когда сайт слишком долго отвечает. Как правило, ограничение по времени составляет 30 секунд, после чего, если ответ не может быть получен, соединение разрывается, и в результате этот сайт оказывается недоступен.
Каковы причины ошибки «Время ожидания ответа истекло»?
Итак, ошибка возникает, если браузеру не удаётся установить соединение. Но почему так происходит?
Ошибка «Превышено время ожидание от сайта» может быть связана с:
- Проблемой подключения сети. Сюда может включаться и отсутствие интернет-соединения, и медленная скорость загрузки, и перегруженное сетевое соединение, и многое другое.
- Избытком временных файлов вашего браузера (кэша и куки).
- Ограничениями, наложенными брандмауэром или антивирусом вашего компьютера, – они вполне способны заблокировать доступ к сайту.
- Включённой VPN-программой или работой через прокси-сервер.
- Блокировкой доступа из-за местоположения вашего IP-адреса. Это значит, что из-за региона, в котором вы находитесь, трудно будет открыть веб-сайт без сторонних программ.
Однако далеко не всегда пользователь способен сам решить проблему, так как иногда ошибка может появиться из-за проблем самого сервера. В некоторых случаях сайт пытается использовать больше ресурсов, чем ему доступно, то есть проблема может зависеть от его ограниченного количества памяти.
Ошибка «Время ожидания ответа истекло» в разных браузерах
Несмотря на то, что каждый из нас хоть раз сталкивался с этой ошибкой, мало кто знает, что она по-разному проявляется в разных браузерах. Поэтому сейчас мы рассмотрим, как выглядит ошибка ERR_CONNECTION_TIMED_OUT в зависимости от используемого браузера.
Выдав ошибку, почти каждый браузер сообщит вам, что «Не удаётся получить доступ к сайту» или «Не удаётся открыть эту страницу», и объяснит, что превышено время ожидания сайта. Кроме того, он предложит вам возможные решения проблемы. Например, проверить подключение к интернету или обратиться к поисковой системе Google.
В Google Chrome
.png)
В Opera
.png)
В Microsoft Edge
.png)
В Яндекс.Браузере
.png)
В Safari
.png)
В Сафари ошибка не указана, но браузер предупреждает, что «Safari не может открыть страницу», поскольку не может безопасно подключиться к серверу. Кроме того, он не предлагает никаких решений выданной ошибке.
Как исправить ошибку ERR_CONNECTION_TIMED_OUT?
Теперь, когда вы увидели, как выглядит ошибка в разных браузерах, давайте рассмотрим возможные решения её исправления.
В первую очередь проверьте открывается ли сайт с ошибкой на другом устройстве. Если ошибка появляется и на нём, в таком случае она связана с сервером, и вам остаётся лишь дожидаться устранения проблемы.
Однако если сайт всё-таки открывается на другом устройстве, причина ошибки находится на вашей стороне.
- Проверьте интернет-подключение
Убедившись в том, что проблема существует только на одном вашем устройстве, первое, что вы должны сделать – это проверить интернет-соединение. Важно иметь в виду, что ошибка также может быть связана с очень медленным соединением, а не только с его отсутствием.
Попробуйте загрузить другие веб-страницы и, если проблема продолжает возникать, убедитесь, что соединение активно.
- Проверьте провода. Сетевой кабель и блок питания роутера должны быть плотно вставлены в разъём. Можете вытащить их и заново вставить до щелчка.
- Перезагрузите роутер. Для этого найдите небольшую кнопку на задней панели и зажмите её примерно на 5-10 секунд или вытащите адаптер из розетки и подождите около минуты.
- Перезагрузите компьютер.
- Запустите проверку состояния сетевого подключения в Windows
Чтобы запустить утилиту устранения сетевых неполадок в Windows:
- Откройте меню «Пуск» в левом нижнем углу экрана.
- Нажмите Параметры, затем «Сетевой & состояние».
- В конце выберите в Интернете.
- Затем нажмите «Устранение неполадок сети», чтобы начать диагностику, и следуйте инструкциям.
- Очистить временные файлы браузера
В некоторых случаях кэшированные данные и куки в браузере могут вызывать ошибки. Эти ошибки возникают в основном, когда они устарели. В этих случаях проблема решается простой очисткой кэша.
Однако перед этим вы можете выполнить простую проверку. Попробуйте открыть браузер в режиме инкогнито и открыть сайт. Если ошибка исчезла, и вы можете зайти на сайт, то проблема, вероятно, в устаревших или повреждённых временных файлах браузера. В противном случае продолжайте пробовать способы, описанные ниже.
Если проблема всё-таки возникла из-за кэшированных данных или куки, их придётся очистить. Больше информации о временных файлах и пошаговые инструкции по очистке кэша вашего браузера вы сможете получить в нашей статье «Кэш: что это и зачем его чистить».
- Отключите брандмауэр и антивирус
Как антивирусы, так и брандмауэры отвечают за безопасность всей вашей системы и файлов. Сканируя ваш компьютер, они ищут прокравшиеся вирусы и выявляют их.
Однако у такой защиты есть и определённые минусы: работающие антивирусы и брандмауэр могут ограничить или и вовсе запретить вход на определённые страницы, если посчитают их небезопасными для вас. Иногда это может происходить, даже если веб-сайт полностью безвреден.
Поэтому получив ошибку ERR_CONNECTION_TIMED_OUT, попробуйте отключить брандмауэр и антивирус. Однако вы должны быть полностью уверены, что страница, к которой вы пытаетесь получить доступ, безопасна.
С отключением антивируса у вас не должно возникнуть проблем, но вот как отключить брандмауэр вы можете не знать. Рассмотрим, как это сделать для двух ОС.
Для Windows
- Откройте Пуск и выберите Параметры.
- Далее вы увидите опцию Обновление и безопасность – примените её.
- Перейдите в Безопасность Windows.
- Нажмите Брандмауэр и защита сети.
- Выберите из списка используемую сеть и отключите брандмауэр, установив значение Выкл.
Для MacOS
В MacOS брандмауэр отключён по умолчанию, так что владельцы устройств Apple могут пропустить этот пункт и перейти к следующему.
- Отключите прокси и VPN
Иногда ошибка «Превышено время ожидания ответа от сайта» может напрямую зависеть от настроек прокси-сервера или включённой программы-VPN.
Откройте настройки прокси-сервера и посмотрите, включён ли он. При положительном результате попробуйте отключить его. А «как» узнаете в пошаговой инструкции ниже.
Для Windows
- Откройте меню Пуск и перейдите в Параметры.
- Найдите раздел Сеть и Интернет.
- В самом низу левого меню выберите опцию Прокси-сервер.
- Отключите пункты Использовать сценарий настройки и Использовать прокси-сервер и тоже отключаем.
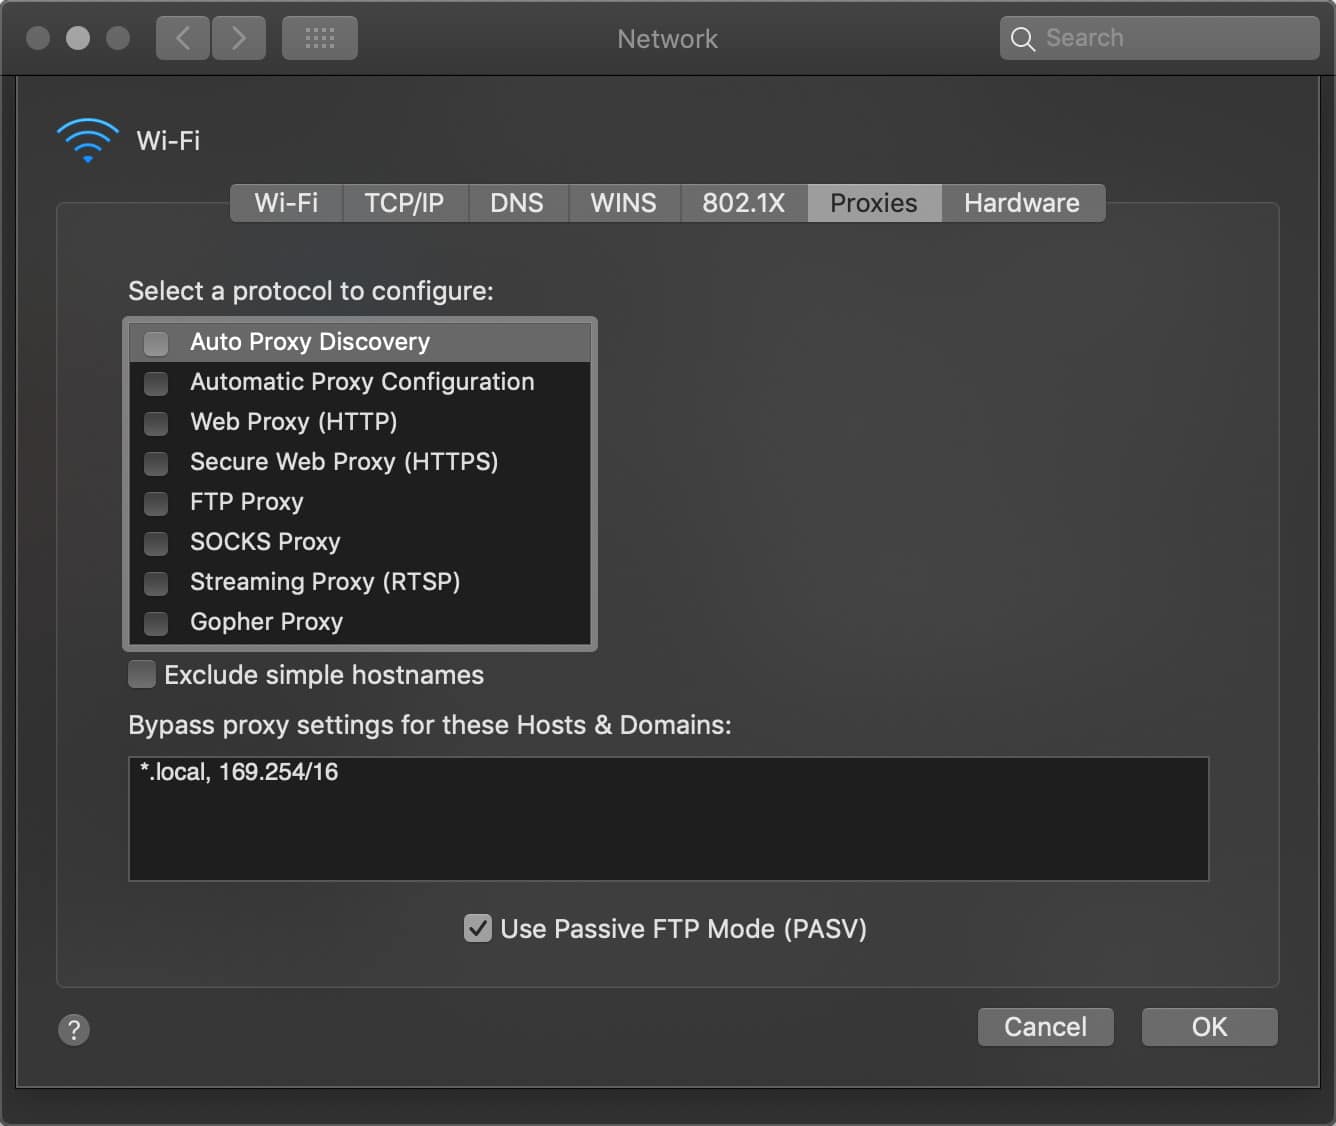
Для MacOS
- Откройте Системные настройки.
- Выберите Сеть и в правом нижнем углу нажмите Дополнительно….
- Появится новое меню. В верхней панели откройте вкладку Прокси и снимите отметку с каждого элемента. Вполне возможно, что у вас всё будет отключено по умолчанию.
После выполненных действий вне зависимости от операционной системы обновите страницу, чтобы увидеть, исчезла ли ошибка.
Кроме того, ошибка ERR_CONNECTION_TIMED_OUT может быть вызвана работающим VPN. В этом случае рекомендуется временно отключить приложение.
- Изменить DNS-серверы
В большинстве случаев ваш компьютер автоматически получает настройки внутренних DNS-серверов вашего интернет-провайдера, однако это не всегда полезно. Иногда необходимо прописать всё вручную, чтобы избавиться от определённых ошибок. В том числе и ошибки Время ожидания ответа истекло.
Для Windows
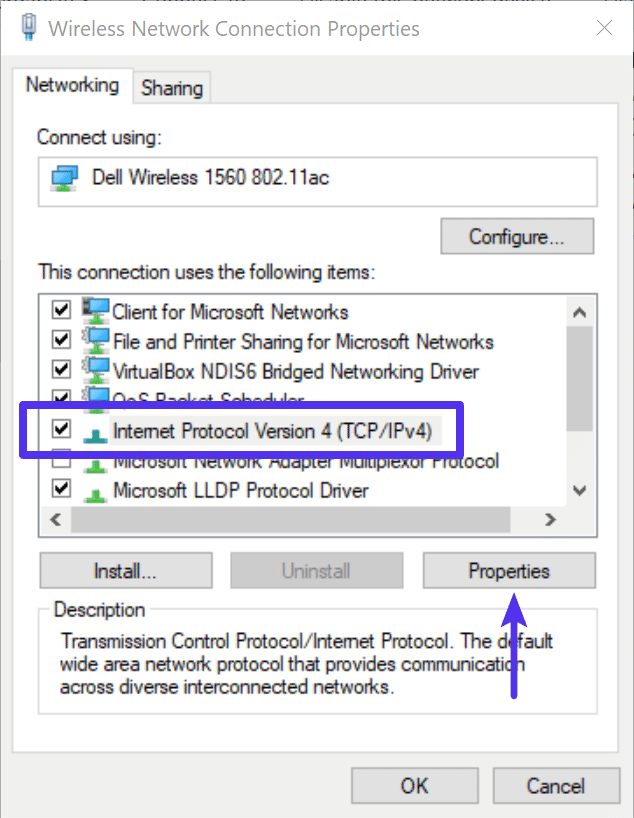
- Откройте окно Выполнить с помощью сочетания клавиш Win+R и введите inetcpl.cpl.
- Щёлкните правой кнопкой мыши по текущему соединению и выберите Свойства в контекстном меню.
- В списке выберите IP версии 4 (TCP/IPv4) и перейдите в Свойства. Включите опцию «Использовать следующие адреса DNS-серверов», после чего вручную пропишите DNS:
Предпочитаемый DNS-сервер: 8.8.8.8
Альтернативный DNS-сервер: 8.8.4.4
- Подтвердите изменения, нажав ОК, а затем перезагрузите браузер.
Для MacOS
- Откройте Системный настройки и перейдите в меню Сеть.
- Щёлкните Дополнительно….
- В верхней части открывшегося меню выберите вкладку DNS.
- Найдите значок + и нажмите на него.
- Впишите 8.8.8.8, после чего подтвердите свой выбор кнопкой ОК.
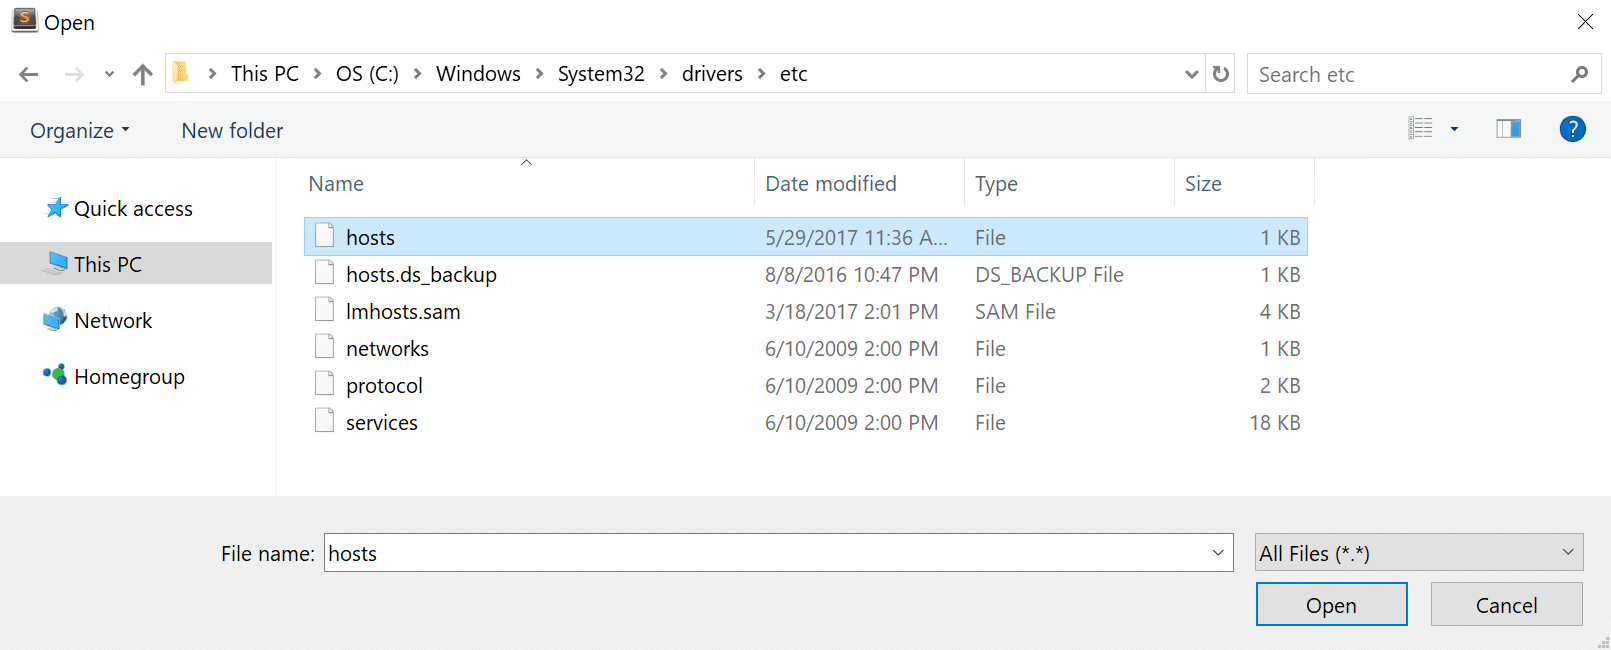
- Проверьте файл hosts
Файл hosts содержит в себе информацию о домене и определённом IP-адресе. Этот файл помогает, например, увидеть промежуточную версию вашего сайта, не дожидаясь делегирования домена на DNS-серверы.
Поэтому увидев ошибку ERR_CONNECTION_TIMED_OUT, проверьте содержимое этого файла – внизу страницы после последнего значка # удалите IP-адрес заблокированного ресурса, доступ к которому вы пытаетесь получить. Если сомневаетесь, просто удалите все строчки без #. Не забудьте сохранить изменения!
Где найти файл hosts:
Для Windows
- Запустите Блокнот или любой другой текстовый редактор от имени администратора. Для этого откройте меню Пуск, найдите в поиске нужную программу и щёлкните на неё правой кнопкой мыши, чтобы выбрать Запуск от имени администратора.
- На верхней панели нажмите Файл и в открывшемся меню щёлкните на опцию Открыть….
- В правом нижнем углу открывшейся вкладки измените тип файлов на «Все файлы».
- Далее в строке поиска наверху впишите путь: C:\Windows\System32\drivers\etc.
- Найдя в открывшейся папке файл hosts выберите его и подтвердите своё решение кнопкой Открыть внизу.
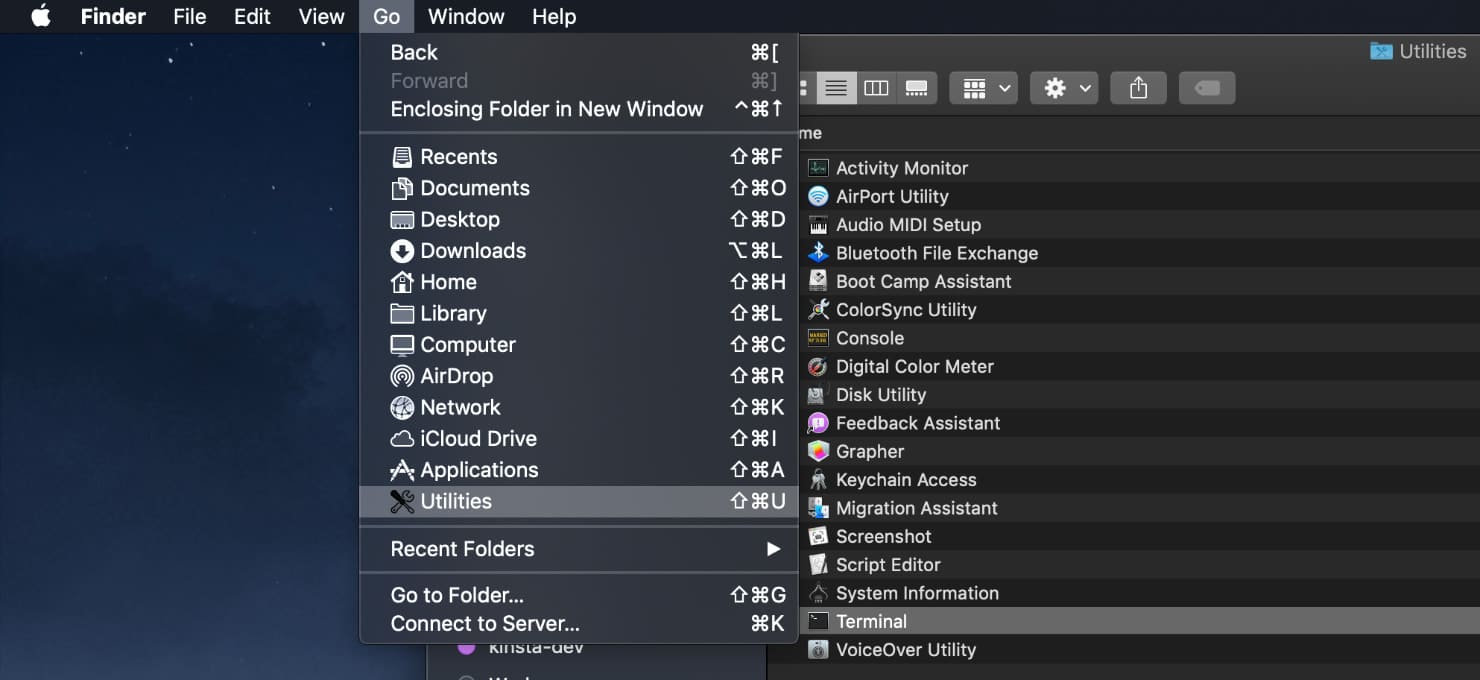
Для MacOS
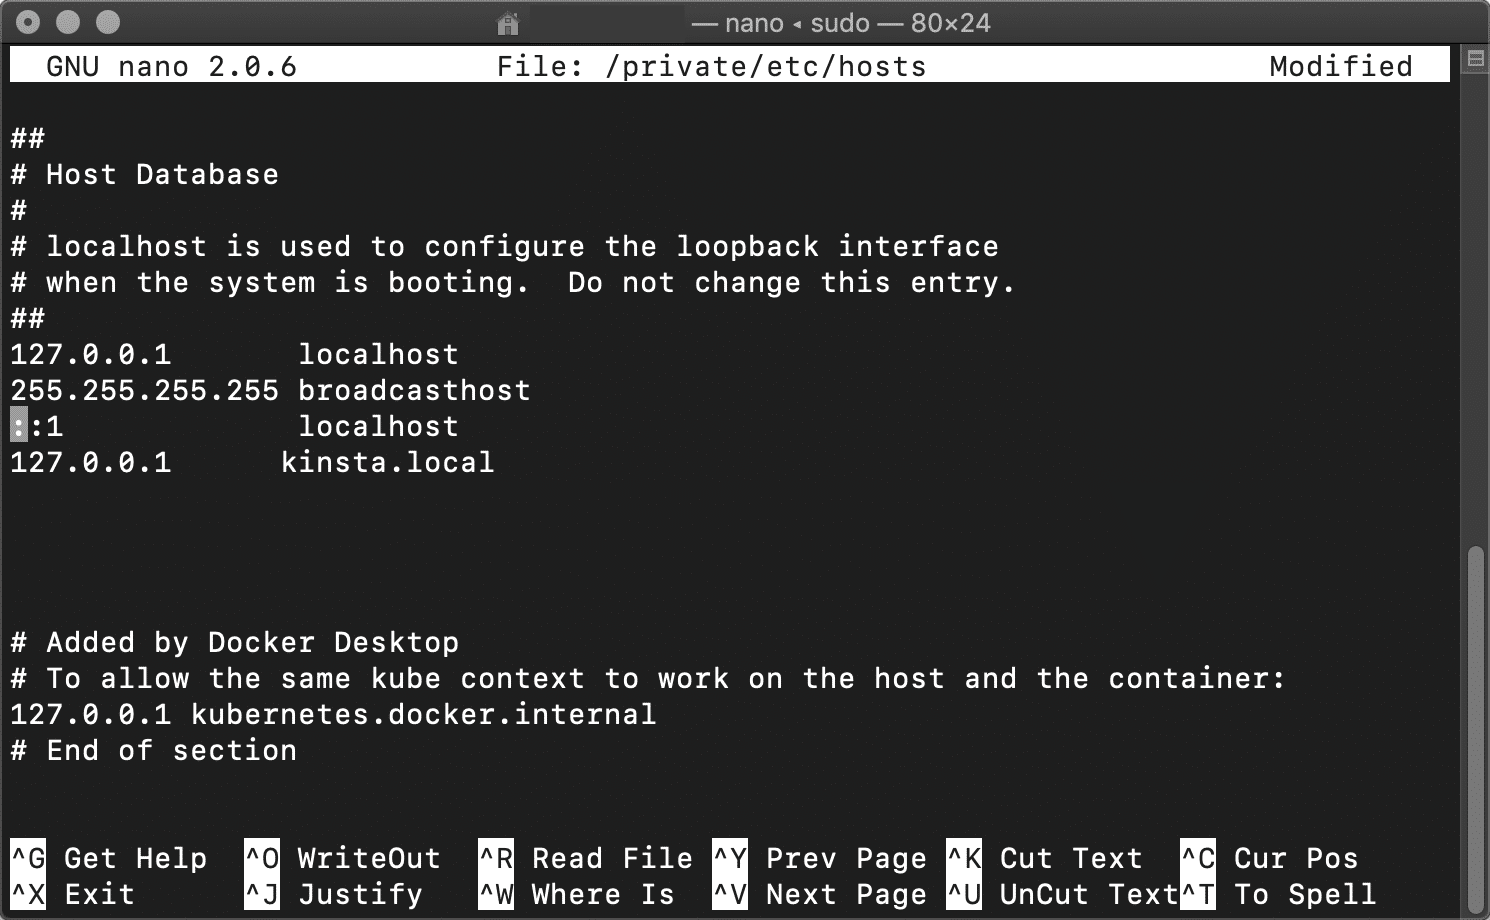
- Откройте утилиту Терминал.
- Введите sudo nano /private/etc/hosts и нажмите Enter. После этого этапа у вас могут запросить пароль. Процесс ввода пароля никак не будет отображаться: просто впишите его и нажмите Enter.
- Убедитесь, что веб-сайт, который вы пытаетесь посетить, не указан в вашем файле hosts. Если он находится там, то удалите его.
- Сбросьте настройки браузера
Если ни один из предыдущих способов избавиться от ошибки ERR_CONNECTION_TIMED_OUT не работает, попробуйте восстановить настройки браузера по умолчанию.
В Google Chrome
- Откройте меню, нажав три точки в правом верхнем углу браузера.
- Перейдите в Настройки.
- Слева на панели найдите и выберите Сбросить настройки, а затем Восстановление настроек по умолчанию.
- Подтвердите свой выбор.
В Opera
- В боковой панели выберите значок Настроек (он выглядит как шестерёнка).
- В поиске в правом углу введите «Сброс», после чего перед вами появится опция Сбросить настройки по умолчанию – выберите её. Щёлкните Сброс, чтобы подтвердить свой выбор.
В Microsoft Edge
- Нажмите на три точки в правом верхнем углу окна.
- Щёлкните Настройки.
- В боковой панели перейдите в Сбросить настройки, а после – Восстановить стандартные настройки.
- Подтвердите решение, выбрав Сбросить.
В Яндекс.Браузере
- В правом верхнем углу щёлкните на значок с тремя линиями.
- Выберите Настройки.
- Слева в углу найдите строку поиска и введите «Сброс». Самым последним будет нужным вам вариант – Сбросить все настройки.
- Нажмите Сбросить.
В Safari
Опция восстановления настроек Safari по умолчанию была отключена компанией Apple.
Заключение
В этой статье мы рассказали о том, чем может быть вызвана ошибка «Время ожидания ответа истекло» и о том, как её устранить.
Теперь вы знаете больше об этой проблеме, и мы надеемся, что помогли с её исправлением. Если же нет – вполне вероятно, что ошибка связана не с вашим устройством и находится на стороне владельца сервера. В таком случае вам остаётся только ждать её исправления.
 Туториал: как исправить ошибку «Превышено время ожидания ответа от сайта»
 При открытии некоторых сайтов в Google Chrome, Microsoft Edge, Яндекс.Браузере и некоторых других браузерах, вы можете столкнуться с ошибкой «Не удается получить доступ к сайту», «Не удается установить соединение с сайтом» или аналогичной с кодом ERR_TIMED_OUT или, в некоторых случаях — ERR_CONNECTION_TIMED_OUT.
В этой инструкции подробно о том, чем может быть вызвана ошибка при открытии сайта и о возможных способах её исправить как в Windows, так и на смартфоне Android или iPhone.
Причины ошибки ERR_TIMED_OUT

Ошибка ERR_TIMED_OUT или ERR_CONNECTION_TIMED_OUT сообщает о превышении времени ожидания ответа от сайта. Если после того, как вы переходите на какой-то сайт, он не сообщает об ошибках, но браузер в течение определенного времени не может установить соединение с ним, результатом будет эта ошибка.
Чем это может быть вызвано? Основные причины в случае, если ошибка возникает только при доступе к определенным сайтам:
- Блокировками на стороне сайта или провайдера, один из примеров таких сайтов — play.google.com при открытии в браузере из РФ.
- Проблемами или техническими работами на стороне сайта.
- Высокой нагрузкой на сайт, который вы хотите открыть, с которой сервер не справляется.
В случае, если та же ошибка возникает при доступе почти к любым сайтам, проблема, вероятнее всего, в вашем Интернет-подключении, о конкретных возможных причинах — далее.
Способы исправить ошибку ERR_TIMED_OUT
Если проблема «Не удается получить доступ к сайту» возникает только при доступе к определенным сайтам, а остальные открываются без каких-либо ошибок:
- Если включен VPN, попробуйте отключить его, а если отключен — наоборот, включить.
- Учитывайте, что проблема может быть со стороны самого сайта, в этом случае отсутствие доступа, вероятнее всего — временное явление и скоро всё будет налажено. Проверить текущую доступность популярных сайтов можно с помощью онлайн-сервисов, таких как Downdetector.
- Если проблема возникла на компьютере с Windows, при этом не открываются только сайты антивирусов и компьютерные сайты, вероятная причина — вредоносное ПО на компьютере, подробнее в статье: Что делать если блокируются сайты антивирусов.
В ситуации, когда об ошибке ERR_TIMED_OUT сообщается для всех или почти всех сайтов, которые вы пробуете открыть, полезными могут оказаться следующие способы и информация:
- Если проблема возникла на телефоне Android или iPhone, при этом проблем с приемом сети нет, учитывайте, что иногда к такому может приводить включенный VPN (попробуйте отключить). Ещё одна возможная причина — ограничение скорости доступа в Интернет после достижения определенного лимита трафика (некоторые операторы «режут» её до 128 Кбит/с и при такой скорости вы можете получить указанную ошибку). Также можно попробовать включить режим полета на телефоне, а затем отключить его — иногда срабатывает.
- Для домашнего интернета: убедитесь, что тариф оплачен, также перезагрузите (выключите из розетки и затем снова включите) ваш роутер. Если используется VPN, попробуйте его отключить.
- В Windows 11 и Windows 10 отключите прокси, в том числе «Автоматическое определение параметров». Подробнее: Как отключить прокси в Windows 11, Как отключить прокси в Windows 10

- Проверьте, открывается ли тот же сайт в режиме инкогнито в браузере (обычно для запуска режима инкогнито можно использовать сочетание клавиш Ctrl + Shift + N). Если в режиме инкогнито все открывается без проблем, попробуйте: отключить все (даже гарантированно полезные) расширения в проблемном браузере и проверить, решило ли это проблему. Если да — включайте их по одному. Также может иметь смысл проверить, не заблокирован ли доступ в сеть для браузера в брандмауэре Windows, либо просто попробовать временно отключить брандмауэр для проверки.

- Если в Wi-Fi сети находится много устройств, активно потребляющих трафик: например, на ТВ воспроизводится онлайн видео, компьютер активно загружает что-то из файлообменной сети, ошибка ERR_TIMED_OUT может быть вызвана тем, что для браузера не осталось достаточной свободной пропускной способности.
- Если для доступа в Интернет с компьютера используется точка доступа на телефоне (режим модема), причиной могут быть ограничения на раздачу или её скорость со стороны оператора связи на вашем тарифе.
- При наличии стороннего антивируса или файрволла, попробуйте временно отключить его и проверить, решило ли это проблему.
- Если на компьютере есть точки восстановления системы на дату, когда проблема не наблюдалась, попробуйте использовать их. Подробнее: Точки восстановления Windows 11 (подойдет и для Windows 10).
- Попробуйте сбросить настройки сети: Как сбросить настройки сети в Windows 11, Как сбросить настройки сети Windows 10.


Надеюсь, один из вариантов поможет разобраться в причинах недоступности сайта или сайтов и решить проблему. Если же ошибка ERR_TIMED_OUT сохраняется, опишите в подробностях ситуацию в комментариях, я постараюсь помочь.
Are you seeing the “ERR_CONNECTION_TIMED_OUT” error in your browser? Not a very helpful error message, is it? If you are a daily WordPress user, then it’s always good to be aware of common errors like these that might prevent you from getting access to your website.
In today’s post, we’re going to take a deep dive into the “ERR_CONNECTION_TIMED_OUT” error and examine why you might see this and what you can do to fix it quickly. Simply put, it’s an indication that the system is unavailable and the time given for one to connect has elapsed, and now the request has timed out. But what does that actually mean?
Let’s find out!
Check Out Our Video Guide to Fixing the ERR_CONNECTION_TIMED_OUT Error
What is the ERR_CONNECTION_TIMED_OUT Error?
An ERR_CONNECTION_TIMED_OUT error typically means there is something wrong with your local network connection. However, that’s not always the case.
According to the WordPress support documentation, a connection timed out error appears when your website is trying to do more than your server can manage. It’s particularly common on shared hosting where your memory limit is restricted.
When you visit a website and it doesn’t load, your browser will try for around 30 seconds or so until it terminates the connection. After which it will return an “ERR_CONNECTION_TIMED_OUT” error, indicating a communication problem. In Google Chrome you might see this as “This site can’t be reached. Domain.com took too long to respond.”

Due to all the different web browsers, operating systems, and servers, the error can present itself in a number of different ways. But most of them have the same or similar meaning. “ERR_NETWORK_CHANGED” and “ERR_CONNECTION_REFUSED” are two very closely related errors that can usually be solved with the same troubleshooting steps below.
Another common error code that appears under ‘This site can’t be reached’ is the DNS_PROBE_FINISHED_NXDOMAIN, which is a DNS error that essentially means the domain that was requested doesn’t exist.
Below are a few examples of how the error might present itself in different browsers.
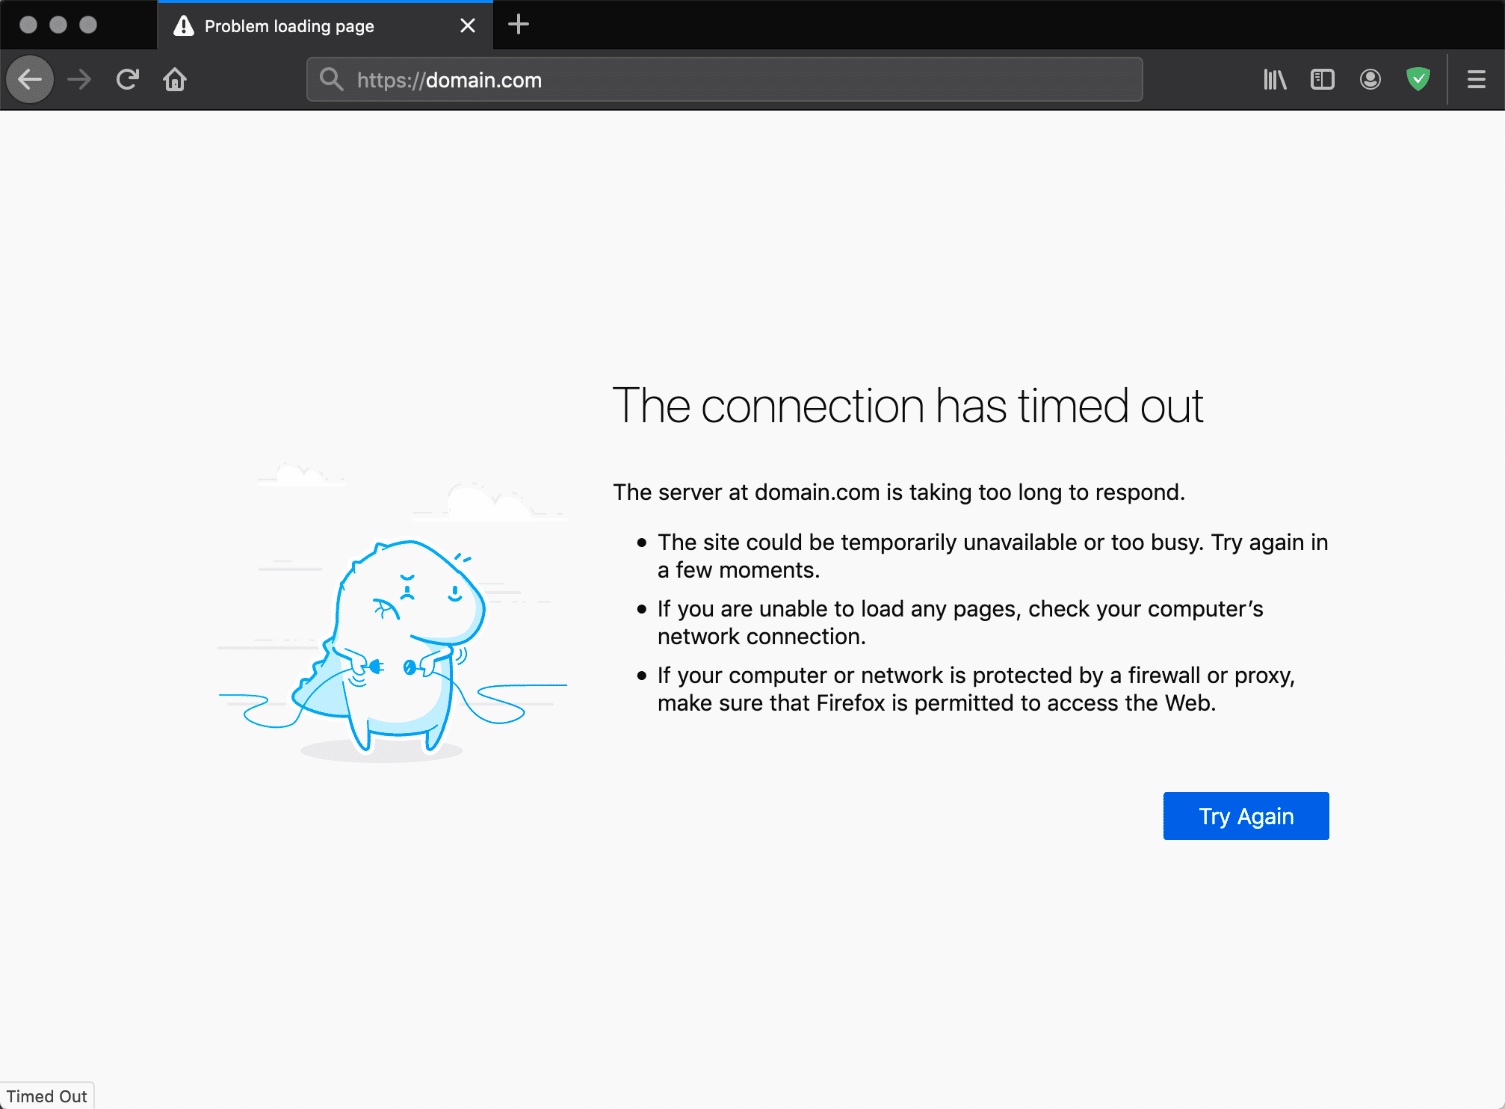
Mozilla Firefox
In Mozilla Firefox the error will show as “The connection has timed out.” The server at domain.com is taking too long to respond.
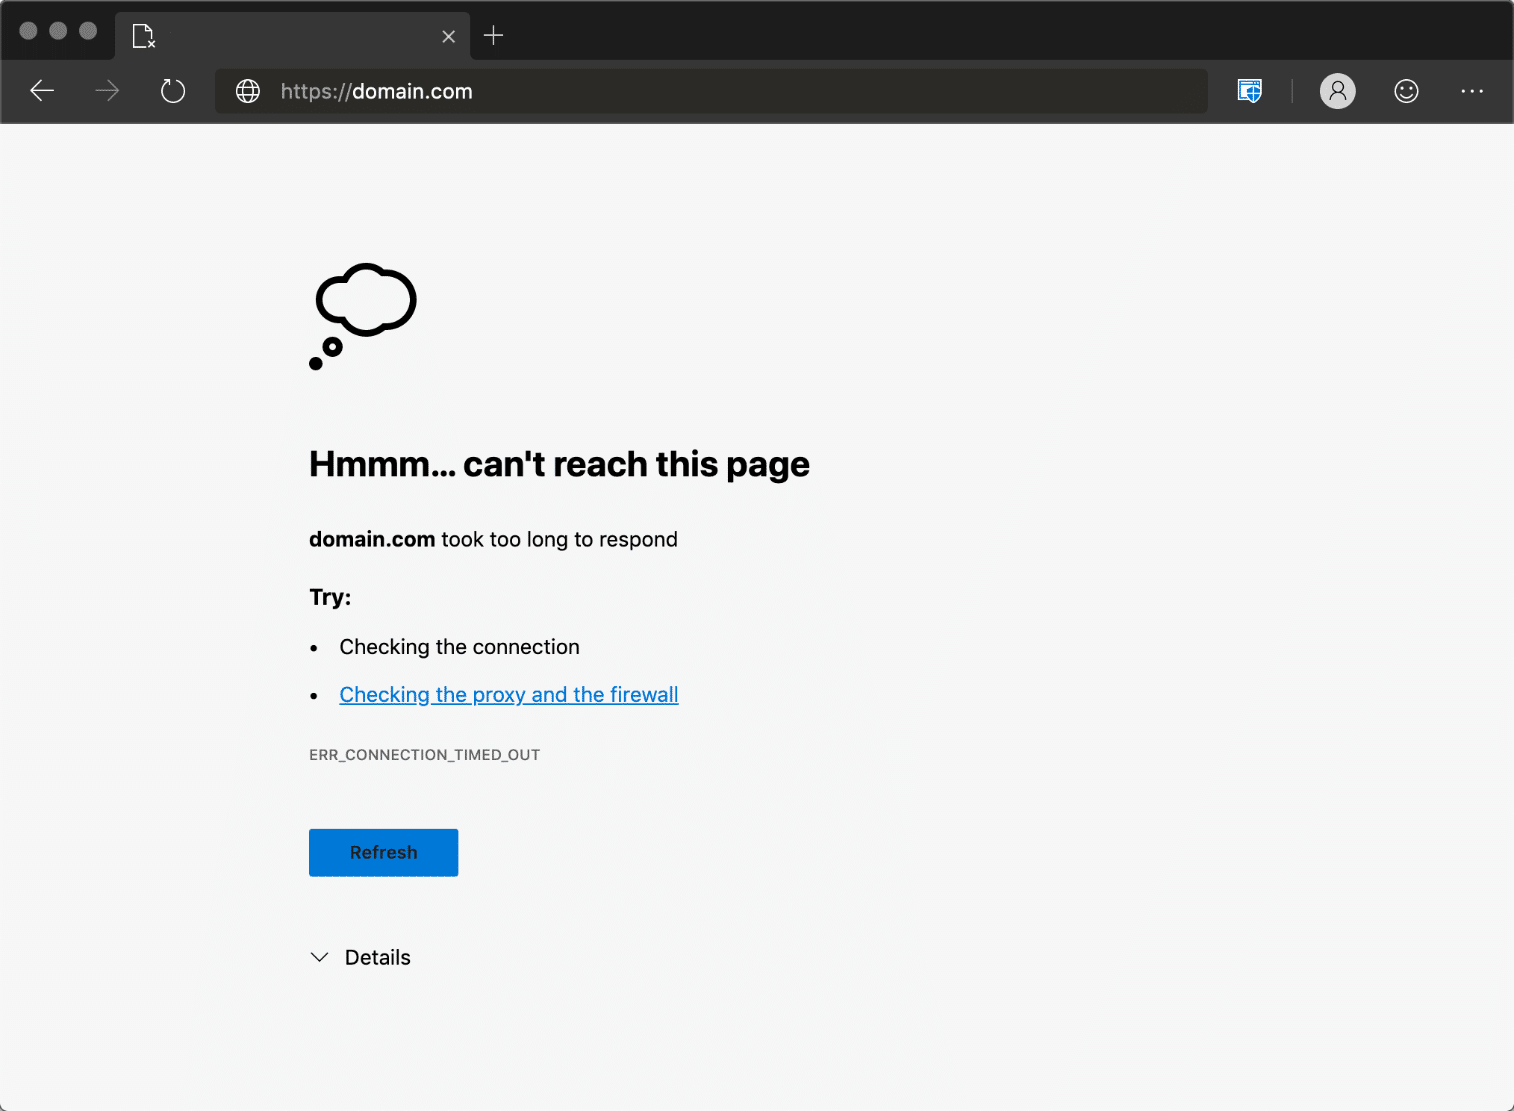
Microsoft Edge
In Microsoft Edge, the error will show as “Hmmm… can’t reach this page. Domain.com took too long to respond.” In Edge, however, it does also contain the “ERR_CONNECTION_TIMED_OUT” error.
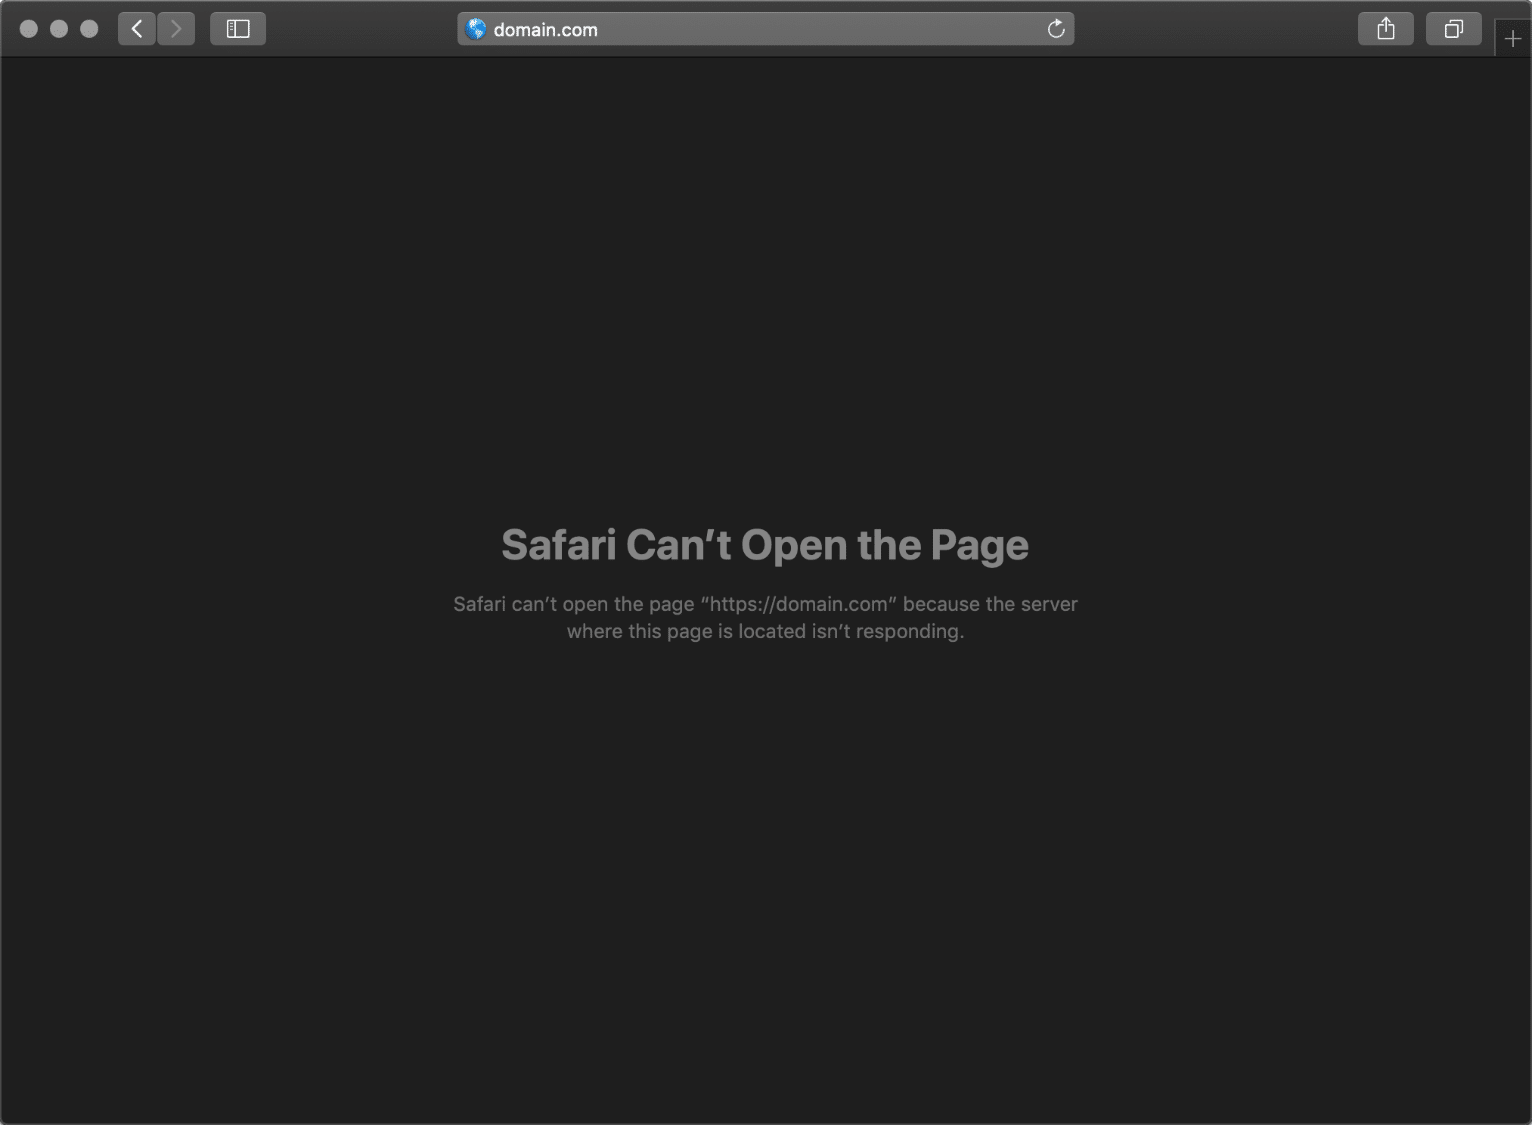
Safari
In Safari, the error will show as “Safari Can’t Open the Page. Safari can’t open the page domain.com because the server where this page is located isn’t responding.”
We’ve taken our knowledge of effective website management at scale, and turned it into an ebook and video course. Click to download The Guide to Managing 60+ WordPress Sites!
How to Fix the ERR_CONNECTION_TIMED_OUT Error
Where should you start troubleshooting if you see this error on your WordPress site? Without a great deal of context, it can sometimes be frustrating and overwhelming where to even begin. Typically these are either client-side problems (issues with your network connection or firewall) or an issue with the server at which the site is hosted (memory limits, execution times, etc.).
1. Check Your Connection
Google Chrome, Firefox, and Edge all recommend that you should check your network connection. While this might sound obvious, they all point to checking your connection first as it’s one of the most common reasons for the error. Here are a few things we recommend:
- Restart your home or office router. This only takes a few minutes and solves more problems than a lot of people would like to admit. To completely power cycle it, disconnect the power supply and then wait 30 seconds before plugging it back in.
- Check to see if you’re on a bad or slow wifi connection. This is a common occurrence on busy public wifi hotspots such as coffee shops or airports.
2. Disable Firewall and Antivirus Software Temporarily
Firewalls and antivirus software are intended to protect users and their systems. They scan your device regularly and automatically block any suspicious activity. However, this type of security can at times lead to connection issues.
This is because firewalls can often block pages they don’t need to or reject content that is completely safe. We’ve seen this happen many times with software like AVG. To check whether this is the case for you, try disabling your firewall and antivirus programs. Of course, this is only advised if you know for sure that the site you’re intending to visit is safe.
Additionally, you should only disable this kind of software temporarily. Switch it back on after you’ve finished checking to see whether the error has been resolved, so you don’t become vulnerable to attacks. If you repeatedly encounter errors because of your firewall or antivirus software, you may want to consider changing what you’re using.
These types of tools also have what is called a “false-positive” report you can fill out. If you’re 100% positive that a site your visiting is blocked and shouldn’t be, you can let the software developer know. Here are a few quick links:
- AVG false positive form
- Norton false positive form
- Sophos false positive form
3. Disable Proxy Settings
Sometimes you might see the ERR_CONNECTION_TIMED_OUT error if you are utilizing a proxy service. This is usually pretty rare, especially on the client-side. However, one might have been set without you even knowing it. To disable or check to ensure no proxy settings are enabled, follow these steps.
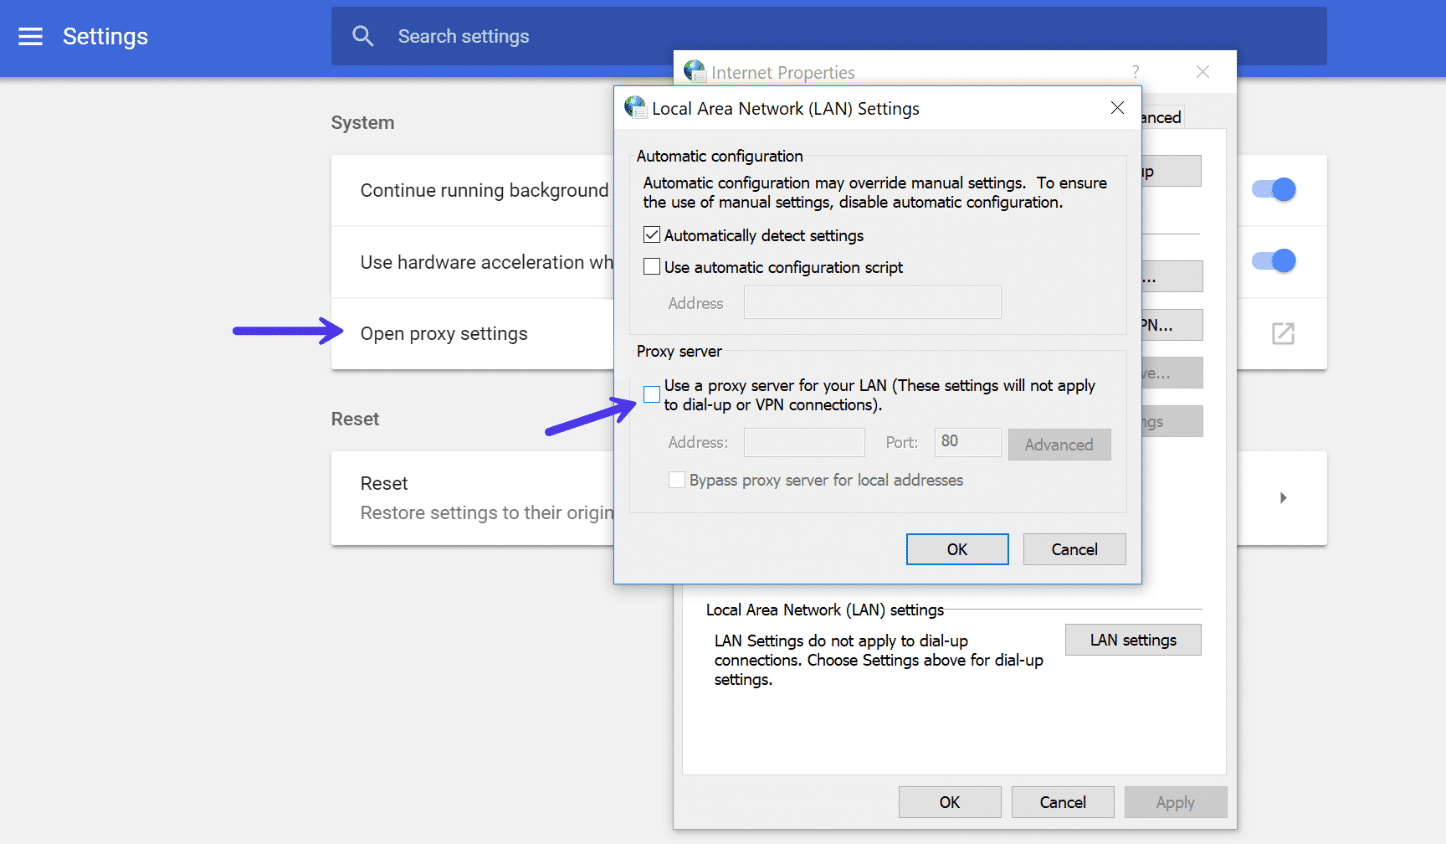
Access the Settings menu in your Chrome browser. This will open up the complete menu of options. Under the System section (you’ll need to click Advanced at the bottom to see this), you should find an entry titled Open proxy settings. By selecting it, you’ll be taken to the corresponding menu:
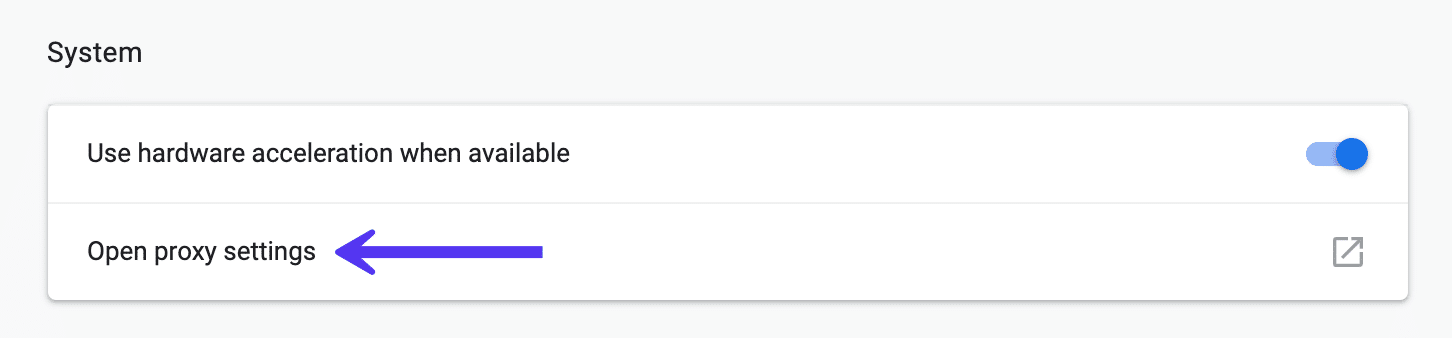
Your next step depends on the system you’re currently using. Windows users will want to click on LAN Settings and uncheck the Use proxy server for LAN option. If you’re a Mac user, you should immediately find yourself in the relevant menu. You’ll then have to uncheck all selectable proxy protocols and check to see if the ERR_CONNECTION_TIMED_OUT message has been resolved.
If you’re on Windows, you will see a “Local Area Network (LAN) Settings” window appear. You will want to confirm that the “Use a proxy server for your LAN” option is unchecked.
The same goes if you’re using a VPN like ExpressVPN or TunnelBear. Make sure you’re not connected by accident.
4. Change DNS Servers
The next thing you can try is changing your DNS servers. By default, DNS servers are automatically assigned by your ISP. But you could try temporarily changing these to a public DNS server, such as Google or Cloudflare.
- Some prefer to use Google’s public DNS (8.8.8.8 and 8.8.4.4) long-term due to them sometimes being more reliable.
- Cloudflare also offers secure and blazing fast free DNS (1.1.1.1 and 1.0.0.1) which we will be using in this example. If you want to use Google’s the steps are the same, you simply replace the DNS server addresses with Googles.
Tip: If you’re already using a free DNS server and having issues, removing it and defaulting back to your ISP’s DNS servers also sometimes fix things.
Google and Cloudflare aren’t perfect 100% of the time and there have been a few instances where we’ve noticed switching back has resolved the issue. This is especially true if you’re using a Wifi hotspot in an airport or coffee shop.
Windows
In Windows simply open up Command Prompt by pressing the Windows logo key and R. Then type “control panel” and hit Enter.
Click on “Network and Internet” and then “Network and Sharing Center.” On the left-hand side, click on “Change Adapter Settings.”

Right click on your current connection, this will either be Local Area Connection or Wireless Network Connection based on how you’re connecting. Then click on “Properties.”
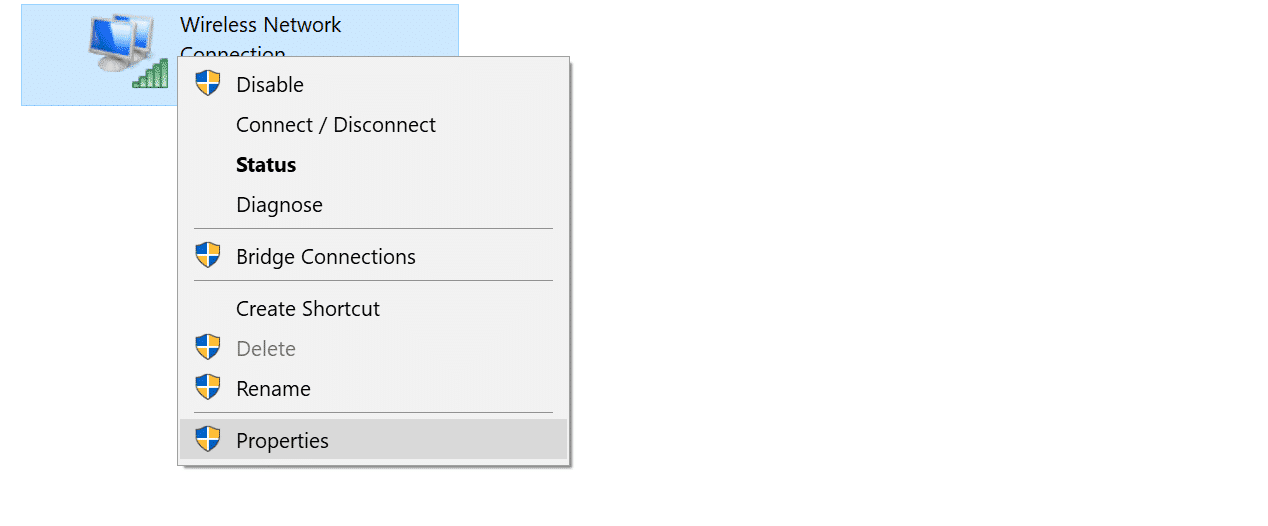
Select Internet Protocol Version 4 (or Version 6 if desired) and click on “Properties.”
Make a note of any existing settings in case you need to revert back. Click “Use the following DNS server addresses.” Enter the following, or replace the existing with these:
For IPv4: 1.1.1.1 and 1.0.0.1
For IPv6: 2606:4700:4700::1111 and 2606:4700:4700::1001
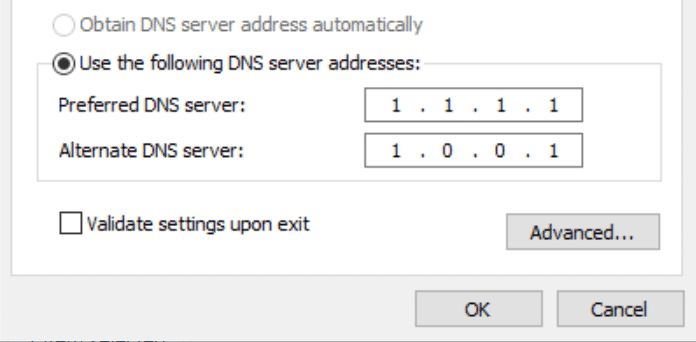
Click OK, then Close. Restart your browser.
Mac
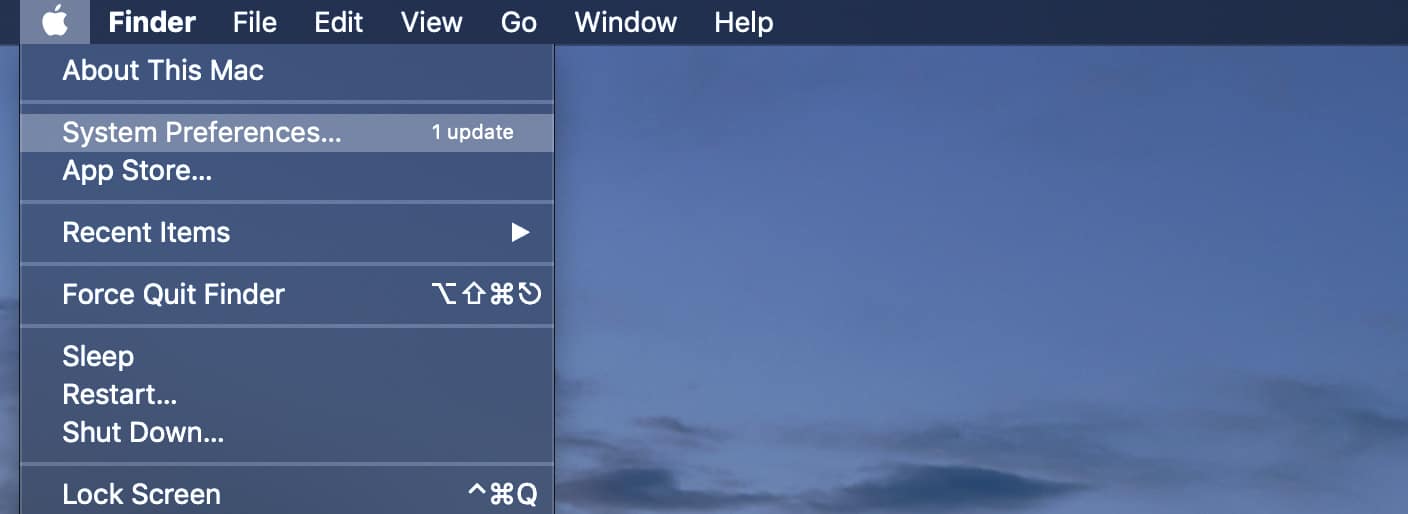
To change DNS servers on a Mac, go to System Preferences…
Click on the network icon and then click “Advanced.”
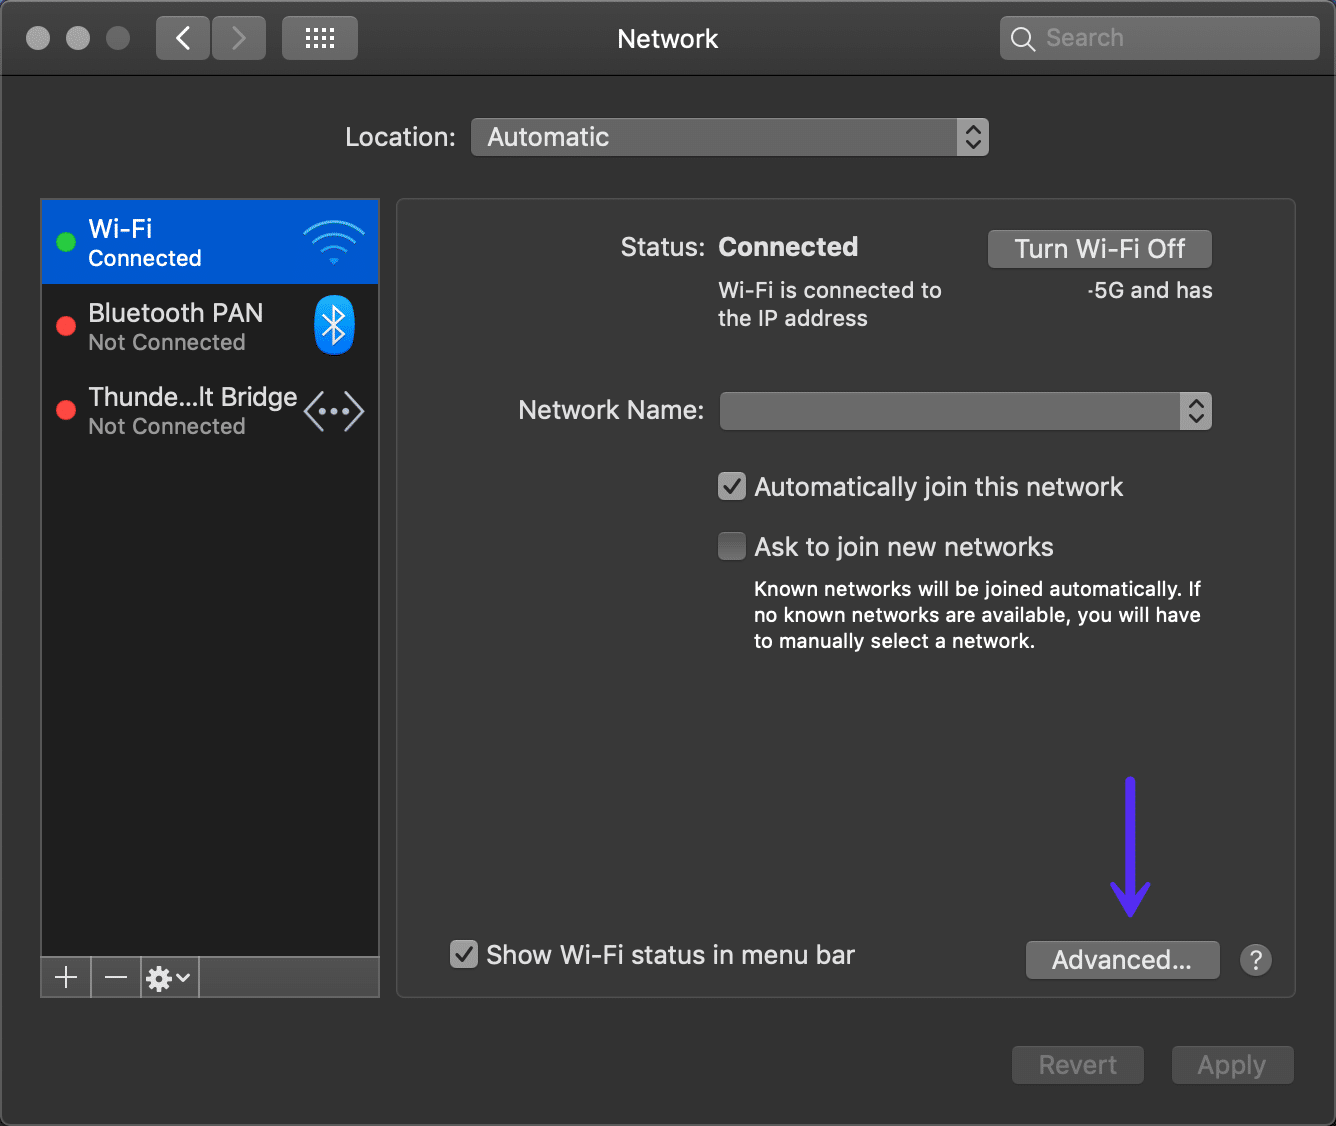
Click on the “DNS” tab.
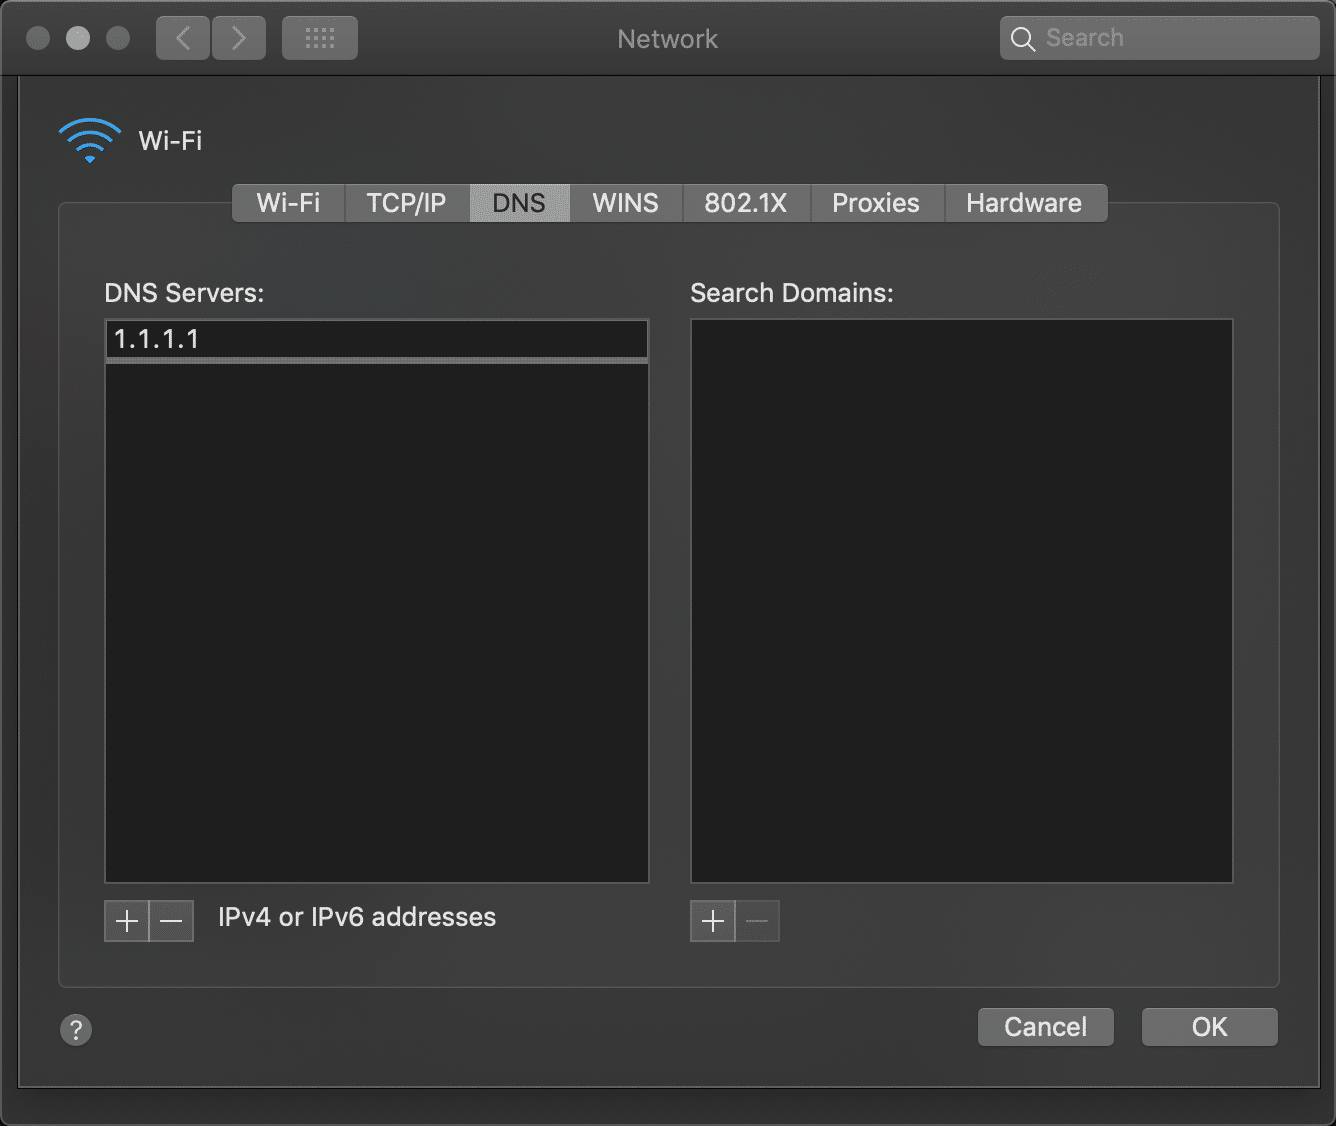
Then add Cloudflare’s DNS server addresses.
For IPv4: 1.1.1.1 and 1.0.0.1
For IPv6: 2606:4700:4700::1111 and 2606:4700:4700::1001
5. Flush/Renew DNS
You can also try flushing your local DNS cache. This is similar to clearing your browser cache. It could be that the site you’re trying to visit isn’t resolving to the correct IP address. If you’ve just migrated your WordPress site to a new host, it’s important to wait for things to fully propagate. This can sometimes take up to 24 hours, although it can be as little as a few minutes. This depends on your DNS provider and the TTL value of your DNS records.
Windows
In Windows simply open up Command Prompt and enter the following:
ipconfig /flushdns
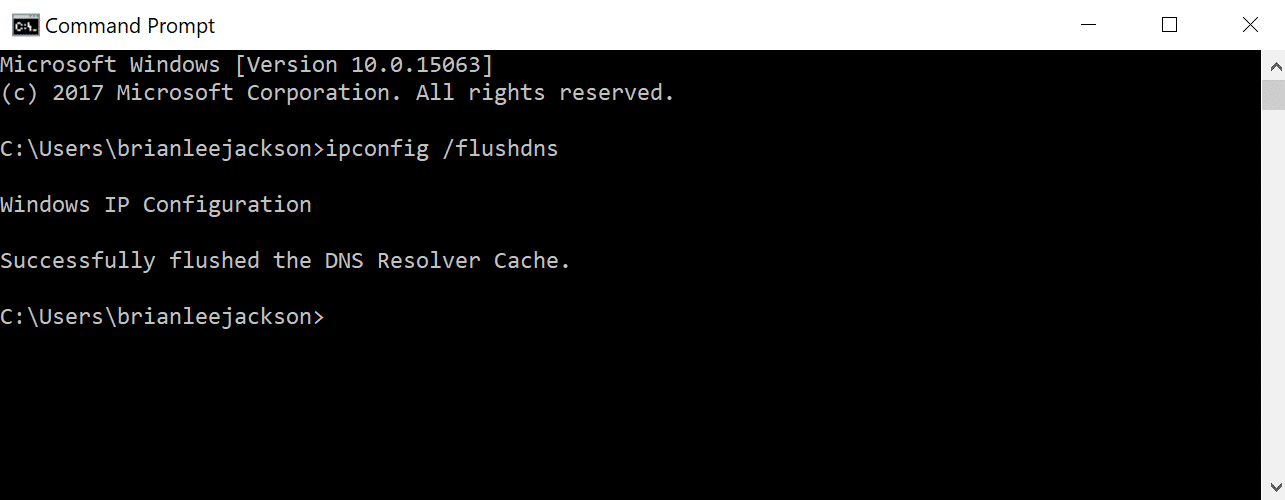
You should see a “Successfully flushed the DNS resolver Cache” if it worked.
Mac
For macOS users, you can enter the following in the terminal:
dscacheutil -flushcache
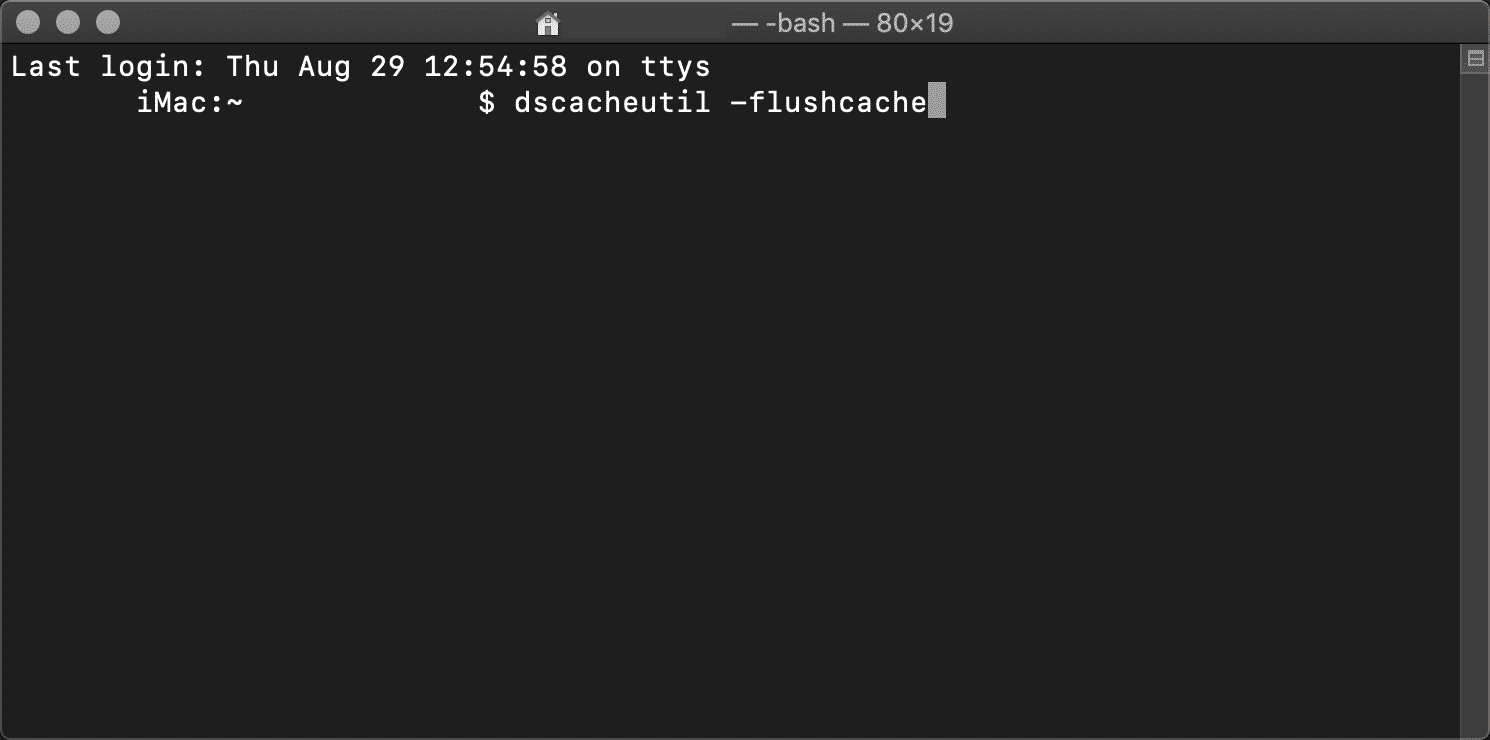
Note: There is no success message on Macs.
6. Check Your Hosts File
Every computer has what they call a local hosts file. This is a file that contains manual DNS entries which are mapped to specific IP addresses. Typically this is only edited when you want to preview your DNS before switching over domains to a new host. Or perhaps you have a local development site running using a tool like DevKinsta, Vagrant, or Docker.
There is a multitude of different ways this file could have been changed or edited. Therefore, it’s always good to check to ensure the website you’re trying to access isn’t in there. Just follow the steps below.
Windows
The hosts file typically requires additional access. So the first step is to open up your text editor as an administrator. Simply click on your start menu, search for your text editor, right-click on it and select “Run as administrator.” This can be done in any text editor such as Notepad, Notepad++, Atom, etc. We are using Sublime in our example below.
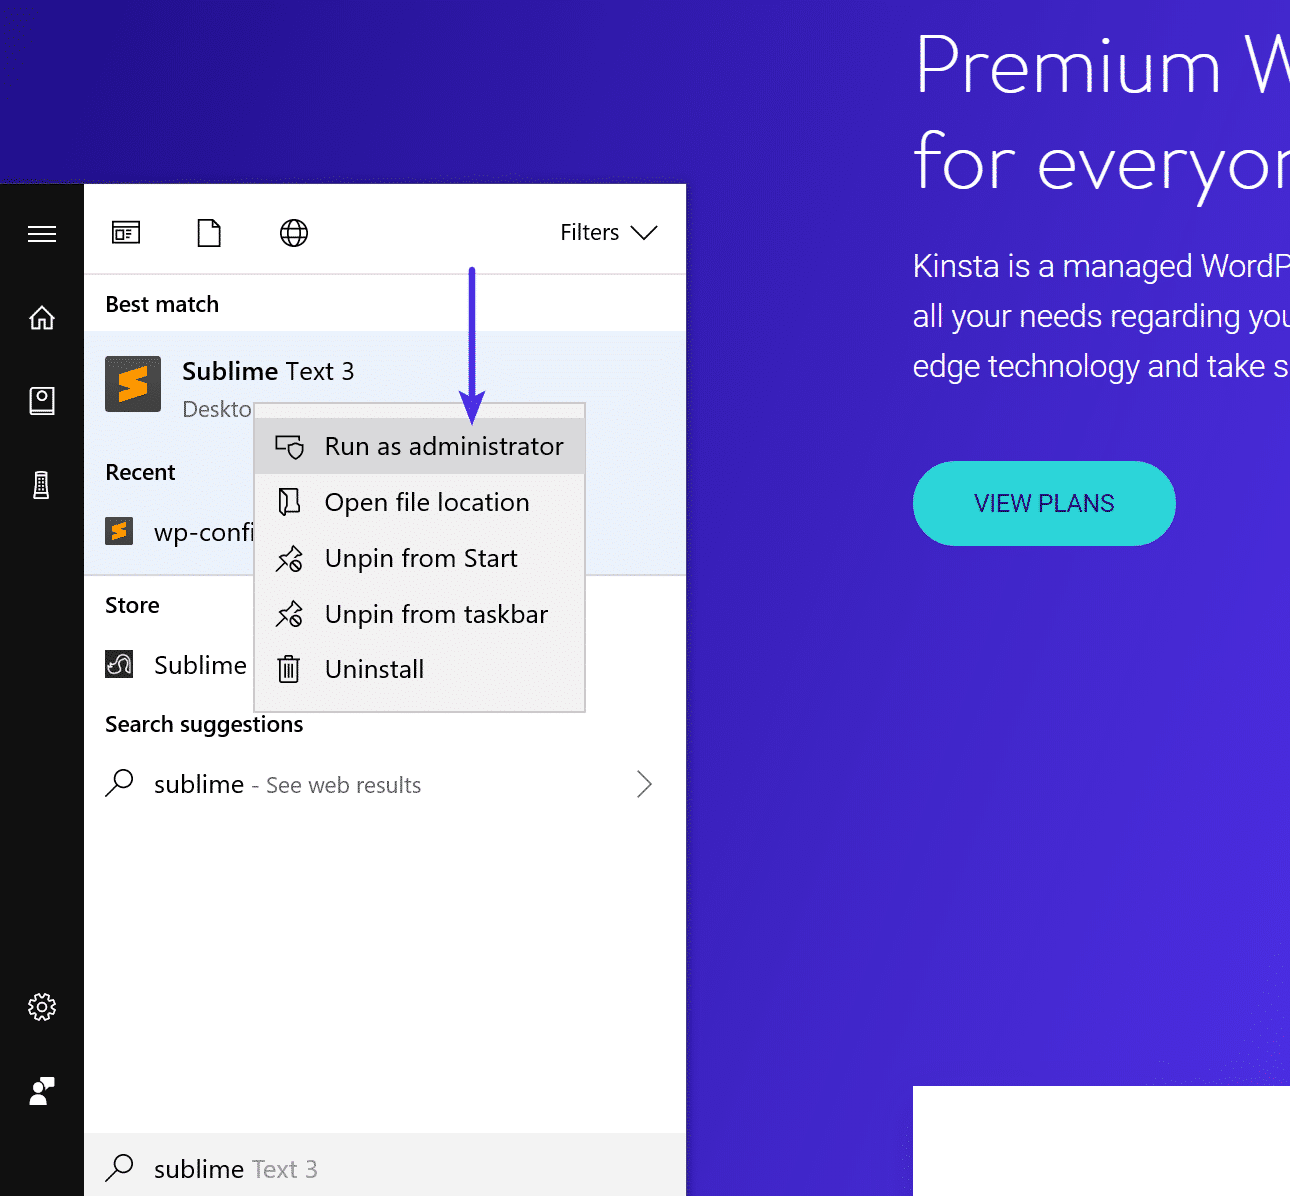
Within your text editor click File → Open and browse to the following location:
C:\Windows\System32\drivers\etc\
Click on the hosts file and “Open.”
Double-check and make sure the website you’re trying to visit isn’t listed in there. If it is, remove it.
Mac
To check your hosts file on a Mac, we recommend getting Gas Mask. It’s a free application that can be used as hosts file manager, hosts files editor, and switch between them. It makes everything quick and easy! Otherwise, you can follow the steps below to edit your hosts file on Mac manually.
Go to Utilities and then click on “Terminal.”
Enter in the following command and press Enter (you will most likely be prompted for your administrator password as well).
sudo nano /private/etc/hosts
Double-check and make sure the website you’re trying to visit isn’t listed in your hosts file. If it is, remove it.
7. Check the DNS of Your Domain
You should also verify that the DNS of your domain is correctly pointed to your hosting provider. If you’re a Kinsta client we have an in-depth post on how to point your domain and or DNS to Kinsta. If you recently migrated your WordPress website to a new host, it could be the DNS was cached incorrectly on your computer. In which case, step 5 above should resolve that. Or it may simply be too soon and you need to wait a few hours for the DNS to fully propagate.
8. Clear Browser Cache
Web browsers store information in cache on your computer. This includes your browsing history, saved login data, and cookies – all of which are recorded in order to load the relevant pages more quickly the next time they’re visited.
And if Edge Caching is enabled, it is even possible to cut in half the time it takes to deliver the HTML of pages to your site’s visitors.
Although they’re useful, caches can cause numerous issues when they become outdated. Fortunately, this problem is easily solved by clearing your cache.
But before you do that, you can easily check to see if it’s a browser cache issue by first opening up your browser in incognito mode. Or you can try a different browser. If you’re still seeing the error, then you will want to proceed with clearing your cache.
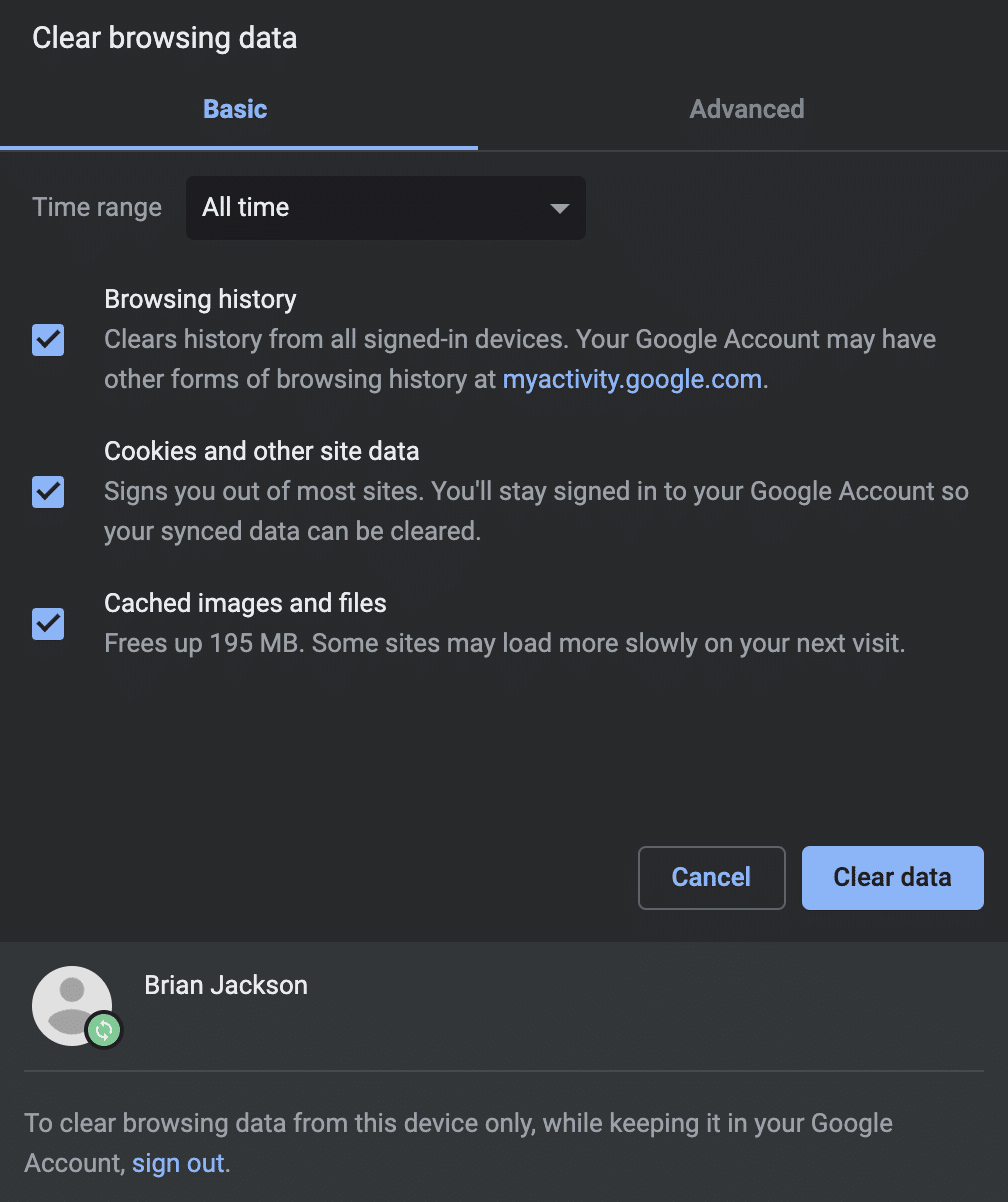
In this example, we’ll be using Google Chrome. Begin by opening up the primary menu (in the top-right corner of your browser window). From there, select More Tools: You can then click on Clear browser data.
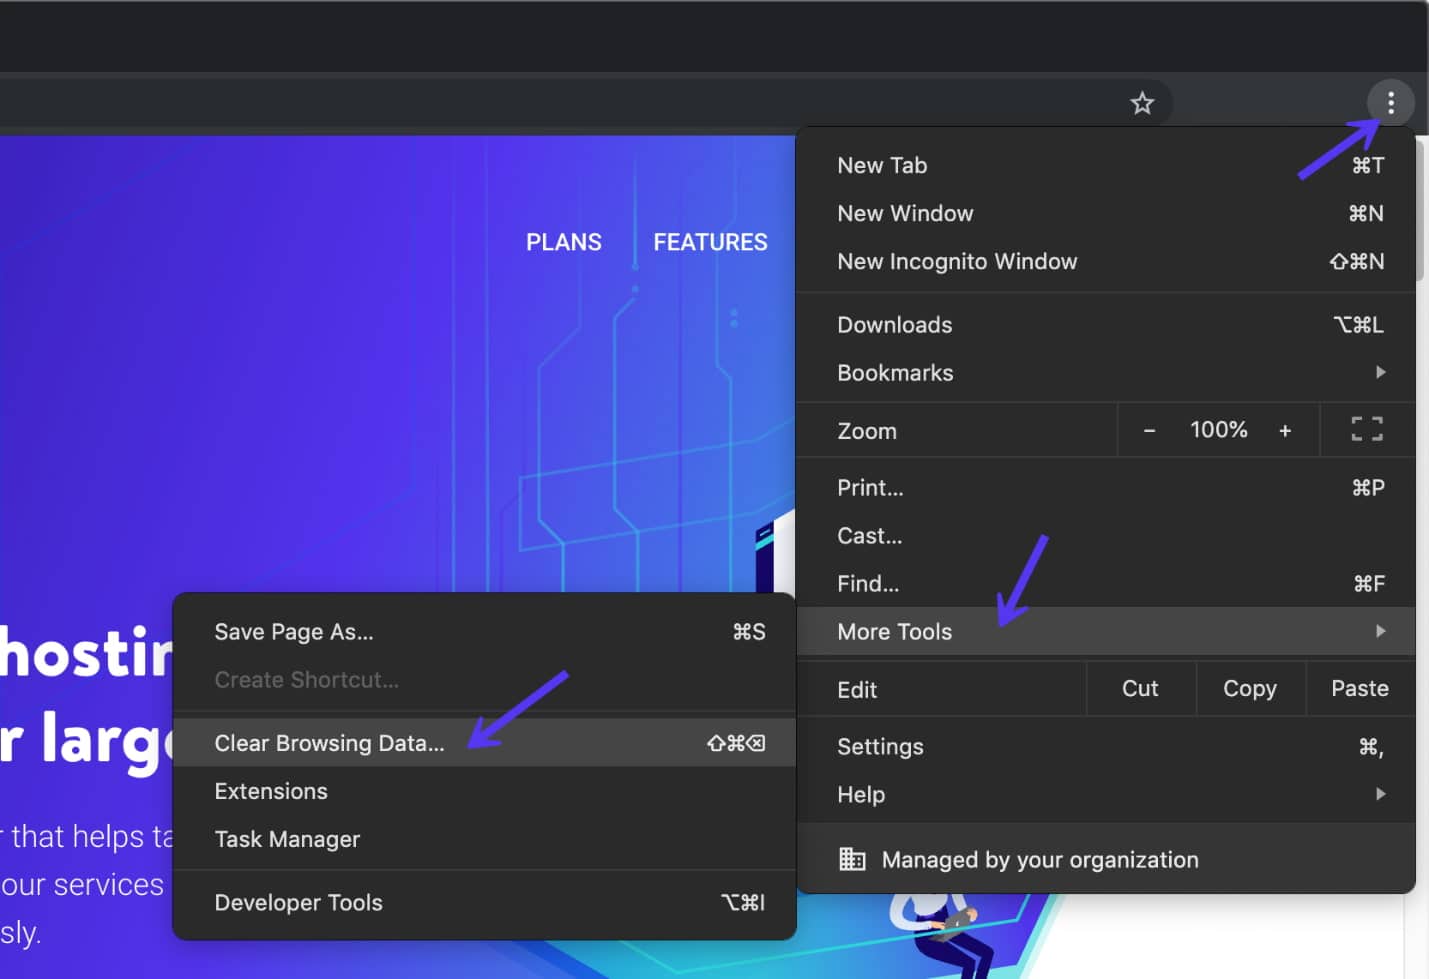
On the resulting page, you’ll need to make sure that all listed file categories are selected. If they aren’t, Chrome won’t be able to empty the entire cache. Instead, it will simply remove the most recent entries, which won’t result in the desired effect:
An alternative method of completing this process is to enter the following URL into your address bar:
chrome://settings/clearBrowserData
The resulting screen should grant you access to the same options we’ve outlined above. Here are some other helpful links for clearing cache.
- How to Force Refresh a Single Page for All Browsers
- How to Clear Cache for Google Chrome
- How to Clear Cache for Mozilla Firefox
- How to Clear Cache on Mac (Safari)
- How to Clear Cache for Internet Explorer
- How to Clear Cache for Microsoft Edge
- How to Clear Cache for Opera
9. Look at The Maximum Execution Time
The rest of the troubleshooting steps we’ll be diving into are those that have to do with the configuration of your WordPress site or server that may help fix the “ERR_CONNECTION_TIMED_OUT” error.
The first is the maximum execution time set for your site. On most servers, the default time is set to 30 seconds. This is the amount of time a PHP script is allowed to run (after which it times out). On shared hosts, this is typically set low or left at the default.
You can’t easily modify this from WordPress as the php.ini file is located on your server. To modify this, we recommend reaching out to your hosting provider to see if they can help. At Kinsta, we set the default maximum execution time to 300 seconds.
If you want to try and modify this yourself, it can usually be done with one of the following options. Both will depend on how your hosting provider configures their servers.
Option 1 – Modify Max Execution Time in php.ini File
If you have a php.ini file in your home directory, find the max_execution_time parameter and modify it. For example, if it’s set to 30 seconds, you can increase it to 300 seconds.
max_execution_time = 300
Option 2 – Modify Max Execution Time in .htacess File
If the above option doesn’t work, you might be able to change it within your .htaccess file. Just like with the php.ini file, this is typically located within your home directory. Place the following in the top of your .htaccess file:
php_value max_execution_time 300
10. Temporarily Disable Your Plugins
As with most WordPress errors, a plugin can definitely be the root of the problem. To determine if that’s what’s happening, you’ll need to disable all of your site’s plugins. However, if you’re getting the “ERR_CONNECTION_TIMED_OUT” error it means you don’t have access to your WordPress admin area. This means you will need to SFTP into your site. We recommend using FileZilla.
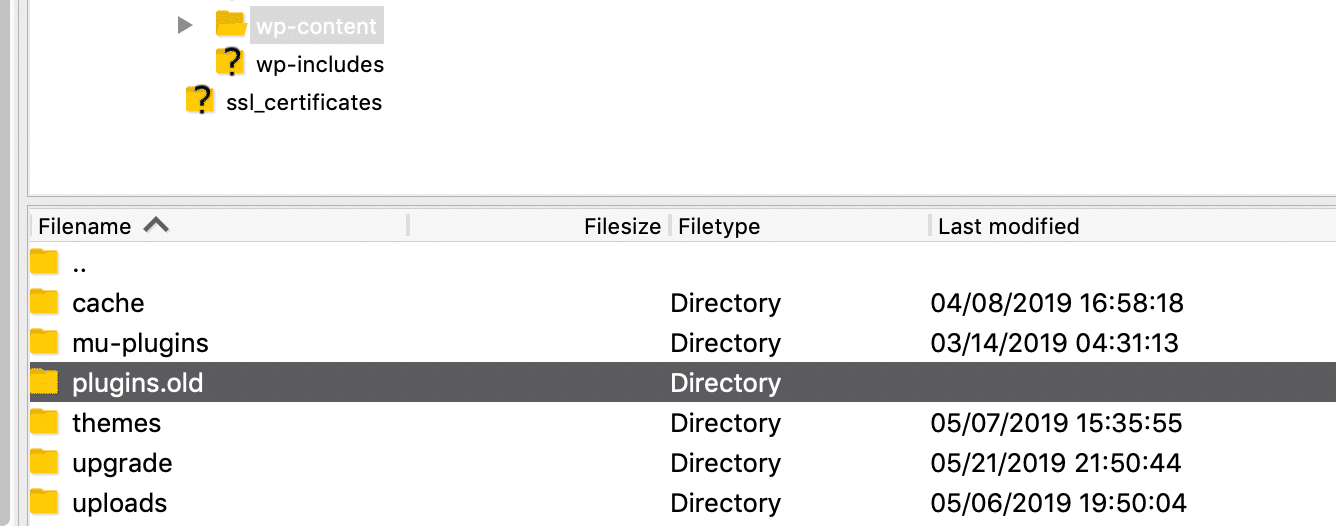
Once your SFTP client is ready, connect to your website through it and navigate to your WordPress root folder. In case you can’t find it, it’s usually called public_html, html, public, www, or your site’s name. If you’re a Kinsta client, it’s your public folder.

Open that folder, and navigate to the wp-content directory. Inside, you’ll see a folder called plugins, which contains individual subdirectories for each of the plugins installed on your site (both active and inactive).
What you’re going to do now is right-click on the plugins folder, and rename it to something else. We recommend plugins.old or plugins.deactivated, so you can easily recognize it later.
WordPress will now not be able to find any of your plugins. When that happens, it will automatically disable those plugins.
Now, try accessing your WordPress dashboard. If the timeout error is gone, then you can assume that one of your plugins was the culprit. All you have to do is figure out which one was at fault.
Return to the wp-content directory, and rename your original plugins folder correctly. Then, you’ll need to disable each of your plugins one by one, until you find the culprit.
To do this, open the wp-content/plugins directory. Inside, you’ll find one folder for each of your plugins. The process you’re going to follow is much the same as before:
- Start with the first folder, and rename it to anything you like.
- Check your website to see if the error is gone.
- If it isn’t, return the plugin folder from the previous step to its original name.
- Move on to the next plugin on your list, repeating the above steps.
This process can take a while if you have a lot of plugins, but it’s vital to check each plugin in turn. If at any point you identify the plugin that’s causing the error, you can uninstall it or replace it with another tool.
If you make it to the end of these steps without finding a solution, you can move on to the next stage of troubleshooting.
11. Temporarily Revert to Default Theme
Now that you’ve ruled out your plugins as the cause of the timeout error, it’s time to do the same with your active theme. In fact, your theme could also be creating compatibility issues.
Unfortunately, the process doesn’t work the same as above. WordPress won’t revert to the default theme if simply rename the theme folder, you would end up with an error like “The theme directory “theme name” does not exist.” Or if you try to rename the entire theme directory folder, you end up with “ERROR: The themes directory is either empty or doesn’t exist. Please check your installation.”
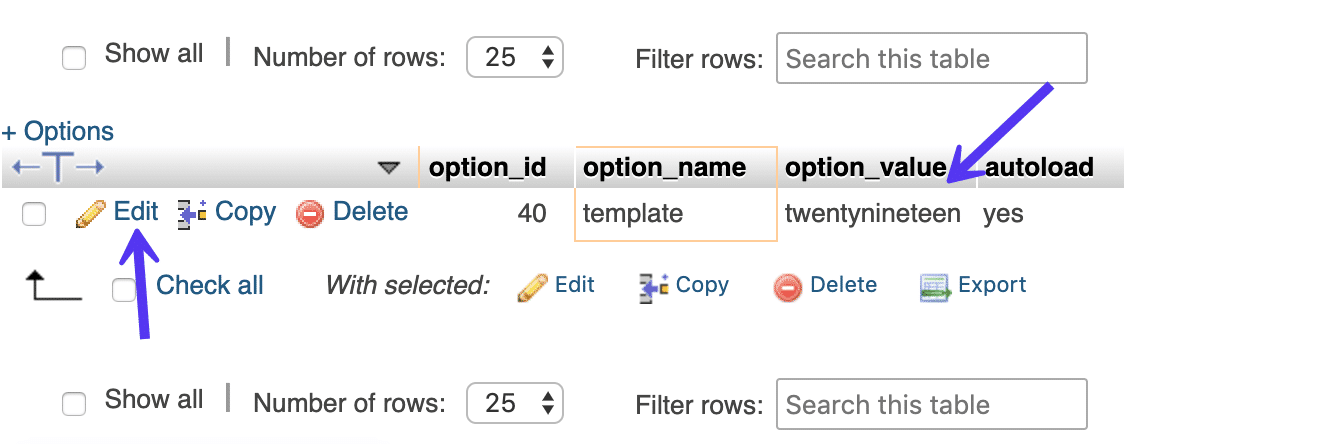
Therefore, you need to access your WordPress database by logging into phpMyAdmin. If you’re a Kinsta client, this can be found within the “Info” section of the MyKinsta dashboard:

After logging in to your database, click into the “wp_options” table, then click on the “Search” tab. You will want to search under the “option_name” for template.

Under the “option_value” column you will see the current name of your theme. Change this to one of the default themes, such as “twentynineteen.”
Check your website again to see if this has fixed the error. If it did, it simply means it’s a problem with your WordPress theme and you might want to try reinstalling it or reverting to your most recent backup.
12. Increase the Memory Limit
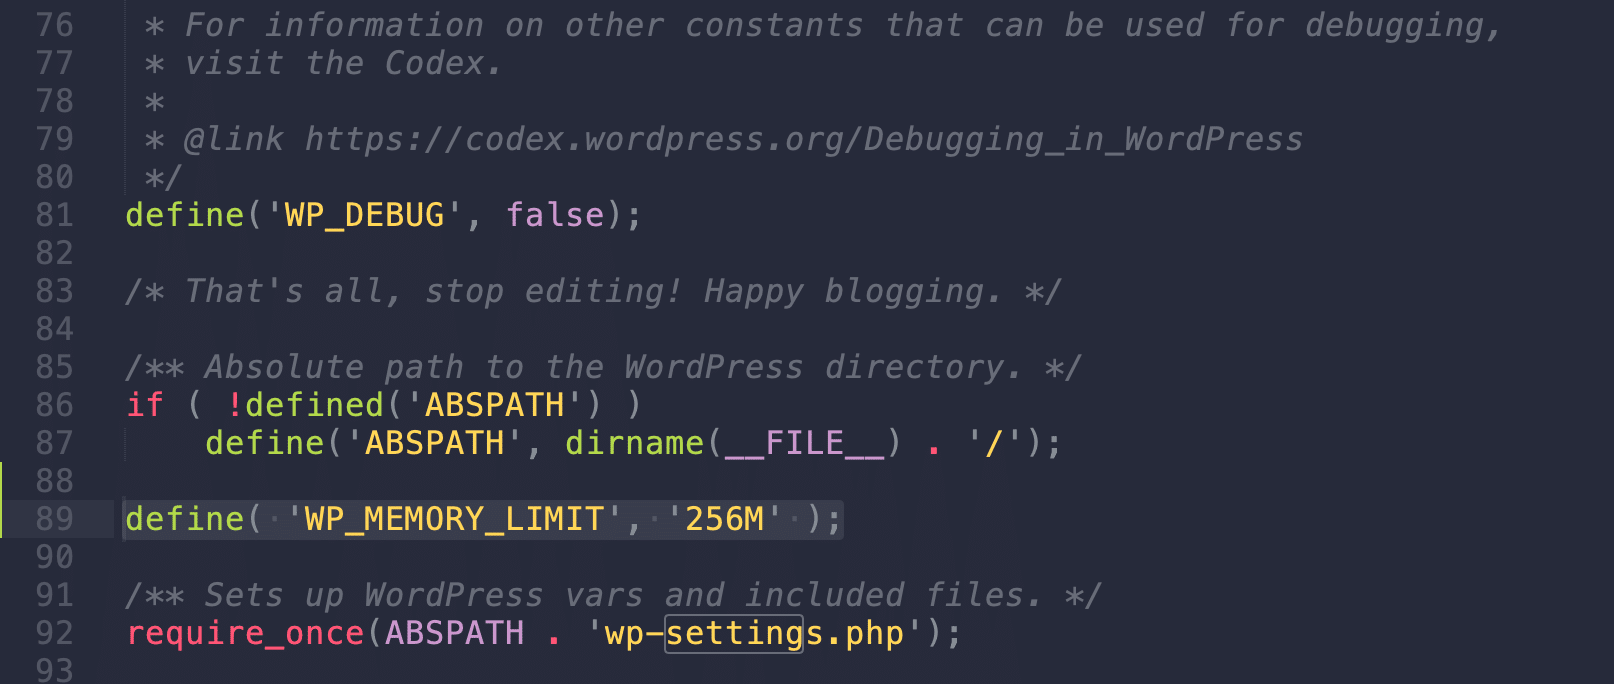
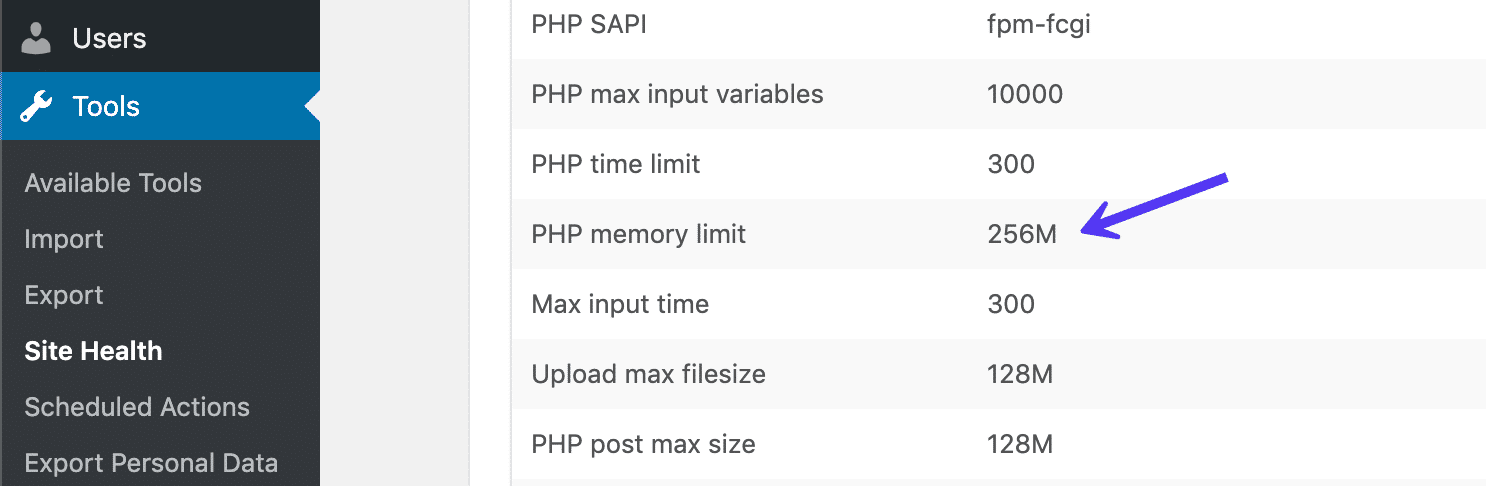
The WP_MEMORY_LIMIT parameter allows you to specify the maximum amount of memory that can be consumed by PHP. If you are using shared hosting, it’s most likely set to a low value such as 64M. At Kinsta, we set the default memory limit to 256M.
You can increase the memory limit by adding the following to your wp-config.php file. This must be placed above the wp-settings.php inclusion.
define( 'WP_MEMORY_LIMIT', '256M' );
Not sure what your current PHP memory limit is set to? If you have access to your WordPress dashboard and are running WordPress 5.2 or above, you can see the PHP memory limit under the “Site Health” tool.
Can’t reach your site because of the *ERR_CONNECTION_TIMED_OUT* error message? Here are 12 possible ways to fix it! 💻😱Click to Tweet
Summary
Connection and timeout errors are never fun to troubleshoot, but hopefully, you have a little more knowledge in your toolbelt now to help resolve it quickly.
It’s important to remember that the “ERR_CONNECTION_TIMED_OUT” error be a result of a client-side problem such as your network connection, or an issue with the server where your WordPress site is hosted. Have any other tips to resolve this error? Let us know below in the comments.
(Suggested reading: Learn how to fix the ERR_CACHE_MISS error in Chrome)
Brian Jackson
Brian has a huge passion for WordPress, has been using it for over a decade, and even develops a couple of premium plugins. Brian enjoys blogging, movies, and hiking. Connect with Brian on Twitter.
-
LinkedIn
-
Twitter
Ошибка «Время ожидания ответа истекло»
Время от времени при работе в браузере каждый пользователь сталкивается с ошибкой «Превышено время ожидания ответа от сайта». В статье мы расскажем, с чем связана эта ошибка и как её исправить.
Что означает ошибка «Время ожидания ответа истекло»
Ошибка ERR_CONNECTION_TIMED_OUT (Время ожидания ответа истекло / Превышено время ожидания ответа от сайта) означает, что сервер, к которому обращается браузер, не отвечает. Чтобы понять, с чем это связано, вкратце рассмотрим, как устроены сайты и как взаимодействуют сервер и браузер.
Когда пользователь переходит на тот или иной ресурс, он видит целостную картину — уже сверстанные страницы с единым дизайном. Эта целостность формируется на внутреннем уровне. «Под капотом» сайт состоит из совокупности элементов — кода, файлов (картинок, текста, видео), элементов верстки.
Пока эти файлы хранятся только на компьютере, о существовании ресурса никто не узнает. Чтобы пользователи могли посетить сайт, его нужно разместить в интернете — на сервере. Для этого можно арендовать сервер или заказать хостинг.
Чтобы попасть на уже размещенный сайт, нужно обратиться к серверу и запросить у него файлы. Этим занимается браузер. Сразу после того, как пользователь вбивает какой-то запрос в поисковик, браузер делает запрос на сервер. После этого сервер дает ответ, и искомый портал открывается в браузере.
Промежуток времени между тем, когда пользователь вбил запрос в адресную строку, и тем, когда в браузере открылся ресурс, называется временем загрузки сайта. Иногда на загрузку уходят миллисекунды. Иногда приходится ждать 10-30 секунд или больше. Общее время загрузки складывается из:
- времени отклика серверов (время запросов и ответов веб и DNS-серверов, к которым относится сайт),
- времени генерации сайта на сервере и в браузере (суммарное время загрузки всех файлов).
Браузер не может ждать ответ от сервера вечно. Если сервер не отвечает, он ожидает некоторое время и сообщает пользователю, что сайт недоступен. Ошибку «Превышено время ожидания ответа от сайта» могут спровоцировать как неисправности на сервере, так и проблемы подключения у пользователя.
Причины возникновения ошибки
Основные причины возникновения ошибки:
- Проблемы с интернет-подключением (отсутствие интернета, неправильные настройки, влияние вредоносного ПО или сторонних программ).
- Низкая скорость загрузки или сильно загруженное интернет-соединение.
- Проблемы на стороне сервера (профилактические работы, сбои).
- Неполадки в работе сайта (некорректные настройки в файле hosts) — в случае если не открывается только конкретный ресурс.
- Захламленность браузера (например, кэшем и куками).
- Блокировка на уровне региона.
- Работа под VPN или через прокси-сервер.
Как устранить ошибку
В первую очередь стоит выяснить, на чьей стороне возникла проблема — на вашей или на стороне сервера. Самый простой способ проверки: подключитесь к искомому порталу с другого устройства. Если сайт по-прежнему недоступен, значит проблема на стороне ресурса. В этом случае придется подождать, когда доступ будет восстановлен.
Если вам удалось попасть на сайт, значит проблема в локальном интернет-соединении. Чтобы наладить доступ, поэтапно выполните следующие шаги:
-
1.
Проверьте корректность URL-адреса сайта, если вводили его вручную.
-
2.
Перезагрузите страницу или попробуйте подключиться к ресурсу повторно.
-
3.
Перезагрузите роутер и компьютер. Чтобы выключить роутер, нажмите на соответствующую кнопку на задней панели. Если кнопка питания отсутствует, обесточьте роутер на 30-60 секунд, а затем снова включите.
Подключитесь к той же сети при помощи другого устройства и проверьте работу интернета. Если на нём тоже нет связи с DNS-сервером, значит проблема в настройках роутера или у интернет-провайдера. Если интернет-соединение и роутер работают исправно, перейдите к следующему шагу.
-
4.
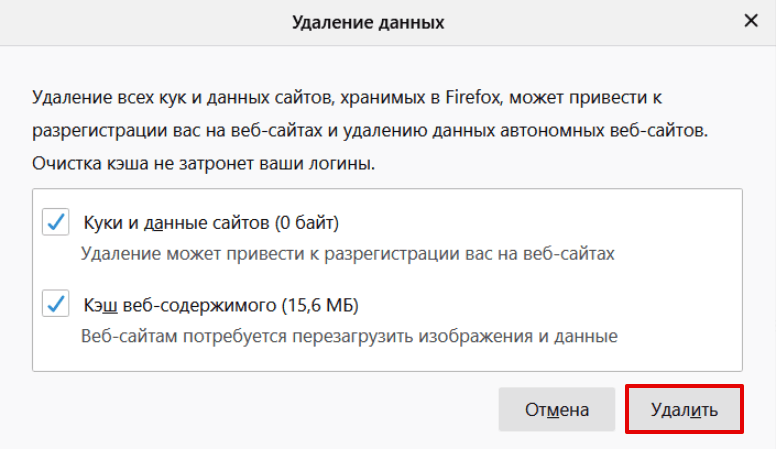
Очистите кеш браузера. Браузер мог кешировать страницу сайта в момент, когда он был недоступен, и теперь показывает устаревшую информацию. Для этого перейдите по нужному адресу и нажмите «Ctrl» + «F5» или используйте способы, которые указаны в инструкции Как очистить кэш браузера.

Пример очистки кэша и куков в браузере Firefox -
5.
Если вы работаете под VPN, отключите программу или расширения и проверьте подключение. Если у вас операционная система Windows, проверьте, не стоит ли в настройках подключение через прокси-сервер. Если работоспособность ресурса не восстановилась, переходите дальше.
-
6.
Если на вашем компьютере установлены антивирусы или фаерволы, попробуйте временно отключить их и посмотрите, изменит ли это ситуацию. В случае неудачи переходите к следующему шагу.
-
7.
Откройте файл .hosts и проверьте его содержимое. В файле не должно быть строки, которая начинается со знака «#» и содержит адрес ресурса, к которому не удается подключиться. Если такая строка присутствует — удалите её, сохраните файл и подключитесь повторно. Вам поможет инструкция Где находится файл hosts и как его изменить.
-
8.
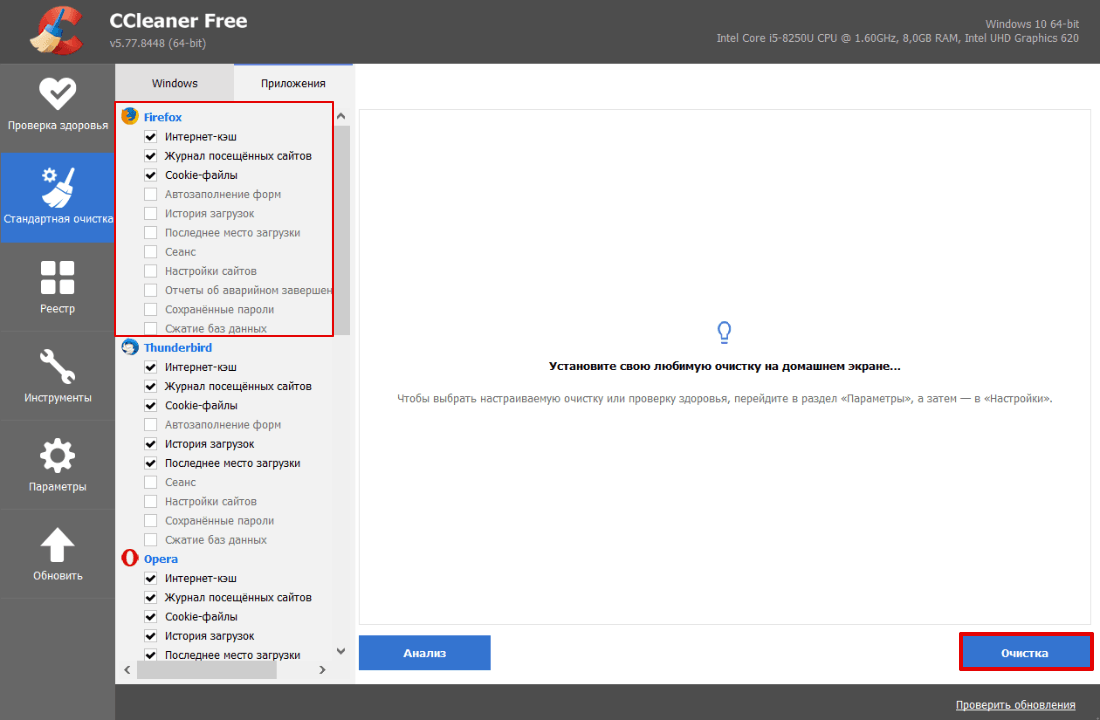
Установите программы для сброса параметров сети и обнаружения вредоносных файлов. Например, CCleaner, Wise Disk Cleaner или расширение Empty Cache Button. Просканируйте компьютер и удалите файлы, которые мешают работе.
Теперь вы разбираетесь в причинах ошибки «Превышено время ожидания ответа от сайта» и знаете, как её исправить, если проблема возникла на вашей стороне.
Помогла ли вам статья?
Спасибо за оценку. Рады помочь 😊
👍
“ERR_CONNECTION_TIMED_OUT” can be stressful to deal with in today’s digital age, where the internet is such an essential part of our lives.
Your browser displays this error message when it fails to connect to a website’s server in time. Naturally, this disrupts our online experience, and we want it quickly fixed.
In this article, we will discuss what the “ERR_CONNECTION_TIMED_OUT” error means, what causes it, and how to fix it. Furthermore, we will show you 6 fixes tailored specifically for WordPress websites timing out, so read on.
What does Err_connection_timed_out mean?
The error connection timed out means that your browser could not establish a connection to the website’s server in time. The problem may be your internet connection, website server, browser, or firewall settings.
Generally, a browser needs about 30 seconds to reach a website’s server. However, if the site takes longer than that – you’ll get the net err_connection_timed_out.
How does the connection timed-out error appear in different browsers?
While the timeout error can appear in any browser, the way it is displayed may vary. In this section, we’ll take a closer look at how the connection timed-out error appears in different browsers:
Google Chrome
The Chrome err_connection_timed_out error shows up with the “This site can’t be reached, took too long to respond” message.

Below the initial error message, Chrome explains that the site took too long to respond. Then it gives you a few troubleshooting suggestions.
Mozilla Firefox
Firefox displays, “The connection has timed out The server at is taking too long to respond.”

Under that initial message, Firefox provides valuable troubleshooting suggestions for resolving the issue.
Microsoft Edge
In Microsoft Edge, you’ll see the message “Hmmm…can’t reach this page”. This browser also suggests a few checks you can do to solve the issue.

Safari
Safari browser has a more wordy message for this error under the initial “Safari Can’t Open the Page.” It then adds that “Safari can’t open the page because the server where this page is located isn’t responding.” Still, that doesn’t give you any hints on how to resolve the issue.

Figuring out the underlying cause of the problem is crucial in troubleshooting the error and getting back to smooth web browsing. Keep reading to learn more about the most common culprits for the “err_connection_refused” error.
Common Causes of “err_connection_timed_out” Error
Dealing with the “err_connection_timed_out” error can be a bothersome interruption to your browsing activity. To troubleshoot and fix the issue effectively, it’s crucial to understand the usual causes of this error.
Some of the most common ones include problems with your internet connection, website server issues, conflicts with your browser or firewall settings, and DNS cache errors. In this section, we’ll examine these causes in more detail, so keep reading.
Main factors causing err_timed_out
- Internet Connectivity Issues – Incorrect IP and TCP configurations or network congestion can lead to the err_connection_timed_out error in your browser.
- DNS Server Problems – If the website’s DNS server isn’t working correctly, your browser won’t be able to connect to the site, resulting in a net err_timed_out error. That can stem from issues with the DNS server.
- Incorrect DNS settings on your computer – Outdated DNS cache, an incorrect local IP address, or misconfigurations in your local hosts file can also trigger the timeout error.
- Firewall or Antivirus Interference – A firewall or antivirus program with overly restrictive settings or misconfigurations may block your browser’s access to certain websites. That can lead to “a website took too long to respond” error showing in your browser.
- Browser Issues – Outdated or incompatible browser extensions, cookies, and cache can cause a website to load slowly or not at all. Any of these can result in a timeout error.
How to Fix “err_connection_timed_out”
It can be frustrating when you can’t access your favorite websites or use online services due to a connection timed out. However, following the troubleshooting steps in this section, you can usually fix the issue yourself.
Keep reading to learn basic and advanced troubleshooting steps for fixing timeout errors. Last but not least, we’ll show you 6 fixes for solving the err_connection_timed_out in WordPress, so read on.
Basic Troubleshooting Steps to fix a connection timeout error
Here, we’ll provide you with some simple solutions to help you troubleshoot and resolve a connection timeout error on your device. These steps can help you quickly get back online and stay connected to the internet.
Try a different device
If you get a connection to server timed out error for a site, first try reaching it from another device. For example, if you cannot access a site from your computer, try loading it from your mobile device. Doing that helps you determine whether the issue occurs only on your end.
In case you can reach the same site from another device, proceed with the next steps to troubleshoot the timeout.
Check your internet connection
You may be experiencing slow network issues if you receive the message “This site can’t be reached err connection timed out” only on your computer. This error usually occurs when using busy public networks like those in malls and airports. Try and switch the network you are using to resolve the error.
Restart your router
If you are at home and there are interruptions in your internet connection, you may experience an err_connection_timed_out in Chrome. Address this disturbance by restarting your router device. To do that, press the power button and allow it some time to cool off. Then turn it on again and give it time to connect to the Internet again.
Still seeing the “This site can’t be reached, took too long to respond” error? Keep investigating using the following fixes.
Clear your browser cache and cookies
Web browsers store the cache of your browsing data, saved logins, and cookies. Thanks to it, you access pages you frequently visit faster. As beneficial as it is, it also holds some drawbacks, especially if the stored cache is out of date. An expired cache can prevent you from reaching a site serving the timed-out error.
Luckily, there is an easy fix: clearing outdated information. Learn how to do that on major browsers from our post “How to clear your browser cache and cookies”.
For mobile devices, read the following guides:
- How to clear the cache on Android devices
- How to clear the cache on iPhone
Disable browser extensions
Extensions are add-on applications that add more functionality to your browser. If you encounter the error “This site can’t be reached“, try disabling browser extensions that might be conflicting.
In Google Chrome, click the three dots menu > More Tools > Extensions to see the list of installed extensions. By disabling them, you can check if any are causing the error and resolve the issue.

Chrome will list all the installed extensions, and you can slide the toggle next to each to disable them.

Mozilla Firefox users can find the extensions list by clicking on the burger menu in the upper right corner. Select the Add-ons and themes option to get to the Extensions page.

Firefox displays the list of installed extensions. You can slide the toggle next to each to disable it.

Check for browser updates
Outdated browser versions can be incompatible and obsolete software may cause the timeout error. Thus, updating your browser ensures that it meets all compatibility requirements.
Thereby, an update may fix the connection timing out.
Additionally, the latest browser versions often include bug fixes and performance improvements.
Solve err_connection_timed_out by restarting your browser or initiating an update from the settings menu.
Update Google Chrome
For Chrome, look for the About Chrome section or restart your browser to check for updates.

Check Mozilla Firefox for updates
Firefox users can update their browsers by going to the General settings page and checking the Firefox Updates section.

If there is an update available, Firefox will proceed with installing it. Restart your browser and check if the error persists.
Disable your Firewall or Antivirus temporarily
Antivirus and Firewalls provide a powerful defense against cyber threats, various types of malware, and unauthorized access attempts. However, if they are too strict, they may block your access even to legitimate websites, causing a timeout.
To test whether your Firewall or Antivirus blocks the site you intend to access, try temporarily disabling them. After these are off, try relaunching the site and see if that solves the err_connection_timed_out.
In case you still see the error, turn back on your security software to keep your data safe and continue investigating the next steps.
If the antivirus or firewall software causes the problem, you can add the website to a whitelist. This way, the software will not filter your access to that site. Alternatively, contact its support or look for another program.
Advanced Troubleshooting Steps
In this part, we’ll show you how to tweak more advanced settings on your computer to fix an err_tmed_out error.
Flush DNS Cache
A DNS cache is a temporary database stored on your computer that keeps recently accessed DNS information. Generally, a DNS cache is beneficial for your smooth browser experience as it expedites DNS resolution.
However, if the DNS information in the cache is incorrect or outdated, it can cause errors like the err_timed_out error. This is because your computer is using the wrong DNS information to try and connect to the website, resulting in a connection timeout.
Thus, you can clear your local DNS cache to force your computer to look up the DNS information again to get the latest data.
- How to flush DNS cache on Windows
Flush your Windows DNS cache by launching the Command Prompt as an administrator and executing the command below.
ipconfig /flushdns- Flush DNS cache on Mac
To clear the DNS cache on a MacOS, run the Terminal and paste the command below, then click Enter.
sudo dscacheutil -flushcacheRenew IP
The ERR_CONNECTION_TIMED_OUT error occurs when your computer fails to connect to a website properly. Often this is due to an outdated or conflicting IP address. By releasing and renewing the IP address, you can obtain a new and unique IP address.
This eliminates conflicts and enables a proper connection, effectively resolving the err_timed_out error. Further in this section, we’ll show you how to do that for Mac OS and Windows, so read on.
- Windows
To renew your IP address on Windows, launch the Start menu and select “Command Prompt (Run as administrator).”

When the Cmd loads, run the commands from the list below by pasting them and clicking Enter for each.
ipconfig /registerdns
ipconfig /release
ipconfig /renew
netsh winsock reset
When ready, restart your computer and check if the “This site can’t be reached err_connection_timed_out” error is gone.
- MacOS
To resolve err_connection_timed_out on a Mac, open System Preferences.

Then select the Network icon, and click Advanced. Under the TCP/IP tab, hit “Renew DHCP lease” to release and renew your IP address.
In case you’re still getting “The connection has timed out” in your browser, proceed with the next steps.
Reset TCP/IP Windows
Resetting TCP/IP on Windows clears outdated settings that may cause timeout errors. Such errors may occur when your device can’t connect with another server due to incorrect TCP/IP settings.
By resetting TCP/IP, you can remove invalid settings that affect your network connection. Moreover, this improves your connection stability and resolves timeout errors.
To reset TCP/IP on Windows 10, you can follow these steps:
- Open Command Prompt as an administrator.
- In the Command Prompt window, type the following command and press Enter:
netsh int ip resetAllow Windows a few seconds to execute the command and provide you with its output.

- Restart your computer to apply the changes, as Windows advises.
After restarting, Windows will reset your TCP/IP settings to their default values. If that was the source of the issue, the err_connection_timed_out in Windows 10 should be gone.
Update Network Adapter Driver in Windows
Updating your network adapter driver in Windows can help improve your network connectivity and performance. Follow the steps below to update your network adapter driver:
- Press the Windows key + X and select “Device Manager” from the menu.

- Expand the “Network adapters” category and locate your network adapter.
- Right-click on your network adapter and select “Update driver“.

- Choose “Search automatically for drivers” and wait for the process to complete.

- If there is an available update, follow the on-screen instructions to install it.
- Restart your computer to apply the changes.
Provided that your browser still displays a “Site cannot be reached, took too long to respond”, keep reading for more solutions.
Change DNS Server – Mac and Windows
When experiencing the err_connection_timed_out error while accessing your site, try changing your DNS server settings to resolve it. To do that, switch the DNS servers provided by your ISP to a public DNS like Google’s (8.8.8.8 and 8.8.4.4).
This way, you can improve your internet connection’s performance and resolve the err_connection_timed_out error on your computer.
Read on to learn how to change your DNS servers on Windows or MacOS.
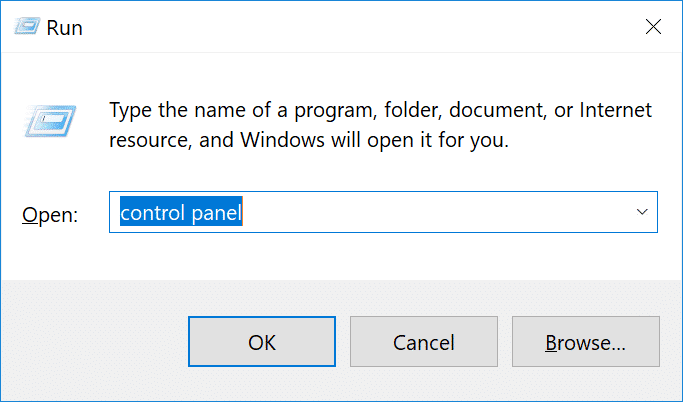
Windows
To change your DNS servers in Windows, click on the Start menu and search for “Control Panel.”

In the Control Panel, select “Network and Internet” and then “Network and Sharing Center“. Next, navigate to “Change adapter settings” to launch the “Properties” menu of your active network.

Locate “Internet Protocol Version 4 (TCP/IPv4)“, then load the “Properties” menu with a right-click. After that, set Google’s Public DNS servers (8.8.8.8 and 8.8.4.4) under “Use the following DNS server address.

Click “OK” and restart your computer to save and apply your changes to the system.
MacOS
Mac users can change their Internet Service Provider’s (ISP) DNS servers to Google’s from System Preferences. In there, select the Network icon and open the Advanced settings menu.

Next, go to the DNS tab and use the “+/-” buttons to add Google’s DNS servers, then click OK.

Restart your browser and check if the site you try to reach loads normally.
Check your local hosts file
The hosts file system is a text file that maps domain names to IP addresses. It allows manual DNS translations, and you can edit it to preview websites. To avoid conflicts, timeouts or DNS probe errors, examine your hosts file contents.
Check our article on How to edit the hosts file on Windows, Mac, or Linux to learn more information.
Disable Proxy Server
A proxy server is an intermediary between a device and the internet. When using a proxy server, all internet traffic passes through the server before reaching its destination.
If the proxy server is misconfigured or experiencing issues, it can block your access to a website, resulting in a timeout error. Disable the proxy server to try to eliminate this error and restore the device’s connection to the internet.
Modify Chrome Flags
Chrome flags are experimental settings that can be used to enable or disable certain features. While these features can enhance the browser’s functionality, they can also cause issues such as the “err_timed_out” error. Disabling certain Chrome flags, such as those related to network or experimental features, can help resolve this error.
Sadly some flags may interfere with the browser’s ability to establish an internet connection. Additionally, some Chrome flags may cause the browser to consume extra resources, leading to slow or unresponsive behavior.
To disable Google Chrome flags, type the following in the browser’s address bar:
chrome://flags/This will launch the Chrome flags page, where you can find all experimental flags that are active for your browser.

There you can use the Reset all button at the top to reset all flags. Alternatively, disable specific flags from the appropriate drop-down menu next to each.
6 Fixes for err_connection_timed_out on WordPress
Err_connection_timed_out is a common WordPress error indicating that the server failed to load a resource. This problem can result from various causes like plugin or theme conflicts, version incompatibilities, or misconfigurations. All these factors cause a WordPress site to use extra server resources and take longer to load.
If you’re experiencing the err_connection_timed_out error on your WordPress site, don’t panic. In this section, we’ve compiled six effective solutions to help you troubleshoot and fix this issue. These fixes will help you get your website back up and running smoothly, so keep reading to learn more.
Fix 1: Check for WordPress updates
First, you should check for available WordPress updates. To do that, log in to the WordPress dashboard and go to the “Updates” section.

If there are updates available, click the “Update Now” button. Alternatively, use a plugin or tool that automates the update process and alerts you when updates are available.
Backing up your WordPress site before initiating major updates is the best practice. This way, you ensure a safe restore point if things go sideways.
Using SiteGround’s WordPress Autoupdate tool, clients can benefit from a core update process that includes a site backup before implementation.
Fix 2: Increase PHP memory limit
Increasing the WordPress PHP memory limit can help resolve a connection timeout error by allowing more resources for website operations. To do this, access your hosting’s File Manager and add the snippet from below in the wp-config.php file.
define( 'WP_MEMORY_LIMIT', '512M' );Before increasing the value of the PHP Memory Limit variable, keep the server’s capabilities and potential effects on website performance in mind. The WordPress memory limit on all SiteGround servers is set to 256 MB by default. This value can be set up to 768M on shared hosting plans and increased further on Cloud servers.
Fix 3: Adjust Max Execution Time
Insufficient max_execution_time value for WordPress can cause a connection timed-out error by not allowing enough time for website operations.
The default max_execution_time value for all SiteGround servers is 120 seconds, which gives plenty of time for regular request executions. You can bump up this value further only on Cloud servers.
Fix 4: Disable WordPress plugins temporarily
A faulty plugin can cause an err_connection_timed_out error in WordPress by consuming excessive server resources. Regularly updating WordPress plugins can also prevent this issue from occurring.
To resolve this error, disable WordPress plugins individually or simultaneously to determine the culprit.
Read our helpful posts on disabling WordPress plugins if you can’t access your Dashboard.
- How to disable all WordPress plugins from the database?
- How to disable all WordPress plugins from Site Tools
Fix 5: Switch to a default theme
A corrupted WordPress theme can also cause a website timeout. Therefore, switching to a default theme eliminates potential conflicts or problems caused by the previous theme.
Default WordPress themes are stable, reliable, and optimized for performance. Thus, you may safely change your active WordPress theme with one of the defaults to troubleshoot an issue.
Remember to backup your site before making any changes and proceed with activating a default theme from your WordPress Dashboard. Then go to Appearance > Themes, select a default theme from the list, and Activate it.

If a corrupted theme was at fault, you should be able to load your WordPress site after changing to a default one.
In case the error prevents you from accessing the dashboard, read this guide to learn how to change the WordPress theme from the database.
Fix 6: Enable WordPress Debug Mode
Enabling WordPress debug mode can help pinpoint a specific component causing an err_connection_timed_out error. It provides detailed error messages and logs that can identify the root cause of the problem.
Turn on WordPress debugging by adding the following lines in your wp-config.php file.
define( 'WP_DEBUG', true);
define( 'WP_DEBUG_LOG', true);
Save your changes and clear your browser cache before reloading your WordPress site. The Debug mode will show you a pointer to the culprit for your WordPress connection timeout error.
Summary
Finally, ERR CONNECTION TIMED OUT is a common problem you can resolve by following the steps and suggested fixes in this article.
WordPress users can solve the problem by disabling plugins, updating themes and plugins, and checking firewall settings.
To ensure seamless web browsing for your visitors, it is critical to identify the root cause and apply the appropriate fix.