Adobe Premiere Pro — отличная программа для профессионального редактирования видео. Его используют миллионы пользователей вместе с After Effects по всему миру. Хотя это программное обеспечение премиум-класса с ежемесячной подпиской, пользователи никогда не разочаровываются, поскольку функции и возможности редактирования видео, которые оно дает вашей машине, нельзя упустить. При экспорте видео в Premiere Pro некоторые пользователи видят код ошибки 3, ошибка компиляции фильма, ошибка экспорта, ошибка завершения рендеринга на ПК с Windows 11/10. В этом руководстве у нас есть некоторые исправления.
Код ошибки 3 появляется на недавно установленных ПК, где параметры, необходимые для Premiere Pro, настроены неправильно. Эта ошибка в основном возникает, когда пользователь пытается отобразить видео в формате H264. Давайте посмотрим, как мы можем решить эту проблему.
Если вы не можете обработать видео в формате H264 и видите Код ошибки 3, ошибка компиляции фильма, ошибка экспорта, ошибка завершения рендеринга в Premiere Pro, следуйте приведенным ниже инструкциям.
Отключите настройки аппаратного кодирования, установите для режима управления питанием значение «Максимум»Обновите графические драйверыОбновите Premiere Pro
Давайте узнайте подробности о каждом методе.
1] Отключить настройки аппаратного кодирования
Это исправление, которое сработало лично для меня. Вам необходимо отключить настройки аппаратного кодирования. Чтобы отключить их,
откройте Premiere Pro, нажмите Изменить в строке меню и наведите указатель мыши на Настройки в нижней части списка. Затем выберите Медиа в настройках Снимите флажки рядом с кнопками Аппаратное ускорение декодирования H264/HEVC (требуется перезагрузка) и Аппаратное ускорение кодирования H264/HEVC (требуется перезагрузка) Нажмите ОК и закройте Premiere Pro. Затем перезагрузите компьютер.
Проверьте, помогло ли исправление устранить проблему.
2] Установите для режима управления питанием значение Максимум
.
Чтобы избавиться от этой проблемы, вам необходимо установить максимальное управление питанием на графическом процессоре. Вы можете сделать это с помощью панели управления NVIDIA или программного обеспечения AMD Radeon на своем ПК. Если вы являетесь пользователем NVIDIA,
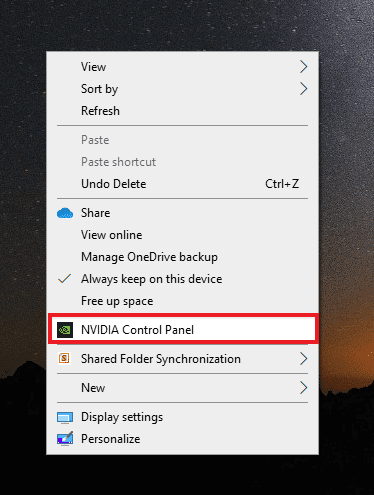
щелкните правой кнопкой мыши на рабочем столе. Нажмите Показать дополнительные параметры. Выберите Панель управления NVIDIA в контекстном меню. Нажмите Управление настройками 3D. Найдите Режим управления питанием в разделе”Настройки”и установите для него максимальную производительность с помощью раскрывающегося меню.
3] Обновите графические драйверы
Некоторые пользователи видят эту ошибку из-за устаревших графических драйверов. Вам необходимо обновить графические драйверы на вашем ПК и устранить проблему.
Вы можете обновить графические драйверы,
4] Обновите Premiere Pro
Проверьте, есть ли доступны ли какие-либо обновления для Premiere Pro. Откройте Adobe Application Updater на своем ПК и нажмите кнопку «Обновить» рядом с Premiere Pro. Он проверит наличие обновлений, загрузит и установит их автоматически.
Как исправить код ошибки 3 в Premiere?
Код ошибки 3 в Premiere Pro можно легко исправить, отключив оборудование ускоренные настройки, обновление графических драйверов, обновление Premier Pro и установка режима управления питанием на максимум.
Как включить аппаратное кодирование в Premiere Pro?
Чтобы включить аппаратное ускорение кодирование в Premiere Pro, нажмите «Редактировать» в строке меню Premiere Pro, наведите указатель мыши на «Настройки» и выберите «Мультимедиа». Затем отметьте кнопку рядом с кодированием с аппаратным ускорением H264/HEVC (требуется перезагрузка). Затем перезагрузите компьютер.
По теме: Как стабилизировать дрожащие видеоматериалы в Adobe Premiere Pro.
When trying to export from Premiere Pro, are you faced with the “Error Code 3”?
If so, it’s your lucky day, as that’s exactly what we will fix in this article.
Error code 3 is an export/render error part of the “Error compiling movie” category.
This is one of the most common errors in Premiere, and because of that, I’ve spent the last weeks doing intense research and testing on how to fix it.
Here’s a video format of the video:
I’ve arranged the solutions from which I would try first to last:
1. Meet Hardware Recommendations
Error code 3 in Premiere Pro usually occurs when there is not enough available VRAM on your GPU to encode your video.
For encoding video in Premiere Pro, Adobe recommends…
- 4GB VRAM for exporting 1080p.
- 6GB VRAM for exporting 4K.
- 8GB VRAM for exporting 6K or higher.
Reference: https://helpx.adobe.com/x-productkb/multi/gpu-acceleration-and-hardware-encoding.html
Here’s how to check your GPU’s amount of VRAM:
If you’re not meeting the VRAM recommendation, this is likely causing the error.
In that case, I would try exporting using only the CPU; jump to that solution here.
However, if your graphics card has enough VRAM, I recommend trying the methods in the order I’ve written them, EXCEPT number 4; save that one for last. That’s because we want to utilize your GPU if it’s possible.
2. Reboot Your Computer
Rebooting your computer is an easy fix known to solve many bugs. Therefore, it’s worth giving it a shot, just in case.

3. Change from Hardware Encoding to Software Encoding
If your GPU does not have enough VRAM, this solution will likely solve the issue for you!
If your GPU met the requirements, I would first test out the other solutions in the article. Not utilizing an excellent GPU would be a shame!
Using Software Encoding means that instead of using both the graphics card and the processor to export your video, Premiere will only be using the CPU.
- Pros: known to make your video higher quality.
- Cons: exporting takes 2-4 times longer.
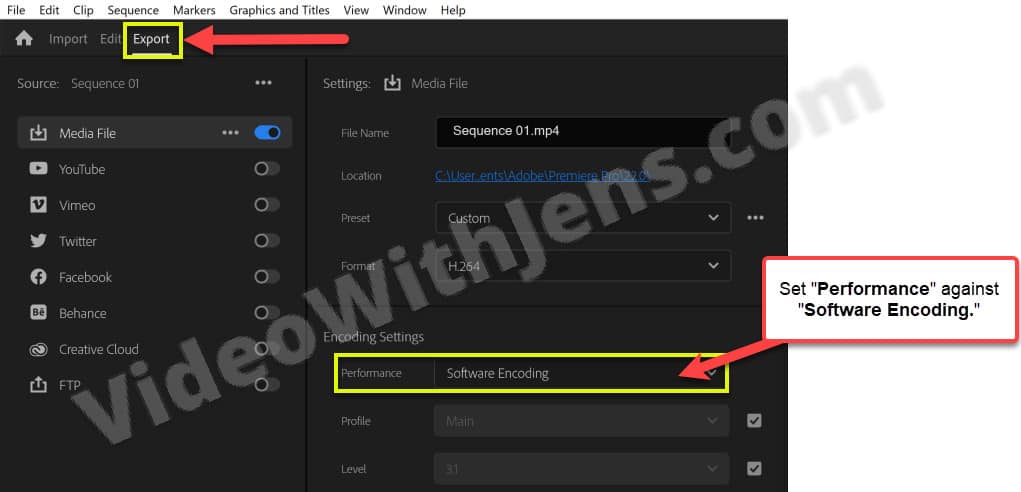
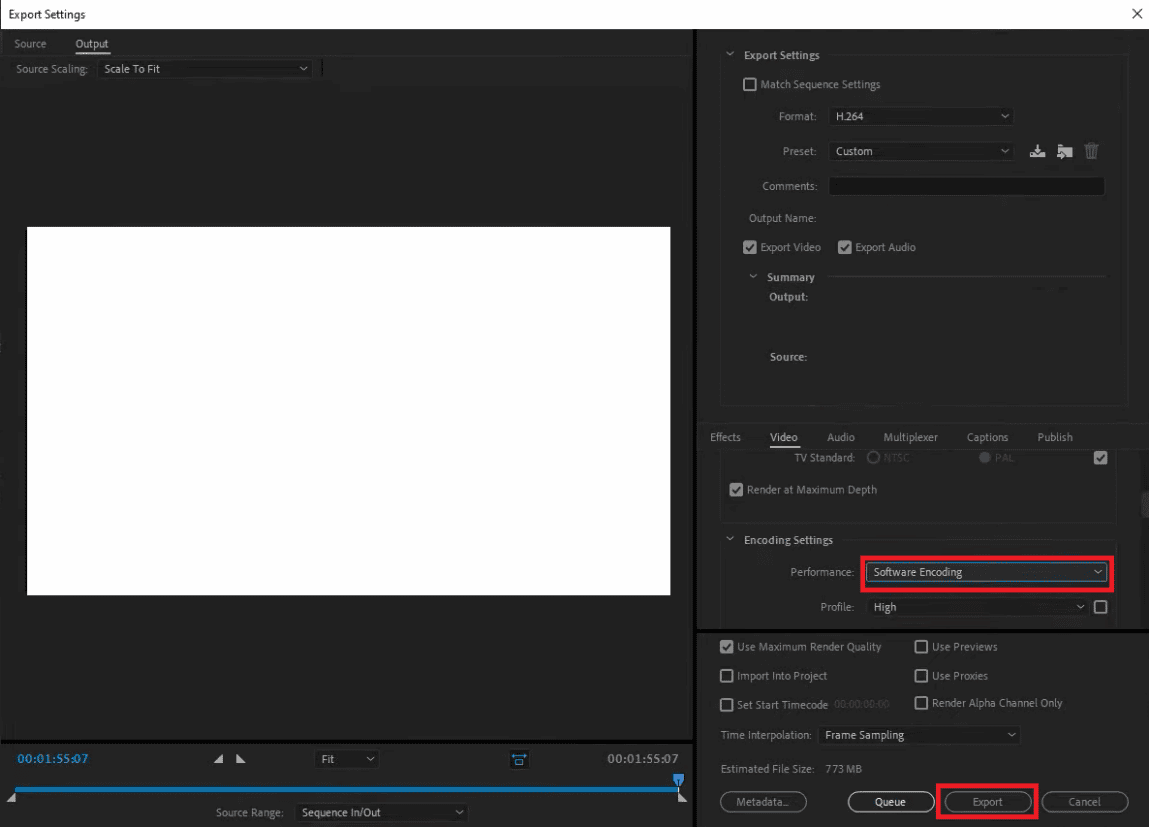
To do this, open the “Export” tab inside Premiere, and then the “Video” sub-tab and click on “More.”
You should see the “Performance” option under “Encoding Settings,” like in the image below. Set it against “Software Encoding,” and try exporting your project.
4. Set Power Management Mode to Maximum
Setting power management mode to maximum will tell Windows that Premiere can use all the GPU capacity available, meaning there are no power restrictions.
According to the internet, you don’t have this option if you use a Mac. However, I found an article on something similar for a 16-inch MacBook PRO with M1 Max (opens in a new tab).
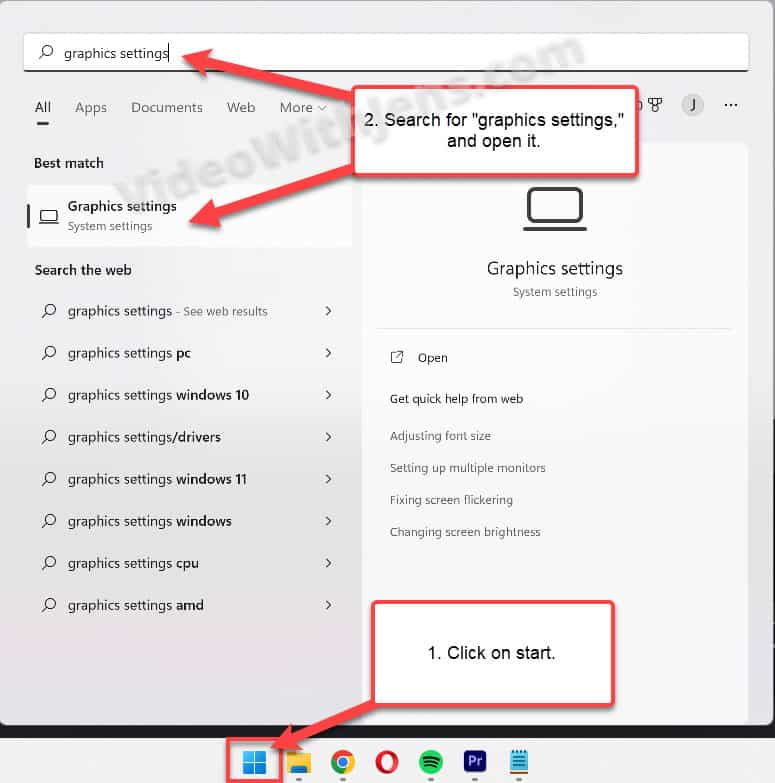
In Windows, open the “Start” menu by clicking on the “Windows” button on your keyboard or the windows icon in the taskbar.
Then search for “graphics settings” and open “Graphics settings.”
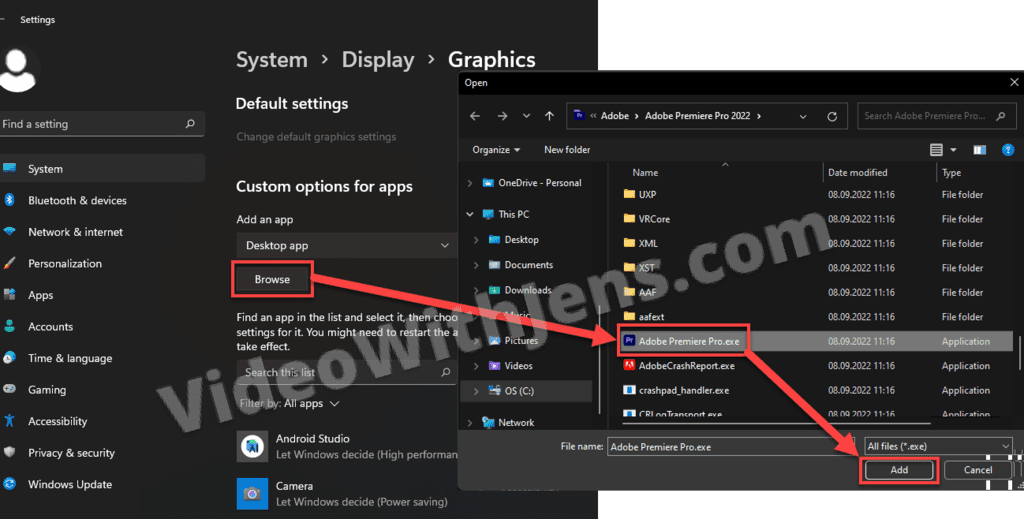
Now, we will add Premiere to the applications in the Graphics settings.
To do this, click on “Browse” and locate the “Adobe Premiere Pro” application file (the one that you can click to start Premiere). It should be found in the installation destination in your file system.
Select the application file, and click on “Add.”
Now you should be able to see Premiere Pro in the graphics settings!
Click on it, and then open “Options.”
Enable the “High performance” option, click “Save,” and reboot your computer.
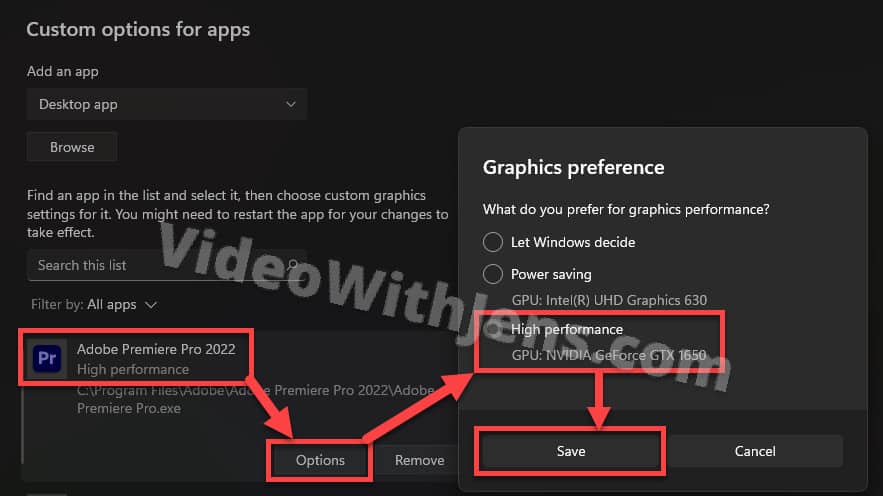
Hopefully, this gave the GPU enough power not to trigger error code 3!
If not, there’s an easy way to delegate even more of the VRAM Premiere:
5. Close Applications Running in the Background
There may be applications running in the background that you are unaware of, and even worse, using part of your graphics card’s VRAM.
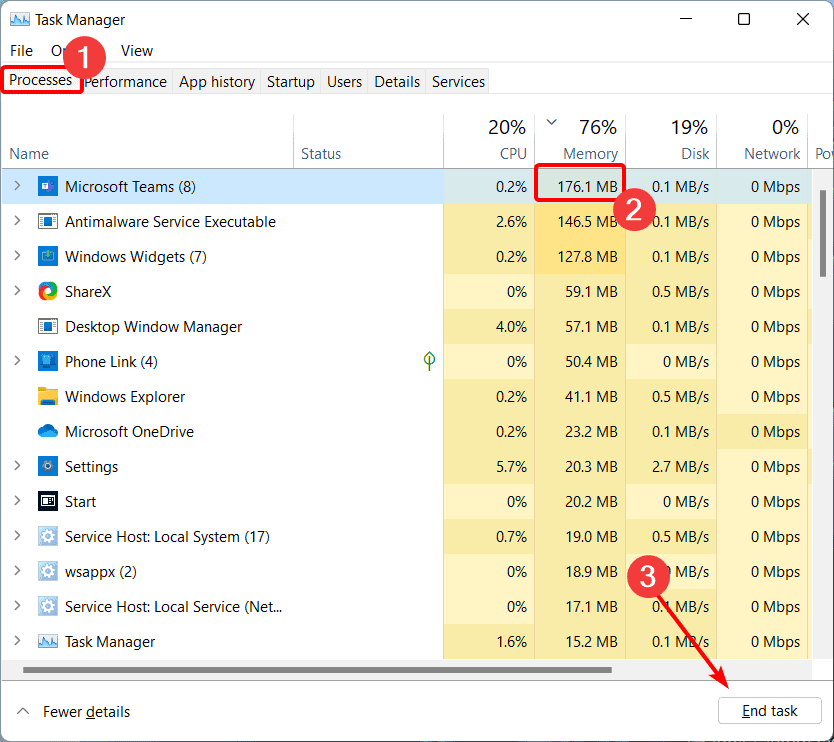
To prevent this from happening, open the “Task Manager” on Windows or the “Activity Monitor” on macOS.
To open it:
- Windows: Press “Start” and search for “task manager.”
- macOS: Press “Command + Spacebar” and search for “activity monitor.”
Now, end applications that you don’t need and consume a lot of power.
Click on the application and then click on “End task” (Windows) or the cross icon (macOS.)
After doing the steps above, try exporting your project from Premiere Pro.
If you’re still facing the error code 3, check out the next solution:
6. Adjust Video at the Timecode
When the error message pops up, it says at what point the error occurred when encoding your video.
You can check this next to “Around timecode,” like in the image below:

There can be many reasons for what’s causing the error, but knowing when it occurred gives you tons of information.
Here are a couple of examples of what you should look for:
- Effects.
- Color adjustments.
- Sound design.
- Titles/text.
- Clips that start around the time code.
If you find anything like that, troubleshoot by removing it and exporting the video.
You can also try trimming the ends of the clip or make some minor adjustments to it in case it’s a bug or something.
7. Update GPU Driver(s)
Make sure that your graphics card’s driver is up to date.
Generally, if you have the latest OS version, your drivers should also be up to date.
However, sometimes it helps to get the drivers directly from the manufacturer, as these are usually newer versions.
Manufacturer’s official website: (will direct you to the driver page)
- AMD drivers.
- NVIDIA drivers.
- Intel drivers.
8. Update to the Latest Version of Premiere Pro
Usually, whenever there is found a bug in Premiere Pro, they will be fast to release a new update fixing it.
Thus, updating Premiere Pro is a standard solution to various issues.
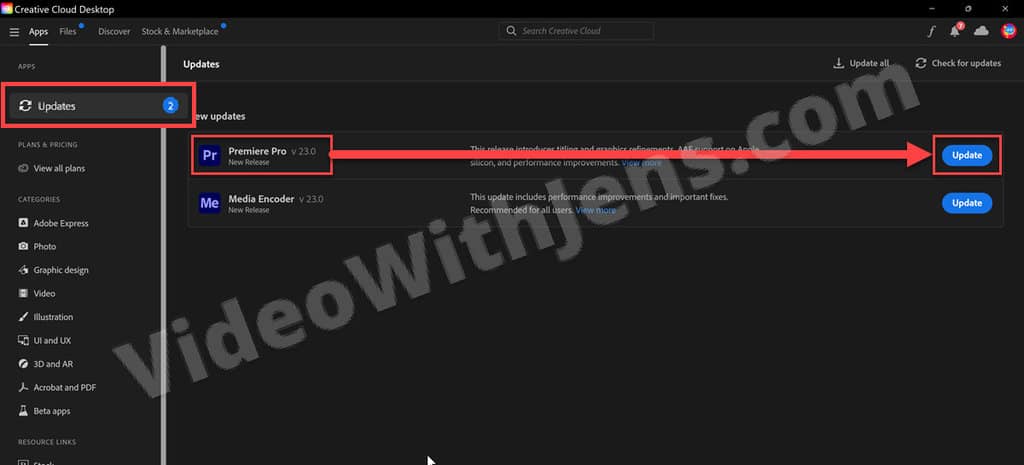
Open the Adobe Creative Cloud application on your computer to update the software.
Then, open “Updates” and click on “Update” next to Premiere Pro (you won’t see the update button if you are already up to date).
9. NVIDIA GPU: Switch from Gaming to Studio Driver
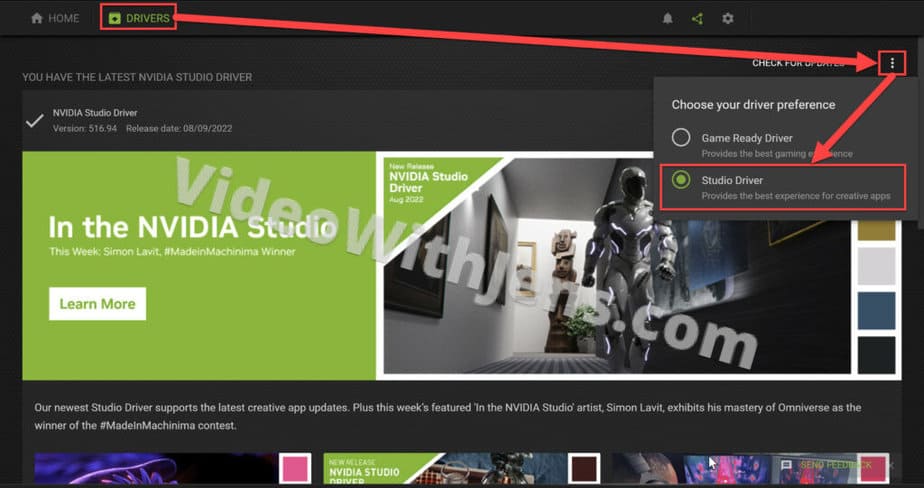
If you have an NVIDIA graphics card, many people have reported problems using the “Game Ready Driver” instead of the “Studio Driver.”
To get the studio version, open GeForce Experience on your computer and then open the “Drivers” section.
In the top right-hand corner, you should be able to see three dots, which, when clicked upon, give you the option to choose “Studio Driver”:
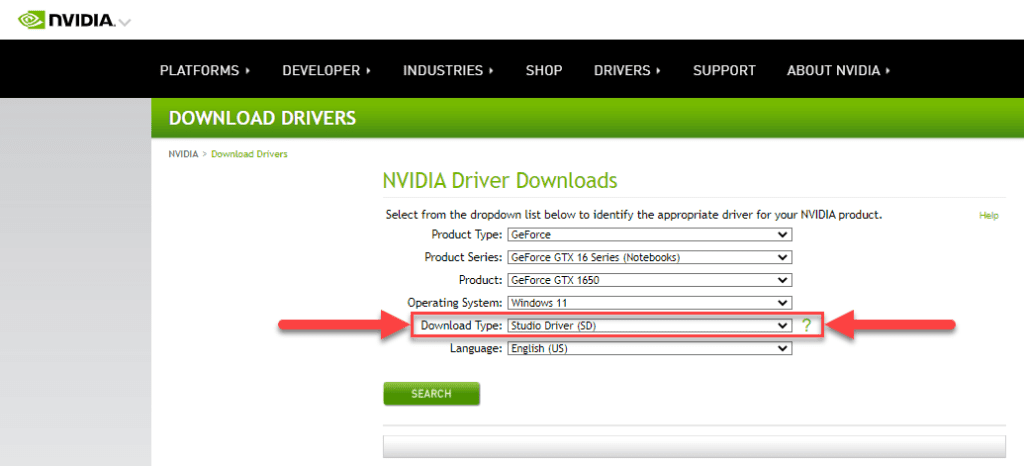
If you are unable to see the three dots, re-install GeForce Experience.
To do this, head over to NVIDIA’s official website (opens in a new tab), fill out your GPU’s technical details, and also set “Download Type” against “Studio Driver.”
Then download the latest driver version, and you’ll also get asked to install GeForce Experience (which you want) when installing.
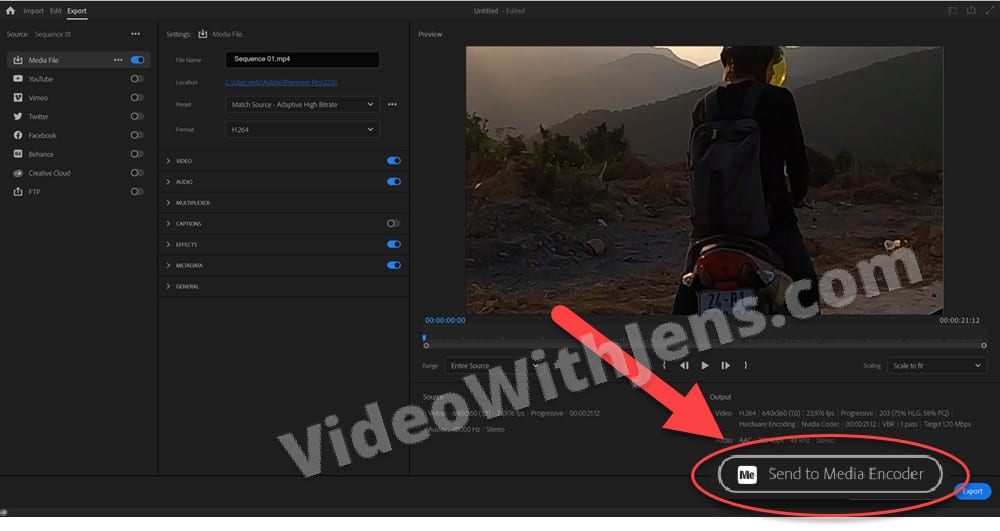
People have reported that exporting with Media Encoder instead of directly from Premiere Pro has solved their error code 3.
Media Encoder is a software that’s included in your Premiere Pro subscription.
Next to the “Export” button in Premiere, there is another button that says “Send to Media Encoder,” click on that one.
Then, set the correct settings over there, and export your project!
Error code 3 is part of the “Error compiling movie” group of errors, which I’ve written more about here.
Adobe Premiere Pro is video editing software that carries out necessary tasks for producing high-definition and good-quality video. The software is a non-linear editing system that perfectly fits professionals and amateurs. This award-winning software is great at what it does, including importing videos, audio, and graphics, adding effects, exporting videos in various formats, and arranging all the elements together to fit a visual timeline. It can thus be used for almost all the common editing tasks, although there is a catch with the software while exporting videos: Premiere Pro error code 3. This error code has been encountered by many users when they try to export their video or content after editing it. If you have also faced the same issue and are looking for fixes, you have come to the right place. We have a perfect guide for resolving error code 3 in Premiere Pro, and along the way will also familiarize you with the reasons behind the error. So, let us get started with our doc right away to fix error code 3 error compiling movie.

Table of Contents
Error code 3 in Adobe Premiere Pro is encountered on a system when the settings required for Premiere Pro are not set up properly. The error code is usually seen when a video is rendered in H264 format, leaving all the editing down the drain and leaving videos compiled incompletely. It can also be an error compiling movie, export error, or error completing render on Windows 10/11.
What Causes Error Code 3?
Some reasons for the above-said issue are listed below:
- Outdated graphics drivers
- Outdated Premiere Pro software
- Duplicate file with the same title and format
- Insufficient space in the hard disk
- Invalid output drive
- Low or medium GPU usage
- Corrupt projection load
Now that you know the causes that usually result in error code 3 when you export a video on Premiere Pro, it is time to look at some of the best troubleshooting methods that are perfect workarounds for the above-given causes.
Method 1: Rename File
The basic method to fix error code 3 is to rename the file you are trying to render. Many error codes are usually related to file names that have special characters. Also, a special character can stop your file from compiling as the system cannot read it. Therefore, you must ensure that your file name has a regular alphabet and no special characters.

Also, renaming the file is great in resolving the issue of duplicate files. If there already is a file with a similar name, format, and title on your system, it can become a roadblock in the export of your current file. So, make sure you change the name by adding a letter or word.
Method 2: Restart Adobe Premiere Pro
Another method that is simple yet effective is restarting the program. It is quite useful in cases where a minor glitch or a bug is causing issues with the video rendering.
Note: Save the edited file before closing it to avoid losing the changes made.
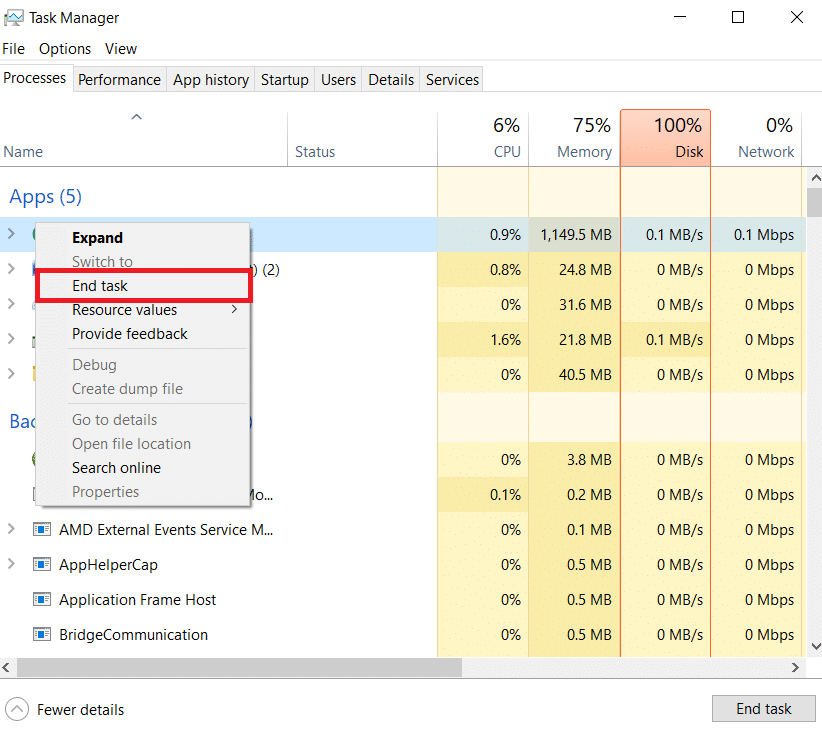
1. Hit the Ctrl + Shift + Esc keys together to open Task Manager.
2. Locate the Adobe Premiere Pro process and right-click on it.
3. Select the End task option to close the app.

4. Now, relaunch the app and check if you can now export the video without the error code.

Also Read: How to Disable Adobe AcroTray.exe at Startup
Method 3: Remove Effects
If you have used excessive effects in your video and added special features like smart rendering or GPU rendering, they are liable to cause Premiere Pro error code 3. Hence, you must remove excessive effects and special features to ensure you get your rendered video without an error. You can also try removing the clips between the video as they can be incompatible. So, make sure you don’t add unnecessary effects to your video.
Method 4: Check Export Crash Location
You can also resolve Premiere Pro error code 3 while exporting the video if you know exactly where the crash led to the error. This can be done by framing the video back a few frames or a few frames forward with the help of the menu present at the bottom of the screen. You can export the small segment first to check if the issue still persists. If not, you cannot export the rest of the file too. Move on to the next method.
Method 5: Change Location of Project File
The following method to consider if you are still facing issues with error code 3 is to change the project file’s location. Also, for many users changing the location of the exported video along with the project file has been extremely helpful. So, let us look at the methods that can help you with the same:
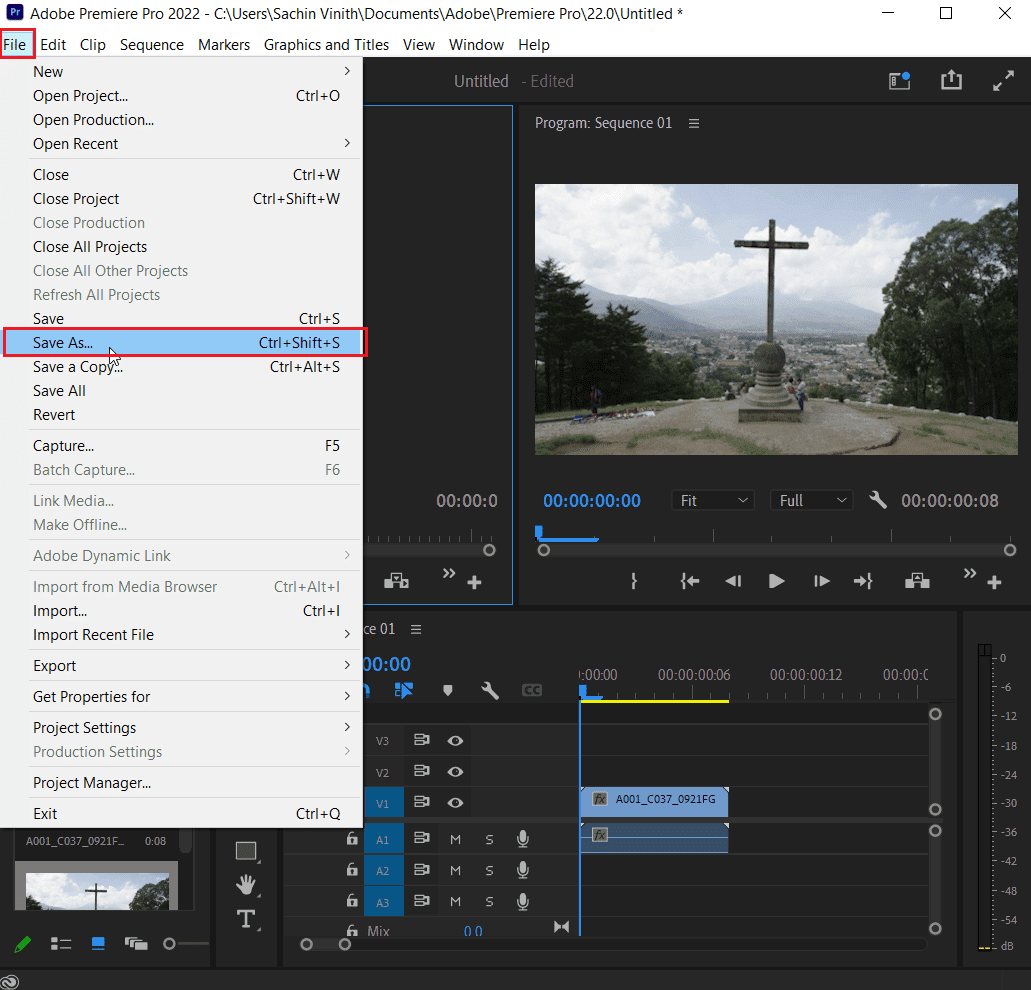
1. Once your project is ready, select the File option from the upper left corner and click on Save As.

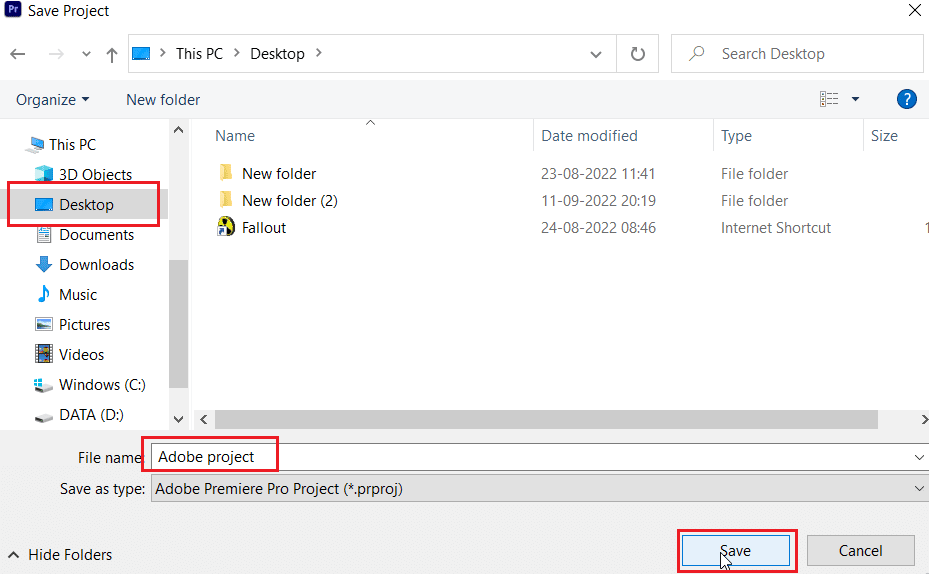
2. Then, set the file’s location to the Desktop or someplace else and click on Save.

3. Now, open Export Settings, select the Output tab and click on Export.
After the steps are performed, check if the action you were trying to process earlier can now be conducted without error code 3.
Also Read: How Do I Fix Accelerated Renderer Error
Method 6: Update Premiere Pro
If you are still struggling to fix error code 3 error compiling movie, then you can try updating the application itself. If the whole issue is caused due to a bug, it can easily be resolved by installing the new version of Premiere Pro. To do it manually, you first need to uninstall the application from your system and install its latest version from the official website. You can easily follow the steps below for the same:
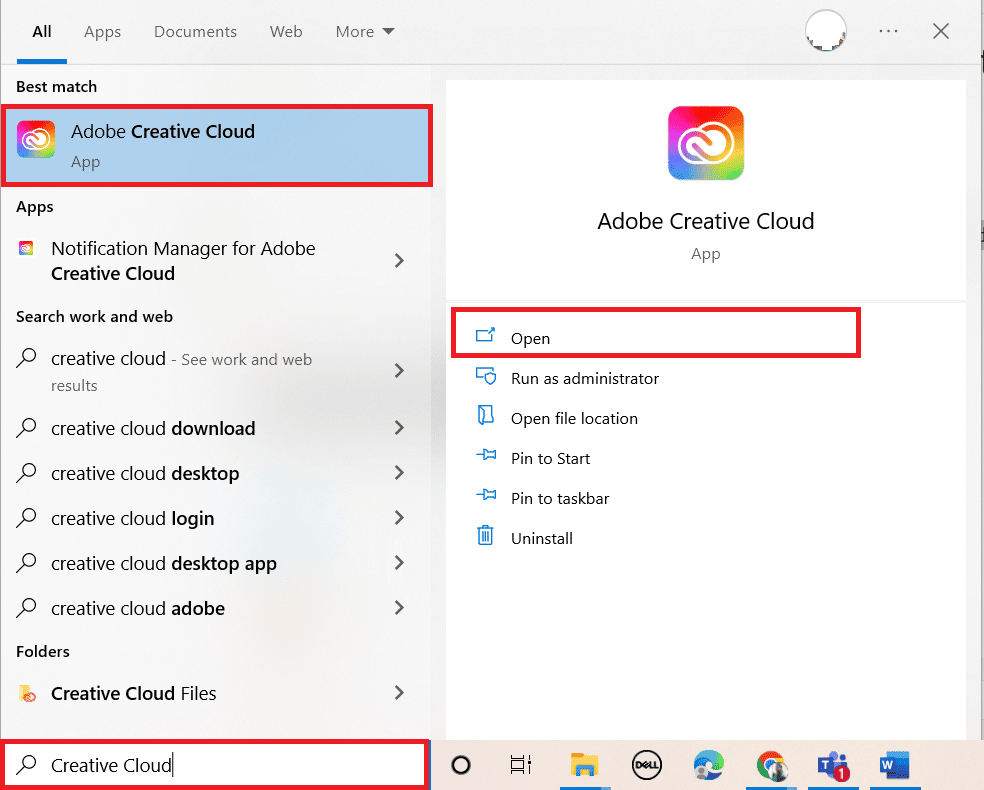
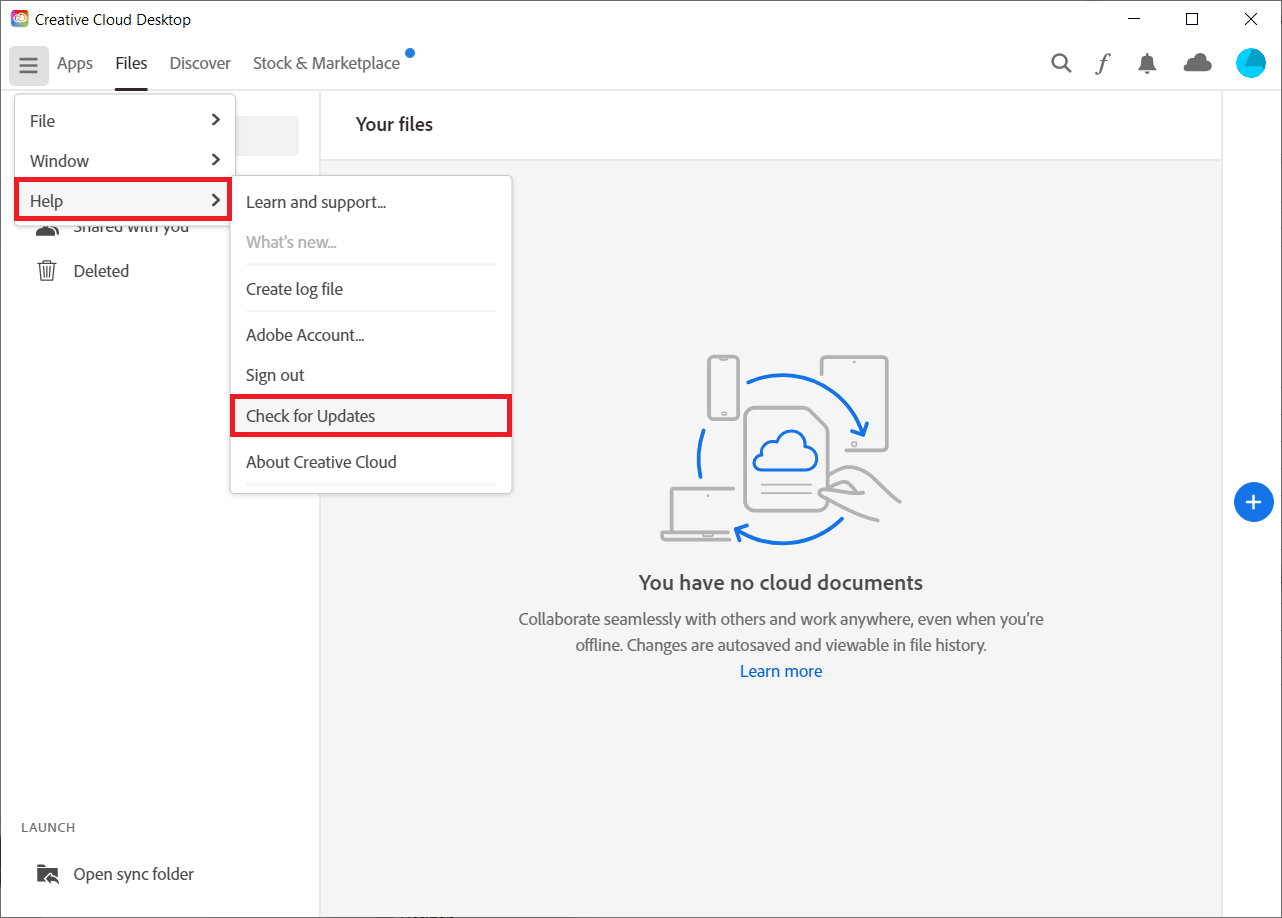
1. Hit the Windows key. Type Creative Cloud and click on Open.

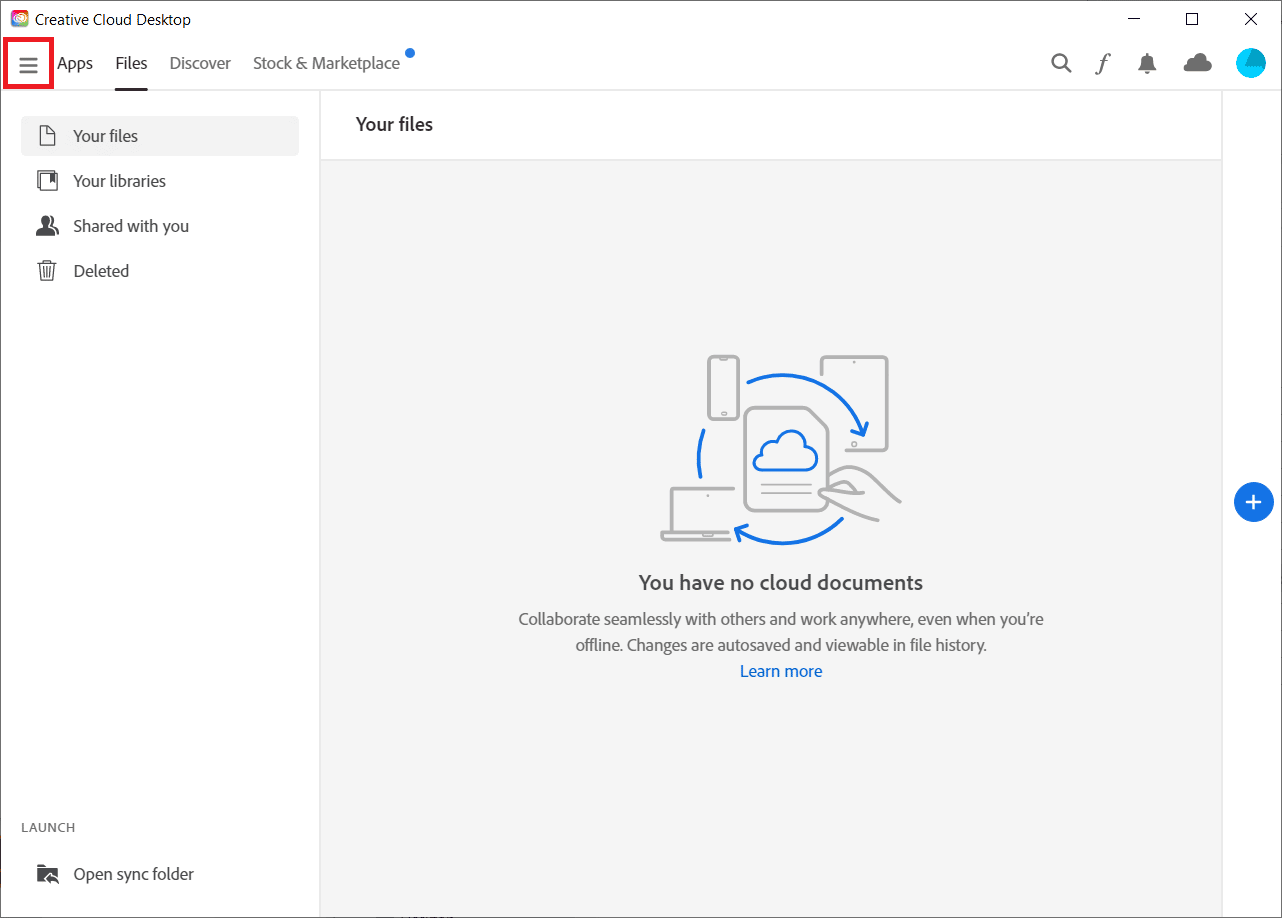
2. Click on the three horizontal lines at the top left corner.

3. Select Help > Check for Updates.

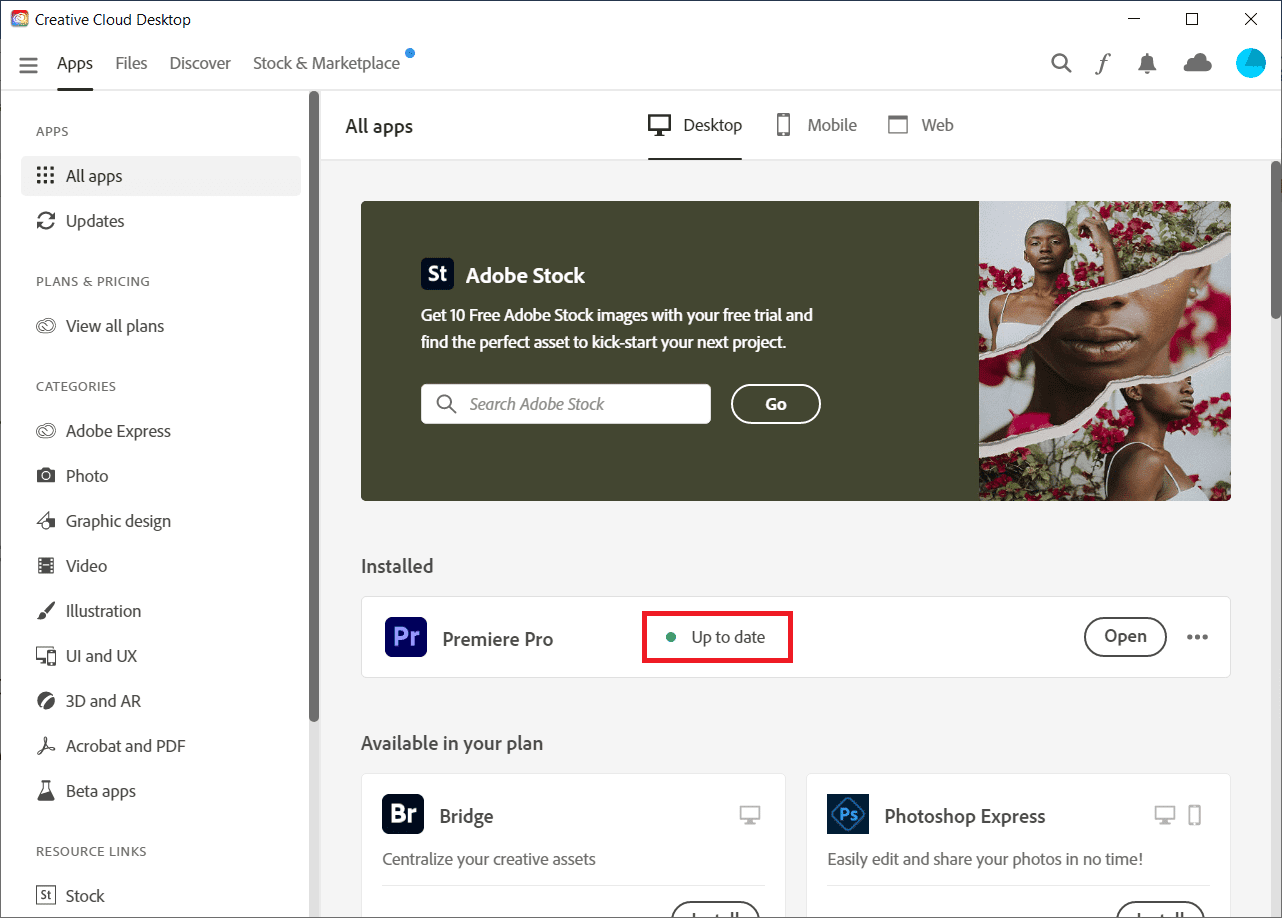
4A. If an update is available, click on Update next to Premiere Pro.
4B. If the software is up-to-date, it will display Up to date next to Premiere Pro.

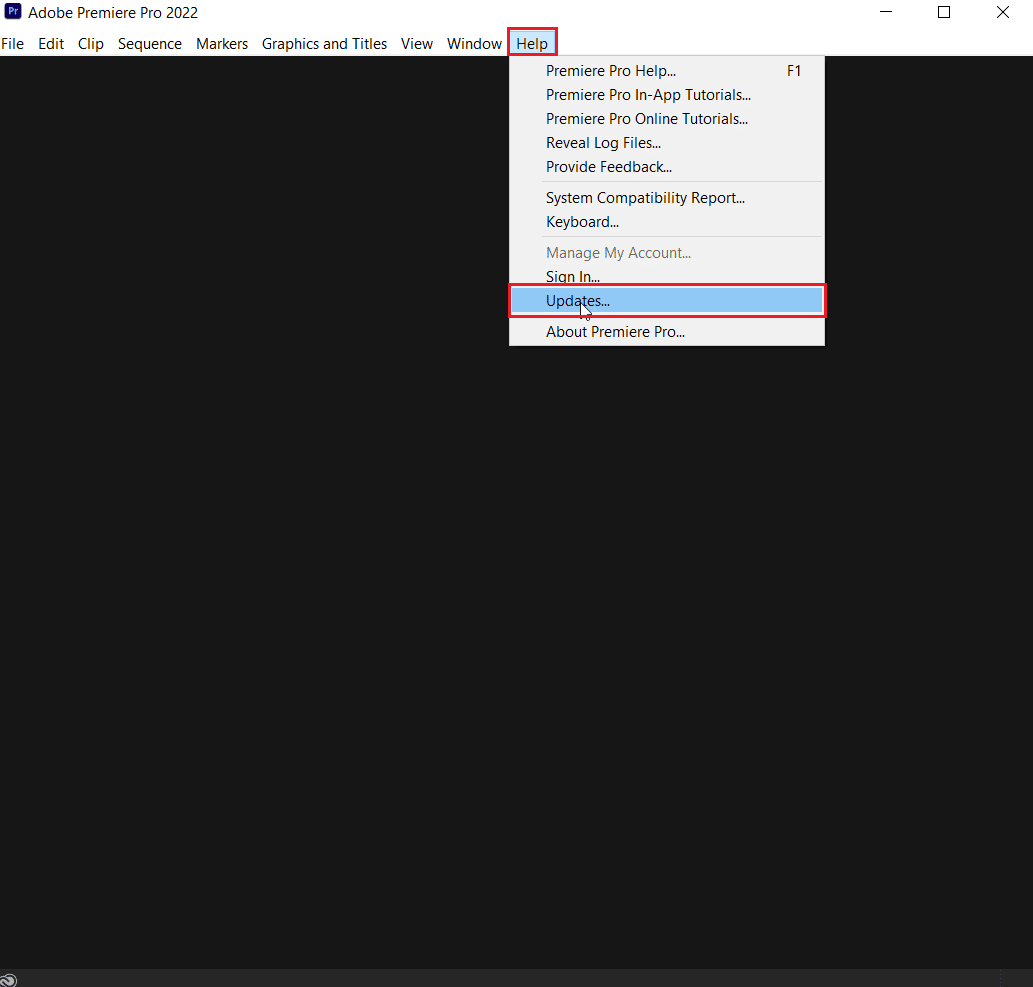
Note: Alternatively you can directly update the app by navigating to Help > Updates… menu in the Adobe Premiere Pro app.

Also Read: Fix Adobe Software You Are Using Is Not Genuine Error
Method 7: Create New Project
You can also try creating a new project for the same file, as it is a convenient and helpful fix. Follow the steps instructed below for details:
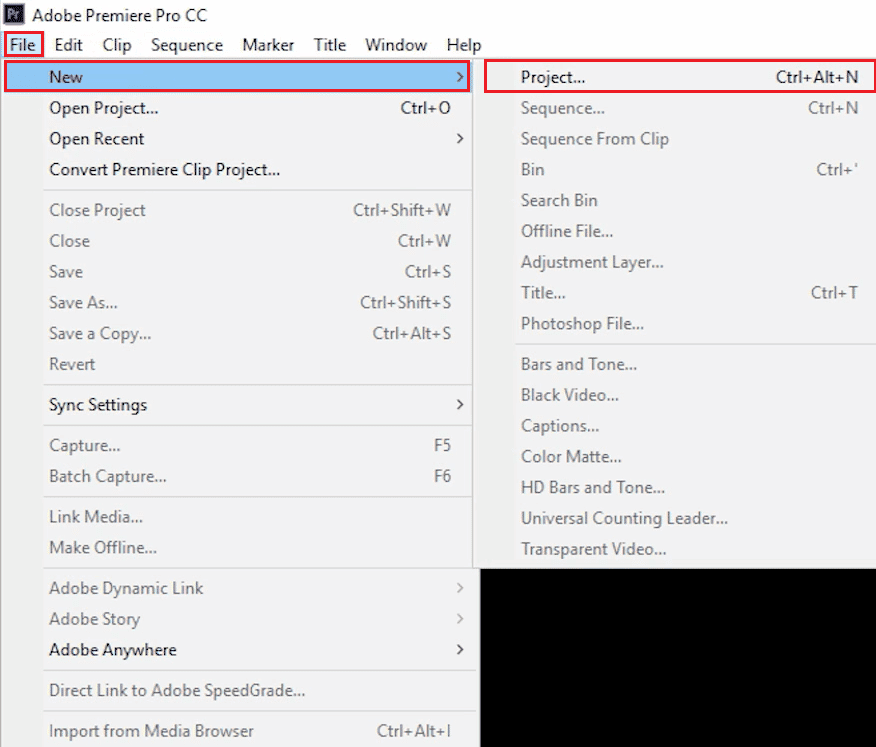
1. Open Adobe Premiere Pro and go to File and select New > Project… option.

2. Name the project and click on OK.

3. Once the new project is created, import the previous project to the new one with drag and drop feature.
After you are done with importing, check if you are facing the same error code on rendering or exporting the video.
Method 8: Change Encoding Preferences
For users who have been struggling with a video export in Premiere Pro, disabling hardware encoding preferences has been of great help in resolving Premiere Pro error code 3. You can do the same using the steps instructed below:
1. In the Export settings wizard, scroll down the Video section.
2. Choose Software Encoding under Performance: in the Encoding Settings section.
3. Then, click on Export button.

Also Read: Top 21 Best Alternatives to Adobe InDesign
Method 9: Change Video Renderer
If you encounter Premiere Pro error code 3 while rendering the video, you can resolve the issue by changing the video renderer. It is an effective fix to try out if none of the methods have helped you out till now.
Note: Mercury Playback Engine Software can cause stability issues in some PC configurations.
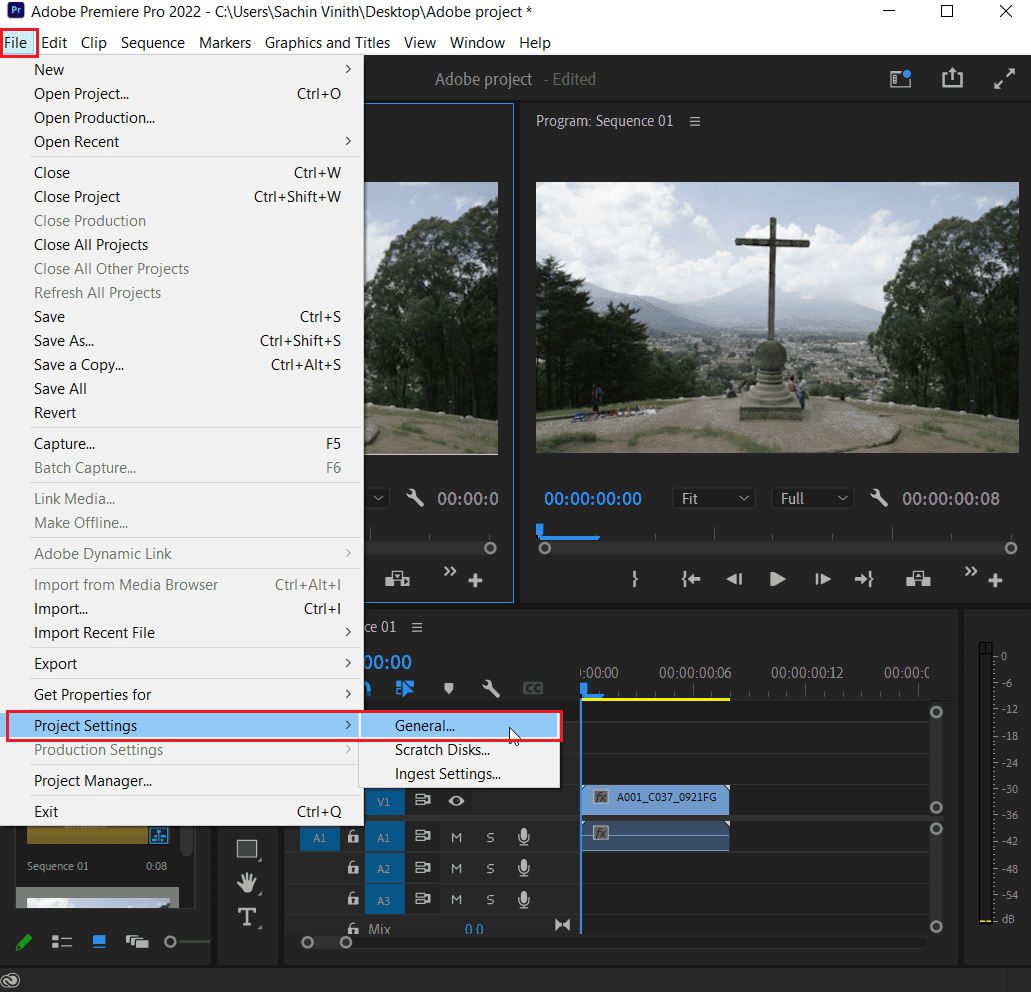
1. Open the video in Premiere Pro that is causing the error and click on File at the top left corner.
2. Choose Project Settings and click on General.

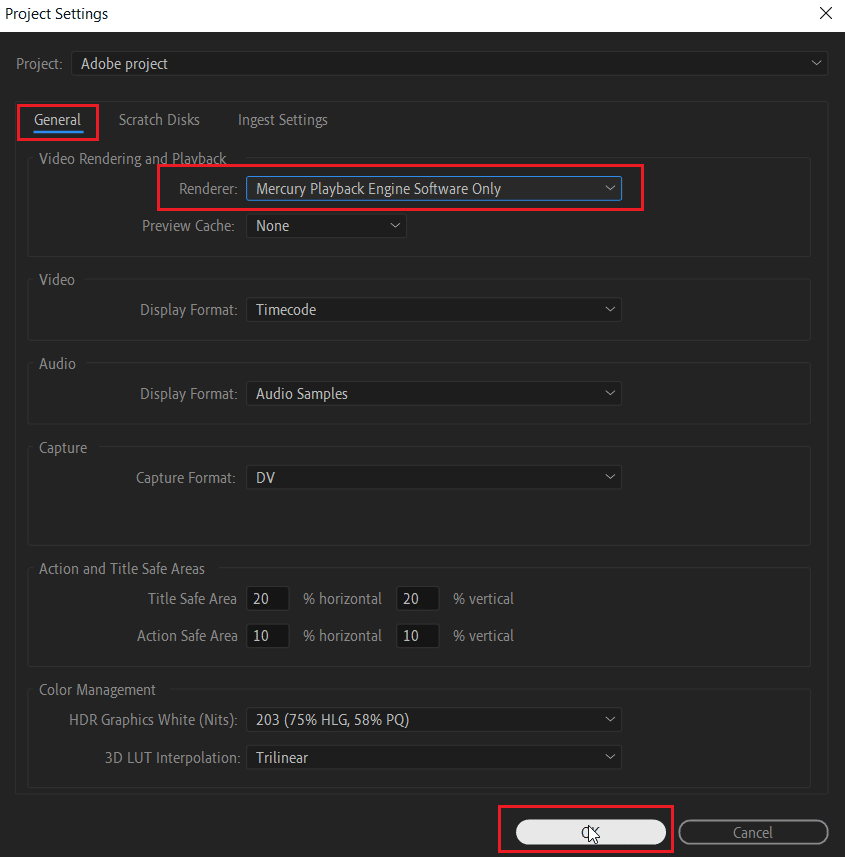
3. Next, go to the Video Rendering and Playback section and click on Renderer to open the drop-down menu.
4. Then, select Mercury Playback Engine Software Only option and click on OK.

5. Re-render the video and check if the issue has been resolved.
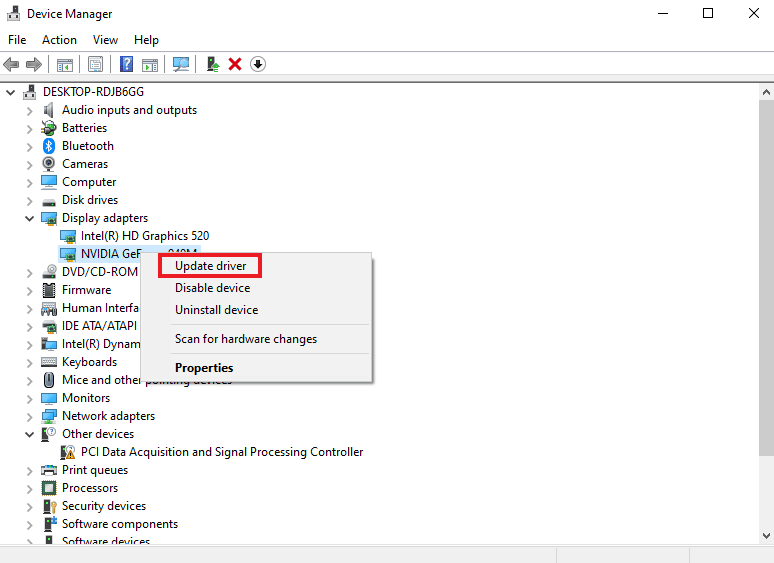
Method 10: Update Graphics Driver
It is also possible that your system’s graphics driver is an underlying cause behind error code 3 in Premiere Pro. If this is the case, then it is important to update them. Even though drivers of your system get new updates every time, you install a new update for Windows. If their update gets skipped for some reason, you can do it manually using our guide on 4 Ways to Update Graphics Drivers in Windows 10. In general, it is always recommended to keep your system’s graphics driver up to date to maintain stability, security, and optimized performance of the system tasks.

Also Read: Fix NVIDIA Driver Not Compatible with this Version of Windows
Method 11: Set Power Management Mode to Maximum
For users with NVIDIA Control Panel or AMD Radeon Software, setting power management mode to the maximum in GPU can be extremely helpful in fixing error code 3 in Premiere Pro. So, if you are an NVIDIA user, follow the steps given below:
1. Right-click on your Desktop and click on NVIDIA Control Panel.

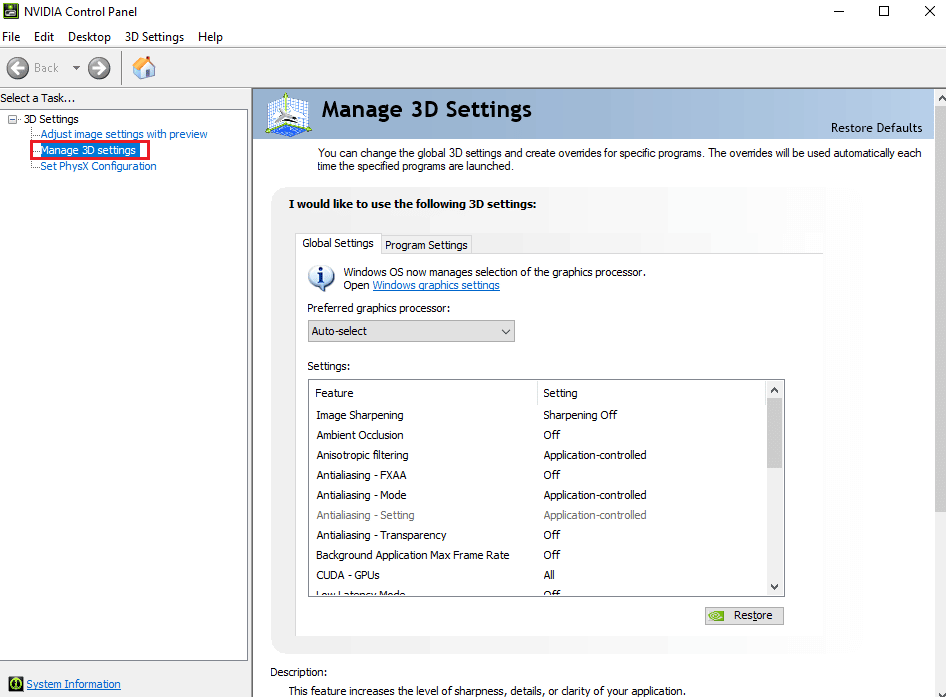
2. Select the Manage 3D settings option from the left-side panel.

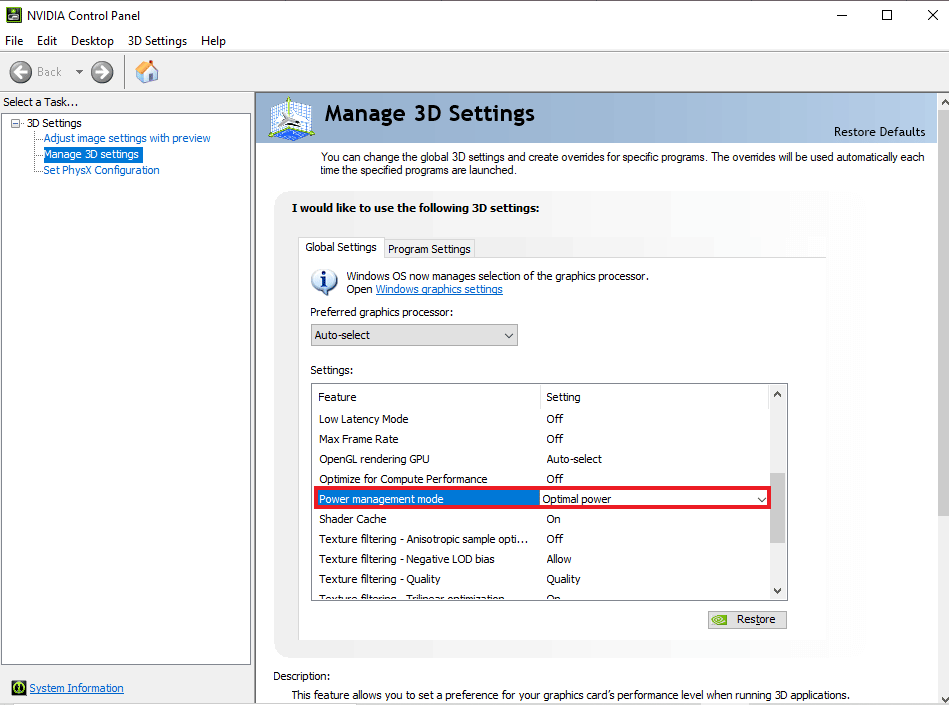
3. Locate Power management mode under Settings and expand its menu.

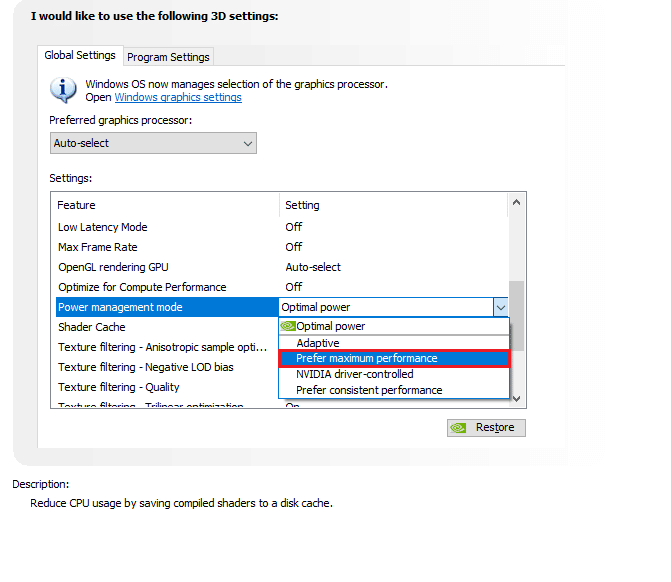
4. Now, select Prefer maximum performance from the drop-down menu.

Recommended:
- 8 Ways to Fix Unable to Send Message to Many Unsent Multimedia Messages
- Why is Adobe Shockwave Crashing All the Time?
- How to Cancel Adobe Acrobat Subscription
- 25 Best Adobe Premiere Pro Free Alternatives
Adobe Premiere Pro is the ultimate program for editing videos professionally. The application’s features and content make it one of the ultimate editing programs. However, issues like Premiere Pro error code 3 can be spoilers for editors who spend hours adding effects and end up getting an error code while exporting their work. We hope that our guide could help people in need looking for a solution to tackle this problem. Let us know how our doc could be of help to you. For queries or suggestions, you can contact us by leaving your comments below.
Adobe Premiere Pro — это программное обеспечение для редактирования видео, которое выполняет необходимые задачи для создания видео высокой четкости и хорошего качества. Программное обеспечение представляет собой систему нелинейного монтажа, которая идеально подходит профессионалам и любителям. Это отмеченное наградами программное обеспечение отлично справляется со своими задачами, включая импорт видео, аудио и графики, добавление эффектов, экспорт видео в различных форматах и компоновку всех элементов вместе, чтобы они соответствовали визуальной временной шкале. Таким образом, его можно использовать практически для всех распространенных задач редактирования, хотя при экспорте видео есть проблема с программным обеспечением: код ошибки Premiere Pro 3. С этим кодом ошибки сталкиваются многие пользователи, когда они пытаются экспортировать свое видео или контент после редактировать его. Если вы также столкнулись с той же проблемой и ищете решения, вы попали в нужное место. У нас есть идеальное руководство по устранению кода ошибки 3 в Premiere Pro, и мы также познакомим вас с причинами ошибки. Итак, давайте сразу приступим к работе с нашим документом, чтобы исправить код ошибки 3 при компиляции фильма.
Оглавление
Код ошибки 3 в Адоб Премьер Про возникает в системе, когда параметры, необходимые для Premiere Pro, не настроены должным образом. Код ошибки обычно появляется, когда видео обрабатывается в формате H264, оставляя все редактирование на ветер и оставляя видео не полностью скомпилированными. Это также может быть ошибка компиляции фильма, ошибка экспорта или ошибка завершения рендеринга в Windows 10/11.
Что вызывает код ошибки 3?
Некоторые причины вышеупомянутой проблемы перечислены ниже:
- Устаревшие графические драйверы
- Устаревшее программное обеспечение Premiere Pro
- Дубликат файла с тем же названием и форматом
- Недостаточно места на жестком диске
- Неверный выходной диск
- Низкое или среднее использование графического процессора
- Неправильная проекционная нагрузка
Теперь, когда вы знаете причины, которые обычно приводят к ошибке с кодом 3 при экспорте видео в Premiere Pro, пришло время рассмотреть некоторые из лучших методов устранения неполадок, которые идеально подходят для устранения указанных выше причин.
Способ 1: переименовать файл
Основной способ исправить код ошибки 3 — переименовать файл, который вы пытаетесь отобразить. Многие коды ошибок обычно связаны с именами файлов, содержащими специальные символы. Кроме того, специальный символ может помешать компиляции вашего файла, поскольку система не может его прочитать. Поэтому вы должны убедиться, что ваше имя файла имеет обычный алфавит и не содержит специальных символов.

Кроме того, переименование файла отлично подходит для решения проблемы дублирования файлов. Если в вашей системе уже есть файл с похожим именем, форматом и заголовком, он может стать препятствием для экспорта вашего текущего файла. Итак, убедитесь, что вы изменили имя, добавив букву или слово.
Способ 2: перезапустите Adobe Premiere Pro
Еще один простой, но эффективный способ — перезапустить программу. Это очень полезно в тех случаях, когда незначительный сбой или ошибка вызывают проблемы с рендерингом видео.
Примечание. Сохраните отредактированный файл перед его закрытием, чтобы не потерять сделанные изменения.
1. Нажмите одновременно клавиши Ctrl + Shift + Esc, чтобы открыть диспетчер задач.
2. Найдите процесс Adobe Premiere Pro и щелкните его правой кнопкой мыши.
3. Выберите параметр «Завершить задачу», чтобы закрыть приложение.
4. Теперь перезапустите приложение и проверьте, можете ли вы теперь экспортировать видео без кода ошибки.
Способ 3: удалить эффекты
Если вы использовали слишком много эффектов в своем видео и добавили специальные функции, такие как интеллектуальный рендеринг или рендеринг с помощью графического процессора, они могут вызвать код ошибки 3 в Premiere Pro. ошибка. Вы также можете попробовать удалить клипы между видео, так как они могут быть несовместимы. Поэтому убедитесь, что вы не добавляете ненужных эффектов в свое видео.
Способ 4: проверить местоположение сбоя экспорта
Вы также можете устранить код ошибки Premiere Pro 3 при экспорте видео, если точно знаете, где сбой привел к ошибке. Это можно сделать, перемотав видео на несколько кадров назад или на несколько кадров вперед с помощью меню в нижней части экрана. Вы можете сначала экспортировать небольшой сегмент, чтобы проверить, сохраняется ли проблема. В противном случае вы не сможете экспортировать остальную часть файла. Переходите к следующему способу.
Способ 5: изменить местоположение файла проекта
Следующий метод, который следует учитывать, если вы по-прежнему сталкиваетесь с проблемами с кодом ошибки 3, — изменить расположение файла проекта. Кроме того, для многих пользователей изменение местоположения экспортируемого видео вместе с файлом проекта было чрезвычайно полезным. Итак, давайте рассмотрим методы, которые могут вам помочь:
1. Когда ваш проект будет готов, выберите параметр «Файл» в верхнем левом углу и нажмите «Сохранить как».
2. Затем укажите местоположение файла на рабочем столе или в другом месте и нажмите «Сохранить».
3. Теперь откройте «Настройки экспорта», выберите вкладку «Вывод» и нажмите «Экспорт».
После выполнения шагов проверьте, можно ли теперь выполнить действие, которое вы пытались обработать ранее, без кода ошибки 3.
Способ 6: обновить Premiere Pro
Если вы все еще пытаетесь исправить ошибку с кодом ошибки 3 при компиляции фильма, вы можете попробовать обновить само приложение. Если вся проблема вызвана ошибкой, ее можно легко решить, установив новую версию Premiere Pro. Чтобы сделать это вручную, вам сначала нужно удалить приложение из вашей системы и установить его последнюю версию с официального сайта. Вы можете легко выполнить следующие шаги для того же самого:
1. Нажмите клавишу Windows. Введите Creative Cloud и нажмите «Открыть».
2. Нажмите на три горизонтальные линии в верхнем левом углу.
3. Выберите «Справка» > «Проверить наличие обновлений».
4А. Если доступно обновление, нажмите «Обновить» рядом с Premiere Pro.
4Б. Если программное обеспечение обновлено, рядом с Premiere Pro будет отображаться «Обновлено».
Примечание. В качестве альтернативы вы можете напрямую обновить приложение, перейдя в меню «Справка» > «Обновления…» в приложении Adobe Premiere Pro.
Способ 7: создать новый проект
Вы также можете попробовать создать новый проект для того же файла, так как это удобное и полезное исправление. Следуйте инструкциям ниже для получения подробной информации:
1. Откройте Adobe Premiere Pro, перейдите в «Файл» и выберите «Создать» > «Проект…».
2. Назовите проект и нажмите OK.

3. После создания нового проекта импортируйте предыдущий проект в новый с помощью функции перетаскивания.
После того, как вы закончите импорт, проверьте, не сталкиваетесь ли вы с тем же кодом ошибки при рендеринге или экспорте видео.
Способ 8: изменить настройки кодирования
Для пользователей, которые боролись с экспортом видео в Premiere Pro, отключение настроек аппаратного кодирования очень помогло в устранении кода ошибки Premiere Pro 3. Вы можете сделать то же самое, выполнив шаги, описанные ниже:
1. В мастере настроек экспорта прокрутите вниз раздел Видео.
2. Выберите «Кодирование программного обеспечения» в разделе «Производительность» в разделе «Настройки кодирования».
3. Затем нажмите кнопку «Экспорт».
Способ 9: сменить средство визуализации видео
Если вы столкнулись с кодом ошибки Premiere Pro 3 при рендеринге видео, вы можете решить проблему, изменив модуль рендеринга видео. Это эффективное решение, которое можно попробовать, если ни один из методов не помог вам до сих пор.
Примечание. Программное обеспечение Mercury Playback Engine может вызывать проблемы со стабильностью на некоторых конфигурациях ПК.
1. Откройте в Premiere Pro видео, которое вызывает ошибку, и нажмите «Файл» в левом верхнем углу.
2. Выберите «Настройки проекта» и нажмите «Общие».
3. Затем перейдите в раздел «Обработка и воспроизведение видео» и нажмите «Обработчик», чтобы открыть раскрывающееся меню.
4. Затем выберите вариант «Только ПО Mercury Playback Engine» и нажмите «ОК».
5. Повторно выполните рендеринг видео и проверьте, устранена ли проблема.
Способ 10: обновить графический драйвер
Также возможно, что графический драйвер вашей системы является основной причиной ошибки с кодом 3 в Premiere Pro. Если это так, то важно обновить их. Несмотря на то, что драйверы вашей системы каждый раз получают новые обновления, вы устанавливаете новое обновление для Windows. Если их обновление по какой-либо причине пропускается, вы можете сделать это вручную, используя наше руководство по 4 способам обновления графических драйверов в Windows 10. В общем, всегда рекомендуется поддерживать графический драйвер вашей системы в актуальном состоянии для поддержания стабильности, безопасности, и оптимизированное выполнение системных задач.
Способ 11: установите режим управления питанием на максимум
Для пользователей с панелью управления NVIDIA или программным обеспечением AMD Radeon установка максимального режима управления питанием в графическом процессоре может быть чрезвычайно полезной для исправления кода ошибки 3 в Premiere Pro. Итак, если вы являетесь пользователем NVIDIA, выполните следующие действия:
1. Щелкните правой кнопкой мыши на рабочем столе и выберите Панель управления NVIDIA.
2. Выберите параметр «Управление параметрами 3D» на левой боковой панели.
3. Найдите режим управления питанием в разделе «Настройки» и разверните его меню.
4. Теперь выберите Предпочитать максимальную производительность в раскрывающемся меню.
***
Adobe Premiere Pro — лучшая программа для профессионального редактирования видео. Функции и содержимое приложения делают его одной из лучших программ для редактирования. Однако такие проблемы, как код ошибки Premiere Pro 3, могут быть спойлерами для редакторов, которые часами добавляют эффекты и в конечном итоге получают код ошибки при экспорте своей работы. Мы надеемся, что наше руководство поможет нуждающимся найти решение этой проблемы. Дайте нам знать, как наш документ может быть вам полезен. По вопросам или предложениям вы можете связаться с нами, оставив свои комментарии ниже.
-
Home
-
MovieMaker
- [Causes + Solutions] How to Fix Premiere Pro Export Error Code 3?
[Causes + Solutions] How to Fix Premiere Pro Export Error Code 3?
By Helen | Follow |
Last Updated
Premiere Pro is a widely used video editing software that offers a range of features and tools for creating professional-quality videos. However, users may sometimes encounter errors when exporting their projects. One such error is «Premiere Pro Export Error Code 3,» also known as «Export Error Premiere Pro Error Code 3.» Another variation of this error is «Premiere Pro Export Error Code 3 Selector 9.» In this article offered by MiniTool video-making program, we will explore the causes of this error and how to fix it.
What Is “Adobe Premiere Export Error Code 3”?
Firstly, it is important to understand what this error means. When you try to export a video from Premiere Pro, the software generates a video file by rendering the project. During this process, the software may encounter an issue that prevents it from completing the export. Error Code 3 is a generic error that indicates an unspecified problem with the export process. Selector 9 is a specific reference to an element in the export process that is causing the error. This could be a clip, effect, or any other element in the project.
Possible Causes of Premiere Pro Export Error Code 3
In general, there are 4 popular situations that may result in an export error Premiere Pro error code 3.
Incompatible Export Settings
Premiere Pro offers a wide range of export settings, such as video codec, frame rate, and resolution. If the export settings you have chosen are not compatible with your project, you may encounter this error.
Corrupted Media Files
If any of the media files in your project are corrupted or damaged, it could cause the export process to fail.
Insufficient Disk Space
When rendering a video, Premiere Pro requires a significant amount of disk space. If your computer does not have enough free space, it could cause the export process to fail.
Outdated Software
If you are using an older version of Premiere Pro, it may not be compatible with the latest operating systems, causing the export process to fail.
Now that we know the possible causes of the error, let’s explore some solutions to fix it.
#1 Check Export Settings
Double-check the export settings you have chosen and ensure that they are compatible with your project. For example, if your project has a resolution of 1080p, make sure that you choose an export setting that supports 1080p resolution.
#2 Remove Corrupted Media Files
Identify the media files that may be causing the issue and remove them from the project. You can do this by creating a new project and importing only the necessary files.
#3 Free up Disk Space
Delete unwanted files (videos/movies, songs, photos, etc.) and programs on your computer to spare some free space for new video exporting.
#4 Upgrade Software
Upgrade Adobe Premiere Pro or its related applications like Adobe Media Encoder to the newest version to make them compatible with the computer system.
#5 Use Premiere Pro Alternative
One more method to handle the Premiere Pro export error code 3 issue is to stop using the software and rely on one of its replacements like MiniTool MovieMaker, a professional and easy-to-use video-making tool. It enables users to export in various formats including MP4, MOV, WMV, MKV, AVI, MP3, GIF, etc., or in formats that are compatible with other devices like iPhone and Galaxy Note.
MiniTool MovieMakerClick to Download100%Clean & Safe
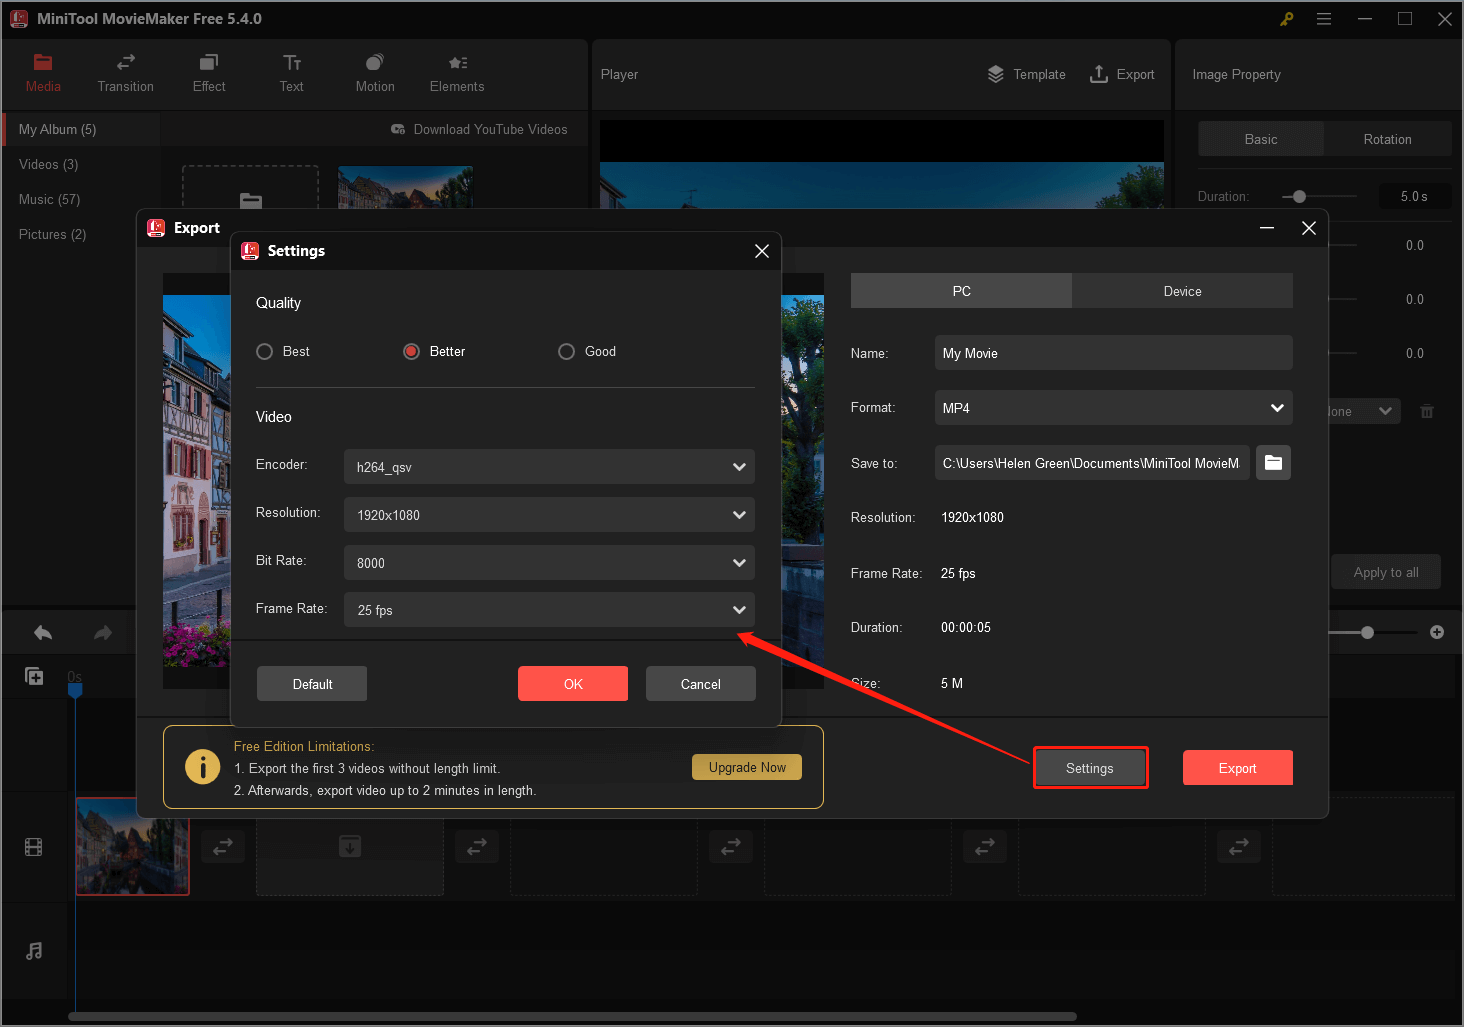
Besides, you are able to set up the encoder, resolution, frame rate, and bitrate of the exporting video.
To Wrap Things Up
In conclusion, Error Code 3 Selector 9 is a frustrating error message that can occur when exporting videos in Premiere Pro. It can be caused by many issues, including corrupt files, hardware problems, and software settings. By following the ways outlined above, you can troubleshoot the issue and get your video export back on track.
Related Articles
- [7+1 Ways] How to Fix Adobe Media Encoder Error Code 3?
- 5 Ways to Fix Adobe Media Encoder Crashes When Rendering
- Adobe Media Encoder Not Activated & How to Get It for Free?
- [9 Ways] Fix Adobe Media Encoder Not Connecting to Project
- Adobe Integrates Firefly AI Tool to Simplify Video Editing
About The Author

Position: Columnist
Helen Graduated from university in 2014 and started working as a tech editor in the same year. Her articles focus on video creation, editing, and conversion. She also has a good knowledge of disk management and data backup & recovery. Through an in-depth exploration of computer technology, Helen has successfully helped thousands of users solve their annoying problems.