Проблема. При запуске After Effects появляется сообщение об ошибке: «3D-рендеринг с трассировкой лучей: сбой компиляции исходного построителя текстуры (5070::0)»
В сообщении об ошибке указывается, что установлена новая карта NVIDIA, которая не поддерживает ускорение 3D-приложений с трассировкой лучей. Эта функция больше не разрабатывается, поэтому эта проблема не является критической.
К графическим процессорам NVIDIA, которые не поддерживаются для ускорения 3D-композиций с трассировкой лучей, относятся следующие:
- GTX 750
- GTX 750 Ti
- GTX 960
- GTX 970
- GTX 980
Эти карты основаны на так называемой архитектуре Максвелла.
Решение 1. Нажмите кнопку «ОК» в диалоговом окне предупреждения. Использование 4D Lite для работы с 3D и After Effects
Нажмите кнопку «ОК» в диалоговом окне предупреждения.
Для работы с 3D и After Effects используйте Cinema 4D Lite (в составе After Effects CC и более поздних версий) вместо 3D-композиций с трассировкой лучей.
Решение 2. Если ваш графический процессор поддерживается для ускорения 3D-композиций с трассировкой лучей, но вы все равно видите сообщение об ошибке, выполните следующие действия:
Вполне возможен вариант, при котором ГП поддерживается для ускорения 3D-композиций с трассировкой лучей, но сообщение об ошибке все равно появляется.
Если ваш графический процессор находится в списке системных требований для ускорения 3D-композиций (см. раздел для After Effects CC и более поздних версий и раздел для After Effects CS6), затем обновите After Effects до самой последней версии.
Если вы используете устаревшую карту NVIDIA (не Maxwell), в которой предусмотрено более 1 ГБ видеопамяти, но при этом она не поддерживается, вы можете включить не тестированный, неподдерживаемый ГП для CUDA-ускорения 3D-рендеринга с трассировкой лучей в меню «Установки» > «Предварительные просмотры» > «Сведения о ГП»: «Включить не тестированный, неподдерживаемый ГП для CUDA-ускорения 3D-рендеринга с трассировкой лучей».
Если все перечисленное выше не помогло (или просто вам неохота возиться, пробуя все подряд), значит, скорее всего ошибка происходит из-за конкретного проекта. При возникновении ошибки или другой проблемы обратите внимание на таймкод (время) ошибки. Если баг возникает каждый раз в одном и том же месте, то есть вероятность, что он вызывается каким-нибудь конкретным эффектом или анимацией, которую придется изучить и, возможно, изменить. Например, при работе с частицами можно выбрать другой режим работы CPU/GPU в плагине (если поддержка есть), уменьшить количество частиц, для Element 3D упростить геометрию, уменьшить количество полигонов, проверить материалы, текстуры, размер и т.п.
Для уточнения проблемного слоя или эффекта мне несколько раз помогал такой способ. Вы выбираете половину слоев в композиции и удаляете их все. Рендерите видео, ну или как вы там предпочитаете проверять. Тут возможны два варианта:
- Если ошибка пропала, значит, она была в удаленных слоях композиции, отменяем удаление, и теперь удаляем только половину удаленных ранее слоев. И снова запускаем рендер.
- Если ошибка осталась, то продолжаем дальше удалять слои, упрощая проект.
Если ошибку вызывает что-то конкретное, рано или поздно мы найдем виновника таким методом. Я понимаю, что это долгий, муторный и неудобный способ, но если вы знаете лучше, то пишите мне, буду благодарен! ![]()
А если ошибка возникает каждый раз в случайных местах композиции, то можно попробовать рендерить не готовое видео, а набор кадров Image Sequence. В After Effects есть несколько пресетов для этой цели под общим названием Multi-Machine Settings/Sequence в очереди рендера Render Queue.
В таком случае каждый кадр будет отдельным изображением на диске, и если рендер оборвется, вы не потеряете уже просчитанный готовый материал. А когда вы продолжите рендер (можно продублировать задание в очереди рендера Render Queue), After Effects пропустит уже существующие на диске кадры и начнет считать со следующего места. За это отвечает отдельная настройка в Render Settings — Skip existing files (allows multi-machine rendering) («Пропустить существующие файлы (позволяет осуществлять рендеринг на нескольких компьютерах)«).
Но, естественно, звук в таком виде не получится вывести из программы After Effects и придется потом дополнительно его считать как WAV файл без видео и объединять с набором отрендеренных кадров композиции. Их, конечно же, надо предварительно импортировать в любую программу для работы с видео — After Effects, Premiere Pro, да любую. Даже мой любимый FFMPEG может это сделать, да все нормальные программы умеют делать такое. Только проверьте частоту кадров, так как куча файлов на диске не имеет такой информации, и это надо задавать руками.
Вообще, это было сделано для рендеринга по сети несколькими компьютерами одновременно, чтобы они не считали одинаковые кадры, назначенные другому After Effects. А самое интересное, что такое можно провернуть и на одной машине для ускорения рендера, ведь одна копия After Effects не задействует ресурсы процессора CPU на полную. Уменьшение времени рендера в After Effects
Содержание
- This effect requires gpu acceleration что делать
- This effect requires GPU acceleration? Here’s how to fix
- Enable Mercury GPU Acceleration in Project Settings
- Change the Order of Effects
- Uninstall Third-Party Plugins
- Clean Install Graphics Drivers and Adobe Product
- Solved: This Effect requires GPU acceleration
- How To Solve “This effect Requires GPU Acceleration” In Windows 10.
- 1- Install The Latest Updates.
- 2- Make Sure That The Application Is Installed Correctly.
- 3- Run “GPUSniffer.exe.”
- 4- Check Your Antivirus.
- 5- Enable GPU Previewing [Mercury Engine]
- How To Optimize Performance In Adobe Premiere Pro CC.
- 1- GPU Acceleration.
- 2- Memory Allocation.
- 3- Optimizing Your System.
- 4- Point Media Cache To A Different Drive From OS.
- Final Verdict:
- Frequently Asked Questions (FAQs)
- 1- How do I fix ‘this effect requires GPU acceleration’?
- 2- What does ‘this effect requires GPU acceleration mean’?
- 3- How do I turn on this feature?
- Fix: This Effect Requires GPU Acceleration – Premiere Pro
- Try these fixes…
- Fix 1: Enable GPU Acceleration
- Fix 2: Update your graphics driver
- Fix 3: Change the order of effects
- Fix 4: Update any third-party effect
This effect requires gpu acceleration что делать
This effect requires GPU acceleration? Here’s how to fix
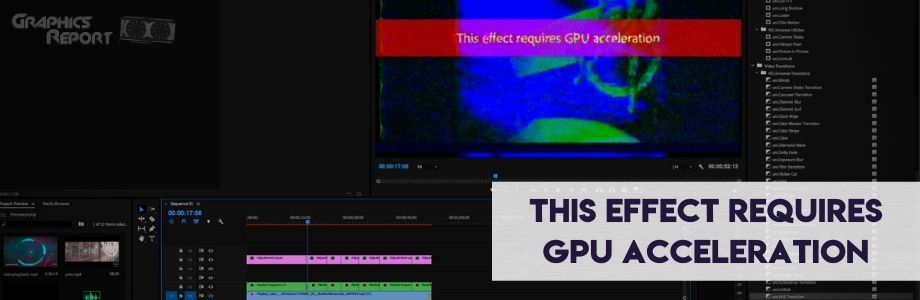
If you are facing the “This effect requires GPU acceleration” error message, you are probably using Premiere Pro or After Effects to apply certain effects on your video. As it turns out, as per the error message, you do not have GPU acceleration enabled which is why some effects may not work. However, in some scenarios, you might have GPU acceleration enabled from the settings of the application and still face the error message in its red ribbon. This can be due to a number of reasons other than the GPU acceleration that we will go through down below as well as show you how to resolve the problem.
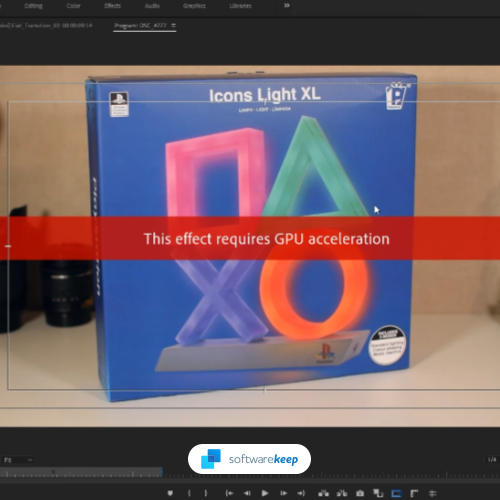
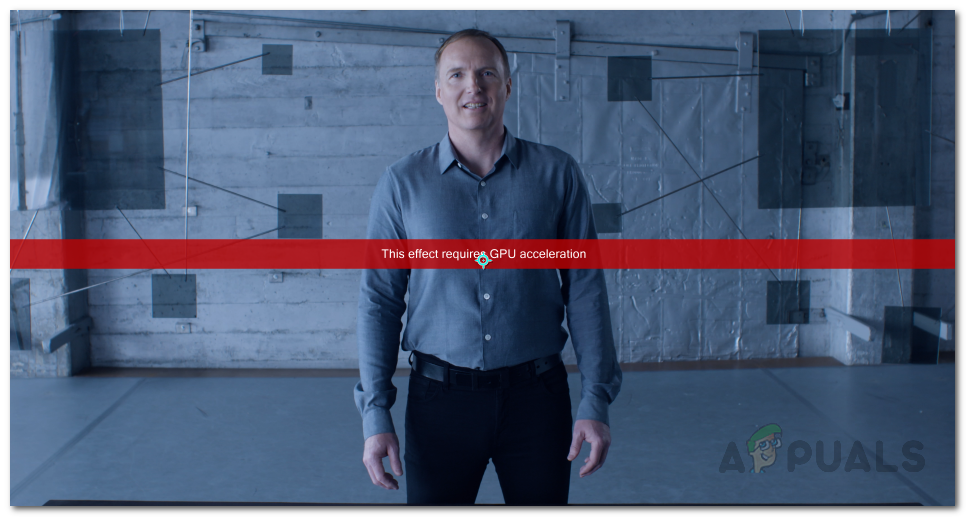 This Effect Requires GPU Acceleration Error Message
As it turns out, there are other factors that can contribute to the error message in question. First off, the pretty obvious reason would be GPU acceleration. Some effects in Premiere Pro or After Effects require GPU acceleration and when that is disabled, you won’t be able to use them on your clips. However, how about when you have GPU acceleration enabled and are still prompted with this error message? It turns out that the order of the effects in your Effects Control Window can also cause the problem in question. This has been particularly reported when you are using a VR-related effect on your videos. Let us look at the potential causes in more detail before proceeding with the workarounds available to resolve the problem.
- Third-Party Plugins — One of the reasons that you might be encountering the error message in question can be due to the plugins that you have installed in Adobe Premiere Pro. While plugins are helpful, some of them can turn out to be a hurdle as they can interfere with the app to cause problems. Therefore, if you have plugins installed that you no longer use or recently installed, you should try uninstalling them to see if that fixes the problem.
- Order of Effects — As it turns out, another potential reason for the mentioned error message can be the order of the effects. The order in which the effects are stacked can sometimes cause this problem in which case you will have to reorder them by moving the problematic effect to the top to see if that gets rid of the issue.
- Outdated Graphics Drivers — In addition to that, having outdated graphics drivers on your system can also, in some cases, trigger the problem in question. If this case is applicable, you will have to update your drivers to the latest version available via the manufacturer’s website to potentially fix the error message.
- GPU Acceleration in Project Settings — Finally, the settings of the project that you are working on can also factor in causing the problem that you are facing. This can happen when you don’t have GPU acceleration enabled in the project settings which is why you encounter the error message mentioned. To fix this, you will simply have to enable GPU acceleration.
Now that we have gone through the potential causes of the error message in question, you probably have established a better understanding of the problem here. With that out of the way, we can now move on to showing you how to resolve the problem in question via the different methods that are available. So, without further ado, let us get right into it.
Enable Mercury GPU Acceleration in Project Settings
As it turns out, the first thing that you should do after you encounter the error message in question is to make sure that you have GPU acceleration enabled. The error message appears when you have Mercury Software Only selected instead of GPU acceleration under Video Rendering and Effects settings. This can be found in the Project Settings window of the application. Therefore, you will have to enable GPU acceleration to get around the problem. To enable Mercury GPU acceleration, follow the instructions given down below:
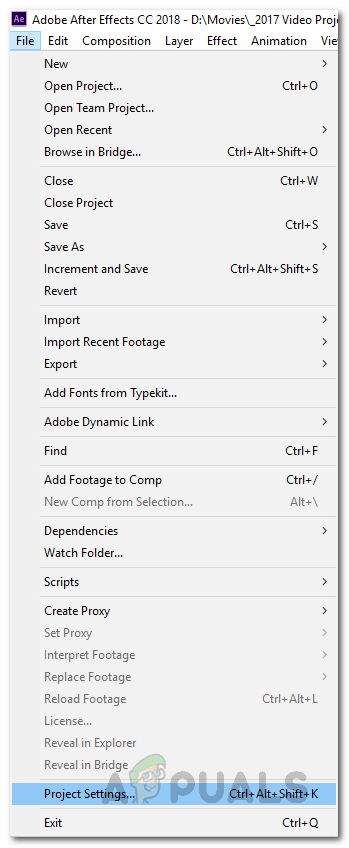
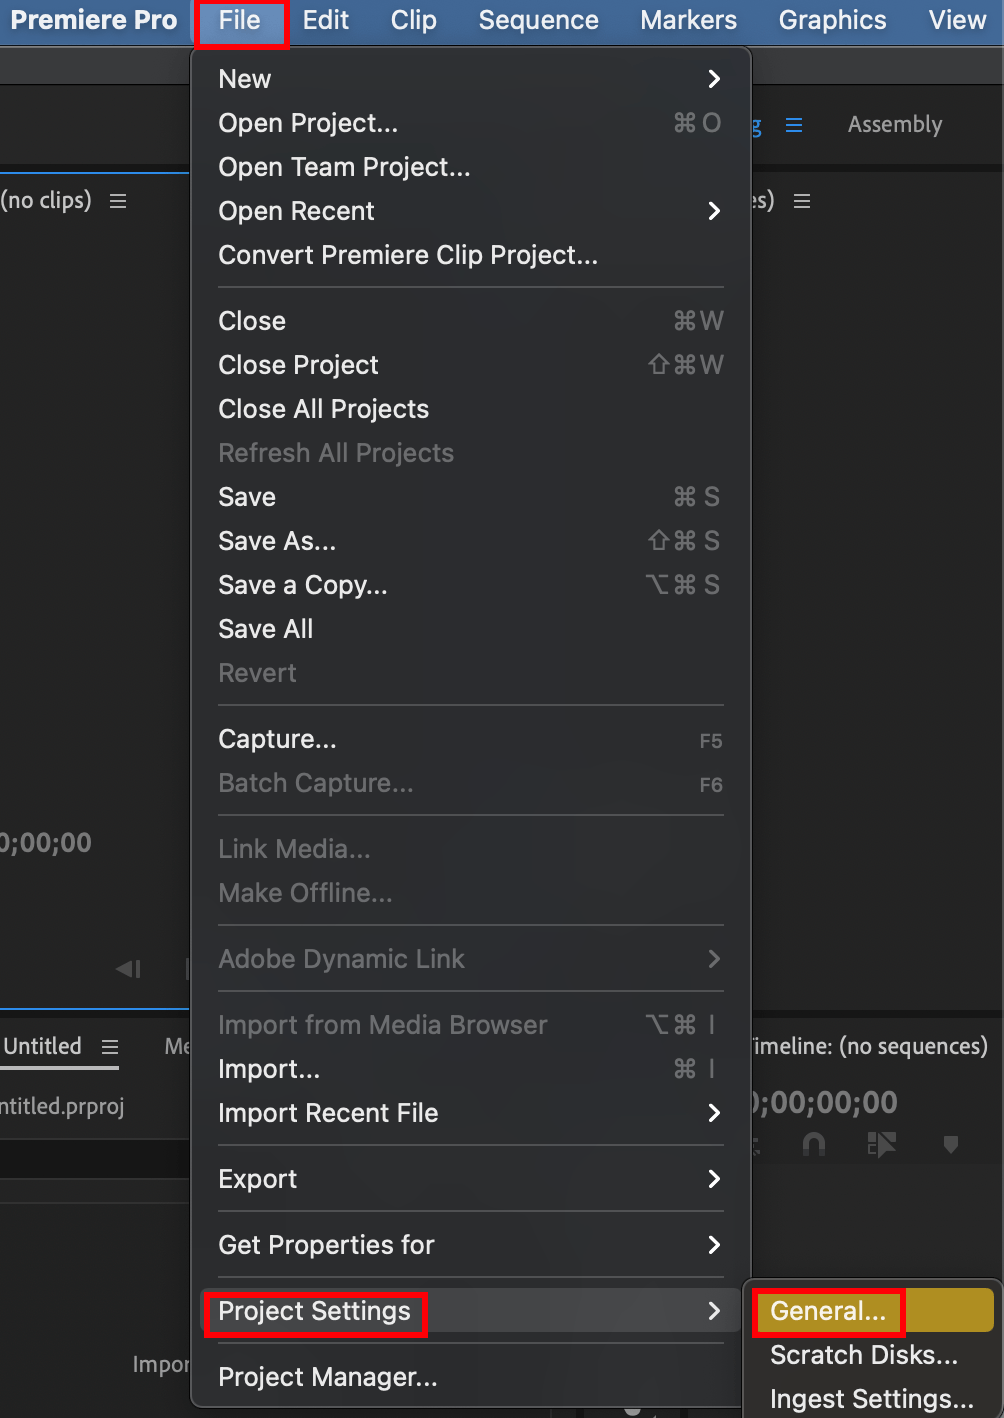
- First of all, on your After Effects or Premiere Pro window, click on the File drop-down menu.
- From there, click on the ProjectSettings option at the bottom. This will bring up a new window on the screen.
 Opening Project Settings Window
 - On the Project Settings window, on the Video Rendering and Effects tab, choose Mercury GPU Acceleration from the drop-down menu provided. Enabling Mercury GPU Acceleration in Project Settings
- Once you have done that, go ahead and click OK.
- Then, go ahead and apply your effects again to see if the problem persists.
 Opening Project Settings Window
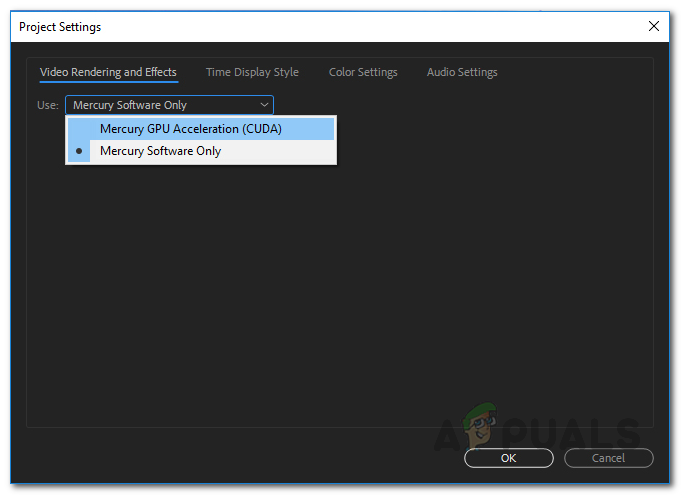 Enabling Mercury GPU Acceleration in Project Settings
Change the Order of Effects
Like we have mentioned above, another reason that you might face the problem in question here can be due to the order of effects on the Effects Control window. To resolve this, what you need to do is simply change the order of the effects that you have applied via the Effects Control Window. You can easily change the order of the effects by dragging and dropping each effect present in the list. To fix the issue, move the effect that is actually causing the issue to the top of the list and then see if that resolves the problem. If that doesn’t work, change the general order of the effects and see if that bears any fruit.
In addition to that, some users have reported that instead of putting the effect that is causing the problem in the Effects Control panel, they put the effect onto the clip directly which resolved the problem for them. Therefore, give that a shot as well if you are not able to fix the problem by changing the order simply and see if it gets rid of the error message.
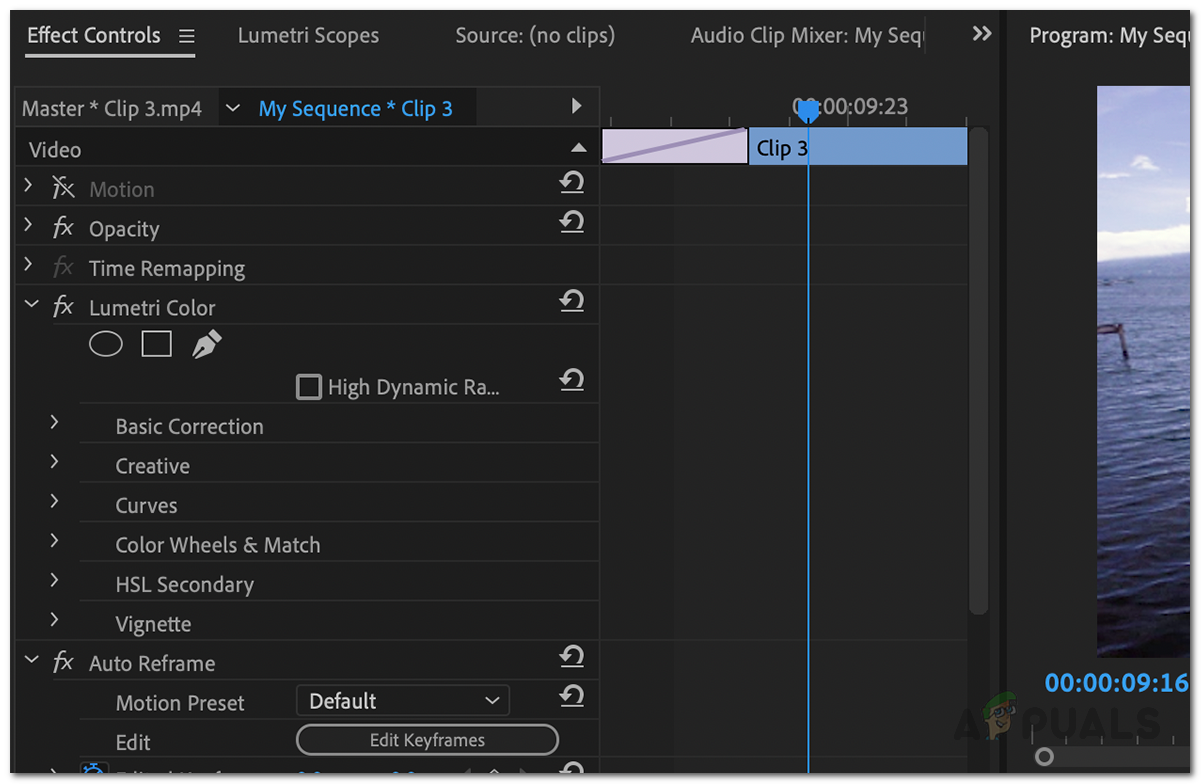 Effect Controls Window
Uninstall Third-Party Plugins
One of the great features of Premiere Pro is that it lets you install third-party plugins on your application which allows the users to enjoy the additional functionality. While plugins are generally really helpful with several things, they can also sometimes cause issues with your application such as the one you are facing here. This can especially happen if you have an old plugin installed and then you update your Premiere Pro application.
Uninstalling the plugin can depend on how you installed it in the first place. You can install plugins via the Adobe website or using a third-party installer. To install the plugins that you have installed via the Adobe website, simply go ahead and open up this link. Choose your product from the left-hand side and then click the three-dots option next to the installed plugins. From there, simply choose Uninstall to remove the plugin.
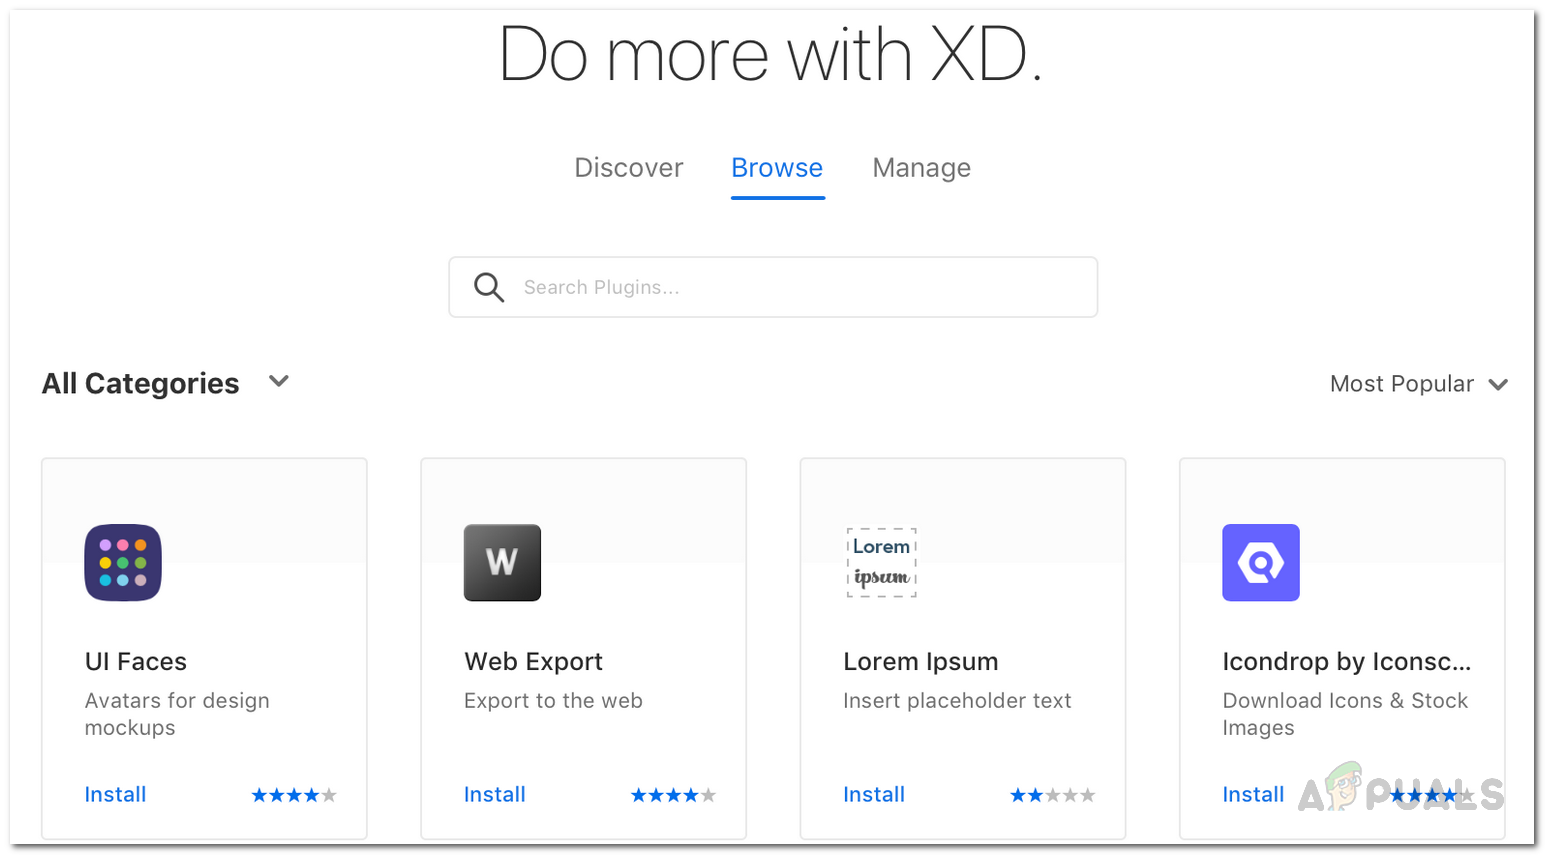 Adobe Plugins
Clean Install Graphics Drivers and Adobe Product
Finally, if you are still facing the error message after trying the methods given above, the problem could be very likely due to your graphics drivers or your Adobe product installation files. In such a scenario, you will have to reinstall to perform a clean install of your graphics drivers along with the product that you use. To do this, go ahead and remove the installed programs from your computer i.e. the Adobe product and follow it up by uninstalling the graphics drivers. Once you have done that, go to your manufacturer’s website and download the latest drivers available for your GPU. Install the drivers along with the Adobe product. If you are using encoders like the Media Encoder, make sure to reinstall that completely as well. To uninstall your graphics drivers, follow the instructions given down below:
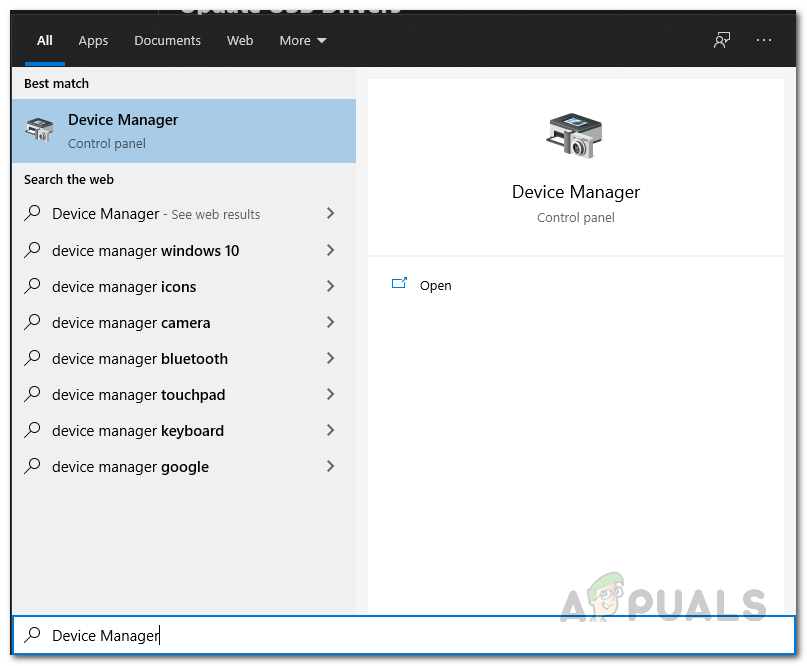
- First of all, open up the Device Manager by searching for it in the StartMenu. Opening Device Manager
- Once it is open, expand the Display adapters list. Here, you will see your graphics driver. Device Manager
- Right-click on your graphics card and from the drop-down menu, choose the Uninstalldevice option. Uninstalling Graphics Drivers
- Follow the on-screen prompts to finish it. This will remove your graphics drivers.
- Once you have done that, go to your manufacturer’s website and download the latest drivers for your card and install them. Also, reinstall Adobe Premiere Pro or After Effects that you are using.
 Opening Device Manager
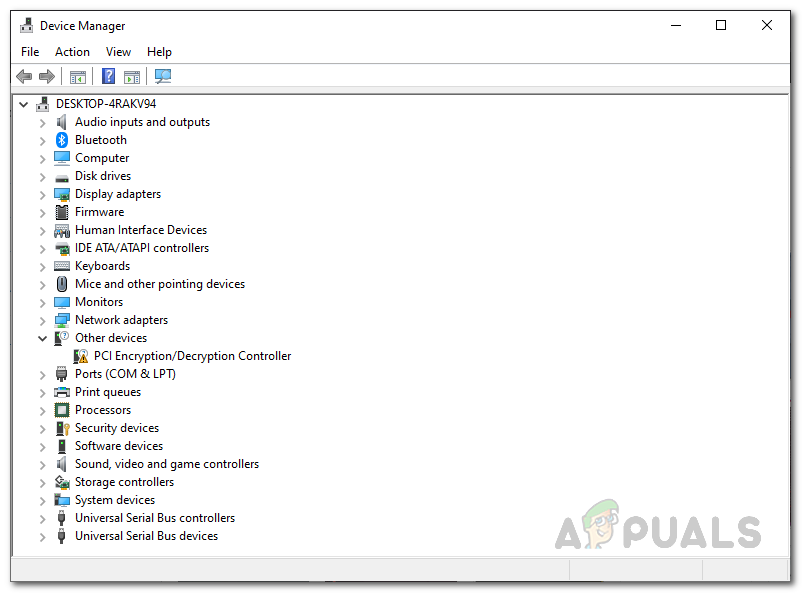 Device Manager
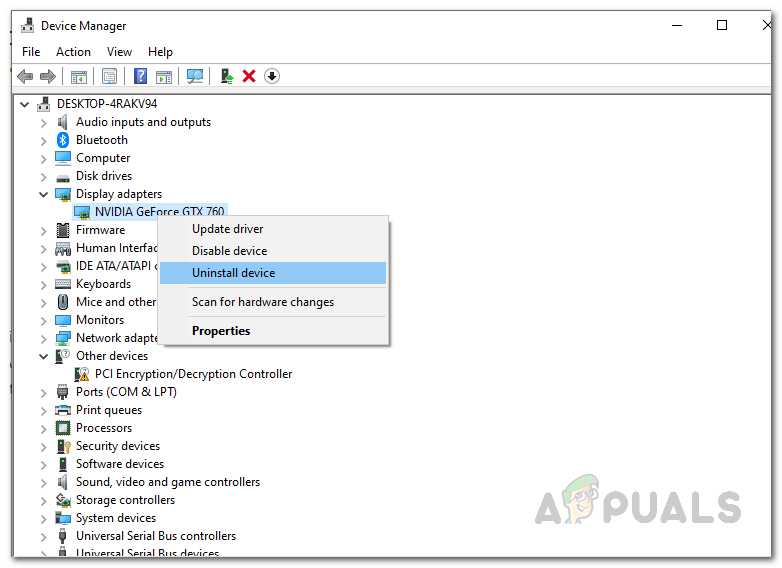 Uninstalling Graphics Drivers
Solved: This Effect requires GPU acceleration
Adobe’s Premiere Pro is arguably the most versatile editing tool available in the industry right now (sorry, Mac users). It allows you to edit your videos with the most excruciating of details and the finest of controls.
And with its ever-growing list of features, it’s become the primary software many people use to edit VR or 360° content.
However, it’s not all roses and daisies out here because the software also often runs into weird bugs and issues, and possibly the most noted one out of all those is the infamous red banner on your screen saying, “This effect requires GPU acceleration.”
This happens when you are editing a video that requires your graphic card’s power to process everything thoroughly, but some obstacles can come in your way to prevent that from happening.
It can be as essential as enabling a toggle or as devastating as accepting the fact that you need to upgrade your graphics card.
How To Solve “This effect Requires GPU Acceleration” In Windows 10.
There are several different culprits behind this error; all of them can be solved, so need not worry. Let’s look at all the possible solutions to fixing the GPU acceleration error in Adobe Premiere Pro in Windows 10.
1- Install The Latest Updates.
It goes without saying, yet I am here saying it, please keep your stuff updated; this goes for everything from applications to even your drivers.
There is a reason developers release updates to their software regularly so that their app, in this case, Adobe Premiere Pro, strays away from any potential bugs or issues that can spoil your editing session.
Updating to the latest version of PP can potentially solve any previous problems or known issues that you were facing. Adobe updates its entire suite of applications pretty regularly to fix bugs and add new features, so make sure you’re running on the latest version of their editing software.
2- Make Sure That The Application Is Installed Correctly.
There is a good chance your installation of Premiere got corrupted, or maybe a fragment of the application is missing from the file directory. This is why you can also get the “Adobe Premiere couldn’t find any valid editing modes” message.
It can happen for various reasons, but to fix this, you have to re-download and then install it again, making sure that the application is installed 100 percent properly. Restart your PC and see if that did the job.
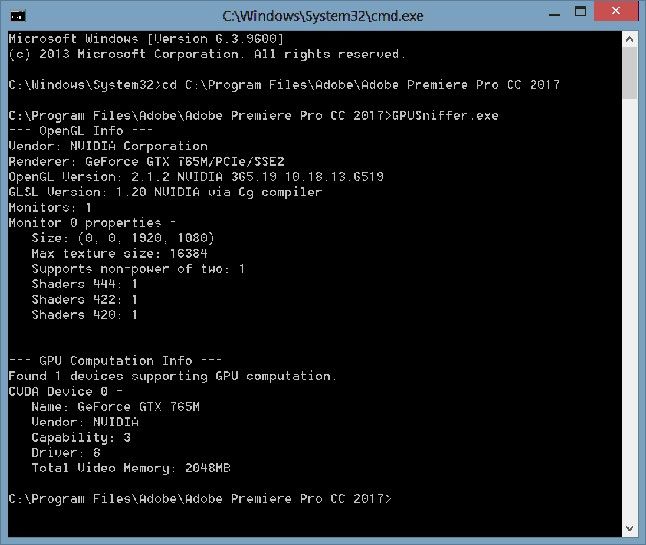
3- Run “GPUSniffer.exe.”
Adobe Premiere utilizes your CPU to run almost all the processes while your graphics card is given minimal work and acts instead as an assistant to your processor.
But that’s not the case all the time; often, the software needs to use your video card to lessen the burden from your processor or hand over tasks that are better suited for a graphics card to perform.
GPU acceleration is the name of this feature where applications call in your video card to work alongside your SoC. Still, sometimes PP fails even to recognize or detect your graphics card.
And here is where GPUSniffer.exe comes into its place to ‘sniff’ (hehe) out your video card from the system so that Premiere can use it for GPU accelerated tasks. To do this, close editing software Pro and,
- Navigate over to where Premiere Pro is installed.
- Search for “GPUSniffer” and locate the executable.
- Double click on it and let the command prompt windows do its thing.
- After the window automatically closes, open Premiere again.
If you are still seeing that red banner and it is not detecting your card, you need to upgrade your graphics drivers to the latest version (or roll back to a previous one if there are known compatibility issues in the new update).
Other than this, it will be good practice to disable your integrated graphics that are built into your CPU via either the BIOS or Device Manager.
This should do the trick and allow PP to pick up your graphics card and finally remove that frustrating red banner from your project. However, if it doesn’t and you are still where you started, then you need to follow along and try the steps mentioned above beforehand, too.
4- Check Your Antivirus.
You may have an antivirus installed on your computer to protect it from all sorts of evil and bad things, but do you know that the antivirus itself could be an evil dark lord?! Calm down. I’m just exaggerating.
Even though antiviruses have been known to cause issues and interfere with your system, they generally do a good job of guarding it, until you run into problems using other applications because of your antivirus.
Try disabling certain features or restrictions in your antivirus to allow for Premiere to run correctly. If the problem still pertains, then try disabling the antivirus entirely so that it does not interfere with the editing software at all.
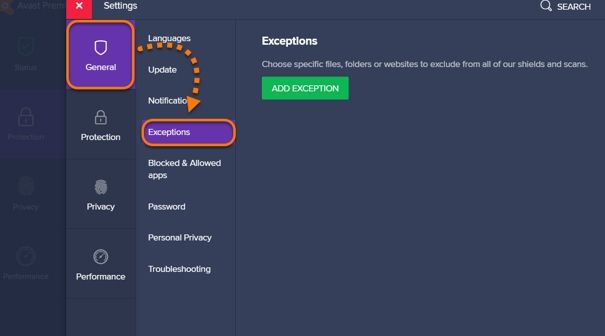
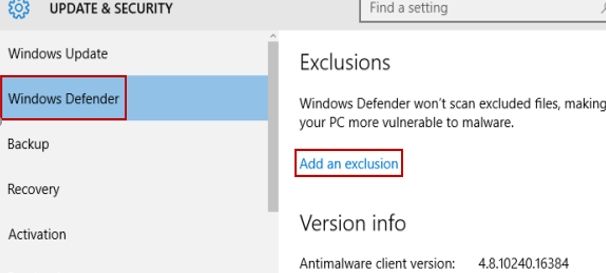
And don’t worry, disabling your antivirus won’t instantly hack your system; Windows Defender will do a good enough job of protecting your PC by itself. Still, I will suggest you also should white-list Adobe Premiere Pro from Windows Defender to stop any interference with the app.
5- Enable GPU Previewing [Mercury Engine]
Premiere Pro uses your processor to render and playback the video in real-time while you are editing it; this limits you to weaker software-based effects as serious or graphics-intensive effects will not work because your CPU has to do all the work here. However, PP can leverage your GPU to preview the video in real-time and essentially reduce the load of your CPU or enable more demanding effects to be pliable in real-time.
There are three different real-time rendering options available in Premiere, Software Only, CUDA, and OpenCL. You will notice that both CUDA and OpenCL are GPU accelerated options while the Software Only option exclusively utilizes your CPU to render everything making your graphics card sit duck. You want to select either of the GPU accelerated options based on your video card so you can be enabled to preview the most demanding effects in real-time.
- Go to File (located on the top tab of your project).
- Select Project Settings and then General.
- Here, under the “renderer” setting, you will see a drop-down menu.
- Select “Mercury Playback Engine GPU Accelerated (CUDA)” for Nvidia cards and “Mercury Playback Engine GPU Accelerated (OpenCL)” for AMD cards .
- Save your newly applied settings, and now you should be utilizing your video card for rendering alongside your processor.

How To Optimize Performance In Adobe Premiere Pro CC.
There are many ways to get more out of your system, case in point, for editing in Premiere. PP is known for being extremely demanding compared to other editing utilities, and for a good reason.
It offers the most multifaceted set of tools available in editing software (for Windows at least) and happens to include very comfortable integration with Adobe’s Creative Cloud.
So, let’s look at the ways you can make your experience using the editing software even better.
1- GPU Acceleration.
As we discussed above, you can push in your video card’s power to be wielded by the editing software for assisting in the preview or real-time rendering of your project.
This is called the way it is as you are “accelerating” your video card and harnessing its capabilities. You need at least a 1GB graphics card from either AMD or Nvidia to use this feature, the more recent, the better.
Nvidia is generally preferred in productivity based systems as Nvidia cards have “CUDA Cores” inside them that help massively in real-time rendering in editing software.
However, lately, AMD cards have been popping up everywhere because of their incredible price to performance ratio and the value proposition to budget-conscious consumers.
Refer to section 5 for more details on how to enable this feature in your project.
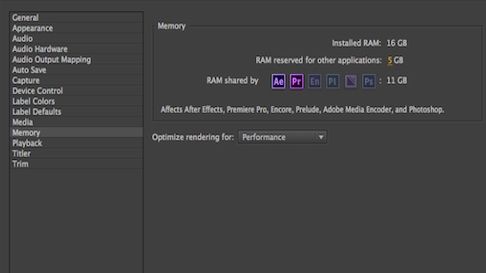
2- Memory Allocation.
RAM is certainly not a downloadable resource from the internet. You have a limited amount of it inside your system, so it’s good practice to allocate that RAM effectively between all your applications across your entire computer.
Adobe Premiere allows you to set a maximum amount of memory that it can use, shared with other Adobe apps like After Effects and Photoshop, etc.
You should set this number to as high as you can while reserving some RAM for other processes running on your computer, your browser, and maybe a media player, for example.
The general rule is to allocate about 75% of your RAM to Adobe Apps and leave the rest for your computer, but this is highly subjective and based upon your preferences and amount of memory present, of course.
To change the allocated memory, select File, navigate to the Memory section, and adjust accordingly.
3- Optimizing Your System.
This is more of a starting step than anything else, as you should make sure that your system is capable of running Premiere Pro smoothly. Most importantly, it would help if you had a fast and capable CPU; I’d recommend at least a 6-core SoC.
Pair that with a graphics card capable of pushing all the frames it can; generally, the more expensive the video card, the better, and try to go with at least 4GB of VRAM (1 is the bare minimum).
Lastly, it would be best to have about 16GB of DDR4 memory for a smooth experience, even though you CAN work with 8. If you can squeeze in 32 gigs, you will be in a real sweet spot.
Keep in mind that SSDs are miles faster than mechanical hard drivers, so opt for one of those; there are many different types of SSDs, so do a little research before deciding.
Cooling is also something you need to give a thought to as you wouldn’t want your editing rig to heat up and start thermal throttling in the middle of an editing session. And like everything I mentioned above, the more you spend on it, the better parts you’ll get.
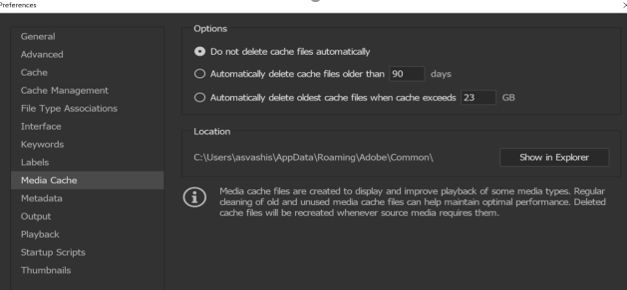
4- Point Media Cache To A Different Drive From OS.
Everyone knows that you install your OS on the fastest drive in your computer, but what about the rest of the stuff? Where does that go? See, Premiere creates cache files of all media that you import in so that it can access those files in a snap.
This can build up many files over time, and it’s going to become unhealthy for those cached files to be stored up inside your drive as it’s going to take up space and slow down your computer.
You want to leave your SSD (or wherever your OS is installed) to be utterly void of any other files so that your SSD can provide the best read/write speeds to your OS and keep everything real snappy. Media Cache files are going to slow that down.
To change this, go to File, navigate over to Media Cache, and set your Media Cache storage location to any drive other than where you have installed your OS to allow for optimal performance.
Final Verdict:
Professionals prefer and use Adobe’s suite of applications daily because they provide the best features available anywhere and allow creators to tailor the perfect video according to their taste. Sometimes, you hit small snags like a graphics acceleration error, but it is relatively easy to resolve this issue and contour your editing.
To get the most out of Adobe Premiere, you will need to follow a couple of straightforward guidelines that will ensure the best experience for you and allow you to make even better videos with the tools that are already readily available in the palm of your hands.
Frequently Asked Questions (FAQs)
1- How do I fix ‘this effect requires GPU acceleration’?
You need to make sure that the editing software is actually detecting your video card and then enable GPU Accelerated real-time preview rendering in the Premiere settings.
2- What does ‘this effect requires GPU acceleration mean’?
Your CPU is sometimes just not enough to handle all the processes that PP is throwing at it, so it needs your graphics card’s assistance, and that’s why you get this specific error.
3- How do I turn on this feature?
Go to File, then General, and under the “Video rendering and playback” settings, change the renderer to “Mercury Playback Engine GPU Accelerated (CUDA)” for Nvidia cards and “Mercury Playback Engine GPU Accelerated (OpenCL)” for AMD cards.
Fix: This Effect Requires GPU Acceleration – Premiere Pro
Adobe Premiere Pro users have been reporting a specific error when they apply effects on the video they’re working on. The error message says “This effect requires GPU acceleration“, and users have been getting it regardless they have enabled GPU acceleration or not. If you’re in the same boat, no worries. We’ve got a few working fixes you can try.
Try these fixes…
Fix 1: Enable GPU Acceleration
First of all, you need to make sure the GPU acceleration feature is actually enabled for your Premiere Pro. Here’s how:
- Run Premiere Pro. Click Files >> Project Settings >> General.
- Under the Video Renderer and Playback section, make sure your Renderer is set to Mercury Playback Engine GPU Acceleration.
- Save the changes and test the issue again.

Fix 2: Update your graphics driver
An outdated or faulty graphics driver could cause trigger random issues in Premiere Pro. You may want to check if your graphics driver is up-to-date and functioning properly.
There are two ways to keep your graphics card driver up-to-date. One is to manually update it via Device Manager. Sometimes Windows may not be able to detect the latest available update, so you would need to search on the manufacturer’s website. Be sure to choose only the driver that is compatible with your Windows version.
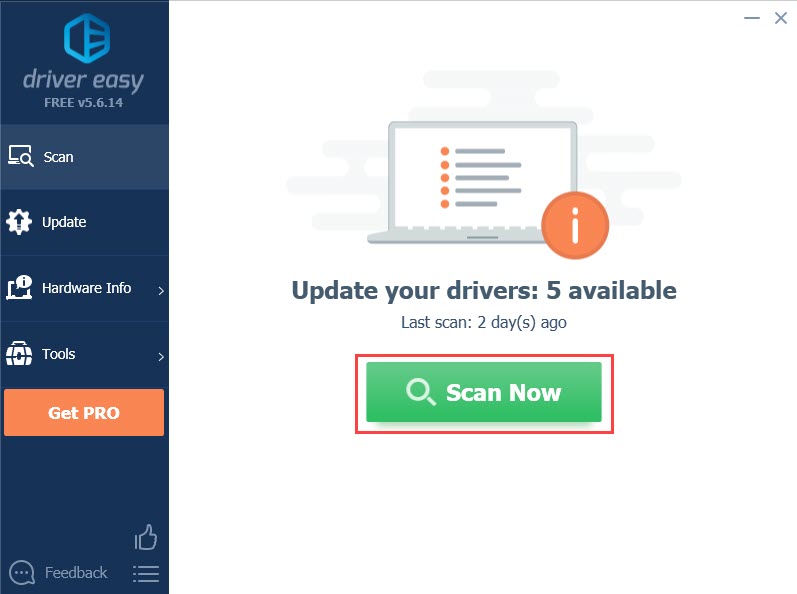
Automatic driver update – If you don’t have the time, patience, or computer skills to update your driver manually, you can, instead, do it automatically with Driver Easy. Driver Easy will automatically recognize your system and find the correct driver for your exact graphics card and your Windows version, then it will download and install the driver correctly:
- and install Driver Easy.
- Run Driver Easy and click the Scan Now button. Driver Easy will then scan your computer and detect any problem drivers.
- Click the Update button next to the flagged graphics card driver to automatically download the correct version of the driver, then you can manually install it (you can do this with the FREE version).
Restart your PC for the new driver to take effect. If updating the graphics driver doesn’t solve your problem, try the next fix.
Fix 3: Change the order of effects
This fix only applies when you’re using multiple effects on your video clip, but it has helped many users with this specific error.
If you’re applying multiple effects to your clip, and the error banner pops up after you use a certain effect, then you know that effect could be problematic. You can drag this effect to the top of the list, or change the general order of all the effects to see if it makes a difference.
If it doesn’t help, there’s one more fix you can try.
Fix 4: Update any third-party effect
You may get this error if the problem effect is a third-party one and it’s outdated or faulty. While you might regularly update Premiere Pro and all the default effects, you may forget to update the third-party plugins and effects as well, which could cause compatibility issues and trigger random errors. You can try updating those, if you use any, and test the issue.
Hopefully this article helps! If you have any questions or suggestions, please feel free to leave a comment down below.
Источник
Несмотря на свою популярность среди видео- и медиа-технологий, Adobe After Effects может вызывать такие проблемы, как медленный рендеринг и другие проблемы с производительностью. Обычно это происходит, когда After Effects не может использовать GPU должным образом.
В этой статье обсуждаются некоторые эффективные методы решения проблемы и возможные причины. Давайте начнем!
У этой проблемы с производительностью может быть несколько причин; некоторые из популярных упомянуты здесь:
- Графический процессор не включен в After Effects. Если параметр «Использовать графический процессор» отключен, приложение не будет использовать графический процессор.
- After Effects не поддерживает ваш графический процессор. Если вы используете низкопроизводительный графический процессор или более старую видеокарту, After Effects не поддерживает их, отсюда и проблема.
- Старый или устаревший графический драйвер. Графические драйверы необходимо обновить, если вы хотите без проблем использовать любой из высокопроизводительных графических процессоров с помощью приложения. Если графические драйверы устарели, это может вызвать эту проблему.
- Параметры композиции настроены неправильно. Параметры композиции не настроены на использование графического процессора, вы можете столкнуться с проблемой. Убедитесь, что у вас включена опция Advanced 3D.
Что делать, если Adobe After Effects не использует графический процессор?
1. Включите графический процессор в After Effects.
- Откройте Adobe After Effects. Перейти к файлу.
- Щелкните Настройки проекта. Перейти к генералу.

- На вкладке «Визуализация и воспроизведение видео» и в раскрывающемся списке для параметра «Визуализатор» выберите «Ускорение Mercury GPU».

- Нажмите OK и нажмите Сохранить.
- Нажмите Ctrl + Shift + Esc , чтобы открыть диспетчер задач.
- Найдите и щелкните правой кнопкой мыши приложение After Effects и выберите «Завершить задачу».


2. Обновите графический драйвер
- Нажмите Windows + R , чтобы открыть консоль «Выполнить».

- Введите devmgmt.msc и нажмите Enter, чтобы открыть диспетчер устройств.
- Перейдите и нажмите «Адаптеры дисплея». Затем щелкните правой кнопкой мыши графические драйверы и выберите «Обновить драйвер».

- В следующем окне нажмите Автоматический поиск драйверов.

- Следуйте инструкциям для завершения.


3. Изменить настройки композиции
- Запустите Adobe After Effects. Перейти к композиции.
- В настройках композиции перейдите к 3D Renderer.
- Также установите Ray-traced 3D.

- Нажмите «ОК».

4. Добавьте имя своего графического процессора в файл RayTraced.
- Щелкните правой кнопкой мыши приложение Adobe After Effects и выберите «Открыть расположение файла».
- В следующем окне найдите файл raytracer_supported_cards.
- Откройте файл и проверьте, можете ли вы найти имя вашей видеокарты.
- Вам нужно добавить его вручную, если вы не найдете его там. Затем скопируйте файл raytracer_supported_cards из папки на рабочий стол.
- Чтобы узнать имя видеокарты, нажмите Windows +, R чтобы открыть окно «Выполнить».

- Введите dxdiag и нажмите Enter, чтобы открыть средство диагностики DirectX.
- Перейдите на вкладку «Дисплей» и обратите внимание на имя рядом с «Тип чипа».
- Откройте raytracer_supported_cards и напишите имя так, как оно отображается в средстве диагностики DirectX.
- Нажмите «Файл» и выберите «Сохранить».
- Теперь скопируйте этот файл, перейдите в папку с файлом Adobe After Effects и вставьте его туда. Он попросит вас заменить его и нажмите «Да».


5. Обновите Adobe After Effects
- Запустите приложение Creative Cloud для настольных ПК.
- Перейдите в «Приложения» и нажмите «Обновления».
- Найдите и нажмите Проверить наличие обновлений.

- Если обновление доступно для After Effects, нажмите «Обновить».

Итак, вот шаги, которые необходимо предпринять, если Adobe After Effects не использует графический процессор для рендеринга. Попробуйте их и сообщите нам, какие из них сработали для вас в комментариях ниже.
The error “This effect requires GPU acceleration” error in editing software like Adobe Premiere Pro and After Effects could mean anything. Learn how to fix it.
As an artist who works in video editing, you’re always looking for new ways to improve your workflow and speed up your rendering times. So when you come across a render that’s taking too long, and you’re not sure why the first thing you do is check the effect settings.
But what if you find out that the effect requires GPU acceleration, and your computer doesn’t have it?
GPU acceleration is a process that uses the graphics processing unit (GPU) in your computer to help with faster rendering speeds. Some effects require this type of acceleration in order to function properly.
If you’re a video editor, you may have come across the message that says “This effect requires GPU acceleration” while using apps like Adobe Premiere Pro or After Effects. This can be frustrating, especially if you’re working on a laptop with an integrated graphics card.
The good news is that you can do a few things to try and fix this issue. Let’s take a look at some of the most effective methods.
What Is GPU Acceleration In After Effects and Adobe Premiere?
GPU acceleration is a term used to describe the process of using the graphics processing unit (GPU) in your computer to help with faster rendering speeds.
Some effects require this type of acceleration in order to function properly. GPU acceleration can be used for a variety of tasks, including video decoding, video encoding, and 3D rendering.
In After Effects and Adobe Premiere, GPU acceleration is used for certain types of renders and previews. For example, when you’re working with 4K footage or doing color correction, you may notice that things start to slow down. This is because these processes are more demanding on your computer’s resources.
Enabling GPU acceleration will help to speed up these processes and make them more efficient. However, not all effects can be accelerated by the GPU. And in some cases, it may actually make things worse.
What Causes the “This Effect Requires GPU Acceleration” Error?
There are a few different reasons why you may see the “This effect requires GPU acceleration” error message while using After Effects or Adobe Premiere.
The most common reason is that your computer doesn’t have a dedicated graphics card. If you’re using an older computer or a laptop with an integrated graphics card, this can be a problem.
Another reason this error message may pop up is because of the way your system is configured. For example, if you’re using certain types of effects, like the 3D Camera Tracker, ray-traced 3D renderer, or Warp Stabilizer VFX, then GPU acceleration will be required.
This error might be caused by third-party plugins or modifying the order of effects in the editing software. This problem can occur if the effects are stacked in an incorrect order, especially when third-party effects are used in your project.
Finally, this error message can also appear if there’s an issue with your graphics card drivers. If your drivers are out of date, or if they’re not compatible with the version of After Effects or Premiere you’re using, then you may see this error message.
There are a few things you can do to try and fix the “This effect requires GPU acceleration” error message. Let’s take a look at some of the most effective methods.
Note: If you don’t have a dedicated graphics card, then you may not be able to fix this issue. In this case, you’ll need to render your project without GPU acceleration or find another way to speed up the rendering process.
Method 1. Change Mercury GPU Acceleration in Your Project Settings
The first thing you can try is changing the Mercury GPU Acceleration setting in your project settings. This setting is located in the “Video Rendering and Playback” section of the settings menu.
By changing to a different GPU acceleration, you can try to use GPU acceleration technology for any effects that may require it.
This method works both in Adobe Premiere Pro and After Effects. To demonstrate how you can change Mercury Playback Engine GPU Acceleration in Premiere Pro, we’ll be using the latest version.
- First and foremost, click on the File drop-down menu in your After Effects or Premiere Pro program. Go to Project Settings > General at the bottom of the File menu.

- This will open a new window on your computer screen. Click on the Mercury GPU Acceleration option from the drop-down menu in the Renderer section and select one of the following options:
- Mercury Playback Engine GPU Acceleration (OpenCL) if you have an AMD graphics card in your system
- Mercury Playback Engine GPU Acceleration (CUDA) if you have an Nvidia graphics card in your system

- After you’ve made the necessary changes, click OK. Then try applying your effects again to see if the problem still exists.


Method 2. Change the Order of Effects on Your Clip(s)
Another reason you might be having this problem is because of the order of effects on the Effects Control window, as we mentioned earlier. If one or more effects require GPU hardware acceleration, try changing the order of the effects you’ve applied in the Effects Control Window.
You can easily rearrange the order of the effects in the list by dragging and dropping each one. To fix the problem, move the effect that is actually causing the problem to the top of the list and see if that fixes it. If that doesn’t work, try switching the effects’ general order and seeing what happens.
Furthermore, instead of putting the effect that is causing the problem in the Effects Control panel, some users have reported that putting the effect directly on the clip solved the problem for them. If you are unable to resolve the issue by simply changing the order, try that as well to see if the error message is resolved.
Method 3. Uninstall Any Third-Party Plugins
If you’re using any third-party plugins, try uninstalling them and see if that fixes the issue. In some cases, certain plugins can cause problems with GPU accelerated effects.
One of Premiere Pro’s best features is that it allows you to install third-party plugins on your application, giving users access to additional functionality. While plugins can be extremely useful in a variety of situations, they can also cause problems with your application, such as the one you’re experiencing right now.
This is especially likely to happen if you have an older plugin installed and then update Premiere Pro. So, if you’re still dealing with an error regarding an effect that requires GPU acceleration in Premiere Pro or After Effects, try uninstalling your plugins.
The method you used to install the plugin may affect how you uninstall it. Plugins can be installed through the Adobe app or through a third-party installer. Follow the publisher’s instructions to remove the plugin and work with Mercury Playback Engine GPU Acceleration without errors.
Method 4. Update Your Graphics Card Driver
In some cases, the problem may be with your graphics card driver. Try updating your driver to see if that fixes the issue. You can usually find the latest drivers on your graphics card manufacturer’s website.
Here are the instructions to update your driver on a few of the most popular graphics cards:
How To Automatically Update Display Drivers on Windows
Windows update has a feature that allows you to automatically update outdated drivers. This can help you quickly find and get some of your components up-to-date without having to individually check for new versions.
- To access the Start menu, click the Windows symbol in the lower-left corner of your screen, and then choose Settings. Alternatively, press Windows + I to bring up the menu.

- Select the Update & Security tile from the drop-down menu. The majority of your Windows Update settings can be found here.

- Go to the Windows Update section, and then click on the View optional updates link if it’s available.

- Expand the Driver Updates section to see which components need to be updated right now. Simply check the boxes next to the drivers you want to update, then click the Download and Install button.
- Allow Windows to download and update your outdated drivers before restarting your machine.


How To Manually Update Drivers on Windows
Use the steps below to manually update a driver that may be out of date. Keep in mind that only legitimate sites should be used to download drivers! Some fraudulent websites may try to trick you into downloading malware-infected files.
- To access the needed utility, press the Windows + X keys on your keyboard and choose Device Manager from the context menu.

- Select Update driver from the context menu after right-clicking on the graphics card you wish to update.

- Choose how you want to update. You may either let Windows find a driver for you automatically or manually seek a fresh driver file on your machine.


Method 5. Reinstall Your Adobe Application
If you’re still seeing the “This effect requires GPU acceleration” error message, then you may need to reinstall your Adobe application. This will delete any preferences or settings that may be causing the problem.
When you reinstall, make sure you download the latest version of the software. This will ensure you have the most up-to-date drivers and software. Here’s how to update Adobe Premiere Pro, After Effects, and other Adobe apps like Media Encoder.
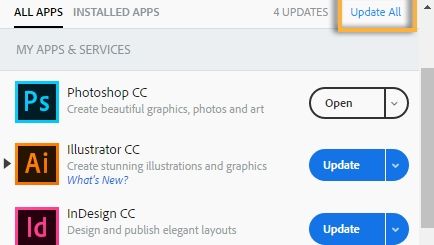
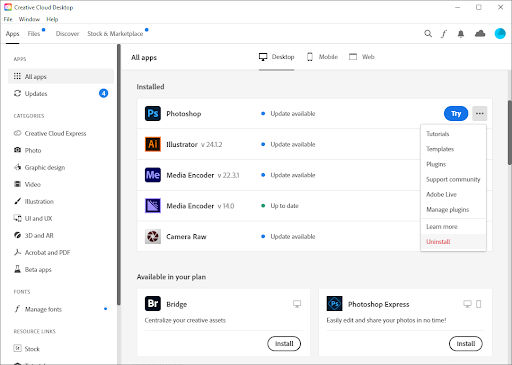
- Launch the Adobe Creative Cloud application. Stay on the Apps page and wait for your applications to load.
- Locate Adobe Premiere Pro or After Effects from your installed apps, and then click on the three dots on the right.
- Select Uninstall from the options in the drop-down menu.

- Click the Remove button to make sure all third-party plugins and potentially damaged settings are removed from your computer.
- After the uninstallation progress is complete, restart your computer and relaunch the Adobe Creative Cloud app. Find Premiere Pro or After Effects and install it again by clicking on the Install button.

That’s it. We believe you’ve got help.
Adobe Premiere Pro users have been reporting a specific error when they apply effects on the video they’re working on. The error message says “This effect requires GPU acceleration“, and users have been getting it regardless they have enabled GPU acceleration or not. If you’re in the same boat, no worries. We believe you got a few working fixes you can try.
TL;DR
- GPU acceleration is a powerful feature that allows your video editing software to render effects more efficiently by using the power of your graphics card.
- If your graphics card doesn’t let you enable GPU acceleration, you may run into the “This effect requires GPU acceleration” error when video rendering.
- To fix this problem, enable Mercury Playback Engine GPU Acceleration in your editing software.
- If the problem persists, try removing any third-party plugins or reorganizing the effects on your clips.
- Make sure your graphics card driver and editing software are always up to date to ensure this error doesn’t pop up again in the future.
- Try a clean install of your editing software.
FAQ
How do I enable GPU acceleration in Premiere 2021?
Set the Renderer to Mercury Playback Engine GPU Acceleration (OpenCL/CUDA/Metal) in Adobe Premiere Pro by going to File > Project Settings > General > Video Rendering and Playback.
How do I turn on GPU acceleration in After Effects?
Select File > Project Settings, click the Video Rendering and Effects tab, and set the Use option to Mercury GPU Acceleration to enable GPU acceleration in After Effects. You may see multiple such options depending on your computer and GPU.
What does it mean when Premiere says this effect requires GPU acceleration?
When you select Mercury Software Only instead of GPU acceleration in the Video Rendering and Effects settings, the error message appears. This can be found in the application’s Project Settings window. As a result, to get around the problem, you’ll need to enable GPU acceleration.
Conclusion
Be sure to check out our Blog and Help Center for more articles on password security and other important topics like cybercrime prevention. Thanks for reading!
One More Thing
Sign up for our newsletter and get early access to our blog posts, promotions, and discount codes.
Recommended Articles
» Tips to Keep in Mind while Choosing the Best Video Editing Software
» How to Rotate a Video in Windows
» OBS vs XSplit: Which Screen Recording Software is Better
Feel free to reach out with questions or requests you’d like us to cover.
Adobe’s Premiere Pro is arguably the most versatile editing tool available in the industry right now (sorry, Mac users). It allows you to edit your videos with the most excruciating of details and the finest of controls.
And with its ever-growing list of features, it’s become the primary software many people use to edit VR or 360° content.
However, it’s not all roses and daisies out here because the software also often runs into weird bugs and issues, and possibly the most noted one out of all those is the infamous red banner on your screen saying, “This effect requires GPU acceleration.”
This happens when you are editing a video that requires your graphic card’s power to process everything thoroughly, but some obstacles can come in your way to prevent that from happening.
It can be as essential as enabling a toggle or as devastating as accepting the fact that you need to upgrade your graphics card.
How To Solve “This effect Requires GPU Acceleration” In Windows 10.
There are several different culprits behind this error; all of them can be solved, so need not worry. Let’s look at all the possible solutions to fixing the GPU acceleration error in Adobe Premiere Pro in Windows 10.
1- Install The Latest Updates.
It goes without saying, yet I am here saying it, please keep your stuff updated; this goes for everything from applications to even your drivers.
There is a reason developers release updates to their software regularly so that their app, in this case, Adobe Premiere Pro, strays away from any potential bugs or issues that can spoil your editing session.
Updating to the latest version of PP can potentially solve any previous problems or known issues that you were facing. Adobe updates its entire suite of applications pretty regularly to fix bugs and add new features, so make sure you’re running on the latest version of their editing software.
2- Make Sure That The Application Is Installed Correctly.
There is a good chance your installation of Premiere got corrupted, or maybe a fragment of the application is missing from the file directory. This is why you can also get the “Adobe Premiere couldn’t find any valid editing modes” message.
It can happen for various reasons, but to fix this, you have to re-download and then install it again, making sure that the application is installed 100 percent properly. Restart your PC and see if that did the job.
3- Run “GPUSniffer.exe.”
Adobe Premiere utilizes your CPU to run almost all the processes while your graphics card is given minimal work and acts instead as an assistant to your processor.
But that’s not the case all the time; often, the software needs to use your video card to lessen the burden from your processor or hand over tasks that are better suited for a graphics card to perform.
GPU acceleration is the name of this feature where applications call in your video card to work alongside your SoC. Still, sometimes PP fails even to recognize or detect your graphics card.
And here is where GPUSniffer.exe comes into its place to ‘sniff’ (hehe) out your video card from the system so that Premiere can use it for GPU accelerated tasks. To do this, close editing software Pro and,
- Navigate over to where Premiere Pro is installed.
- Search for “GPUSniffer” and locate the executable.
- Double click on it and let the command prompt windows do its thing.
- After the window automatically closes, open Premiere again.
If you are still seeing that red banner and it is not detecting your card, you need to upgrade your graphics drivers to the latest version (or roll back to a previous one if there are known compatibility issues in the new update).
Other than this, it will be good practice to disable your integrated graphics that are built into your CPU via either the BIOS or Device Manager.
This should do the trick and allow PP to pick up your graphics card and finally remove that frustrating red banner from your project. However, if it doesn’t and you are still where you started, then you need to follow along and try the steps mentioned above beforehand, too.
4- Check Your Antivirus.
You may have an antivirus installed on your computer to protect it from all sorts of evil and bad things, but do you know that the antivirus itself could be an evil dark lord?! Calm down. I’m just exaggerating.
Even though antiviruses have been known to cause issues and interfere with your system, they generally do a good job of guarding it, until you run into problems using other applications because of your antivirus.
Try disabling certain features or restrictions in your antivirus to allow for Premiere to run correctly. If the problem still pertains, then try disabling the antivirus entirely so that it does not interfere with the editing software at all.
And don’t worry, disabling your antivirus won’t instantly hack your system; Windows Defender will do a good enough job of protecting your PC by itself. Still, I will suggest you also should white-list Adobe Premiere Pro from Windows Defender to stop any interference with the app.
5- Enable GPU Previewing [Mercury Engine]
Premiere Pro uses your processor to render and playback the video in real-time while you are editing it; this limits you to weaker software-based effects as serious or graphics-intensive effects will not work because your CPU has to do all the work here. However, PP can leverage your GPU to preview the video in real-time and essentially reduce the load of your CPU or enable more demanding effects to be pliable in real-time.
There are three different real-time rendering options available in Premiere, Software Only, CUDA, and OpenCL. You will notice that both CUDA and OpenCL are GPU accelerated options while the Software Only option exclusively utilizes your CPU to render everything making your graphics card sit duck. You want to select either of the GPU accelerated options based on your video card so you can be enabled to preview the most demanding effects in real-time.
- Go to File (located on the top tab of your project).
- Select Project Settings and then General.
- Here, under the “renderer” setting, you will see a drop-down menu.
- Select “Mercury Playback Engine GPU Accelerated (CUDA)” for Nvidia cards and “Mercury Playback Engine GPU Accelerated (OpenCL)” for AMD cards.
- Save your newly applied settings, and now you should be utilizing your video card for rendering alongside your processor.
How To Optimize Performance In Adobe Premiere Pro CC.
There are many ways to get more out of your system, case in point, for editing in Premiere. PP is known for being extremely demanding compared to other editing utilities, and for a good reason.
It offers the most multifaceted set of tools available in editing software (for Windows at least) and happens to include very comfortable integration with Adobe’s Creative Cloud.
So, let’s look at the ways you can make your experience using the editing software even better.
1- GPU Acceleration.
As we discussed above, you can push in your video card’s power to be wielded by the editing software for assisting in the preview or real-time rendering of your project.
This is called the way it is as you are “accelerating” your video card and harnessing its capabilities. You need at least a 1GB graphics card from either AMD or Nvidia to use this feature, the more recent, the better.
Nvidia is generally preferred in productivity based systems as Nvidia cards have “CUDA Cores” inside them that help massively in real-time rendering in editing software.
However, lately, AMD cards have been popping up everywhere because of their incredible price to performance ratio and the value proposition to budget-conscious consumers.
Refer to section 5 for more details on how to enable this feature in your project.
2- Memory Allocation.
RAM is certainly not a downloadable resource from the internet. You have a limited amount of it inside your system, so it’s good practice to allocate that RAM effectively between all your applications across your entire computer.
Adobe Premiere allows you to set a maximum amount of memory that it can use, shared with other Adobe apps like After Effects and Photoshop, etc.
You should set this number to as high as you can while reserving some RAM for other processes running on your computer, your browser, and maybe a media player, for example.
The general rule is to allocate about 75% of your RAM to Adobe Apps and leave the rest for your computer, but this is highly subjective and based upon your preferences and amount of memory present, of course.
To change the allocated memory, select File, navigate to the Memory section, and adjust accordingly.
3- Optimizing Your System.
This is more of a starting step than anything else, as you should make sure that your system is capable of running Premiere Pro smoothly. Most importantly, it would help if you had a fast and capable CPU; I’d recommend at least a 6-core SoC.
Pair that with a graphics card capable of pushing all the frames it can; generally, the more expensive the video card, the better, and try to go with at least 4GB of VRAM (1 is the bare minimum).
Lastly, it would be best to have about 16GB of DDR4 memory for a smooth experience, even though you CAN work with 8. If you can squeeze in 32 gigs, you will be in a real sweet spot.
Keep in mind that SSDs are miles faster than mechanical hard drivers, so opt for one of those; there are many different types of SSDs, so do a little research before deciding.
Cooling is also something you need to give a thought to as you wouldn’t want your editing rig to heat up and start thermal throttling in the middle of an editing session. And like everything I mentioned above, the more you spend on it, the better parts you’ll get.
4- Point Media Cache To A Different Drive From OS.
Everyone knows that you install your OS on the fastest drive in your computer, but what about the rest of the stuff? Where does that go? See, Premiere creates cache files of all media that you import in so that it can access those files in a snap.
This can build up many files over time, and it’s going to become unhealthy for those cached files to be stored up inside your drive as it’s going to take up space and slow down your computer.
You want to leave your SSD (or wherever your OS is installed) to be utterly void of any other files so that your SSD can provide the best read/write speeds to your OS and keep everything real snappy. Media Cache files are going to slow that down.
To change this, go to File, navigate over to Media Cache, and set your Media Cache storage location to any drive other than where you have installed your OS to allow for optimal performance.
Final Verdict:
Professionals prefer and use Adobe’s suite of applications daily because they provide the best features available anywhere and allow creators to tailor the perfect video according to their taste. Sometimes, you hit small snags like a graphics acceleration error, but it is relatively easy to resolve this issue and contour your editing.
To get the most out of Adobe Premiere, you will need to follow a couple of straightforward guidelines that will ensure the best experience for you and allow you to make even better videos with the tools that are already readily available in the palm of your hands.
- Graphics card not detected
- Force gpu rendering
- What is AMD’s fidelity fx super-resolution
- Gpu coil whine
- Gpu connector
- What is Nvidia reflex
- What does ti stand for in gpu
Frequently Asked Questions (FAQs)
1- How do I fix ‘this effect requires GPU acceleration’?
You need to make sure that the editing software is actually detecting your video card and then enable GPU Accelerated real-time preview rendering in the Premiere settings.
2- What does ‘this effect requires GPU acceleration mean’?
Your CPU is sometimes just not enough to handle all the processes that PP is throwing at it, so it needs your graphics card’s assistance, and that’s why you get this specific error.
3- How do I turn on this feature?
Go to File, then General, and under the “Video rendering and playback” settings, change the renderer to “Mercury Playback Engine GPU Accelerated (CUDA)” for Nvidia cards and “Mercury Playback Engine GPU Accelerated (OpenCL)” for AMD cards.
В сообщении об ошибке указывается, что установлена новая карта NVIDIA, которая не поддерживает ускорение 3D-приложений с трассировкой лучей. Эта функция больше не разрабатывается, поэтому эта проблема не является критической.
К графическим процессорам NVIDIA, которые не поддерживаются для ускорения 3D-композиций с трассировкой лучей, относятся следующие:
- GTX 750
- GTX 750 Ti
- GTX 960
- GTX 970
- GTX 980
Эти карты основаны на так называемой архитектуре Максвелла.
Решение 1. Нажмите кнопку «ОК» в диалоговом окне предупреждения. Использование 4D Lite для работы с 3D и After Effects
Нажмите кнопку «ОК» в диалоговом окне предупреждения.
Для работы с 3D и After Effects используйте Cinema 4D Lite (в составе After Effects CC и более поздних версий) вместо 3D-композиций с трассировкой лучей.
Решение 2. Если ваш графический процессор поддерживается для ускорения 3D-композиций с трассировкой лучей, но вы все равно видите сообщение об ошибке, выполните следующие действия:
Вполне возможен вариант, при котором ГП поддерживается для ускорения 3D-композиций с трассировкой лучей, но сообщение об ошибке все равно появляется.
Если ваш графический процессор находится в списке системных требований для ускорения 3D-композиций (см. раздел для After Effects CC и более поздних версий и раздел для After Effects CS6), затем обновите After Effects до самой последней версии.
Если вы используете устаревшую карту NVIDIA (не Maxwell), в которой предусмотрено более 1 ГБ видеопамяти, но при этом она не поддерживается, вы можете включить не тестированный, неподдерживаемый ГП для CUDA-ускорения 3D-рендеринга с трассировкой лучей в меню «Установки» > «Предварительные просмотры» > «Сведения о ГП»: «Включить не тестированный, неподдерживаемый ГП для CUDA-ускорения 3D-рендеринга с трассировкой лучей».
| Номер ошибки: | Ошибка 5070 0 | |
| Название ошибки: | After Effects Error 5070 0 | |
| Описание ошибки: | Ошибка 5070 0: Возникла ошибка в приложении Adobe After Effects. Приложение будет закрыто. Приносим извинения за неудобства. | |
| Разработчик: | Adobe Systems Inc. | |
| Программное обеспечение: | Adobe After Effects | |
| Относится к: | Windows XP, Vista, 7, 8, 10, 11 |
Оценка «After Effects Error 5070 0»
Как правило, специалисты по ПК называют «After Effects Error 5070 0» как тип «ошибки времени выполнения». Разработчики программного обеспечения, такие как SoftwareDeveloper, обычно работают через несколько этапов отладки, чтобы предотвратить и исправить ошибки, обнаруженные в конечном продукте до выпуска программного обеспечения для общественности. К сожалению, некоторые критические проблемы, такие как ошибка 5070 0, часто могут быть упущены из виду.
Некоторые пользователи могут столкнуться с сообщением «After Effects Error 5070 0» при использовании Adobe After Effects. Когда это происходит, конечные пользователи программного обеспечения могут сообщить Adobe Systems Inc. о существовании ошибки 5070 0 ошибок. Затем Adobe Systems Inc. исправит ошибки и подготовит файл обновления для загрузки. Если есть запрос на обновление Adobe After Effects, это обычно обходной путь для устранения проблем, таких как ошибка 5070 0 и другие ошибки.
Что вызывает ошибку 5070 0 во время выполнения?
Наиболее распространенные вхождения «After Effects Error 5070 0» проблемы при загрузке Adobe After Effects. Мы можем определить, что ошибки во время выполнения ошибки 5070 0 происходят из:
Ошибка 5070 0 Crash — это типичная ошибка 5070 0 во время выполнения, которая полностью аварийно завершает работу компьютера. Если Adobe After Effects не может обработать данный ввод, или он не может получить требуемый вывод, это обычно происходит.
Утечка памяти «After Effects Error 5070 0» — при утечке памяти Adobe After Effects это может привести к медленной работе устройства из-за нехватки системных ресурсов. Критическими проблемами, связанными с этим, могут быть отсутствие девыделения памяти или подключение к плохому коду, такому как бесконечные циклы.
Ошибка 5070 0 Logic Error — Логические ошибки проявляются, когда пользователь вводит правильные данные, но устройство дает неверный результат. Когда точность исходного кода Adobe Systems Inc. низкая, он обычно становится источником ошибок.
Как правило, ошибки After Effects Error 5070 0 вызваны повреждением или отсутствием файла связанного Adobe After Effects, а иногда — заражением вредоносным ПО. Для устранения неполадок, связанных с файлом Adobe Systems Inc., большинство профессионалов ПК заменят файл на соответствующую версию. В некоторых случаях реестр Windows пытается загрузить файл After Effects Error 5070 0, который больше не существует; в таких ситуациях рекомендуется запустить сканирование реестра, чтобы исправить любые недопустимые ссылки на пути к файлам.
Распространенные сообщения об ошибках в After Effects Error 5070 0
Типичные ошибки After Effects Error 5070 0, возникающие в Adobe After Effects для Windows:
- «Ошибка After Effects Error 5070 0. «
- «Ошибка программного обеспечения Win32: After Effects Error 5070 0»
- «Извините за неудобства — After Effects Error 5070 0 имеет проблему. «
- «Файл After Effects Error 5070 0 не найден.»
- «Отсутствует файл After Effects Error 5070 0.»
- «Проблема при запуске приложения: After Effects Error 5070 0. «
- «After Effects Error 5070 0 не работает. «
- «Отказ After Effects Error 5070 0.»
- «Ошибка пути программного обеспечения: After Effects Error 5070 0. «
Эти сообщения об ошибках Adobe Systems Inc. могут появляться во время установки программы, в то время как программа, связанная с After Effects Error 5070 0 (например, Adobe After Effects) работает, во время запуска или завершения работы Windows, или даже во время установки операционной системы Windows. Важно отметить, когда возникают проблемы After Effects Error 5070 0, так как это помогает устранять проблемы Adobe After Effects (и сообщать в Adobe Systems Inc.).
Источник ошибок After Effects Error 5070 0
Эти проблемы After Effects Error 5070 0 создаются отсутствующими или поврежденными файлами After Effects Error 5070 0, недопустимыми записями реестра Adobe After Effects или вредоносным программным обеспечением.
В первую очередь, проблемы After Effects Error 5070 0 создаются:
- Недопустимый After Effects Error 5070 0 или поврежденный раздел реестра.
- Вирус или вредоносное ПО, которые повредили файл After Effects Error 5070 0 или связанные с Adobe After Effects программные файлы.
- Вредоносное удаление (или ошибка) After Effects Error 5070 0 другим приложением (не Adobe After Effects).
- Другая программа, конфликтующая с After Effects Error 5070 0 или другой общей ссылкой Adobe After Effects.
- Adobe After Effects (After Effects Error 5070 0) поврежден во время загрузки или установки.
Продукт Solvusoft
Загрузка
WinThruster 2022 — Проверьте свой компьютер на наличие ошибок.
Совместима с Windows 2000, XP, Vista, 7, 8, 10 и 11
Установить необязательные продукты — WinThruster (Solvusoft) | Лицензия | Политика защиты личных сведений | Условия | Удаление
How to fix the Runtime Code 5070 0 After Effects Error 5070 0
This article features error number Code 5070 0, commonly known as After Effects Error 5070 0 described as Error 5070 0: Adobe After Effects has encountered a problem and needs to close. We are sorry for the inconvenience.
About Runtime Code 5070 0
Runtime Code 5070 0 happens when Adobe After Effects fails or crashes whilst it’s running, hence its name. It doesn’t necessarily mean that the code was corrupt in some way, but just that it did not work during its run-time. This kind of error will appear as an annoying notification on your screen unless handled and corrected. Here are symptoms, causes and ways to troubleshoot the problem.
Definitions (Beta)
Here we list some definitions for the words contained in your error, in an attempt to help you understand your problem. This is a work in progress, so sometimes we might define the word incorrectly, so feel free to skip this section!
- Adobe — Adobe Systems is a software company headquartered in San Jose, California, USA
- Effects — Non functional enhancements of user interaction with a product most commonly visual and sound
Symptoms of Code 5070 0 — After Effects Error 5070 0
Runtime errors happen without warning. The error message can come up the screen anytime Adobe After Effects is run. In fact, the error message or some other dialogue box can come up again and again if not addressed early on.
There may be instances of files deletion or new files appearing. Though this symptom is largely due to virus infection, it can be attributed as a symptom for runtime error, as virus infection is one of the causes for runtime error. User may also experience a sudden drop in internet connection speed, yet again, this is not always the case.
 Repair Tool")
(For illustrative purposes only)
Causes of After Effects Error 5070 0 — Code 5070 0
During software design, programmers code anticipating the occurrence of errors. However, there are no perfect designs, as errors can be expected even with the best program design. Glitches can happen during runtime if a certain error is not experienced and addressed during design and testing.
Runtime errors are generally caused by incompatible programs running at the same time. It may also occur because of memory problem, a bad graphics driver or virus infection. Whatever the case may be, the problem must be resolved immediately to avoid further problems. Here are ways to remedy the error.
Repair Methods
Runtime errors may be annoying and persistent, but it is not totally hopeless, repairs are available. Here are ways to do it.
If a repair method works for you, please click the upvote button to the left of the answer, this will let other users know which repair method is currently working the best.
Please note: Neither ErrorVault.com nor it’s writers claim responsibility for the results of the actions taken from employing any of the repair methods listed on this page — you complete these steps at your own risk.
Method 6 — Reinstall Your Graphics Driver
If the error is related to a bad graphics driver, then you may do the following:
- Open your Device Manager, locate the graphics driver
- Right click the video card driver then click uninstall, then restart your computer
Method 1 — Close Conflicting Programs
When you get a runtime error, keep in mind that it is happening due to programs that are conflicting with each other. The first thing you can do to resolve the problem is to stop these conflicting programs.
- Open Task Manager by clicking Ctrl-Alt-Del at the same time. This will let you see the list of programs currently running.
- Go to the Processes tab and stop the programs one by one by highlighting each program and clicking the End Process buttom.
- You will need to observe if the error message will reoccur each time you stop a process.
- Once you get to identify which program is causing the error, you may go ahead with the next troubleshooting step, reinstalling the application.
Method 2 — Update / Reinstall Conflicting Programs
Using Control Panel
- For Windows 7, click the Start Button, then click Control panel, then Uninstall a program
- For Windows 8, click the Start Button, then scroll down and click More Settings, then click Control panel > Uninstall a program.
- For Windows 10, just type Control Panel on the search box and click the result, then click Uninstall a program
- Once inside Programs and Features, click the problem program and click Update or Uninstall.
- If you chose to update, then you will just need to follow the prompt to complete the process, however if you chose to Uninstall, you will follow the prompt to uninstall and then re-download or use the application’s installation disk to reinstall the program.
Using Other Methods
- For Windows 7, you may find the list of all installed programs when you click Start and scroll your mouse over the list that appear on the tab. You may see on that list utility for uninstalling the program. You may go ahead and uninstall using utilities available in this tab.
- For Windows 10, you may click Start, then Settings, then choose Apps.
- Scroll down to see the list of Apps and features installed in your computer.
- Click the Program which is causing the runtime error, then you may choose to uninstall or click Advanced options to reset the application.
Method 3 — Update your Virus protection program or download and install the latest Windows Update
Virus infection causing runtime error on your computer must immediately be prevented, quarantined or deleted. Make sure you update your virus program and run a thorough scan of the computer or, run Windows update so you can get the latest virus definition and fix.
Method 4 — Re-install Runtime Libraries
You might be getting the error because of an update, like the MS Visual C++ package which might not be installed properly or completely. What you can do then is to uninstall the current package and install a fresh copy.
- Uninstall the package by going to Programs and Features, find and highlight the Microsoft Visual C++ Redistributable Package.
- Click Uninstall on top of the list, and when it is done, reboot your computer.
- Download the latest redistributable package from Microsoft then install it.
Method 5 — Run Disk Cleanup
You might also be experiencing runtime error because of a very low free space on your computer.
- You should consider backing up your files and freeing up space on your hard drive
- You can also clear your cache and reboot your computer
- You can also run Disk Cleanup, open your explorer window and right click your main directory (this is usually C: )
- Click Properties and then click Disk Cleanup
Method 7 — IE related Runtime Error
If the error you are getting is related to the Internet Explorer, you may do the following:
- Reset your browser.
- For Windows 7, you may click Start, go to Control Panel, then click Internet Options on the left side. Then you can click Advanced tab then click the Reset button.
- For Windows 8 and 10, you may click search and type Internet Options, then go to Advanced tab and click Reset.
- Disable script debugging and error notifications.
- On the same Internet Options window, you may go to Advanced tab and look for Disable script debugging
- Put a check mark on the radio button
- At the same time, uncheck the «Display a Notification about every Script Error» item and then click Apply and OK, then reboot your computer.
If these quick fixes do not work, you can always backup files and run repair reinstall on your computer. However, you can do that later when the solutions listed here did not do the job.
Other languages:
Wie beheben Fehler 5070 0 (After Effects-Fehler 5070 0) — Fehler 5070 0: Adobe After Effects hat ein Problem festgestellt und muss geschlossen werden. Wir entschuldigen uns für die Unannehmlichkeiten.
Come fissare Errore 5070 0 (Errore di After Effects 5070 0) — Errore 5070 0: Adobe After Effects ha riscontrato un problema e deve essere chiuso. Ci scusiamo per l’inconveniente.
Hoe maak je Fout 5070 0 (After Effects-fout 5070 0) — Fout 5070 0: Adobe After Effects heeft een probleem ondervonden en moet worden afgesloten. Excuses voor het ongemak.
Comment réparer Erreur 5070 0 (Erreur After Effects 5070 0) — Erreur 5070 0 : Adobe After Effects a rencontré un problème et doit se fermer. Nous sommes désolés du dérangement.
어떻게 고치는 지 오류 5070 0 (After Effects 오류 5070 0) — 오류 5070 0: Adobe After Effects에 문제가 발생해 닫아야 합니다. 불편을 드려 죄송합니다.
Como corrigir o Erro 5070 0 (Erro After Effects 5070 0) — Erro 5070 0: O Adobe After Effects encontrou um problema e precisa fechar. Lamentamos o inconveniente.
Hur man åtgärdar Fel 5070 0 (After Effects Error 5070 0) — Fel 5070 0: Adobe After Effects har stött på ett problem och måste avslutas. Vi är ledsna för besväret.
Как исправить Ошибка 5070 0 (Ошибка After Effects 5070 0) — Ошибка 5070 0: Возникла ошибка в приложении Adobe After Effects. Приложение будет закрыто. Приносим свои извинения за неудобства.
Jak naprawić Błąd 5070 0 (Błąd po skutkach 5070 0) — Błąd 5070 0: Adobe After Effects napotkał problem i musi zostać zamknięty. Przepraszamy za niedogodności.
Cómo arreglar Error 5070 0 (Error de After Effects 5070 0) — Error 5070 0: Adobe After Effects ha detectado un problema y debe cerrarse. Lamentamos las molestias.
![]() About The Author: Phil Hart has been a Microsoft Community Contributor since 2010. With a current point score over 100,000, they’ve contributed more than 3000 answers in the Microsoft Support forums and have created almost 200 new help articles in the Technet Wiki.
About The Author: Phil Hart has been a Microsoft Community Contributor since 2010. With a current point score over 100,000, they’ve contributed more than 3000 answers in the Microsoft Support forums and have created almost 200 new help articles in the Technet Wiki.
Follow Us: ![]()
![]()
![]()
Last Updated:
09/01/23 12:31 : A Android user voted that repair method 6 worked for them.
Recommended Repair Tool:

This repair tool can fix common computer problems such as blue screens, crashes and freezes, missing DLL files, as well as repair malware/virus damage and more by replacing damaged and missing system files.
STEP 1:
Click Here to Download and install the Windows repair tool.
STEP 2:
Click on Start Scan and let it analyze your device.
STEP 3:
Click on Repair All to fix all of the issues it detected.
DOWNLOAD NOW
Compatibility
![]()
Requirements
1 Ghz CPU, 512 MB RAM, 40 GB HDD
This download offers unlimited scans of your Windows PC for free. Full system repairs start at $19.95.
Article ID: ACX02366EN
Applies To: Windows 10, Windows 8.1, Windows 7, Windows Vista, Windows XP, Windows 2000
Speed Up Tip #79
Disable OneDrive in Windows 10:
If you don’t want to use the built-in cloud storage service that came with Windows 10 you can always disable OneDrive. Indexing and syncing files take up a lot of resources and getting rid of OneDrive can give an extra boost to the performance of your PC.
Click Here for another way to speed up your Windows PC