
Стиральные машины, посудомоечные машины
Стаж: 14 лет, из них в РемБытТех — 5 лет
Для электронных стиральных машин — горит ошибка E02.
Описание ошибки (расшифровка)
Проблема с электродвигателем (приводным мотором) или с контактами.
Признаки возниковения
Стиральная машина не крутит барабан или вообще не начинает стирку.
Самостоятельно (проверка, устранение)
- Проверить контакты электродвигателя;
- Есть ли напряжение в электросети?
- Перезагрузить машинку. Выключить из сети на 20 минут. Возможен сбой платы.
Ремонт и замена
- Замена щеток двигателя;
- Ремонт мотора (двигателя);
- Ремонт модуля управления.
Критичная ошибка! Возможно возгорание электропроводки или самого электромотора.

Получите скидку 10%
При онлайн-заказе на все ремонтные работы скидка —10%.
Отправьте ваш телефон прямо сейчас, и мы перезвоним вам для уточнения деталей заказа.
Расшифровка кода ошибки Е2 стиральной машины Bosch
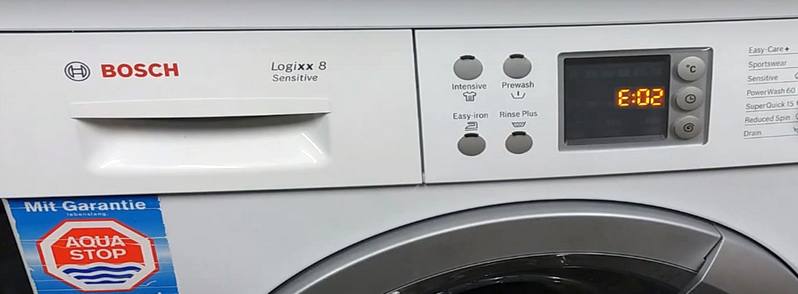
Код ошибки Е2 на дисплее стиральной машины Бош означает, что у техники есть проблемы с двигателем. Во время запуска программы стирки вращение барабана не происходит, либо цикл не начинается вовсе. Подобную ситуацию нужно как можно скорее исправить, поскольку проблема чревата полным выходом из строя мотора либо коротким замыканием и повреждением проводки.
Что проверить самостоятельно?
Можно попробовать выполнить сброс ошибки E2 без вмешательства в устройство стиральной машины Bosch. Для этого стоит сделать следующее:
- Проверить, хватает ли напряжения в сети. В противном случае потребуется помощь электрика.
- Отключить машинку от электричества на 15-20 минут. Если перезагрузка агрегата помогла, значит, причина была во временном нарушении работы электронного контроллера.
Если данная ошибка не сброшена, придется обращаться за помощью к профессионалам.
Устранение причин появления ошибки E2 (E02)
Мотор представляет собой важнейшую деталь в стиральной машине Бош. Он обеспечивает вращение барабана во время стирки. При этом высвечивание кода ошибки Е02 происходит не только из-за выхода из строя двигателя, но и его компонентов.
80% причин при выдаче данной ошибки E2 бывает из-за износа угольных щеток мотора. С течением временем они изнашиваются, и двигатель прекращает работу. На износ щеток указывают следующие признаки:
- Осуществляется залив воды в бак и ее слив, но барабан не вращается.
- Агрегат издает нехарактерный шум, из-под техники наблюдаются искры.
Алгоритм действий при замене щеток следующий:
- Устройство обесточивается, перекрывается кран подачи воды.
- Техника разбирается. Мотор расположен в нижней части машинки, под барабаном.
- Демонтируется ремень привода, двигатель отсоединяется от проводов.
- Откручиваются винты, на которых движется электродвигатель.
- Извлекается мотор, отжимаются контакты угольных щеток.
- Щетки извлекаются. Проверяется их состояние, при сильном износе их придется заменить.
Код ошибки стиральной машины Бош Е2 может возникать и в связи с неисправностью подшипника ротора (например, на моделях серии Bosch Maxx). Пользователь слышит шум во время отжима вещей, или возникает протечка в баке из-за проникновения в подшипниковый узел воды. Чтобы решить проблему, нужно:
- Демонтировать электродвигатель, извлечь ротор.
- Снять с подшипников защитную крышку.
- После прочистки и обработки, выполнить смазку подшипника.
- Осуществить замену подшипника.
Часто встречаемая поломка – деформация роторной оси. В этом случае можно слышать грохот в момент стирки. Требуется выполнить замену ротора.
Мог выйти из строя таходатчик (датчик Холла) — еще одна причина появления на дисплее этой ошибки. Датчик обеспечивает контроль над скоростью вращения мотора. О неисправности тахогенератора можно судить по тому, что барабан крутится слишком быстро, затем прекращает вращение. Если вы заметили такое поведение у стиральной машинки Бош, тогда нужно проверить тахогенератор мультиметром. Нормальным считается сопротивление в пределах 70 Ом — это значит техника функционирует штатно. Если деталь сломана, ее требуется заменить.
В последнюю очередь проверяется двигатель стиралки. Здесь тоже на помощь приходит мультиметр, чьи показатели находятся в диапазоне от 1 до 7 Ом, когда техника работает в нормальном режиме.
В редких случаях код ошибки появляется по причине выхода из строя платы управления. Но когда исключены все возможные причины, нужно проверить модуль управления. Если он пришел в негодность, нужна замена блока или пайка поврежденных элементов микросхем системы управления.
По какой бы причине не отображалась ошибка Е2 (Е02) на стиральной машинке Bosch, для ремонта лучше вызвать мастера сервисного центра, который проведет диагностику с использованием профессионального оборудования и устранит выявленную неисправность в короткие сроки с длительной гарантией от СЦ.
Коды ошибок, актуальные для Canon imagePROGRAF iPF670, iPF605, iPF770, iPF750, iPF710, iPF650, iPF700, iPF785, iPF610, iPF765, iPF680, iPF760, iPF510, iPF780, iPF600, iPF500, iPF685, iPF720, iPF670e, iPF671, iPF671e (для картриджей PFI-102, PFI-104, PFI-107).
Check printing results
Call for service.
Call for service.
После проверки датчика деталей в сервисном меню, замените деталь, указанную в ошибке.
Проверьте загруженные данные перед повтором печати.
Проверьте количество бумаги.
Exchange for the compatible paper to HP-GL/2.
The memory is full.
Check if there is the non-image area of the print. Verify the transmitted data before reprinting.
The memory is full.
The memory is full.
The parameter is out of range.
Verify the transmitted data before reprinting.
This command is not supported.
Delete unwanted data
Delete unneeded jobs stored in Personal Boxes.
Now printing without saving data.
Delete unneeded jobs stored in Personal Boxs.
Prepare to replace the ink.
Renew the C ink tank
Prepare to replace the ink.
Renew the M ink tank.
Prepare to replace the ink.
Renew the Y ink tank.
Prepare to replace the ink.
Renew the MBK ink tank.
Prepare to replace the ink.
Renew the BK ink tank.
Replace the ink tank.
Renew the C ink tank.
Replace the ink tank.
Renew the M ink tank.
Replace the ink tank.
Renew the Y ink tank.
Replace the ink tank.
Renew the MBK ink tank.
Replace the ink tank.
Renew the BK ink tank.
Check ink tank.
Attach the C ink tank.
Check ink tank.
Attach the M ink tank.
Check ink tank.
Attach the Y ink tank.
Check ink tank.
Attach the MBK ink tank.
Check ink tank.
Attach the BK ink tank.
Check the media size check. Change the media size.
Delete unwanted data.
Press the stop button to cancel the print job. Delete print jobs from the queue.
Delete unneeded jobs stored on the hard disk.
Press Online to clear error.
Clean the printhead. Identify the nozzles in a nozzle check pattern. Replace the printhead.
Lift the release lever and reload the paper.
Check the leading end of paper. Reload the paper.
Lift the release lever and align leading edge with orange line.
Check the sheet length. Check to see if paper has not jammed.
Lift the release lever and reload the paper.
Check the right edge of paper. Check the paper type.
Lift the release lever and reload the paper.
Check the left edge of paper.
Check the paper type.
Press Online to clear the error and readjust printhead.
Check the paper on which a pattern is printed for smears. Check the environment for interferences from outside light.
Clean the printhead.
Press Online to clear the error and readjust printhead.
Check the paper on which a pattern is printed for smears. Check the environment for interferences from outside light.
Clean the printhead.
Lift the release lever and replace paper with A4/ LTR (vertical) or larger.
Replace with A4/Letter or any larger-sized paper.
Lift the release lever and replace paper with A3/ Ledger (vertical) or larger.
Replace with A3/11″x17″ or any larger-sized paper.
Lift the release lever and replace roll with 10 in. wide or larger roll.
Replace with roll media at least 10 inches in width.
Remove paper and press Load/Eject.
Remove the paper jam and reload the paper.
Lift the release lever and reload paper.
Reload the paper.
Check supported paper sizes.
Replace with larger-sized paper.
Check supported paper sizes.
Replace with smaller-sized paper.
Press Online to clear the error.
Replace with adjustable media.
Lift the release lever.
Correct the skew in the paper and reload it.
Reload paper.
Reload the paper
Press Load/Eject and reload the paper.
Reload the paper
Lift the release lever and reload the paper.
Reload the roll media.
Press Online to clear the error.
Check to see if paper has not jammed.
Press Load/Eject and load sheets.
Load cut sheets at the paper tray port.
Press OK, remove the sheets, and load a roll.
Replace with roll media.
Press Load/Eject and load a roll.
Load roll media.
Turn printer off and install roll feed unit.
Install the roll media unit.
Lift the release lever and replace the roll.
Renew the supply of roll media.
Press Load/Eject and reload the paper.
Check the type of paper that can be fed and reload the paper.
Press Load/Eject and remove the roll.
Load cut sheets at the paper tray port.
03130031-2E23
Turn off printer, wait, then turn on again.
Check the cutter unit.
03130031-2E14
Turn off printer, wait, then turn on again.
Replace the main controller PCB
03130031-2E16
Turn off printer, wait, then turn on again.
Check the mist fan.
03130031-2E17
Turn off printer, wait, then turn on again.
Check the suction fan.
03130031-2E20
Turn off printer, wait, then turn on again.
Check the purge unit.
03130031-2E22
Turn off printer, wait, then turn on again.
Check the purge unit.
03130031-2E23
Turn off printer, wait, then turn on again.
Check the purge unit.
03130031-2E25
Turn off printer, wait, then turn on again.
Check the carriage unit. Check the linear encoder for smears.
03130031-2E26
Turn off printer, wait, then turn on again.
Check the carriage unit and surrounding parts.
03130031-2E27
Turn off printer, wait, then turn on again.
Check the carriage unit and surrounding parts.
03130031-2E1F
Turn off printer, wait, then turn on again.
Check the purge unit.
03130031-2E2A
Turn off printer, wait, then turn on again.
Check the feed roller encoder and surrounding part. Check to see if paper has not jammed.
03130031-2E29
Turn off printer, wait, then turn on again.
Check the roll feed unit. Check roll media. Check to see if paper has not jammed in the printer.
03130031-2E2E
Turn off printer, wait, then turn on again.
Check the roll feed unit.
03130031-4027
Turn off printer, wait, then turn on again.
Check the carriage unit and surrounding parts.
03130031-2E13
Turn off printer, wait, then turn on again.
03130031-2F32
Turn off printer, wait, then turn on again.
Replace the multi sensor unit.
03130031-2F3A
Turn off printer, wait, then turn on again.
Check the ink supply unit.
03130031-2F3B
Turn off printer, wait, then turn on again.
Remove the ink tanks and then reload them. Check the main controller PCB.
03130031-2F70
Turn off printer, wait, then turn on again.
03130031-2F71
Turn off printer, wait, then turn on again.
03130031-2F72
Turn off printer, wait, then turn on again.
03130031-260E
Turn off printer, wait, then turn on again.
Check the carriage unit and surrounding parts. Replace the main controller PCB.
03130031-2618
Turn off printer, wait, then turn on again.
Check the power supply unit.
03130031-260F
Turn off printer, wait, then turn on again.
Turn off printer and check roll feed unit
Replace the roll feed unit.
Turn off printer, wait a while, then turn it on again.
Transmit valid ROM data.
Turn off printer, wait a while, then turn it on again.
Verify the validity of MID data before transferring it.
03130031-2F2B
Turn off printer, wait, then turn on again.
Open top cover and replace the printhead.
Replace printhead
Open top cover and replace the right printhead.
Replace printhead
Open top cover and replace the right printhead.
Replace printhead
03800500-2F40
Turn off printer, wait, then turn on again.
Проверьте блок очистки печатающей головки и окружающие детали.
Проверьте датчик управления головкой и окружающие детали.
Убедитесь, что печатающая головка установлена правильно.
Если визуально все чисто и корректно подключено, нужно пробовать:
Заменить датчик управления головкой.
Заменить главную плату контроллера.
Замените печатающую головку.
Замените каретку.
03800500-2F2F
Turn off printer, wait, then turn on again.
Замените датчик управления печатающей головкой.
Замените печатающую головку.
Identify the head management sensor unit
Replace the head management sensor unit
Replace the printhead
03800500-2F30
Turn off printer, wait, then turn on again.
Замените датчик управления печатающей головкой.
Замените печатающую головку.
Identify the head management sensor unit
Replace the head management sensor unit
Replace the printhead
Press OK and replace ink tank.
Renew the Bk ink tank
Press OK and replace ink tank.
Renew the Y ink tank
Press OK and replace ink tank.
Renew the M ink tank
Press OK and replace ink tank.
Renew the C ink tank
Press OK and replace ink tank.
Renew the MBk ink tank
Press OK and replace ink tank.
Renew the MBk ink tank
Press OK and replace ink tank.
Replace with a fully replenished Bk ink tank
Press OK and replace ink tank.
Replace with a fully replenished Y ink tank
Press OK and replace ink tank.
Replace with a fully replenished M ink tank
Press OK and replace ink tank.
Replace with a fully replenished C ink tank
Press OK and replace ink tank.
Replace with a fully replenished MBk ink tank
Press OK and replace ink tank.
Replace with a valid Bk ink tank
Press OK and replace ink tank.
Replace with a valid Y ink tank
Press OK and replace ink tank.
Replace with a valid M ink tank
Press OK and replace ink tank.
Replace with a valid C ink tank
Press OK and replace ink tank.
Replace with a valid MBk ink tank
Press OK and replace ink tank.
Replace with a valid MBk ink tank
Press OK and check ink tank.
Install a Bk ink tank
Press OK and check ink tank.
Install a Y ink tank
Press OK and check ink tank.
Install a M ink tank
Press OK and check ink tank.
Install a C ink tank
Press OK and check ink tank.
Install a MBk ink tank
Press OK and check ink tank.
Install a MBk ink tank
Turn off printer, wait a while, and turn it on again.
Close the top cover and turn on the printer again.
Turn off printer, wait a while, and turn it on again.
Close the ink tank cover and turn on the printer again.
Replace the maintenance cartridge.
Renew the maintenance cartridge.
Cartridge capacity.
Replace the maintenance cartridge.
Replace the maintenance cartridge.
Replace the maintenance cartridge.
Renew the maintenance cartridge.
Replace the maintenance cartridge.
Renew the maintenance cartridge.
Check roll position.
Online: Print Load/Eject:
Change Paper
Check to see if a borderless printing spacer is installed. Reload the paper.
Check paper size setting.
Online: Print
Load/Eject: Change Paper
Check the paper size. Change the paper size.
Online: Print
Stop: Stop Printing
Load/Eject: Change Paper
Renew the supply of roll media.
Lift the release lever and reload the paper.
Cut paper manually. Check the cutter.
Press Online to clear the error.
Check the multi sensor.
Check the head management sensor.
Online: Print
Stop: Stop Printing
Load/Eject: Change Paper
Exchange for the compatible paper to HP-GL/2 before reprinting.
Delete unwanted data on your computer to resume printing.
Press Stop to cancel printing.
Delete unneeded jobs stored in Personal Boxes.
Cannot save. Delete unwanted data on your computer to resume printing.
Press Stop to cancel printing.
Press OK to reformat
Press the [OK] button to start reformatting the hard disk. When formatting is finished, the printer automatically restarts.
Turn off printer, wait a while, and turn it on again.
Invalid files will be deleted.
Restart the printer. Only the corrupted files will be deleted, and the printer will restart.
Turn off printer, wait, then turn on again.
Check the head management sensor. Replace the head management sensor. Replace the printhead.
Turn off printer, wait, then turn on again.
Check the pinch roller and surrounding part. Replace the pinch roller pressure drive unit.
Install printhead.
Install the printhead.
Replace the printhead.
Check the maintenance cartridge.
Install the maintenance cartridge.
Lift the release lever and reload the paper.
Check the cutter unit and surrounding part. Replace the cutter.
Renew the supply of roll media.
Manually rewind roll all the way and press OK.
Check the pick-up unit and roll media. Check to see if paper has not jammed.
Load cut sheets at the paper tray port.
Check the media size. Change the media size.
Confirm usage cond. of the paper.
Reload the paper.
Reload the roll media.
 Система самодиагностики неисправностей может вывести ошибку E2 на машинке Bosch (или E02, в зависимости от модели). Расшифровать данный код поможет инструкция к автомату. Разберемся, как починить оборудование, о какой поломке информирует шифр.
«Первая помощь» и расшифровка
Что делать в случае, если стиралка прекратила работу и вывела на экран ошибку? Нужно попытаться исправить ситуацию и разобраться, на какую поломку «намекает» машинка. Код E2 (E02) информирует о проблемах с коллекторным двигателем.
Ошибка E2 считается критической, если не устранить неисправность, может повредиться электропроводка или сгореть движок.
Не всегда необходим ремонт оборудования, можно попытаться сбросить код ошибки без вмешательства в механизм автомата. Обязательно проверьте напряжение в электросети, вдруг его просто недостаточно для работы машинки. Если подача энергии слабая, следует вызвать электрика.
Причиной ошибки E2 может быть кратковременный сбой управляющего модуля, произошедший вследствие скачка напряжения. Попробуйте отключить стиралку от сети на 20 минут, затем снова включите автомат. На некоторых моделях Bosch код придется сбрасывать принудительно, выполнив такие действия:
- нажмите и удерживайте клавишу «Включение»;
- поверните программатор из стандартного положения («выключено») на два щелчка влево. Во время этого кнопку «Вкл» нужно удерживать;
- подождите пару секунд и отпустите клавишу «Включение».
После такой процедуры стиральная машинка Бош отобразит на дисплее время цикла той программы стирки, на которую указывает ручка селектора. На автоматах без экрана должна «моргнуть» индикация на панели управления.
Если такие действия не помогли сбросить код ошибки, значит, произошла реальная поломка. Необходимо провести диагностику двигателя стирального оборудования, выполнить ремонт узла.
Вытащим и проверим мотор
Что делать, обнаружив на дисплее машинки код E2? Как уже было сказано, ошибка указывает на проблемы с электродвигателем стиралки. Как устроен этот узел автомата?
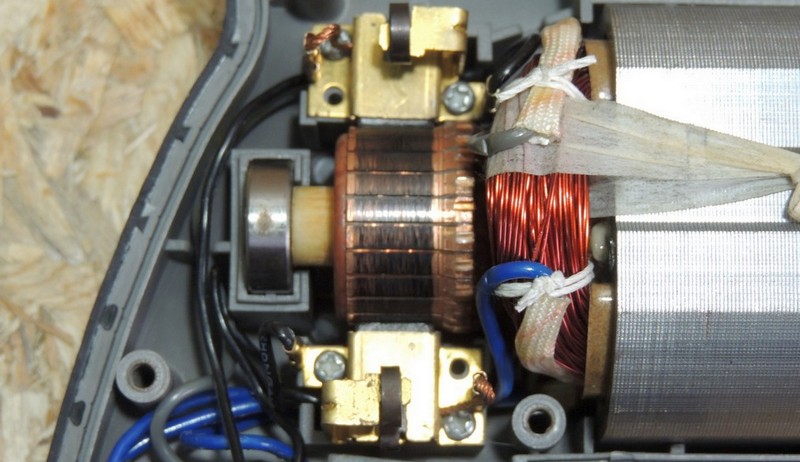
Машины Бош оснащены коллекторным мотором. Движок имеет небольшой размер, но отличается высокой мощностью. Вращение запускается ремнем привода, который соединяет шкив барабана и двигателя.
Коллектор стиралок Bosch состоит из ротора, статора и пары электрических щеток.
Также сверху двигателя установлен датчик Холла. Этот прибор регулирует скорость оборотов мотора. Машинка может не приступать к стирке также из-за проблем с таходатчиком.
Мастера проводят диагностику «сердца» машинки несколькими способами. Однако в любом случае придется извлечь мотор из корпуса. Алгоритм действий будет следующим:
- выкрутите болты, фиксирующие заднюю стенку машинки, уберите панель в сторону;
- вращая «колесо» барабана, ослабьте и уберите ремень привода;
- отсоедините провода, идущие к мотору;
- открутите винты, фиксирующие движок в корпусе;
- аккуратно извлеките элемент, качая его в разные стороны.
Рекомендуется сфотографировать схему подключения проводки к двигателю, чтобы после безошибочно установить деталь на место.
Теперь, когда движок извлечен, можно приступать к его диагностике. В первую очередь следует соединить провода статорной и роторной обмотки. После этого на них подается напряжение 220 Вольт. Если наблюдается вращение, значит, причина не в электродвигателе, ведь он исправно функционирует.
Основной недостаток данной диагностики в том, что она будет неполной. Стиральная машинка, на деле, работает на разных программах, отличающихся скоростью отжима, плавностью вращения барабана. А в ходе таких действий проверяется только один режим. Второй недостаток – мотор может перегреться из-за прямого включения в сеть, что приведет к замыканию. Поэтому перед тем, как подавать на статор и ротор напряжение, в цепь лучше подключить «балласт» – ТЭН, это поможет защитить движок.
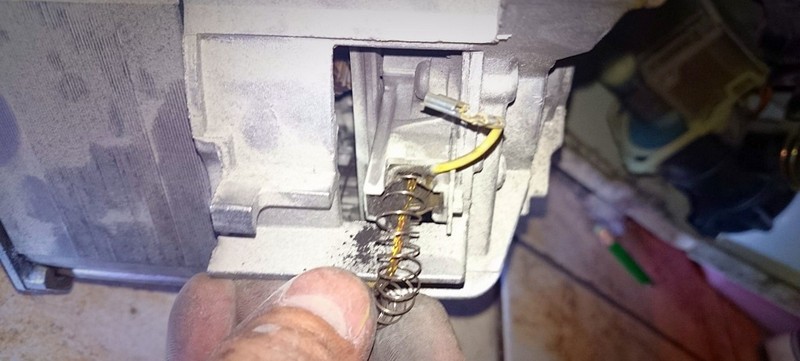
Стерлись щетки
В большинстве случаев в устранении кода ошибки E2 помогает замена электрощеток коллектора. Угольные стержни располагаются по бокам двигателя. Щетки имеют провод, по которому проходит электроэнергия, и пружину, прижимающую их к ламелям. Отыскать детали просто – их не спутать ни с чем.
Чтобы переустановить элементы, необходимо снять их с двигателя. Даже если износилась всего одна щетка, менять обязательно пару. Разберемся, как убрать стертые детали с мотора. Алгоритм действий будет таковым:
- используя шлицевую отвертку, слегка подденьте клемму провода и сбросьте кабель;
- сдвиньте в сторону от проводка контакт электрощетки;
- очень осторожно потяните клемму вверх. Подпружиненный угольный стержень выскочит, и его можно будет снять.
Вытаскивая электрощетку, обязательно запомните, каким краем она стояла, чтобы потом «воткнуть» деталь точно так же.
После того, как обе щетки будут сняты, осмотрите их. Если элементы сильно изношены, потребуется замена. Купить новые запчасти можно в любом специализированном магазине, назвав модель и серийный номер стиральной машины Бош.
Установка происходит следующим образом:
- вставьте щетки в траверсы мотора так, как они стояли прежде;
- туда же пропихните пружину;
- вставьте в зажимы верхней области траверсов клеммы, подвиньте их в сторону провода. Таким образом, электрощетки будут зафиксированы в моторе.
После этого останется только подключить разъем питающего проводка к клеммам. Когда обе щетки будут установлены в двигатель, следует проверить надежность подключения всех контактов. Ремонт завершен, можно собрать стиральную машинку Бош в обратном порядке.
Если данные действия не помогут в устранении ошибки E2, тогда лучше обратиться за помощью к мастеру. Вероятно, потребуется более сложный ремонт или вовсе замена электродвигателя. Возможно, проблема кроется в «мозге» стиралки, и необходима диагностика управляющего модуля.
- Поделитесь своим мнением — оставьте комментарий
Коды ошибок, актуальные для Canon imagePROGRAF iPF670, iPF605, iPF770, iPF750, iPF710, iPF650, iPF700, iPF785, iPF610, iPF765, iPF680, iPF760, iPF510, iPF780, iPF600, iPF500, iPF685, iPF720, iPF670e, iPF671, iPF671e (для картриджей PFI-102, PFI-104, PFI-107).
Check printing results
Call for service.
Call for service.
После проверки датчика деталей в сервисном меню, замените деталь, указанную в ошибке.
Проверьте загруженные данные перед повтором печати.
Проверьте количество бумаги.
Exchange for the compatible paper to HP-GL/2.
The memory is full.
Check if there is the non-image area of the print. Verify the transmitted data before reprinting.
The memory is full.
The memory is full.
The parameter is out of range.
Verify the transmitted data before reprinting.
This command is not supported.
Delete unwanted data
Delete unneeded jobs stored in Personal Boxes.
Now printing without saving data.
Delete unneeded jobs stored in Personal Boxs.
Prepare to replace the ink.
Renew the C ink tank
Prepare to replace the ink.
Renew the M ink tank.
Prepare to replace the ink.
Renew the Y ink tank.
Prepare to replace the ink.
Renew the MBK ink tank.
Prepare to replace the ink.
Renew the BK ink tank.
Replace the ink tank.
Renew the C ink tank.
Replace the ink tank.
Renew the M ink tank.
Replace the ink tank.
Renew the Y ink tank.
Replace the ink tank.
Renew the MBK ink tank.
Replace the ink tank.
Renew the BK ink tank.
Check ink tank.
Attach the C ink tank.
Check ink tank.
Attach the M ink tank.
Check ink tank.
Attach the Y ink tank.
Check ink tank.
Attach the MBK ink tank.
Check ink tank.
Attach the BK ink tank.
Check the media size check. Change the media size.
Delete unwanted data.
Press the stop button to cancel the print job. Delete print jobs from the queue.
Delete unneeded jobs stored on the hard disk.
Press Online to clear error.
Clean the printhead. Identify the nozzles in a nozzle check pattern. Replace the printhead.
Lift the release lever and reload the paper.
Check the leading end of paper. Reload the paper.
Lift the release lever and align leading edge with orange line.
Check the sheet length. Check to see if paper has not jammed.
Lift the release lever and reload the paper.
Check the right edge of paper. Check the paper type.
Lift the release lever and reload the paper.
Check the left edge of paper.
Check the paper type.
Press Online to clear the error and readjust printhead.
Check the paper on which a pattern is printed for smears. Check the environment for interferences from outside light.
Clean the printhead.
Press Online to clear the error and readjust printhead.
Check the paper on which a pattern is printed for smears. Check the environment for interferences from outside light.
Clean the printhead.
Lift the release lever and replace paper with A4/ LTR (vertical) or larger.
Replace with A4/Letter or any larger-sized paper.
Lift the release lever and replace paper with A3/ Ledger (vertical) or larger.
Replace with A3/11″x17″ or any larger-sized paper.
Lift the release lever and replace roll with 10 in. wide or larger roll.
Replace with roll media at least 10 inches in width.
Remove paper and press Load/Eject.
Remove the paper jam and reload the paper.
Lift the release lever and reload paper.
Reload the paper.
Check supported paper sizes.
Replace with larger-sized paper.
Check supported paper sizes.
Replace with smaller-sized paper.
Press Online to clear the error.
Replace with adjustable media.
Lift the release lever.
Correct the skew in the paper and reload it.
Reload paper.
Reload the paper
Press Load/Eject and reload the paper.
Reload the paper
Lift the release lever and reload the paper.
Reload the roll media.
Press Online to clear the error.
Check to see if paper has not jammed.
Press Load/Eject and load sheets.
Load cut sheets at the paper tray port.
Press OK, remove the sheets, and load a roll.
Replace with roll media.
Press Load/Eject and load a roll.
Load roll media.
Turn printer off and install roll feed unit.
Install the roll media unit.
Lift the release lever and replace the roll.
Renew the supply of roll media.
Press Load/Eject and reload the paper.
Check the type of paper that can be fed and reload the paper.
Press Load/Eject and remove the roll.
Load cut sheets at the paper tray port.
03130031-2E23
Turn off printer, wait, then turn on again.
Check the cutter unit.
03130031-2E14
Turn off printer, wait, then turn on again.
Replace the main controller PCB
03130031-2E16
Turn off printer, wait, then turn on again.
Check the mist fan.
03130031-2E17
Turn off printer, wait, then turn on again.
Check the suction fan.
03130031-2E20
Turn off printer, wait, then turn on again.
Check the purge unit.
03130031-2E22
Turn off printer, wait, then turn on again.
Check the purge unit.
03130031-2E23
Turn off printer, wait, then turn on again.
Check the purge unit.
03130031-2E25
Turn off printer, wait, then turn on again.
Check the carriage unit. Check the linear encoder for smears.
03130031-2E26
Turn off printer, wait, then turn on again.
Check the carriage unit and surrounding parts.
03130031-2E27
Turn off printer, wait, then turn on again.
Check the carriage unit and surrounding parts.
03130031-2E1F
Turn off printer, wait, then turn on again.
Check the purge unit.
03130031-2E2A
Turn off printer, wait, then turn on again.
Check the feed roller encoder and surrounding part. Check to see if paper has not jammed.
03130031-2E29
Turn off printer, wait, then turn on again.
Check the roll feed unit. Check roll media. Check to see if paper has not jammed in the printer.
03130031-2E2E
Turn off printer, wait, then turn on again.
Check the roll feed unit.
03130031-4027
Turn off printer, wait, then turn on again.
Check the carriage unit and surrounding parts.
03130031-2E13
Turn off printer, wait, then turn on again.
03130031-2F32
Turn off printer, wait, then turn on again.
Replace the multi sensor unit.
03130031-2F3A
Turn off printer, wait, then turn on again.
Check the ink supply unit.
03130031-2F3B
Turn off printer, wait, then turn on again.
Remove the ink tanks and then reload them. Check the main controller PCB.
03130031-2F70
Turn off printer, wait, then turn on again.
03130031-2F71
Turn off printer, wait, then turn on again.
03130031-2F72
Turn off printer, wait, then turn on again.
03130031-260E
Turn off printer, wait, then turn on again.
Check the carriage unit and surrounding parts. Replace the main controller PCB.
03130031-2618
Turn off printer, wait, then turn on again.
Check the power supply unit.
03130031-260F
Turn off printer, wait, then turn on again.
Turn off printer and check roll feed unit
Replace the roll feed unit.
Turn off printer, wait a while, then turn it on again.
Transmit valid ROM data.
Turn off printer, wait a while, then turn it on again.
Verify the validity of MID data before transferring it.
03130031-2F2B
Turn off printer, wait, then turn on again.
Open top cover and replace the printhead.
Replace printhead
Open top cover and replace the right printhead.
Replace printhead
Open top cover and replace the right printhead.
Replace printhead
03800500-2F40
Turn off printer, wait, then turn on again.
Проверьте блок очистки печатающей головки и окружающие детали.
Проверьте датчик управления головкой и окружающие детали.
Убедитесь, что печатающая головка установлена правильно.
Если визуально все чисто и корректно подключено, нужно пробовать:
Заменить датчик управления головкой.
Заменить главную плату контроллера.
Замените печатающую головку.
Замените каретку.
03800500-2F2F
Turn off printer, wait, then turn on again.
Замените датчик управления печатающей головкой.
Замените печатающую головку.
Identify the head management sensor unit
Replace the head management sensor unit
Replace the printhead
03800500-2F30
Turn off printer, wait, then turn on again.
Замените датчик управления печатающей головкой.
Замените печатающую головку.
Identify the head management sensor unit
Replace the head management sensor unit
Replace the printhead
Press OK and replace ink tank.
Renew the Bk ink tank
Press OK and replace ink tank.
Renew the Y ink tank
Press OK and replace ink tank.
Renew the M ink tank
Press OK and replace ink tank.
Renew the C ink tank
Press OK and replace ink tank.
Renew the MBk ink tank
Press OK and replace ink tank.
Renew the MBk ink tank
Press OK and replace ink tank.
Replace with a fully replenished Bk ink tank
Press OK and replace ink tank.
Replace with a fully replenished Y ink tank
Press OK and replace ink tank.
Replace with a fully replenished M ink tank
Press OK and replace ink tank.
Replace with a fully replenished C ink tank
Press OK and replace ink tank.
Replace with a fully replenished MBk ink tank
Press OK and replace ink tank.
Replace with a fully replenished Bk ink tank
Press OK and replace ink tank.
Replace with a fully replenished Y ink tank
Press OK and replace ink tank.
Replace with a fully replenished M ink tank
Press OK and replace ink tank.
Replace with a fully replenished C ink tank
Press OK and replace ink tank.
Replace with a fully replenished MBk ink tank
Press OK and replace ink tank.
Replace with a valid Bk ink tank
Press OK and replace ink tank.
Replace with a valid Y ink tank
Press OK and replace ink tank.
Replace with a valid M ink tank
Press OK and replace ink tank.
Replace with a valid C ink tank
Press OK and replace ink tank.
Replace with a valid MBk ink tank
Press OK and replace ink tank.
Replace with a valid MBk ink tank
Press OK and check ink tank.
Install a Bk ink tank
Press OK and check ink tank.
Install a Y ink tank
Press OK and check ink tank.
Install a M ink tank
Press OK and check ink tank.
Install a C ink tank
Press OK and check ink tank.
Install a MBk ink tank
Press OK and check ink tank.
Install a MBk ink tank
Turn off printer, wait a while, and turn it on again.
Close the top cover and turn on the printer again.
Turn off printer, wait a while, and turn it on again.
Close the ink tank cover and turn on the printer again.
Replace the maintenance cartridge.
Renew the maintenance cartridge.
Cartridge capacity.
Replace the maintenance cartridge.
Replace the maintenance cartridge.
Replace the maintenance cartridge.
Renew the maintenance cartridge.
Replace the maintenance cartridge.
Renew the maintenance cartridge.
Check roll position.
Online: Print Load/Eject:
Change Paper
Check to see if a borderless printing spacer is installed. Reload the paper.
Check paper size setting.
Online: Print
Load/Eject: Change Paper
Check the paper size. Change the paper size.
Online: Print
Stop: Stop Printing
Load/Eject: Change Paper
Renew the supply of roll media.
Lift the release lever and reload the paper.
Cut paper manually. Check the cutter.
Press Online to clear the error.
Check the multi sensor.
Check the head management sensor.
Online: Print
Stop: Stop Printing
Load/Eject: Change Paper
Exchange for the compatible paper to HP-GL/2 before reprinting.
Delete unwanted data on your computer to resume printing.
Press Stop to cancel printing.
Delete unneeded jobs stored in Personal Boxes.
Cannot save. Delete unwanted data on your computer to resume printing.
Press Stop to cancel printing.
Press OK to reformat
Press the [OK] button to start reformatting the hard disk. When formatting is finished, the printer automatically restarts.
Turn off printer, wait a while, and turn it on again.
Invalid files will be deleted.
Restart the printer. Only the corrupted files will be deleted, and the printer will restart.
Turn off printer, wait, then turn on again.
Check the head management sensor. Replace the head management sensor. Replace the printhead.
Turn off printer, wait, then turn on again.
Check the pinch roller and surrounding part. Replace the pinch roller pressure drive unit.
Install printhead.
Install the printhead.
Replace the printhead.
Check the maintenance cartridge.
Install the maintenance cartridge.
Lift the release lever and reload the paper.
Check the cutter unit and surrounding part. Replace the cutter.
Renew the supply of roll media.
Manually rewind roll all the way and press OK.
Check the pick-up unit and roll media. Check to see if paper has not jammed.
Load cut sheets at the paper tray port.
Check the media size. Change the media size.
Confirm usage cond. of the paper.
Reload the paper.
Reload the roll media.