Дата публикации 11.08.2020
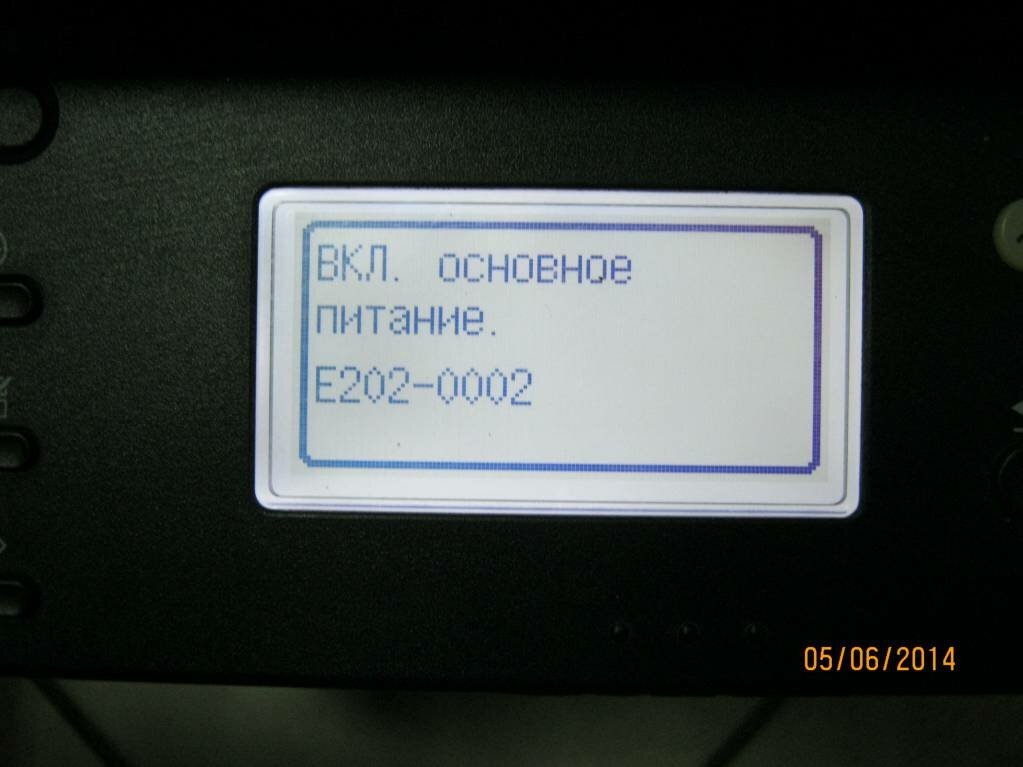
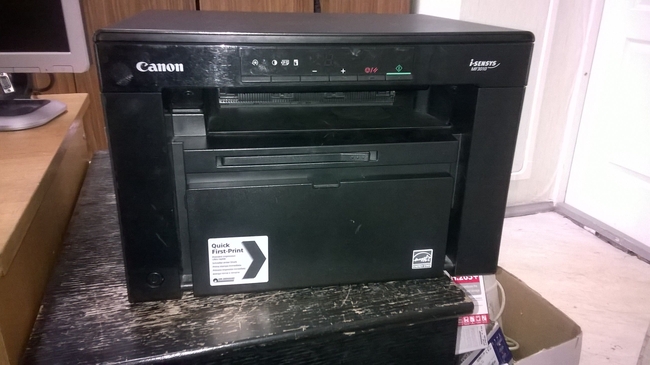
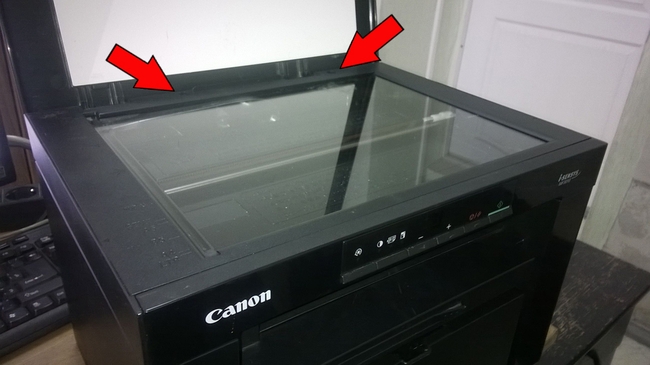
Одной из часто возникающих ошибок при работе с МФУ серии Canon MF 4410/4430. Как оказалось проблема в разметочной планке,которая находится на стекле сканера. Для устранения ошибки Е202-0002 необходимо:
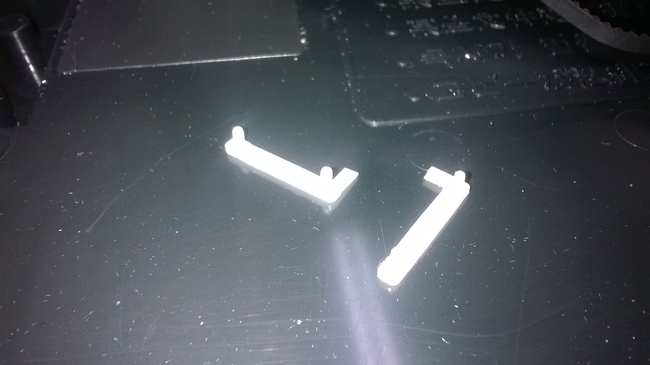
- снять планку
- протереть стекло сканера
- наклеить планку назад
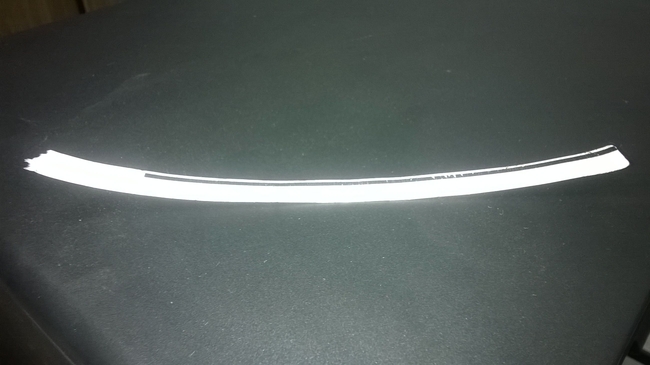
Данная ошибка возникает при смещении разметочной планки. Также, с другой ее стороны идет беспрерывная черная линия, её нарушение или повреждение опять же может провоцировать возникновение ошибки. Если планка повреждена, можно на обычном белом листе сделать черную сплошную линию и наклеить её вместо планки.
Предыдущая
РемонтКак поменять матрицу ноутбука на примере Samsung R40, в картинках с инструкцией
Следующая
РемонтКак исправить CMOS Checksum Invalid — RUN SCU
Помогла статья? Оцените её
![]() Загрузка…
Загрузка…
|
1 / 1 / 0 Регистрация: 28.01.2013 Сообщений: 21 |
|
|
1 |
|
|
15.12.2014, 04:07. Показов 7630. Ответов 11
Добрый день!
0 |

|
Модератор
7444 / 3991 / 500 Регистрация: 13.03.2013 Сообщений: 14,617 Записей в блоге: 12 |
|
|
15.12.2014, 07:18 |
2 |
|
После чего появилась проблема?
0 |
|
Заблокирован |
|
|
15.12.2014, 12:44 |
3 |
|
Есть и описание, и устранение. Е202-002
1 |
|
Модератор
7444 / 3991 / 500 Регистрация: 13.03.2013 Сообщений: 14,617 Записей в блоге: 12 |
|
|
15.12.2014, 14:18 |
4 |
|
Е202-002 Сброс настроек никак не повлияет на данную проблему в худшую сторону, перестаньте морочить людям голову.
0 |

")
|
Заблокирован |
|
|
15.12.2014, 14:38 |
5 |
|
Сброс настроек никак не повлияет на данную проблему в худшую сторону Перечтите пред. пост: лишний гемор — это, само по себе, может и не мировое зло, но добра с него как-то мало. В данном случае со сканером и так возни предстоит автору темы выше крыши, а «Clear all settings» заодно снесет и текущие настройки сканера, что, сами понимаете, «не способствует».
перестаньте морочить людям голову Грубо.
0 |
|
Модератор
7444 / 3991 / 500 Регистрация: 13.03.2013 Сообщений: 14,617 Записей в блоге: 12 |
|
|
15.12.2014, 15:56 |
6 |
|
Lafete, подробнее опишите процесс после включения, что происходит?
1 |
|
Заблокирован |
|
|
15.12.2014, 16:16 |
7 |
|
Включается ли мотор, включается ли лазер Можете пояснить их отношение к проблеме автора?
0 |
|
Модератор
7444 / 3991 / 500 Регистрация: 13.03.2013 Сообщений: 14,617 Записей в блоге: 12 |
|
|
15.12.2014, 16:49 |
8 |
|
Можете пояснить их отношение к проблеме автора? Я не у Вас спросил.
0 |
|
Заблокирован |
|
|
15.12.2014, 18:43 |
9 |
|
Я не у Вас спросил Зато я — у вас, причем был задан конкретный вопрос по теме. Это публичный топик открытого форума, потрудитесь вести себя адекватно, плиз.
0 |
|
Persk |
|||||
|
15.12.2014, 19:02
|
|||||
0 |

|
|
|
15.12.2014, 19:22
|
|
Не по теме:
предупреждение уже было Здесь нельзя задавать конкретные вопросы по содержанию ранее размещенных постов? Я что-то пропустил в местных правилах? Подскажите, плиз.
0 |
|
Модератор
8718 / 3343 / 244 Регистрация: 25.10.2010 Сообщений: 13,601 |
|
|
15.12.2014, 20:09 |
12 |
|
Не по теме: Mishel01, Добавлено через 37 минут
потрудитесь вести себя адекватно, плиз Соответсвенно , это касается и вас
0 |
Содержание
- 1 Ремонт/настройка ПК и окружающих его устройств.
- 2 Коды ошибок (Support/Service code)
- 3 Сообщения об ошибках
- 4 Расшифровка основных ошибок
- 5 Ошибка: код поддержки 1000 – Оранжевый индикатор мигает 2 раза
Обращаем внимание на призыв к помощи от самого МФУ – обычно он организуется в виде вывода кодов ошибок на дисплей оборудования. Среди самых популярных из них:
• E000-0000. Ошибка узла термозакрепления.
• E004-0000. Ошибка двигателя печки.
• E100-0001. Включите основное питание. Проблема с датчиком лазера. Проверьте посадочное место (шахту).
• E202-0002. Включите основное питание. Ошибка позиционирования сканера. Отключите питание, откройте крышку сканера, включите питание и проверьте положение датчика сканера.
• E301-0001. Включите основное питание. Ошибка сканера. Недостаточная интенсивность освещения.
Также смотрим на исправность работы драйверов, программного обеспечения и прошивки. Персональный компьютер, ноутбук или планшет Вам в помощь. С помощью их панели управления проверяем драйвер: дату разработки (возможно он устарел), версию, название поставщика и сведения о файлах. Новую версию без труда можно найти и скачать на официальном сайте производителя Canon в разделе Поддержка.
Откройте в ПО или панели управления данные о картриджах – возможно причина отказа работы МФУ Кэнон кроется всего лишь в том, что тонер в картридже закончился.
Светятся ли индикаторы или слышен ли нормальный шум работы устройства? Нужно понимать, исправен ли шнур питания от электросети и нет ли проблем с кнопками включения оборудования.
Протестировав работоспособность многофункционального устройства можно сделать выводы, починить его или же составить грамотную заявку на вызов инженера сервис-центра. Она должна содержать в себе: тип, бренд и модель аппарата, формат печати, цветность, технологию печати, скорость выдачи листов и результаты Вашей самостоятельной диагностики. Это позволяет ускорить процесс обработки заказа на ремонт МФУ Canon. Прайс лист ЯузаОргСервис находится в открытом доступе – Вы можете скачать его бесплатно прямо сейчас и оставить запрос на предоставление услуги по диагностике или ремонту многофункционального устройства Кэнон.
Ремонт/настройка ПК и окружающих его устройств.
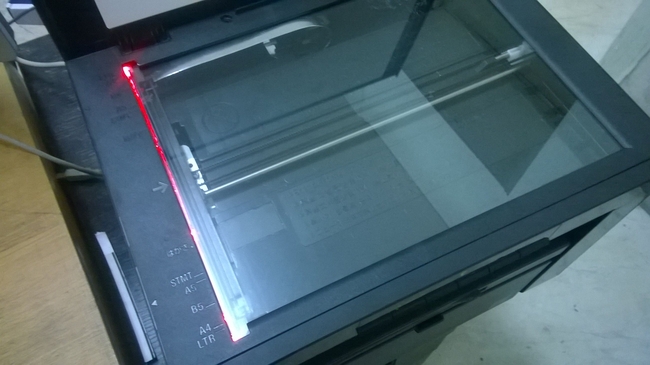
При попытке скопировать документ сканер начинает движение, включается красная/зеленая подсветка, затем сканирующая планка останавливается, немного подергается, попищит, возвращается на место и затихает. На индикаторах загораются значки лотка бумаги и замятие. Мигает ошибка E301. При этом МФУ совершенно нормально распечатывает тестовую и другие страницы с компьютера при подключении через USB.
По симптомам становится понятно, что проблема в сканере. В сервисном мануале, в разделе 7 кодов ошибок написано:
E301. Когда ошибка повторяется, несмотря на то, что питание было выключено и включено несколько раз, выполните следующие действия:
(1) Проверьте соединение между главной платой управления и модулем CIS. (J2)
(2) Замените модуль CIS.
(3) Замените главную плату управления.
Модуль CIS – это сканирующая планка (Contact Image Sensor контактный датчик изображения, линейка из светочувствительных элементов).
Выполним рекомендации по порядку.
1.Разберем сканер, проверим соединения шлейфа, прочистим контакты.
Откручиваем два винта в верхней части.
Откручиваем два винта с нижней стороны сканера.
Отщелкиваем переднюю панель управления.

Отсоединяем шлейф. 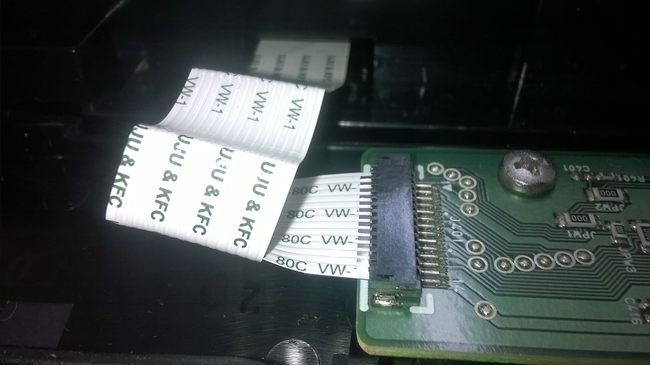
Отщелкиваем в местах с указанием метки-треугольника верхнюю крышку со стеклом. 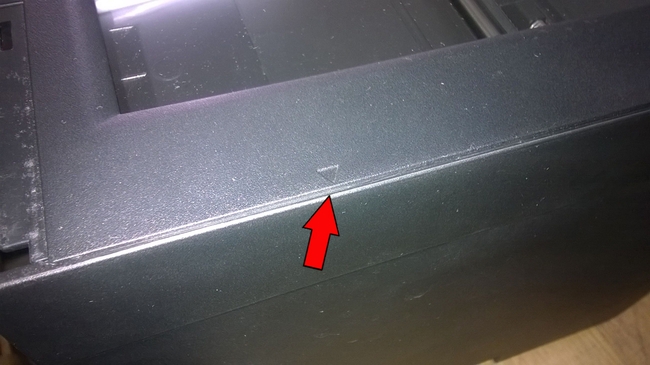
Можно проехать пластиковой карточкой по краям и защелки откроются. 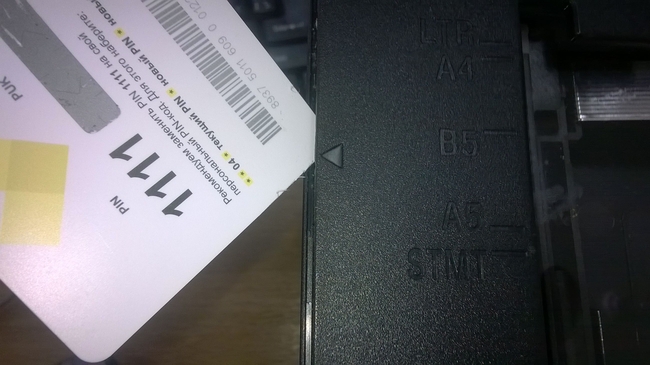
Снимаем верхнюю крышку и ложем в сторону.
Оказалось, что стекло отклеилось и выпало из рамки.
Снимаем ремень привода немного сжав пружину.
С другой стороны тоже.
Снимаем линейку при этом следим, чтоб не потерялись две выравнивающих прокладки по её краям.
Их лучше сразу снять и отложить в сторону. Они, кстати, обычно черного цвета.
Прочищаем, продуваем контакты. Тут вобщем то главное было передернуть (подключить-отключить) шлейф.
Протираем мягкой тканью оптическую поверхность линейки. 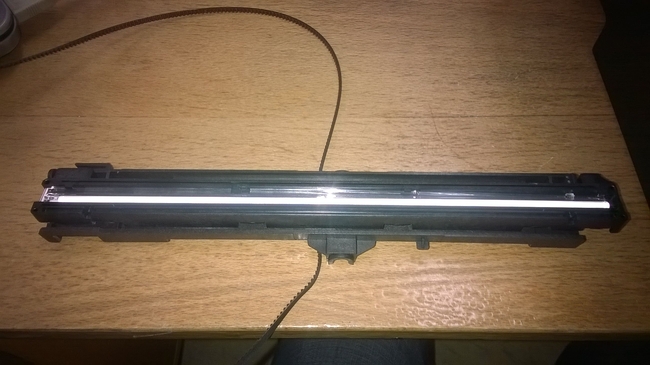
Следим, чтоб пружинки не по слетали со своих мест.
Собираем сканер в обратном порядке.
Подключаем переднюю панель и проверяем помогли ли выполненные действия. В ряде случаем именно эти действия приводят к восстановлению работоспособности сканера.
Однако, в данной ситуации проблема осталась.
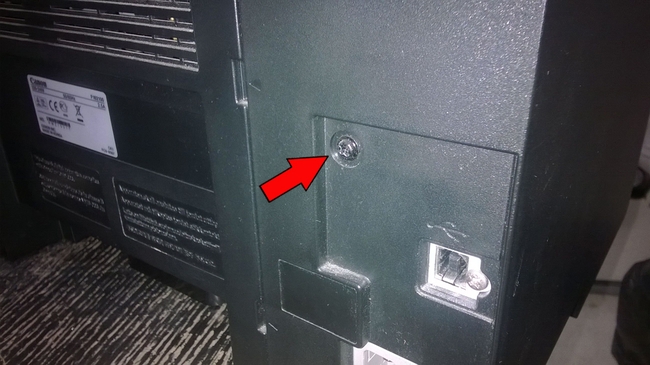
Шлейф так же имеет контакты со стороны платы управления. Переподключим вторую сторону. Откручиваем один винт с задней части корпуса возле USB разъема.
Отщелкиваем боковую крышку.
Видим плату управления.
Находим шлейф сканера (блестящий в данном случае). Отсоединяем его и подключаем обратно.
Проверяем работу. Проблема осталась. Переходим к пункту рекомендаций №2 из сервисного мануала – заменим модуль сканирования. Можно попробовать поменять шлейф, но модуль поменять быстрее. Начнем с него. Так как в наличии есть парк неисправных принтеров, найдем подходящего донора и пересадим нужную часть с него.
Подробности рассматривать не будем. Здесь всё то же самое. Разбираем, заменяем часть, собираем, подключаем, проверяем.
С новой сканирующей линейкой ошибка на принтере неожиданно сменилась с E301 на E202.

В сервисном мануале написано:
E202. CIS Unit home position detection error / homeward reading position error. Ошибка определения исходной позиции модуля CIS.
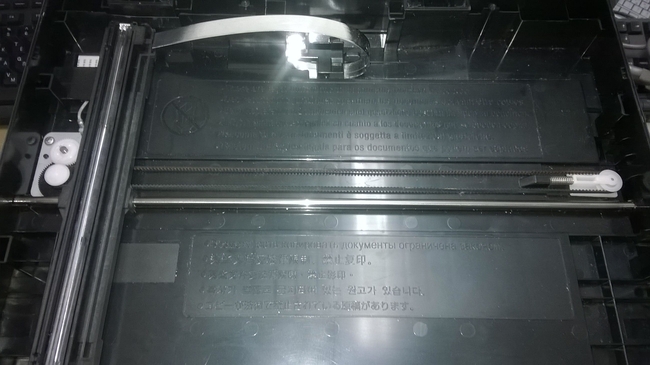
Это уже хорошо. Исходная позиция линейки определяется по калибровочной полоске на нижней части крышки со стеклом. Чтоб не вскрывать сканер несколько раз я проверил работоспособность без крышки. Устанавливаем крышку, проверяем. Ошибка сохранилась. В итоге, после некоторых измышлений и поисков неисправности выяснилось, что отсутствует калибровочная полоска. Без неё сканер не калибруется и аппарат выпадает в ошибку E202. Видимо она отклеилась от крышки вместе со стеклом.
На сканер была переставлена крышка с калибровочной полоской от другого такого же МФУ и ошибка пропала. Аппарат заработал, ремонт окончен.
Что означают коды ошибок принтеров Canon Pixma вы можете посмотреть в этой статье. Обычно в сообщении это “Support code” или “Код поддержки”. Если ваш принтер не имеет экрана, код можно увидеть при подключении к компьютеру или, подсчитывая количество миганий светодиодов на передней панели устройства (но цветовая индикация показывает не все коды). По номерам ошибок можно определить неисправность на большинстве современных принтеров и МФУ Canon: iP2700, iP4700, iP7240, MG5340, MG5140, MG5540, iP4940, MG5440, MG6440, MX924, iP4840, MG5240, iX6540, iX6840, MG6140, MG6240, MG6450, MX884, MG5640, MG6640, MG8140, MG6240, MG8240, MG6140, MP980, MP990, MP620, MP630, iP2840, MG6840, MG5740, TS5040, TS6040, MG7740, TS8040, TS9040, TS6140, TS6240, TS8140, TS8240, TS9140, TS9540, TS9541C, TR7540, TR8540 и многих других.
Коды ошибок (Support/Service code)
Сообщения об ошибках
Коды ошибок для Canon Pixma MP190, MP240, MP250, MP260, MP270, MP490, MP540, MP550, MP560, MP620,PIXMA MP630, MP640, MP980, MP990, MX320, MX330, MX700, MX7600, MX850, MX860:
| Код | Описание |
|---|---|
| #001 | Paper Jam – замятие бумаги |
| #037 | Image Memory Full – переполнение памяти |
| ##111 | Memory error – ошибка памяти |
| ##322 | Printer (LBP) Fixing Unit Trouble – неисправность термоблока (печки) |
| ##323 | Printer (LBP) BD (Beam Detect) Trouble – невозможность детектирования луча лазера |
| ##324 | Printer (LBP) Scanner Trouble – неиcправность лазерного блока |
| ##335 | Data transmission error between the system control section and printer control section – ошибка обмена данными между главной платой и блоком управления печати (ошибка может возникать и из-за некорректно работающего драйвера) |
| ##336 | BJ head abnormal temperature error – ненормальная температура печатающей головки |
| ##337 | BJ head temperature sensor error – ошибка термодатчика печатающей головки |
| ##342, 343 | Cleaning absorption waste ink capacity full – переполнение чернильного абсорбера |
| ##345 | BJ cartridge head cleaning error – ошибка очистки печатающей головки (ошибка парковки) |
| ##346 | Inside temperature error – ошибка внутренней температуры (перегрев) |
| ##348 | Ink detection sensor error – ошибка датчика определения уровня чернил |
| ##352 | Printer control EEPROM head information error – ошибка контроля EEPROM головки |
| ##355 | A motor to lift up for CD-R print is malfunctioned – неисправен мотор лифта для печати на CD (узел «раскрытия» тракта протяжки для прохождения «подставки» CD) |
| ##356 | ASF cam sensor error – ошибка сенсора кулачка (эксцентрика) узла ручной подачи |
| ##357 | ASF paper feed (AP) position error – An error occurred in the AP motor during purging operation – Ошибка позиции (исходного положения) узла подачи. Связана с работой двигателя узла прокачки |
| ##358 | USB Host VBUS overcurrent error – перегрузка по току линий USB |
| ##359 | Paper feed position error – ошибка узла переключения подачи бумаги |
| ##360 | Paper feed cam sensor error – ошибка сенсора кулачка (эксцентрика) узла переключения подачи при подаче из передней кассеты. Также возникает при замятии в верхней (ручной) подаче, если значение счетчика отработки более 60% |
| ##361 | Valve sensor error – ошибка датчика клапанов блокировки кап при прочистке (прокачке) сопел |
| ##362 | Motor driver malfunctioned error – неисправность м/сх драйвера двигателя |
Расшифровка основных ошибок
Ошибка: код поддержки 1000 – Оранжевый индикатор мигает 2 раза
В заднем лотке принтера для бумаги нет бумаги.
Решение
- Вставьте бумагу в задний лоток.
- Нажмите кнопку [Возобновить/Отмена] на устройстве, чтобы продолжить работу.
Если эти действия не помогли устранить ошибку, обратитесь в сервисный центр для ремонта.
 Thanks: 0
 Likes: 0
 Dislikes: 0
-
04-15-2010
#1

Service Manager
250+ Posts
- Rep Power
- 36
ir 5570 E000202-0002
No paper in path anywhere in fixing unit, went to copier—>func—->clr—->err hard boot down power up error comes back on at warm up.
Company we bought this said it wasn’t doing it when we picked up. Meter low only 340K.
Any advice appreciated
-
04-15-2010
#2
Originally Posted by copierpro
No paper in path anywhere in fixing unit, went to copier—>func—->clr—->err hard boot down power up error comes back on at warm up.
Company we bought this said it wasn’t doing it when we picked up. Meter low only 340K.
Any advice appreciated
sounds like a sensor hang up in this area
PS35..jpg
-
04-15-2010
#3
Service Manager
250+ Posts
- Rep Power
- 36
sensor by drum
I looked up code in an ir6000 book and it points my code E000202-0002 to the sensor home for scanner PS39. I had a brain fart on fuser temp in my original post.
Took the scanner to right blew out area with air then powered up and scanner went to home and code gone. Course, that could just be coincidence if you have the 5570 book and it points you to the exit sensor by drum?
-
04-15-2010
#4
Originally Posted by copierpro
I looked up code in an ir6000 book and it points my code E000202-0002 to the sensor home for scanner PS39. I had a brain fart on fuser temp in my original post.
Took the scanner to right blew out area with air then powered up and scanner went to home and code gone. Course, that could just be coincidence if you have the 5570 book and it points you to the exit sensor by drum?
sorry , i thought meant a jam code/ getting old / now i see the big E/ failed vision test :}
-
04-15-2010
#5
Service Manager
250+ Posts
- Rep Power
- 36
all good
thanks TecRat your advice always appreciated
-
04-16-2010
#6
-
04-16-2010
#7
Technician
- Rep Power
- 28
This error pertains to the CIS that reads the second side of the original as it passes through. You need to remove the ADF access door and inner covers until you can see the small motor assy that moves the CIS assy up and down. Rotate this by hand and at some point you will likely feel it hang up slightly.


Tags for this Thread
202,
5570,
advice,
appreciate,
appreciated,
back,
boot,
clr,
copier,
covers,
down,
e00,
e000,
e0002,
error,
fixing,
hang up,
home,
low,
meter,
paper,
path,
power,
unit,
warm
![]()
View Tag Cloud
Bookmarks
Bookmarks
Posting Permissions

- You may not post new threads
- You may not post replies
- You may not post attachments
- You may not edit your posts
- BB code is On
- Smilies are On
- [IMG] code is On
- [VIDEO] code is On
- HTML code is Off
Forum Rules
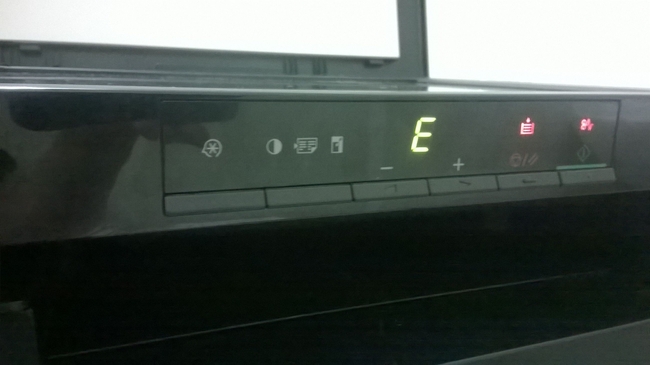
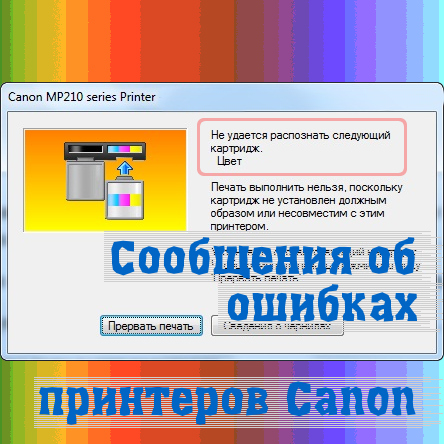
Canon brand is known for their reliable performance, but just like any other machine, Canon printers occasionally experience problems. One such error that bothers users is E202 Error which shows “Turn the main power ON E202 0002” message on the display screen.

In order to fix this issue, it requires the user to perform some hardware maintenance steps, there are many users who prefer visiting the Canon service engineer. However, if you know the exact maintenance steps and perform them carefully, then the error E202 0002 can be fixed in just a few minutes. In this guide, you will learn how to fix error E202 0002 on Canon printers.
Index:
- Meaning of E202 0002 Error
- Required Tools and precautions to fix it
- How to fix E202 0002 Error
What is the Meaning of Error E202 0002
According to the service manual of Canon MF4770n printer the error E202 0002 is displayed when the CIS (Contact Image Sensor) unit didn’t move to HP. Therefore, the possible causes of this error according to the Canon service manual can be:
- Error in Reader Motor
- Error in HP Sensor
- Error in CIS Unit
Although it may seem that the solution to the causes listed above may need you to replace the reader motor, HP sensor or the CIS unit, these are the causes mentioned in the service manual. There are some simpler solutions, which doesn’t require any hardware replacement, but only some minor maintenance process.

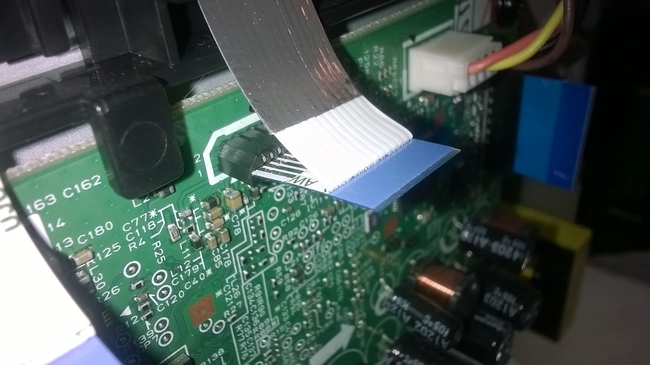
Sometimes, this Canon error is caused when there is a connection problem between the Flat Cable and the Main Controller Board in your Canon image class printer. This problem in the connection adversely affects the functioning of the Contact Sensor, which can cause the error E202 0002 on Canon printers. The simplest solution is to clean the Flat Cable and re-attach it to the Main Controller Board of your Canon printer.
Possible causes behind e202 error
E202 error is very critical. This error doesn’t allow users to print, scan or copy features from the Canon multifunction device.
Commonly, it’s noticed that when scanner’s bar is not able to come back to its start position, which is the left side of the glass flatbed, your Canon MFP will display E202 002 error. This happens when either CCD unit of your scanner is faulty or the cable that connects the CCD unit to your all-in-one has some fault. Therefore, the surest way to fix this error is to replace your CCD unit or its cable with a new one.
Since you will be performing hardware maintenance for your Canon IR 5055 and other Canon printers, you will require some tools.
- Philips Screwdriver: You will need a Philips screwdriver to open the screws on the back of your printer. Make sure that the screwdriver you choose is capable of opening those screws, which means it matches the size of the screws, is long enough to reach the screws and can be used easily without losing your grip.
- Flat-Head Screwdriver: You will require a flat-head screwdriver to open the side cover of your printer. Using this screwdriver will allow you to open the side cover without applying any excessive force.
- Clean Cloth: You may need a clean cloth to wipe dust off of some of the places on your printer.
Also, you will have to take certain precautions so that while performing the maintenance you can avoid damaging your Canon MF232w printer.
- Avoid Excess Force: When working with the printer hardware component, you should not use any excess force. When applying pressure be gentle, but firm. If at any stage you feel that you are unable to perform some steps, then re-read the steps in our guide, most probably you are doing something wrong.
- Read the Guide Carefully: Before starting the printer maintenance process, you must read all the steps carefully multiple times so that you know exactly what needs to be done.
- Don’t Rush Through Steps: Since the complete maintenance process can be completed in just a few minutes, you shouldn’t rush through these steps. Trying to rush through the steps can cause damage to the components of your printer or you may skip some steps in a hurry.
Arrange all the tools mentioned above and follow all the precautions. At any stage during the printer maintenance, if you are confused about what to do, then either re-read our maintenance guide to clear your doubts or simply stop the printer maintenance process.
Example 1 to Fix Error 202 (E202)
When you see the message “Turn the main power ON E202 0002” on your Canon MF733cdw printer display screen, then you should follow the steps given below before contacting the service engineer. Please study this Canon printer maintenance guide carefully and follow its steps in the correct order. The below mentioned maintenance process can be followed for the Canon D530 printer, the Canon MF229 or any other Canon printer as well.
Before starting the maintenance process, switch-off your printer and disconnect the power cable from the printer.
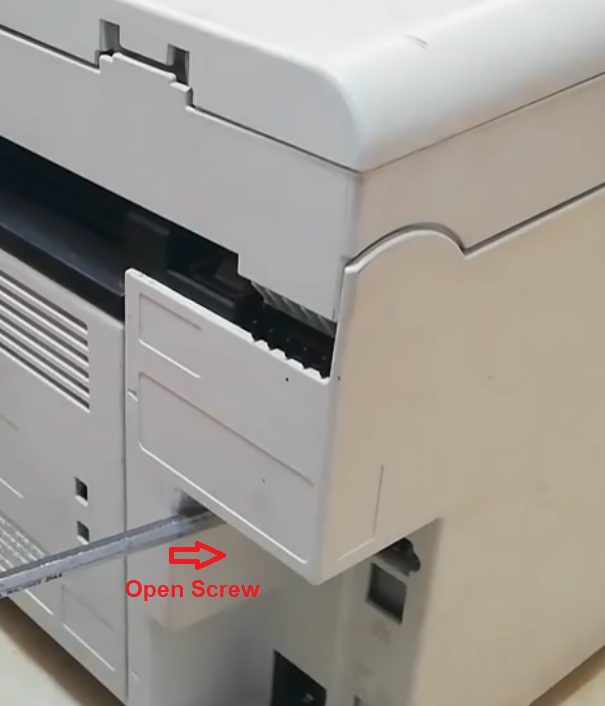
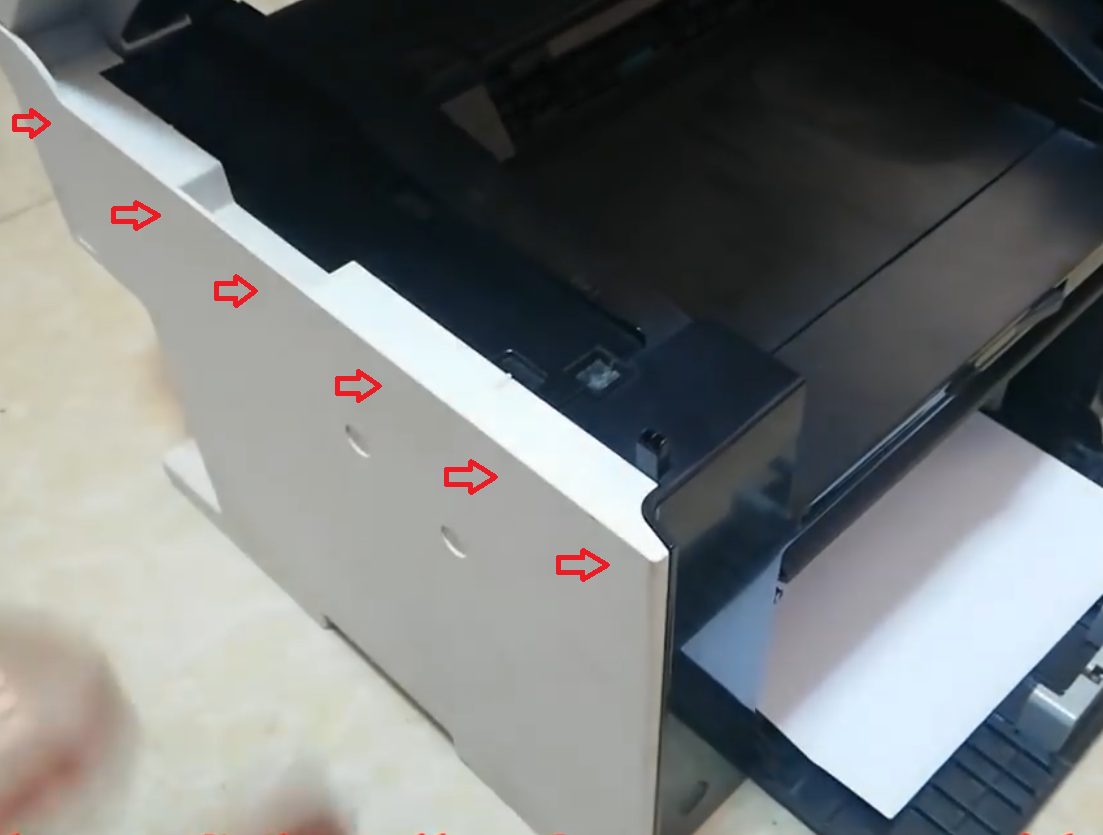
- Use the Philips screwdriver to open the screw on the back left-side of your Canon printer so that you can open the left-side cover.

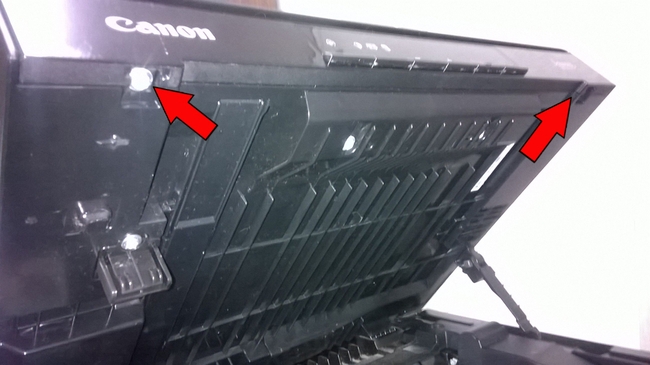
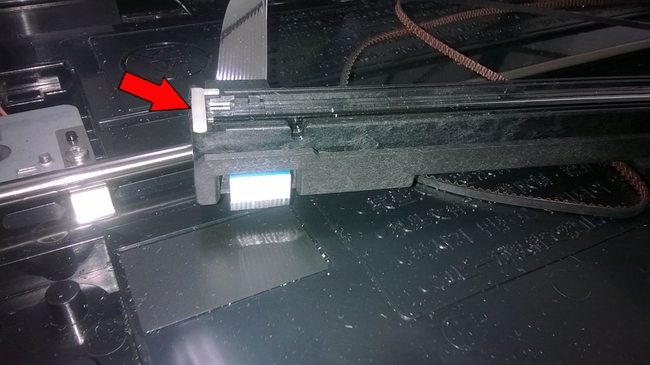
- Use the flat-head screwdriver to unlock the cover as shown in the image below.

- Lift the top-lid cover of your printer from the front.

- Now unlock the left-cover so that it’s completely detached from the printer.

- If you need, then you can use the flat-head screwdriver to ease the detachment of the left-side cover.

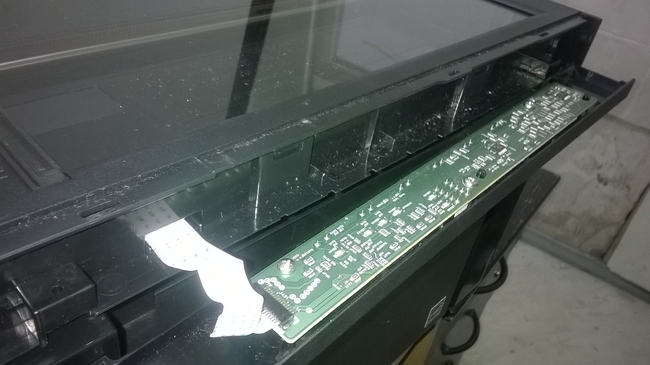
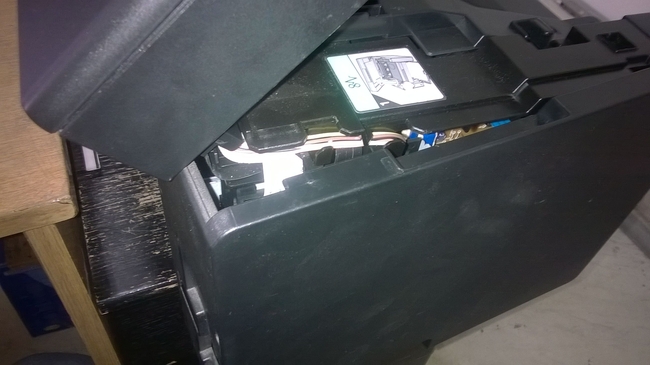
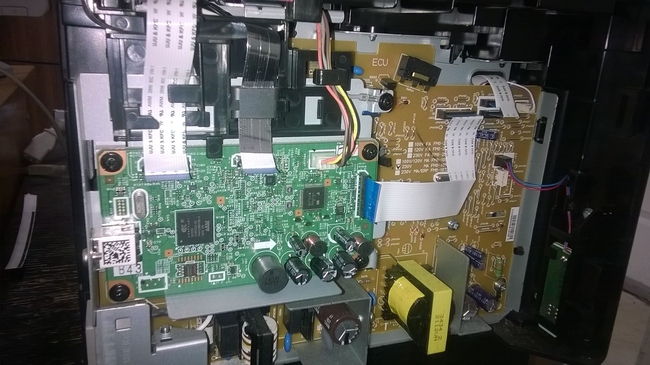
- Now you can see the Main Controller Board of your printer. In the board, you can see two cables connecting with the board as shown in the image below.

- One by one, pull-out these cables and clean them carefully, then reattach the cables into their back to the original positions. (Most important step)

- After cleaning and reattaching the cables you should replace the left-side cover as it was placed originally and tighten the screws.

- Now, reconnect the power cable to your printer and switch-on your printer to check whether the Canon error E202 0002 has been fixed or not.


That’s it, you have successfully cleaned the Flat Cable connected to the Main Controller Board of your printer. This should solve error E202 0002 on Canon printer.
Example 2 to Fix Error 202 (E202)
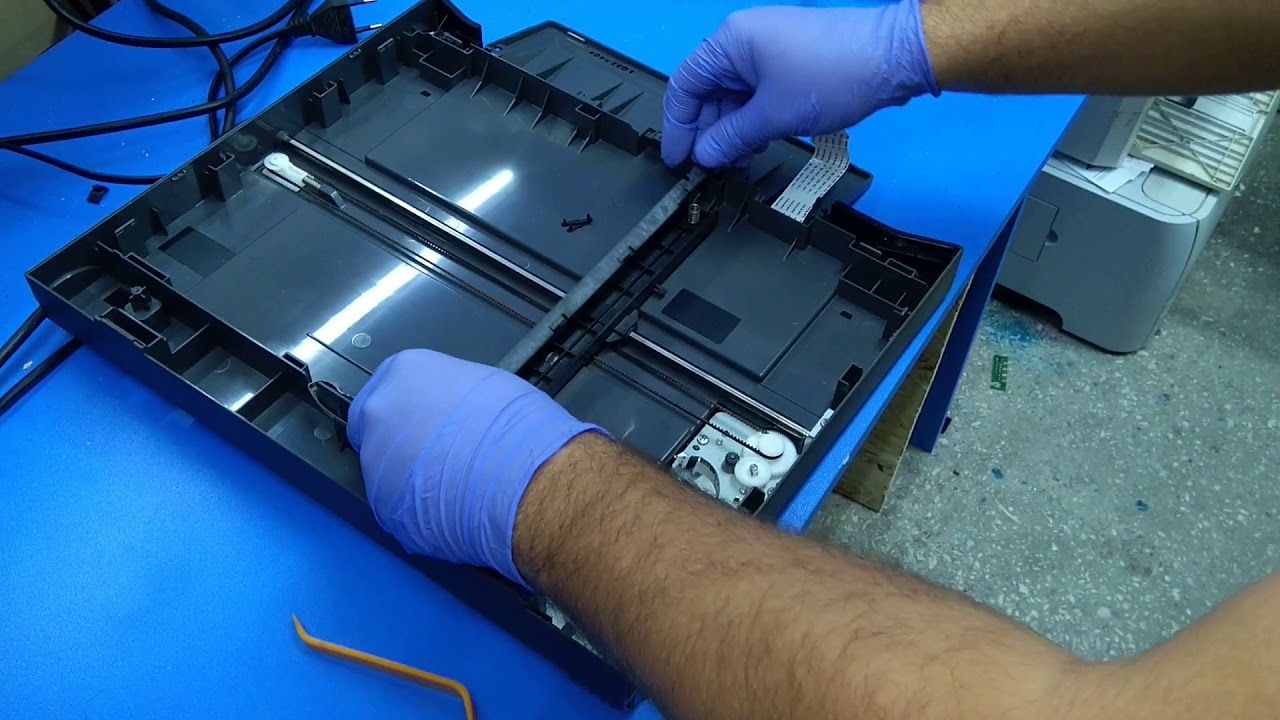
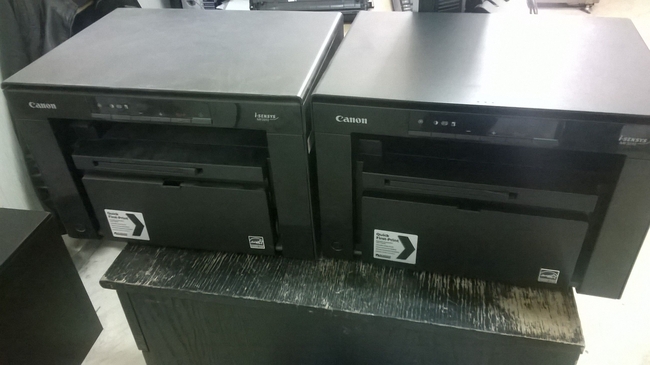
We are taking an example of Canon MF 231 printer, but the same steps can be followed for all Canon MFP printers. The outer design of the MFP’s may be different, but inside the scanner all the Canon all-in-ones will have the same design.
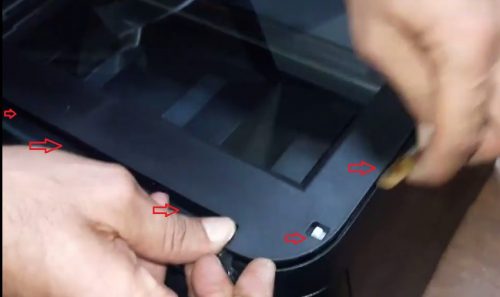
- Open the two screws on the top of your scanner.

- Then, open the screws on the downside of your scanner.

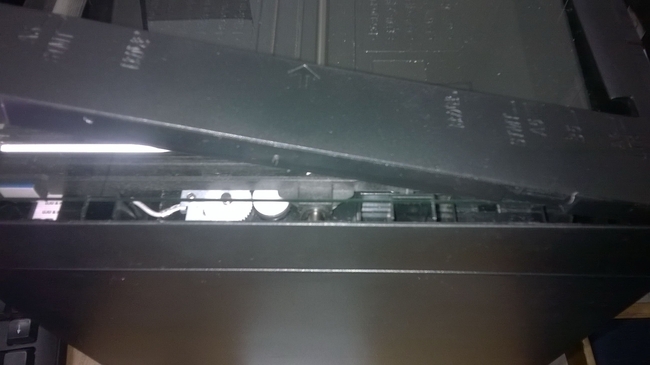
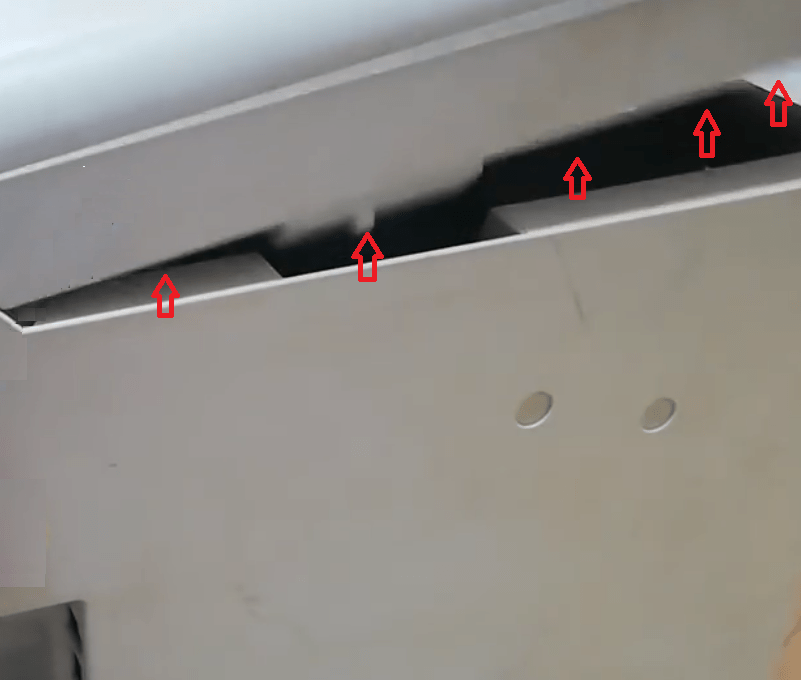
- Now, slowly unlatch the plastic panel which holds the scanner glass top. You can use a blunt plastic strip for assistance.

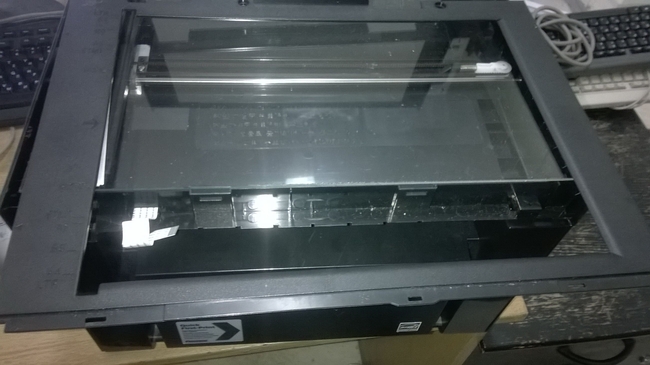
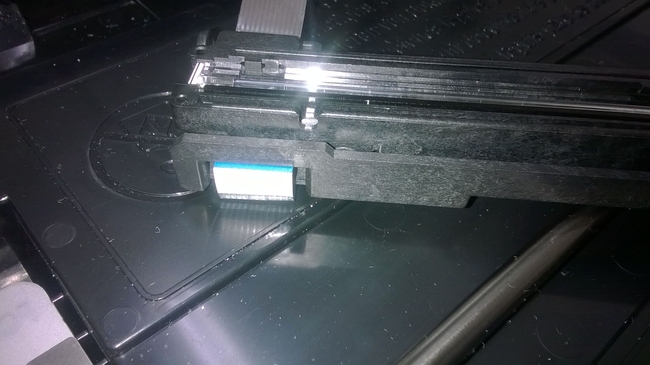
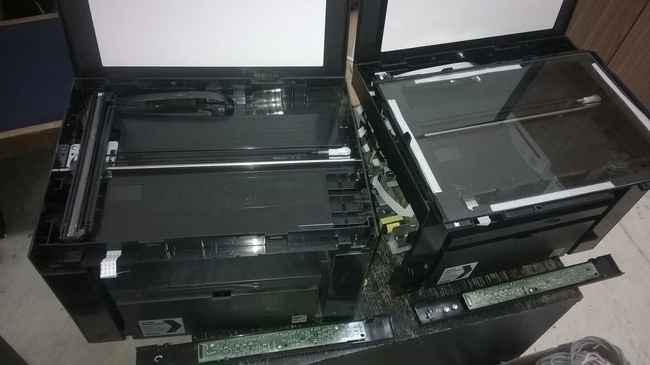
- Once the plastic panel is removed, the scanner glass will be free for removal. Remove it.

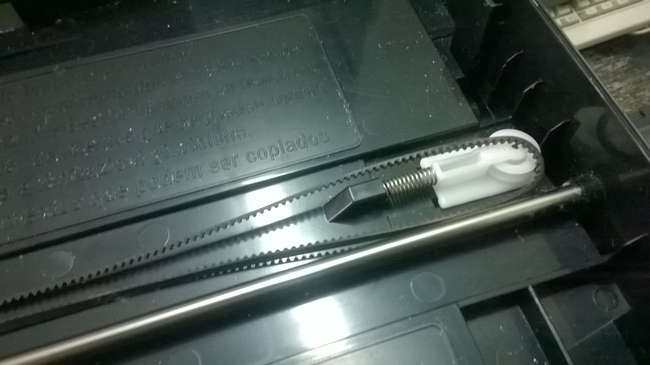
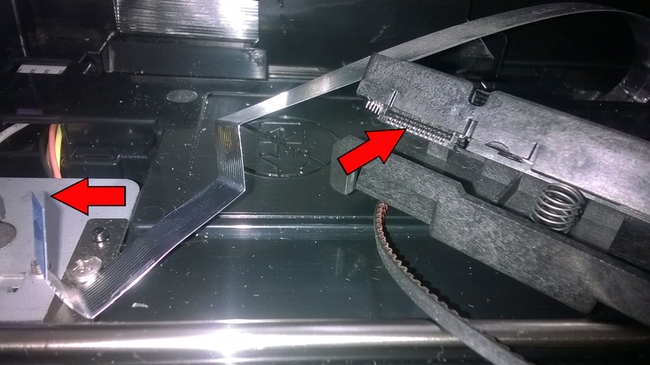
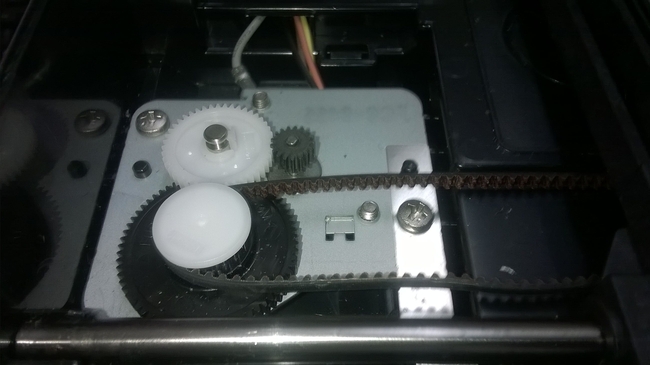
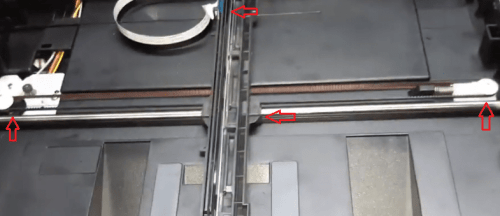
- Information: This will expose the CCD unit which is placed on a metal rail, attached to a ribbon and a rubber strip. The rubber strip is running on two rollers and one of the rollers has a spring attached to it.

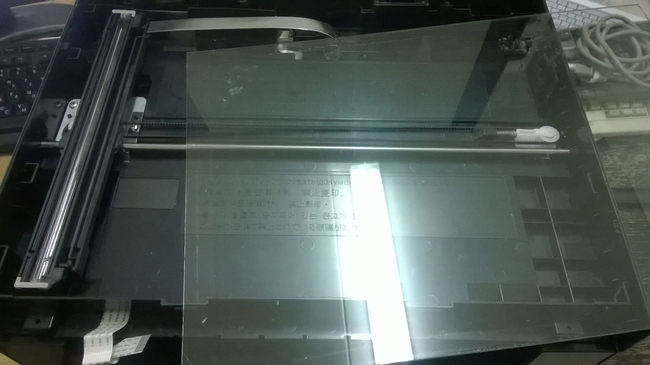
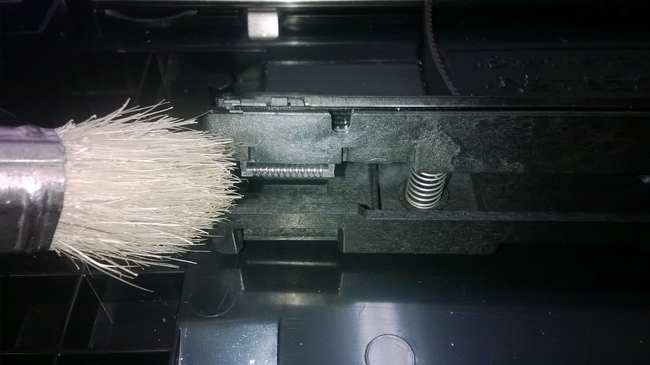
- Move CCD unit to the middle and remove the rubber strip from the roller wheel which doesn’t have spring attached to it.

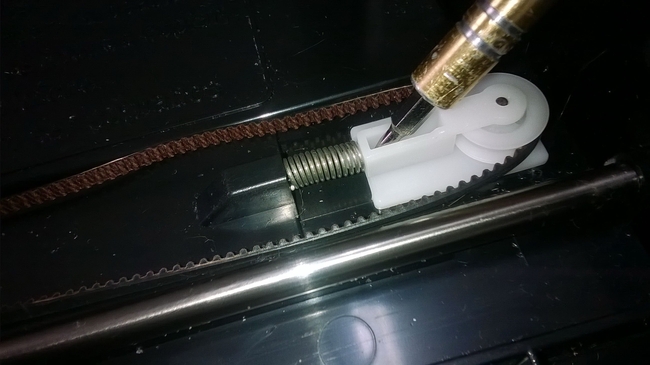
- Now remove the rubber strip from the other roller and gently detach ribbon from the CCD unit.

- Next, gently detach rubber strip from the CCD unit.

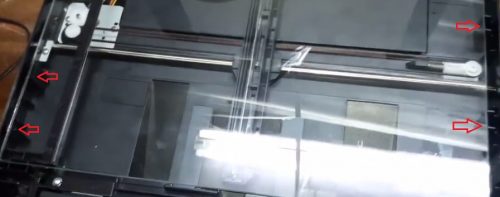
Now, your old CCD unit free to be removed from your printer. Take the new CCD unit and follow the steps given below. - Take the new CCD unit and gently reattach the rubber strip and ribbon. Then, place the CCD unit on the metal rail.

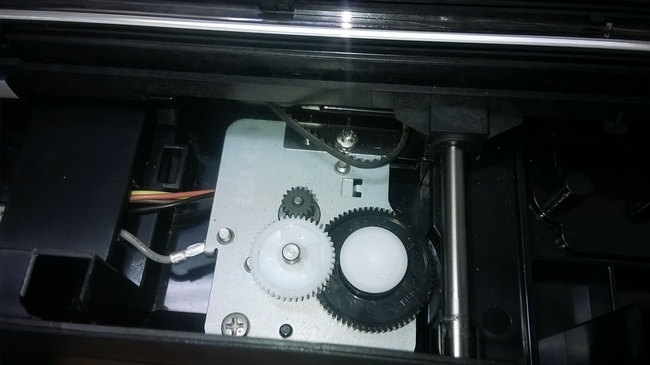
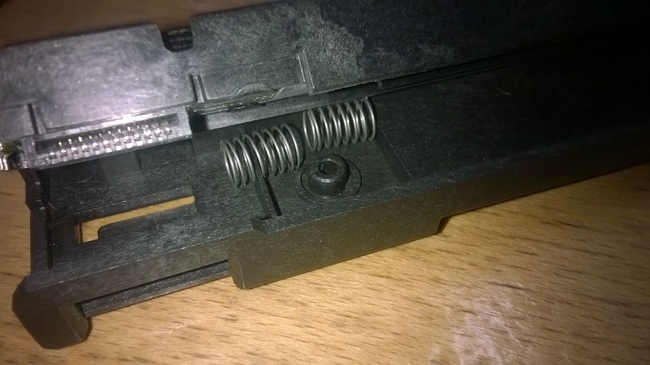
- Next, place the rubber strip around the roller with spring and then stretch it to place on the other roller.

- Once new CCD unit is properly placed, before moving to the next step make sure that CCD unit is moving freely over the metal rail without any obstruction. A properly attached CCD unit should look like this.

- Put the scanner glass to cover the CCD unit. Make sure that scanner glass is stable on the slots made for it and is not moving.

- Reattach the plastic panel to hold the scanner glass. Then, tighten the screws on the top side and downside of the scanner. Now you can restart your printer and it will print, scan, and copy properly.


That’s it.
The steps given above should be followed exactly in the order they have been mentioned. Just remember that all the components of your scanner are sensitive to damage, therefore, when you are working with them you should apply the least force possible and try to do everything gently. By following the steps given in this guide you will be able to fix error 202 in your Canon MFP printer.
Now you know how to fix error E202 0002 on Canon printers. However, if the above solution didn’t work for you, then you should contact the Canon service center because your printer may require some hardware replacement.
— Advertisement —
Are you unable to find the driver for your printer? Try DriverEasy, it will automatically download and update the driver, even for the discontinued
(old / not supported) printers. You must try it once.