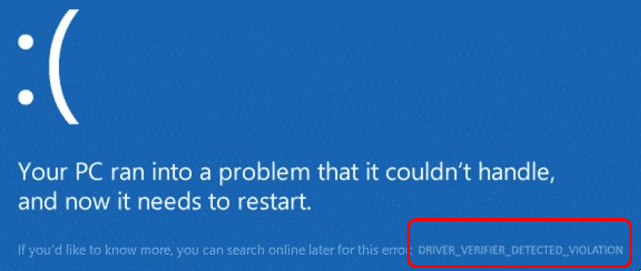
Driver Verifier is built in every version of Windows operating system. It monitors some of your Windows drivers. When it detects a driver issue, it will immediately cause a BSOD (blue screen of death) error. DRIVER_VERIFIER_DETECTED_VIOLATION is the common one of them. Due to the BSOD error, your computer would get into restarting loop problem. As a result, you cannot use your computer properly.
Don’t panic. Usually this is a driver issue, and it’s easy to solve.
Try these fixes:
- Reinstall your graphic card driver
- Update your device drivers
- Disable & Reset Driver Verifier
Method 1: Reinstall your graphic card driver
Mostly, the graphic card driver like NVIDIA, Intel or AMD is the culprit behind this BSOD error. Reinstall graphic card driver helped many users fix the issue. Thus you can give it a shot.
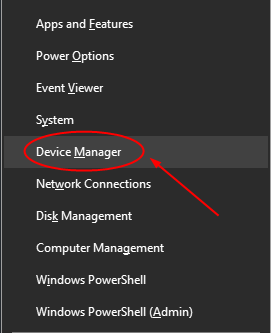
1) On your keyboard, press the Windows logo key ![]() + X key together to open the quick-access menu. Then click Device Manager to open it.
+ X key together to open the quick-access menu. Then click Device Manager to open it.
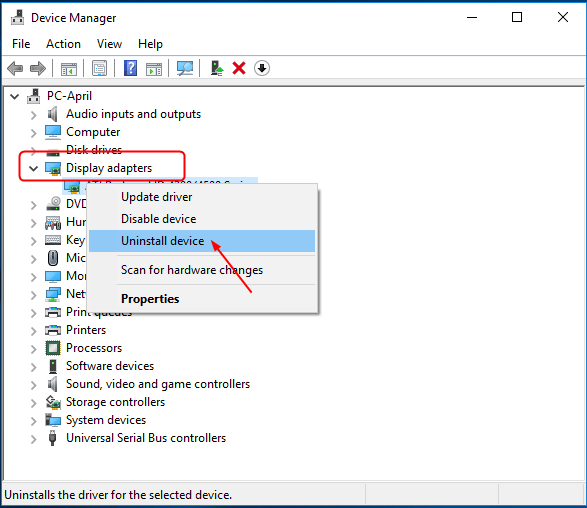
2) On the pop-up window, find and expand Display adapters catalog. Then right-click on your graphic card software to choose Uninstall device.
3) After uninstalling your graphic card driver, go to its manufacturer’s website, find and download the latest driver for you card model.
Then install the new driver on your Windows 10.
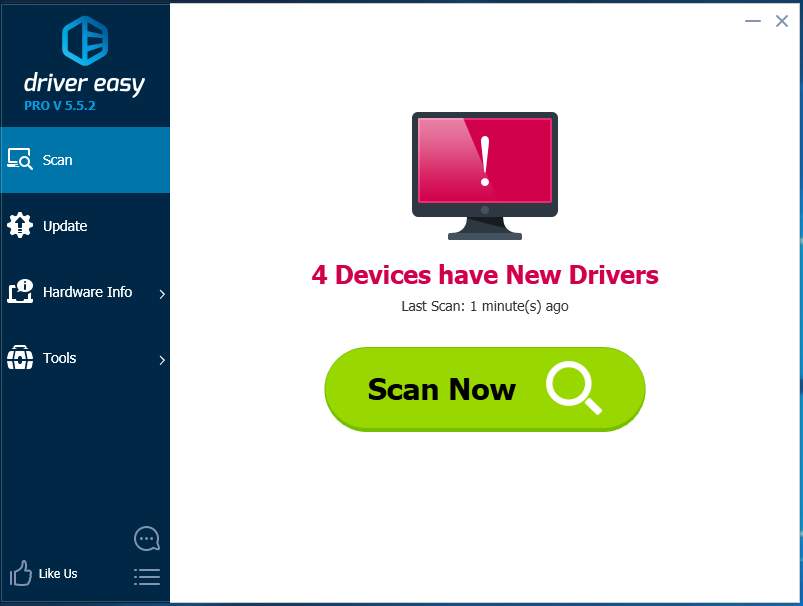
If you have no time, no patience or no enough computer skill to find and download the correct driver, let Driver Easy help you then.
Driver Easy is a reliable and very helpful driver tool. It will automatically recognize your system and find the correct drivers for it. You don’t need to know exactly what system your computer is running, you don’t need to risk downloading and installing the wrong driver, and you don’t need to worry about making a mistake when installing.
You can update your drivers automatically with either the FREE or the Pro version of Driver Easy. But with the Pro version it takes just 2 clicks (and you get full support and a 30-day money back guarantee):
1) Download and install Driver Easy.
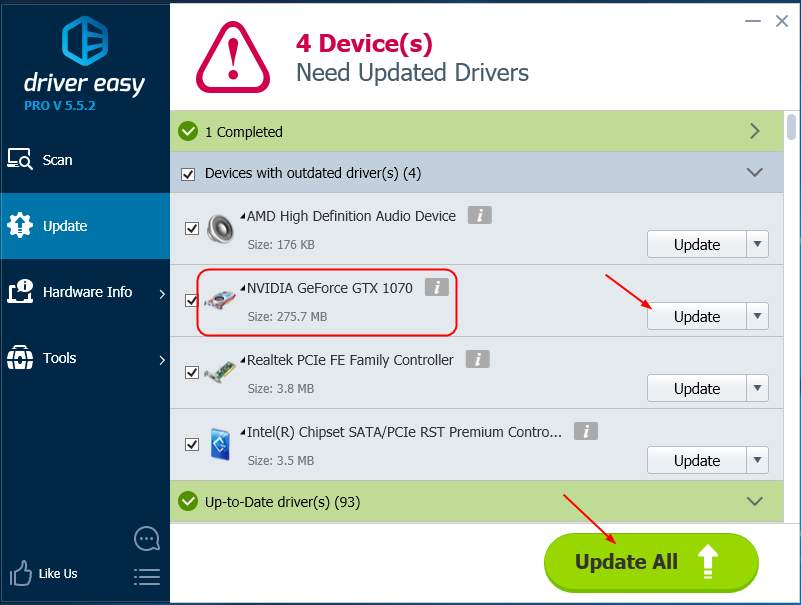
2) Run Driver Easy and click Scan Now button. Driver Easy will then scan your computer and detect any problem drivers.
3) Click the Update button next to a flagged printer driver to automatically download and install the correct version of this driver (you can do this with the FREE version).
Or click Update All to automatically download and install the correct version of all the drivers that are missing or out of date on your system (this requires the Pro version – you’ll be prompted to upgrade when you click Update All).
Method 2: Update your device drivers
The error can often be also caused by outdated or incompatible drivers. If reinstall your graphic card driver didn’t help you fix it, please update other device drivers.
Keep your drivers up-to-date can make your Windows 10 run stable. It’s fairly simple. As the first option, you can choose to update them in Device Manager.
Right-click on the drivers that need to be updated.
Then click Update driver.
Go on to choose Seach automatically for updated driver software.
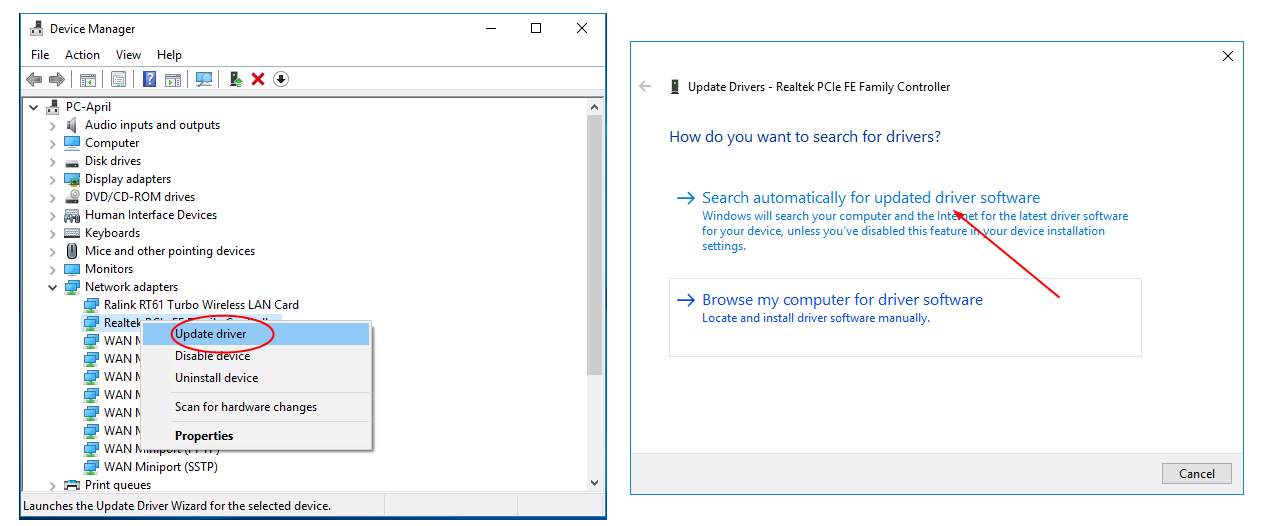
Then Windows will search the update for you automatically.
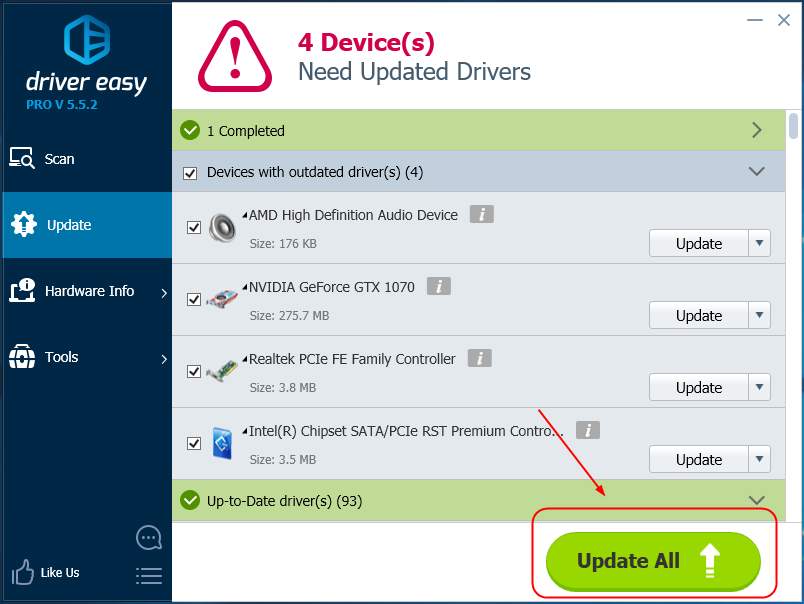
For some reasons, Microsoft cannot always detect the update, and moreover check the update for your drivers one by one could be really tedious. In such case, let Driver Easy help you. It can find all your missing, outdated and incompatible drivers and offer the correct ones in less than 1 min! And with its Pro version, you can make all your drivers up-to-date in just one-go: Update All.
Method 3: Disable & Reset Driver Verifier
If unluckily after solving the driver problems, the error still occur, try to disable and reset the Driver Verifier on your Windows 10.
You need to do these:
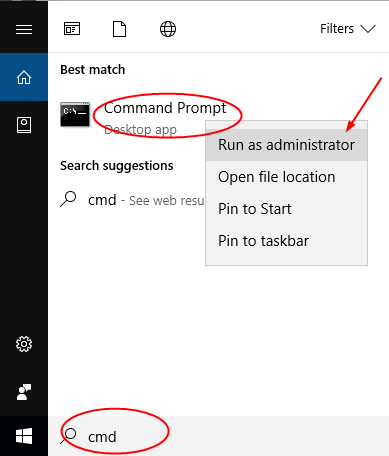
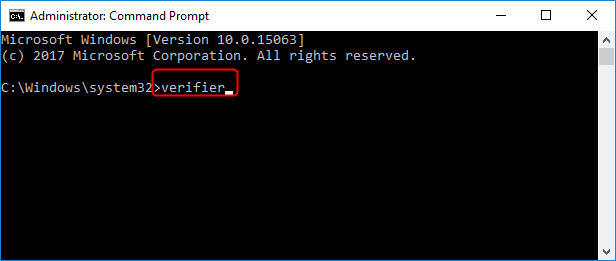
1) Type cmd in the search box from Start menu. Then right-click on Command Prompt to choose Run as administrator.
Note: Click Yes when prompted by User Account Control.
2) On the open black window, type verifier and press Enter.
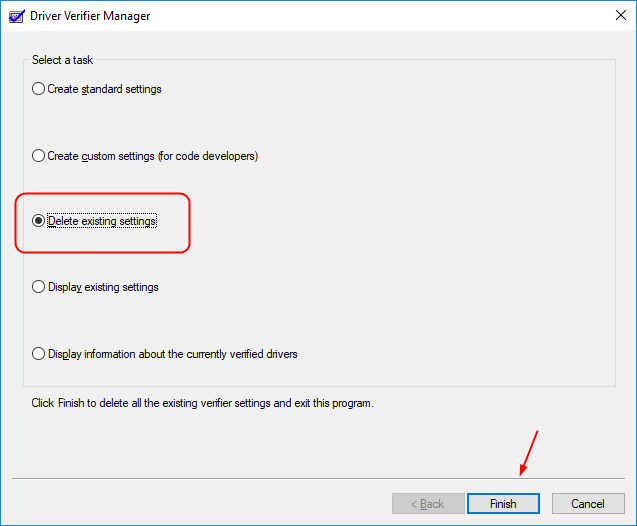
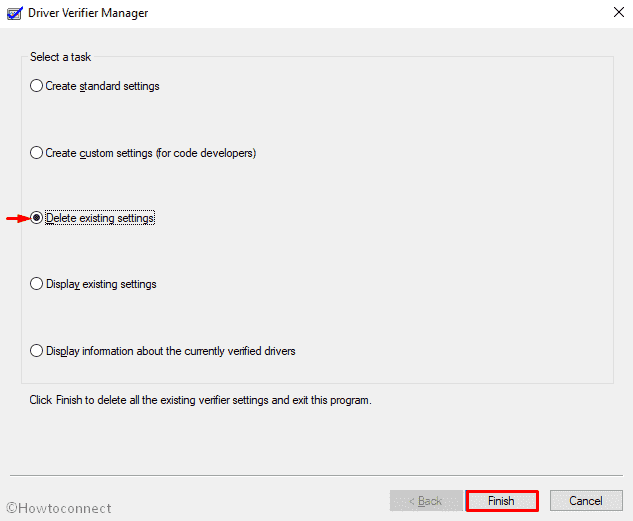
3) Now the Driver Verifier Manager would be open. Tick on Delete existing settings and click Finish.
4) Reboot your Windows 10 and the Driver Verifier would be disabled now.
The BSOD error should be solved, but if not, go on to follow the steps below to reset the verifier.
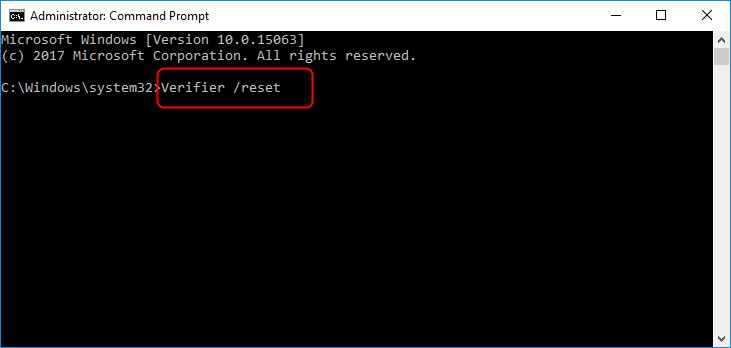
5) Run Command Prompt as administrator again via the same step 1).
Then type Verifier /reset in the window and press Enter to run it.
6) Reboot your Windows 10.
That’s all there is to it.
If you have any questions, please feel free to leave your comment below, thanks.
20
20 people found this helpful
Available in other languages
Stoßen Sie auf einen BSoD-Fehler mit dem Fehlercode DRIVER_VERIFIER_DETECTED_VIOLATION? Hier erfahren Sie 4 effektive Lösungen!
Skip to content
Как убрать DRIVER_VERIFIER_DETECTED_VIOLATION (0x000000C4)?
Как убрать « DRIVER_VERIFIER_DETECTED_VIOLATION» ( 0x000000C4)?
На компьютере или ноутбуке под управлением Windows появился «синий экран смерти»? После появления сообщения «
DRIVER_VERIFIER_DETECTED_VIOLATION» (
0x000000C4) система перезагружается? Ищите как исправить
0x000000C4: «
DRIVER_VERIFIER_DETECTED_VIOLATION»?
Как просмотреть информацию об ошибках, исправить ошибки в Windows 10, 8 или 7
Причины появления ошибки
- На жестком диске компьютера или ноутбука не достаточно места. Для правильной работы ОС Windows 10 на системном диске должно быть свободно 2 — 10 ГБ.
- На компьютер был установлен не совместимый BIOS или прошивка была повреждена.
- Установлены не совместимые с ОС драйвера устройств.
- Реестр Windows был поврежден или удален. Возможно в результате очистки были удалены системные ключи реестра.
- Ативирусное программное обеспечение или компьютерные вирусы могут заблокировать системные файлы или удалить важные ключи реестра.
- В результате ошибок в работе программы для резервного копирования.
- В результате обновления ОС Windows.
Актуально для ОС: Windows 10, Windows 8.1, Windows Server 2012, Windows 8, Windows Home Server 2011, Windows 7 (Seven), Windows Small Business Server, Windows Server 2008, Windows Home Server, Windows Vista, Windows XP, Windows 2000, Windows NT.
Вот несколько способов исправления ошибки «
DRIVER_VERIFIER_DETECTED_VIOLATION»:
Восстановите удаленные файлы
Часто появление BSoD ошибок приводит к утери важных файлов. Блокировка файлов компьютерными вирусами, ошибки в работе программ для резервного копирования, повреждение или перезапись системных файлов, ошибки файловой системы или наличие битых секторов диска – это не далеко полный список причин удаления данных.
Исправление соответствующих ошибок восстановит работоспособность устройства, но не всегда восстановит повреждённые или утерянные файлы. Не всегда имеется возможность устранить ту или иную ошибку без форматирования диска или чистой установки операционной системы, что также может повлечь за собой утерю файлов.
Загрузите бесплатно и просканируйте ваше устройство с помощью Hetman Partition Recovery. Ознакомьтесь с возможностями программы и пошаговой инструкцией.
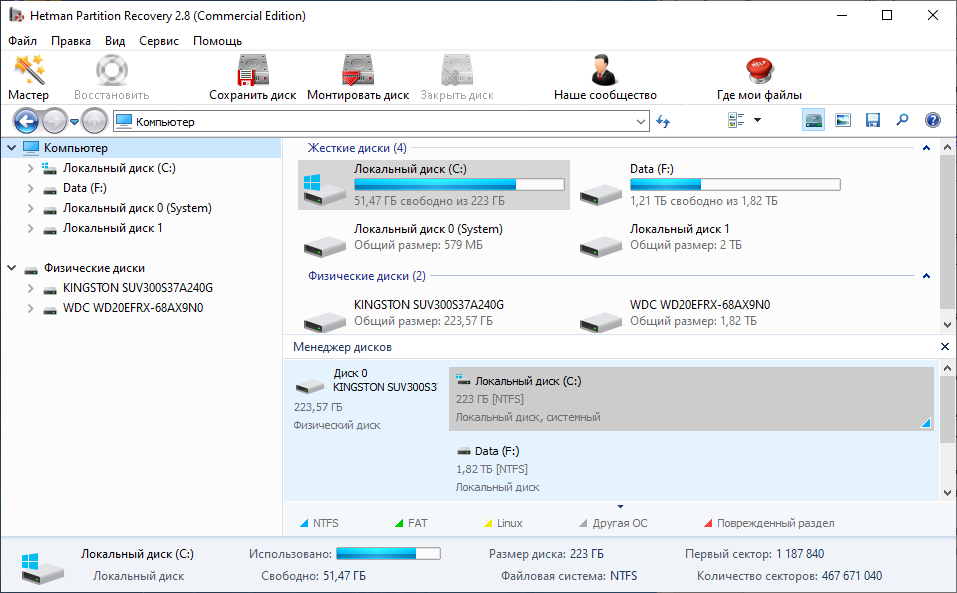
Программа для восстановления данных
Запустите компьютер в «безопасном режиме»
Если ошибка «DRIVER_VERIFIER_DETECTED_VIOLATION» (0x000000C4) возникает в момент загрузки Windows и блокирует любую возможность работы с системой, попробуйте включить компьютер в «безопасном режиме». Этот режим предназначен для диагностики операционной системы (далее ОС), но функционал Windows при этом сильно ограничен. «Безопасный режим» следует использовать только если работа с системой заблокирована.
Чтобы запустить безопасный режим сделайте следующее:
- Перейдите в меню Пуск и выберите Параметры.
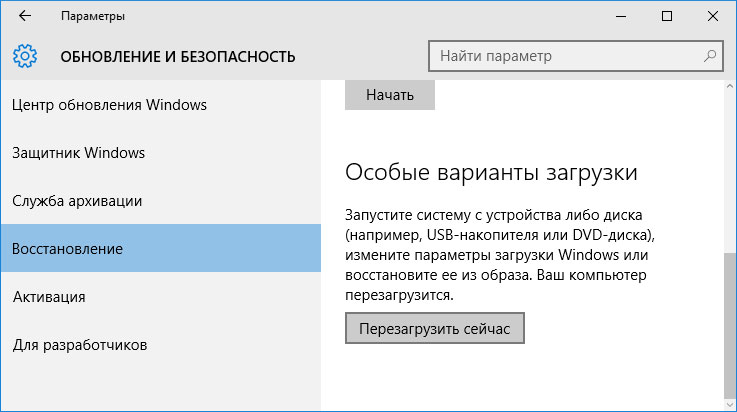
- В открывшемся окне параметров перейдите в меню Обновление и Безопасность и выберите раздел Восстановление.
- В разделе Восстановление найдите Особые варианты загрузки и нажмите кнопку Перезагрузить сейчас.
- После этого Windows перезагрузится и предложит выбрать следующее действие. Выберите Поиск и устранение неисправностей.
- В меню Поиск и устранение неисправностей кликните на Дополнительные параметры, далее — Параметры загрузки.
- Далее Windows уведомит вас о том, что компьютер можно перезагрузить с использованием дополнительных параметров загрузки. Укажите — Включить безопасный режим. Нажмите Перезагрузить.
- После перезагрузки выберите Включить безопасный режим нажав клавишу F4.
Как загрузить Windows в безопасном режиме
Обновите драйвер через Диспетчер устройств
Вы установили новое аппаратное обеспечение на компьютере? Возможно вы начали использовать новое USB-устройство с вашим компьютером. Это могло привести к ошибке «DRIVER_VERIFIER_DETECTED_VIOLATION». Если вы установили драйвер устройства используя диск, который поставляется вместе с ним, или использовали драйвер не c официального сайта Microsoft, то причина в нем. Вам придется обновить драйвер устройства, чтобы устранить эту проблему.
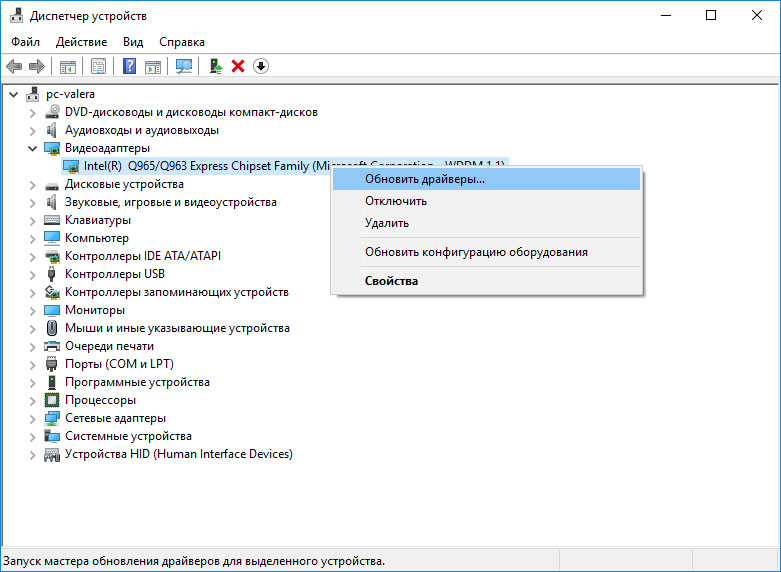
Вы можете сделать это вручную в диспетчере устройств Windows, для того выполните следующие инструкции:
- Нажмите кнопку Windows, затем введите диспетчер устройств с клавиатуры.
- Выберите Диспетчер устройств из списка.
- Просмотрите список категорий устройств, нажмите на стрелочку рядом с категорией вашего нового устройства. Драйвер может быть отмечен желтым треугольником.
- Кликните правой кнопкой мыши на имя устройства и нажмите Обновить драйвер.
- Далее откроется окно Мастера обновления драйверов с двумя опциями:
- Автоматический поиск обновленных драйверов. Windows проверит наличие наиболее подходящего драйвера для этого устройства в автоматическом режиме.
- Выполнить поиск драйверов на этом компьютере. Используйте эту опцию, что бы самостоятельно указать ОС файлы драйвера.
Перезагрузите компьютер после установки драйвера.
Используйте sfc /scannow для проверки всех файлов системы
Повреждение или перезапись системных файлов может привести к ошибке «DRIVER_VERIFIER_DETECTED_VIOLATION». Команда sfc находит поврежденные системные файлы Windows и заменяет их.
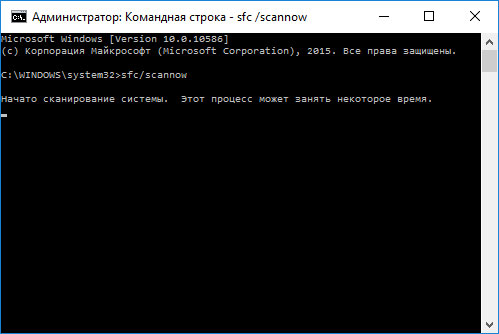
- Нажмите кнопку Windows, затем введите cmd с клавиатуры.
- Правой кнопкой мышки кликните на CMD и запустите от имени администратора.
- В окне командной строки введите sfc /scannow и нажмите Enter.
Этот процесс может занять несколько минут.
Как восстановить системные файлы Windows 10

Проверьте диск с Windows на наличие ошибок командой chkdsk c: /f
Возможно к синему экрану с «DRIVER_VERIFIER_DETECTED_VIOLATION» привела ошибка файловой системы или наличие битых секторов диска. Команда CHKDSK проверяет диск на наличие ошибок файловой системы и битых секторов. Использование параметра /f заставит программу автоматически исправлять найденные на диске ошибки, а параметр /r позволяет найти и «исправить» проблемные сектора диска. Для запуска следуйте инструкциям:
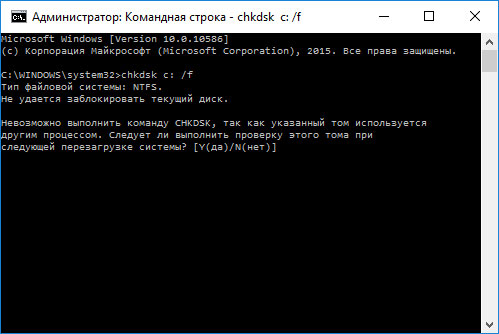
- Нажмите кнопку Windows, затем введите CMD с клавиатуры.
- Правой кнопкой мышки кликните на CMD и запустите от имени администратора.
- В окне командной строки введите chkdsk c: /f и нажмите Enter (используйте ту букву диска, на котором установлена ОС).
Дождитесь окончания процесса и перезагрузите компьютер.
Используйте режим совместимости со старой версией Windows
Отключите лишние программы из автозагрузки Windows
Программное обеспечение, вызывающее «DRIVER_VERIFIER_DETECTED_VIOLATION» (0x000000C4), может быть прописано в автозагрузку Windows и ошибка будет появляться сразу после запуска системы без вашего участия. Удалить программы из автозагрузки можно с помощью Диспетчера задач.

- Загрузитесь в Безопасном режиме.
- Кликните правой кнопкой мышки на Панели задач, затем на пункте Диспетчер задач.
- Перейдите на вкладку Автозагрузка.
- Чтобы убрать ту или иную программу из автозагрузки выберите её из списка и отключите, нажав кнопку Отключить в правом нижнем углу окна.
Обратитесь в поддержку Microsoft
Microsoft предлагает несколько решений удаления ошибки «голубого экрана». «DRIVER_VERIFIER_DETECTED_VIOLATION» (0x000000C4) можно убрать с помощью Центра обновления или обратившись в поддержку Windows.
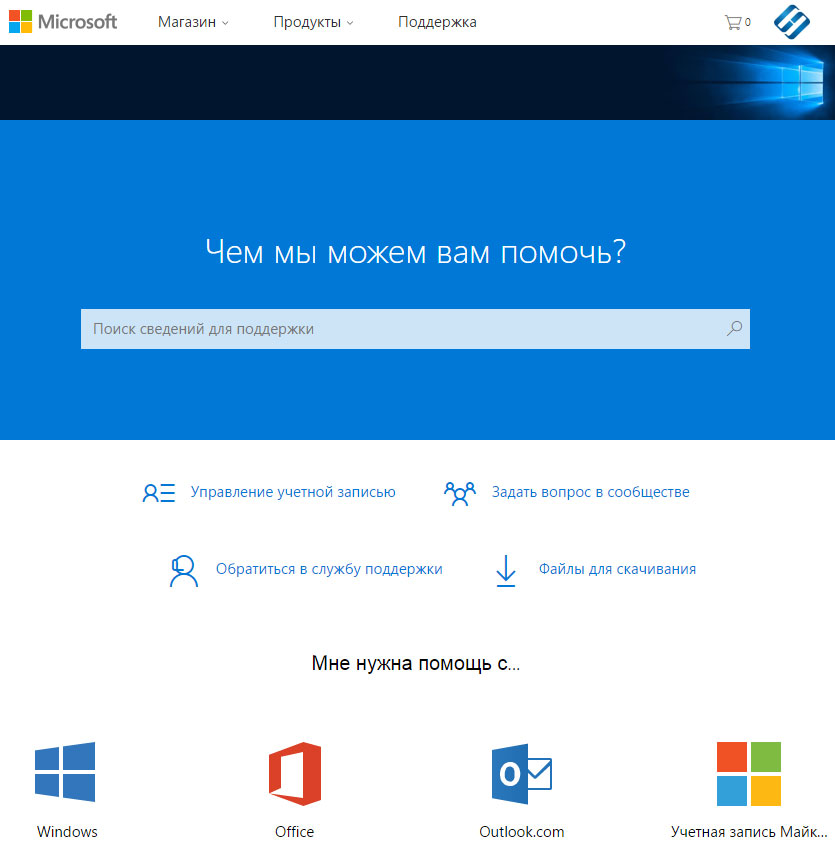
- Перейдите на сайт технической поддержки Microsoft.
- Введите код и сообщение об ошибке в поисковую строку и следуйте найденным рекомендациям.
- Если вы не найдете готового решения, то задайте вопрос в сообществе — возможно вам ответит сертифицированный системный администратор.
Установите последние обновления системы
С обновлениями Windows дополняет базу драйверов, исправляет ошибки и уязвимости в системе безопасности. Загрузите последние обновления, что бы избавиться от ошибки «DRIVER_VERIFIER_DETECTED_VIOLATION» (0x000000C4).
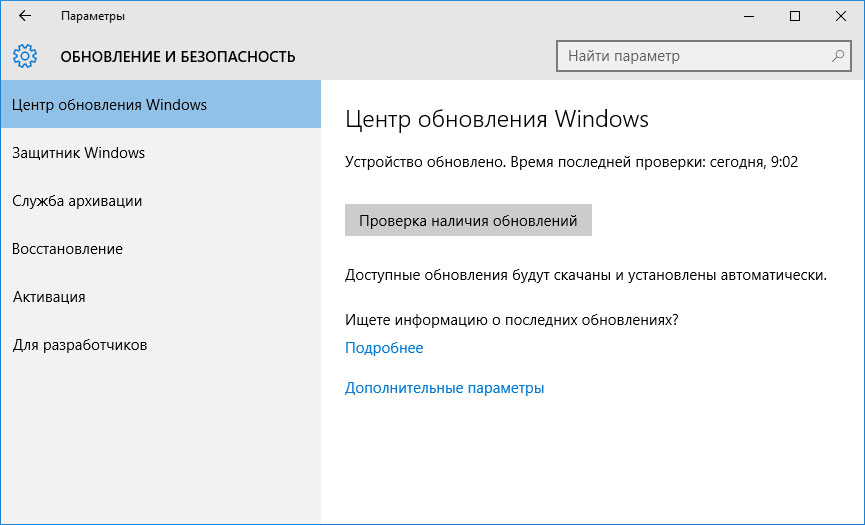
Запустить Центр обновления Windows можно следующим образом:
- Перейдите в меню Пуск и выберите Параметры.
- В окне Параметров перейдите в меню Обновление и Безопасность.
- Для установки последних обновлений Windows нажмите кнопку Проверка наличия обновлений и дождитесь окончания процесса их поиска и установки.
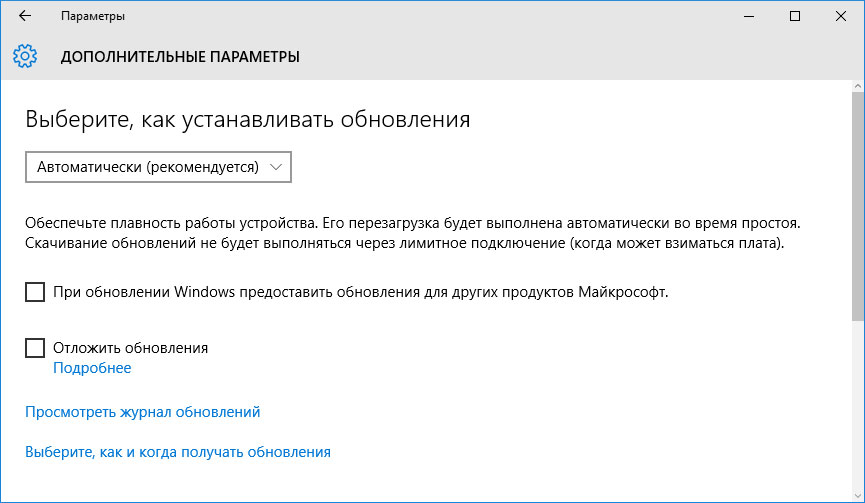
Рекомендуется настроить автоматическую загрузку и установку обновлений операционной системы с помощью меню Дополнительные параметры.
Чтобы включить автоматическое обновление системы необходимо запустить Центр обновления Windows:
- Перейдите в меню Пуск и выберите Параметры.
- В окне Параметров перейдите в меню Обновление и Безопасность и выберите подменю Центр обновления Windows. Для установки последних обновлений Windows нажмите кнопку Проверка наличия обновлений и дождитесь окончания процесса их поиска и установки.
- Перейдите в Дополнительные параметры и выберите, как устанавливать обновления — Автоматически.
Запустите проверку системы на вирусы
«Синий экран смерти» с ошибкой «DRIVER_VERIFIER_DETECTED_VIOLATION» 0x000000C4 может вызывать компьютерный вирус, заразивший систему Windows.
Для проверки системы на наличие вирусов запустите установленную на компьютере антивирусную программу.
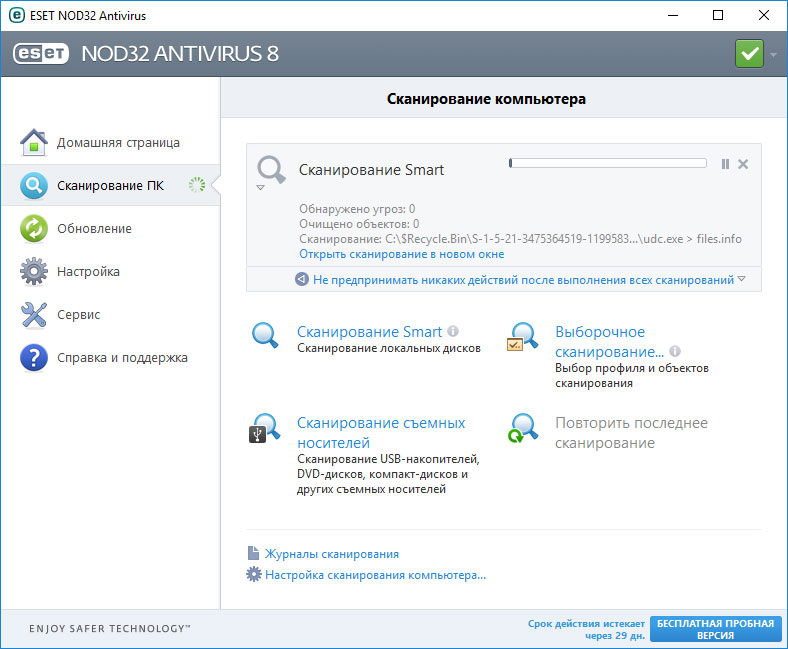
Современные антивирусы позволяют проверить как жесткие диски, так и оперативную память. Выполните полную проверку системы.
Выполните проверку оперативной памяти
Неполадки с памятью могут привести к ошибкам, потере информации или прекращению работы компьютера.
Прежде чем проверять оперативную память, отключите её из разъёма на материнской плате компьютера и повторно вставьте в него. Иногда ошибка DRIVER_VERIFIER_DETECTED_VIOLATION» вызвана неправильно или не плотно вставленной в разъём планкой оперативной памяти, или засорением контактов разъёма.
Если предложенные действия не привели к положительному результату, исправность оперативной памяти можно проверить средствами операционной системы, с помощью средства проверки памяти Windows.
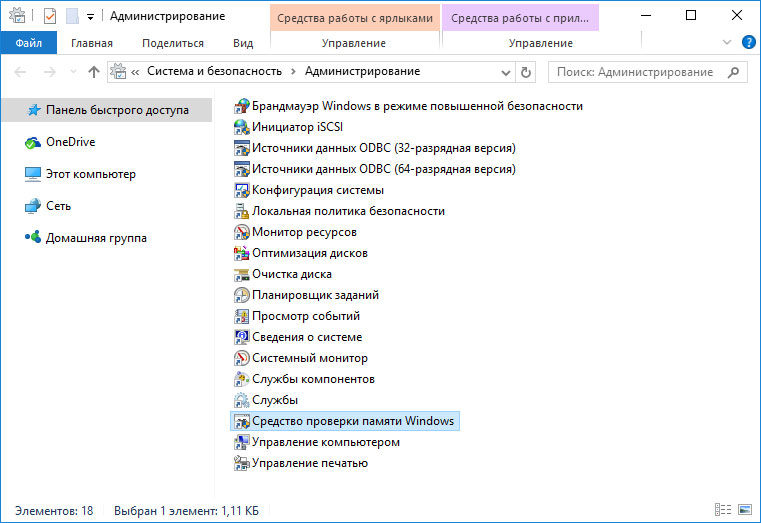
Запустить средство проверки памяти Windows можно двумя способами:
- С помощью Панели управления:

Перейдите в Панель управления / Система и безопасность / Администрирование. Запустите приложение Средство проверки памяти Windows.
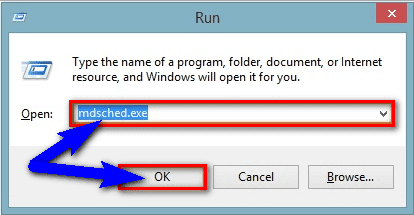
- С помощью средства Выполнить:

Запустите средство Выполнить с помощью комбинации клавиш Windows + R. Наберите mdsched и нажмите Enter. После чего откроется средство проверки Windows.
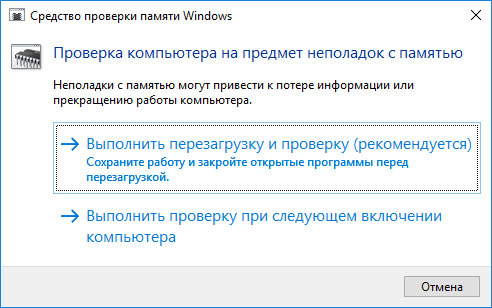
Для начала проверки выберите один из предлагаемых вариантов, проверка оперативной памяти в соответствии с которым будет запущена после перезагрузки компьютера.
Если в результате проверки будут определены ошибки, исправить которые не представляется возможным, то такую память необходимо заменить (замене подлежит модуль памяти с неполадками).
Выполните «чистую» установку Windows
Если не один из перечисленных методов не помог избавиться от DRIVER_VERIFIER_DETECTED_VIOLATION», попробуйте переустановить Windows. Для того чтобы выполнить чистую установку Windows необходимо создать установочный диск или другой носитель с которого планируется осуществление установки операционной системы.
Загрузите компьютер из установочного диска. Для этого может понадобиться изменить устройство загрузки в BIOS или UEFI для более современных компьютеров.
Следуя пунктам меню установщика укажите диск, на который вы хотите установить Windows. Для этого понадобится отформатировать его. Если вас не устраивает количество или размер локальных дисков, их можно полностью удалить и заново перераспределить.
Помните, что форматирование, удаление или перераспределения дисков удалит все файлы с жесткого диска.
После указания диска для установки Windows запуститься процесс копирования системных файлов и установки операционной системы. Во время установки от вас не потребуется дополнительных действий. В течении установки экран компьютера будет несколько раз гаснуть на непродолжительное время, и для завершения некоторых этапов установки компьютер будет самостоятельно перезагружаться.
В зависимости от версии Windows на одном из этапов от вас может понадобиться выбрать или внести базовые параметры персонализации, режим работы компьютера в сети, а также параметры учётной записи или создать новую.
После загрузки рабочего стола чистую установку Windows можно считать законченной.
Примечание. Прежде чем приступить к выполнению чистой установки Windows заранее побеспокойтесь о наличии драйверов ко всем установленным устройствам и сохранности ваших файлов. Загрузите и сохраните драйвера на отдельный носитель информации, а для важных данных создайте резервную копию.
Как сбросить Windows 10 к исходному состоянию
Как сбросить Windows 10, 8, 7 если компьютер не загружается
From Stop Code DRIVER VERIFIER DETECTED VIOLATION Windows PC error code issue, your PC gets crashes and started running slow. The Driver Verifier is basically a program on your Windows PC that tracks down all the bad drivers that are causing a BSOD (Blue screen of death) error problem. It replaces the default O.S. (Operating System) subroutines with ones that are specifically developed to catch the PC driver bugs. This DRIVER VERIFIER DETECTED VIOLATION is one of the most common BSOD (Blue screen of death) error problem issues. So from this Stop Code DRIVER_VERIFIER_DETECTED_VIOLATION error, the PC driver attempting to corrupt the system has been caught.
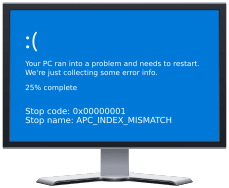
This shows an error code message like,
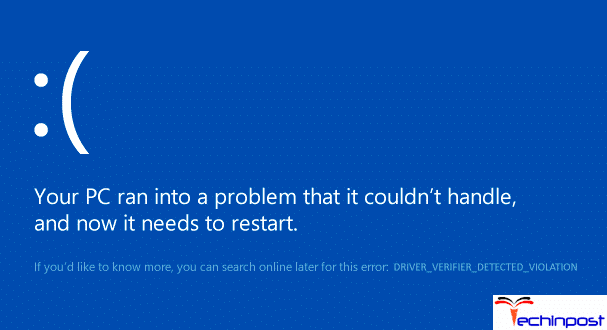
Your PC ran into a problem that it could not handle & now it needs to restart
If you would like to know more about this DRIVER_VERIFIER_DETECTED_VIOLATION then you can search online later for this error DRIVER VERIFIER DETECTED VIOLATION problem
This program works by monitoring the drivers you selected & then if an issue is detected then it will immediately cause a blue screen of death error. This DRIVER VERIFIER DETECTED VIOLATION is also the common bugcheck error problem for fatal errors. You may get this error when after downloading a new NVIDIA graphic card on your Windows PC. So if you want to get rid of this type of error problem then check and read out this below DRIVER VERIFIER DETECTED VIOLATION article once thoroughly,
Causes of Stop Code DRIVER VERIFIER DETECTED VIOLATION Windows Error Issue:
- Windows 10 PC error issue
- BSOD (Blue screen of death) error
- Windows Startup problem
So, here are some new best accessible methods and solutions for fixing and solving this type of Stop Code DRIVER VERIFIER DETECTED VIOLATION Windows PC error code problem issue from your Windows PC permanently.
How to Fix Stop Code DRIVER VERIFIER DETECTED VIOLATION Error Issue
1. Run a Windows Automatic Repair on your PC –
- Go to the start menu
- Search or go to the PC settings there
- Click on the ‘Troubleshoot‘ option there
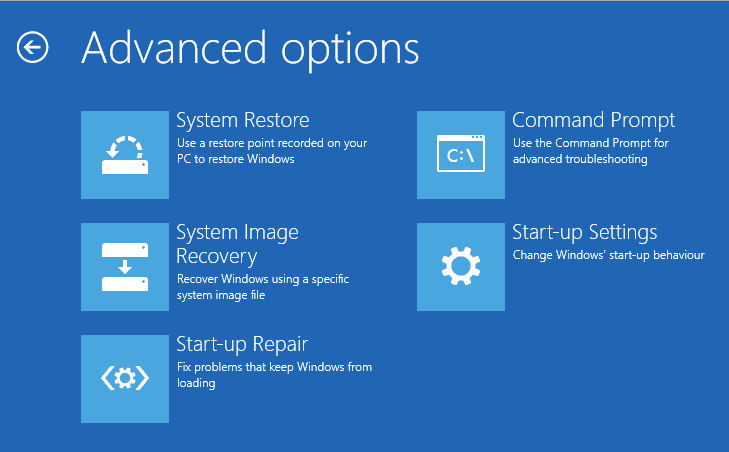
- After opening, click on the ‘Advanced options‘ there
- Then, click on the “Automatic Repair” option there
- After troubleshooting, close the tab
- That’s it, done
Running an automatic repair of your PC can get rid of this error DRIVER VERIFIER DETECTED VIOLATION Windows 10 code problem from your PC.
2. Uninstall the Virtualization Software from your Windows PC –

- Go to the start menu
- Go to & Click on the Control Panel
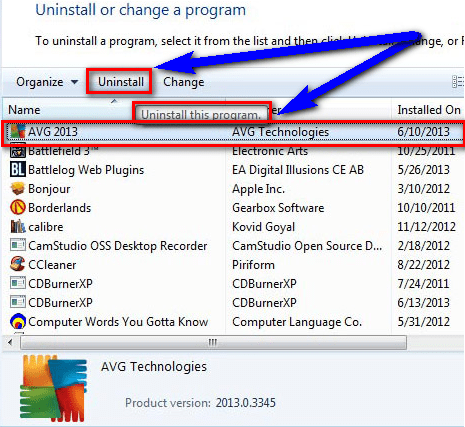
- Go to the Programs and Features option
- Open it & Go to the Virtual Program
- Select & Right click on it
- Select Uninstall option there
- Now, Wait for some seconds to uninstall it
- After completing, close the tab
- Restart your PC once
- That’s it, done
Uninstalling the virtualization software from your Windows PC can quickly get rid of the DRIVER VERIFIER DETECTED VIOLATION Windows 10 error code problem.
3. Disable or Uninstall Windows Antivirus Software on your PC –
- Open the start menu
- Go to the Control Panel
- Now, go to the Security there & then go to the security centre
- If Windows can detect your Antivirus software,
- Then, It will give Virus protection (If the software is ON)
- Check the help for information on ‘Disabling‘ it
- That’s it, Done
Disabling or Reinstalling the Antivirus software will fix this Error Code on how to disable the DRIVER VERIFIER DETECTED VIOLATION Windows 8 problem from your PC.
4. Uninstall Graphic Card Drivers & Install the Latest Version –
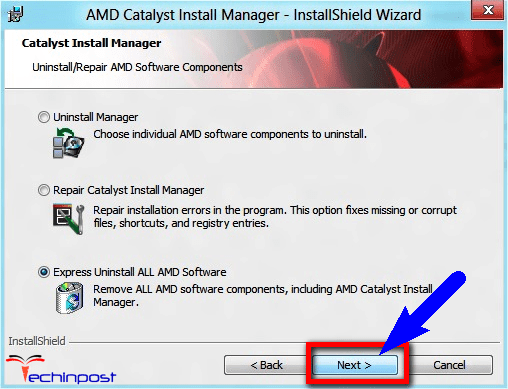
Uninstall all the Graphics card drivers & install the latest version of the drivers on your PC. By doing this, you can get rid of this DRIVER VERIFIER DETECTED VIOLATION loop error code problem.
5. Update your Windows Drivers on your PC –

- Go to the start menu
- Search or go to the Control Panel
- Click on it and opens it there
- After that, scroll down and go to the “Windows Update” section there
- Click on it & Check if any newly latest driver update is available or not
- If any, Update it fast
- Or, you can set it as ‘automatically update.’
- For that, go to the left side
- & click on the “Changes Settings” option there
- After opening, click on the drop-down menu there
- Select the “Install Updates Automatically” option there
- & click on the OK button to save this configuration
- After completing, close the tab
- That’s it, done
Trying the above method can help you to get rid of this type of DRIVER VERIFIER DETECTED VIOLATION loop error problem issue.
” OR “
- Go to the start menu
- Search or go to the Control Panel or directly go to Device Manager
- Click on it and opens it there
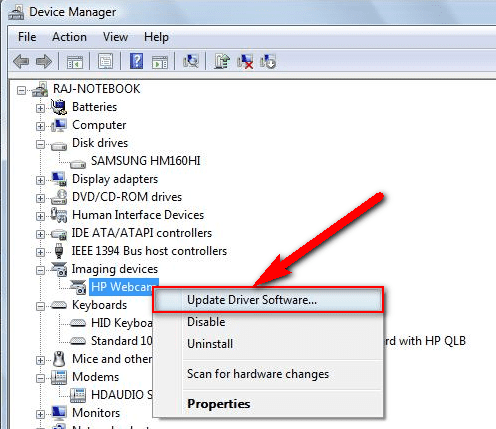
- After going to the Device Manager there,
- check if any driver has an error sign there
- If any, then right-click on it
- & Click on the “Update driver software” there
- Wait for some minutes to update it
- After updating, close the tab
- That’s it, done
Updating your driver by any of these two methods can quickly fix and solve this DRIVER VERIFIER DETECTED VIOLATION Windows 10 problem from your PC.
6. Disable or Reset the Driver Verifier on your Windows PC –
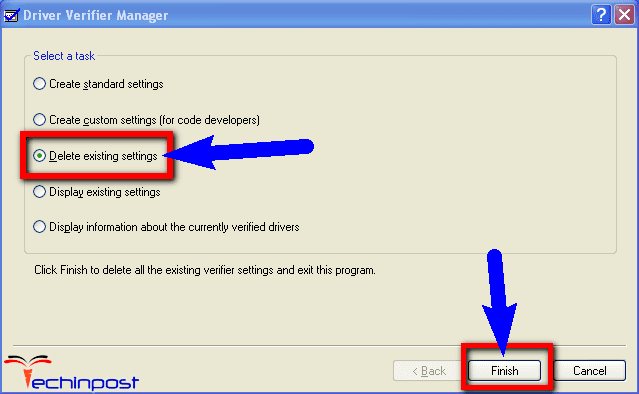
- Go to the start menu
- Type ‘verifier.exe‘ there & open that file
It will open a pop-up there - Mark Delete Exciting Settings there
- Now, click on the Finish option to remove it
- After completing, close that window
- Restart your PC
- That’s it, done
By trying this above guide, you will get back from this type of DRIVER VERIFIER DETECTED VIOLATION Windows 10 error issue from your PC completely.
” OR “
- Go to the start menu
- Type CMD there or directly open it
(It will open the Command Prompt) - Type verifier/reset command there
- Press Enter to start it
- Now, close the CMD
- Restart your PC
- That’s it, done
By disabling or resetting the driver verifier can quickly solve this type of Turn OFF DRIVER VERIFIER DETECTED VIOLATION Windows 8 error code issue from your Windows PC.
7. Undo Recent System Changes on your Windows PC –
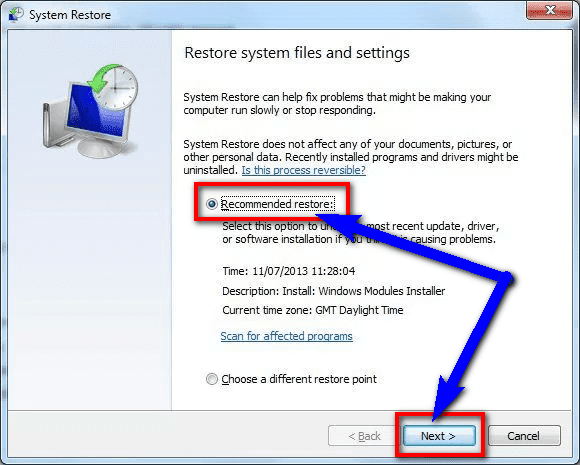
- Go to the start menu
- Search or go to the ‘System Restore there
- Clicks on it & open it
- Follow the steps & choose the Restore point options
- Now, click on the Next option there to start
- After done, close the tab
- That’s it, done
By doing undo recent system changes, it will restore the PC to fix this DRIVER VERIFIER DETECTED VIOLATION loop code problem quickly.
8. Reset or Reinstall the Windows –
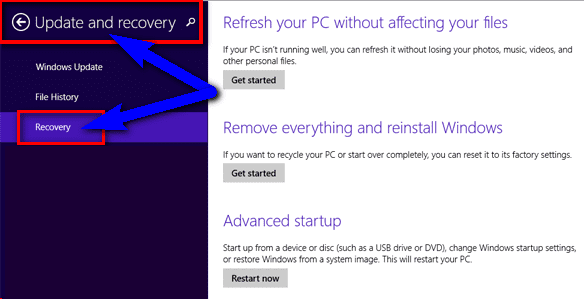
- Run your PC in Safe Mode
- After that, go to the ‘PC settings‘ there
- Click on the ‘Update and Recovery option there
- Now, choose the “Recovery” option there
- Now, wait for some minutes to process
- After that, close the tab
- That’s it, done
Reset or Re-install your windows can also fix and solve this DRIVER VERIFIER BSOD loop or this DRIVER VERIFIER DETECTED VIOLATION Windows 10 problem.
9. Run a Full Scan for Viruses/Malware on your Windows PC –
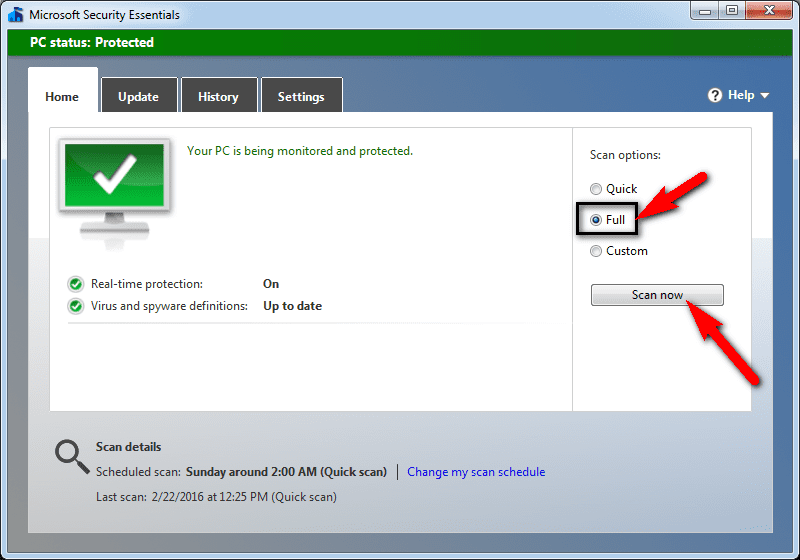
- Go to the start menu
- Search or run the Microsoft Security Essentials there
- Select the ‘Full‘ option there
- Click on the Scan option there
- After scanning, close the tab
- That’s it, done
It will run a complete full scan of your PC to fix this error DRIVER VERIFIER DETECTED VIOLATION Windows 8 code problem quickly.
10. Check any Hardware Failure issue on your Windows PC –
- Go to the start menu
- Search or go to the ‘RUN‘ there
- Click on it and Opens it there
- Type this below command there
” mdsched.exe “ - Now, Press Enter there to start it
- After completing, close the tab
- That’s it, done
Checking for hardware, failure issues can get help you to fix this error DRIVER VERIFIER DETECTED VIOLATION Windows 10 code problem.
Conclusion:
So here are some very natural methods, and the best solutions for getting rid out of this Stop Code DRIVER VERIFIER DETECTED VIOLATION Windows PC error code problem from your Windows PC permanently. Hope these above guides will surely help you to get back from this error Stop Code DRIVER_VERIFIER_DETECTED_VIOLATION issue.
If you were facing any error problem while fixing Stop Code DRIVER VERIFIER DETECTED VIOLATION Windows PC error code or any type of error issue, then you can Comment down the error code problem below you can also directly Contact us.
Худший вид ошибок, который может произойти с вами, это синий экран смерти, который возникает время от времени. Если ошибка возникает слишком часто, ее становится практически невозможно вылечить должным образом, потому что у вас нет доступа к компьютеру достаточно долго, чтобы вылечить ошибку.
Driver Verifier может вызывать эти ошибки, если на вашем компьютере установлен неисправный драйвер, который необходимо исправить. К сожалению, Driver Verifier также может срабатывать из-за ложных срабатываний или просто устаревших драйверов, которые все еще работают должным образом. Следуйте приведенным ниже решениям, чтобы попытаться решить проблему ВЕРИФИКАТОР ДРАЙВЕРОВ ОБНАРУЖИЛ НАРУШЕНИЕ BSOD в Windows.
Решение 1: Отключить запуск программы Driver Verifier
Если Driver Verifier включен по умолчанию или если он запустился сам по себе, вы всегда можете попробовать отключить его. Отключить Driver Verifier легко, если у вас есть непрерывный доступ ко всем настройкам компьютера, но все может стать сложнее, если BSOD появляется каждые пару секунд или минут или если вы вообще не можете получить доступ к своему компьютеру. К счастью, есть способ исправить и это.
Подготовка
Чтобы выполнить любой из способов устранения неполадок, представленных в этой статье, вам потребуется подготовить установочный DVD-диск Windows или USB, который вы будете использовать для устранения ошибки. Для старых версий Windows (старше Windows 10) вам потребуется использовать оригинальный диск, который вы получили вместе с операционной системой. Однако для Windows 10 вы можете создать его в кратчайшие сроки.
- Загрузите программу Media Creation Tool с официального сайта Microsoft сайт. Дважды щелкните на загруженном файле под названием MediaCreationTool.exe для того, чтобы открыть мастер. Нажмите Принять.
- На начальном экране выберите пункт Создать установочный носитель (USB-накопитель, DVD или ISO-файл) для другого ПК.

- Язык, архитектура и редакция загрузочного диска будут выбраны на основе конфигурации вашего компьютера, но вам следует снять флажок Использовать рекомендуемые параметры для этого ПК, чтобы выбрать правильные настройки для ПК, на котором возникает ошибка (вероятно, вы создаете это на другом ПК).
- Нажмите Далее и выберите опцию USB флэш-накопитель или DVD, когда появится запрос, чтобы выбрать USB или DVD, в зависимости от того, какое устройство вы хотите использовать.

- Нажмите Далее и выберите диск из списка, в котором отображаются устройства хранения данных, подключенные к вашему ПК.
- Нажмите Далее, и средство создания носителя перейдет к загрузке файлов, необходимых для установки, чтобы создать установочное устройство.
Теперь пришло время использовать этот носитель для восстановления, чтобы починить компьютер.
- Вставьте диск восстановления, который у вас есть или который вы создали для своей операционной системы, и запустите компьютер. Следующие шаги отличаются для разных операционных систем, поэтому выполняйте их соответственно:
WINDOWS XP, VISTA, 7: Должна открыться программа установки Windows, которая предложит вам ввести язык, а также настройки времени и даты. Введите их правильно и выберите опцию Восстановить компьютер в нижней части экрана. Оставьте первую радиокнопку в качестве выбора, когда появится запрос Использовать средства восстановления или Восстановить компьютер, и нажмите на кнопку Далее. Выберите Command Prompt, когда появится окно Выбор инструмента восстановления.

WINDOWS 8.1, 10: Вы увидите окно Выбор раскладки клавиатуры, поэтому выберите ту, которую вы хотите использовать. Появится окно выбора опции, поэтому щелкните на Troubleshoot (Устранение неполадок) >> Дополнительные параметры >> Командная строка.
- После успешного открытия Командной строки введите следующую команду и обязательно нажмите клавишу Enter после завершения:
Верификатор /сброс

- Перезагрузите компьютер без носителя восстановления и проверьте, сохранилась ли проблема.
Поскольку Driver Verifier является надежным инструментом, вполне возможно, что один из ваших драйверов действительно неисправен, и это лишь вопрос времени, когда на вашем компьютере начнут возникать другие странные ошибки. Вот почему важно обновить все драйверы, как только вы сможете загрузиться в компьютер без постоянных BSOD’ов.
- Выберите кнопку «Пуск», введите «Диспетчер устройств» и выберите его из списка результатов в верхней части страницы.

- Разверните одну из категорий, чтобы найти название устройства, которое вы хотите обновить, затем щелкните на нем правой кнопкой мыши и выберите Обновить драйвер. Для видеокарт раскройте категорию «Адаптеры дисплея», щелкните правой кнопкой мыши видеокарту и выберите «Обновить драйвер».

- Выберите Автоматический поиск обновленного программного обеспечения драйверов.
- Если Windows не находит новый драйвер, вы можете попробовать поискать его на сайте производителя устройства и следовать его инструкциям. Вам нужно будет повторить тот же процесс для всех устройств или вы можете использовать автоматизированный инструмент, чтобы сделать это за вас.
Примечание: Если вы используете Windows 10, последние версии драйверов часто устанавливаются вместе с другими обновлениями Windows, поэтому убедитесь, что вы держите свой компьютер в актуальном состоянии. Windows Update запускается автоматически в Windows 10, но вы можете проверить наличие нового обновления, следуя приведенным ниже инструкциям.
- Используйте комбинацию клавиш Windows + I для того, чтобы открыть Настройки на компьютере с Windows. Также вы можете найти «Настройки» с помощью строки поиска, расположенной в левой части панели задач.
- Найдите и откройте «Обновить & подменю «безопасность» в приложении «Настройки.
- Перейдите на вкладку Windows Update и нажмите на кнопку Проверить наличие обновлений под статусом Обновление, чтобы проверить, доступна ли новая версия Windows.

- Если он есть, Windows должна автоматически продолжить процесс загрузки.
Бонусное решение: Если проблема возникла с игрой Steam
Если ошибка BSOD появляется при попытке запустить игру Steam или при попытке выполнить дополнительные действия, например, установить обновление или расширение для игры, пользователи сообщают, что проверка кэша игры обычно помогает и мгновенно решает проблему, предотвращая повторное появление BSOD. Обязательно проверьте это!
Проверка целостности кэша игры — это опция, доступная только пользователям Steam, которые скачали игру оттуда. Это довольно хорошее исправление, так как эта опция будет искать битые файлы вашей игры, а также автоматически загрузит все недостающие или поврежденные файлы. Для этого выполните следующие действия.
- Откройте клиент Steam, дважды щелкнув по нему или найдя его в меню Пуск, и перейдите на вкладку Библиотека.
- Щелкните правой кнопкой мыши на игре, которая вызывает эти проблемы, и выберите в выпадающем меню пункт «Свойства».
- Перейдите на вкладку Локальные файлы и нажмите на опцию Проверить целостность игровых файлов…

- Попробуйте запустить игру и проверьте, появляется ли по-прежнему BSOD DRIVER_VERIFIER_DETECTED_VIOLATION.
Smooth working on a computer can be a nightmare all of a sudden when your Windows 10 generates DRIVER_VERIFIER_DETECTED_VIOLATION error. With bug check code 0x000000C4, this blue screen error indicates that there is something wrong with the Driver Verifier.
While most of the causes for Blue Screen of death like CPU/GPU overclocking, virus attack, software conflict, bad RAM remain the same, this specific one possibly emerges from Driver issues mostly. Well, nothing much to worry about as we are presenting a bunch of resolutions to fix DRIVER VERIFIER DETECTED VIOLATION in the following segment.
Here is how to fix DRIVER VERIFIER DETECTED VIOLATION BSOD Error in Windows 10 –
Before trying out any workaround, you will have to make the system stable first as BSOD error compels the Windows to reboot frequently and you cannot really work on rectifying it. The system does it purposely so that it can save you from losing important data. However, disabling automatic restart is not hard at all when you follow the below guidelines –
- Firstly, Save and close preferably all the ongoing processes and Press Win+D keys at once to reach the Desktop.
- Right-click on This PC and choose Properties from the context menu.
- Promptly System window will make an appearance from where you need to choose Advanced system settings lying on the left pane.
- Once the System properties wizard opens, jump into the Advanced tab.
- Roll the cursor and reach out to Startup and Recovery segment, eventually, hit Settings.
- In the upcoming popup, rush to System failure area and uncheck box beside Automatically restart.
- Lastly, hit OK from the bottom of the window and save the changes into the system.
When all these changes are saved, the windows will not reboot anytime automatically and you will be able to deploy the resolutions without any disturbance.
1] Reset the Driver Verifier or Disable it to fix DRIVER VERIFIER DETECTED VIOLATION
Bug check code 0x000000C4 has got a clear indication that it comes up from the driver verifier, therefore disable the tool as a resolution. Plenty of the users benefited from doing the same whereas some people also reset the Verifier for the same outcome. To accomplish the task, follow the below guidelines –
- Press the Windows key and type in verifier.exe.
- Hit the Enter key when you see the search result.
- If a UAC prompts, click Yes to continue.
- From the next wizard, choose the radio button located alongside Delete Existing Settings option.
- Click Finish button and reboot the device.
On the next Startup, DRIVER_VERIFIER_DETECTED_VIOLATION should take leave from your Windows 10. Unfortunately, if it still exists, you need to reset Verifier by executing a command in elevated Command Prompt. For that –
- Press Win+S at once and invoke Taskbar Search on display.
- Type cmd.exe in the empty text area and chose Run as Administrator once Command Prompt turns up in the result.
- Hit Yes for the UAC to get access to elevated Command Prompt.
- In the black window, enter the below command and hit Enter key –
Verifier /reset
- After executing the same, reboot Windows 10.
2] Keep the drivers up to date every time using Device Manager
Drivers maintain the relationship between specific hardware and the computer Bus. Also, the same provides software interfaces while running specific hardware items. When such an important element becomes outdated, blue screen error DRIVER VERIFIER DETECTED VIOLATION shows up in the system.
Though the process of updating drivers is made autonomous long with Windows itself, there is a time when you exclude drivers from updates on your own. Or, sometimes automatic process stops in the midway due to causes like poor internet connection and you get stuck in additional drawbacks. In such a case, you need to carry out the procedure manually using Device Manager. The manual process is as follows –
- Click the search icon located on the taskbar and type in devmgmt.msc.
- After viewing Device Manager in the appeared search result, hit Enter key.
- Discover the devices having outdated as well as incompatible drivers. Mostly, system indicates them with a white exclamation mark.
- When you get any, double-click the same in order to expand the driver list.
- Right-click on the driver having a yellow warning sign and select Update driver.
- From the next pop up, choose the option Search automatically for updated driver software.
- Once the system finishes online search, the system will install the available driver automatically.
- Repeat the same for all drivers that may cause blue screen error in Windows 10.
Note – If the system fails to find any newer version for your device driver, visit the manufacturer’s website and get the same from there.
3] Uninstall Graphics Card Driver and get the updated version
In recent times, you will find so many experts declaring Graphics Card Drivers like AMD or NVIDIA come out guilty for causing the DRIVER VERIFIER DETECTED VIOLATION Blue Screen error. The issue has got an easy fix when you uninstall Video driver completely as from the experience of some users who have resolved the stop code already. You can, later on, install the latest version if the error really leaves Windows 10 completely, so try out this workaround soon if you experience a drawback.
- Open Device Manager and expand the Display adapters.
- Right-click on the graphics driver that exists on your system and select the option Uninstall device.
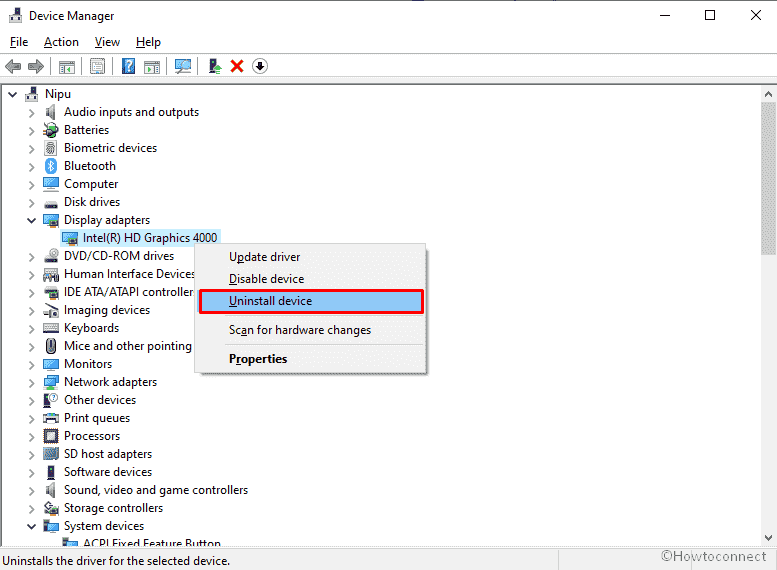
- When a new popup appears, check the box set for Delete the driver software for this device followed by clicking the Uninstall button.
4] Overlocking or Underlock the Graphics Card Driver
Overlocking is an operation of Hardware settings which is too useful for performance improvement. Though the process is a little bit risky when you do not accomplish it carefully. Therefore, we urge you to do the task with utmost care to avoid damaging the Hardware.
Another top-notch process pretty similar to the above overlocking is underclocking where the operation slightly reduces the Hardware performance. This will drop the heat emission of the Hardware as well as you can avoid the incompatibility drawbacks. You can lower the clock of Graphics card to a maximum of 100 Mhz. Both these processes are very much useful for fixing the Blue Screen error from Windows 10.
5] Update Windows installing patches
Microsoft releases Cumulative updates quite regularly and you need to install them as soon as they are available for your machine. These patches mainly contain bug fixes and improvements which help the Operating system maintain good health.
Microsoft has made this process easier as the updates will be installed automatically when connected to an active internet connection. Well, there is a plausible risk involved as the process might get stuck in a loop. Therefore, you can manually install them by going through the below instructions –
- Press Windows and I keyboard shortcut together.
- When the main interface of the Settings app shows up, click Update & Security tile.
- Move to the right pane of currently running page and hit the button Check for updates.
- If the system finds any patch available for you, you will get a new button named Download.
- Click on Download to begin the process.
- Once the procedure finishes, the system will install the patches automatically. All you need to do is stay in front of the device and do what the system suggests.
6] Uninstall Virtualization Software to fix DRIVER VERIFIER DETECTED VIOLATION
Virtualization programs have gained huge popularity over the past 10 years in spite of having some drawbacks in them. A few users have already started experiencing the DRIVER VERIFIER DETECTED VIOLATION Windows 10 blue screen error while using the same. From that point of view, it will be better if you uninstall the Virtualization software to resolve bug check code 0x000000C4.
- Open Run Dialog box in the first place, thereafter, type appwiz.cpl in the text bar.
- Click OK button to get access to Program and Features window.
- Look for Microsoft System Center Application Virtual Management Server or Microsoft System Center Application Streaming Server.
- Once found, right-click on the same and choose Uninstall.
- When a popup prompts, give your consent for removing virtualization software by clicking Yes button.
7] Detect and resolve the Malware codes in Windows Security
From the time we have become so advanced in technology, invader-s started taking the help of malicious software to steal information. These malicious codes carry features to replicate themselves into genuine programs and make them unable to detect easily. Nowadays, they can easily enter into your system, especially through emails, links on web pages and not to mention USB drives. They can sneak through your defense easily and that’s why you need a strong shield to eliminate them.
Once a virus manages to enter into Windows 10, it causes the system files to lose their originality and as a consequence blue screen error like DRIVER_VERIFIER_DETECTED_VIOLATION shows up. Microsoft presents Windows Security with a powerful shield mechanism and that will offer you real-time protection both on and offline. Here in the below segment, you will have the guidance to do a virus scan and resolve the threats using the built-in antivirus –
- Make a click on the Show hidden icon arrow symbol found in the taskbar.
- When the options become visible, select the shield icon to+ to bring forth Windows Security.
- From the left sidebar of the subsequent page, opt for Virus & threat protection.
- Jump to the adjacent right side and click the link that says Scan options.
- Next, hit the radio button of Full scan followed by clicking on Scan now button to initiate the process.
- After being finished, the system will present the scanning result. If you see any malware listed there, select Clean threats option to dismiss them.
- Later on, choose Remove at first and then hit Start actions to clear them all.
8] Uninstall all third party security solutions
We have mentioned above why an antivirus is necessary nowadays to resolve a potential virus program. Though there are good numbers of security solutions, not all can be trusted. Some may be detrimental as well and cause more damage than curing the existing issue.
Well, Windows Security is the best suited for the Operating System, you can use it for strong protection. In case you have another one in the system, you need to uninstall one to avoid software conflict. Uninstalling the third party one is recommended and you can do it moving through below guidelines –
- Press Win+X and select Run from the visible Power user menu.
- Type appwiz.cpl in the blank text bar given and then click OK button.
- When Program and Features window is upfront, locate third-party antimalware program installed in the system and select the same.
- Click Uninstall from the top ribbon.
- If UAC asks for permission, select Yes to give your consent.
9] Go with Default Automatic Repair
In case of severe vulnerabilities like DRIVER VERIFIER DETECTED VIOLATION Blue Screen error, Operating System will automatically launch its Automatic Repair when at the Third Boot. A good number of tests will be carried out in this process and that might be quite lengthy. To save time, you can always try performing t manually using below guidelines –
- Open the Start menu and hit Gear cog. to launch the Windows Settings app.
- Click on the Update & Security tile and from the next page, select Recovery option from the left pane.
- Shift to the adjacent right side and click Restart now button located under Advanced startup.
- On further Startup next, select Troubleshoot =>Advanced options => Startup Repair.
- In the Automatic Repair page, provide your Microsoft account and password.
- Finally, hit the Continue button to initiate the repairing process.
10] Modify Windows Registry
Sometimes, changing something in the Windows Registry might be dangerous to call in a blue screen error in the system. In that case, you have to tweak the registry by going through the below guidelines –
- Press Win+S keys and type regedit in the search bar.
- Hit Enter when you see Registry Editor in the appearing result.
- When a UAC prompts, click Yes button to proceed forward.
- After the Registry window appears, you need to navigate to the following locations –
HKEY_LOCAL_MACHINE\SYSTEM\Setup\Status\ChildCompletion
- On the right side of the window, find and double click on setup.exe.
- In the pop-up window, set the Value data to 3. After that, click OK to save the change and exit the Registry.
- Now, reboot your computer and check if bug check code 0x000000C4 is fixed or not.
11] Fix up Hard Disk Bad areas to fix DRIVER VERIFIER DETECTED VIOLATION
Hard Disk is the storehouse in a device and in most cases, this is a very sensitive part of a machine. Due to prolonged use and poor maintenance, there might be bad sectors formed in it causing some serious havoc like DRIVER VERIFIER DETECTED VIOLATION BSOD error.
Hard Disk must be maintained well every time and there are a quite good number of ways to keep it healthy. Unfortunately, if there have already bad areas formed inside, you have no more way but to deploy the Disk Checking tool. The utility powers up in Command Prompt with administrative privileges. The guideline to avail is as follows –
- Open Command Prompt as administrator using any convenient way.
- When the black panel shows up, insert
chkdsk C: /f /r /xcommand after the winking cursor. - Hit Enter to activate the utility.
- When the process is done, reboot the system.
12] Run the DISM tool to rectify Windows image files
ISO files are released when a Windows Update is about to avail on the internet comprising of image files. These files usually remain intact but sometimes might get corrupted by being trapped in an unexpected loop. In that happens, you might face the blue screen error with bug check code 0x000000C4.
To prevent the stop code, you have to rectify these image files and only DISM tool can help you. The tool is active in Elevated Command prompt, so follow the below guidelines to deploy the workaround –
- Right-click on the Start menu and choose Run.
- When the command box appears, type cmd.exe.
- Press Ctrl+shift+Enter altogether to run Command Prompt with the admin privilege.
- If a User Account Control prompts for consent, choose Yes.
- Type the following command in the black panel –
DISM.exe /Online /Cleanup-image /Restorehealth
- Hit Enter to execute the command-line tool.
13] Check for hardware failures and Memory issues to fix DRIVER VERIFIER DETECTED VIOLATION
There are plenty of reasons to have blue screen error in the system and one of those is a bad RAM stick. In case you observe DRIVER VERIFIER DETECTED VIOLATION BSOD error in your system, go for checking the RAM for issues first.
Next on the list is a defective Hard Drive, Motherboard or Wireless adapter. If you find some bigger snags there, it’s better to go for a full replacement. Very often a simple Memory diagnosis will help a lot as well. Windows has a default Memory Diagnostic tool to serve this purpose which can be reached when you follow the below guidelines –
- Click the taskbar search icon and type mdsched.exe in the search bar.
- Hit Enter to bring forward Memory Diagnostic tool.
- From the upcoming pop-up, opt for Restart now and check for problems (recommended).
- This action compels Windows to perform rebooting promptly.
- After signing back in, a blue screen will become visible which detects memory issues.
- Once the progress reaches 100%, Windows 10 will reboot once again automatically.
- Upon powering back later, results will be available in the System Tray in the Notification area.
14] Repair Windows System components in Elevated Command Prompt
Windows needs some core elements to run it usually termed as System files. The quality of these components should be kept intact even in the worst cases as well to prevent encountering bugs and issues. Often these files might get corrupted due to reasons like malware infection from a software conflict where many of these go missing unexpectedly. If such damage happens in the system, it will be at high risk of having DRIVER VERIFIER DETECTED VIOLATION blue screen error in Windows 10.
Well, to fix this type of stop code, there is a very fine utility that comes pre-installed in the OS called System File Checker tool. The utility powers up in the Elevated Command Prompt and you need to proceed with below guidelines to avail that –
- Launch Elevated Command Prompt.
- Type the following command line and hit Enter to execute the same –
SFC /Scannow
- Let the utility do its job without interruption.
- After completion, restart the device and check if the error has resolved.
Methods:
1] Reset the Driver Verifier or Disable it
2] Keep the drivers up to date every time using Device Manager
3] Uninstall Graphics Card Driver and get the updated version
4] Under lock the Graphics Card Driver
5] Update Windows installing latest patches
6] Uninstall Virtualization Software
7] Detect and resolve the Malware codes in Windows Security
8] Uninstall all third party security solutions
9] Go with Default Automatic Repair
10] Modify Windows Registry
11] Fix up Hard Disk Bad areas
12] Check for hardware failures
13] Run the DISM tool to rectify Windows image files
14] Repair Windows System components in Elevated Command Prompt
That’s all!!
Repair any Windows problems such as Blue/Black Screen, DLL, Exe, application, Regisrty error and quickly recover system from issues using Reimage.