Код ошибки 0x80240438 может возникать как для обновлений Windows, так и для Магазина Microsoft в Windows 10. Это связано с тем, что механизм доставки для обоих является взаимозависимым и общим. По этой причине многие коды ошибок Windows Update и Microsoft Store совпадают. Исправить оба легко, и большинство методов одинаковы. Мы обсудим эти исправления в этой статье сегодня.
При установке обновлений возникли проблемы, но мы попробуем позже. Если вы продолжаете видеть это и хотите искать информацию в Интернете или обратиться в службу поддержки, это может помочь – (0x80240438).

Ошибка 0x80240438 для обновлений Windows и магазина Microsoft
Если вы столкнулись с этой проблемой, вам необходимо проверить следующее:
- Запустите средство устранения неполадок Центра обновления Windows.
- Отключите антивирус или брандмауэр.
- Отключить прокси-соединения.
- Измените политику Удалить доступ, чтобы использовать все функции Центра обновления Windows .
- Сбросить папки Windows Update.
- Загрузите обновление вручную.
1] Запустите средства устранения неполадок Центра обновления Windows .
Вы можете запустить средство устранения неполадок Центра обновления Windows, а также средство устранения неполадок Центра обновления Windows от Microsoft и проверить, поможет ли это в решении любой из ваших проблем.
2] Отключите антивирус или брандмауэр
Вы можете временно отключить Защитника Windows, который устанавливается из коробки на вашем компьютере с Windows 10. Вы также можете отключить брандмауэр Windows на своем компьютере и проверить, исправляет ли это ошибки, с которыми вы сталкиваетесь. Если вы используете стороннее программное обеспечение безопасности, отключите их и посмотрите.
3] Отключить прокси-подключения
Начните с ввода Свойства обозревателя в поле поиска Cortana. Нажмите на соответствующий результат.

Теперь перейдите на вкладку Подключения.
Под разделом, помеченным как Настройки локальной сети (LAN). Нажмите на кнопку с надписью Настройки локальной сети.

В разделе Прокси-сервер снимите флажок с отметки Использовать прокси-сервер для вашей локальной сети (эти настройки не будут применяться для подключений удаленного доступа или VPN-подключений).
Нажмите ОК и перезагрузите компьютер, чтобы изменения вступили в силу.
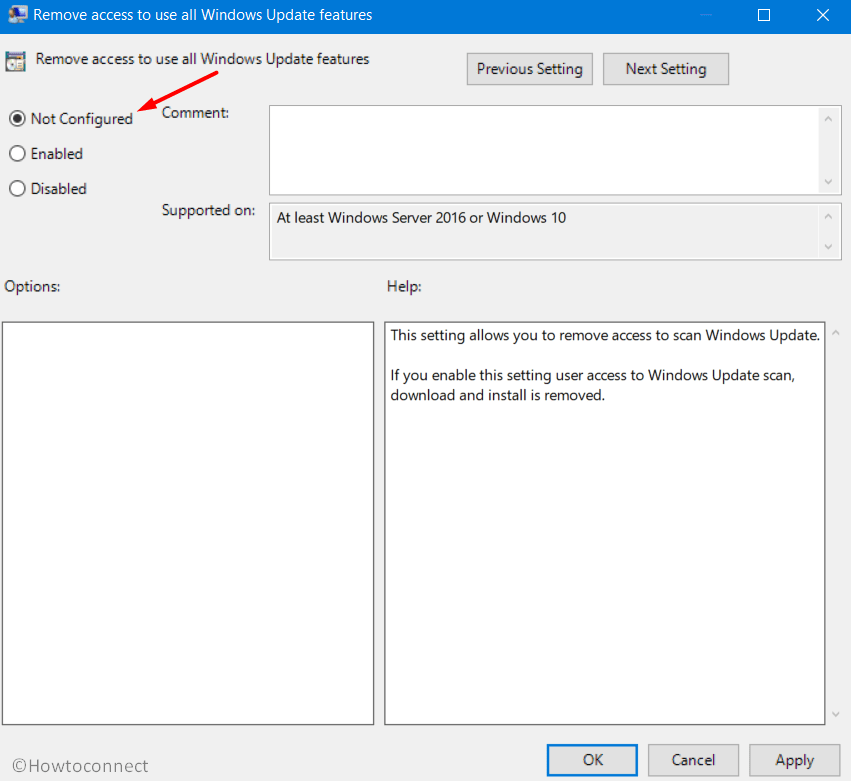
4] Измените Удалить доступ, чтобы использовать все функции Центра обновления Windows Политика .
Нажмите комбинацию кнопок WINKEY + R, чтобы запустить утилиту Run, введите gpedit.msc и нажмите Enter. После открытия редактора групповой политики перейдите к следующему параметру:
Конфигурация пользователя> Административные шаблоны> Компоненты Windows> Центр обновления Windows

Теперь на правой боковой панели дважды нажмите Удалить доступ для использования всех функций Центра обновления Windows и установите для него переключатель Не настроено .
Этот параметр позволяет вам удалить доступ к Центру обновления Windows. Если вы включите этот параметр, все функции Центра обновления Windows будут удалены. Это включает в себя блокировку доступа к веб-сайту Центра обновления Windows по адресу http://windowsupdate.microsoft.com, по гиперссылке Центра обновления Windows в меню «Пуск», а также в меню «Сервис» в Internet Explorer. Автоматическое обновление Windows также отключено; вы не будете ни получать уведомления, ни получать критические обновления из Центра обновления Windows. Этот параметр также запрещает диспетчеру устройств автоматически устанавливать обновления драйверов с веб-сайта Центра обновления Windows.
Если включено, вы можете настроить один из следующих параметров уведомлений:
- 0 = Не показывать никаких уведомлений – этот параметр удалит все доступ к функциям Центра обновления Windows, и никакие уведомления не будут показаны.
- 1 = Показывать уведомления о перезагрузке – этот параметр будет отображать уведомления о перезагрузках, необходимых для завершения установки.

Это решило бы ваши проблемы, если бы это было причиной.
Выйдите из редактора групповой политики и перезагрузите компьютер, чтобы изменения вступили в силу.
5] Сброс папок Центра обновления Windows
Вам необходимо удалить содержимое папки SoftwareDistribution и сбросить папку Catroot2.
6] Загрузите обновление вручную .
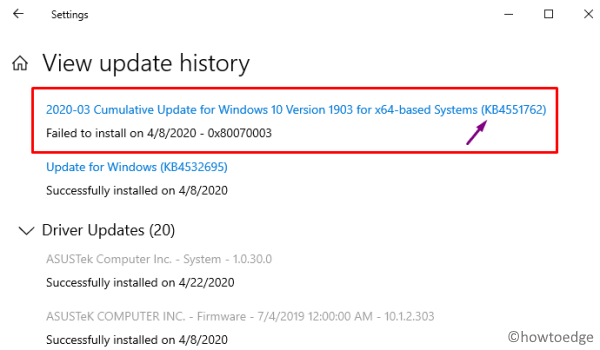
Если это не обновление функции, а только накопительное обновление, вы можете вручную загрузить и установить Центр обновления Windows.Чтобы узнать, какое обновление не удалось выполнить, выполните следующие действия:
- Выберите «Настройки»> «Обновление и безопасность»> «Просмотреть историю обновлений».
- Проверьте, какое именно обновление не удалось. Обновления, которые не удалось установить, будут отображаться как Failed в столбце Status.
- Затем перейдите в Центр загрузки Microsoft и найдите это обновление по номеру КБ.
- Как только вы найдете его, скачайте и установите его вручную.
Вы можете использовать Microsoft Update Catalog, службу от Microsoft, которая предоставляет список обновлений программного обеспечения, которые могут распространяться по корпоративной сети. Использование каталога Центра обновления Майкрософт может оказаться универсальным местом для поиска обновлений программного обеспечения, драйверов и исправлений Microsoft.
Всего наилучшего!
Код ошибки обновления Windows 0x80240438 появляется, когда не удается установить обновление в Windows 10 или 11. Код гласит: «При установке обновлений возникли некоторые проблемы, но мы попробуем позже. При повторной попытке снова выскакивает ошибка.
Давайте посмотрим на методы устранения неполадок, которые могут помочь решить проблему раз и навсегда.
Ошибка обновления 0x80240438 обычно возникает, когда программы безопасности в системе блокируют обновления, ложно считая их угрозой.
Эта проблема может возникать как с брандмауэром Windows, так и со сторонними антивирусными решениями. В любом случае, единственное решение — временно отключить программу безопасности, а затем установить обновление. Мы настоятельно рекомендуем вернуть программу безопасности, так как в противном случае ваша система подвергнется нескольким угрозам.
Вот как вы можете отключить брандмауэр Windows:
- Нажмите Win + I, чтобы открыть приложение «Настройки».
- Выберите Конфиденциальность и безопасность на левой панели.
- Перейдите в правую часть окна и перейдите в раздел «Безопасность Windows» > «Брандмауэр и защита сети».
Доступ к настройкам безопасности Windows
- Выберите свой сетевой профиль из (доменная сеть, частная сеть и общедоступная сеть).
- Перейдите в раздел Брандмауэр Microsoft Defender и отключите переключатель.
- После этого закройте окно и попробуйте установить обновление еще раз.
Если вы используете стороннее решение, вы можете просто щелкнуть его значок на панели задач. Выберите Отключить > Отключить до следующего перезапуска. После этого перейдите в приложение «Настройки» и снова установите обновление.
2. Запустите средство устранения неполадок обновления.
Средство устранения неполадок с обновлениями также может помочь вам исправить ошибки при загрузке и установке обновлений Windows. Microsoft разработала его специально для выявления, устранения и выявления потенциальных проблем в системе, которые могут вызвать проблему.
Вот как вы можете запустить средство устранения неполадок обновления:
- Нажмите клавиши Win + I вместе, чтобы открыть настройки Windows.
- Выберите Система на левой панели.
- Выберите «Устранение неполадок» > «Другие средства устранения неполадок».
- В следующем окне появится средство устранения неполадок Центра обновления Windows. Нажмите на кнопку Run для него, и он начнет работать.
Запуск средства устранения неполадок Центра обновления Windows
- Подождите, пока средство устранения неполадок выполнит поиск ошибок. Если он обнаружит какие-либо проблемы, он уведомит вас, и вы можете нажать «Применить это исправление», чтобы применить рекомендуемое решение.
- Если средство устранения неполадок не может определить проблему, нажмите «Закрыть средство устранения неполадок» и перейдите к следующему способу.
3. Установите обновление вручную
Если вы не можете установить обновления с помощью приложения «Настройки», вы также можете сделать это вручную, используя каталог обновлений Microsoft. Служба обновлений Microsoft предоставляет список запущенных обновлений. Вы можете найти обновления программного обеспечения Microsoft, драйверы и исправления в одном месте.
Вот все, что вам нужно сделать:
- Запустите браузер и перейдите в каталог обновлений Microsoft.
- Используя поле поиска в верхней части экрана, введите номер КБ целевого обновления.
Найдите номер КБ обновления
- Теперь вы сможете просмотреть список подходящих опций в каталоге. Нажмите кнопку «Загрузить», чтобы выбрать нужное обновление для вашего устройства.
Загрузка обновления Windows из каталога Microsoft
- После загрузки обновления нажмите на него, чтобы установить.
- Следуйте инструкциям на экране, чтобы завершить процесс установки.
4. Запустите сканирование системы
В случае коррупционных ошибок или вирусов проблему могут решить встроенные утилиты, разработанные Microsoft.
В этой ситуации мы будем использовать средство проверки системных файлов (SFC) и DISM (обслуживание образов развертывания и управление ими). Утилита SFC просканирует защищенные системные файлы на наличие потенциальных проблем. Если какой-либо из файлов поврежден, он заменит их здоровым аналогом.
DISM, с другой стороны, является более мощным инструментом, чем SFC, и в основном отвечает за восстановление поврежденного образа системы.
Вот как вы можете запустить утилиты SFC и DISM:
- Нажмите cmd в области поиска на панели задач и нажмите «Запуск от имени администратора».
- В окне командной строки выполните следующую команду:
sfc/scannowРазверните сканирование SFC
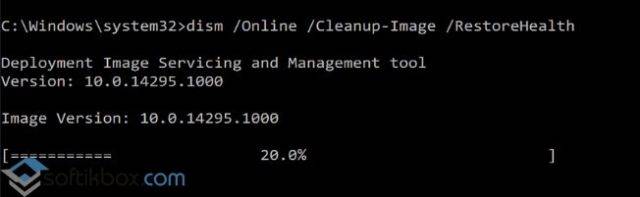
- После выполнения команды SFC выполните команду DISM:
DISM/онлайн/cleanup-image/restorehealthВосстановление системных файлов
После выполнения команды попробуйте снова установить целевое обновление.
5. Отключить IPV6
Пользователи также смогли решить проблему, отключив интернет-протокол версии 6.
IPv6 (Интернет-протокол версии 6) является шестой версией Интернет-протокола и заменяет IPv4. Он предоставляет уникальные IP-адреса для устройств, подключенных к Интернету. Иногда это может вызвать проблемы с установкой обновлений в Windows.
Вот как вы можете отключить его, чтобы решить проблему с сетевым диском:
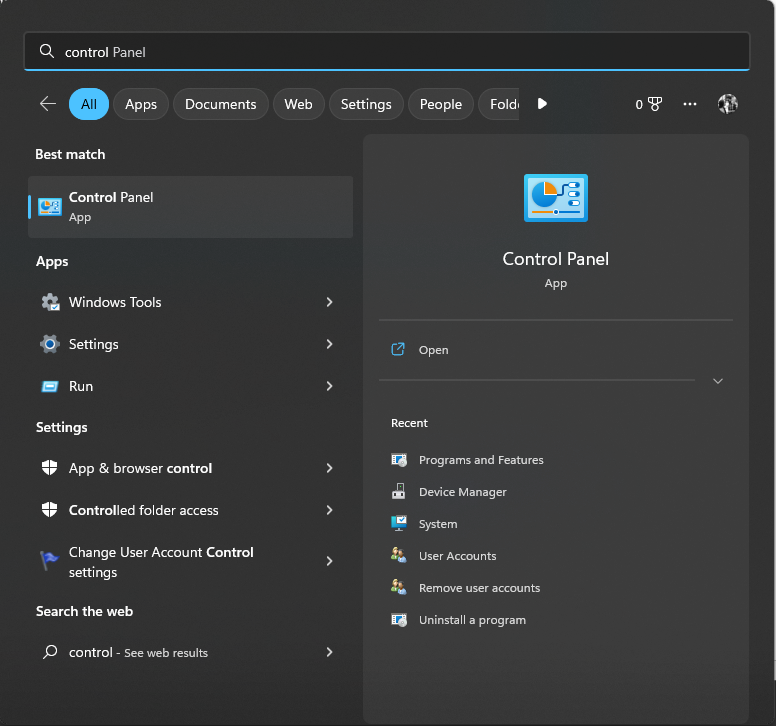
- Введите Панель управления в поиске Windows.
- Выберите Сеть и Интернет в следующем окне.
Доступ к настройкам сети и Интернета
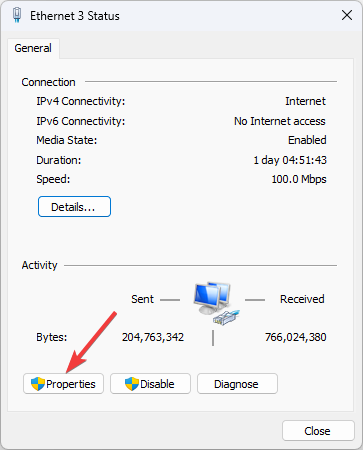
- Перейдите в Центр управления сетями и общим доступом и выберите «Изменить настройки адаптера».
- Откройте «Сетевые подключения» и щелкните правой кнопкой мыши Wi-Fi.
- Выберите Свойства.
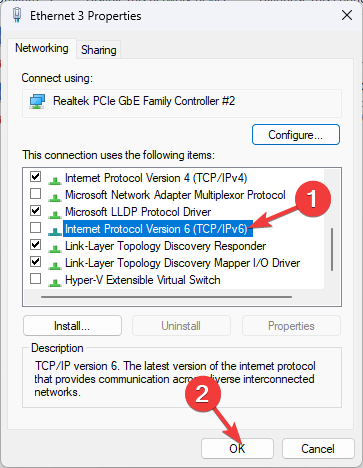
- В диалоговом окне «Свойства» перейдите на вкладку «Сеть» и найдите параметр IPV6.
- Снимите флажок для него и нажмите OK, чтобы сохранить изменения.
Снимите флажок с опции IPV6.
Надеюсь, это решит проблему.
Run Windows Store apps troubleshooter first
by Srishti Sisodia
Srishti Sisodia is an electronics engineer and writer with a passion for technology. She has extensive experience exploring the latest technological advancements and sharing her insights through informative… read more
Updated on
- The Windows Store update error could have occurred if the IPV6 is enabled but not supported by your ISP.
- This guide will cover all the potential fixes to resolve the issue.
Many users have reported that they faced this issue while updating Windows OS or apps on Microsoft Store.
In this guide, we will discuss some expert-recommended solutions to fix the issue right after talking about the causes.
What is 0x80240438?
0x80240438 is a Windows Update error code that typically indicates a problem with the Windows Update service or the associated software components.
What causes the Windows Store error 0x80240438?
There are various reasons why you see 0x80240438 while updating the computer; some of the common ones are mentioned here:
- Network connectivity issues – If your internet connection is slow or has a weak signal, it could prevent you from updating Windows apps, hence the error.
- Third-party security software interference – Third-party antivirus software can interfere with normal Windows functioning, including the update process. Therefore, you get this error.
- Damaged system files – If system files are corrupt or missing, it can prevent the Windows update service from running correctly. Hence you get this error.
- Old or incompatible drivers – If your device drivers are outdated or incompatible with your Windows version, it could cause all kinds of issues.
- Windows update service issue – If there are problems such as incorrect configuration, outdated components, or corrupted files, it can cause an error.
What can I do to fix the Windows Store error 0x80240438?
Before engaging in advanced troubleshooting steps, you should consider performing the following checks:
- Disable the firewall temporarily.
- Restart your computer.
1. Disable IPV6
- Press the Windows key, type Control Panel, and click Open.

- Select Category as View by and click Network & Internet.

- Double-click the network connection, and on the next page, select Properties.

- Remove the checkmark next to Internet Protocol Version 6 (TCP / IPv6).

- Click OK to confirm the changes.

2. Rename the Windows Store cache folder
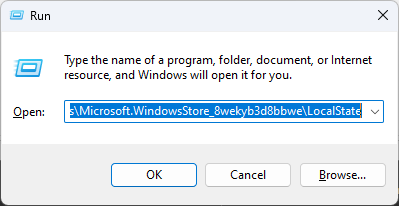
- Press Windows + R to open the Run dialog box.
- Type the following command, replace the username with the user account name, and click OK:
C:\Users\username\AppData\Local\Packages\Microsoft.WindowsStore_8wekyb3d8bbwe\LocalState
- Locate and select the Cache folder, and rename it to Cache.old.

- If you don’t find the folder, create a folder and name it Cache.
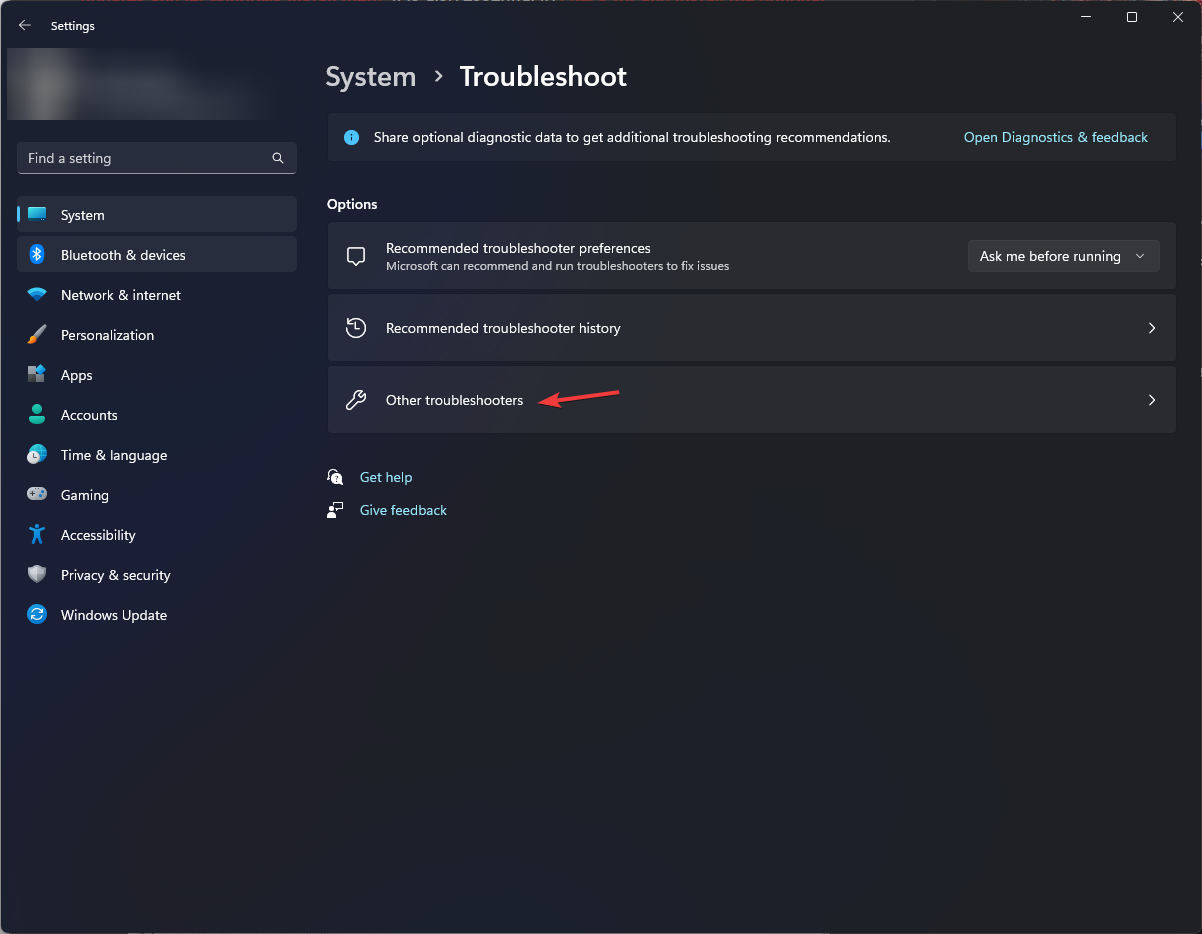
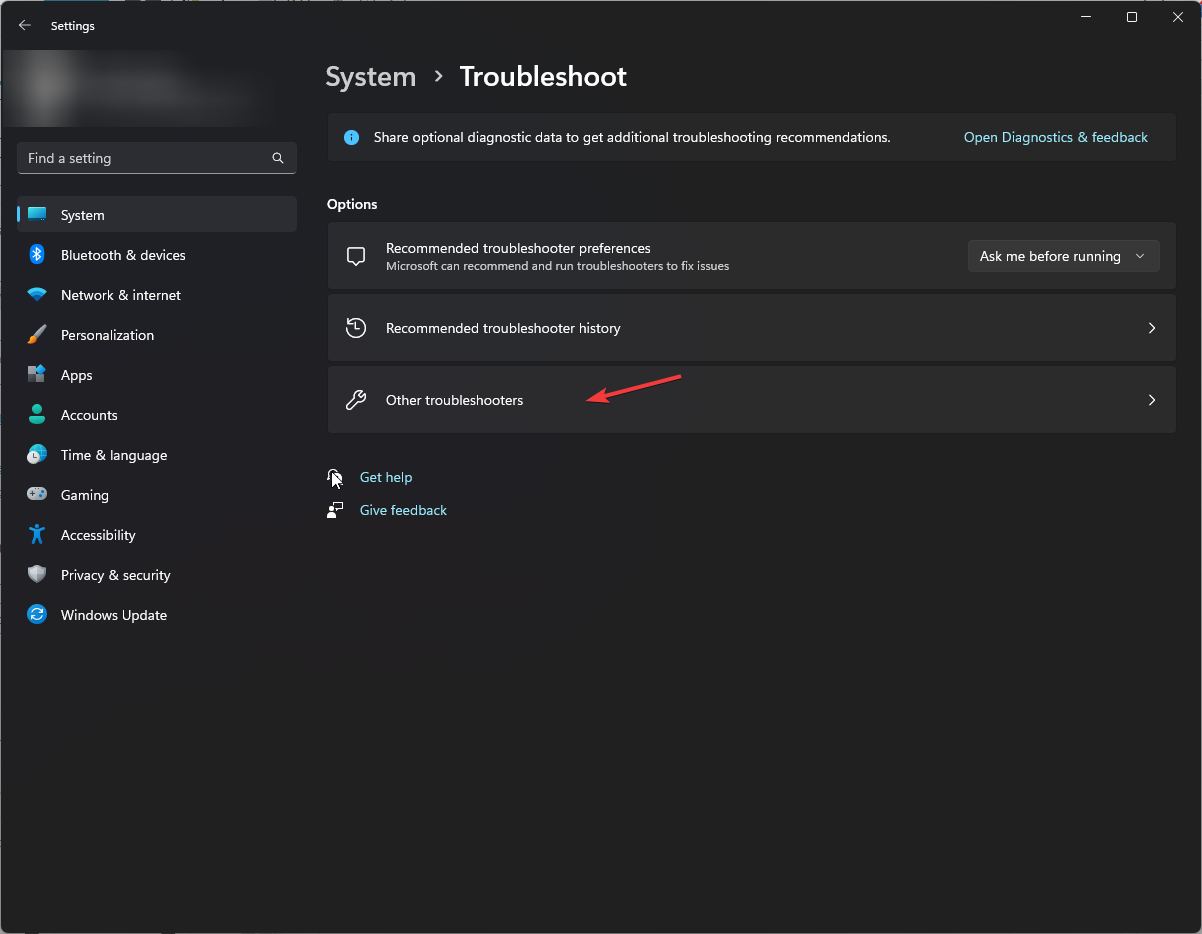
- Press Windows + I to open Settings.
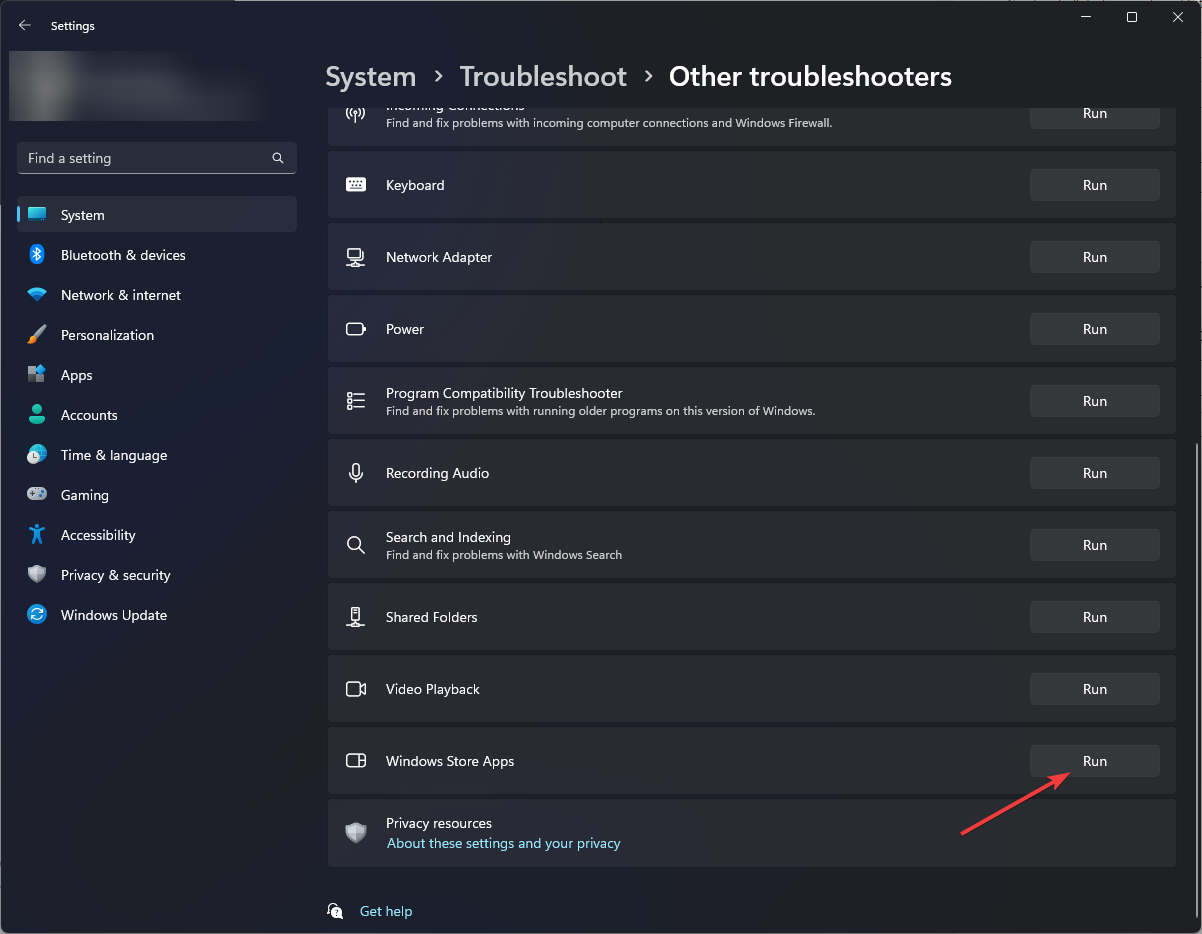
- Go to System, and click Troubleshoot.

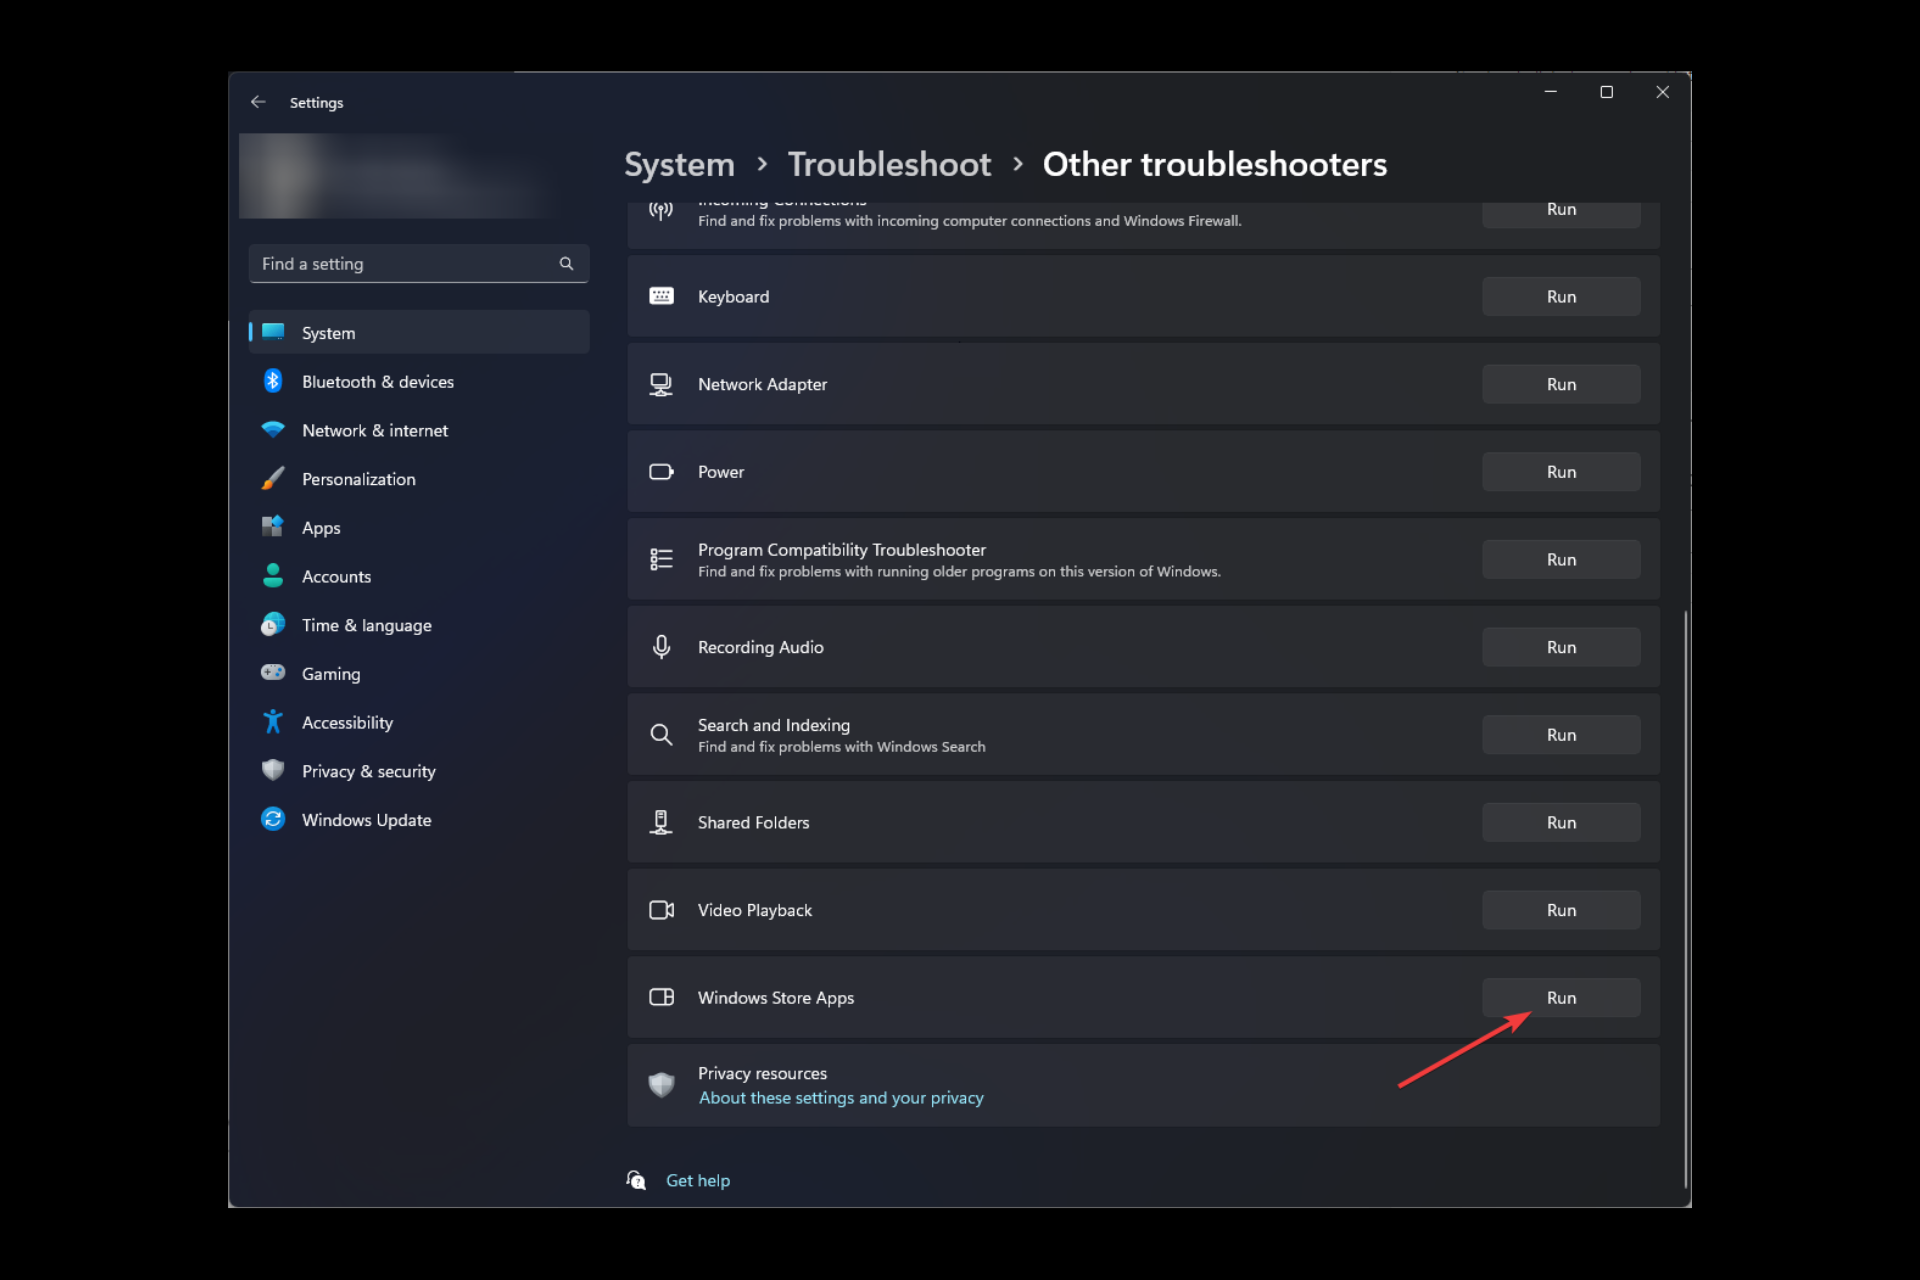
- Now select Other troubleshooters.
- Go to the Windows Store Apps and click Run.
- Follow the onscreen instructions to complete the process.


3. Run the Windows Store Apps troubleshooter
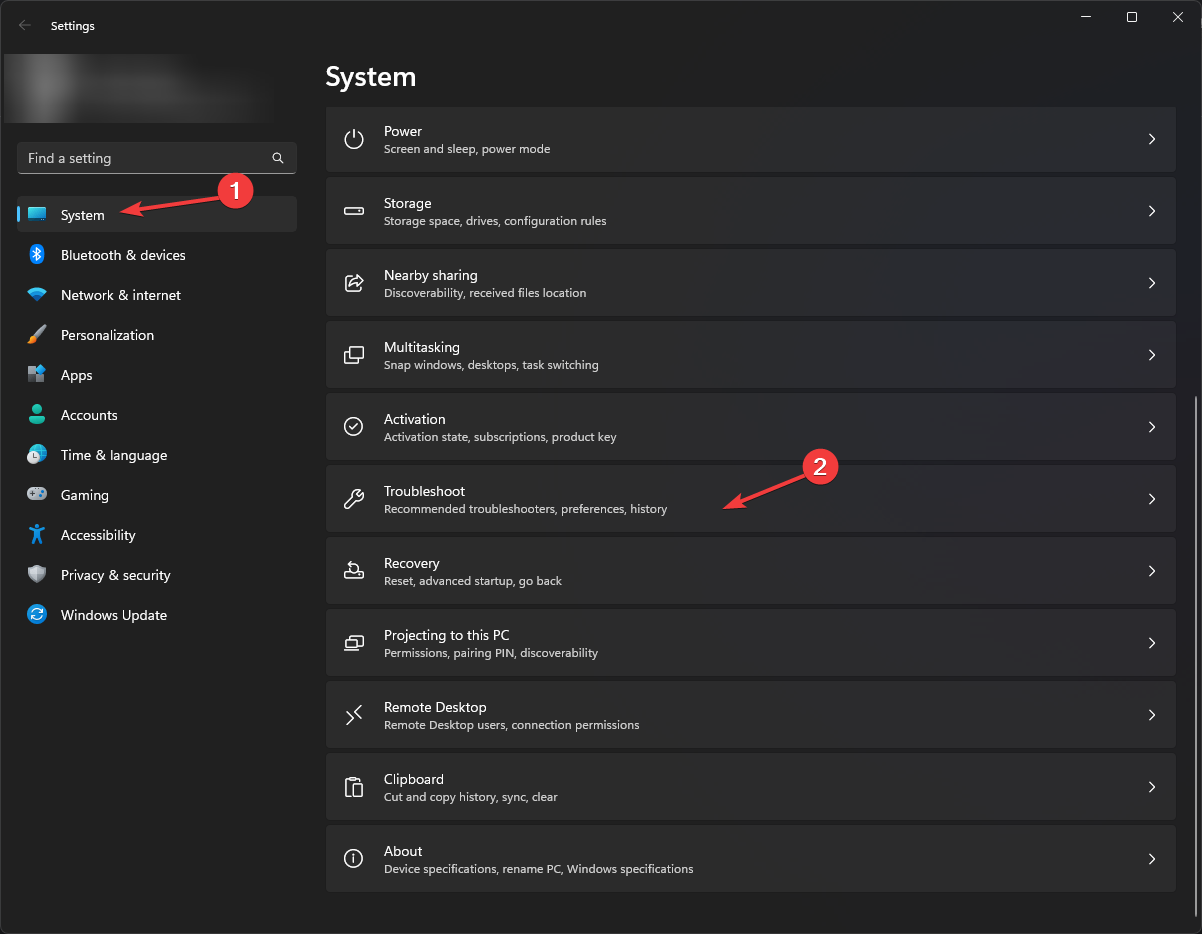
- Press Windows + I to open the Settings app.
- Go to System, and click Troubleshoot.
- Now select Other troubleshooters.
- Go to the Windows Store Apps and click Run.
- Follow the onscreen instructions to complete the process.
- 3 Ways to Block Internet Access for Specific Apps in Windows 11
- 4 Ways to Fix LiveKernelEvent 144 Error on Windows 11
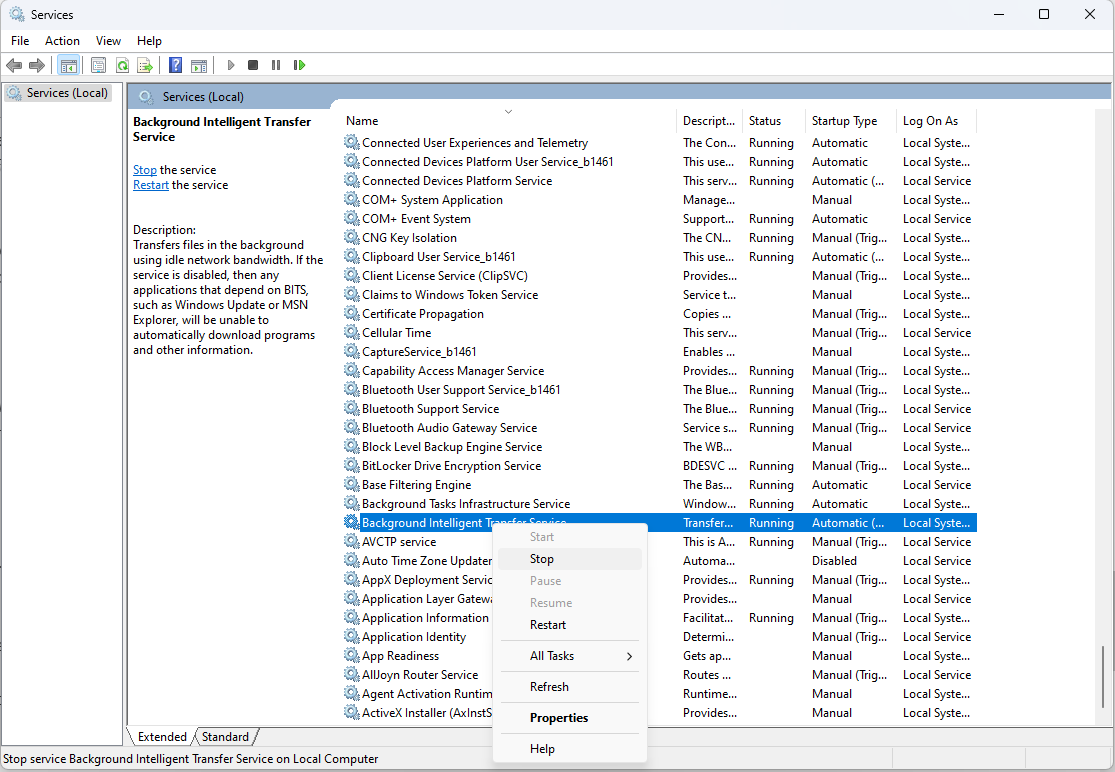
4. Disable BITS and delete the SoftwareDistribution folder
- Press Windows + R to open the Run console.
- Type services.msc and click OK to open the Services app.
- Locate and right-click Background Intelligent Transfer Service and select Stop.

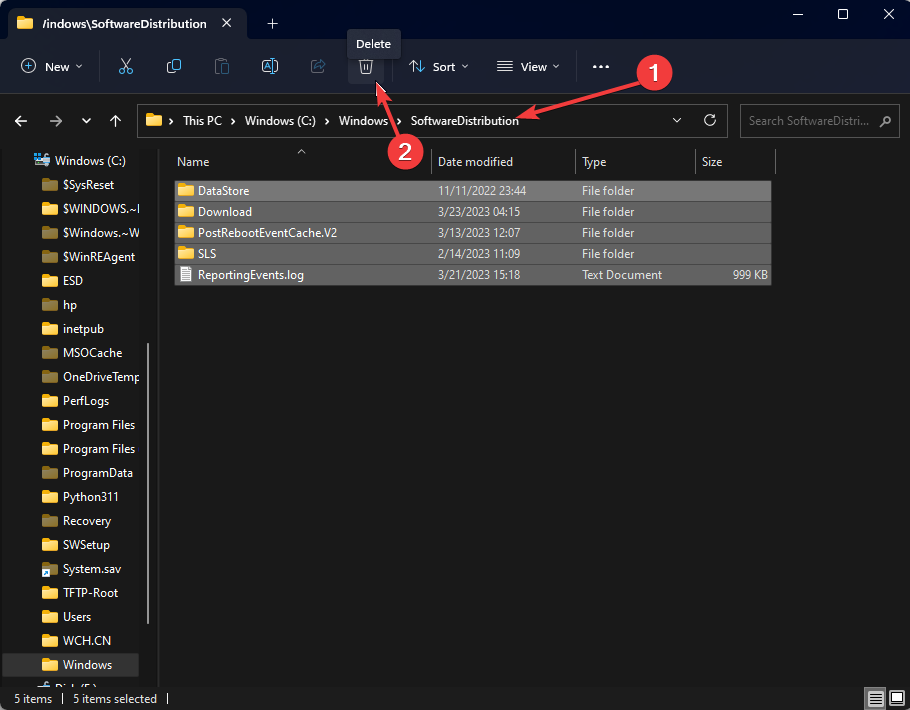
- Press Windows + E to open Windows Explorer.
- Navigate to this path:
C:\Windows\SoftwareDistribution - Select all the content in the SoftwareDistribution folder and click the Delete icon.

- Now go to the Services app, right-click Background Intelligent Transfer Service, and select Start.


5. Clear Windows cache
- Press Windows + R to open the Run console.
- Type wsreset.exe and click OK to reset the Windows Store cache.
- Once the process is finished, your Microsoft Store app will restart.

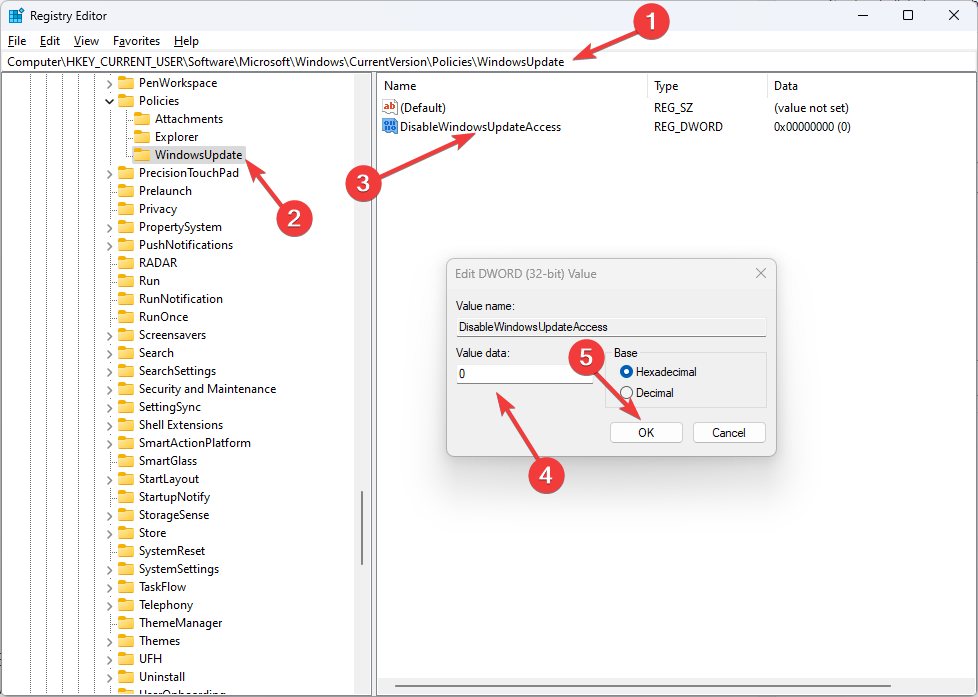
6. Use the Registry Editor
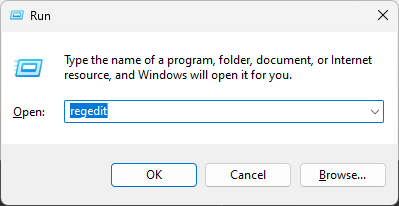
- Press Windows + R to open the Run box.
- Type Regedit and click OK to open Registry Editor.
- Navigate to this path:
Computer\HKEY_CURRENT_USER \Software \Microsoft \Windows \CurrentVersion \Policies\WindowsUpdate - Locate DisableWindowsUpdateAccess, and double-click it.

- Change the Value data from 1 to 0.
- Restart your computer to let the changes take effect.
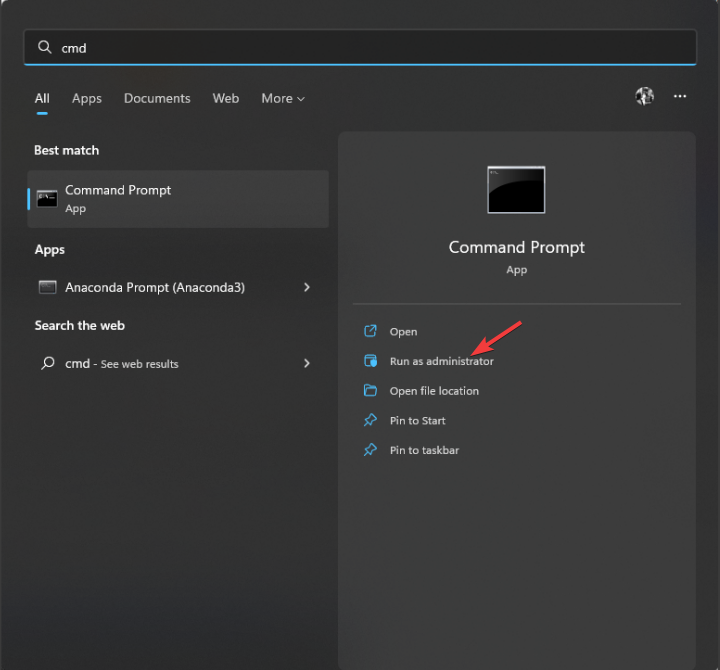
7. Use the Command Prompt
- Press the Windows key, type CMD, and click Run as administrator.

- Type the following commands one by one and press Enter after every command:
sfc\scannowDISM /online /cleanup-image /restorehealth - Copy and paste the following commands one by one and press Enter after every command:
netsh winhttp reset proxynet stop wuauservnet start wuauserv - Restart your computer and check if the issue persists.
So, these are methods you can follow to fix the 0x80240438 error on your Windows computer. Try them and let us know what worked in the comments section below.
![]()
Код ошибки обновления Windows 0x80240438 появляется, когда не удается установить обновление в Windows 10 или 11. Код гласит: «При установке обновлений возникли некоторые проблемы, но мы попробуем позже. При повторной попытке снова выскакивает ошибка.
Давайте посмотрим на методы устранения неполадок, которые могут помочь решить проблему раз и навсегда.
Ошибка обновления 0x80240438 обычно возникает, когда программы безопасности в системе блокируют обновления, ложно считая их угрозой.
Эта проблема может возникать как с брандмауэром Windows, так и со сторонними антивирусными решениями. В любом случае, единственное решение — временно отключить программу безопасности, а затем установить обновление. Мы настоятельно рекомендуем вернуть программу безопасности, так как в противном случае ваша система подвергнется нескольким угрозам.
Вот как вы можете отключить брандмауэр Windows:
- Нажмите Win + I, чтобы открыть приложение «Настройки».
- Выберите Конфиденциальность и безопасность на левой панели.
- Перейдите в правую часть окна и перейдите в раздел «Безопасность Windows» > «Брандмауэр и защита сети».Доступ к настройкам безопасности Windows
- Выберите свой сетевой профиль из (доменная сеть, частная сеть и общедоступная сеть).
- Перейдите в раздел Брандмауэр Microsoft Defender и отключите переключатель.
- После этого закройте окно и попробуйте установить обновление еще раз.
Если вы используете стороннее решение, вы можете просто щелкнуть его значок на панели задач. Выберите Отключить > Отключить до следующего перезапуска. После этого перейдите в приложение «Настройки» и снова установите обновление.
2. Запустите средство устранения неполадок обновления.
Средство устранения неполадок с обновлениями также может помочь вам исправить ошибки при загрузке и установке обновлений Windows. Microsoft разработала его специально для выявления, устранения и выявления потенциальных проблем в системе, которые могут вызвать проблему.
Вот как вы можете запустить средство устранения неполадок обновления:
- Нажмите клавиши Win + I вместе, чтобы открыть настройки Windows.
- Выберите Система на левой панели.
- Выберите «Устранение неполадок» > «Другие средства устранения неполадок».
- В следующем окне появится средство устранения неполадок Центра обновления Windows. Нажмите на кнопку Run для него, и он начнет работать.
Запуск средства устранения неполадок Центра обновления Windows - Подождите, пока средство устранения неполадок выполнит поиск ошибок. Если он обнаружит какие-либо проблемы, он уведомит вас, и вы можете нажать «Применить это исправление», чтобы применить рекомендуемое решение.
- Если средство устранения неполадок не может определить проблему, нажмите «Закрыть средство устранения неполадок» и перейдите к следующему способу.
3. Установите обновление вручную
Если вы не можете установить обновления с помощью приложения «Настройки», вы также можете сделать это вручную, используя каталог обновлений Microsoft. Служба обновлений Microsoft предоставляет список запущенных обновлений. Вы можете найти обновления программного обеспечения Microsoft, драйверы и исправления в одном месте.
Вот все, что вам нужно сделать:
- Запустите браузер и перейдите в каталог обновлений Microsoft.
- Используя поле поиска в верхней части экрана, введите номер КБ целевого обновления.
Найдите номер КБ обновления - Теперь вы сможете просмотреть список подходящих опций в каталоге. Нажмите кнопку «Загрузить», чтобы выбрать нужное обновление для вашего устройства.
Загрузка обновления Windows из каталога Microsoft - После загрузки обновления нажмите на него, чтобы установить.
- Следуйте инструкциям на экране, чтобы завершить процесс установки.
4. Запустите сканирование системы
В случае коррупционных ошибок или вирусов проблему могут решить встроенные утилиты, разработанные Microsoft.
В этой ситуации мы будем использовать средство проверки системных файлов (SFC) и DISM (обслуживание образов развертывания и управление ими). Утилита SFC просканирует защищенные системные файлы на наличие потенциальных проблем. Если какой-либо из файлов поврежден, он заменит их здоровым аналогом.
DISM, с другой стороны, является более мощным инструментом, чем SFC, и в основном отвечает за восстановление поврежденного образа системы.
Вот как вы можете запустить утилиты SFC и DISM:
- Нажмите cmd в области поиска на панели задач и нажмите «Запуск от имени администратора».
- В окне командной строки выполните следующую команду:
sfc/scannowРазверните сканирование SFC - После выполнения команды SFC выполните команду DISM:
DISM/онлайн/cleanup-image/restorehealthВосстановление системных файлов
После выполнения команды попробуйте снова установить целевое обновление.
5. Отключить IPV6
Пользователи также смогли решить проблему, отключив интернет-протокол версии 6.
IPv6 (Интернет-протокол версии 6) является шестой версией Интернет-протокола и заменяет IPv4. Он предоставляет уникальные IP-адреса для устройств, подключенных к Интернету. Иногда это может вызвать проблемы с установкой обновлений в Windows.
Вот как вы можете отключить его, чтобы решить проблему с сетевым диском:
- Введите Панель управления в поиске Windows.
- Выберите Сеть и Интернет в следующем окне.
Доступ к настройкам сети и Интернета - Перейдите в Центр управления сетями и общим доступом и выберите «Изменить настройки адаптера».
- Откройте «Сетевые подключения» и щелкните правой кнопкой мыши Wi-Fi.
- Выберите Свойства.
- В диалоговом окне «Свойства» перейдите на вкладку «Сеть» и найдите параметр IPV6.
- Снимите флажок для него и нажмите OK, чтобы сохранить изменения.
Снимите флажок с опции IPV6.
Надеюсь, это решит проблему.
One of the common issues that users come across while updating Windows or installing apps through Microsoft Store is Error Code 0x80240438. Most of the time, both Store and Windows Update encounter the same error code as they have an interlinked delivery mechanism. As each operating system has multiple characteristics, so the culprit of the issue also varies.
Some of the possible causes that put a hindrance in the Windows Update and Store service are proxy settings, Windows Firewall, IPV6, and more. Regardless of the versions of Windows 10 or 11 you are using, the resolutions will be same. So in the article, we will discuss some of the most verified workarounds to resolve bug code 0x80240438. Find out the solutions –
Here is How to Fix Windows 11/10 Update Error Code 0x80240438 –
1] Install the Windows Update Manually
Microsoft is very much keen to release cumulative updates and features quite regularly packing latest modifications and fixes for bugs and issues. Most of these files start downloading and installation follows automatically in presence of an active internet connection. Error code 0x80240438 appears while the Windows Update feature is autonomous and this is just a cumulative patch, unlike feature update. Hence, we can proceed to install the update patch manually using below guidelines –
- Press Windows key and type in – update history.
- Hit – Enter.
- Explore the list of successful and failed updates.
- Check for the failed updates and then navigate to Microsoft Update Catalog.
- Here, search for the KB that got failed to install. Once you see it, download the compatible architecture and install the file manually.
2] Use the Windows Update Troubleshooter
Windows 10 and 11 Update Error code 0x80240438 comes in when the system encounters difficulties in installing related cumulative patch. Many of the similar drawbacks kept on haunting the users over the ages. To eradicate this issue, Microsoft came up with brand new idea of Windows Update Troubleshooter. The tool guides us on how to resolve a specific error that happens while installing an update. Here is how to use the tool –
For Windows 10
- Press Win+I hotkeys at once to launch the Windows Settings app.
- Click on the Update & Security tile to pass forward in the succeeding page.
- When the page arrives, select Troubleshoot from the left pane.
- Jump to alongside right and click – Additional troubleshooters.
- Select Windows Update option from there.
- Hit Run the Troubleshooter button from the expanded pane.

- The utility will now start looking for update errors in the system. It will also provide guidelines to solve the issue accordingly.
- Follow the instructions shown in the display to complete the process.
For Windows 11
- Right-click Start button and choose – Settings.
- Move to the right of Settings page.
- Scroll down a bit and click – Troubleshoot.
- Select – Other troubleshooters.
- From the next page, click Run present beside Windows update.
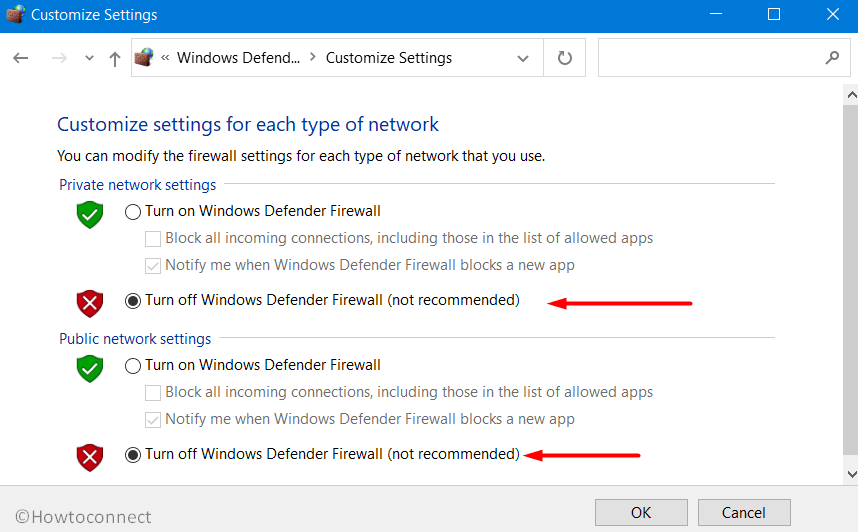
3] Disable Windows Firewall
Having an active security solution often can be detrimental for an update patch to be installed automatically as the tool will detect the file as malware. Windows Firewall provides us real-time protection against malicious invaders and offers maximum security. However, the same can also cause Error code 0x80240438 in Windows 10 and 11. In order to fix the error, we can disable Windows Firewall temporarily until the issue goes off. Here is how to disable the Windows Firewall –
- Open the Taskbar Search pressing Win+Q hotkey together.
- Type Windows Defender Firewall in the empty text space. Select the app after arriving in the result.
- Moving on to the app UI, click Turn Windows Defender Firewall on or off from left pane.
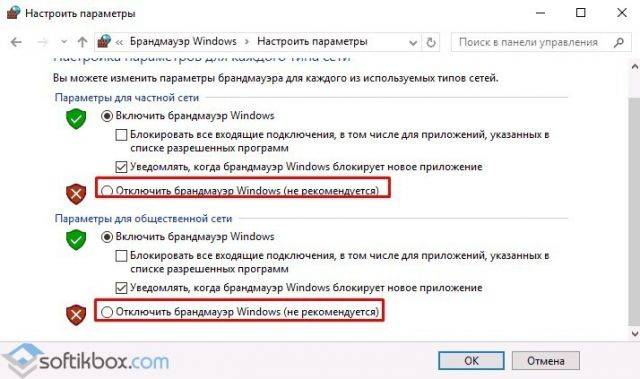
- After a new window unveils, click the radio button against Turn off Windows Firewall (not recommended) option for both the networks on this page.
- Click the OK button and save these changes and there will not be any more 0x80240438 update error.
4] Uninstall Third-party anti-malware tool
Like the Windows Security, any other third party application may often block an update patch and eventually users encounter 0x80240438 error. Moreover, keeping a 3rd party anti-malware solution may be detrimental parallel to Windows Security. So, make room to uninstall security solutions from outside sources right away using the below steps –
- Right-click on Start icon and choose Apps and Features from appearing Win+X menu.
- When the Apps Settings will open up, reach out to the third party security solution on the right pane.
- Select the same and hit Uninstall from expanded pane.
- When UAC prompts for permission, click Yes and follow on-screen guidelines until the process ends.
- Finally, reboot Windows to implement the modifications.
5] Disable IPV6 from Windows
Various forums are evident that disabling IPV6 resolves Error code 0x80240438 in Windows 11 and 10. Therefore we may also give it a try following below instructions –
- Press Win + R keys and invoke the Run dialog box.
- Type ncpa.cpl and click OK button located on wizard to open up Network connections window.
- Moving on to the new window, do a right-click on the internet connection that is connected to your computer.
- Select Properties option from appearing menu.
- Jump to another popup window and uncheck the box against Internet Protocol Version 6 (TPC/IPv6).
- Click on OK button from bottom area and save changes.
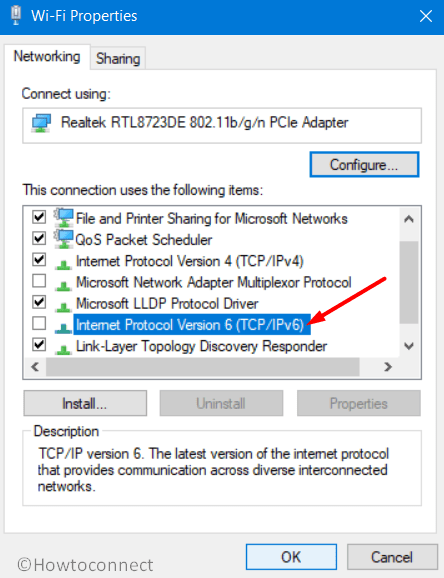
- Lastly, reboot the device and check if the error exists in the system when a new session begins.
6] Tweak Group Policy Editor
Tweaking policy in the Group Policy Editor will let you remove access from Windows Update. Enabling the settings will remove all the Windows Update features from system. Many users have confronted that they have fixed Error code 0x80240438 tweaking the policy. Follow the below guidelines to complete the task –
- Invoke the Run dialog and type gpedit.msc in its empty text box.
- Press Enter key to open Group Policy Editor and navigate to below path –
User Configuration > Administrative Templates > Windows Components > Windows Update
- Upon reaching to Windows Update, jump on the alongside right pane.
- Hereby, make a double click on Remove Access To Use All Windows Update Features.
- Select the radio button against Not Configured.
- If you see it is enabled, configure one of the below notification options –
0 = Do not show any notifications – This setting will remove all access to Windows Update features, and no notifications will be shown.
1 = Show restart required notifications – It will display notifications about restarts that are required to complete the installation.
- Click the OK button finally and close the Group Policy Editor window.
- Restart Windows PC to make changes effective.
7] Disable Proxy server connection
Disable Proxy server connection may also be pretty helpful in eliminating Error code 0x80240438 in Windows 11 and 10. To do so, follow the below steps –
- Press Windows key, type internet options and hit Enter key to access Internet Properties.
- Jump into the Connections tab.
- Move out to Local Area Network (LAN) settings area and click the LAN Settings.
- Upon opening a new settings page, uncheck the box that reads Use a proxy server for your LAN (These settings will not apply to dial-up or VPN connections) under Proxy Server section.
- Click the OK button and later on, reboot Windows to make the changes effective.
8] Clear off Microsoft Store Cache
Windows Update Error code 0x80240438 resembles the Microsoft Store issue as well hence, clearing the Store cache might help. Follow the below guidelines to clear the cache –
- Open Run dialog box pressing Windows key and R.
- Type wsreset in the void text space and press Enter.
- The Command Prompt will open up in a few moments and take over the task.
- Once the process ends, Command Prompt window will close automatically and open Microsoft Store.
See – How to Reset Cache of Windows Store
9] Rename Windows Store cache folder
If the Error code 0x80240438 is evolved from Microsoft Store, renaming the Store Cache folder will resolve the setback. For that –
- Get access to Run and enter following text in its empty search box and press Enter key eventually –
%localappdata%\Packages\Microsoft.WindowsStore_8wekyb3d8bbwe\LocalState- Locate the cache folder, make a right-click on the same, and choose Rename option from menu.
- Name it as cache.old and hit Enter to save it.
- If you don’t find the cache folder in LocalState, make a right-click on empty space and choose New > Folder.
- Enter the name Cache and close File Explorer.
- Now open Windows Settings app and head over to Troubleshoot page.
For Windows 10, Go to Settings => Update & Security => Troubleshoot => Additional troubleshooters.
Windows 11 users, navigate to Settings => Troubleshoot (right column) => Other troubleshooters.
- Reach out to the Windows Store App and hit Run the Troubleshooter or Run button.
- After finishing the process, the error will resolve hopefully.
10] Remove everything from of C:\Windows\SoftwareDistribution folder
Some contents in the SoftwareDistribution folder may often be a cause for Error code 0x80240438 in Windows 10 and 11. In order to resolve the issue, delete everything from this folder going through below process –
- Open the Taskbar Search, write services in the void text box, and press Enter to launch the application.
- Move out for Background Intelligent Transfer Service, make a right-click on it and select Stop.
- Close the Services app and open File Explorer pressing Win+E hotkey at once.
- In the upcoming window, navigate to the “C:WindowsSoftwareDistribution” folder.
- Select all items pressing Ctrl+A hotkey at once and press Delete key on the keyboard.
- Reboot Windows and when the system will load back, we can expect the error will resolve.
11] Modify Registry Editor
Modifying the DWORD value of “DisableWindowsUpdateAccess” is found to resolve Error code 0x80240438 in Windows 11 and10 easily. Follow the below guidelines to accomplish –
- Do a right-click on Start and select Run.
- In the empty text box of the wizard, type regedit and hit Enter to access Registry Editor.
- Navigate to the below directory in left-wing –
HKEY_CURRENT_USER=>Software=>Microsoft=>Windows=>CurrentVersion=>Policies=>WindowsUpdate- On the right pane of WindowsUpdate locate the DWORD DisableWindowsUpdateAccess.
- Make a double click on the same and set the value data as 0.
- Click OK and Restart Windows to implement registry settings.
- After the new session will begin, hopefully, there will be no more 0x80240438 error.
Methods:
1] Install the Windows Update Manually
2] Use the Windows Update Troubleshooter
3] Disable Windows Firewall
4] Uninstall Third party anti-malware tool
5] Disable IPV6 from Windows
6] Tweak Group PolicyEditor
7] Disable Proxy server connection
8] Clear off Microsoft Store Cache
9] Rename Windows Store cache folder
10] Remove everything from of C:\Windows\SoftwareDistribution folder
11] Modify Registry Editor
That’s all!!
Repair any Windows problems such as Blue/Black Screen, DLL, Exe, application, Regisrty error and quickly recover system from issues using Reimage.
The Error 0x80240438 is a recently occurring bug that appears when users try to update their Windows 10 OS or install apps via Microsoft Store. As there is an interlinkage between the store app and the update section, the error remains the same for both. There are primarily three different reasons that lead to this error on Windows 10. They are – Enabled Firewall, Use of IPV6 for the net connectivity, and manually connecting to a Proxy.
Temporarily turning off the Firewall, disabling IPV6, and the use of a manual proxy should resolve the error code 0x80240438. If not, run the update troubleshooter, modify the windows update group policy, or tweak the registry DOWRD key. In this post, we discuss 10 different approaches to correct this issue that are applicable to all Windows 10 Build versions. Let’s explore the solutions in detail –

To solve the Error code 0x80240438 in Windows 10, try the following suggestions –
Fixes List
- Disable Third-party Antivirus Program
- Disable Windows Firewall/ Windows Security
- Manually install the Standalone Package
- Run Windows Update Troubleshooter
- Disable IPV6
- Disable Proxy
- Modify Windows Update features Group Policy
- Reset Windows Update Folders
- Clear Microsoft Store Cache
- Tweak Registry Editor
1] Remove Third-party Antivirus Program
Using a third-party anti-malware program may cause the update or Store error 0x80240438 on Windows 10 PC. This is because there exist two different applications that perform similar tasks i.e. Windows Security. Since you can’t remove the latter one as being the in-built app, you should uninstall the 3rd party antivirus program. Anyways, Windows Defender works quite effectively, unlike its predecessors.
- Hit the Win icon and scroll down to locate the antivirus in the Apps list.
- Make a right-click on the matching result and hit the Uninstall button.
- If the UAC window prompts, tap Yes to confirm this uninstallation.
Note: If you don’t want to uninstall the software, disable it by visiting the Settings page.
- Make sure to reboot your PC as there are leftover files that don’t delete even after the program deletion.
2] Disable Windows Firewall/ Windows Security
Windows Firewall aims to provide maximum security by blocking any files that it finds suspicious. This is very helpful in keeping malicious invaders away. However, this may sometimes block the monthly patch resulting in an error message like 0x80240438. You must check whether this indeed is the case before applying any other fixes. To do so, temporarily disable Windows Firewall using the below steps –
- Press Win + S to start the Search bar, type Windows Firewall and click the top result.
- On the next user interface, click “Turn Windows Defender Firewall on or off“.
- Choose to “Turn off Windows Firewall (not recommended)” under both networks i.e. Private and Public.

- Hit OK to confirm this action. Now, check if the error 0x80240438 resolves or not while opening the Store app/updating Windows 10 OS.
3] Manually install the Standalone Package
Microsoft releases security as well as non-security cumulative updates very often on the patch Tuesday. Since you are already encountering an update error, you may download and install the standalone package that comes with each CU. Here’s how to proceed –
- If you are a Windows 11 user, switch to this article on how to manually download and install the latest cumulative updates on your computer.
Get the name of a Recent CU
- Jointly Press Win+I to launch the Settings app.
- Select Update & Security thereafter Windows Update on the succeeding screen.
- On the right pane, scroll down and click View Update History.
- Here, you can get a list of all cumulative updates – successful or failed ones.
- Note the failed patch number and move to the next section.
Download the Standalone Package
- Open any of your web browsers and visit Microsoft Update Catalog.
- At the search bar, paste the failed knowledge base number (noted down above) and press Enter.
- A list containing all the matching CUs will appear afterward.
- Click the Download button next to the most suited and latest update as per your system architecture.
- When a new window appears, click the first link to download the .msu file. Wait for a while as this is a relatively big file.
- Once over, go to the Download folder and double-click the set-up file to start installing the standalone package.
4] Run Windows Update Troubleshooter
Windows 10 includes an in-built utility that can troubleshoot any update-related issues. If the error 0x80240438 is still appearing, run the troubleshooter to find and repair the underlying cause. Here are the essential steps to work upon –
Windows 11:
- Go to Settings and click System on the left pane.
- Head over to the right side, scroll down, and click Troubleshoot.
- When this expands, click Other troubleshooters.
- Locate Windows update under “Most frequent”, and hit the Run button.
- Now, wait while this tool diagnoses and resolves the issue automatically.
Windows 10:
- Jointly press WinKey + I to start the Settings app.
- Select Update & Security thereafter Troubleshoot on the succeeding window.
- Jump to the right side and click to expand the Windows Update section.
- Hit Run the troubleshooter to start looking for any update errors.

- Follow the instructions as they appear in the remaining process.
Once over, Restart the PC so that changes performed may become effective.
5] Disable IPV6
Several users have confirmed that disabling IPV6 under the Network settings resolves error 0x80240438 on their PCs. That’s why we have included this in the list of solutions and the procedure is as follows –
- Launch the control panel and reach out to the following location –
Control PanelNetwork and InternetNetwork Connections
- Make a click on the internet connection (currently in use to access net connectivity) and hit Properties.

- Next, uncheck the box left to “Internet Protocol Version 6 (TPC/IPV6)” and tap OK.

- Make sure to Reboot your PC so as to apply the recent changes.
From the next login, you must be able to update Windows 10 OS or launch Microsoft Store.
6] Disable Proxy
Connecting the PC to a proxy often causes bugs and issues. So, if you are still experiencing the error 0x80240438 while opening the Store app, try once to disable the Proxy. Here are the steps to work upon –
- Press Win+Q hotkey altogether to start the Search box and type “Proxy”.
- Click the top result to launch the Proxy Settings window.
- Move to the right panel and scroll down to “Manual Proxy Setup“.
- Turn off the toggle switch next to “Use a Proxy server” and click the Save button.

Note: If you use a script address, make sure to disable this as well.
- Restart your PC and check whether this error resolves after the next login or not.
7] Modify Windows Update features Group Policy
If the error 0x80240438 still persists, you should modify the Windows Update features group policy. On different Windows 10 forums, this solution is widely accepted. That’s why we are including this method as well –
- Right-click on the Win icon and select Run.
- Type
gpedit.mscat the empty text box and press Enter. - When the Group Policy window comes into view, browse to the below address –
User Configuration > Administrative Templates > Windows Components > Windows Update
- Move to the adjacent right side and scroll down to locate “Remove Access To Use All Windows Update Features“.
- Once found, double-click on it to open its respective window. Mark the checkbox next to “Not configured” and hit OK.
- Restart your computer so as to implement the changes from the next login.
8] Reset Windows Update Folders
The existing contents inside the SoftwareDistribution and Catroot2 folders may also cause the error 0x80240438 on Windows 11 or 10 PC. To get rid of this nagging issue, you must clean these two update folders accomplishing the below steps –
- Press Win & R to invoke the Run dialog.
- Type cmd at the void, hold Ctrl+Shift and press Enter to launch the Command Prompt as Admin.
- When the UAC window prompts, tap Yes to authorize the access.
- Now, execute the following codes one after another. Make sure to press the Enter key after each command.
net stop bits
net stop wuauserv
net stop appidsvc
net stop cryptsvc
- The above codes will stop the essential update services, now run the below codes to rename certain services –
rmdir %systemroot%SoftwareDistribution /S /Q
rmdir %systemroot%system32catroot2 /S /Q
- Subsequently, configure your network connectivity using the following commands –
netsh winsock reset
netsh winsock reset proxy
- After successfully executing the above codes, restart the services that you have previously stopped.
net start bits
net start wuauserv
net start appidsvc
net start cryptsvc
- Finally, Restart your system and check whether the update error code 0x80240438 gets solved or not.
9] Clear Microsoft Store Cache
Note: This workaround is primarily for Microsoft Store-related error 0x80240438. If you are receiving the error message while performing Windows 10 update, you may skip this solution.
As time passes by, a huge amount of cache piles up in Windows Store. If you don’t clear these unnecessary data, you may end up receiving the error 0x80240438. So, go through the below steps to clear the Store cache –
- Launch the Run dialog, type
wsresetat the void, and press the Enter key. - The Windows console appears immediately afterward clearing off the stored cache.
- When the command prompt finishes the task, Microsoft Store will start without any error code.

10] Tweak Registry Editor
If you are still getting the error 0x80240438 on your computer, modifying the “DisableWindowsUpdateAccess” entry inside the registry may resolve this bug. Here’s how to perform this task –
- Press Winkey + R altogether to start the Run dialog. Type
regeditat the void and press Enter to invoke the Registry Editor. - Using the key ladder on the left pane, reach out to the below path –
HKEY_CURRENT_USERSoftwareMicrosoftWindowsCurrentVersionPoliciesWindowsUpdate
- Head over to the right side and locate “DisableWindowsUpdateAccess“.
- Click on this DWORD entry twice and put “0” at its value data.

- Click OK and Restart Windows 10 to implement the above changes.
That’s it, I hope the above fixes do help to resolve the Update and Store Error 0x80240438 on your Windows 11/10 device. If you have any queries or suggestions related to this article, do tell us in the comment section.
Tip: If you are facing update, activation, or driver issues on your Windows PC, try RESTORO PC Repair Tool. This software will scan your device for potential issues and resolve them automatically.
Содержание
- 1 Исправляем ошибку 0x80240438 в Windows Store
- 2 Причина ошибки
- 3 Как исправить ошибку 0x80240438 в Windows Store. Способы решения?
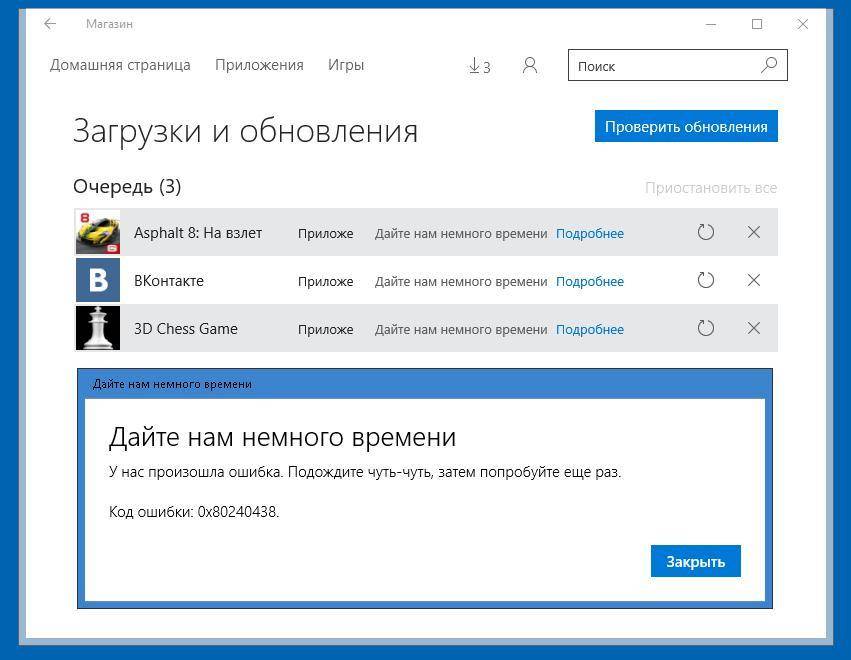
0x80240438 — это очередная ошибка, которая может урезать функционал вашего Windows Store(или же Магазина Windows). Появляется данная ошибка во время попытки пользователями загрузить какое-то приложение из магазина или же обновлений для них.
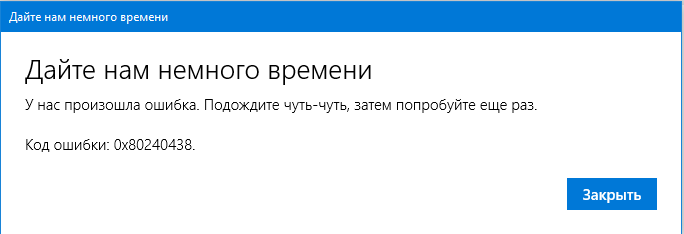
В сообщении ошибки 0x80240438 говорится следующая информация:
Дайте нам немного времени
У нас произошла ошибка. Подождите чуть-чуть, затем попробуйте еще раз.
Код ошибки: 0x80240438
Как видите, никакой точно информации по причинам возникновения проблемы сообщение в Windows Store нам, к сожалению, не предоставляет. Однако, на сегодняшний день в сети уже известны возможные причины появления данной проблемы. Итак, причинами ошибки 0x80240438 может являться:
- скопившейся кэш Windows Store;
- блокирующий соединение Брандмауэр Windows или сторонний Firewall;
- проблемы с Интернет-соединением;
- проблемы на стороне серверов магазина;
- некорректно работающий роутер;
- измененные записи в Реестре Windows;
ОК, это были самые распространенные причины для появления этой ошибки. Хочется отметить, что ошибка 0x80240438 способна появляться и при запуске Защитника Windows.
Исправляем ошибку 0x80240438 в Windows Store
Метод №1 Отключение брандмауэра Windows или стороннего Firewall’а
Давайте сразу же исключим из нашего списка некоторые защитные утилиты, а именно Брандмауэр Windows, системный сетевой экран, выполняющий фильтрацию сетевых подключений в вашей системе, тем самым защищая ее. Так вот, Брандмауэр Windows вполне мог попросту взять и заблокировать подключение, которые было создано в Windows Store, вследствие чего и появилась ошибка 0x80240438.
Чтобы проверить причастность Брандмауэра Windows к возникшей проблеме, вам требуется отключить его. Не знаете как выключить защитный функционал системного firewall’а?
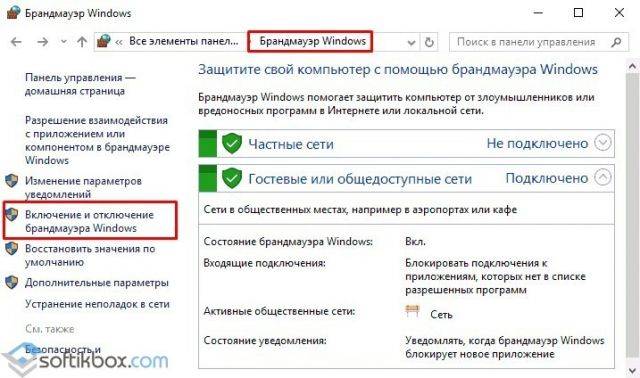
Нажмите комбинацию клавиш Win+S и впишите в поисковую строку «Брандмауэр Windows». Выберите появившейся результат и запустите классическое приложение Windows. Теперь нажмите на ссылку «Включение и отключение брандмауэра Windows». Выберите опции по отключению Брандмауэра как для общественной сети, так и для частной.
Также мы рекомендуем вам отключить сторонние Firewall’ы в своей системе, так как они точно также могут блокировать подключения для Windows Store. Хорошо, как только отключите Брандмауэр Windows и другие защитные утилиты от сторонних разработчиков, снова войдите в Windows Store и попробуйте с него загрузить что-либо, чтобы проверить наличие ошибки 0x80240438.
Метод №2 Перезапуск роутера
Двигаемся дальше. Следующим нашим подозреваемым в появлении ошибки 0x80240438 станет роутер. Порой, маршрутизаторы могут начать работать с перебоями, вследствие чего некоторые подключения становится невозможно установить. Попробуйте перезапустить свой роутрер, дабы проверить его причастность к появлению ошибки 0x80240438. Просто отключите маршрутизатор от питания приблизительно на 30 секунд, а затем подключите его обратно. Возможно, именно он и являлся виновником.
Метод №3 Очистка кэша Windows Store
Кэш предоставляет пользователям невероятный функционал и может значительно ускорить производительность Windows Store. Однако, при скоплении достаточно большого количества кэша могут начаться многочисленные проблемы. Например, ошибка 0x80240438 могла появиться как раз таки вследствие вредоносного кэша.
Проверить догадку с кэшем достаточно просто — его можно очистить. Для этого нажмите комбинацию клавиш Windows+R, чтобы запустить утилиту Выполнить. Затем впишите в пустую строку утилиты WSReset.exe и нажмите Enter. Далее перед вами должна будет появиться пустая Командная строка. Она исчезнет, как только очистка кэша Windows Store будет завершена.
Как только вы очистите кэш Windows Store, пройдите в Магазин и попробуйте загрузить или обновить что-то для проверки наличия ошибки 0x80240438. Если дело заключалось именно в кэше, то вы будете знать на будущее, что его лучше время от времени удалять.
Метод №4 Отключение Прокси-сервера для локальных подключений
Еще один метод по решению ошибки 0x80240438 в Windows Store — это отключение опции Прокси-сервера для локального подключения. Многие пользователи отмечают, что после деактивации этого функционала им удалось вернуть полноценную работоспособность Windows Store.
Нажмите комбинацию клавиш Windows+S. Затем введите в строку поискового запроса «Свойства браузера» и нажмите Enter. Перед вами появится окно параметров вашего Интернета. Перейдите во вкладку «Подключения». Затем нажмите на кнопку «Настройка сети».
Найдите опцию «Использовать прокси-сервер для локальных подключений…» и уберите с нее галочку». Сохраните изменения в настройках Интернета. Теперь снова зайдите в Windows Store и проверьте наличие ошибки 0x80240438.
Метод №5 Переименование папки Cache
Очевидно, что кэш Windows Stote хранится где-то на вашем компьютере. Если в эту папку попало что-то стороннее или же там находятся поврежденные файлы кэша, то это вполне может вызывать различные проблемы как для Windows Store, так и для всей операционной системы в целом, например, ошибку 0x80240438.
Если очистка кэша не решает проблему, то можно переименовать папку, в которой аккумулируется кэш от приложения Windows Store. Итак, все что нужно сделать — это пройти в нужную директорию и найти оговариваемую папку. Нажмите комбинацию Windows+R.
Впишите в пустую строку %localappdata%PackagesMicrosoft.WindowsStore_8wekyb3d8bbweLocalState и нажмите Enter, чтобы пройти в эту директорию. Как только окажетесь в ней, найдите папку под названием Cache(именно так и называется папка с кэшем Windows Store). Нажмите на папку правой кнопкой мыши и выберите пункт переименования. Переименуй папку Cache и Cache.old. Закройте Проводник и пройдите в Windows Store для проверки наличия ошибки 0x80240438.
Метод №6 Коррекция записей Реестра Windows
У нас в запасе остался еще один метод, который потребует от вас модификации записей в Реестре Windows. Нажмите комбинацию Windows+R, впишите regedit.exe и нажмите Enter. С помощью навигационной панели в левой части окна, пройдите в раздел HKEY_CURRENT_USER Software Microsoft Windows CurrentVersion Policies WindowsUpdate.
Найдите в правой части окна параметр под названием DisableWindowsUpdateAccess. Кликните дважды на него левой кнопкой мыши и выставьте этому параметру значение на . Сохраните изменения в Реестре Windows и перезагрузите компьютер.
Как только вы войдете в систему, зайдите в Windows Store и попробуйте выполнить установку приложений или обновлений для них. После всех вышеуказанных методов, ошибка 0x80240438 определенно должна быть исправлена.
Нашли опечатку? Выделите текст и нажмите Ctrl + Enter
Последнее время пользователи все чаще сталкиваются с ошибками при работе с магазином приложений Windows. Одной из распространенных ошибок является 0x80240438.
Возникновение данной ошибки не позволяет пользователю работать с магазином Windows, поскольку блокирует все попытки скачивания или обновления любого из приложений.
При попытке работы с Windows Store пользователь получает следующее сообщение: «Дайте нам немного времени. У нас произошла ошибка. Подождите чуть-чуть, затем попробуйте еще раз. Код ошибки: 0x80240438»
Причина ошибки
К сожалению, точной информации о том, что является причиной ошибки, в сообщении от магазина не указывается, но, как правило, причины следующие:
- большое количество скопившегося кэша в магазине;
- Брандмауэр, который блокирует соединение;
- возникновение сбоев в Интернет-соединении;
- возникновение ошибок на стороне серверов магазина;
- изменение в реестре;
- ошибки в работе роутера и т.д.
Как исправить ошибку 0x80240438 в Windows Store. Способы решения?
Способ №1. Отключите работу антивируса
Вероятно, установленные вами антивирусные утилиты блокируют работу магазина Windows, и, как следствие, возникает ошибка 0x80240438. Попробуйте отключить их работу и проверьте соединение с магазином и появление ошибки.
Способ №2. Проверьте дату и время, установленные на вашем ПК
Возможно, ваш компьютер живет «вчерашним днем» или «на час вперед», что и блокирует работу магазина Windows. Перепроверьте данные параметры.
Способ №3. Перезапустите учетную запись
Сбросьте вашу учетную запись в Windows Store и войдите в нее снова. Ошибка 0x80240438 может возникать из-за проблемы соединения с магазином и «перезаход» в учетную запись вернет вам соединение.
Способ №4. Включите автоматическое восстановление хранилища
Запустите Командную строку от имени администратора (ПКМ по значку «Пуск» — «Командная строка (администратор)) и введите DISM /Online /Cleanup-Image /RestoreHealth.
Запустится автоматическое восстановление хранилища. После окончания операции появится сообщение об устранении повреждения хранилища.
Перезагрузите компьютер и попробуйте воспользоваться магазином Windows.
Способ №5. Отключите Брандмауэр
Именно проблемы с этой утилитой являются самой распространенной причиной возникновения ошибки 0x80240438 при работе с магазином Windows.
Для чего нужна утилита Брандмауэр и как она мешает работе магазина?
Брандмауэр Windows является встроенным в Microsoft Windows межсетевым экраном, главной целью которого является контроль доступа программ в сеть и обеспечение безопасности в работе ОС. Вероятно, именно он блокирует ваши попытки соединения с магазином Windows.
Как ее выключить?
Одновременное нажатие клавиш Win+S на клавиатуре вызовет поисковую строку. В появившемся диалоговом окне вам необходимо вписать «Брандмауэр Windows». Далее найдите и запустите классическое приложение Windows.
Нажмите на ссылку «Включение и отключение брандмауэра Windows».
Вам необходимо отключить Брандмауэр и для частной, и для общественной сети.
После отключения Брандмауэра зайдите в магазин приложений Windows и проверьте наличие ошибки 0x80240438.
Способ №6. Перезапустите роутер
Еще одной простой причиной появления ошибки 0x80240438 являются неполадки с роутером.
В ряде случаев в маршрутизаторе могут возникать сбои, из-за чего и возникают проблемы с магазином Windows, а также с некоторыми другими соединениями.
Отключите роутер от питания на 30-40 секунд. После подключения роутера обратно к питанию проверьте наличие ошибки.
Способ №7. Очистите кэш Windows Store от мусора
Следствием возникновения ошибки 0x80240438 может быть наличие вредоносных кэш-файлов.
Провести очистку кэша можно придерживаясь следующей инструкции:
# нажмите Windows+R на клавиатуре и вызовите Командную строку
# в появившуюся строку введите WSReset.exe и нажмите клавишу Enter.
На экране всплывет пустая Командная строка. Подождите: после автоматической очистки кэша она исчезнет.
Попробуйте запустить магазин Windows снова. Если возникает ошибка 0x80240438 – проблема была не в кэш-файлах. Воспользуйтесь другим методом.
Способ №8. Переименуйте папку Cache-файлов с Windows Store
Если очистка кэш-файлов не помогла в устранении проблемы, попробуйте переименовать папку кэш.
Комбинация Windows+R вызовет Командную строку.
В появившемся окне введите %localappdata%PackagesMicrosoft.WindowsStore_8wekyb3d8bbw и нажмите клавишу Enter.
Найдите папку под названием Cache и переименуйте ее.
Проверьте наличие ошибки 0x80240438 в магазине Windows.
Способ №9. Отключите Прокси-сервер для локальных подключений
- Вызовите строку поискового запроса сочетанием клавиш Windows+S.
- Введите в поиск «Свойства браузера» и нажмите клавишу Enter.
- На экране высветится окно настроек вашего Интернет-подключения.
- Перейдите в папку «Подключения» и нажмите «Настройка сети».
- Уберите галочку с опции «Использовать прокси-сервер для локальных подключений».
- Сохраните изменения и снова проверьте наличие ошибки 0x80240438 в Windows Store.
Способ №10. Проведите коррекцию записей в Реестре Windows
Как это сделать?
- Комбинация Windows+R вызовет Командную строку.
- Введите regedit.exe и нажмите клавишу Enter.
- Перед вами высветится навигационная панель.
- Ваша задача – найти раздел HKEY_CURRENT_USER Software Microsoft Windows CurrentVersion Policies WindowsUpdate.
- Найдите и ЛКМ дважды нажмите на параметр DisableWindowsUpdateAccess.
- Установите значение «0» для данного параметра.
- Сохранение изменения.
После перезагрузки компьютера проверьте возникновение ошибки 0x80240438 в магазине Windows.
Описанные нами методы являются наиболее эффективными при решении проблем в работе с магазином Windows.
Нашли опечатку? Выделите текст и нажмите Ctrl + EnterХ
При попытке загрузить приложение из Магазина Microsoft пользователь может столкнуться с ошибкой 0x80240438. Связана она с политикой безопасности самого устройства. Брандмауэр может блокировать загрузку софта с этого сайта или же сам Магазин может работать некорректно. Чтобы исправить ошибку 0x80240438 Магазина Windows 10 стоит воспользоваться следующими рекомендациями.
Читайте также:Как исправить ошибку 0x80072efd с Магазином Windows 10?
Если при загрузке приложения на экране появился код ошибки 0x80240438 Windows 10 Магазина Microsoft, стоит в первую очередь отключить брандмауэр. Сделать это можно следующим способом:
- Переходим в Панель управления. Выставляем режим просмотра «Мелкие значки» и выбираем «Брандмауэр Windows». Откроется новое окно. В меню слева выбираем «Включение и отключение брандмауэра Windows».
- После выставляет отметки «Отключить брандмауэр Windows».
- Сохраняем результат и повторяем попытку установки софта.
ВАЖНО! Обязательно стоит перезагрузить ПК, чтобы изменения вступили в силу. Рекомендуем также на время отключить антивирус.
Радикальный метод, который на форуме Microsoft отмечен как эффективный, следующий. Запускаем командную строку с правами Администратора. Поочерёдно вводим следующие команды. После каждой жмём «Enter» и ожидаем завершения операции.
- exe – команда для очистки кэша Магазина;
- ipconfig /flushdns – команда для очистки DNS кэша;
- nbtstat –R – команда для обновления кэша имен;
- nbtstat –RR – освобождение и обновление имен NetBIOS для локального компьютера;
- netsh winsock reset – сброс настроек;
- netsh interface tcp set global autotuninglevel=disabled;
- netsh winhttp reset proxy.
После этих действий перезагрузите компьютер и повторите загрузку приложений.
Следующим вариантом, который также может помочь решить проблему является использования команды «DISM /Online /Cleanup-Image /RestoreHealth». Эта команда выполняет проверку и автоматическое восстановление системных файлов, которые были повреждены. Однако перед запуском данной команды с правами Администратора стоит проверить ПК на вирусы.
Кроме командной строки в Windows 10 для решения проблем с Магазином Microsoft можно использовать PowerShell. Для этого стоит выполнить следующее:
- Вводим «Crtl+Alt+Del». Откроется Диспетчер задач. Выбираем «Запустить новую задачу».
- Пишем «powershell» и ставим отметку «Создать задачу с правами Администратора».
- Откроется консоль. Вводим такую задачу: Get-AppXPackage | Foreach {Add-AppxPackage -DisableDevelopmentMode -Register «$($_.InstallLocation)AppXManifest.xml»}.
- На экране произойдет следующее.
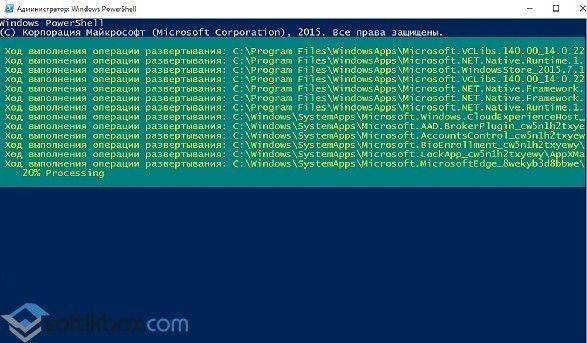
- После стоит перезагрузить ПК и повторить попытку загрузки программ.
Если же ошибка у вас возникла по причине поражения системы вирусами, стоит выполнить редактирование реестра. Для этого делаем следующее:
- Жмём «Win+R» и вводим «regedit».
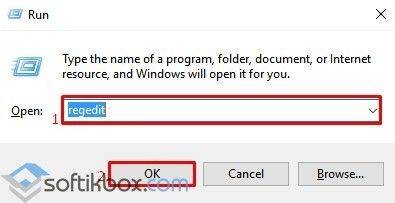
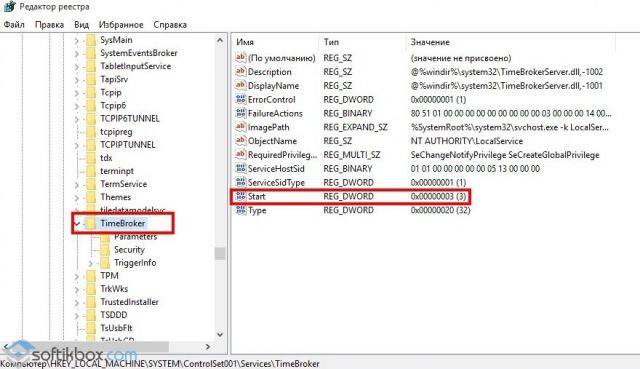
- Переходим по ветке «HKEY_LOCAL_MACHINESYSTEMControlSet001ServicesSystemEventsBroker». Находим параметр «Start» и задаем ему значение «2».
- Также находим такой же параметр по адресу «HKEY_LOCAL_MACHINESYSTEMControlSet001ServicesTimeBroker» и задаем ему значение «3».
После редактирования реестра стоит перезагрузить систему и проверить на работоспособность Магазин Windows.
Используемые источники:
- https://gamesqa.ru/kompyutery/0x80240438-9194/
- https://geekhow.ru/os/windows/0x80240438-windows-store/
- https://softikbox.com/oshibka-magazina-windows-10-c-kodom-0x80240438-23023.html
Run Windows Store apps troubleshooter first
by Srishti Sisodia
Srishti Sisodia is an electronics engineer and writer with a passion for technology. She has extensive experience exploring the latest technological advancements and sharing her insights through informative… read more
Updated on March 27, 2023
Reviewed by
Alex Serban

After moving away from the corporate work-style, Alex has found rewards in a lifestyle of constant analysis, team coordination and pestering his colleagues. Holding an MCSA Windows Server… read more
- The Windows Store update error could have occurred if the IPV6 is enabled but not supported by your ISP.
- This guide will cover all the potential fixes to resolve the issue.
XINSTALL BY CLICKING THE DOWNLOAD FILE
Fortect is a system repair tool that can scan your complete system for damaged or missing OS files and replace them with working versions from its repository automatically.
Boost your PC performance in three easy steps:
- Download and Install Fortect on your PC.
- Launch the tool and Start scanning
- Right-click on Repair, and fix it within a few minutes
- 0 readers have already downloaded Fortect so far this month
Many users have reported that they faced this issue while updating Windows OS or apps on Microsoft Store.
In this guide, we will discuss some expert-recommended solutions to fix the issue right after talking about the causes.
What is 0x80240438?
0x80240438 is a Windows Update error code that typically indicates a problem with the Windows Update service or the associated software components.
What causes the Windows Store error 0x80240438?
Some PC issues are hard to tackle, especially when it comes to corrupted repositories or missing Windows files. If you are having troubles fixing an error, your system may be partially broken.
We recommend installing Restoro, a tool that will scan your machine and identify what the fault is.
Click here to download and start repairing.
There are various reasons why you see 0x80240438 while updating the computer; some of the common ones are mentioned here:
- Network connectivity issues – If your internet connection is slow or has a weak signal, it could prevent you from updating Windows apps, hence the error.
- Third-party security software interference – Third-party antivirus software can interfere with normal Windows functioning, including the update process. Therefore, you get this error.
- Damaged system files – If system files are corrupt or missing, it can prevent the Windows update service from running correctly. Hence you get this error.
- Old or incompatible drivers – If your device drivers are outdated or incompatible with your Windows version, it could cause all kinds of issues.
- Windows update service issue – If there are problems such as incorrect configuration, outdated components, or corrupted files, it can cause an error.
What can I do to fix the Windows Store error 0x80240438?
Before engaging in advanced troubleshooting steps, you should consider performing the following checks:
- Disable the firewall temporarily.
- Restart your computer.
1. Disable IPV6
- Press the Windows key, type Control Panel, and click Open.
- Select Category as View by and click Network & Internet.
- Double-click the network connection, and on the next page, select Properties.
- Remove the checkmark next to Internet Protocol Version 6 (TCP / IPv6).
- Click OK to confirm the changes.
2. Rename the Windows Store cache folder
- Press Windows + R to open the Run dialog box.
- Type the following command, replace the username with the user account name, and click OK:
C:UsersusernameAppDataLocalPackagesMicrosoft.WindowsStore_8wekyb3d8bbweLocalState - Locate and select the Cache folder, and rename it to Cache.old.
- If you don’t find the folder, create a folder and name it Cache.
- Press Windows + I to open Settings.
- Go to System, and click Troubleshoot.
- Now select Other troubleshooters.
- Go to the Windows Store Apps and click Run.
- Follow the onscreen instructions to complete the process.
3. Run the Windows Store Apps troubleshooter
- Press Windows + I to open the Settings app.
- Go to System, and click Troubleshoot.
- Now select Other troubleshooters.
- Go to the Windows Store Apps and click Run.
- Follow the onscreen instructions to complete the process.
- How to end a task from the taskbar on Windows 11
- Can the new File Explorer expose users without consent?
- 0x00000b11: How to Fix This Error on Windows 10 & 11
- Lenovo Laptop Black Screen: How to Fix It in 5 Steps
- Want your Terminal to load faster? Don’t install Build 25336
4. Disable BITS and delete the SoftwareDistribution folder
- Press Windows + R to open the Run console.
- Type services.msc and click OK to open the Services app.
- Locate and right-click Background Intelligent Transfer Service and select Stop.
- Press Windows + E to open Windows Explorer.
- Navigate to this path:
C:WindowsSoftwareDistribution - Select all the content in the SoftwareDistribution folder and click the Delete icon.
- Now go to the Services app, right-click Background Intelligent Transfer Service, and select Start.
5. Clear Windows cache
- Press Windows + R to open the Run console.
- Type wsreset.exe and click OK to reset the Windows Store cache.
- Once the process is finished, your Microsoft Store app will restart.
6. Use the Registry Editor
- Press Windows + R to open the Run box.
- Type Regedit and click OK to open Registry Editor.
- Navigate to this path:
ComputerHKEY_CURRENT_USER Software Microsoft Windows CurrentVersion PoliciesWindowsUpdate - Locate DisableWindowsUpdateAccess, and double-click it.
- Change the Value data from 1 to 0.
- Restart your computer to let the changes take effect.
7. Use the Command Prompt
- Press the Windows key, type CMD, and click Run as administrator.
- Type the following commands one by one and press Enter after every command:
sfcscannowDISM /online /cleanup-image /restorehealth - Copy and paste the following commands one by one and press Enter after every command:
netsh winhttp reset proxynet stop wuauservnet start wuauserv - Restart your computer and check if the issue persists.
So, these are methods you can follow to fix the 0x80240438 error on your Windows computer. Try them and let us know what worked in the comments section below.
Still having issues? Fix them with this tool:
SPONSORED
If the advices above haven’t solved your issue, your PC may experience deeper Windows problems. We recommend downloading this PC Repair tool (rated Great on TrustPilot.com) to easily address them. After installation, simply click the Start Scan button and then press on Repair All.
![]()
Newsletter
28.03.2017
Просмотров: 6536
При попытке загрузить приложение из Магазина Microsoft пользователь может столкнуться с ошибкой 0x80240438. Связана она с политикой безопасности самого устройства. Брандмауэр может блокировать загрузку софта с этого сайта или же сам Магазин может работать некорректно. Чтобы исправить ошибку 0x80240438 Магазина Windows 10 стоит воспользоваться следующими рекомендациями.
Читайте также: Как исправить ошибку 0x80072efd с Магазином Windows 10?
Способы решения ошибки 0x80240438 с Магазином Windows 10
Если при загрузке приложения на экране появился код ошибки 0x80240438 Windows 10 Магазина Microsoft, стоит в первую очередь отключить брандмауэр. Сделать это можно следующим способом:
- Переходим в Панель управления. Выставляем режим просмотра «Мелкие значки» и выбираем «Брандмауэр Windows». Откроется новое окно. В меню слева выбираем «Включение и отключение брандмауэра Windows».

- После выставляет отметки «Отключить брандмауэр Windows».

- Сохраняем результат и повторяем попытку установки софта.
ВАЖНО! Обязательно стоит перезагрузить ПК, чтобы изменения вступили в силу. Рекомендуем также на время отключить антивирус.
Радикальный метод, который на форуме Microsoft отмечен как эффективный, следующий. Запускаем командную строку с правами Администратора. Поочерёдно вводим следующие команды. После каждой жмём «Enter» и ожидаем завершения операции.
- exe – команда для очистки кэша Магазина;
- ipconfig /flushdns – команда для очистки DNS кэша;
- nbtstat –R – команда для обновления кэша имен;
- nbtstat –RR – освобождение и обновление имен NetBIOS для локального компьютера;
- netsh winsock reset – сброс настроек;
- netsh interface tcp set global autotuninglevel=disabled;
- netsh winhttp reset proxy.
После этих действий перезагрузите компьютер и повторите загрузку приложений.
Следующим вариантом, который также может помочь решить проблему является использования команды «DISM /Online /Cleanup-Image /RestoreHealth». Эта команда выполняет проверку и автоматическое восстановление системных файлов, которые были повреждены. Однако перед запуском данной команды с правами Администратора стоит проверить ПК на вирусы.

Кроме командной строки в Windows 10 для решения проблем с Магазином Microsoft можно использовать PowerShell. Для этого стоит выполнить следующее:
- Вводим «Crtl+Alt+Del». Откроется Диспетчер задач. Выбираем «Запустить новую задачу».
- Пишем «powershell» и ставим отметку «Создать задачу с правами Администратора».
- Откроется консоль. Вводим такую задачу: Get-AppXPackage | Foreach {Add-AppxPackage -DisableDevelopmentMode -Register «$($_.InstallLocation)\AppXManifest.xml»}.
- На экране произойдет следующее.

- После стоит перезагрузить ПК и повторить попытку загрузки программ.
Если же ошибка у вас возникла по причине поражения системы вирусами, стоит выполнить редактирование реестра. Для этого делаем следующее:
- Жмём «Win+R» и вводим «regedit».

- Переходим по ветке «HKEY_LOCAL_MACHINE\SYSTEM\ControlSet001\Services\SystemEventsBroker». Находим параметр «Start» и задаем ему значение «2».
- Также находим такой же параметр по адресу «HKEY_LOCAL_MACHINE\SYSTEM\ControlSet001\Services\TimeBroker» и задаем ему значение «3».

После редактирования реестра стоит перезагрузить систему и проверить на работоспособность Магазин Windows.