How to remove media write-protected error? What to do when media cannot be formatted when you try to format it with a formatter or DOS bootable usb maker like HP USB Disk Storage Format Tool? See how it appeared in the following editions of HP USB Format Tool v2.0.6 and v2.2.3.
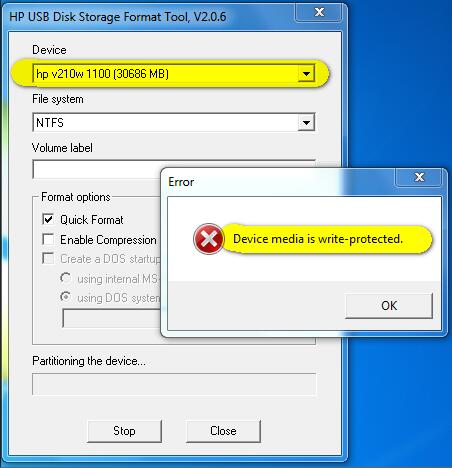 Device media is write protected with HP USB Format Tool v2.0.6
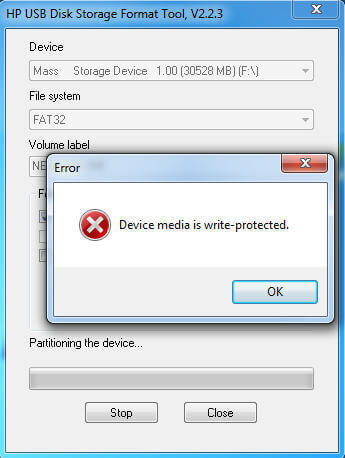 Device media is write protected with HP USB Format Tool v2.2.3
Also read: how to remove write protection, and how to fix can’t format usb
3 Efficient Ways to Fix Device Media Write Protected Error(Video guide included in the end)
Way 1 — Turn off the write protection switch if it was locked
Way 2 — Convert the media no matter usb stick or memory card to be MBR with diskpart
Here are some pre-steps that you need to get it done.
- Step1 — open cmd by pressing ‘Windows icon + R’ on your keyboard to start Run
- Step2 — type ‘diskpart’ to open the diskpart function
CMD to convert media MBR to get the write protection problem fixed
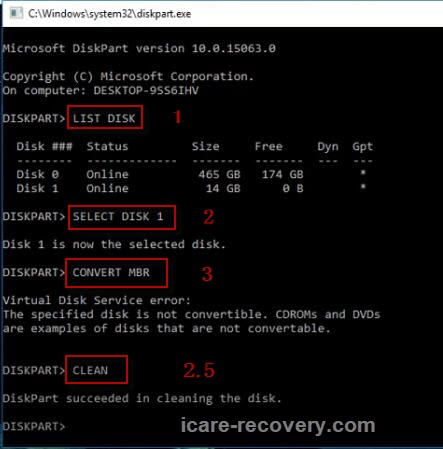
- Step1 — type ‘list disk’
- Step2 — type ‘select disk *’ (* you may need to replace * with the drive letter of your media)
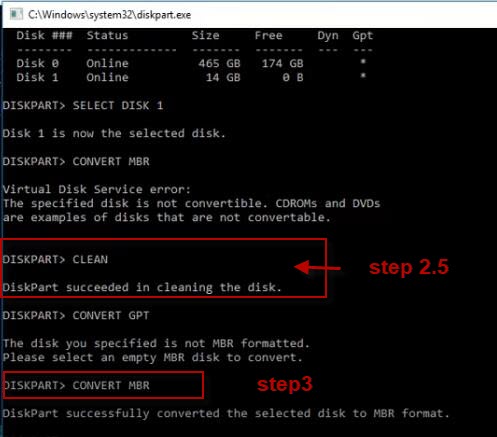
- Step3 — type «convert mbr»
Note: if it does not work and reports some message like ‘The sepecified disk is not convertible’, here is another step that shall be added before the Step3.
- Step2.5 — type ‘clean’
The above step2.5 is to fix the error when it was not working with the convert MBR.
 Remove hp usb format tool write protected with cmd
 Remove hp usb format tool write protected with cmd
Video Guide — how to remove media is write protected error in HP USB Disk Storage Format Tool
Way 3 — Remove the write protection with cmd Attrib disk clean Readonly
Besides the above way2 method, you may also try the following cmd to remove the read-only attribution on your pendrive or disk.
 Remove HP usb format tool write protection readonly attribution
You need to get your media connected to your computer at first, and then start cmd and here are the steps.
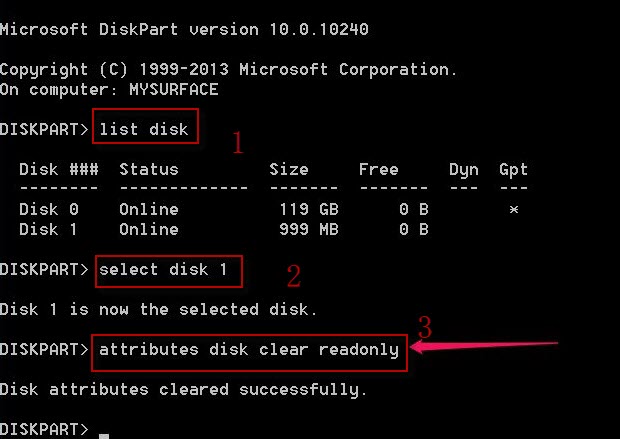
- list disk
- select disk * (You need to replace * with the drive letter of your media to remove the write protection error)
- attributes disk clear readonly
- exit
Or sometimes you may also use ‘attrib disk clear readonly’ as an alternative in the above steps when it comes to the step 3.
Did not work? Try more methods on this page: 10 free ways to remove write protection on usb drive
Last updated on Sept 14, 2023
Hot Articles
- How to recover memory card photos
- Unformatted pen drive data
- HP usb disk format tool alternatives
File Recovery Free > Format Recovery Utility > Howto >HP USB format tool media is write protected
A few days ago I tried to create a bootable MS-DOS bootable USB disk using the «HP USB Disk Storage Format Tool» and received the error «Device media is write protected». Since the above error is similar to the «Disk is write-protected» error that can occur when trying to format a USB disk with the Windows Format tool, I decided to write this tutorial to solve these problems.

How to FIX: «Disk is Write protected» & «Device media is write protected» when formatting a USB Drive on Windows 10/11.
Method 1. Check if there is a Physical Write-Protection Switch.
Some USB drives and SD Cards have a physical switch to prevent the drive from being modified. Therefore, make sure there is no such switch or, if there is, set it to OFF.
Method 2. Start USB Disk Storage Format Tool as Admin.
The second method to bypass the «Device media is write protected» error in HP USB format tool, is to start the tool with Administrative privileges’.
So, right-click at HP USB Disk Storage Format Tool and choose Run as Administrator. Then click YES at UAC warning and try to format the disk again.
Method 3. Delete Volume(s) on Disk using Disk Manager.
Important Note: Before you continue, unplug all unneeded storage devices from your computer (USB disks, Memory cards, etc.), to avoid loosing your data.
1. Press Windows ![]() + R keys to open the run command box.
+ R keys to open the run command box.
2. Type diskmgmt.msc and press OK to open Disk Management.

3. In Disk Management, right-click on the USB drive that you want to format and select Delete Volume.

4. Ask Yes at the warning message to remove the partition.

5. When the deletion is completed, try to format the drive again. *
* Note: If you follow these instructions to resolve the «Device media is write protected» error in the HP USB Format Tool utility, then don’t format the disk using Windows. Just run the ‘HP USB Disk Storage Format Tool’ and leave the tool to format it.
Method 4. Delete all Volumes and Partitions on USB disk using DISKPART tool.
1. Open Command Prompt as Administrator. To do that:
1. Press the Windows
+ R keys to open the ‘Run’ command box
2. Type CMD and then press CTRL + SHIFT + ENTER.

2. In Command Prompt type: diskpart
3. In diskpart, type the following command to list all the available drives (disks) and press Enter:
-
list disk
4. Now locate the disk number of the USB drive by its size in GB (or MB) and give the following command to select it:
-
select disk x
Note: Where «x» is the disk number of the USB disk. *
* In this example, the «Disk Write Protected» error occurred on the 2GB USB disk with number 1 (Disk 1), so the command will be:
-
select disk 1
5. Finally give the following command to clean all volumes and partitions on the selected disk: *
-
clean all
Notes:
1. The «clean all» command will take time to complete depending on the size of the disk. (For a 2GB size it took about 5-7 minutes).
2. If after giving the «clean all» command, you receive the error «DiskPart has encountered an error: Access is denied«, restart your PC and repeat the above steps.

6. When the operation is completed, type exit to close the DISKPAT tool.
7. Restart your PC and try to format the drive. *
* Note: If you follow these instructions to resolve the «Device media is write protected» error in the HP USB Format Tool utility, then don’t format the disk using Windows. Just run the ‘HP USB Disk Storage Format Tool’ and leave the tool to format it.
Method 5. Convert the Disk to GPT using DISKPART tool.
1. Open Command Prompt as Administrator
2. In Command Prompt type the following commands in order :
-
diskpart
-
list disk
3. Now select the USB disk with the write protection error, with this command:
-
select disk x
Note: Where «x» is the disk number of the USB disk. *
* In this example, the «Disk Write Protected» error occurred on the 2GB USB disk with number 1 (Disk 1), so the command will be:
-
select disk 1
4. Then give these commands to remove all partitions or volume formatting from the disk and to convert the partition style to MBR:*
-
clean
-
convert mbr
* Note. If after giving the «clean all» command, you receive the error «DiskPart has encountered an error: Access is denied«, restart your PC and repeat the above steps.
6. When the operation is completed, type exit to close the DISKPAT tool.

7. Now open the HP USB Disk Storage Format Tool and try to format the drive.
That’s all folks! Did it work for you?
Please leave a comment in the comment section below or even better: like and share this blog post in the social networks to help spread the word about this.
If this article was useful for you, please consider supporting us by making a donation. Even $1 can a make a huge difference for us.

Как решить проблему «Устройство защищено от записи»
На чтение 4 мин Опубликовано Обновлено
Возникает ли у вас проблема доступа к устройству хранения данных, сопровождающаяся сообщением «Device media is write protected»? Не беспокойтесь, вы не одиноки! Это достаточно распространенная проблема, которая может возникнуть как на компьютере, так и на других устройствах.
Когда устройство хранения данных защищено от записи, вы не можете добавлять или удалять файлы с этого устройства. Проблема может возникнуть по нескольким причинам — это могут быть как программные проблемы, так и аппаратные неисправности.
Счастливо, большинство случаев проблемы с «write protection» можно решить сравнительно просто. В этой статье мы рассмотрим несколько методов, которые могут помочь вам решить проблему и снова получить полный доступ к вашему устройству хранения данных.
Device media is write protected — это сообщение об ошибке, которое указывает на то, что устройство или носитель записи защищен от записи. То есть, вы не можете вносить изменения или записывать данные на данное устройство.
Такая ошибка может возникнуть по нескольким причинам:
- Защита от записи включена на устройстве: Некоторые устройства, такие как USB-накопители и SD-карты, имеют переключатель или выключатель защиты от записи. Если этот выключатель активирован, то запись на устройство будет невозможна.
- Проблемы с правами доступа: Возможно, у вас не хватает прав доступа для записи на данный носитель или устройство защищено на уровне операционной системы.
- Поврежденный носитель или устройство: Некоторые ошибки могут возникать из-за поврежденного устройства или носителя записи. Например, если разъем или контакты USB-порта повреждены, это может привести к ошибке «Device media is write protected».
Чтобы решить проблему «Device media is write protected», следует проверить следующие вещи:
- Переключите выключатель защиты от записи устройства, если таковой имеется.
- Убедитесь, что у вас есть соответствующие права доступа для записи на данный носитель или устройство. Если нет, то попробуйте выполнить операцию от имени администратора или получить необходимые разрешения.
- Подключите устройство к другому порту или компьютеру, чтобы исключить возможность повреждения разъема или контактов.
- Попробуйте использовать другой носитель записи или устройство, чтобы исключить возможность повреждения текущего устройства или носителя.
- Если все вышеперечисленные методы не помогли решить проблему, возможно, надо обратиться к специалисту или производителю устройства для получения дополнительной помощи.
Важно также помнить о том, что перед внесением изменений в устройство или носитель записи необходимо создать резервную копию важных данных, чтобы не потерять их в случае непредвиденных ситуаций.
Надеюсь, что эта информация поможет вам разобраться с ошибкой «Device media is write protected» и решить свою проблему.
Как решить проблему с Device media is write protected?
Проблема «Device media is write protected» возникает, когда компьютер или другое устройство не позволяет записывать данные на устройство, такое как флеш-накопитель или жесткий диск. Эта проблема может быть вызвана различными причинами, но следующие шаги помогут вам решить эту проблему:
-
Проверьте переключатель защиты записи: Некоторые флеш-накопители и SD-карты имеют переключатель защиты записи, который можно переместить в положение «заблокировано». Убедитесь, что этот переключатель находится в положении «разблокировано», чтобы позволить запись данных на носитель.
-
Используйте административные привилегии: Если вы получаете сообщение об ошибке о защите от записи при попытке выполнить операцию, установите административные привилегии для вашего пользователя или запустите приложение с правами администратора. Это может позволить изменить настройки доступа и разблокировать запись на носителе.
-
Проверьте системные настройки безопасности: Некоторые системные настройки безопасности могут блокировать возможность записи данных на носитель. Убедитесь, что у вас есть соответствующие разрешения на запись данных на устройство.
-
Используйте командную строку: В некоторых случаях можно использовать командную строку для выполнения операций с защищенными от записи устройствами. Откройте командную строку с правами администратора и выполните соответствующие команды для изменения настроек разрешений.
-
Форматируйте устройство: Если все вышеперечисленные методы не сработали, последним решением может быть форматирование устройства. Однако это приведет к потере всех данных на носителе, поэтому перед выполнением этой операции обязательно сделайте резервную копию важной информации.
Если ни один из этих методов не помог решить проблему, возможно, причина кроется в самом устройстве, которое было повреждено или имеет аппаратную проблему. В этом случае, обратитесь к производителю устройства или обратитесь за помощью к специалисту.
Обновлено 19.08.2021
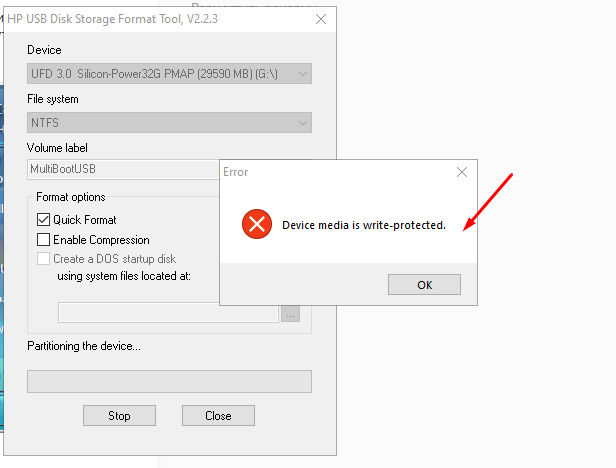
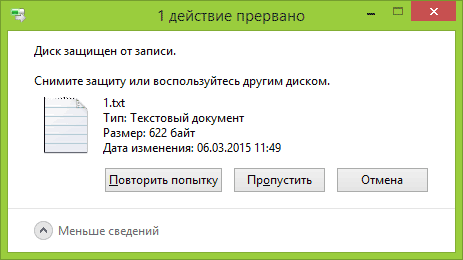
Добрый день уважаемые читатели и подписчики блога pyatilistnik.org. Расскажу небольшую историю как люди ломают usb флешки и как их потом восстанавливать. Мой коллега, дал одному из сотрудников флешку, для переноса данных с одного компьютера на другой. Пользователь произвел перенос и отдал нам носитель. Далее мой коллега, вставил себе эту флешку и попытался на нее, что-либо записать и был очень удивлен, что она вообще не виделась, лишь сразу появилось окно, что ее нужно отформатировать, пробуем и получаем ошибку «Диск защищен от записи«. Давайте я покажу как решить данную проблему и вернуть носитель в рабочее состояние.
Как выглядят ошибки
Давайте покажу как выглядит ошибка. На первом окне форматирования съемного диска, вы увидите «Диск защищен от записи».
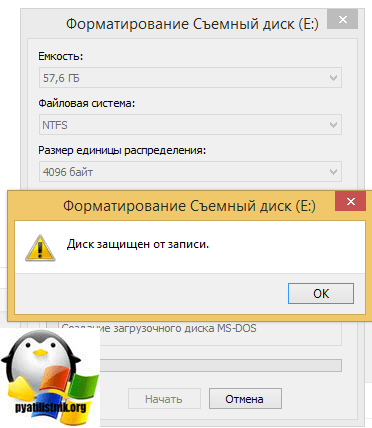
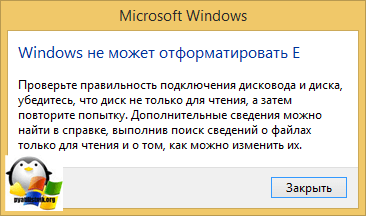
Нажав ок, вы увидите еще интересное предупреждение:
Windows не может отформатировать. Проверьте правильность подключения дисковода и диска, убедитесь, что диск не только для чтения, а затем повторите попытку. Дополнительные сведения можно найти в справке, выполнив поиск сведений о файлах только для чтения и о том, как можно изменить
Если открыть оснастку «Управление дисками», то вы обнаружите, что носитель имеет статус «Только для чтения»
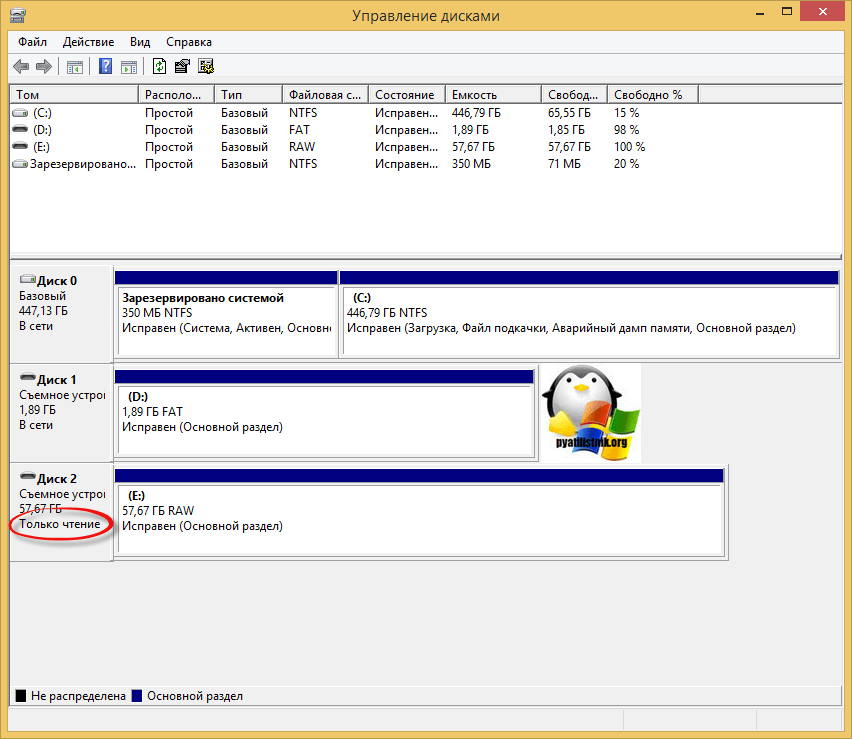
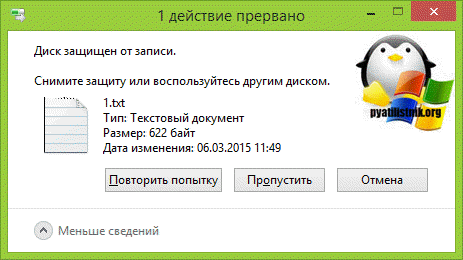
Еще бывает ситуация, что флешка видится и открывается, но вот записать туда ничего не дает, даже если учесть, что на вкладке «Безопасность» права на запись присутствуют. Тут вы уже видите сообщение «Снимите защиту или воспользуйтесь другим диском.»
Все эти симптомы мы с вами легко излечим.
Почему пишет диск защищен от записи
Давайте рассмотрим самые частые причины, приводящие к поломке USB носителя, как на физическом, так и на логическом уровне:
- Не правильное извлечение носителя из компьютера, на уровне операционной системы Windows. Уверен, что и вы этим грешите, в большинстве случаев пользователю, проще просто вытащить флешку, чем делать правильное ее извлечение,через специальное окно или программу. Как следствие вы увеличиваете вероятность краха файловой системы на ней, NTFS такого не любит.
- Большое количество ошибок на флешке
- Физический износ
- Проблема с драйверами
Убираем диск защищен от записи при форматировании
Когда с причинами все понятно, то давайте приступать к практике. Сразу покажу рабочий метод убирающий блокировку носителя «Только для чтения». В этом вам поможет утилита Formatter SiliconPower.
Скачать Formatter SiliconPower можно либо с официального сайта либо у меня.

Утилита полностью portable и не требует установки. Запускаем Formatter SiliconPower.
Перед запуском я вам советую оставить включенной только не рабочую флешку
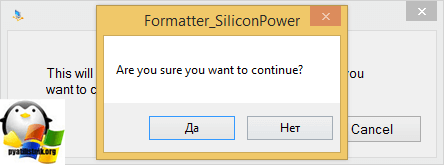
У вас появится окно, в котором вам предложат произвести форматирование, соглашаемся и нажимаем «Format»
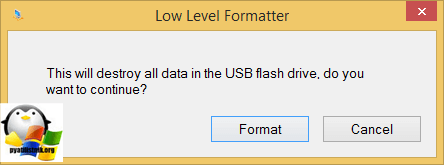
Вас предупредят, что все данные будут удалены, продолжаем операцию.
Начинается процесс восстановления, ни в коем случае не извлекайте флешку, пока не увидите окно, что все прошло успешно.
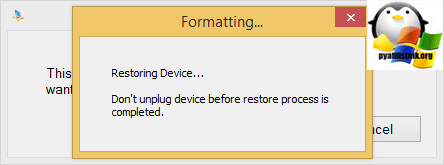
Вот так вот выглядит окно, что все выполнено и теперь usb носитель не защищен от записи, и работает в привычном вам режиме.

Убираем защиту от записи с USB в редакторе реестра Windows
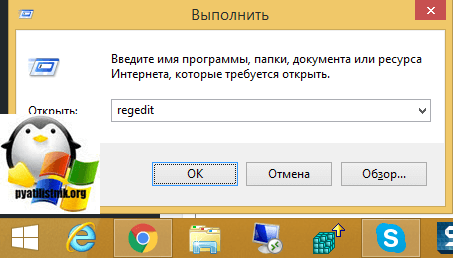
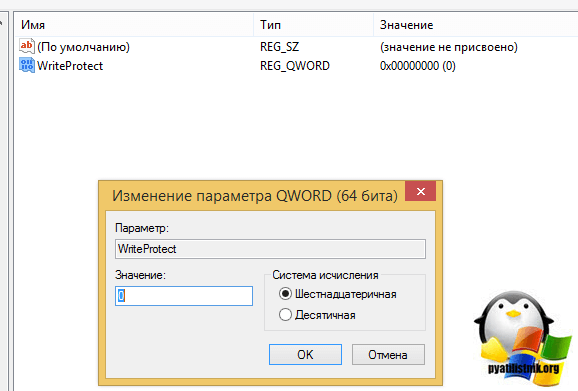
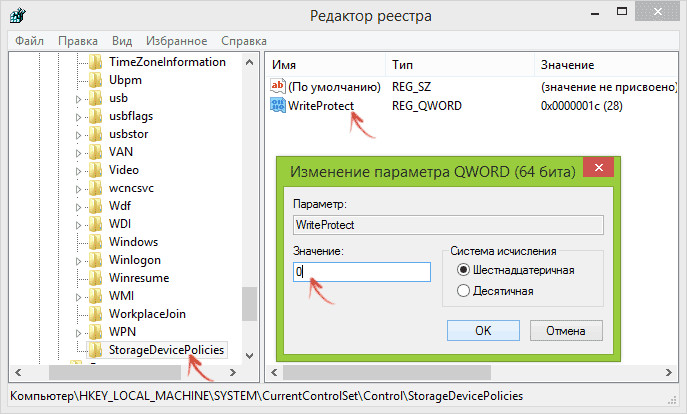
Данный метод поможет в 99 процентах случаев, когда у вас флешка видится, но не дает ничего на себя записать. Тут вся проблема в одном ключе реестра, который нужно поправить или создать заново. И так, нажимаем одновременно кнопки Win и R, и в открывшемся окне «Выполнить» пишем regedit.
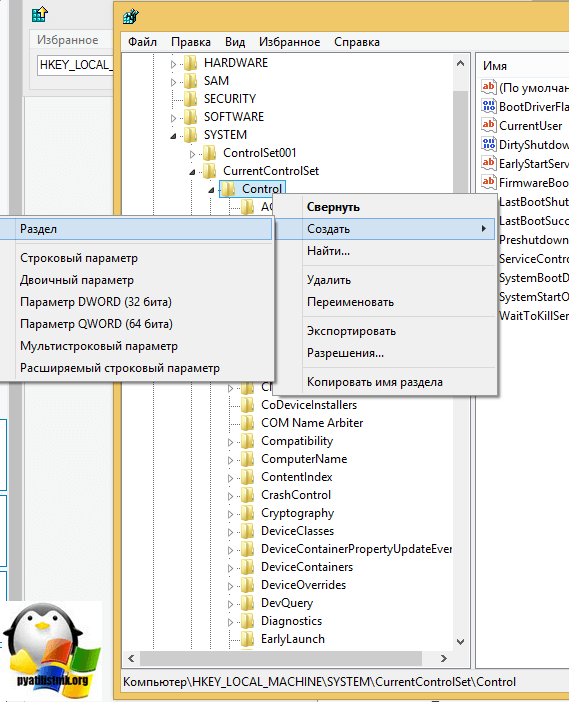
Переходите в раздел:
HKEY_LOCAL_MACHINESYSTEMCurrentControlSetControlStorageDevicePolicies
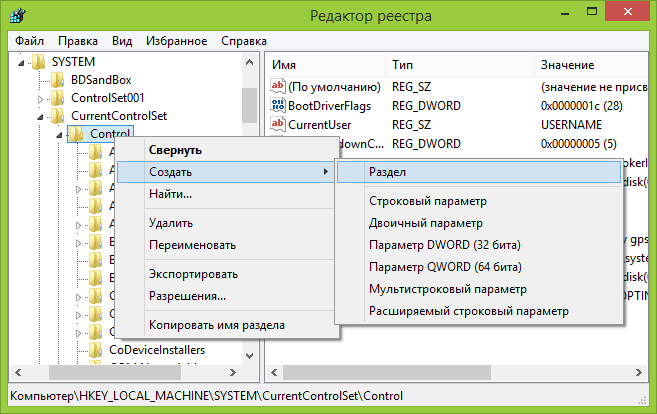
Если такого раздела не будет, то вам придется его создать через правый клик и задать ему имя StorageDevicePolicies
Кто лентяй, тот может уже скачать готовый ключ реестра с нужным значением, скачать WriteProtect. При запуске согласитесь с добавлением ключа
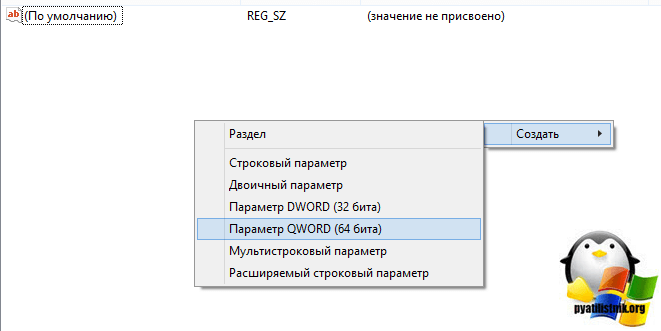
В разделе StorageDevicePolicies вам необходимо создать ключ реестра «Параметр QWORD (64 бита)» с именем WriteProtect и дать ему значение 0.
Если ключ WriteProtect уже был у вас в реестре и имел значение 1, то это он запрещал форматирование флешки и писал, что диск защищен от записи, меняем на ноль.
После внесения изменений в реестр, вам необходимо перезагрузить компьютер, иначе настройки не вступят в силу.
Как убрать защиту от записи в командной строке (cmd)
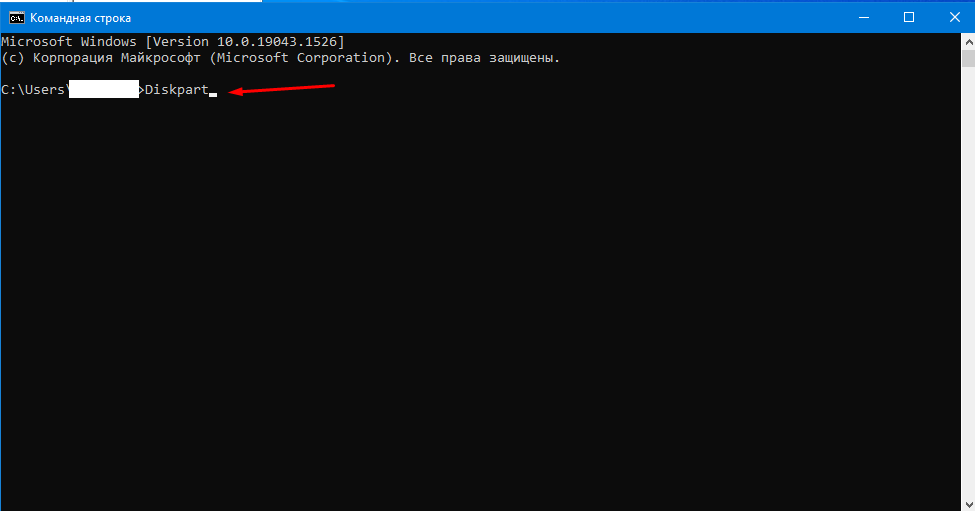
Если у вас по прежнему ваш съемный носитель выдает сообщение «Что usb диск защищен от записи» не спешите расстраиваться, у нас с вами есть в запасе утилита Diskpart. Запустить ее можно через командную строку Windows от имени администратора.
- Запустите командную строку от имени администратора.
- В командной строке введите Diskpart и нажмите Enter. Затем введите команду list disk и в списке дисков найдите свою флешку, вам потребуется ее номер. Введите по порядку следующие команды, нажимая Enter после каждой.
- select disk N (где N номер флешки из предыдущего шага)
- attributes disk clear readonly
- exit
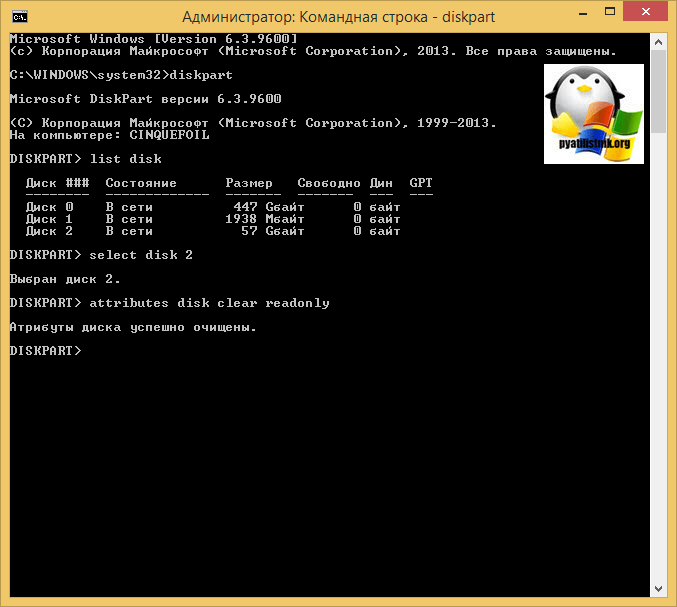
Как видите, утилита diskpart отработала, теперь можно проверять результат ее выполнения.
Не форматируется Trancend флешка
Есть еще специфические методы для USB носителей, определенных производителей, так например, для Trancend, есть специальная утилита JetFlash Online Recovery.
Скачать JetFlash Online Recovery https://ru.transcend-info.com/Support/Software-3/
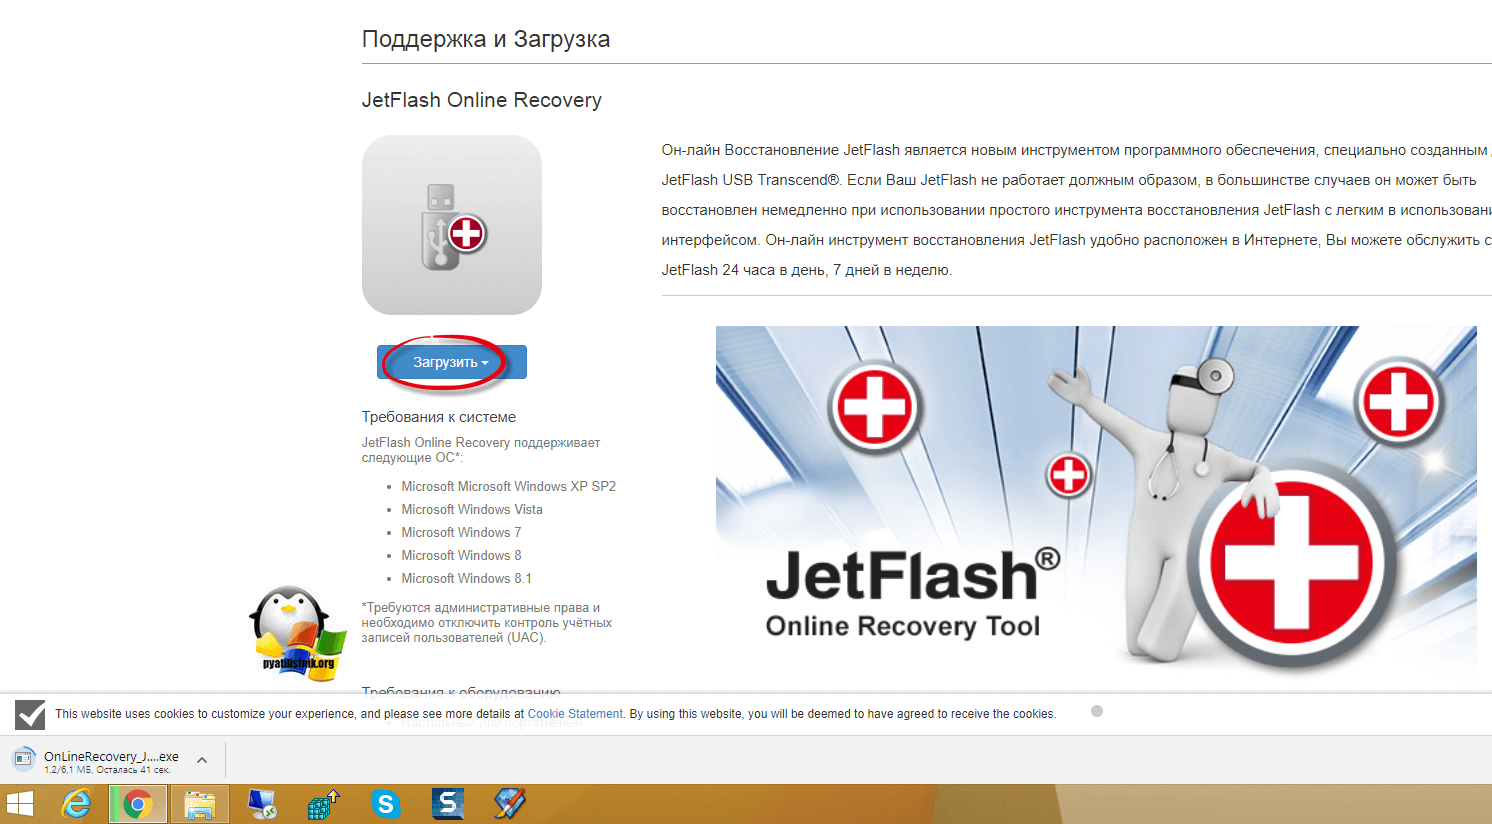
Сама утилита очень простая, запускаете ее и нажимаете Start.
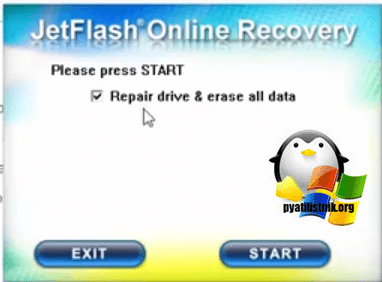
Начнется процесс восстановления usb носителя.
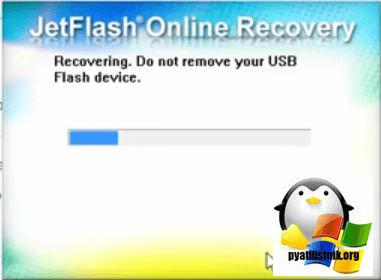
Как видите все успешно выполнилось и флешка спокойно открылась.

Резюме
Как видите ошибка с невозможностью прочитать или отформатировать флешку решается очень просто, для этого есть как встроенные утилиты, так и утилиты от производителей, выбираете подходящий для вас способ и ремонтируйте, если есть вопросы, то пишите их в комментариях, я постараюсь на них ответить, всем спасибо.
Полезный совет от пользователя Сергей (Fin)
Сейчас препарировал трупика и обнаружил окисление контактов USB. У радиолюбителей есть спрей такой Contact CLEANER называется, вот им и воспользовался. Контакты блестят, флешка читается, записывается и форматируется. Надеюсь и дальше будет радовать меня своей работоспособностью (хотя это уже под большим вопросом, общий возраст ее около 8 лет).
Вам Иван, спасибо за статью и всех благ!
Надеюсь поможет остальным вашим читателям.
PS: кто постирал флешку или уронил в воду — разберите, просушите, затем почистите зубной щеткой со спиртом саму плату с обоих сторон. Должна ожить — сам делал так несколько раз =) Удачи!
A few days ago I tried to create a bootable MS-DOS bootable USB disk using the «HP USB Disk Storage Format Tool» and received the error «Device media is write protected». Since the above error is similar to the «Disk is write-protected» error that can occur when trying to format a USB disk with the Windows Format tool, I decided to write this tutorial to solve these problems.
How to FIX: «Disk is Write protected» & «Device media is write protected» when formatting a USB Drive on Windows 10/11.
Method 1. Check if there is a Physical Write-Protection Switch.
Some USB drives and SD Cards have a physical switch to prevent the drive from being modified. Therefore, make sure there is no such switch or, if there is, set it to OFF.
Method 2. Start USB Disk Storage Format Tool as Admin.
The second method to bypass the «Device media is write protected» error in HP USB format tool, is to start the tool with Administrative privileges’.
So, right-click at HP USB Disk Storage Format Tool and choose Run as Administrator. Then click YES at UAC warning and try to format the disk again.
Method 3. Delete Volume(s) on Disk using Disk Manager.
Important Note: Before you continue, unplug all unneeded storage devices from your computer (USB disks, Memory cards, etc.), to avoid loosing your data.
1. Press Windows ![]() + R keys to open the run command box.
+ R keys to open the run command box.
2. Type diskmgmt.msc and press OK to open Disk Management.
3. In Disk Management, right-click on the USB drive that you want to format and select Delete Volume.
4. Ask Yes at the warning message to remove the partition.
5. When the deletion is completed, try to format the drive again. *
* Note: If you follow these instructions to resolve the «Device media is write protected» error in the HP USB Format Tool utility, then don’t format the disk using Windows. Just run the ‘HP USB Disk Storage Format Tool’ and leave the tool to format it.
Method 4. Delete all Volumes and Partitions on USB disk using DISKPART tool.
1. Open Command Prompt as Administrator. To do that:
1. Press the Windows
2. Type CMD and then press CTRL + SHIFT + ENTER.
2. In Command Prompt type: diskpart
3. In diskpart, type the following command to list all the available drives (disks) and press Enter:
-
list disk
4. Now locate the disk number of the USB drive by its size in GB (or MB) and give the following command to select it:
-
select disk x
Note: Where «x» is the disk number of the USB disk. *
* In this example, the «Disk Write Protected» error occurred on the 2GB USB disk with number 1 (Disk 1), so the command will be:
-
select disk 1
5. Finally give the following command to clean all volumes and partitions on the selected disk: *
-
clean all
Notes:
1. The «clean all» command will take time to complete depending on the size of the disk. (For a 2GB size it took about 5-7 minutes).
2. If after giving the «clean all» command, you receive the error «DiskPart has encountered an error: Access is denied«, restart your PC and repeat the above steps.
6. When the operation is completed, type exit to close the DISKPAT tool.
7. Restart your PC and try to format the drive. *
* Note: If you follow these instructions to resolve the «Device media is write protected» error in the HP USB Format Tool utility, then don’t format the disk using Windows. Just run the ‘HP USB Disk Storage Format Tool’ and leave the tool to format it.
Method 5. Convert the Disk to GPT using DISKPART tool.
1. Open Command Prompt as Administrator
2. In Command Prompt type the following commands in order :
-
diskpart
-
list disk
3. Now select the USB disk with the write protection error, with this command:
-
select disk x
Note: Where «x» is the disk number of the USB disk. *
* In this example, the «Disk Write Protected» error occurred on the 2GB USB disk with number 1 (Disk 1), so the command will be:
-
select disk 1
4. Then give these commands to remove all partitions or volume formatting from the disk and to convert the partition style to MBR:*
-
clean
-
convert mbr
* Note. If after giving the «clean all» command, you receive the error «DiskPart has encountered an error: Access is denied«, restart your PC and repeat the above steps.
6. When the operation is completed, type exit to close the DISKPAT tool.
7. Now open the HP USB Disk Storage Format Tool and try to format the drive.
That’s all folks! Did it work for you?
Please leave a comment in the comment section below or even better: like and share this blog post in the social networks to help spread the word about this.
If this article was useful for you, please consider supporting us by making a donation. Even $1 can a make a huge difference for us.
How to remove media write-protected error? What to do when media cannot be formatted when you try to format it with a formatter or DOS bootable usb maker like HP USB Disk Storage Format Tool? See how it appeared in the following editions of HP USB Format Tool v2.0.6 and v2.2.3.
Device media is write protected with HP USB Format Tool v2.0.6
Device media is write protected with HP USB Format Tool v2.2.3
Also read: how to remove write protection, and how to fix can’t format usb
3 Efficient Ways to Fix Device Media Write Protected Error(Video guide included in the end)
Way 1 — Turn off the write protection switch if it was locked
Way 2 — Convert the media no matter usb stick or memory card to be MBR with diskpart
Here are some pre-steps that you need to get it done.
- Step1 — open cmd by pressing ‘Windows icon + R’ on your keyboard to start Run
- Step2 — type ‘diskpart’ to open the diskpart function
CMD to convert media MBR to get the write protection problem fixed
- Step1 — type ‘list disk’
- Step2 — type ‘select disk *’ (* you may need to replace * with the drive letter of your media)
- Step3 — type «convert mbr»
Note: if it does not work and reports some message like ‘The sepecified disk is not convertible’, here is another step that shall be added before the Step3.
- Step2.5 — type ‘clean’
The above step2.5 is to fix the error when it was not working with the convert MBR.
Remove hp usb format tool write protected with cmd
Remove hp usb format tool write protected with cmd
Video Guide — how to remove media is write protected error in HP USB Disk Storage Format Tool
Way 3 — Remove the write protection with cmd Attrib disk clean Readonly
Besides the above way2 method, you may also try the following cmd to remove the read-only attribution on your pendrive or disk.
Remove HP usb format tool write protection readonly attribution
You need to get your media connected to your computer at first, and then start cmd and here are the steps.
- list disk
- select disk * (You need to replace * with the drive letter of your media to remove the write protection error)
- attributes disk clear readonly
- exit
Or sometimes you may also use ‘attrib disk clear readonly’ as an alternative in the above steps when it comes to the step 3.
Did not work? Try more methods on this page: 10 free ways to remove write protection on usb drive
Last updated on Nov 01, 2022
Hot Articles
- How to recover memory card photos
- Unformatted pen drive data
- HP usb disk format tool alternatives
File Recovery Free > Format Recovery Utility > Howto >HP USB format tool media is write protected
Совсем недавно ко мне обратился знакомый с проблемой, он не мог отформатировать обычную флешку, во время этого процесса появлялось сообщение «Device media is write-protected/диск защищён от записи». Лично я за всю свою практику не встречал таких проблем с обычными флешками. Подобного рода сообщения могут появляться на различных CD картах, у которых есть специальный замок на корпусе. Причин по которым флешку вдруг стала защищенной от записи может быть много, соответственно и решений. Сегодня хочу поделиться самым простым способом, который помогает в 80 % процентов случаях. О такой статистики мне рассказали знакомые из сервисного центра.
Для решение этой проблемы нужно воспользоваться командной строкой и специальной утилитой Diskpart, она позволяет сбросить атрибуты.
Ошибка может появляется как во время форматирования флешки встроенными средствами ОС так и с использованием сторонних программ. Само сообщение может выглядеть вот так. Либо если форматирование производиться стандартными средствами на «Диск защищён от записи».
Device media is write-protected
Для сброса атрибутов, необходимо запустить командную строку от имени администратора и ввести.
Diskpart
Далее вводим команда которая отобразить все подключенные к компьютеру диски.
list disk
После чего выбираем выбираем съемный диск командой.
select disk N — номер диска
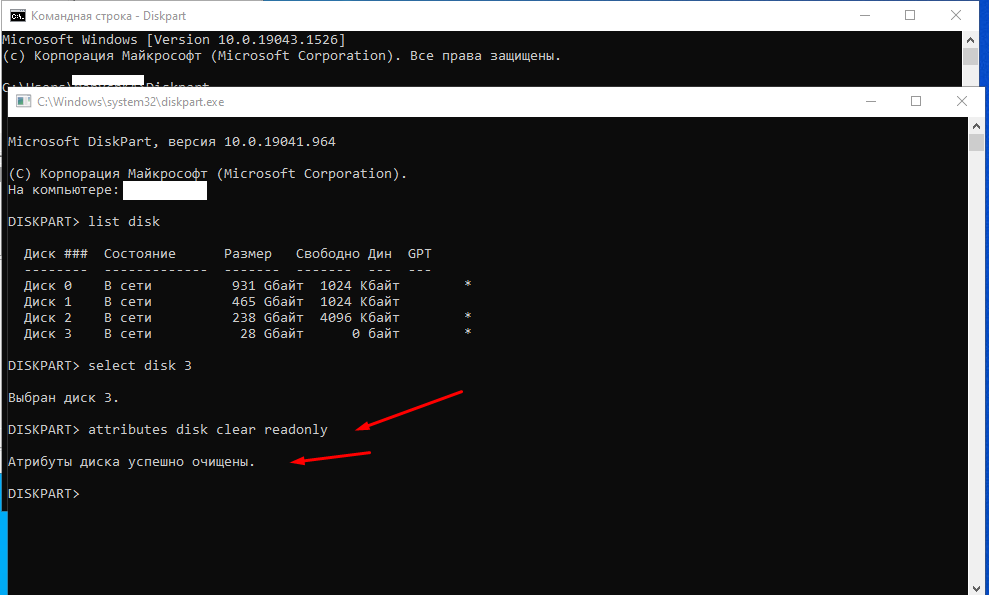
И собственно очищаем сбрасываем атрибуты «Только для чтения».
attributes disk clear readonly
После этого пробуем произвести форматирование флешки. Если это вам не помогло можно воспользоваться специальными утилитами для восстановления флешек, они есть практически у каждого производителя.
Transcend JetFlash — https://ru.transcend-info.com/supports/special.aspx?no=3
Silicon Power — www.silicon-power.com/web/download-USBrecovery
Kingston — https://www.kingston.com/ru/support/technical/downloads/111247
ADATA — https://www.adata.com/ru/ss/usbdiy/
SD Memory Card — https://www.sdcard.org/downloads/formatter/
Если Вы знаете более простой способ, прошу поделиться, так как в текущей ситуации в мире флешки стоит беречь.


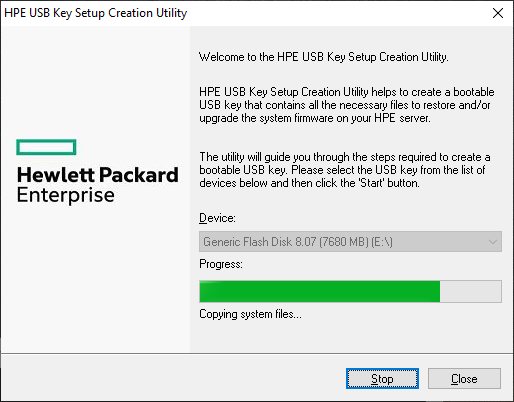
Иногда критические обновления для сервера HPE нужно установить с помощью флешки. Например, недавно собирался обновить BIOS на сервере HP Proliant. Файл прошивки нужно было записать на флешку с помощью утилиты HPE USB Key Utility.
USB Key Utility — приложение для Windows, которое позволяет пользователю записать содержимое ISO образа или DVD на USB флешку. Источниками ISO образов могут быть распространяемые HPE продукты. USB флешка получается загрузочной, можно воткнуть её в сервер и успешно с неё загрузиться.
HPE USB Key Utility для Windows
Однако, при попытке создать загрузочную флешку, произошла ошибка:
Device media is write-protected
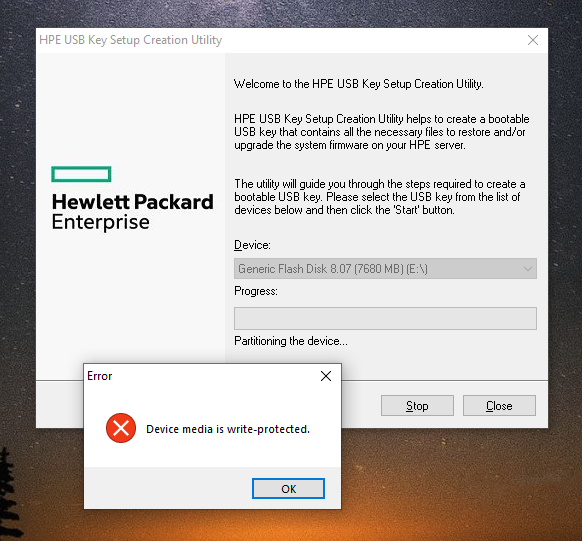
Будем лечить флешку.
Утилиту не закрываем, открываем командную строку под администратором и запускаем утилиту diskpart:
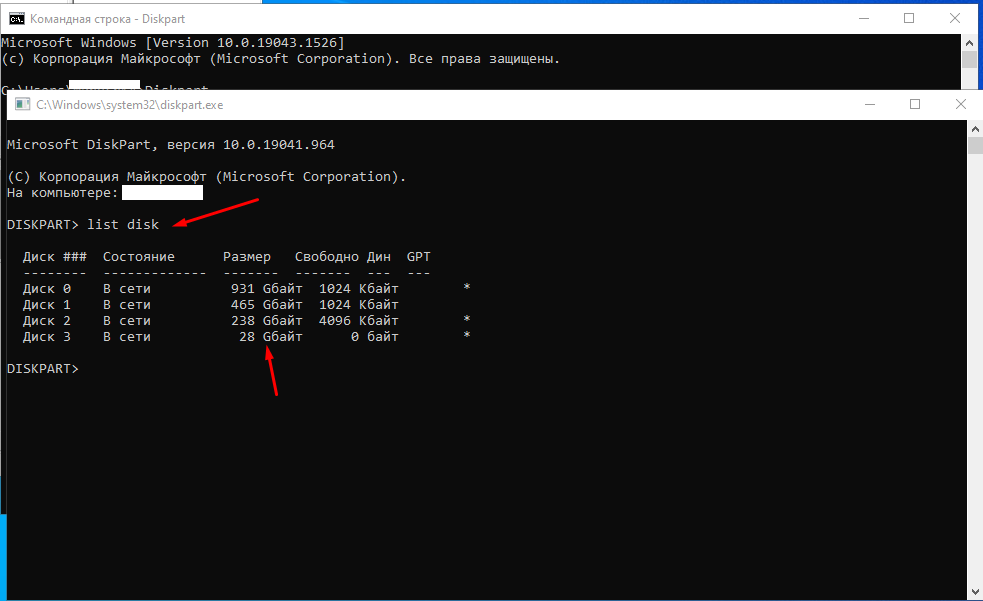
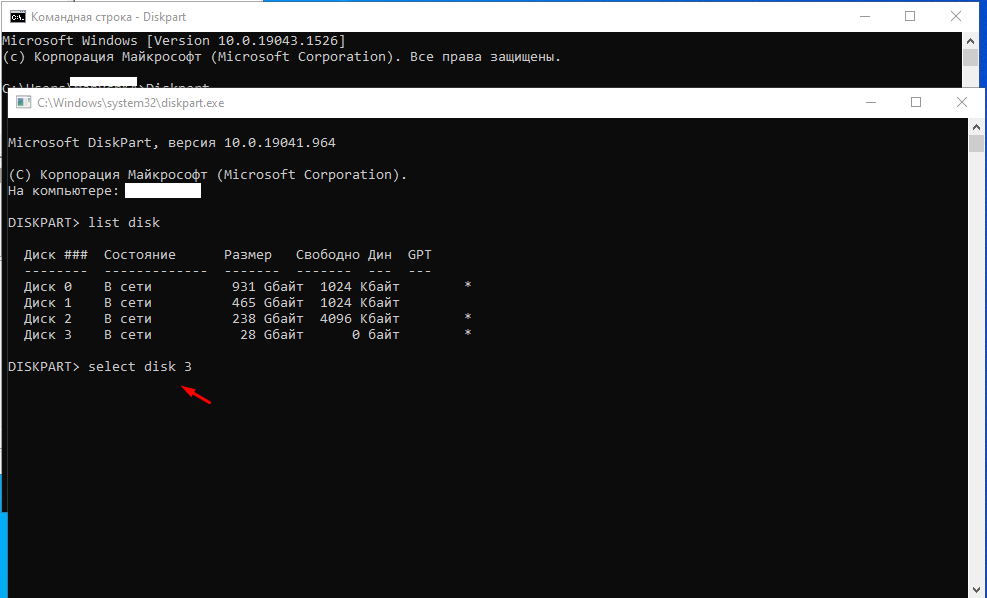
diskpartВыведем список всех доступных дисков:
list disk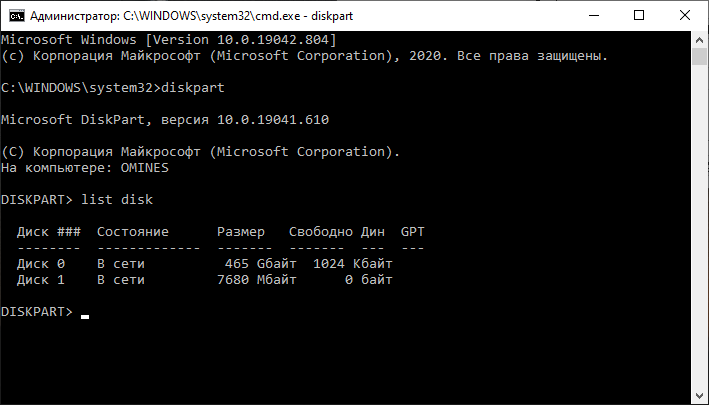
Теперь нам нужно определить номер флешки. У меня всего два диска, по размеру определяю что флешка это «Диск 1». Выбираем первый диск.
select disk 1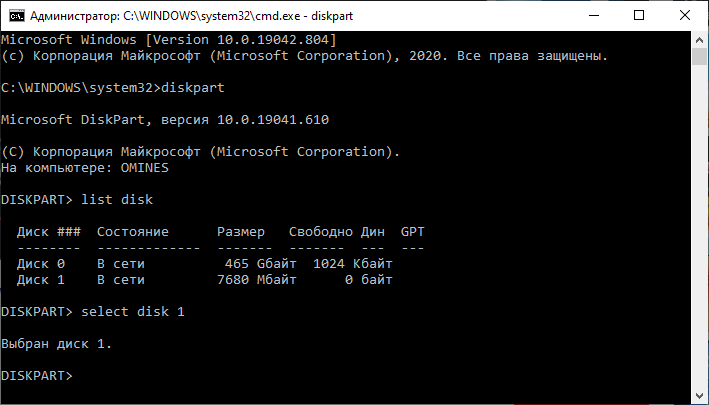
Наша задача, сконвертивать диск в MBR, однако, напрямую это не получается:
convert mbrУказанный диск нельзя преобразовать.
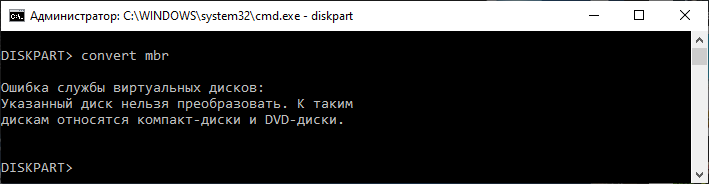
Ну как это нельзя, можно! Чистим диск.
clean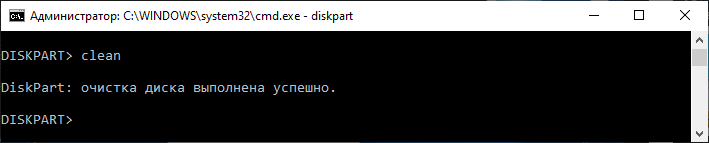
Преобразуем сначала в GTP, а потом в MBR:
convert gpt
convert mbr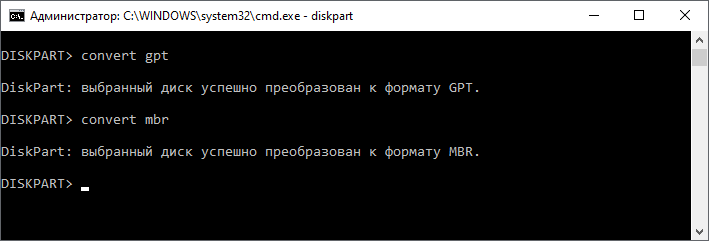
На этот раз преобразование удалось. Возвращаемся к утилите USB Key Utility.
Загрузочная флешка теперь создаётся без проблем.
| Workable Solutions | Step-by-step Troubleshooting |
|---|---|
| #1. Check the Physical Switch | Step 1: Locate the physical write protection switch on the device. The location of the switch will vary depending on the…Full steps |
| #2. Uncheck Read-only | Step 1: Open «File Explorer» and select the write-protected files. Step 2: Right-click the file and click «Properties»…Full steps |
| #3. Run CMD | Step 1: Press Windows + R key simultaneously and type «cmd». Step 2: Type «sfc /scannow» and press Enter…Full steps |
| #4. Scan Virus | Step 1: Click «Update & Security» in Windows Settings. Step 2: Click on «Windows Security». Step 3: Click…Full steps |
| #5. Use EaseUS CleanGenius | Step 1: DOWNLOAD and install EaseUS CleanGenius (free) on your computer. Step 2: Run EaseUS CleanGenius…Full steps |
| Bonus Tip: Format Device after Removing Write Protection | Step 1: Right-click the external drive or USB you intend to format and choose «Format». Step 2: Set the Partition label…Full steps |
What Does It Mean «The Media is Write-protected»?
The media is write-protected means that the media (usually a disk) cannot be written. Several things may cause this error, including physical write-protection switches or software protections. In order to fix this problem, the write-protection must be disabled. Write-protection can be a helpful tool in preventing accidental writing or malware infections. However, it can also be irritating if you need to write to the media and don’t know how to disable the protection.
Have you ever been annoyed by the message «the media is write-protected» when you try to copy, edit or delete files on a USB drive, SD card, or other removable storage devices? This error can be frustrating, especially if you’re in a hurry and need to get work done.
There are a few different reasons why this «the media is write-protected «error might occur. It could be due to a corrupted file system, incorrect permissions, or physical damage to the storage device. Whatever the cause, don’t worry; in this article, we’ll show you some quick and easy fixes that will help you remove write protection and get your storage device working again in no time.
Relate articles about removing write protection:
#1. Check the Physical Switch when the Media is Write-protected
This error message may be caused by the physical write protection switch on the device. If the physical write protection switch is on, writing to the media will not be possible. To check the physical write protection switch, please follow the instructions below:
Step 1: Locate the physical write protection switch on the device. The location of the switch will vary depending on the make and model of the device. The switch is located on the side or the bottom of many devices.
Step 2: Check the switch position. If the switch is in the «on» position, it will be necessary to move the switch to the «off» position in order to write to the media.
Step 3: Once the switch has been moved to the «off» position, try writing to the media again. Please contact your device manufacturer for further assistance if you still cannot write to the media. You can also try the following fixes in our article.
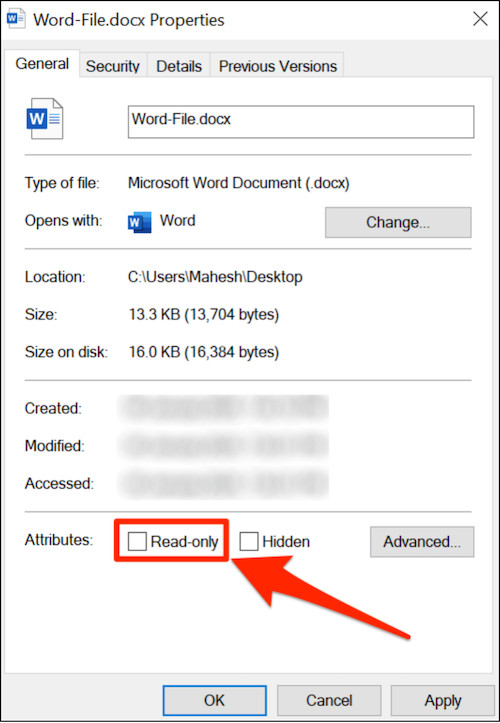
#2. Uncheck Read-only in Properties when the Media is Write-protected
«The media is write-protected» error typically occurs because the file or drive is set to read-only, which means that it can only be read and not modified. The read-only setting can be disabled in the properties menu for the file or drive. Once it has been disabled, the users should be able to copy, delete, or move the files without any issues.
Step 1: Open «File Explorer» and select the write-protected files.
Step 2: Right-click the file and click «Properties».
Step 3: You can uncheck the «Read-Only» option under the «General» tab.
#3. Run CMD to Remove Write Protection
Corrupted system files can also cause «the media is write-protected». If this is the case, you can try running the System File Checker (SFC) scan and Deployment Image & Servicing Management (DISM) scan. The SFC checks and fixes corrupted system files while the DISM scan will repair the Windows image. To run the SFC and DISM scan, follow the steps given below:
Step 1: Press Windows + R key simultaneously and type «cmd».
Step 2: Type «sfc /scannow» and press Enter. It may take 20-30 minutes to scan. Do not close the Command Prompt during this process.
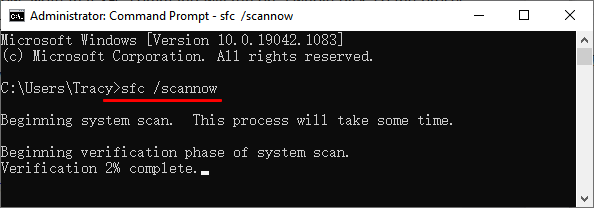
Step 3: Restart your computer and repeat step 1 to open the command prompt.
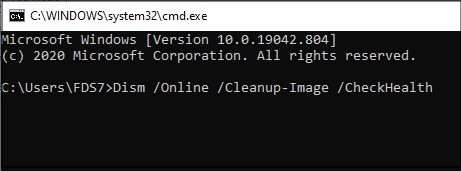
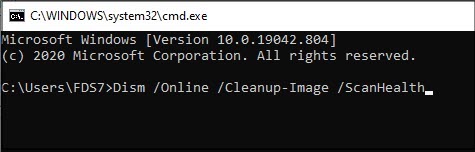
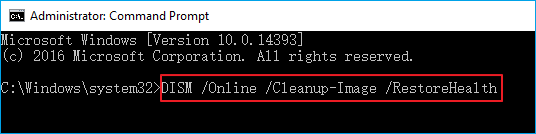
Step 4: Type the following command and press Enter after typing each command.
- Dism /Online /Cleanup-Image /CheckHealth
- Dism /Online /Cleanup-Image /ScanHealth
- Dism /Online /Cleanup-Image /RestoreHealth
#4. Scan Virus to Remove Write Protection
In some instances, the «media is write-protected» error may be caused by malware that has infected your computer. Malware can cause various issues on your computer, including errors. Some malware can write-protect drives to prevent their own deletion. If you suspect that malware is the cause of the error, you should scan your system with an antivirus program. You can choose the Windows built-in Windows Defender antivirus to scan.
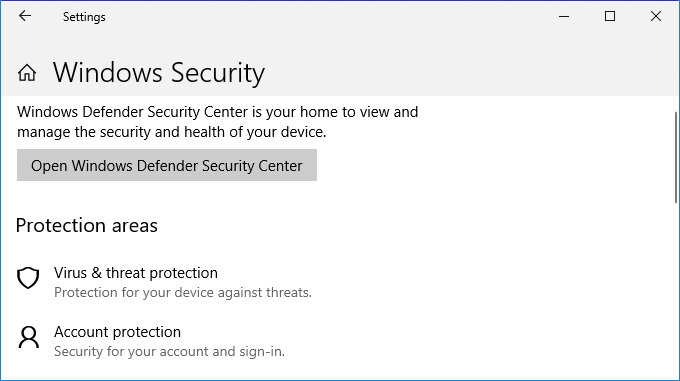
Step 1: Click «Update & Security» in Windows Settings.
Step 2: Click on «Windows Security».
Step 3: Click «Virus & threat protection» under the «Protection area».
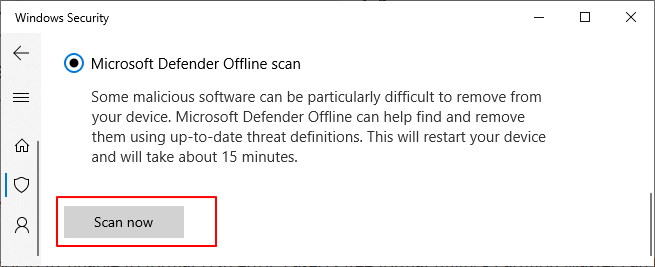
Step 4: Click «Scan options». We recommend you to choose «Microsoft Defender Offline» here.
Step 5: Click «Scan now».
#5. Use Software to Remove Write Protection
A straightforward way to remove write protection is using EaseUS Clean Genius. This software is designed to clean up your drives and can also remove write protection. To use it, download and install the software, then launch it. The software will then scan the drive and remove any present write protection.
If you don’t consider yourself a pro-computer user and you’re not familiar with command-lines, don’t worry. There are graphical-based solutions to help you remove write-protection from your hard drives, USB drives, and even SD cards.
EaseUS CleanGenius is one of these tools that helps you fix aforementioned issues on your drives without knowing a thing about command-line.
Here’s an easy-to-follow guide on how to use this tool to get your issues sorted:
Step 1: DOWNLOAD and install EaseUS CleanGenius (free) on your computer.
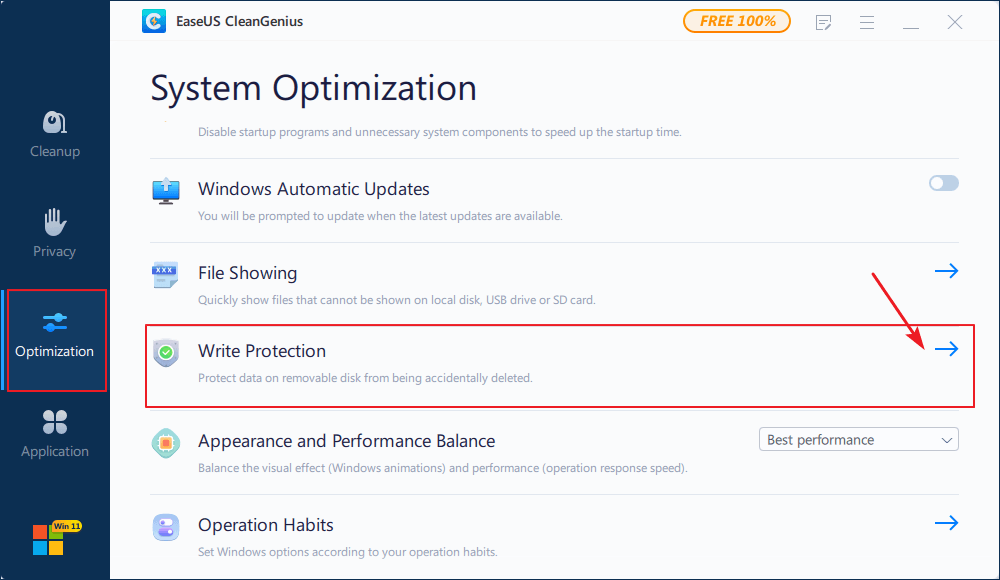
Step 2: Run EaseUS CleanGenius on your PC, select Optimization and choose the Write Protection mode.
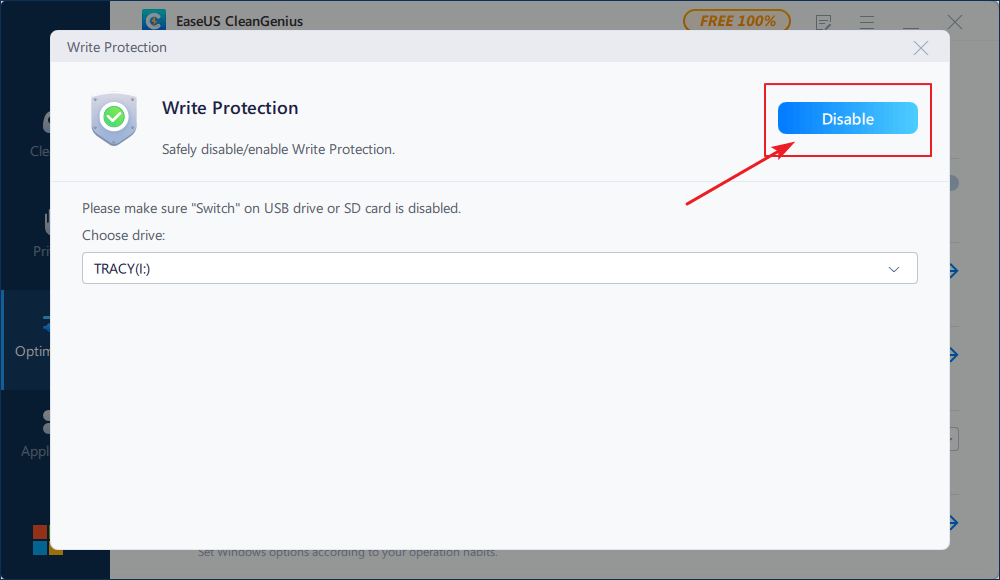
Step 3: Select the device that is write-protected and click Disable to remove the protection.
Bonus Tip: Format Device after Removing Write Protection
The media is write-protected error can be fixed by following the methods above. Once write protection is removed, users can format their device with EaseUS Partition Master.
- Right-click the external drive or USB you intend to format and choose «Format».
- Set the Partition label, File system (NTFS/FAT32/EXT2/EXT3/EXT4/exFAT), and Cluster size, then click «OK».
- Click «Yes» to continue.
- Click the «Execute 1 Task(s)» button and click «Apply» to format the hard drive partition.
EaseUS Partition Master has many advantages, such as resizing, moving, copying, merging, splitting, and converting partitions without data loss. It is also compatible with Windows 10/8.1/8/7 and XP.
Conclusion
When the media is write-protected, it means that the data on the media cannot be modified. This can be incredibly annoying for users, especially if they don’t know how to fix the problem. In our article, we have shown you some solutions to remove write protection. Whichever method you choose, be sure to follow the instructions carefully so that you don’t cause any damage to your computer. With a little bit of effort, you should be able to get rid of the write protection and reaccess your files.
Флешка пишет диск защищен от записи
 Извиняюсь за заголовок, но именно так задают вопрос, когда при действиях с USB флешкой или SD картой памяти Windows сообщает об ошибке «Диск защищен от записи. Снимите защиту или воспользуйтесь другим диском» (The disk is write-protected). В этой инструкции покажу несколько способов снять защиту с флешки или карты памяти и расскажу, откуда она берется.
Отмечу, что в разных случаях сообщение о том, что диск защищен от записи может появляться по разным причинам — часто по причине настроек Windows, но иногда — из-за испорченной флешки. Коснусь всех вариантов и соответствующих им методов снятия защиты в Windows 10, 8.1 или Windows 7. Если что-то оказалось не совсем понятным, то внизу статьи есть видео, в котором продемонстрированы почти все способы исправить ошибку.
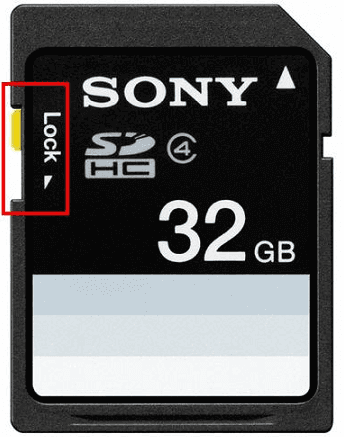
Примечания: бывают USB флешки, на которых есть физический переключатель защиты от записи, обычно подписанный Lock или с изображением замка (проверьте и передвиньте, а еще он иногда ломается и не переключается обратно).
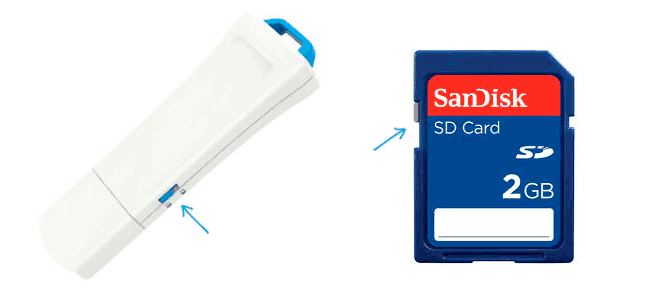
Если под флешкой, защищенной от записи подразумевается SD карта памяти или карта MicroSD, подключаемая через переходник на формат SD, обратите внимание на два нюанса:
- Карты памяти SD и переходники с MicroSD на SD имеют сбоку небольшой переключатель: одно из его положений — защита от записи, второе — запись разрешена.
- Нередко этот переключатель ломается, в результате мы можем получить постоянную защиту от записи, независимо от положения «рычажка». Это легко решается заменой адаптера, если дело в нем и сложнее в случае с полноформатной картой памяти SD.
Убираем защиту от записи с USB в редакторе реестра Windows
Для первого способа исправить ошибку потребуется редактор реестра:
- Для его запуска вы можете нажать клавиши Windows + R на клавиатуре и ввести regedit, после чего нажать Enter.
- В левой части редактора реестра вы увидите структуру разделов редакторе реестра, найдите раздел
HKEY_LOCAL_MACHINESYSTEMCurrentControlSetControlStorageDevicePolicies
Учтите, что этого пункта может и не быть, тогда читаем дальше
- Если этот раздел присутствует, то выберите его и посмотрите в правой части редактора реестра, есть ли там параметр с именем WriteProtect и значением 1 (именно это значение может вызывать ошибку Диск защищен от записи). Если он есть, то кликните по нему дважды и в поле «Значение» введите 0 (ноль). После чего сохраните изменения, закройте редактор реестра, извлеките флешку и перезагрузите компьютер. Проверьте, была ли исправлена ошибка.

- Если такого раздела нет, то кликните правой кнопкой мыши по разделу, находящемуся на уровень выше (Control) и выберите «Создать раздел». Назовите его StorageDevicePolicies и выберите его.

- Затем кликните правой кнопкой мыши в пустой области справа и выберите пункт «Параметр DWORD32» (даже для x64 Windows). Назовите его WriteProtect и оставьте значение равным 0. Также, как и в предыдущем случае, закройте редактор реестра, извлеките USB накопитель и перезагрузите компьютер. После чего можно проверить, сохранилась ли ошибка.
Дополнительно, проверьте 2 раздела реестра
HKEY_LOCAL_MACHINESOFTWAREPoliciesMicrosoftWindowsRemovableStorageDevices
HKEY_CURRENT_USERSOFTWAREPoliciesMicrosoftWindowsRemovableStorageDevices
По умолчанию такой раздел отсутствует в реестре (и, если у вас его нет — значит дело не в нем). При наличии раздела RemovableStorageDevices, обратите внимание на вложенный подраздел и содержащиеся в нем Deny_Write, Deny_Read, Denya_Execute, при значении этих параметров равному 1, они запрещают запись, чтение и выполнение со съемных накопителей.
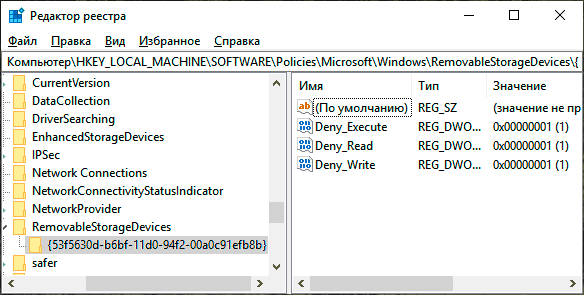
Удалите такие параметры — это должно снять защиту от записи. Перезапустите компьютер (может оказаться достаточным отключить и заново подключить флешку): проблема с защитой флешки от записи должна быть решена.
Как убрать защиту от записи в командной строке
Еще один способ, который может помочь убрать ошибку USB диска, который вдруг показывает ошибку при записи — снять защиту в командной строке.
Для этого проделайте следующие действия:
- Запустите командную строку от имени администратора (В Windows 10 это проще всего сделать через поиск в панели задач, в Windows 8.1 — используя меню правого клика по кнопке Пуск, в Windows 7 — через правый клик по командной строке в меню Пуск).
- В командной строке введите diskpart и нажмите Enter. Затем введите команду list disk и в списке дисков найдите свою флешку, вам потребуется ее номер. Введите по порядку следующие команды, нажимая Enter после каждой.
- select disk N (где N номер флешки из предыдущего шага)
- attributes disk clear readonly
- exit
Закройте командную строку, отключите и заново подключите флешку, затем попробуйте произвести какие-либо действия с флешкой, например, отформатировать ее или записать какую-либо информацию, чтобы проверить, исчезла ли ошибка.
Диск защищен от записи — решение для флешек Transcend, Kingston, Silicon Power и других
Многие производители USB накопителей выпускают собственные утилиты для исправления ошибок с флешками и картами памяти. Часто они срабатывают и в рассматриваемом нами случае, позволяя снять защиту. Подробно обо всех таких утилитах: Программы для ремонта флешки.
Видео инструкция
Ниже — видео по данной ошибке, в которой показаны все описанные выше способы. Возможно, она сможет вам помочь разобраться с проблемой.
Надеюсь, один из подходов помог вам в решении проблемы. Если же нет, рекомендую также проверить вашу флешку на другом компьютере или ноутбуке: это позволит определить, является ли защита от записи следствием параметров системы или же виноват сам накопитель.
The “Device or resource busy” error usually occurs when a file has been altered. To find out which files are open, you can run lsof, which stands for “list open files.”
Once you’ve found the open file, you can delete and reinstall it to fix the error.
Device or Resource busy Linux
When your computer gets a Device or Resource Busy error, it’s frustrating. It can knock your productivity down a few notches. A device or resource busy error can occur in numerous ways, but the most common are:
-A disk is running low on space and needs to be defragmented
-A program you are running is taking too many system resources
-A malfunctioning sound card is causing audio problems for other applications you may have open.
To fix this problem, you have to go through several steps:
1) You should shut down all network connections on the computer. This will eliminate any programs from interfering with your task.
2) If your computer has a manual defragmentation utility, run that first. Sometimes it can pinpoint and fix the problem, especially when there is a lot of background activity.
3) If you are running programs that generate a lot of system resource usage, close these down, so they do not interfere with your task.
4) Try an alternate speaker to see if the problem is solved by changing speakers. This can help isolate the sound card’s malfunction and work with all other applications.
5) If these steps do not fix the problem, you need to contact an IT professional.
Fixing the “Device or Resource Busy” error
When you encounter the Device or resource busy error, it usually means a file is currently open or being changed. To find out if a file is currently open or being changed, run the command lsof.
The result should be a message similar to the one below. If the file is open, you can use the kill(1) command to stop the process. Once the process is stopped, you can try deleting the file.
Uninstalling a device or Resource
Suppose you’re receiving an Uninstall a device or Resource busy error message. In that case, it probably means that you have an open file or that another process is writing to a directory. You can use the command ‘lsof‘ to list open files in a directory, and after finding the open file, attempt to delete it.
Troubleshooting
If you’re receiving a message such as “The device or resource you’re trying to access is busy,” there are a few things you can try to fix the problem.
First, you can try to reboot the system. Rebooting your computer will resolve the problem and give you a chance to see whether there is a boot-time message about serial ports.
If it is, you’ll need to watch for the file that runs setserial at boot time to see if it conflicts with anything else.