The “System cannot find any bootable devices” error indicates that your computer cannot find a healthy device (containing OS files) to boot into Windows. You’re probably stuck with this error due to an incorrectly configured boot mode, partition style, or even corrupted boot sector.
While these are the most common reasons, you cannot disregard the fact that loose connections, faulty components, and BIOS/Windows corruption can also cause it. Whether you have upgraded the CPU/motherboard, installed a new drive, or got this message unexpectedly, this troubleshooting guide should help you fix it.
Table of Contents
Before You Begin
- The ‘System cannot find any bootable devices’ error pops up on the BIOS screen. If you can’t enter the BIOS interface, I recommend checking the physical connection.
- For SATA drives, confirm that both (power and data) cables are securely connected. Check for faulty cables and headers. You can certainly try another SATA header but if a cable is damaged, it’s better to replace it.
- If you’re using an M.2/NVMe SSD, I suggest tightening the screws such that the connection is not loose. When facing problems with bootable devices, it’s always a good idea to reseat/reconnect them.
- If you can access the BIOS, check whether the installed storage devices are detected in the Storage or Disk Information section (varied based on the motherboard).
- Note that some slots might be disabled based on the motherboard and CPU generation you’re using. If that’s the case, your hard drive won’t show up in the BIOS. To check for compatibility, I highly recommend inspecting the Storage specs in your motherboard manual (which should be available online).
- If your system has a built-in HDD or SSD troubleshooter, try running this to check for possible hardware failure. In case you get an error, you might require replacing the storage drive.
Check Secure Boot Settings
Secure Boot is an excellent Windows feature that prevents your computer from malicious codes. It verifies whether each program loaded by the firmware is trusted.
When enabled, your system might not trust the new storage drive and won’t detect it as a trusted bootable source. A simple workaround to this problem is to disable it:
- Based on your motherboard, keep hitting the BIOS key until you get to the interface. Since I’m using an MSI, I’ll be using Del.
- Get to the Settings section.

- Go to Advanced.
- From the list, choose Windows OS Configuration.

- Now, select Secure Boot.
- Then, disable the option as shown below.

- Hit the F10 key to save and exit from BIOS. The shortcut key might be different on your motherboard.


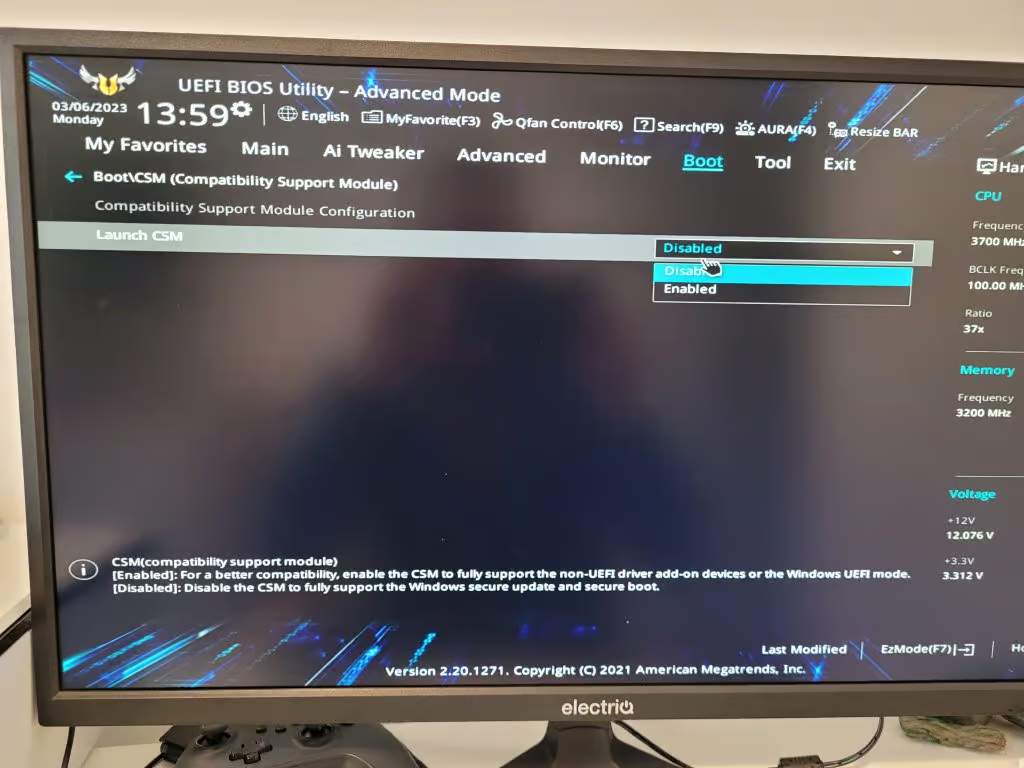
Enable Compatibility Support Module
As the name suggests, the Compatibility Support Module (CSM) adds legacy BIOS compatibility to UEFI firmware.
If your storage drive is partitioned as MBR disk but you have set the boot mode to UEFI, it will certainly not detect it as a viable bootable device. But once you enable CSM, this adds backward compatibility to the current OS and hence you can use your PC as a legacy BIOS.
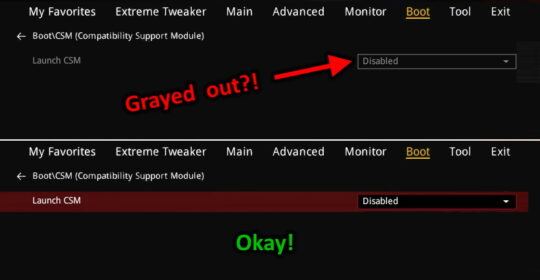
Note: In some systems, you need to first disabled the Secure Boot option to enable CSM or to set the boot mode to legacy. Also, some have the CSM option greyed out when using integrated graphics (for example, iGPU VBIOS doesn’t support CSM).
In this case, I advise installing a dedicated graphics card to see if this solves your problem.
- Trigger the BIOS menu using the dedicated key.
- Then, go to Settings > Advanced > Windows OS Configuration.
- Here, select the BIOS/CSM mode.
- Now, set the option to CSM as shown below.
- Save this setting and exit from BIOS. Your system should now detect the bootable device.


Try Changing Boot Mode
Not all systems incorporate CSM boot mode. Some even allow you to directly change the boot mode to legacy.
As discussed earlier, whether you have an MBR/GPT partitioned drive but have not configured the appropriate boot option, your system may not detect it. Changing the boot mode involves similar steps with slight variations:
- Get to the BIOS and get into the Boot section.
- Find the UEFI/BIOS Boot Mode and set it to Legacy or UEFI (as per your requirement).

- Save and exit from BIOS. Your PC will now restart and the installed hard drive should be detected.

Make the System Partition Active
If your bootable drive is initialized with MBR, it’s important to have the system partition active. In case yours doesn’t have any active partition, you’ll either meet with the ‘OS not found’, ‘System cannot find any bootable devices’, or similar indications.
Here are the necessary steps to mark your system partition as active:
- Insert a Windows installation Media and boot your computer from it. Don’t forget to change the boot priority first.
- The Windows Setup screen should open up. Ensure the keyboard input and other settings are well configured and hit Next.

- Then, click on Repair your computer located at the bottom-left corner of the dialogue box.

- You should enter the Windows Recovery Environment now. Here, choose Troubleshoot.
- Then, pick Advanced Options.
- Select Command Prompt and wait for it to open up.
- Now, execute the
diskpartcommand to start the dedicated utility. - Run the following in succession to active the system partition:


list disk(lists all the current drives in your computer)select disk <disk_number>(input the disk number of the drive containing the boot file)list partition(shows all the partitions inside the selected disk)select partition <partition_number>(input the system partition number to make it active)active(sets the selected partition as active)exit(exits Diskpart utility)

- Now, close the Command Prompt or simply run the
exitcommand. - Once you’re in the Choose an Option screen, select Continue.
- Get to the BIOS again and change the boot priority or simply remove the installation media.
- Restart your computer and the bootable device should now be detected.

Check Other BIOS Settings
The above solutions have worked out for most Windows users. If you’re still unable to fix your problem, it could be due to a few misconfigured BIOS settings that could be incompatible with your system.
One of them is Intel’s VMD technology which could be causing issues with the boot process. While this is an excellent technology that helps manage and aggregate NVMe SSDs, its drivers could be causing the problem.
Likewise, if the enabled TPM or the interface operation is not compatible with the bootable device or the OS, they can also trigger the “System cannot find any bootable devices” error.
- Use the appropriate boot key to enter BIOS.
- Switch to the Advanced tab.
- Find the VMD setup menu, Intel VMD, Volume Management Device, or similar options. If you’re unable to locate this, look it under PCI Configuration or System Agent (SA) Configuration.
- Now, set the Enable VMD Controller to Disabled, as shown below.
- Save the BIOS settings and reboot your computer.
- If you’re still getting the “System Cannot Find Any Bootable Devices” error, boot into BIOS again and navigate to the Advanced option.
- Look for TPM, TPM Device Selection, or similar options. If you can’t find it, search for it under the PCH-FW Configuration section.
- Try changing the configured Firmware TPM to Discrete TPM or vice versa.
- Save the setting and restart your PC.
- If you’re unable to fix the problem, try disabling the TPM (if possible) and recheck.
- In case disabling VMD or TPM didn’t help, try changing the interface operation from AHCI to RAID or vice versa.


Note: For Windows 11, it’s necessary that you enable TPM 2.0. So, if you’re trying to boot into Windows 11 or installing this version, do not disable it.
Repair Boot Sector
The boot sector consists of machine codes that instruct the system where to find the OS and how to load it into the RAM. When this section gets corrupted or destroyed, your computer might not be able to find the bootable code or the device itself.
Fortunately, it’s possible to repair the boot sector in both MBR and GPT partitioned drives. But do note that the process to do it is entirely different.
On MBR Disk
- Use the installation media to get into the Windows RE and launch Command Prompt, as discussed earlier.
- Since the drive containing your boot files can change in the Windows RE, I advise checking this first. As shown below, I have used the dir command. You can do the same. In case, there’s no Windows directory, check in another drive.

- Once you confirm this, start running the below commands in succession to fix MBR:

- Exit from Command Prompt and hit the Continue button to reboot the computer.
On GPT Disk
- Open up Command Prompt from the Windows RE.
- Use the
diskpartcommand to start the disk management utility. - Then, run the below commands to repair the EFI System Partition (ESP):
list volselect vol <volume_number>(pick the volume using the FAT32 file system, the Label field says ‘Boot’, and the Info field indicates ‘System’)assign letter=<mount_letter>:(input a letter of your choice but do not choose those that are already assigned)exit

- Once you’ve exited the Diskaprt utility, run the below commands:
cd /d <mount_letter>:\EFI\Microsoft\Boot\(usecd /d <mount_letter>:\Boot\orcd /d <mount_letter>:\ESD\Windows\EFI\Microsoft\Boot\if you get an error)bcdboot <drive_letter>:\Windows /s <mount_letter>: /f UEFIren BCD BCD.backupbcdboot <drive_letter>:\Windows /s <mount_letter>: /f ALLexit

- After the boot files are created, close the prompt, reboot your computer, and check if this fixes the error.
Change the Partition Style
By now, you should have figured out that the main cause of this problem is using the inappropriate boot mode for the current partition style. While it might be theoretically possible to boot your OS with UEFI for MBR drives, Windows doesn’t offer that.
For that reason, the best option would be converting your MBR-partitioned drive to GPT. Likewise, you may switch to MBR if you’re using an older Windows version.
Note that you’ll have to format the hard drive and remove all the partitions. So, make sure you back up all your important files first. After doing this, you’ll need to reinstall Windows.
- Boot your computer using the Windows Installation Media, and from the Windows Recovery Environment, open up Command Prompt.
- Start by executing the
diskpartcommand.
- Now, run each of the commands below in succession:

list disk(Note the GPT column. If there’s an ‘*’, it’s GPT otherwise MBR)select disk <disk_number>cleanconvert mbrorconvert gptexit

- Close the Command Prompt and hit the Continue option to reboot your computer. If there was a partition-style problem, this should solve it.
Additional Tip: You can even opt for a third-party tool if you wish to change the partition style without having to lose your data.
Clean Install Windows
If none of the above tricks worked for you and you’re also using the appropriate boot mode based on the hard drive partition, I do not see any option than clean installing Windows. This way, all the existing OS and user files are completely wiped.
Along with that, the corrupted MBR and boot sector are also replaced. Since this is going to remove all the files, make sure you have backed up the important files before proceeding.
- Boot your computer using the Windows Installation Media.
- In the Windows setup screen, hit Next after configuring keyboard options.
- Then, pick Install Now.

- Add the product key or choose I don’t have a product key option.

- Select the operating system, accept the license terms, and in the installation type screen, choose custom installation.

- Delete all the partitions, allocate the size, and hit Next. A dialogue box might appear to allow the system to create custom partitions.

- Wait for the Windows installation to complete. From here, follow the on-screen instructions. You’ll be asked to sign in to Microsoft and configure a few more options, which are totally based on your preference.


 This is a fun one!
You get a new motherboard with an Intel 500 Series chipset. You decide to just use the integrated graphics in the CPU, but you can’t boot!
It turns out your actual boot drive is missing from the Boot options menu. Gonzerooni!
WTH?!
The Problem
I recently experienced this problem on a Z590-based motherboard.
This is what I saw (top) and what I should have seen (bottom):
No matter what I did, I couldn’t get the new motherboard to see the mirrored linux boot drives…
What gives?
The Solution
It’s pretty simple. The Asus support page includes the following note:
Why does the CSM option under BIOS appear gray and non-configurable?
Which says:
1. Q: When I use the integrated graphics card on the Intel® 500 series motherboard , why does the CSM option under BIOS appear gray and non-configurable?
A: The Intel® 500 series chipset does not support UEFI VBIOS graphic card, hence the integrated graphics mode does not support legacy boot and CSM option becomes non-configurable
2. Q: How can I configure CSM normally?
A: You can use a discrete graphics card that supports UEFI VBIOS to make CSM option configurable
In other words, Intel decided not to support integrated graphics that boot the old MBR/BIOS way with their newer chipsets.
Your only option is to use the GPT/UEFI way of booting – if you want to use the integrated graphics.
If you don’t know the difference, check out my explanation of BIOS vs. UEFI and MBR vs. GPT here: Convert your Windows 10 boot drive from MBR to GPT
So, either you convert from MBR to GPT (see link above), or you have to install a dedicated graphics card. Note that an older VBIOS graphics card will work just fine!
After you do one or the other, POOF…
CSM will be enable-able again, and your MBR boot drive will once again appear in the Boot menu!


A computer’s BIOS is filled with loads of weird and scary sounding options, and you might have come across a settings like “Launch CSM” and “Secure Boot”. Sometimes you might come across an article online suggesting that you disable CSM, either to speed up boot times or resolve certain hardware bugs.
Unfortunately disabling CSM has left some users unable to boot into Windows. Why is this? And what should you do if you’re eternally stuck in your BIOS?
Re-enabling CSM is often the easiest option, although you might need to clear the CMOS jumper to restore the default BIOS settings. Doing a BIOS update can also help, as will changing your OS partition to be GPT (not MBR) if you really have to have CSM disabled.
Before explaining those options in more detail, I wanted to quickly recap on what the CSM option is – and why it matters so much to the Windows boot process.
What The CSM BIOS Option Is
A BIOS is the underlying software that makes sure that all your computer’s hardware works as expected, and then ‘passes’ this onto your boot process so your operating system (such as Windows) can start up.
CSM stands for Compatibility Support Module, and it essentially allows your motherboard to work like an older, legacy BIOS (in addition to working with newer UEFI BIOS firmware). If those terms seem confusing, fear not – older legacy BIOS all had blue background and white text:
Whereas newer UEFI BIOS look a bit more modern:
When blue-and-white BIOSes were common, you would usually have installed Windows from a CD/DVD – and this would have created GPT partitions (don’t worry too much about that term yet). Unfortunately UEFI BIOSes are unable to boot into Windows systems that were created this way.
Therefore CSM was introduced as an option in newer, UEFI BIOSes. It helps to ensure that your computer can boot into a wide range of operating systems, by ‘listening’ out for older OSes installed on USBs, CDs/DVDs and hard disks.
How To Get Windows Booting After Disabling CSM
While CSM sounds like a useful option, essentially running your BIOS in two ‘modes’ can sometimes cause issues – especially if you want to upgrade to Windows 11. So some people disable this option. Ironically, this has then sometimes resulted in people being unable to boot into Windows – even Windows 11, where they were advised to disable CSM!
Here’s how to fix this annoying, catch 22 situation.
Try Re-Enabling CSM
Let’s start with the obvious fix first: if you disabled CSM and you can no longer boot up, you should initially try re-enabling CSM. Unless there was a good reason why you disabled CSM in the first place, it’s usually best to just keep it enabled. In other words, if a random TikTok ‘tech tips’ video said to disable CSM so that you had fast boot times – ignore this, and re-enable CSM!
To re-enable CSM, you should just need to go back into your BIOS (often by hitting the F2 or Delete key on startup) and go to advanced settings. There should be a ‘Boot’ menu, which then presents you with an option called ‘CSM’ or ‘Launch CSM’. Ensure that this is set back to “Enabled”:
Then exit your BIOS and try starting up again. If your OS now boots, you now that it’s probably worth keeping CSM support enabled – and you may need to explore an alternate route to fixing your issue.
Apologies: Sorry to start with such an obvious fix, but sometimes people disable BIOS options by mistake (or based on bad advice) – so I figure that it’s worth stating the obvious here!
Keep CSM Disabled But Enable Secure Boot And TPM
If you do have a good reason for disabling CSM, thankfully there might be another route open to you – you can instead ensure that secure boot and TPM is enabled in your BIOS. These two options often allow you to boot into Windows, even when CSM is disabled.
The process for enabling secure boot will vary depending on your motherboard, but there should be a “Secure Boot” menu (or option) under the boot section of your BIOS. If you only plan on installing Windows OSes, selecting an option like ‘Windows UEFI Mode’ might work best for you (this option might have slightly different wording in different BIOS versions):
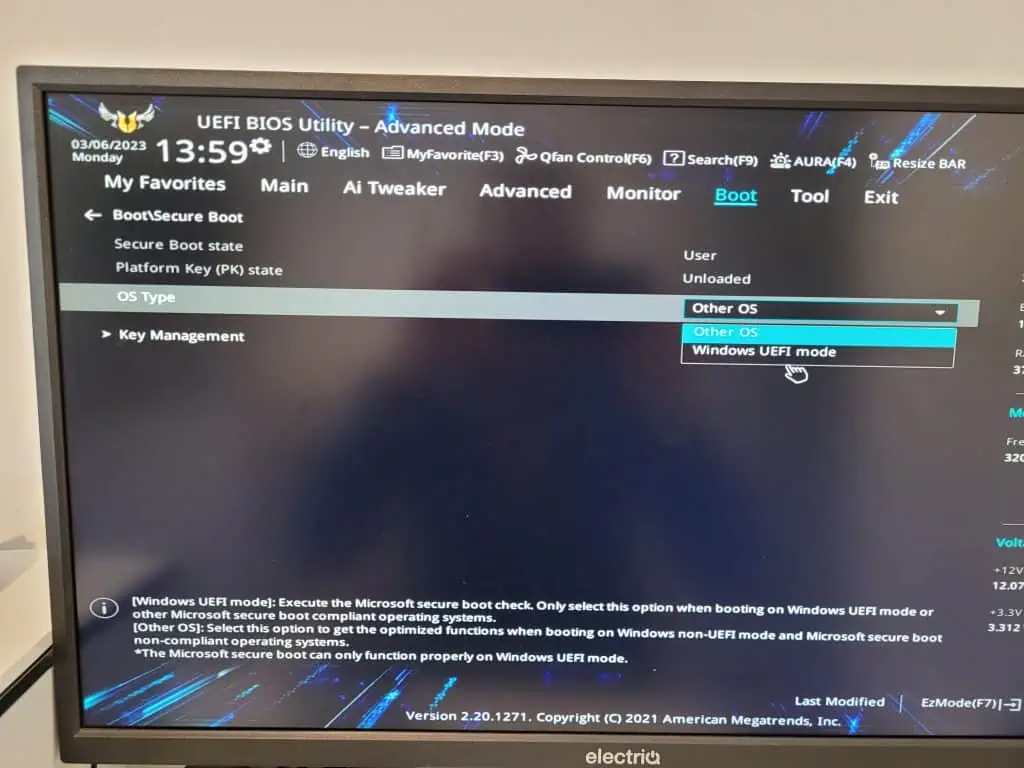
Once this is enabled (or set to a Windows-specific setting), you should also ensure that TPM is enabled. Unfortunately this setting can be quite hard to find, especially because it is often called different things. For example, Asus has a “Trusted Computing” menu under their BIOS, which then allows you to enable TPM. However it can also be called “Intel Platform Trust Technology”, “AMD fTPM Switch” or “Security Device Support”.
If you’re struggling to find the right BIOS option, it is best to Google your motherboard’s make and add on “enable TPM” (for example, “Gigabyte X670 AM5 enable TPM”) – this will usually take you straight to instructions for your BIOS.
These set of options (enabling secure boot and TPM) should allow you to boot into more modern OS installs (like Windows 11) even when CSM support is disabled. Just be aware that if you use TPM/PTT to enable BitLocker encryption, you will need to disable this before carrying out BIOS updates in the future.
Check For Output On A Second Monitor
We’ve all had a facepalm moment in life, and this might be time for another one! If you have multiple monitors plugged into your computer, it is possible that your operating system is booting up – but it’s simply outputting to the second monitor (and that monitor is turned off).
This is because sometimes changing BIOS options can result in a change to the ‘default’ display, and so you might be expecting the OS to output to the monitor in-front of you, but all output is actually going to another screen/monitor – one that is turned off.
I’ve had this happen to me before, and it’s always a facepalm moment when I realise! Quickly rule this out as an option by removing all display cables (from the back of your motherboard), apart from the cable that goes to your main monitor.
Alternatively, you can try hitting WIN+P and pressing UP/DOWN arrows and seeing if something appears. This is because WIN+P allows you to easily change the output of your OS to a different monitor – so even if you can’t see anything, this will hopefully change the output to the monitor in-front of you:
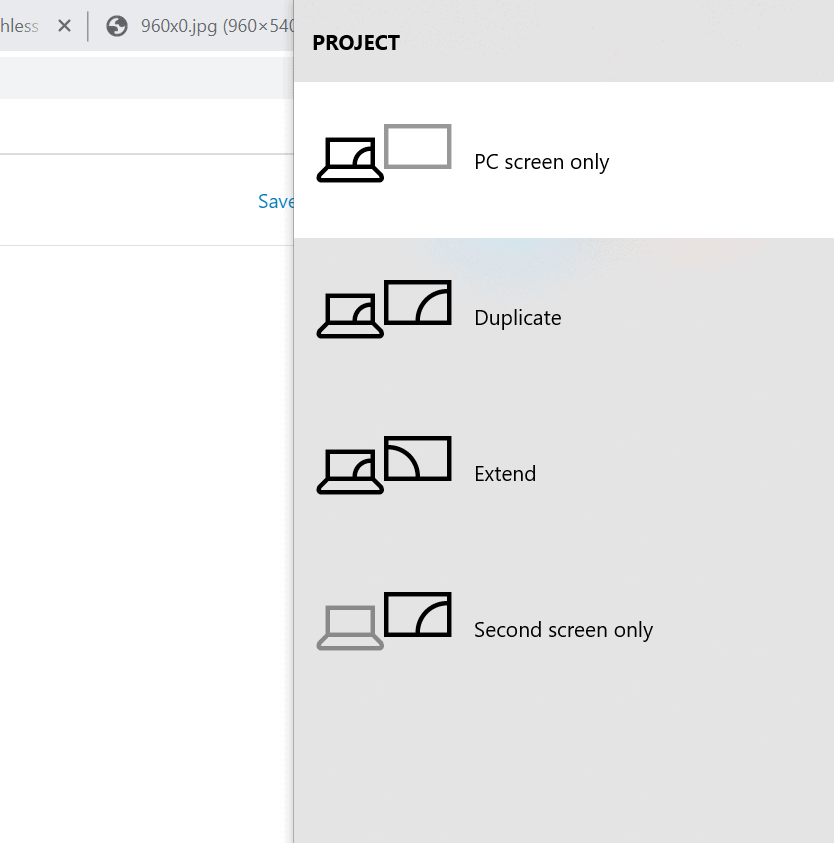
This is actually a really useful thing to try for a range of graphics issues, or when your fans are spinning but no output appears on your screen, because it can ‘reset’ your Windows graphical state.
Update Your Motherboard’s BIOS
Another possible cause of your BIOS not booting into Windows is having outdated motherboard software. You can fix this by updating your motherboard’s BIOS to the latest version. If you Google your motherboard’s model number and add on “BIOS update”, you will often be taken to a webpage that allows you to download the latest BIOS:
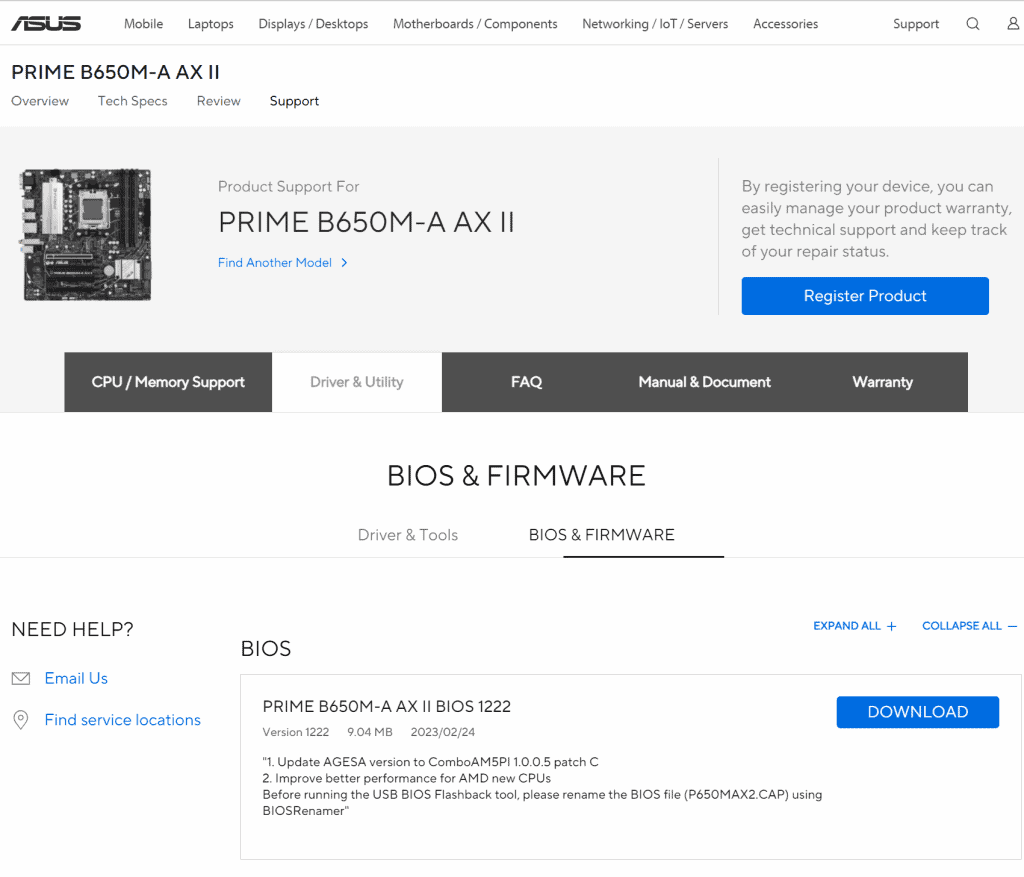
You will then need to follow your motherboard’s BIOS update process, although this often involves putting the BIOS update files onto a USB and booting up into your BIOS. From there, there should be a menu that allows you to update (or flash) your BIOS:
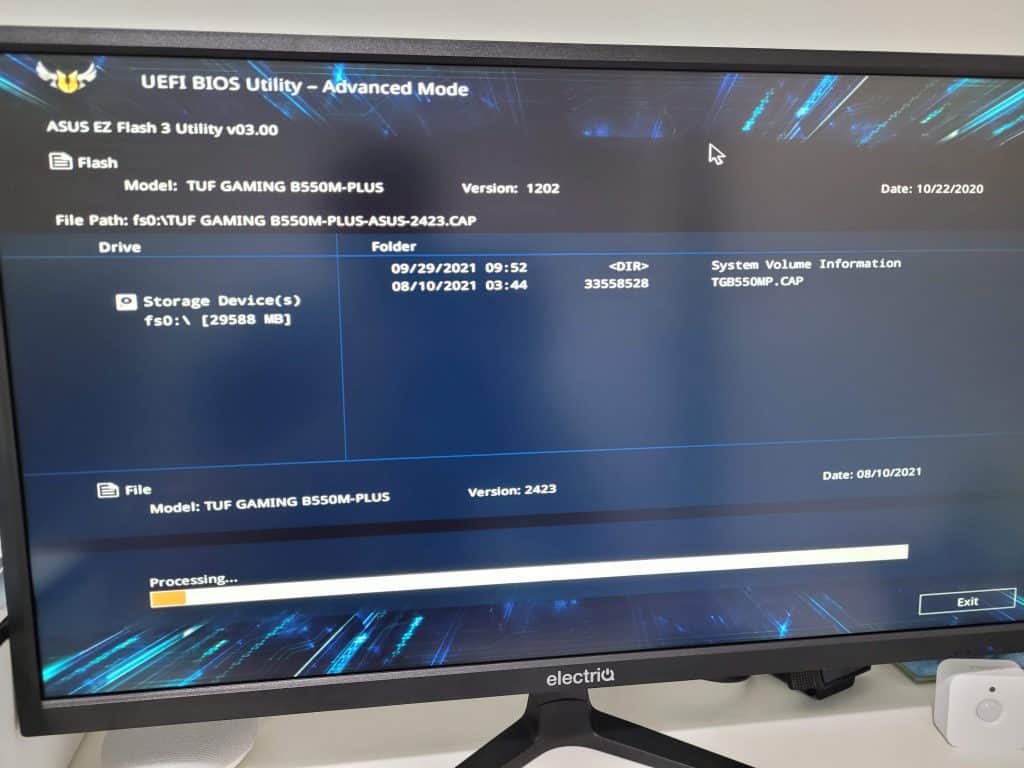
I would always recommend updating your BIOS when you have weird BIOS or boot issues, because with so many hardware variations around, it’s surprisingly common for a hardware-BIOS incompatibility issue to be causing your boot problems.
Once your BIOS is updated, restart your computer and try booting again. With any luck, Windows will boot up fine.
Restore Your BIOS (Clear The CMOS)
If you have tested out a few different BIOS options and you still can’t boot into your OS, I would try restoring your BIOS to its default settings. Bringing your BIOS back to a clean slate can really help solve boot issues. There are a few ways to do this – the BIOS itself should have an option somewhere to “Restore to factory defaults” or “Load optimized defaults”.
Alternatively you can remove the CMOS battery and wait for 10-15 minutes (or press the CMOS jumpers to speed this up), which will clear out the motherboard’s internal memory and wipe it back to a clean slate. The CMOS battery is the round, pocket cell battery – which is pictured to the left of my CPU cooler bracket below:
You can often remove this battery by clicking the clip with your finger, or a flat-edge screwdriver. After waiting 10-15 minutes (or clearing the CMOS jumper), put the battery back in and then boot up your machine again.
Note: You might find that your system takes a bit longer (up to a minute) to fully start up after clearing the CMOS battery, but this is normal. You should see the fans and motherboard LEDs come on soon after, and then the normal boot process should begin.
Convert From MBR To GPT
If nothing else has worked, it’s entirely possible that your Windows install was set-up as an MBR partition, not a GPT partition. Older Windows installs, on older (legacy BIOS) motherboards will probably have been set-up as MBR, but this won’t work with UEFI BIOS modes.
This actually brings us full circle, and it’s entirely why the CSM setting exists: when CSM is enabled, your system can boot up into older MBR Windows installs. So naturally when CSM is disabled (for any reason), you will find yourself unable to boot into it.
If you are able to put this drive into another system (or boot into Windows temporarily), you can confirm whether the Windows install is GPT or MBR via the Disk Management tool. Open it and then right click the drive, and select “Properties”:
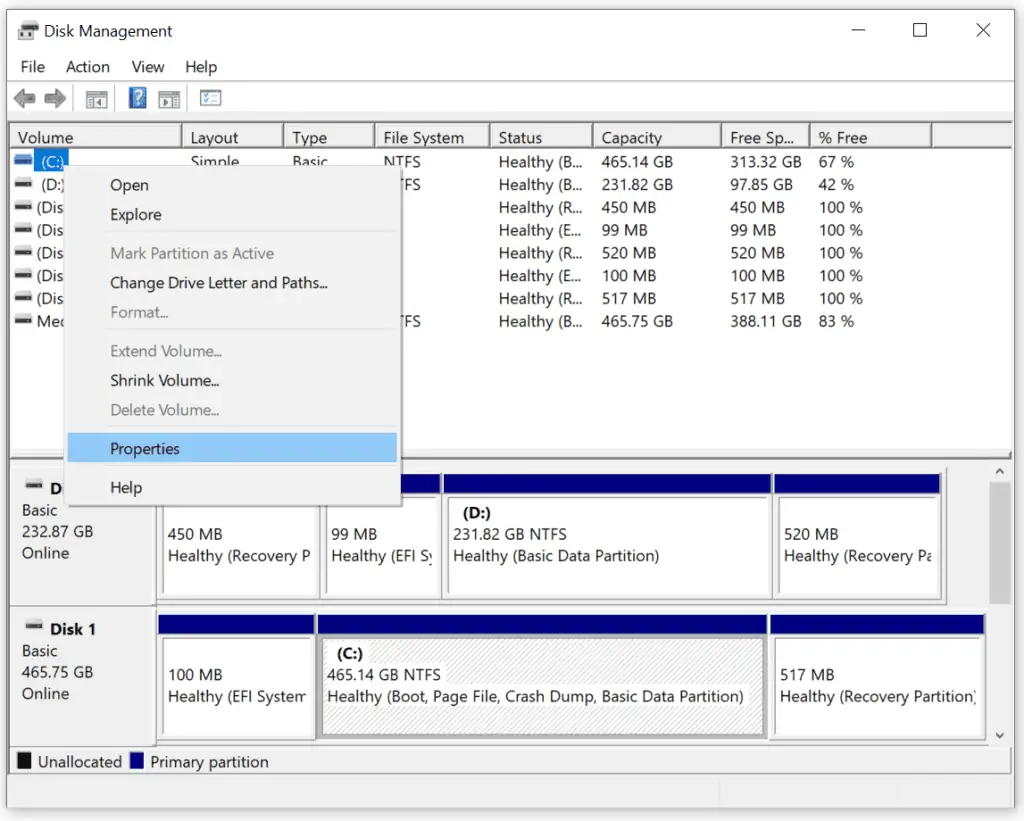
Then select “Hardware”, and the specific drive that you’re struggling to boot into. Then click “Properties” again, and “Volumes” and finally “Populate”:

The “Partition style” will either list “GUID Partition Table (GPT)” or “Master Boot Record (MBR)”. If it is MBR, then this is your problem – it is too old to boot into a UEFI-only BIOS (hence the need for CSM to be enabled).
If you are completely unable to enable CSM again, your only other option is to move this partition from MBR to GPT. The following YouTube video shows exactly how to do this:
After a few months of erratic issues which I will not go into here I think I have finally tracked down an issue with the latest BIOS (1403, and perhaps former updates) for the Crosshair V Formula-Z mobo. I had purchased this mobo some time ago and have enjoyed the new UEFI BIOS i/f, especially w.r.t. tweaking. However, about 2 months ago I upgraded to the latest BIOS version 1403 with the introduction of some new h/w. It seemed to work for a time and everything seemed okay. Recently, past 3 weeks or so I noticed some system issues and then finally this weekend, my BIOS would not post at all and a code of 79 would display on the LEDs indicating an issue in CSM initialization. I looked at my BIOS settings and noticed that CSM was set to enabled, which for my system should be correct. After repeated attempts of trying to reboot the system pressing the mobo «Power-On» and «Reset» buttons I finally turned all power off, hit the power button to drain any power and then tried again. It did not work, 79 again. Then I pressed the «Go button» and the system finally came up. Not sure why. In any case, any subsequent manual boots failed the same way. I followed my «discovered workaround» and got the system up and ran a Memtest86+ which after 2 hours completed successfully. To make a long story short, I decided to reflash at 1201 and all my problems have ‘appeared’, at least for today, to go away.
Has anyone else had issues with the latest Asus 1403 BIOS update? I feel it is circumspect, even though the note beside it prior to downloading indicates to «fix certain stability issues», but it neither defines them nor provides much more information w.r.t. said issues.
ASUS Crosshair V Formula-Z AM3+ AMD 990FX SATA
AMD FX 8350 (Black) 8-core
Corsair Vengeance 16GB (2x8GB) DDR3 1600 MHz
Thermaltake Liq Cooling
SanDisk Extreme SSD 120 GB SATA 6.0 Gb-s2.5-Inch
+5 HDD Winchester/Seagate drives
|
7 / 7 / 2 Регистрация: 05.11.2017 Сообщений: 56 |
|
|
1 |
|
|
17.12.2019, 13:21. Показов 98289. Ответов 14
Всем добра! Есть необходимость установить win.10 на GPT раздел SSD, но для этого нужно включить Secure Boot. Пытаюсь его включить, мне выдается сообщение, что нельзя вкл. эту функцию пока загружен CSM! Перерыл все разделы своего Биоса нигде не нашел опци связанных c CSM. Даже поиск по биосу не помог. Я уже даже менял опции загрузки; Пробывал и UEFI и Legacy+UEFI. Ни шиша…. Ругается на то, что CSM is loaded и всё тут…. Весь инет прошерстил… У всех есть отдельная строка для этого дела, разве что названия могут меняться. Я уже все перевбивал в поисковую строку Биоса, ничо не помогло…. Миниатюры
0 |


|
7 / 7 / 2 Регистрация: 05.11.2017 Сообщений: 56 |
|
|
17.12.2019, 13:30 [ТС] |
2 |
|
Вот ещё фоточки Миниатюры
0 |
|
Модератор
23544 / 13168 / 2298 Регистрация: 23.11.2016 Сообщений: 66,029 Записей в блоге: 31 |
|
|
17.12.2019, 15:18 |
3 |
|
но для этого нужно включить Secure Boot здесь гляньте
1 |

|
7 / 7 / 2 Регистрация: 05.11.2017 Сообщений: 56 |
|
|
17.12.2019, 16:40 [ТС] |
4 |
|
Смотрел эту статью, если идти по первому пункту, то, как раз, и встаёт данная проблема… Или мне просто конвертировать GPT в MBR по второму варианту, и после накатить Win10? Даже если это решит проблему с установкой Windows, то мне уже просто интересно почему же (или где она находится) функция вкл./выкл. CSM. Ведь функция Secure boot присутствует… Миниатюры
0 |

|
Модератор
23544 / 13168 / 2298 Регистрация: 23.11.2016 Сообщений: 66,029 Записей в блоге: 31 |
|
|
17.12.2019, 18:22 |
5 |
|
1 |
|
8586 / 3016 / 507 Регистрация: 14.04.2011 Сообщений: 7,523 |
|
|
18.12.2019, 15:40 |
6 |
|
Есть необходимость установить win.10 на GPT раздел SSD, но для этого нужно включить Secure Boot Если нужно просто установить 10-ку, то 10-ка установится и без включения Secure Boot.
0 |
|
7 / 7 / 2 Регистрация: 05.11.2017 Сообщений: 56 |
|
|
18.12.2019, 22:09 [ТС] |
7 |
|
Я понимаю, здесь, много людей, которым иногда лень гуглить свою проблему Но поверьте, я попытался. Прочел все статьи (включая ту, что Вы мне дали), в поиск BIOS’а вбивал все ключевые слова (их гораздо больше, чем я показал на «фотах»), но нет! Щас посмотрим, что скажет Тех.поддержка MSI. P.S. BOOT MODE UEFI тоже выбирал, но ошибка выдавалась та же . . .
0 |


|
7 / 7 / 2 Регистрация: 05.11.2017 Сообщений: 56 |
|
|
18.12.2019, 22:14 [ТС] |
8 |
|
Если нужно просто установить 10-ку, то 10-ка установится и без включения Secure Boot. Это конечно круто и работает. . . . Eсли у Вас диск без раздела GPT. Если GPT , то при выборе раздела будет выдаваться ошибка с соответствующим сообщением, что, мол, формат раздела GPT. Чтобы это решить надо вкл. Secure Mode, чтобы вкл. Secure Mode надо выключить CSM. https://remontka.pro/stil-razdelov-gpt/
0 |
|
Модератор
23544 / 13168 / 2298 Регистрация: 23.11.2016 Сообщений: 66,029 Записей в блоге: 31 |
|
|
18.12.2019, 23:33 |
9 |
|
Hypern, Load Legacy Option Rom проверьте еще
1 |
|
8586 / 3016 / 507 Регистрация: 14.04.2011 Сообщений: 7,523 |
|
|
19.12.2019, 15:37 |
10 |
|
Это конечно круто и работает. . . . Eсли у Вас диск без раздела GPT. Если GPT , то при выборе раздела будет выдаваться ошибка с соответствующим сообщением, что, мол, формат раздела GPT. Чтобы не было таких ошибок, нужно правильно загрузиться с установочной флешки (нужно загружаться в UEFI режиме и флешка соответственно должна быть UEFI загрузочная).
0 |
|
7 / 7 / 2 Регистрация: 05.11.2017 Сообщений: 56 |
|
|
19.12.2019, 17:07 [ТС] |
11 |
|
Чтобы не было таких ошибок, нужно правильно загрузиться с установочной флешки (нужно загружаться в UEFI режиме и флешка соответственно должна быть UEFI загрузочная). Блин, если бы я хотел услышать, как установить винду, я бы обратился в раздел Windows. Даже название этого топика говорит: » ВЫКЛЮЧЕНИЕ CSM . . . «, а не «как установить windows» и т.д. Мне уже просто интересно, где и как выключить этот CSM. Добавлено через 1 минуту
Hypern, Load Legacy Option Rom проверьте еще Читал за это. Вбивал все эти слова по отдельности (3 фотки, что прикрепил в пред. сообщении) в поиск по BIOS’у, но тщетно…
0 |
|
8586 / 3016 / 507 Регистрация: 14.04.2011 Сообщений: 7,523 |
|
|
19.12.2019, 19:25 |
12 |
|
BOOT MODE UEFI тоже выбирал, но ошибка выдавалась та же . . . После того как включали включали UEFI mode, изменения сохраняли (F10)?
1 |
|
7 / 7 / 2 Регистрация: 05.11.2017 Сообщений: 56 |
|
|
21.12.2019, 11:50 [ТС] |
13 |
|
РешениеВ общем, решение этой проблемы от тех. поддержки. Settings => Boot => Boot mode selecet => выбираем UEFI (после этого я на всякий случай сохранился с перезагрузкой) После идём по следующему пути: Settings =>Advanced => Windows OS Configuration => переводим эту хреновину в положение Enabled, появятся строчки с GOP и Secure Boot, и !ВНИМАНИЕ! Не трогаем Secure boot , т.к. он выдаст ошибку о включенном CSM (и вроде переведёт Windows OS Configuration в положение disabled, что и вводило меня в заблуждение). Просто сохраняемся с перезагрузкой и в поле с проведенными изменениями будут написаны две строчки : Windows OS Configuration [Disabled] => [Enabled] Самое, блин, не очевидное выключение/включение CSM в моей жизни.
3 |
 Сообщение было отмечено kumehtar как решение
|
7 / 7 / 2 Регистрация: 05.11.2017 Сообщений: 56 |
|
|
21.12.2019, 11:57 [ТС] |
14 |
|
После этих действий идём туда же и просто включаем этот чОртов Secure Boot.
1 |
|
Андрей1224 |
|
21.12.2019, 15:24
|
|
Не по теме: С UEFI-BIOS каждый вендор «извращается» как может (хочет).
0 |