in this post I will show you how to get the Unlock Network Samsung Galaxy A23 16-digit country to unlock, unlocking SM-A235F, SM-A235F/DS, SM-A235F/DSN, SM-A235M, SM-A235M/DS (AT&T, Sprint, T-Mobile, Verizon, and U.S. Cellular) with a 16-digit code is straightforward, it is also the most secure way to Unlock Network Samsung Galaxy A23 your phone permanently. Your phone will always be unlocked even after every new firmware update of your phone. Removing the SIM-Lock from the phone using a code does not void the warranty and this is the method provided by the manufacturer.
Once unlocked, you will be able to use your Samsung Galaxy A23 16-digit network unlock code on any network in the country or abroad. Unlock code details will be emailed to you. To get the unlock code for your Samsung Galaxy A23, you need to enter the IMEI number of your Samsung phone.
Unlocking Samsung Galaxy A23 Network
The following options are available to the Unlock Network Samsung Galaxy A23 (Invalid SIM Card). If you don’t know which option to use to unlock your phone, please contact us. We will help you choose the right product for your phone.
Some carriers in some countries use a certain type of network lock on the phones they sell, a type of lock that only reads “Network Lock” instead of “SIM Network” when you insert a SIM card from another carrier. “Unlock PIN” will not have a dedicated field to enter the code.
Read Also: Samsung FRP-Google Account ADB Enabler Tool 2022 Android 8, 9, 10, 11, 12 Supported
Basically, your Samsung will tell you that the network is locked, but won’t let you enter the unlock code.
What is Carrier Lock?
Carrier lock means your SIM card is locked by your local mobile operators (MO) and Unlock Network Samsung Galaxy A23.
- Network lock”
- “SIM network unlock PIN”
- “SIM password”
- “SP lock”
- “Phone freezes SIM unavailable”
Scenario: If you have a postpaid plan with mobile operators (MOs), your phone is locked with them and you cannot use a SIM card from other operators, and it depends on whether the device can be used even after the end of the postpaid contract. Further details will be provided by your Mobile Operators (MOs).
What is another lock?
A different lock means that you cannot use a device purchased in another region, as it must comply with the rules governing that region and be approved.
Scenario: Unlock Network Samsung Galaxy A23 You bought a device from another region and can’t use it when you come to another Region. You must check the local rules and guidelines of that region as these will be followed first. And the service center can’t help to unlock the network because the rule of one Region always applies.
What is a network lock?
Network Lock or Region Lock means that your phone is locked to the region where you purchased it.
Read Also-: Unlock Network Samsung SM-A536W Galaxy A53 5G (Invalid SIM Card)
Scenario: Samsung Galaxy A23 Network Unlock You purchased your phone from another country through an official channel and didn’t unpack it until you went to another country. Now you want to use it and it will prompt “Network Lock” Samsung Galaxy A23 Network Unlock. No need to worry. This is a safety mechanism where you should insert a local SIM card from the country of purchase to activate the device before transferring/shipping it to another country.
If you see the “Enter Network Lock Control Key” or “SIM Network Unlock PIN” on the screen.
If the message “Unsuccessful” appears, you have tried to enter the unlock code several times.
In this case, enter:
- *2767*3855# to reset your Phone.
- Enter your Unfreeze code (MCK) into the SIM network to unlock the PIN.
- It will show you the message “Unsuccessful,” which is expected.
- Now, enter your unlock code and then tap Unlock.
If an Invalid SIM card message appears on the screen:
- Enter the code below (Replace Network (NCK) with the actual code)
- #0111*Network (NCK)#
- You need to type the Unfreeze code (MCK) in the “Phone freeze screen” section. If nothing happens, you can tap the Call button or # after entering the code.
If the SP lock message appears:
- You will be asked for the SPCK code
- Enter the SPCK code.
If the SIM password message appears:
- When prompted, enter your unfreeze code and the phone will be unlocked.
If the SIM lock-enter password message appears:
- Enter the code below (enter your actual code in (MCK))
- #0149*Unfreeze (MCK)#
If the “Network Unlock PIN……contact your service provider” message appears:
- Turn on your Samsung phone without inserting the SIM card.
- Dial #7465625638#
- Enter your Unfreeze code (MCK)
- A message will appear: “Unsuccessful.”
- Now, you need to enter the network unlock code.
If a Phone Freeze message appears on the screen when you try to use a SIM from a different network, then:
Also Read: Unlock Network Samsung SM-F936U Galaxy Z Fold4 (Invalid SIM Card)
How to Unlock Network Samsung Galaxy A23 Using SamKey?
Use this server only for Samsung phones that require an unlock Network Samsung Galaxy A23 Using the SamKey code.
SamKey Server Credits enable quick and easy Unlock Network Samsung Galaxy A23 of AT&T, Sprint, T-Mobile, Verizon, and U.S. Cellular of Samsung phones without a special box or dongle, Supports Android 4, 5, 6, 7, 7.1, 8.0, 8.1, 9, 10, 11, 12, and Android 13 thankyou.
Also Read: Best Easy Samsung FRP Bypass APK Google Account Bypass 2022
Please do not confuse SamKey Server Credits with SamKey TMO Server Credits and note that it does not support SamKey TMO software (TMO software supports Samsung Samsung phones that do not require an unlock code).
Step 1- How much credit do you need, see the list of Credit Models FROM the SUPPORTED MODELS Tab
Step: 2- Purchasing 3 or 6 credits depending on your Samsung model, we will send you a new SamKey username and password (for returning clients, just enter the old username and password you used before)
Step 3- Warranty void must be “0” to read the unlock code correctly.
Step 4- Download the latest software from the SamKey Tool.
Step 5- Use the username and password you have already purchased.
Step 6- Press read codes and then more software instructions to Unlock Network Samsung Galaxy A23 for solved Invalid SIM Card.
Samsung Galaxy A23 “SM-A235F, SM-A235F/DS, SM-A235F/DSN, SM-A235M, SM-A235M/DS” Sim Network Unlock Pin
- Navigate to Settings
- Select Biometrics and security
- Tap on Other security settings
- Tap “Set up SIM card lock.”
- Tap “Lock SIM card
- Enter your SIM card PIN
- (Note: The default PIN is 1234)
–= SamKEY Rules, Conditions, Policy =–
for Unlock Network Samsung Galaxy A23 (Invalid SIM Card):
-) It’s not allowed to Unlock Factory Unlocked (SIM-Free) Devices
-) It’s not allowed to Unlock phones that are already Unlocked
-) It’s not allowed to Unlock phones with Fake IMEI (Changed IMEI)
-) It’s not allowed to Unlock phones with Modified NvData (R&D Purpose)
-) It’s not allowed to Monitor SamKEY using Sniffers/Monitoring Tools
-) It’s not allowed to Debug SamKEY using Debugging Tools
-) SAMSUNG Developers are NOT allowed to use SamKEY
If you violate our policies, your Account will be blocked & You will be blacklisted!
“If you like this article follow us on Google News, Facebook, Telegram, YouTube, and Twitter. We will keep bringing you such articles.”
Z3X EasyJtag Software ver. 2.5.0.8
Loading eMMC Addon Firmware… IO: 3300 mV
Box S/N: 05FF700FA921CDB7, ,FW Ver.: 01.60
CMD Pullup Level:3176 mV
CMD Active Level:3258 mV
Box IO Level:3300 mV
CLK Rate:14000 khz
HiPower mode is off!
———- eMMC Device Information ———-
EMMC CID : 150100434A4E42345207D2D6F0AD8348
EMMC CSD : D02701320F5903FFF6DBFFEF8E40400C
EMMC Manufacturer ID: 0015 , OEM ID: 0100
EMMC Date: 08/2016 Rev.0x7
EMMC NAME: CJNB4R , S/N: 3537301677
EMMC NAME (HEX): 434A4E42345200
EMMC ROM1 (Main User Data) Capacity: 59640 MB
EMMC ROM2 (Boot Partition 1) Capacity: 4096 kB
EMMC ROM3 (Boot Partition 2) Capacity: 4096 kB
EMMC RPMB (Replay Protected Memory Block) Capacity: 4096 kB
EMMC Permanent Write Protection: No
EMMC Temporary Write Protection: No
EMMC Password Locked: Yes
Extended CSD rev 1.8 (MMC Unknown)
Boot configuration [PARTITION_CONFIG: 0x48] Boot from:ROM2 (Boot Partition 1)
Boot bus config [177]: 0x00 , width 1bit , Partition config [179]: 0x48.
H/W reset function [RST_N_FUNCTION]: 0x01
High-capacity W protect group size [HC_WP_GRP_SIZE: 0x00000000]
Partitioning Support [PARTITIONING_SUPPORT]: 0x07
Device support partitioning feature
Device can have enhanced tech.
Partitioning Setting [PARTITION_SETTING_COMPLETED]: 0x00
———————————————
Backup saved: CJNB4R_3537301677_20171125_1540.extcsd
Searching for partition tables…
mmc_read_blocks(0 , 40 ), Reason: CMD Timeout Error
Partitioning not detected…
Done.
In most cases, cardlock_unlock.exe file problems are due to the file missing or being corrupted (malware / virus) and often seen at CardLock_UnLock program startup. As a first troubleshootiong step, most PC professionals will attempt to replace the applicable version of the EXE file. In addition, if your cardlock_unlock.exe error was due to a removed malware infection, we recommend running a registry scan to clean up any invalid file path references created by the malicious program.
Executable Files that are the Windows Executable File format typically carry the EXE file suffix. Our collection of cardlock_unlock.exe files for %%os%% can be found in the listings below. Certain files (such as cardlock_unlock.exe) may not be available currently in our directory for download, but can be requested via the «Request» button below. As a last resort, if your file is not found below, you can also try contacting Huawei Technologies Co., Ltd. for the correct version.
Getting the cardlock_unlock.exe file location correct is critical in making sure these errors are resolved successfully, so it doesn’t hurt to check to make sure. To confim it’s resolved, try starting up CardLock_UnLock to see if the error can be triggered.
| cardlock_unlock.exe File Summary | |
|---|---|
| File Extension: | EXE |
| Function: | CardLock_UnLock |
| Application: | CardLock_UnLock |
| ID: | 1.0.0.6 |
| Programmer: | Huawei Technologies Co., Ltd. |
| Name: | cardlock_unlock.exe |
| Bytes: | 65536 |
| SHA-1: | 9f5e674bf3008c9b05f5d75eb2441bef34491dc9 |
| MD5: | be84b500d184aea986c4ec69a7a2098c |
| CRC32: |
Product by Solvusoft
Download Now
WinThruster 2022 — Scan your PC for cardlock_unlock.exe registry errors
Windows
11/10/8/7/Vista/XP
Optional Offer for WinThruster by Solvusoft | EULA | Privacy Policy | Terms | Uninstall
EXE
cardlock_unlock.exe
Article ID: 1125586
Cardlock_unlock.exe
| File Name | ID | File Size | Download | |||||||||||||||||
|---|---|---|---|---|---|---|---|---|---|---|---|---|---|---|---|---|---|---|---|---|
| + cardlock_unlock.exe | be84b500d184aea986c4ec69a7a2098c | 64.00 KB | ||||||||||||||||||
|
Classic Cardlock_unlock.exe Problems
Partial List of cardlock_unlock.exe CardLock_UnLock Errors:
- «Cardlock_unlock.exe Error.»
- «Cardlock_unlock.exe is not a valid Win32 application.»
- «Sorry for the inconvenience — cardlock_unlock.exe has a problem.»
- «Sorry, we can’t find cardlock_unlock.exe.»
- «Cardlock_unlock.exe not found.»
- «Problem starting application: cardlock_unlock.exe.»
- «Can’t run cardlock_unlock.exe.»
- «Cardlock_unlock.exe failure.»
- «Software Path Fault: cardlock_unlock.exe.»
Cardlock_unlock.exe EXE errors happen during CardLock_UnLock installation, while running Cardlock_unlock.exe-related applications (CardLock_UnLock), during startup or shutdown, or during installation of Windows OS. It’s important to note when cardlock_unlock.exe issues happen, as it helps troubleshoot CardLock_UnLock problems (and report to Huawei Technologies Co., Ltd.).
Creators of Cardlock_unlock.exe Difficulties
Cardlock_unlock.exe issues are caused by a corrupt or missing Cardlock_unlock.exe, invalid registry keys associated with CardLock_UnLock, or a malware infection.
Especially, cardlock_unlock.exe errors stem from:
- Cardlock_unlock.exe registry keys invalid / corrupted.
- Malware has infected cardlock_unlock.exe, creating corruption.
- Cardlock_unlock.exe maliciously, or mistakenly, removed by another software (apart from CardLock_UnLock).
- Another software in conflict with CardLock_UnLock, cardlock_unlock.exe, or shared references.
- CardLock_UnLock (cardlock_unlock.exe) corrupted during download or install.
Терминал — программа терминала для прямой работы с беспроводными модемами Huawei, а также (ограниченно) с любыми другими модемами.

Huawei Terminal — программа терминала для прямой работы с беспроводными модемами Huawei, а также (ограниченно) с любыми другими модемами.

Запускаем My Huawei Terminal. В окне нужно выбрать HUAWEI Mobile Connect — 3G PC UI Interface Нажимаем Подключить (Connect)

Для уверенности, что вы действительно подключились, наберите команду AT и нажмите отправить: Если в ответ от модема OK. Значит вы все сделали правильно и все готово для работы с модемом.

AT^CARDLOCK=»NCK Code», где NCK Code — это код разблокировки который вы приобрели у нас. Например код 43963141 тогда наша команда будет иметь такой вид AT^CARDLOCK=»43963141″. Вставляем команду AT^CARDLOCK=»43963141″ и нажимаем кнопку ENTER клавиатуре.
DC-Unlocker client первая в Мире программа которая начала специализироваться на разблокировке беспроводных 2G3G4G модемов форм-фактора USBPCMCIA. Со временем модельный ряд начал расширятся мобильными телефонами, смартфонами, WiFi роутерами .

Качаем программу DC-Unlocker client и устанавливаем ее. После чего запускаем.
1. Далее меняем язык на русский. Нажимаем Options и выбираем Russian

2. Выбираем производителя модема или роутера в нашем случаи это Huawei. Нажимаем на Лупу как показано на картинке и пойдет чтение информации. Внимание! родная программа от модема должна быть закрыта). После прочтения информации вы увидите Статус SIM блокировки — Блокировано

3. Далее нам необходимо вести команду AT^CARDLOCK=»NCK Code», где NCK Code — это код разблокировки который вы приобрели у нас. Например код 12860791 тогда наша команда будет иметь такой вид AT^CARDLOCK=»12860791″. Вставляем команду AT^CARDLOCK=»12860791″ внизу прочитанной информации и нажимаем кнопку ENTER клавиатуре.

4. После нажатия на ENTER произойдет ввод кода в наше устройство и выйдет сообщение OK

5. Нажимаем еще раз на Лупу, чтобы прочитать заново информацию. И вы увидим, где Статус SIM блокировки — надпись Разблокирован

Вот и все. Наше устройство успешно разблокировано.
AT^CARDLOCK=»NCK Code» – ввод кода снятия блокировки (8-значное число). NCK Code — это код разблокировки. Пример команды AT^CARDLOCK=»12345678″


Так же в этой программе можно посмотреть другие параметры модема.
Скачиваем программу Huawei Modem Tool v3.3, вставляем модем БЕЗ СИМ карты — если запуститься программа модема то закрываем, запускаем huawei modem tool и ждём пока определиться модем, вводим код разблокировки и нажимаем Send Unlock code. После этого модем разблокируется.
Смотрим картинку там всё подробно нарисовано.

Внимание: После ввода команды, во всех трёх программах должен быть ответ ОК. Это значит что команда была принята.

Список доступных at команды модема Huawei и ZTE MF смотрим здесь: AT команды для модемов Huawei и для ZTE MF
| Номер ошибки: | Ошибка 63 | |
| Название ошибки: | Dc Unlocker Error Code 63 | |
| Описание ошибки: | Ошибка 63: Возникла ошибка в приложении DC Unlocker. Приложение будет закрыто. Приносим извинения за неудобства. | |
| Разработчик: | DC Unlocker | |
| Программное обеспечение: | DC Unlocker | |
| Относится к: | Windows XP, Vista, 7, 8 |
Совместима с Windows 2000, XP, Vista, 7, 8 и 10

Признаки ошибки 63
- Появляется сообщение «Ошибка 63» и окно активной программы вылетает.
- Ваш компьютер часто прекращает работу после отображения ошибки 63 при запуске определенной программы.
- Отображается “Dc Unlocker Error Code 63”.
- Windows медленно работает и медленно реагирует на ввод с мыши или клавиатуры.
- Компьютер периодически «зависает» на несколько секунд.
Такие сообщения об ошибках 63 могут появляться в процессе установки программы, когда запущена программа, связанная с DC Unlocker (например, DC Unlocker), при запуске или завершении работы Windows, или даже при установке операционной системы Windows. Отслеживание момента появления ошибки 63 является важной информацией при устранении проблемы.
Причины ошибки 63
- Поврежденная загрузка или неполная установка программного обеспечения DC Unlocker.
- Повреждение реестра DC Unlocker из-за недавнего изменения программного обеспечения (установка или удаление), связанного с DC Unlocker.
- Вирус или вредоносное ПО, которые повредили файл Windows или связанные с DC Unlocker программные файлы.
- Другая программа злонамеренно или по ошибке удалила файлы, связанные с DC Unlocker.
Ошибки типа Ошибки во время выполнения, такие как «Ошибка 63», могут быть вызваны целым рядом факторов, поэтому важно устранить каждую из возможных причин, чтобы предотвратить повторение ошибки в будущем.

Ошибки во время выполнения в базе знаний
star rating here
Ниже описана последовательность действий по устранению ошибок, призванная решить проблемы Ошибка 63. Данная последовательность приведена в порядке от простого к сложному и от менее затратного по времени к более затратному, поэтому мы настоятельно рекомендуем следовать данной инструкции по порядку, чтобы избежать ненужных затрат времени и усилий.
Пожалуйста, учтите: Нажмите на изображение [  ] , чтобы развернуть инструкции по устранению проблем по каждому из шагов ниже. Вы также можете использовать изображение [
  ], чтобы скрывать инструкции по мере их выполнения.
Шаг 1: Восстановить записи реестра, связанные с ошибкой 63
Редактирование реестра Windows вручную с целью удаления содержащих ошибки ключей Ошибка 63 не рекомендуется, если вы не являетесь специалистом по обслуживанию ПК. Ошибки, допущенные при редактировании реестра, могут привести к неработоспособности вашего ПК и нанести непоправимый ущерб вашей операционной системе. На самом деле, даже одна запятая, поставленная не в том месте, может воспрепятствовать загрузке компьютера!
В связи с подобным риском мы настоятельно рекомендуем использовать надежные инструменты очистки реестра, такие как WinThruster [Загрузить] (разработанный Microsoft Gold Certified Partner), чтобы просканировать и исправить любые проблемы, связанные с Ошибка 63. Используя очистку реестра [Загрузить], вы сможете автоматизировать процесс поиска поврежденных записей реестра, ссылок на отсутствующие файлы (например, вызывающих ошибку %%error_name%%) и нерабочих ссылок внутри реестра. Перед каждым сканированием автоматически создается резервная копия, позволяющая отменить любые изменения одним кликом и защищающая вас от возможного повреждения компьютера. Самое приятное, что устранение ошибок реестра [Загрузить] может резко повысить скорость и производительность системы.
Предупреждение: Если вы не являетесь опытным пользователем ПК, мы НЕ рекомендуем редактирование реестра Windows вручную. Некорректное использование Редактора реестра может привести к серьезным проблемам и потребовать переустановки Windows. Мы не гарантируем, что неполадки, являющиеся результатом неправильного использования Редактора реестра, могут быть устранены. Вы пользуетесь Редактором реестра на свой страх и риск.
Перед тем, как вручную восстанавливать реестр Windows, необходимо создать резервную копию, экспортировав часть реестра, связанную с Ошибка 63 (например, DC Unlocker):
- Нажмите на кнопку Начать.
- Введите «command» в строке поиска. ПОКА НЕ НАЖИМАЙТЕENTER!
- Удерживая клавиши CTRL-Shift на клавиатуре, нажмите ENTER.
- Будет выведено диалоговое окно для доступа.
- Нажмите Да.
- Черный ящик открывается мигающим курсором.
- Введите «regedit» и нажмите ENTER.
- В Редакторе реестра выберите ключ, связанный с Ошибка 63 (например, DC Unlocker), для которого требуется создать резервную копию.
- В меню Файл выберите Экспорт.
- В списке Сохранить в выберите папку, в которую вы хотите сохранить резервную копию ключа DC Unlocker.
- В поле Имя файла введите название файла резервной копии, например «DC Unlocker резервная копия».
- Убедитесь, что в поле Диапазон экспорта выбрано значение Выбранная ветвь.
- Нажмите Сохранить.
- Файл будет сохранен с расширением .reg.
- Теперь у вас есть резервная копия записи реестра, связанной с DC Unlocker.
Следующие шаги при ручном редактировании реестра не будут описаны в данной статье, так как с большой вероятностью могут привести к повреждению вашей системы. Если вы хотите получить больше информации о редактировании реестра вручную, пожалуйста, ознакомьтесь со ссылками ниже.
Мы не несем никакой ответственности за результаты действий, совершенных по инструкции, приведенной ниже — вы выполняете эти задачи на свой страх и риск.
Шаг 2: Проведите полное сканирование вашего компьютера на вредоносное ПО
Есть вероятность, что ошибка 63 может быть связана с заражением вашего компьютера вредоносным ПО. Эти вредоносные злоумышленники могут повредить или даже удалить файлы, связанные с Ошибки во время выполнения. Кроме того, существует возможность, что ошибка 63 связана с компонентом самой вредоносной программы.
Совет: Если у вас еще не установлены средства для защиты от вредоносного ПО, мы настоятельно рекомендуем использовать Emsisoft Anti-Malware (скачать). В отличие от других защитных программ, данная программа предлагает гарантию удаления вредоносного ПО.
Шаг 3: Очистить систему от мусора (временных файлов и папок) с помощью очистки диска (cleanmgr)
Со временем ваш компьютер накапливает ненужные файлы в связи с обычным интернет-серфингом и повседневным использованием компьютера. Если такие ненужные файлы иногда не удалять, они могут привести к снижению быстродействия DC Unlocker или к ошибке 63, возможно вследствие конфликтов файлов или перегрузки жесткого диска. Удаление таких временных файлов при помощи утилиты Очистка диска может не только устранить ошибку 63, но и существенно повысить быстродействие вашего компьютера.
Совет: Хотя утилита Очистки диска является прекрасным встроенным инструментом, она удаляет не все временные файлы с вашего компьютера. Другие часто используемые программы, такие как Microsoft Office, Firefox, Chrome, Live Messenger, а также сотни других программ не поддаются очистке при помощи программы Очистка диска (включая некоторые программы DC Unlocker).
Из-за недостатков утилиты Windows Очистка диска (cleanmgr) мы настоятельно рекомендуем использовать специализированное программное обеспечение очистки жесткого диска / защиты конфиденциальности, например WinSweeper [Загрузить] (разработано Microsoft Gold Partner), для очистки всего компьютера. Запуск WinSweeper [Загрузить] раз в день (при помощи автоматического сканирования) гарантирует, что ваш компьютер всегда будет чист, будет работает быстро и без ошибок %%error_name%%, связанных с временными файлами.
Как запустить Очистку диска (cleanmgr) (Windows XP, Vista, 7, 8 и 10):
- Нажмите на кнопку Начать.
- Введите «command» в строке поиска. ПОКА НЕ НАЖИМАЙТЕENTER!
- Удерживая клавиши CTRL-Shift на клавиатуре, нажмите ENTER.
- Будет выведено диалоговое окно для доступа.
- Нажмите Да.
- Черный ящик открывается мигающим курсором.
- Введите «cleanmgr» и нажмите ENTER.
- Программа Очистка диска приступит к подсчету занятого места на диске, которое вы можете освободить.
- Будет открыто диалоговое окно Очистка диска, содержащее флажки, которые вы можете выбрать. В большинстве случаев категория «Временные файлы» занимает большую часть дискового пространства.
- Установите флажки напротив категорий, которые вы хотите использовать для очистки диска, и нажмите OK.
Шаг 4: Обновите драйверы устройств на вашем компьютере
Ошибки 63 могут быть связаны с повреждением или устареванием драйверов устройств. Драйверы с легкостью могут работать сегодня и перестать работать завтра по целому ряду причин. Хорошая новость состоит в том, что чаще всего вы можете обновить драйверы устройства, чтобы устранить проблему с Ошибка 63.
В связи с временными затратами и общей сложностью обновления драйверов мы настоятельно рекомендуем использовать утилиту обновления драйверов, например DriverDoc (разработана Microsoft Gold Partner), для автоматизации этого процесса.
Пожалуйста, учтите: Ваш файл Ошибка 63 может и не быть связан с проблемами в драйверах устройств, но всегда полезно убедиться, что на вашем компьютере установлены новейшие версии драйверов оборудования, чтобы максимизировать производительность вашего ПК.
Шаг 5: Используйте Восстановление системы Windows, чтобы «Отменить» последние изменения в системе
Восстановление системы Windows позволяет вашему компьютеру «отправиться в прошлое», чтобы исправить проблемы Ошибка 63. Восстановление системы может вернуть системные файлы и программы на вашем компьютере к тому времени, когда все работало нормально. Это потенциально может помочь вам избежать головной боли от устранения ошибок, связанных с 63.
Пожалуйста, учтите: использование восстановления системы не повлияет на ваши документы, изображения или другие данные.
Чтобы использовать Восстановление системы (Windows XP, Vista, 7, 8 и 10):
- Нажмите на кнопку Начать.
- В строке поиска введите «Восстановление системы» и нажмите ENTER.
- В окне результатов нажмите Восстановление системы.
- Введите пароль администратора (при появлении запроса).
- Следуйте инструкциям Мастера для выбора точки восстановления.
- Восстановить ваш компьютер.
Шаг 6: Удалите и установите заново программу DC Unlocker, связанную с Ошибка 63
Инструкции для Windows 7 и Windows Vista:
- Откройте «Программы и компоненты», нажав на кнопку Пуск.
- Нажмите Панель управления в меню справа.
- Нажмите Программы.
- Нажмите Программы и компоненты.
- Найдите DC Unlocker в столбце Имя.
- Нажмите на запись DC Unlocker.
- Нажмите на кнопку Удалить в верхней ленте меню.
- Следуйте инструкциям на экране для завершения удаления DC Unlocker.
Инструкции для Windows XP:
- Откройте «Программы и компоненты», нажав на кнопку Пуск.
- Нажмите Панель управления.
- Нажмите Установка и удаление программ.
- Найдите DC Unlocker в списке Установленные программы.
- Нажмите на запись DC Unlocker.
- Нажмите на кнопку Удалить справа.
- Следуйте инструкциям на экране для завершения удаления DC Unlocker.
Инструкции для Windows 8:
- Установите указатель мыши в левой нижней части экрана для показа изображения меню Пуск.
- Щелкните правой кнопкой мыши для вызова Контекстного меню Пуск.
- Нажмите Программы и компоненты.
- Найдите DC Unlocker в столбце Имя.
- Нажмите на запись DC Unlocker.
- Нажмите Удалить/изменить в верхней ленте меню.
- Следуйте инструкциям на экране для завершения удаления DC Unlocker.
После того, как вы успешно удалили программу, связанную с Ошибка 63 (например, DC Unlocker), заново установите данную программу, следуя инструкции DC Unlocker.
Совет: Если вы абсолютно уверены, что ошибка 63 связана с определенной программой DC Unlocker, удаление и повторная установка программы, связанной с Ошибка 63 с большой вероятностью решит вашу проблему.
Шаг 7: Запустите проверку системных файлов Windows («sfc /scannow»)
Проверка системных файлов представляет собой удобный инструмент, включаемый в состав Windows, который позволяет просканировать и восстановить поврежденные системные файлы Windows (включая те, которые имеют отношение к Ошибка 63).
Чтобы запустить проверку системных файлов (Windows XP, Vista, 7, 8 и 10):
- Нажмите на кнопку Начать.
- Введите «command» в строке поиска. ПОКА НЕ НАЖИМАЙТЕENTER!
- Удерживая клавиши CTRL-Shift на клавиатуре, нажмите ENTER.
- Будет выведено диалоговое окно для доступа.
- Нажмите Да.
- Черный ящик открывается мигающим курсором.
- Введите «sfc /scannow» и нажмите ENTER.
- Проверка системных файлов начнет сканирование на наличие проблем Ошибка 63 и других системных файлов (проявите терпение — проверка может занять длительное время).
- Следуйте командам на экране.
Шаг 8: Установите все доступные обновления Windows
Microsoft постоянно обновляет и улучшает системные файлы Windows, связанные с Ошибка 63. Иногда для решения проблемы Ошибки во время выполнения нужно просто напросто обновить Windows при помощи последнего пакета обновлений или другого патча, которые Microsoft выпускает на постоянной основе.
Чтобы проверить наличие обновлений Windows (Windows XP, Vista, 7, 8 и 10):
- Нажмите на кнопку Начать.
- Введите «update» в строке поиска и нажмите ENTER.
- Будет открыто диалоговое окно Обновление Windows.
- Если имеются доступные обновления, нажмите на кнопку Установить обновления.
Шаг 9: Произведите чистую установку Windows
Предупреждение: Мы должны подчеркнуть, что переустановка Windows займет очень много времени и является слишком сложной задачей, чтобы решить проблемы Ошибка 63. Во избежание потери данных вы должны быть уверены, что вы создали резервные копии всех важных документов, изображений, программ установки программного обеспечения и других персональных данных перед началом процесса. Если вы сейчас е создаете резервные копии данных, вам стоит немедленно заняться этим (скачать рекомендованное решение для резервного копирования), чтобы защитить себя от безвозвратной потери данных.
Пожалуйста, учтите: Если проблема 63 не устранена после чистой установки Windows, это означает, что проблема Ошибки во время выполнения ОБЯЗАТЕЛЬНО связана с аппаратным обеспечением. В таком случае, вам, вероятно, придется заменить соответствующее оборудование, вызывающее ошибку 63.
Информация об операционной системе
Сообщения об ошибках 63 могут появляться в любых из нижеперечисленных операционных систем Microsoft Windows:
- Windows 10
- Windows 8
- Windows 7
- Windows Vista
- Windows XP
- Windows ME
- Windows 2000
Проблема с 63 все еще не устранена?
Обращайтесь к нам в любое время в социальных сетях для получения дополнительной помощи:


Об авторе: Джей Гитер (Jay Geater) является президентом и генеральным директором корпорации Solvusoft — глобальной компании, занимающейся программным обеспечением и уделяющей основное внимание новаторским сервисным программам. Он всю жизнь страстно увлекался компьютерами и любит все, связанное с компьютерами, программным обеспечением и новыми технологиями.
Список AT-команд модемов Huawei
Приведенные AT-команды для Huawei модемов позволяют тонко настроить устройство и включить / отключить некоторые функции 3G модемов.
Для ввода команд можно использовать программу терминал, встроенную в любую систему Windiws, или скачать отдельную программу My Huawei Terminal. Для его работы требуется установленный .NET Framework версии 2.0 или выше и подключение к этому порту HUAWEI Mobile Connect – 3G PC UI Interface.
Также можно использовать программу Dc-Unlocker. В ней через автопоиск найти модем и в окне программы вводить команды.

AT команды для Huawei модемов:
- AT^SETPORT? — Показывает текущую конфигурацию устройства;
- AT^GETPORTMODE — Показывает режим модема, который активен в данный момент;
- AT^SETPORT=»A1,A2;1,2,3,7,A1,A2″ — Устанавливает все настройки по-умолчанию;
- AT^SETPORT=»A1,A2;1,2,3,7″ — отключение режима CD+SD;
- AT^SETPORT=»A1,A2;2,7″ — Отключение режима CD+SD, но сохраняет PCUI и Windows 7 NDIS режим;
- AT^SETPORT=»A1;2,7″ — Режим 3 в одном: CD + NDIS + PCUI;
- Для включения режима: модем + CD-ROM + Card Reader вводим — AT^U2DIAG=276 или AT^U2DIAG=255, модем + CD-ROM — AT^U2DIAG=1, модем + Card Reader — AT^U2DIAG=256;
- AT^SYSCFG=13,1,3FFFFFFF,2,4 — Только GPRS/EDGE режим;
- AT^SYSCFG=14,2,3FFFFFFF,2,4 — Только 3G/WCDMA режим;
- AT^SYSCFG=2,1,3FFFFFFF,2,4 — Предпочитать режимы GPRS/EDGE;
- AT^SYSCFG=2,2,3FFFFFFF,2,4 — Предпочитать режимы 3G/WCDMA;
- AT^U2DIAG=0 — Команда чтобы устройство было только в режиме модема;
- AT^SETPORT=»A1,A2;1,2,3,7,A1,A2,4,5,6,A,B,D,E» — Аналогичная команда настроек по умолчанию;
- Способы сброса счетчика попыток ввода NCK кода на некоторых модемах Huawei. Способы рабочие -проверены на моделях E1550, E1750, E173.
- AT^CARDUNLOCK=»nck md5 hash» — Счетчик попыток ввода unlock кода сбросится на значению 10 (можно снова 10 раз ввести NCK);
- AT^CARDLOCK=»nck code» – команда ввода кода разблокировки напрямую на терминале. NCK код можно получить по ссылке — Код разблокировки Huawei;
- AT^CARDLOCK? — Проверить состояние блокировки и кол-во оставшихся попыток. Пример ответа — ^CARDLOCK: 2,10,0. Первая цифра «2» — означает, что SIM Lock снят или его нет, «1» — означает что модем залочен. Вторая цифра будет означать количество оставшихся попыток кода разблокировки. По умолчанию у нового модема их 10. У новых моделей попытки могут полностью отсутствовать (так задумано оператором), но их unlock вы также можете заказать на нашем сайте.
ВНИМАНИЕ! Все команды вводите без СИМ-карты и карты памяти в модеме.
Дополнение для сетей GSM:
- at^hspa=0 — wcdma
- at^hspa=2 — hspa-mode
- at^hspa=1 — hsdpa
- at^hspa=3 — hspa+mode
Если у вас есть добавить в этот список новую команду – свяжитесь с нами по почте support@imei-unlock.ru. Если команда существует – мы её добавим в этот список, а вам будет начислен бонус в виде кредитов на сайте.
Для разблокировки новых типов модемов, оснащенных новой защитой, используйте DC-Unlocker (Логи, Кредиты Активации)
Memory card locked error is one of the common errors that users are facing. It is always suggested to have a backup of your important data. Because many of us usually forget to have a backup as we rely too much on the memory card, which we shouldn’t as sometimes memory card give up as well resulting in loss of our precious photo, videos, audio, etc.
If your camera SD memory card is showing “Card is Locked”, “Memory card/SD card is locked” error, then don’t worry! In this article, you are going to learn some effective methods that will help you to fix Memory card is locked error.
However, while applying the troubleshooting fixes, if you found that your vital SD card data gets deleted, you can use the best SD Card Recovery Tool to recover deleted data from the SD card.
Rated Excellent on Trustpilot
Free SD Card Recovery Tool.
Recover data from corrupted, damaged, & formatted SD cards of all brands on Windows. Try now!
Alright so let’s get started…
How Do You Unlock A Locked Camera Memory Card?
Well, there are many methods that will help you to unlock a locked memory card some are mentioned below, have a look at the methods and perform them one by one.
- Method 1: Fix Memory Card Locked Error By Sliding The Lock Switch To Unlock Position
- Method 2: Memory Card Won’t Read
- Method 3: Try Formatting Memory Card
- Method 4: Unrecognized Files in Memory Card
- Method 5: Toothpick Method
- Method 6: Tape Fix Method
- Recover Media Files after Fixing “Memory Card Is Locked” Error
Watch Our Ultimate Video Guide To Fix “Memory Card Locked” Error
Method 1: Fix Memory Card Locked Error By Sliding The Lock Switch To Unlock Position
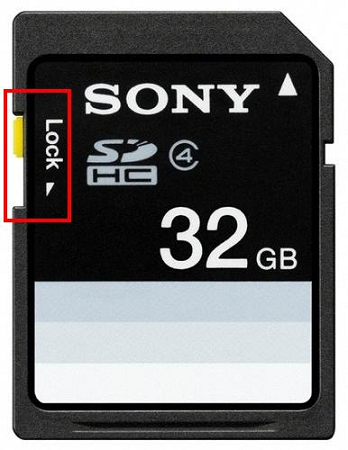
Normally, SD card, SDHC/SDXC, Eye-Fi cards or other various card have a small plastic slider switch on the left edge that is used to “lock” or write protected SD card. It prevents erasing, deleting or writing of files stored on the card.
If the small plastic slider lock switch is in “Up” position, it means your card is unlocked and anyone can add/delete or access your card. And if the small slider switch lock is in the “Down” position, it means that your card is locked and nobody can add/delete or access your card.
So, the rest solutions to fix micro SD card locked no switch issue are mentioned below!
If you use a digital camera and if it displays “Memory card is locked” error message then the problem might be with your memory card that has a tiny lock switch that has moved into the locked position. This may happen if you have accidentally switched the slide switch that is present on the side of your SD card in the “Locked” position in the downward position. Then correct its position by sliding up towards the direction of connectors.
If you discover that the locking switch is missing or it is broken then you should try methods those are mentioned below.
Alternatively, you can remove the card and re-install it again, but you must switch off the camera before removing the memory card. And then re-install the card on your camera.
Method 2: Memory Card Won’t Read
The old camera and the card readers cannot read the memory card with 4 GB capacity or higher – If such a problem is happening after buying a new card then you need to use the command line. To perform that follow the steps given below:
- Click on the Start button, type Run in the search box and press Enter.
- In Run box, type regedit and click OK to confirm and then click Yes.
- This will open a new window.
Go to: HKEY_LOCAL_MACHINESYSTEMCurrentControlSetControlStorageDevicePolicies
- If there are no StorageDevicePolicies, then you need to create one folder. To create the folder, right-click on the Control and click on New>Key, name this StorageDevicePolicies, right-click on the new folder that you have created now named as StorageDevicePolicies and click New> DWORD Value.
- Name it WriteProtect.
- Double click on the Write Protect and set the Value Data to 0 and click OK.
This will resolve the issue of memory card won’t read.
Method 3: Try Formatting Memory Card
If you are using your card for a long time but recently it started to show “memory card error” or “card requires formatting” then your card has not been formatted for a long period. An unformatted card may work fine initially with the camera but it may get corrupt over time. The card may also get corrupted if the camera power gets interrupted during the shooting of pictures.
Formatting the card in the camera corrects this problem. But this can erase all your photos that are taken on the card. You need to save all these photos on your computer and then proceed with the formatting option. But if you don’t do it you can easily recover your photos back using SD Card Recovery Software.
Rated Excellent on Trustpilot
Free SD Card Recovery Tool.
Recover data from corrupted, damaged, & formatted SD cards of all brands on Windows. Try now!
Method 4: Unrecognized Files in Memory Card
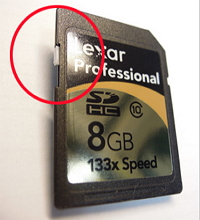
If still, file corruption occurs occasionally then the files or movies taken on the card may consist of unrecognized files or something similar to it. Then you need to see the “Class” or the writing speed of the card. The face of the card contains a Class with a number or number circled with a capital “C”. If neither C nor Class is written on the card then the card is of Class 2 or lower.
Today’s newer camera consists of very high-resolution pictures and high video definition that we write on the SD cards. So the older cards cannot keep up with the writing speed of the newer camera to save these files. As a result, some of your files may get corrupted or lost. So it is recommended to use newer cards.
Method 5: Toothpick Method
If still the file corruption occurs then use the famous “Toothpick” fix method. Even after performing above all these techniques your card is still showing locked then it is likely that the locking switch inside the camera card slot may have stuck.
If you see inside the slot on the side of the slot where the SD card slide switch is present you will notice a glint of gold color on the side. This is the camera’s lock and unlocks switch. Then push this switch to unlock and clear out if any junk is present that has caused this jamming.
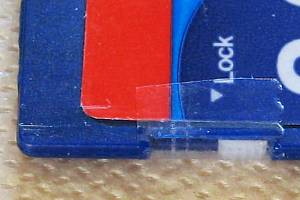
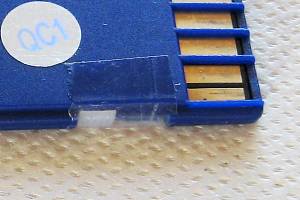
Method 6: Tape Fix Method
Use the Tape Fix method to repair SanDisk memory card locked error. If above all these methods do not work then you may have a broken locking tab on your card. Then you need to take a tiny piece of clear tape and place it tightly over the slot where the locking of the switch is present. It may correct your problem.
Automatic Solution To Recover Media Files After Fixing “Memory Card Is Locked” Error
If your camera or phone still displays “memory card locked” or “card is write protected” error or even after unlocking “card needs formatting”, then it means that your card or file system is corrupted. In such cases, formatting the card is the only option to fix this problem.
But formatting the card will erase all data saved on your card. So, do you fix card is locked issue without losing data?
Well, in such case if your media files are inaccessible then it is recommended that you must first try Memory Card Data Recovery software that is available for both Windows and Mac computer.


* Free version of the program only scans and previews recoverable objects.
It will help you to recover data from locked memory cards, write-protected/corrupted/damaged/cannot read memory cards. The recovery tool for a locked card will allow recovering photos, videos and audio files from the card.
Below follow the step by step guide on how to recover inaccessible data from locked memory card by using Photo Recovery software.
People Also Ask
What Does It Mean If A Memory Card Is Locked?
If a SD card is locked or memory card locked error showing on your digital camera then you won’t be able to add new files to your device. Also, you’ll not be able to edit or delete the files stored on your SD card.
Why Do SD Cards Have A Lock?
SD cards have a lock because it prevents anything to be written on it. When an SD card is unlocked position, you can read and write the SD card. But, when it is in locked position, it will not allow you to make any changes to its file system, making it a read-only device.
How Do I Unlock My Micro SD Card On Android?
To unlock your Micro SD card on Android, the only way to access data on the SD memory card is to decrypt it. To do so, first insert the SD card to the source phone then restart your phone. After that, scroll to the bottom and tap on the “Decrypt SD Card” option.
Why Does My Canon Camera Says Memory Card Locked?
Sometimes, the SD memory card removed unexpectedly or removing the memory card from a card reader while files are still being transferred to a computer. Due to these actions your Canon camera says that your memory card is locked. So, in this case, formatting this SD card will resolve this issue.
What Is The Use Of Lock In SD Card?
The lock is a tiny slider along one side of the SD card. In an unlocked position, you can read and write the SD card. But, in the locked position, the SD card will not allow any changes to its file system, making it a read-only device.
Final Words
After reading the article, I am sure that from the above-stated methods you were easily able to fix and get rid of SD memory card locked error message.
In case after fixing the canon memory card locked error, if your all important data gets deleted then you can make use of the Memory Card Data Recovery software that allows you to recover inaccessible media files from locked memory card without losing data and will also help to repair corrupted memory card.
That’s all…

Taposhi is an expert technical writer with 5+ years of experience. Her in-depth knowledge about data recovery and fascination to explore new DIY tools & technologies have helped many. She has a great interest in photography and loves to share photography tips and tricks with others.
When your memory card gets locked, don’t worry. Follow one fo the provided methods here to unlock your memory card without losing any data:
| Workable Solutions | Step-by-step Troubleshooting |
|---|---|
| Fix 1. Switch Card Lock | If the memory card has a plastic slider switch, switch if from «OFF» to «ON»…Full steps |
| Fix 2. Unlock with Password | On Android Phone, go to «Settings» > «Security & privacy» > «»More settings» > «Unlock SD card»…Full steps |
| Fix 3. Remove Write Protection | Use attributes disk clear readonly command or EaseUS M Tool to remove the write protection...Full steps |
| Fix 4. Format Memory Card | Connect SD card to PC > Use File Explorer or Disk Management to format the card…Full steps |
| Bonus Tip. Recover Data | If you lost data, run EaseUS Data Recovery Wizard > Scan and recover lost SD data…Full steps |
Memory Card Locked
«Recently, I have some problems with my camera card. Every time when I am trying to take pictures using my Sony camera, it shows me «Memory card locked» error message. So how do I unlock a locked memory card without formatting or losing my data?»
Memory cards, including SD cards, Micro SD cards, CF cards, and more, are commonly used in digital cameras and Android phones. Like memory card not showing files on mobile, «memory card locked» error also occurs quite frequently. If your memory card is locked or write-protected, you will get the error you cannot add new files to the device or edit the existing files on it, which is not wanted by most of the users. To make sure you can use your SD card as usual, you need to unlock the memory card to remove the «memory card locked» or «SD card locked» error.
4 Fixes for «Memory card locked» Error
Depending on your specific situation, you will need different ways to unlock the SD card.
Method 1. Remove «Memory card locked» Error via Lock Switch
Usually, SD memory card, SDHC memory card, SDXC memory card or Eye-Fi cards have a small plastic slider switch on the left side of the card which is used to unlock or unlock the device, serving to prevent the writing or erasing of the files stored in the card. In the ‘up’ position the card is unlocked, writable, and can be erased. In the ‘down’ position the memory card is ‘locked’ and then your camera or Android phone will show you the «Memory card locked» error.
So, when you get «Memory card locked» error message, check your SD card and make sure that you didn’t accidentally place the tiny locking slide switch on the side of your SD card in the «locked» downward position. It is the first and easiest step to unlock memory card.
If the switch is missing or broken, you can use a toothpick or something similar to carefully toggle the switch to unlock your SD card.
Method 2. Unlock SD Card with Password
If you have locked your SD card on your Android phone, you need to remove the error «SD card locked» on your mobile using the password you set.
Step 1. Open «Settings» on your Android phone.
Step 2. Go to «Security & privacy» > «More settings».
Step 3. Choose «Unlock SD card» and enter your password when needed.
Method 3. Remove Write Protection on the SD Card
Write protection on the SD card may also cause «SD card locked» error on your digital camera or mobile phone. Thus, removing write protection could be helpful in some cases. Here you can remove the «read-only» attribute using diskpart on computer.
Step 1. Connect your memory card into your computer via a card reader and run «Command Prompt» as an administrator.
Step 2. Enter diskpart and click «Yes» in the prompt asking for notification.
Step 3. Enter the following command in order:
list volume select volume X (Replace «X» with the number of your write-protected SD card.)
attributes disk clear readonly
If you don’t consider yourself a pro-computer user and you’re not familiar with command-lines, don’t worry. There are graphical-based solutions to help you remove write-protection from your hard drives, USB drives, and even SD cards.
EaseUS CleanGenius is one of these tools that helps you fix aforementioned issues on your drives without knowing a thing about command-line.
Here’s an easy-to-follow guide on how to use this tool to get your issues sorted:
Step 1: DOWNLOAD and install EaseUS CleanGenius (free) on your computer.
Step 2: Run EaseUS CleanGenius on your PC, select Optimization and choose the Write Protection mode.
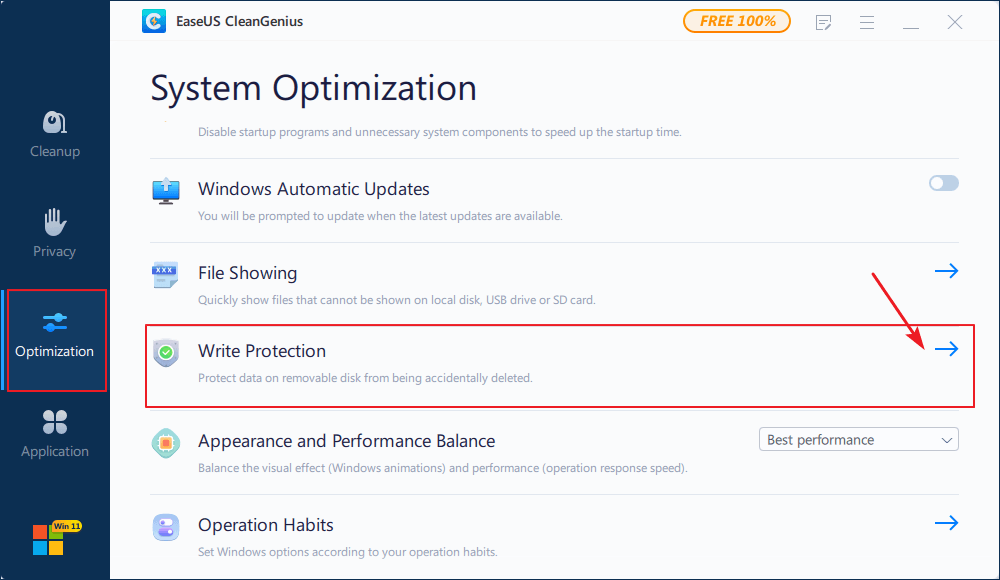
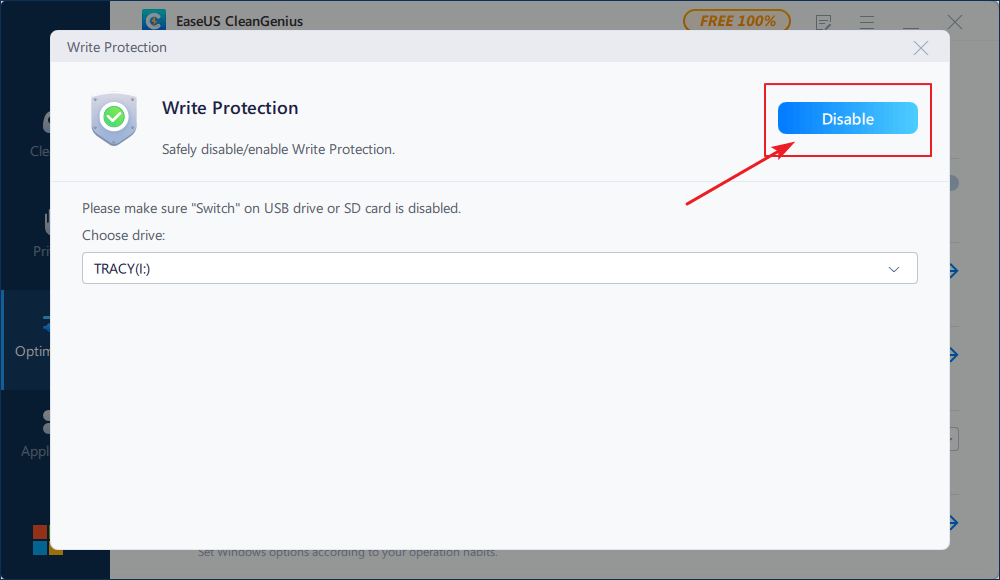
Step 3: Select the device that is write-protected and click Disable to remove the protection.
Method 4. Format the Memory Card
If you don’t remember the password you set when lock your SD card or the tips above fail to fix «memory card locked» error on your storage device, you can only force unlock your memory card by formatting, which will erase all the existing files on your device. Besides, data erased by force unlocking your SD card is difficult to recover.
How to Recover Lost Files from Locked Memory Card
If you have successfully removed the error «memory card locked» but find there is data loss on your device, you can use EaseUS Data Recovery Wizard to recover the lost data. Besides, although retrieving the data erased by force unlocking the device is hard to get back, you can also try the software to scan for lost files.
To perform SD card data recovery:
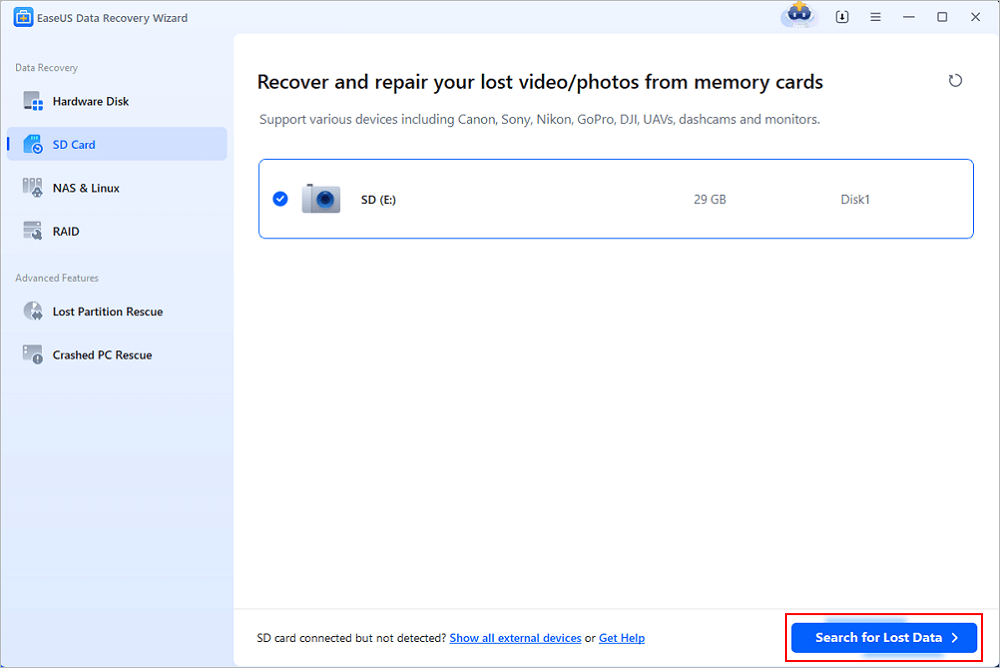
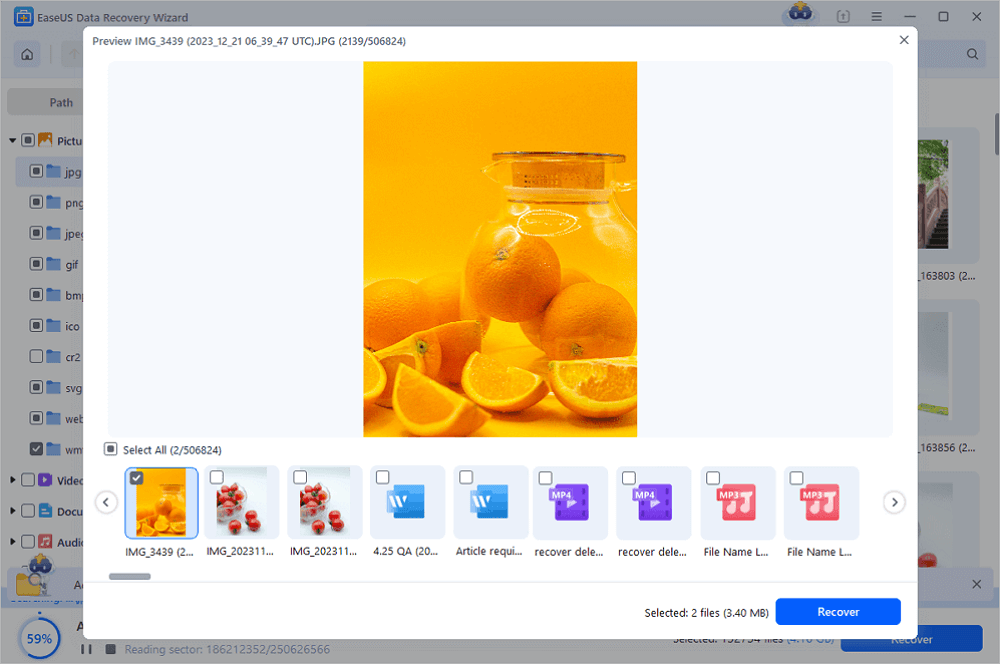
Step 1. Connect the SD card, memory card, or CF Card to your computer and launch EaseUS memory card recovery software on your PC. The SD card will be listed under the Devices section. Choose the SD card and click «Scan» to start looking for your lost data.
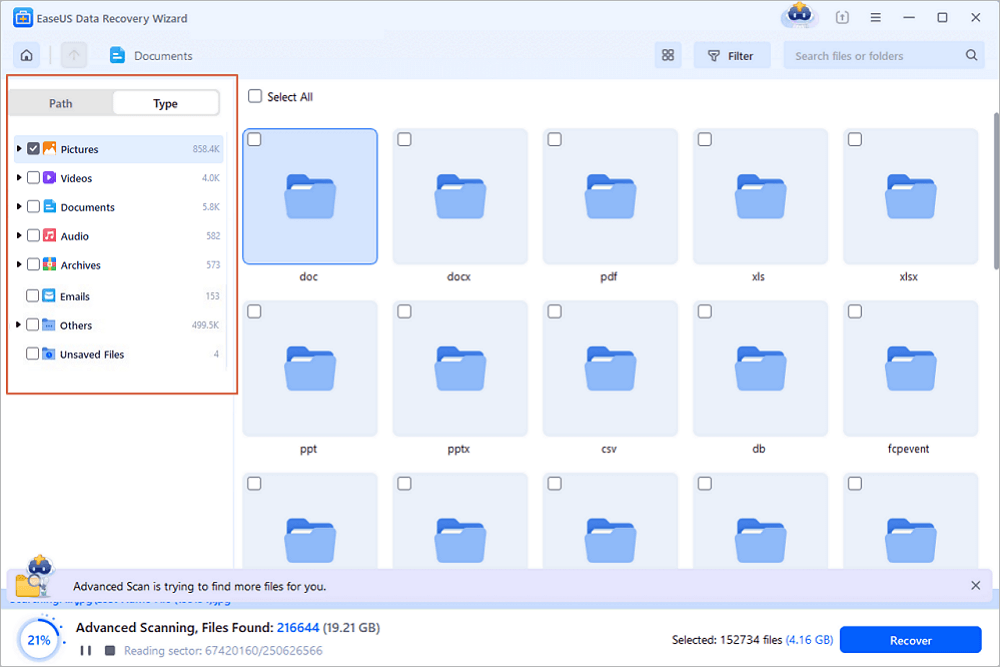
Step 2. The software will start a scan automatically. The scan is powerful enough to find all lost files that even lost file names. After the scanning process, you can find deleted items from the tree-view panel on the left. Then, click «Filter» if you are looking for a specific file type, like photos, documents, videos or emails.
Step 3. You can directly double-click the files to preview the content. After this, you can choose wanted files and click «Recover» to restore them to a secure location on your PC or other external storage devices.
The Bottom Line
To fix a problem like «SD card locked» is always companied with data loss if you forget the password or the switch isn’t working. This should remind you of backing up data regularly. You can do back up your SD card by manually copying files to somewhere else, using free backup software or sync the files to the cloud storage. No matter which way you choose, taking action is the most important.
 07-28-2019, 11:13 |
#1 (permalink) |
|
kothamamun No Life Poster
Join Date: Apr 2016 Location: B A N G L A D E S H Posts: 2,995 Member: 2556542 Status: Offline Thanks Meter: 1,626 |
asus t00j/a500cg card locked unlock error help Code: Setting frequence to 21 Mhz CMD Pullup Level: 2093 mV CMD Active Level: 2361 mV EMMC Device Information : EMMC CID: 90014A483847326404050A32F1D4314A EMMC CSD: D02701320F5903FFFFFFFFEF8A4040D2 EMMC Manufacture : SKHYNIX , EMMC NAME: H8G2d , HEX: 483847326400 , S/N: 0A32F1D4 , rev. 0x05 EMMC Manufacture ID: 0x90 , OEM ID: 0x4A , Device Type: BGA (Discrete embedded) , Date: 3/2014 EMMC ROM 1 (Main User Data) Capacity: 7448 MB (0001D1800000) EMMC ROM 2/3 (Boot Partition 1/2) Capacity: 4096 KB (000000400000) EMMC RPMB (Replay Protected Memory Block) Capacity: 4096 KB (000000400000) EMMC GP1 (GP Partition 1) Capacity: 8 MB , WR_REL (000000800000) EMMC Permanent Write Protection: No EMMC Temporary Write Protection: No Extended CSD Information : Extended CSD rev: 1.6 (MMC 4.5, MMC 4.51) Boot configuration [PARTITION_CONFIG]: 0x00 , Boot from: no boot Boot Bus Config: 0x06 , width 8bit H/W Reset Function [RST_N_FUNCTION]: 0x01, RST_n signal is permanently enabled Supported partition features [PARTITIONING_SUPPORT]: 0x07 Device supports partitioning features Device can have enhanced technological features in partitions and user data area Device can have extended partitions attribute Partition Settings [PARTITION_SETTING_COMPLETED]: 0x01 Backup saved: H8G2d_0A32F1D4_20190728_235651.extcsd EMMC Init completed. Operation: Universal Factory Format Please, wait ... Error: CARD Lock/Unlock Error |
 |

| 07-28-2019, 11:36 |
#2 (permalink) |
|
layder Product Supporter
Join Date: Jun 2002 Location: Belarus Age: 46 Posts: 3,120 Member: 13148 Status: Offline Thanks Meter: 2,806 |
|
| |

| 07-28-2019, 11:48 |
#3 (permalink) |
|
kothamamun No Life Poster
Join Date: Apr 2016 Location: B A N G L A D E S H Posts: 2,995 Member: 2556542 Status: Offline Thanks Meter: 1,626 |
when power on phone direct go cmd waitning can not go fastboot mode or recovery mode. |
| |
| 07-28-2019, 13:16 |
#4 (permalink) |
|
layder Product Supporter
Join Date: Jun 2002 Location: Belarus Age: 46 Posts: 3,120 Member: 13148 Status: Offline Thanks Meter: 2,806 |
Quote: Originally Posted by kothamamun when power on phone direct go cmd waitning can not go fastboot mode or recovery mode. I was post link to solution thread |
| |

| 07-28-2019, 14:09 |
#5 (permalink) |
|
kothamamun No Life Poster
Join Date: Apr 2016 Location: B A N G L A D E S H Posts: 2,995 Member: 2556542 Status: Offline Thanks Meter: 1,626 |
unexpected z3x easy jtag not supported this operation |
| |
| 07-28-2019, 17:53 |
#6 (permalink) |
|
layder Product Supporter
Join Date: Jun 2002 Location: Belarus Age: 46 Posts: 3,120 Member: 13148 Status: Offline Thanks Meter: 2,806 |
I mistake. You eMMC not Password protected. |
| |
| 07-29-2019, 03:38 |
#7 (permalink) |
|
kothamamun No Life Poster
Join Date: Apr 2016 Location: B A N G L A D E S H Posts: 2,995 Member: 2556542 Status: Offline Thanks Meter: 1,626 |
Quote: Originally Posted by layder I mistake. You eMMC not Password protected. i will try and post result |
| |
| 07-30-2019, 05:57 |
#8 (permalink) |
|
kothamamun No Life Poster
Join Date: Apr 2016 Location: B A N G L A D E S H Posts: 2,995 Member: 2556542 Status: Offline Thanks Meter: 1,626 |
Code: Device supports partitioning features Device can have enhanced technological features in partitions and user data area Device can have extended partitions attribute Partition Settings [PARTITION_SETTING_COMPLETED]: 0x01 Backup saved: H8G2d_0A32F1D4_20100428_005417.extcsd EMMC Init completed. Operation: Writing all eMMC Regions... Operation: Writing BootConfig ... Reg: 179 Value: 0x00 Reg: 177 Value: 0x06 Reg: 162 Value: 0x01 Done Writing to: ROM2 , start: 0x000000000000 , size: 0x000000400000 Filename: EMMC_VTU00M_ROM2_000000000000_000000400000.bin eMMC switching to ROM2 Writing partition... Done writing partition. Write speed: 289.86 KB/s Writing to: ROM3 , start: 0x000000000000 , size: 0x000000400000 Filename: EMMC_VTU00M_ROM3_000000000000_000000400000.bin eMMC switching to ROM3 Writing partition... Done writing partition. Write speed: 289.51 KB/s Writing to: GP1 , start: 0x000000000000 , size: 0x000000800000 Filename: EMMC_VTU00M_GP1_000000000000_000000800000.bin eMMC switching to GP1 Writing partition... Error writing at address: 0000000A0000 , error: 64, 64 Unknown error ... Retry #1 Error writing at address: 0000000A0000 , error: 64, 64 Unknown error ... Retry #2 Error writing at address: 0000000A0000 , error: 64, 64 Unknown error ... Retry #3 Too many errors. Writing has been stopped |
| |
| 07-30-2019, 18:09 |
#9 (permalink) |
|
layder Product Supporter
Join Date: Jun 2002 Location: Belarus Age: 46 Posts: 3,120 Member: 13148 Status: Offline Thanks Meter: 2,806 |
Quote: Originally Posted by kothamamun Writing to: GP1 , start: 0x000000000000 , size: 0x000000800000 1) eMMC is damaged |
| |
|
The Following User Says Thank You to layder For This Useful Post: |
Если истрачены все 10 попыток разблокировки 3G модема
Источник: Активация голоса и сброс счетчика неверных попыток ввода NCK на модемах Huawei с новым алгоритмом блокировки, Автор Kulibin.
Данный материал представляет лишь выдержку из первоисточника в части касающейся сброса счетчика попыток разблокировки.
Продаваемые в салонах операторов связи 3g-модемы заблокированы и обеспечивают работу только с сим-картами конкретного оператора связи (sim-lock). При установке в модем сим-карты другого оператора, устройство требует ввода кода разблокировки (NSK-код). Модем предоставляет всего 10 попыток ввода кода разблокировки после чего блокирует саму возможность ввода кода.
Пользователь получает сообщение следующего или аналогичного содержания: «Карта памяти временно заблокирована. Пожалуйста свяжитесь с Вашим оператором».
Сброс счетчика попыток разблокировки по предложенному Kulibinым методу был успешно опробован на модеме Е1550.
Для успешной разблокировки и сброса счетчика необходимо выполнить следующие действия:
1. Необходимо узнать unlock code своего модема.
Для старых модемов, таких как: HUAWEI: E156, E155, E1550, E1552, E156G, E160, E160G, E161, E166, E169, E169G, E170, E171, E172, E176, E1762, E180, E182E, E196, E226, E270, E271, E272, E510, E612, E618, E620, E630, E630, E660, E660, E800, E870, E880, EG162, E880, EG162, EG162G, EG602, EG602G,
VODAFONE: K2540, K3515, K3520, K3565, K3520, K3565
использовать программу Huawei Calculator
Для модемов Huawei E171, E172, E173, E176, E177, E180, E181, E182, E166, E155, E156, E158, E160, E170, E161, E169, E188, E196, E216, E219, Е220, E226, E22X, E230, E270, E271, E272, E303, E352, E353, E355, E357, E367, E368, E369, E372, E392, E397, E398, E612, E618, E620, E630, E660, E800, E870, E880, E968, E1550, E1551, E1552, E1553, E155X, E156C, E156G, E156X, E1609, E160E, E160G, E1612, E1615, E1616, E1630, E1632, E166G, E1690, E1692, E1820, E1823, E182E, E1831, E1800, E1803, E180G, E180S, E169G, E170G, E1780, E172G, E1762, E2010, S4011, E1731, E3131, E630+, E660A, K3517, K3520, K3710, EG162, EG602, EM770, EG602G, EG162G, UMG181, HiLink
использовать ресурс http://huaweicodecalculator.com/new-algo/index.php для чего необходим аккаунт Google+. После перехода на страницу нажимаем «Sign in with Google+», входим, заполняем поля IMEI и Model, нажимаем «CALCULATE», затем «g+1», чтобы получить результат. Данный сервис не подходит для модемов с алгоритмом 201_algo.
Подробно читать здесь
Для модемов с алгоритмом 201_algo, таких как: M100-4, 824F (E3272), MR100-3, 823F, 826FT (E5372), 423s, M21-4 (E3531), E8231, E5330 и E3372 (827F) и других новых модемов с этим алгоритмом необходимо использовать ресурс http://huaweicodecalculator.com/algo/index.php.
Требования и последовательность действий такая же как для предыдущего ресурса.
Итак, после того, как мы узнали код разблокировки своего модема, переходим к следующему шагу.
2. Сброс счетчика. Скачиваем архив инструментов. Из скачанного и распакованного архива запускаем программу ResHacker. В открывшемся окне программы выбираем графу «Файл» и открываем входящий в пакет программ файлик Patch.exe. В открывшемся файле открываем ветку IMEI>136 и вписываем IMEI своего модема (подчеркнуто зеленым) и через пробел анлок-код (подчеркнуто красным).

Жмем кнопку «Компилировать» и сохраняем полученный файл под новым именем, например mypatch.exe (не забыв дописать расширение .exe).
Закрываем Resource hacker и запускаем созданный патч. Если все проделано верно, должно появится такое сообщение:

Теперь модем снова залочен. Лок становится под МТС-Россия, независимо от того, с какой сетью модем работал раньше. Однако счетчик доступных попыток разблокировки вновь принял значение 10.
3. Разлочиваем модем. Запускаем Huawei Modem Terminal и, используя ранее полученный unlock-код и команду AT^CARDLOCK=»unlock-code», разблокируем его:
Send:ATI
Recieve: M anufacturer: huawei
Recieve: Model: E1550
Recieve: Revision: 11.608.12.00.143
Recieve: IMEI: 351911045421867
Recieve: +GCAP: +CGSM,+FCLASS,+DS
Recieve: OK
Send:AT^CARDLOCK?
Recieve: ^CARDLOCK: 1,10,0
Recieve: OK
Send:AT^CARDLOCK=»59111508″
Recieve: OK
Send:AT^CARDLOCK?
Recieve: ^CARDLOCK: 2,10,0
Recieve: OK
Задача выполнена.
Addons
Если после разлочки скорость работы модема упала с 7,2 Мbit/sec до 3,6, то поправить это можно другим патчем из этого же набора инструментов.
Запускаем ResHacker, открываем патч 7.2M_enabler.exe и повторяем процедуру, описанную выше, а именно: в ветке BIN—>133—>1040 и вписываем IMEI своего модема.

Нажимаем кнопку «Compile Script», сохраняем, по аналогии с предыдущим патчем, и запускаем. Нажимаем кнопку «Avanti» и после успешного завершения работы «Fine».
После завершения, запускаем еще одну утилиту из этого же набора инструментов: Set HSUPA.exe. В открывшемся окне программы жмем Next. Утилита может выдать сообщение
«The data card doesn’t support HSUPA» , на что так же жмем «далее». Правда возможен еще один вариант работы: прога зависает не достигая результата. Увы, в этом случае ищем другой способ.
В случае успешной работы данного продукта, голосовой вызов будет активирован, что можно увидеть в сообщении DC-Unlocker:

Содержание
- Что могло произойти
- Как разблокировать карту памяти на фотоаппарате
- Способ 1: Снятие аппаратной блокировки SD карты
- Способ 2: Форматирование карты памяти
- Как отформатировать карту памяти в фотоаппарате Canon?
- Альтернативные варианты
- Механическое повреждение и защита SD-карты
- Фотоаппарат пишет «карта памяти заблокирована»
Что могло произойти
Прежде чем решать проблему, попытайтесь определить, что могло вызвать блокировку micro sd. Причина может быть программной или чисто механической.
- Очень часто доступ к файлам на карте памяти невозможен из-за вируса.
- Некоторые карты, приобретенные не у официальных производителей (подделки), автоматически блокируются при заполнении памяти. Обратите внимание, что если устройство рассчитано на 2 ГБ, то фактическая емкость часто составляет 1,7-1,8 ГБ. То есть вы думаете, что в вашем телефоне еще достаточно памяти, но она уже заполнена, и карта памяти перестает работать.
- Иногда программное обеспечение путается, и microSD требует пароль. Если вы случайно забыли его, вам понадобится специальный инструмент для разблокировки аксессуара.
- Самая простая и легкая причина заключается в том, что рычаг блокировки карты сместился.
Возникает закономерный вопрос — как узнать, что из вышеперечисленного относится к вашему случаю? Обычно, если карта памяти механически заблокирована, вы можете просматривать файлы на своей камере/смартфоне, но не можете делать новые фотографии или удалять старые.
Если это вирус или программный сбой, устройство, воспроизводящее информацию с карты памяти, начинает «глючить», самопроизвольно перезагружаясь при попытке просмотра файлов.
Будьте внимательны, если вы уронили свое устройство с большой высоты, повредив его внутренние детали, или если вы отдали его незнакомцам или скачали что-то с подозрительных сайтов. Эта информация поможет вам точно определить, почему карта памяти вашего фотоаппарата или телефона заблокирована и как это исправить.
Как разблокировать карту памяти на фотоаппарате
Давайте рассмотрим основные способы разблокировки карты памяти.
Способ 1: Снятие аппаратной блокировки SD карты
Если вы используете SD-карту, у них есть специальный режим блокировки записи. Чтобы снять замок, сделайте следующее:
- Извлеките карту памяти из гнезда в фотокамере. Поместите его контактами вниз. С левой стороны вы увидите небольшой рычаг. Это выключатель замка.

- Если карта заблокирована, рычаг находится в положении «Блокировка». Для изменения положения сдвиньте его вверх или вниз вдоль карты. Иногда его может заклинить. Поэтому его необходимо несколько раз переместить.
- Карта памяти разблокирована. Вставьте его обратно в камеру и продолжайте.

Переключатель на карте памяти мог заклинить из-за резких движений камеры. Это самая распространенная причина застревания карты памяти в камере.
Способ 2: Форматирование карты памяти
Если первый способ не помог и камера продолжает выдавать ошибку о том, что карта заблокирована или защищена от записи, необходимо отформатировать карту. Периодическое форматирование карты полезно по следующим причинам
- Предотвращает возможные неисправности во время использования;
- Он устраняет ошибки, возникающие во время использования;
- Форматирование восстанавливает файловую систему.

Форматирование можно выполнить с помощью камеры или компьютера.
Давайте сначала рассмотрим, как это сделать с помощью камеры. После сохранения фотографий на компьютере выполните процедуру форматирования. Использование камеры гарантирует, что карта будет отформатирована в наилучшем формате. Эта процедура также позволяет избежать ошибок и увеличить скорость работы карты.
- войдите в главное меню камеры;
- выберите «Настройка карты»;
- выполнить функцию «Формат».

Если у вас возникли вопросы о параметрах меню, обратитесь к руководству по эксплуатации вашей камеры.
Флэш-накопители также можно форматировать с помощью специального программного обеспечения. Лучше всего использовать программное обеспечение SDFormatter. Он специально разработан для форматирования карт памяти SD. Чтобы использовать его, выполните следующие действия:
- Запустите SDFormatter.
- Вы увидите, что подключенные карты памяти автоматически определяются при запуске и отображаются в главном окне. Выберите тот, который вам нужен.

Выберите параметры для форматирования. Для этого нажмите кнопку «Опция».
Здесь можно выбрать параметры форматирования:
- Быстро — Нормально;
- Full (Erase) — Полный со стиранием данных;
- Полный (перезапись) — Полный с перезаписью.
Нажмите OK. Формат печати. 
Теперь карта будет отформатирована. Файловая система будет автоматически установлена на FAT32.
Эта программа быстро восстановит работоспособность вашей карты памяти.
Как отформатировать карту памяти в фотоаппарате Canon?
В меню «Мой компьютер» найдите карту памяти, щелкните на ней правой кнопкой мыши Выберите «Форматировать» из всплывающего меню Выберите соответствующий тип файловой системы Нажмите «Пуск».
Альтернативные варианты
Что делать, если SD-карта заблокирована, а перечисленные приложения мне не нравятся или не подходят? Существует ряд других бесплатных приложений, доступных на тематических сайтах. Самые известные и простые в использовании среди них — Disk Digger и EASEUS Data Recovery Free. Эти программы не требуют от пользователя никакого опыта и интуитивно понятны в использовании.
Стоит также отметить, что все эти программы также подходят для восстановления случайно удаленных фотографий на картах SD или MicroSD (используются в большинстве современных смартфонов и планшетов). Однако если на том же носителе позже были сохранены другие файлы, восстановить потерянные данные будет невозможно.

Стандартный размер SD-карты был достигнут за счет тонкой пластиковой оболочки, которую легко повредить при ношении в кармане или сумке среди других предметов.
Иногда маленький переключатель защиты от записи может выпасть, в результате чего SD-карта перестанет работать в камере или другом устройстве, требующем постоянной возможности записи. Какой бы ни была причина защиты SD-карты от записи, в таком состоянии вы не сможете удалять или записывать на нее файлы. В этом случае есть только одно решение — перенести информацию на другой носитель. Если SD-карта повреждена таким образом, ее можно открыть только для чтения, не более того.

Фотоаппарат пишет «карта памяти заблокирована»
Почти все типы приводов имеют функцию «принудительной блокировки». Когда это происходит, диск становится видимым, можно просмотреть его содержимое, но больше ничего сделать нельзя. Что мне делать, когда это происходит?
Вам необходимо извлечь карту памяти из камеры. На левом краю должен быть небольшой переключатель с надписью «lock». Нижнее положение означает, что привод заблокирован, т.е. выключатель должен быть нажат вверх.
Если карта памяти MicroCD заблокирована, тумблер должен находиться на адаптере.
Ошибка карты памяти: что делать? Проблема может возникнуть, если карта новая или использовалась с другим оборудованием. Самый простой способ — отформатировать диск, как предлагает сама камера Nikon.
Форматирование можно выполнить на компьютере по следующему алгоритму:
- Установите диск в ноутбук;
- Найдите устройство памяти;
- Выберите «формат» на диске, щелкните правой кнопкой мыши на диске;
- Выберите соответствующую систему: «fat32» или «ntfs»;
- Отформатируйте диск.
Процедура не помогла, а камера все равно пишет — ошибка карты памяти или она заблокирована, возможно, полностью несовместима с устройством. Проверьте его на другом устройстве.
Источники
- https://Lumpics.ru/how-unlock-memory-card-on-camera/
- https://MyComp.su/ustrojstva/kak-snyat-parol-s-fleshki.html
- https://chelc.ru/kak-razblokirovat-kartu-pamiati-v-fotoapparate
- https://konsultm.ru/kak-razblokirovat-kartu-pamyati-v-fotoapparate-nikon/
- https://kamin159.ru/kak-razblokirovat-kartu-pamiati-dlia-fotoapparata
- https://FB.ru/article/242091/chto-delat-esli-zablokirovalas-sd-karta-sovetyi-po-ustraneniyu-problemyi
- https://tehnika.expert/cifrovaya/fotoapparat/kak-ustranit-problemy.html
- https://tehnofaq.ru/chto-delat-esli-fotoapparat-ne-vidit-kartu-pamyati-bystro-razryazhaetsya-ne-vklyuchaetsya/
- https://mirka-master.ru/vse-stati/kak-razblokirovat-kartu-pamyati.html
When your memory card gets locked, don’t worry. Follow one fo the provided methods here to unlock your memory card without losing any data:
| Workable Solutions | Step-by-step Troubleshooting |
|---|---|
| Fix 1. Switch Card Lock | If the memory card has a plastic slider switch, switch if from «OFF» to «ON»…Full steps |
| Fix 2. Unlock with Password | On Android Phone, go to «Settings» > «Security & privacy» > «»More settings» > «Unlock SD card»…Full steps |
| Fix 3. Remove Write Protection | Use attributes disk clear readonly command or EaseUS M Tool to remove the write protection...Full steps |
| Fix 4. Format Memory Card | Connect SD card to PC > Use File Explorer or Disk Management to format the card…Full steps |
| Bonus Tip. Recover Data | If you lost data, run EaseUS Data Recovery Wizard > Scan and recover lost SD data…Full steps |
Memory Card Locked
«Recently, I have some problems with my camera card. Every time when I am trying to take pictures using my Sony camera, it shows me «Memory card locked» error message. So how do I unlock a locked memory card without formatting or losing my data?»
Memory cards, including SD cards, Micro SD cards, CF cards, and more, are commonly used in digital cameras and Android phones. Like memory card not showing files on mobile, «memory card locked» error also occurs quite frequently. If your memory card is locked or write-protected, you will get the error you cannot add new files to the device or edit the existing files on it, which is not wanted by most of the users. To make sure you can use your SD card as usual, you need to unlock the memory card to remove the «memory card locked» or «SD card locked» error.
4 Fixes for «Memory card locked» Error
Depending on your specific situation, you will need different ways to unlock the SD card.
Method 1. Remove «Memory card locked» Error via Lock Switch
Usually, SD memory card, SDHC memory card, SDXC memory card or Eye-Fi cards have a small plastic slider switch on the left side of the card which is used to unlock or unlock the device, serving to prevent the writing or erasing of the files stored in the card. In the ‘up’ position the card is unlocked, writable, and can be erased. In the ‘down’ position the memory card is ‘locked’ and then your camera or Android phone will show you the «Memory card locked» error.
So, when you get «Memory card locked» error message, check your SD card and make sure that you didn’t accidentally place the tiny locking slide switch on the side of your SD card in the «locked» downward position. It is the first and easiest step to unlock memory card.
If the switch is missing or broken, you can use a toothpick or something similar to carefully toggle the switch to unlock your SD card.
Method 2. Unlock SD Card with Password
If you have locked your SD card on your Android phone, you need to remove the error «SD card locked» on your mobile using the password you set.
Step 1. Open «Settings» on your Android phone.
Step 2. Go to «Security & privacy» > «More settings».
Step 3. Choose «Unlock SD card» and enter your password when needed.
Method 3. Remove Write Protection on the SD Card
Write protection on the SD card may also cause «SD card locked» error on your digital camera or mobile phone. Thus, removing write protection could be helpful in some cases. Here you can remove the «read-only» attribute using diskpart on computer.
Step 1. Connect your memory card into your computer via a card reader and run «Command Prompt» as an administrator.
Step 2. Enter diskpart and click «Yes» in the prompt asking for notification.
Step 3. Enter the following command in order:
list volume select volume X (Replace «X» with the number of your write-protected SD card.)
attributes disk clear readonly
If you don’t consider yourself a pro-computer user and you’re not familiar with command-lines, don’t worry. There are graphical-based solutions to help you remove write-protection from your hard drives, USB drives, and even SD cards.
EaseUS CleanGenius is one of these tools that helps you fix aforementioned issues on your drives without knowing a thing about command-line.
Here’s an easy-to-follow guide on how to use this tool to get your issues sorted:
Step 1: DOWNLOAD and install EaseUS CleanGenius (free) on your computer.
Step 2: Run EaseUS CleanGenius on your PC, select Optimization and choose the Write Protection mode.
Step 3: Select the device that is write-protected and click Disable to remove the protection.
Method 4. Format the Memory Card
If you don’t remember the password you set when lock your SD card or the tips above fail to fix «memory card locked» error on your storage device, you can only force unlock your memory card by formatting, which will erase all the existing files on your device. Besides, data erased by force unlocking your SD card is difficult to recover.
How to Recover Lost Files from Locked Memory Card
If you have successfully removed the error «memory card locked» but find there is data loss on your device, you can use EaseUS Data Recovery Wizard to recover the lost data. Besides, although retrieving the data erased by force unlocking the device is hard to get back, you can also try the software to scan for lost files.
To perform SD card data recovery:
Step 1. Connect the SD card, memory card, or CF Card to your computer and launch EaseUS memory card recovery software on your PC. The SD card will be listed under the Devices section. Choose the SD card and click «Scan» to start looking for your lost data.
Step 2. The software will start a scan automatically. The scan is powerful enough to find all lost files that even lost file names. After the scanning process, you can find deleted items from the tree-view panel on the left. Then, click «Filter» if you are looking for a specific file type, like photos, documents, videos or emails.
Step 3. You can directly double-click the files to preview the content. After this, you can choose wanted files and click «Recover» to restore them to a secure location on your PC or other external storage devices.
The Bottom Line
To fix a problem like «SD card locked» is always companied with data loss if you forget the password or the switch isn’t working. This should remind you of backing up data regularly. You can do back up your SD card by manually copying files to somewhere else, using free backup software or sync the files to the cloud storage. No matter which way you choose, taking action is the most important.
-
31.01.2017, 11:46
#1

Новичок
Carrier Vektor 1800 Mt ошибка а23
Всем доброго дня!Ситуация такая:после новогодних каникул поехал на загрузку,реф завёл и он выдал ошибку а23-перегрузка сети.Подскажите где что сломалось?Спасибо.
-
31.01.2017, 12:38
#2
Мастер
Это повышенный ток генератора.
В сервис,на диагностику.
-
28.02.2017, 09:47
#3
Новичок
Сообщение от sne
Это повышенный ток генератора.
В сервис,на диагностику.После неоднократных попыток установка всё-таки стала работать как и надо.Съездил уже два рейса всё нормально,только не может эта ошибка опять вылезти?


Похожие темы
-
Ответов: 16
Последнее сообщение: 13.03.2020, 07:24
-
Ответов: 24
Последнее сообщение: 23.08.2019, 18:45
-
Ответов: 8
Последнее сообщение: 06.05.2018, 17:33
-
Ответов: 6
Последнее сообщение: 10.06.2016, 08:46
-
Ответов: 3
Последнее сообщение: 24.11.2014, 19:36
Социальные закладки
Социальные закладки
-
Google

Ваши права

- Вы не можете создавать новые темы
- Вы не можете отвечать в темах
- Вы не можете прикреплять вложения
- Вы не можете редактировать свои сообщения
- BB коды Вкл.
- Смайлы Вкл.
- [IMG] код Вкл.
- [VIDEO] код Вкл.
- HTML код Выкл.
Правила форума
“Network locked SIM card inserted” or “Invalid SIM Card” is the error android users have reported while trying to activate a new SIM card on their phone. This can be caused by a series of problems. But, how to fix the error and get your SIM card to work on the device? What causes your android to show “Network locked SIM card inserted” messages? Let’s find the answers.
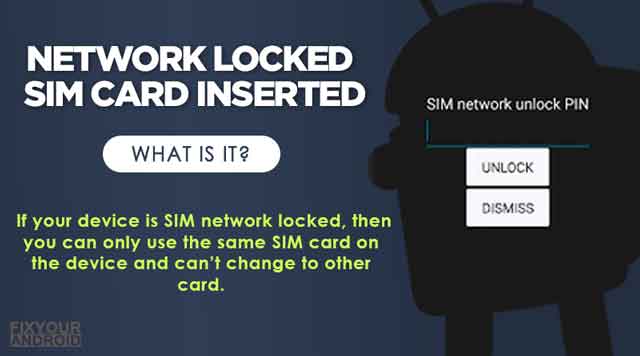
- An Invalid SIM card or Network locked SIM card error is associated with a network error at the end of the service provider.
- Shifting from one network provider to another may cause the Network locked SIM card error to appear.
- If your device is SIM network locked, then you can only use the same SIM card on the device and can’t change to other card.
The Network Locked SIM Card Inserted or invalid SIM card error comes into the surface when you try to switch the carrier provider on your device. There are, however several other reasons that might cause the error which we have discussed in the article.
Thankfully, the error can be resolved using simple methods that includes changing the service provider, upgrading the device, and others. Also, don’t forget to check the carrier status on phone settings of it’s marked as ‘No SIM Restrictions‘.
What Does Network Locked Sim Card Inserted Error Mean?
A network locked SIM card inserted simply signifies that the SIM card is not able to access the network settings or fails to connect to the network service provider. This can be caused by several reasons including a corrupt SIM card or UICC locked device.
Read Also: How to Fix Mobile Network State Disconnected: Sprint | AT & T | Tmobile
What Causes Network Locked SIM Card Inserted Error?
There are several reasons that may cause your android to show the network locked SIM card inserted error. A temporary local network error, damaged SIM card, physical damage to phone hardware or even corrupt firmware can also cause the SIM to unable to access the network and show the Network Error with SIM card.
Here are some major reasons that may cause the network locked SIM card inserted error;
1. Carrier Switching
Switching the service provider is one of the major reasons that may cause the device to show the “Network Locked SIM Card Inserted” error or an invalid sim card.
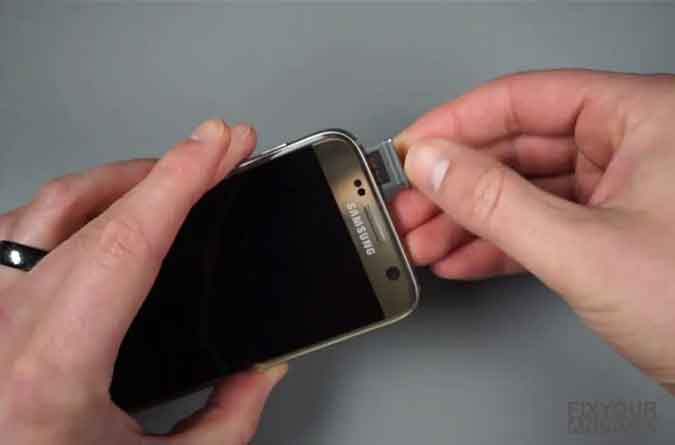
We often tend to switch the carrier provider from one to another because of heavy charges or network coverage issues. In such, the error pop-ups when the device is unable to register the SIM card with new service provider on the device.
2. Region Locked SIM
A Region looked SIM can also cause the network locked sim card inserted error that is related to the phone itself. Such phones are designed to use with a particular service provider and can’t be used with any other carrier providers.
Verizon, AT&T, Vodafone, and Straight Talk are well known for selling such devices to keep the customers stick using their network on the device. The process is called UICC Lock and the device can be used with SIM cards only provided by themself only.
Also, depending on the nation you’re in and the carrier you picked, a region lock may be activated. It is not feasible to use the Samsung phone outside of this zone.
Read More: What is Samsung CSC Code | Change CSC on Samsung Devices
3. Firmware Issue on the Device
In rare circumstances, the Firmware installed on the device can also lead to a network locked SIM card inserted error as well. This can be caused by some faulty firmware update.
Mobile manufacturers tend to launch security and firmware updates frequently which is actually good for the security of the device from Malware, Spyware or Hacking attacks.
But, any error on the Firmware can also interfere with the algorithm of the SIM card settings on the device which might lead to SIM card errors on the device.
Read Also: Do Android phones need antivirus or internet security apps?
There are other several reasons that include physical damage to the device or SIM or moisture on the device that can also cause the error but chances are nil.
Fixing the network locked SIM card inserted error doesn’t require any special or high level of technical knowledge. All you need is to follow the methods explained below to get rid of the error.
The network locked sim card error might ask you to the network pin to unlock the SIM. Now you may wonder; what this pin is and how can you get it.
Here are the three simple methods on how to unlock network-locked SIM cards.
1. Contact Carrier Provider
call your old service provider if you are getting the SIM card network lock error after changing the network provider. New will give you a 8-16 digit network PIN or network unlock code that will unlock the SIM with a new network provider.
Once you have this network lock PIN, simply follow these steps;
- Turn your smartphone off and insert the new SIM card.
- After restarting the device, it should prompt you for that code; input it, and you should be able to use it.
2. UICC Unlock
UICC Unlocking is a process you can follow to unlock a carrier locked or region locked smartphone to use with any other carrier provider and fix the network locked SIM card inserted error.
All the major Smartphone manufacturers like Samsung and others offer their smartphones at cheap dirt prices when bought with some specific carrier providers. These phones are
These smartphones are locked with pre-assigned carrier SIM cards and in order to use the SIM from any other network provider you need to unlock UICC on the device.
💡: Sadly, there are several software developers available online who claim to resolve the error with their so-called software. We have tried and tested most of them and found non of them working to resolve the locked SIM card inserted error on the device.
3. Repairing the Phone Firmware
If you are suddenly getting the Network locked SIM card error message on your device after restoring or updating, then the error can occur by the corrupt Firmware. You can either update to Firmware of the device or downgrade it to a lower version to fix the problem.
5. Use a Firmware Repair Tool
Alternatively, you can also use the firmware repair tool if the methods explained above don’t seem to work and you are still getting the same “Network Locked SIM card Inserted” error on the device.
4. Use Online Tool To Fix SIM Lock Error
For the Canada region, you can actually use the online unlock feature to fix the network locked SIM card error. You can simply follow this legal process tp unlock the device for network locked SIM. The service uses the IMEI of the device.
Here is how to do it;
- Reach out to the online unlocking services.
- The unlock details will be sent to your email.
- Key in the sim unlock pin when prompted.
- If you key the code correctly, an ‘unlock pin successful’ message appears on the screen.
Read Also: How to Fix Sim Not Provisioned Error on Android or iPhone
What is SIM Card Lock?
A SIM card lock protects your SIM from being used on other mobile devices. Follow the below steps to find out how to lock or unlock your SIM card.
- Open the Settings app.
- Tap Other security settings.
- Tap Set up SIM card lock.
- Enter your SIM card PIN, then tap OK.
- The default PIN number will depend on your network provider.
- You can also find your SIM card’s PIN number on the original packaging it came in.
- When the SIM card lock is activated, you can tap Change SIM card PIN to change to a new PIN number.
- To disable the SIM card lock, tap Lock SIM card again, then enter the PIN number.
I inserted a new SIM card and now it is asking me for a PIN or unlock code to unlock it
What is Network Lock
If you originally received your device from one network provider and your new SIM card is from a different network, the original network provider may have locked the device to their network.
Samsung does not lock any of its devices to any particular network. You will need to contact the original service provider or retailer to request an unlock code.
Some service providers may allow you to unlock the device for a small charge or for free, whereas others may not allow the device to be unlocked at all.
Final Words:
A Network Locked SIM Card Inserted error can pop-up when you try to activate a new SIM card on your device. This can occur if your device either have a region lock or carrier lock activated. This keeps you from using the SIM card on the device. The error can be resolved by asking the service provider for the SIM lock PIN. Alternatively, you can follow the methods to fix the network lock SIM card problem explained above. Also, don’t forget to read the TROUBLESHOOT section to find out other troubleshooting guides for android.
RELATED:
- How to Identify Sim Card Carrier on my Phone?
- How to Fix Sim Not Provisioned Error on Android or iPhone
- Why Does My Phone Say NO SIM? Reasons and Troubleshoots
- 10 Methods to Fix Invalid SIM Card Error on Android and iPhone
- “Number you have dialed is unallocated” What Does It Mean?
- Verizon LTE Not Working? How to Fix 4G Mobile Data Error on Verizon?
- Verizon No Network Connection Error | How to Fix?
- How to fix “Mobile network not available” error on android
When a device is locked to a certain mobile network carrier, the issue of carrier lock, often referred to as the SIM not supported message, manifests itself on an iPhone 14. This indicates that alternative SIM cards from carriers cannot be used with the device; only the SIM card provided by that carrier is compatible. For consumers who travel frequently or want to switch carriers for better service or lower prices, this can be a significant hassle.
Users who attempt to use a different SIM card on a carrier-locked device will often receive a notice on the screen that reads “SIM not supported” or “Invalid SIM card.” This might render the smartphone worthless by preventing users from placing calls, sending texts, or utilizing mobile data.
Several factors, including entering into a contract with a carrier, unpaid bills, or purchasing a device from a third party seller that did not unlock the device, might result in the carrier lock.
How we can Fix the SIM Not Supported Error for you
Are you fed up with having your iPhone 14 tied to one carrier and unable to use it with different SIM cards? Are you tired of your device’s “SIM not supported” message? UnlockMaker.com can assist you!
We are aware of how frustrating it may be to be constrained by a carrier and the restrictions it may impose on your iOS device. Because of this, we have developed a free web application that enables you to quickly and securely remove the carrier lock—also known as the SIM lock—from your iPhone 14.
You can use your device with any SIM card from any carrier thanks to UnlockMaker.com. This enables you to use your cellphone while going abroad without having to pay exorbitant roaming fees or change carriers for better service or more affordable pricing.
Our method is straightforward and simple to use. Visit UnlockMaker.com and adhere to the detailed instructions, that’s all. To ensure a successful unlock, our team of professionals will walk you through the procedure and offer pointers and troubleshooting guidance. The best part is that it is entirely free.
Stop letting carrier lock keep you back. You can use your iPhone 14 to its full potential and appreciate the flexibility of using any SIM card with the help of UnlockMaker.com. The “SIM not supported” notice can go away, and a world of opportunities can begin. Today, unlock your device by going to UnlockMaker.com!
Supported iPhone 14 Models:
- iPhone 14
- iPhone 14 Plus
- iPhone 14 Pro
- iPhone 14 Pro Max
Reasons your iPhone 14 is showing SIM Not Supported
When a mobile phone is “locked” to a certain mobile network carrier, it can only be used with SIM cards from that carrier. This is known as a carrier lock. This implies that even if a SIM card from another carrier is compatible with the phone, it cannot be used with it. This is done to entice clients to stick with a carrier and deter them from transferring to another one.
Reasons for Carrier Lock (SIM Not Supported) errors include:
- Your Mobile Phone Contract: As a requirement of the contract, the mobile network provider may lock the phone to their network. This guarantees that the client will keep using their services during the term of the contract.
- Unpaid Bills: If a customer owes money or is behind on payments, carriers may freeze a phone. To ensure that the client will pay their bills before they may use their phone again, this is done as a security measure.
- Improperly Unlocked: A phone may still be locked to the original carrier if it is purchased from a third-party seller. This might occur if the phone was improperly unlocked by the seller before being sold.
- Phone Financing: Some carriers allow customers to purchase phones through installment payments; in this scenario, the phone is locked to the carrier until the balance is paid in full.
- Purchasing a Phone from a Different Country: When purchasing a phone from a different country, it may already be tied to a local carrier. This may occur if the phone is solely meant to be used in that nation and cannot accept SIM cards from other nations.
- Reported as Stolen: Phone that has been reported lost or stolen may be locked by the carrier in order to stop unauthorized use.
These are the most frequent causes of carrier locking on phones. It is crucial to be aware of these causes and take preventative measures to make sure that, if desired, a phone is not tied to a certain carrier.
The Consequences of Carrier Lock on iPhone 14 Models
The following are some detrimental effects of carrier lock for mobile phone users:
- Utilization of other SIM cards is prohibited, which is the carrier lock’s primary and most noticeable side effect. This indicates that the phone is locked to a particular carrier and may only be used with SIM cards from that carrier. For consumers who travel frequently or want to switch carriers for better service or lower prices, this can be a significant hassle.
- Device functionality restrictions: When a phone is carrier locked, some features or apps might be disabled or have their operation restricted. This can encompass functions like Wi-Fi calling, tethering, and VoLTE (Voice over LTE), among others.
- Limited resale value: Because a carrier-locked phone can only be used with a certain carrier, its value may be lower than that of an unlocked phone.
- No choice of plans or pricing: When a user has a carrier lock, they are compelled to use the carrier’s plans and tariffs, which may not be the best options for them financially.
How to Use UnlockMaker to Remove Carrier Lock
This tutorial will walk you through how to use UnlockMaker to successfully unlock your device’s carrier lock. You will be able to unlock your iPhone and enjoy the freedom to use it with any carrier of your choosing with the help of simple instructions and step-by-step assistance. You may quickly and easily unlock your iPhone 14 by using this method to remove the carrier lock.
Start Unlocking your iPhone 14
You must enter your full name and an active email address in order to start the process of deleting “SIM not supported” from your iPhone (as you will receive a confirmation code there). Do not forget to tick the box to verify the validity of your email.
Provide the Details about your iPhone
The device displaying the “SIM Not Supported” screen must be chosen, and its IMEI number must be entered. Remember that the IMEI must belong to the iPhone that has to be unlocked and that the information must be accurate. Remember that the software from UnlockMaker will automatically delete all data from the iPhone for security reasons after the SIM limitation has been removed.
Watch the Instructional Video
Although the procedure is simple, UnlockMaker has produced a useful tutorial video in case you need help. Do not forget to tick the appropriate box to verify that you have watched the instructional video.
Create an Account to Get a Free Membership
You can skip this step if you already have an account with UnlockMaker and input the membership code you were given during prior interactions. If not, you must authenticate your identity and register for a website account. This account was created for security and privacy purposes. Keep in mind that the account is necessary for UnlockMaker to confirm your identity and make sure that only you have access to the iPhone SIM unlocking code that unlocks your iPhone.
Get the Unlocking Code
To download the iPhone SIM unlocking code with an account, first follow the on-screen instructions after entering the membership code that was sent to your email in the “reference number” box. Once you have it, use the code to unlock the SIM on your iPhone. Keep in mind that depending on your iPhone’s version, more procedures may be necessary to unlock it, and an update may also be required. After it is finished, you can use a new SIM card from any network provider.
Why to Choose UnlockMaker to Unlock your iPhone 14
With a number of advantages over competing similar services, UnlockMaker is a widely sought-after carrier lock removal service. The following are some of the main justifications for selecting UnlockMaker over other carrier lock removal solutions:
- Straightforward and Easy Procedure: Unlocking a device is frequently a difficult and perplexing process, but UnlockMaker makes it simple by giving clear instructions and a user-friendly interface. Because of this, unlocking your iPhone 14 is a quick and simple process.
- Free Service: UnlockMaker is absolutely free to use, unlike many other carrier lock removal services. This means that you may unlock your iPhone 14 for free, making it a cheap choice for anyone wishing to increase their device’s level of independence.
- Making any SIM Card from Any Carrier Usable: Your iPhone 14 can be used with any SIM card from any carrier once it has been unlocked. People who frequently travel or reside in places with spotty carrier coverage will find this to be especially helpful. When traveling, having an unlocked handset makes it simple to switch to a different carrier or buy a local SIM card, which can help you avoid paying roaming fees and guarantee that you always have access to a strong signal.
- Permanent Unlock: UnlockMaker permanently removes the carrier lock off your iPhone 14 in contrast to certain other carrier lock removal services. As a result, you won’t have to go through the unlocking procedure again in the future to use any SIM card from any carrier.
- Safe and Legal: UnlockMaker does not harm the device in any way and is entirely safe. This means that even after unlocking your iPhone 14, you can still use your warranty.
Sharing the tutorial with others who might be having the same issue is strongly encouraged if you have successfully used UnlockMaker to unlock your iPhone 14 from the carrier lock.
Many people don’t realize they can permanently unlock their device, or they may not be aware of how to accomplish it. You can assist others in obtaining the liberty and adaptability that come with an unlocked device by disseminating the tutorial.
Frequently asked Questions by Readers
Many people have come to UnlockMaker for assistance in resolving their iPhone 14 carrier lock issues. Over time, our readers have asked us a number of questions about this subject. Some of the most typical queries are listed below:
What does it mean by SIM Not Supported?
When a device says “SIM Not Supported,” it means that it cannot read or recognize the SIM card you have entered. This can be because of a number of things, including a hardware problem with the device, a software problem with the device, or an issue with the SIM card and the device’s compatibility. In some circumstances, this warning could also show up if the SIM card has been deactivated or is not active.
Why does my iPhone show SIM not supported?
The notice “SIM not supported” on your iPhone is probably a sign that it is restricted to a particular carrier. Both used and brand-new iPhones that have been purchased through a carrier may exhibit this problem. The gadget can only be used with a SIM card from the carrier to which it is locked, according to this. It would be necessary to unlock the smartphone in order to utilize a different SIM card. It’s crucial to remember that in order to avoid this problem when buying a used iPhone, it’s recommended to find out if the device is locked and if it works with your carrier.
How to activate iPhone if SIM is not supported?
There are a few things you can attempt to fix the “SIM Not Supported” error if you’re trying to activate an iPhone and getting the message:
- Ensure the SIM card is properly placed into the tray. The cut-off corner should line up with the cut-off corner of the tray when it is installed, with the metal contacts facing down.
- Switch off your iPhone. Slide the slider to switch off your iPhone after holding down the power button until the “slide to power off” message appears. Hold down the power button once more until the Apple logo shows after turning the device off.
- Test out a different SIM card. Try activating the iPhone with a different SIM card if the one you have doesn’t work with the device.
- Call the carrier to inquire. Contact the carrier if the issue continues to occur to see whether the SIM card needs to be provided or activated.
- Contact Apple. You might need to contact Apple for additional help if none of the aforementioned methods are successful. They could be able to assist you in figuring out the cause of the SIM card not being recognized.
It’s important to remember that before attempting to activate an iPhone with a different carrier if the problem is with a locked iPhone, you must make sure that it is unlocked from the original carrier.
How to fix SIM not supported for free?
An iPhone’s carrier lock can be removed with the aid of the service or online tool known as UnlockMaker, enabling you to use the smartphone with a new carrier. You won’t spend any money using this web application because it is free to use.
Using UnlockMaker can assist you in resolving the SIM Not Supported issue that appears on your iPhone. You can activate the iPhone by inserting a SIM card from a different carrier after the carrier lock has been removed.
Can I use my iPhone without a SIM card?
While an iPhone can operate without a SIM card, it cannot use cellular data or make or receive calls. Some functions, including Wi-Fi calling, and non-cellular data-required apps, will continue to function.