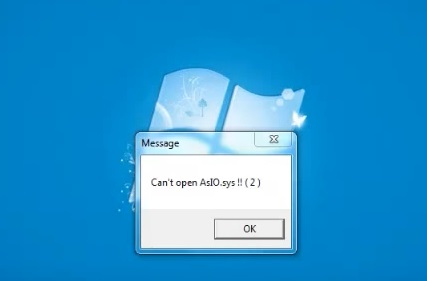
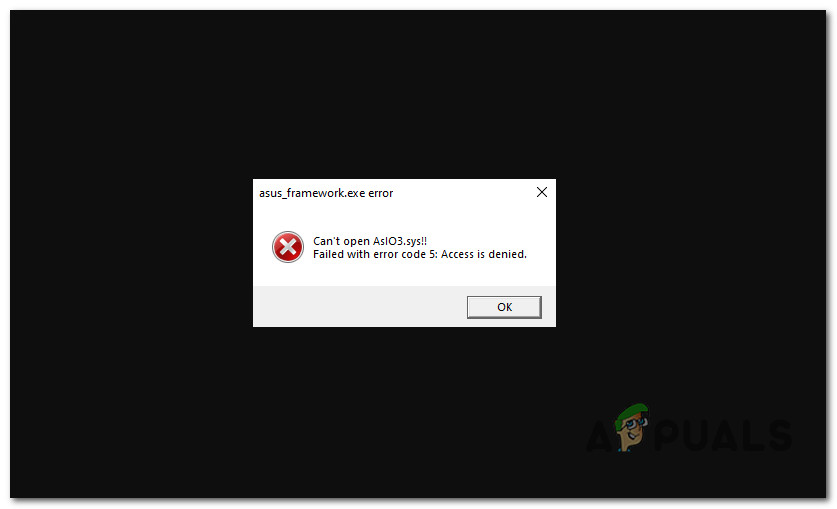
While installing or opening the ASUS utility or startup of Asus AI Suite and AURA the error comes with a popup notification saying Can’t open AsIO.sys !! ( 2 ).
This is a very common issue faced by a lot of Asus users. If you’re one of them and already get annoyed with this mess, then don’t worry.
In this article, we’re going to suggest to you all the relevant information about how to solve this error. So, stick with the article till the end.

Why Can’t Open AsIO sys 2 Error Occurs?
AsIO.sys is basically an Asus driver file that comes with the Asus motherboard preinstalled.
When the AsIO.dll file gets missing or corrupted or defective, the system can’t open or execute the AsIO.sys file, and then this error occurs.
To solve this error, you’ve to apply some effective methods. Jump to the next section to check them all.
How to Solve Can’t Open AsIO.sys !! ( 2 ) Error?
Here’re the possible solutions to this error. Check and apply them one by one until they get fixed.
Method 1: Unblock the Asus AI Suite
When you try to install the AI Suite and fail because of this error, then this method will get rid of it.
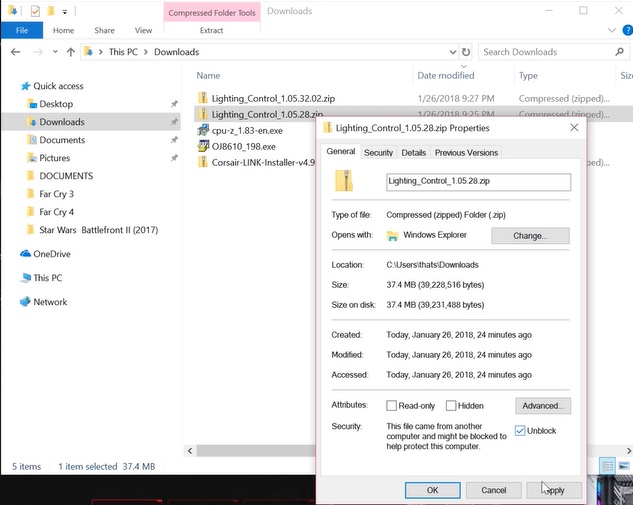
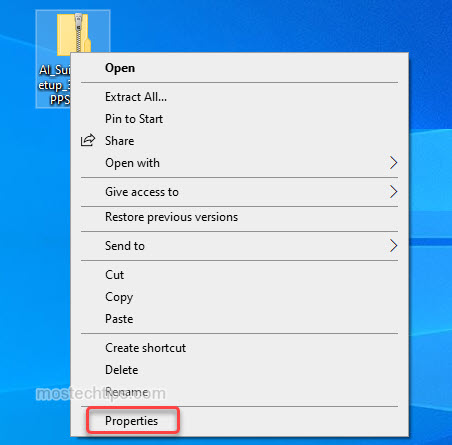
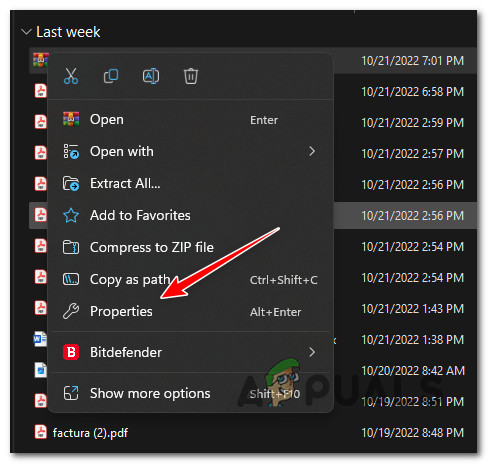
Step 1: Right-click on the downloaded AI Suite ZIP file.
Step 2: Select Properties.
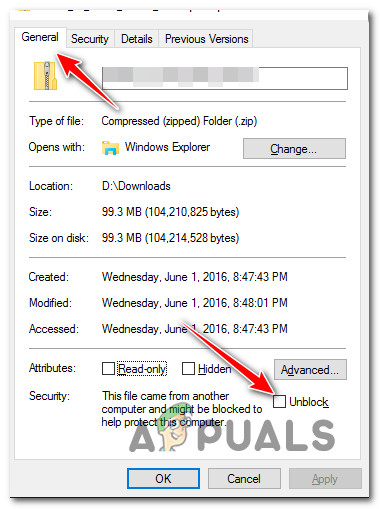
Step 3: Mark the Unblock box at the bottom and click OK.
Step 4: Now, open the ZIP file and extract the folder.
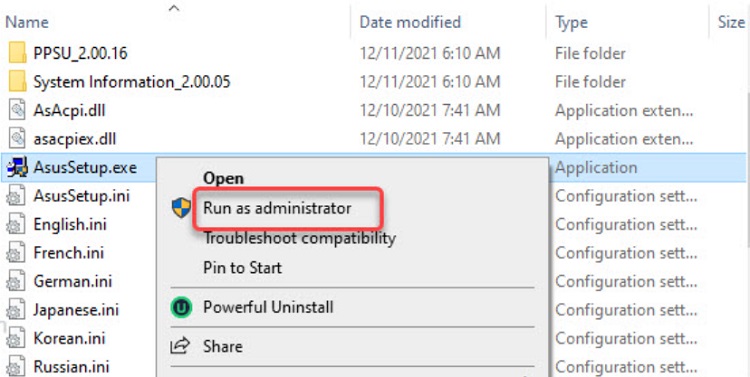
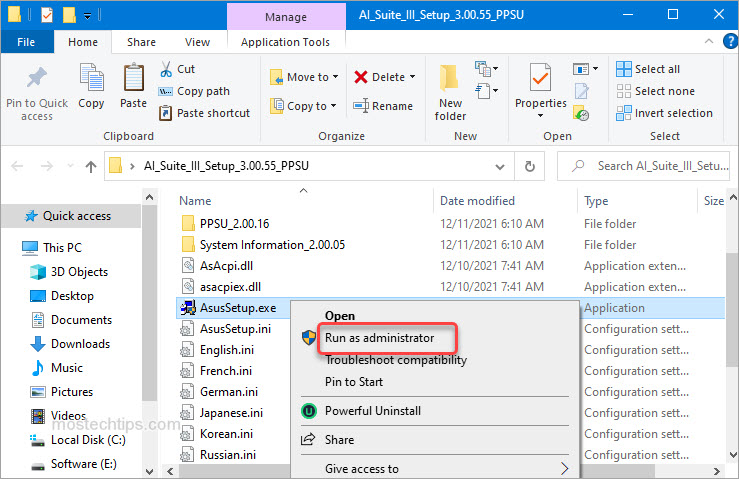
Step 5: Inside the folder, right-click on the AsusSetup.exe file and choose to Run as administrator.
In this way, you can successfully install the software.
Method 2: Replace AsIO.dll and AsIO.sys File
Another best solution to this error is replacing the AsIO.dll files and the AsIO.sys file according to the following ways –
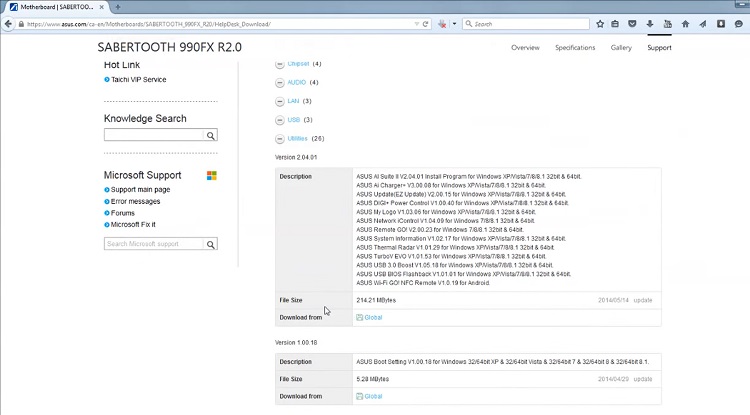
Step 1: Download the latest AI Suite package according to your motherboard from Asus’ official site.
Step 2: Open the ZIP file and extract the contained folder.
Step 3: After extracting, find the DrvResource folder inside this folder.
Step 4: Locate the folder named Io. It contains the AsIO.dll file.
Step 5: Now, navigate to the AI Suite Installation folder.
Step 6: Go to the search bar at the top-right corner and search for AsIO.dll.
Step 7: Then, replace all the AsIO.dll files with the one from DrvResource/Io.
Step 8: Ensure to replace all the AsIO.dll in the AI Suite installation folder.
Step 9: Now, navigate to local drive (C:) > Windows > SysWOW64 > drivers.
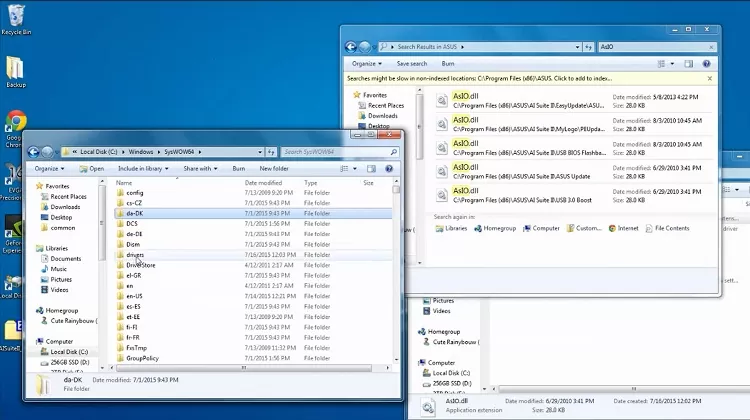
Step 10: Replace the AsIO.sys file with the one from DrvResource/Io according to your Windows version. Such as for 64-bit you should use AsIO64.sys file to replace. To do so –
- Delete the AsIO.sys file in drivers.
- Now copy the AsIO64.sys file from DrvResource/Io and paste it in drivers.
- Rename it as AsIO.sys.
Step 11: Close the windows and check if the error appears.
Method 3: Reinstall AI Suite
When the previous methods fail to solve the problem for you, it’s time to go for a fresh install of the program. But before doing so, you must do some initial things. Here’s the whole method –
Step 1: Uninstall the Asus AI Suite.
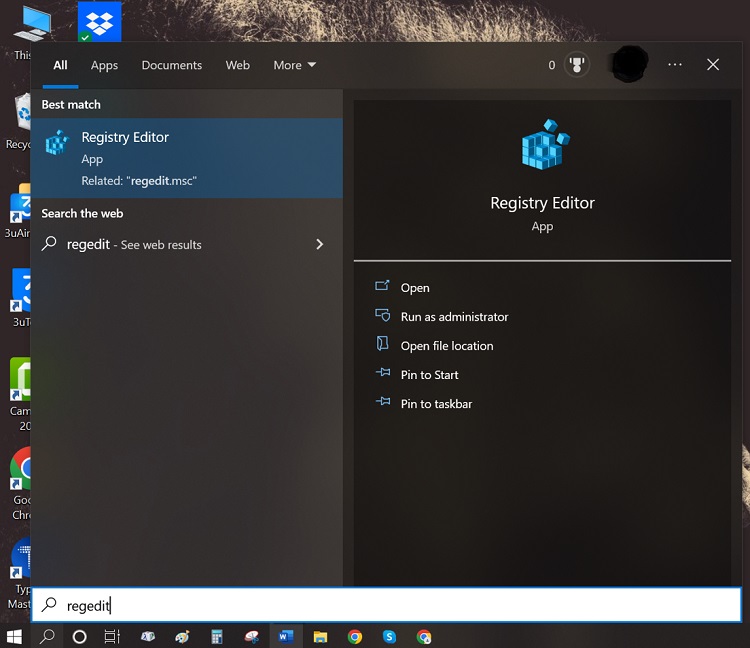
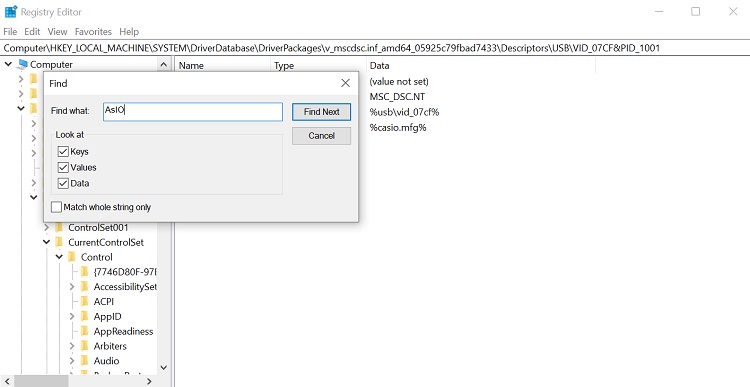
Step 2: Search for regedit in the search bar and select Registry Editor.
Step 3: Here, locate all entries related to AsIO.sys and delete them.
Step 4: Now, reinstall the Asus AI Suite.
There’s another method to solve this issue, but it’s a little bit more complex than the others. It’s not recommended to apply it first. Any of the first 3 methods should do the job for you. But if anyhow they all fail, you can try the following one.
Method 4: Grant Permission for AsIO.sys (Optional)
Step 1: First, log in with the administrative account.
Step 2: Navigate to the local drive (C:) > Windows > SysWOW64.
Step 3: Right-click on the drivers folder and select Properties.
Step 4: Open the Security tab and go to Edit.
Step 5: Now, select Add.
Step 6: Type Everyone in the box at the bottom and click OK.
Step 7: Return to the Security tab and select Advanced.
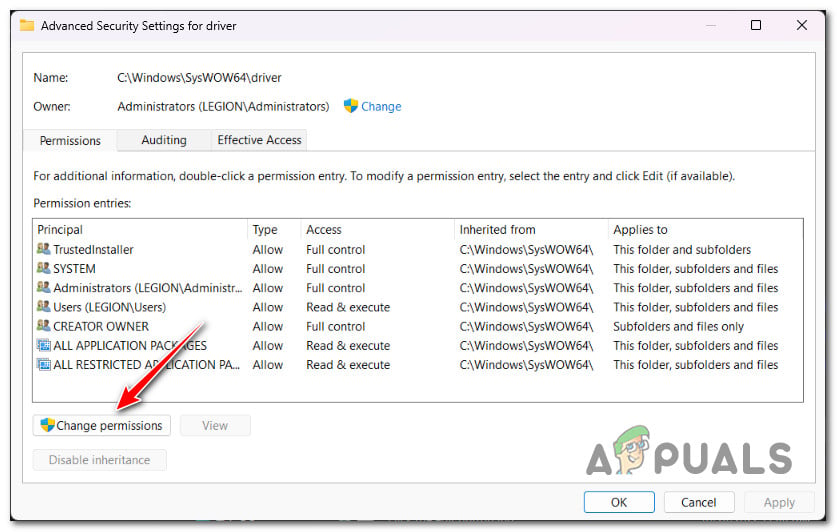
Step 8: Navigate Advanced Security Settings > Permissions. Select Change Permissions.
Step 9: Again, type Everyone in the box. Ensure the Replace owner on subcontainers and objects is marked.
Step 10: Open Auditing tab and select the owner as Add with Everyone.
Step 11: Set Everyone as the priciple and then locate Basic Authorization. Mark the Full control box.
Step 12: Finish the process and restart the computer.
Frequently Asked Questions (FAQs)
Can I delete the AsIO.sys file?
AsIO.sys is an important driver file of Asus Utility software. Without it, the software won’t function perfectly. So, you can surely delete it from the installation folder, but you shouldn’t if the utility program is essential for you. But you may delete it when it seems to cause a threat to your computer system.
How to launch ASIO panel?
The procedure is quite simple. First of all, press F10 and click on the speaker icon to access Audio Settings. Or you can access the Audio Settings from the Options menu. Then at the bottom-left, you can see the Show ASIO panel option. Click it to open the panel.
How to activate ASIO4ALL?
To do so, you should start by opening the Start menu and locating ASIO4ALL offline settings. After that, click the next button to choose your interface. Then open playback/input settings. Finally, choose ASIO4ALL as the playback/input device.
What is the cause behind Can’t open AsIO3.sys error?
It occurs when somehow your computer hard drives get corrupted or have bad sectors and affect the utility installation folder. That means if the AsIO3.sys file is being defective by the hard drive corruption then this error shows up.
Conclusion
That’s all about the error. If you’re able to apply these methods successfully, then you may overcome this problem with ease. If you think you get any help from this post then don’t forget to share your valuable feedback with us.
The error “can’t open AsIO.sys” can occur at startup, installing or opening an ASUS utility. If you’re experiencing this error, don’t worry. The tips below may help you fix the error.
What’s AsIO.sys?
AsIO.sys is a driver file that belongs to ASUS. Usually it’s preinstalled on your ASUS computer and installed along with the ASUS motherboard. The error “can’t open AsIO.sys” is one of the common errors that ASUS users have reported. It usually occurs to AURA & AI Suite.
You may encounter this error whenever you start your computer, or when you install AURA or AI Suite. Select one of the links below for the fix depending on your situation.
Fix: If you run into this error when you open AURA or AI Suite
Fix: If you run into this error when you install AURA or AI Suite
Fix: If you run into this error When you start your computer
Fix: If you run into this error when you open AURA or AI Suite
The message “can’t open AsIO.sys” can pop up at opening AURA or AI Suite. To fix the error, you just need to run the utility as administrator.
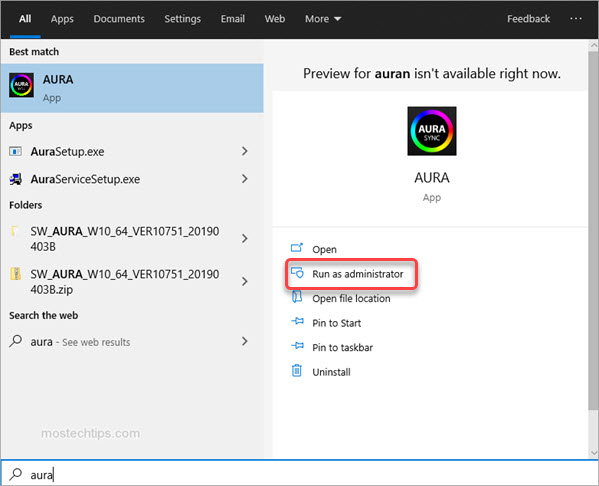
1) On your keyboard, press the Windows logo key.
2) Type the utility you have the problem with (AURA or AI Suite), and then click on Run as administrator. Then you should be able to open the program.
Fix: If you run into this error when you install AURA or AI Suite
Many users have reported that this error occurs when they install AURA or AI Suite (I, II or III). If you also can’t install AURA or AI Suite due to this error, you can follow these steps to fix it.
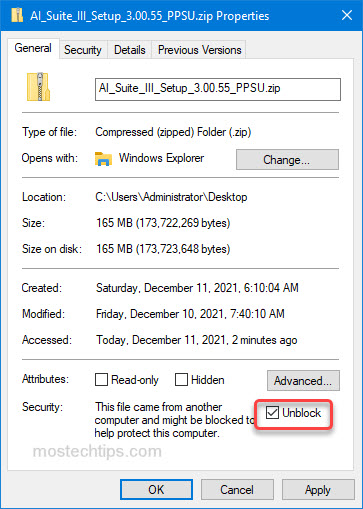
1) Right-click on the downloaded file of the utility (the zip file) and select Properties.
2) At the bottom, tick the “Unblock” checkbox, and then click OK to save the changes.

3) Extract the zip file.
4) Open the extracted folder and then locate the file called “AsusSetup.exe”.
5) Right-click on “AsusSetup.exe” and select Run as administrator. Then you should install the utility successfully.

Fix: If you run into this error When you start your computer
If this error message pops up at startup, the ASUS utilities (usually, AURA or AI Suite) could be the culprit.
If you have multiple ASUS utilities installed, to figure out which utility is causing the problem, you can uninstall them one by one then you can determine which one is causing the problem. If you only have one ASUS utility installed, just uninstall it and reinstall it as administrator.
Here’s how to do it:
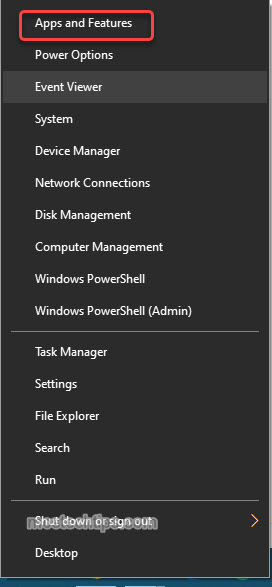
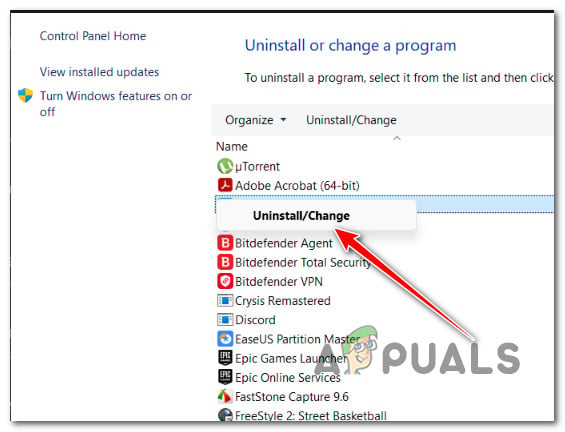
1) Right-click on the Start menu button and select Apps and Features.
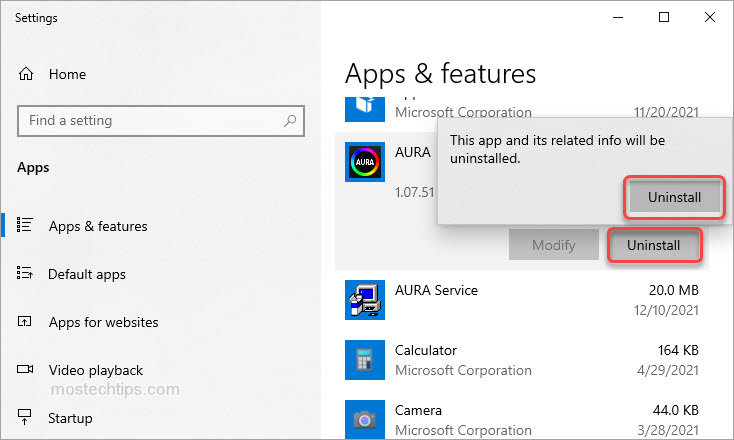
2) Scroll down and select one of the ASUS utilities.
3) Click Uninstall, then the confirmation dialog will pop up, then click Uninstall again.
4) Once the uninstallation is done, restart your computer and check to see if the error still occurs.
If the error still occurs, it means that utility is not the cause. If you have multiple ASUS utilities installed, repeat the steps above until you figure out the one that’s causing the problem.
Once you figure out and uninstall the utility that’s causing the problem, you can reinstall it by following these steps:
a) Right-click on the downloaded file of the utility (.zip file) and select Properties.

b) At the bottom, tick the “Unblock” check box, and then click OK to save the changes.
c) Extract the zip file.
d) Open the extracted folder and locate the file called “AsusSetup.exe”.
e) Right-click on “AsusSetup.exe” and select Run as administrator.
Hopefully you can fix the “Can’t open AsIO.sys” with the above tips. If you have any questions, feel free to drop a comment below. I’ll get back to you ASAP.
If you’re getting the ‘Can’t open AsIO3.sys – Failed with error code 5: Access is denied‘ error when attempting to install AURA Sync or another ASUS-related software on your PC; this article will help you fix it. We will dive into all the variations of this issue (on Windows 10 and Windows 11) and feature every confirmed fix that other users have used successfully.
As you’ll see below, this error has a huge variety of potential culprits, as there are a lot of potential conflicts that might cause the “Can’t open asio3.sys” error.
1. Unblock the zip file
One of the most popular reasons this issue occurs is because the .zip file that you download (containing software that uses the AsIO3.sys) is blocked.
This issue is known to occur with older software builds – Until recently, every .zip file downloaded from the official ASUS support website was blocked.
To fix this issue and get around the ‘Can’t open AsIO3.sys‘, you’ll need to access the Properties screen of the .zip file and unblock it before carrying on the installation.
For specific instructions on how to do this, follow the steps below:
- Open File Explorer and navigate to the location of the .zip file.
- Right-click on it and choose Properties from the context menu that just appeared.

Access the Properties screen - Once you’re inside the Properties screen of the .zip file, access the General tab.
- Scroll down to the bottom of the page and see if you have a Security entry.
- Check the Unblock button before clicking on Apply if you spot a Security layer.

Unblock the .zip file - At the confirmation prompt, click Yes, then wait until the file is unblocked.
- Double-click on the recently unblocked .zip file and extract the files before carrying on the installation normally.
- Double-click on the executable and see if it produces the same ‘Can’t open AsIO3.sys’ error.
If the problem is still not fixed, move to the next method below.
2. Grant yourself full permission for AsIO.sys (if applicable)
If the method above didn’t work for you and you already have installed ASUS drivers, the problematic AsIO.sys file is already installed on your PC.
You might be experiencing this issue because the file doesn’t have full permission to jump into action when called by Windows Installer (during the installation of another ASUS software).
Note This is typically confirmed to occur on systems with aggressive UAC (User Account Control) settings.
To address this issue, go to C:\Windows\SysWOW64\drivers\AsIO.sys and give yourself permission through the security tab. This fix was confirmed to work by most users dealing with the ‘Can’t open AsIO3.sys‘ error.
Important: This method is only applicable if you previously installed another ASUS software and the AsIO.sys supporting file is already installed on your PC.
Here’s what you need to do:
- Start by ensuring that you are logged in with an administrative account.
- Open File Explorer (Windows key + E) and navigate to the following location:
C:\Windows\SysWOW64\
Note: If you can’t spot the AsIO.sys file inside this directory, this method does not apply to you. In this case, skip to the next method below.
- Right-click the drivers folder and choose Properties from the menu that appears.

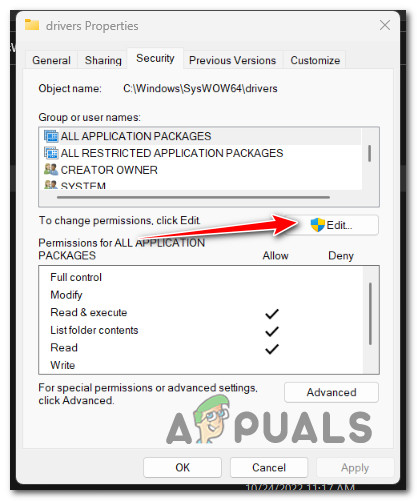
Access the Properties screen of drivers - On the Properties screen of the drivers folder, go to the Security tab and click the Edit button (near Change Permissions, click Edit).

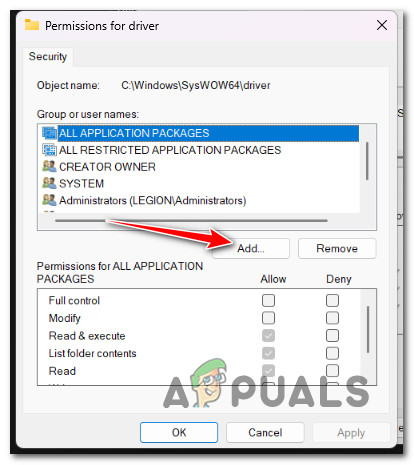
Click on the Edit button - On the Security tab, click the Add button next to Group or user names.

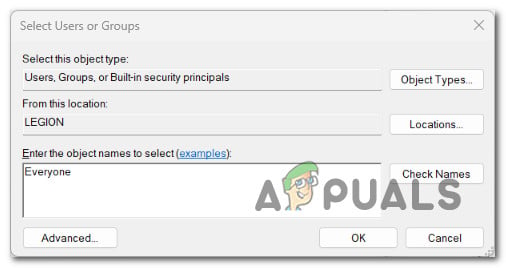
Adding new security for user - In the Select Users or Groups window, type Everyone in the box next to Enter the object names to select (examples), and click OK to save the changes.

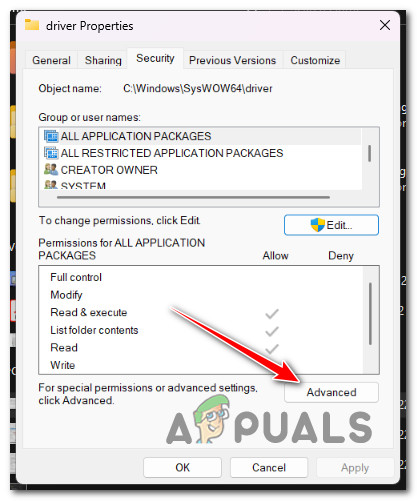
Apply security rule for everyone - Click “Apply” to keep your changes.
- Go back to the volume’s Properties and click on the Security tab. This time, click on the Advanced button (associated with Special permissions or advanced settings)
Access the Advanced Permissions settings - Go to the Permissions tab in the Advanced Security Settings box and click on Change Permissions.

Changing Permissions - In the “Enter the object name to select” field of the “Select User or Group” window, type “Everyone.”
- Make sure the Replace owner on subcontainers and objects option is checked.
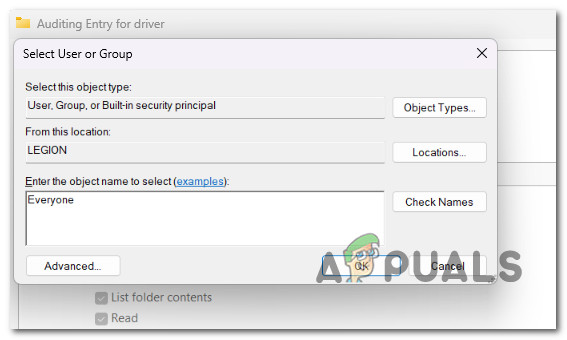
- Click the Auditing tab and click Add with Everyone as the owner.
- Choose Everyone as the Principal under the Auditing Entry, then go to the Basic Authorization section and check the box next to Full control.

Setting up the ‘Everyone’ value as Principal for every group - Finally, click Ok and then Apply to save the changes.
- Restart your computer and attempt to install the ASUS software once again.

If you’re still seeing the ‘Can’t open AsIO3.sys’ error, try the next method below.
3. Perform SFC & DISM scans
If you’ve reached this point without a workable solution, you should check to see if a corrupted system file prevents you from installing ASUS software (and triggering the ‘Can’t open AsIO3.sys’ error).
If you don’t want to use third-party tools, it would be smart to use a few of your operating system’s tools. (SFC and DISM).
System File Checker and Deployment Image Servicing and Management are two built-in tools that can be used to fix corrupt system files that may stop your OS from utilizing Windows Install dependencies.
System File Checker is the best place to start because it can be run without an internet connection. Follow these steps to deploy an SFC scan.
Important: If the System File Checker scan window stops responding while running, DO NOT CLOSE THE WINDOW until the procedure is done.
Note: System File Checker swaps out broken parts of system files with working ones by using a cache that is stored locally. This process shouldn’t be stopped until it’s done to avoid making more logical mistakes. Using an old HDD instead of a modern SSD could take an hour or more (depending on how fast your storage device can read and write).
When the SFC scan is done, restart your computer to see if the ‘Can’t open AsIO3.sys’ error is fixed.
If the problem is still there, deploy a DISM scan.
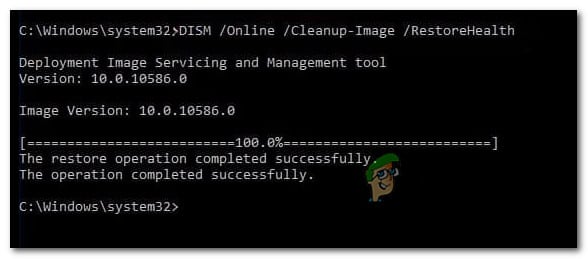
Before you start this process, you should know that DISM uses a part of Windows Update to replace corrupted files with ones that aren’t corrupted. This means that your Internet connection needs to be stable.
After the SFC and DISM checks, you should restart your computer to see if you’re still experiencing the ‘Can’t open AsIO3.sys’ error.
If the problem keeps happening, move on to the next method below.
4. Install ASUS Armory Crate (if applicable)
Even if you’re not a fan of bloatware (we aren’t either), you should still consider installing the ASUS Armory Crate utility – it will most likely fix the issue automatically.
Note: Armoury Crate is an integration app for gaming laptops and desktops in the ROG and TUF series. It combines different functions, such as the ROG Gaming Center from Gaming NB, the AEGIS III from Gaming DT, Lighting, and AURA Sync from AURA. Installing it serves our purpose of installing all the required dependencies (including the asio3.sys dependency).
The only bad thing about this integration app is that it also installs some bloatware from ASUS. But for the most part, these are non-intrusive and won’t slow down your system.
Follow the instructions below to download and install ASUS Armory Crate:
Important: Only follow the instructions below if you are experiencing this issue on a ROG or TUF gaming laptop.
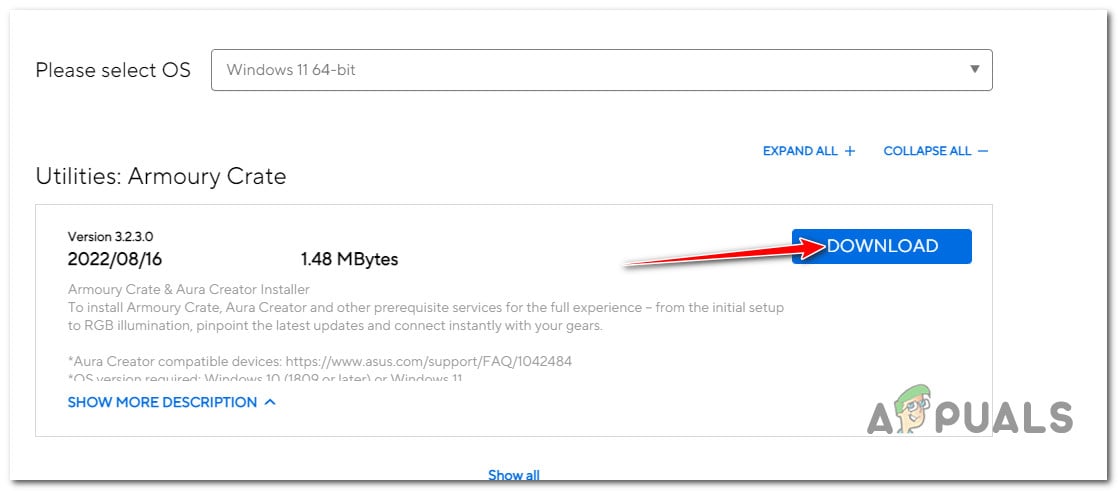
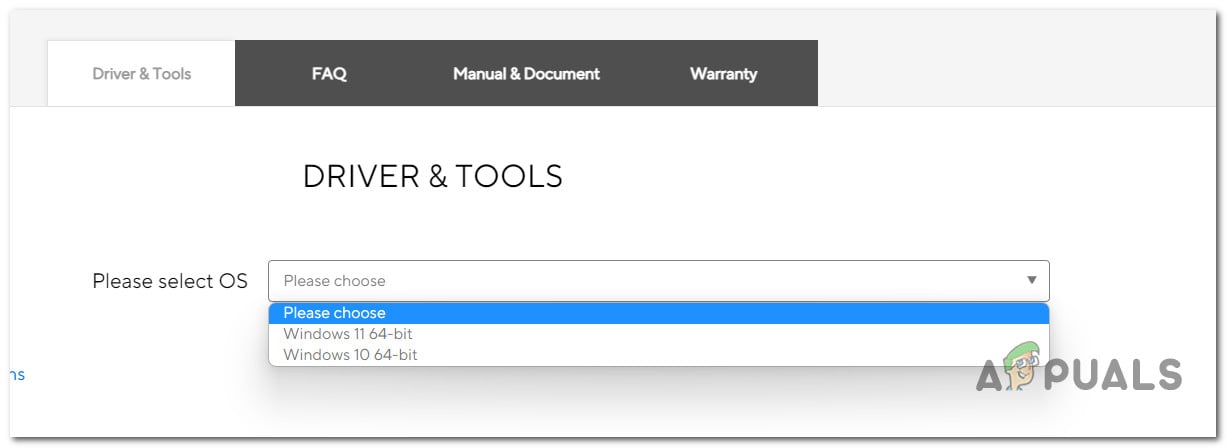
- Open your browser and navigate to the official download page of ASUS Armory Crate.
- From the Please select OS drop-down menu, select your operating system.
- Next, click on the Download button associated with the recommended version of Armory Crate.

Downloading the ASUS Armory Crate installation executable - Once the executable has been downloaded, extract it using the built-in utility or a 3rd party suite like WinZip or WinRar.
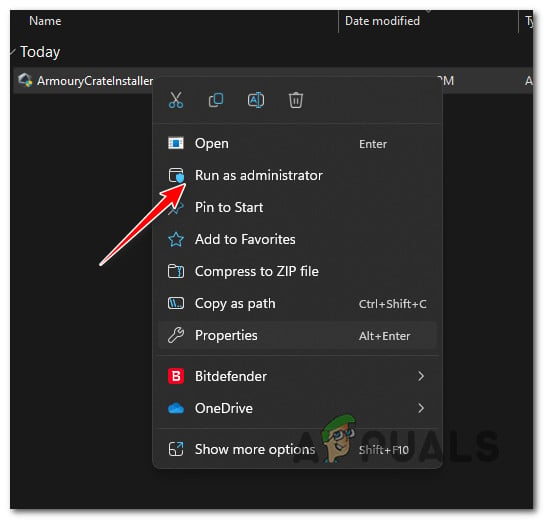
- Next, right-click on the ArmouryCrateInstaller.exe and click on Run as Administrator from the context menu.

Run the executable as administrator - Follow the remaining instructions to complete the installation, then reboot your PC.
- Once the next startup is complete, repeat the previous action causing the ‘Can’t open AsIO3.sys – Failed with error code 5: Access is denied’ error and see if the problem is now fixed.
If the problem is still not fixed, move down to the next method below where we explore a potential issue caused by Windows Update.
5. Uninstall the latest Windows Security Update
This problem is also caused by a bad Windows security update that Microsoft released for Insider Previews and retail versions on some ASUS laptop models.
If the “Can’t open AsIO3.sys” error started showing up after your operating system installed a security update, uninstalling it should fix the problem for you.
Follow the steps below to get rid of the latest Windows update:
Important: You can hide the update and stop it from being installed again by following the extra instructions.
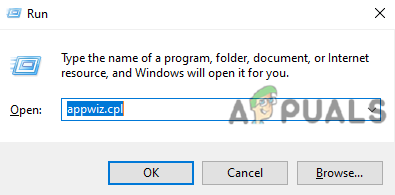
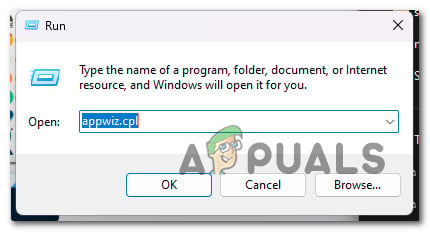
- Use the Windows key + R to get to the Run box and the Programs and Features page.
- Then type “appwiz.cpl” into the text box where you just typed it.

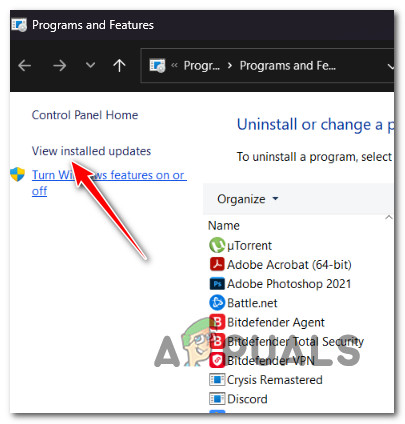
Open the Programs and Features menu - Go to Programs and Features, and then choose View installed updates from the left-hand menu.

View the recently installed Windows Updates - On the Installed Updates page, look for the most recent update and right-click on it. From the menu that pops up, click Uninstall.

Uninstall the Windows Update that was installed recently - When asked if you want to get rid of the update, choose “Yes.” Let the uninstalling process finish by saying “Yes” when asked to do so.
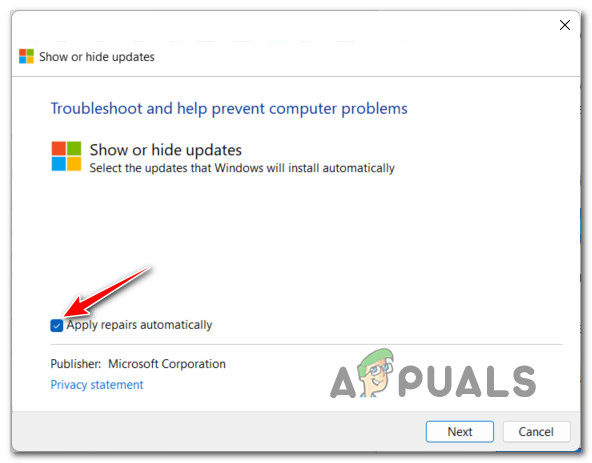
- It would be best if you didn’t restart your computer after removing the update. Instead, go to the official site where you can download the Microsoft Show or Hide troubleshooter.
- We should start downloading the tool we’ll be using right away.
- After the process, open the .diagcab file and click on Advanced.
- Select the box next to Apply Repairs Automatically and then click Next.

Applying the repairs automatically when using Windows Show / Hide Troubleshooter Note: The program will look through your computer for updates that haven’t been downloaded yet. Choose Hide Updates from the list of options on the next screen to hide updates.
- On the next page, click Next and check the box next to the most recent Windows update. If you do this, the system won’t try to install the same update again.
- Restart your computer once to see if the problem has been fixed.
If the problem is still not fixed, move to the next method below.
6. Install ASUS AI Suite addon (if applicable)
If you followed the method above to troubleshoot an issue caused by a bad windows update, let’s troubleshoot against a potential issue caused by ASUS AI Suite.
If you have this tool installed on your PC, you might want to check if the tool has an available add-on waiting to be installed.
Note: ASUS has released an add-on to tackle this issue for certain laptop models. This will be applied to your existing installation using the manual updating solution from ASUS.
Remember that ASUS AI Suite doesn’t have a dynamic self-updating feature. If you want to ensure that they’re updated to the latest version, you’ll need to run the AsusSetup executable (which can be found inside the download folder) and follow the instructions to install every pending addon.
Here’s what you need to do to install pending add-ons for your ASUS AI suite:
- First, close any currently running 3rd party applications (including ASUS AI Suite).
- Open your browser and download the latest compatible version of ASUS AI Suite (according to your motherboard or laptop model) from the official ASUS download website.
- Next, navigate to the location where you downloaded the latest version of AI Suite and extract the .zip archive.
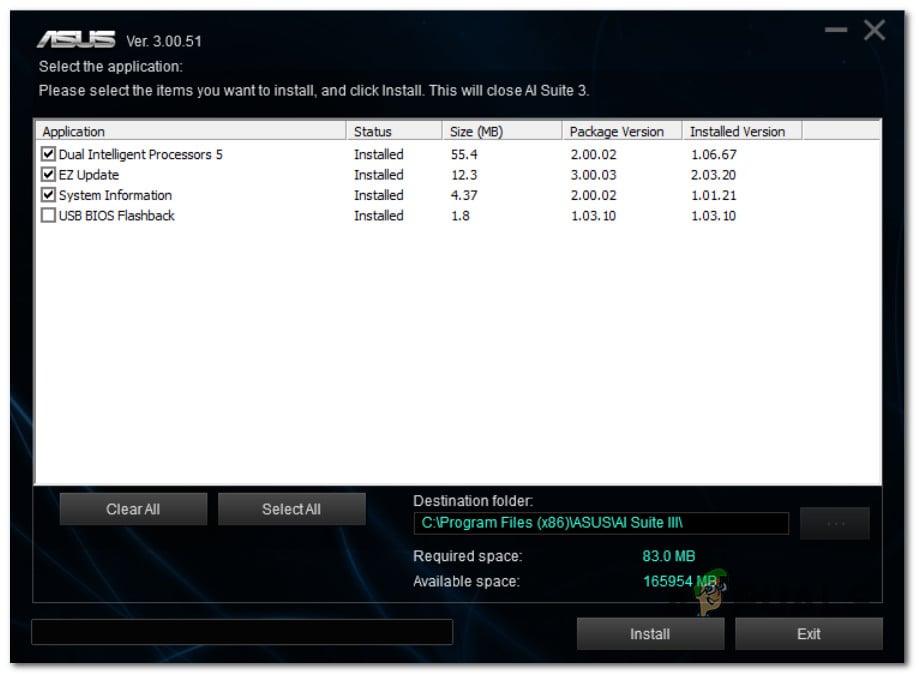
- Access the extracted folder, right-click on AsusSetup, and click on Run as Administrator from the context menu that just appeared.

Run the AsusSetup executable with administrative access - Click Yes to grant admin access at the User Account Control (UAC).
- Once you get to the next screen, check every ASUS application box and click on Install to update every underlying application to the latest version.

Update the ASUS suite to the latest version - At the end of this process, the installer will confirm that the AI Suite has been updated to the latest version. Click Ok to finish the process.
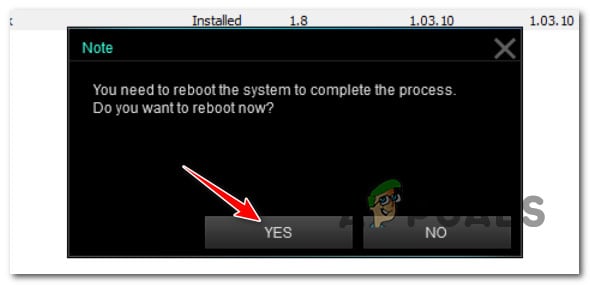
- Next, you will be prompted to reboot your PC. Do so by clicking Yes.

Confirm the reboot operation - Once the next startup is complete, repeat the action causing the asio3.sys error and see if the problem is now fixed.
If the problem is still not fixed or this method is not applicable, move down to the next method below.
7. Use System Restore to revert the installation of ASUS AI Suite
If this issue started after you updated your ASUS AI Suite version to the latest version, you might be able to revert to a version that doesn’t produce this behavior.
Unfortunately, ASUS only has the latest build of ASUS AI Suite available on their official download website. Your only solution (unless you want to use a 3rd party service like Oldversion.com) is to use System Restore.
Note: System Restore will allow you to revert your system to a previous state in time. By default, this utility is configured to automatically create new restore snapshots at important system events (such as installing a new update for an existing app).
If you didn’t modify the default behavior of System Restore, you should have a restore snapshot created just before the installation of the ASUS AI Suite update.
Follow the instructions below to use System Restore to revert ASUS AI Suite to a previous version:
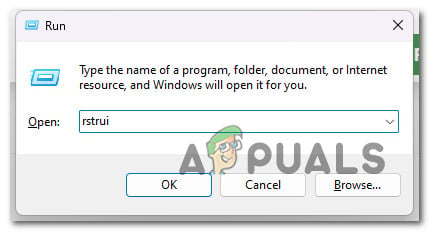
- Open the Run dialog box, type “rstrui,” and press Enter to launch the System Restore wizard.

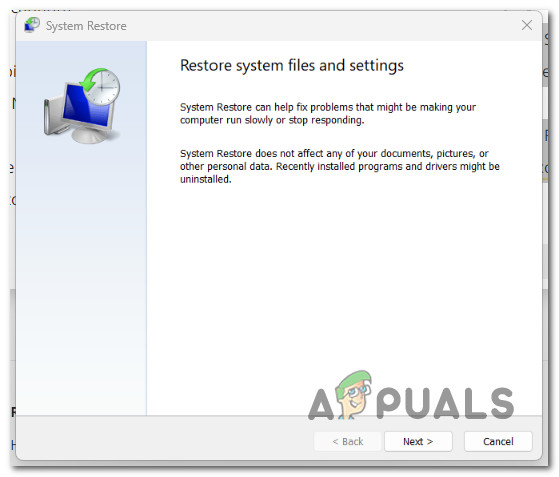
Open Restore point - Click Yes if the User Account Control asks you to provide admin access.
- To proceed, click Next on the System Restore window’s first screen.

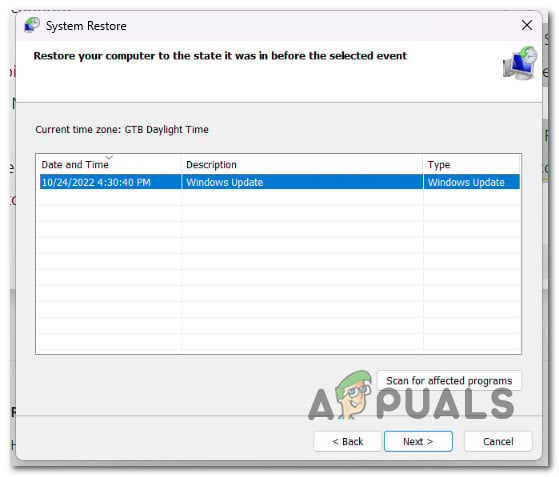
Get past the initial System Restore screen - Before clicking Next, pick a reliable restore point. If you don’t see the restore point created just before the update of the ASUS AI suite, check the box next to Show more restore points.
- Select a restore point produced before you first ran into the ‘Can’t Open asio3.sys’ error, then click Next to begin the restoration process.
Selecting a viable Restore Point - Restart your computer and repeat the action that was previously causing the issue with asio.sys.
If the problem is still not fixed, move to the next method below.
8. Uninstall Armory Crate using a dedicated uninstaller
If you started experiencing this issue after installing or updating the Armory Crate utility from ASUS, you are not the only one affected by this issue.
We’ve identified dozens of user reports experiencing the same Can’t open AsIO3.sys error due to a bad version of Armory Crate.
To fix it, you’ll have to uninstall the utility.
Important: If you install this suite conventionally (via Programs and Features), chances are you will still experience this issue. Our advice is to use the dedicated Armoury Crate uninstaller.
Here’s how to uninstall Armory Crate using the dedicated uninstaller:
- First, close every 3rd party application (including any utility from ASUS).
- Open any browser and access the official Armory Crate download site.
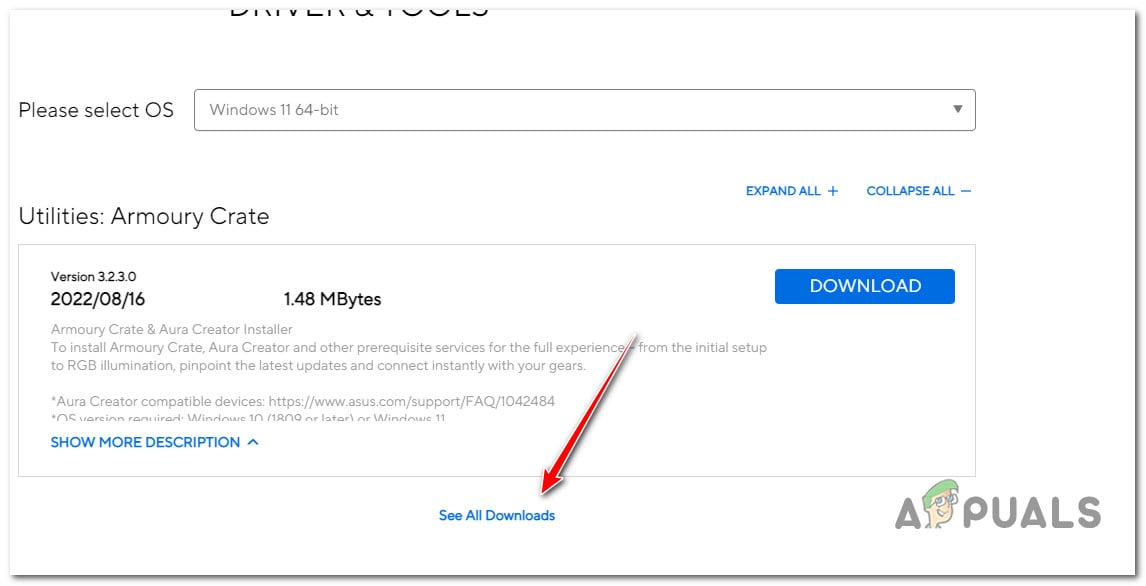
- On the official download website, start by selecting your OS to get the correct download version.

Selecting the correct OS version - After selecting your OS, you will only see the latest version of Armory Crate. When this happens, click on See All Downloads.

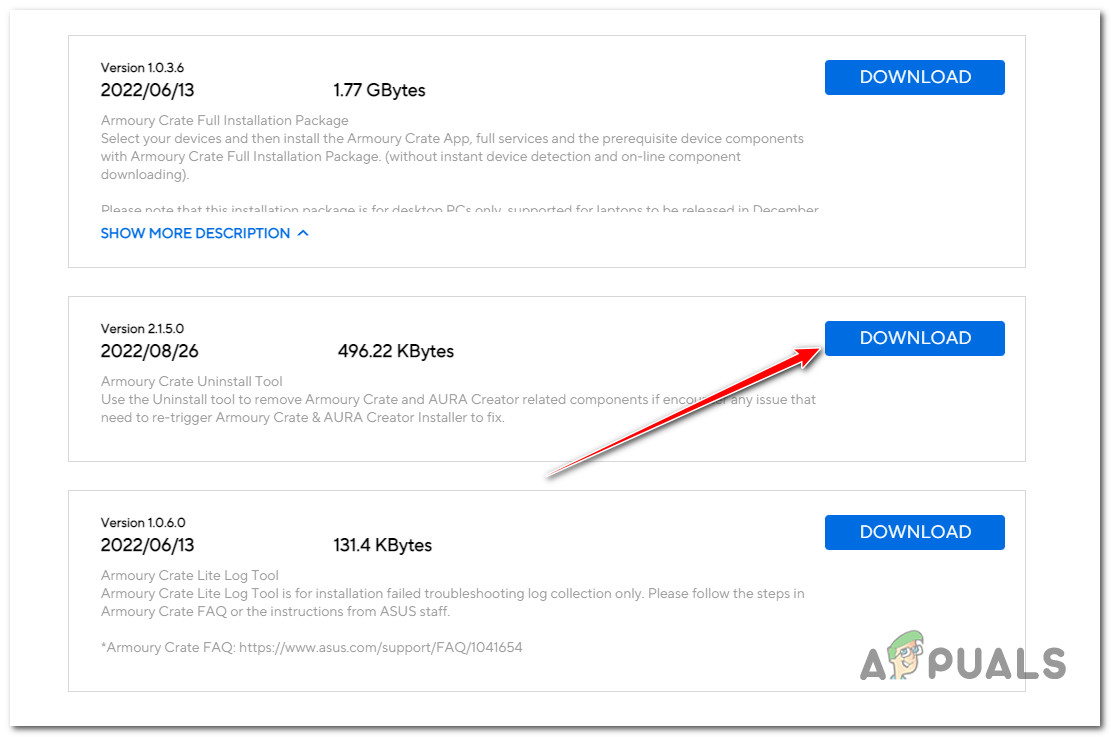
Viewing all available updates - Scroll down to the bottom and locate the Download button associated with the Armoury Crate Uninstall Tool. Click on it.

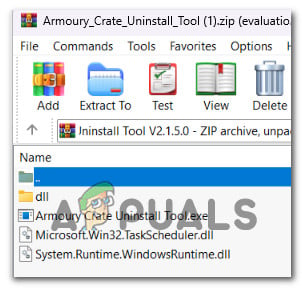
Downloading the correct uninstaller - Once the download is complete, extract the archive.

Extracting the uninstaller Note: You can use the built-in extraction tool (if applicable) or go for a third party solution (like WinZip or WinRar)
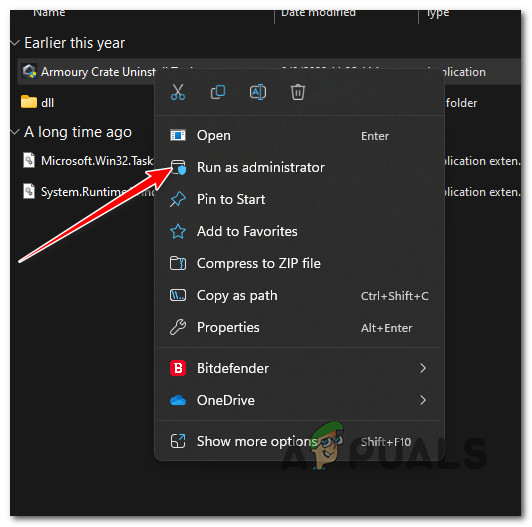
- Once the extraction is complete, right-click on Armoury Crate Uninstall Tool.exe and choose Run As Administrator from the context menu.

Running as administrator - At the User Account Control, click Yes to grant admin access.
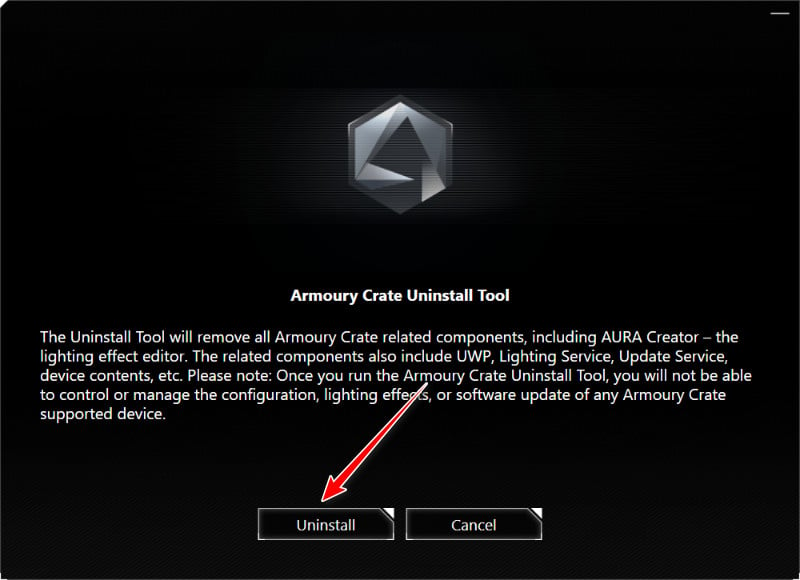
- Next, click Uninstall to begin the operation and confirm at the next prompt.

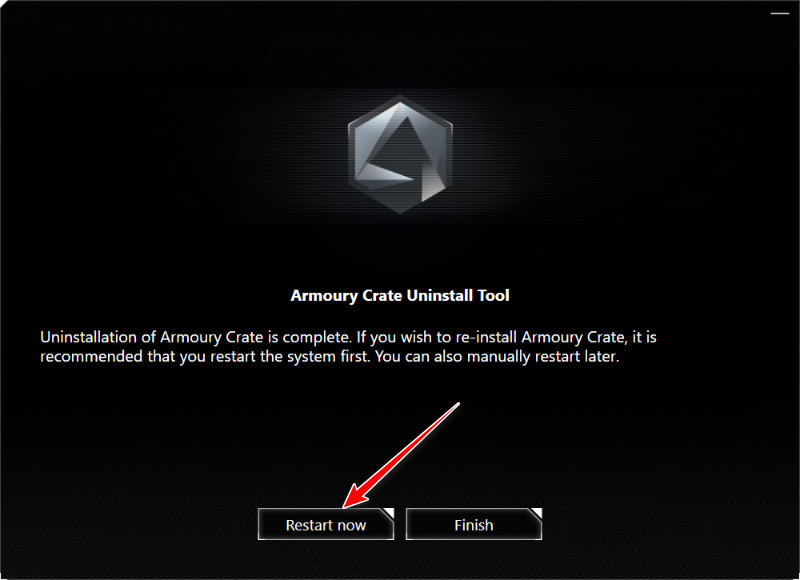
Uninstalling the Armoury Crate - Once the uninstallation is complete, click on Restart Now and wait until your PC boots back up.
Restarting the PC after uninstallation - Repeat the action causing the error and see if it’s fixed.
If you’re still experiencing the ‘Can’t open AsIO3.sys error, move down to the next method below.
9. Enable AsusCertService
If you’re using an aggressive system optimizer suite, there’s a big chance that it ends up blocking the AsusCertService to improve the RAM usage of your PC.
This might be the cause of why you are seeing the ‘Can’t open AsIO3.sys error when opening ASUS applications (because this important dependency is inaccessible).
Fortunately, the fix for this particular issue is simple. You need to access your Service settings and ensure that AsusCertService service is enabled and configured to start at every system start.
Here’s how to do this:
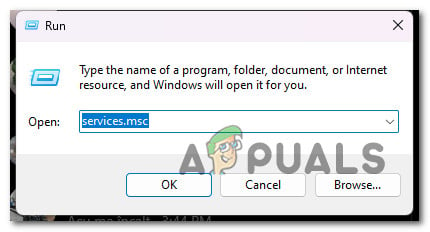
- Press Windows key + R to open up a Run dialog box.
- Next, type ‘services.msc’ inside the text box and press Ctrl + Shift + Enter to open the Services screen with admin access.
Accessing the Services screen - At the User Account Control (UAC), click Yes to grant admin access.
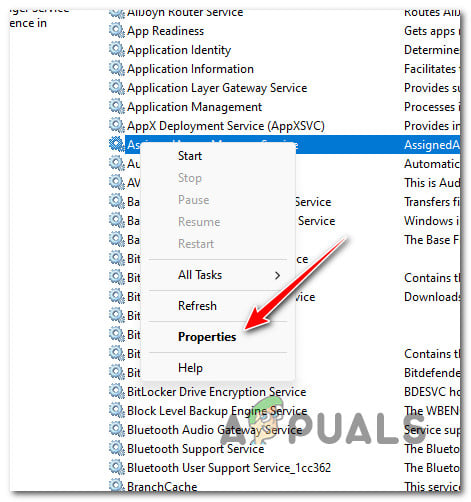
- Once inside the Services screen, use the right-hand pane to locate the Asus Certificate Service.
- Right-click on it and choose Properties from the context menu.

Accessing the Properties screen of AsusCertService - From the next screen, set the Startup Type to Automatic, then click on Start to start the service.
- Click Apply to save the changes.
- Repeat the action that was causing the ‘Can’t open AsIO3.sys’ error and see if the problem is now fixed.
If the problem is still not fixed, move down below.
10. Install the latest Lightning updates via Aura
Another potential cause that might cause this issue is a scenario in which one of your ASUS suites is missing the lightning updates.
Note: This is a more recent dependency required nowadays by every proprietary software released by ASUS.
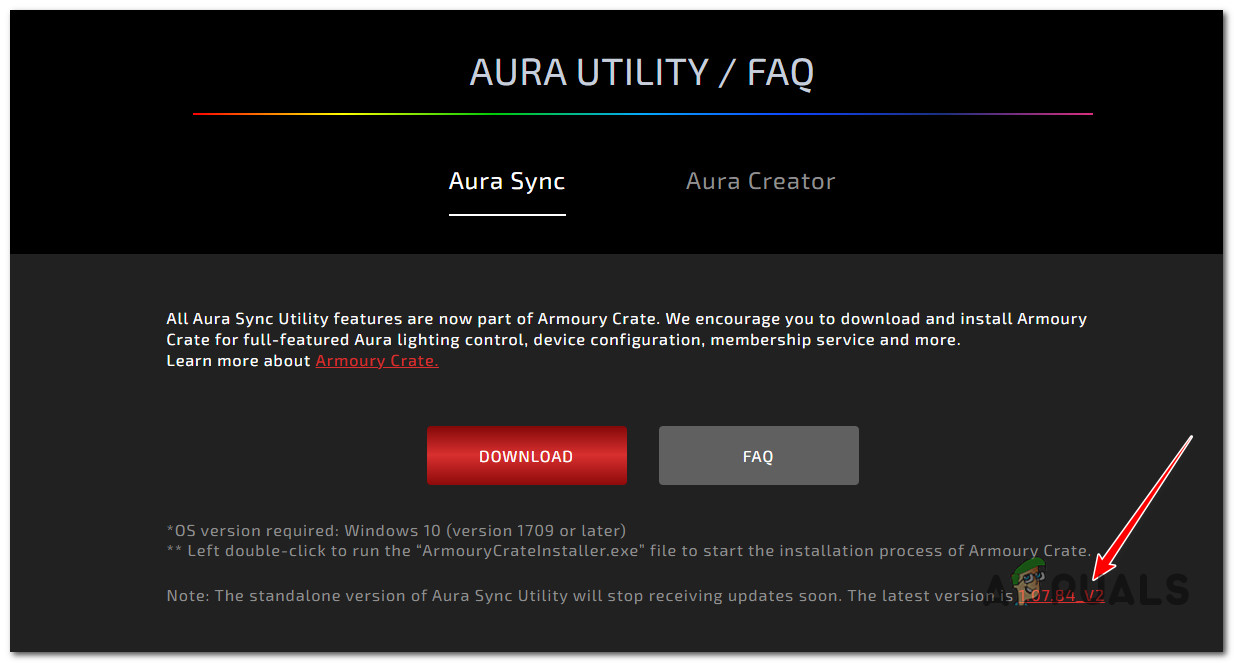
The quickest way to ensure you have all the required lightning updates is to use Aura Sync to install them automatically.
Remember that Aura Sync is now a part of Armoury Crate, but you can still install it individually.
Follow the instructions below to carry out this procedure:
- Start by closing every 3rd party application, including ASUS software.
- Visit the official download page for Aura Sync.
- The standalone version of Aura Sync Utility can be downloaded by clicking on the hyperlink at the bottom of the page.

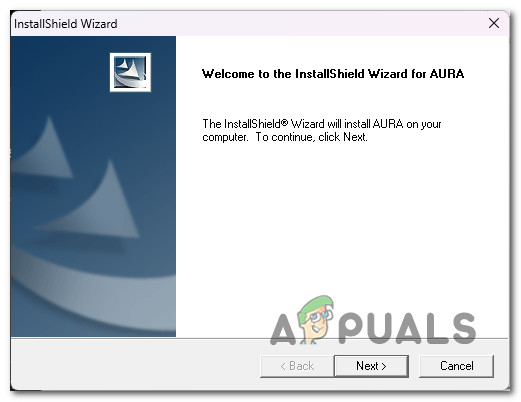
Download the standalone version of Aura Sync - Extract the recently downloaded archive, right-click on Setup.exe and click on Run as Administrator.
- Click Yes to grant admin access from the context menu that just appeared.
- Go through the installation instructions, then reboot your computer once Aura Sync is installed on your PC.

Go through the installation instructions - Run Aura Sync, and you should get a popup asking if you want to install the pending updates. Click Yes and wait until all the lightning dependencies are installed, then restart your PC.
If the problem is still not fixed, move to the next method below.
11. Disable Plugins in iCUE Settings (if applicable)
If you’re using the iCUE software to synchronize the RGB lighting on all your compatible devices, you should know that this software is known to conflict with the ASUS AI Suite and produce the ‘Can’t open AsIO3.sys’.
Fortunately, you can fix this conflict easily by accessing your iCUE settings and unchecking the box associated with Enable plugins.
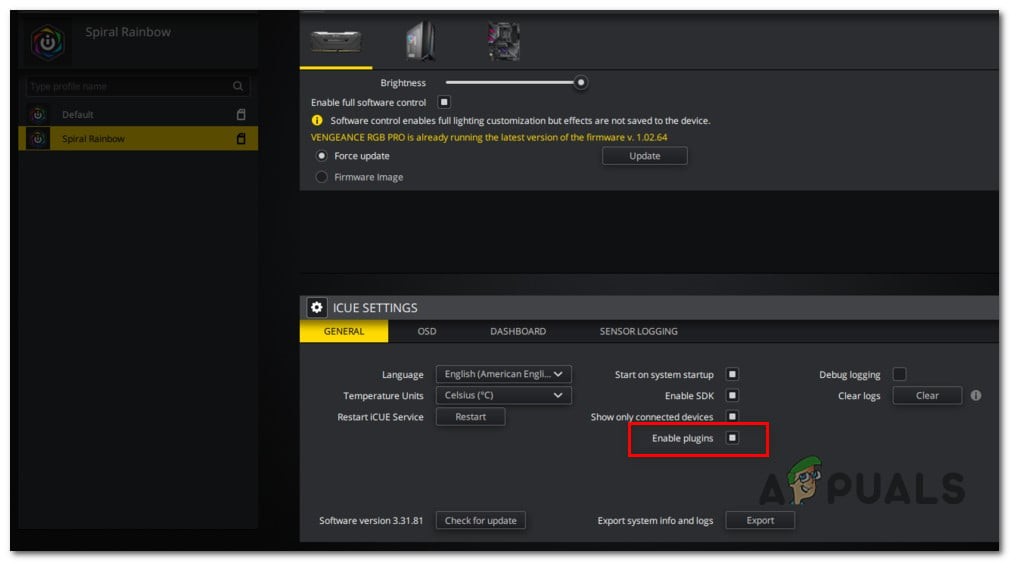
After you do this, reboot your PC, and the issue should be fixed.
If this scenario is not applicable, move to the next method below
12. Uninstall Asus Probe (if applicable)
ASUS Probe is the final 3rd party conflict known to produce this error. This is legacy software that ASUS no longer supports. Furthermore, it’s known to cause compatibility issues with many of the newer proprietary software from ASUS (ASUS AI Suite, Aura Sync, EZ Flash, etc.)
Note that ASUS Probe doesn’t have any functionality that is not available on the flagship ASUS AI Suite, so you have no reason not to uninstall it if you still have it on your system.
Follow the steps below to complete the installation:
- Press the Windows key + R to open up a Run dialog box.
- Next, type ‘appwiz.cpl’ inside the text box, then press Ctrl + Shift + Enter to open the Programs and Features utility with admin access.
Open up the Programs and Features screen - Click Yes to grant admin access at the User Account Control (UAC).
- Once inside the Programs and Features screen, right-click on Asus Probe and click on Uninstall from the context menu.

Uninstalling ASUS probe - Follow the remaining prompts to complete the uninstallation, reboot your PC and see if the conflict is resolved.
If the same problem is still occurring, move to the final fix below.
13. Perform a clean install or repair install
If none of the above fixes worked and you’re still getting the error “Can’t open AsIO3.sys – Failed with error code 5: Access is denied” after trying all of them, the only thing left to do is to refresh the kernel data along with every Windows file.
Many users who said they had the same problem said it was fixed after they did a full system refresh. You can choose either a clean install or a repair install (in-place repair).
The biggest problem with a clean installation is that you can’t save any of your data unless you first make a copy of everything (apps, games, personal media, etc.). This could take some time to do.
But if you choose the repair install (in-place repair) method, you might be able to save your personal information (including applications, games, personal material, and even specific user preferences). But the process will take a little longer.
Download Windows Speedup Tool to fix errors and make PC run faster
Some Asus users have experienced an error – Can’t open AsIO3.sys when working on their Windows 11/10 computer. This is an error that can prevent you from using your computer, as the system won’t be able to access this file. When this type of error occurs, there is something wrong with the registry entries or system files that are linked to the operating system. In this article, we explain the reasons why the AsIO3.sys file may not be accessible and how you can fix the issue.
Can’t open AsIO3.sys! Failed error code 433, A device which does not exist was specified
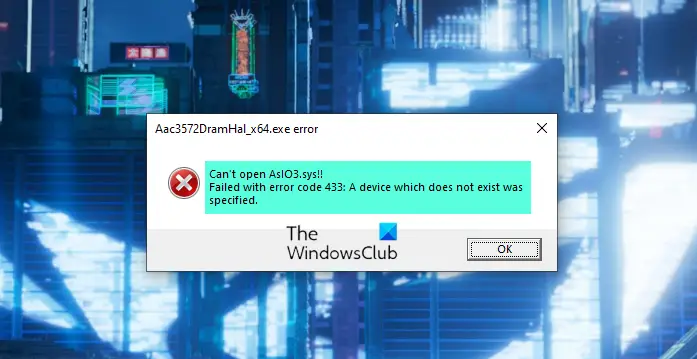
A full scan of the system, the updating of drivers, and the removal of newly installed programs can help fix this issue. Read on to learn everything you need to know about AsIO3.sys error on ASUS computers and how to fix it.
What Is AsIO3.sys and why is it not opening?
AsIO3.sys is a driver designed specifically for ASUS computers. AsIO stands for Asus Input Output. As part of the preinstalled software on your ASUS computer, this application monitors RAM temperature and GPU unit speed. It also controls other hardware, such as the speed of internal fans. This tool makes it easy to monitor and manage your ASUS computer because it notifies you when hardware-related issues occur.
There have been reports of users experiencing an error message saying “Can’t open AsIO3.sys” when they try to start their computer. Several factors can lead to this error, including malicious software infections, malfunctioning hard drives, and corrupted memory. Check out this article if you are experiencing this error on your ASUS computer.
If you can’t open AsIO3.sys error on ASUS computers, follow the below suggestions. Before you apply these methods, be sure to back up your data in case something goes wrong with it and your data gets lost.
- Reinstall the driver or the ASUS software
- Disable or Uninstall Asus TUF Armoury Crate
- Update your device drivers
- Run System File Checker
- Perform System Restore
Let’s take a closer look at each method:
1] Reinstall the driver or the ASUS software
This method requires you to reinstall the driver or the Asus software that includes or installs this AsIO3.sys file
2] Disable or Uninstall Asus TUF Armoury Crate
The solution to this problem is to disable or uninstall the Asus TUF Armoury Crate & Aura Creator. Following are the steps you can take to uninstall all Armoury Crate apps and services:
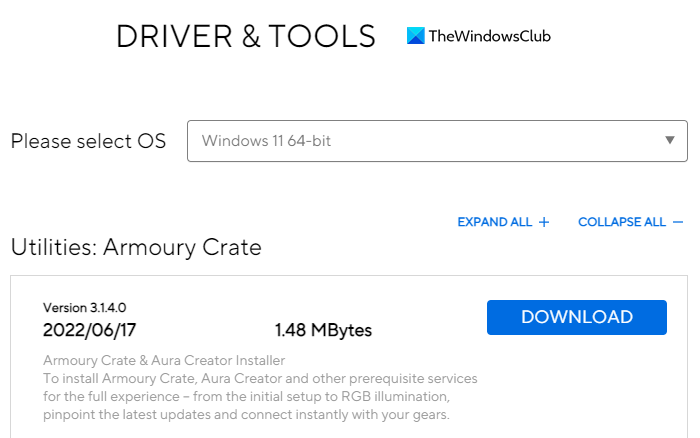
- Open the web browser and navigate to the Armoury Crate support website.
- On the Driver & Utility tab, click on the drop-down menu.
- Here you will find two options, Windows 11 64-bit or Windows 10 64-bit, choose whichever option suits your needs to download Armoury Crate Uninstall Tool.
- Click on the Download button to get the file.
- Once you download it, open File Explorer (Windows+E keys) and go to the Downloads folder.
- Unzip “Armoury_Crate_Uninstall_Tool.zip” and double-click “Armoury Crate Uninstall Tool.exe” to start the uninstall process.
- Once the uninstallation has been completed, restart the system.
Note: The official AC cleaning tool is the best way to remove the Armoury crate.
3] Update your device drivers
A faulty or outdated driver may also be responsible for causing this Blue Screen error. In such a case, you have two options to choose from:
- Update your driver manually through the Device Manager.
- Go to Windows Update and get the driver updates under the Optional Updates section.
- You can also download the latest driver version via the manufacturer’s website.
4] Run System File Checker
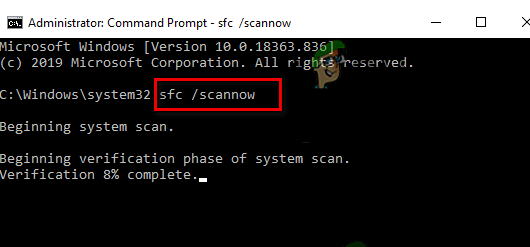
In case the above solutions don’t work, it appears your system is corrupted. To resolve system file corruption, you can use the System File Checker utility using the following steps:
To get started, launch the Command Prompt as an administrator.
In the Command Prompt, copy and paste the following command:
sfc /scannow
Now hit the Enter key and it will then scan the system for any corrupted files. When the scan is finished, restart your PC and see if the problem is solved
5] Perform System Restore
This solution is highly effective at fixing many problems on Windows PCs, including BSOD errors like this. So, if nothing helps, simply restore your system to its previous state. In this way, you will be able to restore your system to its previous state, which was functioning properly at the time.
How to Download Asus Audio Drivers?
The following steps will guide you through the process of downloading the Asus Audio Drivers for Windows 11/10:
- First of all, visit asus.com.
- Then search for your product using the serial number.
- On the next page, click Drivers & Utility.
- Select the Operating System and then download the Audio Driver.
Related Post: How to fix Tcpip.sys Blue Screen Error on Windows computer
Digvijay is a Windows enthusiast who likes to write about the Windows OS and software in specific, and technology in general. When he is not working, he would either surf the web or dives into learning tech skills.
I’m not experiencing any issues with the lighting. As far as that goes, everything works as intended. I haven’t tried anything else, not really sure what to try. Looking online, file . net, states the file belongs to Asus, apparently an acronym for Asus Input Output Drive. We both have an ASUS GPU, what apps from ASUS do you have installed? I have Aura and a wireless driver.
What strikes me as odd, is that falling back to the previous version of iCue does not fix the problem. I can’t think of what I might have installed a couple weeks back that would have caused the error.
EDIT: I just uninstalled Aura and the error is now gone. Let me know what you find out.
Edited by frostschaden