hp-concentra-wrapper-portlet
![]()
Actions
Introduction
Whenever the printer is switched on, it automatically performs a series of internal self-test and mechanical initialization sequences. If any of the printer parts fail, a system error or a system warning will occur.
note:
Unlike system errors, system warnings are not displayed on the front panel display of the printer. System warnings only appear in the Printer Status Section of the Printer Information pages, and unlike system errors, they do not interfere with the operation of the printer.
This document contains instructions for printing the Printer Information pages, and lists the system warning codes along with their descriptions and the corrective actions that are recommended for resolving them.
Retrieving system warning codes
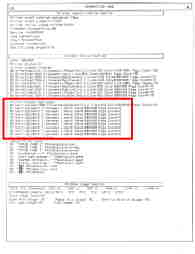
System warning messages can be found by printing the Printer Information pages. The warnings are listed on page one.
-
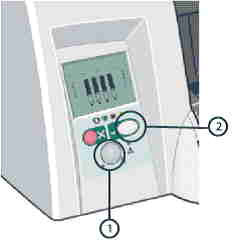
On the printer’s front panel, press and hold the Power switch.
-
While still pressing the Power switch, press the OK button four times.
-
Power switch
-
OK button
Figure : Front panel of printer

-
-
Release the Power switch and the Printer Information pages will print.
Figure : Printer Information page one
Understanding the front panel error code display
System error codes are displayed on the printer’s front panel, using the lit or flashing Ink Cartridge icon bars (see the figure below). When performing a system error test, count the lit or flashing bars, which indicate a four-digit code.
Since the front panel can display only graphics, determine the error code by counting the lit bars on the front panel.
-
Failing subsystem indicators
-
Recovery action indicators
-
First two digits of error code
-
Second two digits of error code
-
Solid light indicates one digit
-
Blinking light indicates two digits
Figure : Determining the error code

System error codes consist of four digits. The first two digits explain which component/system is failing. The second two digits indicate what action should be taken to resolve the problem.
A blinking light indicates two digits in the error code.
In the figure above, the error code displayed is 7904, using the following interpretation:
-
The first indicator area displays two columns totaling seven lights.
-
The two columns in the second indicator area show eight lights and one blinking light, indicating a total of nine in this area.
-
The next area is blank, indicating zero.
-
The last area displays four lights.
System Error codes
01:10 error code
Explanation
An error has occurred with the electronics module.
Recommended action
01:12 error code
Explanation
Electronics Module Error.
note:
This error code may also be reported as a warning code, which will not prevent continued use of the printer.
Recommended action
02:10 error code
Explanation
A problem has occurred with the printer’s carriage assembly.
Recommended action
-
Unplug the power cable from the printer and wait a few seconds. Plug in the power cable again and check to see if the error code has disappeared.
04:13 error code
Explanation
A generic firmware error (network card) has occurred.
Recommended action
Unplug the power cable from the printer and wait a few seconds. Plug in the power cable again and check to see if the error code has disappeared. If the error code continues, please call HP for technical support to troubleshoot the problem. Click here for information on contacting HP Customer Care.
08:11 error code
Explanation
The printer’s front panel cannot be detected.
Recommended action
11:10 error code
Explanation
A trailing cable failure has occurred.
Recommended action
11:11 error code
Explanation
Problems with trailing cable connection.
Recommended action
21:10 error code
Explanation
A service station failure has occurred.
Recommended action
22:10 error code
Explanation
An ink supply station failure has occurred.
Recommended action
35:01 error code
Explanation
Cleanout Assembly not detected while loading
media.
Recommended action
Remove and reinstall the cleanout assembly.
-
Remove and re-install the Cleanout assembly as follows:
-
To release the Cleanout assembly, push in
the 2 buttons on either side.Figure : Release buttons
-
Remove the Cleanout assembly from the
Printer.Figure : Removing cleanout assembly
-
-
Reinstall the cleanout assembly, and attempt to verify functionality.
-
If problems persist, contact HP support.


42:10 error code
Explanation
A carriage motor failure (short-circuit) has occurred.
Recommended action
56:10 error code
Explanation
An error has occurred during the calibration of the motor encoder system, or there was a problem finding the zero position on the encoder disc.
Recommended action
56:13 error code
Explanation
Error during the calibration of the Line-feed motor/Encoder system or a problem finding the zero position on the Encoder disk.
Recommended action
Unplug the power cable from the printer and wait a few seconds. Plug in the power cable again and check to see if the error code has disappeared. If the error code continues, please call HP for technical support to troubleshoot the problem. Click here for information on contacting HP Customer Care.
58:10 error code
Explanation
Problem detected in the Color Sensor system.
note:
This error code may also be reported as a warning code, which will not prevent continued use of the printer.
Recommended action
61:05 error code
Explanation
Language interpreting error. This is usually an error produced while
parsing a file. There is most likely an incompatibility between the driver and
the firmware.
note:
This error code may also be reported as a warning code, which will not prevent continued use of the printer.
Recommended action
62:04, 63:04, 64:04 and 65:04 error code
Description
I/O module error (62 = parallel; 63 = Network; 64 = USB).
Recommended action
-
Unplug the power cable from the printer and wait a few seconds. Plug in the power cable again and check to see if the error code has disappeared.
65:01 error code
Explanation
A communication failure has occurred.
note:
This error code may also be reported as a warning code, which will not prevent continued use of the printer.
Recommended action
-
Unplug the power cable from the printer and check the cable connections (parallel, USB, network). Plug in the power cable again and check to see if the error code has disappeared.
71:03 error code
Description
Memory Management Error (Out of memory).
Recommended action
-
Unplug the power cable from the printer and wait a few seconds. Plug in the power cable again and check to see if the error code has disappeared.
71:14 error code
Explanation
Memory Management Error (Out of memory during firmware upgrade).
Recommended action
Unplug the power cable from the printer and wait a few seconds. Plug in the
power cable again and check if the Error Code has disappeared.
72:04 error code
Explanation
A generic firmware error has occurred (expected).
Recommended action
-
Unplug the power cable from the printer and wait a few seconds. Plug in the power cable again and check to see if the error code has disappeared.
74:12 error code
Explanation
Firmware Upgrade Error (Memory size check failed during firmware upgrade).
Recommended action
79:04 error code
Explanation
An unexpected generic firmware error has occurred (unexpected).
Recommended action
-
Unplug the power cable from the printer and wait a few seconds. Plug in the power cable again and check to see if the error code has disappeared.
-
Remove switchboxes and connect the printer directly to the computer via USB or Parallel cables.
81:01 error code
Explanation
There has been a paper-axis shutdown, which is usually a paper jam caused by a blockage of the paper-axis system.
note:
This error code may also be reported as a warning code, which will not prevent continued use of the printer.
Recommended action
-
If this error code was caused by a paper jam, unplug the power cable from the printer and clear the blockage. Plug in the power cable again and check to see if the error code has disappeared. Click here for information on how to clear a paper jam.
81:12 error code
Explanation
Recommended action
This error usually appears during the paper-advance calibration. Retry the
paper-advance calibration.
83:10 error code
Explanation
A sheet-feeding failure has occurred.
Recommended action
85:10 error code
Explanation
A paper-axis encoder error has occurred.
Recommended action
86:01 error code
There has been a scan-axis shutdown — usually a paper jam caused by a blockage of the scan-axis system.
Recommended action
-
Turn the printer off.
-
Open the main top cover, and check for any possible obstruction that may be preventing the carriage to move freely.
-
Remove obstruction (if found), and attempt to verify printer functionality.
86:11 error code
Explanation
Scan-axis shutdown during initialization. This error typically occurs when the printer detects an incorrect length.
Recommended action
If the Carriage stopped on the right-hand side of the Printer:
-
Check that the foam packing that secures the
Carriage during shipping has been removed. -
Make sure that the carriage is properly latched.
95:00 error code
Explanation
There has been a printhead alignment failure — the printhead alignment was cancelled.
note:
This error code may also be reported as a warning code, which will not prevent continued use of the printer.
Recommended action
95:02 error code
Explanation
There has been a printhead alignment failure — the printhead alignment was cancelled.
note:
This error code may also be reported as a warning code, which will not prevent continued use of the printer.
Recommended action
-
Unplug the power cable from the printer and wait a few seconds. Plug in the power cable again and try the printhead alignment again.
-
If the error code appears again, check the printhead alignment print.
-
If the printhead alignment was printed correctly without any print defects, then check that the media is moving freely (backwards and forwards) while the printer is scanning it.
-
If the printhead alignment was printed incorrectly with some print defects, replace the faulty printhead in which the color defects were noticeable. Click here to see how to install a printhead.
95:04 error code
Explanation
There has been a firmware error during printhead alignment.
note:
This error code may also be reported as a warning code, which will not prevent continued use of the printer.
Recommended action
System Warning codes
Warnings will not be displayed on the front panel. They will appear on the Information page, allowing continued operation of the printer without the need of immediate intervention. To print an Information Page, hold the POWER button down while pressing and releasing the CONTINUE button four times.
270:00 warning code
Explanation
Recommended action
271:00 warning code
Explanation
Recommended action
272:00 warning code
Explanation
Recommended action
273:00 warning code
Explanation
Recommended action
83:01:1 warning code (applicable to HP Designjet 100plus only)
Explanation
The paper is rejected from the Bypass due to skew.
Recommended action
When manually loading paper from the front of the printer, make sure that it
is loaded straight.
83:01:3 warning code (applicable to HP Designjet 100plus only)
Explanation
The paper is rejected from the roll due to skew.
Recommended action
When loading paper from the roll, make sure that it is loaded straight.
Upgrading the firmware
-
If the System Maintenance tool is not already loaded, load from the CD shipped with the printer, or download the HP Designjet System Maintenance Tool at the HP Software and Drivers page.
-
Under system maintenance, select the appropriate printer model.
-
If registration appears, register now or select skip registration.
-
Choose your printer’s current firmware, then select the appropriate operating system (OS).
-
-
Install the tool.
-
Open the System Maintenance tool and select Upgrade firmware.
Clearing a paper jam
-
Try pressing the CONTINUE button on the printer’s front panel. If this does not solve the problem, continue with the remaining steps.
-
Turn off the printer.
-
Remove all media from the trays. Pull out any media that is visibly stuck.
-
If the rear path through is installed, remove it by pressing the buttons on each side and pulling it out.
-
Rear path through buttons
Figure : Rear path through
-
-
Removing the rear path through provides access to the inside of the printer from the rear. Pull out any media that may be stuck inside that is accessible from the rear.
-
Replace the rear path through and make sure it fits securely.
-
Remove the back panel by pressing the two catches inwards.
-
Pull out any media that may be stuck inside.
-
Replace the back panel and make sure it fits securely.
-
Close the rear access door.
-
If the printer still reports jammed media, lift the top cover and pull out any media that may be stuck.
caution:When lifting the cover, be careful not to damage or disturb any of the tubes or other internal parts of the printer.
-
Turn the printer back on.

Cleaning the printheads
-
Select the Help button from the driver software.
-
Start the Maintenance application.
-
Select the Recover Printheads option. (This is the cleaning process.)
Installing printheads
-
Press the POWER button to turn on the printer.
-
Open the ink cartridge door at the front, right side of the printer. Continue lifting the ink cartridge door until the printheads are accessible.
-
When the printhead door is opened, the carriage assembly will briefly move left, then back right.
warning:Do not attempt to access the printheads until the carriage assembly has come to a complete stop, flush against the right side of the printer.
-
Access the printheads by lifting the latch from the rear. Pull the latch forward and down to release the latch hook. Then, lift up and push the latch toward the back of the printer.
-
Remove the printhead from the packaging. Remove the protective tape from the printhead.
-
Insert the printhead into its own color-coded socket. Firmly press the printhead into its slot.
-
Repeat Steps 5 and 6 for each of the six printheads that may need to be installed or replaced.
-
Close the printhead latch. Ensure that the hook on the printhead latch catches the carriage lock.
-
Close the printhead door, and then close the ink cartridge door.
HP Customer Care
Go to the Contact HP page for further assistance.
-
Turbik
hp 500 системная ошибка
Принтер выдает ошибку: sustem error 21:11 call hp support
У кого есть сервис мануал, гляньте пожалуста о чем это он????
Спасибо.
-
VasVlad
Сообщение VasVlad » 11 окт 2011 23:50
Элементарно ищется в Google!
System error 21:11
Explanation
A problem has been detected with the Service Station assembly.
Recommended action
Turn the printer off and allow a few minutes for printer to cool. Turn the printer on and attempt to verify functionality. If problems persist contact HP support .
-
Turbik
Сообщение Turbik » 13 окт 2011 11:52
Да, действительно элементарно… причем на ошибки 21:10 и 21:11 одинаковое описание. СПАСИБО.
Вернуться в «Принтеры HEWLETT-PACKARD»
Кто сейчас на конференции
Сейчас этот форум просматривают: нет зарегистрированных пользователей и 1 гость
Введение.
В настоящем документе описывается общая процедура поиска и устранения системной ошибки с кодом 21:10 или 21:11. Данная системная ошибка относится в основном к сервисной станции. Однако в некоторых случаях она может быть вызвана и другими компонентами.
Следуйте указаниям из списка ниже, чтобы произвести точное устранение проблемы.
Поиск и устранение неисправности.
1. Отключите шнур питания.
2. Откройте верхнее окно.
3. Вручную переместите каретку влево (за пределы сервисной станции).
ПРИМЕЧАНИЕ. Если каретка не передвигается влево, НЕ ПЫТАЙТЕСЬ СДВИНУТЬ ЕЕ СИЛОЙ. Попробуйте перезагрузить устройство несколько раз. Проверьте, может ли каретка выйти автоматически при попытке запуска. При выходе каретки немедленно отключите шнур питания. Если после этих действий каретка ВСЕ ЕЩЕ не в состоянии выйти, обратитесь в службу технической поддержки за указаниями по разблокировке каретки.
4. Проверьте путь каретки на наличие видимых препятствий (область печати и сервисная станция).
ПРИМЕЧАНИЕ. Если каретка в состоянии переместиться влево, вручную передвиньте ее из стороны в сторону несколько раз, чтобы убедиться, что на ее пути отсутствуют препятствия.
• Проверьте состояние ремня каретки (он должен быть натянут и не изношен или поврежден)
• Очистите и смажьте (машинным маслом) стержень каретки.
• Проверьте состояние трейлинговых кабелей — они должны быть плоскими и передвигаться свободно следом за кареткой.
• Очистите (не царапая поверхность) ленту позиционирования каретки (с помощью неабразивной чистящей жидкости и безворсовой ткани).
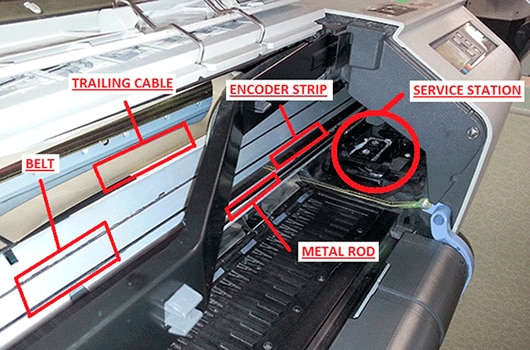
ВАЖНО! Повреждение ЛЮБОЙ из перечисленных деталей будет означать ее замену, поскольку может привести к снижению качества работы, ошибкам или появлению сообщений.
5. Извлеките из каретки все ПЕЧАТАЮЩИЕ ГОЛОВКИ.
ПРИМЕЧАНИЕ. Для того чтобы извлечь печатные головки, откройте синюю защелку в верхней части каретки и поднимите крышку каретки. Поднимайте печатные головки за синюю ручку. После их извлечения тщательно закройте крышку каретки (синяя защелка должна входить в фиолетовый крючок), затем оставьте каретку в центре направляющих принтера. Закройте окно.
6. Подключите шнур питания.
7. Перезапустите принтер.
ПРИМЕЧАНИЕ. Если процедура прошла нормально, то вместо системной ошибки принтер выдаст запрос о печатающих головках. Если принтер вновь покажет системную ошибку, отключите питание на несколько секунд, вновь подключите и перезагрузите принтер. При необходимости повторите эту процедуру не менее трех раз. Если системная ошибка сохраняется после нескольких процедур перезагрузки, скорее всего, необходимо заменить сервисную станцию.
8. При появлении запроса верните печатающие головки на место.
ПРИМЕЧАНИЕ. После появления запроса на печатающие головки нажмите клавишу «ENTER», чтобы начать процедуру установки головок. Каретка автоматически выйдет из сервисной станции. На дисплее отобразится запрос на открытие окна и продолжения процедуры установки головок. Установив головки, тщательно закройте крышку каретки (передвигать каретку не нужно) и окно обслуживания.
ВАЖНО! На каждой печатающей головке указана дата истечения срока годности. Головки с истекшим сроком годности могут вызывать системную ошибку. Если при замене появится сообщение об отклонении печатной головки или если принтер не в состоянии будет завершить выравнивание печатных головок, необходимо будет заменить печатные головки с истекшим сроком годности новыми, с действующей гарантией. Если проблема решена, но время от времени сообщение об ошибке продолжает появляться, также необходимо заменить головки.
9. Если проблема устранена, проверьте работу устройства.
10. Если проблема не устранена, выполните обновление МИКРОПРОГРАММЫ.
ПРИМЕЧАНИЕ: Это обновление рекомендуется проводить ТОЛЬКО в качестве последней меры, и ТОЛЬКО если установленная версия микропрограммы не является самой новой. С другой стороны, при наличии новых версий микропрограммы вы можете в любой момент обновить ее. Это поможет улучшить работу устройства.
ВАЖНО! Для модели DJ 500 рекомендуется перед обновлением микропрограммы извлечь карту HPGL2 (при ее наличии). Для этого снимите крышку отсека карты с тыловой части левой крышки. Открутите два винта, крепящие карту HPGL2 к блоку электроники. Извлеките карту.
Для обновления микропрограммы выполните следующие действия (они сработают только в случае, если принтер подключен к компьютеру через USB).
a. Загрузите (www.hp.com/bizsupport), сохраните и распакуйте файл обновления на вашем компьютере.
b. Убедитесь, что принтер находится в режиме SPECIAL X MODE (это необходимо, поскольку принтер не может перейти в режим готовности).
• Отсоедините шнур питания.
•Нажмите кнопку «CANCEL».
• Переподключите шнур питания (не отпуская кнопку «CANCEL»).
• Дождитесь появления на дисплее мигающего символа «X».
c. Запустите распакованный выполняемый файл. Программа будет установлена и выполнит автоматический поиск принтера.
d. Для установки обновления следуйте инструкциям.
e. После завершения обновления на передней панели появится сообщение о необходимости отключения принтера.
f. Отключите принтер, подождите несколько секунд и подключите его снова.
ВАЖНО! Если принтер может перейти в состояние готовности в любой момент, то НЕТ никакой необходимости переводить принтер в режим SPECIAL X MODE. Он будет найден через USB или через сеть.
11. Если даже после выполнения всех предыдущих шагов проблема сохранится, если у вас есть сомнения или вопросы, или требуется дополнительная помощь, обратитесь к вашему представителю HP или в службу технической поддержки HP.
Ошибка 21:10
Системная ошибка 21:10 обычно возникает в плоттерах моделей HP DesignJet 500, 510 и 800. Так как в данных плоттерах нет русского интерфейса, ошибка показана, как System error 21:10. Эта ошибка говорит нам о неисправности сервисной станции.

Данная ошибка возникает после 3-4 лет работы плоттера. Сервисная станция-это по сути бункер отработки плоттера. Там происходит парковка печатающих головок, их чистка и прокачка. Соответственно там скапливается вся грязь и отработанные чернила. При переполнении сервисной станции, двигателю уже тяжело двигать салазку внутри станции. А если Ваш плоттер стоял без дела более 3-х месяцев, то внутри происходит затвердевание сгустков. При работе двигателя происходит резкий толчок, при котором могут отломаться хрупкие детали, повредиться шестерня или перегореть двигатель.

Так же ошибка 21:10 возникает и в других плоттерах HP. Просто в некоторых моделях она обозначается так же 21:10, но может и меняться последняя цифра. Но первое число 21 всегда будет присутствовать. Ниже мы опишем и другие ошибки.
Как же избежать данную ошибку?
Своевременное техническое обслуживание поможет избежать данную ошибку. Данную процедуру следует проводить раз в 2-3 года. Это поможет избежать переполнения сервисной станции. Но если у Вас все-таки возникла данная ошибка, то здесь есть два решения. Самое простое, это заменить станцию на новую. Но так как модель больше не производится, то деталь редкая и цена на закупке у нее больше 200$. Это еще без учета работы. Согласитесь, жалко выкидывать около 15-16 тыс рублей за кусок пластмассы. Либо второй вариант, это купить восстановленную станцию или восстановить Вашу старую. При восстановлении мы полностью отмываем станцию, меняем изношенные детали и перематываем двигатель, если он перегорел. Данную деталь можно без проблем ставить рабочую или восстановленную, так как данный узел не имеет электронных компонентов и не влияет на качество печати. Поэтому при ошибке 21:10 нет надобности покупать новую станцию и выкидывать большие деньги.
Ошибка 21:13
Ошибка 21:13 выходит в плоттерах серии T и Z. Это такие модели, как HP DesignJet T610, T620, T770, T790-795, T1100, T1120, T1200, T1300, T2300, Z2100, Z2600, Z3100, Z3200, Z5200, Z5400 и многие другие. Эта ошибка встречается в разных вариантах. Перечислим некоторые из них. 21:10 – 21:13 – 21.1:03 – 21.1:13 – 21.2:03 – 21.2:13. Такое количество ошибок по сервисной станции обусловлено тем, что сервисная станция на данные аппараты намного сложнее, чем на плоттерах 500 модели.

Некоторые плоттеры Z-серии имеют 12 картриджей и 6 печатающих головок. Поэтому станция сложная. Имеет свой вакуумный насос, для прокачки головок. Если в 500 плоттере при ошибке сервисной станции плоттер выдает одну ошибку, то на этих плоттерах ошибка выдается в зависимости от вышедшего из строя элемента внутри станции. Но первая цифра 21 всегда остается неизменной. А вот последующие цифры указывают нам, что именно вышло из строя в данном узле.
Данный новый узел стоит в районе 450-500$ без учета проводимых работ. Но мы так же восстанавливаем такие сервисные станции. Клиенту это обходится почти в три раза дешевле.

На рисунке показана сервисная станция от плоттера HP DesignJet T920, T930, T1500, T1530, T2500, T2530 и T3500. У них одна и та же сервисная станция. Видно внутри, что скопилось много грязи. Вот такая грязь в итоге и выводит из строя сервисную станцию.
Если Ваш плоттер выдал одну из выше перечисленных ошибок, наши специалисты устранят ее в кратчайшие сроки и за разумную сумму.
Обращайтесь в наш сервисный центр, будем рады Вам помочь!
Ответим на интересующие Вас вопросы ( в чатах моментальные ответы / Будние дни).
Дадим профессиональную консультацию.
Примем меры по устранению неполадок!
Связаться с нами можно по телефонам:
Дата публикации статьи : 19.04.2019 (обновление страницы 23.09.2022)
Мы ведём новости и обновляем информацию на сайте каждый день. Будем рады любым замечаниям и рекомендациям для улучшения сервиса сайта и компании.
Содержание
- Hp designjet 500 plus system error 21 10
- Принтеры серии HP Designjet 500/510/800 — системная ошибка 21:10
- Условия
- Вопросы/Симптомы
- Причина
- Ответ/Решение
- HP Designjet 500/510/800 Series Printers — System Error 21:10
- Environment
- Questions/Symptoms
- Cause
- Answer/Solution
Hp designjet 500 plus system error 21 10
Системная ошибка 21:10(System error 21:10)
Дата добавления: 2010-09-27
Системная ошибка 21:10 (System error 21:10) возникает, когда плоттер обнаруживает проблему в «Сервисной станции» (Service Station). Причинами этой ошибки могут послужить Сервисная станция или Каретка (Carriage) плоттера. Следуйте инструкциям ниже, чтобы точно определить проблему.
Если у вас что-то не получается и вы считаете, что ремонтом плоттера должны заниматься специалисты, обращайтесь к нам. Мы оказываем платные консультации и платную удалённую техническую поддержку. Обращайтесь к нам в Ремонт Плоттеров, также вы можете узнать стоимость ремонта плоттера. Мы отремонтируем плоттер по выгодной для вас цене и в максимально сжатые сроки.
Обязателно прочитайте продолжение статьи System error 21:10 продолжение
Designjet 500 — C7769B, C7770B, C7769C, C7770C
Designjet 800 — C7779B, C7780B, C7779C, C7780C
Каталожный номер Service station — C7769-60149.
Поиск и устранение неисправности:
Текущая прошивка плоттера должна быть не ниже 02.04 для установки новой Сервисной станции. Если прошивка плоттера ниже, чем 02.04, загрузите с официального сайта самую новую доступную прошивку перед продолжением работ.
1. Отключите силовой кабель от задней части плоттера.
2. Откройте верхнюю крышку и переместите Каретку в центр плоттера (если Каретка плоттера не будет перемещаться свободно, смотрите шаг 5).
3. Закройте верхнюю крышку, включите питание плоттера. Если ошибок нет, то попытайтесь проверить работу плоттера.
Если ошибка плоттера появилась вновь, то продолжаем дальше.
4. Вручную переместите Каретку из области Сервисной станции, и проверьте не мешает ли что-либо двигаться Каретке и Сервисной станции (обрывки бумаги, засохшие чернила или посторонние предметы – удалите, если обнаружили).
5. Если у вас не получается выдвинуть Каретку плоттера, то тогда придётся снять правую крышку, закрывающую Сервисную станцию, и определить местонахождение шестерни Сервисной станции (как изображено ниже). Поверните её против часовой стрелки, приблизительно, на четыре оборота. Каретка плоттера должна теперь освободиться.
Иллюстрация 1: Механизм Сервисной станции 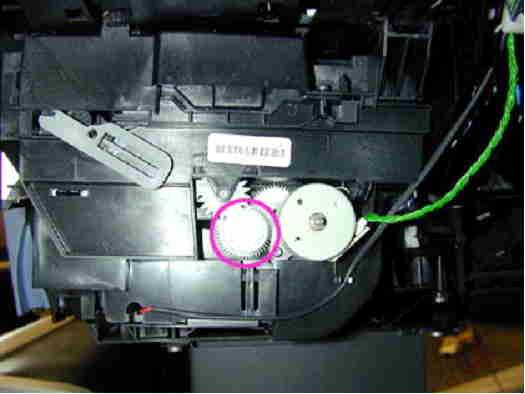
Если то, что мешает движению Сервисной станции плоттера найдено и удалено, включите питание, и проверьте работоспособность аппарата.
6. Если никаких помех не найдено, то оставьте Каретку в центре, закройте крышку и включите плоттер.
Если проблема осталась, то приступайте к последующим шагам.
7. Отсоедините шнур питания от плоттера.
8. Снимите правую крышку плоттера.
9. Откройте центральную крышку и выдвиньте Каретку с Сервисной станции.
Флаг Сервисной станции должен быть, приблизительно, под углом 45 градусов (как изображено ниже).
Иллюстрация 2: флаг Сервисной станции, правильное положение 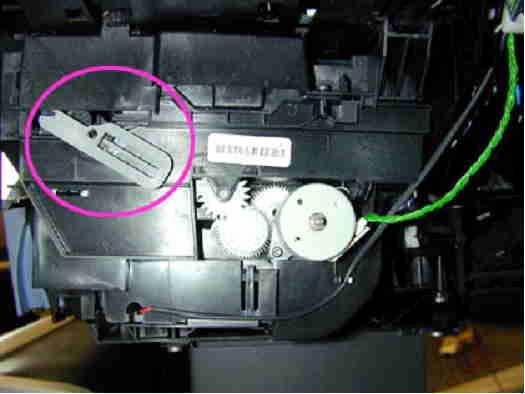
10. Если флаг в правильном положении, переходите к Шагу 14.
11. Если флаг не под углом 45 градусов, нажмите (мягко) на нижнюю часть флага и перемещайте её направо (к задней части плоттера) до момента пока верхняя часть флага не защёлкнется на корпусе Сервисной станции. Флаг должен остаться, приблизительно, под углом 45 градусов.
12. Включите питание плоттера.
13. Закройте верхнюю крышку, включите питание плоттера. Если ошибок нет, то попытайтесь проверить работу плоттера.
Если ошибка вновь появляется, продолжаем..
14. Выключите плоттер и выдерните шнур питания.
15. Замените Сервисную станцию.
16. Проверка работоспособности плоттера:
Включите плоттер.
Дайте принтеру проинициализироваться.
Загрузите бумагу в плоттер.
На панели плоттера выберите «Ink menu» и нажмите ENTER. Выберите «Troubleshooting» и нажмите ENTER.
Следуйте за инструкциями на передней панели. После успешной печати «Troubleshooting», плоттер можно считать работоспособным.
Обязателно прочитайте продолжение статьи System error 21:10 продолжение
Если у вас что-то не получается и вы считаете, что ремонтом плоттера должны заниматься специалисты, обращайтесь к нам.
Обращайтесь к нам в Ремонт Плоттеров, также вы можете узнать стоимость ремонта плоттера.
Мы отремонтируем плоттер по выгодной для вас цене и в максимально сжатые сроки.
Источник
Принтеры серии HP Designjet 500/510/800 — системная ошибка 21:10
Условия
Вопросы/Симптомы
Причина
Ответ/Решение
В настоящем документе описывается общая процедура поиска и устранения системной ошибки с кодом 21:10 или 21:11. Данная системная ошибка относится в основном к сервисной станции. Однако в некоторых случаях она может быть вызвана и другими компонентами.
Следуйте указаниям из списка ниже, чтобы произвести точное устранение проблемы.
Поиск и устранение неисправности.
1. Отключите шнур питания.
2. Откройте верхнее окно.
3. Вручную переместите каретку влево (за пределы сервисной станции).
ПРИМЕЧАНИЕ. Если каретка не передвигается влево, НЕ ПЫТАЙТЕСЬ СДВИНУТЬ ЕЕ СИЛОЙ. Попробуйте перезагрузить устройство несколько раз. Проверьте, может ли каретка выйти автоматически при попытке запуска. При выходе каретки немедленно отключите шнур питания. Если после этих действий каретка ВСЕ ЕЩЕ не в состоянии выйти, обратитесь в службу технической поддержки за указаниями по разблокировке каретки.
4. Проверьте путь каретки на наличие видимых препятствий (область печати и сервисная станция).
ПРИМЕЧАНИЕ. Если каретка в состоянии переместиться влево, вручную передвиньте ее из стороны в сторону несколько раз, чтобы убедиться, что на ее пути отсутствуют препятствия.
• Проверьте состояние ремня каретки (он должен быть натянут и не изношен или поврежден)
• Очистите и смажьте (машинным маслом) стержень каретки.
• Проверьте состояние трейлинговых кабелей — они должны быть плоскими и передвигаться свободно следом за кареткой.
• Очистите (не царапая поверхность) ленту позиционирования каретки (с помощью неабразивной чистящей жидкости и безворсовой ткани).
ВАЖНО! Повреждение ЛЮБОЙ из перечисленных деталей будет означать ее замену, поскольку может привести к снижению качества работы, ошибкам или появлению сообщений.
5. Извлеките из каретки все ПЕЧАТАЮЩИЕ ГОЛОВКИ.
ПРИМЕЧАНИЕ. Для того чтобы извлечь печатные головки, откройте синюю защелку в верхней части каретки и поднимите крышку каретки. Поднимайте печатные головки за синюю ручку. После их извлечения тщательно закройте крышку каретки (синяя защелка должна входить в фиолетовый крючок), затем оставьте каретку в центре направляющих принтера. Закройте окно.
6. Подключите шнур питания.
7. Перезапустите принтер.
ПРИМЕЧАНИЕ. Если процедура прошла нормально, то вместо системной ошибки принтер выдаст запрос о печатающих головках. Если принтер вновь покажет системную ошибку, отключите питание на несколько секунд, вновь подключите и перезагрузите принтер. При необходимости повторите эту процедуру не менее трех раз. Если системная ошибка сохраняется после нескольких процедур перезагрузки, скорее всего, необходимо заменить сервисную станцию.
8. При появлении запроса верните печатающие головки на место.
ПРИМЕЧАНИЕ. После появления запроса на печатающие головки нажмите клавишу «ENTER», чтобы начать процедуру установки головок. Каретка автоматически выйдет из сервисной станции. На дисплее отобразится запрос на открытие окна и продолжения процедуры установки головок. Установив головки, тщательно закройте крышку каретки (передвигать каретку не нужно) и окно обслуживания.
ВАЖНО! На каждой печатающей головке указана дата истечения срока годности. Головки с истекшим сроком годности могут вызывать системную ошибку. Если при замене появится сообщение об отклонении печатной головки или если принтер не в состоянии будет завершить выравнивание печатных головок, необходимо будет заменить печатные головки с истекшим сроком годности новыми, с действующей гарантией. Если проблема решена, но время от времени сообщение об ошибке продолжает появляться, также необходимо заменить головки.
9. Если проблема устранена, проверьте работу устройства.
10. Если проблема не устранена, выполните обновление МИКРОПРОГРАММЫ.
ПРИМЕЧАНИЕ: Это обновление рекомендуется проводить ТОЛЬКО в качестве последней меры, и ТОЛЬКО если установленная версия микропрограммы не является самой новой. С другой стороны, при наличии новых версий микропрограммы вы можете в любой момент обновить ее. Это поможет улучшить работу устройства.
ВАЖНО! Для модели DJ 500 рекомендуется перед обновлением микропрограммы извлечь карту HPGL2 (при ее наличии). Для этого снимите крышку отсека карты с тыловой части левой крышки. Открутите два винта, крепящие карту HPGL2 к блоку электроники. Извлеките карту.
Для обновления микропрограммы выполните следующие действия (они сработают только в случае, если принтер подключен к компьютеру через USB).
a. Загрузите (www.hp.com/bizsupport), сохраните и распакуйте файл обновления на вашем компьютере.
b. Убедитесь, что принтер находится в режиме SPECIAL X MODE (это необходимо, поскольку принтер не может перейти в режим готовности).
• Отсоедините шнур питания.
•Нажмите кнопку «CANCEL».
• Переподключите шнур питания (не отпуская кнопку «CANCEL»).
• Дождитесь появления на дисплее мигающего символа «X».
c. Запустите распакованный выполняемый файл. Программа будет установлена и выполнит автоматический поиск принтера.
d. Для установки обновления следуйте инструкциям.
e. После завершения обновления на передней панели появится сообщение о необходимости отключения принтера.
f. Отключите принтер, подождите несколько секунд и подключите его снова.
ВАЖНО! Если принтер может перейти в состояние готовности в любой момент, то НЕТ никакой необходимости переводить принтер в режим SPECIAL X MODE. Он будет найден через USB или через сеть.
11. Если даже после выполнения всех предыдущих шагов проблема сохранится, если у вас есть сомнения или вопросы, или требуется дополнительная помощь, обратитесь к вашему представителю HP или в службу технической поддержки HP.
Источник
HP Designjet 500/510/800 Series Printers — System Error 21:10
Environment
Questions/Symptoms
Cause
Answer/Solution
This document explains the general procedure to troubleshoot, isolate and solve System Error Code 21:10 or 21:11. This System Error refers mainly to the Service Station. However, in some cases, it can be also caused by other components.
Follow the steps listed below to accurately troubleshoot and isolate the problem.
Troubleshooting:
1. Disconnect the power cord.
2. Open the top window.
3. Manually move the carriage to the left (out from the Service Station).
NOTE: If the carriage does not manually move to the left, DO NOT FORCE IT. Try to restart a couple of times. Check if it is able to automatically come out at any point while trying to initialize. If so, unplug the power cord immediately. If even after this, the carriage is STILL NOT able to come out, contact technical support for specific instructions about unlocking the carriage.
4. Check for any visible obstructions (printing area and Service Station).
NOTE: If the carriage was able to move to the left, manually move it from side to side a couple of times making sure that there are no obstructions:
• Check that the carriage belt is in good conditions (tight and not worn-out or shredded).
• Clean and oil (synthetic oil) the carriage rod.
• Check that the Trailing Cables are flat and move freely following the movement of the carriage.
• Clean (not scratching) the Encoder Strip (using a non-abrasive liquid and a lint-free cloth).
IMPORTANT: Damage on ANY of the previous parts mean replacement of it as this will cause quality issues, errors or messages.
5. Remove all PRINTHEADS (PHs) from the carriage.
NOTE: In order to remove the PHs, release the blue latch on top of the carriage, then lift up the carriage cover. Use the blue handle on every PH to lift them up. Once they have been removed, make sure to properly close the carriage cover (blue latch engaging the purple hook), then leave the carriage in the middle of the printer. Close the Window.
6. Reconnect the power cord.
7. Restart the printer.
NOTE: If all goes fine, the printer will ask for PHs instead of showing the System Error. If the printer shows the System Error again, disconnect the printer for some seconds, reconnect it and restart. If required, repeat this process at least 3 more times. If the System Error definitely persists after several times, most likely the Service Station needs to be replaced.
8. Put the PHs back in when asked to do so.
NOTE: Once the printer asks for PHs, press ENTER to start with the replacement. The carriage will automatically come out of the Service Station. Then the display will ask to open the window and proceed with the replacement. Once they have been inserted, make sure to properly close the carriage cover (no need to move the carriage) and window.
IMPORTANT: Every PH has its own expiration date stamped on it. Expired PHs can be the cause of the System Error. If any rejection of PHs appears while replacing them or if the printer is unable to finish the PH alignment, then the expired PHs need to be replaced with new ones in warranty. If the issue gets solved but continues to appear from time to time, it is also important to replace them.
9. If no issue persists, verify functionality.
10. If the issue persists, perform FIRMWARE (FW) update.
NOTE: This is recommended ONLY as the last step and ONLY if the FW is not up to date. On the other hand, feel free to update the FW if the printer is able to get to ready at any point. This will improve the general functionality of the device.
IMPORTANT: For the DJ 500, it is recommended to remove the HPGL2 card (if installed) before updating the FW. For doing this, remove the Card Cover from the back of the Left Hand Cover. Then unscrew the 2 screws attaching the HPGL2 card to the Electronics Module. Finally, pull out the card.
To update the FW follow the next steps (it will ONLY work if the printer is connected via USB to the computer):
a. Download (www.hp.com/bizsupport), save and unzip the update file to your computer.
b. Ensure that the printer is SPECIAL X MODE (this is needed as the printer is not able to get to ready):
• Disconnect the power cord.
• Press the CANCEL button.
• Reconnect the power cord (while still pressing the CANCEL button).
• Wait until the display shows a flashing ‘X’.
c. Run the unzipped executable file. A program will be installed and then it will look for the printer automatically.
d. Follow the instructions to perform the update.
e. Once the update is complete, the front panel will indicate that the printer must be disconnected.
f. Disconnect the printer, wait some seconds and then reconnect it.
IMPORTANT: If the printer is able to get to ready at any point, there is NO need to put the printer in special X mode. It will be detected via USB or Network.
11. If even after following all the previous steps the issue persists, if you have questions or doubts, or if more assistance is needed, please contact your HP Representative or call HP Technical Support.
Источник
A part from the several astonishing features of HP PC, you may also stumble upon several errors while using this machine. Among st the number of system errors, boot device not found or 3F0 error on HP PC is the most frequent error that is reported by computer users. It takes place all of a sudden devoid of giving you a slight chance to act upon it. However, you can effortlessly resolve this error by following the set of measures which are discussed below. Else you can also put a call on HP Support Number and take assistance from online experts to fix this error swiftly.
The provided remedial measures are only applicable if you see any of the mentioned hard drive errors on your computer screen:
- Boot device is unable to found. Please install an OS on your hard disk first.
- There is no boot device is available.
- Boot device not found, hard disk error (3F0).
- No bootable device has been found, insert boot disk and then press any key.
When you see Boot device not found 3F0 error?
When the hard disk is unable to support the boot process of system, then you may stumble upon hard drive boot device not found 3F0 error. While the booting process is running, the OS loads into Random Access Memory (RAM). In order to complete this task, a setup process starts and BIOS update (basic input output system) takes the whole charge. Then, BIOS need to access certain file from the bootable device. But, when the hard drive is not accessed by BIOS, then Boot device not found 3F0 error pops up on the computer screen.
What are the reasons behind the occurrence of Boot Device 3F0 Error?
Once you have the knowledge about the causes of 3F0 error, then you tackle down this error with suitable courses of action.
The potential causes of hard drive 3F0 error consist of:
-
- Having incorrect boot sequence in the BIOS.
- Boot sector or the Master Boot Record in damaged.
- Facing some hard drive connection issue.
- Malware or virus attack
- You have corrupt hard drive partitions.
- Corrupt hard drive partitions and damaged hard drive
Now, you are familiar with the reasons by which this nasty error takes place. It’s time to learn how to Fix Boot Device Not Found Error.
In order to fix this error, follow the mentioned measures carefully.
Perform a Hard Reset
By performing a hard reset you can easily re-establishes the connection with BIOS and the hardware. It is a very easy process that will also fix boot device not found 3F0 error. For this, you have to follow the below noted steps.
- Turn your HP PC off.
- Remove computer from any attached docking station and after that unplug the AC adaptor from the computer.
- Make sure no peripheral device is connected with the computer.
- Afterward, you need to press the power button for at least 15 seconds to drain out all of the residual charge.
- Now, you need to start the system by pressing the power button.
- When the startup menu appears, select the start windows normally by using arrow keys and press enter.
Steps to Restore BIOS Default Settings
Sometimes, the system is configured to boot from an Unbootable disk and you need to Restore BIOS Default Settings. In order to fix boot device not found 3F0 error, go after these steps:
- Start the computer by pressing the power button and instantly after this, press F10 key repeatedly to enter into BIOS setup menu.
- In order to load and restore BIOS setup default settings, simply press F9 on the BIOS setup menu.
- When it loaded completely, press F10 to save and exit.
- Choose yes, and when prompted exit saving changes, simply press enter.
- After that, simply follow the on screen instructions to restart the computer.
How can you perform Reset Hard Drive?
The boot device not found error is might be due to some lose connections, so you need to reset hard drive in order to fix this error. For this, follow these steps:
- Turn off the computer by pressing the power button for a few seconds.
- Now, you need to unplug the power cable.
- After that, you have to disconnect and reconnect the hard drive.
- Join all removed cable to the computer and restart it to see if it works seamlessly.
By following these simple measures, you can eliminate boot device not found 3F0 error in an efficient manner. However, whenever you need to additional support to understand any of the measure, then you can put a call on Hp Tech Support Number at anytime.
Frequently Asked Questions (FAQs)
How Do I Fix Boot Device Not Found?
Are you facing the boot device not found problems? Are you searching for the suitable method to fix it permanently? First of all, you should restart your computer system. After that, you need to open the BIOS menu by pressing the necessary key. Once done, you should navigate to the ‘Boot’ tab and then consider changing the boot order. Apart from that, you also need to list the HDD of your computer and then save the settings. Hereafter, you should also restart your computer system and check for the resolution to such error.
How Do I Fix My HP Laptop Boot Device Not Found?
Are you looking forward to getting rid of the HP Laptop Boot Device Not Found problems? Before you begin for fixing the hurdles, you should restart your computer and then open up the necessary key. Now, you should go to the ‘Boot’ tab and then you have to change the boot order. Apart from that, you will also have to list your computer’s HDD. Once you done successfully, you should save the settings and restart your computer system. By this way, you will be able to resolve the whole host of such hurdles completely from the root.
What Is Boot Device Not Found?
‘Boot device not found’ is one of the error messages that most of the users might come across. However, it might happen when users try to boot the operating system. The error code simply signifies that the Windows operating System is completely unable to find out the bootable device to boot from. The bootable device can be an optical CD/DVD ROM drive, internal hard drive, network adapter and an external USB drive. Hence, you don’t need to worry about such errors as you can resolve it by taking help from the experts.
How Do I Fix My Boot Device?
Are you one of those users who are running into boot device problems? Are you also looking for the suitable solution to deal with such kind of errors? However, there are various methods via which you can easily get rid of it completely from the root. Below are the feasible solutions that you should implement carefully:
- You should try repairing boot sector effectively.
- Next, you also need to consider fixing hard disk of your computer system.
- Check the PC boot order and then modify it as per your needs.
- Make use of the ‘Startup Repair’ to eradicate operating system problems.
How Do I Fix My HP Laptop Boot Device Not Found?
Are you trying to boot the operating system of your HP laptop? Is your windows OS not able to detect the device? You might confront Boot Device Not Found error while performing the same operation. For the correct resolution, you should consider repairing MBR as quickly as possible. Apart from that, if the problem occurs, you should modify and check the PC boot order to resolve such problems. Moreover, you should also try to repair the problematic hard disk and resolve boot device not found problems.
How Do I Fix Boot Device Not Found Hard Drive 3f0?
To get rid of the boot device not found hard driver 3F0 error, you should walkthrough the below-mentioned steps carefully: For that, you should start your computer system by pressing the ‘Power’ button. Then, you also need to F10 key repeatedly to open up the BIOS setup menu. Immediately after this, you should press the F9 key to restore BIOS Setup Default settings. Once done, you also need to press the F10 key to save and exit from the BIOS menu.
What Does It Mean When It Says Boot Device Not Found?
Are you coming across the error says ‘Boot Device Not Found’? It simply means that your Windows is completely incapable of determining the bootable device. Whether you’re using internal hard drive, network adapter, or external hard drivers for booting, you are getting failure. It generally arises when you attempt to boot the operating system of your computer system. By implementing some operations such as repairing MBR, checking the PC boot order and many more, you can resolve it. Besides, you can also take help and proper guidance from the experts and get rid of such errors effectively.
What Do You Do When Your Computer Says Boot Device Not Found?
Are you trying to boot the operating system? Is your Windows unable to detect the bootable device including optical network adapter, CD/DVD ROM drive and internal hard drive? First of all, you should quickly open the BIOS setup menu and try to restore the setup default setting. Doing so will surely help you out in resolving the Boot Device Not Found problems completely from the root. If you still face the same problems, you should also consider taking help from the experts as quickly as possible.
How Do I Select Boot Device From Startup?
To select the boot device from the startup, you should press and hold the ‘Shift’ key for a couple of seconds. In the ‘Start’ menu, you will have to click on the ‘Restart’ option. Doing so will get you the boot options menu where you need to choose an option states ‘Use a device’. After that, you will have to select the bootable device you would like to boot from. It can be a DVD ROM, USB drive, or network adapter that you can use for booting your operating system.
Why Does My Computer Say Boot Device Not Found?
Sometimes, your computer system often says ‘Boot Device Not Found’ error. The users usually encounter it when they try to boot the operation system and the bootable device is not found. However, you don’t need to worry at all as the process of fixing such errors is as easy as a piece of cake. What you need to do is to check the PC boot order and repair MBR effectively. Now, you should check for the same error and then consider fixing the hard drive problem. Doing so will surely help you out to resolve boot device not found problems.
Last update:
Free download and update Firmware Software on Hp Laserjet 3015 Error Call Hp Support
Easy Way To update Hp Laserjet 3015 Error Call Hp Support Firmware Software new version, supported android 13/10/7/6/11/8/4/12/5/9.
Hp Laserjet 3015 Error Call Hp Support Firmware
Free download Firmware on a android version: Android 9, Android 7, Android 8, Android 12, Android 6, Android 4, Android 13, Android 10, Android 5, Android 11.
| App Name: | FirmwareAndroid.APK |
| Last Update: | 18 September 2022 |
| Language pack: | English, Persian, Romanian, Hindi, Czech |
| Version: | 2.9 |
| File Size: | 8.68 MB |
| File Type: | application/vnd.android.package-archive |
| Downloads: | 68 760 |
Download Android firmware file
Supported android devices: Hp Laserjet 3015 Error Call Hp Support, Synology Dsm 4 3, Tp Link Archer C7 Watch, Sony Bravia Kdl-48w585b, Panasonic Wv-cw634f, Boway U3 and many others.
Watching YouTube video — How do I update Firmware Software for Hp Laserjet 3015 Error Call Hp Support?
All rights reserved. Unauthorized reproduction, in whole or in part is strictly prohibited.
POPULAR TODAY
- SOLVED: upgrade Firmware on Synology Dsm 4 3
- Top 9 Ways to upgrade Firmware in Tp Link Archer C7 Watch
- Easy Way To upgrade Stock firmware with Sony Bravia Kdl-48w585b
- 9 Solutions to upgrade Android firmware with Panasonic Wv-cw634f
- Learn how to upgrade Android firmware in Boway U3