Easy and tested solutions for this issue
by Madalina Dinita
Madalina has been a Windows fan ever since she got her hands on her first Windows XP computer. She is interested in all things technology, especially emerging technologies… read more
Updated on
- An asio.sys error may be triggered by malware, a corrupted HDD, or system memory issues.
- Often, you can get Asio.sys and a Blue Screen of Death, which shuts you off the system.
- A BSOD fixer tool can quickly get you out of trouble.
Windows 10 users may sometimes encounter the asio.sys error on their machines. It would be good to know what asio.sys is before we move on to the solutions.
Variations of asio.sys issues read Can’t open asio.sys (5) or system service exception asio.sys.
What is ASIO Sys?
- What is ASIO Sys?
- How do I fix asio.sys error?
- 1. Update the Universal ASIO driver
- 2. Run an SFC
- 3. Run a complete malware scan
- How do I download and install the Realtek ASIO component?
ASIO.sys is a virtual driver for Asus PC Probe. It is specific to ASUS computers.
The ASUS PC sound is guaranteed not to undergo sample-rate conversion or digital signal processing when using ASIO or Audio Stream Input/Output mode.
It is chosen by audiophiles seeking perfect fidelity since it is almost entirely accurate to its source.
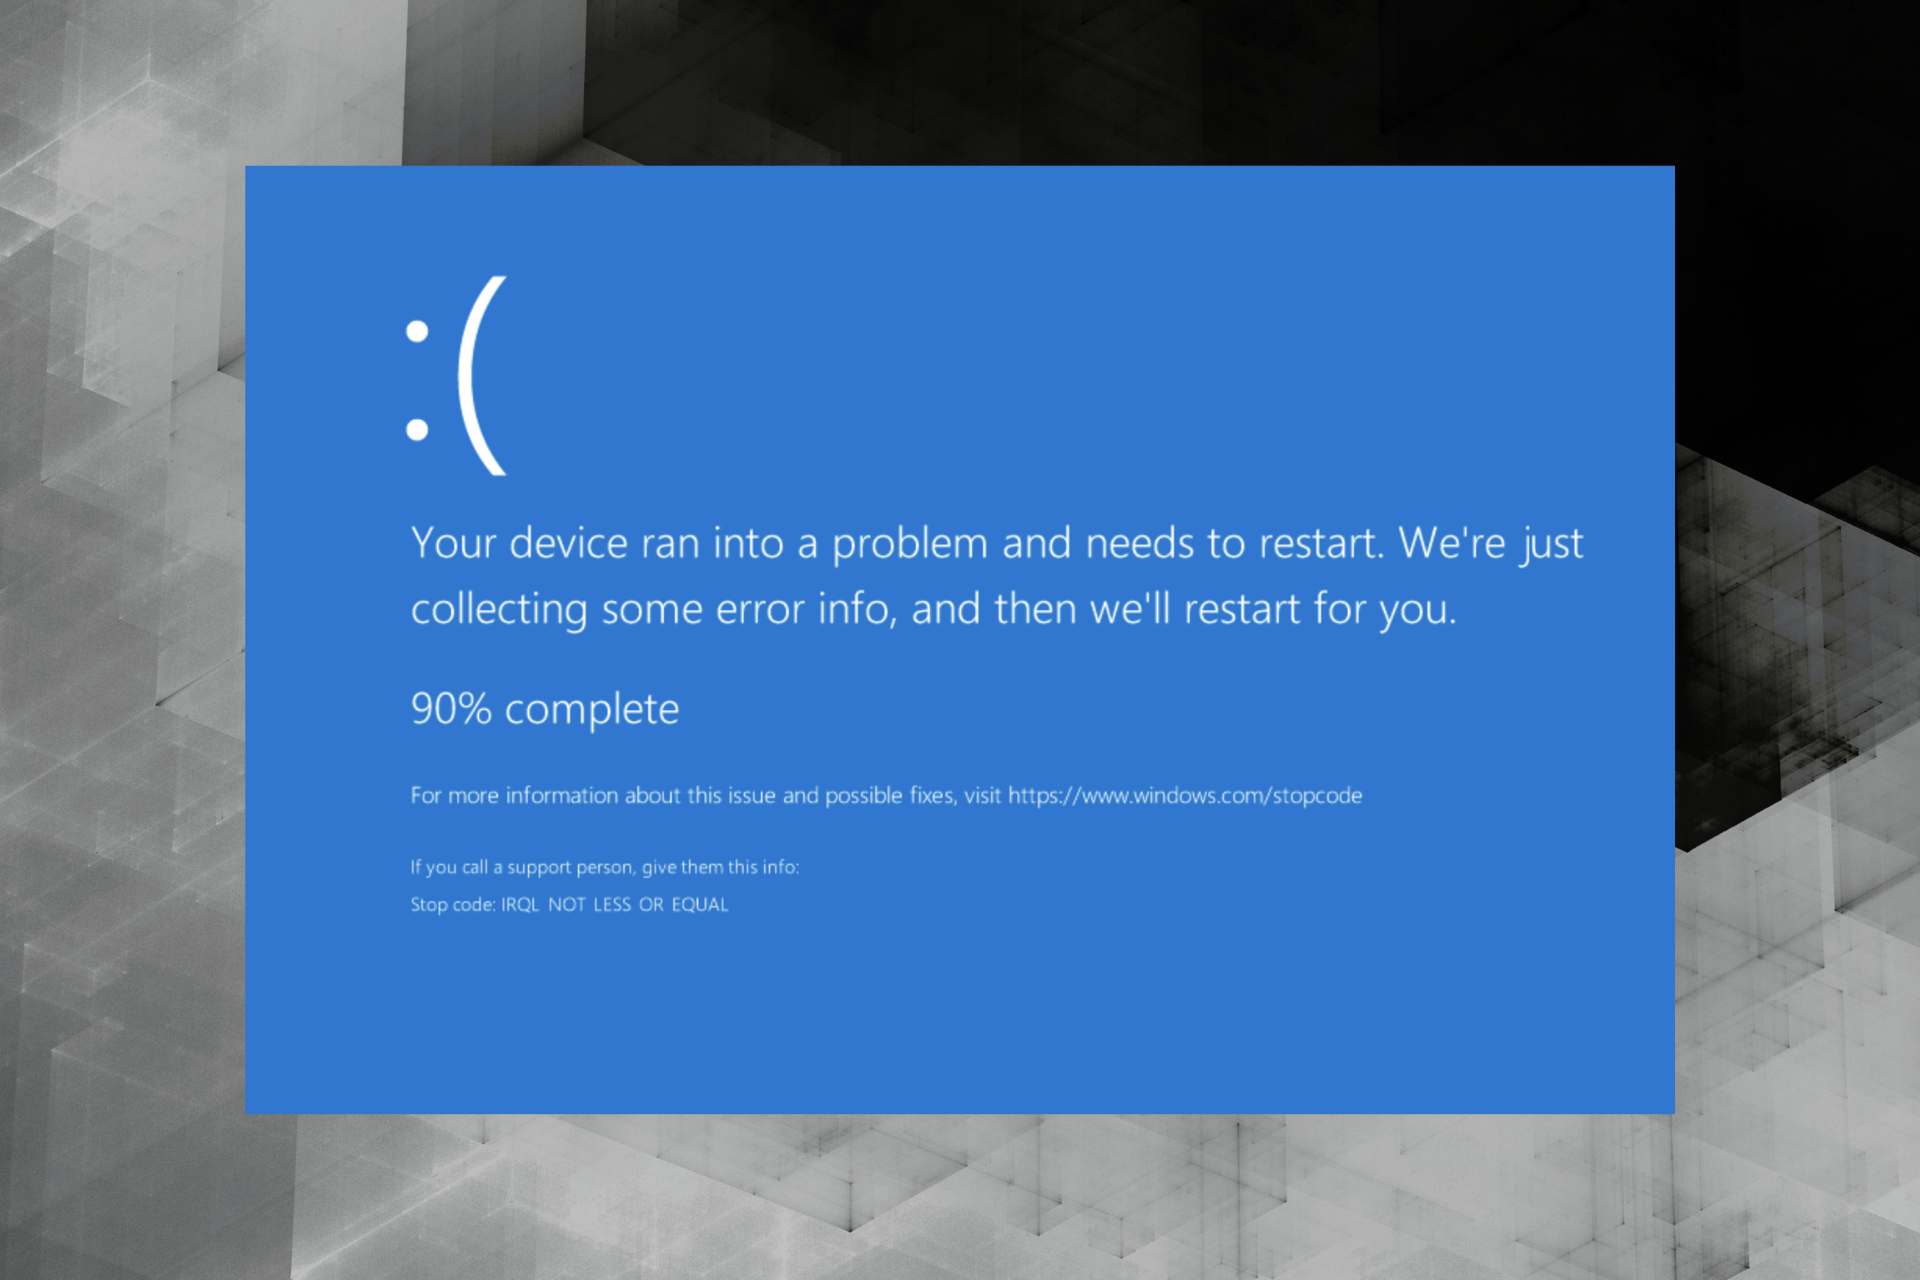
Corrupt files and faulty hardware often cause this asio.sys error. And this often leads to Blue Screen of Death errors.
It is worth mentioning that Asio.sys error may also be triggered by malware infections, corrupted hard disk issues, and memory corruption issues.
How do I fix asio.sys error?
Before starting any core fixes we have put together, you should consider using a specialized BSOD troubleshooter.
1. Update the Universal ASIO driver
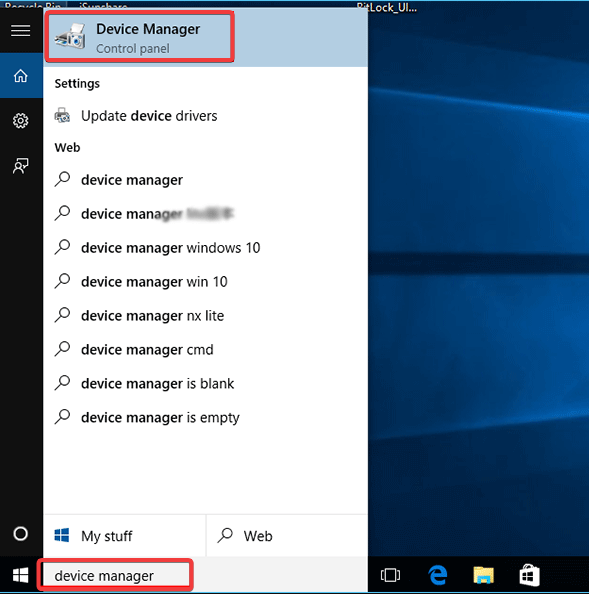
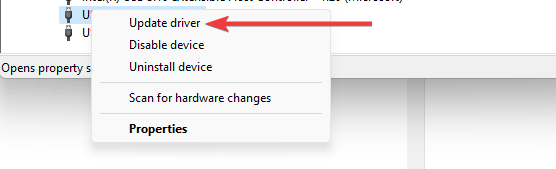
- Press Windows Key + S, then type Device Manager.

- Expand Universal ASIO Driver, right-click on Universal ASIO Driver and select Update driver.

- Once done, restart the PC.
Thankfully, there is another more accessible way to update your drivers. Download third-party software that does it for you. Not only will it be safer, but it will also save you the time of searching and doing it manually.
Moreover, the software will ensure that only the latest compatible drivers are being downloaded so that you won’t have any problems with version mismatching.
⇒ Get Outbyte Driver Updater
2. Run an SFC
A System File Checker is an accessible tool within Windows that can scan and repair your Windows system files.
- Type cmd in the Search box and click on Run as Administrator to open an elevated Command Prompt window.
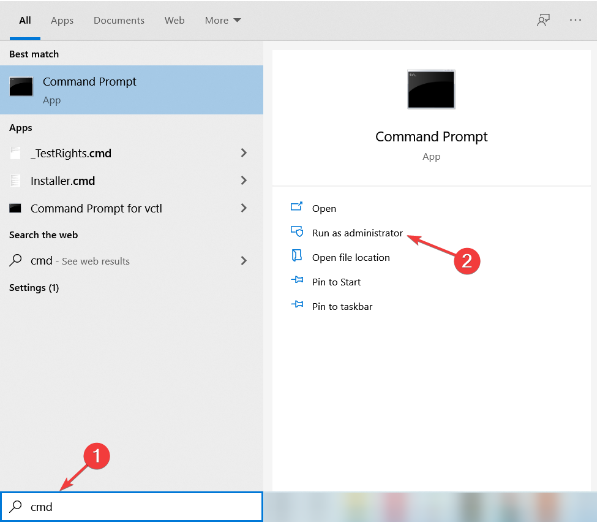
2. When Command Prompt opens, enter the following command and press Enter: sfc /scannow
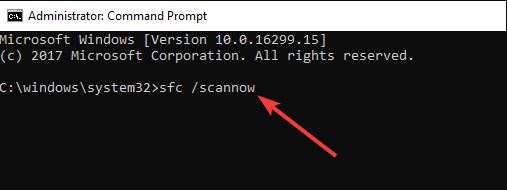
3. Don’t close Command Prompt or interrupt the repair process. It can take a while, so wait patiently while it completes.
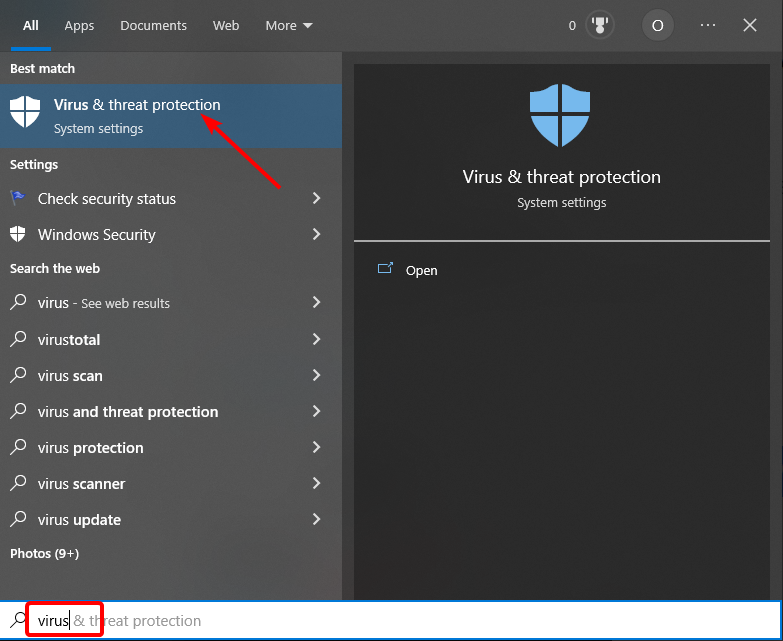
3. Run a complete malware scan
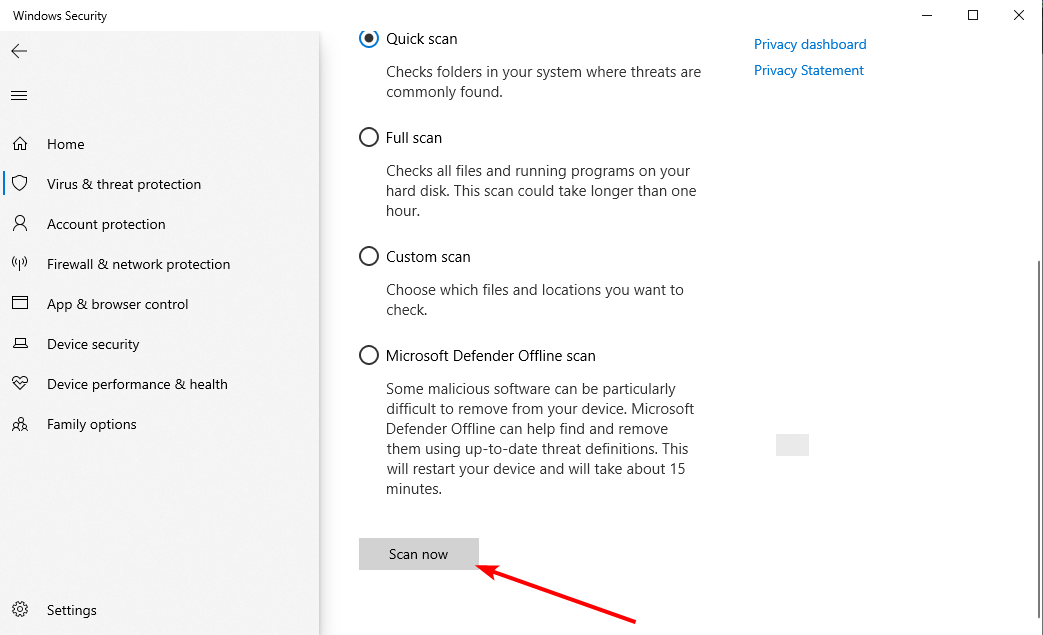
- Press the Start button, type virus, and select the Virus & threat protection option.

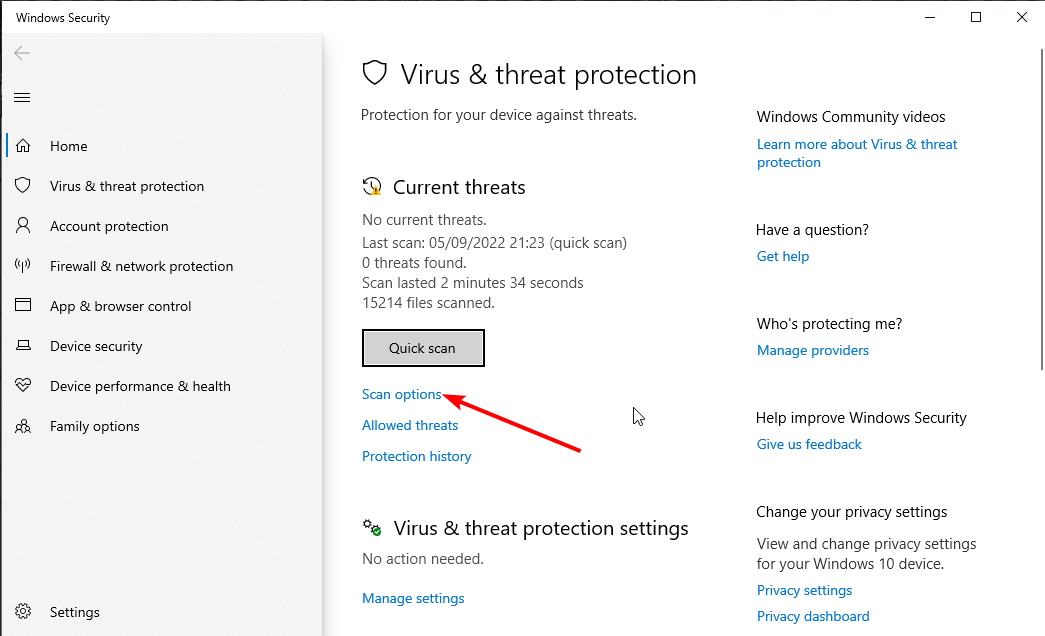
- Choose Scan options.

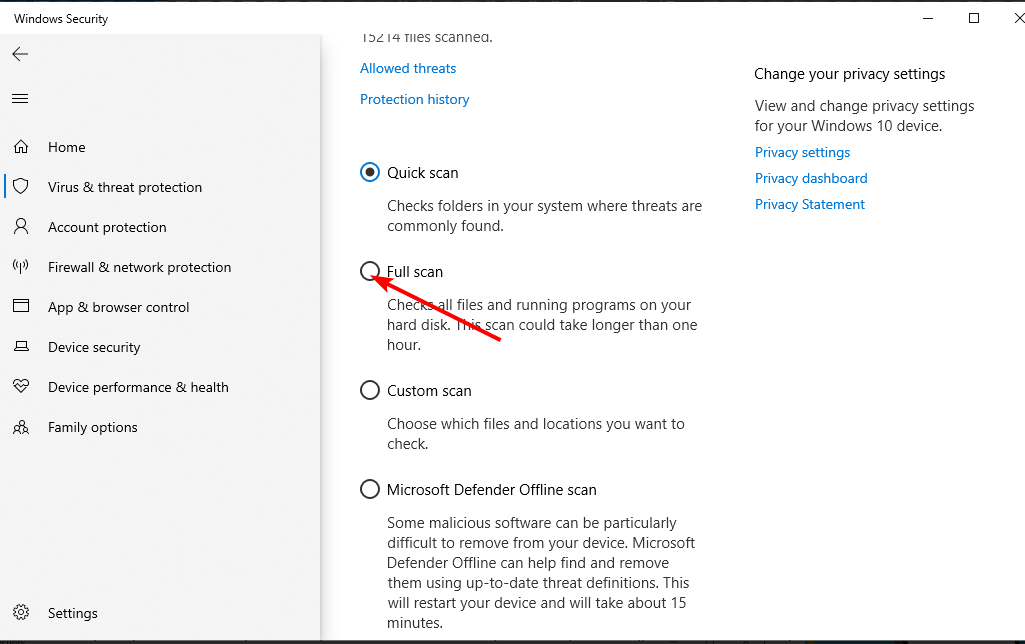
- Select the Full Scan option.

- Finally, click the Scan now button and wait for the scan to finish.

Alternatively, you can run a full system scan using other antimalware tools.
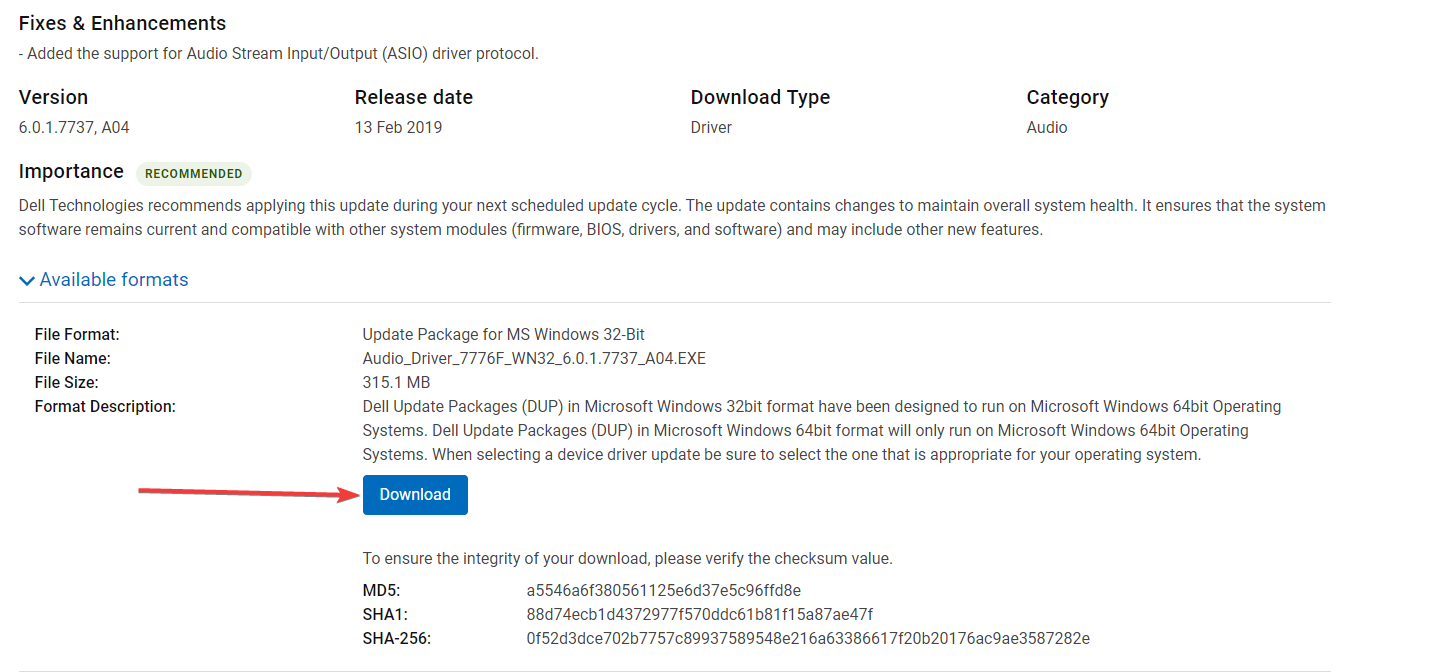
How do I download and install the Realtek ASIO component?
- Visit the official site for the driver download (this will depend on your computer manufacturer).
- Once you locate the Realtek ASIO driver, click on download.

- You should then click the downloaded file to install it on your computer.
This ASUS error can often be stubborn to get rid of, but if you have tried these solutions, you should have successfully fixed the asio.sys error.
Lastly, tell us what worked for you in the comments section below.
![]()
The error “can’t open AsIO.sys” can occur at startup, installing or opening an ASUS utility. If you’re experiencing this error, don’t worry. The tips below may help you fix the error.
What’s AsIO.sys?
AsIO.sys is a driver file that belongs to ASUS. Usually it’s preinstalled on your ASUS computer and installed along with the ASUS motherboard. The error “can’t open AsIO.sys” is one of the common errors that ASUS users have reported. It usually occurs to AURA & AI Suite.
You may encounter this error whenever you start your computer, or when you install AURA or AI Suite. Select one of the links below for the fix depending on your situation.
Fix: If you run into this error when you open AURA or AI Suite
Fix: If you run into this error when you install AURA or AI Suite
Fix: If you run into this error When you start your computer
Fix: If you run into this error when you open AURA or AI Suite
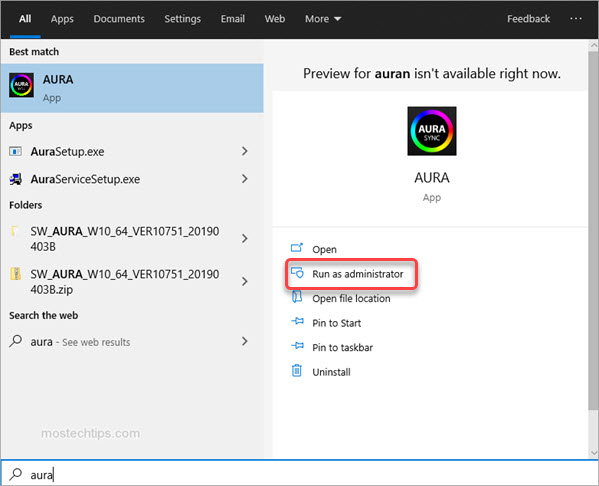
The message “can’t open AsIO.sys” can pop up at opening AURA or AI Suite. To fix the error, you just need to run the utility as administrator.
1) On your keyboard, press the Windows logo key.
2) Type the utility you have the problem with (AURA or AI Suite), and then click on Run as administrator. Then you should be able to open the program.
Fix: If you run into this error when you install AURA or AI Suite
Many users have reported that this error occurs when they install AURA or AI Suite (I, II or III). If you also can’t install AURA or AI Suite due to this error, you can follow these steps to fix it.
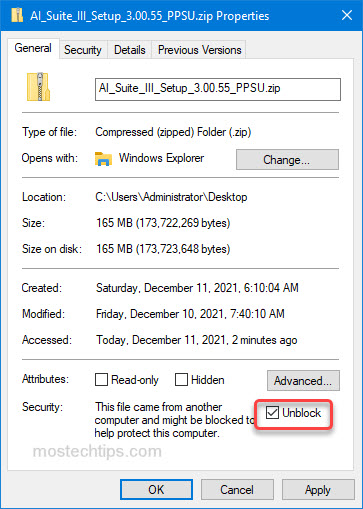
1) Right-click on the downloaded file of the utility (the zip file) and select Properties.
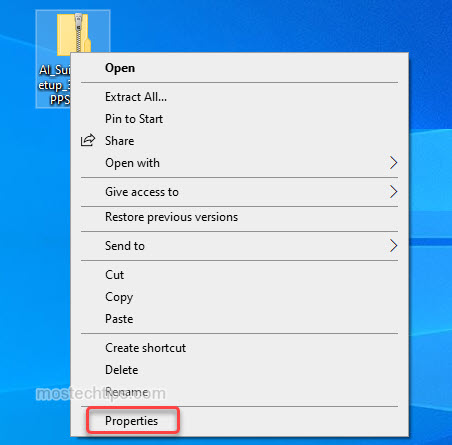
2) At the bottom, tick the “Unblock” checkbox, and then click OK to save the changes.

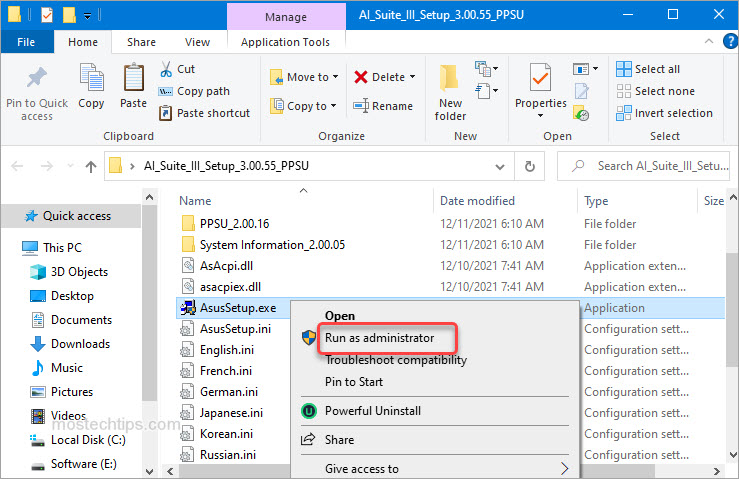
3) Extract the zip file.
4) Open the extracted folder and then locate the file called “AsusSetup.exe”.
5) Right-click on “AsusSetup.exe” and select Run as administrator. Then you should install the utility successfully.

Fix: If you run into this error When you start your computer
If this error message pops up at startup, the ASUS utilities (usually, AURA or AI Suite) could be the culprit.
If you have multiple ASUS utilities installed, to figure out which utility is causing the problem, you can uninstall them one by one then you can determine which one is causing the problem. If you only have one ASUS utility installed, just uninstall it and reinstall it as administrator.
Here’s how to do it:
1) Right-click on the Start menu button and select Apps and Features.
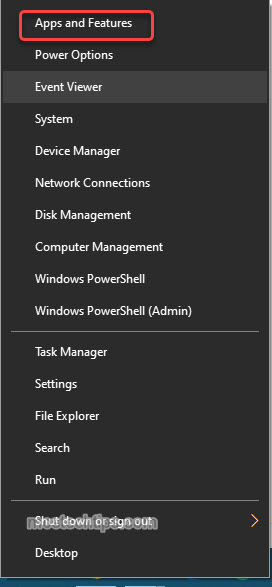
2) Scroll down and select one of the ASUS utilities.
3) Click Uninstall, then the confirmation dialog will pop up, then click Uninstall again.
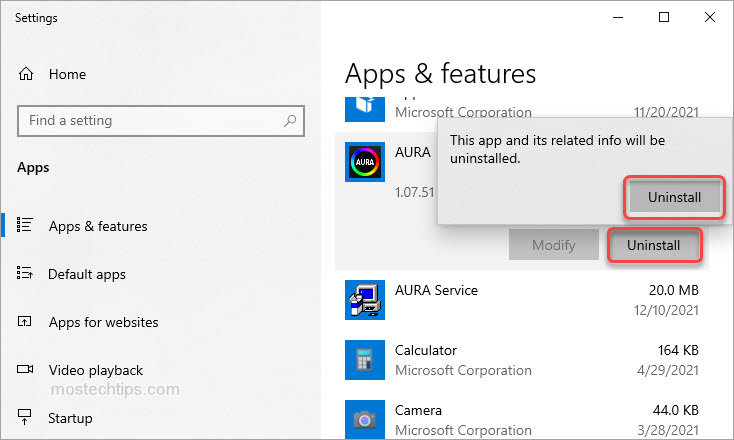
4) Once the uninstallation is done, restart your computer and check to see if the error still occurs.
If the error still occurs, it means that utility is not the cause. If you have multiple ASUS utilities installed, repeat the steps above until you figure out the one that’s causing the problem.
Once you figure out and uninstall the utility that’s causing the problem, you can reinstall it by following these steps:
a) Right-click on the downloaded file of the utility (.zip file) and select Properties.

b) At the bottom, tick the “Unblock” check box, and then click OK to save the changes.
c) Extract the zip file.
d) Open the extracted folder and locate the file called “AsusSetup.exe”.
e) Right-click on “AsusSetup.exe” and select Run as administrator.
Hopefully you can fix the “Can’t open AsIO.sys” with the above tips. If you have any questions, feel free to drop a comment below. I’ll get back to you ASAP.
AsIO.sys – файл программы Asus PC Probe, которая устанавливает драйвер для материнской платы ASUS и служит для мониторинга компонентов ПК. Если вы меняли компоненты компьютера и не удалили программу Asus PC Probe, то столкнетесь с кодом ошибки SYSTEM SERVICE EXCEPTION и указанием на файл AsIO.sys в Windows 10/8.1/7.
Нужно удалить программу Asus PC Probe, чтобы избавиться от синего экрана, но как это сделать, если все новые компоненты установлены и нет возможности загрузиться на рабочий стол. Если вы опытный пользователь и вы можете загрузиться на рабочий стол, то удалите программу Asus PC Probe через инсталлятор, но я покажу, что делать, когда нет возможности попасть на рабочий стол.
1. Включите и выключите компьютер 4-5 раза, доходя до ошибки или загрузки логотипа Windows. Далее вас перебросит в дополнительные параметры загрузки, где вы должны выбрать “Параметры загрузки” > “Перезагрузить” > и нажать F4 “Безопасный режим”. Это даст вам возможность загрузиться на рабочий стол и вы сможете удалить Asus PC Probe.

2. Если вы не можете попасть в дополнительные параметры, то нужно создать установочную флешку и на пункте установки нажать снизу на “Восстановление системы”. Далее вас перекинет в дополнительные параметры, где вы можете запустить безопасный режим, как в пункте 1.

Пользователи Windows 10 могут иногда сталкиваться с ошибками asio.sys на своих компьютерах. Было бы хорошо узнать, что такое asio.sys, прежде чем перейти к решению.
Asio.sys — это драйвер, специфичный для компьютеров ASUS. Поврежденные файлы и неисправное оборудование часто вызывают эту ошибку. Это часто приводит к ошибкам Blue Screen of Death.
Стоит отметить, что ошибка Asio.sys также может быть вызвана заражением вредоносным ПО, повреждением жесткого диска и повреждением памяти.
Шаги для исправления ошибок Asio.sys
Вот подробный список процесса устранения неполадок для решения проблем asio.sys. Имейте в виду, что эти шаги довольно сложны. Итак, выполняйте каждый шаг.
Решение 1. Обновите драйверы системного устройства.
Ошибка типа «синий экран» asio.sys, влияющая на вашу систему, может быть вызвана устаревшими драйверами устройств .
По многим причинам драйверы, которые работают нормально, могут просто перестать работать в следующую минуту. Но вы можете обновить драйвер устройства, чтобы исправить проблему BSOD.
Независимо от того, являетесь ли вы экспертом в поиске, загрузке и обновлении драйверов, процедура все равно может быть очень напряженной и расстраивающей. Ухудшение проблем при загрузке не того драйвера или несовместимой версии драйвера.
Таким образом, из-за сложности и нехватки времени рекомендуется использовать инструмент обновления драйверов для ускорения процесса.
Средство обновления драйверов автоматически обновит все драйверы устройств на вашем компьютере, а не только драйверы, связанные с ошибкой asio.sys.
Одно из самых надежных обновлений драйверов, которое мы тестировали в Tweakbit.
TweakBit Driver Updater — это комплексное решение для автоматического обновления. Обновление драйверов оптимизирует ваш компьютер, обеспечивая правильную работу устройств в соответствии с последними функциями.
- Скачать сейчас TweakBit’s Driver Updater
Решение 2. Исправьте записи реестра
Иногда ошибки Asio.sys Blue Screen могут быть связаны с проблемами в реестре Windows. Таким образом, вам нужно будет исправить любые проблемы реестра, прежде чем вы сможете исправить эту системную ошибку.
Если вы не являетесь экспертом в этом, не пытайтесь редактировать реестр Windows вручную, чтобы избавиться от недействительных ошибок asio.sys. Если вы неправильно отредактируете свой реестр, ваш компьютер может перестать функционировать, и это может привести к необратимому повреждению вашей ОС.
Поэтому по этой причине мы рекомендуем вам использовать надежное средство очистки реестра для сканирования и исправления проблем реестра asio.sys. Когда вы используете очиститель реестра, процедура поиска отсутствующих файлов, неработающей ссылки в реестре или недействительных записей реестра может стать проще.
Если вы не знаете, какой Registry Cleaner установить на свой компьютер, ознакомьтесь с этим руководством.
Решение 3: Запустите полное сканирование вредоносных программ на вашем компьютере
Ошибка остановки файла asio.sys может быть вызвана заражением вашего компьютера вредоносным ПО.
Запустите полное сканирование системы с использованием антивирусных и вредоносных программ . Затем перезагрузите компьютер и проверьте, сохраняется ли проблема.
Не знаете, какой антивирус установить на свой компьютер? Это руководство поможет вам.
Решение 4. Удалите недавно установленные программы
Удаление сторонних приложений может быть правильным решением, если ошибка BSOD asio.sys связана с определенной программой.
Просто зайдите в Панель управления, перейдите в раздел «Программы и компоненты», выберите программу, которую вы недавно установили, и удалите ее с вашего ПК. 
Перезагрузите компьютер.
Решение 5: Запустите SFC
Средство проверки файлов Windows — это доступный инструмент Windows, который может сканировать и восстанавливать системные файлы Windows.
Чтобы запустить SFC, откройте командную строку как администратор и введите sfc / scannow . Нажмите Enter. 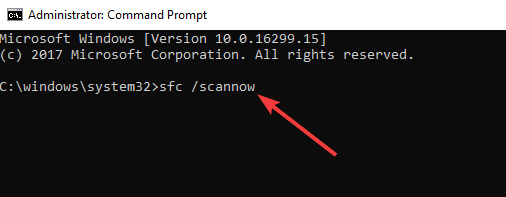
На этом этапе средство проверки системных файлов начинает сканирование системных файлов. Это должно занять несколько минут, так что наберитесь терпения.
Решение 6. Установите все доступные обновления Windows
Время от времени Microsoft обновляет и улучшает системные файлы Windows, которые могут быть связаны с asio.sys. Время от времени найти подходящее решение проблемы asio.sys может быть легко, как обновить Windows с помощью текущего пакета обновления или любого другого патча, выпущенного Microsoft.
Итак, зайдите в Настройки и проверьте наличие обновлений. 
Решение 7. Проверьте наличие повреждений жесткого диска
Как упоминалось ранее, проблемы asio.sys могут быть вызваны проблемами с повреждением жесткого диска.
К счастью, в Microsoft встроен простой сервис, известный как Check Disk, который может исправить проблемы с повреждением жесткого диска.
Чтобы использовать его, запустите командную строку как администратор рекламы и введите chkdsk / f . 
CheckDisk начнет сканирование на наличие повреждений жесткого диска.
Решение 9. Проверьте RAM на наличие повреждений
Повреждение памяти может привести к ошибкам BSOD asio.sys. Если вы сталкиваетесь со случайной перезагрузкой компьютера, сбоем компьютера, получением «звуковых» кодов при запуске, а также проблемами BSOD asio.sys, это может указывать на повреждение памяти компьютера.
Для получения дополнительной информации о том, как исправить проблемы с ОЗУ, ознакомьтесь с руководствами ниже:
- Как исправить поврежденный дамп памяти эффективно и результативно
- Решите: у вашего компьютера недостаточно памяти в Windows 10, 8.1 или 7
Мы надеемся, что эти решения помогут вам решить проблемы с asio.sys. Обратная связь от вас будет оценена.
You should upgrade or use an alternative browser.
- Status
- Not open for further replies.
-
- Mar 31, 2020
-
- 2
-
- 0
-
- 10

-
#1
I’ve just bought myself a new MB & processor to upgrade my machine, it is an Asus Prime A320M-K with AMD Ryzen 5 2600 CPU
my current setup is a Asus A68HM-Plus with AMD A6 6400
I was hoping this would be a simple upgrade as both MBs are asus (i had previously upgraded from an ECS GeForce 6100 PM-M2 to this Asus A68 and all i did was plug everything in, and it worked) but with this new MB/CPU after booting up and logging into windows, after a few mins i’m getting a blue screen with a asio.sys error
I know the best way to resolve this is to start afresh with reinstalling windows, but, i have hundreds of GB of music, videos, photos as well as steam saved games on this HDD which i really really don’t want to lose (C drive has 275GB free of 930GB) the largest thing i have to make any kind of backup is a 500GB sata HDD (probably scavenged from a sky box) so i don’t think i have the capacity to back up everything.
Is there an easy way? I’ve just made a W10 bootable dvd (from the media creation tool) with the current version of W10, should i just run this at boot up and do it all from there?
-
L
llb522
Hi all, new here so please be patient with me.I’ve just bought myself a new MB & processor to upgrade my machine, it is an Asus Prime A320M-K with AMD Ryzen 5 2600 CPU
my current setup is a Asus A68HM-Plus with AMD A6 6400
I was hoping this would be a simple upgrade as both MBs are asus (i had previously upgraded from an ECS GeForce 6100 PM-M2 to this Asus A68 and all i did was plug everything in, and it worked) but with this new MB/CPU after booting up and logging into windows, after a few mins i’m getting a blue screen with a asio.sys errorI know the best way to resolve this is to start afresh with reinstalling windows, but, i have hundreds of GB of music, videos, photos as well as steam saved games on this HDD which i really…
![]()
-
- Dec 31, 2007
-
- 7,483
-
- 502
-
- 33,390
-
#2
Just make sure you unplug your C drive that you have now until it has finished.
Plug in old C drive to use as a data drive.
-
- Mar 31, 2020
-
- 2
-
- 0
-
- 10
-
#3
Install windows on the 500gig drive.
Just make sure you unplug your C drive that you have now until it has finished.
Plug in old C drive to use as a data drive.
I had thought about doing exactly that, and I have done something very similar in the past, but, I’m led to believe that these sky box HDDs aren’t that great, and, my plan is to utilise the A68 MB and the ‘spare’ 500gb HDD in my other machine that runs on my TV (just a basic machine that just runs windows and has some films and stuff on it) (this one currently has the old geforce mb & cpu and 2x IDE HDDs which are 80 and 250gb — the A68 MB doesn’t have IDE, so I need to use a sata drive(s) on that)
-
- Apr 11, 2020
-
- 1
-
- 0
-
- 10
-
#4
Hi all, new here so please be patient with me.I’ve just bought myself a new MB & processor to upgrade my machine, it is an Asus Prime A320M-K with AMD Ryzen 5 2600 CPU
my current setup is a Asus A68HM-Plus with AMD A6 6400
I was hoping this would be a simple upgrade as both MBs are asus (i had previously upgraded from an ECS GeForce 6100 PM-M2 to this Asus A68 and all i did was plug everything in, and it worked) but with this new MB/CPU after booting up and logging into windows, after a few mins i’m getting a blue screen with a asio.sys errorI know the best way to resolve this is to start afresh with reinstalling windows, but, i have hundreds of GB of music, videos, photos as well as steam saved games on this HDD which i really really don’t want to lose (C drive has 275GB free of 930GB) the largest thing i have to make any kind of backup is a 500GB sata HDD (probably scavenged from a sky box) so i don’t think i have the capacity to back up everything.
Is there an easy way? I’ve just made a W10 bootable dvd (from the media creation tool) with the current version of W10, should i just run this at boot up and do it all from there?
Have you clean installed windows yet. ? If not you need to boot up on your “old set up and motherboard with the drive that has everything installed. I went from Asus Z97-AR with I7-4790K to Asus Prime X- 570 with Ryzen 9 3900X and was able to boot with my SSD that was fully loaded with my software. I set up the new system and put my SSD in. Windows actually booted to the desktop — then the BSOD with the asio.sys error, loop after loop. I googled and googled my problem most everyone said you had to do a clean install on the SSD then reinstall all your software. Well I did NOT want to go through all that stuff. I finally found a post from 2 years ago with the solution that someone else found AND IT WORKED! You need to boot your old system on the old MB. Go into your Programs and settings. Delete everything that says ASUS, Probe 2, etc. Then delete anything “Realtek” as this is the audio drivers associated with ASUS mb and then delete your antivirus program. Finally take the disk that came with your new motherboard and install their drivers. Take the drive out. When your new set up is ready put the drive in to boot. If you are like me Windows 10 will go through it’s “found new stuff” Getty ready then reboot. When it comes back it snhould go to desktop with all your icons and software. GOOD LUCK AND I HOPE THIS WORKS FOR YOU LIKE IT DID FOR ME!
- Status
- Not open for further replies.
Similar threads
![]()
- Advertising
- Cookies Policies
- Privacy
- Term & Conditions