Windows предлагает встроенную функцию резервного копирования, чтобы периодически создавать резервные копии ваших файлов и восстанавливать их при необходимости. Может случиться так, что резервное копирование может завершиться неудачно, и в одном из таких случаев сообщается код ошибки 0x8078011E. Полное сообщение включает:
Резервному копированию Windows не удалось получить монопольную блокировку системного раздела EFI (ESP), доступ запрещен. Код ошибки 0x8078011E.
В сообщении также указана вероятная причина: существует другое приложение, использующее файлы на ESP. Этот пост расскажет, как решить эту проблему.
Перезагрузка компьютера и повторная попытка – это всегда хорошая идея, если сторонняя программа застряла в цикле. Перезапуск снимет блокировку и позволит резервному копированию завершить процесс.
Теперь вы должны немного узнать об EFI. Это небольшая часть, созданная для хранения загрузчиков, и приложения, используемые микропрограммой в системе во время запуска, хранятся. Это скрыто для всех пользователей Windows, и его можно увидеть только с помощью инструментов управления дисками. Резервное копирование Windows – это не система резервного копирования файлов, а резервное копирование всего, что необходимо для загрузки и запуска Windows.
Это очищено, это основная причина, по которой возникает ошибка, потому что другое программное обеспечение безопасности блокирует доступ. Это не ошибка, но это сделано специально. Большая часть программного обеспечения безопасности ограничивает любой доступ для чтения или записи для других инструментов и, в данном случае, системы резервного копирования.
Поэтому, если у вас есть такое программное обеспечение, которое блокирует такой доступ, вы можете либо временно отключить его, либо добавить исключение для резервного копирования Windows. Временное отключение и запуск резервного копирования вручную гарантирует, что стороннее программное обеспечение не создает препятствий, и оно завершится без ошибок.
Некоторые сообщили о программном обеспечении, вызывающем проблему: Avast, ESET, Trend Micro и AVG. Эти приложения постоянно сканируют файлы в системном разделе EFI. Вы можете добавить их в исключение, чтобы они не сканировались и, следовательно, не использовались. Приведенный ниже список взят с официального форума ESET.
-
DeviceHarddiskVolume(%number%)EFIMicrosoftBootBCD
-
DeviceHarddiskVolume(%number%)EFIMicrosoftBootBCD.LOG
-
DeviceHarddiskVolume(%number%)EFIMicrosoftBootbootmgfw.efi
-
\?GLOBALROOTDeviceHarddiskVolume(%number%)EFIMicrosoftBootBCD
-
\?GLOBALROOTDeviceHarddiskVolume(%number%)EFIMicrosoftBootBCD.LOG
-
\?GLOBALROOTDeviceHarddiskVolume(%number%)EFIMicrosoftBootbootmgfw.efi
-
%WINDIR%system32winload.efi
Помогает ли чистая загрузка?
Вы можете выполнить чистую загрузку в Windows, где разрешены только службы Windows. Поскольку стороннего приложения нет, шансы резервного копирования Windows завершить процесс выше. Это также подтвердит, что проблема возникает из-за стороннего программного обеспечения.
Имейте в виду, что этот раздел не должен удаляться или изменяться пользователем вручную. Это может привести к тому, что компьютер вообще не загружается.
Adjust your antivirus settings to fix 0x8078011e in Windows Backup
by Milan Stanojevic
Milan has been enthusiastic about technology ever since his childhood days, and this led him to take interest in all PC-related technologies. He’s a PC enthusiast and he… read more
Updated on
- To fix 0x8078011e in Windows Backup, check your antivirus settings and make sure it’s not blocking certain paths.
- Certain antivirus software can interfere with this feature, so you might have to remove it.

Backing up your files is important, and many reported error 0x8078011e while using Windows Backup. If this issue occurs, you won’t be perform a backup at all.
In case you’re not familiar with this tool, it allows you to set up automatic backups on Windows, so it’s great for protecting your data.
However, there are several methods that you can use that will help you fix this issue once and for all, and today we’re going to show them to you.
What is error code 0x8078011e?
This is a Windows Backup error code, and the full error states the following: Windows Backup failed to get an exclusive lock on the EFI system partition (ESP). Regarding the causes, here are the most common ones:
- Conflicting software – Sometimes certain applications can interfere with Windows Backup and cause this issue. To fix it, you need to remove them manually or by using uninstaller software.
- Antivirus settings – In some instances, your antivirus will protect certain directories, thus causing this issue.
How can I fix the 0x8078011e error?
1. Uninstall third-party antivirus software
- Press Windows key + X and choose Apps and Features.

- Locate your antivirus software and click on Uninstall.

- Follow the instructions on the screen to remove it.
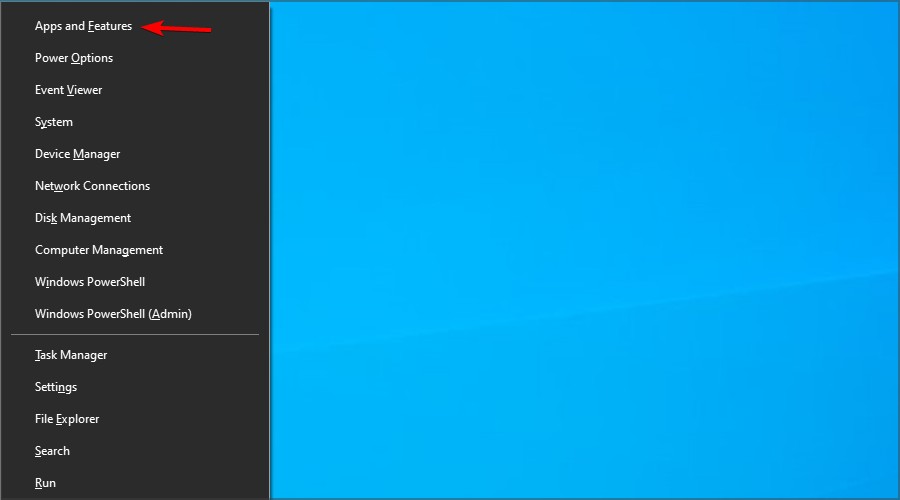
Many users reported that Avast was responsible for this issue, so if you use it, uninstall it and check if that solves the problem. For more information, visit our how to uninstall Avast Antivirus guide.
Keep in mind that other antivirus software could cause this issue as well.
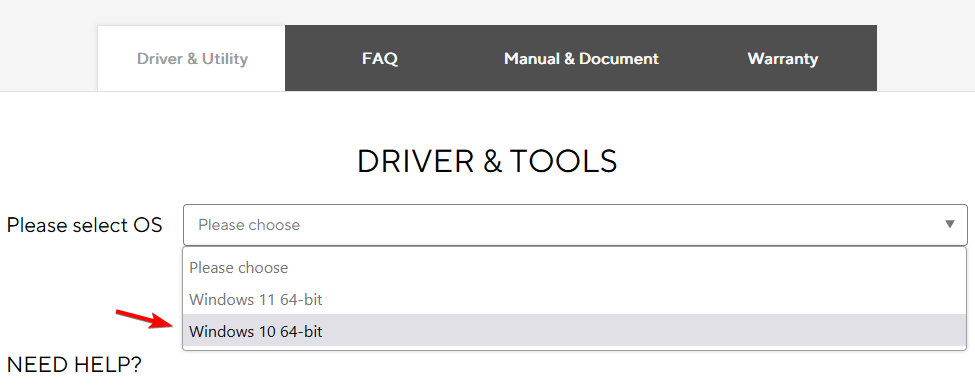
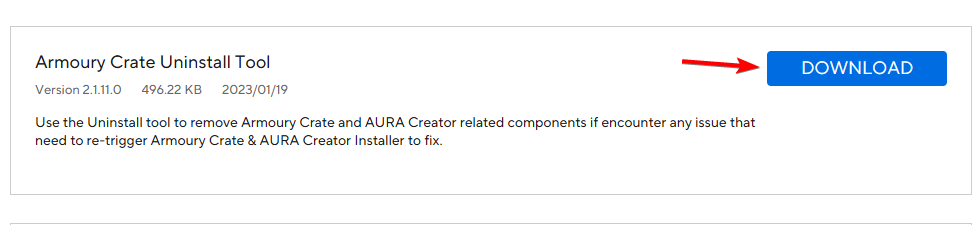
2. Remove Armoury Crate software

NOTE
This method only works if you’re using an ASUS motherboard and have Armoury Crate software installed.
- Visit the Armoury Crate download page. Next, select your version of Windows.

- Locate Armoury Crate Uninstall Tool and click the Download button.

- Wait for the software to download.
- Once it’s downloaded, start it and follow the instructions on the screen to complete the uninstall process.
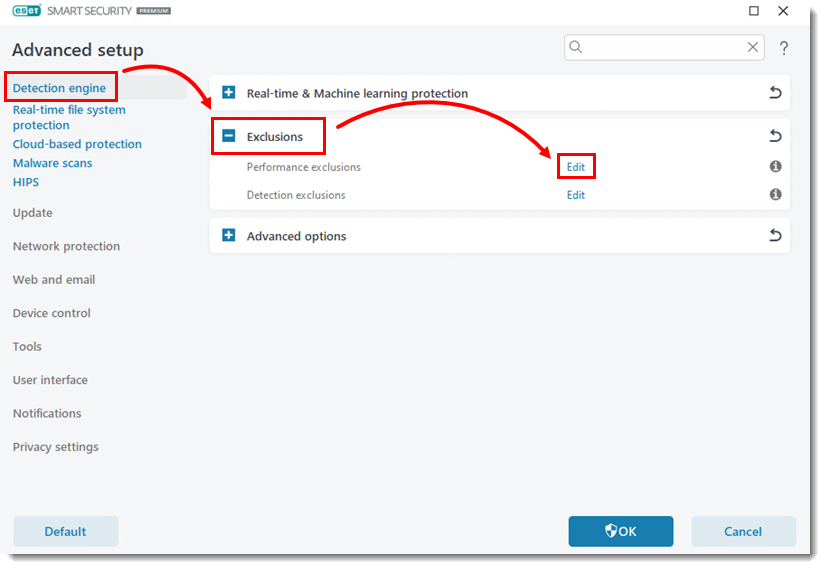
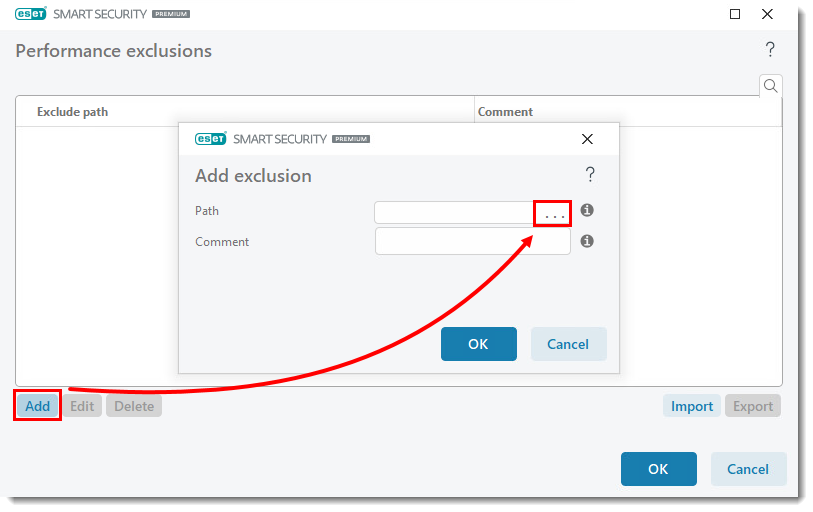
3. Add exclusions to your third-party antivirus software
NOTE
Keep in mind that the instructions will vary depending on your antivirus of choice.
- Open your antivirus software.
- Open Settings and click Edit in the Exclusions section.

- Now click Add and the dots icon next to the Path.

- Add the following paths:
\Device\HarddiskVolume1\EFI\Microsoft\Boot\BCD
\Device\HarddiskVolume1\EFI\Microsoft\Boot\BCD.LOG
\Device\HarddiskVolume1\EFI\Microsoft\Boot\bootmgfw.efi
%WINDIR%\system32\winload.efi - Save changes.
- How to Properly Fix a PC That’s Not Turning on [12 ways]
- Security Settings Blocked Self-signed Application [Fix]
- 10 Common Computer Problems & How to Properly Fix Them
- 0xc0000102 Error: How to Fix it on Windows 10 & 11
- WordPad Not Opening? 4 Ways to Fix it
4. Perform a clean boot
- Press Ctrl + Shift + Esc to open Task Manager.
- Navigate to the Startup tab and disable all applications. You can do that by right-clicking the application and choosing Disable from the menu.

- After you’re done, press the Windows key + R and enter msconfig. Click OK.

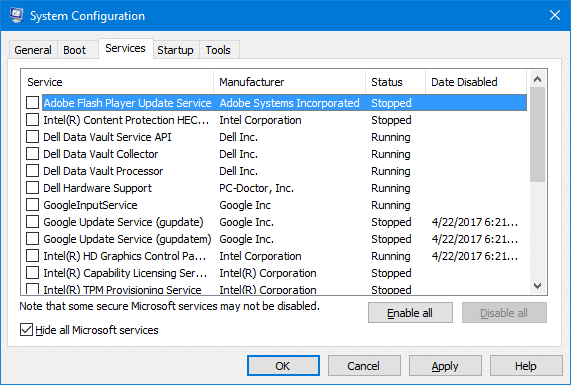
- Go to the Services tab. Check Hide all Microsoft services. Now click on Disable all.

- Click on Apply and OK. When offered to restart your PC, choose the restart option.
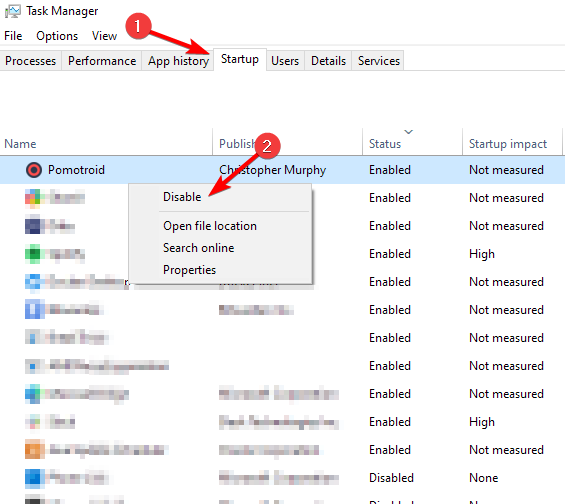

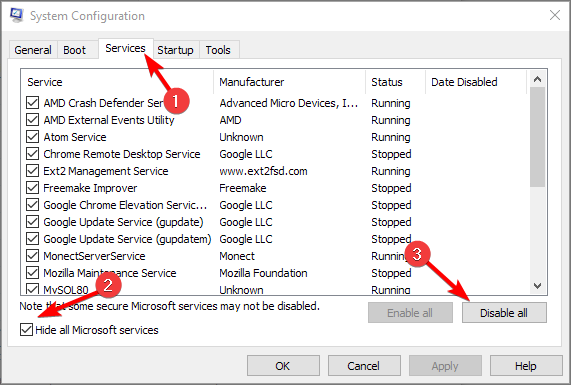
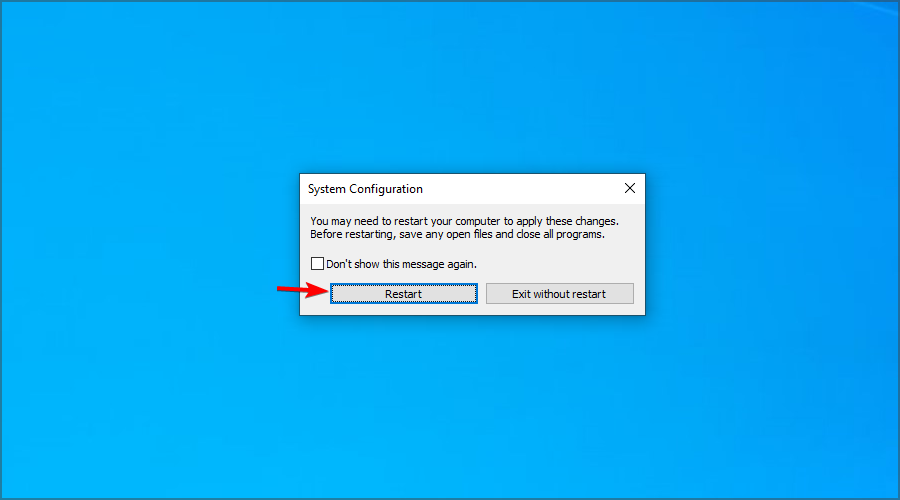
After your PC restarts, try to perform the backup again. If it works, enable services and applications again by following the same steps.
NOTE
Keep in mind that this solution doesn’t fix the core error, it just circumvents the issue.
As you can see, this issue is pretty simple to fix, and in most cases, you need to disable or remove the applications that are interfering with it.
Keep in mind that Windows Backup is available just for legacy purposes; for better results, it’s best to use quality backup software for Windows.
What solution did you use to fix this problem? Let us know in the comments below.
![]()
Когда вы пытаетесь создать системный образ с помощью Windows Backup на вашем компьютере, возникает следующая ошибка и процедура резервного копирования останавливается.
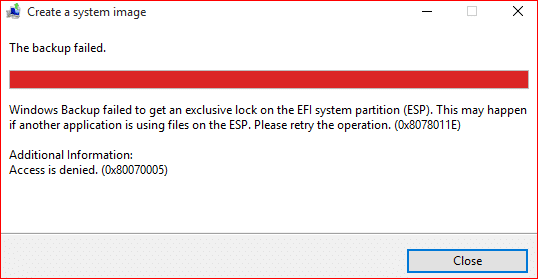
Windows Backup не удалось получить эксклюзивную блокировку системного раздела EFI (ESP). Это может произойти, если другое приложение использует файлы в ESP. Пожалуйста, повторите операцию. (0x8078011E)
Дополнительная информация:
Доступ запрещен. (0x80070005)
а также
Проверьте вашу резервную копию. Последнее резервное копирование не завершено успешно.
Исправлено: сбой резервного копирования Windows для получения эксклюзивной блокировки на системном разделе EFI
Проблема может возникнуть, если системный раздел EFI заблокирован или другое приложение использует файлы в системном разделе. Стороннее программное обеспечение безопасности защищает системные файлы и может быть причиной этой проблемы. Чтобы решить эту проблему, временно отключите стороннее программное обеспечение безопасности и выполните чистую загрузку.
Перевод вашей системы в чистое состояние загрузки помогает определить, не вызывают ли проблемы какие-либо сторонние приложения или элементы автозагрузки. Посмотрите, как выполнить чистую загрузку в Windows с помощью утилиты MSConfig.
 Устранение неполадок при чистой загрузке с помощью утилиты настройки системы (msconfig)
Заметка: Если вы ранее отключили некоторые службы, запишите их названия на листе бумаги. Позже, выполнив процедуру чистой загрузки и нажав «Включить все», вы можете снять флажки с этих конкретных служб (которые вы уже отключили) вручную.
Пользователи среднего и продвинутого уровня также могут выполнить чистую загрузку с помощью средства автозапуска из Windows SysInternals.
Если это не помогло, удалите стороннее антивирусное решение, перезапустите Windows и попробуйте снова запустить Windows Backup.
Компонент Avast антивируса NG (Secure Virtual Machines) может быть виновником в большинстве случаев.
Avast NG — это аппаратное решение для виртуализации, обеспечивающее более изолированное пространство для тестирования. Он способен запускать каждый процесс Windows в автономной безопасной виртуализированной среде (ВМ) и полностью интегрирован в ваш рабочий стол. Каждый процесс выполняется в своем собственном экземпляре виртуальной машины, что означает полную изоляцию от других ваших приложений. Эта функция теперь позволяет Avast DeepScreen улучшать сканирование неизвестных программ (лучшее обнаружение).
Удалить Avast / Trend Micro / AVG
- Открытая панель управления, программы и функции
- Щелкните правой кнопкой мыши запись антивирусного программного обеспечения (например, «Avast Free Antivirus / Avast Internet Security», «Trend Micro» или «AVG»), затем нажмите «Удалить»
- Следуйте инструкциям на экране и перезапустите Windows.
Сервисное обслуживание серверов Intel Energy WILLAMETTE
Также известно, что Intel Energy Checker / Intel Energy Server Service WILLAMETTE вызывают ту же проблему. Посмотрите, устраняет ли проблема отключение / удаление этой программы.
ESET Antivirus
Если вы используете антивирус ESET, создайте исключения для этих двух файлов:
- \ Device \ HarddiskVolume1 \ EFI \ Microsoft \ Boot \ BCD
- \ Device \ HarddiskVolume1 \ EFI \ Microsoft \ Boot \ BCD.LOG
Предполагая, что буква диска I:\ это исключения, которые необходимо создать в настройках ESET:
- I: \ EFI \ Microsoft \ Boot \ BCD
- I: \ EFI \ Microsoft \ Boot \ BCD.LOG
Дополнительную информацию и снимки экрана можно найти в статье ESET «Ошибка резервного копирования Windows» из базы знаний ESET.
Надеюсь, что это руководство помогло устранить ошибку «Резервное копирование Windows не удалось получить эксклюзивную блокировку системного раздела EFI» (коды ошибок 0x8078011E 0x80070005 ) при запуске резервного копирования Windows на компьютерах с Windows 7 по Windows 10.
We all love backing up important files or folders every now and then on Windows 10 PC. However, what if, you are not able to generate a new backup and instead start getting an error 0x8078011E? In this tutorial, we outline all possible reasons that may arise this problem along with five working ways to fix it. When backup failed on this error, you may encounter the following message as well –
Windows Backup failed to get an exclusive lock on the EFI system partition (ESP), Access is denied. Error code 0x8078011E.
This is quite clear from the above message that this bug occurred because some external application is preventing system backup to complete. Let’s explore the solutions in detail –
If you are not able to create a new system backup on account of the error 0x8078011E, try out the below suggestions sequentially –
1] Restart Windows 10
This error mostly arises when your computer is stuck in a recursive loop. It doesn’t matter how many times you have tried creating a system image backup, this will keep failing on the 0x8078011E error. In such a case, all you require is to reboot your device. Rebooting Windows 10 will restart all functions and modules so that they don’t call to themselves repeatedly. If the error persists even after restarting your PC, follow the next set of solutions discussed below –
2] Disable Third-party Antivirus
Security apps are known to cause problems while generating new system backups on the computer. In case, you are using external antivirus software, make sure that you have temporarily disabled it. By doing so, you may create new backups without getting into the 0x8078011E error.
As per reports, Avast, ESET, Trend Micro, and AVG software are responsible for this bug as they keep on scanning all the files available at the EFI system partition. If the antivirus program is not providing options to disable it temporarily, use these steps to uninstall them from your computer –
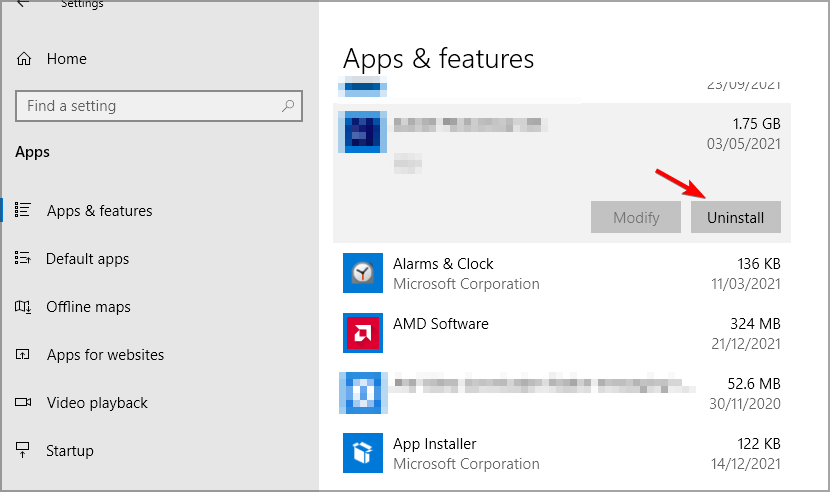
- Right-click on the Windows icon and select Apps & Features.
- When the Settings app opens up, look for the third-party security app on the right pane.
- Once you find the same, click once over it, and hit the uninstall button.
Alternatively, you may also uninstall this software by visiting the Programs and Features section on the Control panel.
3] Configure the “Plug and Play” service
Any incorrect configuration on the Services window may also prohibit the system from generating new backups. “Plug and Play” is one such service that may fail to recognize any hardware wherein you want to create backups. So, you must check if this service is running properly on your device or not. Here’s how to properly configure this service –
- Press Win + S to launch the search bar.
- Type “services” and double-click over the top result to enter the Services window.
- Scroll down and locate the “Plug and play” service. Once found, right-click over it, and select the Properties option.
- Select Automatic using the drop-down menu next to the “Startup type” section.
Note: In case this service was already running, stop it first and then change its startup type.
- Now, click over the Start button.

- In the end, hit Apply > OK, and restart your computer.
From the next sign-in, you should be able to generate a new system image backup.
4] Turn off Real-Time Protection
If you rely on Windows Defender to cleanse viruses or malware on your device, make sure that you have disabled this program as well. To do so, use these steps –
- Go and click the up arrow key available on the taskbar.
- When it expands, click over the shield icon.
- The system will then take you to Windows Security.
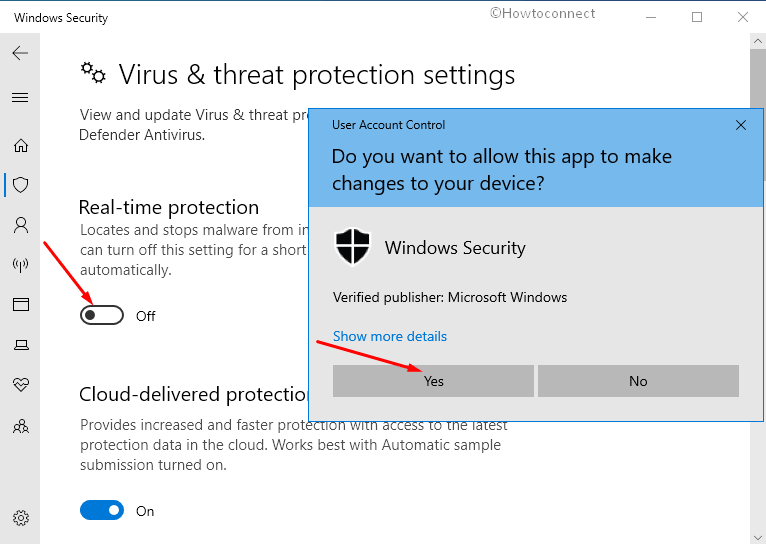
- Select the Virus & Threat protection tab on the left column.
- Move to the right side and click “Manage Settings” under Virus & Threat Protection Settings.
- Subsequently, turn off the following toggle switches –
- Real-time protection
- Cloud-delivered protection
- Automatic sample submission
- Tamper protection

- Come out of this window, and generate the system image backup.
- When the system image backup creation completes, restart Windows 10.
- From the next logon, you may re-enable all the protections that have recently disabled.
5] Boot into the Safe Mode on Windows 10
If none of the above solutions help, booting your computer into the Safe mode should fix the trouble. Clean boot in Windows 10 ensures no third-party apps or services start, even in the background. Since the error 0x8078011E occurs just because some 3rd-party application was using files on the ESP, going this way must resolve the problem. Here’s how to clean boot Windows 10 –
- Press Win + R.
- Type “MSConfig” and hit OK.
- On the System Configuration window, go to the Services tab.
- Mark the checkbox that reads “Hide all Microsoft services”, and hit Disable all.

- Now, go to the boot tab and tick the checkbox – Safe boot. By default, the minimal checkbox gets selected as well.

- Hit Apply then OK to confirm the recent changes.
- The next time you restart your PC will open the operating system into the Safe boot. You may now create a system image backup without getting into any error.
I hope this tutorial helps to resolve the backup failed error 0x8078011E on your computer. In case you have any queries or suggestions, let us know in the comment section.
Are you facing thwarting problems while creating system image backup on an external drive in Windows 10? Some users report finding error code 0x8078011E with a message and an additional code 0x80070005. The message is – “Windows Backup failed to get an exclusive lock on the EFI system partition (ESP). This may happen if another application is using files on the ESP”. Another error code 0x80070005 indicates that Access is denied.
The Backup failed Error 0x8078011E commonly occurs because of 3rd party antivirus program installed on your computer. Furthermore, sometimes, boot issues lead to this issue where clean install is a solo solution.
Here is how to Fix The Backup failed Error 0x8078011E in Windows 10 –
1] Modify Plug and play service
This issue might occur because incorrect configuration of Service that was making Windows 10 unable to recognize the hardware you have connected to take backup. Play and plug service is responsible for this task that enables a computer to identify and adapt to hardware changes with little or no user input. Therefore modify it using following steps –
- Press – Winkey.
- Type – Services.
- Hit – Enter.
- Once the Services console appears, find Plug and play in the Name column.
- Right click on “Plug and play” and select Properties.
- Click the dropdown for Startup type and choose – Automatic.
- Hit Start under Services status.
- At last, click Apply and then OK.
2] Uninstall or disable 3rd party antivirus
External antivirus application is the primary reason for this system image issue in most cases so you should disable or uninstall the program. Windows 10 offers built-in security app but sometimes this also creates hindrance during the backup process. First, disable the antivirus using the following steps –
- Unfold the system tray by clicking on the up arrow icon in the notification area.
- Right click on the Antivirus and choose to Disable it temporarily.
Note – If Settings doesn’t support placing the antivirus icon on the system tray you will need to open it directly using search or icon on the desktop. Then disable from the application interface.
Even a user reports that after disabling real time in McAfee fixed the system image backup issue.
Rather uninstalling the 3rd party antivirus will be a better option –
- Click the Search from the taskbar.
- Type – Apps and features.
- Press the – Enter.
- Locate the antivirus in the list of installed programs and click on it.
- Select – Uninstall.
- If any confirmation pop up is prompted approve this and follow the onscreen instructions.
Now try to create the system image backup.
3] Temporarily turn off Real-time protection to fix Backup failed Error 0x8078011E
On many occasions, Windows security stops creating the backup of system image and Error code 0x8078011E appears. However, you certainly not think to turn off the virus and threat protection which is real time protection service on Windows 10. Therefore, disable Virus & threat protection setting for the duration the backing up in progress and then revert the same.
- Press the – Winkey.
- Type – security.
- Hit – Enter.
- Select – Virus & threat protection.
- Click the link – Manage settings.
- Click the toggle switch for – Real-time protection.
- Once the User account control appears, click – Yes.
- When the system image backup is completed, again click the same toggle to enable real time protection.
4] Clean Boot Windows 10
The error message clearly indicates that another application is using files on the ESP and this might be third-party app. Therefore, uninstall the third-party software present on your system and then start taking backup. Furthermore, close all the programs before starting the procedure and check if you don’t experience the error code. Still, 0x8078011E persists then clean boot Windows 10 to get rid of the backup error.
- Hit the – Winkey.
- Type – MSConfig.
- Press the – Enter.
- Check the box that says – Hide all Microsoft services.
- Next, click – Disable all.
- Click – Apply and then – OK.

- Reboot your PC, take backup and then check if the issue is resolved.
Methods list
1] Modify Plug and play service
2] Uninstall or disable 3rd party antivirus
3] Temporarily turn off Real-time protection
4] Clean Boot Windows 10
That’s all!!!
Repair any Windows problems such as Blue/Black Screen, DLL, Exe, application, Regisrty error and quickly recover system from issues using Reimage.