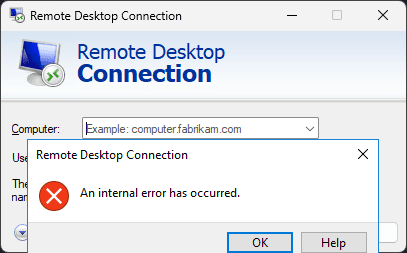
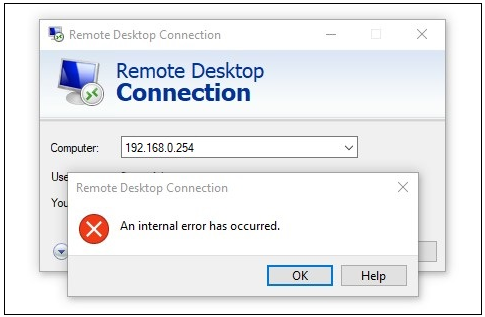
“An Internal Error has Occurred” Error appears while connecting to a desktop or laptop through the Remote Desktop Connection. The error can be caused by misconfigured Remote Desktop Protocol (RDP) and security settings. When the error popups, that means RDP is not able to create a connection with the RDP server between the user and the client.

Before going further, we recommend reading the causes below. So you will understand deeply about this error:
- Disabled Remote Connection- If the Remote Desktop connection is not enabled on your computer, the error will likely appear. Hence, allow the Remote Desktop connection on your Windows to fix this error.
- Misconfigured RDP Security Settings- The misconfiguration of the Remote Desktop Protocol settings can cause this error. However, you can easily fix this error by configuring RDP settings correctly.
- Corrupt Windows Update- According to some users, the error can appear due to a corrupt Windows Update installation. Therefore, reinstalling the Windows update might fix your issue.
- Disabled Remote Desktop Service- If the Remote Desktop Service is disabled, you might encounter several errors such as this one. Hence, you need to ensure that the Remote Desktop Service is running properly.
- Using Static IP- Another reason that can lead you to this issue is using a static IP address like Google, Cloudfare, and among others. If the DNS server is down, this error might appear. Therefore try switching to the automatic DNS to avoid this error.
1. Change RDP Security Settings
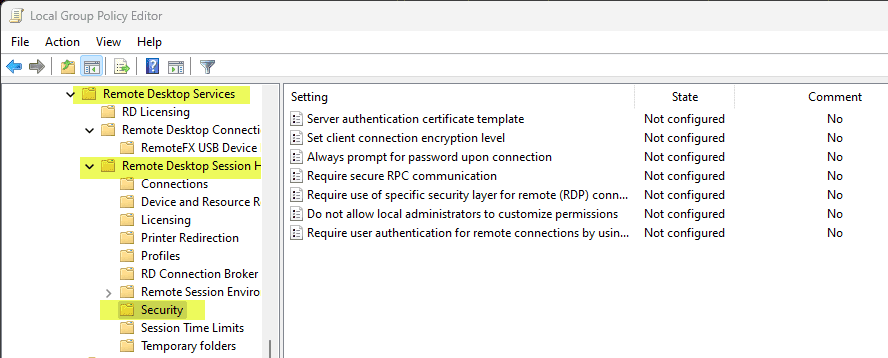
The error can often be caused by a disabled RDP setting in the Local Group Policy. The settings specify whether to use the RDP security layer feature to communicate between clients and the RDP server. However, in many scenarios, you might encounter this error if this setting is disabled. Several users have managed to fix this error by enabling this setting. Follow the steps:
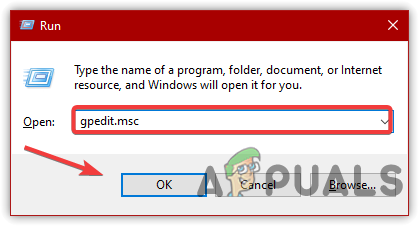
- Press the Win + R Simultaneously on the keyboard to open Run Window
- Type gpedit.msc and click OK

Opening Run Window - Go to the following directory
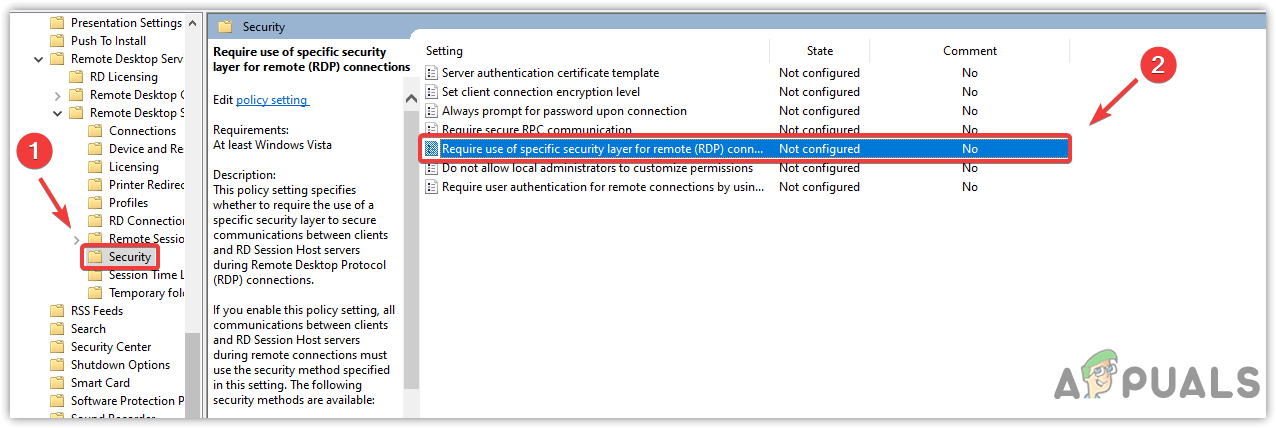
Computer Configuration > Administrative Templates > Windows Components > Remote Desktop Services > Remote Desktop Session Host > Security
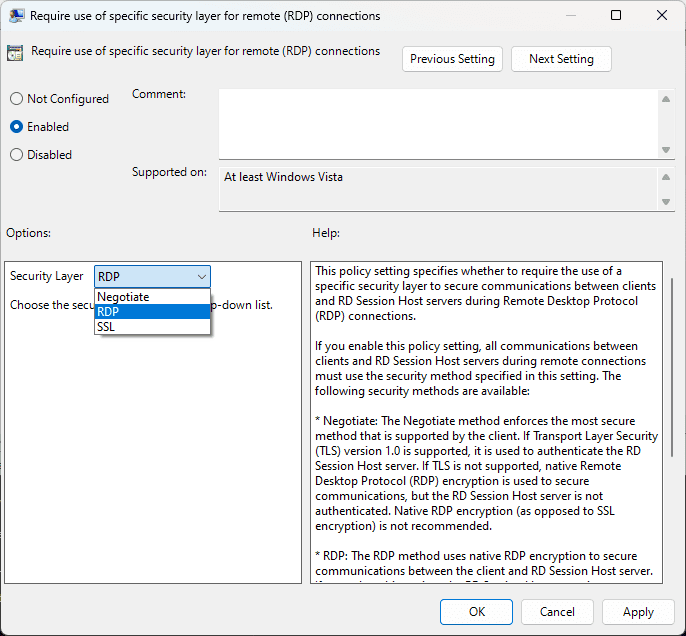
- Find and open Require Use Of Specific Security Layer For Remote (RDP) Connections from the right pane

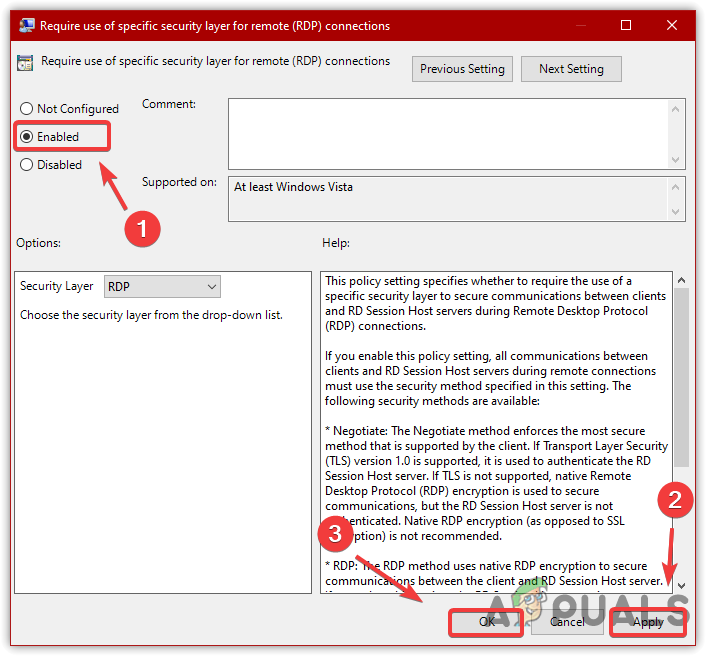
Opening RDP Service - Choose the Enabled option from the top left
- Click Apply and click OK

Enabling RDP Security Layer Settings - Once all is finished, restart your computer and then try reconnecting to check if the error is fixed.
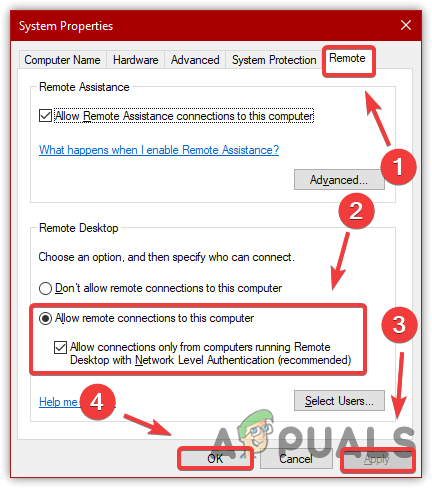
2. Allowing Remote Connections
The error also occurs if the Allow Remote connection option for your computer is not enabled from the settings. Hence, allow the Remote Desktop Connection and then try connecting to check if the error is fixed. Follow the steps to allow Remote Connection:
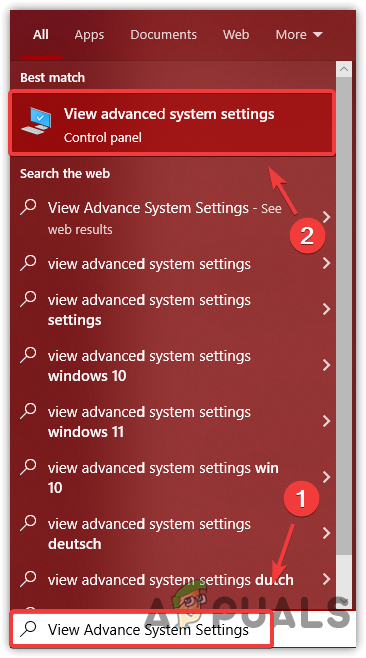
- Press the Windows key and type View Advance System Settings

Opening Advance System Settings - Hit Enter to open the System Settings
- Click on Remote from top
- Select Allow Remote Connections To This Computer
- Click Apply, then click OK

Allowing Remote Connection - Once done, try connecting through a Remote Desktop connection to check if the error persists.
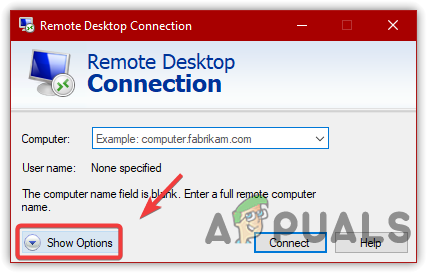
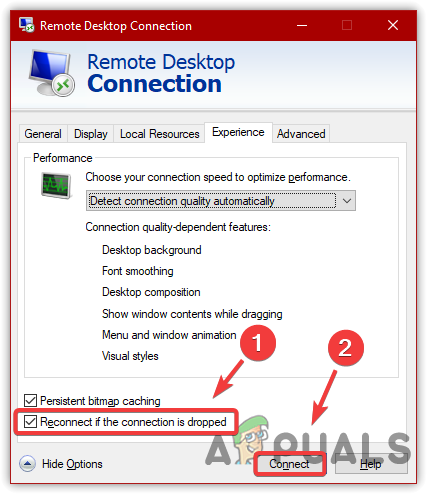
3. Enable Reconnect If the Connection is Dropped
There is an option in the Remote Desktop Connection app that allows the user to reconnect when the user disconnects suddenly. So if the error is occurring due to an unstable network connection, enabling this option might help as it reconnects the user when the connection drops. Below are the steps:
- Press the Windows key and type Remote Desktop Connection
- Click Show Options

Click Show Options - Then, click Experience and check the option Reconnect If The Connection Is Dropped

Enabling Reconnect If The Connection Is Dropped - After that, try connecting to a Windows system.
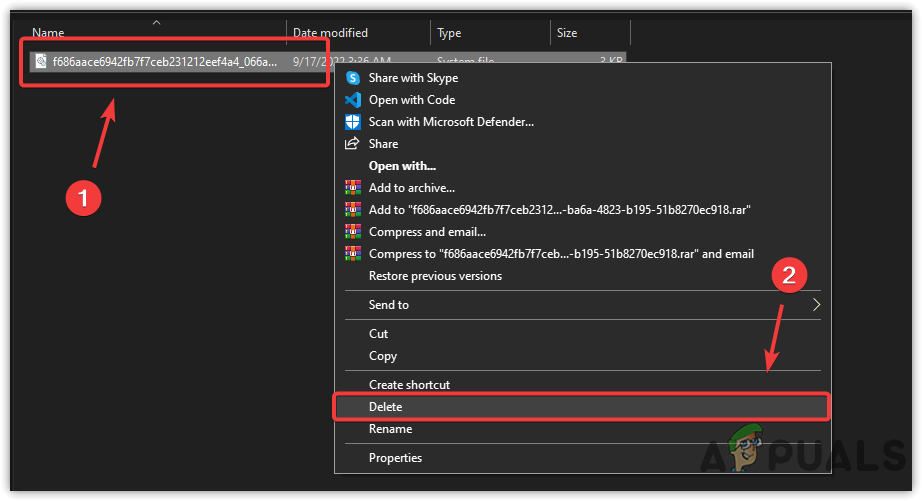
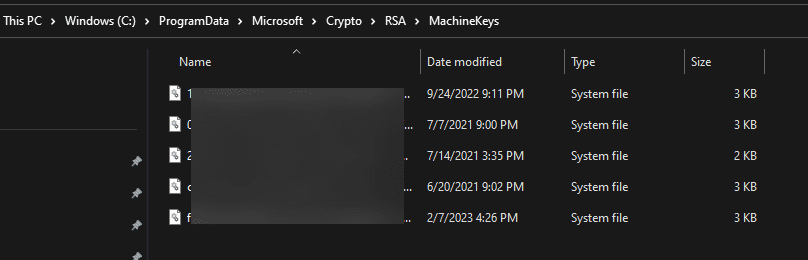
4. Delete MachineKeys
Another solution that can fix this issue is deleting a machine keys folder. As per the affected users, deleting the Machinekeys fixed their issue. Hence, follow the steps to delete the MachineKeys.
- Open File Explorer, navigate to the following path
C:\ProgramData\Microsoft\Crypto\RSA\MachineKeys
- Right-click the f686.. file and click Delete

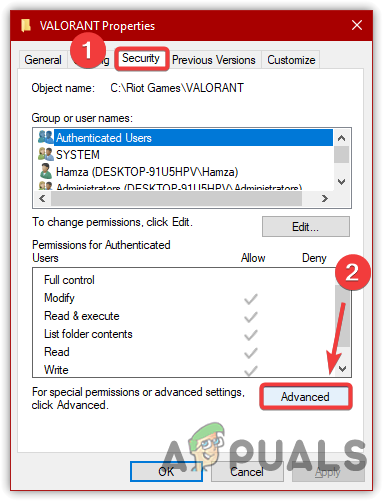
Deleting Machine Key File - If you get an error message, right-click the file and go to Properties
- Click Security from the top, then click Advanced

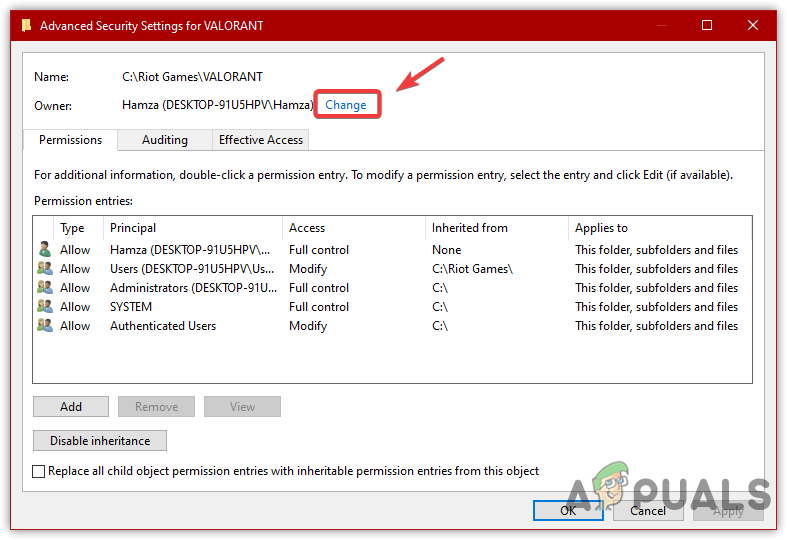
Opening Advanced Folder Settings - Click Change and type the username of your local account

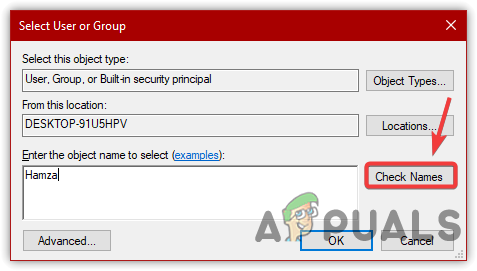
Click Change - Then, click Check Names and click OK

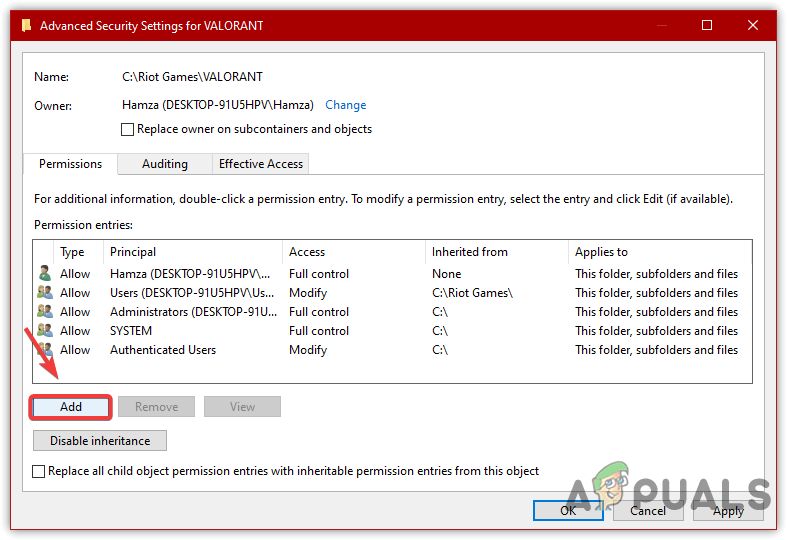
Entering Microsoft Local Account Name - Click Add, then click Select A Principal
Clicking Add Button - Again, type the username and click Check Names, then click OK
- Tick all the permissions under Basic Permissions

Taking Full Access to the File - Click OK, then click Apply and again click OK
- Again, click OK to close the Window
- Now try to delete the file and check if the error is fixed.

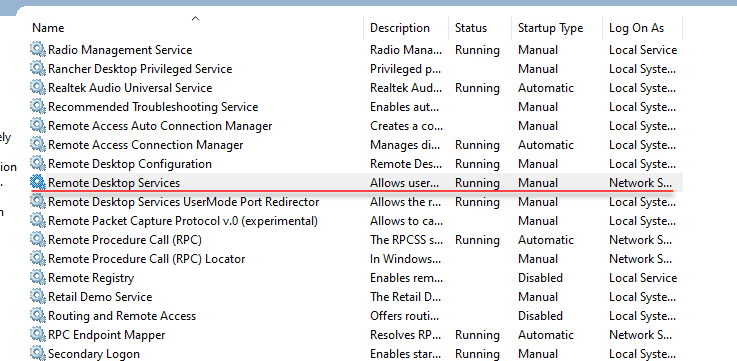
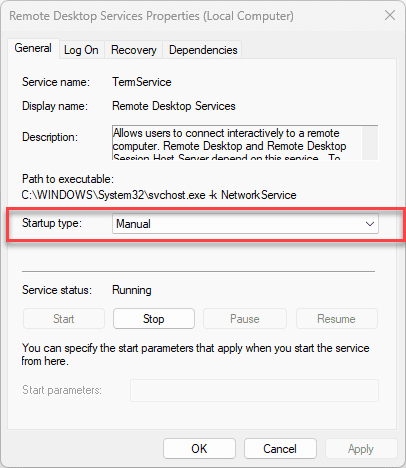
5. Restarting Remote Desktop Service
Remote Desktop Service allows the user to access the other Windows computer system. If this service is not working properly, it can cause this error. Hence, to fix this, try restarting the Remote Desktop Service. Below are the steps:
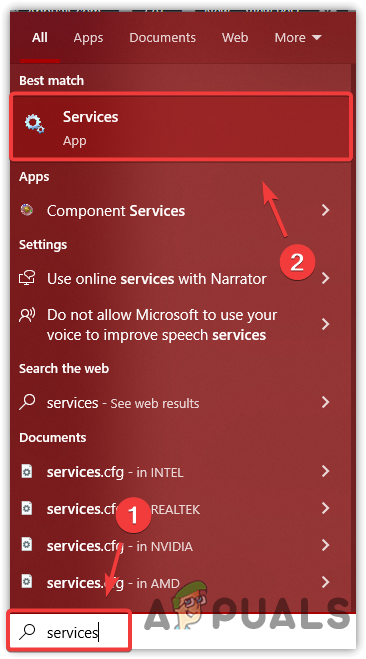
- Press the Win key and type Services from Start Menu

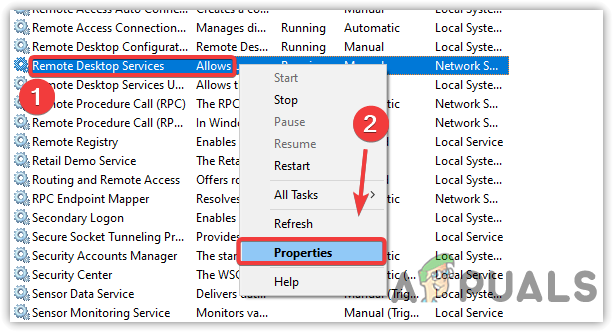
Opening Services App - Open Services Window and find Remote Desktop Services
- Right-click on the service and click Properties

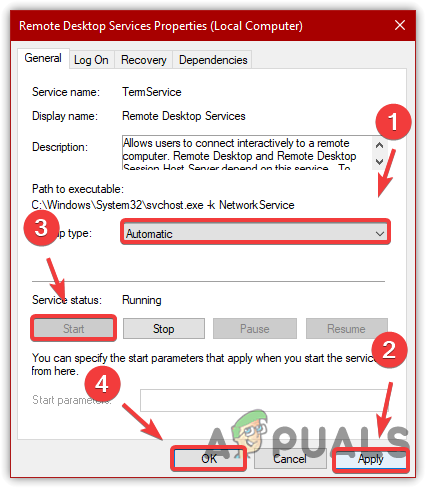
Opening Service Properties - Change the startup type to Automatic
- Then click Apply and if the service is stopped, click the Start button

Restarting RDP Service - Once done, check if it fixes the issue.
6. Disable or Uninstall VPN
If you use a VPN, your connection might be routed to another server; that is why you are encountering this error. Therefore, disable any Proxy server or uninstall VPN from the computer to fix this issue. Below are the steps:
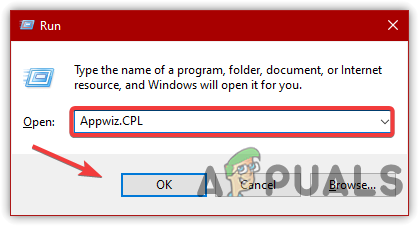
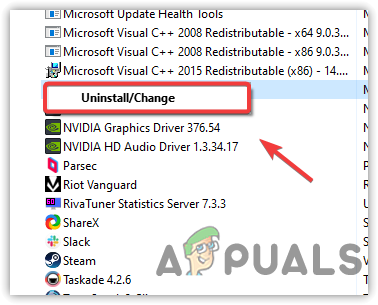
- Press the Windows key and type Appwiz.CPL and click OK
Opening Programs And Features - Select the VPN and click Uninstall

Uninstalling VPN Program - To disable proxy, follow the first method mentioned in this article
- Once done, now check if the issue is fixed.
7. Switch to Automatic DNS
If you use a manual DNS instead of the automatic one, this error will likely appear as it is possible that the DNS you are using is facing server issues or the DNS is incompatible with RDP. Hence, to fix this, try switching to automatic DNS. Below are the steps:
- Press Win + I to navigate into Settings
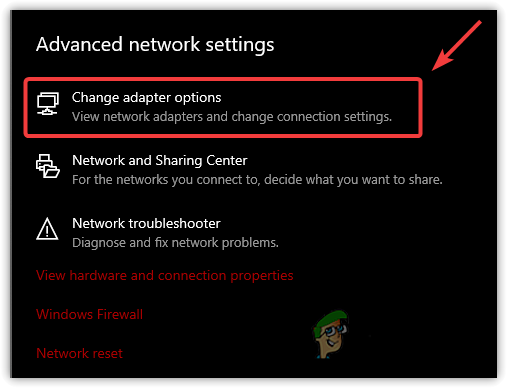
- Then, go to Network & Internet
- Click Change Adapter Settings

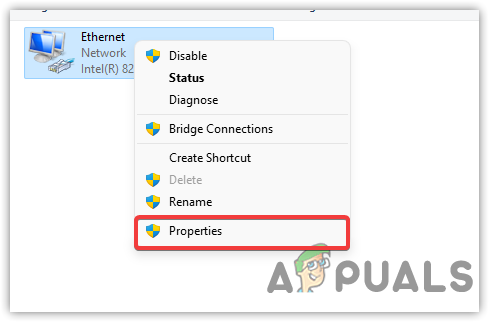
Navigating to Network Adapter Settings - Right-click the network adapter and select Properties

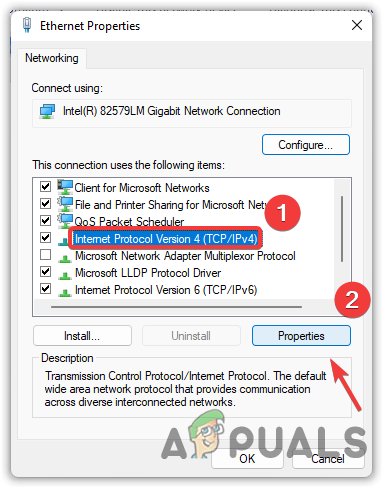
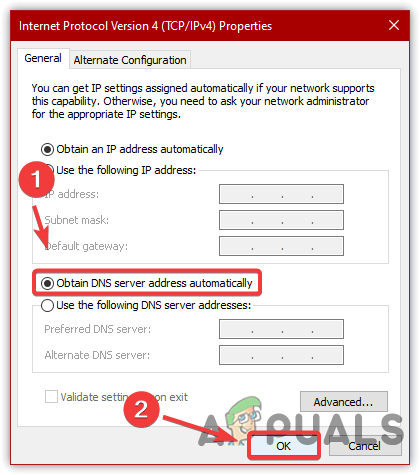
Opening Network Adapter Properties - Select Internet Protocol Version (TCP/IPv4) and click Properties

Opening Internet Protocol Version 4 (TCP IPv4) Properties - Choose Obtain DNS Server Address Automatically and click OK

Switching to Automatic DNS - Once done, check if the Remote Desktop app still gives the same error message.
8. Reinstall Windows Update
As per the affected users, a corrupt Windows update can lead to this error. Therefore, try reinstalling the recent Windows update to check if it fixes the error. If this method does not help, try to disable the HP printer driver, as it can cause this issue. Below are the steps to reinstall a recent Windows update:
- Click Start Menu and type Control Panel
- Open the control panel, then click Uninstall Programs
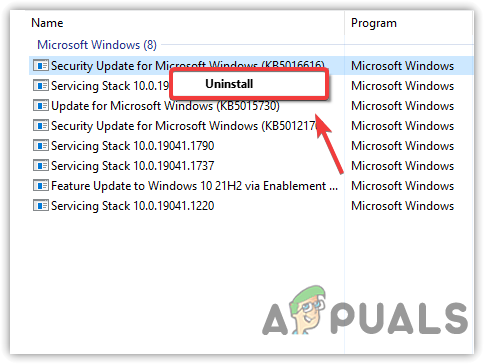
- Click View Installed Updates from the left pane

Viewing Installed Updates - Select the recent Windows Update and click Uninstall

Uninstalling Recent Windows Update - Now type Windows update from Start Menu and open it
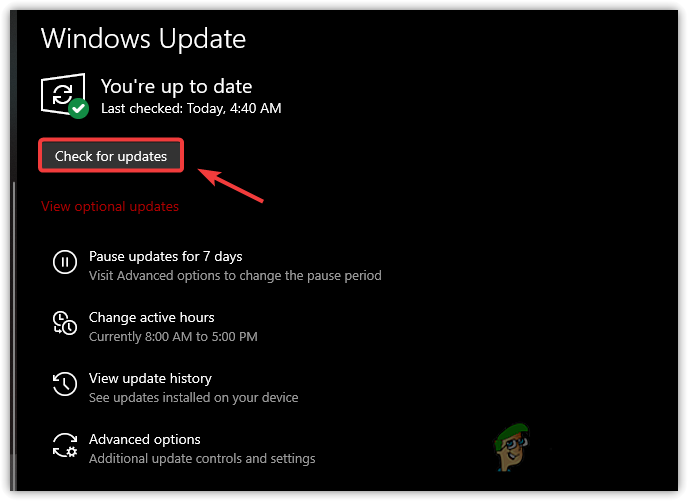
- Click on Check for Updates

Updating Windows update - Download and install pending updates
- Restart your computer, and then try connecting the Remote Desktop app to see if the error is resolved.

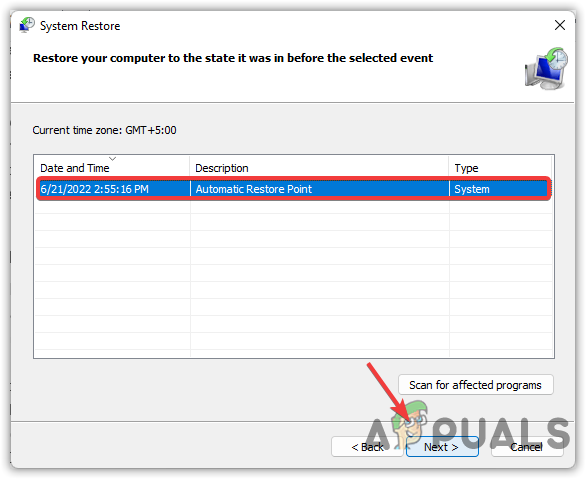
9. Use System Restore
Unfortunately, if none of the solutions have worked, try restoring Windows to a previous state, as it can fix this issue. However, for this process, you will need a restore point, which should be created before encountering the error.
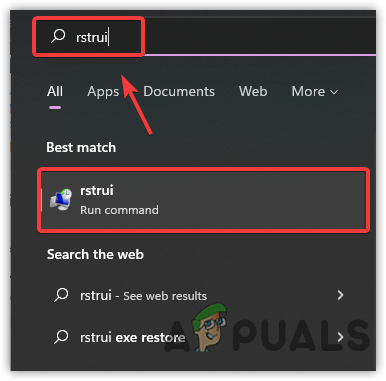
- To use a System Restore, type rstrui from the start menu

Opening System Restore Settings - Open the restore settings and click Next

Clicking Next - Then, select a restore point and click Next
Selecting a Restore Point - Then, click Finish to start the process.


Kevin Arrows
Kevin Arrows is a highly experienced and knowledgeable technology specialist with over a decade of industry experience. He holds a Microsoft Certified Technology Specialist (MCTS) certification and has a deep passion for staying up-to-date on the latest tech developments. Kevin has written extensively on a wide range of tech-related topics, showcasing his expertise and knowledge in areas such as software development, cybersecurity, and cloud computing. His contributions to the tech field have been widely recognized and respected by his peers, and he is highly regarded for his ability to explain complex technical concepts in a clear and concise manner.
You may be looking the ways to fix the Remote Desktop Connection an internal error has occurred issue while trying to connect to a remote computer from your PC. Most of the users are also facing this error like you. And as this Remote Desktop an internal error has occurred error can occur because of several reasons, it confuses the users as well. No worries! Read this article till the end to learn the methods to fix the Remote Desktop an internal error has occurred error in no time.

Table of Contents
Out of the several reasons causing this error, a few of them are listed below for your understanding.
- Issues with the current domain
- Disabled remote connections
- Disabled Persistent Bitmap Caching feature from RDP settings
- NLA-enabled system
- Disabled Persistent bitmap caching
- Static IP address
The following section contains the methods to fix the RDP an internal error has occurred Windows 10 error caused by the above-mentioned reasons.
Method 1: Restart Remote Desktop Service
Sometimes, if you restart the Remote Desktop Service on your Windows 10 PC, you may be able to fix the Remote Desktop Connection an internal error has occurred issue immediately. Follow the upcoming methods to that.
1. Press the Windows key, type Services and click on Open.

2. Scroll down and click on the Remote Desktop Services from the list.
3. Then, click on the Restart option.

After the restart, check if the issue is fixed or not.
Method 2: Re-Join Domain
The current domain your PC is connected to can also cause an internal error has occurred RDP issue. Let us see the steps to re-join the domain to eventually fix this same issue.
1. Open Settings on your PC.
2. Click on the Accounts tab from there.

3. Click on Access work or school from the left pane.
4. Then, click on the Disconnect option for the desired domain connected to your system.

5. Click on Yes from the confirmation popup.
6. Restart your PC and re-join the desired domain once again from the same menu.
Launch the RDP app once again to check if the discussed error is fixed or not.
Also Read: Fix The Trust Relationship Between This Workstation and the Primary Domain Failed
Method 3: Modify Remote Desktop Connection Settings
Adjusting certain Remote Desktop Connection settings can also resolve the RDP an internal error has occurred Windows 10 problem successfully. Below are the steps to modify settings from the RDP app.
1. Press the Windows key, type Remote Desktop Connection and click on Open.

2. Click on Show Options from the bottom-left corner of the window.

3. Switch to the Experience tab and check the box for Reconnect if the connection is dropped, as shown below.

4. Click on Connect, as highlighted above.
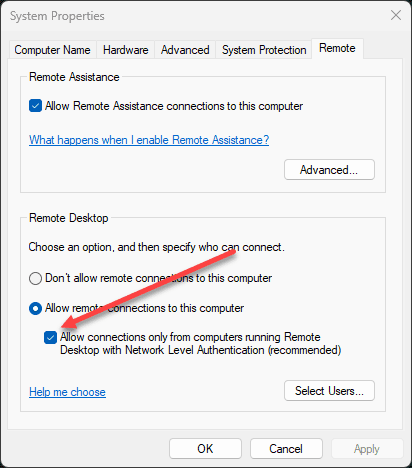
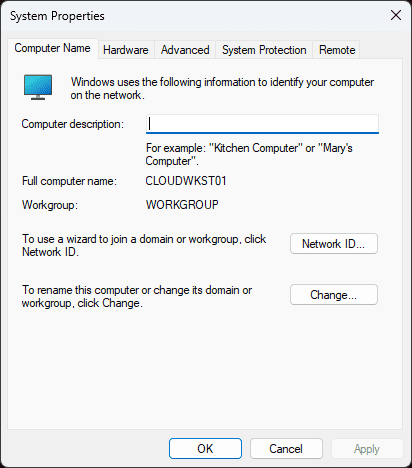
Method 4: Enable Remote Connections
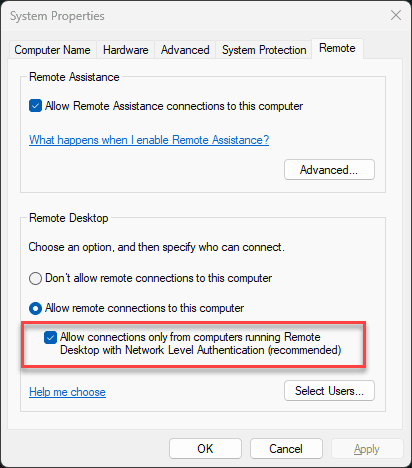
If the remote connections are not allowed on your PC, the error in question may occur. Let us see the steps to fix it by enabling it from the system properties.
1. Open the File Explorer app on your PC and right-click on This PC from the left pane, as shown below.
2. Click on the Properties option from the context menu.

3. Click on Remote Settings.

4. The Remote tab in the System Properties popup window will appear. Check the boxes for the following two options:
- Allow Remote Assistance connections to this computer under the Remote Assistance section
- Allow remote connections to this computer under the Remote Desktop section

5. Finally, click on Apply > OK, as shown above.
Also Read: Fix Remote Desktop Won’t Connect in Windows 10
Method 5: Change Remote Desktop Services Startup Type
Setting the startup type of the Remote Desktop Services to Automatic also has fixed the discussed issue for most of the users.
1. Press the Windows + R keys simultaneously to launch the Run dialog box.
2. Type Services.msc in the given field and press the Enter key to open Services window.

3. Double-click on the Remote Desktop Services > Stop options.
4. Expand the Startup type drop-down menu and select the Automatic option, as shown below.

5. Click on Apply > OK to save the changes, as highlighted above.
6. Restart the PC and see if the issue is fixed or not.
Method 6: Enable Persistent Bitmap Caching
Follow the steps mentioned below to allow the Persistent bitmap caching on your PC to get rid of the said issue.
1. Type Remote Desktop Connection in the Windows search bar and click on Open.

2. Click on Show Options from the bottom-left corner of the window.

3. Switch to the Experience tab and check the box for Persistent bitmap caching, as shown below.

4. Click on Connect to make a connection and see if the Remote Desktop Connection an internal error has occurred issue is resolved or not.
Also Read: How to Change IP address in Windows 10
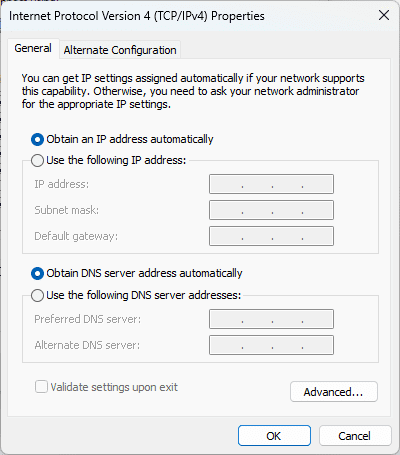
Method 7: Disable Static IP Address
The Remote Desktop Connection on your PC will not align properly with the network adapter if you have configured it for using a static IP address. And it may further cause an internal error has occurred RDP issue on your computer. Read the steps listed below to disable the static IP address and let the system automatically obtain it.
1. Open the Control Panel app and click on Network and Internet.

2. Click on Network and Sharing Center > Change adapter settings.

3. Double-click on the desired connection and click on Properties.

4. Click on Internet Protocol Version 4 (TCP/IPv4) > Properties.

5. Select the radio button for the Obtain an IP address automatically option and click OK to save the changes, as highlighted below.

6. Exit the window and then proceed to see if the Remote Desktop an internal error has occurred issue still appears or not.
Method 8: Reconfigure Local Security Policy
With the help of the Local Security Policy utility on your PC, you can get rid of the discussed issue. Follow the steps below to know how to do it.
1. Press the Windows + R keys together to launch the Run dialog box.

2. Type Secpol.msc in the given field and press the Enter key to launch the Local Security Policy utility.

3. Then, click on Local Policies > Security Option.
4. From the right pane, scroll down and click on the System cryptography option.
5. Then, double click on System cryptography: Use FIPS 140 compliant cryptographic algorithms, including encryption, hashing and signing algorithms.
6. Click on the Enabled radio button.
7. Finally, click on Apply > OK to save the made changes.
8. Exit from the window and check if the error is now fixed or not.
Also Read: Fix The Diagnostics Policy Service Is Not Running Error
Method 9: Turn Off UDP on Client
Read and follow the upcoming steps to modify the settings to disable the client UDP from Registry Editor.
1. Press the Windows + R keys together to launch the Run dialog box.
2. Type regedit in the given field and press the Enter key to launch the Registry Editor.

3. Navigate to the following path in the Registry Editor window.
HKLM\SOFTWARE\Policies\Microsoft\Windows NT\Terminal Services\Client

4. In the right pane, double click on fClientDisableUDP and set the Value data to 1.
5. Click on OK to save the changes and exit from the registry window.
See if this successfully fixed the RDP an internal error has occurred Windows 10 issue or not.
Method 10: Disable Network Level Authentication
Sometimes the said error can occur in your system if it is configured only for the computers with the NLA Remote Desktop connections. You can fix it by disabling the NLA. Follow the steps mentioned below to perform it on your PC.
Note: Disabling this setting can make your system less secure and more vulnerable.
1. Open the File Explorer app on your PC and right-click on This PC from the left pane, as shown below.
2. Click on the Properties option from the context menu.
3. Click on Remote Settings.

4. The Remote tab in the System Properties popup window will appear. Check the box marked Allow connections only from computers running Remote Desktop with Network Level Authentication optiona as depicted below.

5. Finally, click on Apply > OK, as shown above.
Recommended:
- Fix Xbox One Error 0x807a1007
- Fix A Specified Logon Does Not Exist in Windows 10
- Fix VirtualBox Interface Has Active Connections Error Message
- Fix Remote Desktop Cannot Connect to the Remote Computer
So, we hope you have understood how to fix remote desktop connection an Internal Error has Occurred issue with the detailed steps to your aid. You can let us know any queries about this article or suggestions about any other topic you want us to make an article on. Drop them in the comments section below for us to know.
Microsoft’s Remote Desktop Service is a great way to administer your Windows clients and Windows Servers. However, occasionally, you may encounter issues with the RDP server, preventing you from connecting to your remote host. One is the RDP an internal error has occurred” error message. This post will consider several different troubleshooting workarounds to help fix rdp error messages like the one described.
Table of contents
- What is Remote Desktop Protocol (RDP)?
- What Triggers the Remote Desktop Internal Error for Windows?
- Ensure Remote Desktop Connection Settings (RDP Settings) are Correct
- Allow Remote Connections
- Domain of Computer
- Enable Reconnect If the Connection is Dropped
- Restart Remote Desktop Service
- RDP Security
- Change RDP Security Settings
- How to Fix Windows RDP Internal Error?
- Delete MachineKeys
- Other Solutions to Fix RDP an Internal Error Has Occurred
- Additional Workarounds
- Monitor Windows System Logs
- Adjust Remote Desktop Connection App Settings
- Update Remote Desktop Connection Client
- Check Proxy Server Settings
- Check Control Panel Settings
- Update Windows Server
- Troubleshoot Network Connectivity
- Related Posts
- Wrapping up
What is Remote Desktop Protocol (RDP)?
Remote Desktop Protocol (RDP) is a proprietary protocol developed by Microsoft that allows users to access and control a Windows operating system computer remotely. Using RDP, users can work on their remote computers as if sitting in front of them. Businesses, IT professionals, and home users widely use this powerful tool to manage and troubleshoot remote systems.
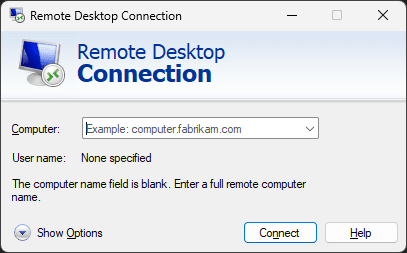
Launching the Remote Desktop Connection from a client computer (mstsc.exe)
What Triggers the Remote Desktop Internal Error for Windows?
Various factors can trigger the remote desktop connection an internal error message. These factors include incorrect Remote Desktop Connection settings, network issues, security settings, Windows Firewall configuration, and problems with the Remote Desktop Service itself.

Ensure Remote Desktop Connection Settings (RDP Settings) are Correct
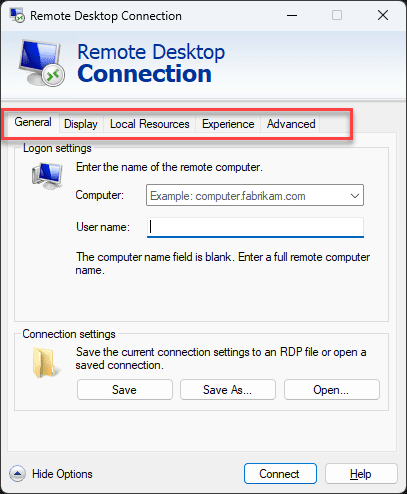
First, ensure that your RDP Connection settings are correct to fix the “internal error has occurred” issue. Follow these steps:
-
Open the Remote Desktop Connection app.
-
Click on “Show Options” to access advanced settings.
-
Ensure that the correct computer name or IP address is entered in the General tab.
-
Verify that the User name and Password are correct.
-
Adjust the screen resolution and color depth in the Display tab according to your preference.
-
In the Experience tab, select the appropriate connection speed from the drop-down menu to optimize performance.
Allow Remote Connections
To enable remote connections on the target computer, follow these steps:
-
Right-click on “This PC” and select “Properties.”
-
Click on “Remote settings” in the System Properties window.
-
Under “Remote Desktop,” select “Allow remote connections to this computer.”
-
Click “Apply” and then “OK.”
Domain of Computer
Ensure the client and the remote computer are part of the same domain or workgroup. This can help avoid authentication issues that might trigger the “internal error has occurred” message.
Enable Reconnect If the Connection is Dropped
In the Remote Desktop Connection window, go to the Experience tab and check the box “Reconnect if the connection is dropped.”
This setting allows the RDP client to automatically attempt to reconnect to the remote computer if the connection is lost.
Restart Remote Desktop Service
Restarting the Remote Desktop Service on your RDP server can sometimes resolve the rdp error. To do this, follow these steps:
-
Press Windows Key + R to open the Run dialog.
-
Type services.msc and press Enter.
-
Find Remote Desktop Services in the list of services.
-
Right-click and select Remote Desktop Services and select “Restart.”
RDP Security
RDP security layer feature settings are crucial in ensuring a stable and secure remote connection. Incorrect or incompatible security settings can trigger the “internal error has occurred” message.
Change RDP Security Settings
To change RDP security settings, follow these steps:
-
Open the Local Group Policy Editor by pressing Windows Key + R, typing gpedit.msc, and pressing Enter.
-
Navigate to “Computer Configuration > Administrative Templates > Windows Components > Remote Desktop Services > Remote Desktop Session Host > Security.”
-
Double-click on “Require use of specific security layer for remote (RDP) connections” and select “Enabled.”
-
In the “Options” section, select the appropriate security layer from the drop-down menu, such as “RDP Security Layer” or “Negotiate.”
-
Click “Apply” and then “OK.”
How to Fix Windows RDP Internal Error?
To fix the “RDP aninternal error has occurred” issue, several solutions can be attempted. Here are some of the most effective methods:
Delete MachineKeys
Corrupt or outdated MachineKeys can cause RDP internal errors. To delete MachineKeys, follow these steps:
-
Press Windows Key + R to open the Run dialog.
-
Type %ProgramData%MicrosoftCryptoRSAMachineKeys to find the machine keys folder and press Enter.
-
Back up the MachineKeys folder by copying it to a different location.
-
Delete all files in the original MachineKeys folder.
-
Restart the computer and try the Remote Desktop Connection again.
Other Solutions to Fix RDP an Internal Error Has Occurred
If the above methods do not resolve the issue, try the following solutions:
Reconnect the Domain
If the remote computer is part of a domain, try removing it from the domain and then rejoining it. This can resolve potential authentication issues.
Modify the Startup of Services
Ensure that the Remote Desktop Services and its dependencies have the correct startup type. Set the startup type to “Automatic” for these services:
-
Remote Desktop Services
-
Remote Desktop Configuration
-
Remote Desktop Services UserMode Port Redirector
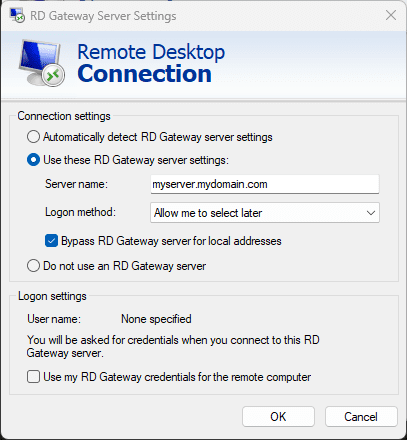
Adjust Remote Desktop Connection Configuration
In the Remote Desktop Connection app, go to the “Advanced” tab and click “Settings” under “Connect from anywhere.”
Ensure that the correct RD Gateway server name is entered, and select “Use my RD Gateway credentials for the remote computer.”
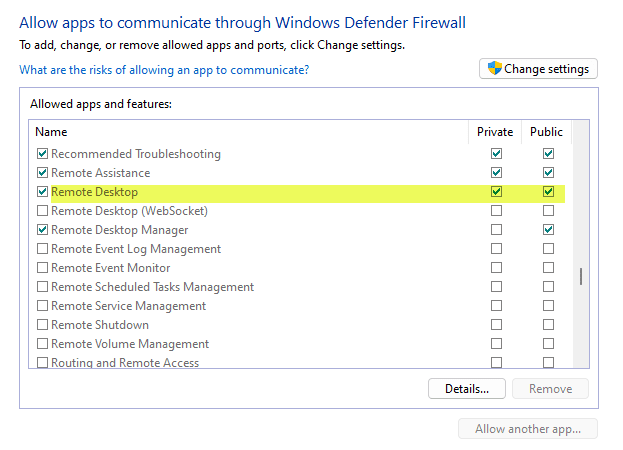
Allow the Windows Firewall to Connect to RDP
Ensure that the Windows Firewall is not blocking RDP connections. To do this:
-
Press Windows Key + R and type firewall.cpl, then press Enter.
-
Click on “Allow an app or feature through Windows Firewall.”
-
Locate “Remote Desktop” in the list and ensure that it is allowed for both “Private” and “Public” networks.
Disable Network Level Authentication
Disabling Network Level Authentication can sometimes resolve RDP internal errors. To do this, follow the steps mentioned in the “Allow Remote Connections” section and uncheck the box “Allow connections only from computers running Remote Desktop with Network Level Authentication.”
Disabling VPN Settings
VPN connections can interfere with RDP connections. Disable any active VPN connections and try the Remote Desktop Connection again.
Reinstall Windows Update
Some Windows updates might cause RDP internal errors. Uninstall the problematic update, and then reinstall it to resolve the issue.
Modifying Your Local Security Policy
-
Press Windows Key + R, type secpol.msc, and press Enter to open the Local Security Policy utility.
-
Navigate to “Local Policies > Security Options.”
-
Locate and double-click “System cryptography: Use FIPS compliant algorithms for encryption, hashing, and signing.”
-
Select “Disabled” and click “Apply” and “OK.”
Disable VPN Connections
Disable any active VPN connections and try connecting to the remote computer again.
Change the Startup Status of the Remote Desktop Protocol Service
Ensure the Remote Desktop Protocol service has the correct startup status. Set the startup type to “Automatic” for this service.
Disabling Static IP on Your Computer
If your computer has a static IP address, try disabling it and switching to DHCP. This can resolve RDP internal errors caused by network issues.
-
Press Windows Key + R, type ncpa.cpl, and press Enter to open the Network Connections window.
-
Right-click on your network adapter and select “Properties.”
-
Double-click on “Internet Protocol Version 4 (TCP/IPv4).”
-
Select “Obtain an IP address automatically” and “Obtain DNS server address automatically.”
-
Click “OK” and restart your computer.
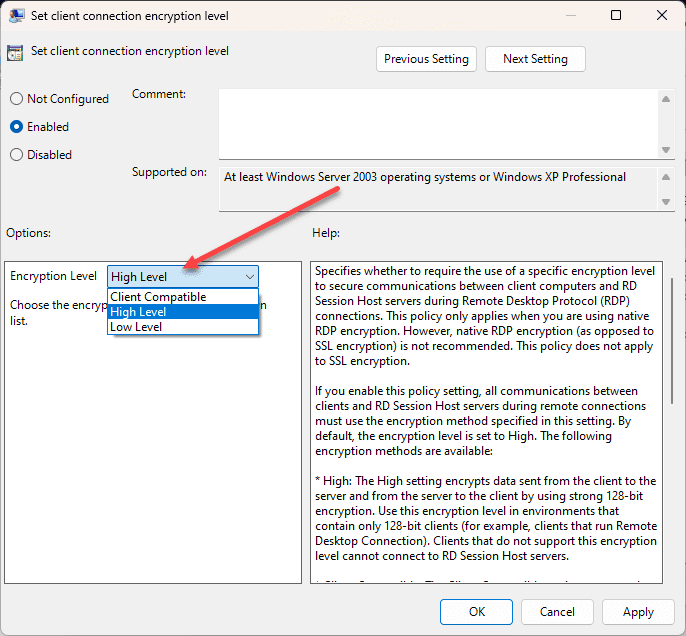
Modifying RDP Security in Group Policy Editor
-
Open the Local Group Policy Editor.
-
Navigate to “Computer Configuration > Administrative Templates > Windows Components > Remote Desktop Services > Remote Desktop Session Host > Security.”
-
Double-click on “Set client connection encryption level” and select “Enabled.”
-
In the “Options” section, select “High Level” from the drop-down menu.
-
Click “Apply” and then “OK.”
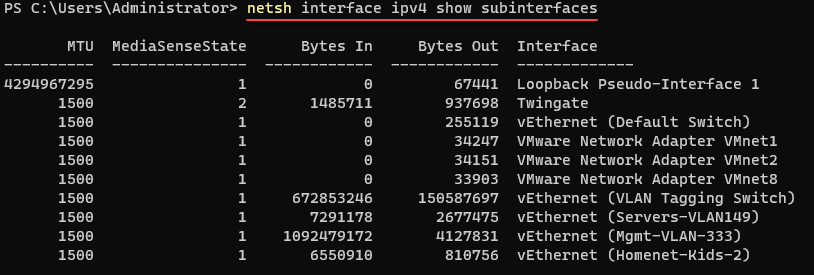
Change the MTU Value
Changing the Maximum Transmission Unit (MTU) value can help resolve RDP internal errors caused by network issues.
-
Open an elevated Command Prompt by right-clicking on the Start button and selecting “Command Prompt (Admin).”
-
Type netsh interface ipv4 show subinterfaces and press Enter to view the current MTU value.
-
Note the name of the network interface you are using for RDP.
-
Type netsh interface ipv4 set subinterface “Interface Name” mtu=1458 store=persistent and press Enter, replacing “Interface Name” with the name of your network interface.
-
Restart your computer and try the Remote Desktop Connection again.
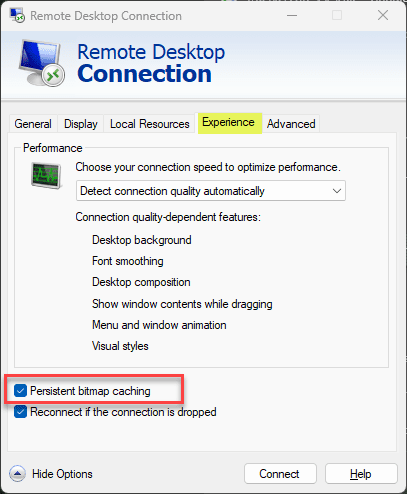
Enable Persistent Bitmap Caching
Enabling persistent bitmap caching can improve the performance of your Remote Desktop Connection and potentially resolve RDP internal errors.
-
Open the Remote Desktop Connection app.
-
Click on “Show Options” to access advanced settings.
-
In the Experience tab, check the box “Persistent bitmap caching.”
-
Click “Connect” to establish the RDP connection.
Additional Workarounds
Check the following additional workarounds if the above doesn’t resolve the issue.
Monitor Windows System Logs
Monitoring Windows System Logs can provide valuable information about the cause of the “RDP an internal error has occurred” issue. To access the Event Viewer and check the logs, follow these steps:
-
Press Windows Key + R, type eventvwr.msc, and press Enter to open the Event Viewer.
-
In the left pane, navigate to “Windows Logs > System.”
-
Look for events related to Remote Desktop Services or any errors that occurred around the time the issue was encountered.
You may also want to check the “Windows Logs > Application” section for any related events or errors.

Adjust Remote Desktop Connection App Settings
In some cases, adjusting the settings of the Remote Desktop Connection app may resolve the internal error. To do this:
-
Open the Remote Desktop Connection app.
-
Click on “Show Options” to access advanced settings.
-
In the “Display” tab, adjust the screen resolution and color depth settings.
-
In the “Local Resources” tab, configure the settings for audio, keyboard, and local devices.
-
In the “Experience” tab, select the appropriate connection speed from the drop-down menu and enable or disable specific performance options.
Experiment with these settings to find the optimal configuration that resolves the internal error.
Update Remote Desktop Connection Client
An outdated Remote Desktop Connection client may cause internal errors. To update the client, follow these steps:
-
Press Windows Key + R, type appwiz.cpl, and press Enter to open the “Programs and Features” window.
-
Look for “Remote Desktop Connection” or “Microsoft Remote Desktop” in the list of installed programs.
-
Follow the on-screen instructions to update the client if an update is available.
Alternatively, you can visit the Microsoft Download Center or the Microsoft Store to download the latest Remote Desktop Connection client version.
Check Proxy Server Settings
A misconfigured proxy server providing an Internet connection can interfere with RDP connections, causing internal errors. To check and adjust your proxy server settings:
-
Press Windows Key + I to open the Windows Settings app.
-
Click on “Network & Internet.”
-
In the left pane, select “Proxy.”
-
Ensure that the correct proxy settings are configured, or disable the proxy server if it is not required.
Check Control Panel Settings
The Control Panel provides additional settings related to Remote Desktop connections. To check these settings:
-
Press Windows Key + R, type control, and press Enter to open the Control Panel.
-
Click on “System and Security.”
-
Under “System,” click on “Allow remote access.”
-
Ensure that the correct settings are configured for remote connections, including allowing Remote Desktop and enabling Network Level Authentication.
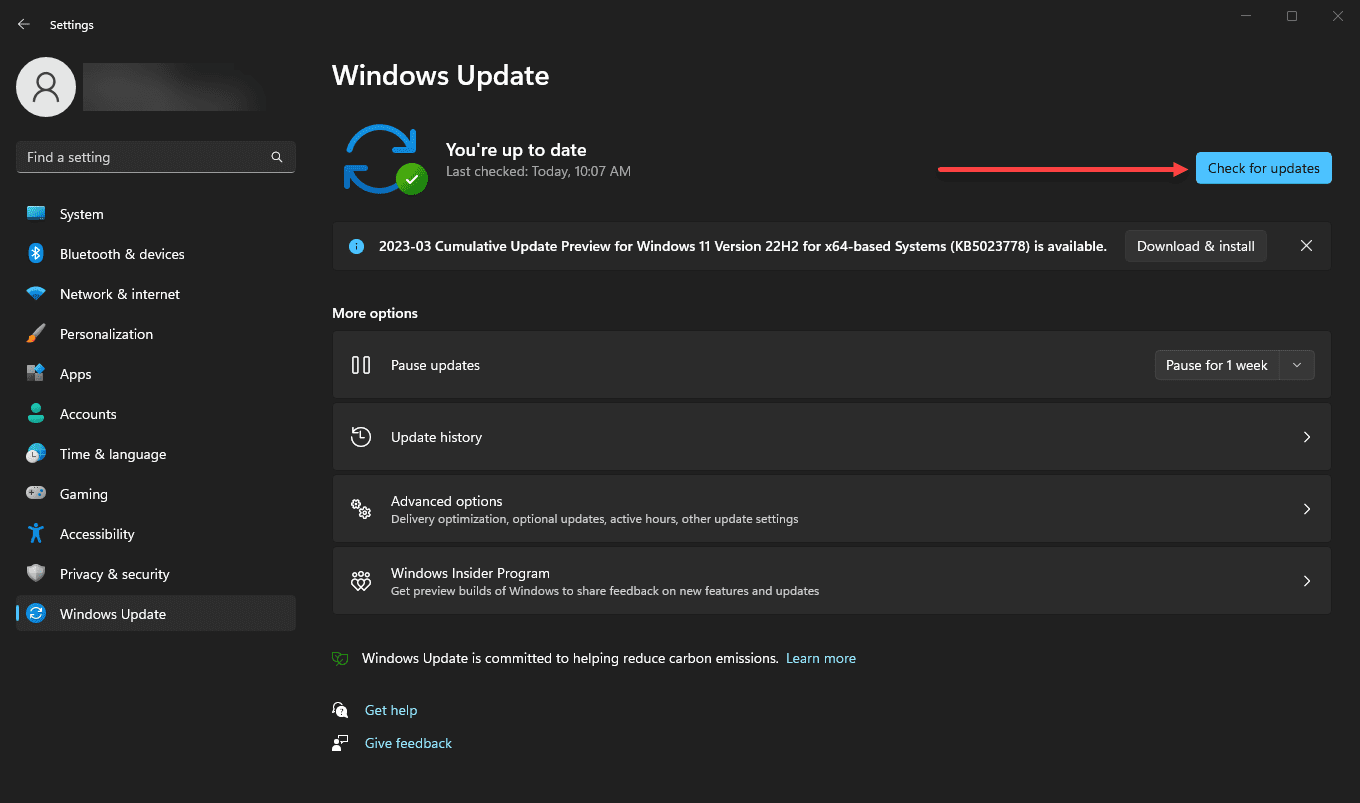
Update Windows Server
An outdated Windows Server may cause RDP internal errors. To update your server, follow these steps:
-
Press Windows Key + I to open the Settings app.
-
Click on “Update & Security.”
-
In the “Windows Update” tab, click on “Check for updates” and follow the on-screen instructions to install any available updates.
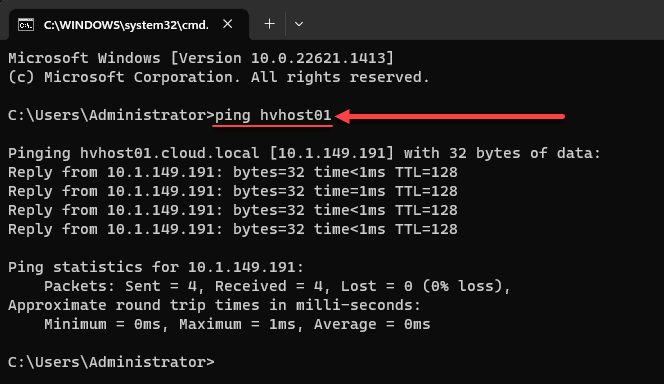
Troubleshoot Network Connectivity
Network connectivity issues can cause RDP internal errors. To troubleshoot your network connection:
-
Check the physical connections between your computer and the network, such as cables and switches.
-
Use the ping command to test the connection between your and remote computers.
-
Check your router or switch for any configuration issues, such as incorrect VLAN settings or IP address conflicts.
Wrapping up
In conclusion, the “RDP an internal error has occurred” issue can be caused by various factors, such as incorrect settings, network issues, or outdated software. By following the solutions and workarounds outlined in this blog post, you should be able to address the issue and establish a successful Remote Desktop Connection. Remember to carefully analyze your specific situation and tailor the solutions to your needs for optimal results.
An internal error has occurred error for Remote Desktop Connection is a very vague error message. It occurs mostly when a user is trying to connect to a remote computer. This could be caused by a weak network connection, an invalid configuration of the remote connection, and more.

Some of the working solutions that have been known to help resolve this RDC error in Windows 11/10 are as follows:
- Configure the settings.
- Turn off any VPN Connections.
- Leave and re-join a domain.
- Use the Local Security Policy utility.
- Change MTU Value
- Disable Network Level Authentication
You will need an administrator account to execute these suggestions.
1] Configure the settings
Open the Remote Desktop Connection client by searching for it in the Windows Search box.
Select the Show Options button from the bottom left portion of the screen. Navigate to the Experience tab.
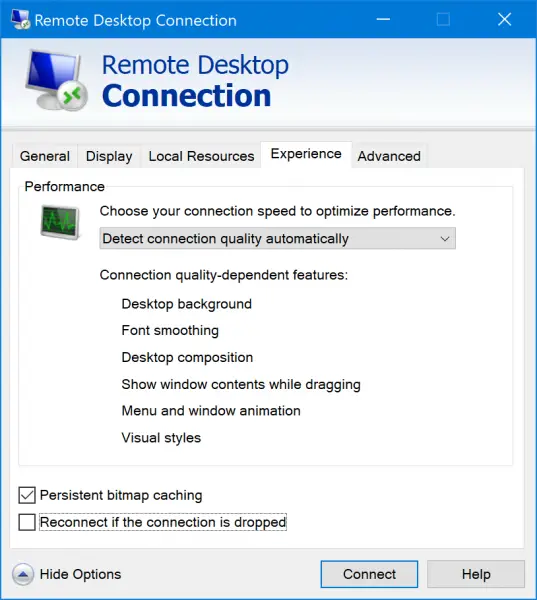
Uncheck the option that says Reconnect if the connection is dropped.
2] Turn off any VPN Connections
Open Windows 10 Settings app. Navigate to the following path: Network & Internet > VPN.
Select the VPN network that your computer is connected to and select Disconnect.
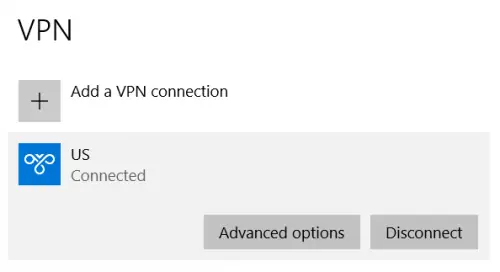
If you are using any third-party VPN software, exit that application.
3] Leave and re-join a domain
To remove a system from the domain, use the following procedure:
- Click on the Start button and open the Settings app.
- Go to System > Accounts > Access work or school.
- Select the organization you want to disconnect your computer from.
- Select Disconnect in order to disconnect from the organization.
- Restart the system.
This would disconnect the system from the domain.
4] Use the Local Security Policy utility
Search for Local Security Policy and select the appropriate result. Select Local Policies > Security options in the left side navigation panel.
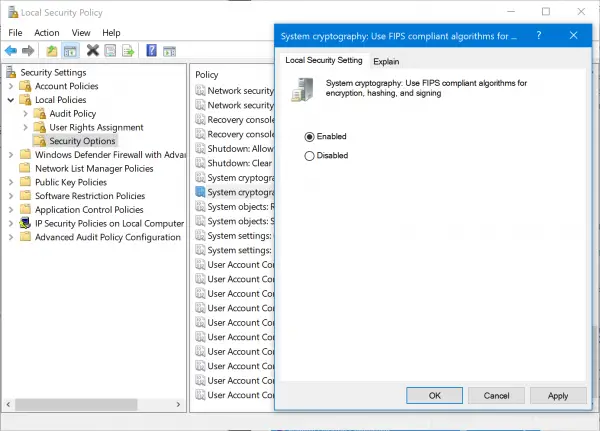
On the right-side panel, double click on System cryptography: Use FIPS compliant algorithms for encryption, hashing, and signing.
It will open the configuration dialog.
Select Enabled. Select Apply and then select OK.
Reboot your computer and check if that fixes your issues.
5] Change MTU Value
MTU or maximum transmission unit measures the largest data packet that a network device will accept. If the data size is increased, it will reduce the chance of any connection drop. While Windows doesn’t offer a direct method, you can use the TCP optimizer tool available here and then change the MTU value.
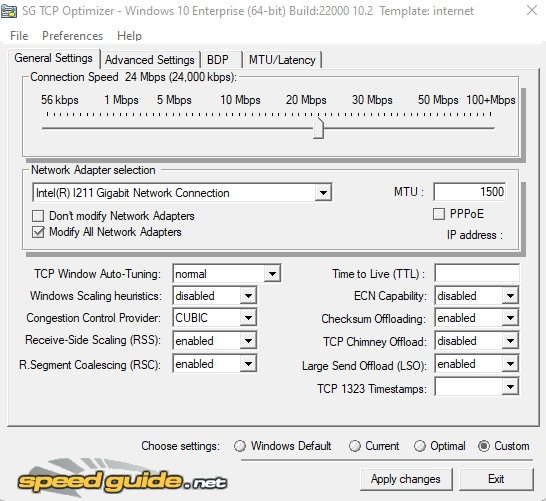
Choose the custom mode to enable the MTU box, and then increase the size. You may have to experiment a bit to get the right value to resolve the error.
6] Disable Network Level Authentication
- Open Windows Settings (Win + I)
- Navigate to System > Remote Desktop
- Un-tick the Allow connections only from computers running Remote Desktop with Network Level Authentication checkbox.
- Close the settings Windows.
Now try connecting to a remote desktop, and it should hopefully resolve the problem.
Is higher or lower MTU better?
While a larger MTUY can carry more data if it’s too large, the data can get fragmented. You will need to experiment with different values to determine what works between your router and the computer.
Why is the Remote Desktop connection not working?
There can be various reasons, even if your password is correct. Some of them are network issues, authentication issues on the server-side, Firewall, and the option to connect to a computer via remote.
Remote Desktop Connection stops all of a sudden
If you face this often, you may want to reduce the number of connected devices that carry along with the connection. it includes printers, audio playback settings, and so on. The best way to figure this out is to connect with the bare minimum setting and then add one at a time.
I hope the post was easy to follow, and you were able to figure out the problem where you get the internal error with Remote Desktop.
If you use Remote Desktop to work with remote computers in Windows environment, you will frequently come across the following error.
 This error commonly occurs in Windows 8.1 and 10 when the username for remote computer is saved in Windows registry.
The following video will delete the saved username from Windows registry and the error will go away.
If you work with a lot of remote computers and you probably encounter this error quite often. This will make it cumbersome to browse Windows registry and delete the registry value for every single remote computer. In the next section, I will show you how to create a PowerShell module which will feel and behave like a traditional PowerShell cmdlet. Using this module, you can fix “An internal error has occurred” issue with just a single command.
Creating Fix-RDPError PowerShell Module
Launch the Windows PowerShell console with administrator privilege , paste the following code and hit enter:
$module = New-Item -Path "$env:userprofile\documents\WindowsPowerShell\Modules\Fix-RDPError" -Name Fix-RDPError.psm1 -ItemType File -Force
if($module){
notepad $module
}
This command will create new new PowerShell module file under “$env:userprofile\documents\WindowsPowerShell\Modules” and then opens the modules file in notepad.
Now copy the following code, paste it in notepad and press Ctrl+S to save it.
<#
.Synopsis
Fixes "An internal error has occurred" issue.
.DESCRIPTION
This cmdlet will fix "An internal error has occurred" issue while trying to connect a computer through Remote Desktop.
.Parameter <ComputerName>
This is a required parameter where you need to specify a computer name or IP address of the remote computer.
.EXAMPLE
Fix-RDPError -ComputerName DC01
This command will delete the saved "UsernameHint" value in registry for remote computer DC01, which will fix "An internal error has occurred" issue.
.EXAMPLE
Fix-RDPError -IP 192.168.10.10 -Verbose
This command will verbosely delete the saved "UsernameHint" value in registry for remote computer 192.168.10.10, which will fix "An internal error has occurred" issue.
#>
function Fix-RDPError
{
[CmdletBinding()]
Param
(
# Required parameter ComputerName
[Parameter(Mandatory=$true,
Position=0)]
[Alias ('HostName','cn','Host','Computer', 'IP')]
[string]$ComputerName
)
$BasePath = "HKCU:\SOFTWARE\Microsoft\Terminal Server Client\Servers"
$RegPath = "$BasePath\$ComputerName"
$exists = Test-Path "$BasePath\$ComputerName"
if ($exists) {
if((Get-ItemProperty $RegPath).PSObject.Properties.Name -contains "UsernameHint") {
Write-Host "Saved Username found in registry!" -ForegroundColor Green
Write-Verbose ("Removing the `"UsernameHint`" value from [$RegPath] registry key!")
Remove-ItemProperty -Path $RegPath -Name "UsernameHint" -Force
if($?){
Write-Host "Operation completed successfully!"-ForegroundColor Green
} else {Write-Host "Something went wrong! Try running the command again." -ForegroundColor Red}
}
else {Write-Error "Username is not saved for `"$ComputerName`""}
}
else {Write-Error "Computer name `"$ComputerName`" doesn't exist in registry!"}
}
If you followed the steps correctly, your Fix-RDPError module is now created and ready for use. This module requires you to have administrative privilege on local computer since it involves deleting value(s) from Windows registry.
Using the Fix-RDPError Module
Now that you created the FIx-RDPError module, let me tell you how to use it. Launch a PowerShell console with administrator privilege. copy the following command:
Fix-RDPError -ComputerName SRV01
Make sure you change the SRV01 with your remote computer name.

The module will search for a saved username in Windows registry and deletes it if found. This will fix “An internal error has occurred” issue.
This PowerShell module may be useful for the windows administrators who frequently uses Remote Desktop to connect remote computers and face this error quite often.