Introduction: This document explains the general procedure to follow when the printer shows continuous or intermittent System Error 86:01 (also 86:10 or 86:11) or 42:10 when initializing or printing. This document can be used with the following printers:
HP Designjet T-Series Printers: T610/T620/T1100/T1120/T1200/T770/T2300/T790/T1300/Z2100/Z3100/Z3200/Z5200/Z5400.
Generally, System Error 86:01 refers to paper jams or obstructions (problems moving the carriage) in the Scan Axis area. On the other hand, System Error 42:10 refers to a Scan Axis Motor Failure (electrical problem caused by difficulties moving the carriage – too much force needed to move it due to obstructions, high friction or restrictions). However, it is important to understand that System Error 86:01 is not always a real visible paper jam and it should never be confused with System Error 81:01 (Paper Axis). On the other hand, System Error 42:10 is not always a problem with the Scan Axis Motor. Troubleshooting for both errors, consequently, is basically the same.
In simple terms, ANY restriction or obstruction preventing the carriage from freely moving will cause the printer to stop working and show any of these errors.
The best and easier way to diagnose the problem is to locate the spot where the carriage stops when the printer shows the error (in case of no real paper jam). Most likely the main possible cause of the issue will be there.
If service onsite is needed, a proper diagnosis of the failing component is indispensable. Even if one component looks like the obvious cause of the problem, it is important to check other Scan Axis components.
Check the following picture to better identify the main Scan Axis components:
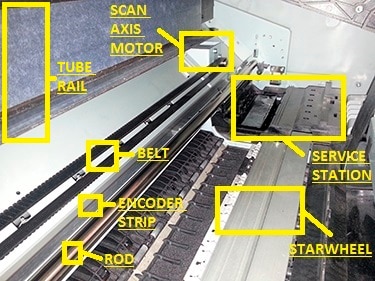
In case no visible obstructions are found in the Scan Axis area, here there are some of the most common causes of these errors.
Possible hardware causes:
-
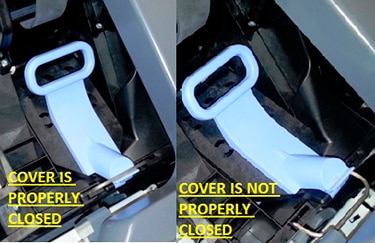
Carriage: With the printer unplugged and no paper loaded, MANUALLY move it from side to side, check for general obstructions. It must move freely across the entire Scan Axis area. If the carriage is locked by the Service Station (right hand side) it will not be possible to manually take the carriage out. If so, the recommendation is to restart the printer, wait for the carriage to come out and then unplug the printer. The Carriage Cover MUST be properly closed (blue latch must engage the metal piece in front of the carriage). If required, for ideal troubleshooting, it is recommended to remove all printheads (PHs) from the carriage to look for pieces of paper under the PHs. Also, check if they are delaminated (thin plastic strip at the bottom) as this may make them crash with the paper. Keep them out during the rest of the diagnosis.

-
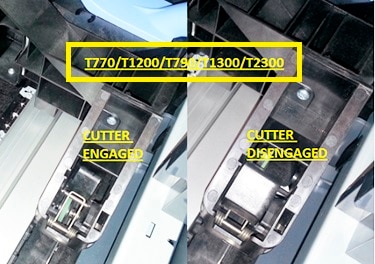
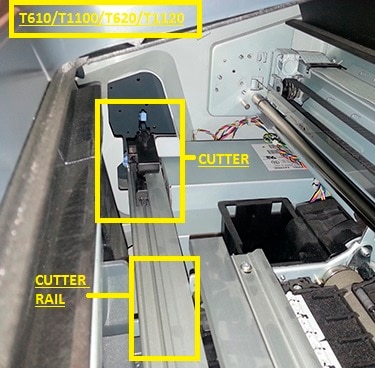
Cutter: For printers with the cutter NOT attached to the carriage (T610/T1100/T620/T1120/Z2100/Z3100/Z3200/Z5200), make sure it is completely toward the left hand side of the printer (when facing it). No pieces of paper must be obstructing its movement. It must engage and disengage correctly and it should freely move (with no friction) through its rail. For printers with the cutter attached to the carriage (T770/T1200/T790/T1300/T2300/Z5400), make sure that it slides freely when the carriage is manually moved from side to side. It must be deactivated (up position) and no pieces of paper must be obstructing its movement. It must engage and disengage correctly. For ideal troubleshooting (if the cutter is suspected as part of the problem) it is recommended to remove it. For any printer it is a Customer Self Replaceable part.
-
Belt: if it is loose, worn-out, shredded or broken, the Scan Axis Motor will not be able to grab it and move it. In some cases, the part of the belt being worn-out (missing teeth) or shredded will “slip” when it is grabbed by the motor. Noises are common when this happens. Because of this, it is important to closely check the entire belt, inch by inch. If it starts missing teeth, they will get either all over the Scan Axis or on top of the printouts. Also, check (if possible) the Belt Tensioner (left end of the belt when facing the printer), it may be broken or out of place. Depending on the printer series, the tensioner may not be included with the belt.
-
Carriage rod: It must be properly oiled. The carriage must slide freely through it, if not; clean and oil the rod using synthetic oil.
-
Encoder strip: It must not be scratched, bent or damaged. If dirty, proceed to clean it using a non-abrasive liquid and a lint-free cloth. Hold the cloth in an inverted “U” shape around the Encoder Strip. Wipe until no ink residue appears on the cloth.
-
Service station: Pieces or paper may have fallen in it. Check for obstruction, especially if the carriage stops on it when it shows the System Error. If so, it is important to also remove all PHs.
-
Starwheel assembly: If there are pieces of paper under it, it will not be able to move up and down correctly. If it remains only in the up position, the carriage may touch it when it moves from side to side. When the lever on the left is up, paper must be able to manually pass under the Starwheel Assembly and through the complete Paper Axis area (from the back to the front) with no problems.
-
Trailing Cable/Ink tubes: The Ink Tubes must freely move and follow the movement of the carriage. They must also slide freely through the Tube Rail. The Trailing Cable must freely move and follow the movement of the carriage and tubes. On the T610/T1100/T620/T1120/Z2100/Z3100/Z3200/Z5200 the Trailing Cable is located separate from the Ink Tubes. On the T770/T1200/T790/T1300/T2300/Z5400 the Trailing Cable is attached to the Ink Tubes.
-
Scan Axis Motor: Check if it is able to move the carriage while initializing (if the error is continuous), if so the motor is OK. Scan Axis Motor issues can be easily mistaken with encoder reading issues (Carriage Encoder Sensor is not able to read the Encoder Strip). If the motor is not apparently moving it is a good idea to restart the printer with the Window Sensor is blocked and check if the carriage moves at least a couple of millimeters (pay close attention). If it moves then most likely the motor is not the problem. In this case the issue has to do with encoder reading; service will be needed.
note:
If any issue persists, it will be necessary to run some internal tests. For more information about this or if any further assistance is needed, contact HP Technical Support.


86:01 is a Carriage Servo Shutdown error
Check for paper scrap or mass stuck in the plotter in the carriage path, also check that the Carriage Stopper is properly installed (page 8-53 Step 12 in the manual).
Also it could be the Scan Axis motor.
86:11 is Scan-Axis Length too Short.
Again check for obstructions or a scrap of paper in the carriage path.
Also check the Carriage belt is properly installed and the encoder is clean and free of defect. (bends, kinks, tears and not defaced.)
Both of these errors lead towards obstructions in the carriage movement path, so get out your flashlight and check that plotter thoroughly, you may have had a paper jam in the past and the paper had to be manually removed, a little piece stayed in the plotter.
Also check with your hands the full on End to End movement of the carriage assembly.
Freedom of movement, no noise and the belt moves freely, also gives you a chance to examine the belt for defect or missing teeth. Sometimes the belt is only missing a few teeth and that will cause it to slip and throw an error.
22.01.2014
Вопрос:
вообще то модель Т790, выдает код ошибки 86,01
Ответ:
Подобная ошибка случается при обычных замятиях бумаги, и прежде всего следует убедиться, что нигде не замята бумага и не осталось ни одного, даже очень маленького, кусочка бумаги. Само по себе замятие бумаги может быть как естественным следствием неровно поданной бумаги, так и отдельной проблемой. Чаще всего подобная ошибка начинает возникать спустя полгода-год, в зависимости от нагрузки на аппарат. Проблема заключается в ServiceStation (Узел парковки). В этот узел сбрасываются чернила из головок при прочистке, там же находится механизм очистки головок от остатков краски. В этот же узел паркуется каретка при выключении аппарата. При работе плоттера все шестерни и подвижные части этого узла, со временем, покрываются слоем краски смешанной с бумажной и бытовой пылью. Эта смесь постепенно становится все более вязкой и со временем может помешать нормальному движению механизмов и частей узла, что приводит к появлению этой ошибки. По нормам производителя – 1 раз в полгода требутся проведение Технического Обслуживания. При проведении Технического Обслуживания, ServiceStation очищают от краски, наносят свежую смазку, возвращая тем самым деталям узла нормальную подвижность. Ошибка 86:01 не является постоянной и может пропадать при включении-выключении аппарата, но в этом случае вы должны помнить о риске поломок механизмов и шестерен в ServiceStation, что приведет уже к необходимости замены всего узла целиком.
Задайте свой вопрос
Introduction: This document explains the general procedure to follow when the printer shows continuous or intermittent System Error 86:01 (also 86:10 or 86:11) or 42:10 when initializing or printing. This document can be used with the following printers:
HP Designjet T-Series Printers: T610/T620/T1100/T1120/T1200/T770/T2300/T790/T1300/Z2100/Z3100/Z3200/Z5200/Z5400.
Generally, System Error 86:01 refers to paper jams or obstructions (problems moving the carriage) in the Scan Axis area. On the other hand, System Error 42:10 refers to a Scan Axis Motor Failure (electrical problem caused by difficulties moving the carriage – too much force needed to move it due to obstructions, high friction or restrictions). However, it is important to understand that System Error 86:01 is not always a real visible paper jam and it should never be confused with System Error 81:01 (Paper Axis). On the other hand, System Error 42:10 is not always a problem with the Scan Axis Motor. Troubleshooting for both errors, consequently, is basically the same.
In simple terms, ANY restriction or obstruction preventing the carriage from freely moving will cause the printer to stop working and show any of these errors.
The best and easier way to diagnose the problem is to locate the spot where the carriage stops when the printer shows the error (in case of no real paper jam). Most likely the main possible cause of the issue will be there.
If service onsite is needed, a proper diagnosis of the failing component is indispensable. Even if one component looks like the obvious cause of the problem, it is important to check other Scan Axis components.
Check the following picture to better identify the main Scan Axis components:
In case no visible obstructions are found in the Scan Axis area, here there are some of the most common causes of these errors.
Possible hardware causes:
-
Carriage: With the printer unplugged and no paper loaded, MANUALLY move it from side to side, check for general obstructions. It must move freely across the entire Scan Axis area. If the carriage is locked by the Service Station (right hand side) it will not be possible to manually take the carriage out. If so, the recommendation is to restart the printer, wait for the carriage to come out and then unplug the printer. The Carriage Cover MUST be properly closed (blue latch must engage the metal piece in front of the carriage). If required, for ideal troubleshooting, it is recommended to remove all printheads (PHs) from the carriage to look for pieces of paper under the PHs. Also, check if they are delaminated (thin plastic strip at the bottom) as this may make them crash with the paper. Keep them out during the rest of the diagnosis.
-
Cutter: For printers with the cutter NOT attached to the carriage (T610/T1100/T620/T1120/Z2100/Z3100/Z3200/Z5200), make sure it is completely toward the left hand side of the printer (when facing it). No pieces of paper must be obstructing its movement. It must engage and disengage correctly and it should freely move (with no friction) through its rail. For printers with the cutter attached to the carriage (T770/T1200/T790/T1300/T2300/Z5400), make sure that it slides freely when the carriage is manually moved from side to side. It must be deactivated (up position) and no pieces of paper must be obstructing its movement. It must engage and disengage correctly. For ideal troubleshooting (if the cutter is suspected as part of the problem) it is recommended to remove it. For any printer it is a Customer Self Replaceable part.
-
Belt: if it is loose, worn-out, shredded or broken, the Scan Axis Motor will not be able to grab it and move it. In some cases, the part of the belt being worn-out (missing teeth) or shredded will “slip” when it is grabbed by the motor. Noises are common when this happens. Because of this, it is important to closely check the entire belt, inch by inch. If it starts missing teeth, they will get either all over the Scan Axis or on top of the printouts. Also, check (if possible) the Belt Tensioner (left end of the belt when facing the printer), it may be broken or out of place. Depending on the printer series, the tensioner may not be included with the belt.
-
Carriage rod: It must be properly oiled. The carriage must slide freely through it, if not; clean and oil the rod using synthetic oil.
-
Encoder strip: It must not be scratched, bent or damaged. If dirty, proceed to clean it using a non-abrasive liquid and a lint-free cloth. Hold the cloth in an inverted “U” shape around the Encoder Strip. Wipe until no ink residue appears on the cloth.
-
Service station: Pieces or paper may have fallen in it. Check for obstruction, especially if the carriage stops on it when it shows the System Error. If so, it is important to also remove all PHs.
-
Starwheel assembly: If there are pieces of paper under it, it will not be able to move up and down correctly. If it remains only in the up position, the carriage may touch it when it moves from side to side. When the lever on the left is up, paper must be able to manually pass under the Starwheel Assembly and through the complete Paper Axis area (from the back to the front) with no problems.
-
Trailing Cable/Ink tubes: The Ink Tubes must freely move and follow the movement of the carriage. They must also slide freely through the Tube Rail. The Trailing Cable must freely move and follow the movement of the carriage and tubes. On the T610/T1100/T620/T1120/Z2100/Z3100/Z3200/Z5200 the Trailing Cable is located separate from the Ink Tubes. On the T770/T1200/T790/T1300/T2300/Z5400 the Trailing Cable is attached to the Ink Tubes.
-
Scan Axis Motor: Check if it is able to move the carriage while initializing (if the error is continuous), if so the motor is OK. Scan Axis Motor issues can be easily mistaken with encoder reading issues (Carriage Encoder Sensor is not able to read the Encoder Strip). If the motor is not apparently moving it is a good idea to restart the printer with the Window Sensor is blocked and check if the carriage moves at least a couple of millimeters (pay close attention). If it moves then most likely the motor is not the problem. In this case the issue has to do with encoder reading; service will be needed.
note:
If any issue persists, it will be necessary to run some internal tests. For more information about this or if any further assistance is needed, contact HP Technical Support.
Ошибка 86:01 HP DesignJet(System error code 86:01)
Ошибка 86:01 встречается во всех плоттерах HP DesignJet. Чаще всего данная ошибка проявляется в плоттерах HP DesignJet 500 | 510 | 800. Данная ошибка является самой распространенной среди всех ошибок. Связана данная ошибка с передвижением каретки. Если открыть документацию, то по этой ошибке сказано следующее – Замятие бумаги.

Давайте более детально рассмотрим ошибку 86:01. Как говорилось выше, эта ошибка по документации характеризуется, как ошибка замятия бумаги. То есть, во время печати или обрезке бумаги, рулон заминается, и каретка с печатающими головками встает на месте, так как под нее замялась бумага. Вывод следующий – бумага замялась и помешала движению каретки. Значит из этого следует, если каретка не прошла заданную дистанцию и ей что-то помешало, плоттер выдаст ошибку 86:01. Но что делать, если бумаги нет, а плоттер выдал эту ошибку? Что может послужить образованию условий для данной ошибки? Ниже рассмотрим более детально все факторы, которые могут послужить образованию данной ошибки.
- Износ ремня привода каретки
Следует сразу отметить, что каретка у нас передвигается с левой части плоттера в правую и назад по оси X. За передвижение каретки отвечает мотор привода ремня каретки и сам ремень. В среднем данный ремень служит от 3-х до 5 лет. Потом ремень начинает крошиться. Осыпается наружная резиновая оболочка и оголяется сама корда, которая начинает везде цепляться, а иногда и наматываться либо на ролик натяжителя, либо на сам мотор. В итоге каретка не может продолжить движение и плоттер впадает в ошибку.

Поэтому в первую очередь при возникновении ошибки 86:01 следует открыть крышку и осмотреть визуально ремень каретки. Если есть повреждения на ремне, то его просто следует заменить. Иногда можно предупредить данную ошибку. Обычно ремень не сразу расслаивается, а начинает потихоньку крошиться. Поэтому, если вы заметили маленькие черные крошки на рулоне, немедленно визуально осмотрите ремень. И если увидите, что ремень начал портиться, лучше сразу закажите специалиста для замены ремня привода каретки.
- Износ линейки позиционирования
При своем движении каретка должна понимать в какой части плоттера она находится. Свое местоположение каретка определяет по линейке позиционирования, на которой нанесены риски. Плоттер понимает, что от нулевой точки и до конечной, каретка переместится на определенное количество рисок. Возьмем к примеру любой плоттер формата А1. На линейке находятся около 550 рисок. Проще говоря, линейка с миллиметровыми полосками в количестве 550 штук. От одного края до другого каретка проходит их все. Внутри каретки находится датчик энкодера, который и считывает риски с линейки, которая проходит внутри каретки через данный датчик. И если каретка определила, что она прошла не 550, а 549 рисок, то плоттер выдаст нам ошибку 86:01.

Что может послужить износу линейки позиционирования? В процессе работы плоттера внутри распыляются мелкие частицы чернил. В итоге они оседают на всю поверхность внутри плоттера. Через пару лет работы на линейке образуется налет, в особенности со стороны сервисной станции. И где находится больше всего налета, там датчик и не может считать информацию. В данном случае поможет чистка линейки. Но здесь главное действовать без фанатизма, потому что можно стереть полностью риски. Если не чистить линейку и срок работы плоттера превысил 5 лет, риски могут сами осыпаться. На линейке, если ее внимательно осмотреть, можно будет заметить пустой участок между рисками. В этом месте каретка как раз и остановится и плоттер выдаст ошибку. Чтоб такое не происходило, плоттеры HP DesignJet следует чистить как минимум раз в два года. При больших объемах работы в 1-1.5 года. Если же у Вас все-таки износилась данная лента, то ее следует просто заменить.
- Износ каретки
Еще одним фактором возникновения ошибки 86:01 является износ самой каретки. Точнее сказать износ бушингов каретки. В каретке есть две бушинги, которые скользят по направляющей штанге. Вот они и изнашиваются. Есть еще одна верхняя бушинга, которая фиксирует верхнее положение. Она тоже стирается и нарушает люфт каретки.

Если при движении каретка у Вас подпрыгивает, то значит проблема в этих бушингах. Но, износ этих деталей очень редок. Здесь лучше пригласить инженера на диагностику плоттера HP, чтоб знать наверняка, что вышло в каретке из строя.
- Загрязненность плоттера
Загрязненность плоттера тоже может повлиять на работоспособность плоттера и вызвать ошибку 86:01. Как было сказано выше, налет от чернил оседает по всему плоттеру. Этот же налет ложится на направляющую. Здесь даже не нужно приглашать инженера. Достаточно протереть направляющую начисто и после смазать силиконовым маслом подходящей для региона вязкостью.

Так же переполняется сервисная станция. Обычно при переполнении сервисной станции плоттер выдает ошибку 21:10, чему мы и посветили отдельную статью. Но иногда станция продолжает работать, но не возвращается в исходную позицию. В этом случае каретка двигаясь на свое парковочное место, встречает сопротивление в узле сервисной станции, так как станция из за грязи не выполнила свой цикл до конца. При ударе каретки о станцию, плоттер тут же впадает в ошибку 86:01. Здесь уже требуется полное техническое обслуживание.
На данную ошибку могут повлиять еще куча мелких различных факторов, которые описать простым языком очень трудно и долго. Выше мы перечисли все основные моменты, которые влияют на работоспособность плоттера и могут вызвать эту ошибку. Если Вы столкнулись с данной ошибкой, выявили причину, но не смогли самостоятельно ее решить, Вам достаточно позвонить в нашу компанию, описать суть ошибки и оформить заявку. Наша компания на протяжении 20 лет осуществляет работы в сфере ремонта оргтехники и имеет огромный опыт работы в данном направлении. При этом основным направлением нашей компании является ремонт плоттеров HP DesignJet. После оформления заявки наши инженеры выедут к Вам в течении одного рабочего дня и устранят ошибку у Вас на месте.
Если ошибка 86:01 возникла в плоттерах серии HP DesignJet 500 | 510 | 800, то для ремонта могут понадобиться следующие детали:
- Ремень каретки 24 дюйма формата А1 — C7769-60182 Carriage Belt 24 inch.
- Ремень каретки 42 дюйма формата А0 — C7770-60014 Carriage Belt 42 inch.
- Лента позиционирования 24 дюйма формата А1 — C7769-60183 Encoder Strip 24 inch.
- Лента позиционирования 42 дюйма формата А0 — C7770-60013 Encoder Strip 42 inch.
- Каретка в сборе — C7769-60272| C7769-69272| C7769-60151| C7769-60376 Carriage Assembly.
- Бушинг каретки — Q5669-60687 Carriage Rear Bushing.
- Сервисная станция — C7769-60149| C7769-60374 Service Station.
- Шлейф каретки 24 дюйма формата А1 — C7769-60295| C7769-60147| C7769-60271| C7769-60305 Trailing Cable 24 inch.
- Шлейф каретки 42 дюйма формата А0 — C7770-60266| C7770-60258| C7770-60147| C7770-60274 Trailing Cable 42 inch.
Если ошибка 86:01 возникла в плоттерах серии HP DesignJet T610|T620|T1100|T1120, то для ремонта могут понадобиться следующие детали:
- Ремень каретки 24 дюйма формата А1 — Q5669-60673 Belt Assembly 24 inch.
- Ремень каретки 44 дюйма формата А0 — Q6659-60175 Belt Assembly 44 inch.
- Лента позиционирования 24 дюйма формата А1 — Q6683-60242 | Q6683-60209 Encoder Strip HP DesignJet T1100ps T1100 T610 24 inch.
- Лента позиционирования 24 дюйма формата А1 — CK837-67017 Encoder Strip HP DesignJet T1120ps T1120 T620 24 inch.
- Лента позиционирования 44 дюйма формата А0 — Q6687-60094 | Q6687-60067 Encoder Strip HP DesignJet T1100ps T1100 T610 44 inch.
- Лента позиционирования 44 дюйма формата А0 — CK839-67005 Encoder Strip HP DesignJet T1120ps T1120 T620 44 inch.
- Каретка в сборе — Q6683-67017 Carriage Assembly HP DesignJet T1100ps T1100 T610 24 inch.
- Каретка в сборе — Q6687-67009 Carriage Assembly HP DesignJet T1100ps T1100 T610 44 inch.
- Каретка в сборе — CK837-67027 | CK837-67004 Carriage Assembly HP DesignJet T1120 T620.
- Бушинг каретки — Q5669-60687 Carriage Rear Bushing.
- Сервисная станция — Q6683-60187 Service Station HP DesignJet T610|T1100.
- Сервисная станция — CK837-67022 Service Station HP DesignJet T620|T1120.
- Шлейф каретки 24 дюйма формата А1 — Q5669-67052 Trailing Cable HP DesignJet T1100ps T1100 T610 24 inch.
- Шлейф каретки 44 дюйма формата А0 — Q6659-67015 Trailing Cable HP DesignJet T1100ps T1100 T610 44 inch.
Если ошибка 86:01 возникла в плоттерах серии HP DesignJet T120|T520, то для ремонта могут понадобиться следующие детали:
- Ремень каретки 24 дюйма — CQ890-67059 Belt 24 inch.
- Ремень каретки 36 дюймов — CQ893-67016 Belt 36 inch.
- Лента позиционирования 24 дюйма — CQ890-67003 Encoder Strip 24 inch.
- Лента позиционирования 36 дюймов — CQ890-67004 Encoder Strip 36 inch.
- Каретка в сборе — CQ890-67002 Carriage Assembly with Belt 24 inch.
- Каретка в сборе — CQ893-67011 Carriage Assembly with Belt 36 inch.
- Сервисная станция — CQ890-67045 Service Station Assembly.
- Шлейф каретки 24 дюйма — CQ890-67005 Trailing Cable 24 inch.
- Шлейф каретки 36 дюймов — CQ893-67001 Trailing Cable 36 inch.
| Обращайтесь в наш сервисный центр, будем рады Вам помочь! |
| Ответим на интересующие Вас вопросы ( в чатах моментальные ответы / Будние дни). |
| Дадим профессиональную консультацию. |
| Примем меры по устранению неполадок! |
| Связаться с нами можно по телефонам: |
Дата публикации статьи : 08.05.2019 ( обновление информации 18.11.2021 )
Мы ведём новости и обновляем информацию на сайте каждый день. Будем рады любым замечаниям и рекомендациям для улучшения сервиса сайта и компании.
Hi,
There are a few possible causes.
— Ink cartridges.
Replace any ink cartridges below 30% and reseat the printehads.
Once the printer accept the printheads you can install the old cartridges to use the ink
— Bad contact between the printheads and the carriage
Clean the electrical contacts on the flex cables and printheads.
This could be related to bad flex contacts or Carriage PCA
— Dirty Drop Detector
Drop detector is not able to identify the working nozzles think the printhead is bad
On the following link is a document with the instruction to clean it
http://h20564.www2.hp.com/hpsc/doc/public/display?docId=emr_na-c00814402
— Dirty encoder strip
Carriage does not move to the right position so the drop detector check the nozzles
— Printhead
Nozzles are not working or there is an electrical problem with the printhead
On this case replace the printhead
Also, make sure the firmware is updated.
Best regards
Mike G
I’m an HP Inc employee. But my response is not in behalf of HP Inc
Ситуация 1
При движении каретки плоттера появился шум или системная ошибка 86:01 (System error 86:01) появилась на передней панели плоттера. Причинами ошибки могут быть: обрывки бумаги или другие посторонние предметы на пути движения каретки, кабель каретки – неправильно проложенный или сильно изношенный и загрязнённый, изношенные подшипники каретки, отсутствие смазки на пути движения каретки, грязная энкодерная линейка(Encoder Strip), двигатель каретки, или станции обслуживания (Service Station). Ниже описаны шаги, которые помогут устранить проблему или более или менее точно локализовать её.
Важно: текущая прошивка плоттера должна быть 02.04 или выше, чтобы новая Станции обслуживания(Service Station) смогла правильно работать. Если версия прошивки ниже, чем 02.04, загрузите самую новую, доступную на сайте производителя.
Откройте центральную крышку плоттера и визуально проверьте наличие обрывков бумаги или других предметов на пути каретки и удалите любые найденные посторонние предметы (перед этим желательно удалить загруженную бумагу, если была загружена).
Включите плоттер и определите, нормален ли звук при его работе. Несильный шум – это вполне нормально. Также, нормально если слышны щелчки, когда каретка плоттера занимает крайнее правое и левое положения (уходит под крышки).
Разблокируйте каретку плоттера:
Выделите Set up menu на экране плоттера и нажмите клавишу ENTER.
Затем одновременно зажмите клавиши «UP» и «ENTER» (стрелку «вверх» и «ввод»).
Пролистайте меню до пункта Service Utilities и затем нажмите клавишу ENTER.
В появившемся меню листайте до Unlock Carriage и подтвердите разблокировку нажатием клавиши ENTER.
Отключите питание, выдернув кабель питания из плоттера.
Руками переместите каретку плоттера по всему пути её движения, чтобы понять, нет ли на пути движения каких-либо препятствий или участков с повышенным сопротивлением движению каретки. Удалите все такие препятствия, если возможно.
Протрите начисто спиртом ось каретки плоттера и смажьте её. Смазать таким образом:
Две-три капли масла по краям и по центру оси каретки. Затем переместить несколько раз каретку по всему пути для того, что бы равномерно распределить смазку по оси.
Затем влажной тканью не оставляющей волокон протрите энкодерную линейку и кабель каретки.
ПРЕДУПРЕЖДЕНИЕ: Будьте осторожны, энкодерная линейка плоттера имеет острые края и при не аккуратном обращении можно получить травму.
Также, промойте влажной тканью направляющую системы подачи чернил плоттера (трубы). При движении каретки трубы могут заедать в своей направляющей.
Включите плоттер и проверьте его работоспособность. Если проблемы остались, то, скорее всего, пришло время ремонта плоттера.
Скорее всего, понадобятся следующие части:
24-дюймовые модели — C7769B, C7769C, C7779B, C7779C
C7769-60305, C7769-60272 , C7769-60176, C7769-60182,
C7769-60146, C7769-60149
42-дюймовые модели — C7770B, C7770C, C7780B, C7780C
C7770-60274, C7769-60272, C7769-60176, C7770-60014, C7769-60146,
C7769-60149
Ситуация 2
Если ошибка 86:01 появляется во время инициализации плоттера, и при этом каретка не покидает сервисной станции, есть смысл проверить (возможно только при снятой левой крышке) соединение двигателя сервисной станции и так называемой соединительной платой (interconnect PCA). Если соединение в порядке, то попробуйте, включив питание плоттера, увидеть, приходит ли в движение сервисная станция. Если видно, что каретка при попытке двинуться вправо упирается в сервисную станцию, то сервисную станцию следует заменить.
Hi,
There are a few possible causes.
— Ink cartridges.
Replace any ink cartridges below 30% and reseat the printehads.
Once the printer accept the printheads you can install the old cartridges to use the ink
— Bad contact between the printheads and the carriage
Clean the electrical contacts on the flex cables and printheads.
This could be related to bad flex contacts or Carriage PCA
— Dirty Drop Detector
Drop detector is not able to identify the working nozzles think the printhead is bad
On the following link is a document with the instruction to clean it
http://h20564.www2.hp.com/hpsc/doc/public/display?docId=emr_na-c00814402
— Dirty encoder strip
Carriage does not move to the right position so the drop detector check the nozzles
— Printhead
Nozzles are not working or there is an electrical problem with the printhead
On this case replace the printhead
Also, make sure the firmware is updated.
Best regards
Mike G
I’m an HP Inc employee. But my response is not in behalf of HP Inc
Bath, Birmingham, Bradford, Brighton, Bristol, Carlisle, Cambridge, Canterbury, Chester, Chichester, Coventry, Derby, Durham, Ely, Exeter, Gloucester, Hereford, Kingston-upon-Hull, Lancaster, Leeds, Leicester, Lichfield, Lincoln, Liverpool, London, Manchester, Newcastle-upon-Tyne, Norwich, Nottingham, Oxford, Peterborough, Plymouth, Portsmouth, Preston, Ripon, Salford, Salisbury, Sheffield, Southampton, St Albans, Stoke-on-Trent, Sunderland, Truro, Wakefield, Wells, Westminster, Winchester, Wolverhampton, Worcester, York | Counties: Bedfordshire, Berkshire, Buckinghamshire, Cambridgeshire, Cheshire, Cornwall, Cumbria, (Cumberland) Derbyshire, Devon, Dorset, Durham, Essex, Gloucestershire, Hampshire, Hertfordshire, Huntingdonshire, Kent, Lancashire, Leicestershire, Lincolnshire, Middlesex, Norfolk, Northamptonshire, Northumberland, Nottinghamshire, Oxfordshire, Rutland, Shropshire, Somerset, Staffordshire, Suffolk, Surrey, Sussex, Warwickshire, Westmoreland, Wiltshire, Worcestershire, Yorkshire