by Milan Stanojevic
Milan has been enthusiastic about technology ever since his childhood days, and this led him to take interest in all PC-related technologies. He’s a PC enthusiast and he… read more
Updated on
- If you receive the VPN error 809, it means that the network connection between your computer and the VPN server could not be established because the remote server is not responding.
- You can easily fix this error by following our instructions below. However, the best long-term solution is to use a native VPN app instead of a manual VPN connection.
- Discover more solutions to similar issues in our VPN Errors Code section.
- Join our VPN Troubleshooting Hub to master your VPN service.

VPN error 809 is usually caused by the firewall between the client and server, which blocks the ports used by the VPN tunnel.
On top of that, Windows doesn’t support IPsec NAT-T security associations to servers behind a NAT device by default.
When the error appears, the event log too won’t display any related logs because the traffic can’t reach the MX’s WAN interface. But you should be able to solve it on Windows 10.
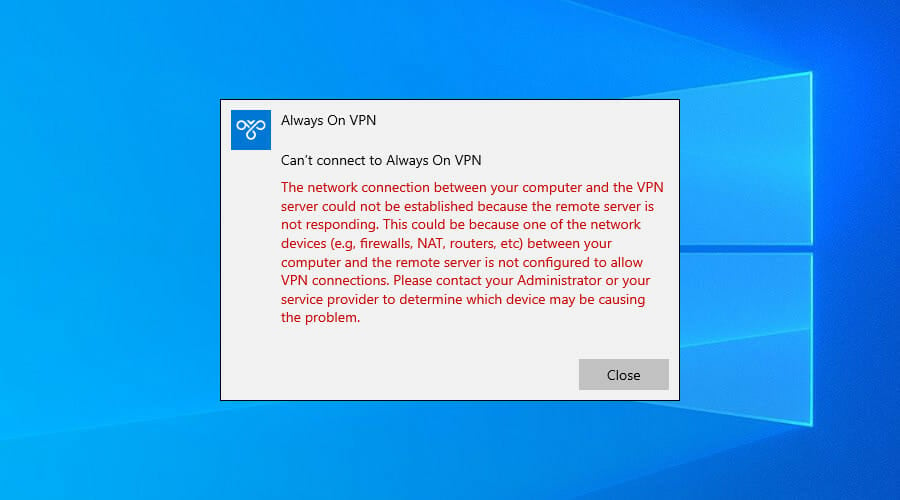
Here’s the error message we’re talking about.
How can I fix VPN error 809 on Windows 10?
Enable the ports on your firewall or router

You need to open the ports on your firewall or router, depending on which VPN protocol you’re using.
- Port 1723 over TCP for PPTP
- Port 500 or 4500 over UDP for L2TP/IPsec or IKEv2/IPsec
If this is not possible, deploy the SSTP- or OpenVPN-based tunnel on your VPN provider.
This allows the VPN connection to work across the firewall, NAT, and web proxies.
Find out more about how to fix VPN blocked by Windows Firewall.
Use a VPN client instead of a manual VPN connection

Windows 10 is prone to various problems, including VPN errors like 809. It can be the result of incorrect network settings.
Even if you manage to fix the issue, it doesn’t mean you won’t face it again.
So, if you’re looking for a long-term solution to get rid of VPN errors, we suggest opting for Private Internet Access (PIA).
It has a native VPN app ready for Windows 10 as well as older Windows versions and other devices: Mac, Linux, Android, and iOS, and even routers.
You can use PIA to create a secure tunnel to the public Internet. This way, you can protect your privacy, encrypt your data against any hacker attacks, and unblock content that’s not available to your region.
More about PIA:
- Support for OpenVPN and WireGuard protocols
- Native port forwarding
- Kill switch
- No logging, no leaks
- 24/7 live chat support
- 30-day money-back guarantee (no free trial)

Private Internet Access
Use this reliable VPN app to eliminate any VPN errors and enjoy a secure connection on your device.
Make a small modification to the system registry
- Right-click Start and select Run
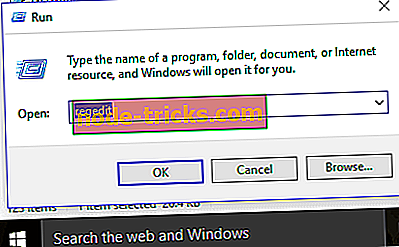
- Type regedit and press Enter
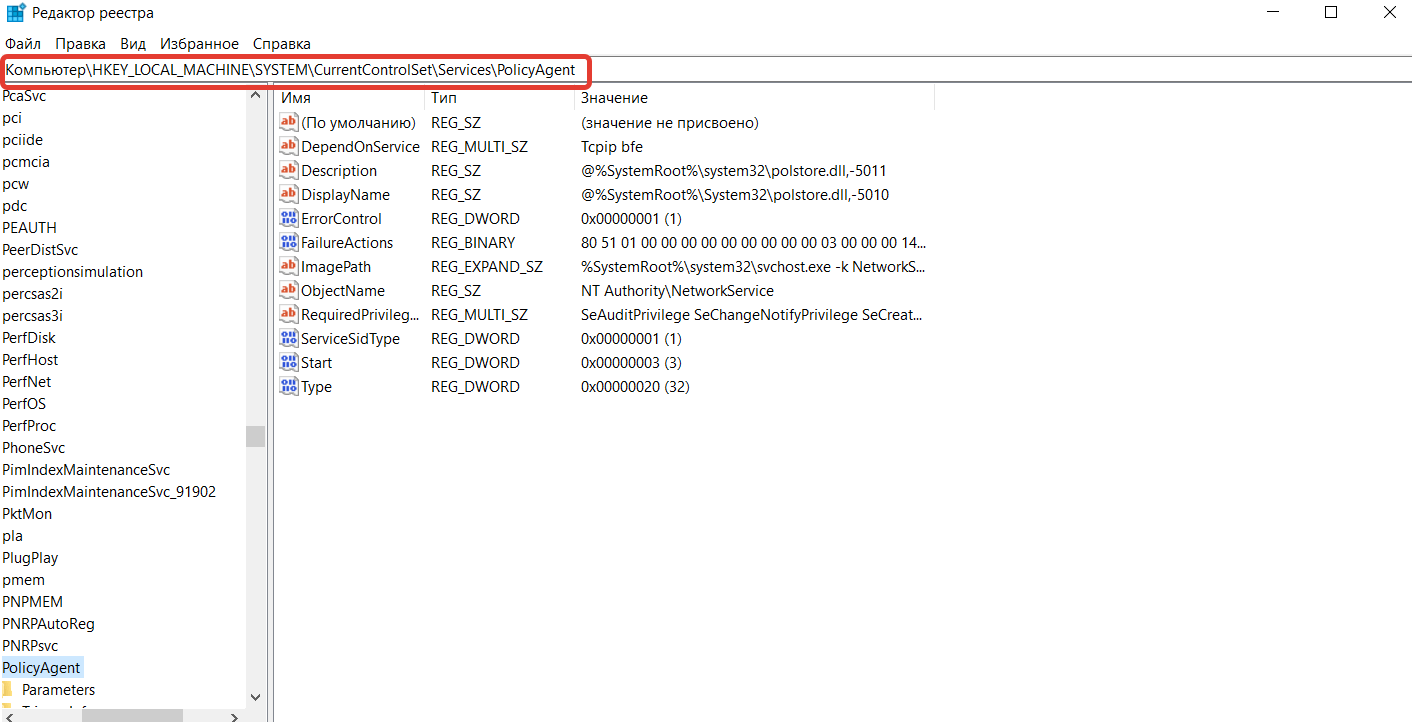
- Go to this location:
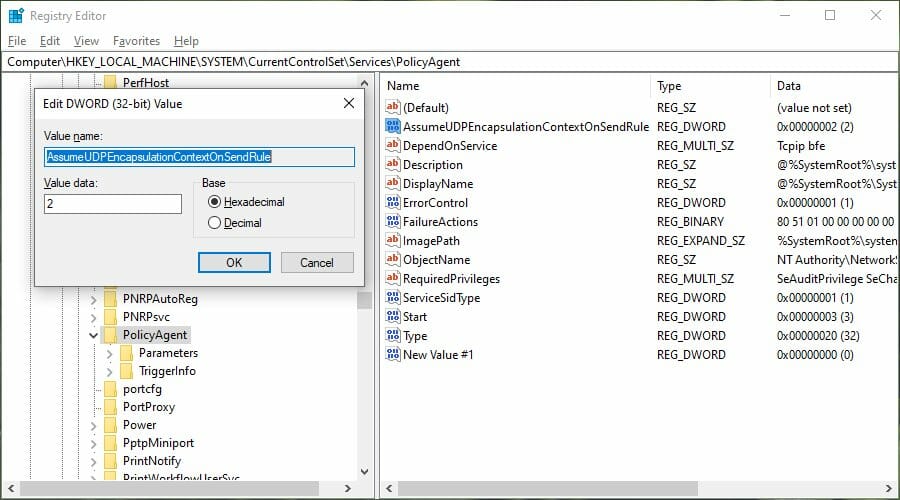
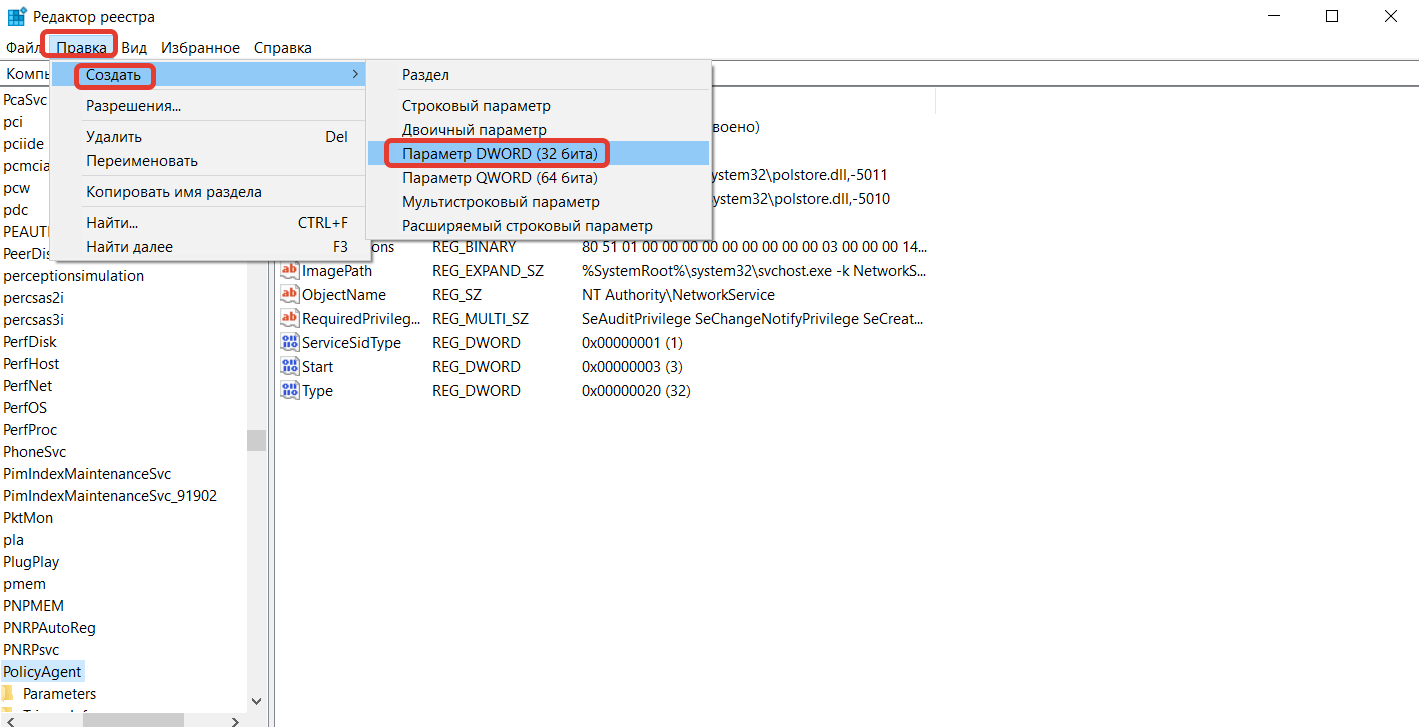
HKEY_LOCAL_MACHINESYSTEMCurrentControlSetServicesPolicyAgent - Open the Edit menu, go to New, and click DWORD (32-bit) Value
- Type AssumeUDPEncapsulationContextOnSendRule and press Enter
- Double-click the AssumeUDPEncapsulationContextOnSendRule entry
- Set Base to Hexadecimal
- Set Value data to 2
- Click OK
- Restart your PC.

NOTE
Some third-party network apps can cause VPN error 809, like SmartByte, so disabling it can also fix the problem and let your VPN connect again.
Disable Xbox Live Networking services
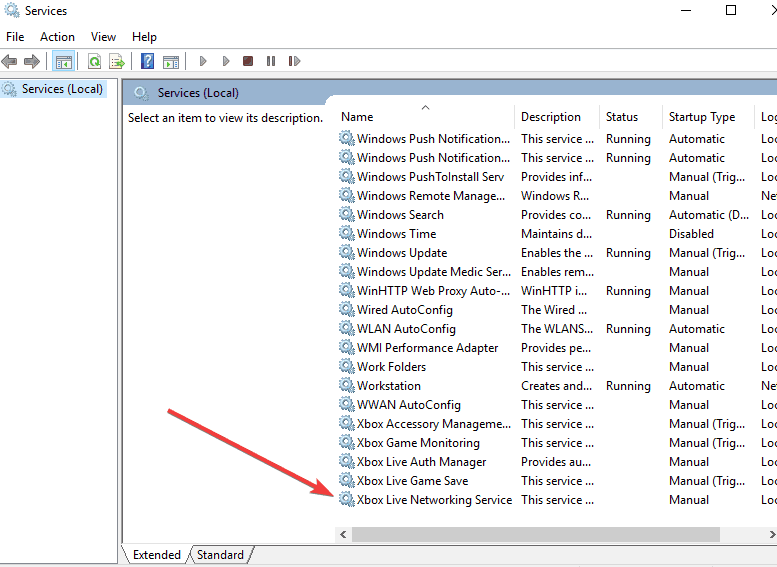
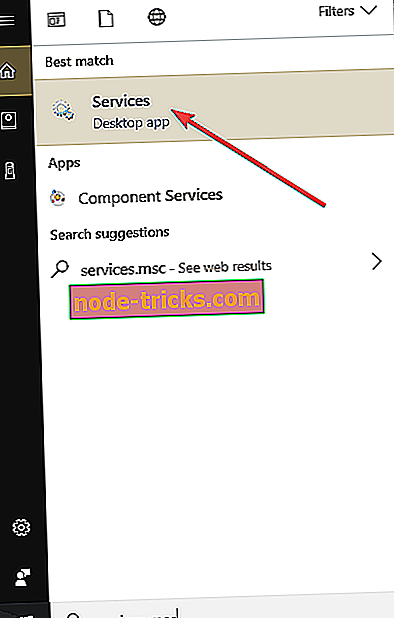
- Type services in the search box
- Click on Services from search results
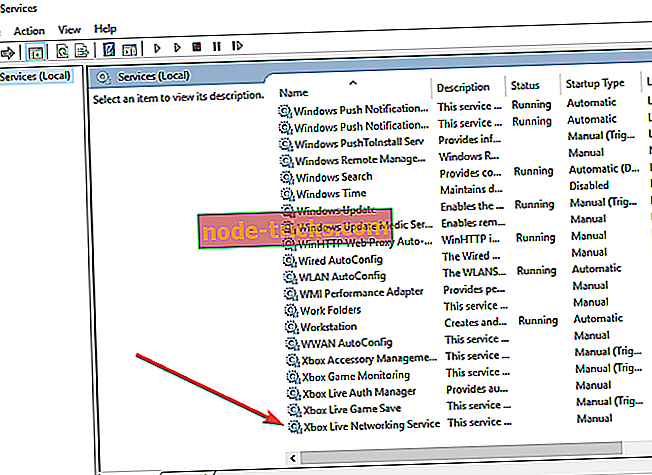
- Find Xbox Live Networking Services and disable it
- Check if your VPN connection works and if the error 809 disappears
If your anti-malware solution is not compatible with Windows 10, it could break down your IPsec connections.
So you should temporarily disable it to see if it’s the root of VPN error 809.
Discover more about how to bypass VPN blocks on Windows 10 PC.
Check PAP settings
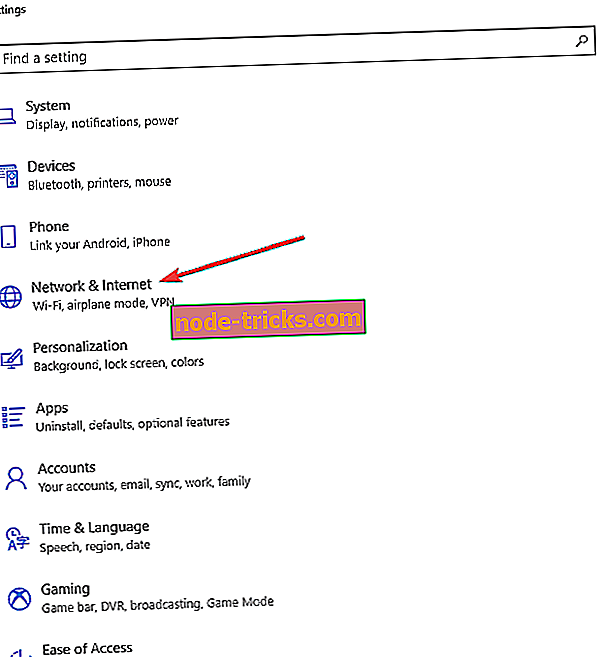
- Click Start and select Settings
- Select Network and Internet
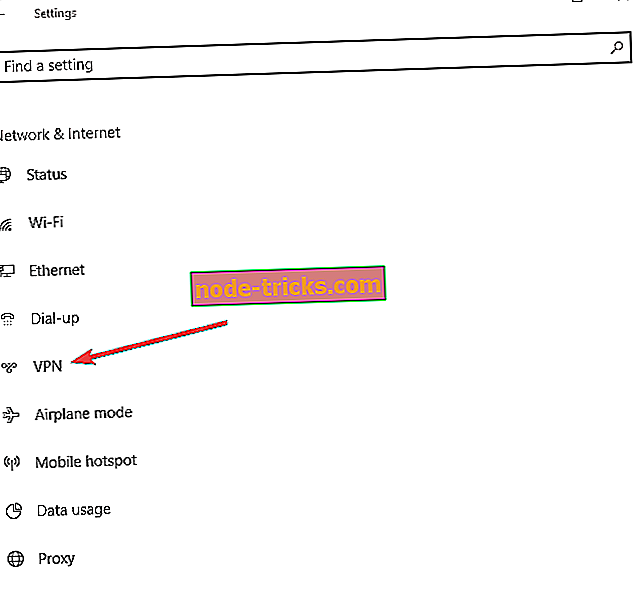
- Click VPN on the left pane
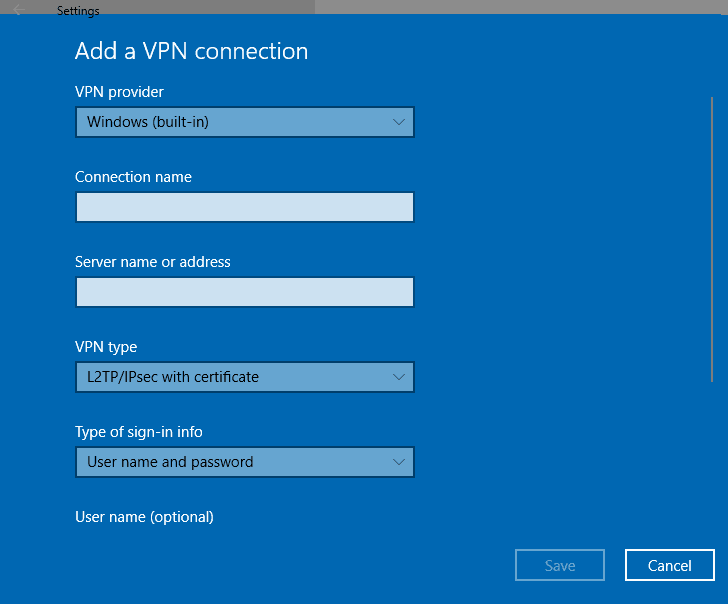
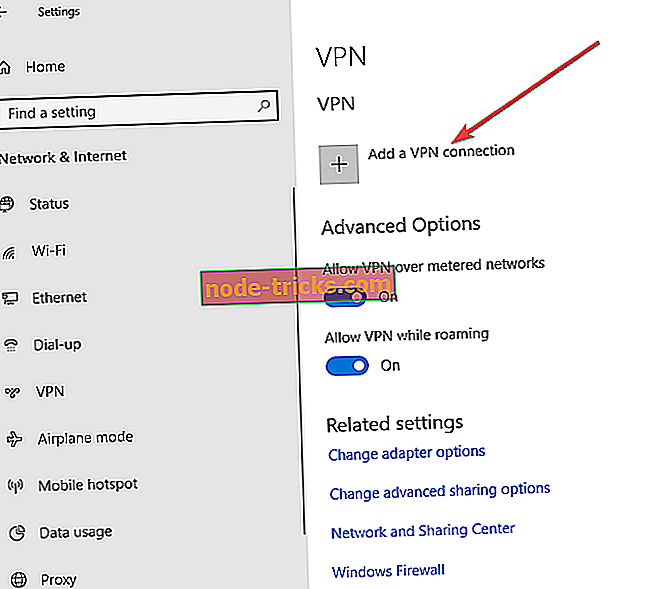
- Click Add a VPN connection and use the following:
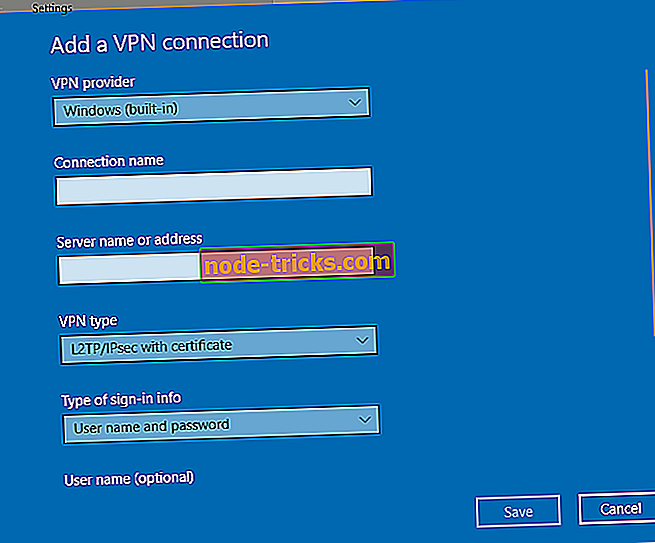
- For VPN provider, use Windows (built-in)
- For Connection Name, write anything you like as this will be shown on the interface
- For Server name or address, write the external hostname of your VPN
- For VPN type, choose L2TP/IPsec
- For Type of sign-in info, select Username and password
- Click Save
- Select Change adapter options
- Right-click the connection you created and select Properties
- Under the Security tab, click Advanced Settings
- Click Use pre-shared key
- Enter the PSK and click OK
- Set Data encryption to Maximum Strength
- Under Authentication, select Allow these protocols
- Tick the PAP box only
- Restart your computer
- Smartbyte: What it is and how to remove it
- How To Fix VPN Blocking AirPlay [3 Working Solutions]
- Fix GTA Online Not Working with VPN [5 Tested Methods]
In conclusion, you should be able to fix the VPN error 809 on your Windows 10 PC by opening ports in your firewall or router.
You can also make a tiny modification to your system registry and check PAP settings when creating the VPN connection.
However, the surest way to get rid of VPN errors is by using a native VPN app for Windows instead of setting up a manual VPN connection.
And we can’t think of a more suited VPN provider than Private Internet Access (buy here).
![]()
Error 809 is a VPN error usually occurs when a firewall blocks the VPN ports between the user and the server. If your VPN connection fails, here are the steps to fix it.
It’s very common for VPN connections to experience some problems along the road. If you’re using Windows and a VPN together, you may face VPN error 809.
A common reason is that when Windows doesn’t allow you to establish a VPN connection through the firewall, this error might appear if you don’t use a firewall but on a NAT device.
Network Address Translation (NAT) is meant for IP address conservation. It lets private IP networks with unregistered IP addresses connect to the internet. NAT normally operates on a router, connecting two or more networks, and alters the unregistered network into legal addresses.
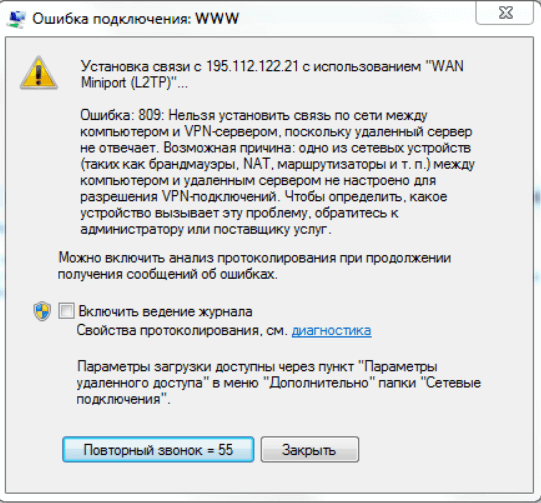
The error message looks something like this:
How to fix VPN Error 809?
«The network connection between your computer and the VPN server could not be established.»
Here are the ways how to fix VPN error 809 on Windows 10:
- Enable the ports on your firewall/router
- Add value to the Windows registry
- Disable Xbox Live Networking services
- Enable IKEv2 fragmentation
1. Enable the ports on your firewall/router
Usually, the VPN error 809 is caused by a firewall or router blocking the PPTP port (TCP 1723) or port L2TP or IKEv2 port (UDP ports 500 and 4500). Since VPN Surf runs on IKEv2 protocol, this might be a reason you will face this error.
To learn more about VPN protocols, have a quick read to get acquainted with them.
The solution is pretty simple! Simply enable the ports on the firewall or your router.
2. Add value to the Windows registry
When establishing your VPN connection, if your MX is placed behind a NAT, you must add the «AssumeUDPEncapsulationContextOnSendRule» DWORD value to the Windows registry.
This lets Windows OS establish a secure connection when your VPN’s server and the computer client are behind NAT devices. Here’s how:
- Login to Windows with admin access
- Type ‘Run’ on the search bar and click on the application

- Type «regedit» and click on ‘OK’

- Now in the open Window, find this path: HKEY_LOCAL_MACHINE > SYSTEM > CurrentControlSet > Services > PolicyAgent
**The full path cannot be seen in the below picture

- Once you get to the path Right, click and create a new ‘DWORD (32-bit) Value‘

- Change the Value name to «AssumeUDPEncapsulationContextOnSendRule»
- Change the new entry and change Value Data from «0» to «2 «
- Click ‘OK’

- Reboot the computer and test the connection.
Note: This is a perfect solution when your VPN server and the computer client are behind NAT devices.
3. Disable Xbox Live Networking services
A Windows 10 service may block access to the L2TP/IPsec VPN, so to resolve this and prevent seeing error 809, you can do this:
- Type «services» in the search box and click on ‘Services’

- Find ‘Xbox Live Networking Services’ and double-click on it
- On the drop-down menu of ‘startup type’ select «Disabled»
- Click «Apply» and click on ‘OK’

- Check if your VPN connection works!
4. Enable IKEv2 Fragmentation
VPN error 809 can occur due to the IKE fragmentation while using the IKEv2 VPN protocol. What happens is quite technical; however, let me break it down into a simple explanation.
During the IKEv2 connection between the client and the server, the packet size may exceed the IP Maximum Transmission Unit. This results in the packets being fragmented. Due to the fragmentation, intermediary devices like routers, NAT devices, or firewalls will sometimes block IP fragments.
Hence the VPN connection will not be established. Even though it sounds complicated, what you must do to overcome this error is simple!
Solution: Update your Windows 10 devices to the latest version. IKEv2 fragmentation was introduced in Windows 10 1803 and is enabled by default.
Conclusion
By now, your VPN should work without getting any errors. VPN Surf uses the IKEv2 protocol for our VPNs which secures your data and provides the anonymity you need. It’s right there for the taking, just a click away.
Frequently Asked Questions
1. What does error 809 mean?
The error code 809 indicates that the VPN failed to react, which denotes a timeout. Although network connectivity is frequently the direct source of this, other elements may play a role occasionally.
2. Where are the 809 prefixes located?
Area codes 809, 829, and 849 are the North American Numbering Plan (NANP) telephone area codes for the Dominican Republic.
3. What time zone is area code 809?
The time zone in the Dominican Republic is Atlantic Standard Time. This means there are no Daylight Saving Time clock changes during the year.
4. What failed to cause the error code to return on failure is 809?
Your machine and the VPN server could not establish a network connection because the distant server is not responding. One of the network devices (firewall, NAT, router, etc.) separating your computer from the distant server is not set up to support VPN connections.
5. How do I fix a VPN error 800?
- Turn off your Firewall
- Verify your VPN’s IP address, name, and password again.
- Remove the DNS cache
- Try resetting Winsock
- Try Network Troubleshooter
- Run antivirus against possible malware
- Download the VPN software again
- Check together with your ISP
Do you value your privacy online?
Use VPN Surf and surf safely and securely in the open waters of the internet.
Ошибка 809 VPN обычно возникает, когда межсетевой экран между клиентом и сервером блокирует порты, которые использует VPN-туннель. Кроме того, по умолчанию Windows не поддерживает сопоставления безопасности IPsec NAT-T с серверами за устройством NAT.
Устройства NAT имеют способ трансляции сетевого трафика, и из-за этого могут возникать ошибки, когда вы размещаете сервер за устройством NAT и используете среду IPsec NAT-T.
Некоторые из симптомов ошибки VPN 809 включают в себя сообщение об ошибке, которое вы получаете, и если вы используете протокол L2TP, вы не можете подключиться, поэтому отображается сообщение об ошибке: « Невозможно установить сетевое соединение между вашим компьютером и сервером VPN. «.
Когда появляется ошибка, журнал событий также не отображает никаких связанных журналов, потому что трафик не достигнет интерфейса WAN MX.
Чтобы устранить ошибку VPN 809, вот несколько решений, которые вы можете попробовать.
- Включите порты на вашем брандмауэре / маршрутизаторе
- Добавить значение в реестр Windows
- Отключить службы Xbox Live Networking
- Проверьте настройки PAP
1. Включите порты на вашем брандмауэре / маршрутизаторе
Обычно ошибка 809 VPN проявляется портом PPTP (TCP 1723) или портом L2TP или портом IKEv2 (порт UDP 500 или 4500), заблокированным брандмауэром или маршрутизатором.
Решение состоит в том, чтобы включить порт на брандмауэре или маршрутизаторе. Если это невозможно, разверните VPN-туннель на основе SSTP или OpenVPN на своем VPN-провайдере.
Это позволяет VPN-соединению работать через брандмауэр, NAT и веб-прокси.
2. Добавьте значение в реестр Windows
Если вы получаете ошибку VPN 809 при попытке установить VPN-подключение, и ваш MX расположен за NAT, решение этой проблемы заключается в добавлении значения DWORD AssumeUDPEncapsulationContextOnSendRule »в реестр Windows.
Это позволяет операционной системе Windows устанавливать ассоциации безопасности, когда сервер VPN и компьютерный клиент находятся за устройствами NAT.
Для Windows 10 сделайте это:
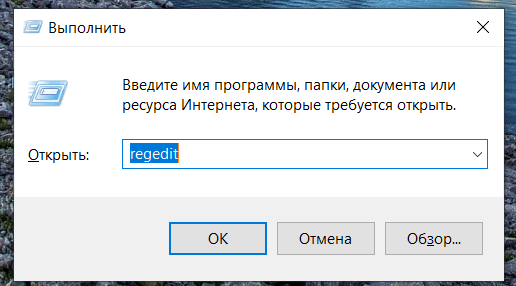
- Нажмите правую кнопку мыши и выберите « Выполнить».
- Введите regedit и нажмите Enter
- Найдите этот путь: HKEY_LOCAL_MACHINESYSTEMCurrentControlSetServicesPolicyAgent
- RegValue: AssumeUDPEncapsulationContextOnSendRule
- Введите DWORD
- Измените значение данных на 2. После создания ключа перезагрузите компьютер.
Примечание. Некоторые сторонние сетевые приложения могут вызывать ошибку VPN 809, например SmartByte, поэтому отключение может также решить проблему и позволить вашему VPN-подключению снова подключиться.
Примечание . Если вам нужен инструмент VPN, который работает как шарм, мы рекомендуем вам Cyberghost. Установите сейчас Cyberghost VPN (в настоящее время скидка) и защитите себя. Он защищает ваш компьютер от атак во время просмотра, маскирует ваш IP-адрес и блокирует любой нежелательный доступ.
CyberGhost также выпустил 7-ю версию для Windows с множеством новых функций безопасности, поэтому мы предлагаем вам попробовать ее.
Почему стоит выбрать CyberGhost? Cyberghost для Windows
- 256-битное шифрование AES
- Более 3000 серверов по всему миру
- Отличный ценовой план
- Отличная поддержка
Получить сейчас CyberGhost VPN
3. Отключите службы Xbox Live Networking
Иногда ваш антивирус может быть несовместим с Windows 10, что приводит к разрыву соединений IPsec. Служба Windows 10 может заблокировать доступ к L2TP / IPsec VPN, поэтому для решения этой проблемы и предотвращения ошибки 809 VPN сделайте следующее:
- Введите услуги в поле поиска
- Нажмите на Услуги из результатов поиска
- Найдите Xbox Live Networking Services и отключите его
- Проверьте, работает ли ваше VPN-соединение, и ошибка 809 исчезает
— СВЯЗАННО: VPN заблокирован на Windows 10? Не паникуйте, вот исправление
4. Проверьте настройки PAP
- Нажмите Пуск и выберите Настройки
- Выберите Сеть и Интернет
- Нажмите VPN на левой панели
- Нажмите Добавить VPN- подключение и используйте следующее:
Для провайдера VPN используйте Windows (встроенный)
В поле «Имя подключения» напишите все, что вам нравится, так как это будет показано в интерфейсе.
В качестве имени или адреса сервера напишите внешнее имя хоста вашего VPN
Для типа VPN выберите L2TP / IPsec.
Для Типа информации для входа выберите Имя пользователя и пароль.
Для имени пользователя / пароля / Запомнить меня : установите как требуется, поскольку они являются необязательными
- Нажмите Сохранить
- Выберите Изменить параметры адаптера.
- Щелкните правой кнопкой мыши на созданном вами соединении и выберите « Свойства».
- На вкладке «Безопасность» выберите « Дополнительные параметры».
- Нажмите кнопку « Использовать общий ключ».
- Введите PSK и нажмите ОК
- Установить шифрование данных на максимальную прочность
- Под Аутентификацией выберите Разрешить эти протоколы
- Отметьте только поле PAP
- Перезагрузите компьютер
- Отключите службу Xbox Live Networking Services и посмотрите, сохраняется ли ошибка 809 VPN
Удалось ли устранить ошибку VPN 809? Дайте нам знать в комментариях ниже.
Содержание
- В чём причина ошибки 809?
- Для начала
- Порты брандмауэра
- Новое правило для реестра
- Изменение настроек шифрования через реестр
- Отключение сторонних сервисов
- Если всё ещё возвращает ошибку 809
- 1. Обновите «операционку»
- 2. Удалите VPN-приложения вместе с настройками
- 3. Очистите устройство от «файлового мусора»
Иногда случается, что пользователь, пытающийся подключиться к VPN-серверу, получает ошибку с кодом 809. Например, такая проблема может возникнуть у абонентов билайна, так как провайдер предоставляет доступ в интернет по технологии L2TP, то есть через ВПН-туннель.
Рассказываем в статье, что делать в такой ситуации.
В чём причина ошибки 809?
Чаще всего проблема на стороне пользователя: его компьютера и ОС Windows.
Сбой может быть из-за того, что один из компонентов ОС или устройство между ПК и сервером не имеет разрешения на подключение к VPN. Один из таких компонентов — NAT (Network Address Translation), отвечающий за преобразование IP-адресов во внутренние и внешние. Другая вероятная причина — настройки брандмауэра. И таких «виновников» может быть немало.
Но обо всём по порядку.
Для начала
Встроенный защитник Windows — одна из самых частых причин сбоев в работе интернета. А если учесть, что по дефолту в брандмауэре не настроена корректная работа с VPN-соединениями, то стоит начать с него.
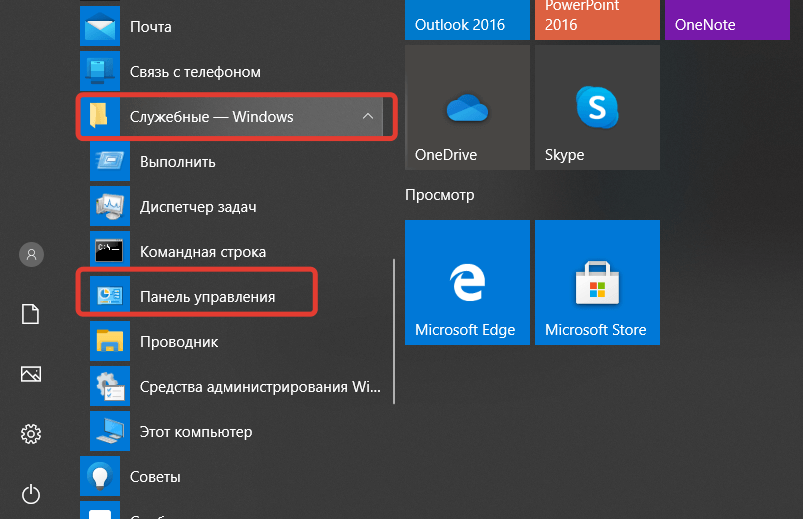
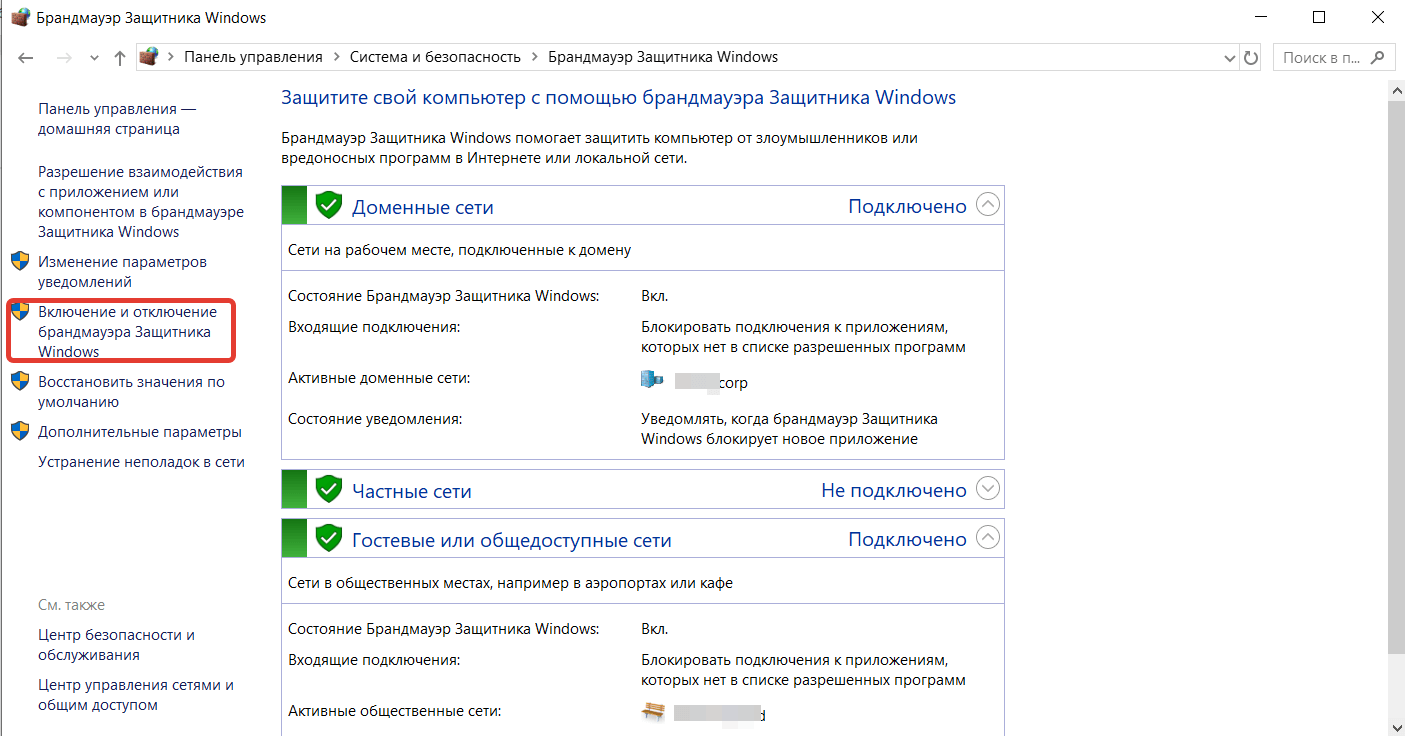
- Запустите «Панель управления».
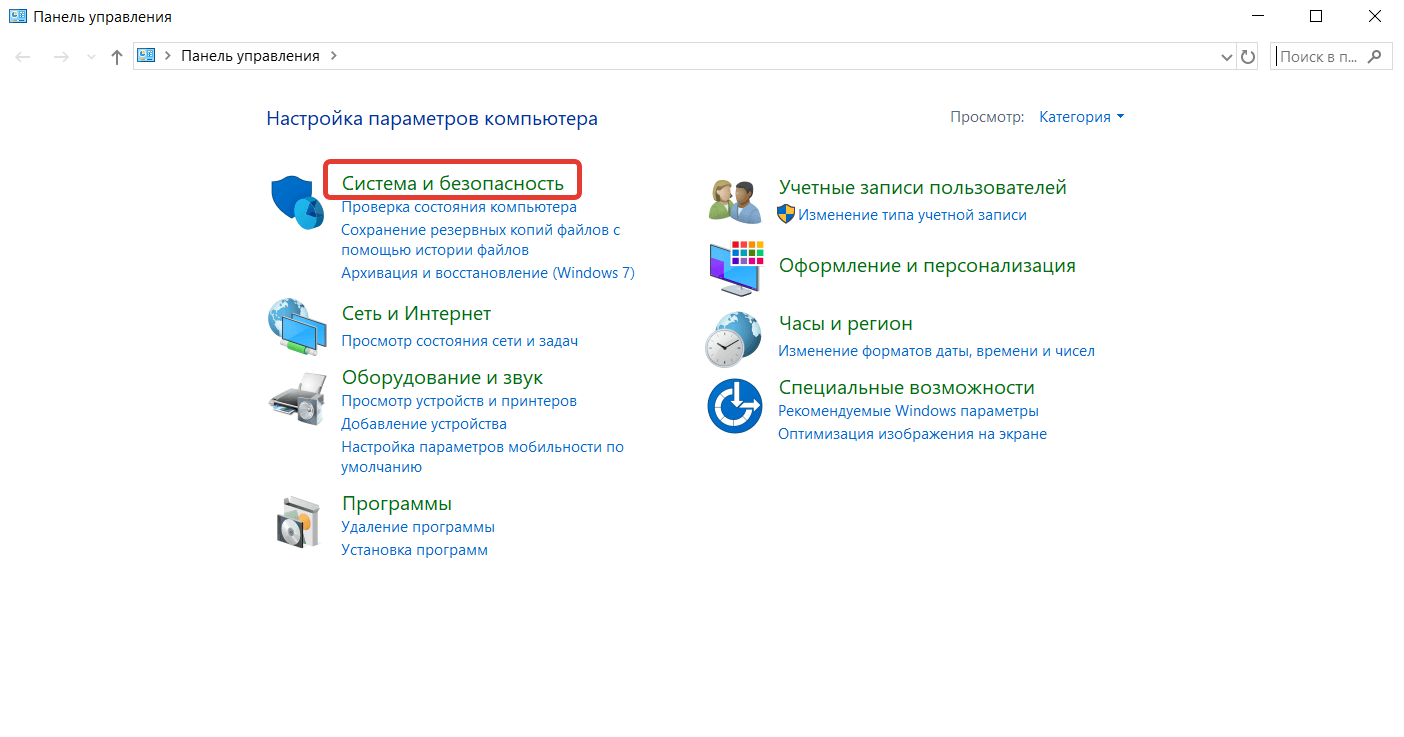
- Перейдите в раздел «Система и безопасность».
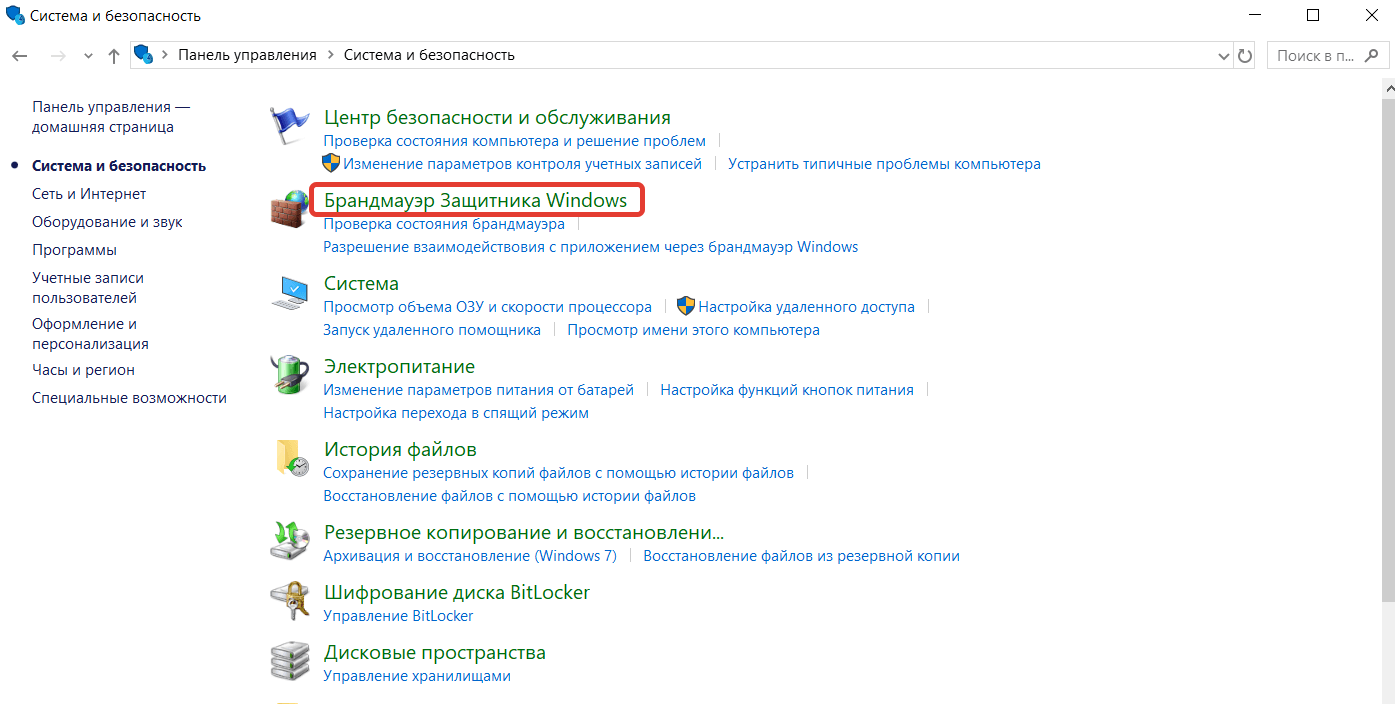
- Нажмите на строчку «Брандмауэр Защитника Windows».
- В левом меню найдите интерактивную надпись «Включение и отключение брандмауэра…» и нажмите на неё.
- В открывшемся окне проставьте маркеры напротив всех опций, связанных с отключением брандмауэра, и подтвердите изменения.
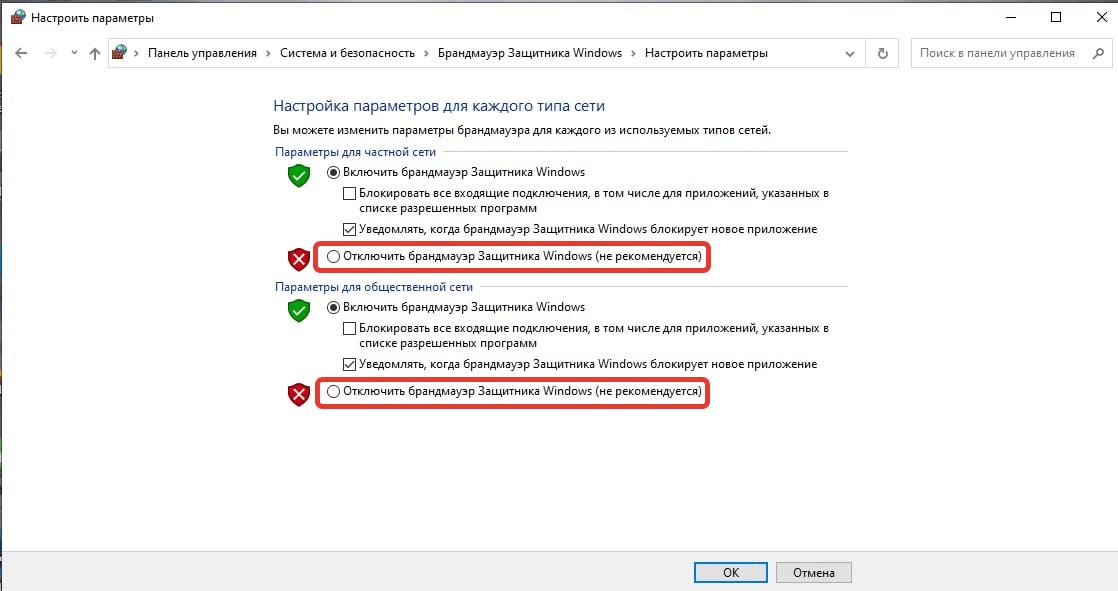
Попробуйте подключиться к интернету или VPN-серверу снова. Если соединение не заработало, то переходите к инструкции «Новое правило для реестра» и следующим. Если же доступ в интернет появился, то включите брандмауэр и следуйте гайдам в предложенной последовательности.
Примечание: инструкции актуальны для Windows 7, 8 и 10. Команды, пути, названия и т. п. вводятся без кавычек.
Порты брандмауэра
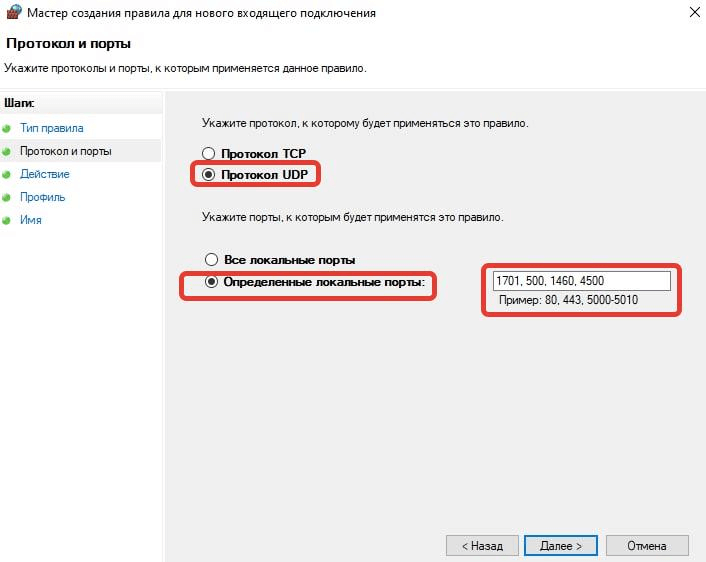
Если у вас домашний интернет билайн по протоколу L2TP, то с высокой долей вероятности открытие портов 1701, 500, 1460, 4500 решит проблему.
- Запустите «Панель управления».
- Перейдите в раздел «Система и безопасность».
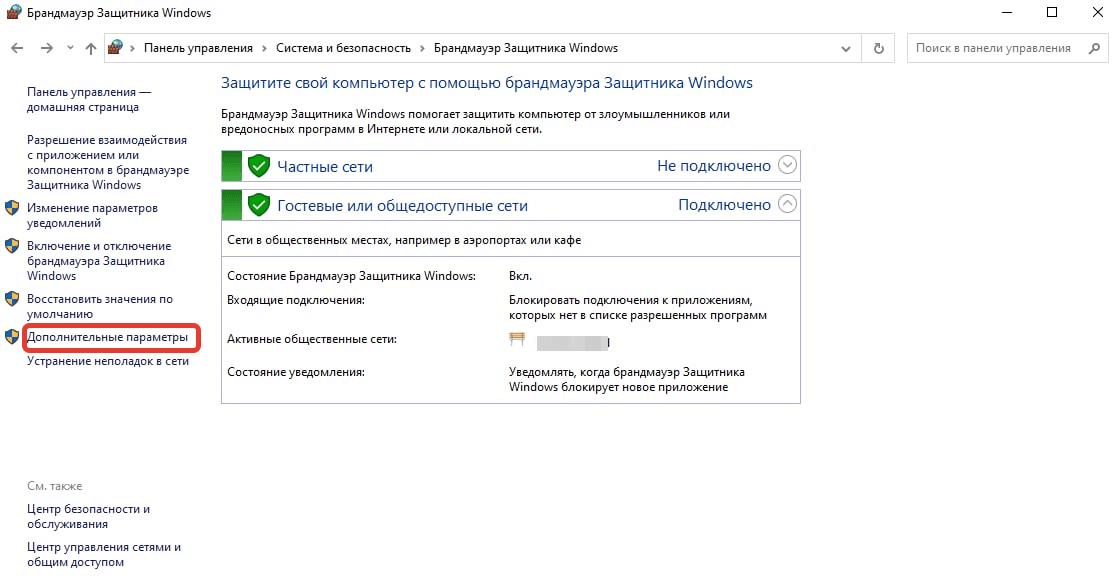
- Перейдите в подраздел «Брандмауэр Защитника Windows».
- В левом меню кликните по интерактивной строке «Дополнительные параметры».
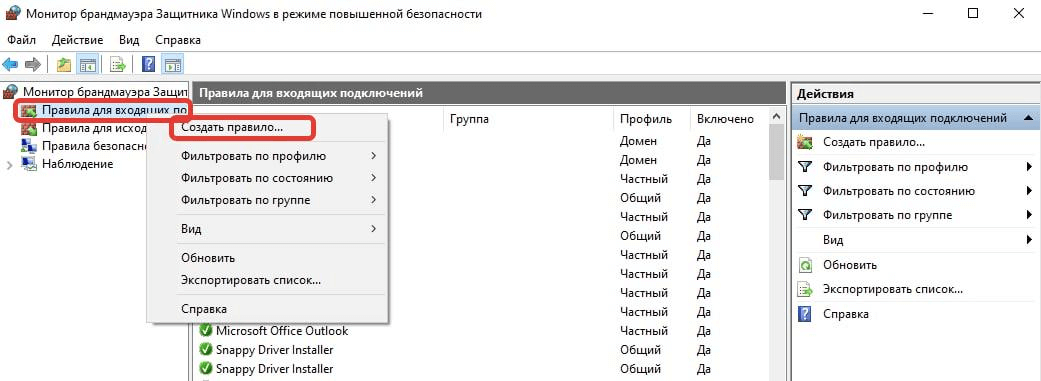
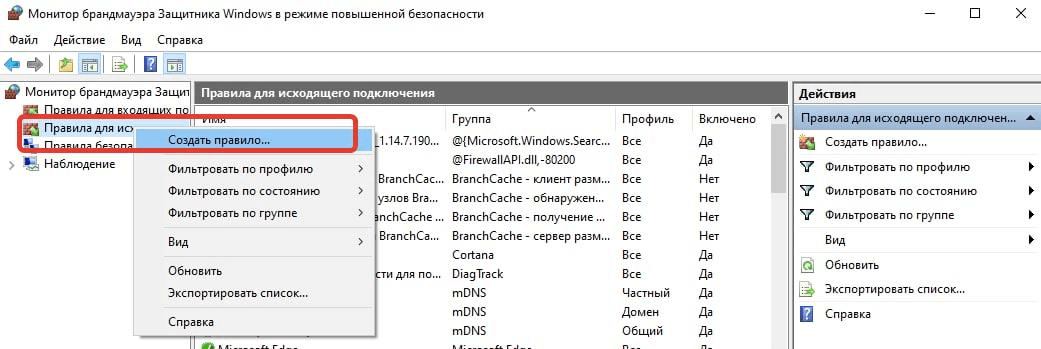
- Нажмите правой кнопкой мыши на строчку «Правила для входящих подключений».
- Нажмите ЛКМ по опции «Создать правило» в появившемся контекстном меню.
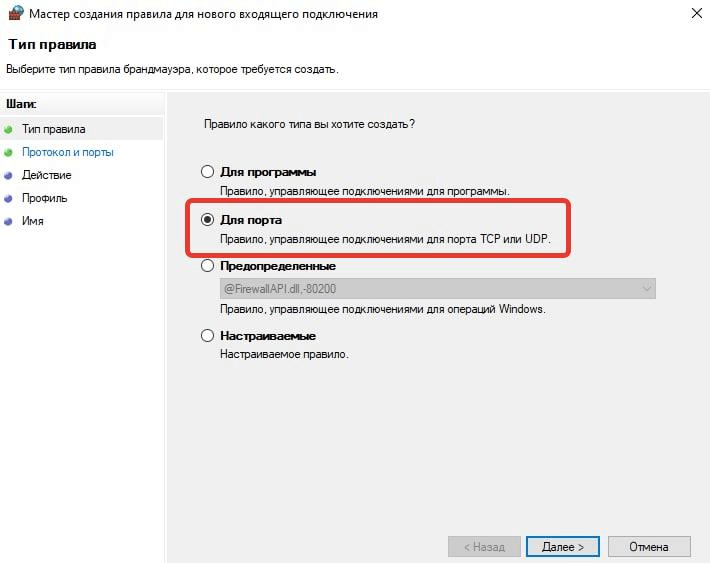
- Экран «Тип правила»: поставьте маркер напротив опции «Для порта» и нажмите «Далее».
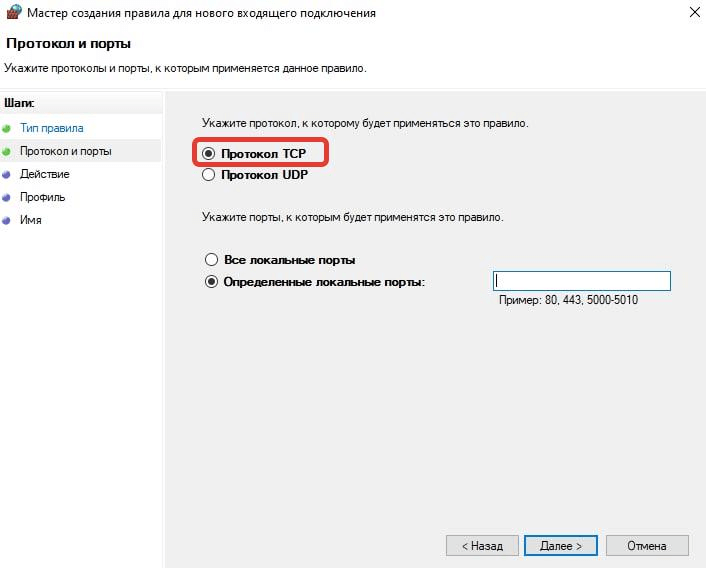
- Экран «Протоколы и порты»: поставьте маркер напротив опции «Протокол UDP» и «Определённые локальные порты». В строке введите «1701, 500, 1460, 4500», нажмите «Далее».
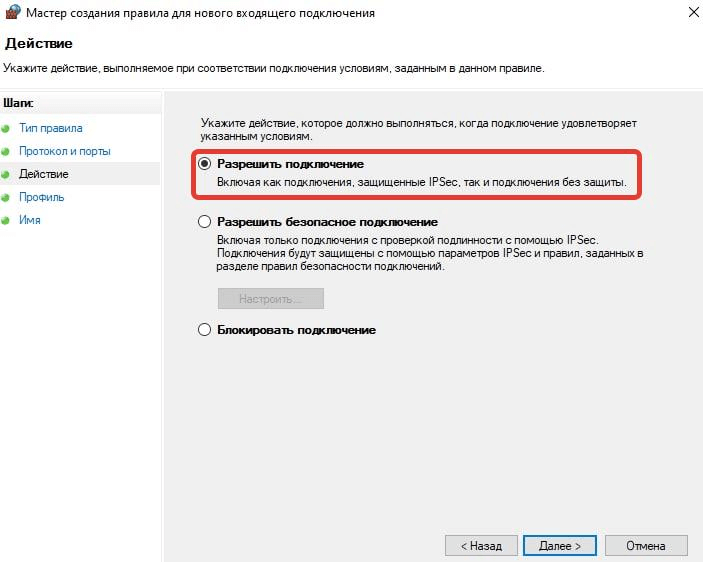
- Экран «Действие»: отметьте маркером опцию «Разрешить подключение», нажмите «Далее».
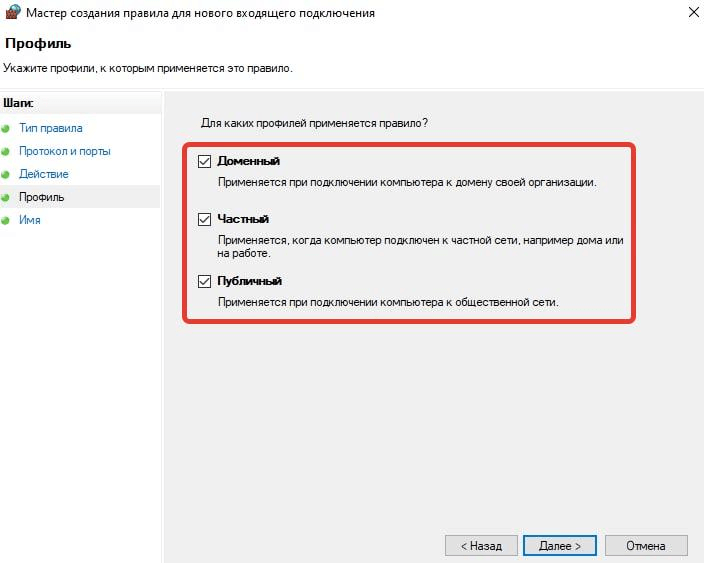
- Экран «Профиль»: отметьте галочками все опции и снова нажмите «Далее».
- Экран «Имя»: назовите правило. В качестве имени можно использовать, например, «Интернет билайн».
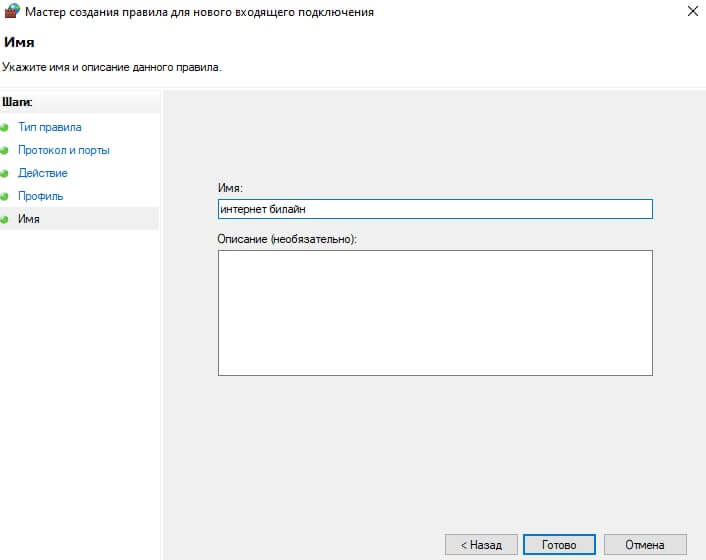
- Нажмите «Готово» и повторите шаги № 5–11, но для исходящих подключений.
Попробуйте подключиться к интернету. Если соединение работает, то всё сделано верно. Если нет, то повторите действия с одним изменением: на шаге № 8 выберите не UDP, а TCP.
Новое правило для реестра
- Нажмите Win + R и в появившемся окне пропишите команду regedit.
- Вставьте в адресную строку путь HKEY_LOCAL_MACHINE\SYSTEM\CurrentControlSet\Services\PolicyAgent.
- Нажмите на кнопку «Правка».
- Поочерёдно выберите «Создать» и «Параметр DWORD (32 бита)». Созданному сеттингу присвойте название AssumeUDPEncapsulationContextOnSendRule.

- Дважды кликните по параметру левой кнопкой мыши.
- В строке «Значение» напишите цифру 2.
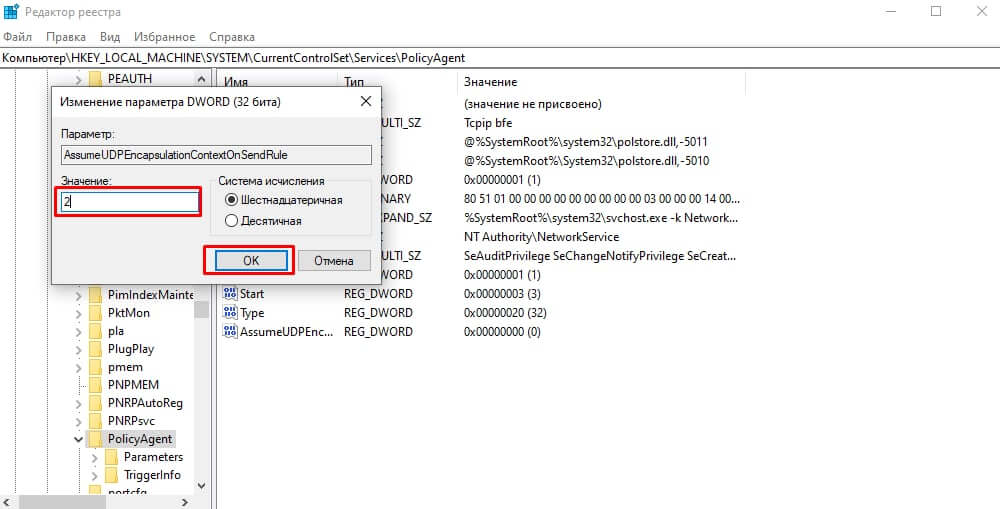
- Сохраните новые параметры и перезагрузите устройство.
Изменение настроек шифрования через реестр
- Повторите 1-й шаг из предыдущей инструкции.
- Вставьте в адресную строку путь HKEY_LOCAL_MACHINE\SYSTEM\CurrentControlSet\Services\RasMan\Parameters.
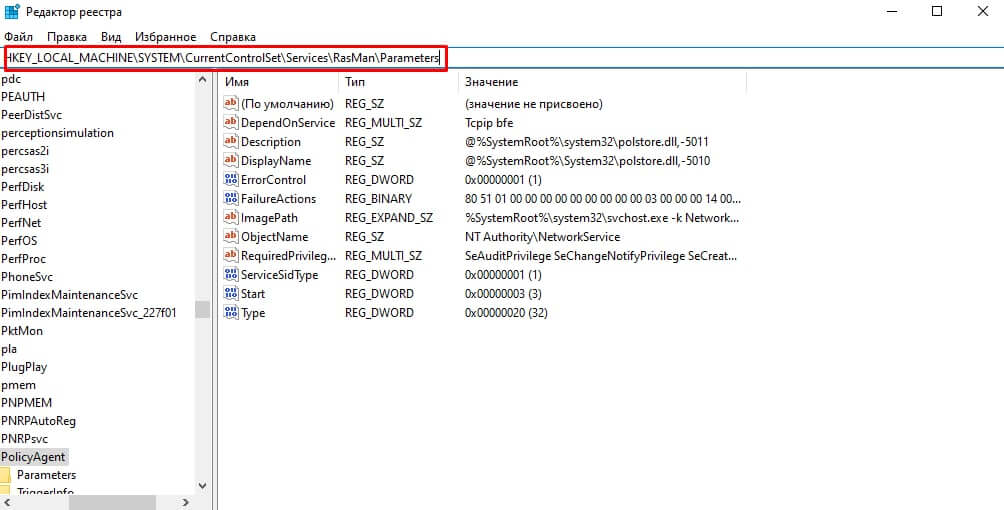
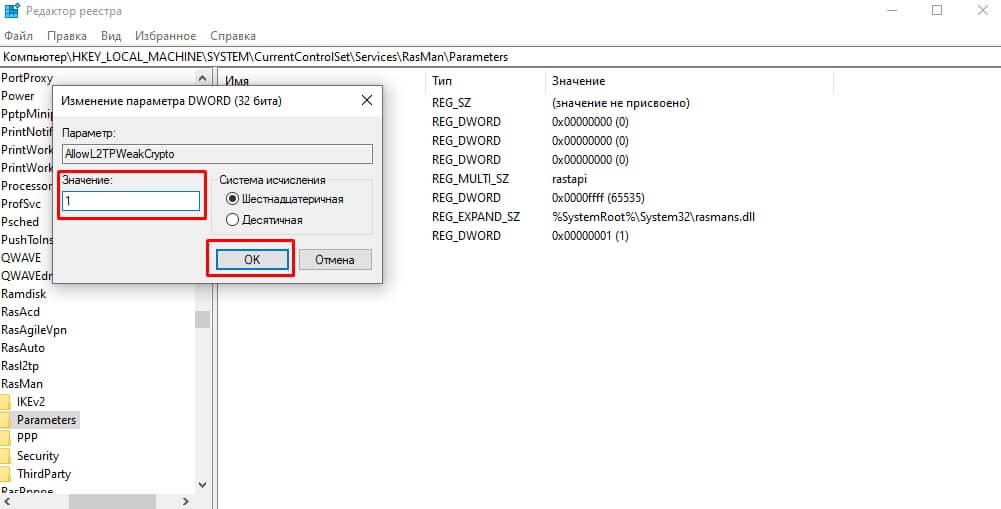
- Найдите параметр AllowL2TPWeakCrypto, дважды кликните по нему ЛКМ, пропишите в поле значение «1» и подтвердите изменения.
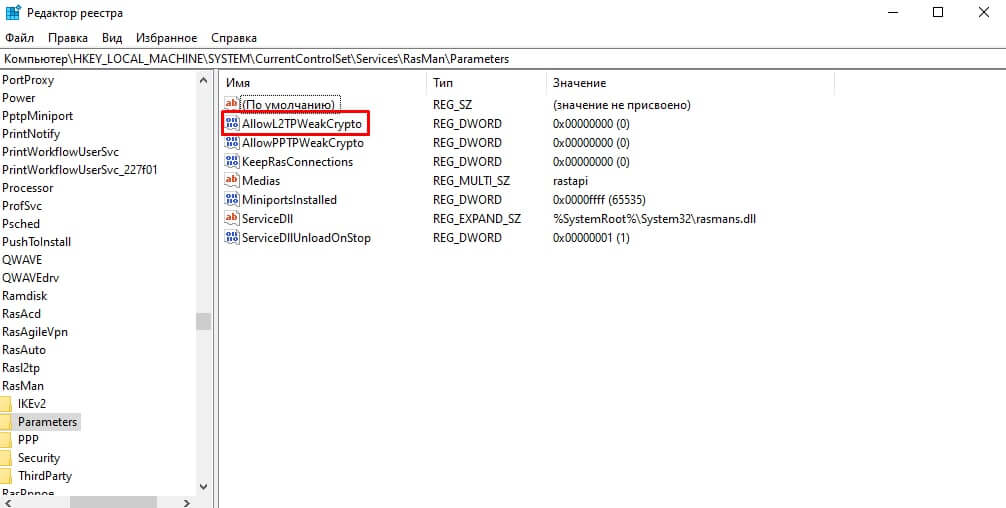
- Найдите строку ProhibitIPSec, дважды кликните по ней, укажите в поле значение «0» и сохраните.
- Перезагрузите компьютер.
Если сбой не был устранён, то снова откройте AllowL2TPWeakCrypto, пропишите «0» и перезапустите компьютер.
Отключение сторонних сервисов
С Windows 8 и 10 «виновником» может стать интегрированный сервис Xbox Live — стоит попробовать его отключить. Для этого:
- нажмите Win + R;
- впишите команду services.msc;
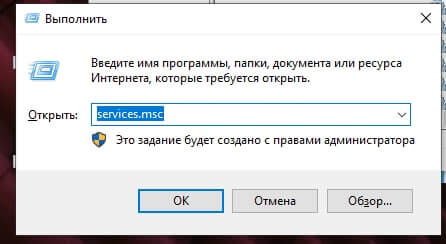
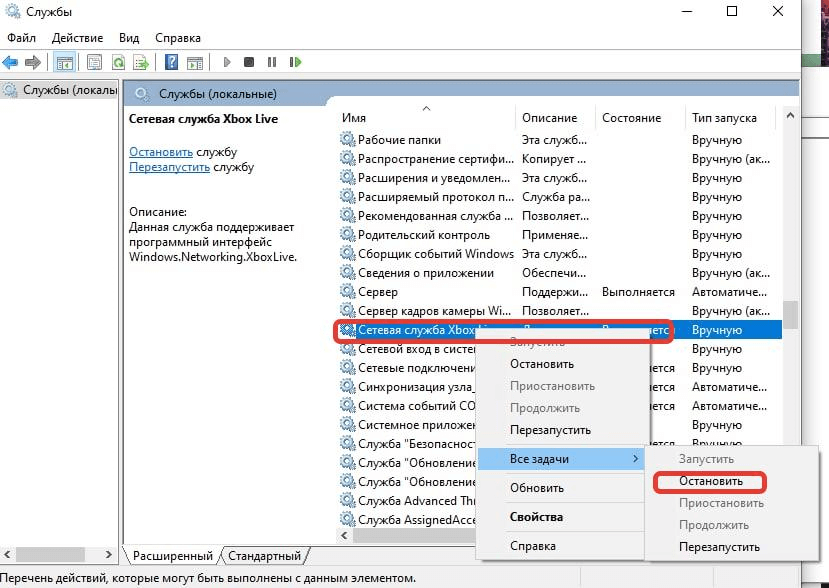
- найдите строку «Сетевая служба Xbox Live» и кликните по ней правой кнопкой мыши;
- во вкладке «Общие» найдите параметр «Тип запуска», вызовите dropdown-меню и выберите опцию «Отключена».
Если всё ещё возвращает ошибку 809
1. Обновите операционную систему
Инструкция для Windows 10
-
Откройте меню «Пуск».
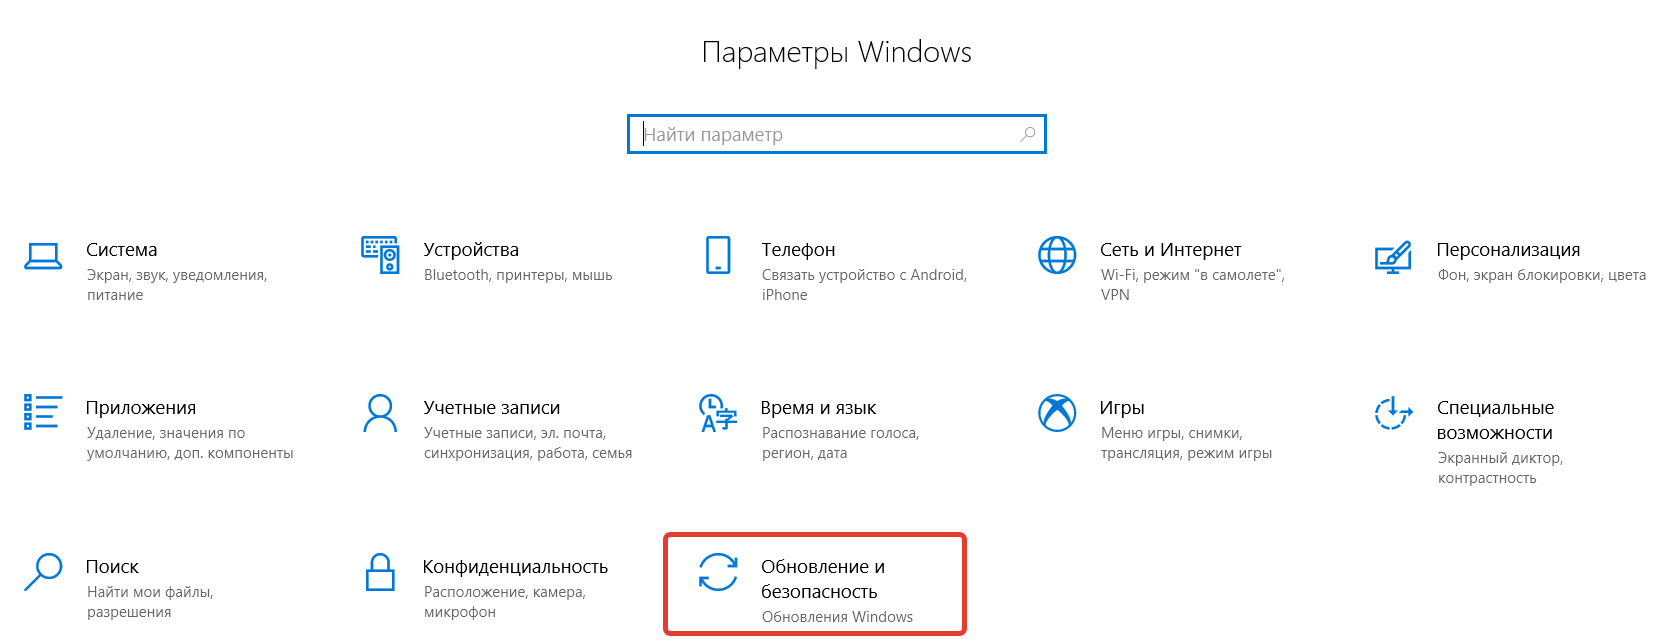
- Найдите шестерёнку и нажмите на неё.
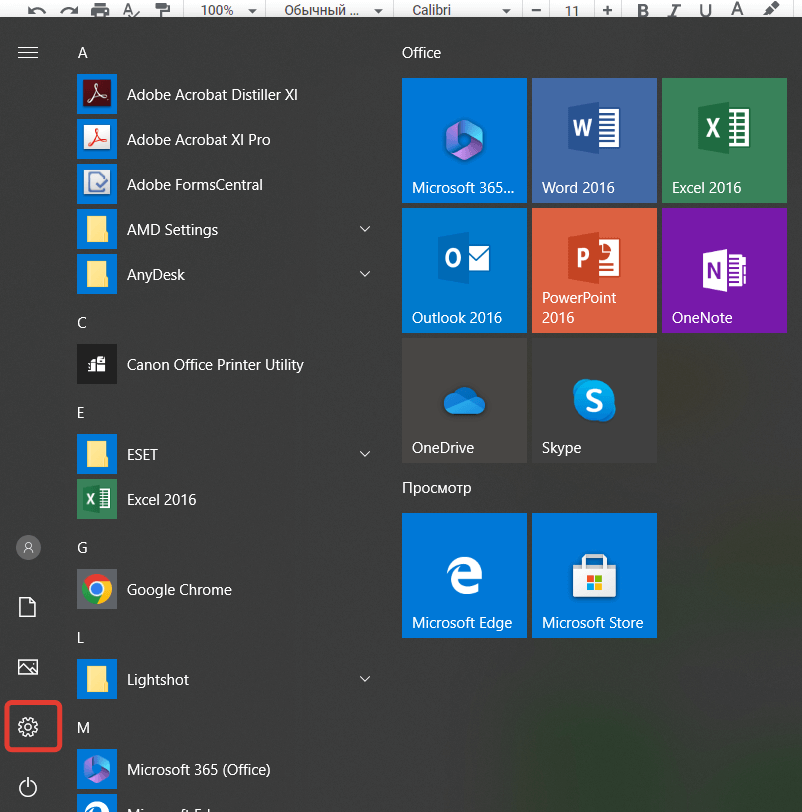
- Перейдите в подраздел «Обновление и безопасность».
- Откроется «Центр обновления Windows» — кликните по кнопке «Проверить наличие обновлений».
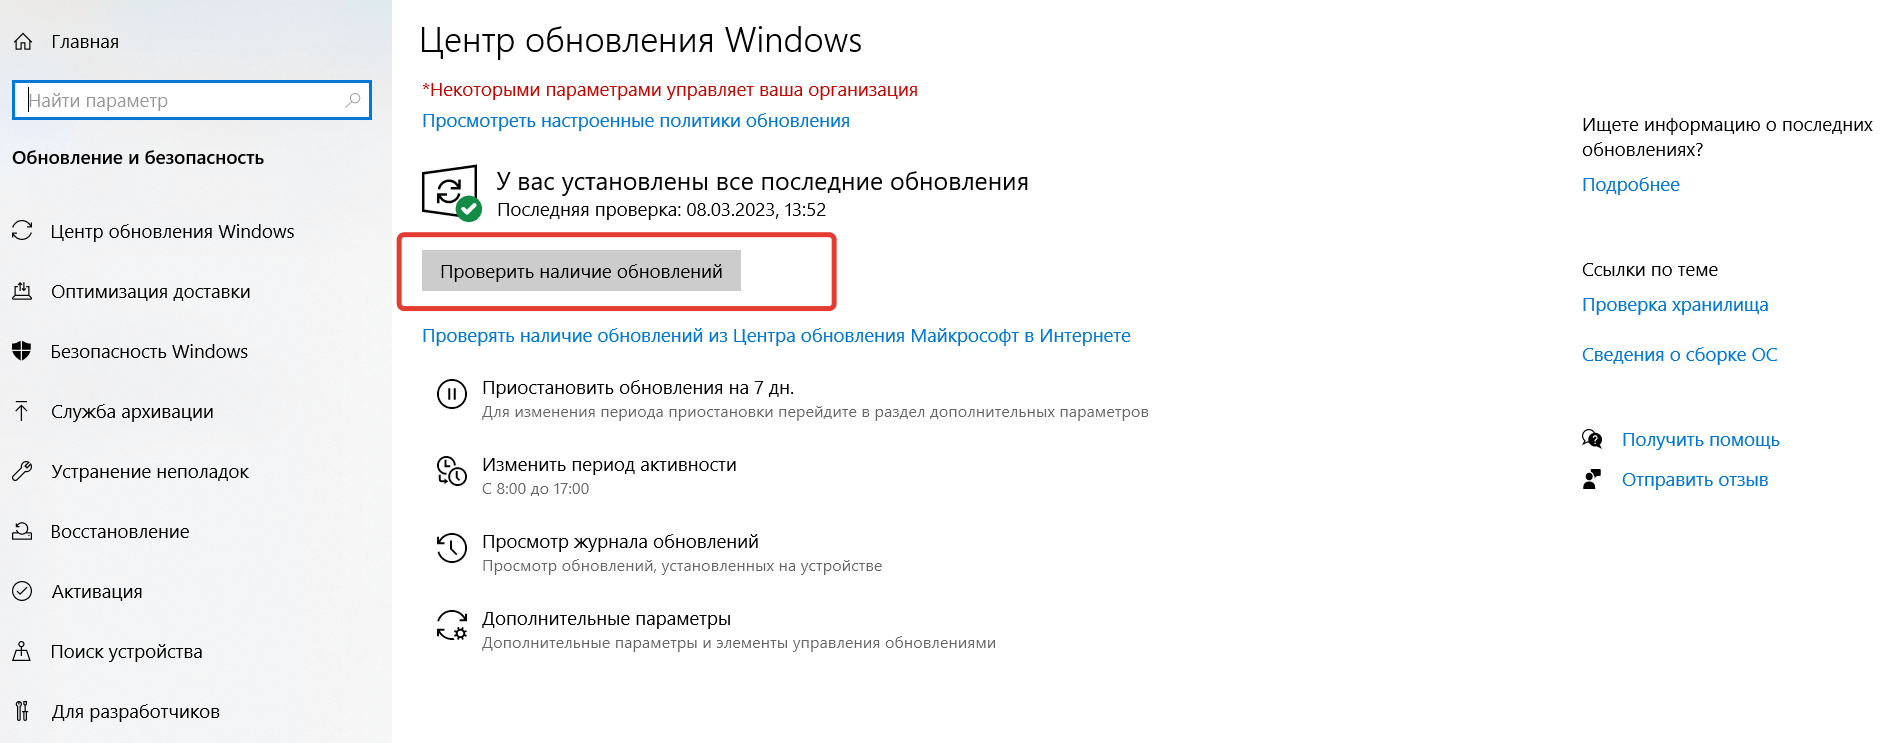
- Если система найдёт патч, то появится соответствующий блок. Нажмите на кнопку «Загрузить и установить», расположенную под ним.
Инструкция для Windows 7
- Запустите «Панель управления».
- Перейдите в подраздел «Центр обновления Windows».
- Проверьте, есть ли обновления. По умолчанию они загружаются автоматически. Если да — нажмите «Установить».
2. Удалите VPN-приложения вместе с настройками
Если вы устанавливали какие-либо приложения, работающие с VPN, то попробуйте избавиться от них. Важно провести полное удаление.
- Запустите «Панель управления».
- Откройте раздел «Программы» / «Установка и удаление программ».
- Найдите в списке программу, которую хотите деинсталлировать, и выделите её.
- В меню над блоком с приложениями станет активной кнопка «Удалить» — нажмите на неё и следуйте инструкциям. Если деинсталлятор предложит удалить настройки программы — согласитесь.
- Перезагрузите ПК.
3. Очистите устройство от «файлового мусора»
Этот способ лучше всего применять вкупе с предыдущим: «файловый мусор» может остаться даже после удаления приложения средствами ОС. Для очистки ПК от ненужных файлов воспользуйтесь специальной утилитой. Например, CCleaner.
Но рекомендуем очень внимательно отнестись к настройке параметров удаления. Иначе вместе с ненужными файлами вы можете очистить сохранённые учётные данные ПК для авторизации в различных сервисах.
When testing an Always On VPN connection, the administrator may encounter a scenario where the VPN client fails to connect to the VPN server. On the Windows 10 client the error message states the following.
“Can’t connect to [connection name]. The network connection between your computer and the VPN server could not be established because the remote server is not responding. This could be because one of the network devices (e.g. firewalls, NAT, routers, etc.) between your computer and the remote server is not configured to allow VPN connections. Please contact your Administrator or your service provider to determine which device may be causing the problem.”

In addition, the Application event log records an error message with Event ID 20227 from the RasClient source. The error message states the following.
“The User [username] dialed a connection named [connection name] with has failed. The error code returned on failure is 809.”

Connection Timeout
The error code 809 indicates a VPN timeout, meaning the VPN server failed to respond. Often this is related directly to network connectivity, but sometimes other factors can come in to play.
Troubleshooting VPN Error Code 809
When troubleshooting VPN error code 809 the following items should be carefully checked.
- Name Resolution – Ensure the VPN server’s public hostname resolves to the correct IP address.
- Firewall Configuration – Confirm the edge firewall is configured properly. Inbound TCP port 443 is required for the Secure Socket Tunneling Protocol (SSTP) and inbound UDP ports 500 and 4500 are required for the Internet Key Exchange version 2 (IKEv2) protocol. Make sure that any NAT rules are forwarding traffic to the correct server.
- Load Balancer Configuration – If VPN servers are located behind a load balancer, make certain that virtual IP address and ports are configured correctly and that health checks are passing. For IKEv2 specifically, it is crucial that UDP ports 500 and 4500 be delivered to the same backend server. This commonly requires custom configuration. For example, on the KEMP LoadMaster the administrator will configure “port following”. On the F5 BIG-IP a custom “persistence profile” must be configured. On the Citrix NetScaler a “persistency group” must be defined.
IKEv2 Fragmentation
VPN error code 809 can also be caused by IKE fragmentation when using the IKEv2 VPN protocol. During IKEv2 connection establishment, payload sizes may exceed the IP Maximum Transmission Unit (MTU) for the network path between the client and server. This causes the IP packets to be fragmented. However, it is not uncommon for intermediary devices (routers, NAT devices, or firewalls) to block IP fragments. When this occurs, a VPN connection cannot be established. However, looking at a network trace of the connection attempt, the administrator will see that the connection begins but subsequently fails.

Enable IKEv2 Fragmentation Support
The IKEv2 protocol includes support for fragmenting packets at the IKE layer. This eliminates the need for fragmenting packets at the IP layer. IKEv2 fragmentation must be configured on both the client and server.
Client
IKEv2 fragmentation was introduced in Windows 10 1803 and is enabled by default. No client-side configuration is required.
Server
IKEv2 is commonly supported on many firewall and VPN devices. Consult the vendor’s documentation for configuration guidance. For Windows Server Routing and Remote Access (RRAS) servers, IKEv2 fragmentation was introduced in Windows Server 1803 and is also supported in Windows Server 2019. It is enabled via a registry key. The following PowerShell command can be used to enable IKEv2 fragmentation on supported servers.
New-ItemProperty -Path “HKLM:\SYSTEM\CurrentControlSet\Services\RemoteAccess\Parameters\Ikev2\” -Name EnableServerFragmentation -PropertyType DWORD -Value 1 -Force
Validation
Once IKEv2 fragmentation is configured on the VPN server, a network capture will reveal the IKE_SA_INIT packet now includes the IKEV2_FRAGMENTATION_SUPPORTED notification message.

Additional Information
Windows 10 Always On VPN and IKEv2 Fragmentation
Windows 10 Always On VPN IKEv2 Security Configuration
Windows 10 Always On VPN Hands-On Training Classes