There’re several users around the world who complain about an error, mostly known as the Xbox error code 0x80070490, that they’ve faced while using the Xbox One gaming console, or launching an app on Windows.
This error code brings up a message that – Something went wrong… 0x80070490
Generally, it indicates that your Xbox has confronted an unexpected error and the fact is it’s not a well-known error to people except those who’ve already come across it.
If you’re one of those who’re suffering from this problem then this article will guide you to get rid of it. Just stick to the article till the end.

Table of Contents
- What Is Xbox Error Code 0x80070940 and Its Reasons?
- How to Fix the ‘Xbox Error Code 0x80070940’ Error?
- Method 1: For the Xbox Console
- Method 2: For the Windows
- FAQs (Frequently Asked Questions)
- What to do to force update my Xbox One console?
- Is it possible to perform an offline system update on my Xbox One?
- Conclusion
What Is Xbox Error Code 0x80070940 and Its Reasons?
According to the experts, this specific error occurs because there’re possibly processes or files in the system that may have been got corrupted or damaged.
In terms of Windows, it can be a possible reason that the component store or component-based service has corrupted files. Moreover, when any third-party antimalware software is installed, sometimes it disputes with the operating system and impedes the general processes.
Whatever the reason, this error needs to get fixed. The good thing about this error is it can be solved easily.
In the next section, you’re going to know about the solution.
How to Fix the ‘Xbox Error Code 0x80070940’ Error?
There’re two different methods for two different systems (Xbox and Windows). Here’re them one by one –
Method 1: For the Xbox Console
First, try rebooting the console.
Step 1: First, you need to shut down the console. To do so, press the Xbox button for at least ten to fifteen seconds. It’ll get turned off.
Step 2: Disconnect the power cord of the console for a while.
Step 3: Reconnect the power cord.
Step 4: Again, press and hold the Xbox button in order to turn the console on.
If the problem still remains, then try to reset the console.
Step 1: Launch the guide option using the Xbox button.
Step 2: Now, navigate through Profile & system, Settings, System, and Console info accordingly.
Step 3: Go for Reset console.
Step 4: Here, you can find three options. One is for resetting and removing everything. Another one is for resetting and keeping the games and apps. The last one is to cancel the process.
Step 5: Choose any of the first two options as your wish.
Method 2: For the Windows
First, try uninstalling the third-party antimalware software. It has the ability to impede operating system processes along with Windows updates. To do so,
Step 1: Go to This PC.
Step 2: At the top panel, select the Computer tab.
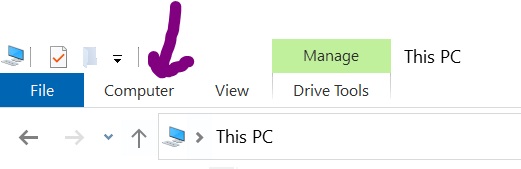
- Then, choose Uninstall or change a program.

Step 3: Now, find the antimalware software and uninstall it.
Check if the error still persists. If so, then you’ve to go for the Windows update troubleshooting.
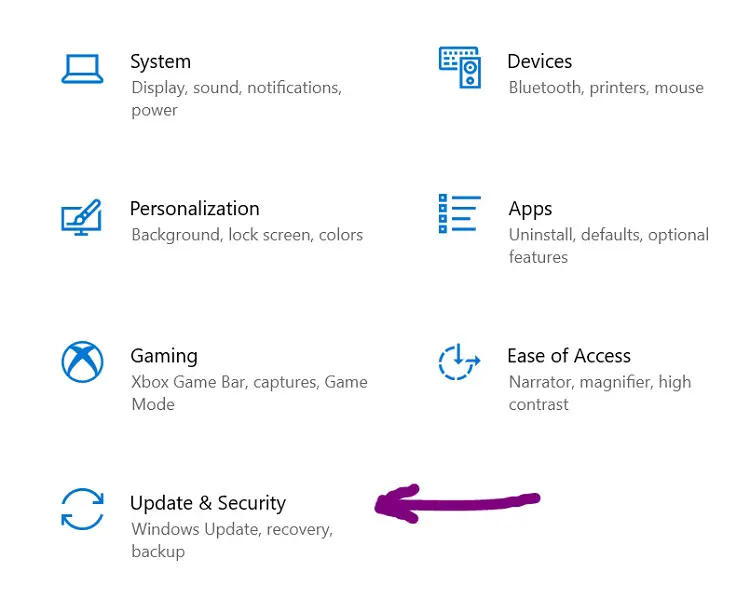
Step 1: Open the Start menu.
Step 2: Click on Settings.
Step 3: Go to Update & Security.
Step 4: Click on Troubleshoot from the left pane.
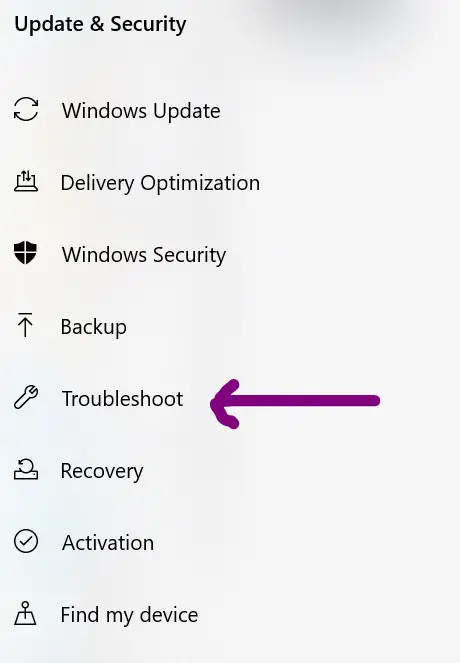
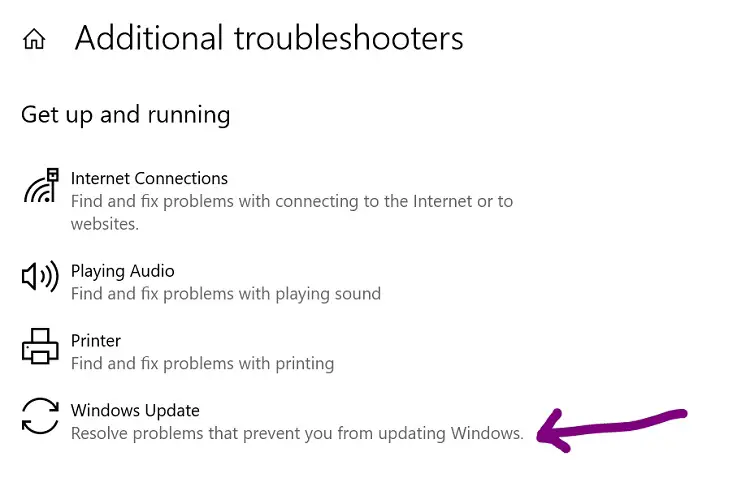
Step 5: Select Additional troubleshooters.
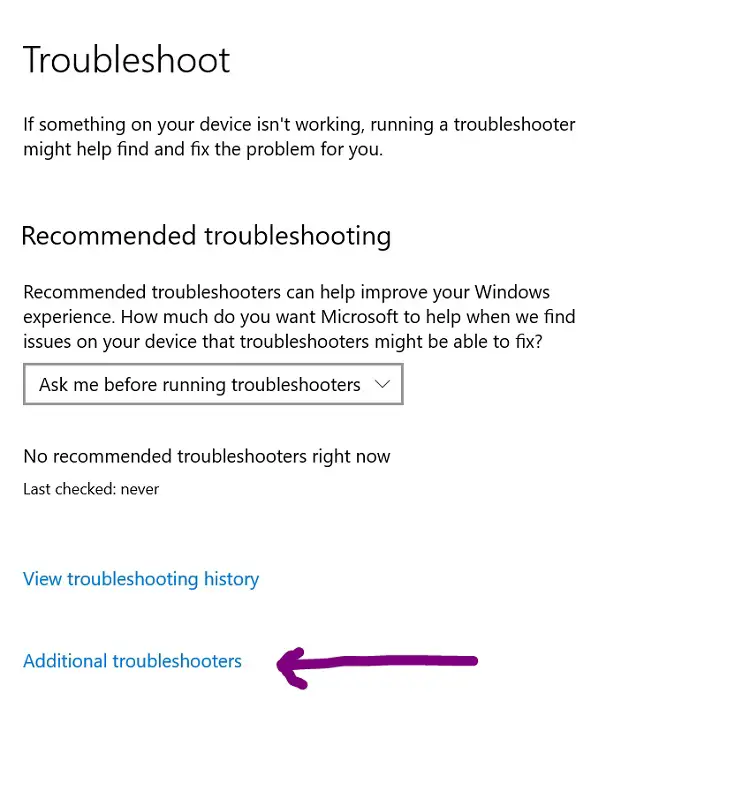
Step 6: Now, choose Windows Update.
Yet if the problem doesn’t go, then try resetting Windows Update components as a final solution. To do so,
Step 1: Start by stopping Windows Update Services.
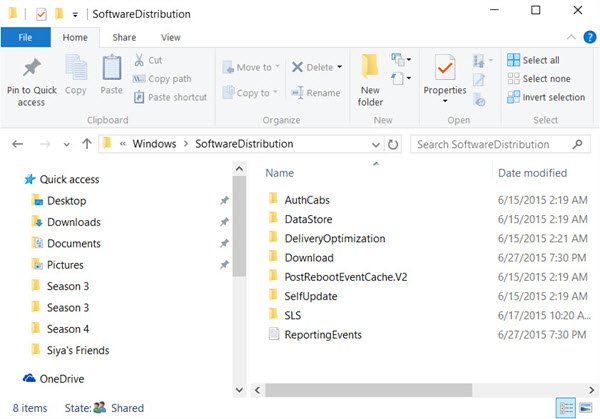
Step 2: Delete the catroot2 and the SoftwareDistribution directories.
Step 3: Delete qmgr*dat files.
Step 4: Delete inapposite Registry values.
Step 5: Reset the Windows Update Service along with the BITS service.
Step 6: Re-register the Windows Update DLL files and also the BITS files.
Step 7: Reset the Winsock.
Step 8: Enable Windows Update Services.
FAQs (Frequently Asked Questions)
What to do to force update my Xbox One console?
If you want to perform a force update of your Xbox One then you’ve to do it manually.
- Hit the Xbox button and go to the Guide.
- Now, select Profile & system.
- Open Settings.
- Go for System.
- Choose Updates & downloads.
- Finally, select Console Update available. Do as it says on the screen.
Is it possible to perform an offline system update on my Xbox One?
Yes, it’s possible. But in terms of performing an OSU, you’ll need an active USB port on a computer having Windows OS and an internet connection. In this way, you’ve to download the execution file in USB Flash Drive for installing it onto the Xbox One console.
Conclusion
As you’ve come this far, we hope that you’ve got an overall idea about this Xbox error code 0x80070490. Following the mentioned instructions should help you to overcome this problem. Give us your feedback if you find this article necessary.
Recently we’ve come to understand that several Xbox One and Windows PC users have been coming face-to-face with error 0x80070490 or 80070490. Now, these are not very common errors people tend to come across on a regular basis, but that doesn’t mean the issue here is not fixable. From what we’ve gathered, error 0x80070490 or 80070490 will show up when the user turns on or try to use their Xbox One video game console. They may also pop up whenever folks attempt to open a game or an app via their Windows computer.
![]()
What is 0x80070003 error?
Error 0x80070003 is usually a sign that there is a problem with Windows Update on a Windows 11/10 computer. This error tends to pop up whenever Windows Update is unable to install a pending update.
How do I fix error 0x8007003?
Fixing error 0x8007003 will not take a lot of effort. Since this error code is linked to Windows Update mostly, then repairing that aspect of Windows 11/10 is the best route to take. This article explains everything nicely.
What is error code 0x80070490?
When we see this error code, it represents a corrupted file or process from within the system component. It can affect both the Xbox One and Windows 11/10 computers, but that doesn’t mean it’s difficult to deal with. Where the Windows 11/10 operating systems are concerned, this error can appear due to conflicts created by a third-party anti-virus tool. Additionally, it is possible Component-Based Servicing (CBS) or in System, Component Store contains corrupted files.
How do I fix error code 0x80070490?
In terms of fixing this particular error code, you may need to do a few things. For example, restart or reset your Xbox One, and if you’re running Windows 11, then disable third-party anti-virus tool, or repair Windows Update.
Solving the problem will take a few minutes of your time, but worry not because once you’re done, everything should return to normal.
First, we are going to look at how to solve this issue where the Xbox One video game console is concerned.
- Turn off the Xbox One
- Unplug the Xbox One
- Turn on the Xbox One
- Reset the Xbox One
1] Turn off the Xbox One
OK, so we believe a simple power cycle can set things back to normal, and the first thing to do in such a situation is to turn off the Xbox One.
To get this done, please press the Xbox button on the front of the console for up to 10 seconds until the console shuts down completely.
2] Unplug the Xbox One
The next thing to do here is to unplug the Xbox One from the power source. After doing that, we suggest waiting 10 seconds before plugging the power cable back to its rightful place.
3] Turn on the Xbox One
Finally, press the Xbox button on the console or on the controller to have the device up and running again. Go ahead and check if error 0x80070490 or 80070490 is still appearing.
4] Reset the Xbox One
If the above actions have failed, then we believe it’s time to reset the Xbox One to its default settings.
Fix 0x80070490 or 80070490 on Windows 11/10
As we have stated above, this problem can also affect Windows 11/10 computers, so, what can we do in a situation like this? Let us take a look.
- Disable third-party anti-virus tool
- Run Windows Update Troubleshooter on PC
- Reset Windows Update components
1] Disable third-party anti-virus tool
If you are not using Microsoft Defender to protect your Windows 11 computer, then we suggest disabling the third-party anti-virus suite. Such tools, when active, can cause Windows Update to act improperly.
2] Run Windows Update Troubleshooter on PC
Run the Windows Update Troubleshooter on your Windows computer and from there, go back and check if the error codes are gone.
3] Reset Windows Update components
The final act to take here is to reset the Windows Update components to their default state.
let us know if this post helped.
| Workable Solutions | Step-by-step Troubleshooting |
|---|---|
| Fix Error 0x80070490 in Windows Update |
Fix 1. Close Antivirus Software Temporarily…Full steps Fix 2. Run Windows Update Troubleshooter…Full steps Fix 3. Run SFC and DISM Scan…Full steps More fixes… |
|
Fix Error 0x80070490 in the Mail App |
Fix 1. Update Mail App…Full steps Fix 2. Check Email Privacy Settings…Full steps Fix 3. Reset Mail and Calendar…Full steps More fixes… |
| Fix Error 0x80070490 on Xbox |
Fix 1. Restart the Xbox/console…Full steps Fix 2. Factory Reset the Xbox…Full steps |
What Is the Error Code 0x80070490
Many of us use Windows OS, and we also prefer it due to its ease. But sometimes we might encounter an error 0x80070490. Numbers can get confusing, and you do not know what to do. But let us first understand what this error is.
You might have several accounts on different apps and want them to be on your Windows computer. So you try to add another account to your Windows but are greeted by a notification that says that your trial was unsuccessful and gives an error code 0x80070490.
So in simple words, when your Mail on Windows 10/11 fails to add another account of yours, error code 0x80070490 occurs. Also, it happens while updating via Windows Update or when updating an application downloaded from the Microsoft Store.
Reasons for Error Code 0x80070490
We told you how this error code 0x80070490 occurs; your Mail fails to add another account in simple words. Let us now look at this situation more technically, in computer terms, so that you understand it better and comprehend it.
Your Mail on Windows 10/11 fails to add another account because there has been a vitiated file or process in the System Component Store or Component-Based Servicing (CBS). So what are these System Component Store and Component-Based Servicing?
CBS or System Component Store or Component-Based Servicing is an added feature to Windows to make the installation process more manageable. It is more robust and secure than earlier systems. It is responsible for running and taking care of all Windows-related update operations.
Let us look at the various causes of this error in brief:
- An antivirus is trying to protect your system and working against the update or installation since it finds it a third-party object and harmful.
- Vitiated file or process in the System Component Store or Component-Based Servicing (CBS).
- You might have made some settings manually that are becoming an obstacle in the way of updates to be done by WU.
How to Fix Error Code 0x80070490 on Windows 10/11
Now that you know what this error code 0x80070490 signals and for what reasons it is caused, let us now look at how to fix it because you cannot stay with it. Can you? So let us get going with how to fix it on Windows 10/11, and we will see how to fix it on devices further in this article.
Even if you do not encounter this issue on your Windows 10/11, you can surely still follow it since it will help solve any other problems related to updates and installation. This method is strictly for Windows 10/11 and might not support other devices, so only follow it for Windows 10/11.
So now we will look at three ways to fix this error, so let us get going.
Fix 1. Close Antivirus Software Temporarily
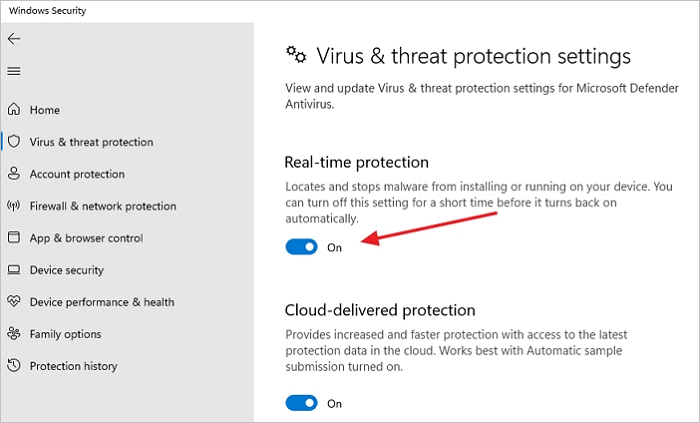
This error code 0x80070490 could be caused due to some antivirus. So we will have to disable it to let the update and installation process flow. Also, make sure that you have an antivirus installed on your system to follow this method, or you could skip to any other.
Disabling an antivirus for installation and updating isn’t that difficult. You only have to disable its firewall and Real-time protection. Once you are done doing this, you can try installing or updating again.
If it runs, congratulations! You have completed the process, and you can reinstall your antivirus. If this did not work for you, let us move on to the following method.
Fix 2. Run Windows Update Troubleshooter
You can fix this issue with a feature that Windows provides in its recent versions. The built-in troubleshooter can resolve most Windows Update-related issues.
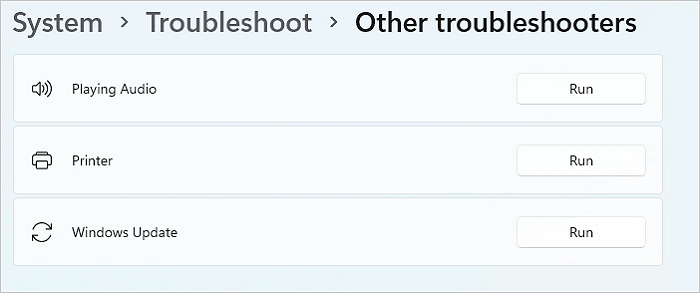
Step 1. Open Windows Settings using Win + I, and go to «System > Troubleshoot > Other troubleshooters».
Step 2. Locate the Windows update troubleshooter, and click on the Run button.
Step 3. Let the wizard complete the process, and once it’s done, try to update Windows.
Fix 3. Run SFC and DISM Scan
Windows is well prepared for problems related to its files and provides solutions for them. The System File Checker will perform scanning of your windows, look for corrupted files like bugs, and try to repair them.
Let us see how you can use System File Checker.
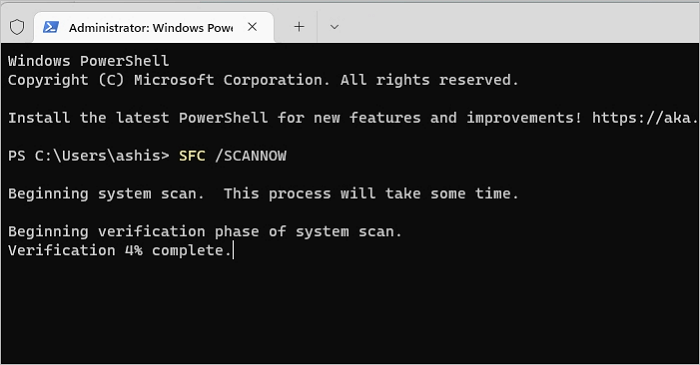
Step 1. On the start bar, type cmd and then right-click on Command Prompt and select Run as administrator.
Step 2. Next, on Command Prompt, type SFC /scannow and tap Enter.
Step 3. Once the System File Checker completes its job, it will tell you if the CBS store is corrupted or not.
If you get a message that says-Windows Resource Protection did not find any integrity violations, then there is no error.
Since there is no error, you can then run the DISM command to replace those old files.
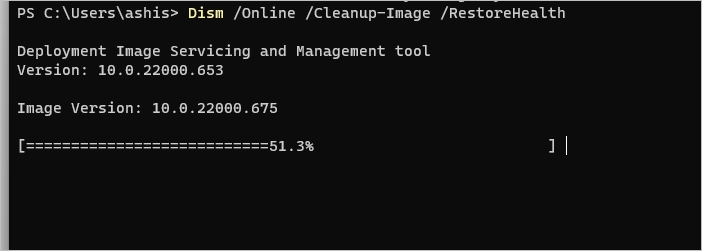
Step 1. In the admin command prompt, type and execute the following command:
Dism /Online /Cleanup-Image /RestoreHealth
Step 2. Once it’s done scanning and replacing those files, you will need to restart the Window Update Service. Open Run prompt using Win + R, and then type services.msc and press the Return key.
Step 3. In the services list, look for Windows Update, right-click and select Restart. Once the system gets restarted, again do the procedure with Windows Module Installer. You can try updating now.
Fix 4. Reset Windows Update Components
Since you are now on the fourth method, the methods above did not work out well. No problem, this method could help you through, or else we also have a final solution to this error.
We will manually reset Windows update components and SoftwareDistribution and Catroot2 folders to create updates in this method.
Step 1. Click the start bar and search for cmd. Right-click on «Command Prompt» and select «Run as administrator».
Step 2. We will stop BITS, Cryptographic, MSI Installer, and Windows Update services. Paste the following on the Command prompt and press enter after each line:
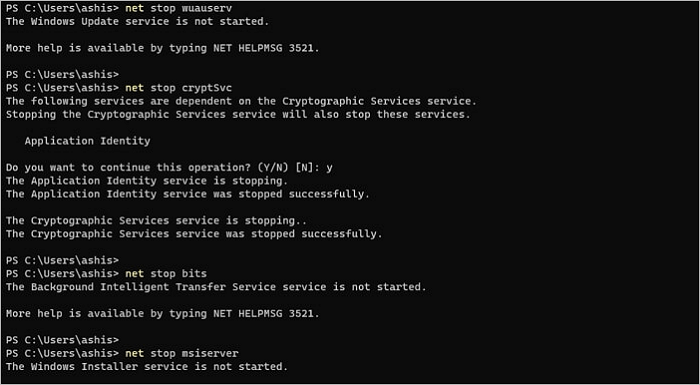
net stop wuauserv
net stop cryptic
net stop bits
net stop msiserver
Step 3. Now that the services are disabled, rename the Catroot2 and SoftwareDistribution folders. Pate the following on the command prompt and press enter after each line:
ren C:WindowsSoftwareDistribution SoftwareDistribution.old
ren C:WindowsSystem32catroot2 Catroot2.old
Step 4. Restart the services. Do the same with the codes below that you did before, paste on the Command prompt, and press enter after each one.
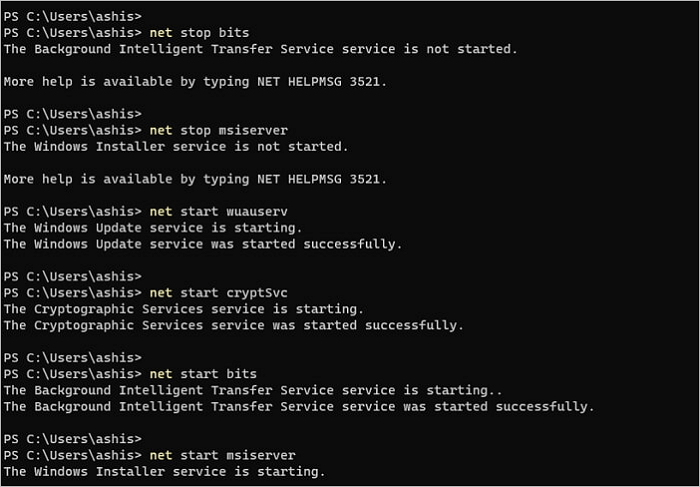
net start wuauserv
net start cryptSvc
net start bits
net start msiserver
Step 5. Lastly, all you have to do now is restart your system and try to perform the main task, updating. If this method doesn’t work, move on to the final solution.
Fix 5. Perform a System Restore
Now we have reached the final solution for this issue. We kept this method at the end so that you get the work done more quickly, but nothing has worked yet; this will. In this method, we will try restoring Windows to a previous version. It will take your Windows back to when there were no issues.

Step 1. Tap Windows+R to open the Run command. Type rstrui and tap Enter; this will open System Restore.
Step 2. Click Next and find Show more restore points. Select a restore point before the application began malfunctioning and click the Next. To start the restoration process, select Finish and then Yes.
Step 3. Once the restoration is done, your system will restart by itself. Now you have the older version of the OS with no error code 0x80070490. And Voila!
Bonus Tip: How to Restore Lost Data for Windows Error Code
While these tips work, there is a chance that you may lose data. If that is the case, you can use EaseUS Data Recovery Wizard to restore lost files. The process works even when the computer doesn’t boot.
Main features of EaseUS data recovery software:
- Recover data from formatted partition
- Compatible with any file system, such as FAT12, FAT16, FAT32, NTFS, NTFS5, HFS, HFS+, and exFAT
- Preview files before recovery
- Remote Support for novice users
- Recover and repair corrupted files, including videos, photos, and documents
The best part of using the EaseUS Data Recovery Wizard is that it is straightforward. You don’t need to be an expert to use this software, but you can follow the wizard, set your requirement, and extract the lost files. You only need to make sure to extract the files on a separate drive instead of the same drive. The steps of how to use EaseUS Data Recovery Wizard are listed below:
Step 1. Select a drive and start scanning
Launch EaseUS Data Recovery Wizard and hover over the partition where you lost data. This could be an internal hard disk, external disk, USB, or SD card. Then, click «Scan».

Step 2. Check and preview scanned files
Use the file format filter on the left or upper right corner to narrow the scan results until you find the files you need. Then, you can click the «Preview» button or double-click a file to preview its content, if you’d like.

Step 3. Recover lost data to a secure location
Click the checkbox next to the file and click «Recover» to restore the lost data to a secure place. We recommend that you do not store the recovered data on the disk where you lost it earlier.

How to Fix Error Code 0x80070490 in the Mail App
The error code 0x80070490 is a common and harmless error on the Mail app of Windows 10/11. So let us look at the easy methods to fix it.
Fix 1. Update Mail App
App updates are available through the Microsoft Store App.
Step 1. Open the Microsoft Store app from the taskbar or by searching it through the Start Menu.
Step 2. Click on the Library icon at the bottom left to open the update and download section.
Step 3. Click on the Get Updates button, and let Microsoft check if there is an app update available. If yes, it will be listed among other apps.
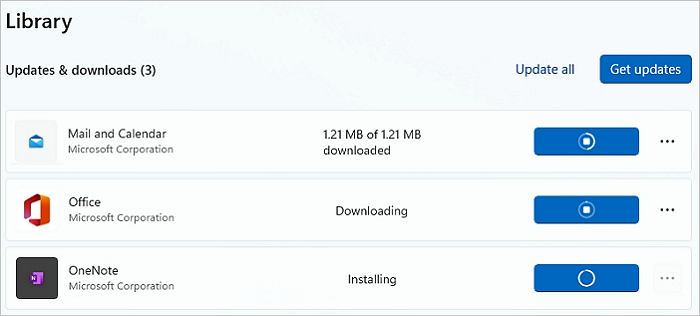
Step 4. Click on the update button next to the Mail app, and let the store download and update it.
Once the update is complete, launch the app and check if it’s complete.
Fix 2. Check Email Privacy Settings
Error code 0x80070490 could also occur due to the wrongly made Email settings, so let us fix them.
Step 1. To do that, open Setting and select Privacy & Security, and open Email.
Step 2. Now turn on the switch next to Email Access. Let apps access your email, Mail, and Calendar.

Step 3. Check if you are still facing the issue.
Fix 3. Reset Mail and Calendar
Step 1. In this method, open «Settings», select «Apps», and then «App & Features».
Step 2. Locate the Mail and Calendar app listing and then click on the three-dot menu and the advanced options menu.
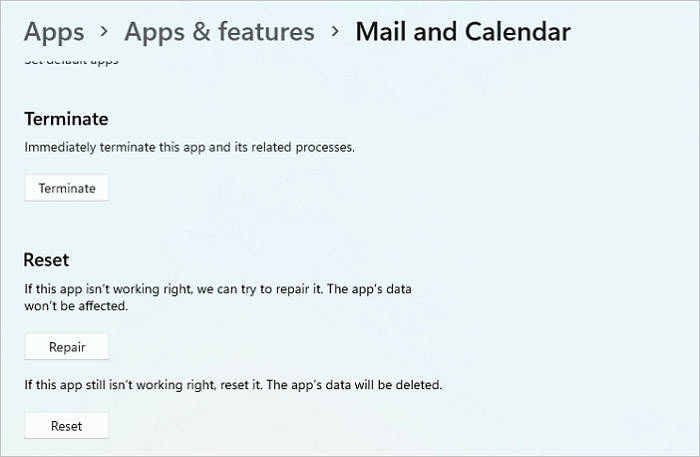
Step 3. Now select Terminate and then, Repair. If the problem gets fixed by just terminating, then all is good. If it does not, you choose further reset and let the process complete.
Fix 4. Reinstall the Mail and Calendar
Now you can move further and install Mail and Calendar, and hopefully, you will not experience error code 0x80070490 again.
Step 1. Right-click the Start button and click on Windows Terminal (Admin) or Windows PowerShell (Admin). This will open the elevated Windows Powershell console.
Step 2. To uninstall the Mail and Calendar apps, paste the following code and run it:
Get-AppxPackage Microsoft.windowscommunicationsapps | Remove-AppxPackage
Step 3. To finally install Mail and Calendar, open the Microsoft Store and install them. Now hopefully, you have got rid of the error code 0x80070490.
How to Fix Error Code 0x80070490 on Xbox
Xbox is a device that many people love, and they buy it to enjoy its services. So why put a break on it due to error code 0x80070490? So let us see how we can fix this situation.
Fix 1. Restart the Xbox/console
Step 1. We will start with the very basic restarting of the system. For this, firstly, shut down the console.
Step 2. Next, unplug everything for a few minutes. After a few minutes, put the plugs back, restart, and try again.
Fix 2. Factory Reset the Xbox
If the above fixes do not work, we will have to factory reset the console. It will remove all your data, so make sure you have a backup of all those before trying out this fix.
Step 1. You can start by turning off your console. Then unplug everything. Here, it is better to wait for a few minutes and replug the power cord.
Step 2. To factory reset, press and hold the BIND button and press the Xbox button on the console.
Step 3. After this, hold BIND and EJECT for 10-20 seconds and wait for it to start, after which you will be taken to the Troubleshooters. Now, select Reset and select Keep your games and apps, and you are done!
Conclusion
This article taught us what error code 0x80070490 is and what causes it. You might have often encountered it when adding another email id to your Mail app on Windows 10/11. But several other devices face this issue.
So we saw how you could fix this issue on Windows 10/11, Mail, and Xbox. You can follow some of the fixes even if you do not face this issue, as it will update the other apps and solve any problems if available.

Xbox is a great tool to play games but only when it works excellently. When you face some trouble on the console, this is the console that will infuriate you the most because the resolution of error codes on Xbox is a little tricky.
But if you have reached this page, you are at the right place because here we are going to discuss the Xbox error code 0x80070490.
The solutions that we will suggest for this in this blog are taken both from official support as well as the player advice from player forums.
The error code 0x80070490 on Xbox is an unexpected error code and the prompt with the error code also reads the same. “Something went wrong….0x80070490”
Let’s see the different solutions that you can use in order to get rid of this annoying error code on Xbox and resume gameplay asap.
How can you solve the error code 0x80070490 on your Xbox?
From the explanation of the error code, we have gathered very little. We only know that this is an unexpected error code.
From the reasons and the fixes of the error code, we will learn more.
Here are the fixes that you can apply to get rid of the error code 0x80070490 on Xbox.
Fix 1: Make sure that your console is updated to the latest version
The Xbox console gets regular updates that keep the software aspect of the device in line with the new features on the market.
If you do not update your console, it can cause many issues on your device, especially with the newly launched features. The newly launched features might not work because your console is now not equipped with the latest firmware.
When you encounter this error, check if the console has some pending updates. The auto-update feature of the console is also really beneficial in the long run.
This can help people who constantly forget about updating their devices.
Fix 2: Temporary software glitch
No matter how new your device is, there can always be temporary software glitches without a proper explanation.
Power cycling the console in such cases can be helpful.
Here is how you can power cycle your Xbox console.
- Find the Xbox button on the controller and press it for 10 seconds. This will turn off the console.
- Remove the power cable that is connected to the console
- Wait for 10 seconds
- Now plug the power cable into the console again
- Again press the Xbox button on the console and it will turn on
- The power cycling of your console will be completed.
Fix 3: Reset the console to factory settings
Sometimes, there are issues with the console that cause it to glitch and a simple power cycle also does not solve the issue.
In this case, you should think about resetting the console to the factory settings.
Before you reset the console to the factory settings, be aware of the fact that this means all your previous preferences will be erased and you will have to start from scratch.
This means you will have to reenter your profiles and again set all the controls to your liking, all your saved games will also be deleted.
You can reset the console by pressing the Xbox buttons and then opening the guide. You will find the option to reset the console. Select that option and it shall help you with the long-term problems on the console.
Fix 4: Your antivirus is blocking the Xbox platform from functioning
The Microsoft in-built anti-virus does not count in this list because it recognizes the Xbox platform.
However, if you are using any third-party anti-virus, it can block some of the functions on your PC.
The Xbox platform could also be a victim of the same. Make sure that the Xbox platform is not on the block list of your anti-virus.
Fix 5: Contact the Xbox support
Being a Microsoft product, you get the same quality of user support that you get with other Microsoft products.
The support team at Microsoft helps you with the exact problems that you are facing and provides you with solutions for the same.
We have already picked the two solutions suggested by the official support website to include in this article and usually, they work but just in case they don’t, you have to find a unique solution with the help of the support team.
To conclude
The Xbox error code 0x80070490 is certainly unexpected and rare. It is also confusing because nothing is explained in detail about what it exactly means.
However, we have made our best efforts to research the exact solutions for the topic so that you can get back to your gameplay without much delay.
We hope that this was helpful. Keep following for more technical and gaming advice in further articles.
Happy Gaming!!
Like This Post? Checkout More
- How To Fix Xbox Error Code 8015190e?
- How To Fix XBox Error Code 0x87e10bef?
- How To Fix Xbox Error Code 0x801901f7?
- How To Fix Roblox Error Code 119 On Xbox?
Недавно мы узнали, что несколько пользователей Xbox One и Windows PC встречаются лицом к лицу с ошибкой 0x80070490 или 80070490 . Это не очень распространенные ошибки, с которыми люди обычно сталкиваются на регулярной основе, но это не значит, что проблему нельзя исправить. Исходя из того, что мы собрали, ошибка 0x80070490 или 80070490 появится, когда пользователь включит или попытается использовать свою игровую консоль Xbox One. Они также могут появляться всякий раз, когда люди пытаются открыть игру или приложение на своем компьютере с Windows.
Что такое ошибка 0x80070003?
Ошибка 0x80070003 обычно является признаком проблемы с Центром обновления Windows на компьютере с Windows 11/10. Эта ошибка обычно появляется всякий раз, когда Центр обновления Windows не может установить ожидающее обновление.
Как исправить ошибку 0x8007003?
Исправление ошибки 0x8007003 не потребует больших усилий. Поскольку этот код ошибки в основном связан с Центром обновления Windows, восстановление этого аспекта Windows 11/10-лучший путь. В этой статье все подробно объясняется.
Что такое код ошибки 0x80070490?
Когда мы видим этот код ошибки, он представляет собой поврежденный файл или процесс из системного компонента. Это может повлиять как на Xbox One, так и на компьютеры с Windows 11/10, но это не значит, что с этим трудно справиться. В операционных системах Windows 11/10 эта ошибка может появиться из-за конфликтов, созданных сторонним антивирусным средством. Кроме того, возможно обслуживание на основе компонентов (CBS) или в системе, хранилище компонентов содержит поврежденные файлы.
Как исправить код ошибки 0x80070490?
Что касается исправления этого конкретного код ошибки, вам может потребоваться сделать несколько вещей. Например, перезапустите или перезагрузите Xbox One, а если вы используете Windows 11, отключите сторонний антивирусный инструмент или восстановите Центр обновления Windows.
Решение проблемы займет несколько минут вашего времени, но не беспокойтесь, потому что, как только вы закончите, все должно вернуться в норму.
Сначала мы рассмотрим как решить эту проблему с игровой консолью Xbox One.
Выключите Xbox One Отключите Xbox One Включите Xbox One Сбросьте Xbox One
1] Выключите Xbox One
Хорошо, мы считаем, что простой цикл питания может вернуть все в норму, и первое, что нужно сделать в такой ситуации,-выключить Xbox One.
Для этого нажмите кнопку Нажмите кнопку Xbox на передней панели консоли и удерживайте до 10 секунд, пока консоль полностью не выключится.
2] Отключите Xbox One
Следующее, что нужно сделать, это отключить Xbox One от источника питания. После этого мы предлагаем подождать 10 секунд, прежде чем снова вставить кабель питания на его законное место.
3] Включите Xbox One
Наконец, нажмите кнопку Xbox на консоли. или на контроллере, чтобы устройство снова заработало. Продолжайте и проверьте, появляется ли по-прежнему ошибка 0x80070490 или 80070490.
4] Сбросьте Xbox One
Если вышеуказанные действия не помогли, то мы считаем, что пришло время перезагрузить Xbox One к настройкам по умолчанию.
Исправьте 0x80070490 или 80070490 в Windows 11/10
Как мы заявили выше, эта проблема также может повлиять на компьютеры с Windows 11/10, так что мы можем делать в такой ситуации? Давайте посмотрим.
Отключить сторонний антивирусный инструмент Запустить средство устранения неполадок Центра обновления Windows на ПК Сбросить компоненты Центра обновления Windows
1] Отключить сторонний антивирусный инструмент
Если это не так с помощью Microsoft Defender для защиты вашего компьютера с Windows 11, тогда мы предлагаем отключить сторонний антивирусный пакет. Такие инструменты, когда они активны, могут привести к неправильной работе Центра обновления Windows.
2] Запустите средство устранения неполадок Центра обновления Windows на ПК
Запустите средство устранения неполадок Центра обновления Windows на своем компьютере с Windows и оттуда перейдите назад и проверьте, исчезли ли коды ошибок.
3] Сбросить компоненты Центра обновления Windows
Последнее, что нужно сделать, это сбросить компоненты Центра обновления Windows до их состояния по умолчанию.
сообщите нам, помогла ли эта публикация.
| Workable Solutions | Step-by-step Troubleshooting |
|---|---|
| Fix Error 0x80070490 in Windows Update |
Fix 1. Close Antivirus Software Temporarily…Full steps Fix 2. Run Windows Update Troubleshooter…Full steps Fix 3. Run SFC and DISM Scan…Full steps More fixes… |
|
Fix Error 0x80070490 in the Mail App |
Fix 1. Update Mail App…Full steps Fix 2. Check Email Privacy Settings…Full steps Fix 3. Reset Mail and Calendar…Full steps More fixes… |
| Fix Error 0x80070490 on Xbox |
Fix 1. Restart the Xbox/console…Full steps Fix 2. Factory Reset the Xbox…Full steps |
What Is the Error Code 0x80070490
Many of us use Windows OS, and we also prefer it due to its ease. But sometimes we might encounter an error 0x80070490. Numbers can get confusing, and you do not know what to do. But let us first understand what this error is.
You might have several accounts on different apps and want them to be on your Windows computer. So you try to add another account to your Windows but are greeted by a notification that says that your trial was unsuccessful and gives an error code 0x80070490.
So in simple words, when your Mail on Windows 10/11 fails to add another account of yours, error code 0x80070490 occurs. Also, it happens while updating via Windows Update or when updating an application downloaded from the Microsoft Store.
Reasons for Error Code 0x80070490
We told you how this error code 0x80070490 occurs; your Mail fails to add another account in simple words. Let us now look at this situation more technically, in computer terms, so that you understand it better and comprehend it.
Your Mail on Windows 10/11 fails to add another account because there has been a vitiated file or process in the System Component Store or Component-Based Servicing (CBS). So what are these System Component Store and Component-Based Servicing?
CBS or System Component Store or Component-Based Servicing is an added feature to Windows to make the installation process more manageable. It is more robust and secure than earlier systems. It is responsible for running and taking care of all Windows-related update operations.
Let us look at the various causes of this error in brief:
- An antivirus is trying to protect your system and working against the update or installation since it finds it a third-party object and harmful.
- Vitiated file or process in the System Component Store or Component-Based Servicing (CBS).
- You might have made some settings manually that are becoming an obstacle in the way of updates to be done by WU.
How to Fix Error Code 0x80070490 on Windows 10/11
Now that you know what this error code 0x80070490 signals and for what reasons it is caused, let us now look at how to fix it because you cannot stay with it. Can you? So let us get going with how to fix it on Windows 10/11, and we will see how to fix it on devices further in this article.
Even if you do not encounter this issue on your Windows 10/11, you can surely still follow it since it will help solve any other problems related to updates and installation. This method is strictly for Windows 10/11 and might not support other devices, so only follow it for Windows 10/11.
So now we will look at three ways to fix this error, so let us get going.
Fix 1. Close Antivirus Software Temporarily
This error code 0x80070490 could be caused due to some antivirus. So we will have to disable it to let the update and installation process flow. Also, make sure that you have an antivirus installed on your system to follow this method, or you could skip to any other.
Disabling an antivirus for installation and updating isn’t that difficult. You only have to disable its firewall and Real-time protection. Once you are done doing this, you can try installing or updating again.
If it runs, congratulations! You have completed the process, and you can reinstall your antivirus. If this did not work for you, let us move on to the following method.
Fix 2. Run Windows Update Troubleshooter
You can fix this issue with a feature that Windows provides in its recent versions. The built-in troubleshooter can resolve most Windows Update-related issues.
Step 1. Open Windows Settings using Win + I, and go to «System > Troubleshoot > Other troubleshooters».
Step 2. Locate the Windows update troubleshooter, and click on the Run button.
Step 3. Let the wizard complete the process, and once it’s done, try to update Windows.
Fix 3. Run SFC and DISM Scan
Windows is well prepared for problems related to its files and provides solutions for them. The System File Checker will perform scanning of your windows, look for corrupted files like bugs, and try to repair them.
Let us see how you can use System File Checker.
Step 1. On the start bar, type cmd and then right-click on Command Prompt and select Run as administrator.
Step 2. Next, on Command Prompt, type SFC /scannow and tap Enter.
Step 3. Once the System File Checker completes its job, it will tell you if the CBS store is corrupted or not.
If you get a message that says-Windows Resource Protection did not find any integrity violations, then there is no error.
Since there is no error, you can then run the DISM command to replace those old files.
Step 1. In the admin command prompt, type and execute the following command:
Dism /Online /Cleanup-Image /RestoreHealth
Step 2. Once it’s done scanning and replacing those files, you will need to restart the Window Update Service. Open Run prompt using Win + R, and then type services.msc and press the Return key.
Step 3. In the services list, look for Windows Update, right-click and select Restart. Once the system gets restarted, again do the procedure with Windows Module Installer. You can try updating now.
Fix 4. Reset Windows Update Components
Since you are now on the fourth method, the methods above did not work out well. No problem, this method could help you through, or else we also have a final solution to this error.
We will manually reset Windows update components and SoftwareDistribution and Catroot2 folders to create updates in this method.
Step 1. Click the start bar and search for cmd. Right-click on «Command Prompt» and select «Run as administrator».
Step 2. We will stop BITS, Cryptographic, MSI Installer, and Windows Update services. Paste the following on the Command prompt and press enter after each line:
net stop wuauserv
net stop cryptic
net stop bits
net stop msiserver
Step 3. Now that the services are disabled, rename the Catroot2 and SoftwareDistribution folders. Pate the following on the command prompt and press enter after each line:
ren C:\Windows\SoftwareDistribution SoftwareDistribution.old
ren C:\Windows\System32\catroot2 Catroot2.old
Step 4. Restart the services. Do the same with the codes below that you did before, paste on the Command prompt, and press enter after each one.
net start wuauserv
net start cryptSvc
net start bits
net start msiserver
Step 5. Lastly, all you have to do now is restart your system and try to perform the main task, updating. If this method doesn’t work, move on to the final solution.
Fix 5. Perform a System Restore
Now we have reached the final solution for this issue. We kept this method at the end so that you get the work done more quickly, but nothing has worked yet; this will. In this method, we will try restoring Windows to a previous version. It will take your Windows back to when there were no issues.
Step 1. Tap Windows+R to open the Run command. Type rstrui and tap Enter; this will open System Restore.
Step 2. Click Next and find Show more restore points. Select a restore point before the application began malfunctioning and click the Next. To start the restoration process, select Finish and then Yes.
Step 3. Once the restoration is done, your system will restart by itself. Now you have the older version of the OS with no error code 0x80070490. And Voila!
Bonus Tip: How to Restore Lost Data for Windows Error Code
While these tips work, there is a chance that you may lose data. If that is the case, you can use EaseUS Data Recovery Wizard to restore lost files. The process works even when the computer doesn’t boot.
Main features of EaseUS data recovery software:
- Recover data from formatted partition
- Compatible with any file system, such as FAT12, FAT16, FAT32, NTFS, NTFS5, HFS, HFS+, and exFAT
- Preview files before recovery
- Remote Support for novice users
- Recover and repair corrupted files, including videos, photos, and documents
The best part of using the EaseUS Data Recovery Wizard is that it is straightforward. You don’t need to be an expert to use this software, but you can follow the wizard, set your requirement, and extract the lost files. You only need to make sure to extract the files on a separate drive instead of the same drive. The steps of how to use EaseUS Data Recovery Wizard are listed below:
Step 1. Select a drive and start scanning
Launch EaseUS Data Recovery Wizard and hover over the partition where you lost data. This could be an internal hard disk, external disk, USB, or SD card. Then, click «Scan».
Step 2. Check and preview scanned files
Use the file format filter on the left or upper right corner to narrow the scan results until you find the files you need. Then, you can click the «Preview» button or double-click a file to preview its content, if you’d like.
Step 3. Recover lost data to a secure location
Click the checkbox next to the file and click «Recover» to restore the lost data to a secure place. We recommend that you do not store the recovered data on the disk where you lost it earlier.
How to Fix Error Code 0x80070490 in the Mail App
The error code 0x80070490 is a common and harmless error on the Mail app of Windows 10/11. So let us look at the easy methods to fix it.
Fix 1. Update Mail App
App updates are available through the Microsoft Store App.
Step 1. Open the Microsoft Store app from the taskbar or by searching it through the Start Menu.
Step 2. Click on the Library icon at the bottom left to open the update and download section.
Step 3. Click on the Get Updates button, and let Microsoft check if there is an app update available. If yes, it will be listed among other apps.
Step 4. Click on the update button next to the Mail app, and let the store download and update it.
Once the update is complete, launch the app and check if it’s complete.
Fix 2. Check Email Privacy Settings
Error code 0x80070490 could also occur due to the wrongly made Email settings, so let us fix them.
Step 1. To do that, open Setting and select Privacy & Security, and open Email.
Step 2. Now turn on the switch next to Email Access. Let apps access your email, Mail, and Calendar.
Step 3. Check if you are still facing the issue.
Fix 3. Reset Mail and Calendar
Step 1. In this method, open «Settings», select «Apps», and then «App & Features».
Step 2. Locate the Mail and Calendar app listing and then click on the three-dot menu and the advanced options menu.
Step 3. Now select Terminate and then, Repair. If the problem gets fixed by just terminating, then all is good. If it does not, you choose further reset and let the process complete.
Fix 4. Reinstall the Mail and Calendar
Now you can move further and install Mail and Calendar, and hopefully, you will not experience error code 0x80070490 again.
Step 1. Right-click the Start button and click on Windows Terminal (Admin) or Windows PowerShell (Admin). This will open the elevated Windows Powershell console.
Step 2. To uninstall the Mail and Calendar apps, paste the following code and run it:
Get-AppxPackage Microsoft.windowscommunicationsapps | Remove-AppxPackage
Step 3. To finally install Mail and Calendar, open the Microsoft Store and install them. Now hopefully, you have got rid of the error code 0x80070490.
How to Fix Error Code 0x80070490 on Xbox
Xbox is a device that many people love, and they buy it to enjoy its services. So why put a break on it due to error code 0x80070490? So let us see how we can fix this situation.
Fix 1. Restart the Xbox/console
Step 1. We will start with the very basic restarting of the system. For this, firstly, shut down the console.
Step 2. Next, unplug everything for a few minutes. After a few minutes, put the plugs back, restart, and try again.
Fix 2. Factory Reset the Xbox
If the above fixes do not work, we will have to factory reset the console. It will remove all your data, so make sure you have a backup of all those before trying out this fix.
Step 1. You can start by turning off your console. Then unplug everything. Here, it is better to wait for a few minutes and replug the power cord.
Step 2. To factory reset, press and hold the BIND button and press the Xbox button on the console.
Step 3. After this, hold BIND and EJECT for 10-20 seconds and wait for it to start, after which you will be taken to the Troubleshooters. Now, select Reset and select Keep your games and apps, and you are done!
Conclusion
This article taught us what error code 0x80070490 is and what causes it. You might have often encountered it when adding another email id to your Mail app on Windows 10/11. But several other devices face this issue.
So we saw how you could fix this issue on Windows 10/11, Mail, and Xbox. You can follow some of the fixes even if you do not face this issue, as it will update the other apps and solve any problems if available.