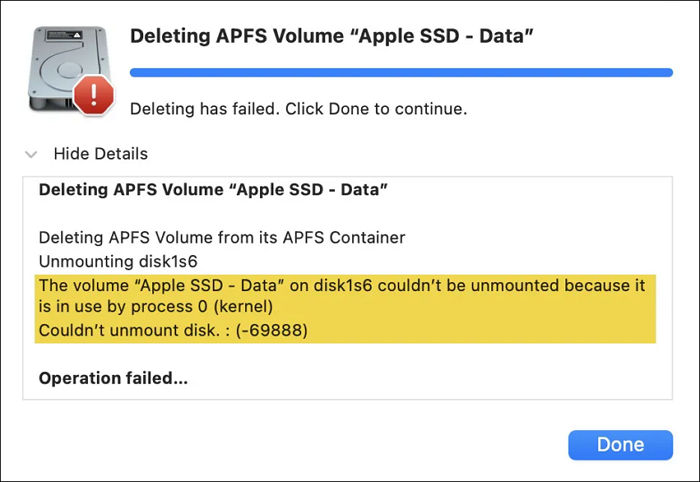
If you encounter this «couldn’t unmount disk 69888» error on your MacBook Pro/Air, it implies you’re trying to partition, reformat, or delete a disk. Unfortunately, you couldn’t do it because the OS won’t let it.
After all, the disk is recently being utilized by other apps or hardware failure. Today’s article will discuss everything about this error, the reasons, and the solutions.
| Workable Solutions | Step-by-step Troubleshooting |
|---|---|
| Fix 1. Exclude the Drive from Spotlight Indexing | Go to the Apple menu, followed by System Preferences and Spotlight, and hit the privacy tab…Full steps |
| Fix 2. Remove Drive from Time Machine on Mac | Open system preferences to eliminate the drive from Time Machine; select Time Machine…Full steps |
| Fix 3. Force Unmount Disk with Terminal on Mac | Open Terminal > Utilities folder, and type the command: diskutil list to get the disk identifier…Full steps |
| Fix 4. Boot into macOS Recovery to Fix Error 69888 | Enter macOS Recovery on the latest Macs having a recovery partition, opt for Disk Utility…Full steps |
| Other Practical Fixes | Delete the internal volume in Safe Mode and unmount each volume to unmount the disk…Full steps |
The incompetence of unmounting disk information on Mac ensues when you’re unable to erase, delete, or partition an external or internal volume or disk on Mac, including an HDD or SSD, Time Machine backup disk, USB flash drive, and an internal fusion drive. Hence, it causes several errors, and one of the most significant errors is «error 69888: Couldn’t unmount disk.»
Why Couldn’t Unmount Disk 69888 Error Occurs on Mac
Couldn’t unmount disk 69888 on macOS typically occurs when you perform some manipulations with the internal or external drive. The MacBook won’t let you make the changes if some other process or app uses the drive.
You may also not reformat, partition, or delete the disk you’re recently booted from. However, you may try to change the drive and not get this error 69888.
How to Fix Couldn’t Unmount Disk 69888
Countless fixes are there to solve this error message on macOS. But before proceeding with the below-mentioned 6 fixes, we will provide a video for help. These are the main outlines of the video:
- 00:14 — Hit the erase button
- 00:24 — Hit the OK button to continue, as the erase process has failed
- 01:14 — Enter the command diskutil list
- 01:58 — Enter the command diskutil unmountDisk force /dev/disk0
Note that In the below-mentioned fixes, solutions 1-3 are for external disk on Mac, and the rest 4-6 solutions are for internal disk.
Fix 1. Exclude the Drive from Spotlight Indexing
Spotlight aids you in finding things quickly on Mac and its linked devices by indexing files persistently. Nevertheless, you may face the «Couldn’t unmount disk 69888» error if you’re trying hard to format a drive Spotlight is indexing. Follow the steps below to unmount the drive:
Step 1. Navigate to the Apple menu, followed by System Preferences and Spotlight.
Step 2. Hit the «Privacy» tab.
Step 3. Click the «+» button to pick the external drive’s folder.

Step 4. Select «Choose».
Fix 2. Remove the Drive from Time Machine
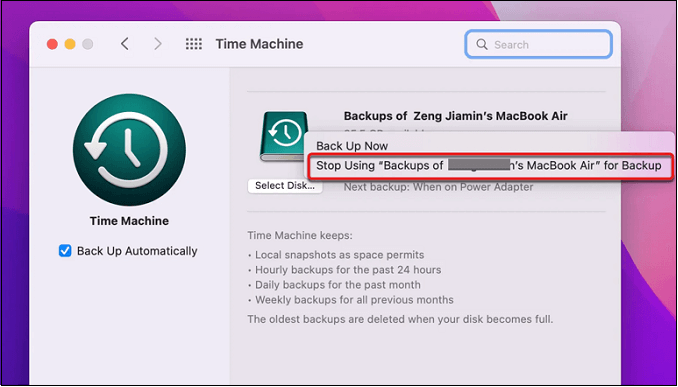
Disabling Time Machine from backing up to the hard drive is preferable if your Mac previously used the disk for a Time Machine backup. Follow the steps below to remove the external drive from Time Machine:
Step 1. Open «System Preferences» to eliminate the drive from Time Machine on macOS Monterey.
Step 2. Select «Time Machine».
Step 3. You need to right-click on the Time Machine disk, which causes error 69888, and opt for «Stop Using (drive name) for Backup.»
Share this article on social media to help others learn how to fix error 69888 on Mac.
Fix 3. Force Unmount Disk with Terminal
Can’t unmount the disk on Mac? If so, you may force an unmounted disk in the Mac Terminal. After that, try to partition or eliminate the external disk once more. These are the steps to follow to force unmount the disk with Terminal:
Step 1. From the Applications, open the «Terminal > Utilities» folder.

Step 2. Type the command diskutil list to get the disk identifier.
Step 3. To forcefully remove the drive, enter the command diskutil unmountDisk force /dev/disk and press «Enter».
Fix 4. Boot into macOS Recovery to Fix Error 69888
These are the best solutions if you can’t unmount disk 69888 while adjusting volumes on the internal HDD on Mac. Disk elimination occurred in a few instances. You encounter the «Couldn’t unmount disk 69888» issue when attempting to change the boot drive.
But since that’s where the OS launches, you can’t. To accomplish this, build the machine from a volume different from the one you would like to format. To repair issue 69888, take the following actions to start Mac in Recovery Mode:
Step 1. Enter Mac Recovery Mode on the latest Macs having a recovery partition.
Step 2. Opt for «Disk Utility» to format the boot disk.
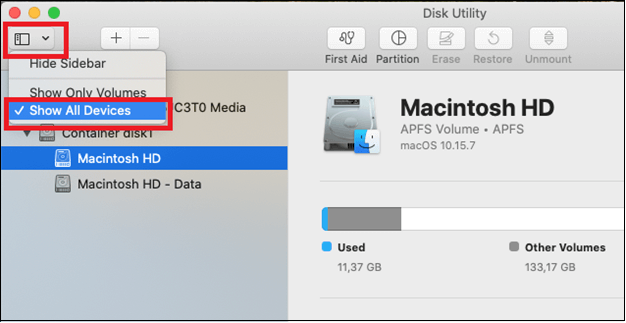
Step 3. Erase the entire disk if you can’t erase the Mac startup disk in recovery mode after hitting «View > Show All Devices» rather than eliminating the data volume.
Step 4. Erase the Macintosh HD volume or restart in Mac Internet Recovery Mode.
In case the error happens after removing Macintosh HD, you may try eliminating the Macintosh HD volume and opt for «Erase Volume Groups» instead.

How to Recover Data from Macintosh HD Data
This tutorial will show you how to reinstall macOS from macOS Recovery with step-by-step guides. Read more >>
Fix 5. Delete the Internal Volume in Safe Mode
You must be capable of erasing or removing additional internal files in a standard boot, except for the internal disk and the Macintosh HD — Data volume categories. You may reboot in Mac Safe Mode and shut down again if Disk Utility exhibits the «Couldn’t unmount disk» warning before trying again.
You may encounter data loss while deleting the internal volume in safe mode. To protect you from the hassles of data loss, EaseUS Data Recovery Wizard for Mac is the one-stop solution to recover deleted files on Mac.
It helps solve several hardcore data loss cases and recover external hard drive unmounted Mac, including photos, documents, videos, emails, etc. The best features of EaseUS Data Recovery Wizard for Mac are the following:
- Recover emptied Trash Mac.
- Flexible scanning modes: fast and straightforward.
- Preview before recovery.
- Supports formatted/lost partition recovery Mac.
Download this data recovery tool, and follow the steps below to recover the accidentally deleted data with a few clicks:
Step 1. In the main EaseUS Data Recovery Wizard window, there will be a list of the drives connected to your Mac. Select the drive you need to recover accidentally deleted files from, and click the «Search for lost files» button.

Step 2. EaseUS Data Recovery Wizard for Mac will immediately scan your selected disk volume and display the scanning results on the left pane. You can sort the results to find the wanted files if you want certain files.

Step 3. Once you have found the desired files, preview the files and then click «Recover» to begin the recovery of your deleted/lost Mac files.

EaseUS Data Recovery Wizard for Mac Review [Update in 2023]
EaseUS Data Recovery Wizard for Mac is a trusted and effective data recovery software that supports data recovery of various file types. Read more >>
Fix 6. Unmount Each Volume to Unmount the Disk
You can also remove every partition or disk if you possess a fusion drive prior to installing the startup disk in Terminal if you get the error message «Forced unmount of disk0 did not work: at least a single disk couldn’t be unmounted». Follow the steps below:
Step 1. Reboot Internet Recovery on your Mac.
Step 2. Select «Terminal» under Utilities.
Step 3. To get a list of all connected drives and volumes, run the command diskutil list.
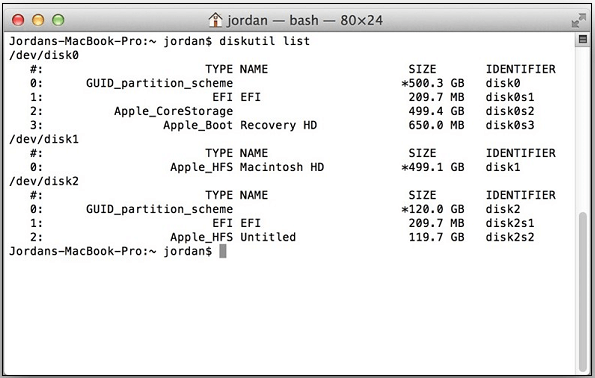
Step 4. Save the disk or volume identifier, for example, disk1, in your notes. If there’s more than one drive or a volume mounted under one disk, use the command diskutil unmountDisk force /dev/disk_identifier to unmount it forcefully.
Step 5. You may eliminate the drive in the Terminal once the startup disk is unmounted with this command diskutil eraseDisk file_system disk_name /dev/disk_identifier.
Tips to Avoid Error Couldn’t Unmount Disk 69888
How do you avoid error 69888: Couldn’t unmount disk? These are the best tips to follow:
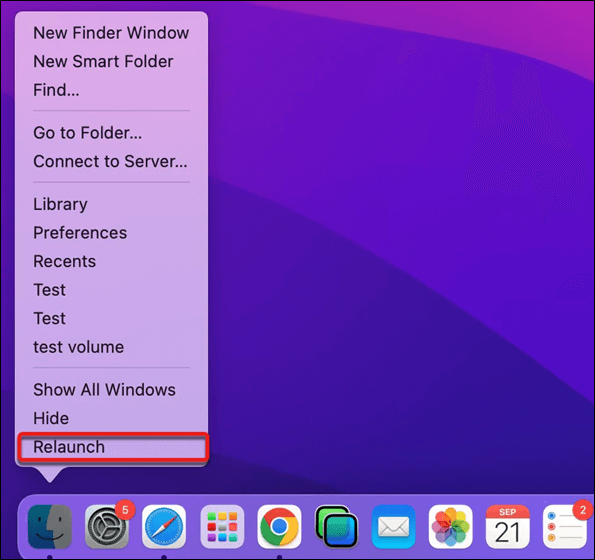
🔎Relaunch Finder to Fix Error 69888
The process, which is employing your disk often and causes an error «Couldn’t unmount disk» is Finder. You must relaunch Finder to stop it from accessing the drive:
Step 1. The Finder symbol needs to be right-clicked on along with holding the «Option» key.
Step 2. Hit the «Relaunch» option to restart Finder.
Step 3. Eject the external drive on your MacBook safely.
Step 4. You need to replug the drive into your MacBook.
Step 5. Keep trying until it eliminates or partitions the disk.
💽Quit Apps/Processes Using Disk
If rebooting Finder doesn’t work, you can identify which programs currently use the hard drive or its volume by their PID number and terminate them. The error message should be your first port of call. Once you have the PID of the complicated procedure, follow these instructions to end it:
Step 1. Open «Terminal» from the «Applications > Utilities» folder.
Step 2. Enter this command sudo kill PID and hit the «Enter» button.
Step 3. Type your password, and hit the «Enter» button.
Step 4. Force terminate the process by typing this command sudo kill -9 PID.
📂Ensure the Same Files System Before Merging Two Partitions
You must select your chosen file system and reformat every partition with it before combining them if you encounter the error «Error: -69888: Couldn’t unmount disk» while trying to combine two differently configured partitions.
For example, if one has been formatted as APFS and the other as Mac OS Extended(HFS+), you may combine the two volumes after first formatting the Mac OS Extended disk to APFS.
Conclusion
Couldn’t remove a disk on macOS may not be an everyday occurrence on your Mac because the macOS is typically good at preventing problems. However, users may still run through this issue when employing Disk Utility to fix, lay out, and divide the boot drive.
You are only required to utilize the remedies provided above the next time you run into the «error 69888: Couldn’t unmount disk». Also, to avoid data loss during the process, EaseUS Data Recovery Wizard for Mac is the best recovery software to try!
Consider the below-mentioned FAQs to avoid Couldn’t unmount disk 69888 error:
1. How do I fix error code 69888 on Mac?
You may create a non-APFS partition before eliminating the disk. Follow the steps below:
Step 1. Your Mac will start up in macOS Recovery.
Step 2. Select «Disk Utility».
Step 3. Choose the startup disk container.
Step 4. Hit the (+) button after selecting the partition. Any system that supports files, but not APFS, should be used.
Step 5. Pick any size that you want, and tap «Apply» to re-format the drive.
2. How do I force my Mac to unmount the disk?
Choose the disk group you are interested in unmounting in the sidebar of the Disk Utility software on your Mac. In the toolbar that appears or next to the title of the disk set, select the Unmount option. The disk member you intend to unmount must be disconnected.
3. Why can’t I unmount the hard drive on Mac?
Make sure your Mac and external hard drive are connected properly. Make sure the hard drive’s USB cable or adapter is properly fastened by reattaching it. Your Mac’s hard drive needs to be linked to a different Mac or USB port. Repair any USB cables or adapters that may be damaged.
4. What does it mean to unmount a hard drive on Mac?
Firstly, disconnecting an optical disc or a disk drive from a PC. The operating system unmounts the media when an individual chooses «Eject» to remove an optical disc from the computer compared to the mount. Unmounting means taking a tape or disk cartridge out of the drive.
macOS Sonoma: Available 9.26
Looks like no one’s replied in a while. To start the conversation again, simply
ask a new question.
Trying «How to create a bootable installer for macOS» El Capitan ends up terminal saying: Error erasing disk error number (-69888, 0)
A error occurred erasing the disk. Followed the instructions exactly! 16 G Kingston USB stick.
Mac Pro
Posted on Sep 1, 2019 9:20 AM
I figured it out and thought it might help others with error number (-69888, 0).
Although I renamed the new 16 GB USB stick MyVolume per instructions, it had a prior installation of it that never worked!
Because of that the disk could not be dismounted to be erased.
Solution:
I used Disk Utility to erase the stick and reformat to Mac OS Extended and named MyVolume.
then:
Following the instructions at https://support.apple.com/en-us/HT201372 again all worked perfect!
Posted on Sep 1, 2019 4:44 PM
Similar questions
-
Why does my MacBook Air come up with error when installing macOS Sierra
When installing macOS on my MacBook Air I keep coming up with “error occurred while preparing the installation”laptop given to me after previous owner erased all data.
I’m trying to install on factory settings again
431
3
-
How to fresh install MACOS? Error…
Hello,
I have a macbook 13 inch from 2009.
The harddrive was damage so i put another hard drive with windows installed and the Macbook turn on perfectly..
Now i want to put a MACOS operating system but i always get this error :
» An error ocorrer during install MAC OS X»..
already put date and time correct…
Because i have another pc with windows i use TransMAC to create a bootable USB.
Already try with EL CAPITAN, Sierra.
I use this toturial:
https://support.apple.com/pt-pt/HT208496And this:
https://support.apple.com/en-us/HT204904
I dont know what to do more…
tanks
457
4
-
An Error Occurred While Preparing The Installation Try Running This Application Again — MacBook Air 13
I have been trying to install MacOS Sierra using the network, but every time it is about to finish it says An Error Occurred While Preparing The Installation Try Running This Application Again
I wanted to use other Startup disks like flash drives or an external hard drive, but it seems thats not working.A look into the log files shows these two errors
MacBook-Air osishelperd[615]: Couldn’t mount base system dmg! (error code 110)
MacBook-Air osishelperd[615]: Couldn’t mount base system dmg! (error code 110)I have tried doing this more than 10 days but i keep getting the same errors.
Is there anyone who was able to find a solution to this problem?
264
5
Why do I get an error erasing the disk has occurred?
If you see the error «Couldn’t unmount disk.: (-69888)» or «Error: -69888: Couldn’t unmount disk» on Mac, it usually means that you are trying to reformat, partition, or delete a volume or disk but can’t because the operating system won’t allow it due to the volume/disk currently being used by other applications or …
How do I reset my startup disk on a Mac?
Set a default startup disk
On your Mac, choose Apple menu > System Settings, click General in the sidebar, then click Startup Disk on the right. (You may need to scroll down.) Click the icon of the disk you want to use, then click Restart.
What is required to create a bootable USB key?
To create a bootable USB flash drive
- Insert a USB flash drive into a running computer.
- Open a Command Prompt window as an administrator.
- Type diskpart .
- In the new command line window that opens, to determine the USB flash drive number or drive letter, at the command prompt, type list disk , and then click ENTER.
How to install Mac OS from USB?
STEPS TO INSTALL macOS FROM USB IN RECOVERY MODE:
- Turn off your Mac.
- Incorporate the bootable USB.
- Holding down the Option/Alt key while starting your Mac will put it in recovery mode.
- Click on the USB-connected external disc when your Mac’s Startup Manager appears.
- Click Continue after selecting Install macOS.
How do I open Disk Utility on a Mac?
Use Launchpad: Click Launchpad in the Dock, type Disk Utility in the search field, then click the Disk Utility icon. Use the Finder: In the Finder , choose Go > Utilities, then double-click the Disk Utility icon. (Disk Utility is located in the /Applications/Utilities folder.)
Error erasing disk error number 69888, 0 solved Tutorial
How do I fix a corrupted hard drive on my Mac?
Repair a storage device in Disk Utility on Mac
- In the Disk Utility app on your Mac, choose View > Show All Devices. …
- In the sidebar, select a volume, then click the First Aid button .
- In the First Aid dialog, click Run, then follow the onscreen instructions.
- When the First Aid process is complete, click Done.
How do I fix my internal hard drive not showing up Mac?
Change Mac’s settings to show the internal hard drive
Here are some simple fixes for this: Open Finder, and then click the Finder menu on the Apple menu bar at the top of the screen. Select Preferences > General. Check «Hard disks» in the General tag to make the internal hard drives show on the Desktop.
How to make USB Mac bootable?
Use Terminal to create the bootable installer
- Plug in the USB flash drive or other volume that you’re using for the bootable installer.
- Open Terminal, which is in the Utilities folder of your Applications folder.
- Type or paste one of the commands below into Terminal, then press Return to enter the command.
How to update macOS from USB?
Once at the boot options screen, select the USB icon representing the USB Installer Drive and select “Enter” to proceed. If prompted, select your desired language. Next, the installer environment will load. Select Utilities | Install macOS, then select Continue.
What format does a USB need to be in to boot from USB?
The above comparison table shows that the best format for a bootable USB drive is FAT32 because of its compatibility across different operating systems and USB devices.
How to create bootable USB without tool?
Connect a USB drive to your computer and format it as FAT32. Open the ISO file in 7-Zip and extract the contents of the ISO to the USB drive. Make sure that the boot order in your BIOS is set to boot from USB first. Reboot your computer, and it should now boot from the USB drive.
How do I reinstall Mac without startup disk?
Restart your Mac. Choose Apple menu > Shut Down, press and hold the power button until “Loading startup options” appears, select Options, click Continue, then follow the onscreen instructions. In the Recovery app window, select Reinstall for your macOS release, click Continue, then follow the onscreen instructions.
How do I restart my Mac without a startup disk?
Go to Apple menu > Restart. Immediately press and hold Command+R. Don’t release the keys until you hear Mac’s startup sound or until the Apple logo appears.
How do I reinstall macOS manually?
Reinstall macOS
- Install the latest version of macOS compatible with your computer: Option-Command-R.
- Reinstall your computer’s original version of macOS (including available updates): Option-Shift-Command-R.
- Reinstall your current version of macOS: Command-R.
How to update macOS without USB?
Tutorial
- Restart your Mac, or power it on, while holding down the Command + R key combination.
- Release the Command + R key combination once you see the Apple logo on display. …
- Once you see a window like the one below, click on Disk Utility and Erase your main Mac HDD (or SSD).
How to create macOS bootable USB without terminal?
Create macOS bootable USB installation media
- Download and install TransMac on Windows 10. …
- Connect the USB flash drive. …
- Right-click the TransMac app and select the Run as administrator option.
- Click the Run button. …
- Right-click the USB flash drive and select the “Format Disk for Mac” option from the left pane.
Why can’t i create bootable USB Mac?
Unmount ISO Image File
Boot Camp could not generate a bootable USB drive is a common issue when installing Windows on a Mac system. You can unmount the ISO file to resolve this and other issues connected with the USB. To eject the ISO file is very easy: Right-click on the needed ISO image file.
How to format bootable USB Mac terminal?
Method 2. Format USB to FAT32 on Mac with Terminal Command Line
- Connect the USB flash drive to your Mac computer.
- Hit cmd + space to run Spotlight, type: terminal, and hit Enter.
- Type: diskutil list and find out which disk is your USB drive.
- Type: sudo diskutil eraseDisk FAT32 MBRFormat /dev/disk2.
How do I know if my Mac hard drive is failing?
You can check the health of many disks using Disk Utility. Many disks include Self-Monitoring, Analysis, and Reporting Technology (S.M.A.R.T) hardware, which lets a disk test itself for potential problems. On your Mac, open Disk Utility in the Utilities folder in Applications. Select the disk you want to check.
What causes a Mac hard drive to fail?
Electrical damage – Power surges or the discharge of static electricity can cause a drive failure. Moisture or humidity – Exposing an HDD or SSD to extremely high humidity or moisture can destroy the drive. Excessive heat – Heat can cause your drive to fail.
Why can’t I see my USB drive on my Mac?
Check the power, port, and cable connections: Make sure the USB device is turned on and its cables are properly connected. If your computer has more than one USB port , switch the device’s cable to another port. If you still can’t use the device, contact the manufacturer for more information.
Can you repair a Mac hard drive?
Disk Utility is a built-in Mac repair tool. It can scan the hard drive and fix most drive errors related to the formatting and directory structure. This program can also fix particular disk errors like when multiple apps quit unexpectedly, external devices fail to work, or your Mac won’t boot up.
How do I bypass a corrupted hard drive?
Methods to Fix Corrupted Hard Drive
- Go to Computer/This PC >> Select Hard Drive >> Choose Properties.
- Select Tools >> Error checking >> Check now >> Check local disk >> Start.
- Shut down all open and running programs >> wait for the system to check upon the next boot >> restart the PC.
Мы имеем дело с двумя разными проблемами.
Для создания загрузочного USB вам понадобится пакет Mavericks Installer из Apple Store, 5,5-гигабайтный файл, сохраненный на MBA-, но не запущенный.
Я использовал этот процесс для создания загрузочного USB:
Загрузочный USB
Отформатируйте его с помощью Disk Utility как диск Mac OS Extended (Journaled) с именем Mavericks.
Это можно сделать на вкладке «Стереть» в приложении; убедитесь, что на USB-накопителе нет нескольких разделов (такое может случиться, поэтому перейдите на вкладку «Разделы», чтобы проверить и исправить это).
Откройте Терминал.
Стирание диска: 0%… 10%… 20%… 30%…100%…
Копирование файлов программы установки на диск… (эта часть может занять 30 минут)
Копирование завершено.
Создание загрузочного диска…
Копирование загрузочных файлов…
Копирование завершено.
Готово.
Если проблемы повторяются, приобретите другой USB-накопитель емкостью не менее 8 Гб (без разделов).
- Вторая проблема:
Восстановление жесткого диска:
Если MBP загружается в режиме восстановления с помощью cmd-r, следуйте этому процессу для восстановления установки ОС, или используйте Disk Utility для проверки/восстановления диска.
Вы можете открыть терминал и использовать команду fsck -fy для проверки и восстановления диска.
Если проблема незначительна, вы можете запустить систему в безопасном режиме, который исправит некоторые незначительные проблемы.