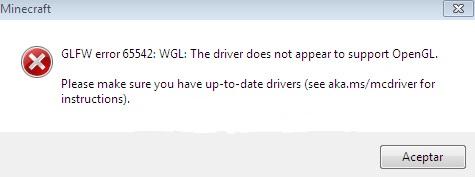
This error often occurs for owners of new hardware or after reinstalling Windows. Below are the main methods to resolve the issue. They are presented as logical steps that follow one another. If the previous method doesn’t help, you should move on to the next one.
Method 1: Installing New Java
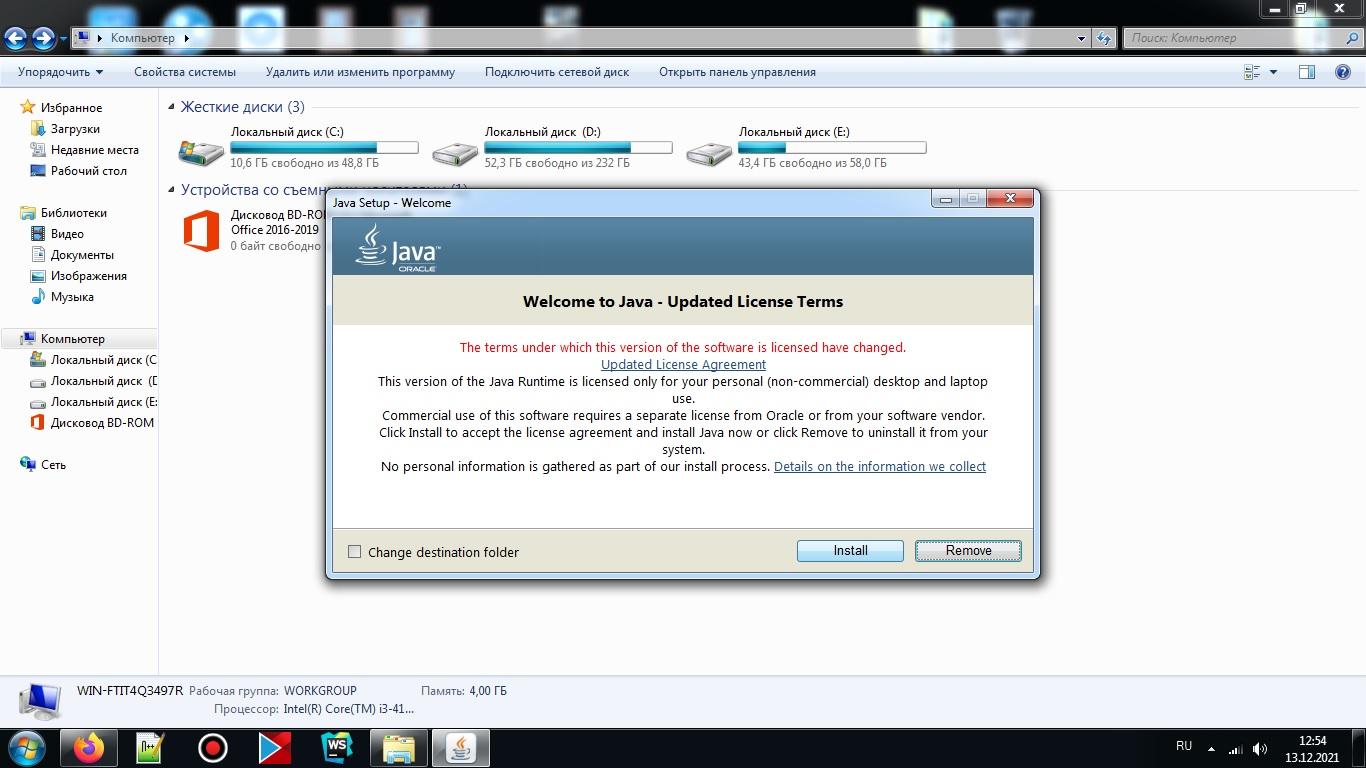
One of the possible solutions to the problem. You should go to the official Java website (https://www.oracle.com/java/technologies/downloads/). There, you need to download the latest available version. The main thing is that it should be at least Java 16, as this is the version supported by the game starting from 1.17. Download the file and follow the installer’s instructions. Done! The new Java is installed.
Method 2: Manually Adding OpenGL.dll File
Usually, there are no problems when installing Java files, as the installer automatically installs opengl32.dll or opengl64.dll. However, in Windows 10, Java installers often skip this step in the installation process. It is the absence of this file in the Java directory that causes the error.
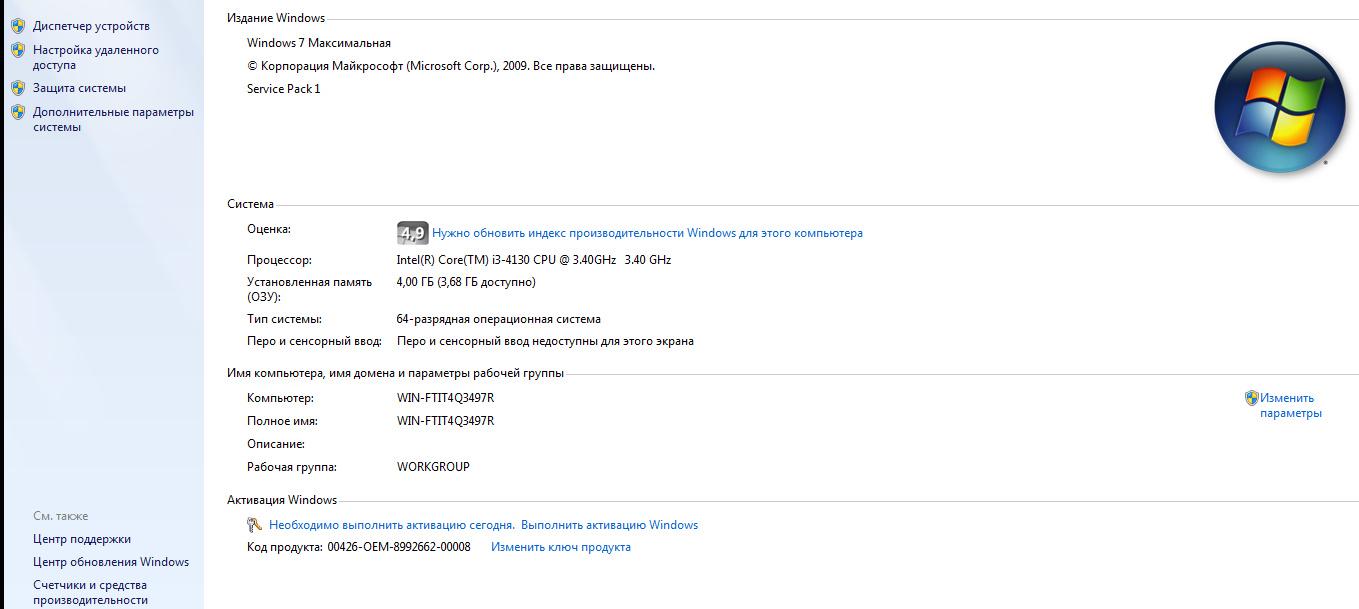
Step 1: Go to the website https://ru.dll-files.com/opengl32.dll.html. Download the file suitable for your operating system’s architecture (64-bit or 32-bit). To find out which architecture is used on your computer, right-click on «My Computer» on the desktop, select properties. The «System type» will be displayed there. Download a file with the same architecture as your OS.
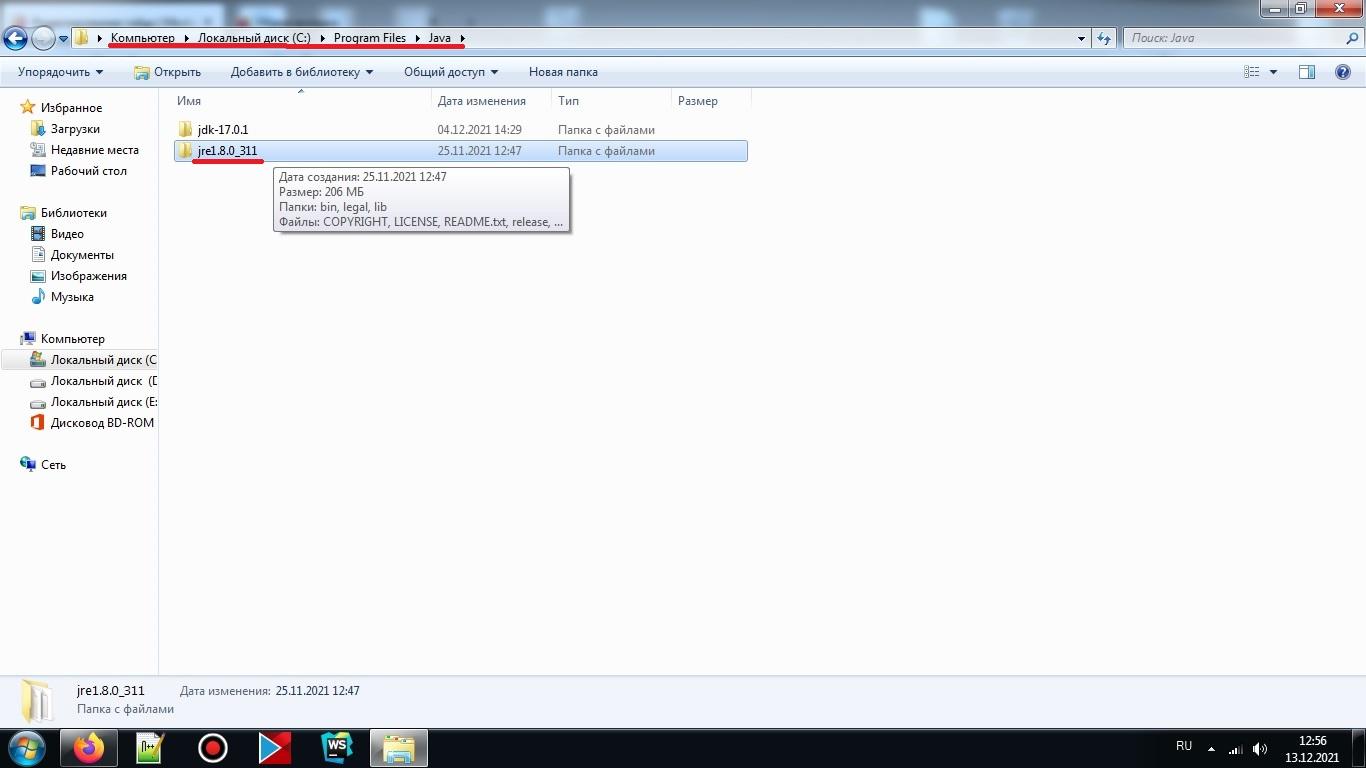
Step 2: Locate the «bin» folder in Java\JRE\bin. If Java is installed by default, the path will be as follows:
«C:\Program files\Java\jre\bin\»
Copy the opengl64.dll (or opengl32.dll) file into the «bin» directory. If prompted to provide administrator access, agree.
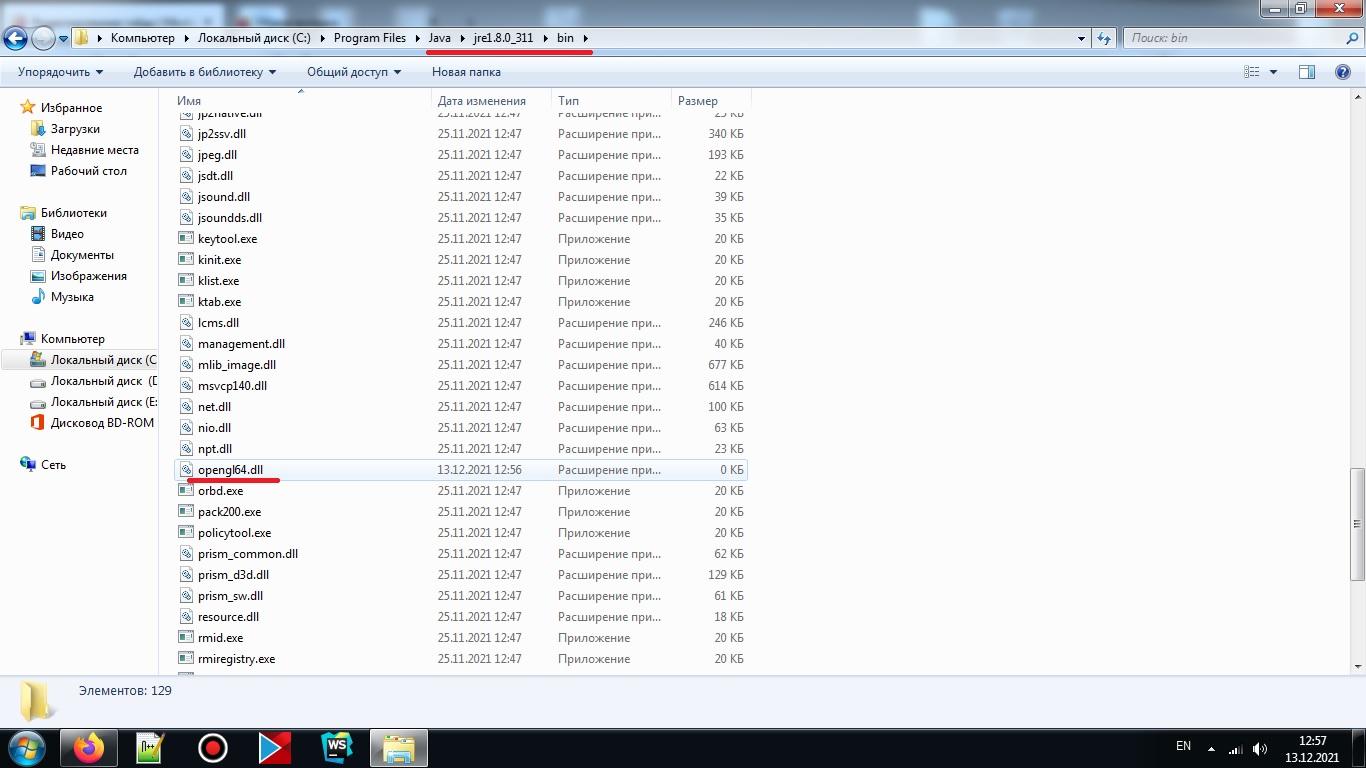
Step 3: Launch Minecraft again. If the problem persists, then proceed to the next method.
Method 3: Removing DisplayLink (selectively)
The DisplayLink driver (if you are using it) sometimes conflicts with certain Java files. However, it can be safely removed.
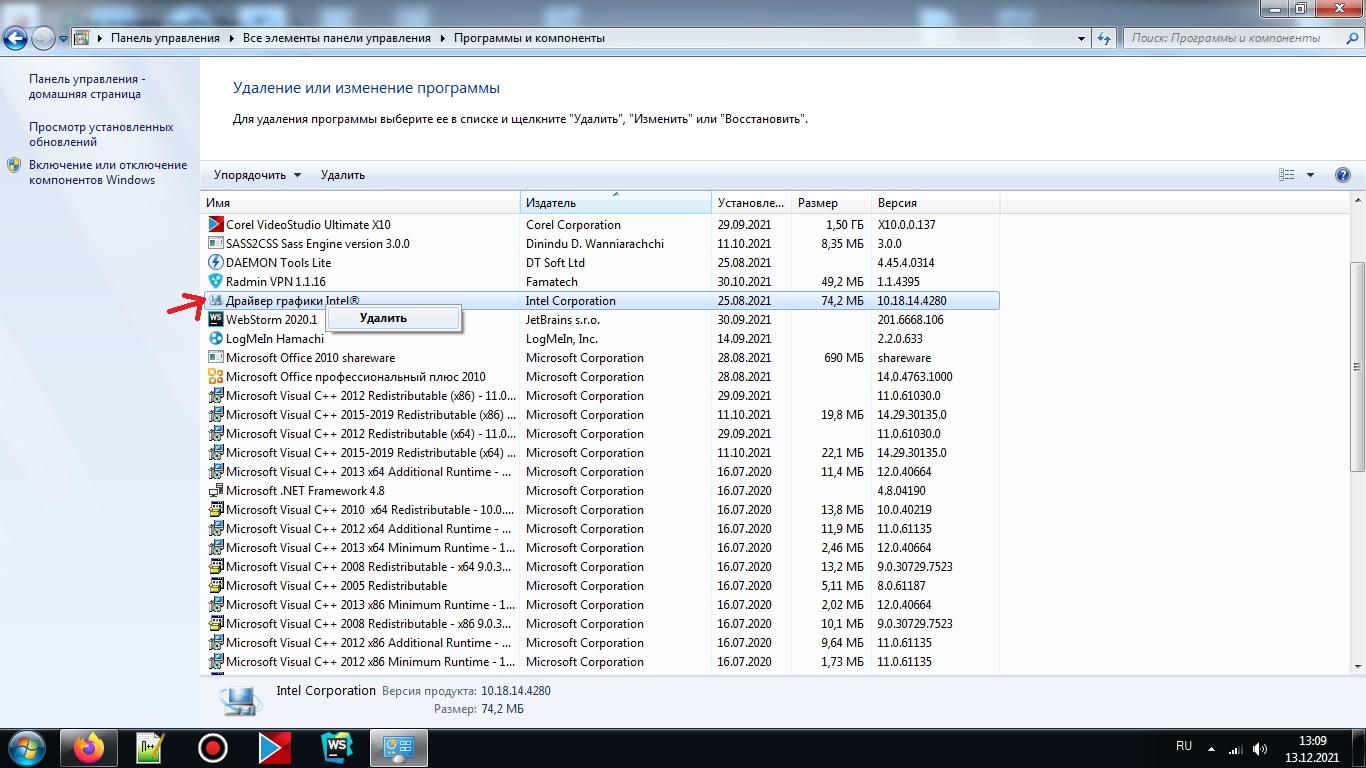
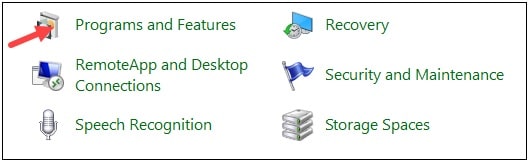
Step 1: Go to «Programs and Features». You can access it through the «Start» menu, «Control Panel,» and find the appropriate icon there. Alternatively, you can press «Win + R» and enter appwiz.cpl in the «Run» window.
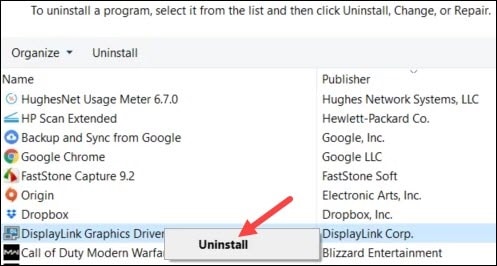
Step 2: Find DisplayLink Graphics Driver in the list. Remove it.
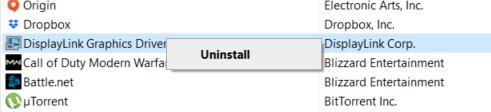
Step 3: After the removal is complete, restart your computer. Open Minecraft and check if the issue has been resolved.
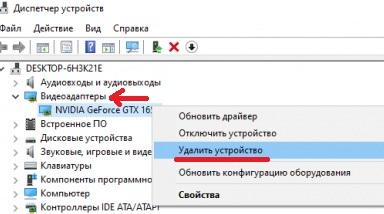
Method 4: Reinstalling Video Card Drivers
The problem may lie with outdated drivers for your device. They may simply not understand how to interact with OpenGL.
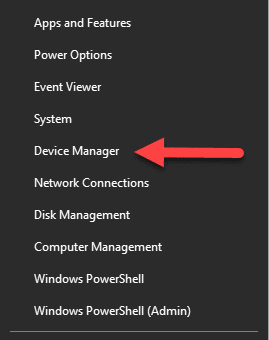
Step 1: Press «Win + R». The «Run» window appears. Enter devmgmt.msc and go to «Device Manager.»
Step 2: Find «Display adapters» or «Video adapters.» Remove all the drivers from there. WARNING! The screen may become dim, flicker, or glitch. These are all normal phenomena as the system returns to its default drivers.
Step 3: Next, go to «Programs and Features.» To do this, select this file in the Start menu > Control Panel. Or press «Win + R» and enter appwiz.cpl, as in the previous method.
Step 4: Important note: everyone has different hardware, including graphics cards. Therefore, you need to independently find components of specific equipment. Usually, these are Nvidia, AMD, or Intel graphics cards. The last two are integrated. On certain computers, there may be both integrated and discrete graphics cards. There are also USB graphics cards, but they are not used for games.
Therefore, you need to find + delete ALL files related to the GPU (graphics card). It is important not to touch other components and utilities.
Step 5: Restart your computer. After the restart, go to the hardware manufacturer’s website and download new drivers for your graphics card. For example, links to the websites of the three mentioned companies are provided below.
Nvidia: https://www.nvidia.com/Downloa…
Intel: https://www.intel.com/content/…
AMD: https://www.amd.com/en/support
Step 6: Install the drivers for your graphics card. Restart your computer. Open Minecraft again and check.
Method 5: Hardware Replacement
If all the subsequent methods have been followed correctly and have not produced any results, then the graphics card should be replaced. Most likely, the hardware is outdated and does not support the new version of Minecraft. However, this method does not apply to those who had the game working fine before reinstalling the system.
Nevertheless, it is worth double-checking the correctness of the previous methods. Especially if the GLFW error 65543/65542 has not disappeared. Additionally, you can change the game launcher as the problem may sometimes be hidden in it. In any case, the problem can be resolved. The main thing is to find the root cause: drivers, hardware, or the absence of the opengl.dll file.
Данная ошибка часто возникает у обладателей нового железа или же после переустановки Windows. Ниже рассмотрены основные способы для устранения проблемы. Они представлены в виде логичных шагов, которые идут друг за другом. Если предыдущий способ не помог, то следует переходить к следующему.
Способ 1: Установка новой Java
Одно из возможных решений проблемы. Следует перейти на официальный сайт Jav’ы (https://www.oracle.com/java/technologies/downloads/). Далее, там же нужно скачать новейшую доступную версию. Главное, чтобы она была не меньше Java 16 – ведь именно такая версия начинает поддерживаться игрой, начиная с 1.17. Скачиваем, следуем инструкциям инталлятора. Готово! Новая Java установлена.
Способ 2: Добавление OpenGL.dll вручную
Обычно при установке Java-файлов проблем не возникает. Ведь инсталлятор сам автоматически устанавливает opengl32.dll или opengl64.dll. Тем не менее, чаще всего в Windows 10, Java-установщики бывают пропускают этот шаг в установке. Именно отсутствие этого файла в директории Jav’ы вызывает ошибку.
Шаг 1: Переходим на сайт https://ru.dll-files.com/opengl32.dll.html . Качаем файл, подходящий архитектуре нашей операционной системы (64-х или 32-х битная). Чтобы узнать какая стоит на определенном компьютере: нужно на рабочем столе нажать ПКМ (Правой Кнопкой Мыши) на “Мой Компьютер”, затем выбрать свойства. Там будет виден “Тип системы”. Качаем файл такой же архитектуры, как и ОС.
Шаг 2: Находим папку “bin” в JavaJREbin . Если Java установлена по умолчанию, то путь будет следующим:
“C:Program filesJavajrebin”
Вставляем в директорию “bin” файл opengl64.dll (или opengl32.dll). Если предлагают предоставить доступ администратору, соглашаемся.
Шаг 3: Вновь запускаем Minecraft. Если проблема не устранена, тогда переходим к следующему методу.
Способ 3: Удаление DisplayLink (выборочно)
Драйвер DisplayLink (если у вас используется именно он) иногда конфликтует с некоторыми Java-файлами. При этом его можно безбоязненно удалить.
Шаг 1: Переходим в “Программы и компоненты”. Для этого можно зайти в “Пуске” в “Панель управления” и там найти нужную нам иконку. Или же можно нажать “Win + R”. Затем, вписать в окно “Выполнить” значение appwiz.cpl .
Шаг 2: Находим в списке DisplayLink Graphics Driver. Удаляем его.
Шаг 3: После завершения удаления перезагружаем компьютер. Открываем Minecraft. Проверяем устранение проблемы.
Способ 4: Переустановка драйверов видеокарты
Проблема может заключаться в слишком старых драйверах для вашего устройства. Они просто могут не понимать: каким образом взаимодействовать с OpenGL.
Шаг 1: Нажимаем “Win + R”. Появляется окно “Выполнить”. Вводим в него devmgmt.msc и переходим на “Диспетчер устройств”.
Шаг 2: Находим “Display adapters” или же “Видеоадаптеры”. Удаляем все драйвера оттуда. ВНИМАНИЕ! Экран может тускнеть, мерцать, глючить. Это все нормальные явления, ведь система возвращается к собственным драйверам по умолчанию.
Шаг 3: Далее заходим в “Программы и компоненты” . Для этого выбираем этот файл в Пуск > Панель управления. Или же нажимаем “Win + R” и вписываем appwiz.cpl , как в прошлом способе.
Шаг 4: Важный момент: у каждого разное железо, в том числе видеокарты. Поэтому необходимо самостоятельно найти компоненты определенного оборудования. Обычно это видеокарты Nvidia, AMD или Intel. Последние две являются встроенными. На определенных компьютерах могут быть сразу как встроенные видеокарты, так и дискретные. Есть еще USB-видеокарты, но для игр они не используются.
Поэтому необходимо найти + удалить ВСЕ файлы, связанные с GPU (видеокартой). При этом: важно не задеть остальные компоненты и утилиты.
Шаг 5: Перезагружаем компьютер. После перезагрузки переходим на сайт производителя оборудования и скачиваем новые драйвера для своей видеокарты. Например: внизу оставлены ссылки на сайты 3-ех уже упомянутых компаний.
Nvidia: https://www.nvidia.com/Downloa…
Intel: https://www.intel.com/content/…
AMD: https://www.amd.com/en/support
Шаг 6: Устанавливаем драйвера для своей видеокарты. Перезагружаем компьютер. Вновь заходим в Minecraft и проверяем.
Способ 5: Замена железа
Если все последующие способы были выполнены правильно и не дали никакого результата, то следует заменить видеокарту. Скорее всего, железо устарело и не поддерживает новую версию Minecraft. Правда, этот способ не касается тех людей, у которых до переустановки системы игра работала нормально.
Тем не менее, стоит еще раз убедиться в правильности предыдущих способов. Особенно, если GLFW error 65543/65542 так и не исчезла. Дополнительно можно поменять игровой лаунчер, ибо проблема порой может скрываться в нем. В любом случае проблему можно устранить. Главное – найти корень проблемы: драйвера, железо или же отсутствие файла opengl.dll .
Содержание
- Minecraft glfw error 65542 wgl как исправить
- Как устранить ошибку GLFW error 65543/65542 в Minecraft
- Способ 1: Установка новой Java
- Способ 2: Добавление OpenGL.dll вручную
- Способ 3: Удаление DisplayLink (выборочно )
- Способ 4: Переустановка драйверов видеокарты
- Способ 5: Замена железа
- Как исправить «ошибку GLFW 65542: драйвер WGL не поддерживает OpenGL» в Minecraft
- Копирование библиотеки OpenGL.DLL в папку Java
- Переустановка драйвера видеокарты
- Удаление DisplayLink
- GLFW error 65542 WGL: Драйвер не поддерживает OpenGL
- Как исправить ошибку OpenGL GLFW 65542 в Windows 11/10
- 1. Правильно обновить видеодрайвер
- 2. Удалить DisplayLink
- 3. Скачать оригинальный OpenGL32.dll, DirectX и Java
- 4. Отключить встроенную видеокарту
- 5. Попробуйте другую версию Minecraft
- GLFW error 65542: WGL the driver does not appear to support OpenGL — что делать?
- Суть ошибки «GLFW error 65542: WGL the driver does not appear to support OpenGL»
- Что делать для замены библиотеки opengl32.dll
- Обновление драйверов для видеокарты при ошибке с кодом 65542
- Установка новой версии Java, если возникают проблемы с OpenGL
- Заключение
Minecraft glfw error 65542 wgl как исправить
31 категория с 45 модификацией для Minecraft
Данная ошибка часто возникает у обладателей нового железа или же после переустановки Windows. Ниже рассмотрены основные способы для устранения проблемы. Они представлены в виде логичных шагов, которые идут друг за другом. Если предыдущий способ не помог, то следует переходить к следующему.
Способ 1: Установка новой Java
Одно из возможных решений проблемы. Следует перейти на официальный сайт Jav’ы (https://www.oracle.com/java/technologies/downloads/). Далее, там же нужно скачать новейшую доступную версию. Главное, чтобы она была не меньше Java 16 – ведь именно такая версия начинает поддерживаться игрой, начиная с 1.17. Скачиваем, следуем инструкциям инталлятора. Готово! Новая Java установлена.
Способ 2: Добавление OpenGL.dll вручную
Обычно при установке Java-файлов проблем не возникает. Ведь инсталлятор сам автоматически устанавливает opengl32.dll или opengl64.dll. Тем не менее, чаще всего в Windows 10, Java-установщики бывают пропускают этот шаг в установке. Именно отсутствие этого файла в директории Jav’ы вызывает ошибку.
Шаг 1: Переходим на сайт https://ru.dll-files.com/opengl32.dll.html . Качаем файл, подходящий архитектуре нашей операционной системы (64-х или 32-х битная). Чтобы узнать какая стоит на определенном компьютере: нужно на рабочем столе нажать ПКМ (Правой Кнопкой Мыши) на “Мой Компьютер”, затем выбрать свойства. Там будет виден “Тип системы”. Качаем файл такой же архитектуры, как и ОС.
Шаг 2: Находим папку “bin” в JavaJREbin . Если Java установлена по умолчанию, то путь будет следующим:
Вставляем в директорию “bin” файл opengl64.dll (или opengl32.dll). Если предлагают предоставить доступ администратору, соглашаемся.
Шаг 3: Вновь запускаем Minecraft. Если проблема не устранена, тогда переходим к следующему методу.
Способ 3: Удаление DisplayLink (выборочно )
Драйвер DisplayLink (если у вас используется именно он) иногда конфликтует с некоторыми Java-файлами. При этом его можно безбоязненно удалить.
Шаг 1: Переходим в “Программы и компоненты”. Для этого можно зайти в “Пуске” в “Панель управления” и там найти нужную нам иконку. Или же можно нажать “Win + R”. Затем, вписать в окно “Выполнить” значение appwiz.cpl .
Шаг 2: Находим в списке DisplayLink Graphics Driver. Удаляем его.
Шаг 3: После завершения удаления перезагружаем компьютер. Открываем Minecraft. Проверяем устранение проблемы.
Способ 4: Переустановка драйверов видеокарты
Проблема может заключаться в слишком старых драйверах для вашего устройства. Они просто могут не понимать: каким образом взаимодействовать с OpenGL.
Шаг 1: Нажимаем “Win + R”. Появляется окно “Выполнить”. Вводим в него devmgmt.msc и переходим на “Диспетчер устройств”.
Шаг 2: Находим “Display adapters” или же “Видеоадаптеры”. Удаляем все драйвера оттуда. ВНИМАНИЕ! Экран может тускнеть, мерцать, глючить. Это все нормальные явления, ведь система возвращается к собственным драйверам по умолчанию.
Шаг 3: Далее заходим в “Программы и компоненты” . Для этого выбираем этот файл в Пуск > Панель управления. Или же нажимаем “Win + R” и вписываем appwiz.cpl , как в прошлом способе.
Шаг 4: Важный момент: у каждого разное железо, в том числе видеокарты. Поэтому необходимо самостоятельно найти компоненты определенного оборудования. Обычно это видеокарты Nvidia, AMD или Intel. Последние две являются встроенными. На определенных компьютерах могут быть сразу как встроенные видеокарты, так и дискретные. Есть еще USB-видеокарты, но для игр они не используются.
Поэтому необходимо найти + удалить ВСЕ файлы, связанные с GPU (видеокартой). При этом: важно не задеть остальные компоненты и утилиты.
Шаг 5: Перезагружаем компьютер. После перезагрузки переходим на сайт производителя оборудования и скачиваем новые драйвера для своей видеокарты. Например: внизу оставлены ссылки на сайты 3-ех уже упомянутых компаний.
Шаг 6: Устанавливаем драйвера для своей видеокарты. Перезагружаем компьютер. Вновь заходим в Minecraft и проверяем.
Способ 5: Замена железа
Если все последующие способы были выполнены правильно и не дали никакого результата, то следует заменить видеокарту. Скорее всего, железо устарело и не поддерживает новую версию Minecraft. Правда, этот способ не касается тех людей, у которых до переустановки системы игра работала нормально.
Источник
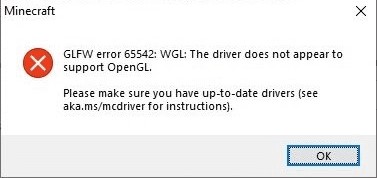
Как исправить «ошибку GLFW 65542: драйвер WGL не поддерживает OpenGL» в Minecraft
После установки игры Minecraft многим не удалось запустить ее из-за ошибки «Ошибка GLFW 65542: драйвер WGL не поддерживает OpenGL». Как указано в сообщении, драйвер не поддерживает OpenGL, в результате интерфейса WGL не может выполнить привязку Java-скрипта к этому стандарту. Узнаем подробнее, что нужно сделать для ее исправления.
Во многих случаях исправить код« glfw 65542 »путем копирования библиотеки ошибки opengl32.dll в каталог Java. Если этот способ не работает или не хотите вручную модифицировать каталог, попробуйте переустановить драйвер видеокарты, в ходе которого также будет заменен файл opengl32.dll. Кроме того, если столкнулись с этой проблемой в Java-версии Minecraft, скорее всего, возник конфликт с программой DisplayLink. В этом случае проблема решается удалением конфликтующего драйвера.
Копирование библиотеки OpenGL.DLL в папку Java
В состав драйвера графического процессора должны входить все требуемые библиотеки динамической компоновки, но это не всегда так. Кроме того, файл opengl32.dll или opengl64.dll может быть отправлен в карантин антивирусом при установке Майнкрафт, что в конечном итоге приводит к ошибке GLFW 65542.
Попытайтесь вручную скопировать недостающую библиотеку DLL в папку Java, Чтобы Minecraft смог использовать стандартный OpenGL.
Перейдите по ссылке (установлен на рисунке) и загрузите архив Minecraft_OpenGL.zip.
Извлеките его содержимое в удобное место с помощью архиватора 7zip. Щелкните правой кнопкой мыши на файл, совместимый с разрядностью установленной версии Windows, скопируйте его.
Если не знаете разрядность ОС, откройте Проводник нажатием на Win + E, откройте Проводник нажатием на Win + E, правым щелчком мыши на «Этот компьютер» »Откройте контекстное меню и выберите свойства. Искомая информация указана в строке типа системы.
Затем вставьте файл opengl32.dll, который скопировали в буфер обмена:
C: Program Files ( x86) Java * версия JRE * bin
После копирования (замены) файла запустите Minecraft и проверьте, прерывается ли ее запуск ошибкой GLFW error 65542.
Переустановка драйвера видеокарты
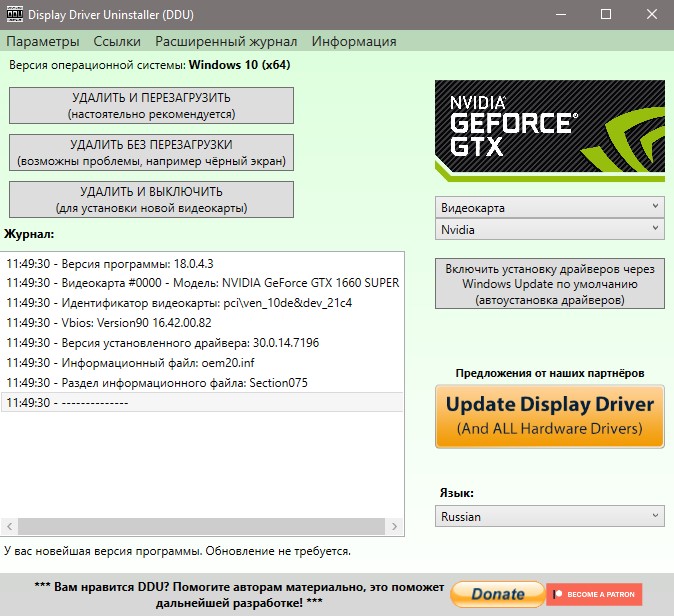
Возможно, не запущен драйвер Minecraft по той причине, что устаревшие драйверы видеокарты, которые не поддерживаются графическим стандартом OpenGL. Известны случаи, когда при сканировании компьютера на наличие вредоносных программ, антивирус отправляет некоторые файлы Также карантин, требующийся для запуска OpenGL, что приводит к ошибке GLFW 65542.
Для удаления графических драйверов предпочтительнее использовать программу DDU. Загрузите утилиту с официального сайта, ссылка на который указана на рисунке.
Затем перезагрузите компьютер в безопасном режиме. Если вы используете Windows 10, откройте меню Пуск и нажмите кнопку Питания. Затем удерживая Shift, щелкните кнопку «Перезагрузка». При отображении окна выбора действия, по пути: Поиск и устранение неисправностей — Дополнительные параметры. В среде восстановления щелкните Параметры загрузки и F4 для перезагрузки компьютера в безопасный режим.
После запустите утилиту DDU и укажите графический процессор. Для очистки драйверов щелкните кнопку «Удалить и перезагрузить».
После завершения операции загрузите последнюю версию программного обеспечения из сайта AMD, NVIDIA или Intel в соответствии с установленной видеокартой.
Запустите загруженный файл и следуйте инструкциям до завершения установки. После перезагрузки ПК запуск Майнкрафт не должен прерываться ошибкой «Ошибка GLFW 65542: драйвер WGL не поддерживает OpenGL».
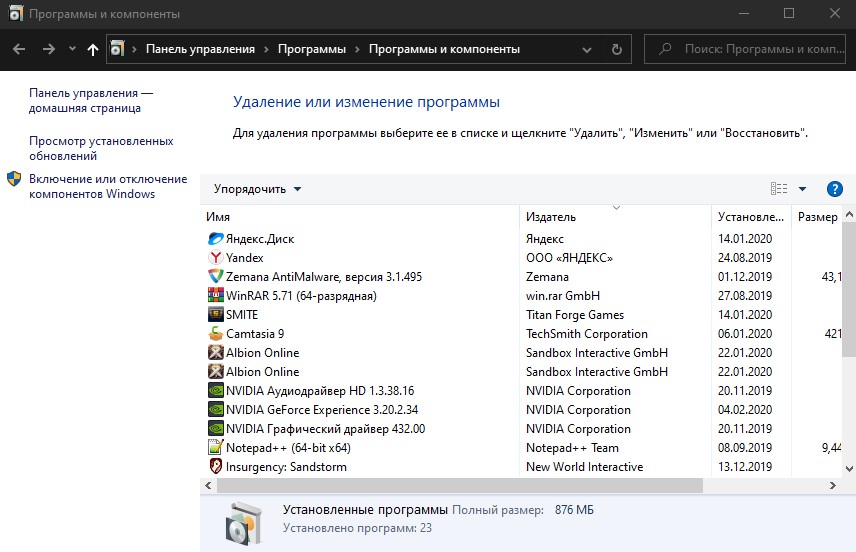
Удаление DisplayLink
Если используется технология DisplayLink, предназначенная для подключения дополнительных мониторов через USB, то, скорее всего, она вызывает конфликт с Java-версией Minecraft. Для исправления ошибок GLFW 65542 попробуйте удалить это программное обеспечение.
Разверните раздел «Программы и компоненты» командой appwiz.cpl, запущенной из окна Win + R.
В списке приложения DisplayLink Graphics Driver щелкните по нему правой кнопкой мыши и выберите пункт «Удалить». Следуйте инструкциям на экране, чтобы завершить этот процесс.
Перезагрузите ПК и посмотрите, прерывается запуск игры ошибкой GLFW 65542.
Источник
GLFW error 65542 WGL: Драйвер не поддерживает OpenGL
Ошибка GLFW error 65542 WGL: The driver does not appear to support OpenGL возникает при запуске лаунчера игры Micnecraft на ПК с Windows 11 и 10. Кроме того, с данной проблемой можно столкнуться и при запуске других игр и программ для видеомонтажа, 3D графики.
OpenGL (Open Graphics Library) — это кросс-платформенный API интерфейс программирования для обработки 2 и 3D графики, чтобы снизить нагрузку на систему.
Если касаясь самой игры Minecraft, то произошло в игре обновление шейдеров и ошибка возникает у пользователей, которые имеют встроенную видеокарту и данная видеокарта не поддерживает шейдеры. В этой ситуации вы ничего не сделайте, но можно переключиться на внешнюю видеокарту, если у вас их две. Кроме того, ошибка 65542 OpenGL может быть из-за повреждения графического драйвера.
Как исправить ошибку OpenGL GLFW 65542 в Windows 11/10
В данной инструкции разберем, как исправить ошибку «GLFW error 65542 WGL The driver does not appear to support OpenGL» при запуске таких игр как Minecraft в Windows 11/10.
1. Правильно обновить видеодрайвер
Исключим сразу две проблемы — это устаревшие графические драйвера и поврежденные. По этой причине, нужно следовать поэтапно для правильного обновления GPU драйверов. Обратитесь ниже к полным руководствам.
2. Удалить DisplayLink
Если у вас установлен драйвер DisplayLink USB Graphics, то было установлено на форуме игры, что данное ПО конфликтует с Minecraft Java. Сам DisplayLink нужен для подключения нескольких мониторов.
- Откройте удаление программ
- Удалите DisplayLink, если он есть в списке
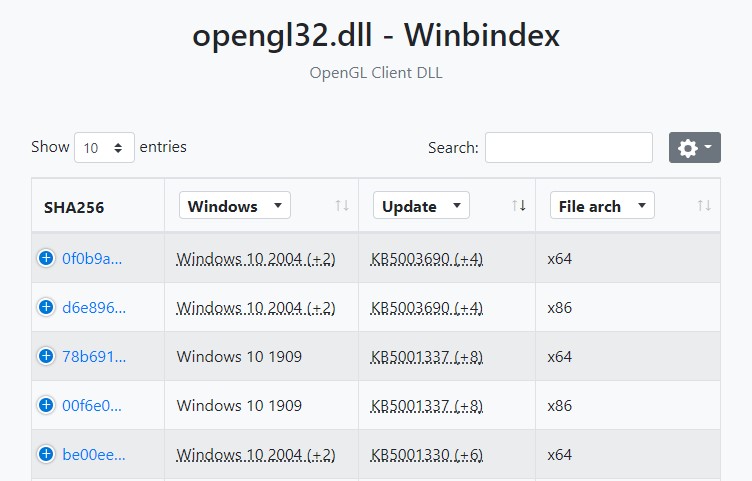
3. Скачать оригинальный OpenGL32.dll, DirectX и Java
Скачайте оригинальный файл OpenGL32.dll через winbindex и скопируйте его к себе по пути:
! Если не помогла вставка файла OpenGL32.dll, то обновите DirectX и Java
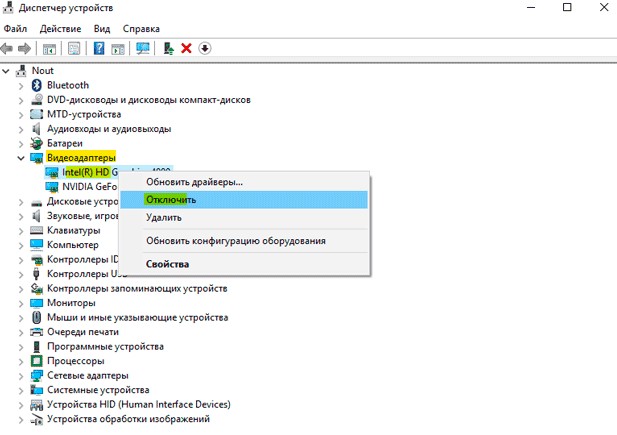
4. Отключить встроенную видеокарту
Если у вас две видеокарты на ноутбуке или компьютере, то стоит отключить работу встроенной видеокарты, так как шейдеры могут быть не поддерживать в ней, и включить работу внешней карты.
- Нажмите Win+X и выберите Диспетчер устройств
- Разверните гафу Видеоадаптеры
- Нажмите правой кнопкой мыши по встроенной видеокарте
- Выберите Отключить и перезагрузитесь
5. Попробуйте другую версию Minecraft
Если ни один выше способ не помог, то можно понизить версию Minecraft в TL Launcher .
Источник
GLFW error 65542: WGL the driver does not appear to support OpenGL — что делать?
При запуске популярной игры «Minecraft» игра может внезапно прерваться сообщением «GLFW error 65542: WGL the driver does not appear to support OpenGL» , и не понятно, что с этим делать. Причиной возникшей проблемы могут являться устаревшие драйвера видеокарты, в полной мере не поддерживающие функционал спецификации OpenGL. Ниже рассмотрим сущность ошибки, а также обозначим эффективные пути её решения.
Суть ошибки «GLFW error 65542: WGL the driver does not appear to support OpenGL»
Как следует из данного сообщения, появление ошибки 65542 связано с отсутствием поддержки драйвером WGL работы технологии OpenGL. Указанная технология задействуется при выводе различных вариантов 3D графики, активно используемой в игре «Minecraft».
GLFW error может возникнуть по следующим причинам:
- На пользовательском ПК установлены устаревшие драйвера;
Давайте рассмотрим способы, позволяющие исправить проблему с уведомлением «WGL the driver does not appear» на вашем ПК.
Что делать для замены библиотеки opengl32.dll
Эффективным способом устранить ошибку 65542 является замена dll-библиотеки opengl32.dll на модифицированную.
Процедура замены состоит в следующем:
- Закройте ваш « TLauncher »;
Затем подтвердите наложения файлов. Останется запустить игру и наслаждаться геймплеем Minecraft. Это должно помочь устранить ошибку «GLFW error 65542: WGL the driver does not appear to support OpenGL».
Обновление драйверов для видеокарты при ошибке с кодом 65542
Ещё одним способом, позволяющим избавиться от ошибки «GLFW error 65542» является обновление драйверов до самой актуальной версии продукта.
Алгоритм реализации выглядит следующим образом:
- Нажмите на Win+R;
- Введите в открывшемся окне команду devmgmt.msc и нажмите на Энтер;
Также для установки самых актуальных драйверов рекомендуем посетить сайт производителя вашей видеокарты. Найдите и загрузите оттуда самые актуальные драйвера для вашей карты.
Кроме того могут помочь полуавтоматические инструменты для установки драйверов «DriverPack Solution», «Driver Booster Free» и другие аналоги.
Установка новой версии Java, если возникают проблемы с OpenGL
Также мы рекомендуем обновить версию Java, установленную на вашем ПК. Свежую версию программы можно загрузить с java.com/ru/download/. После установки перезагрузите ПК и вновь запустите ваш Майнкрафт.
Заключение
Выше мы рассмотрели, почему возникает ошибка «GLFW error 65542: WGL the driver does not appear to support OpenGL» и что же именно нужно сделать для её исправления. Наибольшую эффективность в устранении дисфункции показал способ с заменой файла opengl32.dll. Используйте данный способ для устранения проблемы, что позволит вам в полной мере насладиться увлекательным геймплеем игры «Minecraft».
Источник

Minecraft
Minecraft is a video game in which players create and break apart various kinds of blocks in three-dimensional worlds. The game’s two main modes are Survival and Creative. In Survival, players must find their own building supplies and food. They also interact with block like mobs, or moving creatures an on other hand the creative mode give you all material and supply to give creativity full chance to come out.
This is comes in the most popular games list.
How do I update my OpenGL driver?
On the official site of your processor or graphic card, navigate to the graphics driver and choose your operating system. Download the latest drivers for your graphics card and install it to your computer. This will also update the OpenGL on your computer.
How do I know if I have OpenGL compatibility?
You can check your opengl version from your intel graphics control panel. It should be under system information or something similar. Alternatively there are third party applications that you can find by googling ‘check opengl version’.
How can I fix OpenGL errors on Windows 10?
As we know that this is graphic card related error so just you have to update your graphic card driver.
But in most cases this doesn’t work at all to update your graphic card to fix OpenGL error.
So what to do, don’t worry there is a Manual way as well to solve OpenGL error.
Read below to know that.
How to Fix GLFW error 65443
Step 1. download the Fix File
It is the main step other steps cant be done without it so just be sure that you have downloaded the right fix file to sholve your GLFW error 65543.

Step 2. Extract the Fix file
Now extract the zip file using Winrar.
The second step is to extract the fix file to use it as manually.
To extract it use this password

Pass — Fix by Tech MatriX
Step 3. Identifying the right file for you

There will be 2 files one for 32 bit operating system and other for 64 bit operating system.
just select the file according to your operating system to perform further steps.
Step 4. Identify your OS bit
To identify your OS bit just open your my Computer or press win+E button.

Now right click in empty space and select properties and the next window will be open.
Here your can get most of your computer details.
Step 5. Copy the Fix file

After identifying the right bit file for your system just copy it from there.
just right click and select copy or can even cut if you want.
Step 6. Paste it to Root directory

Now paste the copied file to root directory bin folder of JAVA.
The bin folder of JAVA root direct commonly situated at
Computer > Local disc C > Program files > Java > jre(your java version) > bin
Enjoy the Game
𝙁𝙞𝙭 𝙈𝙞𝙣𝙚𝙘𝙧𝙖𝙛𝙩 𝙡𝙖𝙜
P
Finally the video is here.
Minecraft Lag fix in Java edition PC
Download the fix file here
SUBSCRIBE and LIKE to UNLOCK LINK
IF YOU AR FACING ANY PROBELM IN DOWNLOAD THEN WATCH THIS VIDEO
LAG FIX 🔥🔥🔥🔥🔥

Hope you liked this post if this post fixed your all error.
1. OpenGL 2.0 error
2. Lag fix.
So don’t forget to leave a subscribe on my YouTube channel.

FOLLOW THE INSTRUCTIONS BELOW
Update Graphics Card Driver
The OpenGL launch error can be caused by an outdated graphics driver, java issues, or when Minecraft cannot use the correct OpenGL files on startup.
First, open up your Windows Device Manager. On this window, expand your Display adaptors. If you have to use intel integrated graphics, right-click the processor and select Update Driver. Next, select Search automatically for drivers.
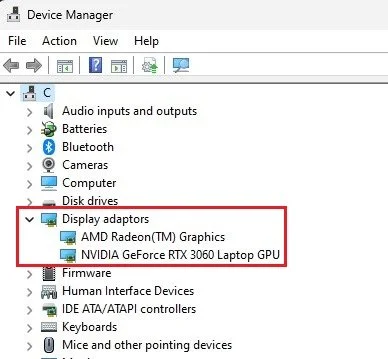
Device Manager > Display adaptors
If you are using an NVIDIA or AMD graphics card, I suggest using the GeForce Experience application for NVIDIA graphics card users and the AMD Radeon Software for AMD users. In the Drivers tab, click on Download. This will take a couple of minutes to download and automatically install the latest graphics driver to your system. After installing the driver, try to relaunch Minecraft, as this will fix the OpenGL error for most users.
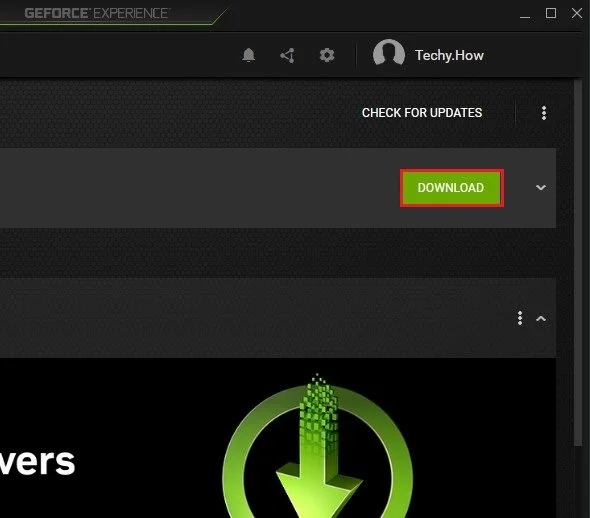
GeForce Experience > Drivers
Install or Update Java on Windows
If the problem persists, then this issue is probably related to your current Java version. Open up your preferred browser and navigate to java.com/en/download to get to this page. Click on Download Java, which will take a couple of seconds to download the latest Java version to your system.

Download Java
When the download is complete, double-click the downloaded .exe file and follow the Java setup to install the latest version to your system.
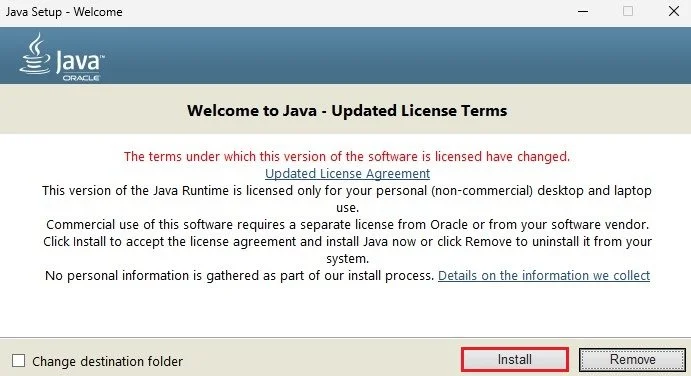
Java Setup > Install
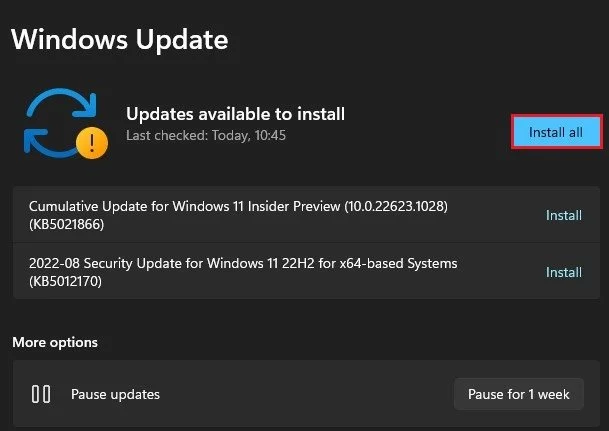
Windows Update
When this is done, open up your Windows settings. In the Windows Update section, click on Check for Updates and proceed to download the latest update before restarting your PC. Windows updates will install outdated drivers, which can help fix the OpenGL error you are getting.
Windows Settings > Windows Update
Replace OpenGL DLL File
Lastly, if nothing has helped you, you will have to replace the OpenGL file in your Minecraft installation. Navigate to DLL-Files.com and look up OpenGL32.dll. Here, you can download the latest version of the OpenGL Client. It might take a second for the download to start, and your browser can help you find your downloaded files.
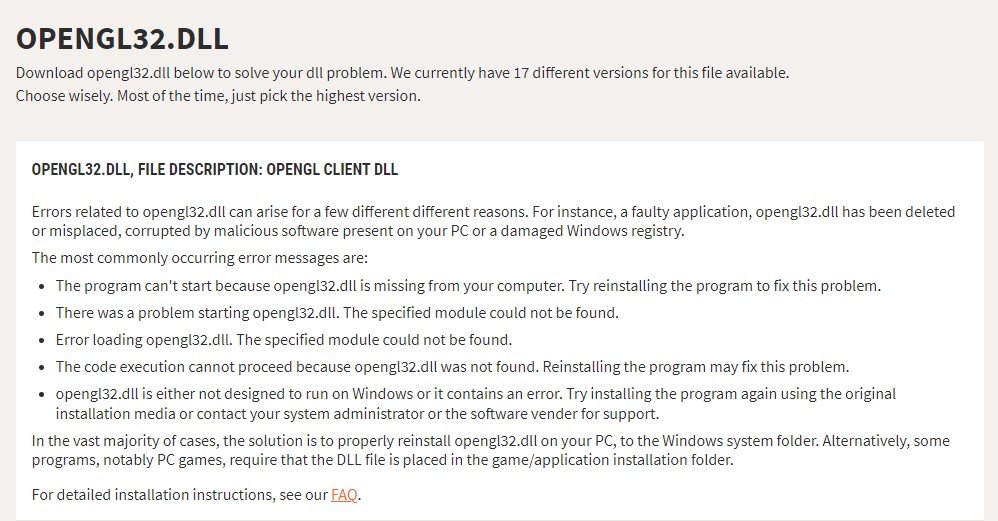
Download Missing OpenGL.dll File
Drag and drop the downloaded .zip file to your desktop. Here, right-click the file, select Extract All, and then unzip your download content to your desktop.
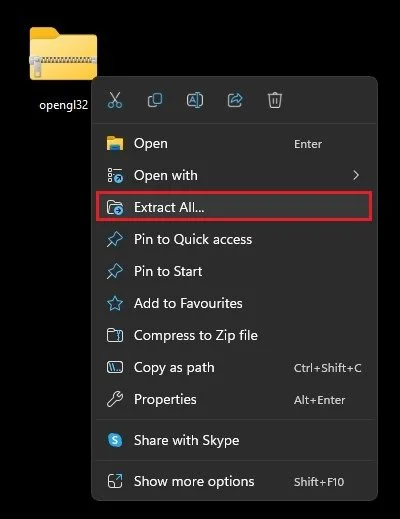
Unzip OpenGL32 File
Next, search for %AppData% and hit enter. Your file explorer will open up. Navigate to .minecraft and search for OpenGL in this folder. A list of OpenGL files and folders will show up. Right-click one of the OpenGL.dll files and select Open File Location.
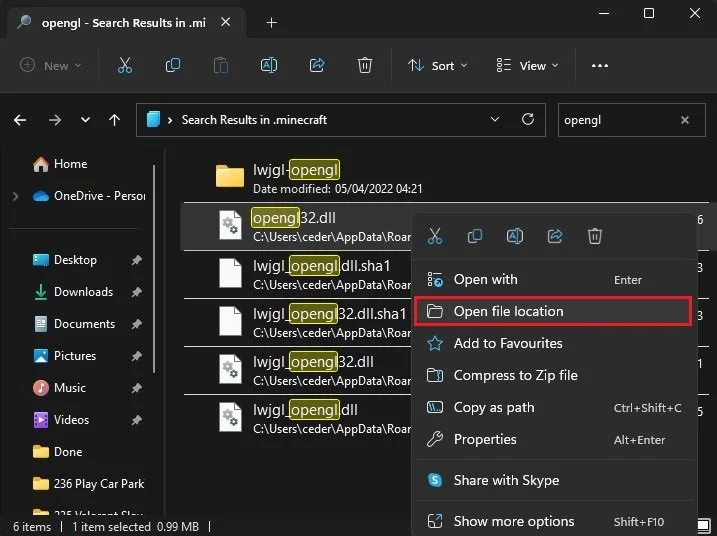
%AppData% > .minecraft > OpenGL
Finally, drag and drop the downloaded OpenGL.dll file into this folder. When done, you will be required to restart your PC before relaunching Minecraft, and the OpenGL error will be fixed.
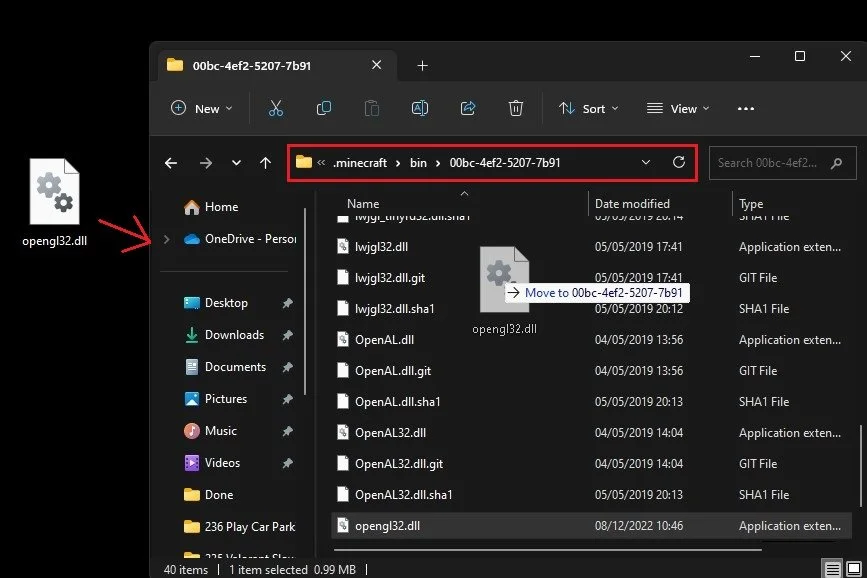
Replace OpenGL32.dll File
GLFW error 65543 on Minecraft mainly occurs while you attempt to launch the game.
Gamers having the Java version of the game are mostly reported to encounter this Minecraft OpenGL error.
So, if you are in the same boat, then read this article as here I am going to discuss the solutions to fix the error.
Follow the detailed guidelines provided below to fix GLFW error 65543 on Minecraft.
1) Uninstall DisplayLinkUSB Graphics Software
If you are a Display Link user, then you should uninstall it when you are getting GLFW error 6554 on Minecraft.
This happens when the DisplayLink driver conflicts with Minecraft.
Now follow the steps to uninstall Display Link USB Graphics software:
- Click on the Windows Start Menu and enter Control Panel in the search bar. Select the topmost option.
- Click on Programs and Features.
- Now scroll down the list of all your installed apps and select DisplayLink Graphics Driver.
- Right-click on it and from the context menu click on the Uninstall option.
- Follow the onscreen prompts to finish the uninstallation process.
- After that, restart your PC and check if you are getting the Minecraft error again.
Also read: What to do when there is no sound on Minecraft!
2) Update Your GPU Drivers
Outdated GPU drivers can also trigger Minecraft errors.
So, to maximize your gaming experience and avoid these kinds of problems, you should always keep your Graphics drivers updated.
Follow the steps to do so:
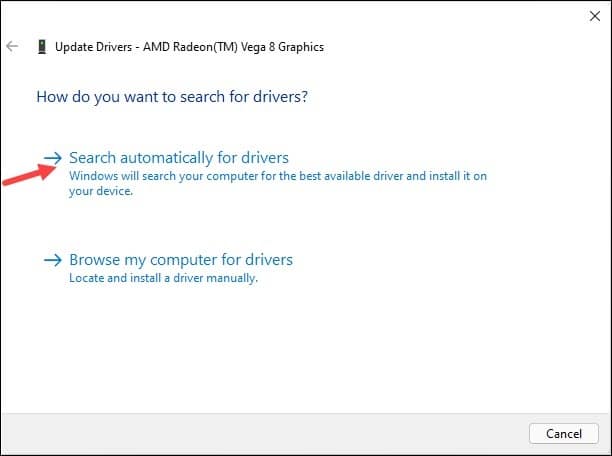
- Right-click on the Windows Start menu and select Device Manager from the option.
- Go to the Display Adapters section and expand it.
- Right-click on your graphics adapter and choose the Update driver option.
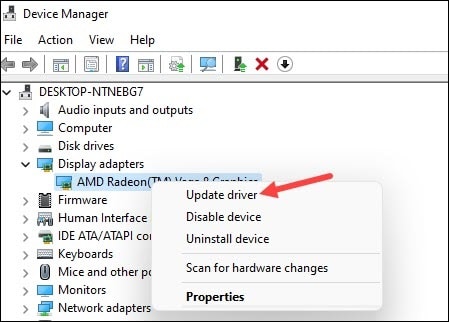
- Select Search automatically for the drivers option. Wait till Windows finish the updating process.
If after updating the graphics drivers, you are still getting GLFW error 65543 on Minecraft, move on to the next solution.
3) Update Windows
Outdated Windows versions can also trigger Minecraft OpenGL errors.
So, if you have not updated your windows for a long time, update them now.
To update your Windows follow the given steps:
- Click on the Windows Start button and select Settings. Click on Update & Security option.
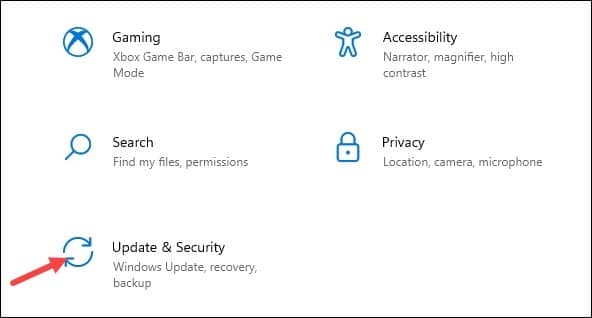
- Select Updates and click on Check for updates. If you find any available update then download it.
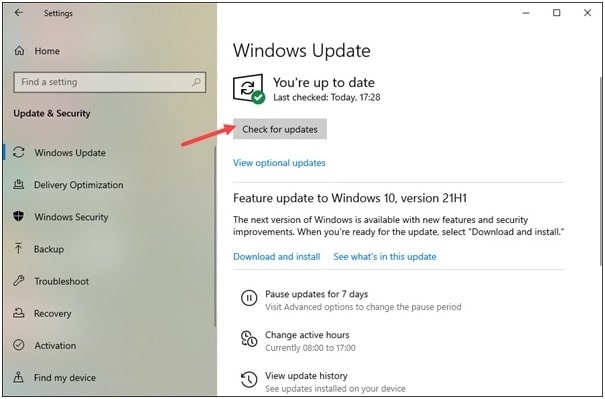
- Wait for some time and then launch Minecraft and see if this could solve the problem.
4) Reinstall Java
If you still cannot fix the Minecraft OpenGL error, then reinstall Java.
If the Java packages installed on your PC have compatibility issues, then you will get these kinds of errors on Minecraft.
So, reinstalling Java is a good option. Here is how to fix the OpenGL error in Minecraft by reinstalling Java:
- Open Windows Control Panel and click on the Programs and Features option.
- Click on Uninstall a program option and scroll down to find Java.
- Right-click on Java and click on the Uninstall button.

Now install the latest version of Java. Launch Minecraft and see if this has settled the problem, otherwise reinstall Minecraft.
5) Reinstall Minecraft
If no other steps could fix Minecraft OpenGL error 65543 then reinstall Minecraft freshly.
To do that follow the given guidelines:
- Open Programs and Features from Control Panel.
- Find Minecraft from the installed apps and right-click on it. Select Uninstall option.
Now, reinstall Minecraft, and this should solve the problem.
Closing Up
Hope with the help of the above methods you could fix GLFW error 65543 on Minecraft.
If you have any game or tech-related issues then let us know by commenting in the section below.
Minecraft is a popular sandbox game enjoyed by millions of players worldwide. However, like any software, it can sometimes encounter errors that disrupt the gaming experience. One such error is GLFW Error 65543, which often occurs in the Minecraft launcher. In this article, we will explore the causes of this error and provide you with a step-by-step troubleshooting guide to fix it and get you back to enjoying the game.
- What does GLFW Error 65543 mean in Minecraft?
- Why should I update Java Runtime Environment (JRE) to fix GLFW Error 65543?
- Common Causes of GLFW Error 65543:
- Troubleshooting Steps to Fix GLFW Error 65543:
- Step 1: Update Graphics Drivers:
- Step 2: Check Graphics Card Compatibility:
- Step 3: Reinstall Minecraft:
- Step 4: Update Java Runtime Environment (JRE):
- Step 5: Disable Antivirus/Firewall:
- Step 6: Clear Minecraft Data:
- Step 7: Replace OpenGL32.dll Manually
- Additional Tips to Fix GLFW Error 65543
- Check System Requirements
- Disable Overclocking
- Scan for Malware
- Create a New Launcher Profile
- Try Compatibility Mode
- Seek Support from Minecraft Community
- Conclusion
- F.A.Qs
What does GLFW Error 65543 mean in Minecraft?
GLFW Error 65543 is an error code in the Minecraft launcher, indicating an issue with the GLFW library responsible for graphics and window management. It often results in a black or frozen window and prevents the game from launching successfully.
Why should I update Java Runtime Environment (JRE) to fix GLFW Error 65543?
Minecraft heavily relies on Java, and an outdated or incompatible version of JRE can cause conflicts and trigger the error. Updating to the latest version of JRE ensures that Minecraft can utilize the necessary Java components effectively.
Common Causes of GLFW Error 65543:
To effectively troubleshoot and fix the error, it’s essential to understand its potential causes. Here are some common factors that contribute to GLFW Error 65543:
Outdated Graphics Drivers: Obsolete or incompatible graphics drivers can conflict with Minecraft’s requirements and trigger the error.
Graphics Card Compatibility: Certain graphics cards may not be fully compatible with Minecraft or its OpenGL requirements, leading to the error.
System Configuration Issues: Configuration conflicts or inconsistencies within the operating system or launcher settings can also cause the error to occur.
Troubleshooting Steps to Fix GLFW Error 65543:
Follow these steps to resolve GLFW Error 65543 and ensure a smooth Minecraft gaming experience:
Step 1: Update Graphics Drivers:
Start by updating your graphics drivers to the latest version. Visit the official website of your graphics card manufacturer (e.g., NVIDIA, AMD, Intel) and download the appropriate drivers for your system. Install the drivers and restart your computer before launching Minecraft again.
Step 2: Check Graphics Card Compatibility:
Verify that your graphics card meets the minimum requirements specified by Minecraft. If your card falls short, consider upgrading to a more compatible model that supports OpenGL.
Step 3: Reinstall Minecraft:
Uninstall the Minecraft launcher from your system and then download and reinstall the latest version from the official Minecraft website. This helps ensure that any corrupted files or configuration issues are resolved.
Step 4: Update Java Runtime Environment (JRE):
Minecraft heavily relies on Java, so make sure you have the latest version of Java Runtime Environment installed on your system. Visit the official Java website to download and install the latest JRE version.
Step 5: Disable Antivirus/Firewall:
Temporarily disable your antivirus or firewall software and launch Minecraft again. Sometimes, these security measures can interfere with the game’s functioning and trigger the GLFW error.
Step 6: Clear Minecraft Data:
Clearing Minecraft’s temporary files and data can help resolve any conflicts or corruption issues. Navigate to the Minecraft installation folder and delete the “versions” folder, then relaunch the game.
Step 7: Replace OpenGL32.dll Manually
To replace the OpenGL32.dll file manually, follow these steps:
Locate a Compatible OpenGL32.dll File: Start by obtaining a compatible version of the OpenGL32.dll file. You can extract it from another computer with a functioning OpenGL installation, ensuring that the operating system version and architecture (32-bit or 64-bit) match your system.
Backup the Original OpenGL32.dll File: Before replacing the file, it’s essential to create a backup of the original OpenGL32.dll file to avoid any irreversible changes. Navigate to the system’s Windows directory (typically, C:\Windows\System32) and locate the existing OpenGL32.dll file. Copy it to a separate location as a precautionary measure.
Rename the Original OpenGL32.dll File: To prevent any conflicts during the replacement process, rename the original OpenGL32.dll file in the Windows directory. For example, you can add “.bak” to the end of the filename (e.g., OpenGL32.dll.bak).
Replace the OpenGL32.dll File: Take the compatible OpenGL32.dll file you obtained in Step 1 and copy it into the system’s Windows directory (C:\Windows\System32). Ensure that you’re replacing the renamed original file from Step 3.
Restart the Computer: After replacing the file, restart your computer. This step allows the changes to take effect and ensures that Minecraft and other applications can recognize the updated OpenGL library.
Test Minecraft Launcher: Launch the Minecraft launcher and check if GLFW Error 65543 is resolved. If the error no longer occurs, you have successfully replaced the OpenGL32.dll file.
Additional Tips to Fix GLFW Error 65543
- Ensure that your system meets the minimum system requirements for Minecraft.
- Verify that your operating system is up to date with the latest patches and updates.
- Consider allocating more RAM to Minecraft if you experience frequent performance issues.
Check System Requirements
- Ensure that your computer meets the minimum system requirements specified by Minecraft. Insufficient hardware specifications can cause performance issues and potentially trigger GLFW Error 65543. Check the official Minecraft website or documentation for the recommended system requirements.
Disable Overclocking
- If you have overclocked your graphics card or CPU, try reverting them to their default clock speeds. Overclocking can sometimes lead to stability issues and conflicts with certain applications, including Minecraft.
Scan for Malware
- Perform a thorough scan of your system using reliable antivirus software to check for any malware or potentially unwanted programs (PUPs). Malware infections can interfere with the proper functioning of applications, including Minecraft.
Create a New Launcher Profile
Create a new launcher profile within the Minecraft launcher. Sometimes, the error may be specific to a corrupted profile. By creating a new one, you can eliminate any profile-related issues.
Try Compatibility Mode
- Right-click on the Minecraft launcher executable or shortcut and select “Properties.” In the properties window, navigate to the “Compatibility” tab and enable the “Run this program in compatibility mode” option. Choose a compatible operating system version and apply the changes. Launch Minecraft again to see if the error persists.
Seek Support from Minecraft Community
- If the error persists despite trying the troubleshooting steps mentioned, it’s helpful to seek assistance from the Minecraft community. Visit official Minecraft forums, Reddit communities, or other online platforms where fellow players and enthusiasts can provide insights, tips, or potential solutions.
Conclusion
GLFW Error 65543 can be frustrating when you’re eager to dive into the Minecraft world. By following the troubleshooting steps outlined in this article, you should be able to resolve the issue and get back to enjoying your gaming experience. Remember to keep your drivers, Java, and Minecraft updated regularly to minimize the occurrence of such errors. Happy gaming!
F.A.Qs
Here are some frequently asked questions (FAQs) related to the topic “How to Fix GLFW Error 65543”