Когда на сайт пытается попасть человек, а вместо искомого контента натыкается на ошибку, то важно выяснить, что это за ошибка и почему она посмела явиться в столь неподходящий (а это любой) момент.
Благо у нас есть замечательные коды 4хх и 5хх, хоть и не так подробно, как хотелось бы, но рассказывающие о том, почему возникла ошибка. Ну а мы, зная эту информацию, можем попытаться ошибку исправить.
В этом материале речь пойдет об ошибке 405 Method Not Allowed. В деталях опишу проблему и расскажу, как ее побороть.
Что означает код ошибки сервера 405?
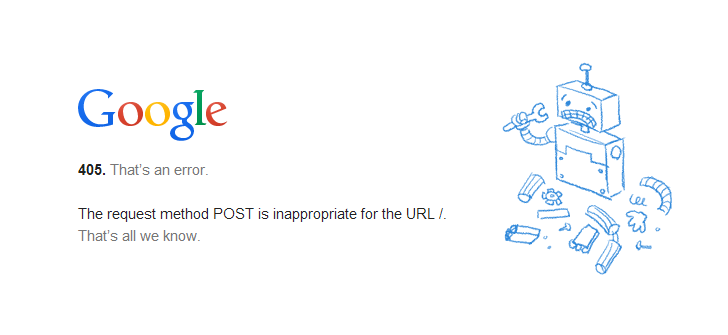
Код 405 Method Not Allowed говорит нам о том, что сервер получил определенный запрос с заданным HTTP-методом, смог его распознать, но не дает добро на его реализацию. То есть пользователь не получит доступ к контенту, который запросил.
В отличие от 404, 405 уточняет, что запрашиваемая страница существует и функционирует. Только вот стоит изменить используемый в HTTP-запросе метод. Иначе ничего не выйдет.
Комьюнити теперь в Телеграм
Подпишитесь и будьте в курсе последних IT-новостей
Подписаться
Из-за чего я вижу эту ошибку?
Есть 9 HTTP-методов, которые используются браузерами для общения с серверами. Из них два задействуются чаще остальных. Это метод GET для запроса информации с ресурса и метод POST для передачи какой-нибудь информации на ресурс. Два метода покрывают почти все существующие сценарии взаимодействия клиента и сервера от запроса статьи до отправки логина и пароля на сайт. Так как они выполняют разные задачи, для сервера нет никакой нужды принимать GET для авторизации на сайте или POST для загрузки данных. Если же клиент так делает и отправляет некорректный запрос (не с тем методом, который должен быть), то сервер ответит ему ошибкой. То же произойдет, если ресурс будет настроен так, что не сможет принимать специфичный набор запросов, не попадающих в «стандарт». Такие дела.
Как исправить 405 Method Not Allowed?
Ок, небольшой ликбез провел, теперь расскажу о том, что можно предпринять, чтобы исправить обнаруженную ошибку и вернуть посетителям доступ к сайту.
Что может сделать пользователь?
Ошибка Method Not Allowed под номером 4хх вроде бы говорит о вине клиента. Но несмотря на это, пользователь мало что может сделать, чтобы устранить проблему. В его компетенции только убедиться в том, что он не допустил ошибку в базовых вещах, и попробовать повторить те же действия в надежде на успех.
Заново открыть ту же страницу
Иногда 405 Method Not Allowed может исчезнуть после перезагрузки страницы. Так что перед тем как принимать сложные решения и жаловаться на владельцев сайта, нажмите F5 или Cmd + R раза два.
Проверить, правильно ли он ввел URL-адрес
Несложная задача, но полезная. Как и в случае с кучей других ошибок, 405 может явиться из-за банальной опечатки или лишнего символа. К тому же многие серверы защищены таким образом, чтобы напрочь блокировать доступ к несуществующим страницам или каким-либо подуровням (в которые человек может пытаться залезть неслучайно).
Так что пользователю стоит заглянуть в адресную строку браузера и убедиться в корректности введенной ссылки. Если что-то нет так, то лучше открыть главную страницу сайта и искать нужную информацию там, а не пытаться попасть на нее, вводя адрес вручную.
Что может сделать владелец сайта?
Как это часто бывает, у сервера гораздо больше способов исправить клиентскую ошибку. Тут реально целый ворох решений: от удаления подозрительных компонентов из CMS до редактирования конфигурационных файлов.
Проверить настройки сервера
Тут будут инструкции для владельцев сайтов на базе Apache и Nginx в Timeweb. Понятно, что есть другие варианты конфигураций, но эти два — чуть ли стандарт, использующийся повсеместно. А информация, касающаяся конкретно Timeweb, заденет только расположение файлов и работу с панелью управления хостинга. Остальные моменты универсальны.
Инструкция для пользователей Apache
Наша задача состоит в том, чтобы в файле .htaccess найти записи, которые могут провоцировать появление ошибки 405. А потом их закомментировать или удалить. Чтобы это сделать:
- Открываем панель управления Timeweb.
- Ищем внутри вкладку «Файловая система» и переходим на нее.
- Открываем файл .htaccess.
- Внутри .htaccess ищем директивы Rewrite… (обычно это RewriteEngine, RewriteCond и RewriteRule).
Эти директивы помогают в настройке переадресации и некоторых других аспектах поведения сервера. Например, чтобы заставить сервер отправлять клиенту ошибку на каждый запрос GET, можно ввести такой код:
RewriteEngine on
RewriteCond %{REQUEST_URI} ^/ru/services/?.$
RewriteCond %{REQUEST_METHOD} =GET
RewriteRule ^(.)$ http://timeweb/ru/new$1 [R=405,L]
За появление ошибки отвечает запись [R=405,L]. То есть в настройках указано, как себя будет вести сервер при определенном запросе. Надо найти все такие директивы и закомментировать их, поставив # перед записью.
Инструкция для пользователей Nginx
Здесь нужно сделать примерно то же. Разница в том, как выглядит файл с настройками и в его расположении.
- Ищем файл nginx.conf по пути /usr/local/nginx/conf или /usr/local/etc/nginx.
- Открываем его любым текстовым редактором.
- Находим код, включающий в себя упоминание ошибки 405.
В Nginx код выглядит немного сложнее. Например, запрос метода для ссылки https://moysait.com/ru/services/create будет выглядеть так:
server { listen 80; listen 443 ssl;

server_name moysait.com;

location /users/create { if ($request_method = POST) { return 405 https://moysait.com/services/create$request_uri; } } }
Делаем ту же процедуру. Останавливаемся везде, где находим директиву с ошибкой 405. Анализируем ее (вдруг, она тут случайно). И при необходимости комментируем или удаляем.
Исправить проблемы, связанные с PHP-скриптами
Ошибки могут возникнуть при попытке импортировать или экспортировать слишком объемную базу данных. На хостинге может быть установлено ограничение в полминуты, запрещающее использовать один PHP-скрипт дольше этого времени. Поэтому, если процесс затянется, сервер может отозваться ошибкой 405.
Обойти ограничение можно тремя путями:
- Попробовать экспортировать БД через phpMyAdmin.
- Разбить файл БД на несколько мелких частей, передача каждого из которых займет меньше 30 секунд.
- Использовать для передачи БД Cron-задачу. На них сервер выделяет больше времени.
Еще специалисты рекомендуют удалить статические файлы с разрешением, которые Nginx обрабатывать не должен. Это делается через панель управления хостингом в соответствующем разделе файлового менеджера.
Исправить эксклюзивные для Nginx ошибки
Как мы уже выяснили выше, ошибка может возникнуть при попытке использовать неподходящий метод. Вот как можно исправить это в случае с Nginx-сервером.
Первый вариант — убедить сервер в том, что вместо кода 405 надо отправлять код 200, и это вполне нормально:
server {
   listen 80;
   server_name localhost;
location / {
   root html;
   index index.html index.htm; }
error_page 404 /404.html;
  error_page 403 /403.html;
error_page 405 =200 $uri;

…

}
Для тех, у кого Nginx-сервер — это proxy, понадобится вот такой код:
error_page 405 =200 @405;

location @405 { root /htdocs; proxy_pass http://localhost:8080; }
Аналогичная ошибка возникает при работе с модулем FastCGI. Из-за него сервер неправильно считывает запросы с методом POST, поэтому необходимо делить параметры и адрес скрипта вот так:
location ~\.php(.*) {
 fastcgi_pass 127.0.0.1:9000;
 fastcgi_split_path_info ^(.+\.php)(.*)$;
 fastcgi_param SCRIPT_FILENAME $document_root$fastcgi_script_name;
 fastcgi_param PATH_INFO $fastcgi_path_info;
 fastcgi_param PATH_TRANSLATED $document_root$fastcgi_path_info;
 include /etc/nginx/fastcgi_params;
}
Далее речь пойдет об общих методах диагностики и исправления ошибок. На крайний случай, если конкретные решения не помогли.
Проанализировать все недавние изменения в коде
Если недавно что-то поменяли, а после этого все сломалось, то надо это «поменяли» рассмотреть подробнее. Провести ручной дебаггинг, если можно это так назвать. Наверняка где-то затесалась несерьезная, но обидная ошибка.
Удалить сторонние дополнения для CMS
Если вы используете условный WordPress, то разного рода ошибки могут подкрасться оттуда, где их не ждешь. Например, после установки нового расширения.
Так что при подозрении на наличие сбойного дополнения, лучше попробовать от него избавиться и посмотреть, что будет. Возможно, ошибка исчезнет.
После этого уже можно будет поискать альтернативное расширение или пообщаться с разработчиками по поводу того, почему вообще возникает сбой.
Главное, не забудьте сделать резервную копию CMS перед тем, как что-то удалять и менять. И продолжайте делать бэкапы после, чтобы всегда можно было восстановить рабочую версию сайта.
Откатиться на более старую версию CMS
Бывает так, что сама CMS несет в себе баги и ошибки. Ну или криво установилась. В таком случае можно восстановиться из старой резервной копии и откатиться на одну или несколько версий в прошлое. Когда все работало без ошибок.
Проверить новые записи в базе данных
Расширения могут вносить изменения в базу данных сайта. Иногда не очень полезные. Надо проверить, не появилось ли после установки свежего дополнения каких-либо непрошенных изменений в базе данных. Может, появились подозрительные записи, которых не должно быть. Лучше подвергнуть анализу всю БД от начала до конца (если другие методы исправления ошибки 405 не помогли, конечно).
На этом будем заканчивать. Мы и так уже перешли на самые маловероятные способы исправления этой ошибки. Надеюсь, они не понадобятся, но знать о таких вариантах стоит. Вдруг эти знания когда-нибудь спасут вас и посетителей вашего сайта.
Ошибка HTTP 405 указывает на то, что сервер отклонил конкретный метод HTTP, используемый веб-браузером. Узнайте, почему он может появиться на вашем сайте и как быстро исправить его, не нанося ущерба вашей репутации в интернете.
Нет ничего более неприятного для потребителя, который ищет мгновенного удовлетворения, чтобы наткнуться на ошибку на вашем сайте. Если вместо того, чтобы найти нужную им информацию, они наткнутся на страницу с надписью “ошибка”, скорее всего, подавляющее большинство потребителей покинут ваш сайт.
Но помимо того, что потребители быстро уходят, вы также можете испытать разрушительные последствия для ваших коэффициентов конверсии. Не говоря уже о том, что поисковые системы также обращают внимание на показатели отказов. Ошибка, которая может появиться на вашем сайте и вызвать разочарование у потребителей — это Ошибка HTTP 405.
К сожалению, эта ошибка похожа на что-то мистическое. Она говорит вам, что что-то пошло не так, но не дает более подробного объяснения.
Хорошая новость заключается в том, что с помощью небольшого исследования и усилий с вашего сайта вы можете быстро определить суть проблемы и исправить ее, прежде чем заметите падение активности и продаж.
В этой статье мы поговорим о том, что такое Ошибка HTTP 405, почему она может появиться на вашем сайте, а также о том, как ее исправить. Давайте начнем!
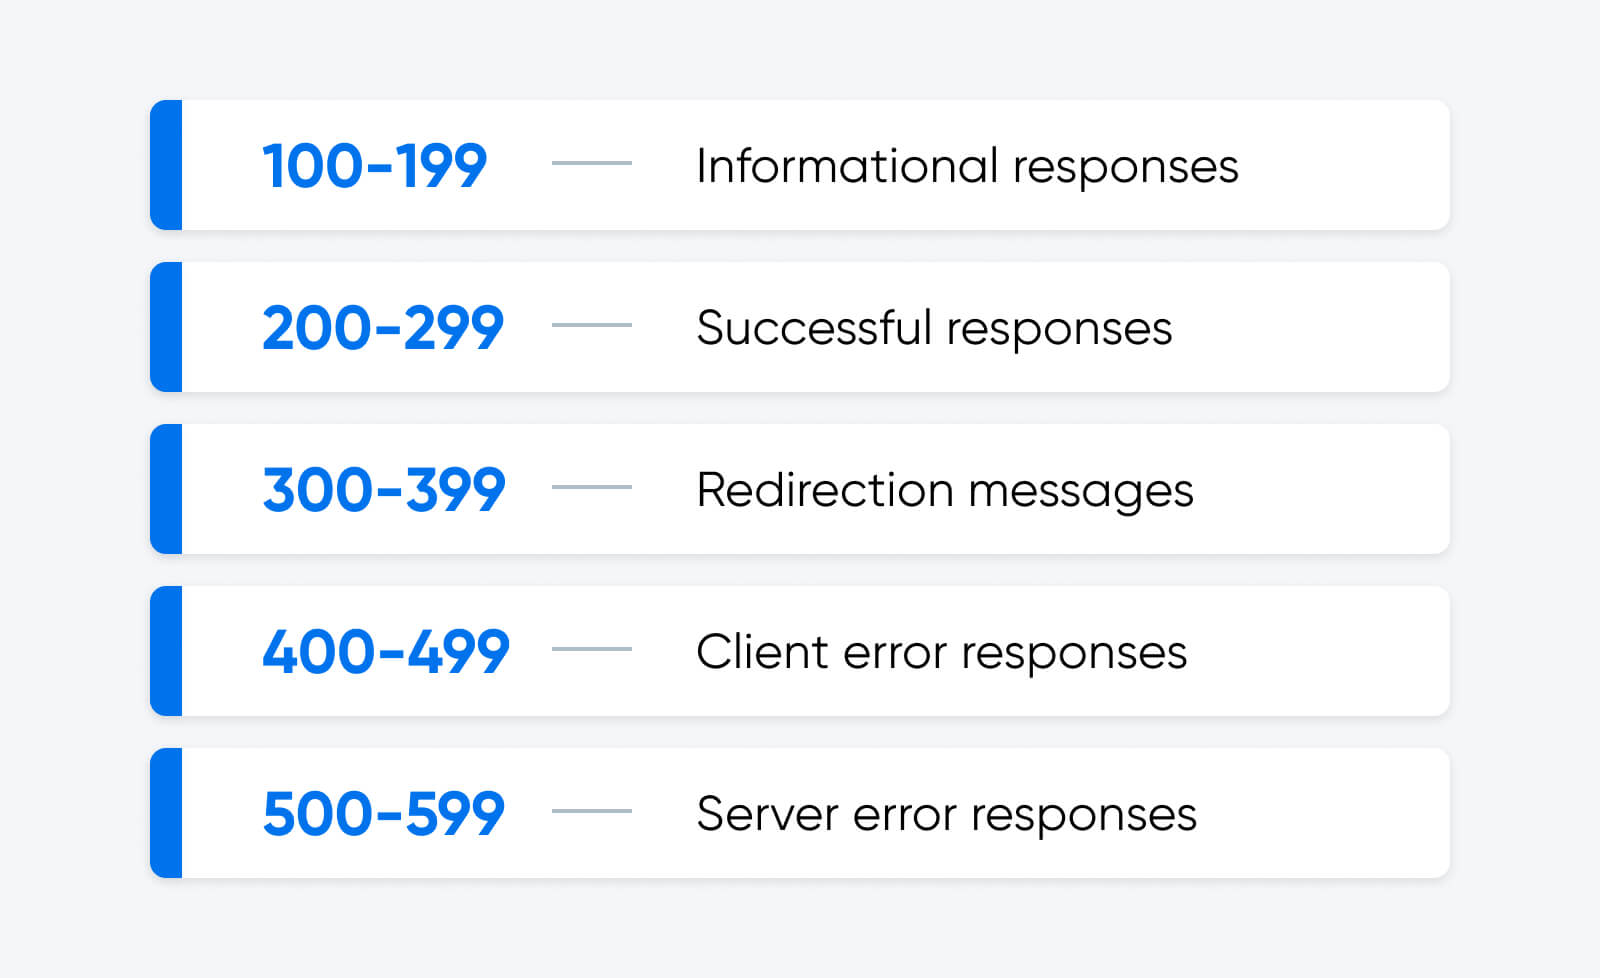
HTTP 405 – это код состояния ответа HTTP. Существует пять видов кодов состояния HTTP-ответа. Все они сообщают пользователю, был ли успешно выполнен определенный HTTP-запрос. Пять основных кодов состояния включают в себя:
1xx коды состояния: Информационные запросы 2xx коды состояния: Успешные запросы 3xx коды состояния: Перенаправление 4xx коды состояния: Ошибки клиента 5xx коды состояния: Ошибки сервера
Сообщение об Ошибке 405 Method Not Allowed – это ошибка клиента, которая указывает на то, что проблема заключается в чем-то на стороне клиента.
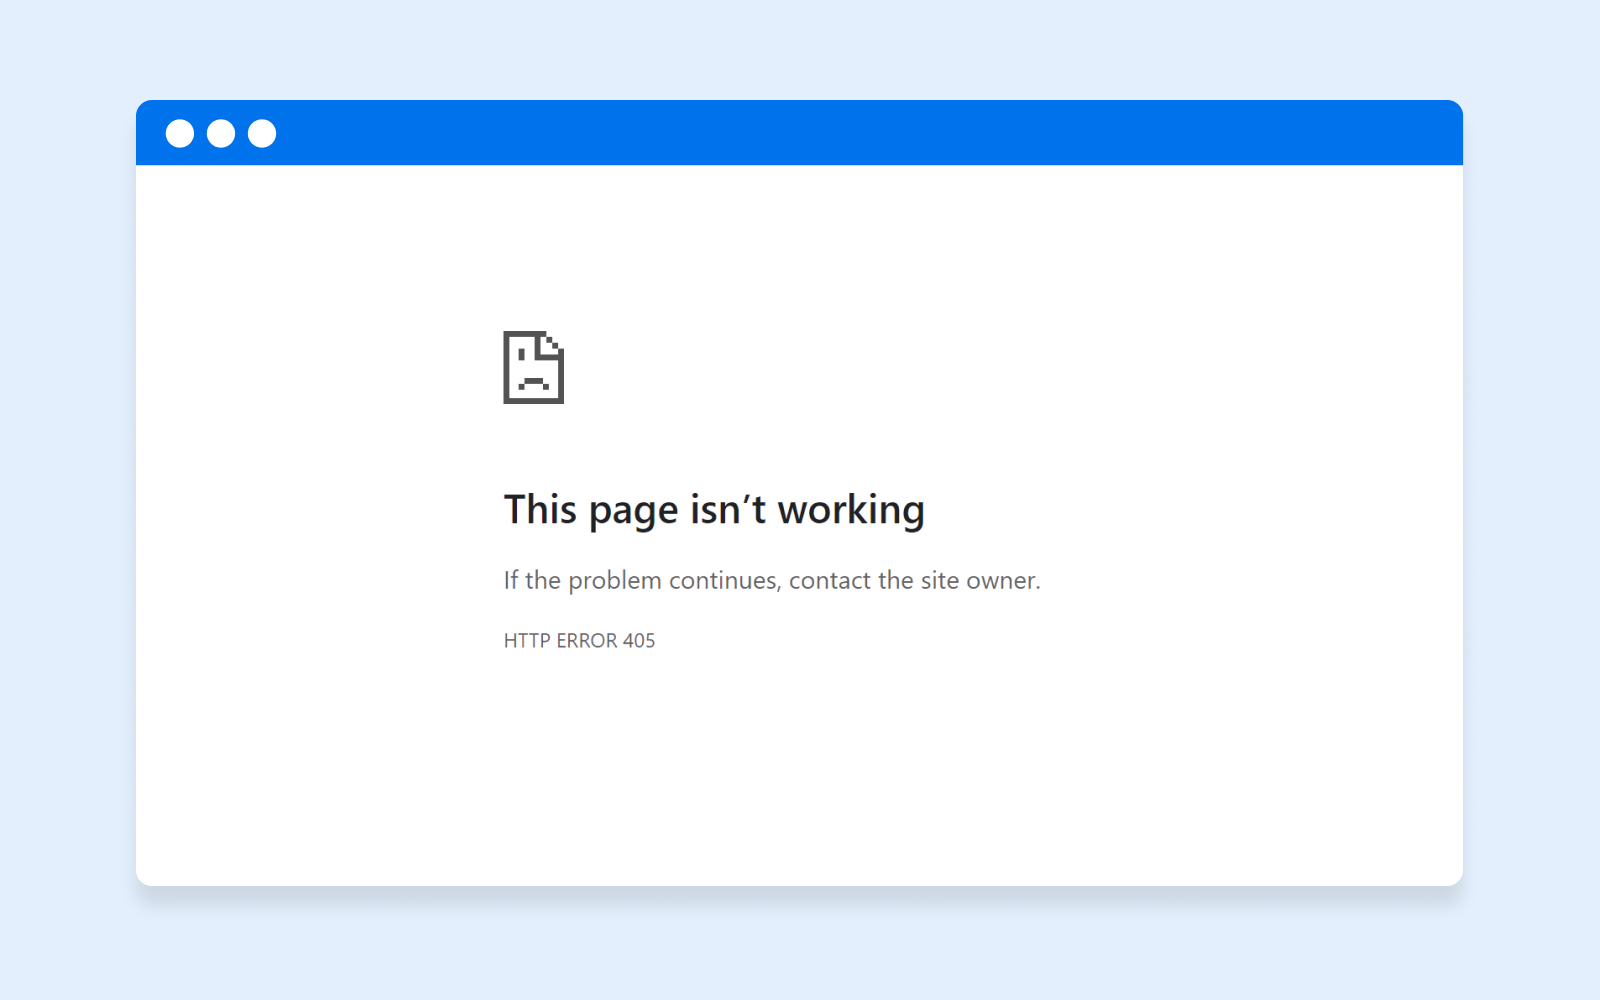
Ошибка HTTP 405 указывает на то, что веб-браузер запросил доступ к одной из ваших страниц, и ваш веб-сервер распознал этот запрос. Однако сервер отклонил конкретный метод HTTP, который он использует. В результате ваш веб-браузер не может получить доступ к запрошенной веб-странице. Когда это произойдет, ваши посетители увидят веб-страницу с ошибкой.
Варианты имен Ошибок HTTP 405
Различные веб-серверы, операционные системы и браузеры отображают ошибку по-разному. Важно отметить, что причина проблемы также может меняться от одного сервера к другому.
Наиболее распространенные способы появления Ошибки HTTP 405 для потребителей включают в себя:
- HTTP Ошибка 405 – Метод Не Дозволен
- HTTP Метод Не Дозволен
- 405 Не Дозволено
- Метод Не Дозволен
- HTTP Ошибка 405
Независимо от того, как появляется ошибка, будь то Ошибка HTTP 405 или Метод Не Дозволен, проблема одна и та же, и это то, что ее трудно исправить. Вы знаете, что что-то не так, но понятия не имеете, что это может быть. Вам предстоит найти суть проблемы и устранить ее до того, как она нанесет непоправимый ущерб.
Как исправить Ошибку 405?
Проверьте URL-адрес
Первое, что вам нужно сделать, когда вы видите Ошибку 405 на своем сайте – это проверить, правильно ли вы ввели URL-адрес.
Внимательно посмотрите на URL-адрес и убедитесь, что он содержит все правильные буквы.URL-адрес содержит какие-либо специальные символы, убедитесь, что они вставлены правильно.
Пока вы этим занимаетесь, вы также можете попробовать обновить страницу. Вы можете обнаружить, что обновление страницы может заставить ее правильно загрузиться. Если вы уверены, что ввели правильный URL-адрес, но все еще видите ошибку, выполните откат последних обновлений.
Откат последних обновлений
Большая часть веб-сайтов размещается на таких CMS, как WordPress или Wix. Вы можете обнаружить, что недавнее обновление системы может быть основной причиной проблемы.
Попробуйте подумать, когда вы впервые заметили Ошибку 405 на своем сайте. Это было сразу после того, как вы обновили CMS? Если это так, то подумайте о том, чтобы вернуться к предыдущей версии.
Удаление новых расширений, модулей или плагинов
Расширения и плагины могут быть полезны для улучшения возможностей вашего сайта, но они также могут нанести серьезный ущерб.
Некоторые расширения могут полностью контролировать вашу систему и вносить изменения в любой код, включая PHP, CSS, HTML, JavaScript и вашу базу данных. В этом случае рекомендуется удалить все новые расширения, которые вы недавно добавили в свою систему.
Если вам нужна помощь в удалении расширения, просто сделайте быстрый поиск в Google, чтобы найти официальную документацию для этого процесса.
Дважды проверьте изменения в своей базе данных
Иногда, даже если вы удалите расширение, изменения, внесенные этим расширением в систему, не могут быть полностью возвращены.
Есть некоторые расширения, особенно на CMS WordPress, которые имеют карт-бланш внутри приложения, который включает в себя полный доступ к базе данных. Расширение может изменять записи базы данных, которые не принадлежат самому расширению, а создаются и управляются другими расширениями. Когда это происходит, расширение может не знать, как вернуть изменения в записи базы данных, что приводит к тому, что расширение игнорирует такие вещи во время удаления.
Лучшее, что вы можете сделать в таком случае – это открыть базу данных и вручную просмотреть таблицы и записи, которые могли быть изменены расширением. Или вы можете провести быстрое исследование и попытаться найти людей, которые столкнулись с той же проблемой, чтобы увидеть, как они справились с этой проблемой.
Проверьте файлы конфигурации для вашего веб-сервера
Если двойная проверка изменений базы данных не помогла, попробуйте проверить файлы конфигурации программного обеспечения веб-сервера на наличие непреднамеренных инструкций перенаправления.
Ваше приложение работает либо на веб-серверах Apache, либо на веб-серверах nginx.
Если вы используете Apache, вам необходимо проверить как файл конфигурации сервера apache, так и файл конфигурации сервера apache файл .htaccess. После того, как вы найдете файл .htaccess, откройте его в текстовом редакторе и найдите строки, использующие указания RewriteXXX. В случае, если вы столкнетесь с какими-либо странными указаниями RewriteCond или RewriteRule, попробуйте временно сделать замечание, используя префикс символа #. Перезагрузите веб-сервер и посмотрите, устранена ли проблема.
Если вы используете nginx, вам нужно проверить nginx.conf файл. Файл находится в одном из нескольких общих каталогов: /usr/local/nginx/conf, /etc/nginx или /usr/local/etc/nginx. Как только вы найдете файл, откройте его в текстовом редакторе и выполните поиск указании, использующих флаг кода ответа 405. Сделайте замечания на любые аномалии, а затем перезагрузите сервер, чтобы увидеть, была ли проблема решена.
Проверьте журналы приложений
Журналы приложений содержат историю вашего веб-сайта, в том числе информацию о том, какие страницы были запрошены, к каким серверам он подключался и многое другое.
Открытие журналов приложений может указать вам правильное направление, в котором может возникнуть ошибка.
Расположение журналов приложений зависит от типа используемого сервера. Как только вы их найдете, запустите поиск Ошибок 405. Надеюсь, вы определите, что является основной причиной проблемы.
Отладка кода приложения или скриптов
Если вы перепробовали все вышеперечисленное и ничего не получилось, возможно, пришло время посмотреть, не является ли причиной ошибки проблема в каком-то пользовательском коде вашего приложения.
Вы можете поставить диагноз, вручную отладив приложение и проанализировав журналы приложений и серверов.
Сделайте копию приложения на локальную машину разработки и выполните пошаговую отладку. Вам удастся воссоздать точный сценарий, в котором произошел 405 Метод Не Дозволен, и просмотреть код приложения, когда что-то пойдет не так.
Заключение
Надеемся что наша подробная запись о кодах состояния HTTP, будет полезная для вас. Помните что регулярный контроль и техническое обслуживание помогут сохранить ваш сайт безупречным, а его владельца-беззаботным.
Понравилось то, что вы прочитали?
Подписывайтесь на нашу рассылку и получайте ежедневные обновления о новых учебниках, статьях, курсах и о многом другом!
Просто введите ваш адрес электронной почты, чтобы подписаться.
(Без спамов; ежемесячно два письма; отписаться от рассылки можно в любое время)
![]()
Web servers inform clients, like internet browsers for example, about the processing status of the submitted request with the help of HTTP status codes. So there are various codes that confirm the success or failure of a request – along with very specific messages. While some of these messages are encountered relatively frequently with daily use of the World Wide Web, the 405 (Method Not Allowed) error is one of the more rare error messages. In this article you’ll find out exactly what leads to this error message, and why solving the problem is the responsibility of the website operator.
Contents
- What’s behind the 405 HTTP error?
- When does the 405 error occur?
- HTTP error 405: How to fix the problem
- Solution 1: Enable HTTP methods
- Solution 2: Clean up the source code
- Solution 3: Bypass the provider’s security barrier
$1 Domain Names
Register great TLDs for less than $1 for the first year.
Why wait? Grab your favorite domain name today!
Matching email
SSL certificate
24/7/365 support
What’s behind the 405 HTTP error?
The Hypertext Transfer Protocol (HTTP for short) defines methods that indicate possible actions that can be performed on the contacted web server. For example, this includes the following methods:
- GET: Retrieve information associated with a specific URL resource
- HEAD: Retrieve header information linked with a URL resource
- POST: Send data to the web server – for example, form data
- PUT: Replace the data for a specific URL with new data transmitted by the client
- DELETE: Delete the data behind the respective URL
To display this video, third-party cookies are required. You can access and change your cookie settings here.
The administrator can configure each web server so that the individual methods are either allowed or not allowed. For example, if there’s no interactive content on the website, it’s only logical that the POST method isn’t allowed, since the user has no options to enter their own data and send it to the server. Otherwise, the error message mentioned above with the status code 405 would appear, informing the browser and its user that the method is not allowed.
The exact wording of the 405 HTTP message varies from server to server. Here are some common phrases:
- 405 Method Not Allowed
- 405 Not Allowed
- Method Not Allowed
- HTTP 405 Error
- HTTP Error 405 – Method Not Allowed
- HTTP 405 Method Not Allowed
- Error: 405 Method Not Allowed
- 405 – HTTP verb used to access this page is not allowed
- HTTP Status 405 – HTTP method GET is not supported by this URL
When does the 405 error occur?
We have already indicated that the 405 error is caused solely by a server-side problem. But since status code 405 technically belongs to the client error messages (codes with the pattern 4xx), this doesn’t seem to make sense. This contradiction is quickly solved, though: If, as a browser user, you forward a request to the webserver with an HTTP method that it doesn’t allow due to its configuration, the error lies on the client side from the server’s point of view – in this case, the client simply made a wrong request. The server isn’t aware when processing the request of the fact that you’re only interested in the website’s offer, for example, to fill out a contact form.
Three scenarios in particular can lead to a “Method Not Allowed” error message:
- The ban of the corresponding HTTP method is due to a misconfiguration of web servers or software components that are supposed to perform the respective action for the desired URL resource.
- The ban of the HTTP method is from the website operator – in most cases, for security reasons. The error lies in a URL resource of the web project in question, on the grounds that its programming requires its method to not be allowed.
- The HTTP method is not allowed by the hosting provider of the website operator. This particularly occurs with the POST method, which is required for entering data and is blocked by some providers for security reasons when accessing HTML documents.
HTTP error 405: How to fix the problem
If you come across a web project that displays the 405 Not Allowed error message, you can hardly solve the problem yourself. While with other HTTP messages you can usually solve the problem using tricks like refreshing the page, restarting the router, or checking the proxy settings, these measures are useless against the 405 error. In this case, it makes sense to contact the responsible website operator or administrator to make the problem known or receive exact information about the causes.
If you yourself are responsible for the site that is displaying the 405 HTTP code to visitors, then the circumstances are of course different: Depending on the cause of the error message, you have several options for solving the problem. To avoid angering your users and/or being penalized by search engines, you should resolve the error as quickly as possible.
Solution 1: Enable HTTP methods
If you’re not sure of the cause of the “405 Method Not Allowed” message, you should always first look at the settings of the software components that are responsible for responding to HTTP requests. Typically, this is handled by the web server, but a pre-connected Proxy or HTTP handler (in ASP.NET web applications) could also be responsible for the problem if the method is simply not enabled. Since the different applications differ from each other in terms of configuration, you first have to find out how the activation or deactivation of the HTTP methods functions for each software.
For Apache web servers, enabled methods are specified with the help of the mod_allowmethods module, for example. This can be controlled using the AllowMethods directive in the <Location> containers, which are needed to specify settings for one or more desired URLs. One configuration that enables access to the resource as well as client-side data entry can be implemented with the following entry:
<Location "/">
  AllowMethods GET POST OPTIONS
</Location>
Note
With older Apache versions, permitted HTTP methods are defined with the directives <Limit> and <LimitExcept>
Solution 2: Clean up the source code
If you’ve deliberately blocked an HTTP method, for example, to guarantee the safety of the website (common practice for the PUT method), but the client still triggers such a request to retrieve URL resources, this is often due to incorrect website programming. The requested page or element is therefore incorrectly linked with the method, which is why the 405 error is the logical consequence. The solution is to locate the problematic code in the corresponding HTML document and replace the entered code with the correct request method. If the server configurations and source code are reconciled, then there’s a high possibility that the 405 HTTP error will disappear from the browser window of your visitor.
Solution 3: Bypass the provider’s security barrier
As previously mentioned, the 405 error can also have the background that the corresponding HTTP methods for certain MIME types – like an HTML document, for example – have been disabled by the hosting provider for security reasons. In this case, you can of course contact your provider and ask for approval – but if this isn’t possible, there are tricks that allow you to use the method for your web project anyway.
You can deliver the website with a different MIME type available for the desired method to work around the barrier. POST, for example, is usually deactivated for HTML pages, while the method functions in PHP documents. If you change the extension type, for example, from index.html to index.php, there’s a good chance that you’ll have solved the “405 Method Not Allowed” problem.
To display this video, third-party cookies are required. You can access and change your cookie settings here.
A second trick is to implement the website that causes the HTTP error as the content of the displayed 405 error page. To do this, simply save the page in question in a separate directory and define this in the configuration file as the official 405 error message:
ErrorDocument 405 /PathToFile/example.htmlThis solution does have the disadvantage, though, that all success page accesses for the page are classified and counted as errors, which complicates the statistical analysis.
Related articles
 MichaelJayBerlinShutterstock
403 Forbidden: What does the http status code mean and how do you fix it?
Is your browser displaying an http error 403 instead of the web page you requested? This means that the web server has not granted you access to that page. The reason for this differs from case to case; sometimes the website operator as secured this area from being accessed but sometimes it’s simply a case of adjusting your browser settings. This article outlines the various causes of the http…
403 Forbidden: What does the http status code mean and how do you fix it?
 Roland IJdemaShutterstock
How to fix Error 401 Unauthorized
You’re surfing around on the internet, but instead of getting the desired content you only receive an error message: annoying or even downright frustrating. Especially if you don’t exactly know what the status is supposed to mean. How are you expected to solve the problem, if you don’t know what’s causing it? This also goes for the error 401. Here we explain what the error means and what you can…
How to fix Error 401 Unauthorized
 MichaelJayBerlinShutterstock
HTTP 400: Bad Request explained
Internet users are often confronted with error messages. HTTP status codes can be especially annoying, and even more so if you don’t understand what they mean. The message ‘HTTP 400 – Bad Request’ is a mystery for many internet users, but luckily it can be solved in most cases. We explain what the error message means and how to fix the error.
HTTP 400: Bad Request explained
 RDVectorShutterstock
HTTP 408: how to fix the timeout error
Permanent availability is one of the most important things when it comes to a website. However, even the best technical conditions do not offer a 100% guarantee that a website will constantly run smoothly. Connection errors like HTTP error 408 regularly present websites with minor and major difficulties, especially since the causes are often found on the client side. Our guide looks at the causes…
HTTP 408: how to fix the timeout error
 REDPIXEL.PLShutterstock
GET vs. POST – the two most important HTTP requests compared
The two most common and well-known website HTTP requests are GET and POST. But which request method is better? Learn more about these two HTTP requests and find out which method is the right one for your programming needs.
GET vs. POST – the two most important HTTP requests compared
Funny enough, HTTP error codes are both really useful and incredibly frustrating at the same time.
Seeing an error when you load a page makes it very clear that something has gone wrong with the website — But most of us haven’t got the faintest clue about what “405 Method Not Allowed” means, let alone how to fix it.
That’s why we wrote this handy-dandy guide! A 405 error isn’t any reason to panic; there are just a few steps to restore your website back to working order.
Over the next few pages, we will explain what this error is all about and show you how to make it disappear.
What Is the 405 Method Not Allowed Error?
The 405 error is a type of HTTP status code — This means it’s a message that a server sends to your web browser, explaining why it can’t deliver the content you asked for.
Server
A server is a computer that stores data. A web server is a type of server that stores and delivers web pages to users. Web servers are connected to the internet and use HTTP to send web pages to users who request them.
Read More
A persistent 405 status code is a problem for anyone running a website. If multiple users see the same error, that means there’s something misconfigured on your website.
Until you fix the problem, visitors won’t be able to access the page where the error code is displayed.
This error code may appear as:
- 405 Method Not Allowed
- 405 Not Allowed
- Method Not Allowed
- HTTP 405 Error
- HTTP Error 405 – Method Not Allowed
- HTTP 405 Method Not Allowed
What Causes the 405 Error?
Let’s get a bit more technical.
Whenever you try to visit a specific web page, your browser asks the hosting server to send over the content. Typically, the server sees this request and shoots the page straight to your device in a fraction of a second. Success!
This whole process is regulated by HTTP, or Hypertext Transfer Protocol. This protocol uses a series of status codes to track progress and problems.
Codes in the 400s relate to client-side errors. And the 405 Method Not Allowed error code means that your browser has sent an HTTP request (GET, POST, PUT, etc.) that isn’t allowed for that specific resource, or URL.
In many cases, this is triggered by something the user does. The most common cause is inputting the wrong URL.
However, the 405 error code can also appear when something has gone wrong with the configuration of your website. We will explore some of those issues later.
What Is the Difference Between 404 and 405 Errors?
Both 404 and 405 errors prevent users from accessing content on your website, but they relate to different problems.
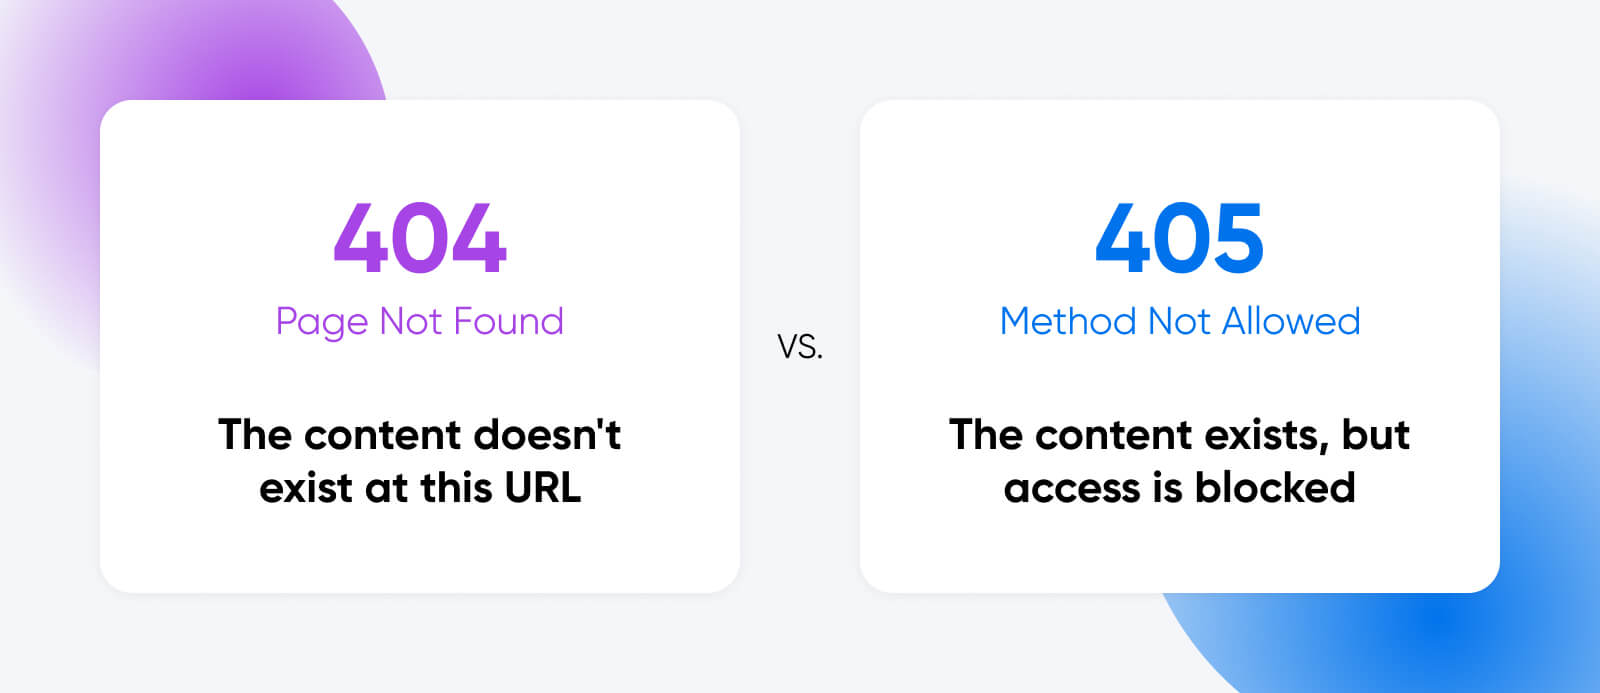
The 404 error code shows up when someone visits a URL where no context exists. For example, this sometimes happens when pages are removed, or domains are changed.
In contrast, the 405 error means that your server is rejecting an HTTP request from a browser. The content is there, but the server refuses to provide access because the request was made in the wrong format.
Understanding what causes the 405 error is an important step in solving the issue.
However, this status code doesn’t tell us exactly what’s wrong. The only way to identify the precise problem is by troubleshooting.
Ready to get started? Here’s a checklist of potential fixes:
1) Check Your Links
When you spot a 405 error in the wild, there’s a strong chance that you simply visited the wrong page.
For security reasons, web servers are typically configured to accept only specific types of requests on each URL. If you visit a page that is not open access, you may end up seeing the 405 error message.
If visitors to your site consistently see 405 error codes, it might be because they are following a bad link.
One way to prevent this is by checking your site using the Dead Link Checker or a similar free tool. And make sure that none of your social links and landing pages point towards private pages.

2) Check Your Updates
Have you updated your content management system, your theme, or even a plugin recently? That might be why you’re suddenly seeing 405 Method Not Allowed error messages.
Updates are essential for maintaining good website security. They can also fix existing bugs, and give you access to new features. But just occasionally, fresh updates introduce new gremlins.
If you’re unsure if you’re due for an update, log into your admin account and navigate to Dashboard > Updates page. Here, you’ll see a timestamp of the last time WordPress checked for updates. If need be, you can click “Check again” to manually check for updates.
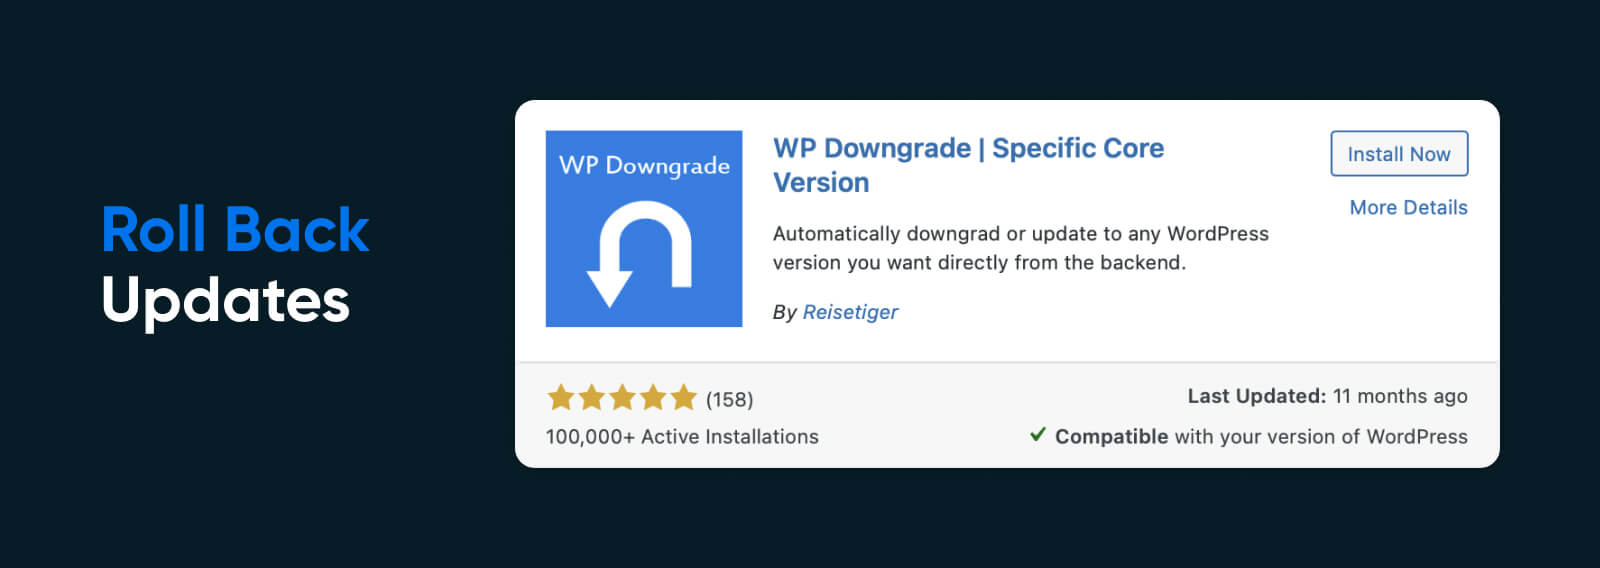
Unfortunately, sometimes an update might break your website. To fix this, you can simply roll back to the previous version of the system, theme, or plugin that might be causing problems.
The exact process here depends on what you need to downgrade. For instance, WordPress users can use the WP Downgrade plugin to revert to a previous version.
For some websites, the easiest route is simply to restore your entire site from a backup — see step 10 for more.
How to Downgrade WordPress Plugins and Themes
If you believe that a specific theme or plugin is causing the problem, we recommend using the WP Rollback plugin. Once activated, this gives you the option to downgrade any plugin or theme you have installed.
Simply open up Plugins > Installed Plugins or Appearance > Themes inside your WordPress Admin area, and you will see a little “Rollback” button under each plugin or theme.
Click this, and WP Rollback will allow you to choose the exact version you want to restore.
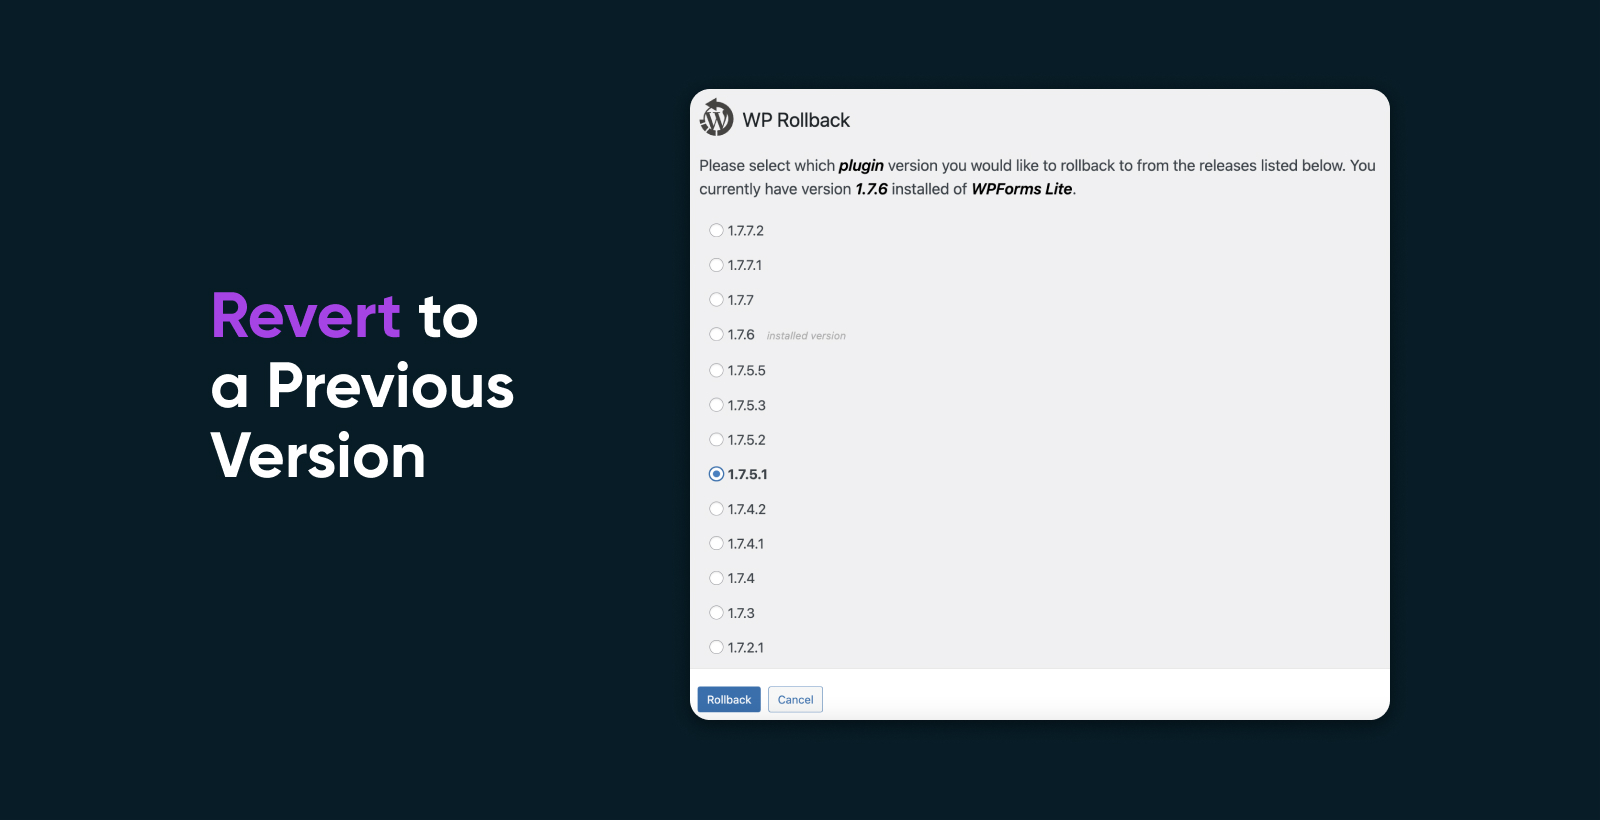
Once the downgrade is complete, make sure to hit Activate on the plugin or theme to put the old version into action.
3) Uninstall New Plugins, Modules, and Themes
Just as updates to existing plugins and themes can mess things up, so can brand new additions to your site.
With this in mind, it’s worth deactivating new plugins, modules, and themes if you start seeing 405 Method Not Allowed errors on your site.
Once again, the process here will depend on the content management system you are using.
In WordPress, you can do this through the Admin area. Navigate to Plugins or Appearance > Themes, and you should see a little red Deactivate button next to every plugin and theme.
Not sure which plugin is causing the problem? You can disable all your plugins within a minute via FTP or SSH:
- In your FTP/SSH client, head to your WordPress site directory
- Navigate to wp-content and right-click on plugins
- Select Rename
- Change the name of the folder to /plugins_OFF
This will immediately cut off all plugins. When you want to reverse the process, simply follow the steps again and rename the folder as plugins.
If you want to delete themes through FTP/SSH:
- Visit your site directory
- Navigate to wp-content/themes directory.
- Delete the folder of the theme you want to remove
Just bear in mind that you might want to keep a backup of this folder, just in case the theme is not to blame.
4) Restore Your Database
Plugins and themes usually need at least some access to your database to perform their duties.
Sometimes they get a little unruly and start making changes to parts of the database that are none of their business. These changes can cause 405 errors.
Database
A database is a collection of information accessible to computers. Databases are used to store information such as customer records, product catalogs, and financial transactions.
Read More
Even if you remove the offending plugin or theme, the changes they made will remain. There are only two ways to fix these issues:
- Look through your database logs for problematic changes
- Restore a previous version of your database
Database Logs
To access the database logs for your website, head to the control panel of your hosting provider. Usually, you will only be able to access logs if you have a private server.
For databases hosted with DreamHost, head to MySQL Databases to find the name of your MySQL Databases, and then get in touch with technical support to get access.
If you know exactly when the 405 errors started appearing, you may be able to find the offending database change by sorting the logs by time. You’re looking for “INSERT”, “UPDATE”, or “DELETE” changes.
Just be aware that you need a strong knowledge of web development to identify potential problems here. If you’re not sure what you’re looking at, avoid making modifications and consult a professional.
Restore Your Database
If you don’t have developer-level skills, restoring your database to a previous version is probably a more realistic option.
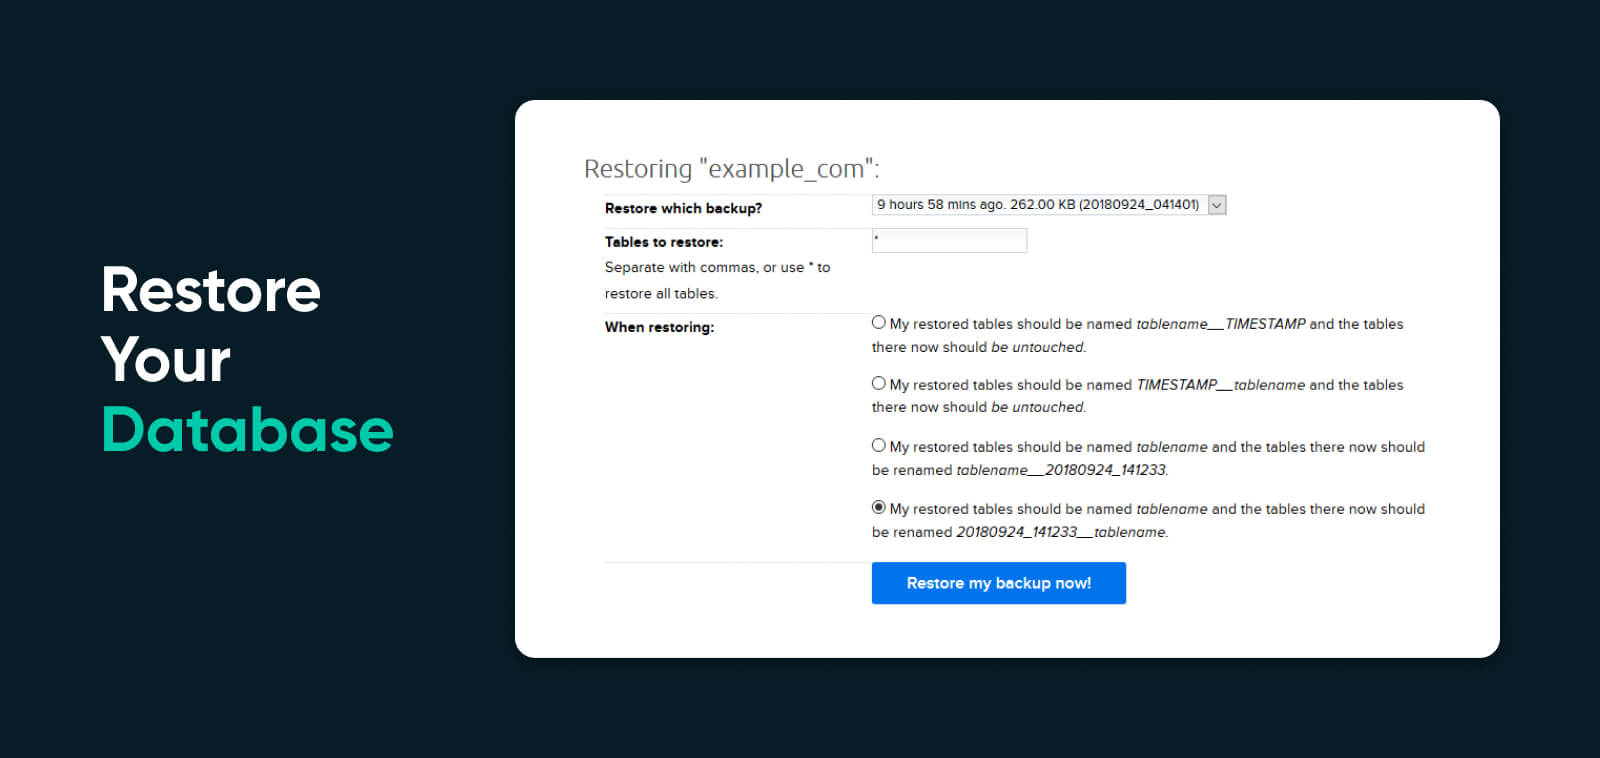
As with site data, DreamHost automatically creates a backup of your database every day. To restore one of these backups:
- Visit the MySQL Databases page in your account
- Click the Restore DB button to the right of your database
- Choose the time of the backup you want to restore
- Under When restoring, select option 3 or 4 depending on your CMS; choose option 4 for WordPress
5) Read Your Server-Side Logs
Just as your database logs can reveal problems that will lead to 405 errors, we can also find clues in the server-side logs.
The files we’re looking for here are named error.log and access.log. With DreamHost, you can view them via SFTP (Secure File Transfer Protocol):
- In your FTP client, visit the /logs directory in your user folder
- Open the site you want to check
- Open the most recent directory with a name that starts with http
- Open the log file inside, using your preferred text editor
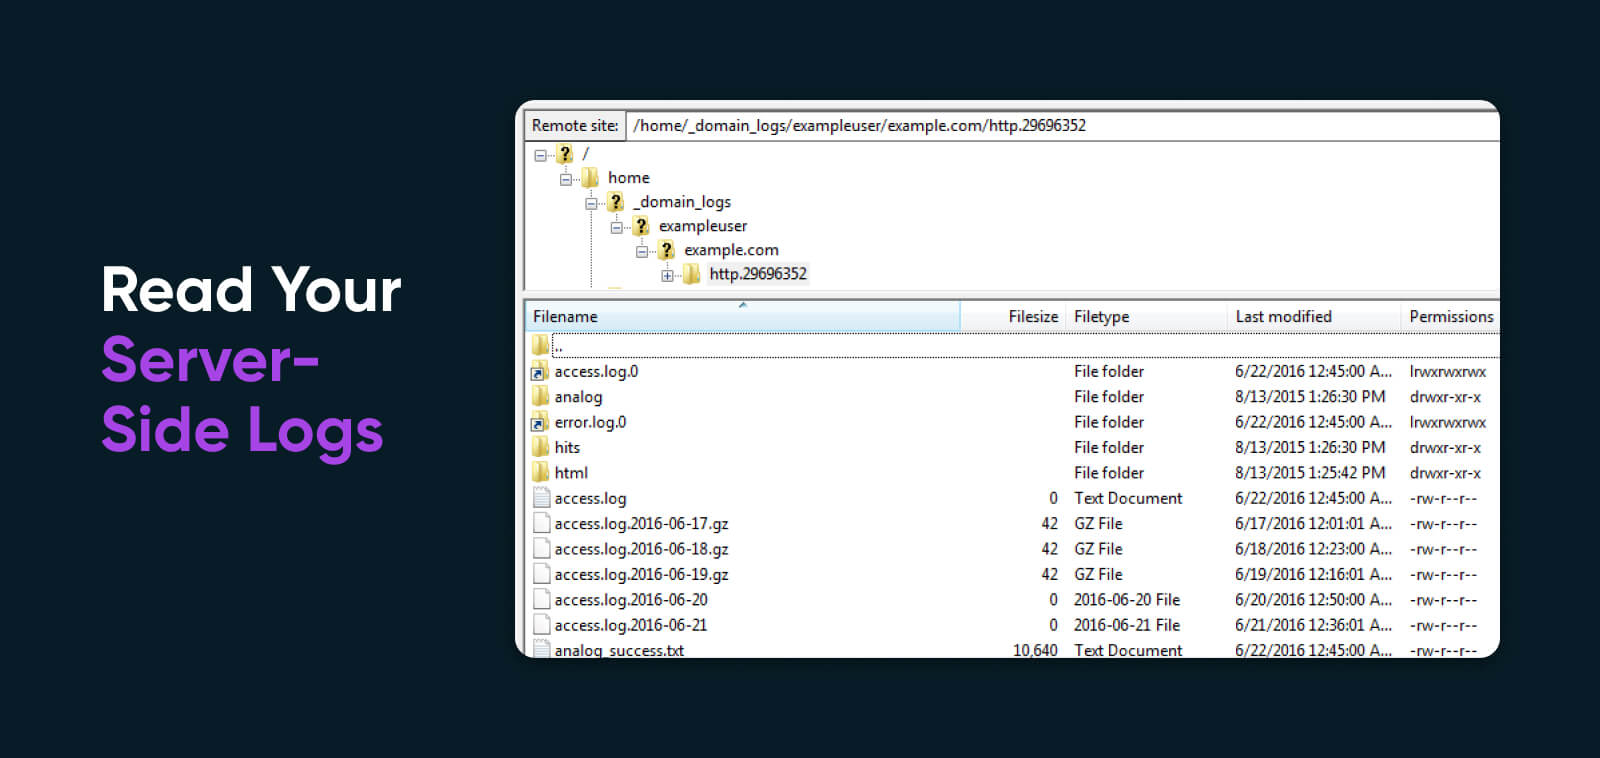
When you examine the files, check for errors relating to server configuration or changes to your web application code.
6) Confirm Your Web Server Configuration
As we mentioned earlier, the 405 Method Not Allowed error occurs when a web server rejects a request.
Most of the time, this is helpful. If your server did not block certain request methods, your site could easily be overwhelmed with unwanted attention.
But just like an over-aggressive club doorman, sometimes web servers block the wrong kind of requests, or wrongly restrict access to certain content. This is usually caused by incorrect server configuration. The result is that visitors are redirected to an error page.
To figure out whether this is the problem with your site, you will need to visit your server configuration file. The exact file name will depend on whether your web server software is Apache, Nginx, or Cloudflare.
We use Apache by default at DreamHost, so you’re looking for the .htaccess file in the root directory of your site. On VPS plans, you have the option to switch to Nginx hosting; in this case, your configuration file will be nginx.conf.
After finding the relevant file, open it with your preferred text editor. Next, search for Rewrite commands. These are associated with Apache’s mod_rewrite module.
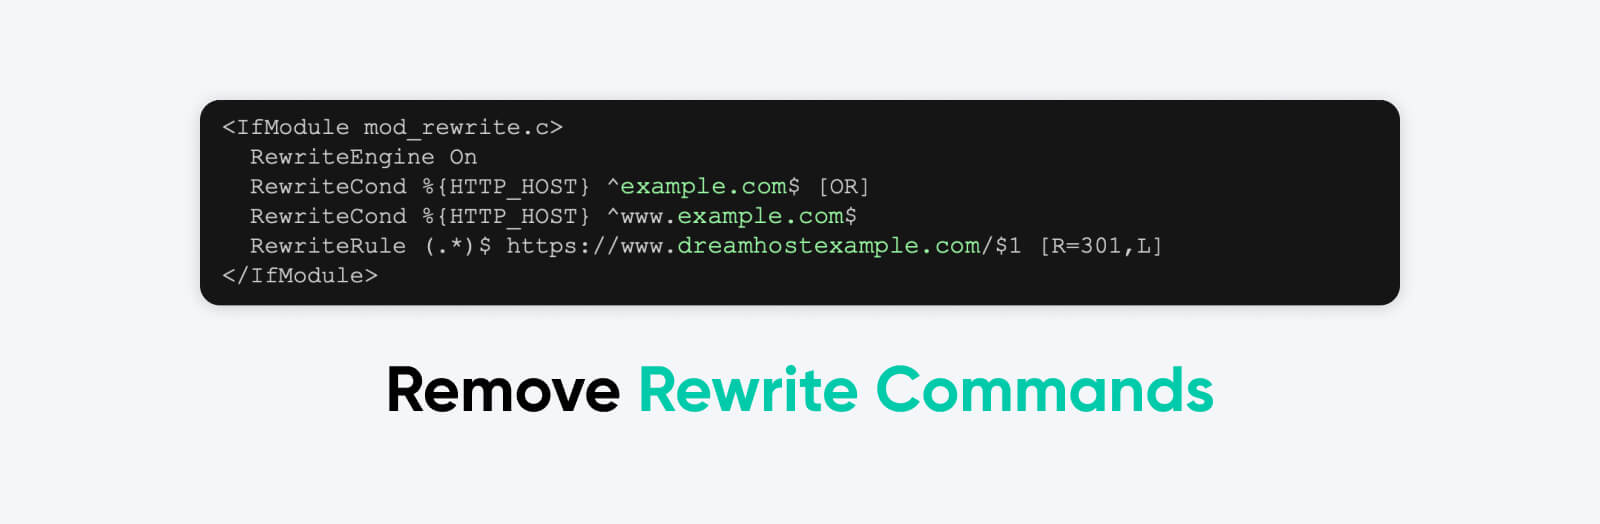
This module allows you to modify URLs that are requested by users, before they are processed by your server. This can be useful when you want to redirect users to a different page, divert certain types of traffic, or just display a more user-friendly URL.
The problems usually involve commands like this in your configuration file:
RewriteRule ^(.*)$ http: //example.com [R=405, L]This makes the server return a 405 HTTP response status code when someone visits the URL mentioned in the command.
If you’re struggling with persistent errors, try commenting out such commands in your config file. You can do this by adding a # at the start of the line you wish to comment out.
Alternatively, you can change the directive from RewriteEngine ON to RewriteEngine OFF.
7) Fix File Permissions
Another reason why a server might be blocking access to certain content is because your site permissions are misconfigured.
For instance, your server may allow an admin to use a specific HTTP method. But when a general site visitor tries the same request, they are blocked and handed an error code.
The fastest way to check and manage permissions is usually through your panel. DreamHost users can utilize the built-in file manager:
- Visit Manage Websites and tap the Manage button
- Open the directory for your website
- To view permissions, right click on any file and choose CHMOD
You may just discover that one of your important files does not have public read access.
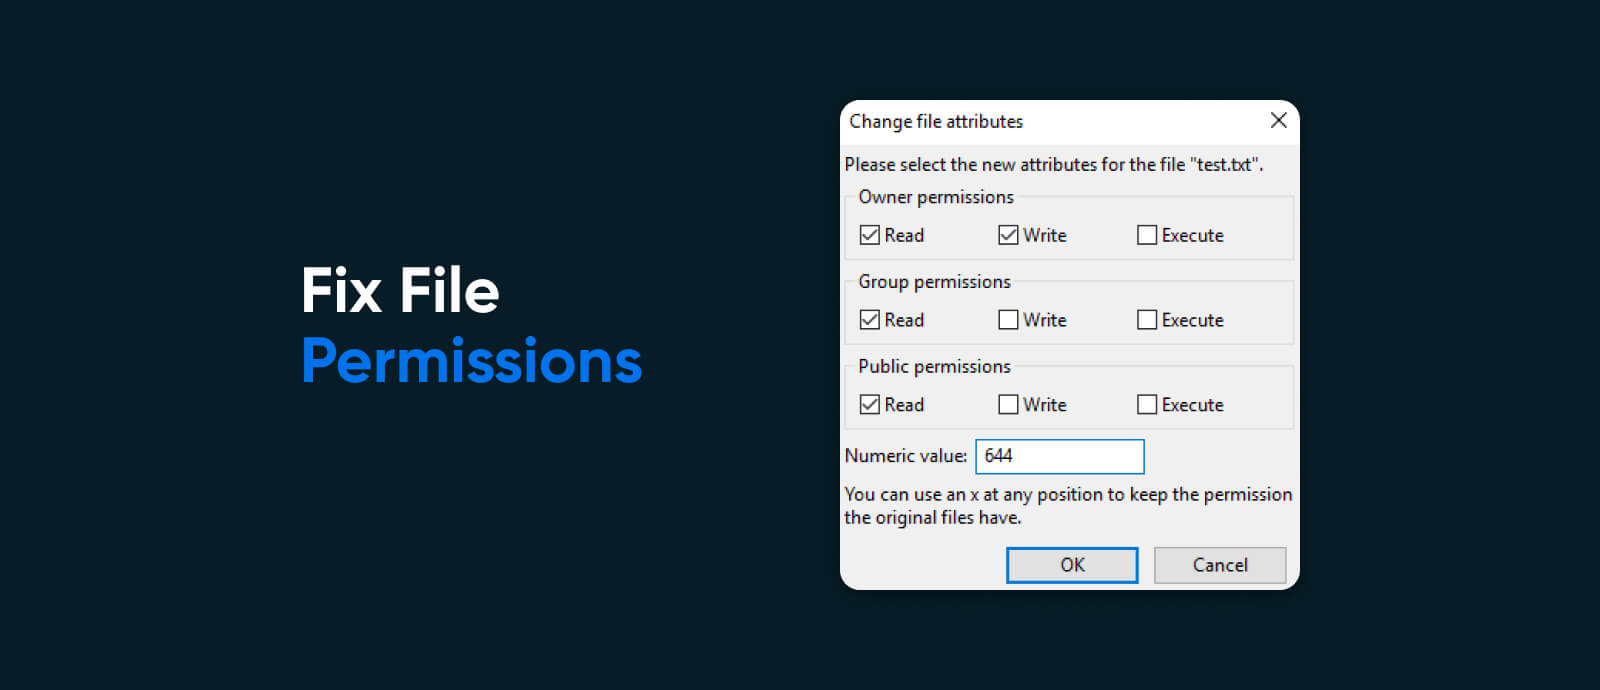
If you’re running your own private server or VPS, it’s also worth checking the configuration settings. Your server might be set up to accept only certain HTTP request methods for specific file types.
 Debug Your Code
 Debug Your Code
Ultimately, the cause of your 405 errors might be that something is wrong with the code of your website or web app.
To diagnose such problems, you will need to follow a full debugging process. This usually involves creating a complete local copy of your website, and then trying to recreate the error. Alternatively, you can use an online development environment.
The exact process you will need to follow is dependent on the CMS, scripts, and programming languages you’re using. If your site runs on WordPress and you are confident in the command line, you could try using WP-CLI.
9) Restore Your Whole Website
Sometimes in life, you need to know when to accept defeat and, as the kids say “take the L”.
If you’ve tried other fixes and nothing seems to work, you might just need to restore your site to how it was before the client errors arrived.
When you host any website with DreamHost, we always recommend making regular backups and keeping a copy of those files offline. But we do keep daily backups of every website that is hosted on our servers.
Cloud Hosting
Traditional web hosting houses a website on a physical server. On the other hand, “cloud hosting” uses multiple virtual (remote) servers for the same task.
Read More
This means you can restore your website to how it was yesterday with a couple of clicks.
To achieve this, head to Hosted Domains, and click the Restore button on the right-hand side.
Then, choose how far you want to go back in time, and select the “Make backup copy live” option. This will replace your current live site with your chosen backup.
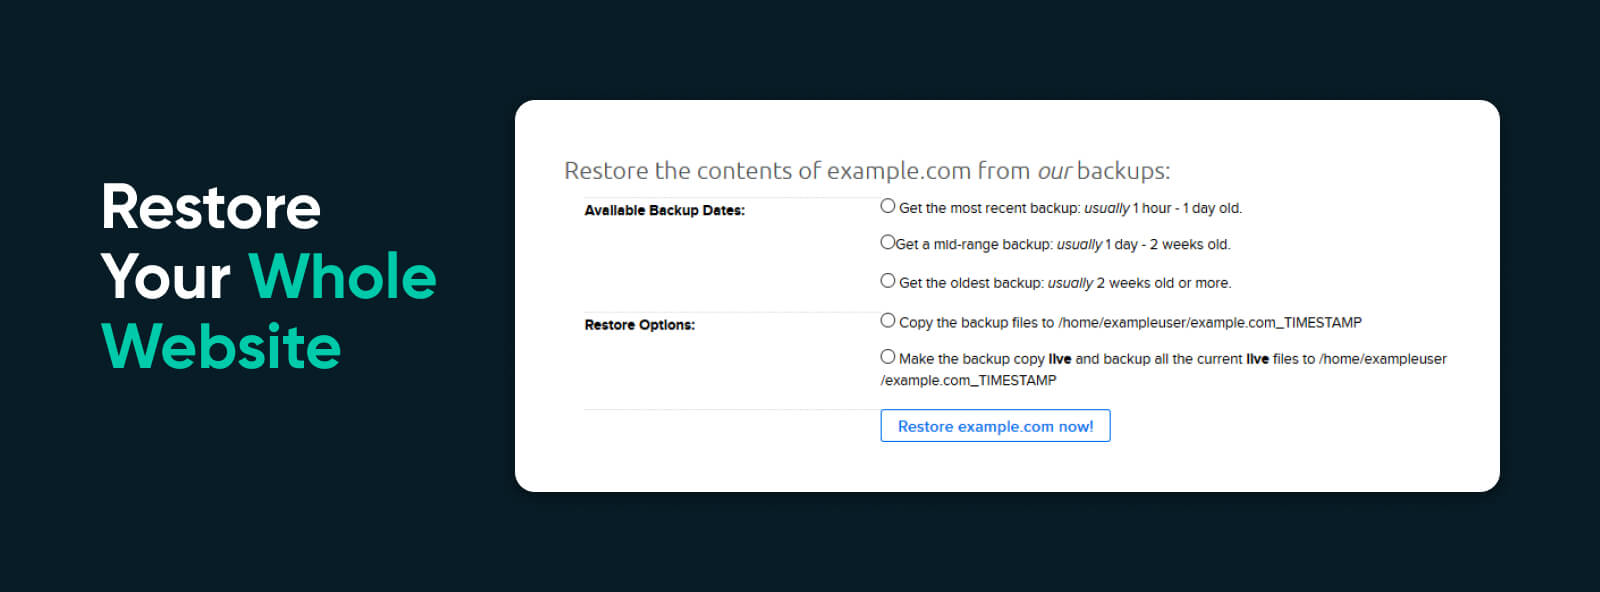
If you’re using DreamPress, you can complete the same process by visiting Managed WordPress and tapping the Manage button beside your domain.
Next, select the Backups tag and hit Restore on the archived version you want to use. Confirm with Start restore, and your site will soon be back to the way it was, without the 405 error.
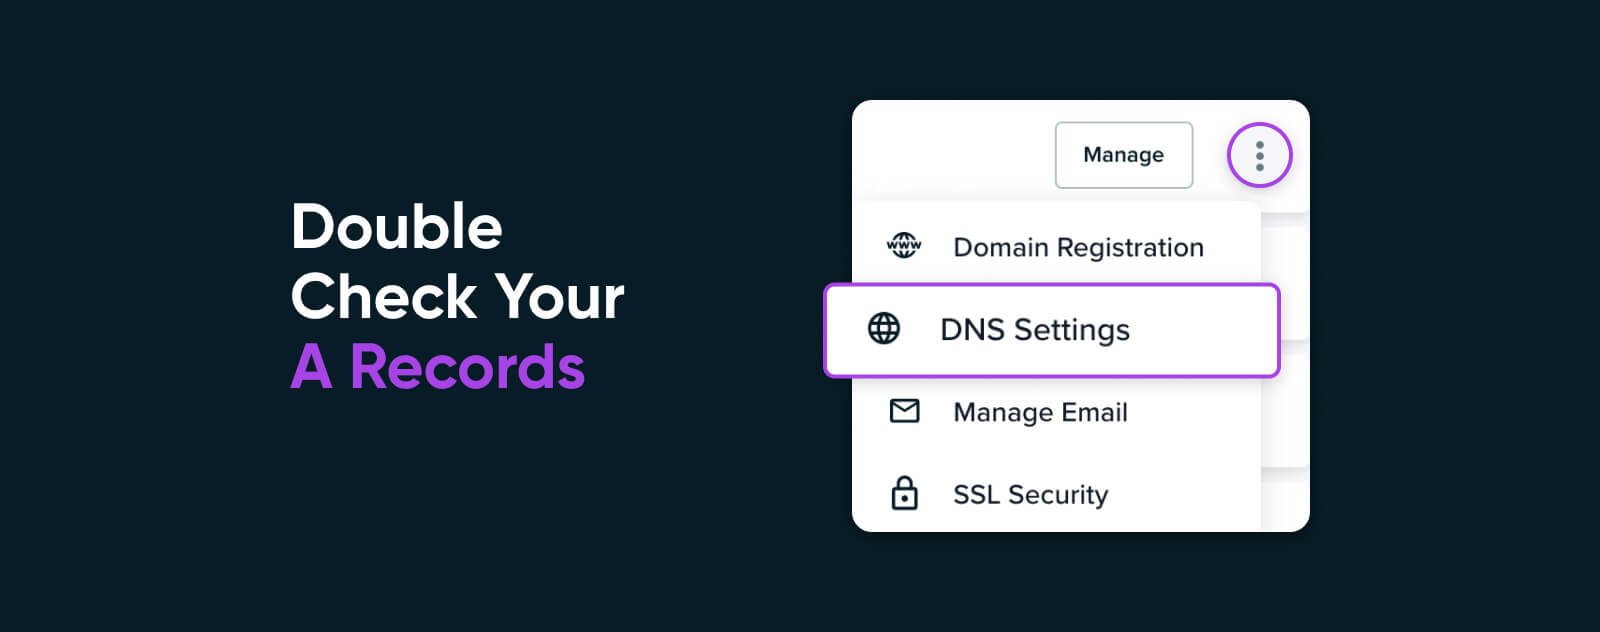
10) Double-Check Your A Records
One final tip: make sure the A records for your domain are configured correctly.
In some cases, you may see 405 errors if your A records are pointing towards the wrong server. For instance, a server that is set up for hosting your website might have different rules than one set up for hosting an API (Application Programming Interface).
If your domain is registered or managed via DreamHost, you can check your A records by visiting Manage Websites:
- Tap on the three dots
- Select DNS Settings from the menu
Bonus: Stop 405 Errors on Your API Calls
If your site relies on a connection with an external API, you might come across a 405 error because the API server is refusing your request. This is often down to incorrect request formatting.
To prevent this from happening, make sure to include a “Content-Type” header with your POST requests. Here are some examples:
- Java/PHP – Content-Type: application/json
- HTML – Content-Type: text/html; charset=UTF-8
- XML – Content-Type: application/xml
It’s also a good idea to include an “Accept” header:
- Java/PHP – Accept: application/json
- HTML – Accept: text/html
- XML – Accept: application/xml
Be sure to check API documentation, as well. You might find out that the type of request you’re making is not supported by the API. Likewise, your site or application logs may reveal the underlying problem here.
How to Stop the 405 Error From Returning
Working through all of the steps mentioned above is no small task. But if you’re willing to put in the effort, you should be able to banish all 405 errors that are showing up on your website or app.
Want to make sure you don’t go through the whole thing again? Here are a few key tips:
- Test your site – Whenever you install new plugins or themes, make sure to run some tests. If the change is going to cause 405 errors, it’s good to know early!
- Pay attention to authentication – Always keep an eye on who has access to what resources on your server.
- Help your users to troubleshoot – In the majority of cases, 405 errors are isolated to a specific user. Consider setting up custom error pages that include information about how users can fix the problem themselves.
With a little persistence, you can conquer the 405 error once and for all, and provide a seamless browsing experience for your visitors!
Get Content Delivered Straight to Your Inbox
Subscribe to our blog and receive great content just like this delivered straight to your inbox.
HTTP response status code 405 Method Not Allowed is a client error that is returned by the server to indicate that the resource specified by the request exists but the requested HTTP method is not allowed. For example, an HTTP method DELETE request is not allowed for a read-only resource.
The response is cacheable by default. If the default behavior needs to be overridden then the response must include the appropriate HTTP caching headers.
Usage
When the 405 Method Not Allowed error message is received, the client will understand that the resource exists but the specified request is not allowed. As part of the response, the server will send an Allow header to inform the client as to which operations are currently supported.
Note
Search engines like Google will not index a URL with 405 Method Not Allowed response status, and consequently, URLs that have been indexed in the past but are now returning this HTTP status code will be removed from the search results.
Example
In the example, the client requests a resource and the server responds with the 405 Method Not Allowed status because the client is trying to use an HTTP method DELETE on a read-only resource. When parsing the response, the client learns that only HTTP methods GET, HEAD, and OPTIONS operations are allowed.
Request==
DELETE /policies.pdf HTTP/1.1
Host: www.example.re
Response
HTTP/1.1 405 Method Not Allowed
Allow: GET, HEAD, OPTIONS
Content-Type: text/html
Content-Length: 157

<html>
  <head>
    <title>Operation Not Permitted</title>
  </head>
  <body>
    <p>This resource is read-only and cannot be deleted.</p>
  </body>
</html>
Code references
.NET
HttpStatusCode.MethodNotAllowed
Rust
http::StatusCode::METHOD_NOT_ALLOWED
Rails
:method_not_allowed
Go
http.StatusMethodNotAllowed
Symfony
Response::HTTP_METHOD_NOT_ALLOWED
Python3.5+
http.HTTPStatus.METHOD_NOT_ALLOWED
Java
java.net.HttpURLConnection.HTTP_BAD_METHOD
Apache HttpComponents Core
org.apache.hc.core5.http.HttpStatus.SC_METHOD_NOT_ALLOWED
Angular
@angular/common/http/HttpStatusCode.MethodNotAllowed
Takeaway
The 405 Method Not Allowed status code indicates that the resource exists but the specified operation is not allowed. A list of acceptable HTTP methods are returned to the client.
See also
- RFC 7231
Last updated: August 2, 2023