Веб-серверы Nginx и Apache мало похожи друг на друга, и их отличия касаются не только особенностей подключения пользователей, но и обработки URL на сервере. Очень часто новые пользователи Nginx получают ошибку 404 для URL, которые, по сути, должны были бы работать.
В этой статье рассмотрим, почему возникает ошибка «404 not found Nginx», а также способы её устранения и отладки.Мы не будем разбираться с ситуацией, когда файла действительно нет на сервере — это решение, не требующее пояснений. Мы рассмотрим проблему обработки location в Nginx.
Давайте сначала разберёмся, как обрабатываются URL в Nginx. Когда веб-сервер определил, к какому блоку server (сайту) нужно передать запрос пользователя, просматриваются все префиксные блоки location и выбирается тот, который подходит лучше всего. Например, рассмотрим стандартную конфигурацию для WordPress. Здесь префиксные location отмечены зелёным, а с регулярным выражением — оранжевым:
location / {
index index.html index.php;
}
location /favicon.ico {
access_log off;
}
location ~* \.(gif|jpg|png)$ {
expires 30d;
}
location ~ \.php$ {
fastcgi_pass localhost:9000;
fastcgi_param SCRIPT_FILENAME
$document_root$fastcgi_script_name;
include fastcgi_params;
}
Префиксные локейшены всегда начинаются с символа /. Регулярные же содержат символы регулярных выражений: ~ $ ^ * и так далее. Если пользователь запрашивает favicon.ico, то будет выбран второй location, так как он лучше всего соответствует запросу, при любом другом запросе будет выбран location /, так как он соответствует всем запросам, а других префиксных location у нас нет. Это просто, а дальше начинается магия. После того, как был найден нужный location, Nginx начинает проверять все регулярные выражения в порядке их следования в конфигурационном файле.
При первом же совпадении Nginx останавливает поиск и передаёт управление этому location. Или, если совпадений не было найдено, используется ранее обнаруженный префиксный location. Например, если запрос заканчивается на .php, то первый location будет проигнорирован, а управление передастся четвёртому (~ \.php$)
Таким образом, любое неверно составленное регулярное выражение в любой части конфигурационного файла может полностью всё сломать. Поэтому разработчики рекомендуют по минимум использовать регулярные выражения. Что касается вложенных location, то обрабатываются они так же как и основные, только уже после передачи управления в нужный location. Путём чтения конфигурационного файла понять, какой location вызывает 404 сложно, поэтому, чтобы исправить ошибку, нам понадобиться режим отладки Nginx.
Как включить режим отладки Nginx?
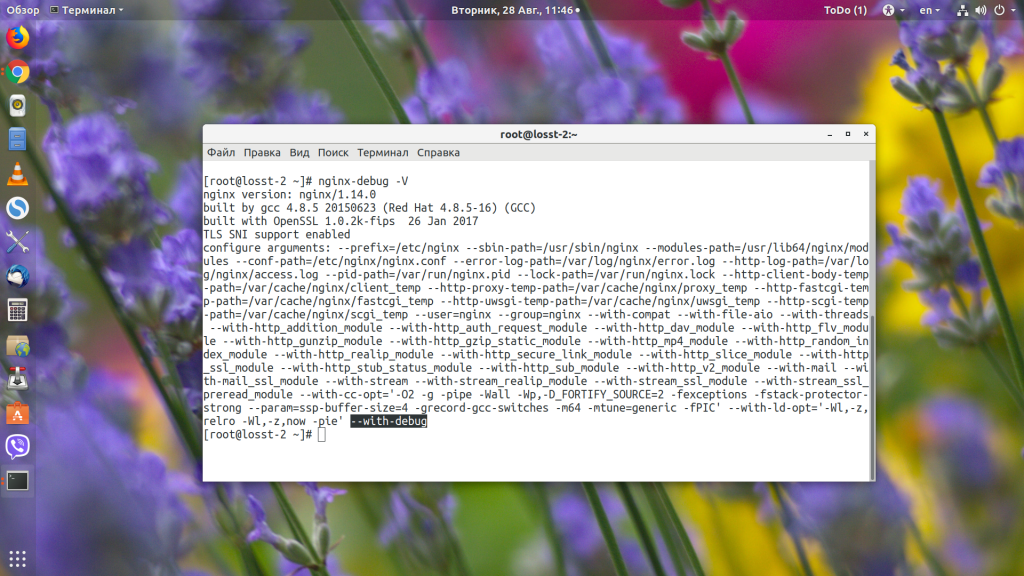
Сначала нам необходимо установить версию Nginx с поддержкой отладки. Чтобы проверить, поддерживает ли ваша текущая версия этот режим, наберите:
nginx -V
В выводе должна быть строчка «—with-debug». Если её нет, значит отладка не поддерживается, и надо установить версию с поддержкой. В CentOS такой пакет называется nginx-debug. Для его установки наберите:
sudo yum install nginx-debug
Теперь появился ещё один исполняемый файл, и он собран уже с поддержкой отладки:
nginx-debug -V
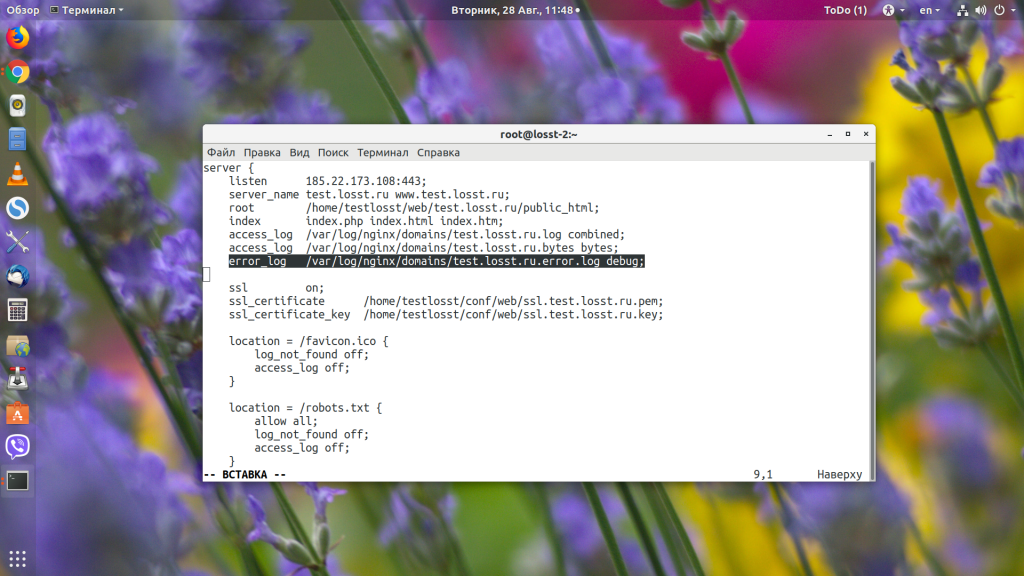
Откройте конфигурационный файл вашего сайта или глобальный конфигурационный файл, если вы не задавали настройки логов отдельно для каждого сайта, и в конце стоки error_log замените error на debug:
error_log /var/log/nginx/domains/test.losst.pro.error.log debug
Останавливаем обычную версию и запускаем версию с отладкой:
systemctl stop nginx
systemctl start nginx-debug
Как исправить «404 Not Found Nginx»?
1. Регулярные выражения
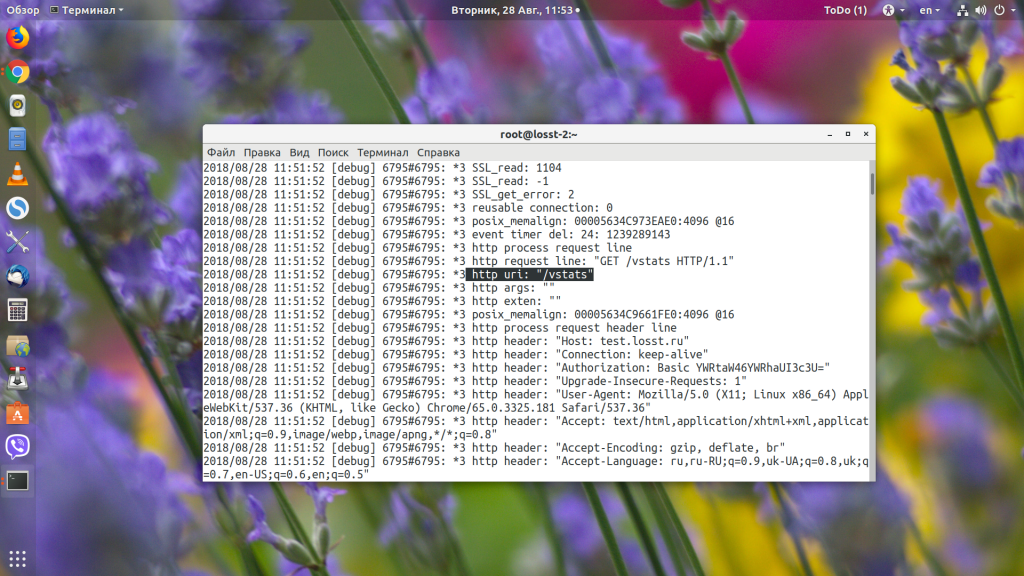
Как я уже сказал выше, самой частой проблемой, которая вызывает 404, являются регулярные выражения. Смотрим, что происходит в лог файле:
tail -f /var/log/nginx/domains/test.losst.pro.error.log
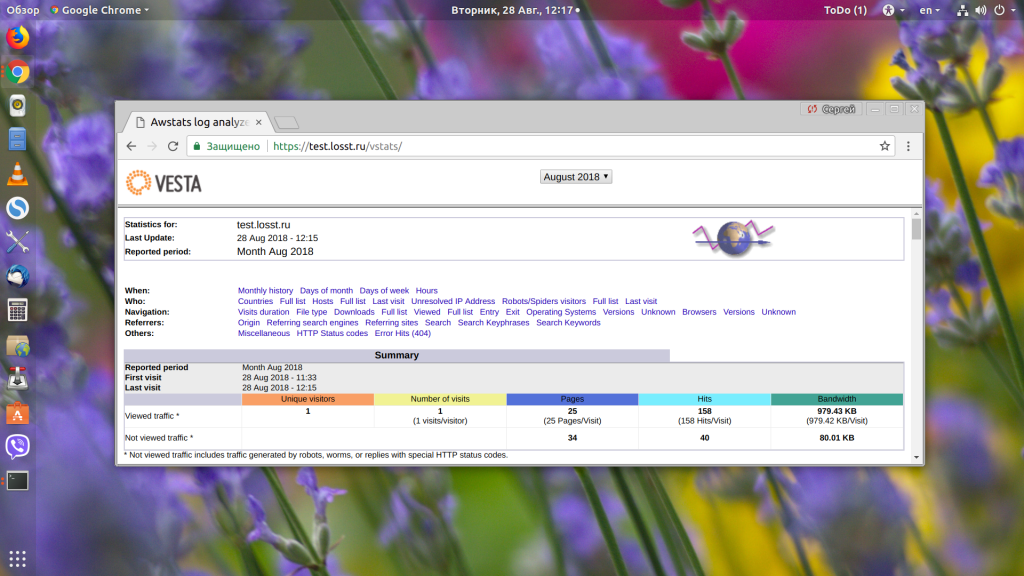
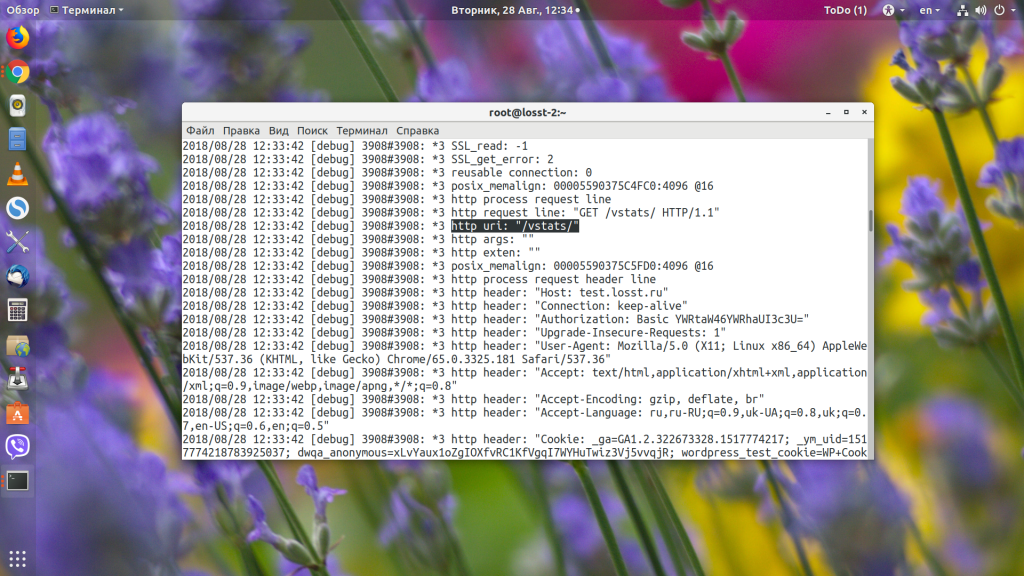
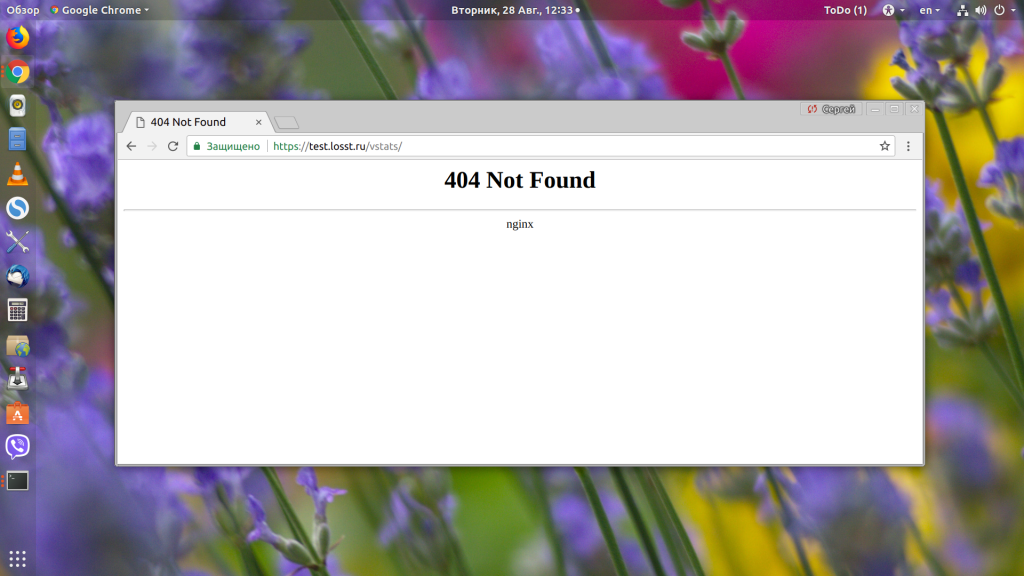
Видим, что серверу пришёл запрос /vstats. Дальше он проверяет location: /, /robots.txt, /vatsts/, /site-control/. Здесь уже можем понять, в чём проблема — промазали на один слеш. Дальше проверяются все регулярные выражения, и, так как в них ничего найдено не было, выбирается location /.
Далее директива try_files пытается найти файл /vstats, не находит и ищет index.php, который, в свою очередь, возвращает 404.
Если мы наберём, то что ожидает видеть Nginx — /vstats/, то откроется наша страница статистики.
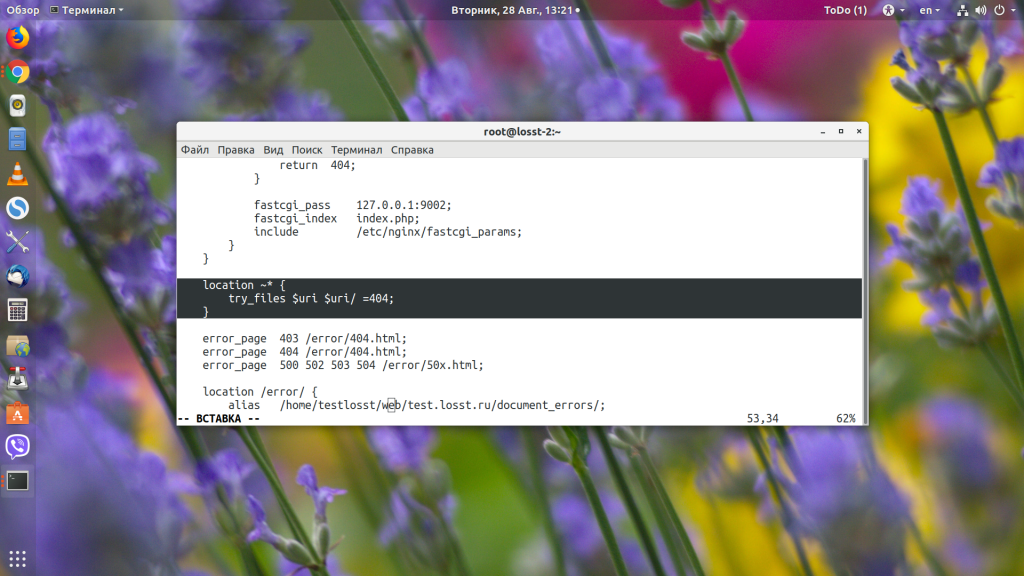
Если мы добавим к конфигурационному файлу ещё один location с регулярным выражением, например:
location ~* {

try_files $uri $uri/ =404;

}
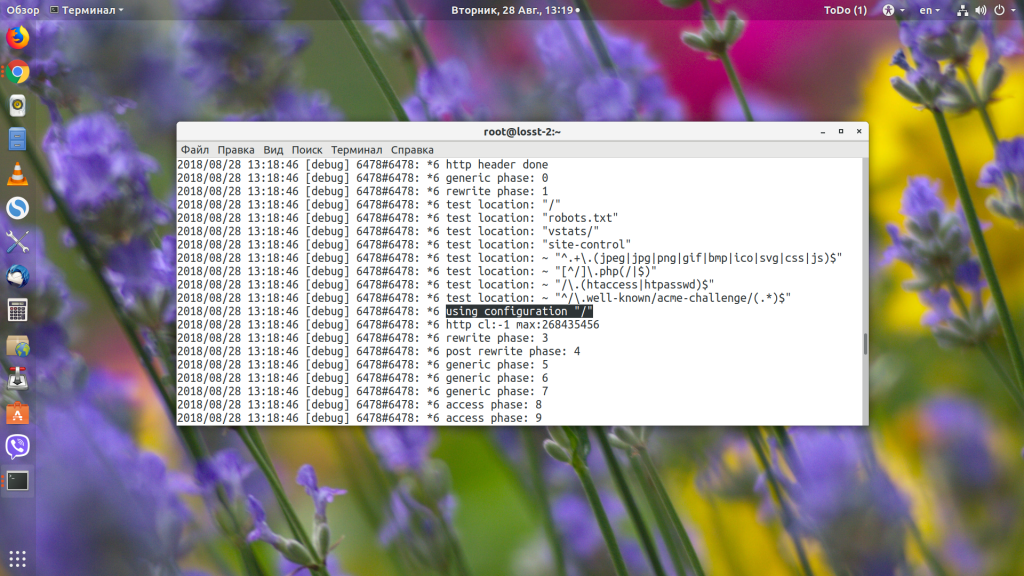
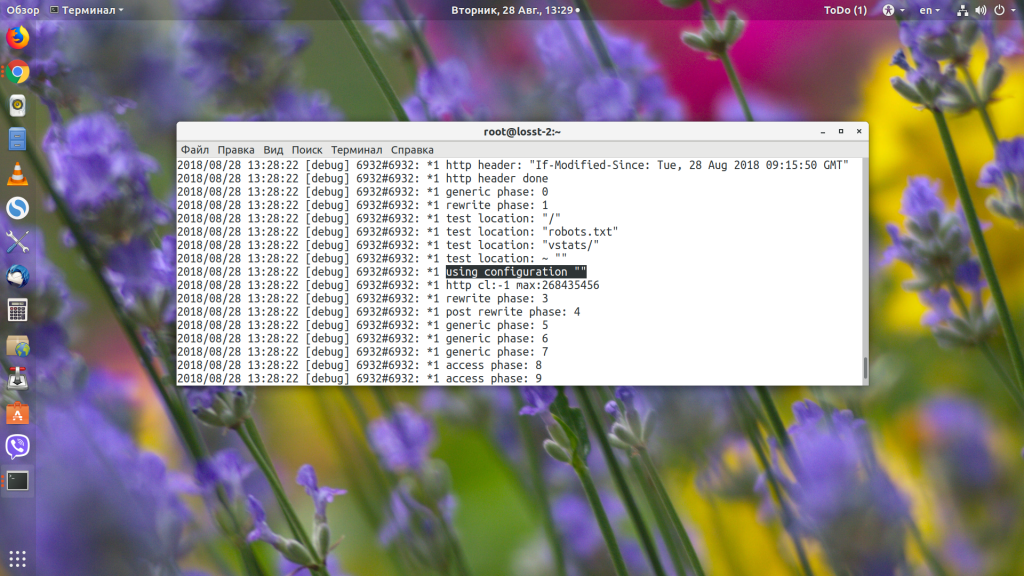
То абсолютно все запросы будут обрабатываться именно этим регулярным выражением и, естественно, что ничего работать не будет. Видим, что приходит запрос /vstats/:
Он совпадает с префиксным location, но потом Nginx видит наше регулярное выражение и передаёт управление ему.
Поэтому будьте очень осторожны с регулярными выражениями, если они вам нужны, то размещайте их только внутри префиксных location, чтобы ограничить их область действия этим location, иначе может возникнуть ошибка 404 nginx.
2. Недостаточно памяти
Если php-скрипту не хватило оперативной памяти для выполнения, и его процесс был убит операционной системой, то Nginx тоже может вернуть ошибку 404. Такое поведение вы будете наблюдать, когда скрипт очень долго выполняется, а потом появляется «404 Not Found» или страница ошибки вашего движка. Обычно эта неисправность тоже видна в отладочном логе.
Решить такую проблему можно, освободив память на сервере, часто такое может возникать из-за утечек памяти в php, когда процессы php-fpm занимают почти всю память на сервере. Поэтому перезапуск php-fpm решает проблему:
systemctl restart php-fpm
Чтобы избежать этой проблемы в будущем, можно настроить автоматический перезапуск процессов после обработки определённого количества запросов. Например каждые 200 запросов:
vi /etc/php-fpm.d/www.conf
pm.max_requests = 200
3. Не найден index
Если вы запрашиваете URL вида /vstats/, но в настройках Nginx не указан файл index, который нужно использовать для этой ссылки, то у вас ничего не выйдет, и вы получите 404. Вы можете добавить директиву index в ваш location:
location / {

index index.php index.html index.htm;

}
Или сразу в server, в Nginx все location наследуют директивы, установленные в server.
4. Другие проблемы
Подобных проблем, вызывающих 404 в Nginx, может быть очень много, но все они решаемы, и всё, что нужно для их решения, есть в отладочном логе Nginx. Просто анализируйте лог и на основе этого вносите исправления.
Выводы
В этой статье мы рассмотрели основные причины, из-за которых может возникнуть ошибка 404 not found Nginx. Как видите, может быть много проблем, но всё достаточно просто решается. А с какими проблемами, вызывающими эту ошибку, вы сталкивались? Как их решали? Напишите в комментариях!
Обнаружили ошибку в тексте? Сообщите мне об этом. Выделите текст с ошибкой и нажмите Ctrl+Enter.
Статья распространяется под лицензией Creative Commons ShareAlike 4.0 при копировании материала ссылка на источник обязательна .
Ubuntu is one of the popular and widely used Linux distributions, which, in contrast to the valuable features it offers, has flaws that may be annoying for users. Fortunately, the powerful and lovely Linux does not leave worries in the hearts of users. Therefore, you can easily solve your problems in Linux by finding solutions.
For this reason, today users prefer buying Ubuntu VPS to other operating systems because they are sure of the features of Linux in solving all problems. One of the common problems of users using Ubuntu is receiving errors when updating the Ubuntu repository and repeatedly usingapt-get(apt-get update).
If you are an Ubuntu user, most likely you have experienced various errors including the “404 Not found” error when updating the package list of the old version of Ubuntu using apt-get. Encountering this error is due to the short-term support (9 months) of Ubuntu versions, and if an old version is not supported, you will receive an error message. Don’t panic and worry when you see these errors in Ubuntu, this error is common and very easy to fix. In this article, you will learn the instructions to fix the common Ubuntu update error; by following the instructions in this article, your problem will be solved.
Solving the problem of receiving a “404 Not Found” error in Ubuntu
When you update the repository and packages of the old version of Ubuntu by running the “apt-get update” command, getting a “404 Not Found” error is one of the common errors in Ubuntu.
sudo apt-get updateGet:1 http://security.ubuntu.com/ubuntu jammy-security InRelease [110 kB]
Ign:2 http://old-releases.ubuntu.com/ubuntu jammy InRelease
Ign:3 http://old-releases.ubuntu.com/ubuntu jammy-updates InRelease
Ign:4 http://old-releases.ubuntu.com/ubuntu jammy-backports InRelease
Hit:5 https://packages.microsoft.com/repos/azure-cli jammy InRelease
Err:6 http://old-releases.ubuntu.com/ubuntu jammy Release
404 Not Found [IP:********** **]
Ign:7 http://security.ubuntu.com/ubuntu impish-security InRelease
Err:8 http://old-releases.ubuntu.com/ubuntu jammy-updates Release
404 Not Found [IP:********** **]
Err:9 http://security.ubuntu.com/ubuntu impish-security Release
404 Not Found [IP:********** **]
Err:10 http://old-releases.ubuntu.com/ubuntu jammy-backports Release
404 Not Found [IP:********** **]
Hit:11 http://apt.postgresql.org/pub/repos/apt jammy-pgdg InRelease
Reading package lists… Done
E: The repository ‘http://old-releases.ubuntu.com/ buntu jammy Release’ does not have a Release file.
N: Updating from such a repository can’t be done securely, and is therefore disabled by default.
N: See apt-secure(8) manpage for repository creation and user configuration details.This error indicates that the URL defined to access other resources in the default location http://archive.ubuntu.com/ubuntu/dist/ is not available, which is due to Ubuntu moving the repositories to another server.
This error is usually displayed when you intend to add a PPA repository to Ubuntu. If you ask why? In response, it should be said that if the PPA repository does not support the version of Ubuntu you are using and is not available for your version of Ubuntu, you will receive a 404 Not Found error. Also, the incompatibility of the PPA repository with Ubuntu causes problems in updating the repository and the package list of the Ubuntu operating system. Therefore, one of the solutions to avoid receiving errors is to check the availability and compatibility of the PPA repository for the version of Ubuntu you are using, before installing the PPA.
Maybe you have a question about what PPA is and how to install PPA. We have already guided you in detail about what PPA is, you can benefit from our educational articles.
Solving the problem of receiving the “404 Not Found” error when updating Ubuntu is possible in two ways, the graphical interface and the command line. In this training, we will teach both methods so that you can solve your problem with whichever method is more convenient for you.
Method 1: Fixing the “404 Not Found” Error via the command line
Expert and experienced Linux users find it easier and more efficient to troubleshoot and solve Linux problems through the command line. There are different ways to solve this problem. The methods that you can use through the command line to solve the “404 Not Found “error and correct the performance of apt commands are as follows:
- Upgrading the version of Ubuntu
- Updating old package repositories’ source URLs
- Restoring the default Ubuntu repository and removing the PPA repository
Distribution Upgrade
The most basic and easiest step to solve this problem is to upgrade Ubuntu by running the following command:
sudo apt-get dist-upgradeIf the problem is solved by upgrading the version of Ubuntu, that is great; If the problem still persists, you should try other methods.
Changing Packages Url
If you failed to solve this problem by upgrading the Ubuntu version, updating the source URL for the Ubuntu repository can be a useful way to solve the “404 Not Found” error. By updating the source URL for Ubuntu repositories you will find older packages.
Thesedcommand helps you update the resources in the /etc/apt/sources.list file.
sudo sed -i -e 's/archive.ubuntu.com\|security.ubuntu.com/old-releases.ubuntu.com/g' /etc/apt/sources.listNormal versions of Ubuntu due to dependency on archive…. and security… URLs after 9 months when the support for the Ubuntu version is stopped, the relevant repositories will be moved to old-releases. Therefore, by running the previous command, archive.ubuntu.com, and security.ubuntu.com package repository URLs are updated along with old-releases.ubuntu.com.
Update the other files in /etc/apt/sources.list.d/ that need to be updated using thegrepcommand:
grep -E 'archive.ubuntu.com|security.ubuntu.com' /etc/apt/sources.list.d/*Then update the Ubuntu source again:
sudo apt-get updateYou can take additional measures in this field to solve your problem. Follow the instructions below:
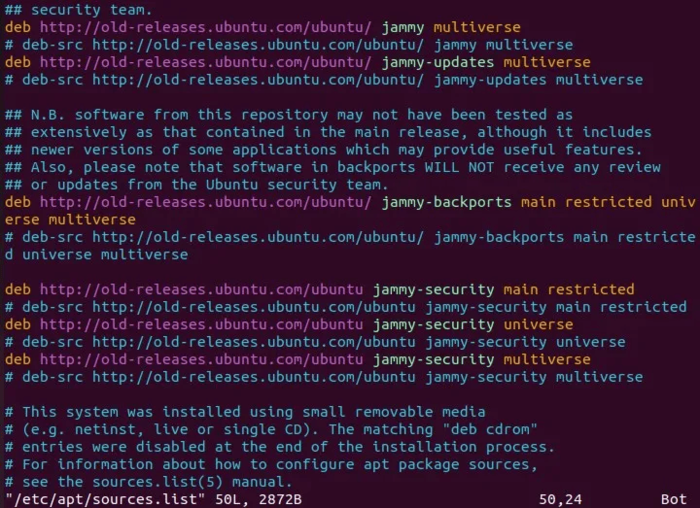
- Access the contents of the /etc/apt/sources.list file using your favorite editor (vim editor is preferred in this tutorial):
vim /etc/apt/sources.list- Add the following comment because the repository support is discontinued:
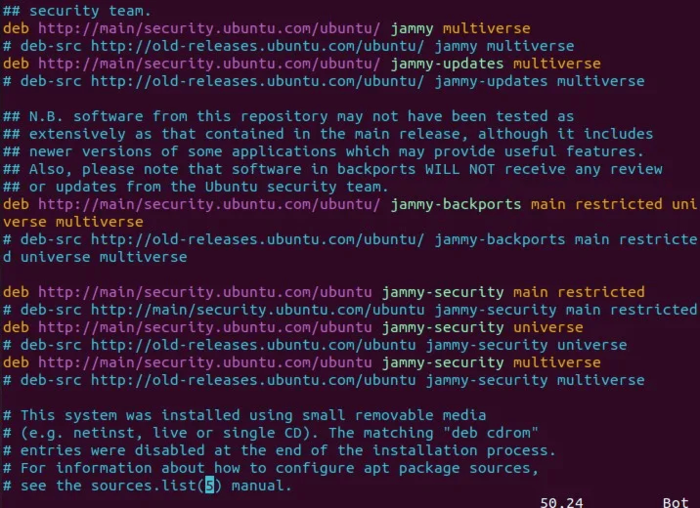
#extras.ubuntu.com- After commenting out extras.ubuntu.com, replace main/security repositories with old-releases by following the procedure you see:
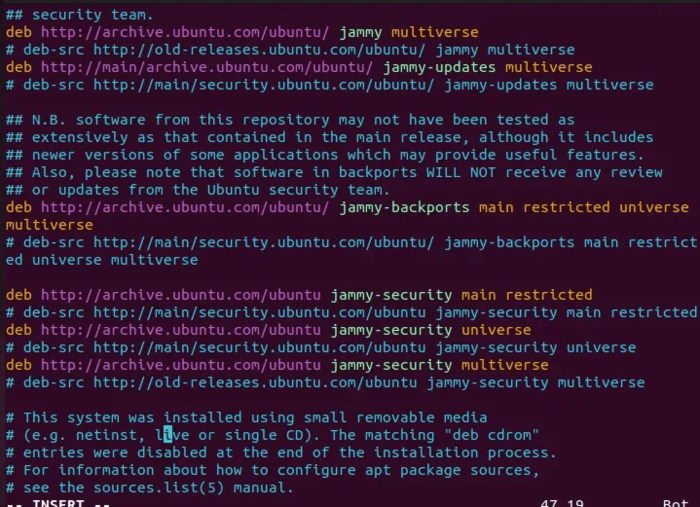
You can replace archive instead of main/security:
If the “404 not found” error is fixed by following the instructions of this method, you do not need to read the rest of the article, otherwise, you should use other methods.
Restoring the default Ubuntu repository and removing the PPA repository
The incompatibility of PPA repositories in Ubuntu is one of the common reasons for receiving the 404 Not Found error, that’s why restoring the default Ubuntu repository and removing the incompatible PPA repository can solve this problem. For this purpose, first, create a directory and add the following commands to it:
mkdir ~/solution
cd ~/solution/

cat << EOF > ~/solution/sources.list
deb http://archive.ubuntu.com/ubuntu/ focal main restricted universe multiverse
deb-src http://archive.ubuntu.com/ubuntu/ focal main restricted universe multiverse
deb http://archive.ubuntu.com/ubuntu/ focal-updates main restricted universe multiverse
deb-src http://archive.ubuntu.com/ubuntu/ focal-updates main restricted universe multiverse
deb http://archive.ubuntu.com/ubuntu/ focal-security main restricted universe multiverse
deb-src http://archive.ubuntu.com/ubuntu/ focal-security main restricted universe multiverse
deb http://archive.ubuntu.com/ubuntu/ focal-backports main restricted universe multiverse
deb-src http://archive.ubuntu.com/ubuntu/ focal-backports main restricted universe multiverse
deb http://archive.canonical.com/ubuntu focal partner
deb-src http://archive.canonical.com/ubuntu focal partner
EOF
sudo rm /etc/apt/sources.list
sudo cp ~/solution/sources.list /etc/apt/sources.list
Then, by running the following command, remove all the PPA repository from the Ubuntu system:
sudo mv /etc/apt/sources.list.d/* ~/solutionYou can also use another method to remove the PPA repository. You can directly remove the PPA repository by mentioning the desired PPA repository name:
sudo add-apt-repository --remove ppa:<ppa_repository name>Finally, update your Ubuntu system again to check if the “404 Not Found” error is resolved:
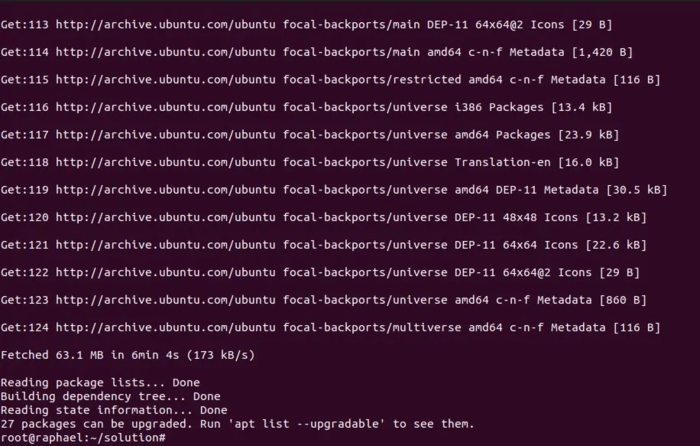
sudo apt-get updateThe output reports that this problem has been solved. Finally, your problem has been successfully solved.
Method 2: Fixing the “404 Not Found” Error via GUI
The Linux GUI is the easiest way for novice users to solve their problems, so follow the instructions to solve the problem of getting a “404 Not Found” error through the GUI:
1. Open the Ubuntu Application Menu and select the Software & Updates option.
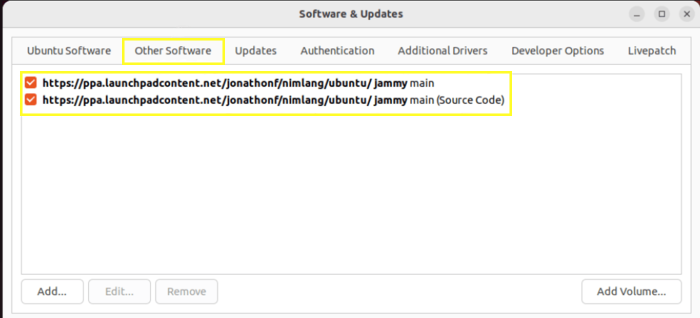
2. Select the Other software tab to access a list of PPA repositories you have installed.
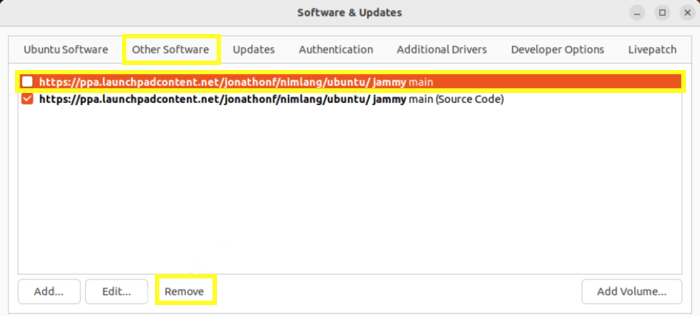
3. In the list of PPA repositories, find the repository associated with the 404 Not Found error and remove it by marking the box next to the desired PPA repository and clicking the Remove button.
Note: Never delete the main repository. We have chosen the main repository to delete for training in the image you see. Uncheck the main repository from the list of repositories you want to remove and do not delete it.
4. To ensure the problem is solved, run thesudo apt-get updatecommand and check if you get a 404 Not Found error when updating the Ubuntu repository.
Most likely, your problem will be solved. We got over this problem so easily.
FAQ
- PPA repository incompatibility and failure
- The Existence of non-working URLs in the resource repository files (/etc/apt/sources.list)
- The short period of support for regular versions of Ubuntu and the need for regular updates
the apt-get upgrade is executed to upgrade the actual packages that are installed, while the package index files are updated by running the apt-get update. Using these two commands, the list of packages and the Ubuntu operating system is updated and you can use the latest software, security patches, and technologies.
Not at all, it is always recommended to update Ubuntu to take advantage of new features, security updates, kernel upgrades, bug fixes, stability, and performance improvements. Therefore, updating Ubuntu provides valuable advantages; also if you use the normal version of Ubuntu, after 9 months the support for the old version of Ubuntu will be stopped, and updating the version of Ubuntu will be a necessity.
Conclusion
PPA is a repository that provides rare and unique software to Ubuntu users, and Linux users install the PPA repository on Ubuntu to benefit from software that is not supported by the default Ubuntu repository. Sometimes PPA repositories are not compatible with older versions of Ubuntu and do not work properly; With the discontinuation of support for Ubuntu versions, when updating Ubuntu repositories, users will receive a 404 Not Found error due to the incompatibility of PPA repositories with the Ubuntu system or the presence of broken URLs in the source repository file (/etc/apt/sources.list).
Removing broken and incompatible PPA repositories from the Ubuntu system is one of the main solutions to solve this problem. In this training, we taught different methods to solve your problem. We hope you can fix “404 Not Found Repository Errors” in Ubuntu using the instructions in this article.
If you need more help in any part of the article, ask us your questions in the comments section and we will answer your questions as soon as possible.
If you use the desktop edition of Ubuntu, you may ultimately run into the issue where apt-get update frequently returns “Failed to obtain 404 Not Found” warnings. The identical issue could also arise when using apt-get install. Not to worry; it will be resolved shortly. In this guide we went through all the commonly known troubleshooting steps that can fix the problem. Other guides are here: Change User Account Type in Windows 10 and How to modify Windows 11 Taskbar via Intune and GPO also How to Change User Account Type in Windows 10 again upgrade from Ubuntu 20.04 LTS to 22.04 LTS and install Rust in a Linux System and Change User Account Type in Windows 10. In this article, you will learn how to Fix 404 Not Found Repository Errors in Ubuntu/Debian distribution.
The Issue “404 Not Found Repository Errors”
When using the apt-get update or apt-get install command, you can encounter messages similar to the ones below. This is due to the short 9-month support period for Ubuntu versions. Releases with LTS (Long Term Support) have support for 5 years. You’ll start receiving those error messages as soon as the version you’re using loses support. Please refer to these exciting guides: VMSA-2022-0026: An arbitrary file read vulnerability in VMware Aria Operations, how to Search Group Policy for a Specific Setting in Windows 10 and Windows 11, and how to Deploy Code from GitHub to Azure App Service from the Command-line.
The default location below is no longer available due to Ubuntu moving the repositories to a different server.
http://archive.ubuntu.com/ubuntu/dist/rdgmh@raphael:~$ sudo su
[sudo] password for rdgmh:
root@raphael:/home/rdgmh# apt update
Get:1 http://security.ubuntu.com/ubuntu jammy-security InRelease [110 kB]
Ign:2 http://old-releases.ubuntu.com/ubuntu jammy InRelease
Ign:3 http://old-releases.ubuntu.com/ubuntu jammy-updates InRelease
Ign:4 http://old-releases.ubuntu.com/ubuntu jammy-backports InRelease
Hit:5 https://packages.microsoft.com/repos/azure-cli jammy InRelease
Err:6 http://old-releases.ubuntu.com/ubuntu jammy Release
404 Not Found [IP: 91.189.91.124 80]
Ign:7 http://security.ubuntu.com/ubuntu impish-security InRelease
Err:8 http://old-releases.ubuntu.com/ubuntu jammy-updates Release
404 Not Found [IP: 91.189.91.124 80]
Err:9 http://security.ubuntu.com/ubuntu impish-security Release
404 Not Found [IP: 91.189.91.38 80]
Err:10 http://old-releases.ubuntu.com/ubuntu jammy-backports Release
404 Not Found [IP: 91.189.91.124 80]
Hit:11 http://apt.postgresql.org/pub/repos/apt jammy-pgdg InRelease
Reading package lists... Done
E: The repository 'http://old-releases.ubuntu.com/ubuntu jammy Release' does not have a Release file.
N: Updating from such a repository can't be done securely, and is therefore disabled by default.
N: See apt-secure(8) manpage for repository creation and user configuration details.
E: The repository 'http://old-releases.ubuntu.com/ubuntu jammy-updates Release' does not have a Release file.
N: Updating from such a repository can't be done securely, and is therefore disabled by default.
N: See apt-secure(8) manpage for repository creation and user configuration details.
E: The repository 'http://security.ubuntu.com/ubuntu impish-security Release' does not have a Release file.
N: Updating from such a repository can't be done securely, and is therefore disabled by default.
N: See apt-secure(8) manpage for repository creation and user configuration details.
E: The repository 'http://old-releases.ubuntu.com/ubuntu jammy-backports Release' does not have a Release file.
N: Updating from such a repository can't be done securely, and is therefore disabled by default.
N: See apt-secure(8) manpage for repository creation and user configuration details.
N: Skipping acquire of configured file 'main/binary-i386/Packages' as repository 'http://apt.postgresql.org/pub/repos/apt jammy-pgdg InRelease' doesn't support architecture 'i386'
root@raphael:/home/rdgmh#
There are three ways to make your apt commands function properly once more. Upgrade the Ubuntu release first. Second, change the old package repositories’ sources urls. and finally restore the PPA and default repository. The details of the three options are provided below.
sudo apt-get dist-upgrade As you can see, this didn’t solve the problem so we will go with option 2. You can alter the sources url for the Ubuntu repository to find the older packages if an immediate distribution upgrade is not an option.
Update Packages Url
To update the sources in /etc/apt/sources, use the sed tool. list file to the new repository location for outdated packages
sudo sed -i -e 's/archive.ubuntu.com\|security.ubuntu.com/old-releases.ubuntu.com/g' /etc/apt/sources.listUse the grep command below to see if there are any other files in /etc/apt/sources.list.d/ that require updating.
grep -E 'archive.ubuntu.com|security.ubuntu.com' /etc/apt/sources.list.d/* There are a series of steps we need to take further
- open /etc/apt/sources.list with a text editor, in this case, i have chosen to use vim so the command will be as shown below:
vim /etc/apt/sources.list2. We need to comment out extras.ubuntu.com like this below
#extras.ubuntu.com The reason we are commenting it out is because the repo is no longer supported
3. replace main/security repositories with old-releases versions as follows.

this solution too did not work. Even replaced main/security with the archive as shown below
Replace default repository: The only solution that worked!
The majority of the PPAs and repositories in your sources.list are broken and no longer functional. The default repositories should be restored, in my opinion.
So let’s make a directory change into it and write the following code
mkdir ~/solution
cd ~/solution/

cat << EOF > ~/solution/sources.list
deb http://archive.ubuntu.com/ubuntu/ focal main restricted universe multiverse
deb-src http://archive.ubuntu.com/ubuntu/ focal main restricted universe multiverse

deb http://archive.ubuntu.com/ubuntu/ focal-updates main restricted universe multiverse
deb-src http://archive.ubuntu.com/ubuntu/ focal-updates main restricted universe multiverse

deb http://archive.ubuntu.com/ubuntu/ focal-security main restricted universe multiverse
deb-src http://archive.ubuntu.com/ubuntu/ focal-security main restricted universe multiverse

deb http://archive.ubuntu.com/ubuntu/ focal-backports main restricted universe multiverse
deb-src http://archive.ubuntu.com/ubuntu/ focal-backports main restricted universe multiverse

deb http://archive.canonical.com/ubuntu focal partner
deb-src http://archive.canonical.com/ubuntu focal partner
EOF

sudo rm /etc/apt/sources.list
sudo cp ~/solution/sources.list /etc/apt/sources.listRemove all the PPAs in your system:
sudo mv /etc/apt/sources.list.d/* ~/solutionrun the command to update again and you will see that the problem has been solved
apt updateSummary
404 Not Found is a common problem in Ubuntu and the only effective way to solve this is to replace the default repository just as we saw in the final step above. I hope you found this blog post helpful on how to Fix 404 Not Found Repository Errors in Ubuntu/Debian distribution. If you have any questions, please let me know in the comment session.
When you’re running a website on an Nginx web server, encountering a 404 Not Found error can be frustrating. This error typically means that while the server itself is reachable, the specific page you’re trying to access isn’t. In this article, we’ll guide you through some troubleshooting steps to resolve this issue.
To troubleshoot a 404 Not Found error on an Nginx web server, you should first check the Nginx configuration to ensure that the server block is properly set up with the correct root directory and index file. Next, verify the file permissions and make sure they are readable by the Nginx user. If your website uses HTTPS, check the SSL configuration as well. Restart Nginx after making any changes. If the issue persists, check the Nginx error log for more specific information.
- Understanding the 404 Error
- Check the Nginx Configuration
- Verify Server Block Configuration
- Check File Permissions
- Check the SSL Configuration
- Restart Nginx
- Check the Nginx Error Log
- Conclusion
Understanding the 404 Error
The 404 Not Found error is an HTTP status code that means the server couldn’t find the requested resource. In the context of a web server like Nginx, this usually means that there’s no match for the URL you’re trying to access in the server’s configuration or the file doesn’t exist in the site’s root directory.
Check the Nginx Configuration
The first step in troubleshooting is to check your Nginx configuration. The configuration files for Nginx are typically located in the /etc/nginx/ directory.
Verify Server Block Configuration
The server block (also known as a virtual host) configurations are located in the /etc/nginx/sites-available/ directory. Each website hosted on your server should have its own configuration file here.
Here’s an example of what a server block might look like:
server {
 listen 80;
 server_name test.com www.test.com;
 root /var/www/test.com/html;
 index index.html index.htm;
}
In this example, listen 80; is telling Nginx to listen on port 80, which is the standard HTTP port. The server_name directive should be set to your website’s domain name. The root directive specifies the root directory of your website, where your index file is located. The index directive lists the names of files that Nginx should try to serve as the default page if a specific one isn’t requested.
Make sure that the root directive points to the correct directory and that an index file exists there.
Check File Permissions
Next, check the permissions of the files and directories of your website. They should be readable by the user that Nginx runs as, which is usually www-data.
You can check the current permissions with the ls -l command:
ls -l /var/www/test.com/htmlThe output will show the permissions, owner, group, and name of the files and directories in the specified directory. The permissions are displayed in the form rwxrwxrwx, which represents the permissions for the owner, group, and others, respectively. The r stands for read, w for write, and x for execute.
If the permissions are incorrect, you can change them with the chmod command, and you can change the owner with the chown command:
sudo chown -R www-data:www-data /var/www/test.com/html
sudo chmod -R 755 /var/www/test.com/html
In the chown command, -R means to apply the change recursively to the directory and its contents. www-data:www-data is the user and group that you’re changing the owner to.
In the chmod command, 755 sets the permissions to read, write, and execute for the owner, and read and execute for the group and others.
Check the SSL Configuration
If your website uses HTTPS, you also need to check the SSL configuration in the Nginx server block. It should look something like this:
server {
 listen 443 ssl;
 server_name test.com www.test.com;
 root /var/www/test.com/html;
 index index.html index.htm;

 ssl_certificate /etc/letsencrypt/live/test.com/fullchain.pem;
 ssl_certificate_key /etc/letsencrypt/live/test.com/privkey.pem;
}
The listen 443 ssl; directive tells Nginx to listen on port 443, which is the standard HTTPS port, and to enable SSL. The ssl_certificate and ssl_certificate_key directives specify the locations of the SSL certificate and private key files, respectively.
Make sure that the paths to the SSL certificate and private key files are correct and that the files are readable by the www-data user.
Restart Nginx
After making any changes to the Nginx configuration, you need to restart the service for the changes to take effect. You can do this with the following command:
sudo service nginx restartCheck the Nginx Error Log
If you’re still encountering the 404 error after following the above steps, the next place to look is the Nginx error log. By default, it’s located at /var/log/nginx/error.log.
You can view the most recent entries in the log with the tail command:
sudo tail /var/log/nginx/error.logThe error log can provide more specific information about what’s causing the 404 error.
Conclusion
Troubleshooting a 404 Not Found error on an Nginx web server involves checking the server block configuration, file permissions, and SSL configuration, and examining the Nginx error log. By following these steps, you should be able to identify and resolve the issue.
If you encounter a 404 Not Found error on your Nginx web server, you should first check your Nginx configuration. Verify the server block configuration to ensure that the root directory and index file are correctly specified. Also, check the file permissions to ensure that they are readable by the Nginx user (www-data). If your website uses HTTPS, make sure to check the SSL configuration as well. After making any changes to the configuration, restart Nginx for the changes to take effect. If the issue persists, check the Nginx error log for more specific information about the error.
The Nginx configuration files are typically located in the /etc/nginx/ directory. The server block configurations for each website hosted on your server can be found in the /etc/nginx/sites-available/ directory.
When using the desktop version of Ubuntu you’ll eventually get or probably have the problem that apt-get update throws a lot «Failed to fetch 404 Not Found» errors. Additionally, you may have the same problem when running apt-get install. Don’t worry, it will be fixed in a minute.
The Problem
You may see messages like the ones below when executing apt-get update or apt-get install. That is because Ubuntu releases are only supported for 9 months. LTS (Long Term Support) releases have support for 5 years. Once support is cut for the version you’re using, you’ll see those error messages. Ubuntu moves the repositories to another server and the defined URL to reach the sources are no longer available on default location http://archive.ubuntu.com/ubuntu/dist/.
$ sudo apt-get update
Ign http://de.archive.ubuntu.com raring Release.gpg
Ign http://de.archive.ubuntu.com raring-updates Release.gpg
Ign http://de.archive.ubuntu.com raring-backports Release.gpg
Ign http://security.ubuntu.com raring-security Release.gpg
Ign http://de.archive.ubuntu.com raring Release
Ign http://de.archive.ubuntu.com raring-updates Release
Ign http://de.archive.ubuntu.com raring-backports Release
…
404  Not Found [IP: 91.189.92.201 80]
Err http://security.ubuntu.com raring-security/restricted Sources
404  Not Found [IP: 91.189.92.201 80]
Err http://security.ubuntu.com raring-security/universe Sources
404  Not Found [IP: 91.189.92.201 80]
Err http://security.ubuntu.com raring-security/multiverse Sources
404  Not Found [IP: 91.189.92.201 80]
Ign http://de.archive.ubuntu.com raring-backports/main Translation-en
Ign http://de.archive.ubuntu.com raring-backports/multiverse Translation-en
Err http://security.ubuntu.com raring-security/main amd64 Packages
…

W: Failed to fetch http://de.archive.ubuntu.com/ubuntu/dists/raring/restricted/source/Sources  404  Not Found [IP: 141.30.13.30 80]

W: Failed to fetch http://de.archive.ubuntu.com/ubuntu/dists/raring/universe/source/Sources  404  Not Found [IP: 141.30.13.30 80]

W: Failed to fetch http://security.ubuntu.com/ubuntu/dists/raring-security/main/source/Sources  404  Not Found [IP: 91.189.92.201 80]

W: Failed to fetch http://de.archive.ubuntu.com/ubuntu/dists/raring/multiverse/source/Sources  404  Not Found [IP: 141.30.13.30 80]

…

E: Some index files failed to download. They have been ignored, or old ones used instead.
How to Fix The Problem
There are two solutions to get your apt commands working again. First: upgrade the Ubuntu release. Second: update the sources url to the old package repositories. Both solutions are described below in more detail.
Distribution Upgrade
The most simple solution is to upgrade your Ubuntu instance to the newest release:
sudo apt-get dist-upgrade
If the distribution upgrade is not an option right now, you can update the sources url for the Ubuntu repositories to find the old packages.
Update Packages Url
You can use the sed command to update the sources in /etc/apt/sources.list file to the new location for old package repositories2.
Run the following command to update archive.ubuntu.com and security.ubuntu.com package repository4 URLs with old-releases.ubuntu.com. Since the normal Ubuntu releases link to the archive.… and security.… URLs, the support will be removed after their live cycle of 9 months and respective repositories3 moved to old-releases.….
sudo sed -i -e 's/archive.ubuntu.com\|security.ubuntu.com/old-releases.ubuntu.com/g' /etc/apt/sources.list

**Linux Mint additionally requires the execution of this command:**

sudo sed -i -e 's/archive.ubuntu.com\|security.ubuntu.com/old-releases.ubuntu.com/g' /etc/apt/sources.list.d/official-package-repositories.list
To check whether there are other files in /etc/apt/sources.list.d/ which need to be updated, use the following grep command.
grep -E 'archive.ubuntu.com|security.ubuntu.com' /etc/apt/sources.list.d/*
That’s it. Now you can update your sources again.
sudo apt-get update
Bazinga!
- 1: Myles McNamara’s blog post saved me a lot of time to understand the problem and find a solution
- 2: Ask Ubuntu: Install Software From Old Repositories (sed command)
- 3: Ubuntu Old Releases
- 4: Ubuntu Current Releases

