09/11/2021 LCU Known issues lists some Network printer error codes such as 0x00000709 (“ERROR_INVALID_PRINTER_NAME”), 0x000006e4 (“RPC_S_CANNOT_SUPPORT”), and 0x0000007c (“ERROR_INVALID_LEVEL”) for Windows 10 v2004, v20H2, v21H1. Furthermore, after installing KB5007189 multiple users are reporting to encounter #283, 0x0000011b, and other error codes that prevent connecting a printer to Windows 10 system. So we are going to cover here all the printer problems that started after you received the November 2021 security patch.
Origin of these printer problems lies in the Print Nightmare vulnerability that occurred in the month of July in 2021. Actually, an attacker penetrated the security wall of Windows 10 remotely through Print spooler service. Dealing with this vulnerability Microsoft restricted non-admin users from installing or updating any printing device driver to neutralize the chance of further attack. The security again became intact but many users started complaining about different error codes appearing when connecting to a printer. These codes were 0x00000709, 0x0000011b, #283, and other with message “Windows cannot connect to printer” or “Operation could not be completed”. Fortunately, you can fix your printer and add it successfully to the Windows 10 PC with the workarounds here.
Network Printer Error KB5007189 0x00000709,0x0000011b, #283 Windows 10
Here is how to fix Fix Network Printing Error #283, 0x00000709, 0x0000011b, KB5007189 Windows 10 –
Way-1: Uninstall KB5007189
Uninstallation of a patch is the foremost solution hitting to mind when getting an error after installing a Windows update. This is also natural, therefore, if you find any of the error codes #283, 0x00000709, 0x0000011b, or other; uninstalling KB5007189 will fix the problem.
A] Via Settings
- Press – Winkey+R.
- Type – appwiz.cpl.
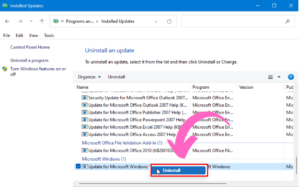
- When Program & Features window appears, click the link – .View installed updates.
- Move down and locate KB5007189.
- Right-click on it.
- Select – Uninstall.
- ClickYes on the confirmation prompt.
- Pursue the guidelines till the end and ensure that the patch is fully uninstalled.
B] Through cmd command
You might experience trouble in uninstalling the patch using the above method at times, but don’t worry, try performing the same task using cmd command –
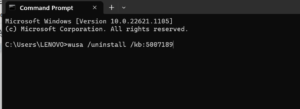
- Click – Start.
- Type – cmd.
- Select – Run as administrator.
- Go with – Yes on UAC prompt.
- When Command prompt appears, type – wusa /uninstall /kb:5007189
- Hit – Enter.
- If you are asked to confirm, click – Yes.
C] Pause updates or Hide updates
Soon after the removal of the patch, you might notice that it is AGAIN automatically downloaded and asking you to install. So, after KB5007189 is uninstalled successfully you will have to make an arrangement to stop the automatic installation of the cumulative update. There are 2 ways in this concern – 1. Using Pause updates and 2. through Hide updates. Pause updates is the easier one as you need to only go to – Settings (Windows + I) > Windows update and click on Pause updates. But this has also a drawback; you will have to repeatedly Pause the update at an interval of a certain date. You can also use the second method easily –
- Download the built-in – Windows 10 Update Disable Tool.
- Extract the file and run the wushowhide.diagcab.
- Follow the guidelines on the tool as they will be self-explanatory.
However, you might get help from – Windows 10 Update Disable Tool [Download].
Way-2: Edit Registry to fix KB5007189 printer error
Microsoft rolled out a workaround to fix the printing problems that occur after installing cumulative updates. According to this, you will have to edit registry to fix 0x0000011b, #283, 0x00000709 or other related to printer that started after getting KB5007189 on your system. In addition to manually adding registry keys and values, you can also use a cmd command for the same which is rather easier. One more thing, editing registry is risky so before following this method make sure that you can proficiently handle this tool.
A] Using Registry Setting
- Click – Search.
- Type – regedit.exe.
- Hit- enter.
- On User account control prompt, select – Yes.
- Once the Registry Editor opens up, navigate to the following location by browsing (or using copy-paste-hit through address bar) –
HKEY_LOCAL_MACHINE\Software\Policies\Microsoft\Windows NT\Printers\PointAndPrint
- Right-click on an empty place in the right pane.
- Select – New > DWORD (32-bit) Value.
- Provide a name to this value – RestrictDriverInstallationToAdministrators.
- Open Value data by double-clicking on it.
- Enter 0 in the Value data box.
- Click – OK.
- Restart the system and check as the printer error should be fixed now.
- Still, the error is not solved then download Network_Printing_Error.zip.
- Unzip the file and right-click on Network_Printing_Error.reg.
- Select – Open.
- Click Yes on UAC prompt.
- Again click Yes on Registry Editor warning pop up.
- Reboot your device and now everything should be fine.
B] Through Command prompt
- Launch command prompt as administrator following the method as provided in Way-1 B.
- Copy the following –
reg add "HKEY_LOCAL_MACHINE\Software\Policies\Microsoft\Windows NT\Printers\PointAndPrint" /v RestrictDriverInstallationToAdministrators /t REG_DWORD /d 1 /f- Paste into the Command prompt.
- Press the – “Enter”.
- Reboot and see if the issue is solved.
From – Microsoft support.
Way-3: Add a network printer through Static IP address
In case, printer errors appear after installing KB5007189 cumulative update and you don’t want to uninstall the LCU then this method will solve your problem. You can manually add a share network printer through Static IP address or hostname to fix #283, 0x0000011b, 0x00000709, or other printing issues on Windows 10 19043.1320, 19042.1320, 19041.1320 –
- Hit – Windows and I keys.
- Click – Devices.
- From the left pane, Choose – Printer & scanner.
- Go to the right and click – +Add a printer or scanner.
- You come across a link after a while – The printer that I want isn’t listed; click on it.

- A separate wizard will come out named – Add a printer.
- Check the option – Add a printer using a TCP/IP or hostname.
- Click – Next.
- Now, type IP address or Hostname of the printer and choose “Next”.
- The system will identify the printer and show its name.
- Select – Next.
- In case, you are running a shared printer then check – ‘Share this printer so that others on your network can find and use it’.
- Otherwise, check – Do not share this printer and click on Next.
- Now click Print a test page and make sure it is not generating any error.
- At last, click – Finish.
For the users who don’t know how to find IP address of the printer then follow the guidelines –
- Press Windows + S on the keyboard.
- Type – control.
- Hit – Enter.
- When the Control panel is launched change it to Small or Large icons view.
- Select – Devices and Printers.
- Right-click on the printer device you are going to add and choose – Properties.
- Go to the Location field.
- This will have the IP address inside you are looking for.
Alternatively, see – How to Find Printer’s IP and MAC Address in Windows 10.
Way-4: Run built-in Printer troubleshooter
Certain users report that the Windows 10 built-in troubleshooter may fix KB5007189 printer problems. This utility will detect the underlying reasons and then repair ‘Windows cannot connect to the printer’ error if you follow the steps –
- Hit – Windows + S.
- Type – troubleshooter.
- Press – Enter.
- This will take you straight to the Troubleshooters Settings page.
- Click on – Printer.
- Finally, click – Run the troubleshooter.
Way-5: Properly Set Print Spooler service
Services is the most basic tool in Windows that can manage the printing operations and print job that is why its configuration should be correct. You need to ensure in this app that Spooler service startup type is automatic and its Status is Running. You can now the easy method for – How to Disable/Enable Print Spooling Service Windows 10.
- Press the – Winkey + S.
- Type – Services.
- Next, press – Enter.
- Find – Print Spooler.
- Double click on the service
- Confirm that the Startup type is set to Automatic.
- If not, click on the drop-down and choose – Automatic.
- Below Service status, click on – Start.
Way-6: Update printer driver
When KB5007189 error #283 adding printer Windows 10, 0x0000011b or 0x00000709 occurs outdated driver might be the root cause. Even Microsoft states in this case – “Use the same version of the print driver on the print client and the print server. The problem will be fixed externally by keeping the print drivers up-to-date. Still, the error continues, establish contact with the OEM helpline aka manufacturer’s support”. Hence, follow the steps to update the printer driver –
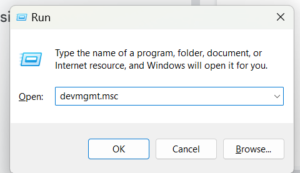
- Press Windows and R keys at a time.
- Type – devmgmt.msc.
- When the Device Manager opens up, double click on Printer.
- This will reveal all the drivers, right-click on the appropriate one and select – Update driver.
- Select – Search automatically for drivers.
- Repeat the same with Print Queue if showing.
- Reboot the PC and check the error; hopefully, it should be fixed.
- If not then go to the manufacturer’s website of the Printer and find the driver and manually download and install it.
Methods list:
Way-1: Uninstall KB5007189
Way-2: Edit Registry
Way-3: Add a network printer through Static IP address
Way-4: Run built-in Printer troubleshooter
Way-5: Properly Set Print Spooler service
Way-6: Update printer driver
That’s all!!
Repair any Windows problems such as Blue/Black Screen, DLL, Exe, application, Regisrty error and quickly recover system from issues using Reimage.
After a cyber attack on the Windows Print spooler service in 2021, Windows introduced security patches to protect the system. But after that, many users complained about being unable to install the printer and getting the 283 error code.
So, we can’t install this printer right now error 283 – how to fix this?
To fix the error code 283 and install the printer you have to restart the printer and the computer first. After that, try running the printer’s troubleshooter, make the user an admin, and edit the registry. If this doesn’t solve the problem, uninstall the new updated patch, try manually connecting the printer through IP, set the spooler service setting properly, and update the printer’s driver.
This article will discuss all the solutions step-by-step. So keep reading.
Primary Diagnosis for Printer Error 283 Windows 10
Before going into the reason-based solution, try the following diagnosis first.
Diagnosis 1: Restarting your Printer & the Computer
You should start by restarting your computer and the printer. Mostly this simple method solves the problem. Restarting your computer stops unimportant background tasks which might prevent the printer from being installed.
Diagnosis 2: Run The Printer’s Built-In Troubleshooter
If restarting the devices doesn’t work, the next easiest fix to this problem is running the troubleshooter of the printer. This method also helps with other printer problems including printer validation failure. Here’s how to do it.
Step 1: Press the “windows” and “s” buttons on your keyboard simultaneously.
Step 2: In the search box at the top, type “Troubleshoot Setting”.
Step 3: click on the “Troubleshoot Setting”.
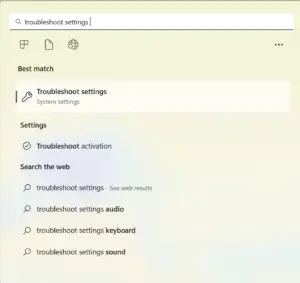
Step 4: After getting into the troubleshooting page, type printer at the top left search box and select “Printer and Scanner”.
Step 5: Click on the “Run the troubleshooter” option.
Now, your computer should automatically detect the problem and fix it. If that doesn’t work, go to the next diagnosis.
Diagnosis 3: Make The User An Admin
Through GPO, printers can only be installed by admin users. There are two types of user accounts in Windows 10.
The administrator or admin user can install and launch any application on the computer. On the other hand, standard users can not install any applications and only launch them. Here’s how to make the user and admin in Windows 10.
Step 1: Press the Windows Button or Click on the “Windows’ icon on your computer.
Step 2: Click on the “setting” option.
Step 3: Go to the “Accounts” option.
Step 4: Select the “Family & Other People” option.
Step 5: you will find the user you want to make an admin under the other people list. select that user. If you don’t find the person, click on the “Add someone else to the PC” option and feed the user’s email.
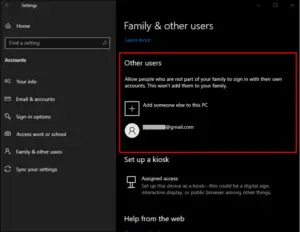
Step 6: Click on the “change account type” option located below the user’s name.
Step 7: From the drop-down list, choose the “administrator” option.
Step 8: Now click the ok button and the job is done.
Try installing the printer now and see if that works.
Diagnosis 4: Edit The Registry
After a cumulative update, the printer sometimes does not get installed. To fix this problem, Microsoft introduced the registry edit solution. You can perform the registry edit on two methods.
Method 1: Using Registry Setting
Step 1: Click the Windows key and type regedit.exe on the search box.
Step 2: Select “regedit.exe”.
Step 3: A user account control prompt should come up. Select the “Yes” button/
Step 4: The Registry Editor tab will show up. In the address bar, paste the following text.
HKEY_LOCAL_MACHINE\Software\Policies\Microsoft\WindowsNT\Printers\PointAndPrint
Step 5: In the right pane locate an empty place and right-click on there.
Step 6: Click new > DWORD (32-bit) Value
Step 7: Rename the value “RestrictDriverInstallationToAdministrators.”
Step 8: Double-click on the value data to open it.
Step 9: In the Value data box, type “0”. And then press OK.
Step 10: Restart your computer. After that, try to install the printer.
Step 11: If the problem doesn’t go away, download Network_Printing_Error.zip.
Step 12: This file will be zipped. Unzip it and locate the option Network_Printing_Error.reg. Right-click on that option and click “Open”
Step 13: An UAC prompt will pop up. Select the “Yes” button.
Step 14: A warning pop-up will come up. Click “Yes”.
Step 15: Now, reboot the computer.
Method 2: Through Command prompt
If the above-mentioned method is not possible on your PC, try the following steps.
Step 1: Press on the start button and in the search bar, type “CMD”.
Step 2: Select the “Run as Administrator” option and when the UAC prompt pops up, select “Yes”.
Step 3: Copy & paste the text given below on the command prompt and press enter.
reg add “HKEY_LOCAL_MACHINE\Software\Policies\Microsoft\Windows NT\Printers\PointAndPrint” /v RestrictDriverInstallationToAdministrators /t REG_DWORD /d 1 /f

Step 3: Reboot your computer.
You have to move on to the next segment and troubleshoot the other reasons for the problem if these quick diagnoses do not resolve the issue.
Troubleshooting Other Reasons For Printer Error 283 Windows
In Windows 10, we can’t install this printer right now error 283 problem, can occur for the following reasons.
Reason 4: Patch Malfunction
If you have recently updated your Windows 10, and the printer problem started after that, then the new updated printer patch is faulty. Error 283 when adding printer windows 10 often happens for this reason.
Solution 1: Uninstall the Patch
To solve the patch malfunction problem, you can uninstall the new patch from your PC. There are two simple ways of uninstalling the patch.
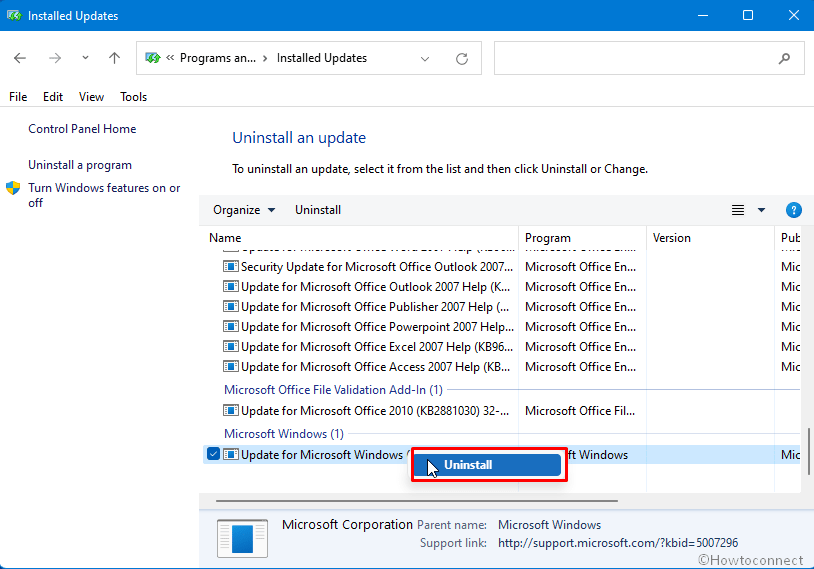
Method 1: Via Settings
Step 1: Press the Windows key and R button simultaneously.
Step 2: On the search bar, type “ appwiz.cpl” and click enter. The “Program and Features” window will show up.
Step 3: From the left slide of the select “ View installed updates” option.
Step 4: scroll and locate KB5007189. Right-click on that option.
Step 5: Click on the “Uninstall” button.
Step 6: Click “yes” for confirmation.
Step 7: Follow the Uninstallation guideline, agree with the policy, and let the patch completely uninstall.
If you face a problem uninstalling the patch through this method, try method 2.
Method 2: Through CMD Command
Step 1: Hit the start button and click on the “Run as Administrator” button,
Step 2: On the UAC prompt, hit the “Yes” button.
Step 3: In the command prompt, type “wusa /uninstall /kb:5007189” and press enter.
Step 4: Select “Yes” for confirmation.
After uninstalling, you have to prevent that patch from updating again. To ensure that, follow the steps below.
Step 1: Download the Windows 10 Update Disable Tool software.
Step 2: Extract this file on your computer and run the wushowhide.diagcab.
Step 3: The guidelines on the tool will instruct everything you need to do. Follow those instructions step-by-step.
Solution 2: Manually Connect the Printer
If you don’t want to uninstall the patch, you can manually connect the printer to your computer via the printer’s IP.
Before jumping into the connecting method, here’s how you have to find out the printer’s IP address.
Step 1: Click Windows + S button
Step 2: Type “control” in the search box and select “Control panel”.
Step 3: Click on the “Devices and Printers” option.
Step 4: In the printer option, right-click and go to the ‘properties”
Step 5: Select the “Location Field” and locate the IP address mentioned here.
Now, let’s jump to the printer connecting process.
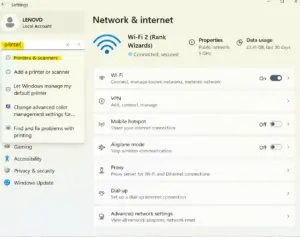
Step 1: Press the Windows and I key on your keyboard together.
Step 2: Select “Devices”
Step 3: From the right side, locate and select “Printer & Scanner”.
Step 4: In the right pane, there is a “+Add a printer or scanner” button. Select the button and select the printer model you want to install.
Step 5: If your printer is not on the list, wait for a while. An option “The printer that I want isn’t listed” will pop up. Select this option.
Step 6: Add your printer’s IP in the box and then select “Next”.
Step 7: You can see your printer’s name pops up. Again select “next”.
Step 8: There will be two options. “Share this Printer” and Don’t share this Printer”. Select according to your preference.
Step 9: Click on the “Finish Button”.
Now, try to install the printer.
Reason 2: Improper Print Spooler Service
Spooler service is the software in windows that handles all printer-related activities. For example, installing the printer, instructing it to print, and storing the data before printing. If the settings of this software aren’t automatic and the status is not set to “start”, it can cause the installation error problem.
Solution:
Correctly set up the print spooler service by following the steps mentioned below.
Step 1: Hit the windows key and S button together.
Step 2: Type “services” on the search bar and hit enter.
Step 3: Locate the “Print Spooler” option and select the option by double-clicking.
Step 4: From the drop-down option, select “Automatic”.
Step 5: Select the “start” option below the service status.
Reason 3: Outdated Printer Driver
If the printer driver in your computer is out-of-date, you will face this installation problem.
Solution:
You have to update the printer driver. Here’s how you can update the driver.
Step 1: Hit the “Windows key” and “R” buttons on your computer at the same time.
Step 2: On the box, type devmgmt.msc and press enter.
Step 3: From the device manager, select “printer” by double-clicking on it.
Step 4: A number of drives will show up. If any of the drives is out-of-date, you will find an “Update Driver” button on their right. Select the button.
Step 5: You will get an option “Search automatically for drivers” select it.
Step 6: Reboot your computer and try installing the printer again.
You can also manually download the drive from your printer’s manufacturer’s website and then install it.
After installing, ensure your computer is completely connected to the network if you are using a network printer. Otherwise, your computer can’t verify the printer.
Frequently Asked Questions (FAQs):
What Does Error 0x0000011b Mean?
This is a printer error in Windows 10 and 11 where the printer will face problems operating. This is a security patch created by Windows to protect the printer from spoofing vulnerabilities. To solve this issue, try restarting the spooler service, using the local port to manually install the printer, or uninstalling recent updates.
How Do I Fix A Network Printer Error?
To fix the network printer error, unplug the printer and reconnect it and make sure the printer cables are connected properly. Try to uninstall and reinstall the printer and update the printer driver. Also, resetting the spooler service can resolve this problem.
Why Is My Printer Not Connecting To The Ethernet?
Your printer is not connecting to the ethernet due to a connection problem. Check whether the cables of the printer, hub, switch, or router are properly connected or not. You can remove and reconnect the printer cable. Also, check if the router switch is turned on.
Conclusion
I hope this article was enough for solving the “We can’t install this printer right now error 283” problem. Troubleshoot all the diagnoses and reasons with patience and you will be successful.
If you still can’t solve this printer installation problem, you should contact your printer’s dealer.
Now it’s time for me to say goodbye. Best of luck with the printer and have a great day!
HP Printer Error 283 is a common error that occurs when there is an issue with the communication between the printer and the computer. This error can be caused by various factors, including incorrect printer configuration settings, outdated or corrupted printer drivers, network connectivity issues, or problems with the printer’s hardware. When this error occurs, the printer may fail to print or may produce incomplete or corrupted printouts.
Most HP printers come with the features of printing, scanning, and faxing. HP printers are, therefore, widely used because of their multi-functionality features. However, like all technical products, HP printers also suffer from occasional glitches. These are displayed as error codes in alphanumeric or in numbers. There can be printing errors, scanning errors as well as faxing errors. Fax errors are displayed in numbers. One common HP printer Fax error is error code 283. The appearance of this error code implies that there is something wrong with the phone connection or in the modem and you face problems in sending and receiving faxes. What do you do?
Let’s find out in this article the cause of HP printer error 283 and how to resolve it.
Causes of HP Printer/Fax Error 283
With the 283 error code, it means that the printer has detected that the modem carrier has stopped. This can be due to the following causes:
- The telephone connection has been disconnected or lost
- The telephone line reception quality is very poor
- The remote HP printer machine has aborted the transmission
Troubleshooting HP Printer Error 283
How to resolve HP Printer/Fax Error 283?
Try the following methods to solve the issue. Or else you have to contact professional technical support.
Method 1: Retry the transmission
Your printer might show an error when the telephone connection is lost. So, wait for some time. Let the printer rest for few minutes. And then retry the transmission. If you still face the error, then move to Method 2.
Method 2: Disable Error Correction Mode (ECM)
Follow the following steps to disable ECM:
Step 1: Press the < or > button
Step 2: You need to press this way till you see the message “Fax Setup” on the front panel
Step 3: Now press the ENTER button
Step 4: Again Press the < or > button
Step 5: Keep pressing this till it displays “All Faxes”
Step 6: Press ENTER
Step 7: Now, again Press the < or > button
Step 8: Keep pressing till the front display reads “Error Correction”
Step 9: Press ENTER
Step 10: Press the < or > button
Step 11: Now you will see “Off”
Step 12: Press ENTER button to save the setting. This means that you have disabled ECM
Step 13: Now, proceed again with steps 1 to 10.
Step 14: Now you will see “ON”
Step 15: Press ENTER button to save the setting. This means that you have enabled ECM
Method 3: Another method to resolve the error 283 is by setting the host machine to receive faxes at a slower transmission speed.
Method 4: Ask the remote user who is going to send faxes to check his or her HP printer, and then ask the user to send the fax again.
Call for assistance at HP Printer Support Telephone Number
Are you still facing the error code 283? Have you tried the above-mentioned methods to resolve the issue? If the error still persists, it means that you are not troubleshooting in a proper way. Or there must be some other technical problem in the device. Let us help you to solve your HP printer error 283. Call us at  and get quick support.
Scope of services
24-hour availability: You can call us at any time to resolve your issue.
Team of experts: We are backed by a team of excellent professional and certified technicians who can solve all printer-related issues and problems.
Latest tools: We have all the latest tools and infrastructure to help solve the problem.
Affordable: There are no hidden costs involved. We charge as per the intensity of the problem. Our charges are quite affordable.
Reliable: We assure 100% reliable services with guaranteed solutions.
FAQ’s
Ques 1. How is error 283 added to the printer?
Ans. Error 283 can occur when trying to print, scan, or fax using an HP printer. This error could be caused by a number of issues, such as a corrupted driver, a software conflict, or a missing component. To resolve this error, you should restart your machine, check your connection and drivers, uninstall and reinstall the printer drivers, run the HP Print and Scan Doctor tool, and check for any pending updates. Following these steps should help resolve the issue quickly and easily.
Ques 2. How to install a printer with Error 283?
Ans. Error 283 typically indicates that there is a problem with the communication between your computer and the printer. Here are some steps you can try to resolve the issue and install your printer:
- Check the printer connections: Make sure that the printer is properly connected to your computer and that all cables are securely plugged in. Also, check if the printer is turned on and has enough paper and ink.
- Restart the printer and computer: Sometimes, a simple restart can resolve the communication issue. Turn off both the printer and computer, wait for a few seconds, and then turn them back on.
- Run the printer troubleshooter: Most operating systems have built-in printer troubleshooters that can help diagnose and fix common printer problems. Go to the Control Panel, select Devices and Printers, right-click on your printer, and select Troubleshoot.
- Update printer drivers: Outdated or corrupted printer drivers can also cause communication errors. You can download the latest printer drivers from the manufacturer’s website and install them on your computer.
- Disable third-party antivirus software: If you have third-party antivirus software installed on your computer, it might interfere with the printer’s communication. Try temporarily disabling the antivirus software and then try installing the printer again.
Ques 3. How to add a network on the printer when error 2833 occurs?
Ans. Error 2833 on a printer usually indicates a problem with the network connection. To add the printer to the network, you can try the following steps:
- Restart your printer and computer: Sometimes, simply restarting your devices can resolve connectivity issues.
- Check the network connection: Make sure that your printer is connected to the network and that the network connection is stable. You can check this by printing a network configuration page or by accessing the printer’s web interface.
- Verify network settings: Check the network settings on your printer and make sure they are correct. This includes the IP address, subnet mask, and default gateway. You may need to consult your printer’s user manual for instructions on how to check and adjust these settings.
- Add the printer manually: If the automatic setup process fails, you may need to add the printer manually by specifying its IP address. To do this, go to your computer’s settings and select “Devices and Printers” or “Printers and Scanners.” Click “Add a Printer,” select “Add a network, wireless or Bluetooth printer,” and then select “The printer that I want isn’t listed.” Enter the printer’s IP address and follow the on-screen prompts to complete the setup process.
- Update printer drivers: Make sure that you have the latest printer drivers installed on your computer. You can usually download these from the printer manufacturer’s website.
This guide will help you fix Error 283 when Adding a Printer on Windows 10. Printer issues like these can be tricky to solve and perplexing. Thankfully, this guide can help.
Step 1: Check Device Drivers
The first thing to do is check whether your device drivers are up-to-date and compatible with your printer. To do this, go to the Devices section of your Control Panel. Look for any yellow exclamation marks—these indicate drivers that are not up-to-date. Once you find a driver that needs updating, download the latest version from the manufacturer website and install it.
Step 2: Uninstall the Printer
If updating the drivers does not solve the issue, try uninstalling the printer. To do this, go to the Devices section of your Control Panel and select the printer. Right click and select “Uninstall”. After the uninstall process is complete, try reinstalling the printer.
Step 3: Troubleshoot the Printer
If uninstalling and reinstalling the printer does not solve the issue, you can try running the troubleshooter to detect any problems. To start the troubleshooter, select “Troubleshoot” from the Devices section of your Control Panel.
Step 4: Remove any Third-Party Software
If all else fails, try removing any third-party software that may be interfering with the printer. To do this, go to the Programs and Features section of your Control Panel and select the program you want to remove. Right click and select “Uninstall”. After the program is removed, try reinstalling the printer.
FAQ
What is Error 283?
Error 283 is an issue caused by an incompatible driver or a faulty installation.
How do I check if my device drivers are up-to-date?
You can check if your device drivers are up-to-date by going to the Devices section of your Control Panel and looking for any yellow exclamation marks. If you find any, download the latest version from the manufacturer website and install it.
What if none of the steps worked?
If none of the steps above worked, the issue may be caused by a hardware problem. If this is the case, you’ll need to contact your printer manufacturer for further assistance.
How do I uninstall the printer?
To uninstall the printer, go to the Devices section of your Control Panel and select the printer. Right click and select “Uninstall”.
What if I don’t have the troubleshooter option?
If you don’t have the troubleshooter option, you’ll need to download it from the Microsoft website. Once it’s downloaded, run the troubleshooter to detect any problems.
Where can I download the latest device drivers?
You can download the latest device drivers from the manufacturer website. Make sure to download the correct version for your device.
- https://learn.microsoft.com/en-us/answers/questions/562522/event-id-7016-with-error-283-when-deploying-printe
- https://howto-connect.com/fix-network-printing-error-283-0x00000709-0x0000011-kb5007189-windows-10/
Hi,
283 and 232 communication errors are usually caused by excessive line noise. Sometimes a retry will transmit the fax successfully. Try turning off ECM and V.34 to V.14 from the Control Panel of the CLJ 2840. This will turn off the Error Correction Mode (ECM) and also slow the modem speed down. Toggling these settings will sometimes allow faxes to transmit properly if comm errors are seen.
Since comm errors are legitimate transmission errors- turning off ECM will allow faxes to transmit- but the data on the received or sent printed fax may not be as good a quality as a fax sent or received with ECM turned on. From the Control Panel on the CLJ2840 print out a Menu Map to find these two Settings for ECM and V.34. Try toggling ECM to OFF and turn V.34 to the V.17.
Although I am an HP employee, I am speaking for myself and not for HP.