Содержание:
- Отключить антивирус
- Изменение прав доступа к папке Autodesk
- Загрузка Autodesk через AVA ( Autodesk Virtual Agent )
- Очистить Переустановить Autocad
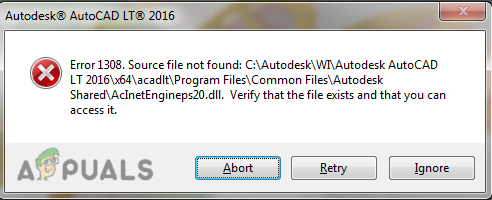
Вы можете столкнуться с этой ошибкой при установке программы AutoCAD, согласно нашим исследованиям, ошибка появляется на экране, когда Autodesk не может найти исходный файл во время установки AutoCAD, однако, если проверить файл, он присутствует.
Существует множество причин возникновения этой ошибки, мы перечислили некоторые из них ниже:-
- Поврежденные файлы- Файлы AutoCAD могут быть повреждены в процессе установки, что может быть причиной возникновения этой ошибки.
- Стороннее программное обеспечение- Если вы пытаетесь взломать программу AutoCAD и скачали ее из стороннего источника, то это может быть причиной появления на экране ошибки 1308.
- Антивирус- Антивирус может препятствовать процессу загрузки AutoCAD, убедитесь, что вы отключили защитник Windows или антивирус.
- Разрешение отклонено- Существует вероятность того, что у вас больше нет доступа к C:\Autodesk по этой причине Autodesk не может прочитать исходный файл и выдает ошибку 1308.
Отключить антивирус
Антивирусы и брандмауэры защищают наши данные и информацию от онлайн-ресурсов, таких как приложения и веб-серверы. а также защищает нас от хакеров и вредоносных байтов.
Иногда антивирус препятствует процессу загрузки программ запуска, поэтому разработчики Autodesk советуют отключать антивирус на компьютере при попытке загрузить AutoCAD.
Примечание- Если вы используете антивирусное программное обеспечение сторонних производителей, отключите его вручную.
Выполните действия для отключения антивируса:-
- Перейдите к настройкам, нажав кнопку Windows + I клавиши вместе, чтобы открыть настройки.
- Нажмите на Обновление & Безопасность.
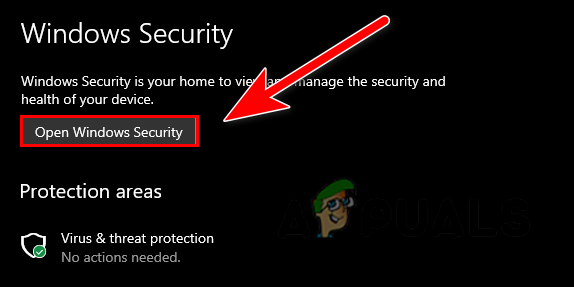
- Нажмите на Безопасность Windows на левой боковой панели, затем нажмите на Открыть Безопасность Windows на правой панели.
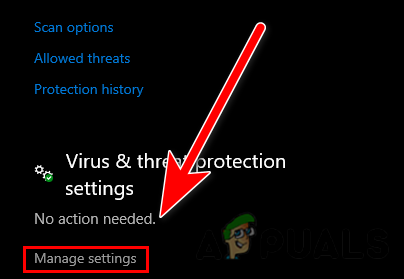
Нажмите на Открыть Безопасность Windows - Перейдите в Вирус & защита от угроз затем нажмите на Управление настройками под пунктом Вирус & настройки защиты от угроз.
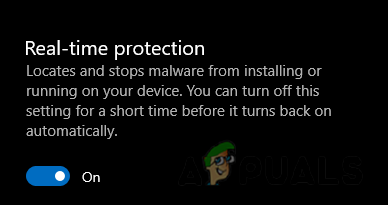
Нажмите на Управление настройками - Здесь отключите защиту в реальном времени, нажав на нее.
Отключите защиту в реальном времени - После этого проверьте, сохраняется ли ошибка.
Изменение прав доступа к папке Autodesk
Если у вас нет разрешения на полный контроль, перейдите по ссылке Autodesk папку, расположенную на диске C:\, может возникнуть ошибка 1308, однако это можно исправить, внеся некоторые изменения в настройки разрешений.
Вот как можно изменить разрешения Autodesk:-
- Если у вас есть другие продукты Autodesk, рекомендуется удалить папку Autodesk с диска C:\, а затем снова загрузить программу через браузер.
- Выйдите из установки и откройте проводник, перейдите по ссылке C:\ диск.
- Щелкните правой кнопкой мыши папку Autodesk и выберите пункт свойства опцию.
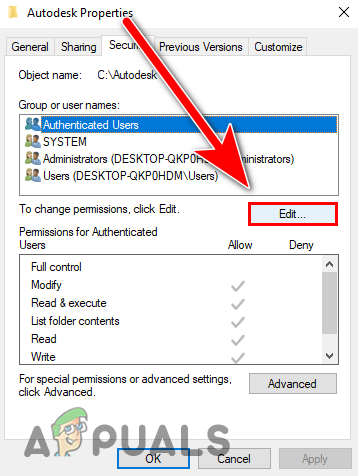
- Перейдите на вкладку «Безопасность» в верхней части и нажмите на кнопку Кнопка Изменить внести изменения в разрешения.
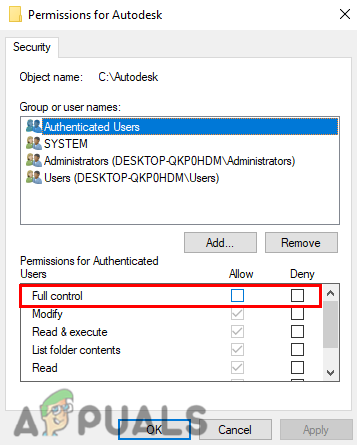
Нажмите кнопку Изменить, чтобы внести изменения в разрешения - Проверьте Полный контроль опцию и нажмите кнопку Применить для сохранения изменений, а затем нажмите кнопку OK.
Отметьте опцию полного контроля, чтобы получить полный контроль над папкой Autodesk - После этого проверьте, сохраняется ли ошибка.
Загрузка Autodesk через AVA ( Autodesk Virtual Agent )
Autodesk предоставляет нам альтернативный вариант установки своих продуктов с помощью виртуального агента Autodesk. По сути, это бот, который помогает нам загрузить продукты Autodesk, которые мы можем установить на нашу систему. Мы используем этот метод, когда получаем ошибки при установке продуктов Autodesk с помощью браузера.
Autodesk Virtual Agent разработан как альтернативный вариант для загрузки продуктов Autodesk, недавно пользователи сообщили, что они получают ошибки при установке продуктов Autodesk. По этой причине они представили нам AVA (Autodesk Virtual Agent).
Вот как можно загрузить AutoCAD с помощью виртуального агента:-
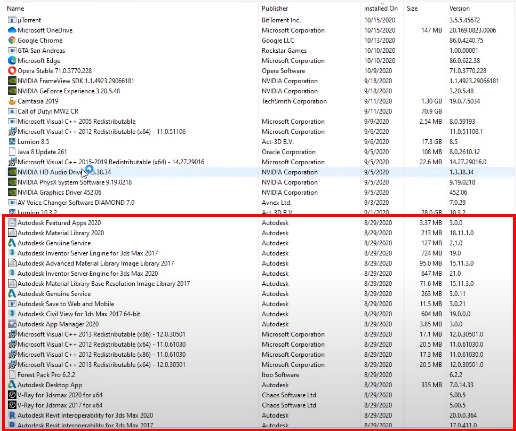
- Сначала удалите Autocad и все продукты Autodesk из панели управления, затем следуйте инструкциям по установке AutoCAD через виртуального агента.
Деинсталлируйте Autodesk со всеми его компонентами - Откройте свой любимый браузер и выполните поиск Виртуальный агент Autodesk и нажмите ввод.
- Когда все результаты поиска будут загружены, откройте первую ссылку и убедитесь, что она принадлежит Autodesk.
- Здесь вы опишите, какой продукт вам нужен, но перед началом описания вы должны войти в систему/зарегистрироваться для загрузки продуктов Autodesk.
- если у вас уже есть учетная запись, войдите в нее и перейдите к 8-му шагу.
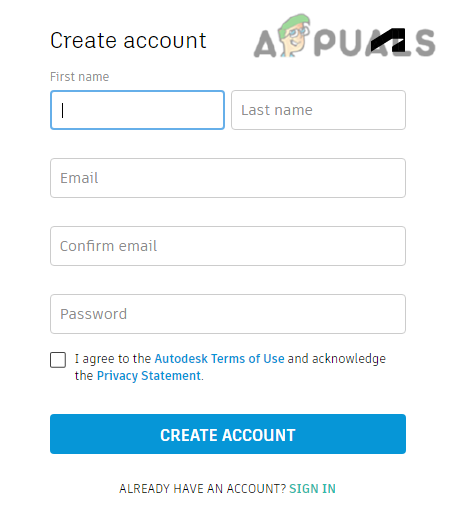
- Нажмите на кнопку Вход в систему в правом верхнем углу, затем нажмите на кнопку создать учетную запись.
Нажмите на кнопку входа в систему, чтобы войти в свою учетную запись - Заполните данные, необходимые для создания учетной записи, после чего на указанный вами аккаунт Gmail будет отправлена ссылка для проверки. Зайдите в Gmail и откройте почту Autodesk, нажмите на Verify Email и войдите в учетную запись Autodesk.
Заполните данные для создания учетной записи - После входа в систему вернитесь к виртуальному агенту Autodesk.
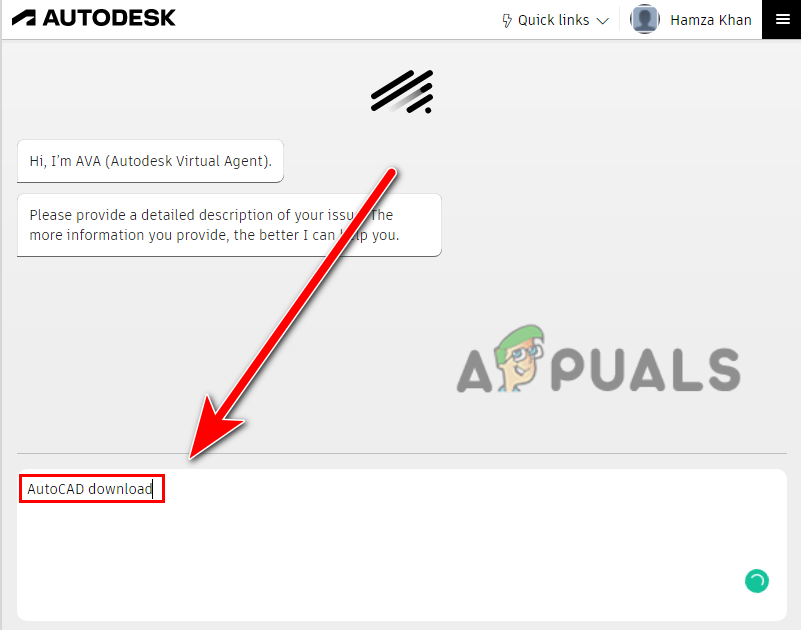
- Введите Загрузка AutoCAD и нажмите ввод.
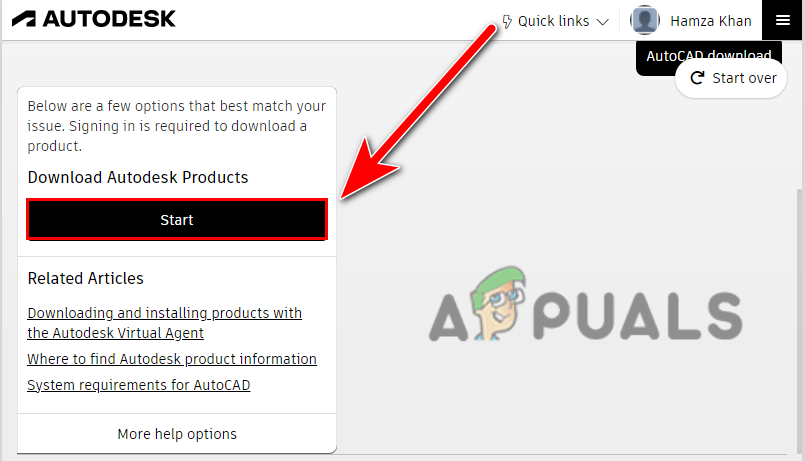
Введите AutoCAD download и нажмите клавишу Enter - Нажмите на кнопку Пуск, чтобы перейти к следующему шагу.
Нажмите на кнопку Пуск, чтобы перейти к следующему шагу - Теперь он спросит, что вы хотите, тщательно выберите один вариант в соответствии с вашей ситуацией, если у вас есть существующий ключ, вы можете пойти на это и на следующем шаге он должен попросить ключ продукта, если у вас нет ключа продукта, то вы можете перейти к пробной версии, как мы.
Выберите вариант в соответствии с вашей ситуацией - После выбора опции появится запрос, хотите ли вы запустить AutoCAD на нескольких компьютерах или только на этом компьютере.
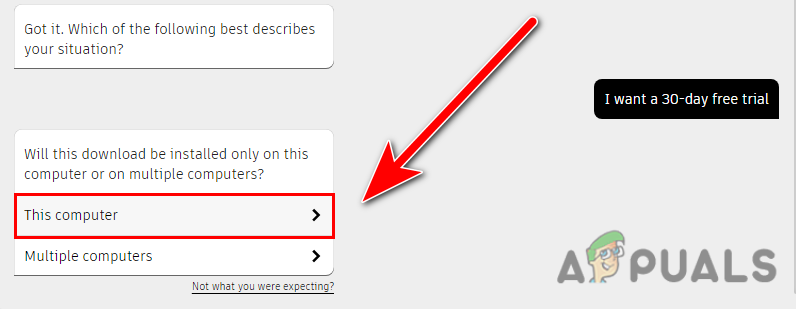
- Вы можете выбрать несколько, но мы остановимся на следующих Этот компьютер опция.
Щелкните на опции «Этот компьютер», чтобы установить AutoCAD на свой компьютер - Нажмите на Продолжить с AVA чтобы получить ссылку Autodesk Virtual Agent.
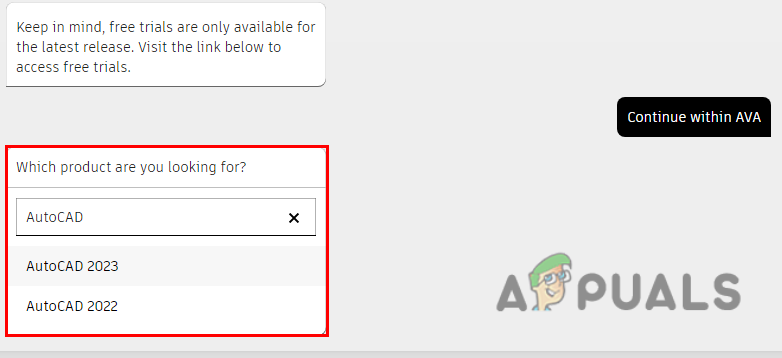
- Выберите версию AutoCAD, которую вы хотите скачать, в моем случае я выбрал пробную версию, поэтому она показывает последние версии AutoCAD, но если у вас есть ключ продукта, то вы можете скачать более старые версии AutoCAD, но если у вас его нет, а вам нужны старые версии Autocad, такие как 2014, 2016, то вы можете купить ключ продукта, чтобы скачать старые версии.
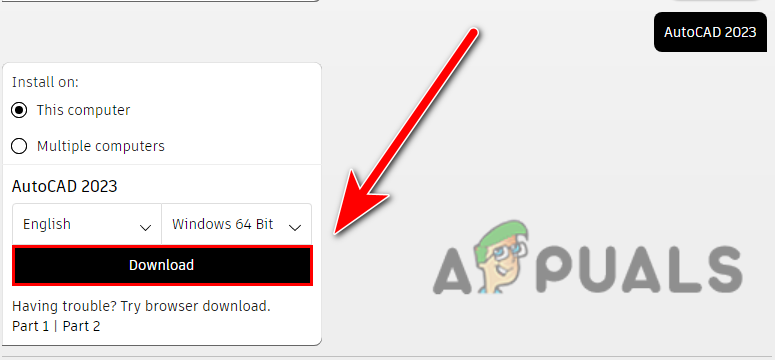
Выберите версию в соответствии с вашими предпочтениями - После выбора версии AutoCAD он выдаст вам файл Скачайте кнопку, нажмите на нее, чтобы загрузить программу установки AutoCAD.
Нажмите на кнопку Загрузить для установки AutoCAD - После загрузки программы установки AutoCAD дважды щелкните на ней, чтобы запустить ее.
- Это должно запустить процесс загрузки, после чего на экране появится менеджер загрузки Autodesk, который используется для загрузки продуктов Autodesk.
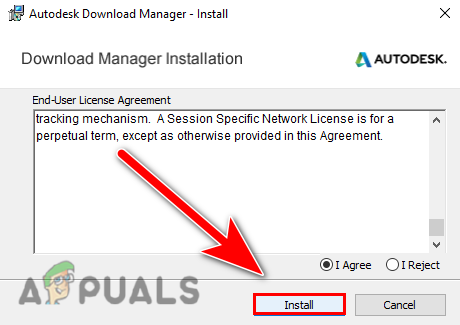
- Нажмите на кнопку I Согласен чтобы принять соглашение, нажмите Далее чтобы загрузить менеджер загрузки Autodesk.
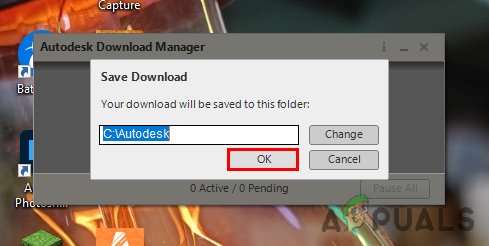
Нажмите на кнопку установки, чтобы установить Autodesk manager - После завершения установки он спросит о директории установки Autodesk для сохранения на компьютере, вы также можете изменить директорию, нажав на кнопку Измените кнопка.
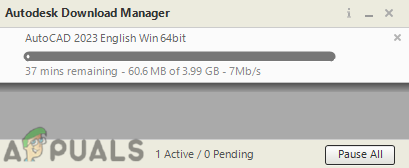
Нажмите кнопку Ok, чтобы выбрать местоположение - После выбора каталога начнется процесс загрузки программы AutoCAD, который, надеюсь, не приведет к ошибкам.
Начнется загрузка AutoCAD
Если вы тщательно выполнили все шаги один за другим, вы больше не столкнетесь с ошибкой 1308.
Если ни один из этих методов не помог вам, то вы можете применить этот метод для чистого удаления AutoCAD с вашего компьютера, а затем установить его снова с помощью методов браузера.
Сначала необходимо удалить программное обеспечение AutoCAD и другие продукты Autodesk, включая их компоненты.
- Нажмите Windows + R чтобы открыть окно Выполнить, введите appwiz.cpl в окне поиска и нажмите ввод.
- Здесь вы должны увидеть все программы, которые установлены на вашем компьютере. Удалите AutoCAD и другие продукты Autodesk по одному, включая их компоненты, выбрав продукт и нажав на кнопку Uninstall в верхней части.
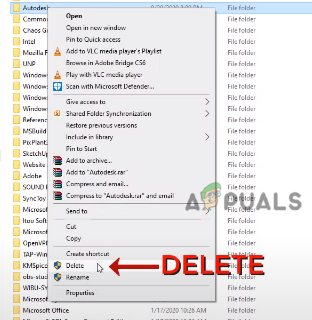
- После деинсталляции AutoCAD необходимо удалить папку Autodesk из диска C, для этого перейдите по адресу проводник файлов затем Локальный диск C, и перейдите к Pрограммные файлы.
- Найдите Autodesk папку, щелкните на ней правой кнопкой мыши и нажмите кнопку удалить.
Удалить Autodesk из программных файлов - После этого перейдите к Общие файлы, Щелкните правой кнопкой мыши на Autodesk shared и удалите его.
Перейдите к общим файлам - Теперь необходимо удалить папку Autodesk папка AppData, в которой хранятся настройки и информация о программе, необходимые приложению компьютерной системы для выполнения задания.
- Нажмите Windows + R клавиши, чтобы открыть окно «Выполнить» и ввести AppData затем нажмите ввод.
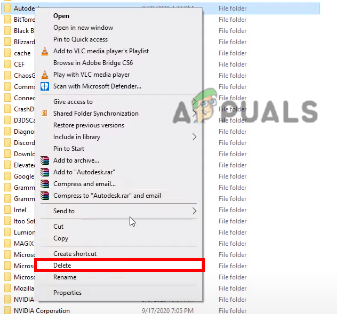
- Перейдите в Локальный диск, найдите Autodesk папку, щелкните на ней правой кнопкой мыши и удалите ее.
Удалите папку Autodesk из appdata - Вернитесь в предыдущий каталог, затем перейдите в каталог Роуминг папка.
- Щелкните правой кнопкой мыши на Autodesk и удалите его отсюда.
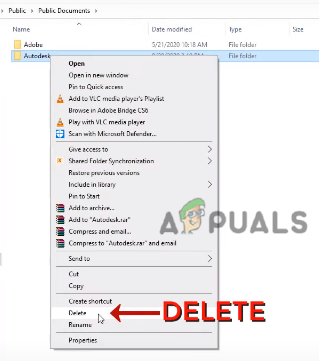
- После этого нажмите на кнопку Локальный диск (C:) на левой боковой панели и перейдите к пункту Пользователи>Public>Публичные документы.
Удалите папку Autodesk из общих загрузок - Щелкните правой кнопкой мыши на Autodesk папку и удалите ее.
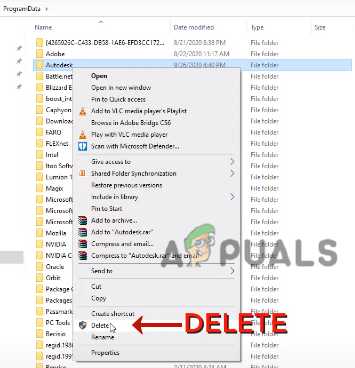
- Нажмите Windows + R чтобы открыть окно Выполнить, затем введите %programdata% и нажмите ввод.
- Найдите для Autodesk папку, щелкните правой кнопкой мыши на папке и удалите ее.
Удалите папку Autodesk из данных программы - Нажмите кнопку Windows ключ затем введите Regedit в строке поиска.
- Откройте Редактор реестра это база данных компьютерной системы, в которой хранятся конфигурации, настройки и информация о системе.
- Перейдите по следующему пути.
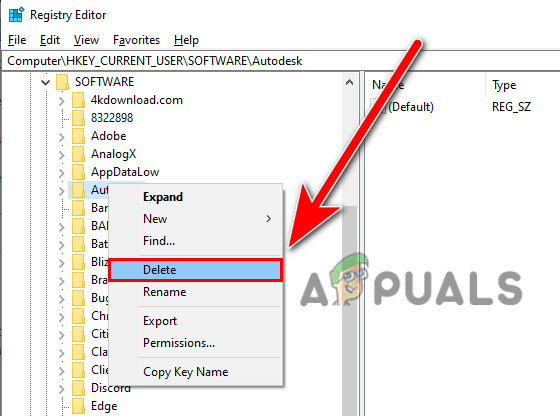
Компьютер\HKEY_CURRENT_USER\SOFTWARE\Autodesk
- Щелкните правой кнопкой мыши на Autodesk папку и удалите ее.
Удалите папку Autodesk из редактора реестра - Снова перейдите по следующему пути
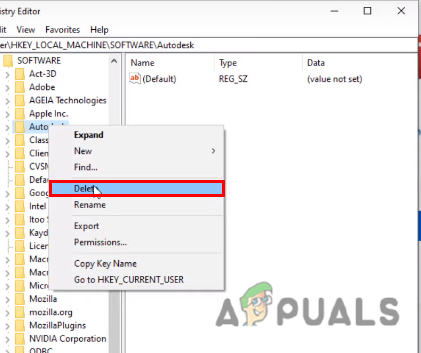
Компьютер\HKEY_LOCAL_MACHINE\SOFTWARE\Autodesk - Щелкните правой кнопкой мыши на Autodesk папку и удалите ее.
Снова удалите Autodesk из реестра - После этого перезагрузите компьютер.
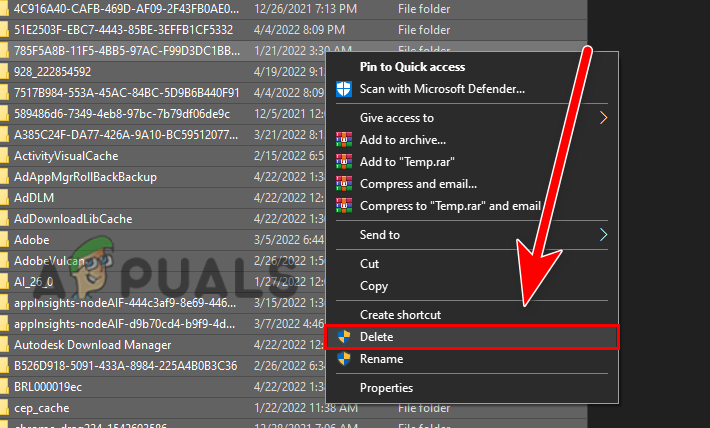
- Нажмите Windows + R откройте окно «Выполнить» и введите %temp% и нажмите ввод.
- Затем нажмите Ctrl + A чтобы выбрать все временные файлы, щелкните правой кнопкой мыши и нажмите удалить, чтобы удалить все временные файлы.
Примечание- Все файлы не удаляются, потому что в фоновом режиме работают другие приложения. просто нажмите Sкип оставить.
Удалите все временные файлы - После удаления всех файлов Autodesk из системы обязательно отключите антивирус или защитник Windows, выполнив описанные выше действия.
- Теперь загрузите Autodesk и его продукты с сайта официальный сайт.
Если вы застряли где-то при применении методов, расскажите нам в комментариях, мы будем рады помочь вам.
| Номер ошибки: | Ошибка 1308 | |
| Название ошибки: | AutoCAD — Error 1308. Source File not found: \ | |
| Описание ошибки: | AutoCAD — Error 1308. Source File not found: \. Verify that the file exists and that you can access it. This error message indicates that a file cannot be found on the installation media or in the deployment location. | |
| Разработчик: | Autodesk Inc. | |
| Программное обеспечение: | AutoCAD | |
| Относится к: | Windows XP, Vista, 7, 8, 10, 11 |
Фон «AutoCAD — Error 1308. Source File not found: \»
Эксперты обычно называют «AutoCAD — Error 1308. Source File not found: \» «ошибкой времени выполнения». Когда дело доходит до программного обеспечения, как AutoCAD, инженеры могут использовать различные инструменты, чтобы попытаться сорвать эти ошибки как можно скорее. К сожалению, иногда ошибки, такие как ошибка 1308, могут быть пропущены во время этого процесса.
Пользователи AutoCAD могут столкнуться с сообщением об ошибке после выполнения программы, например «AutoCAD — Error 1308. Source File not found: \. Verify that the file exists and that you can access it. This error message indicates that a file cannot be found on the installation media or in the deployment location.». После возникновения ошибки 1308 пользователь программного обеспечения имеет возможность сообщить разработчику об этой проблеме. Разработчик сможет исправить свой исходный код и выпустить обновление на рынке. Чтобы исправить любые документированные ошибки (например, ошибку 1308) в системе, разработчик может использовать комплект обновления AutoCAD.
Почему происходит ошибка времени выполнения 1308?
Сбой устройства или AutoCAD обычно может проявляться с «AutoCAD — Error 1308. Source File not found: \» в качестве проблемы во время выполнения. Вот три наиболее заметные причины ошибки ошибки 1308 во время выполнения происходят:
Ошибка 1308 Crash — программа обнаружила ошибку 1308 из-за указанной задачи и завершила работу программы. Если данный ввод недействителен или не соответствует ожидаемому формату, AutoCAD (или OS) завершается неудачей.
Утечка памяти «AutoCAD — Error 1308. Source File not found: \» — последствия утечки памяти AutoCAD связаны с неисправной операционной системой. Критическими проблемами, связанными с этим, могут быть отсутствие девыделения памяти или подключение к плохому коду, такому как бесконечные циклы.
Ошибка 1308 Logic Error — логическая ошибка возникает, когда AutoCAD производит неправильный вывод из правильного ввода. Это видно, когда исходный код Autodesk Inc. включает дефект в анализе входных данных.
Как правило, ошибки AutoCAD — Error 1308. Source File not found: \ вызваны повреждением или отсутствием файла связанного AutoCAD, а иногда — заражением вредоносным ПО. В большинстве случаев скачивание и замена файла Autodesk Inc. позволяет решить проблему. Более того, поддержание чистоты реестра и его оптимизация позволит предотвратить указание неверного пути к файлу (например AutoCAD — Error 1308. Source File not found: \) и ссылок на расширения файлов. По этой причине мы рекомендуем регулярно выполнять очистку сканирования реестра.
Распространенные проблемы AutoCAD — Error 1308. Source File not found: \
Усложнения AutoCAD с AutoCAD — Error 1308. Source File not found: \ состоят из:
- «Ошибка приложения AutoCAD — Error 1308. Source File not found: \.»
- «AutoCAD — Error 1308. Source File not found: \ не является программой Win32. «
- «AutoCAD — Error 1308. Source File not found: \ должен быть закрыт. «
- «Файл AutoCAD — Error 1308. Source File not found: \ не найден.»
- «AutoCAD — Error 1308. Source File not found: \ не может быть найден. «
- «Проблема при запуске приложения: AutoCAD — Error 1308. Source File not found: \. «
- «Файл AutoCAD — Error 1308. Source File not found: \ не запущен.»
- «Отказ AutoCAD — Error 1308. Source File not found: \.»
- «Неверный путь к приложению: AutoCAD — Error 1308. Source File not found: \.»
Проблемы AutoCAD — Error 1308. Source File not found: \ с участием AutoCADs возникают во время установки, при запуске или завершении работы программного обеспечения, связанного с AutoCAD — Error 1308. Source File not found: \, или во время процесса установки Windows. Запись ошибок AutoCAD — Error 1308. Source File not found: \ внутри AutoCAD имеет решающее значение для обнаружения неисправностей электронной Windows и ретрансляции обратно в Autodesk Inc. для параметров ремонта.
Источник ошибок AutoCAD — Error 1308. Source File not found: \
Заражение вредоносными программами, недопустимые записи реестра AutoCAD или отсутствующие или поврежденные файлы AutoCAD — Error 1308. Source File not found: \ могут создать эти ошибки AutoCAD — Error 1308. Source File not found: \.
Особенно ошибки AutoCAD — Error 1308. Source File not found: \ проистекают из:
- Недопустимый AutoCAD — Error 1308. Source File not found: \ или поврежденный раздел реестра.
- Вирус или вредоносное ПО, которые повредили файл AutoCAD — Error 1308. Source File not found: \ или связанные с AutoCAD программные файлы.
- Другая программа злонамеренно или по ошибке удалила файлы, связанные с AutoCAD — Error 1308. Source File not found: \.
- Другая программа находится в конфликте с AutoCAD и его общими файлами ссылок.
- Поврежденная установка или загрузка AutoCAD (AutoCAD — Error 1308. Source File not found: \).
Продукт Solvusoft
Загрузка
WinThruster 2023 — Проверьте свой компьютер на наличие ошибок.
Совместима с Windows 2000, XP, Vista, 7, 8, 10 и 11
Установить необязательные продукты — WinThruster (Solvusoft) | Лицензия | Политика защиты личных сведений | Условия | Удаление
Я все еще ищу решение или, по крайней мере, какое-то руководство, хотя я согласен с тем, что это выходит за рамки обычной хорошей практики. — Джек 1 час назад
У меня нет доступа к моим инструментам развертывания, но я постараюсь представить перспективу. Поскольку я не полностью понимаю все аспекты того, что вы пишете, это будут общие комментарии. Я надеюсь, что это как минимум связано с тем, что вы просите. Это превратилось в блог, как я написал.
Для меня патч MSI эффективен для 2 основных сценариев:
- Исправлена ошибка в последовательности удаления установленного продукта с небольшим обновлением.
- Вы предоставляете небольшое обновление для пары файлов в качестве » исправления » для выпущенного продукта, который может быть огромным и требует много времени для переустановки.
Для этих двух целей я несколько раз профессионально использовал исправления MSI. В каждом случае не было другого хорошего решения. Патчинг IMHO предназначен для «исправления» — это то, для чего предназначена вся технология, а не для развертывания частых, постепенных обновлений. Доставка 96 обновлений файлов НЕ является исправлением.
Патч — это рабочее обновление. Помните, что исправление — это просто более компактный механизм доставки для обновления, которое уже работает. Это может быть серьезное, незначительное или даже небольшое обновление, и каждое из них будет работать по-своему. Прежде чем делать что-либо еще, убедитесь, что вы проверили свой фактический MSI полного обновления, прежде чем пытаться упаковать его как патч. Это лучший совет, который я могу вам дать. Все усилия, потраченные на исправление, будут потрачены впустую, если полное обновление не работает правильно. И да, это включает в себя установку, удаление и обновление во всех взаимодействиях перед созданием самого патча. Это, пожалуй, самая распространенная ошибка исправления из всех.
Существует несколько препятствий, мешающих удалению патча. Существуют десятки технических проблем, которые могут привести к удалению исправлений (рекомендуется прочитать). Иногда это огромная проблема, поскольку исправление, в котором установлено исправление, может быть признано дефектным и, следовательно, должно быть полностью восстановлено. На мой взгляд, это одно из основных применений небольшого патча — развернуть быстрое исправление, которое затем можно откатить.
Условия исправления и настраиваемого действия: для меня один из худших аспектов исправления состоит в том, что настраиваемые действия в пакетах могут не быть настроены должным образом, чтобы НЕ запускаться при выполнении операции исправления в отличие от обычной установки. Патч обладает свойствами, специфичными для патча, такими как PATCH и MSIPATCHREMOVE. Используйте эти условия для пользовательских действий, чтобы они запускались или не запускались во время исправления в зависимости от того, что необходимо. Будьте осторожны с условиями пользовательских действий, они сложны, чтобы получить право. Вот » Листок условий MSI «, чтобы помочь вам. Я не проверял эти условия — тестирование является единственной гарантией.
Некоторые дальнейшие советы по исправлению:
- Я бы полностью забыл об основных обновлениях. Я попробовал их и попробую снова, но они, как правило, не идеальны. Абсолютным требованием для исправления основного обновления является то, что RemoveExistingProducts помещается после InstallFinalize в InstallExecuteSequence. Причина этого заключается в том, что в противном случае файлы удаляются до того, как пакет исправлений попытается исправить существующие файлы. Вполне улов 22.
- Незначительное обновление не удаляет существующую установку, но rater повторно кэширует новый файл MSI, чтобы использовать его для операций обслуживания и удаления. Это означает, что патч может исправить последовательность удаления до его запуска — один из хороших патчей использует тот, который я перечислил выше. Фактически, если незначительное обновление работает, патч может не понадобиться вообще. Просто используйте незначительное обновление, если ваш MSI-файл не очень большой и вы не хотите поставить небольшое «исправление».
- Если вам нужно включить файлы в ваш патч, я рекомендую включить » включать целые файлы «. В противном случае выполняется исправление на уровне битов, и это лишняя сложность (если ваши двоичные файлы огромны). Я также не уверен, как исправление на уровне битов работает с подписанными файлами и цифровыми подписями.
- Включите в патч только то, что вам нужно. Добавьте не файлы или настройки, которые не требуются, и вы можете сделать надежный патч. Избегайте добавления пользовательских действий, если это возможно.
- Как уже упоминалось: имейте в виду, что исправление использует тот же InstallExecuteSequence, что и обычная установка, но вы можете по-разному обусловить настраиваемые действия с помощью свойств, специфичных для исправления, таких как PATCH и MSIPATCHREMOVE. Используйте эти условия для пользовательских действий, чтобы они запускались или не запускались во время исправления в зависимости от того, что необходимо.
- Ссылка на компонент должна быть на 100% правильной, чтобы ЛЮБОЙ тип патча работал. Без исключений.
- Незначительные обновления должны быть запущены с правильной командной строкой msiexec.exe, чтобы работать, если они не доставлены через setup.exe / update.exe.
- Сторонние модули слияния часто вызывают проблемы с исправлениями в моем опыте.
- » Ложная версия «, как они ее называют, — черное искусство обеспечения того, чтобы файлы всегда обновлялись путем добавления другой версии в MSI-файл для файла на диске, что, похоже, приводит к ошибкам исправления.
- Патч покажет тот же графический интерфейс, что и основная установка. На мой взгляд, это ошибочный дизайн. Пользовательские действия в графическом интерфейсе могут испортить процесс исправления (следует ли принимать новый пользовательский ввод значений для исправления?).
- Я считаю, что каждый патч должен быть накопительным — заменять все предыдущие патчи. Я никогда не получал эту работу должным образом, когда тестировал несколько патчей, установленных последовательно и последовательно. По многим причинам я пришел к выводу, что это был бесполезный подход к исправлению с самого начала. У меня были проблемы, точно такие же, как вы описываете с семействами исправлений, целевыми выпусками и т. Д. Патч не слишком умен, он представляет собой сложный набор из нескольких файлов, пытающихся найти продукт, к которому он принадлежит.
Очевидная вещь, которую следует заключить, заключается в том, что я действительно не рекомендую использовать такой подход к исправлению, даже когда вас об этом попросят. Тем не менее, я прочитал эту ветку, которая, кажется, указывает на успешное исправление для кого-то, кто перешел на использование WIX вместо Installshield. Вы должны проверить ссылку CodeProject тоже.
Что касается сценария развертывания — я не полностью осознаю все его аспекты, но похоже, что разработчики хотят, чтобы исправления преобразовывали работающее приложение в текущую версию QA через исправление? Я бы никогда не согласился с этим, иначе сценарий должен отличаться от того, на что он похож. Полностью потраченные впустую усилия по созданию патча, когда вы уже должны вначале выпустить незначительные или крупные обновления — их более чем достаточно для поставки программного обеспечения для обеспечения качества. Вы можете использовать dev-branch для доставки отдельного MSI, а затем время от времени создавать несколько исправлений, чтобы проверить исправимость продукта, но я бы никогда не использовал исправления для внутренней доставки установщиков вашего продукта. Я не знаю, если это то, что вас просят сделать.
Работайте с небольшими и крупными обновлениями — желательно последними для исправлений, не требующих исправлений, и доставляйте исправления, когда они вам действительно нужны. Если продолжительность установки является проблемой, вы можете просто запланировать ежедневное масштабное обновление после завершения ночной сборки на всех компьютерах разработчика и QA? (включая уничтожение любых запущенных процессов, необходимых для работы установки). Я не знаю, полностью ли я не в курсе того, чем на самом деле является ваш сценарий.
Посетите сайт installsite.org Стефана Крюгера, чтобы узнать больше обновлений и советов по исправлению.
Посмотрите этот хорошо известный учебник по wix для обновлений и исправлений. И MSDN.
What is Error 1308?
Error 1308 is a kind of Runtime error that is found in the Microsoft Windows operating systems. The file can be found for AutoCAD. AutoCAD — Error 1308. Source File not found: \ has a popularity rating of 2 / 10.
Errors
This tutorial contains information on Error 1308 or otherwise known as AutoCAD — Error 1308. Source File not found: \. Errors such as AutoCAD — Error 1308. Source File not found: \ indicate your machine has faulty hardware or software that should be fixed when possible. Below is information on how to repair Error 1308 and get your computer back to normal.
 Signs of Error 1308:
- When your computer freezes or locks up at random.
- When your computer crashes when you are running AutoCAD.
- If AutoCAD — Error 1308. Source File not found: \ pops up and causes a program to shutdown or your computer to crash.
- Your computer is running slow, taking a long time to boot up, and you suspect Error 1308 by AutoCAD is the cause.
What Causes Runtime Errors Like Error 1308?
There are several causes of runtime errors like AutoCAD — Error 1308. Source File not found: \, such as viruses, out of date drivers, missing files or folders, incomplete or poor installation, and registry errors. They can also occur due to an issue with the computer’s memory, which may often be due to a hardware problem. In some cases there was an issue installing AutoCAD and an error occurred.
 How to Fix AutoCAD — Error 1308. Source File not found: \
Follow the step by step instructions below to fix the Error 1308 problem. We recommend you do each in order. If you wish to skip these steps because they are too time consuming or you are not a computer expert, see our easier solution below.
Step 1 — Uninstall and Reinstall AutoCAD
If the AutoCAD — Error 1308. Source File not found: \ is a result of using AutoCAD, you may want to try reinstalling it and see if the problem is fixed. Please follow these steps:
Windows XP
- Click “Start Menu”.
- Click “Control Panel”.
- Select the “Add or Remove” program icon.
- Find the Error 1308 associated program.
- Click the Change/Remove button on the right side.
- The uninstaller pop up will give you instructions. Click “okay” or “next” or “yes” until it is complete.
- Reinstall the software.
Windows 7 and Windows Vista
- Click “Start Menu”.
- Click “Control Panel”.
- Click “Uninstall a Program” which is under the “Programs” header.
- Find the Error 1308 associated program.
- Right click on it and select “Uninstall”.
- The uninstaller pop up will give you instructions. Click “okay” or “next” or “yes” until it is complete.
- Reinstall the software and run the program.
Windows 8, 8.1, and 10
- Click “Start Menu”.
- Click “Programs and Features”.
- Find the software that is linked to **insert file name**.
- Click Uninstall/Change.
- The uninstaller will pop up and give you instructions. Click “okay” and “next” until it is complete.
- Restart your computer.
- Reinstall the software and run the program.
Step 2 — Remove Registry Entry related to Error 1308

- Create a backup of registry files.
- Click “Start”.
- Type regedit, select it, and grant permission in order to proceed.
- Click HKEY LOCAL MACHINE>>SOFTWARE>>Microsoft>>Windows>>Current Version>>Uninstall.
- Find the AutoCAD — Error 1308. Source File not found: \ software from the list you wish to uninstall.
- Select the software and double click the UninstallString icon on the right side.
- Copy the highlighted text.
- Exit and go to the search field.
- Paste the data.
- Select Okay in order to uninstall the program.
- Reinstall the software.
Step 3 – Ensure Junk Isn’t Causing AutoCAD — Error 1308. Source File not found: \
Any space that isn’t regularly cleaned out tends to accumulate junk. Your personal computer is no exception. Constant web browsing, installation of applications, and even browser thumbnail caches slow down your device and in the absence of adequate memory, can also trigger a AutoCAD — Error 1308. Source File not found: \ error.
So how do you get around this problem?
- You can either use the Disk Cleanup Tool that comes baked into your Windows operating system.
- Or you can use a more specialized hard drive clean up solution that does a thorough job and flushes the most stubborn temporary files from your system.
Both solutions may take several minutes to complete the processing of your system data if you haven’t conducted a clean up in a while.
The browser caches are almost a lost cause because they tend to fill up quite rapidly, thanks to our constantly connected and on the go lifestyle.
Here’s how you can run the Window’s Disk Cleanup Tool, without performance issues or surprises.
- For Windows XP and Windows 7, the program can be ran from “Start” and from the “Command Prompt”.
- Click “Start”, go to All Programs > Accessories > System Tools, click Disk Cleanup. Next choose the type of files you wish to remove, click OK, followed by “Delete Files”.
- Open up the Command Prompt, type “c:\windows\cleanmgr.exe /d” for XP and “cleanmgr” for Windows 7. Finish by pressing “Enter”.
- For Windows 8 and Windows 8.1, the Disk Cleanup Tool can be accessed directly from “Settings”. Click “Control Panel” and then “Administrative Tools”. You can select the drive that you want to run the clean up on. Select the files you want to get rid of and then click “OK” and “Delete Files”.
- For Windows 10, the process is simplified further. Type Disk Cleanup directly in the search bar and press “Enter”. Choose the drive and then the files that you wish to wipe. Click “OK”, followed by “Delete Files”.
The progressive ease with which the Cleanup Tool can be used points to the growing importance of regularly deleting temporary files and its place in preventing AutoCAD — Error 1308. Source File not found: \.

Remember to run the Disk Cleanup as an administrator.
Step 4 – Fix Infections and Eliminate Malware in Your PC

Well, for one, you may find certain applications misbehaving.
And you may also see the occurrence of Error 1308.
Infections and malware are the result of:
- Browsing the Internet using open or unencrypted public Wi-Fi connections
- Downloading applications from unknown and untrustworthy sources
- Intentional planting of viruses in your home and office networks
But thankfully, their impact can be contained.
- Enter “safe mode” by pressing the F8 key repeatedly when your device is restarting. Choose “Safe Mode with Networking” from the Advanced Boot Options menu.
- Back up all the data in your device to a secure location. This is preferably a storage unit that is not connected to your existing network.
- Leave program files as is. They are where the infection generally spreads from and may have been compromised.
- Run a thorough full-system scan or check of an on-demand scanner. If you already have an antivirus or anti-malware program installed, let it do the heavy lifting.
- Restart your computer once the process has run its course.
- Lastly, change all your passwords and update your drivers and operating system.

Step 5 – Return to the Past to Eliminate Error 1308
The steps outlined up until this point in the tutorial should have fixed AutoCAD — Error 1308. Source File not found: \ error. But the process of tracking what has caused an error is a series of educated guesses. So in case the situation persists, move to Step 5.
Windows devices give users the ability to travel back in time and restore system settings to an uncorrupted, error free state.
This can be done through the convenient “System Restore” program. The best part of the process is the fact that using System Restore doesn’t affect your personal data. There is no need to take backups of new songs and pictures in your hard drive.
- Open “Control Panel” and click on “System & Security”.
- Choose the option “System”.
- To the left of the modal, click on “System Protection”.
- The System Properties window should pop-up. You’ll be able to see the option “System Restore”. Click on it.
- Go with “Recommended restore” for the path of least hassles and surprises.
- Choose a system restore point (by date) that will guarantee taking your device back to the time when Error 1308 hasn’t been triggered yet.
- Tap “Next” and wrap up by clicking “Finish”.
If you’re using Windows 7 OS, you can reach “System Restore” by following the path Start > All Programs > Accessories > System Tools.
Step 6 — Error 1308 Caused by Outdated Drivers
Updating a driver is not as common as updating your operating system or an application used to run front-end interface tasks.
Drivers are software snippets in charge of the different hardware units that keep your device functional.
So when you detect an AutoCAD — Error 1308. Source File not found: \ error, updating your drivers may be a good bet. But it is time consuming and shouldn’t be viewed as a quick fix.
Here’s the step-by-step process you can go through to update drivers for Windows 8, Windows 8.1 and Windows 10.
- Check the site of your hardware maker for the latest versions of all the drivers you need. Download and extract them. We strongly advice going with original drivers. In most cases, they are available for free on the vendor website. Installing an incompatible driver causes more problems than it can ever fix.
- Open “Device Manager” from the Control Panel.
- Go through the various hardware component groupings and choose the ones you would like to update.
- On Windows 10 and Windows 8, right-click on the icon of the hardware you would like to update and click “Update Driver”.
- On Windows 7 and Vista, you right-click the hardware icon, choose “Properties”, navigate to the Driver panel, and then click “Update Driver”.
- Next you can let your device automatically search for the most compatible drivers, or you can choose to update the drivers from the versions you have on your hard drive. If you have an installer disk, then the latter should be your preferred course of action. The former may often get the driver selection incorrect.
- You may need to navigate a host of warnings from the Windows OS as you finalize the driver update. These include “Windows can’t verify that the driver is compatible” and “Windows can’t verify the publisher of this driver”. If you know that you have the right one in line, click “Yes”.
- Restart the system and hopefully the AutoCAD — Error 1308. Source File not found: \ error should have been fixed.
Step 7 – Call the Windows System File Checker into Action

With the Windows File Checker, you can audit all the system files your device needs to operate, locate missing ones, and restore them.
Sound familiar? It is almost like “System Restore”, but not quite. The System Restore essentially takes you back in time to a supposedly perfect set up of system files. The File Checker is more exhaustive.
It identifies what is amiss and fills the gaps.
- First and foremost, open up an elevated command prompt.
- Next, if you are using Windows 8, 8.1 or 10, enter “DISM.exe /Online /Cleanup-image /Restorehealth” into the window and press Enter.
- The process of running the Deployment Image Servicing and Management (DISM) tool may take several minutes.
- Once it completes, type the following command into the prompt “sfc /scannow”.
- Your device will now go through all protected files and if it detects an anomaly, it will replace the compromised version with a cached version that resides at %WinDir%\System32\dllcache.
Step 8 – Is your RAM Corrupted? Find Out.
Is it possible? Can the memory sticks of your device trigger Error 1308?
It is unlikely – because the RAM chips have no moving parts and consume little power. But at this stage, if all else has failed, diagnosing your RAM may be a good move.
You can use the Windows Memory Diagnostics Tool to get the job done. Users who are on a Linux or Mac and are experiencing crashes can use memtest86.
- Open up your device and go straight to the “Control Panel”.
- Click on “Administrative Tools”.
- Choose “Windows Memory Diagnostic”.
- What this built-in option does is it burns an ISO image of your RAM and boots the computer from this image.
- The process takes a while to complete. Once it is done, the “Status” field at the bottom of the screen populates with the result of the diagnosis. If there are no issues with your RAM/memory, you’ll see “No problems have been detected”.
One drawback of the Windows Memory Diagnostic tool pertains to the number of passes it runs and the RAM segments it checks.
Memtest86 methodically goes over all the segments of your memory – irrespective of whether it is occupied or not.
But the Windows alternative only checks the occupied memory segments and may be ineffective in gauging the cause of the AutoCAD — Error 1308. Source File not found: \ error.
Step 9 – Is your Hard Drive Corrupted? Find Out.
Your RAM or working memory isn’t the only culprit that may precipitate an AutoCAD — Error 1308. Source File not found: \ error. The hard drive of your device also warrants close inspection.
The symptoms of hard drive error and corruption span:
- Frequent crashes and the Blue Screen of Death (BSoD).
- Performance issues like excessively slow responses.
- Errors like Error 1308.
Hard drives are definitely robust, but they don’t last forever.
There are three things that you can do to diagnose the health of your permanent memory.
- It is possible that your device may have a hard time reading your drive. This can be the cause of an AutoCAD — Error 1308. Source File not found: \ error. You should eliminate this possibility by connecting your drive to another device and checking for the recurrence of the issue. If nothing happens, your drive health is okay.
- Collect S.M.A.R.T data by using the WMIC (Windows Management Instrumentation Command-line) in the command prompt. To do this, simply type “wmic” into the command prompt and press Enter. Next follow it up with “diskdrive get status”. The S.M.A.R.T status reading is a reliable indicator of the longevity of your drive.
- Fix what’s corrupt. Let’s assume you do find that all isn’t well with your hard drive. Before you invest in an expensive replacement, using Check Disk or chkdsk is worth a shot.
- Open the command prompt. Make sure you are in Admin mode.
- Type “chkdsk C: /F /X /R” and press “Enter”. “C” here is the drive letter and “R” recovers data, if possible, from the bad sectors.
- Allow the system to restart if the prompt shows up.
- And you should be done.
These steps can lead to the resolution you’re seeking. Otherwise the AutoCAD — Error 1308. Source File not found: \ may appear again. If it does, move to Step 10.
Step 10 – Update Windows OS

Yes, we’ve all heard the troubling stories.
Devices often develop problems post unfinished updates that do not go through. But these OS updates include important security patches. Not having them applied to your system leaves it vulnerable to viruses and malware.
And may also trigger Error 1308.
So here’s how Windows 7, Windows 8, Windows 8.1 and Windows 10 users can check for the latest updates and push them through:
- Click the “Start” button on the lower left-hand corner of your device.
- Type “Updates” in the search bar. There should be a “Windows Update” or “Check for Updates” option, based on the OS version you’re using.
- Click it. The system will let you know if any updates are available.
- You have the convenience of choosing the components of the update you’d like to push through. Always prioritize the security updates.
- Click “OK” followed by “Install Updates”.
Step 11 – Refresh the OS to Eliminate Persistent AutoCAD — Error 1308. Source File not found: \ Error
“Windows Refresh” is a lifesaver.
For those of you who are still with us and nothing has worked to eliminate the Error 1308, until recently, a fresh install of Windows would have been the only option.
Not anymore.
The Windows Refresh is similar to reinstalling your Windows OS, but without touching your personal data. That’s hours of backup time saved in a jiffy.
Through the Refresh, all your system files become good as new. The only minor annoyance is the fact that any custom apps you’ve installed are gone and the system applications you had uninstalled are back.
Still, it is the best bet as the final step of this process.
- Enter the “Settings” of your PC and click on “Change Settings”.
- Click “Update and recovery” and then choose “Recovery”.
- Select “Keep my files”. This removes apps and settings, but lets your personal files live on.
- You’ll get some warning messages about the apps that will be uninstalled. If you’ve gone through a recent OS upgrade, the Refresh process makes it so that you can’t go back to your previous OS version – if you should ever feel the need to do it.
- Click the “Refresh” button.
Are you using an older version of Windows that doesn’t come with the power to “Refresh”?
Maybe it is time to start from scratch.
- Enter your BIOS set-up.
- This is where you need to change your computer’s boot order. Make it so that the boot happens not from the existing system files, but from the CD/DVD Drive.
- Place the original Windows disk in the CD/DVD drive.
- Turn on or restart the device.
- Choose where you’d like the system files to be installed.
- Your PC will restart several times as the process runs its course.
FAQ’s
Do Runtime Errors Like Error 1308 Mean My Computer is Infected?
Runtime errors are usually not associated with viruses. Sometimes they will come disguised as false alerts which are actually viruses in disguise. These are mostly pretty easy to distinguish, however. In these cases, it is recommended that you scan your computer with an antivirus software.
Will Removing Runtime Errors Like Error 1308 Improve My Start Up Speed?
Runtime errors have no impact on the start up speed since the error occurs while the program is running. It may, however, cause the OS to crash during or after start up. Correcting runtime errors will have no impact on the startup speed of the computer. It may just help you save time by reducing crashes and errors which may cause the computer to keep starting up.
How Long Will It Take to Fix Runtime Errors like AutoCAD — Error 1308. Source File not found: \?
Depending on the problem, it may take anywhere from five minutes to fifty minutes. The most time consuming process is finding what’s causing the problem, it may be a hardware issue or a software glitch. Once the issue has been correctly identified, it only takes a few minutes to solve the problem. Using a software can help you save time since it works in a specifically designed way solving the problem in a quick manner.
Start Download Now
Author:
Curtis Hansen has been using, fiddling with, and repairing computers ever since he was a little kid. He contributes to this website to help others solve their computer issues without having to buy a new one.
You may experience this error while installing AutoCAD software, according to our research, the error appears on the screen when Autodesk is unable to find the source file during the installation of AutoCAD, however, if you check the file it is present.
There are multiple causes for this error to occur, we have listed some of them below:-
- Corrupted files- The AutoCAD files might get corrupted during the installation process and it might be the cause for this error to occur.
- Third-party software- If you are trying to crack AutoCAD software and you have downloaded it from a third-party source then, that could be the reason for the 1308 error to appear on the screen.
- Antivirus- Antivirus can prevent the downloading process of AutoCAD, make sure to disable the Windows defender or the antivirus.
- Permission denied- There is a chance that you have no longer access to C:\Autodesk for that reason Autodesk is unable to read the source file and it throws a 1308 error.
Disable Antivirus
Antivirus and firewalls protect our data and information from online resources such as applications, and webservers. and it also protects us from hackers and malware bytes.
Sometimes the antivirus prevents the downloading process of the launchers and also it is advised by the Autodesk developers is to disable the antivirus from your computer when you attempt to download AutoCAD.
Note- If you are using third-party Antivirus software then disable it manually.
Follow the steps to disable antivirus:-
- Go to settings by pressing the Windows + I keys together to open the settings.
- Click on Update & Security.
- Click on Windows Security on the left sidebar then click on Open Windows Security on the right pane.
Click on Open Windows Security - Go to Virus & threat protection then Click on Manage settings under the Virus & threat protection settings.
Click on Manage settings - Here, turn off real-time protection by clicking on it.
Turn off real-time protection - Once done check if the error persists.
Modify the Permissions of the Autodesk folder
If you don’t have full control permission on the Autodesk folder which is located in C:\ drive then you may get a 1308 error, however, you can fix this by just doing some changes to the permission settings.
Here is how you can modify the permissions of Autodesk:-
- In case you have other Autodesk products then It is recommended to delete the Autodesk folder from the C:\ drive and then download the software again by the browser method.
- Exit the installation and open the explorer, go to C:\ drive.
- Right-click on the Autodesk folder and select the properties option.
- Go to the security tab on the top, and click on the Edit button to make changes to the permissions.
Click on the Edit button to make changes to permissions - Check the Full Control option and click on Apply to save changes and then press OK.
Tick on the full control option to get the full control of the Autodesk folder - Once done, check if the error persists.
Download Autodesk via AVA ( Autodesk Virtual Agent )
Autodesk provides us an alternative option to install their products via Autodesk virtual agent basically it is a bot that helps us to download Autodesk products that we can install on our system we use this method when we get errors while installing Autodesk products with the browser methods.
Autodesk Virtual Agent is developed as an alternative option to download Autodesk products, recently users have reported that they are getting errors while installing Autodesk products. for that reason they introduced us to AVA ( Autodesk Virtual Agent ).
Here is how you can download AutoCAD via virtual agent:-
- First, uninstall Autocad and all the Autodesk products from the control panel then follow the installation instruction of AutoCAD via a virtual agent.
Uninstall Autodesk with all its components - Open your favourite browser and search Autodesk virtual agent and press enter.
- Once all the search results are loaded, then open the first link, and make sure the link belongs to Autodesk.
- Here you will describe what product you want but before you start describing you have to sign in/signup to download Autodesk products.
- if you have an existing account then sign in to your account and skip to the 8th step.
- Click on the Sign-in button on the top right, then click on create an account.
Click on the sign-in button to login into your account - Fill out the details that are required to create your account, once done, they will send you a verification link on your Gmail account that you provided, go to the Gmail and open the Autodesk mail, click on Verify Email then sign in to the Autodesk account.
Fill out the detail to create your account - Once you sign in, go back to the Autodesk virtual agent.
- Type AutoCAD download and press enter.
Type AutoCAD download and press enter - Click on the Start button to proceed to the next step.
Click on the Start button to proceed to the next step - Now It will ask what you want, carefully choose the one option according to your situation, if you have an existing key you can go for it and on the next step it should ask for the product key, if you don’t have a product key then you can proceed with the trial version like us.
Choose the option according to your situation - Once you selected the option, then it will ask, if you want to run AutoCAD on multiple computers or only on this computer.
- You can choose multiple but we will go for This Computer option.
Click on the This Computer option to install AutoCAD on your computer - Click on Continue with AVA to get the link from Autodesk Virtual Agent.
- Select the version of AutoCAD you want to download, In my case, I have selected the trial version for that reason it shows the latest AutoCAD versions, but if you have a product key then you can download older versions of AutoCAD but if you haven’t and you want old versions of Autocad such as 2014, 2016 then you can buy a product key to download older versions.
Choose the version according to your preference - After selecting the AutoCAD version, it will give you the Download button, click on it to download the AutoCAD installer.
Click on the Download button to install AutoCAD - Once the AutoCAD installer is downloaded, double click on it to run it.
- It should start the downloading process, once done, the Autodesk download manager will come up on the screen that is used to download Autodesk products.
- Click on I Agree to accept the agreement then click on Next to download the Autodesk download manager.
Click on the install button to install the Autodesk manager - Once the installation is done it will ask about the installation directory of Autodesk to save it on the computer, you can also change the directory by clicking on the Change button.
Press the Ok button to select the location - After selecting the directory, the downloading process of AutoCAD software will start and hopefully, it will not get you into the errors.
It starts downloading AutoCAD
If you followed the steps carefully one by one you will not face the 1308 error again.
Clean Reinstall Autocad
If none of these methods worked for you then you can apply this method to clean uninstall AutoCAD from your computer and then install it again with the browser methods.
First, you have to uninstall AutoCAD software and other Autodesk products including its components.
- Press Windows + R keys to open Run Window, type appwiz.cpl in the search box, and press enter.
- Here you should see all the programs that are installed on your computer. Uninstall AutoCAD and other Autodesk products one by one including its components by selecting the product and clicking on Uninstall button on the top.
- After uninstalling the AutoCAD, you have to delete the Autodesk folder from the C driver for that, go to file explorer then Local disk C, and navigate to Program Files.
- Find the Autodesk folder here, Right-click on it, and click the delete button.
Delete Autodesk from program files - After, Navigate to Common Files, Right-click on Autodesk shared and delete it.
Navigate to common files - Now you have to delete the Autodesk folder from AppData that stores the settings and program information that the computer system application requires to execute the task.
- Press Windows + R keys to open the Run Window and type AppData then press enter.
- Navigate to Local, find the Autodesk folder, right-click on it and delete it.
Delete the Autodesk folder from appdata - Go back to the previous directory, then navigate to the Roaming folder.
- Right-click on Autodesk and delete it from here.
- Once done, click on the Local Disk (C:) on the left sidebar, and navigate to Users>Public>Public Documents.
Delete the Autodesk folder from public downloads - Right-click on the Autodesk folder and delete it.
- Press Windows + R keys to open Run Window then type %programdata% and press enter.
- Locate for Autodesk folder, Right-click on the folder and delete it.
Delete the Autodesk folder from the program data - Press the Windows key then type Regedit in the search bar.
- Open the Registry Editor which is a database of a computer system that stores the configurations, settings, and information about the system.
- Navigate to the following path below.
Computer\HKEY_CURRENT_USER\SOFTWARE\Autodesk
- Right-click on the Autodesk folder and delete it.
Delete the Autodesk folder from Registry Editor - Again navigate to the following path
Computer\HKEY_LOCAL_MACHINE\SOFTWARE\Autodesk - Right-click on the Autodesk folder and delete it.
Again delete Autodesk from registry - Once done, restart your computer.
- Press Windows + R keys to open the Run Window and type %temp% and press enter.
- Then, press Ctrl + A to select all the temporary files, right-click and click on delete to delete all the temp files.
Note- All files will not be deleted because other applications are running in the background. just press Skip to leave it.Delete all the temporary files - After deleting all the Autodesk files from the system, make sure to disable the antivirus or Windows defender by following the above step.
- Now download Autodesk and its products from the official website.
If you are stuck somewhere while applying methods, tell us in the comments we would like to help you.
Muhammad Zubyan
Muhammad Zubyan is a certified Google IT Support Professional with over 7 years of extensive experience. He has worked on more than 1500 computers, gaining valuable insights that enable him to detect and troubleshoot any complicated root cause of Windows-related issues and errors. In addition to managing Appuals as a Senior Editor, he is currently developing his own Game Optimization program that caters to both gamers and casual users alike.


 Signs of Error 1308:
 How to Fix
