Have you ever tried to use your VPN app only to be slapped by an error message saying error 1168 element not found? It is not only annoying but frustrating.
As an avid VPN user, it is normal to encounter one of these errors because VPNs are not as fail-proof as one might think.
But you are in the right place if you have experienced this error, so read till the end to know how to clear VPN error 1168 element not found for good.
What is the element not found error?
The element not found error is usually a network connection problem that appears on Windows versions 7 and 8.
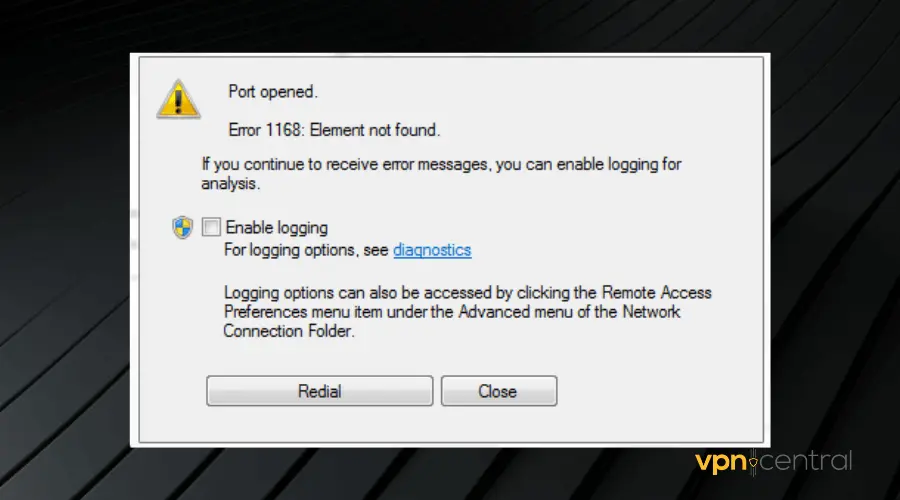
Oftentimes, this error message pops up when launching your VPN app.
However, it can also happen with apps like File Explorer, Microsoft Edge, Command Prompt, or even the Settings app in Windows.
It usually appears either as a result of a bad Windows update, corrupt drivers, or interference from third-party applications.
Below are some fixes you can try:
- Install pending Windows updates
- Reload Explorer.exe
- Uninstall any recently installed apps
- Run the DSM tool
- Reset your PC
- Use a modern VPN
1. Install pending updates
This error may occur if one of your computer’s software components is outdated.
Therefore, ensure that you update your software to the latest version. Follow the steps below to achieve this:
- Open Windows settings.
- Click Update and Security.
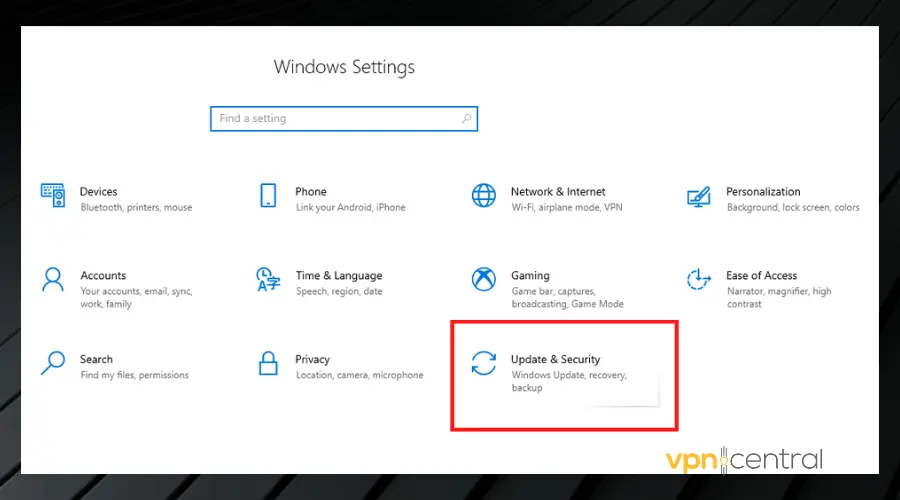
- Click Check for updates.
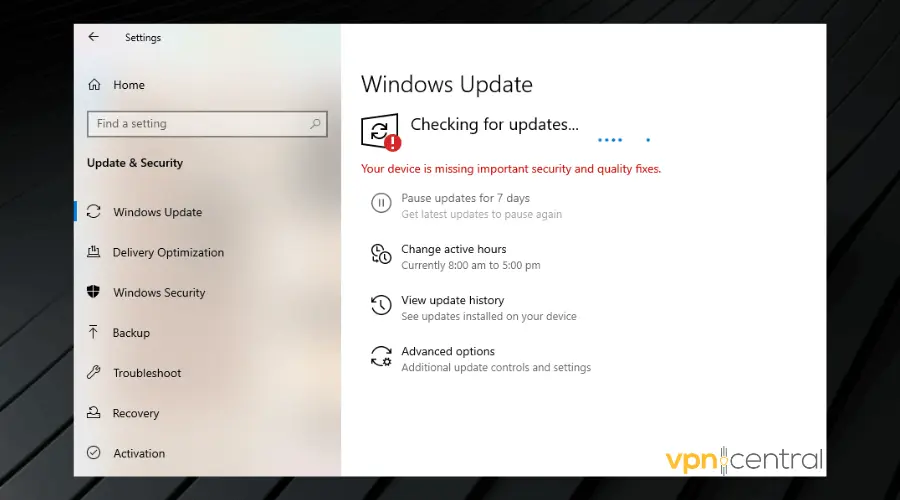
Your PC will search the internet for any relevant updates. Click the Update button to download and install any available updates.
2. Reload Explorer.exe
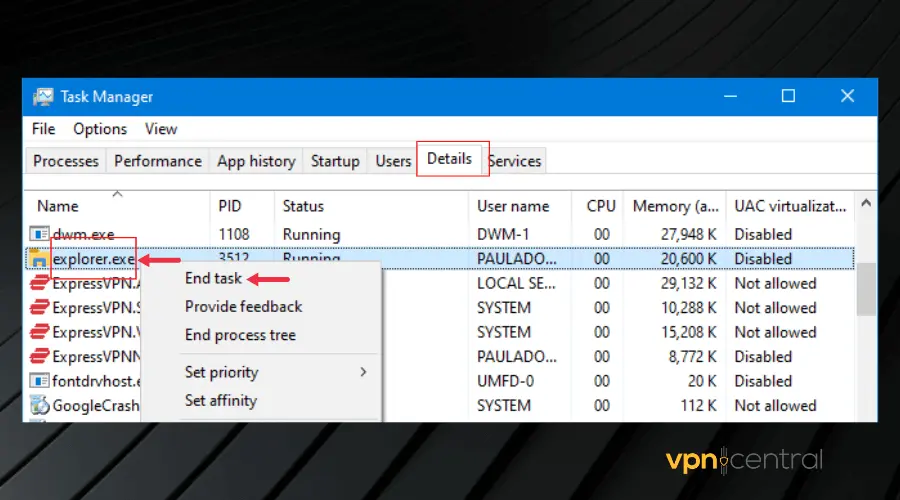
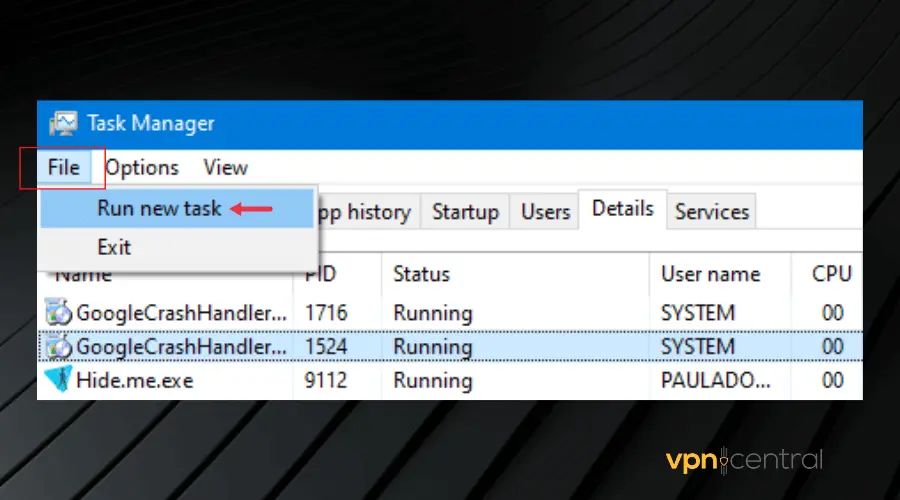
If you get the element not found error whenever you start up your VPN, you may need to reload your File Explorer. Here is how to do that:
- Press the Ctrl + Shift + Esc keys on your keyboard to launch the Task Manager.
- Click on the Details tab.
- Right-click Explorer.exe and select End Task. This will close all Windows Explorer processes so you can reload it.
- Click on File and select Create new task.
- Type explorer.exe into the text box.
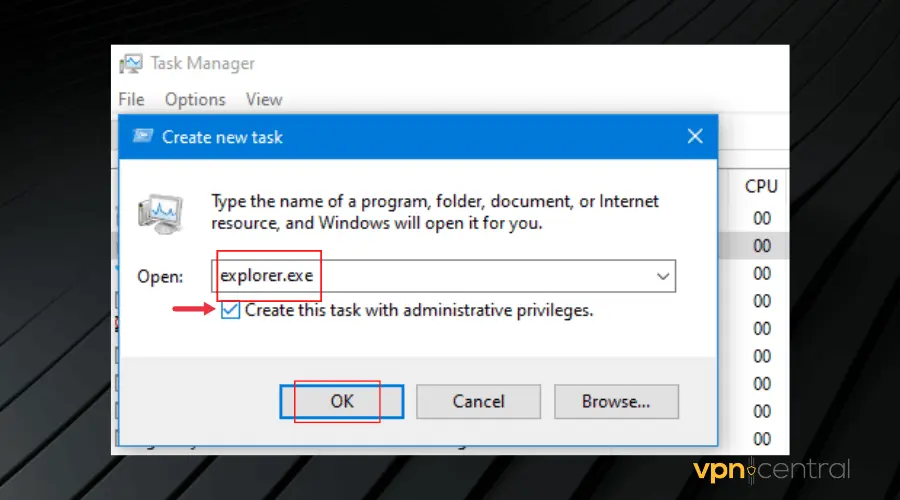
- Tick the Create this task with administrative privileges box and click OK.
Doing this refreshes your computer so that the Windows Explorer process can start afresh.
3. Uninstall any recently installed apps
If you started getting the error message after installing an app, then it’s only logical to uninstall it and check if it fixes the issue.
This is because the new app may have installed a driver that doesn’t support the VPN application. This has worked in many cases, so you should try it if you have any recently installed apps.
To uninstall apps on your computer, follow these steps:
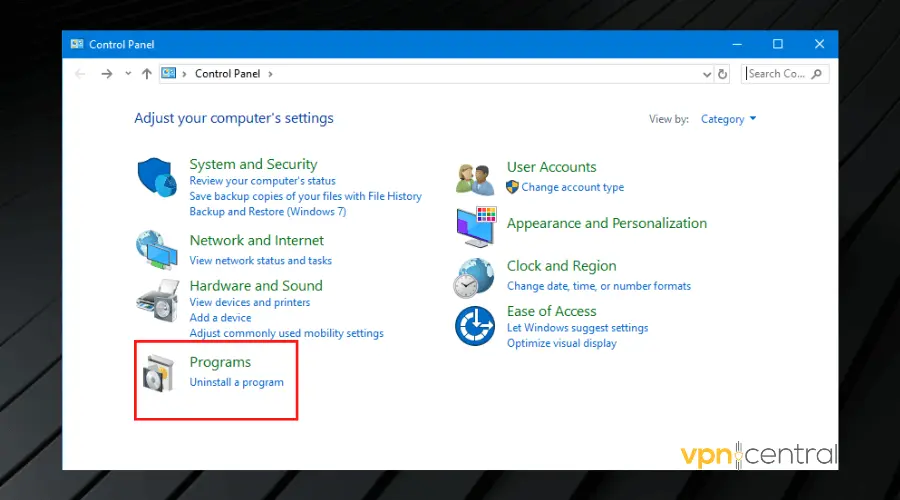
- Press the Windows + R keys on your keyboard.
- Type Control Panel and press Enter to launch the Control Panel.

- Click on Programs.
- Click on Uninstall a program.
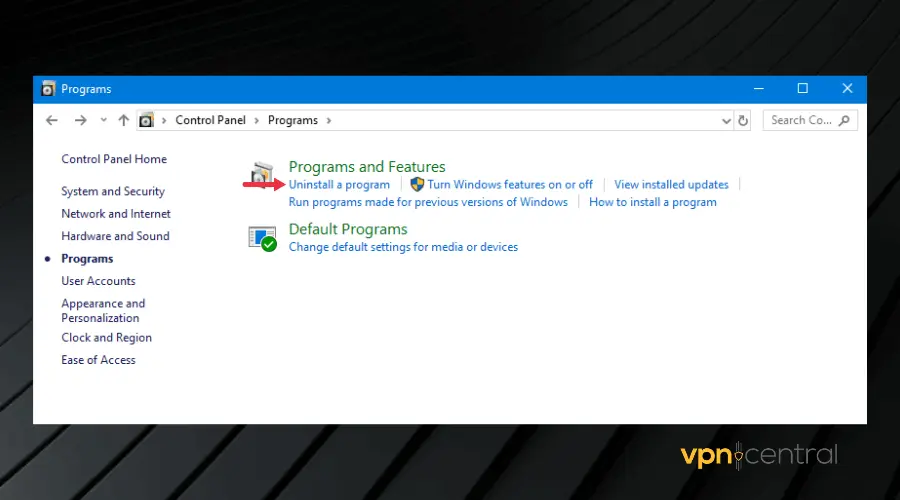
- Search for the recently installed app, right-click on it, and click Uninstall.
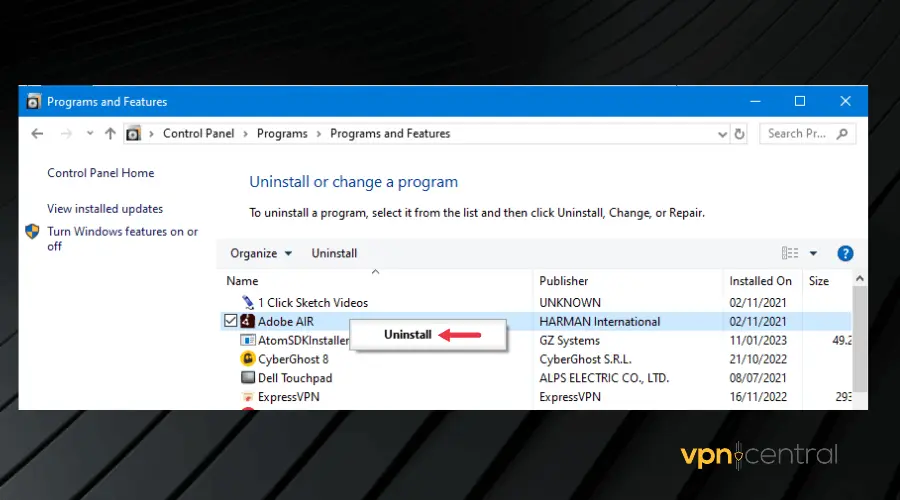
Now check to see if your VPN works properly.
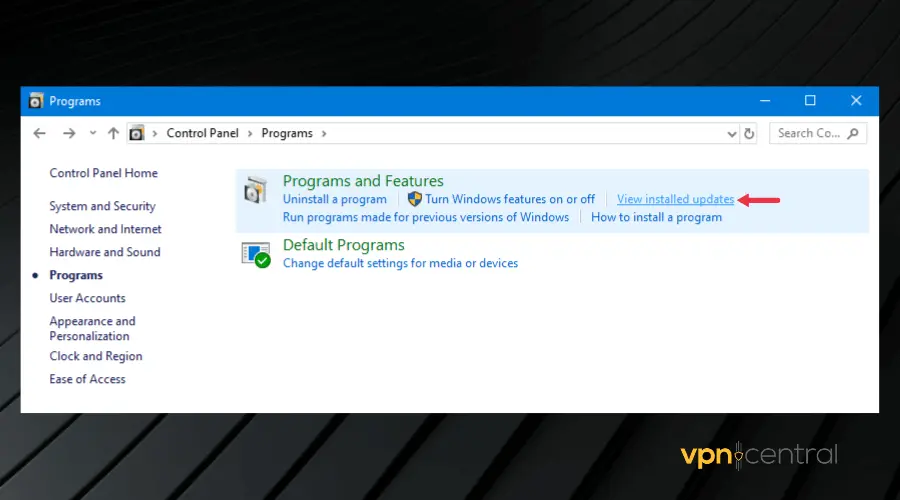
Alternatively, some windows updates can cause this error to happen. Therefore, you may need to uninstall recent updates. The process is similar to the one above. However, instead of clicking on Uninstall a program,
- Click on View installed updates.
- Then right-click on the affected updates and click Uninstall.
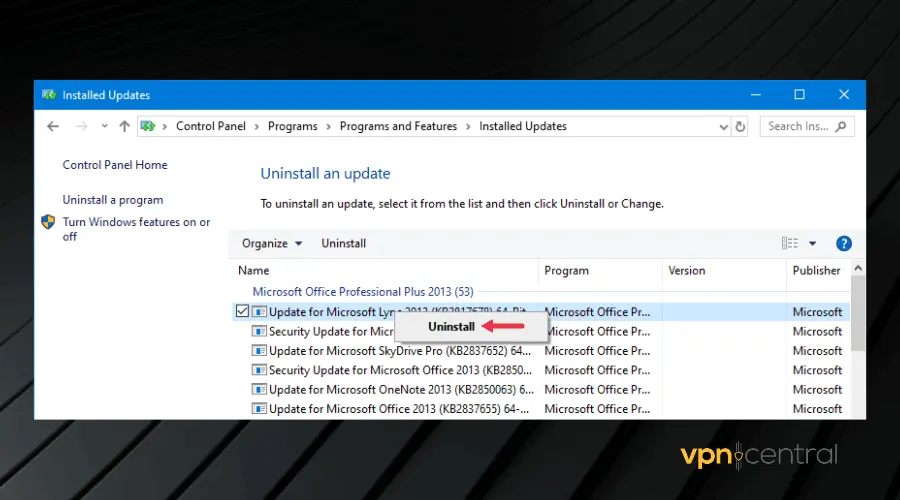
Check back to see if the error message is now clear.
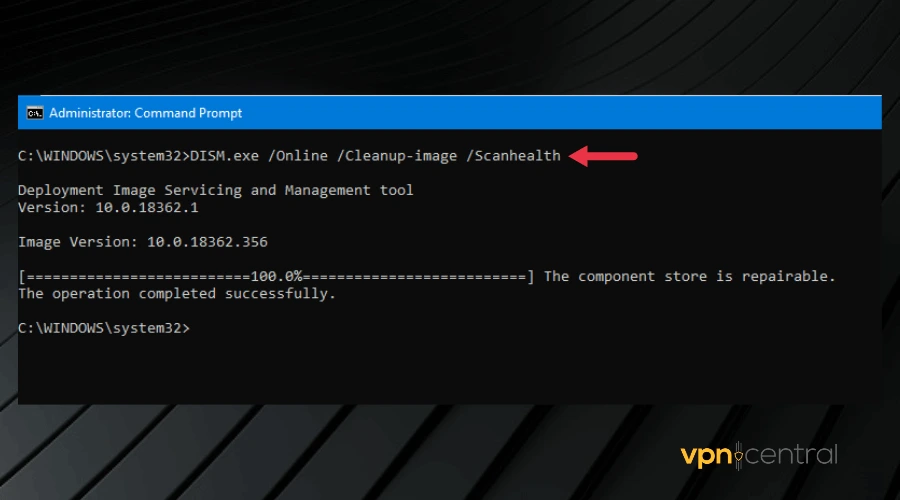
4. Run the DISM tool
Running the Deployment Image Servicing and Management tool is another fix for the element not found error.
The purpose of the tool is to scan your PC for problems that can lead to errors and repair them for you.
To run this tool:
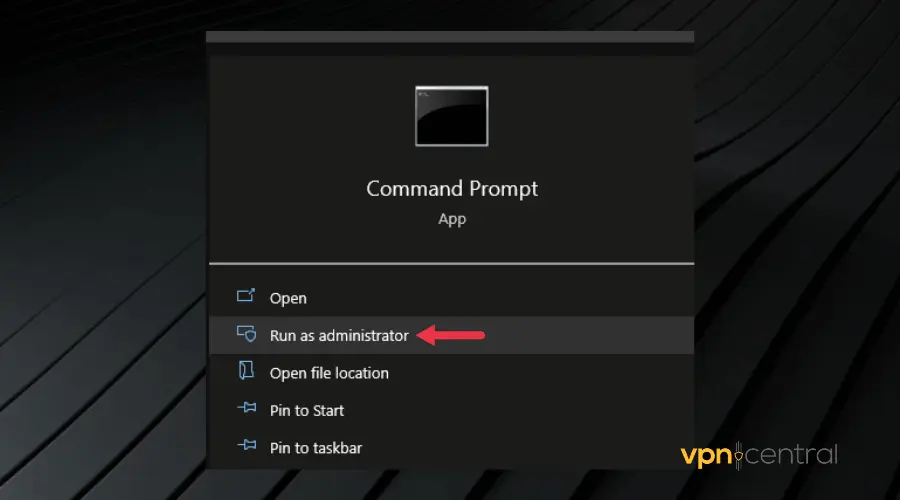
- Search for Command Prompt from your Start Menu.
- Right-click on its icon and select Run as administrator. After this, a black rectangular window will pop up, asking for a command.

- Type in the following command: DISM.exe /Online /Cleanup-image /Scanhealth and press the Enter key.
- After the scan is complete, type this second command: DISM.exe /Online /Cleanup-image /Restorehealth and press Enter to run it.
This fix requires a little bit of patience if there are serious or multiple issues with your configuration.
The good news is that it can get rid of a lot of errors and there’s not a lot of work on your end, you just have to make sure you enter the correct commands.
5. Reset Your PC
Resetting your PC should be the last fix to try if you have tried fixes 1- 4 and none worked. Although intense, performing a full reset on your PC is definitely going to clear this error from your computer.
Follow these steps to reset your PC:
- Open Computer Settings and click Update and Security.
- Click Recovery.
- Then click on Get Started below the Reset PC menu.
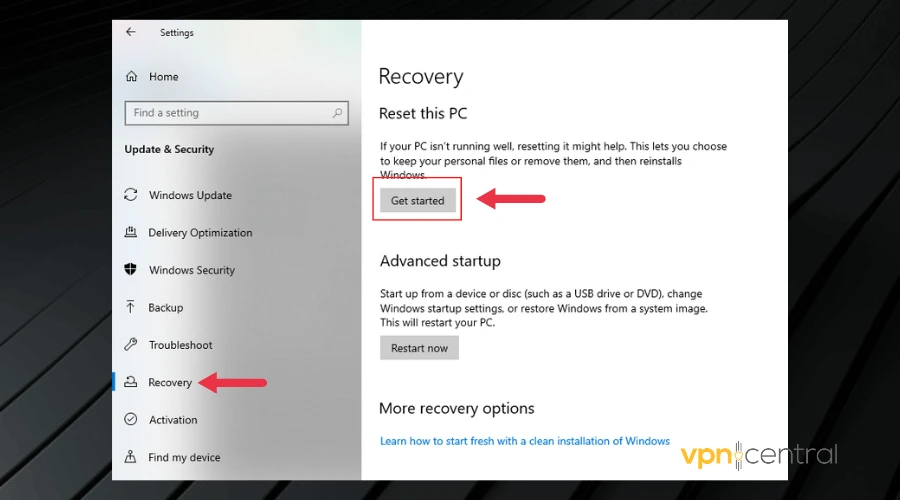
- Select an option from the menu that appears and follow the instructions to reset your PC.
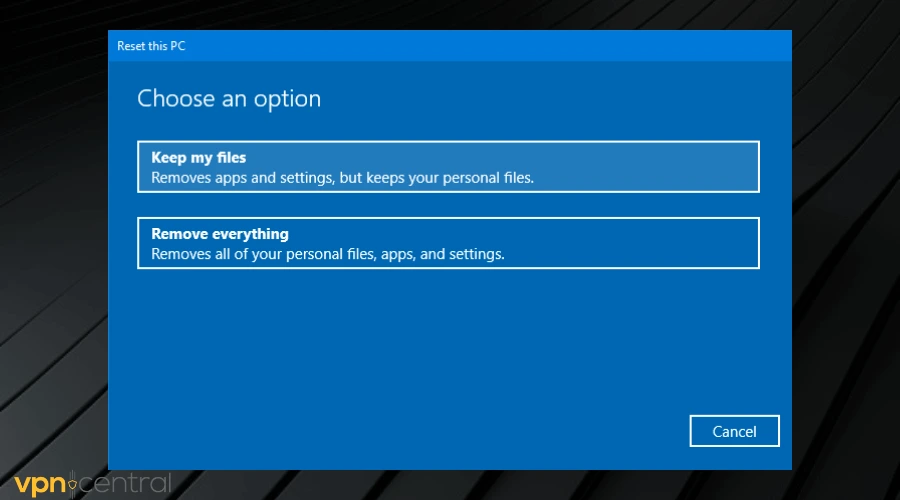
Resetting your PC returns the Windows OS to its original condition – as it was when you first installed it without all the installed programs so it is important to back up your personal files.
6. Use a modern VPN
This element not found error is most pronounced on VPNs with old tunneling protocols, especially L2TP and PPTP.
Therefore, switching to a provider with modern protocols such as OpenVPN and Wireguard is a sure way to fix the issue permanently.
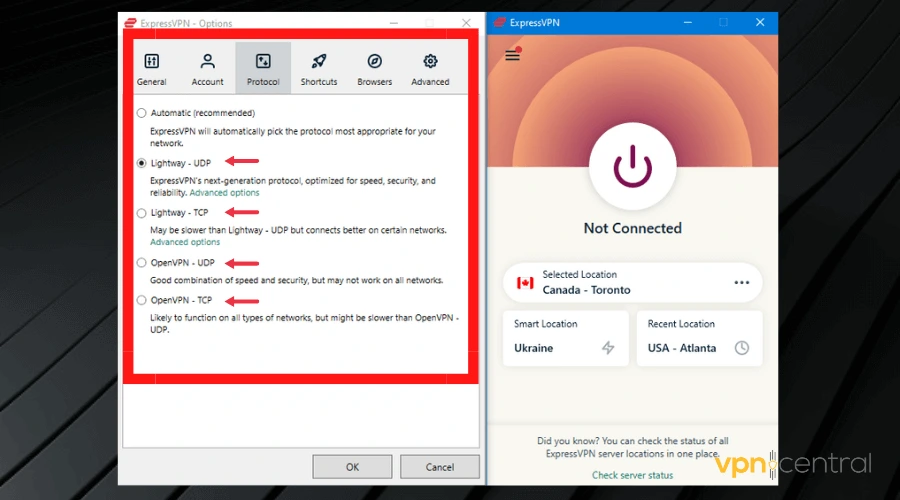
If you want an error-free experience and very fast connections, consider ExpressVPN.
The tool is frequently updated to avoid errors. On top of that, as you can see in the screenshot, it gives you the possibility to pick from multiple VPN protocols.
We must also mention that the VPN has a large network of 3000+ servers located in 94 countries. This is great for anyone who uses VPNs for a better connection or to bypass geo-blocking.

ExpressVPN
Use this up-to-date VPN to prevent any errors and enjoy all the benefits of private browsing!
Conclusion
We tested all the fixes in this article. Therefore, we hope that one of them works for you and helps you get rid of the VPN error 1168 element not found on your PC.
by Teodor Nechita
Eager to help those in need, Teodor writes articles daily on subjects regarding Windows, Xbox, and all things tech-related. When not working, you may usually find him either… read more
Updated on December 14, 2021
XINSTALL BY CLICKING THE DOWNLOAD FILE
This software will keep your drivers up and running, thus keeping you safe from common computer errors and hardware failure. Check all your drivers now in 3 easy steps:
- Download DriverFix (verified download file).
- Click Start Scan to find all problematic drivers.
- Click Update Drivers to get new versions and avoid system malfunctionings.
- DriverFix has been downloaded by 0 readers this month.
Several users have been reporting on the official Microsoft forums that they are having issues with the XPS printer:
I was unable to print from software using the XPS writer. I attempted to reinstall the printer but the installation fails reporting “printer driver not installed. Element not found”
Apparently, they are getting an error 1168: Element not found can have a wide variety of causes.
This article will guide you step-by-step on how to fix this error with the XPS printer.
How do you fix a generic error 1168?
1. Update your drivers
- Click on the Start button, then go to Settings
- Select Update & Security
- Click on Check for updates
- Allow Windows Update to download and install the updated driver
Follow these steps to install the latest printer drivers using Windows Update.
Alternatively, you can use a professional third-party tool that performs this process automatically and aims to keep your printer drivers updated and healthy.
More so, by choosing this automated method of managing drivers you also stay secure from potential damages caused by devices incompatibility.
Thus if you need reliable support to install or update any driver, the following software will accomplish this mission with no exception.
⇒ Get DriverFix
2. Try reinstalling the Windows XPS feature
- Press Windows
- Click on Settings (the cogwheel-shaped button)
- Select Apps
- Go to Apps & features
- Click Optional features
- Look for XPS feature if it is present
- If it is, right-click it and select uninstall
- Restart your PC
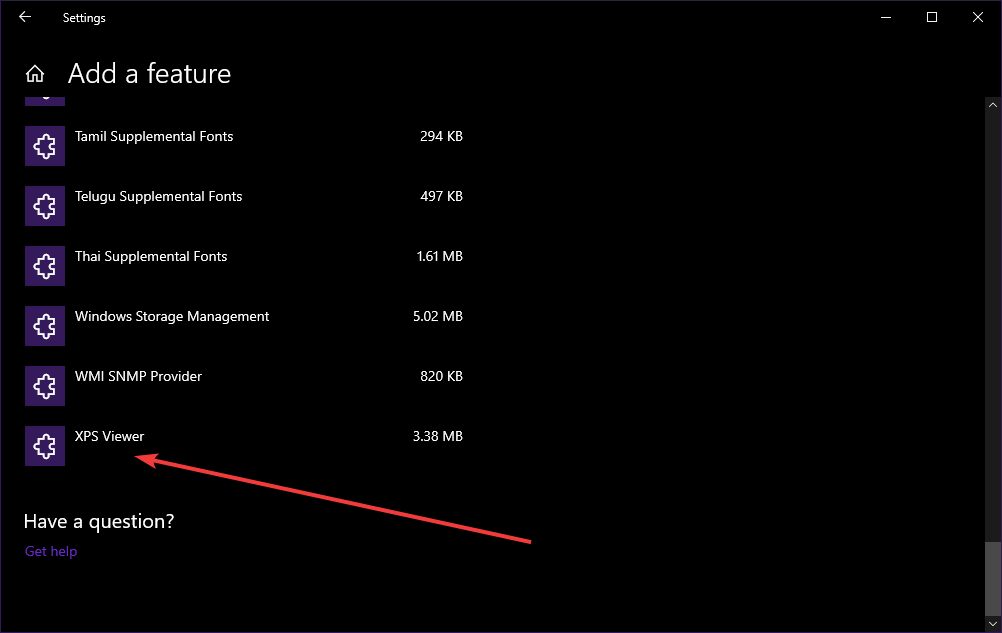
- After the restart or if your PC didn’t have the feature, go to the Manage optional features screen, and select Add a new feature
- When on the Add a new feature screen, select the XPS Viewer
- Restart your PC
3. Manually search for the location of your XPS Writer
Depending on which version of Windows 10 you have installed, the location of the XPS Writer may vary.
As such, if the solution listed above didn’t work, try this:
- Press Windows + R
- Type in control.exe
- Click Programs
- Select Programs and Features
- Click Turn Windows features on or off
- See if XPS Services and XPS Viewer are listed
- If the services are marked in their checkbox, unmark them and restart the PC
- If the services are unmarked in their checkbox, mark them and restart the PC
- Press Windows + R
- Type in control.exe
- Go to Hardware and Sound
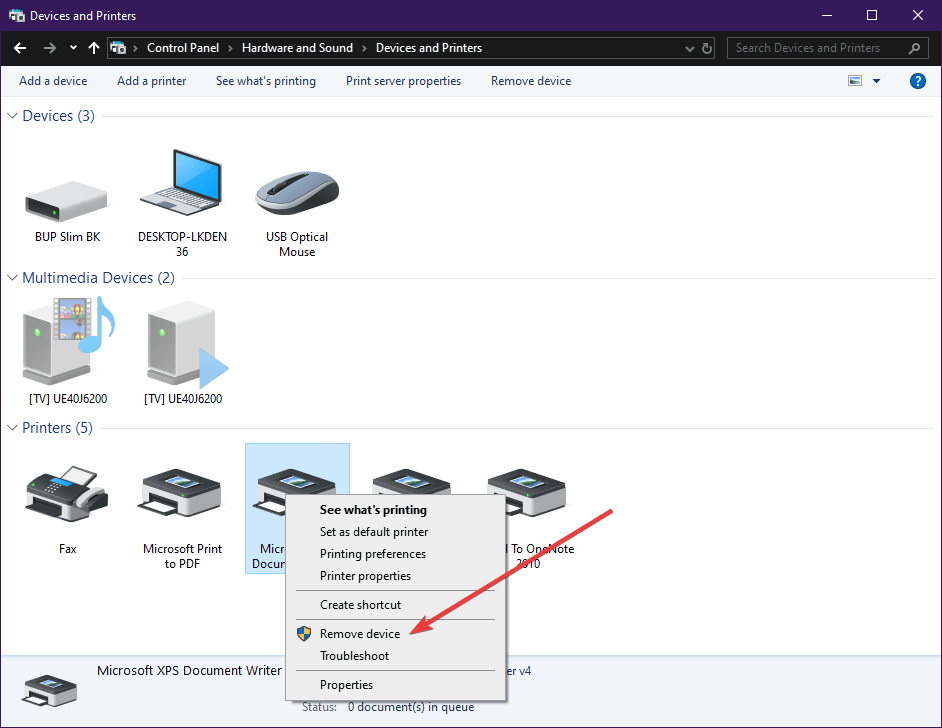
- Click Devices and Printers
- See if Microsoft XPS Document Writer is installed as a printer.
- If it is, right-click it and choose Remove device
- Restart your PC
- Go back to Devices and Printers and select Add a printer
- Select The printer that I want isn’t listed
- Click Add a local printer or network printer with manual setting
- In the Choose a printer port screen, select Use an existing port and PORTPROMPT: (Local Port)
- In the Install a printer driver screen, select Microsoft on the left pane and Microsoft XPS Document Writer on the right
- When asked Which version of the driver do you want to use? select Use the driver that is currently installed (recommended)
If these particular steps didn’t help, you could also try to:
- Uninstall Recent Windows Updates
- Reset Your PC
![]()
Newsletter
by Teodor Nechita
Eager to help those in need, Teodor writes articles daily on subjects regarding Windows, Xbox, and all things tech-related. When not working, you may usually find him either… read more
Updated on December 14, 2021
XINSTALL BY CLICKING THE DOWNLOAD FILE
This software will keep your drivers up and running, thus keeping you safe from common computer errors and hardware failure. Check all your drivers now in 3 easy steps:
- Download DriverFix (verified download file).
- Click Start Scan to find all problematic drivers.
- Click Update Drivers to get new versions and avoid system malfunctionings.
- DriverFix has been downloaded by 0 readers this month.
Several users have been reporting on the official Microsoft forums that they are having issues with the XPS printer:
I was unable to print from software using the XPS writer. I attempted to reinstall the printer but the installation fails reporting “printer driver not installed. Element not found”
Apparently, they are getting an error 1168: Element not found can have a wide variety of causes.
This article will guide you step-by-step on how to fix this error with the XPS printer.
How do you fix a generic error 1168?
1. Update your drivers
- Click on the Start button, then go to Settings
- Select Update & Security
- Click on Check for updates
- Allow Windows Update to download and install the updated driver
Follow these steps to install the latest printer drivers using Windows Update.
Alternatively, you can use a professional third-party tool that performs this process automatically and aims to keep your printer drivers updated and healthy.
More so, by choosing this automated method of managing drivers you also stay secure from potential damages caused by devices incompatibility.
Thus if you need reliable support to install or update any driver, the following software will accomplish this mission with no exception.
⇒ Get DriverFix
2. Try reinstalling the Windows XPS feature
- Press Windows
- Click on Settings (the cogwheel-shaped button)
- Select Apps
- Go to Apps & features
- Click Optional features
- Look for XPS feature if it is present
- If it is, right-click it and select uninstall
- Restart your PC
- After the restart or if your PC didn’t have the feature, go to the Manage optional features screen, and select Add a new feature
- When on the Add a new feature screen, select the XPS Viewer
- Restart your PC
3. Manually search for the location of your XPS Writer
Depending on which version of Windows 10 you have installed, the location of the XPS Writer may vary.
As such, if the solution listed above didn’t work, try this:
- Press Windows + R
- Type in control.exe
- Click Programs
- Select Programs and Features
- Click Turn Windows features on or off
- See if XPS Services and XPS Viewer are listed
- If the services are marked in their checkbox, unmark them and restart the PC
- If the services are unmarked in their checkbox, mark them and restart the PC
- Press Windows + R
- Type in control.exe
- Go to Hardware and Sound
- Click Devices and Printers
- See if Microsoft XPS Document Writer is installed as a printer.
- If it is, right-click it and choose Remove device
- Restart your PC
- Go back to Devices and Printers and select Add a printer
- Select The printer that I want isn’t listed
- Click Add a local printer or network printer with manual setting
- In the Choose a printer port screen, select Use an existing port and PORTPROMPT: (Local Port)
- In the Install a printer driver screen, select Microsoft on the left pane and Microsoft XPS Document Writer on the right
- When asked Which version of the driver do you want to use? select Use the driver that is currently installed (recommended)
If these particular steps didn’t help, you could also try to:
- Uninstall Recent Windows Updates
- Reset Your PC
![]()
Newsletter
C++, windows-application, wlanapi, qt
Здравствуйте!
Я хочу подключатся к сетям WiFi Enterprise через свою программу. Настроил Radius Server, поключение к сети через Windows работает. Но при подключении через программу пишет: ошибка 1168 (ERROR_NOT_FOUND). Если быть точнее, то такую ошибку возращает функция: WlanSetProfileEapXmlUserData.
Разрабатываю эту программу на Qt 5.9.8 (Windows 10).
Пример кода:
QString xmlProfile = "<?xml version="1.0"?><WLANProfile xmlns="http://www.microsoft.com/networking/WLAN/profile/v1"><name>" + profileName + "</name><SSIDConfig><SSID>" "<name>" + apName + "</name></SSID><nonBroadcast>" + checkHiddenAP(hiddenAP) + "</nonBroadcast></SSIDConfig><connectionType>ESS</connectionType><connectionMode>" + checkAutoConnection(isAutoConnection) + "</connectionMode><MSM><security><authEncryption><authentication>" + checkAuthentication(authAlgorithm) + "</authentication><encryption>" + checkEncryption(encryption) + "</encryption><useOneX>true</useOneX></authEncryption><PMKCacheMode>enabled</PMKCacheMode><PMKCacheTTL>720</PMKCacheTTL><PMKCacheSize>128</PMKCacheSize>" "<preAuthMode>disabled</preAuthMode><OneX xmlns="http://www.microsoft.com/networking/OneX/v1"><authMode>user</authMode><EAPConfig><EapHostConfig " "xmlns="http://www.microsoft.com/provisioning/EapHostConfig"><EapMethod><Type xmlns="http://www.microsoft.com/provisioning/EapCommon">25</Type><VendorId " "xmlns="http://www.microsoft.com/provisioning/EapCommon">0</VendorId><VendorType xmlns="http://www.microsoft.com/provisioning/EapCommon">0</VendorType>" "<AuthorId xmlns="http://www.microsoft.com/provisioning/EapCommon">0</AuthorId></EapMethod>" "<Config xmlns="http://www.microsoft.com/provisioning/EapHostConfig"><Eap xmlns="http://www.microsoft.com/provisioning/BaseEapConnectionPropertiesV1"><Type>25</Type>" "<EapType xmlns="http://www.microsoft.com/provisioning/MsPeapConnectionPropertiesV1"><ServerValidation>" "<DisableUserPromptForServerValidation>false</DisableUserPromptForServerValidation><ServerNames></ServerNames></ServerValidation>" "<FastReconnect>true</FastReconnect><InnerEapOptional>false</InnerEapOptional><Eap xmlns="http://www.microsoft.com/provisioning/BaseEapConnectionPropertiesV1"><Type>26</Type>" "<EapType xmlns="http://www.microsoft.com/provisioning/MsChapV2ConnectionPropertiesV1"><UseWinLogonCredentials>false</UseWinLogonCredentials></EapType></Eap>" "<EnableQuarantineChecks>false</EnableQuarantineChecks><RequireCryptoBinding>false</RequireCryptoBinding><PeapExtensions><PerformServerValidation " "xmlns="http://www.microsoft.com/provisioning/MsPeapConnectionPropertiesV2">true</PerformServerValidation><AcceptServerName " "xmlns="http://www.microsoft.com/provisioning/MsPeapConnectionPropertiesV2">true</AcceptServerName><PeapExtensionsV2 " "xmlns="http://www.microsoft.com/provisioning/MsPeapConnectionPropertiesV2"><AllowPromptingWhenServerCANotFound " "xmlns="http://www.microsoft.com/provisioning/MsPeapConnectionPropertiesV3">true</AllowPromptingWhenServerCANotFound></PeapExtensionsV2></PeapExtensions></EapType></Eap></Config>" "</EapHostConfig></EAPConfig></OneX><EapHostUserCredentials xmlns="http://www.microsoft.com/provisioning/EapHostUserCredentials" " "xmlns:eapCommon="http://www.microsoft.com/provisioning/EapCommon" xmlns:baseEap="http://www.microsoft.com/provisioning/BaseEapMethodUserCredentials"><EapMethod>" "<eapCommon:Type>25</eapCommon:Type><eapCommon:AuthorId>0</eapCommon:AuthorId></EapMethod><Credentials xmlns:eapUser="http://www.microsoft.com/provisioning/EapUserPropertiesV1" " "xmlns:xsi="http://www.w3.org/2001/XMLSchema-instance" xmlns:baseEap="http://www.microsoft.com/provisioning/BaseEapUserPropertiesV1" " "xmlns:MsPeap="http://www.microsoft.com/provisioning/MsPeapUserPropertiesV1" xmlns:MsChapV2="http://www.microsoft.com/provisioning/MsChapV2UserPropertiesV1"><baseEap:Eap>" "<baseEap:Type>25</baseEap:Type><MsPeap:EapType><MsPeap:RoutingIdentity>" + apName + "</MsPeap:RoutingIdentity><baseEap:Eap><baseEap:Type>26</baseEap:Type><MsChapV2:EapType>" "<MsChapV2:Username>" + username + "</MsChapV2:Username><MsChapV2:Password>" + password + "</MsChapV2:Password></MsChapV2:EapType></baseEap:Eap></MsPeap:EapType></baseEap:Eap>" "</Credentials></EapHostUserCredentials></security></MSM></WLANProfile>"; LPCWSTR wlanProfile = reinterpret_cast<LPCWSTR>(profileName.utf16()); // profileName - это название Точки Доступа которую получаю через параметр функции. DWORD dwResult = WlanSetProfileEapXmlUserData(hClient, &adapterGUID, wlanProfile, WLAN_SET_EAPHOST_DATA_ALL_USERS, reinterpret_cast<LPCWSTR(xmlProfile).utf16()), nullptr); qDebug() << dwResult;Подключения к персональной сети работают, там использую WlanSetProfile функцию. Проблема только если подключатся к корпоративной сети. Я думаю что проблема с неверным XML профилем. На сайте Microsoft, есть много примеров профилей, к примеру:
https://docs.microsoft.com/en-us/windows/win32/nativewifi/wpa2-enterprise-with-peap-mschapv2-profile-sample
и
https://docs.microsoft.com/en-us/windows/win32/eaphost/peap-ms-chapv2-user-properties
Как думаете в чем может быть проблема? Или где можно узнать какой профиль нужен? Спасибо за помощь.
| Номер ошибки: | Ошибка 1168 | |
| Название ошибки: | Windows Defender Error Code 1168 | |
| Описание ошибки: | Ошибка 1168: Возникла ошибка в приложении Windows Defender. Приложение будет закрыто. Приносим извинения за неудобства. | |
| Разработчик: | Microsoft Corporation | |
| Программное обеспечение: | Windows Defender | |
| Относится к: | Windows XP, Vista, 7, 8, 10, 11 |
Фон «Windows Defender Error Code 1168»
Эксперты обычно называют «Windows Defender Error Code 1168» «ошибкой времени выполнения». Программисты, такие как Microsoft Corporation, стремятся создавать программное обеспечение, свободное от этих сбоев, пока оно не будет публично выпущено. Как и во всем в жизни, иногда такие проблемы, как ошибка 1168, упускаются из виду.
После первоначального выпуска пользователи Windows Defender могут столкнуться с сообщением «Windows Defender Error Code 1168» во время запуска программы. Когда это происходит, конечные пользователи могут сообщить Microsoft Corporation о наличии ошибок «Windows Defender Error Code 1168». Microsoft Corporation может устранить обнаруженные проблемы, а затем загрузить измененный файл исходного кода, позволяя пользователям обновлять свою версию. Поэтому, когда вы сталкиваетесь с запросом на обновление Windows Defender, это обычно связано с тем, что это решение для исправления ошибки 1168 и других ошибок.
Вполне вероятно, что при загрузке Windows Defender вы столкнетесь с «Windows Defender Error Code 1168». Проанализируем некоторые из наиболее распространенных причин ошибок ошибки 1168 во время выполнения:
Ошибка 1168 Crash — это распространенная ошибка 1168 во время выполнения ошибки, которая приводит к полному завершению работы программы. Обычно это происходит, когда Windows Defender не может обработать данные в удовлетворительной форме и поэтому не может получить ожидаемый результат.
Утечка памяти «Windows Defender Error Code 1168» — ошибка 1168 утечка памяти приводит к тому, что Windows Defender постоянно использует все больше и больше памяти, увяская систему. Возможные причины включают сбой Microsoft Corporation для девыделения памяти в программе или когда плохой код выполняет «бесконечный цикл».
Error 1168 Logic Error — Ошибка программной логики возникает, когда, несмотря на точный ввод от пользователя, производится неверный вывод. Это связано с ошибками в исходном коде Microsoft Corporation, обрабатывающих ввод неправильно.
Повреждение, отсутствие или удаление файлов Windows Defender Error Code 1168 может привести к ошибкам Windows Defender. Как правило, решить проблему можно заменой файла Microsoft Corporation. В некоторых случаях реестр Windows пытается загрузить файл Windows Defender Error Code 1168, который больше не существует; в таких ситуациях рекомендуется запустить сканирование реестра, чтобы исправить любые недопустимые ссылки на пути к файлам.
Распространенные проблемы Windows Defender Error Code 1168
Усложнения Windows Defender с Windows Defender Error Code 1168 состоят из:
- «Ошибка программного обеспечения Windows Defender Error Code 1168. «
- «Недопустимая программа Win32: Windows Defender Error Code 1168»
- «Windows Defender Error Code 1168 должен быть закрыт. «
- «Файл Windows Defender Error Code 1168 не найден.»
- «Windows Defender Error Code 1168 не может быть найден. «
- «Проблема при запуске приложения: Windows Defender Error Code 1168. «
- «Windows Defender Error Code 1168 не выполняется. «
- «Windows Defender Error Code 1168 выйти. «
- «Windows Defender Error Code 1168: путь приложения является ошибкой. «
Проблемы Windows Defender Error Code 1168 с участием Windows Defenders возникают во время установки, при запуске или завершении работы программного обеспечения, связанного с Windows Defender Error Code 1168, или во время процесса установки Windows. При появлении ошибки Windows Defender Error Code 1168 запишите вхождения для устранения неполадок Windows Defender и чтобы HelpMicrosoft Corporation найти причину.
Причины проблем Windows Defender Error Code 1168
Проблемы Windows Defender Error Code 1168 могут быть отнесены к поврежденным или отсутствующим файлам, содержащим ошибки записям реестра, связанным с Windows Defender Error Code 1168, или к вирусам / вредоносному ПО.
В первую очередь, проблемы Windows Defender Error Code 1168 создаются:
- Недопустимая или поврежденная запись Windows Defender Error Code 1168.
- Вирус или вредоносное ПО, которые повредили файл Windows Defender Error Code 1168 или связанные с Windows Defender программные файлы.
- Windows Defender Error Code 1168 злонамеренно удален (или ошибочно) другим изгоем или действительной программой.
- Другая программа, конфликтующая с Windows Defender Error Code 1168 или другой общей ссылкой Windows Defender.
- Windows Defender (Windows Defender Error Code 1168) поврежден во время загрузки или установки.
Продукт Solvusoft
Загрузка
WinThruster 2022 — Проверьте свой компьютер на наличие ошибок.
Совместима с Windows 2000, XP, Vista, 7, 8, 10 и 11
Установить необязательные продукты — WinThruster (Solvusoft) | Лицензия | Политика защиты личных сведений | Условия | Удаление
by Teodor Nechita
Eager to help those in need, Teodor writes articles daily on subjects regarding Windows, Xbox, and all things tech-related. When not working, you may usually find him either… read more
Updated on December 14, 2021
XINSTALL BY CLICKING THE DOWNLOAD FILE
This software will keep your drivers up and running, thus keeping you safe from common computer errors and hardware failure. Check all your drivers now in 3 easy steps:
- Download DriverFix (verified download file).
- Click Start Scan to find all problematic drivers.
- Click Update Drivers to get new versions and avoid system malfunctionings.
- DriverFix has been downloaded by 0 readers this month.
Several users have been reporting on the official Microsoft forums that they are having issues with the XPS printer:
I was unable to print from software using the XPS writer. I attempted to reinstall the printer but the installation fails reporting “printer driver not installed. Element not found”
Apparently, they are getting an error 1168: Element not found can have a wide variety of causes.
This article will guide you step-by-step on how to fix this error with the XPS printer.
How do you fix a generic error 1168?
1. Update your drivers
- Click on the Start button, then go to Settings
- Select Update & Security
- Click on Check for updates
- Allow Windows Update to download and install the updated driver
Follow these steps to install the latest printer drivers using Windows Update.
Alternatively, you can use a professional third-party tool that performs this process automatically and aims to keep your printer drivers updated and healthy.
More so, by choosing this automated method of managing drivers you also stay secure from potential damages caused by devices incompatibility.
Thus if you need reliable support to install or update any driver, the following software will accomplish this mission with no exception.
⇒ Get DriverFix
2. Try reinstalling the Windows XPS feature
- Press Windows
- Click on Settings (the cogwheel-shaped button)
- Select Apps
- Go to Apps & features
- Click Optional features
- Look for XPS feature if it is present
- If it is, right-click it and select uninstall
- Restart your PC
- After the restart or if your PC didn’t have the feature, go to the Manage optional features screen, and select Add a new feature
- When on the Add a new feature screen, select the XPS Viewer
- Restart your PC
3. Manually search for the location of your XPS Writer
Depending on which version of Windows 10 you have installed, the location of the XPS Writer may vary.
As such, if the solution listed above didn’t work, try this:
- Press Windows + R
- Type in control.exe
- Click Programs
- Select Programs and Features
- Click Turn Windows features on or off
- See if XPS Services and XPS Viewer are listed
- If the services are marked in their checkbox, unmark them and restart the PC
- If the services are unmarked in their checkbox, mark them and restart the PC
- Press Windows + R
- Type in control.exe
- Go to Hardware and Sound
- Click Devices and Printers
- See if Microsoft XPS Document Writer is installed as a printer.
- If it is, right-click it and choose Remove device
- Restart your PC
- Go back to Devices and Printers and select Add a printer
- Select The printer that I want isn’t listed
- Click Add a local printer or network printer with manual setting
- In the Choose a printer port screen, select Use an existing port and PORTPROMPT: (Local Port)
- In the Install a printer driver screen, select Microsoft on the left pane and Microsoft XPS Document Writer on the right
- When asked Which version of the driver do you want to use? select Use the driver that is currently installed (recommended)
If these particular steps didn’t help, you could also try to:
- Uninstall Recent Windows Updates
- Reset Your PC
![]()
Newsletter
- Remove From My Forums
-
Вопрос
-
Нужно раздать интернет с ноутбука. Настроил раздачу через консоль, создал точку доступа. Телефон точку нашёл, но интернет всё-равно не работал. Полез я в ноутбуке в «Центр
управления сетями и общим доступом«, далее залез в настройки беспроводной сети и попытался включить «Общий доступ к подключению к интернету«, но вылезла такая ошибка:
«Что общий доступ уже используется для подключения «iftype0_0». Вместо этого будет разрешен доступ для «Телефонное подключение (модем через который я подкл. к интернету) «.
Я нажимаю «ОК» потом ещё раз чтобы открыть общий доступ для своей сети Wi-Fi и вылетает ошибка «Не удаётся разрешить общий доступ. Ошибка 1168: Элемент
не найден.» Google не нашёл ничего такого, что разрешило бы мою проблему, поэтому обратился сюда в надежде, что мне помогут.
Ответы
-
Проверьте, что у вас есть поддержка Hosted Network и попробуйте сделать через NETSH WLAN
-
Помечено в качестве ответа
27 апреля 2020 г. 20:53
-
Помечено в качестве ответа
|
Проблемы с сетью |
||||||
|
||||||
|
||||||
|
||||||
|
||||||
|
||||||
|
||||||
|
||||||
|
||||||
|
||||||
|
||||||
|
||||||
|


by Teodor Nechita
Eager to help those in need, Teodor writes articles daily on subjects regarding Windows, Xbox, and all things tech-related. When not working, you may usually find him either… read more
Updated on December 14, 2021
XINSTALL BY CLICKING THE DOWNLOAD FILE
This software will keep your drivers up and running, thus keeping you safe from common computer errors and hardware failure. Check all your drivers now in 3 easy steps:
- Download DriverFix (verified download file).
- Click Start Scan to find all problematic drivers.
- Click Update Drivers to get new versions and avoid system malfunctionings.
- DriverFix has been downloaded by 0 readers this month.
Several users have been reporting on the official Microsoft forums that they are having issues with the XPS printer:
I was unable to print from software using the XPS writer. I attempted to reinstall the printer but the installation fails reporting “printer driver not installed. Element not found”
Apparently, they are getting an error 1168: Element not found can have a wide variety of causes.
This article will guide you step-by-step on how to fix this error with the XPS printer.
How do you fix a generic error 1168?
1. Update your drivers
- Click on the Start button, then go to Settings
- Select Update & Security
- Click on Check for updates
- Allow Windows Update to download and install the updated driver
Follow these steps to install the latest printer drivers using Windows Update.
Alternatively, you can use a professional third-party tool that performs this process automatically and aims to keep your printer drivers updated and healthy.
More so, by choosing this automated method of managing drivers you also stay secure from potential damages caused by devices incompatibility.
Thus if you need reliable support to install or update any driver, the following software will accomplish this mission with no exception.
⇒ Get DriverFix
2. Try reinstalling the Windows XPS feature
- Press Windows
- Click on Settings (the cogwheel-shaped button)
- Select Apps
- Go to Apps & features
- Click Optional features
- Look for XPS feature if it is present
- If it is, right-click it and select uninstall
- Restart your PC
- After the restart or if your PC didn’t have the feature, go to the Manage optional features screen, and select Add a new feature
- When on the Add a new feature screen, select the XPS Viewer
- Restart your PC
3. Manually search for the location of your XPS Writer
Depending on which version of Windows 10 you have installed, the location of the XPS Writer may vary.
As such, if the solution listed above didn’t work, try this:
- Press Windows + R
- Type in control.exe
- Click Programs
- Select Programs and Features
- Click Turn Windows features on or off
- See if XPS Services and XPS Viewer are listed
- If the services are marked in their checkbox, unmark them and restart the PC
- If the services are unmarked in their checkbox, mark them and restart the PC
- Press Windows + R
- Type in control.exe
- Go to Hardware and Sound
- Click Devices and Printers
- See if Microsoft XPS Document Writer is installed as a printer.
- If it is, right-click it and choose Remove device
- Restart your PC
- Go back to Devices and Printers and select Add a printer
- Select The printer that I want isn’t listed
- Click Add a local printer or network printer with manual setting
- In the Choose a printer port screen, select Use an existing port and PORTPROMPT: (Local Port)
- In the Install a printer driver screen, select Microsoft on the left pane and Microsoft XPS Document Writer on the right
- When asked Which version of the driver do you want to use? select Use the driver that is currently installed (recommended)
If these particular steps didn’t help, you could also try to:
- Uninstall Recent Windows Updates
- Reset Your PC
![]()
Newsletter
C++, windows-application, wlanapi, qt
Здравствуйте!
Я хочу подключатся к сетям WiFi Enterprise через свою программу. Настроил Radius Server, поключение к сети через Windows работает. Но при подключении через программу пишет: ошибка 1168 (ERROR_NOT_FOUND). Если быть точнее, то такую ошибку возращает функция: WlanSetProfileEapXmlUserData.
Разрабатываю эту программу на Qt 5.9.8 (Windows 10).
Пример кода:
QString xmlProfile = "<?xml version="1.0"?><WLANProfile xmlns="http://www.microsoft.com/networking/WLAN/profile/v1"><name>" + profileName + "</name><SSIDConfig><SSID>" "<name>" + apName + "</name></SSID><nonBroadcast>" + checkHiddenAP(hiddenAP) + "</nonBroadcast></SSIDConfig><connectionType>ESS</connectionType><connectionMode>" + checkAutoConnection(isAutoConnection) + "</connectionMode><MSM><security><authEncryption><authentication>" + checkAuthentication(authAlgorithm) + "</authentication><encryption>" + checkEncryption(encryption) + "</encryption><useOneX>true</useOneX></authEncryption><PMKCacheMode>enabled</PMKCacheMode><PMKCacheTTL>720</PMKCacheTTL><PMKCacheSize>128</PMKCacheSize>" "<preAuthMode>disabled</preAuthMode><OneX xmlns="http://www.microsoft.com/networking/OneX/v1"><authMode>user</authMode><EAPConfig><EapHostConfig " "xmlns="http://www.microsoft.com/provisioning/EapHostConfig"><EapMethod><Type xmlns="http://www.microsoft.com/provisioning/EapCommon">25</Type><VendorId " "xmlns="http://www.microsoft.com/provisioning/EapCommon">0</VendorId><VendorType xmlns="http://www.microsoft.com/provisioning/EapCommon">0</VendorType>" "<AuthorId xmlns="http://www.microsoft.com/provisioning/EapCommon">0</AuthorId></EapMethod>" "<Config xmlns="http://www.microsoft.com/provisioning/EapHostConfig"><Eap xmlns="http://www.microsoft.com/provisioning/BaseEapConnectionPropertiesV1"><Type>25</Type>" "<EapType xmlns="http://www.microsoft.com/provisioning/MsPeapConnectionPropertiesV1"><ServerValidation>" "<DisableUserPromptForServerValidation>false</DisableUserPromptForServerValidation><ServerNames></ServerNames></ServerValidation>" "<FastReconnect>true</FastReconnect><InnerEapOptional>false</InnerEapOptional><Eap xmlns="http://www.microsoft.com/provisioning/BaseEapConnectionPropertiesV1"><Type>26</Type>" "<EapType xmlns="http://www.microsoft.com/provisioning/MsChapV2ConnectionPropertiesV1"><UseWinLogonCredentials>false</UseWinLogonCredentials></EapType></Eap>" "<EnableQuarantineChecks>false</EnableQuarantineChecks><RequireCryptoBinding>false</RequireCryptoBinding><PeapExtensions><PerformServerValidation " "xmlns="http://www.microsoft.com/provisioning/MsPeapConnectionPropertiesV2">true</PerformServerValidation><AcceptServerName " "xmlns="http://www.microsoft.com/provisioning/MsPeapConnectionPropertiesV2">true</AcceptServerName><PeapExtensionsV2 " "xmlns="http://www.microsoft.com/provisioning/MsPeapConnectionPropertiesV2"><AllowPromptingWhenServerCANotFound " "xmlns="http://www.microsoft.com/provisioning/MsPeapConnectionPropertiesV3">true</AllowPromptingWhenServerCANotFound></PeapExtensionsV2></PeapExtensions></EapType></Eap></Config>" "</EapHostConfig></EAPConfig></OneX><EapHostUserCredentials xmlns="http://www.microsoft.com/provisioning/EapHostUserCredentials" " "xmlns:eapCommon="http://www.microsoft.com/provisioning/EapCommon" xmlns:baseEap="http://www.microsoft.com/provisioning/BaseEapMethodUserCredentials"><EapMethod>" "<eapCommon:Type>25</eapCommon:Type><eapCommon:AuthorId>0</eapCommon:AuthorId></EapMethod><Credentials xmlns:eapUser="http://www.microsoft.com/provisioning/EapUserPropertiesV1" " "xmlns:xsi="http://www.w3.org/2001/XMLSchema-instance" xmlns:baseEap="http://www.microsoft.com/provisioning/BaseEapUserPropertiesV1" " "xmlns:MsPeap="http://www.microsoft.com/provisioning/MsPeapUserPropertiesV1" xmlns:MsChapV2="http://www.microsoft.com/provisioning/MsChapV2UserPropertiesV1"><baseEap:Eap>" "<baseEap:Type>25</baseEap:Type><MsPeap:EapType><MsPeap:RoutingIdentity>" + apName + "</MsPeap:RoutingIdentity><baseEap:Eap><baseEap:Type>26</baseEap:Type><MsChapV2:EapType>" "<MsChapV2:Username>" + username + "</MsChapV2:Username><MsChapV2:Password>" + password + "</MsChapV2:Password></MsChapV2:EapType></baseEap:Eap></MsPeap:EapType></baseEap:Eap>" "</Credentials></EapHostUserCredentials></security></MSM></WLANProfile>"; LPCWSTR wlanProfile = reinterpret_cast<LPCWSTR>(profileName.utf16()); // profileName - это название Точки Доступа которую получаю через параметр функции. DWORD dwResult = WlanSetProfileEapXmlUserData(hClient, &adapterGUID, wlanProfile, WLAN_SET_EAPHOST_DATA_ALL_USERS, reinterpret_cast<LPCWSTR(xmlProfile).utf16()), nullptr); qDebug() << dwResult;Подключения к персональной сети работают, там использую WlanSetProfile функцию. Проблема только если подключатся к корпоративной сети. Я думаю что проблема с неверным XML профилем. На сайте Microsoft, есть много примеров профилей, к примеру:
https://docs.microsoft.com/en-us/windows/win32/nativewifi/wpa2-enterprise-with-peap-mschapv2-profile-sample
и
https://docs.microsoft.com/en-us/windows/win32/eaphost/peap-ms-chapv2-user-properties
Как думаете в чем может быть проблема? Или где можно узнать какой профиль нужен? Спасибо за помощь.
| Номер ошибки: | Ошибка 1168 | |
| Название ошибки: | Windows Defender Error Code 1168 | |
| Описание ошибки: | Ошибка 1168: Возникла ошибка в приложении Windows Defender. Приложение будет закрыто. Приносим извинения за неудобства. | |
| Разработчик: | Microsoft Corporation | |
| Программное обеспечение: | Windows Defender | |
| Относится к: | Windows XP, Vista, 7, 8, 10, 11 |
Фон «Windows Defender Error Code 1168»
Эксперты обычно называют «Windows Defender Error Code 1168» «ошибкой времени выполнения». Программисты, такие как Microsoft Corporation, стремятся создавать программное обеспечение, свободное от этих сбоев, пока оно не будет публично выпущено. Как и во всем в жизни, иногда такие проблемы, как ошибка 1168, упускаются из виду.
После первоначального выпуска пользователи Windows Defender могут столкнуться с сообщением «Windows Defender Error Code 1168» во время запуска программы. Когда это происходит, конечные пользователи могут сообщить Microsoft Corporation о наличии ошибок «Windows Defender Error Code 1168». Microsoft Corporation может устранить обнаруженные проблемы, а затем загрузить измененный файл исходного кода, позволяя пользователям обновлять свою версию. Поэтому, когда вы сталкиваетесь с запросом на обновление Windows Defender, это обычно связано с тем, что это решение для исправления ошибки 1168 и других ошибок.
Вполне вероятно, что при загрузке Windows Defender вы столкнетесь с «Windows Defender Error Code 1168». Проанализируем некоторые из наиболее распространенных причин ошибок ошибки 1168 во время выполнения:
Ошибка 1168 Crash — это распространенная ошибка 1168 во время выполнения ошибки, которая приводит к полному завершению работы программы. Обычно это происходит, когда Windows Defender не может обработать данные в удовлетворительной форме и поэтому не может получить ожидаемый результат.
Утечка памяти «Windows Defender Error Code 1168» — ошибка 1168 утечка памяти приводит к тому, что Windows Defender постоянно использует все больше и больше памяти, увяская систему. Возможные причины включают сбой Microsoft Corporation для девыделения памяти в программе или когда плохой код выполняет «бесконечный цикл».
Error 1168 Logic Error — Ошибка программной логики возникает, когда, несмотря на точный ввод от пользователя, производится неверный вывод. Это связано с ошибками в исходном коде Microsoft Corporation, обрабатывающих ввод неправильно.
Повреждение, отсутствие или удаление файлов Windows Defender Error Code 1168 может привести к ошибкам Windows Defender. Как правило, решить проблему можно заменой файла Microsoft Corporation. В некоторых случаях реестр Windows пытается загрузить файл Windows Defender Error Code 1168, который больше не существует; в таких ситуациях рекомендуется запустить сканирование реестра, чтобы исправить любые недопустимые ссылки на пути к файлам.
Распространенные проблемы Windows Defender Error Code 1168
Усложнения Windows Defender с Windows Defender Error Code 1168 состоят из:
- «Ошибка программного обеспечения Windows Defender Error Code 1168. «
- «Недопустимая программа Win32: Windows Defender Error Code 1168»
- «Windows Defender Error Code 1168 должен быть закрыт. «
- «Файл Windows Defender Error Code 1168 не найден.»
- «Windows Defender Error Code 1168 не может быть найден. «
- «Проблема при запуске приложения: Windows Defender Error Code 1168. «
- «Windows Defender Error Code 1168 не выполняется. «
- «Windows Defender Error Code 1168 выйти. «
- «Windows Defender Error Code 1168: путь приложения является ошибкой. «
Проблемы Windows Defender Error Code 1168 с участием Windows Defenders возникают во время установки, при запуске или завершении работы программного обеспечения, связанного с Windows Defender Error Code 1168, или во время процесса установки Windows. При появлении ошибки Windows Defender Error Code 1168 запишите вхождения для устранения неполадок Windows Defender и чтобы HelpMicrosoft Corporation найти причину.
Причины проблем Windows Defender Error Code 1168
Проблемы Windows Defender Error Code 1168 могут быть отнесены к поврежденным или отсутствующим файлам, содержащим ошибки записям реестра, связанным с Windows Defender Error Code 1168, или к вирусам / вредоносному ПО.
В первую очередь, проблемы Windows Defender Error Code 1168 создаются:
- Недопустимая или поврежденная запись Windows Defender Error Code 1168.
- Вирус или вредоносное ПО, которые повредили файл Windows Defender Error Code 1168 или связанные с Windows Defender программные файлы.
- Windows Defender Error Code 1168 злонамеренно удален (или ошибочно) другим изгоем или действительной программой.
- Другая программа, конфликтующая с Windows Defender Error Code 1168 или другой общей ссылкой Windows Defender.
- Windows Defender (Windows Defender Error Code 1168) поврежден во время загрузки или установки.
Продукт Solvusoft
Загрузка
WinThruster 2022 — Проверьте свой компьютер на наличие ошибок.
Совместима с Windows 2000, XP, Vista, 7, 8, 10 и 11
Установить необязательные продукты — WinThruster (Solvusoft) | Лицензия | Политика защиты личных сведений | Условия | Удаление
- Remove From My Forums
-
Question
-
Нужно раздать интернет с ноутбука. Настроил раздачу через консоль, создал точку доступа. Телефон точку нашёл, но интернет всё-равно не работал. Полез я в ноутбуке в «Центр
управления сетями и общим доступом«, далее залез в настройки беспроводной сети и попытался включить «Общий доступ к подключению к интернету«, но вылезла такая ошибка:
«Что общий доступ уже используется для подключения «iftype0_0». Вместо этого будет разрешен доступ для «Телефонное подключение (модем через который я подкл. к интернету) «.
Я нажимаю «ОК» потом ещё раз чтобы открыть общий доступ для своей сети Wi-Fi и вылетает ошибка «Не удаётся разрешить общий доступ. Ошибка 1168: Элемент
не найден.» Google не нашёл ничего такого, что разрешило бы мою проблему, поэтому обратился сюда в надежде, что мне помогут.
Answers
-
Проверьте, что у вас есть поддержка Hosted Network и попробуйте сделать через NETSH WLAN
-
Marked as answer by
Monday, April 27, 2020 8:53 PM
-
Marked as answer by
We get it — there’s nothing more frustrating than trying to use a VPN application and seeing an error on your screen (usually accompanied by an annoying sound). However, you’re bound to encounter one at some point if you use a VPN daily. That’s because you are using a VPN client behind which is a powerful and complex network of servers. There’s a huge number of «moving parts» in this system, where any of those parts can malfunction. Therefore, we’ve decided to help you by listing several VPN error codes and possible solutions to each of those.
We also need to note that, in this article, we’ve focused on solving problems with your locally installed VPN client. However, you’ll also find a range of error codes related to servers so that you know when to contact your VPN’s customer support team. Also, we did our best to do in-depth research and provide multiple solutions in the effort of offering you a full list of VPN error code fixes. Of course, if our proposed fixes below fail to resolve the error you see, please post a comment. We’ll do our best to respond as soon as possible and to try to come up with another solution.
There are close to sixty VPN error code fixes in this article. To make things easy to navigate, we’ve prepared a handy table below that acts as the article’s table of contents. Click on any number below that corresponds to the error you’re seeing, and you’ll be automatically taken to a possible solution.
Finally, it’s time to take a deep dive into resolving problems with your VPN. We will go over 55+ VPN error code fixes, so there’s plenty to cover. Let’s jump right in.
1. VPN Error Code 5
Error Message: «(Error 5): No hostname exists for this connection entry.»
Explanation & Solution: This error message indicates a problem with your Cisco VPN profile. This is a .pcf file found in C:\Program Files\Cisco Systems\VPN Client\Profiles on your Windows PC. The solution to this error is to replace this file with a new version supplied by your VPN network admin.
2. VPN Error Code 12
Error Message: «Unable to logon to the server. Your username or password may not be configured properly for this connection. (-12)»
Explanation & Solution: As the error message clearly explains, you need to recheck your credentials (your username and password). Also, this error usually happens when using the Fortinet VPN client, so make sure that your password is alphanumeric (keep in mind that no special characters are allowed).
3. VPN Error Code 51
Error Message: «Unable to communicate with the VPN subsystem.»
Explanation & Solution: This is a somewhat common VPN error that happens on Cisco VPN clients. In most cases, restarting your machine or restarting the VPN client will solve this issue. Furthermore, this VPN error code appears to be related to macOS users primarily. In that case, you can use the ‘sudo SystemStarter restart CiscoVPN’ command via macOS’s Terminal (Applications > Utilities).
4. VPN Error Code 56
Error Message: «(Error 56) The Cisco Systems, Inc. VPN client has not started. Please start this service and try again.»
Explanation & Solution: For some reason, your Cisco VPN client isn’t able to launch. Most probably, when you double-click on its icon to open the VPN client, nothing happens for a while — and you see the ‘Error 56’ message after a few seconds.
Your first option is to reinstall the Cisco VPN Client software, and also make sure to go to your Windows Device Manager and remove all Cisco Virtual Adapters. Then, install the latest version of the client. If that doesn’t help, there might be a software conflict — we recommend removing any antivirus applications you might have installed on your computer.
5. VPN Error 87
Error Message: «The parameter is incorrect.»
Explanation & Solution: The biggest problem with this error is that it shows a vague message without pinpointing the exact cause. Therefore, your VPN will most likely ask you to reboot your machine, try connecting to a different VPN protocol, and try reinstalling IKEv2 WAN Miniport. Some users have also reported fixing this problem by disabling the ‘Internet Connection Sharing’ on their Windows 10 machine.
6. VPN Error Code 113
Error Message: «Connection error! The VPN connection terminates unexpectedly!»
Explanation & Solution: This issue is characteristic for the Fortinet VPN client, for versions 6.2.X running on macOS Catalina. The problem is that versions 6.2.X are incompatible with this operating system, so the solution would be to roll back to version 6.0.X. There’s also a chance that Fortinet could fix this error in the meantime, so check if this is mentioned in any of the release notes of freshly released updates.
7. VPN Error Code 121
Error Message: «The VPN connection terminates unexpectedly (Error Code: -121).»
Explanation & Solution: This VPN connection error happens to those using the Fortinet client on iOS. More precisely, due to a software conflict between Fortinet 6.0.X and iOS 13, there is a known problem related to establishing a VPN connection via a mobile hotspot. We recommend updating your VPN client, as versions above 6.2.X promise to fix this issue.
8. VPN Error Code 130
Error Message: «ERR_PROXY_CONNECTION_FAILED» or «Unable to connect to the proxy server.»
Explanation & Solution: As this error message says, there’s a problem connecting to the selected proxy server. It means that you either need to remove or reconfigure the proxy server you’re using. Press ‘Windows Key + R’ and type in ‘inetcpl.cpl’ to open the Internet Properties page. Then, select the ‘Connections’ tab and click on the ‘LAN Settings’ button. This is where you can reconfigure your proxy server or select ‘Automatically detect settings’ to remove any custom proxy settings.
It’s also recommended to flush your DNS, reset Winsock, and reset TCP/IP values. Open the Start menu and click on ‘Command Prompt’ — but make sure to right-click on its icon and then choose ‘Run as Administrator.’ Then, use the following command: ‘ipconfig /flushdns‘ followed by ‘netsh int ip reset resettcpip.txt.‘ Make sure to press Enter between entering these commands to apply them. And finish with the ‘netsh winsock reset‘ command.
9. VPN Error Code 402
Error Message: «The Connection Manager was unable to read the connection entry, or the connection entry has missing or incorrect information.»
Explanation & Solution: This error message points to a problem in your Cisco VPN profile, which is most probably corrupt or incomplete. You need to obtain a fresh copy of your connection profile file (which is a .pcf file) and replace the old file found in C:\Program Files\Cisco Systems\VPN Client\Profiles (on Windows). If you don’t have a backup copy of this file, make sure to contact your VPN network administrator.
10. VPN Error Code 403
Error Message: «The remote peer terminated the connection during the negotiation of security policies.»
Explanation & Solution: This vague error message points to a problem with the security (IKE) negotiations between your VPN client and the VPN server. This can happen due to several reasons, such as having an unstable Internet connection, poor Wi-Fi signal, or conflicting apps (such as antivirus software).
As a possible solution, you can also go to ‘Log Settings’ of your Cisco VPN client and make sure to change ‘IKE’ to ‘High.’ Then, open the Log Window and start your VPN connection. Keep a close eye and see if you see any further errors, which could be helpful to your VPN network’s administrator.
11. VPN Error Code 412
Error Message: «The remote peer is no longer responding.»
Explanation & Solution: Similar to the error code 51, this issue is also related to Cisco VPN clients. It happens when a secure connect drops, which is often caused by a client’s firewall blocking UDP or TCP ports. Possible solutions include using a wired connection (instead of wireless), turning off your firewall via your VPN client, or enabling ‘NAT-T/TCP’ in your profile.
12. VPN Error Code 413
Error Message: «(Error 413) User authentication failed.»
Explanation & Solution: Typically found on Cisco VPN networks, error 413 points to a problem of reaching the limit of simultaneous connections. This happens if you’re using more than the allowed number of connections, which prevents you from creating any further VPN connections on your device.
There are several possible resolutions to this problem. First, make sure to contact your VPN administrator and ask about the limit of simultaneous connections of your VPN network. Then, make sure to update ‘Cisco’s VPN Dialer’ to the latest available version. And if nothing helps (and if you’re within the limit of your network), try changing your password.
13. VPN Error Code 422
Error Message: «(Reason 422) Lost contact with the secure gateway. Check your network connection.»
Explanation & Solution: You are most probably using Cisco’s VPN client to create a secure Web connection. So, our first recommendation would be to update your VPN client to the latest available version (make sure first to uninstall your existing client properly). If the problem persists, it’s worth trying a new router/modem — especially if you have an older or entry-level model.
14. VPN Error Code 429
Error Message: «Unable to establish the VPN connection. The server may be unreachable» or «Unable to resolve host or server address.»
Explanation & Solution: As you can see, the message you’re viewing is vague. That’s because there’s an unidentified problem with your Internet connection, and your VPN isn’t capable of pinpointing the exact cause. However, in many cases, all you need is to set your IP address and DNS server address to be obtained automatically, as explained below.
- Open the Control Panel on your Windows PC.
- Navigate to ‘Network Connections’ and right-click on your Web connection. Then, pick ‘Properties’ from the dropdown menu.
- In the ‘Properties’ tab, look for ‘Internet Protocol (TCP/IP).’ Make sure to check the boxes for ‘Obtain an IP address automatically’ and ‘Obtain a DNS server address automatically.’
- Now, return to your VPN client and try establishing a new VPN connection.
It’s also helpful to remove any other VPN clients you have installed on your device. Also, try using a different VPN protocol or connecting to a different VPN server.
15. VPN Error Code 442
Error Message: «Reason 422: Failed to enable Virtual Adapter.»
Explanation & Solution: You probably use Cisco’s VPN, which might run into a software conflict with one of the services running on your Windows PC. The solution to this error is to disable the problematic service and then try restarting Cisco’s VPN, as explained below.
- Launch the Start Menu and type in ‘msc.’ Then, press the enter key.
- Then, navigate to the program called ‘Cisco Systems, Inc. VPN Service,’ select it and then stop the application from running.
- Using that same window, find the service called ‘Internet Connection Sharing (ICS) Service’ and then stop this one from running as well.
- Finally, restart your Cisco VPN client and then relaunch it. That’s it!
16. VPN Error Code 455
Error Message: «Permission denied (-455).»
Explanation & Solution: This error usually happens in Fortinet clients. If your permission is denied, your user credentials aren’t valid. So, make sure to check if you’re using the correct username and password.
17. VPN Error Code 609
Error Message: «A device type was specified that does not exist.»
Explanation & Solution: As its description says, your VPN can’t connect through a port since the device type is corrupted or not configured. Here’s how to resolve this error:
- On Windows, run the Command Prompt (with admin privileges) and type in the following command: ‘netcfg.exe -q <miniport name>.’
- Depending on what type of tunnel you’re using, here are the possible Miniport names that you need to use: PPTP tunnel = MS_PPTP, L2TP tunnel = MS_L2TP, SSTP tunnel = MS_SSTP.
18. VPN Error Code 619
Error Message: «A connection to the remote computer could not be established.»
Explanation & Solution: Often associated with Windows PCs, this error can have several possible causes. In some cases, having more than one VPN installed creates this issue. Therefore, uninstall all VPNs that you don’t plan on using, restart your PC, and try again. In addition, you can turn off Windows Firewall:
- Launch the Start menu and type in ‘Firewall.’
- Among the search results, you’ll see an item named ‘Windows Firewall’ or ‘Windows Defender Firewall.’ Open either of these.
- On the left side of the screen, you’ll see an option that lets you disable the firewall. On Windows 10, click on ‘Turn Windows Defender Firewall on or off.’
- Disable the firewall and click ‘OK.’
19. VPN Error Code 628
Error Message: «The connection was terminated by the remote computer before it could be completed.»
Explanation & Solution: This error code can happen if you’re using a dial-up connection or modem that relies on your phone line. These are several things that you can try doing:
- Make sure that your phone line is working properly;
- If you have a very old modem, make sure to update its firmware and use only the latest available drivers on your computer. Also, check if your VPN supports your modem
- Temporarily disable any antivirus software that you might have, and also disable your computer’s firewall protection.
- If the problem is still there, you can try uninstalling the modem from your system and then reinstall it.
20. VPN Error Code 629
Error Message: «Port disconnected by the remote computer.»
Explanation & Solution: This error is typically associated with dial-up connections, and it means that the VPN connection can’t be achieved since a port isn’t open. It means that your first action should be to check if your firewall is blocking your traffic. Also, note that port 1723 needs to be open, and protocol 47 needs to be enabled with the firewall configuration settings.
21. VPN Error Code 633
Error Message: «The modem is already in use or is not configured properly.»
Explanation & Solution: This issue happens when another Internet-connected application uses a TCP port. Even though this doesn’t happen often, this port can be occupied by another application that might have stalled. The best solution is to restart your modem, restart your computer, and wait until it boots up. Another solution is to disable and re-enable your network connection, so here’s how to do that.
- Launch the Start Menu and type in ‘Control Panel.’
- Now click on ‘Change Adapter Settings’ on the left-place sidebar within the ‘Network and Sharing Center.’
- Locate your Web connection adapter, right-click on it, and click on ‘Disable.’
- Wait a few minutes, and then re-enable the Internet connection.
22. VPN Error Code 645
Error Message: «There was an internal authentication error.»
Explanation & Solution: This error is often associated with older Windows versions where setting up a VPN connection had to be done manually. As its description notes, there’s an incorrect username or password. So, go back to your VPN connection settings and make sure that you have the correct user credentials.
23. VPN Error Code 651
Error Message: «Your model (or other connecting device) has reported an error.»
Explanation & Solution: This issue happens with L2TP connections on Windows 7 and earlier versions when trying to establish a dial-up connection to the server via ISDN. To resolve this error, it’s recommended to update to Windows 10, as the individual hotfix isn’t available anymore.
In addition, you could try checking your Device Manager and clicking on View > Show Hidden Devices. This is where you’ll see a list of WAN Miniports, where you can try removing those installed by other applications which you no longer use.
24. VPN Error Code 691
Error Message: «Access denied because the username and/or password is invalid on the domain.»
Explanation & Solution: As you can see, this error is identical to the previously described VPN error (code 645). This happens when you’re using the wrong username or password. You need to take another look at your VPN and make sure you have the correct credentials.
25. VPN Error Code 716
Error Message: «The remote access IP configuration is unusable.»
Explanation & Solution: Here, we have a relatively rare issue that happens with the Sonicwall Mobile Connect app on Windows 8 and below (and often on Lenovo computers). There’s no concrete information about this issue on Sonicwall’s website. However, many users were able to resolve the problem by reinstalling Windows or updating to the latest available version of this operating system.
26. VPN Error Code 720
Error Message: «A connection to the remote computer could not be established.»
Explanation & Solution: If a VPN provider doesn’t offer a native app, you need to set up your VPN connection manually. This requires you to set up a VPN protocol in the ‘VPN Type’ field on Windows. In case you’ve entered the wrong protocol, the error code 720 will appear. You can try setting the protocol to ‘Automatic’ or check with your VPN provider which protocol you’re allowed to use.
27. VPN Error Code 721
Error Message: «The remote computer did not respond.»
Explanation & Solution: Most often, the cause of this error is found in the NAT (Network Address Translation) settings of your router. Older routers can have a hard time allowing multiple computers to share a single connection – especially while using VPN applications via the PPTP tunnel. A solution to this problem is to buy a router that supports VPN-related pass-through. Alternatively, you can try setting up a stating NAT mapping on your router.
28. VPN Error Code 732
Error Message: «Your computer and the remote computer could not agree on PPP control protocols.»
Explanation & Solution: This error code indicates that your VPN client doesn’t have the required privileges to connect to the VPN server. As such, this usually happens within workplace or university networks and is rarely related to commercial VPN services. The best solution is to contact the administrator of the VPN network that you’re trying to access. And if you use a commercial VPN, turn to its customer support and explain your problem.
29. VPN Error Code 734
Error Message: «The PPP link control protocol was terminated.»
Explanation & Solution: Very similar to the previously explained error code, this one is caused by invalid access rights. It happens after the connection has been established but then suddenly drops, which prevents you from using the VPN. Once again, you need to contact the administrator of your VPN network or contact the customer support team of your VPN service.
30. VPN Error Code 756
Error Message: «This connection is already being dialed.»
Explanation & Solution: For some reason, your computer might believe that there’s an existing VPN connection that’s already active. It means that you’re prevented from creating a new one until you disconnect from the active VPN. In many cases, this issue can be resolved by restarting your router or your VPN server (depending on your configuration and where you have access to the server).
Also, keep in mind that this error is mostly happening on Windows 7 and earlier. Therefore, it’s highly recommended to update your operating system to the latest available version.
31. VPN Error Code 766
Error Message: «A certificate could not be found.»
Explanation & Solution: VPN connections that use the L2TP/IPsec protocol need a digital certificate to run. If this certificate is missing, the VPN won’t be able to connect due to a missing security layer. Furthermore, this error is related to remote access servers, which means that contacting your VPN provider should get this error fixed.
32. VPN Error Code 781
Error Message: «The encryption attempt failed because no valid certificate was found.»
Explanation & Solution: Certain types of VPN protocols need security certificates installed on the server end. If you encounter this error code, you need to contact your VPN and let them know about this problem.
A temporary solution would be to change the VPN protocol to PPTP within your VPN client. This protocol doesn’t need a security certificate to work and might get you through the secure server. With this said, this error is often associated with the L2TP/IPSec protocol.
33. VPN Error Code 788
Error Message: «The L2TP connection attempt fails because the security layer cannot authenticate the remote computer.»
Explanation & Solution: As evident from the error message, we’re talking about an L2TP connection here. More precisely, something is preventing this VPN protocol from working properly, where a remote server is typically the source of the problem. Therefore, our suggestion would be to contact the administrator of your VPN network.
In case you have a very old router, there might be a chance that it doesn’t support the appropriate protocol used by this VPN connection. So, another possible solution would be to replace it with a newer model or perhaps try installing DD-WRT firmware.
34. VPN Error Code 789
Error Message: «The security layer encountered a processing error during initial negotiations with the remote computer.»
Explanation & Solution: Once again, we have an error related to L2TP/IPsec connections. In this case, several types of digital security certificates might be missing, or there might be a problem with the certificates that prevents the network from connecting you to the remote server. As these problems are often server-related, you need to contact your VPN’s support team.
35. VPN Error Code 797
Error Message: «The modem could not be found.»
Explanation & Solution: For some reason, your VPN doesn’t recognize your modem. In other words, it looks like you’re trying to create a VPN connection without being connected to the Internet. Here are a few possible solutions:
- Make sure that your modem is working properly. Try connecting to the Web without a VPN, and see if any data can be exchanged;
- Completely remove the installed modem from your system, and reinstall it;
- Make sure to use the latest drivers for your modem;
- If nothing helps, there might be a chance that your modem is obsolete. Check with your VPN if your modem is on the list of supported devices.
36. VPN Error Code 798
Error Message: «A certificate could not be found that can be used with this Extensive Authentication Protocol.»
Explanation & Solution: If you’re using Windows Server, you need to have the correct security certificates in place. In case these are missing, you won’t be able to achieve a VPN connection. To fix the error 798, you need to add the correct certificate to ‘Current User’ > ‘Personal Store.’ Also, make sure that you have the ‘Server Certificate’ as well as the ‘Client Certificate’ since both of these are needed to make a VPN connection happen.
37. VPN Error Code 800
Error Message: «Unable to establish the VPN connection because a tunnel could not be set up.»
Explanation & Solution: More often than not, this error happens to those who set their VPN protocol to ‘Automatic.’ Since there isn’t a specific protocol involved, you’re getting a generic error message. First of all, you could try going back to your VPN’s settings and choosing a specific protocol. If that doesn’t help, here are a few solutions:
- Try turning off your system’s firewall;
- Reset your router, and reset your computer as well;
- Disable ‘Remote Access Connection Manager’ within Windows Services (open the Start menu, can type in ‘services.msc’ to open this tool.
38. VPN Error Code 806
Error Message: «The VPN connection between your computer and the VPN server could not be completed.»
Explanation & Solution: In this case, your VPN can successfully connect to a remote server. However, something is blocking data exchange, which is causing this error to appear. In most cases, your computer or your router’s firewall is blocking this type of traffic, which means that you have two possible solutions.
First, we recommend setting up your firewall to accept VPN connections on your computer. Here’s how that is done:
- Navigate to Control Panel > Windows Defender Firewall (you can search for this option within the Control Panel);
- Click on ‘Advanced Settings’ in the left-placed sidebar;
- Select ‘Inbound Rules’ on the left, and then go to Actions > New Rule;
- You should see a new window right now. Select ‘Port’ and click on ‘Next’;
- Next, check ‘TCP’ and enter ‘1723’ in the ‘Specific Remote Ports’ field. Click ‘Next’;
- Then, select ‘Allow the connection’;
- Make sure to apply the new rule to everyone on your computer (Domain, Private, and Public);
- Finally, enter anything you want on the last step (Name and Description);
- That’s it!
If the following guide doesn’t help, you’ll need to contact your ISP. Ask them for instructions on how to open the TCP port 1723, and tell them that something is blocking your VPN data traffic.
39. VPN Error Code 807
Error Message: «The network connection between your computer and the VPN server was interrupted.»
Explanation & Solution: As you can see from the description, this error is most commonly associated with the VPN server, which is where the cause of the problem can be found. So, your first action should be to contact the VPN’s support team and report this problem. Still, there’s plenty you can try as well, so here are some tips.
- Try disabling your antivirus and your system’s firewall. There might be a conflict with security-related software that’s blocking your VPN data traffic;
- Check if your Web connection is working normally. This means opening an Internet browser without using a VPN and seeing if it can open a Web page. In case that doesn’t happen, restart your router and try again;
- Double-check if you have the correct VPN user credentials;
- Try using the PPTP protocol (Point-to-Point Tunneling Protocol).
40. VPN Error Code 809
Error Message: «The network connection between your computer and the VPN server could not be established because the remote server is not responding.»
Explanation & Solution: This is a slight variation of one of the previously explained error. Something is blocking the traffic from and to your computer, and your firewall is to blame. So, you can disable the firewall or open TCP 1723. If you need additional assistance, you can turn to your Internet Service Provider (not your VPN provider).
41. VPN Error Code 812
Error Message: «The connection was prevented because of a policy configured on your RAS/VPN server.»
Explanation & Solution: This is a problem on the server end. If you use a commercial VPN, try connecting to a different server. If the issue persists, you need to contact your VPN provider and report the problem.
42. VPN Error Code 829
Error Message: «Completely disconnected connection (ERROR_LINK_FAILURE).»
Explanation & Solution: You are most probably able to achieve a VPN connection, but you’re having a hard time keeping it alive. This is a time-out message, which means that your VPN server will disconnect you if your VPN connection becomes inactive. If you use a commercial VPN service, you need to contact its customer support team and provide as much information as possible (as this issue can be resolved by tweaking a setting on the server that was implemented to impose time-outs).
43. VPN Error Code 860
Error Message: «The remote access connection completed, but authentication failed because of an error in the certificate that the client uses to authenticate the server.»
Explanation & Solution: You are most probably using an IKEv2 VPN connection on your Windows PC (and you’ve probably created that connection manually). To resolve this issue, make sure to open the Settings app and navigate to your VPN connections. Then, click on ‘Change Adapter Settings’ and right-click on the VPN connection that’s failing to connect. Select Properties > Networks and untick ‘Internet Protocol Version 6,’ ‘File and Printer Sharing,’ and ‘Client for Microsoft Windows.’ Also, right-click on ‘Internet Protocol Version 4’ and select Properties. Make sure to check ‘Use default gateway on remote network’ box.
44. VPN Error Code 868
Error Message: «The remote connection was not made because the name of the remote access server did not resolve.»
Explanation & Solution: When there’s a problem with the DNS (Doman Name System), you won’t be able to connect to a remote server. It means that you need to double-check if you’ve entered the DNS address accurately when setting up your VPN. In other words, you need to contact your VPN provider and check which DNS you need to use. Alternatively, you can enter an IP address instead of using a DNS.
45. VPN Error Code 1009
Error Message: «The internet connection appears to be offline (-1009).»
Explanation & Solution: In the majority of cases, this error is produced by Bitdefender VPN, even though some other VPNs can create it as well. In essence, the 1009 error means that you have a problem with Internet connectivity. It means that you need to check if your router is working correctly. Alternatively, make sure that your Windows Firewall isn’t blocking the VPN application you’re trying to use. And also, it’s a good idea to remove any other VPNs you might have installed on your device.
46. VPN Error Code 1168
Error Message: «Error 1168 — Element not found.»
Explanation & Solution: This is a common network connectivity problem appearing on specific versions of Windows 7 and 8. With this said, we strongly recommend updating to the latest version of Windows (Windows 10) if possible. If not, you can try running the DISM tool, as explained below.
- Open Command Prompt on your Windows PC. Make sure to right-click on its icon, and then select ‘Run as administrator.’
- You will now see a black rectangular window, asking for a command. So, make sure to type in the following command: ‘DISM.exe /Online /Cleanup-image /Scanhealth.’ Press the Enter key, and then use this command: ‘DISM.exe /Online /Cleanup-image /Restorehealth.’ Keep in mind that this tool might take up to 20 minutes to finish running.
47. VPN Error Code 1231
Error Message: «PING: Transmit Failed, Error Code 1231.»
Explanation & Solution: Considering that this issue is often related to Windows Vista, we recommend updating your operating system, which should fix this issue. However, if you’d like to continue using Windows Vista, you can try resetting the TCP/IP stack, as explained below.
- Open the Start Menu and type in ‘cmd.’ You should now see your Command Prompt, so make sure to right-click on its icon and select ‘Run as Administrator.’
- Now, you need to use a series of commands. However, make sure to input each of the following ones in the same order as below. And once you input each command, press Enter and wait for the corresponding operation to end.
- Start with ‘ipconfig /flushdns‘ and then use ‘nbtstat -R‘ and ‘nbtstat -RR.’ Then, go with ‘netsh int reset all,’ ‘netsh int ip reset,’ and ‘netsh winsock reset.’
48. VPN Error Code 1329
Error Message: «You’re not allowed to sign in. Please contact the network administrator.»
Explanation & Solution: Often produced on devices trying to connect to a VPN network controlled by Pulse Connect, this error means your device can’t be recognized appropriately. Pulse Connect works by allowing you to join a specific group of users, like employees or clients, in a work environment. The only way to fix this issue is to contact your network administrator (in your office or campus, where Pulse Connect is most often utilized).
49. VPN Error Code 2250
Error Message: «There was an unknown error (Error 2250).»
Explanation & Solution: Those using one of SonicWall’s cybersecurity solutions can encounter an error that prevents their Internet traffic from leaving their device. In most cases, we’re talking about the error 2250 — related to a firewall solution that shuts down your Web traffic. Therefore, make sure to take a close look if you have any firewall solution installed on your device and disable it. As per SonicWall’s technical documentation, this is a known problem when using Kaspersky Endpoint Protection or Symantec Endpoint Protection.
50. VPN Error Code 10051
Error Message: «Unknown error (code=10054).»
Explanation & Solution: This is a tricky error to resolve, as it doesn’t point to the exact cause of the problem. However, in most cases, when this error appears, you need to check your firewall settings and make sure that port forwarding is set correctly. Also, this error can be caused by an expired CA certificate.
The 10051 error code typically happens on OpenVPN connections. As such, your VPN service can cause it as well, so we strongly recommend contacting your VPN and providing as much detail as possible.
51. VPN Error Code 10054
Error Message: «Unknown Error (Code=10054).»
Explanation & Solution: There are two possible reasons for this error message, which usually happens when trying to connect to a VPN server via an OpenVPN connection. You either need to check if your ports are forwarded correctly or if your device’s firewall is blocking your Web traffic (this doesn’t only include your Windows Firewall but also firewall solutions offered by antivirus software).
52. VPN Error Code 13801
Error Message: «IKE authentication credentials are unacceptable.»
Explanation & Solution: This error is related to IKE (Internet Key Exchange) credentials, which is one of the widely-used VPN protocols. If you’re facing this error, you should know that there’s nothing you can do. Since it’s related to problems on the server-end, you need to contact your VPN and report the problem.
53. VPN Error Code 13868
Error Message: «The user [username] dialed a connection named [connection name] which has failed. The error code returned on failure is 13868.»
Explanation & Solution: «Always On» VPN environments usually rely on the IKEv2 protocol, which ensures strong encryption and fast performance. With this said, the 13868 error is connected to default IKEv2 settings, indicating a mismatch between the client and the server.
First, you need to check the current IKEv2 policy configuration, which can be done on Windows by using an elevated PowerShell command window (therefore, make sure to open PowerShell with administrative privileges). Make sure to use the following command: «Get-VpnServerIPsecConfiguration» and press Enter. Now, make sure to check the IKEv2 security policy used by the VPN server. This same policy needs to be applied to the client as well, so use the «Get-VPNconnection -Name[connection name] | Select-Object -ExpandProperty IPsecCustom Policy» command. In case you see the IKEv2 security policy isn’t the same on the server and the client, make sure to follow this tutorial to update your settings.
54. VPN Error Code 20199
Error Message: «Unable to establish the VPN connection. The VPN server may be unreachable (-20199).»
Explanation & Solution: We have an error usually related to the Fortinet client here. For some reason, third-party software can block Fortinet from working properly, which means that certain settings need to be tweaked. More precisely, your need to update your WAN Miniport driver and settings. So, we recommend using VPNHosting’s handy WAN Miniport Repair Tool. Click on the provided link to download the required software to your computer.
55. VPN Error Code 20227
Error Message: «The certificate’s CN name does not match the passed value.»
Explanation & Solution: As you can see, there’s a problem with your certificate’s CN name (common name). You need to make sure that you’re using the correct hostname to which your IP is resolving. If you’re connecting to an X.X.X.X IP that resolves to (for example) ‘myvpn.mydomain.com,’ you need to make sure that your certificate contains that CN name.
56. VPN Error Code 0x800704C9
Error Message: «No SSTP ports available on the server.»
Explanation & Solution: As you can imagine, this error can happen if you’re using the SSTP protocol. As such, it can be resolved by making adjustments via the Remote Access Server, so here’s what you need to do.
- Initialize the RRAS (Routing and Remote Access) within your Windows Server OS;
- Expand the server you want to connect to;
- Right-click on ‘Ports’ and then select ‘Properties’;
- Click on ‘WAN Miniport (SSTP)’ from the ‘Name List’ and click on ‘Configure’;
- Make sure that you have plenty of ports in the ‘Maximum Ports’ list, with the default value being set to ‘128’;
- Click ‘OK’ to apply the new rule.
57. VPN Error Code 0x80072746
Error Message: «Connection closed by remote host.»
Explanation & Solution: Since this issue is related to HTTPS authentication certificates, there’s nothing you can do to fix it. Instead, you need to contact your VPN provider and report the problem.
58. VPN Error Code — Hamachi VPN Tunnel
Error Message: If you see the ‘VPN Error Status’ error when using the Hamachi client, something is blocking the client from tunneling properly.
Explanation & Solution: First, we recommend disabling and enabling Hamachi’s virtual adapter. Go to Control Panel > Network & Sharing Center > Change Adapter Settings. Then, right-click on the Hamachi network adapter and select ‘Disable.’ Now, do the same, just make sure to click on ‘Enable.’
You can also try restarting the Hamachi Tunneling Engine service. Press ‘Window Key + R’ on your keyboard, and type in ‘services.msc.’ Press enter, and then search for ‘Hamachi Tunneling Service.’ Right-click on it and select ‘Disable.’ Then, repeat the procedure, but make sure to click on ‘Enable.’
Among other solutions, we recommend removing any previously installed TAP drivers, removing any firewall tools (including antivirus software), removing Oracle Virtual Box, and reinstalling your Hamachi client.
Further Reading
TechNadu’s editorial team has been very busy producing all kinds of VPN reviews, guides, and other types of helpful content. With this said, check out the following resources.
- What is a VPN?
- How Do VPN Applications Work?
- The Complete Guide to Hardware VPNs
- Which VPN Protocol Should You Use?
- Everything to Know About VPN Encryption
- VPN Buyer’s Guide
- The Best VPN Services
- 5 Great VPN Features You Probably Didn’t Know About
Finally, in case of any questions, don’t hesitate to post a comment below. And in case you need additional help, we recommend checking our VPN troubleshooting guide.
by Teodor Nechita
Eager to help those in need, Teodor writes articles daily on subjects regarding Windows, Xbox, and all things tech-related. When not working, you may usually find him either… read more
Updated on
Several users have been reporting on the official Microsoft forums that they are having issues with the XPS printer:
I was unable to print from software using the XPS writer. I attempted to reinstall the printer but the installation fails reporting “printer driver not installed. Element not found”
Apparently, they are getting an error 1168: Element not found can have a wide variety of causes.
This article will guide you step-by-step on how to fix this error with the XPS printer.
How do you fix a generic error 1168?
1. Update your drivers
- Click on the Start button, then go to Settings
- Select Update & Security
- Click on Check for updates
- Allow Windows Update to download and install the updated driver
Follow these steps to install the latest printer drivers using Windows Update.
Alternatively, you can use a professional third-party tool that performs this process automatically and aims to keep your printer drivers updated and healthy.
More so, by choosing this automated method of managing drivers you also stay secure from potential damages caused by devices incompatibility.
Thus if you need reliable support to install or update any driver, the following software will accomplish this mission with no exception.
⇒ Get Outbyte Driver Updater
2. Try reinstalling the Windows XPS feature
- Press Windows
- Click on Settings (the cogwheel-shaped button)
- Select Apps
- Go to Apps & features
- Click Optional features
- Look for XPS feature if it is present
- If it is, right-click it and select uninstall
- Restart your PC
- After the restart or if your PC didn’t have the feature, go to the Manage optional features screen, and select Add a new feature
- When on the Add a new feature screen, select the XPS Viewer
- Restart your PC
3. Manually search for the location of your XPS Writer
Depending on which version of Windows 10 you have installed, the location of the XPS Writer may vary.
As such, if the solution listed above didn’t work, try this:
- Press Windows + R
- Type in control.exe
- Click Programs
- Select Programs and Features
- Click Turn Windows features on or off
- See if XPS Services and XPS Viewer are listed
- If the services are marked in their checkbox, unmark them and restart the PC
- If the services are unmarked in their checkbox, mark them and restart the PC
- Press Windows + R
- Type in control.exe
- Go to Hardware and Sound
- Click Devices and Printers
- See if Microsoft XPS Document Writer is installed as a printer.
- If it is, right-click it and choose Remove device
- Restart your PC
- Go back to Devices and Printers and select Add a printer
- Select The printer that I want isn’t listed
- Click Add a local printer or network printer with manual setting
- In the Choose a printer port screen, select Use an existing port and PORTPROMPT: (Local Port)
- In the Install a printer driver screen, select Microsoft on the left pane and Microsoft XPS Document Writer on the right
- When asked Which version of the driver do you want to use? select Use the driver that is currently installed (recommended)
If these particular steps didn’t help, you could also try to:
- Uninstall Recent Windows Updates
- Reset Your PC
![]()