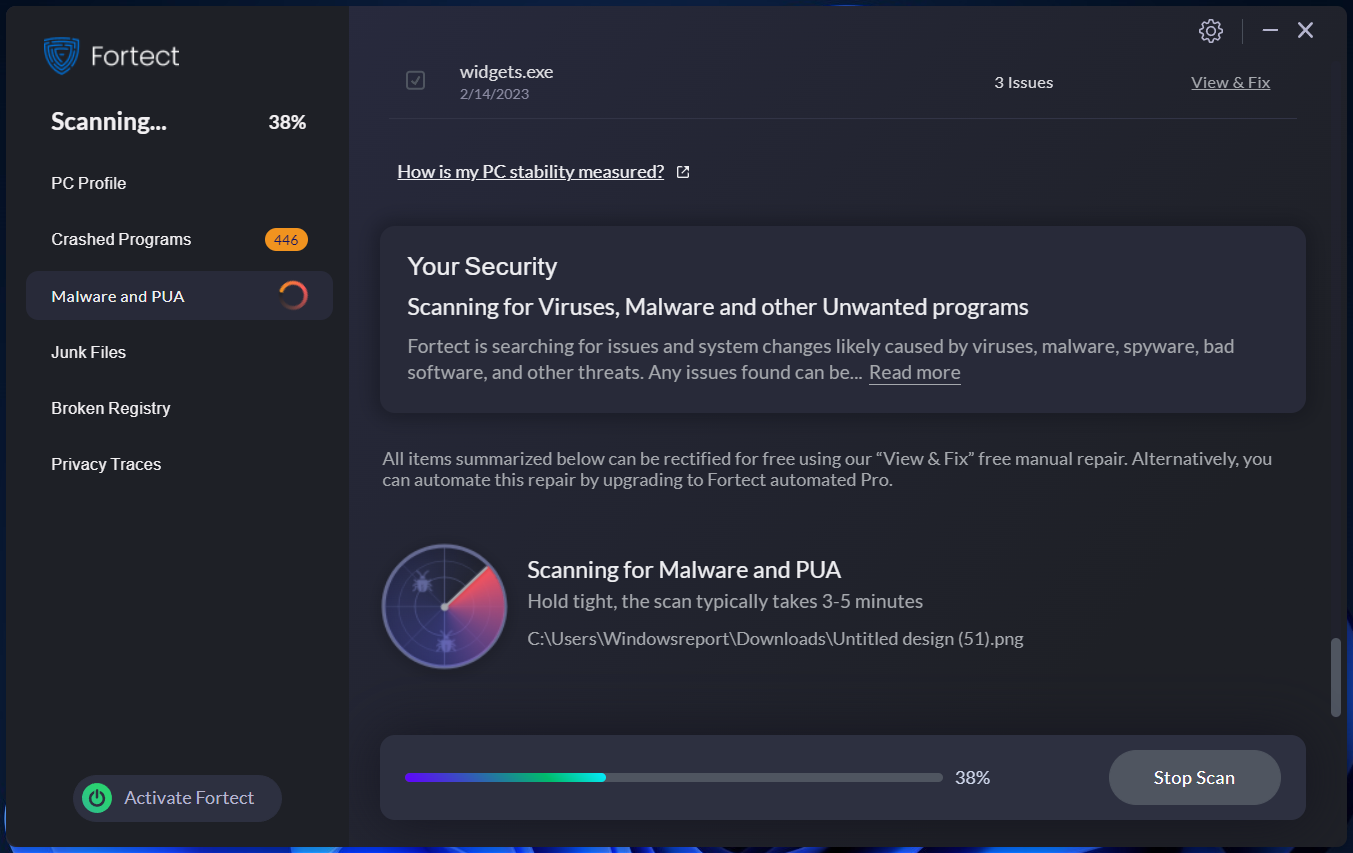
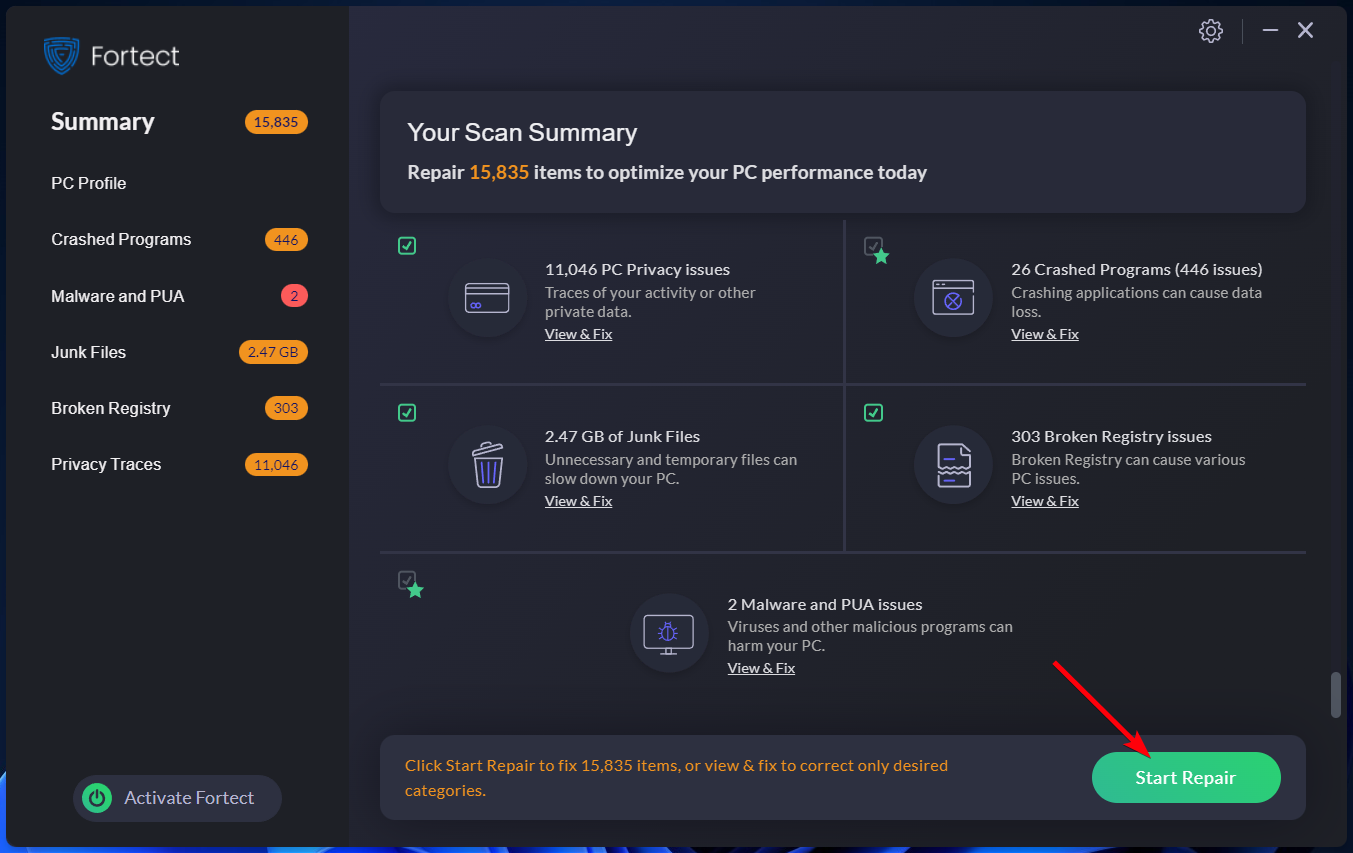
Check the solutions that worked for other users
by Matthew Adams
Matthew is a freelancer who has produced a variety of articles on various topics related to technology. His main focus is the Windows OS and all the things… read more
Updated on
- The LoadLibrary failed with error 1114 is usually encountered on NVIDIA and AMD graphics.
- Usually, it’s the misconfigured power or graphics settings to blame though some users found outdated drivers to be the culprit.
- To fix things, update the OS and the affected app, or manually secure the missing DLL, amongst other solutions.

XINSTALL BY CLICKING THE DOWNLOAD FILE
Get rid of malfunctioning drivers on your PC
SPONSORED
Drivers can often become corrupt as they can interfere with malfunctioning system files, thus arriving to be installed but not running correctly. To keep your drivers running smoothly, your Windows OS must run even smoother. Get it in perfect shape by following the steps below:
- Download Fortect and install it on your PC.
- Start the tool’s scanning process to look for corrupt files that are the source of your problem
- Right-click on Start Repair so the tool can start the fixing algorithm
- Fortect has been downloaded by 0 readers this month, rated 4.4 on TrustPilot
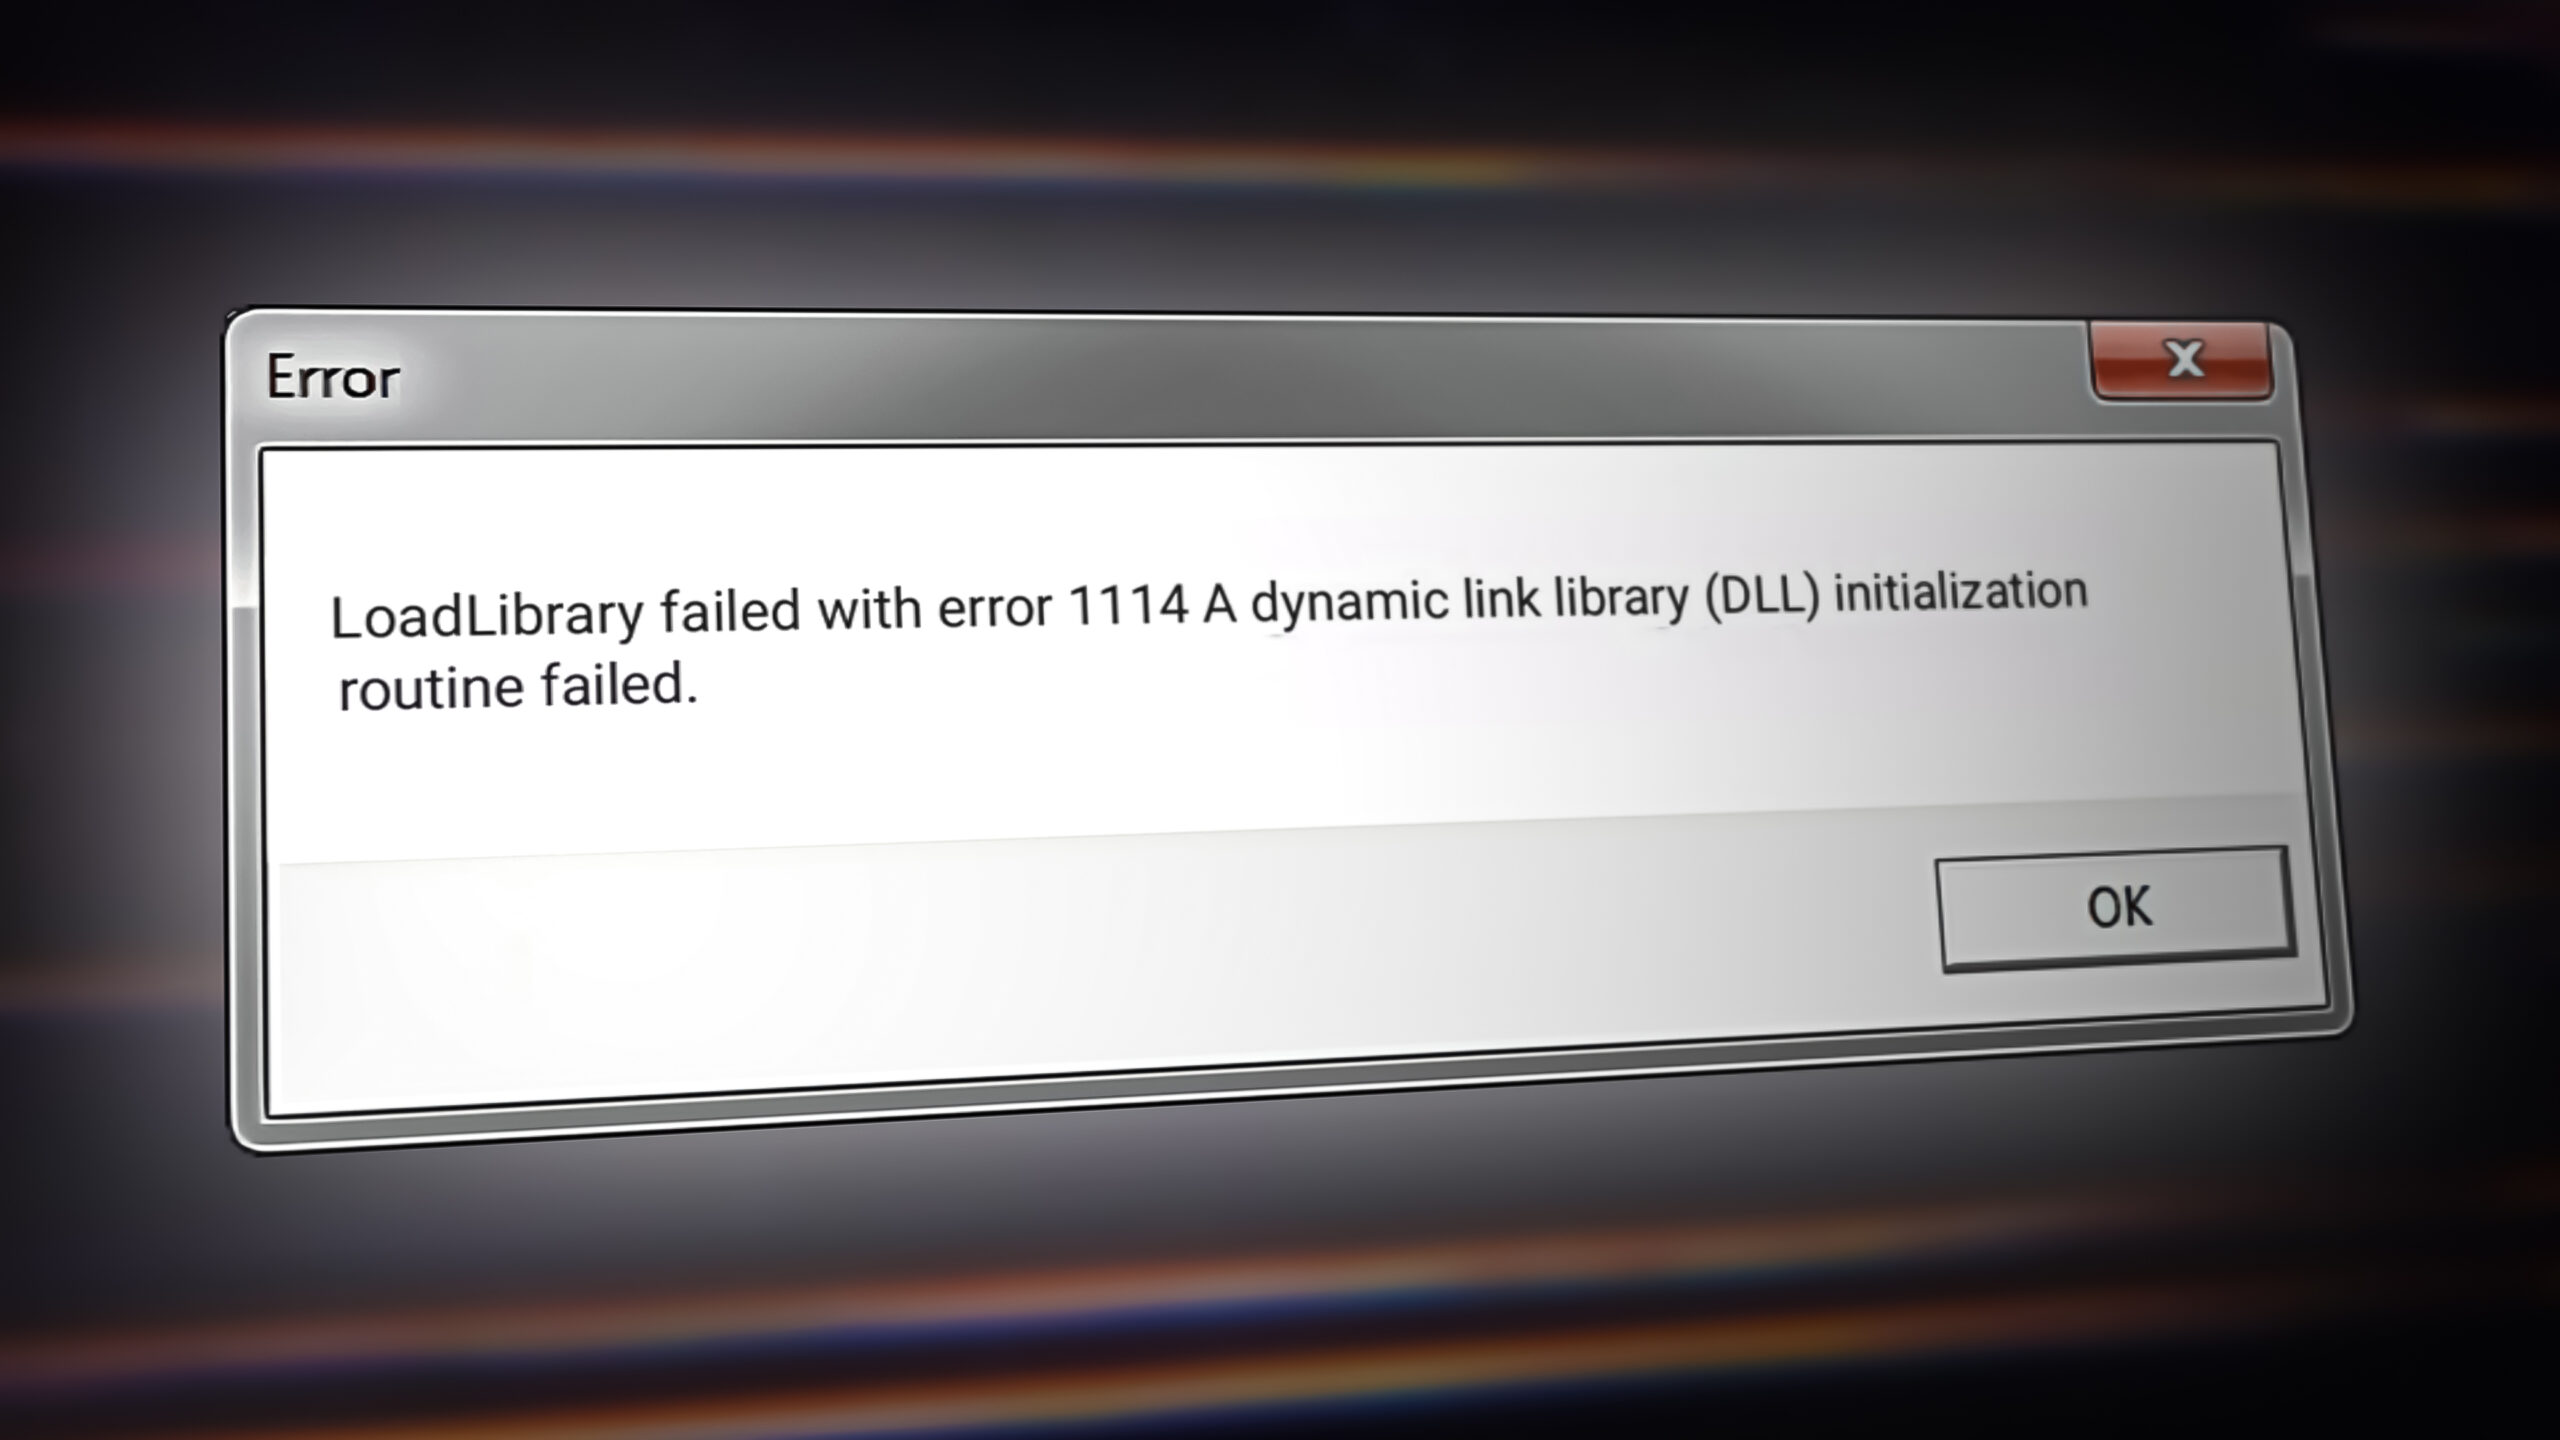
Encountering errors in Windows is common, and we get a lot of them. But, LoadLibrary failed with error 1114 is one that prevents apps from launching on PCs running Nvidia and AMD graphics.
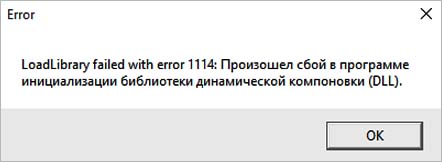
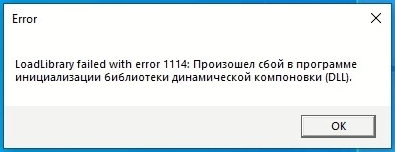
The complete error message reads, LoadLibrary failed with error 1114: A dynamic link library (DLL) initialization routine failed. So, let’s find out how you can fix things in no time.
Why is LoadLibrary failing with error 1114?
LoadLibrary is employed by processes to access or link to a DLL file. And when it fails, the corresponding application fails to launch. It could fail with several error codes, with 1114 being one of them.
Here are some of the reasons you are getting the error:
- Misconfigured graphics settings – In most cases, misconfigured graphics settings were responsible for the error.
- Incorrect power settings – If you have a power saving setting turned on, it might lead to issues with the graphics.
- Missing DLL files – Oftentimes, the DLL files were missing, which led to trouble accessing them, and as a result, the LoadLibrary failed with error 1114 showed up.
- Corrupt system files – When the system files are corrupt, it leads to issues with OS, including this error.
Besides, here are some of the cases you may encounter the error:
- AMD Driver LoadLibrary failed with error 1114 – The error is usually encountered due to issues with the AMD graphics driver.
- Autodesk LoadLibrary failed with error 1114 – Autodesk applications often throw the error, but the solutions remain the same.
- Minecraft LoadLibrary failed with error 1114 – Some users had trouble with Minecraft but reinstalling it usually did the trick.
- Raft Failed to load DLL from the list error code 1114 – Many also reported the error with Raft, and our solutions would help in this case.
How can I fix Failed to load dll from the list error code 1114?
Before we try the slightly complex solutions, here are a few quick ones that might fix things:
- Restart the computer.
- Update Windows and the program that throws the error.
- Uninstall the app installed recently in case the error starts appearing after you downloaded it.
1. Get the DLL file
The easiest way to fix the error is to get the missing DLL file. You can perform this manually and identify the missing files triggering the error, or better use dedicated software to fix any DLL file issues.
Thus, the most practical method you can employ is using an expert system repair tool that can detect and solve broken DLL files or damaged system files like Fortect.
- Download Fortect on your PC.
- After installing, open the program to start the scan.

- Wait for less than 5 minutes until the scanning is complete.
- Afterward, click on Start Repair to solve missing DLL issues or other problems.
After this process, you can proceed to repair missing or broken DLL files by replacing the faulty software files with healthy components from its vast database.
2. Change power plan settings
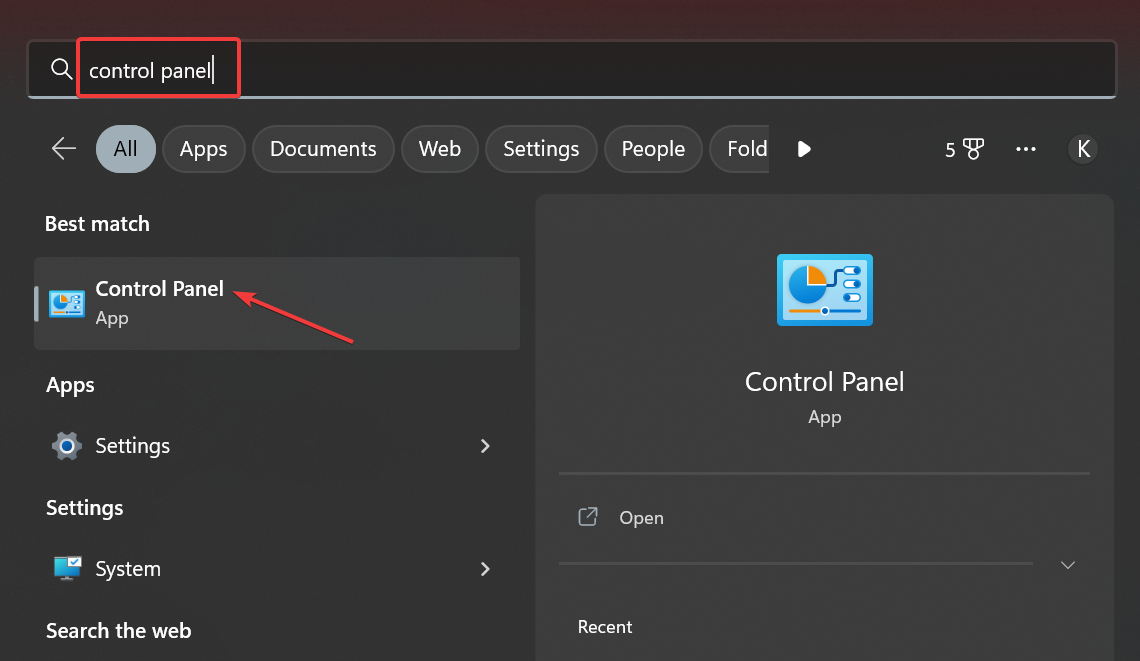
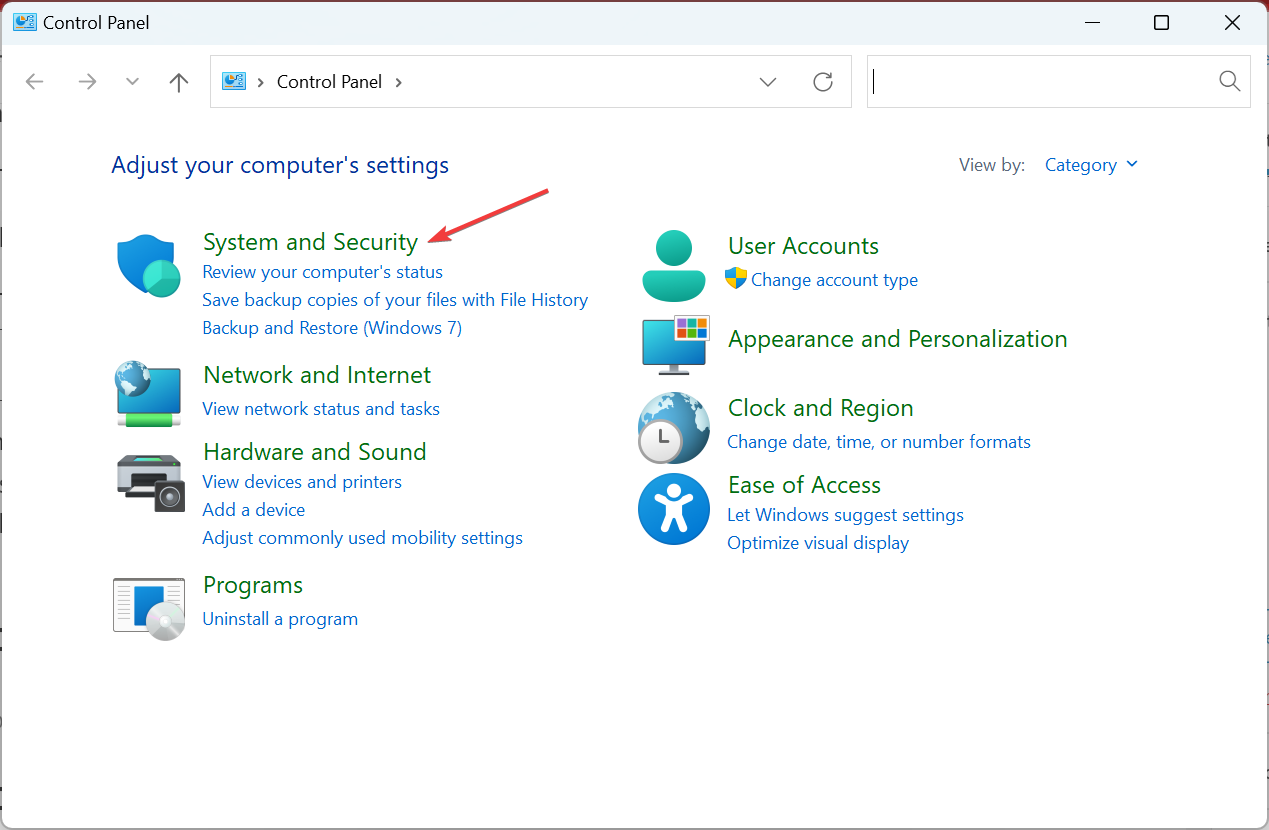
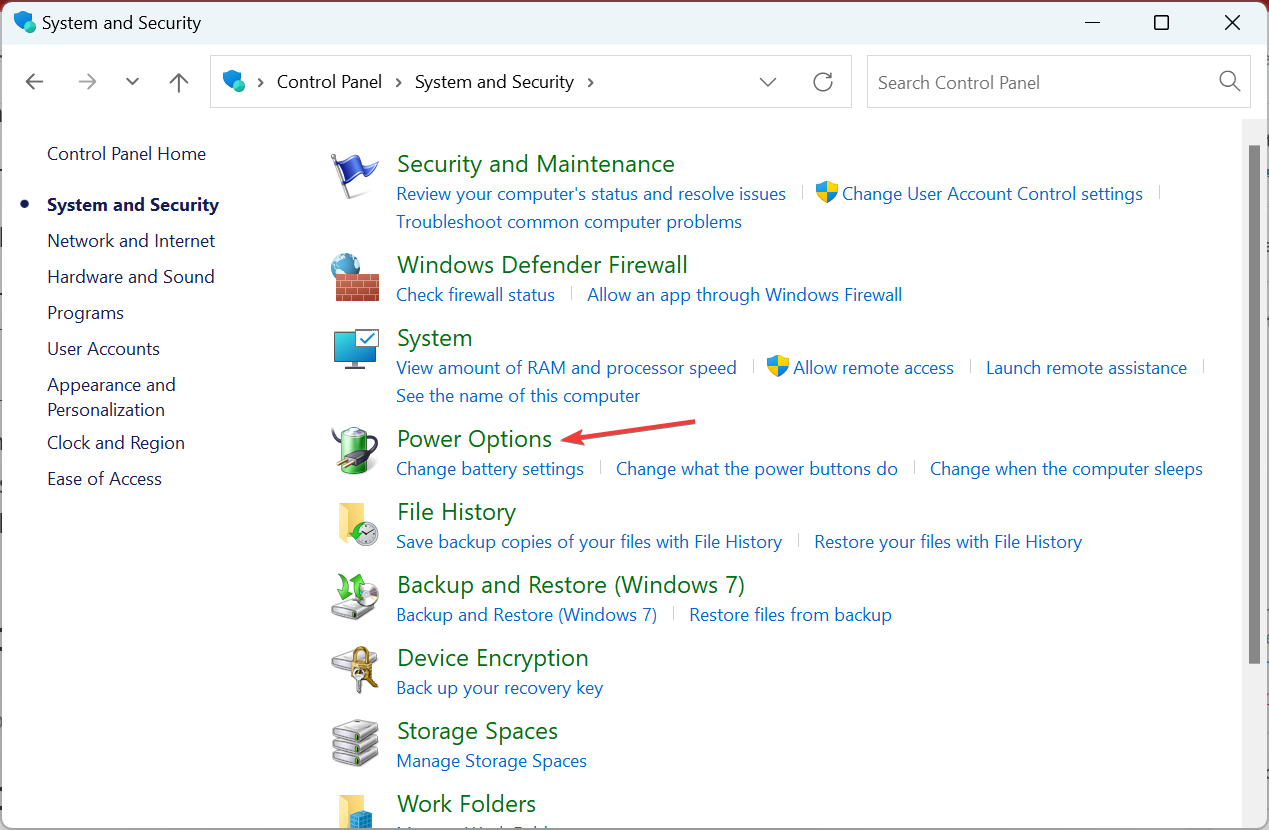
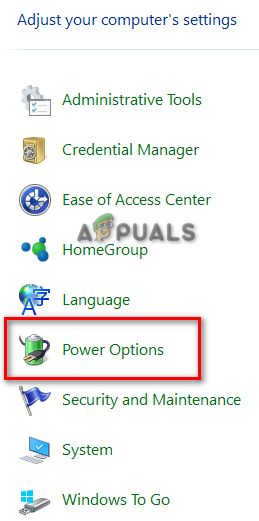
- Press Windows + S to open Search, type Control Panel in the text field, and click on the relevant search result.

- Now, click on System and Security.

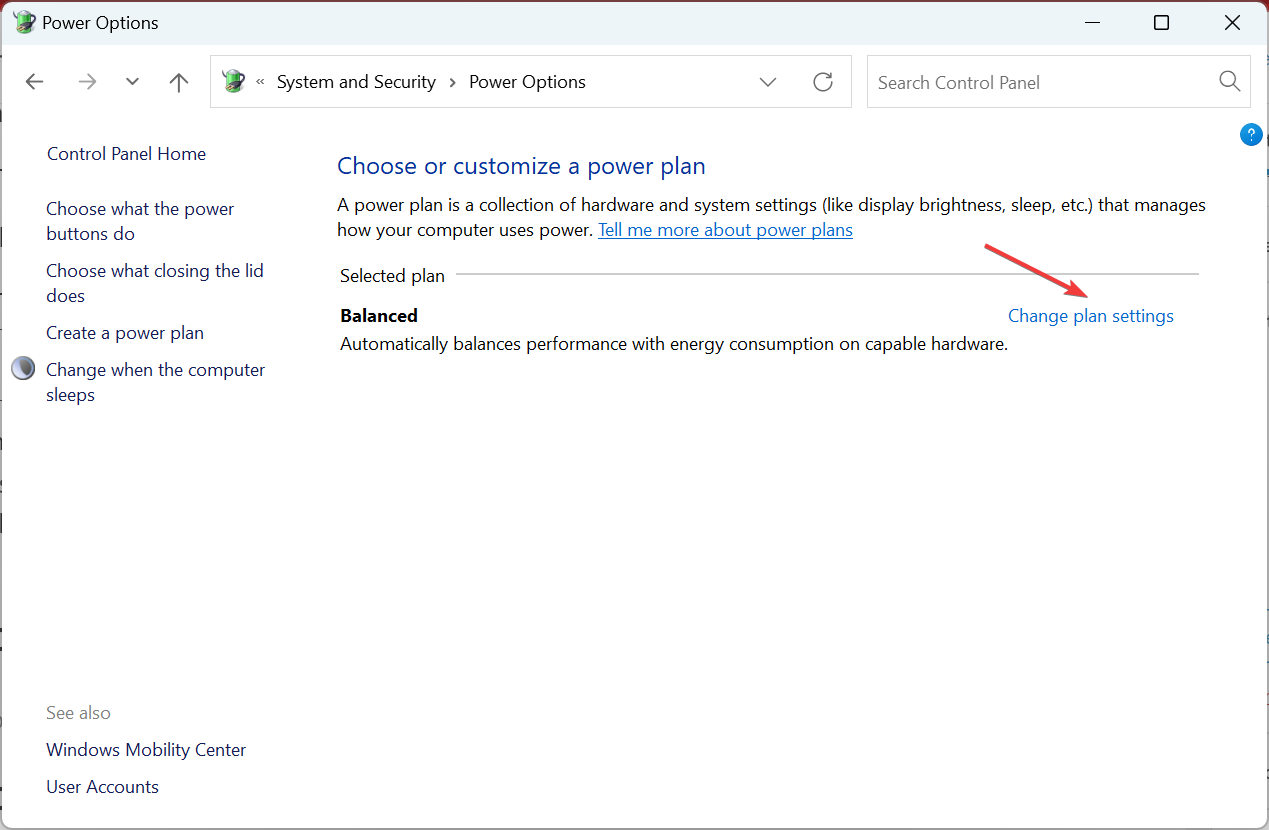
- Click on Power Options.
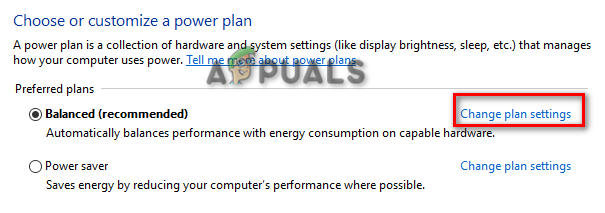
- Click on Change plan settings next to the current plan.
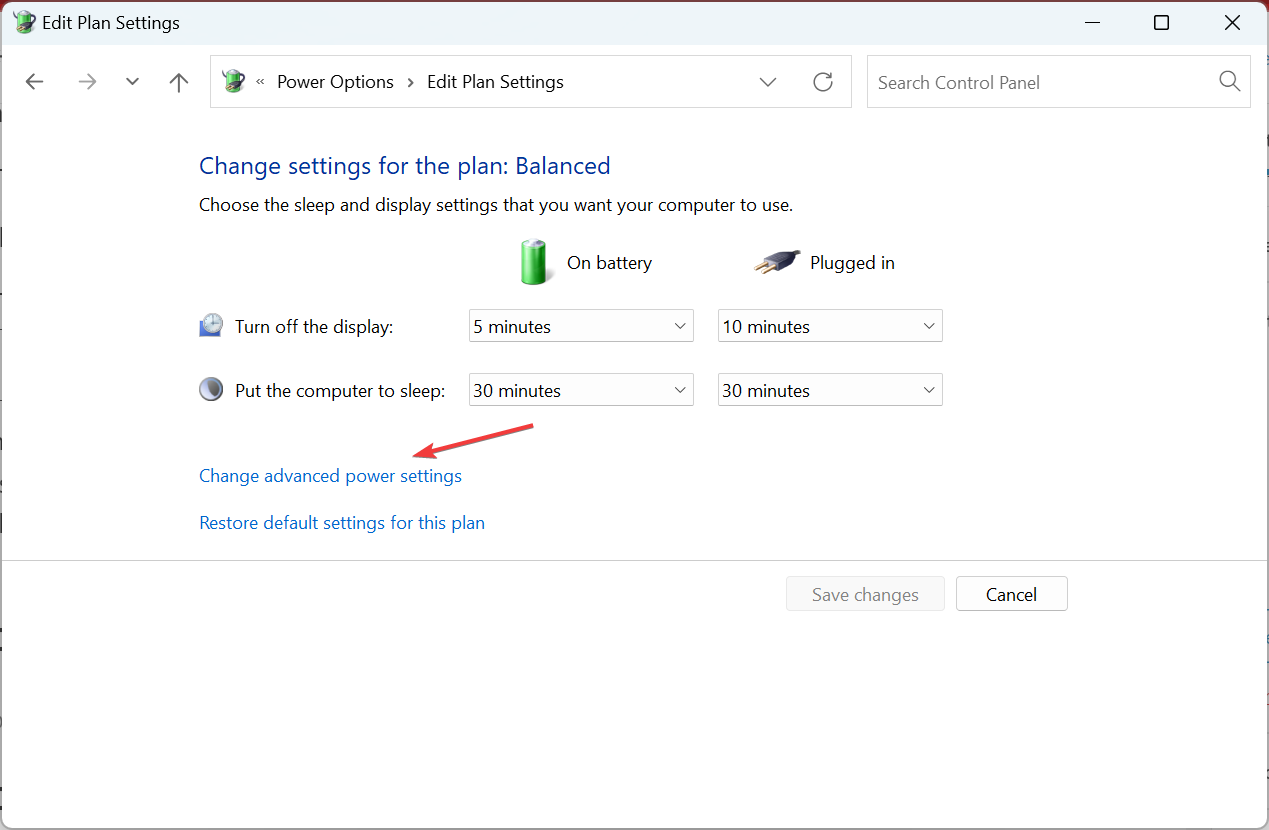
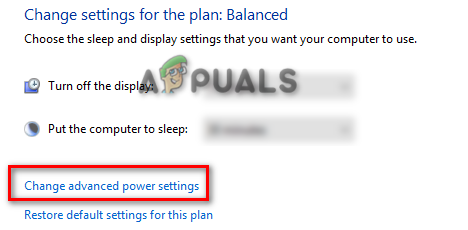
- Now, choose Change advanced power settings.
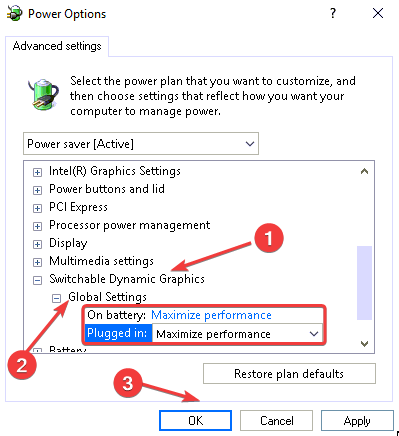
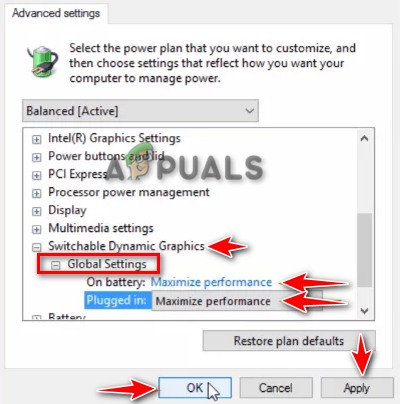
- Expand Switchable Dynamic Graphics, double-click on Global settings, choose Maximize performance for both On battery and Plugged in, and then click OK to save the changes.

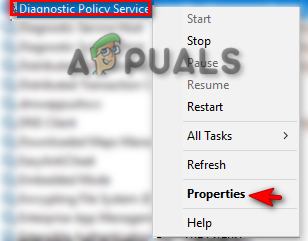
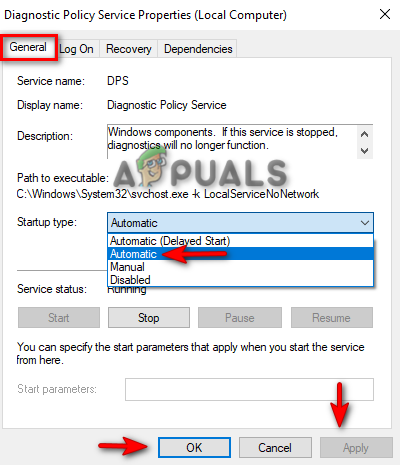
3. Run the Diagnostic Policy Service
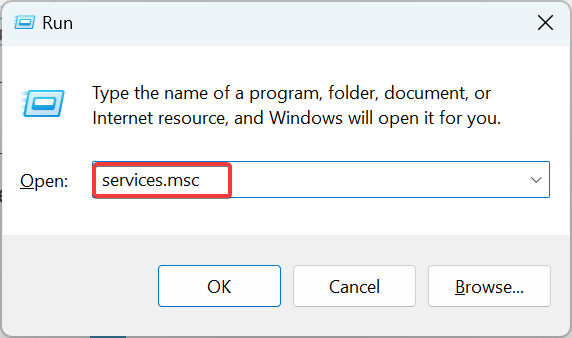
- Press Windows + R to open Run, type services.msc, and hit Enter.

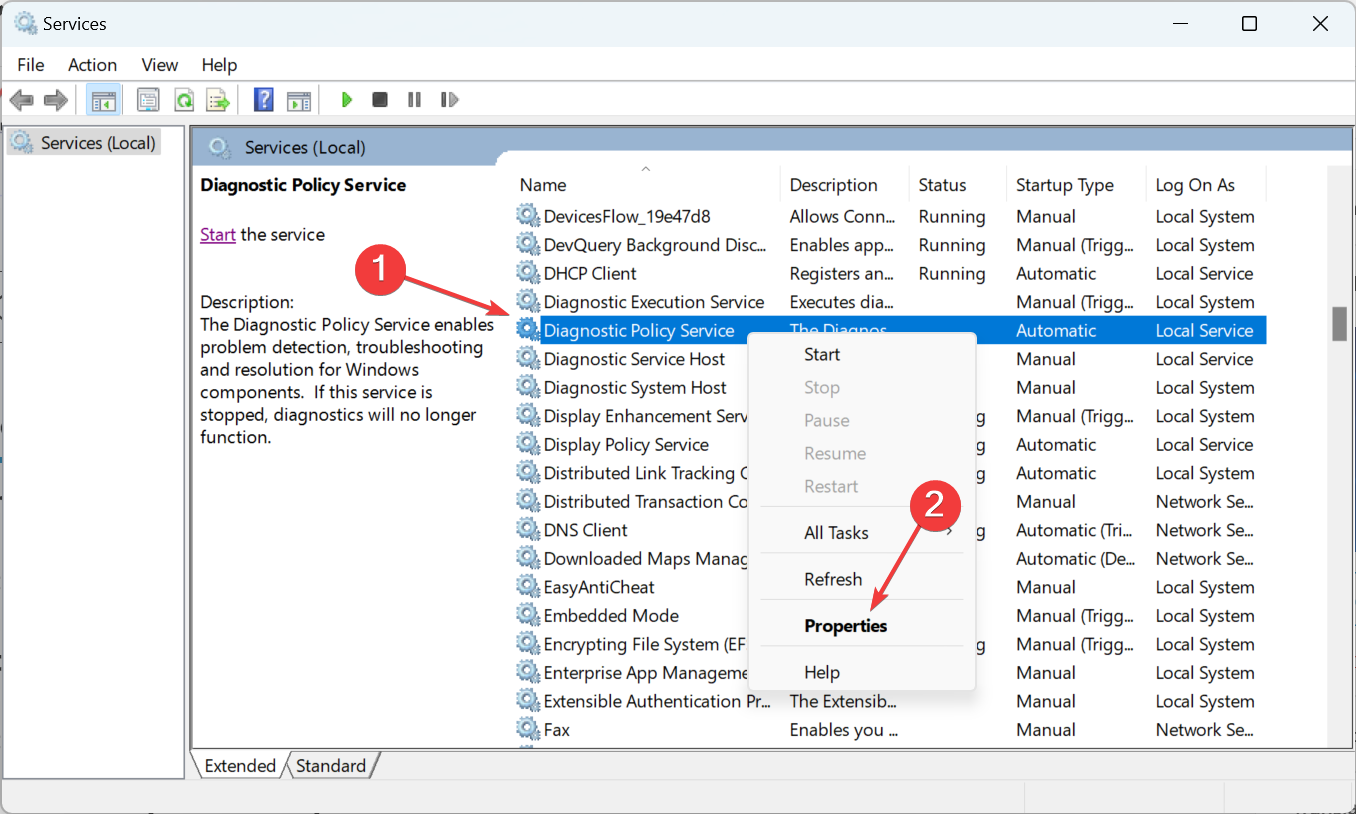
- Locate the Diagnostic Policy Service, right-click on it, and select Properties.

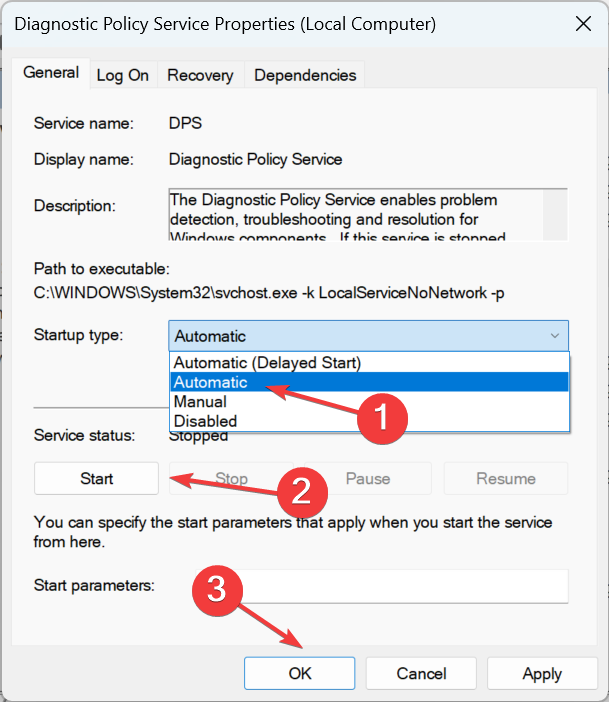
- Select Automatic from the Startup type dropdown menu, click on Start to run the service, and then on OK to save the changes.

Once done, restart the computer for the changes to come into effect and verify if the LoadLibrary failed with error 1114 dialog disappears for good.
- Microsoft Olive will make your AMD GPUs 10 times faster
- Security Settings Blocked Self-signed Application [Fix]
- AI is helping AMD grow its market share vs. Nvidia
- Fix: Page Fault in Nonpaged Area on Windows 10
4. Update the graphics driver
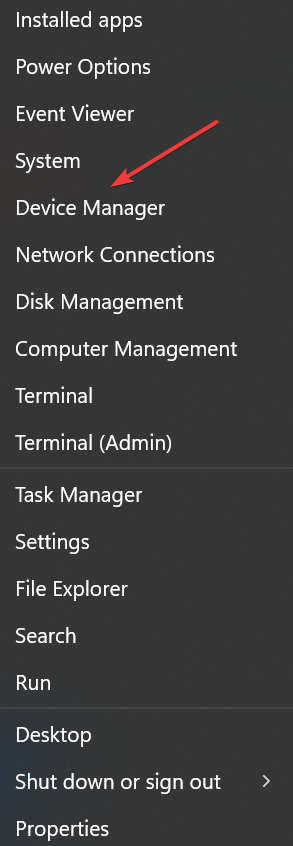
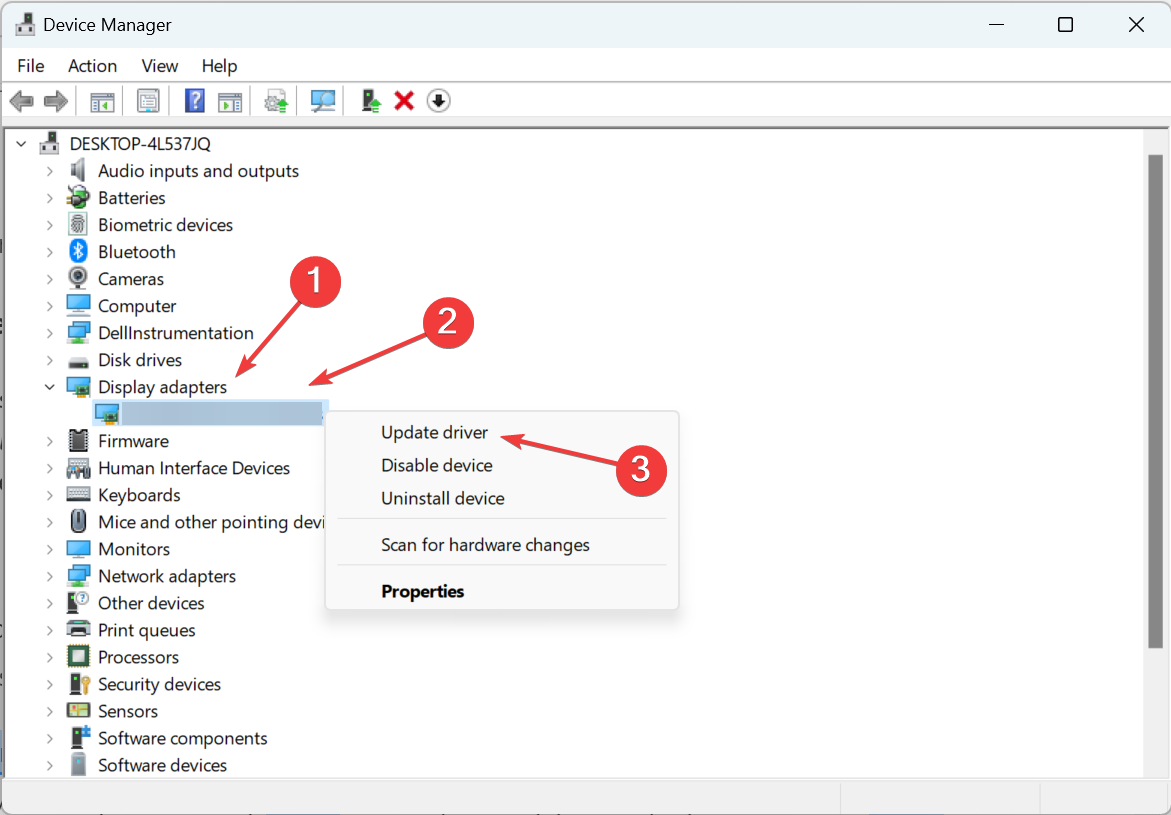
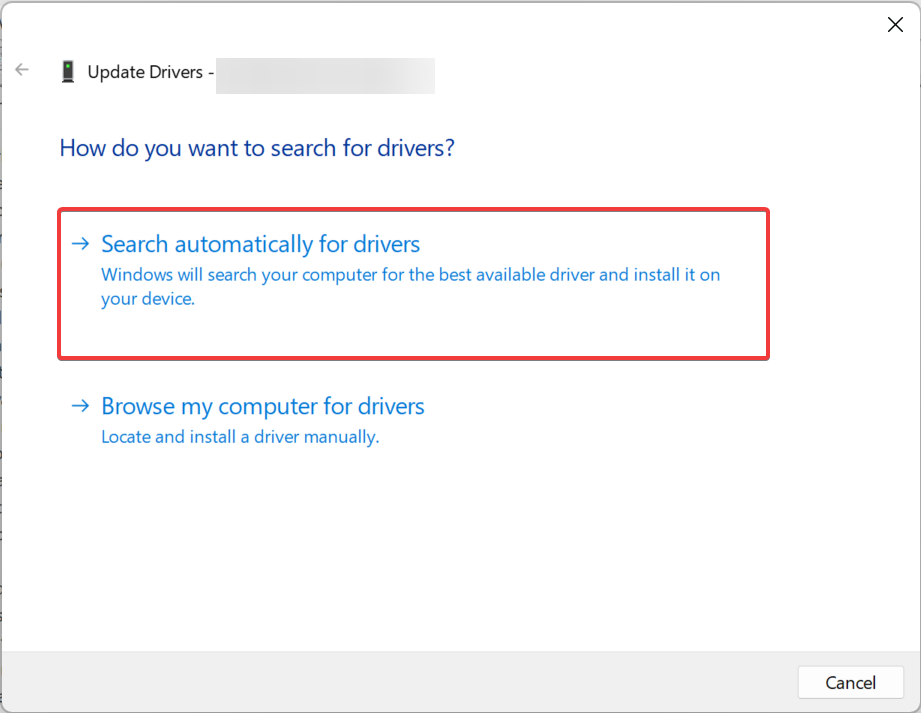
- Press Windows + X to open the Power User menu, and select Device Manager.

- Now, expand Display adapters, right-click on the NVIDIA or AMD graphics adapter, and select Update driver.

- Now, choose Search automatically for drivers and wait for the update to complete.

Outdated drivers are the main reason for errors & system issues. If some of your drivers are missing or needs updating, an automated tool like OutByte Driver Updater can solve these problems in just a couple of clicks. Plus, it’s also lightweight on your system!
An outdated driver is just as likely to cause the error, and updating the graphics driver should get things running for most. Also, if Windows is unable to find an update, you can always manually install a newer driver version.
Update drivers automatically
Keep in mind that downloading and updating drivers manually from the manufacturer’s website can damage your system by choosing and installing the wrong driver version.
In order to prevent that, we strongly suggest doing it automatically by using Outbyte Driver Updater.
This tool is tested and approved by our team and will help you not damage your PC by downloading and installing the wrong driver versions.
After several tests, our team concluded that this is the best automatized solution.

Outbyte Driver Updater
Avoid installing the wrong drivers and get the right versions for your device by using Outbyte Driver Updater.
5. Change the graphics settings
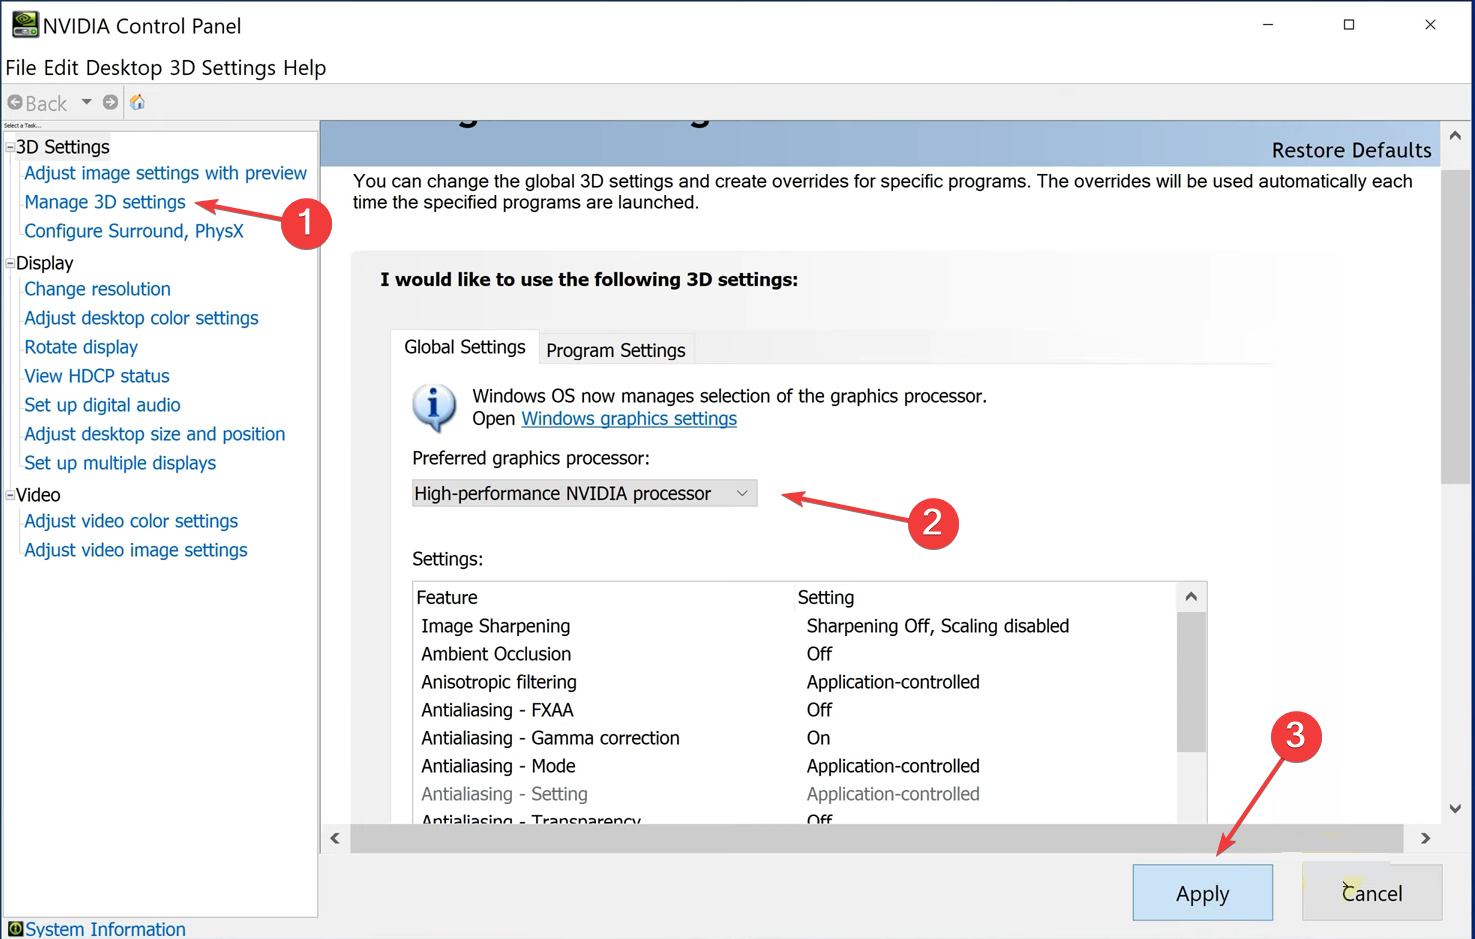
5.1 NVIDIA graphics
- Launch the NVIDIA Control Panel.
- Now, choose Manage 3D settings under 3D Settings, select High-performance NVIDIA processor under the Preferred graphics processor dropdown menu, and click on Apply for the changes to come into effect.

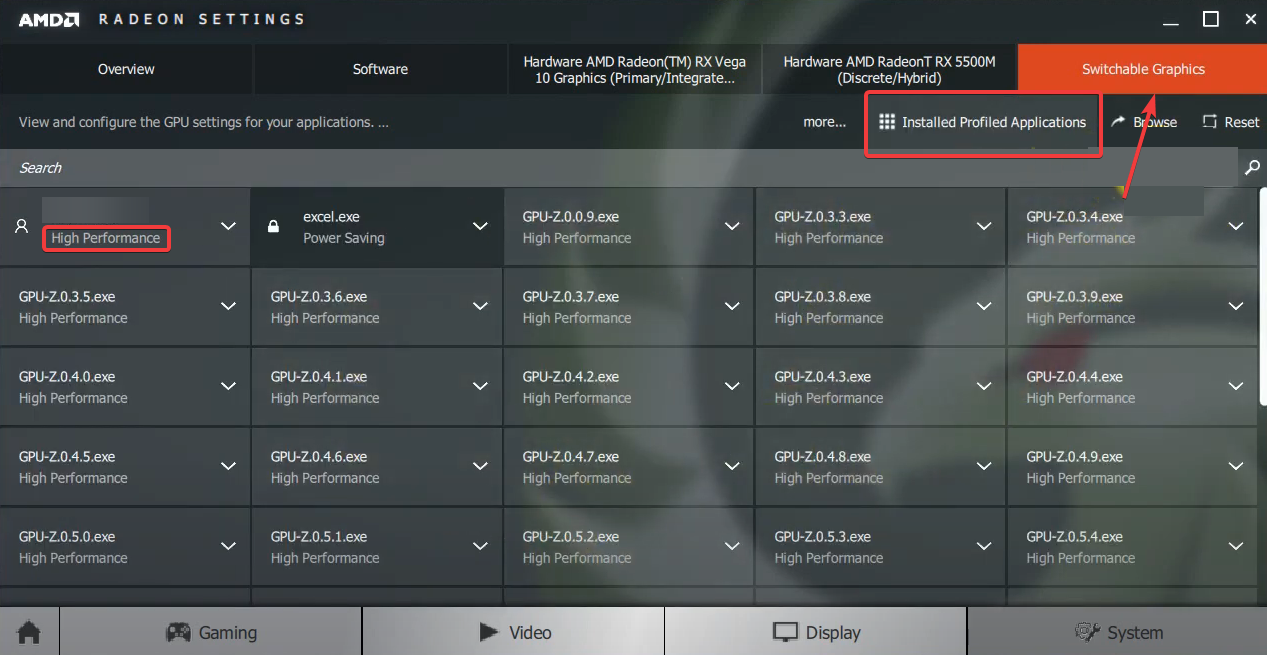
5.2 AMD graphics
- Launch the AMD Radeon Settings.
- Now, navigate to Switchable graphics, select Installed Profiled Applications from the dropdown menu, and verify that the problematic app is set to High performance.

This should fix LoadLibrary failed with error 1114. A dynamic link library (dll) initialization in Windows. In case the error appears again, head to the last solution.
6. Reinstall the app that throws the error
- Press Windows + R to open Run, type appwiz.cpl, and click OK.
- Now, locate the app that throws the error, select it, and click on Uninstall.
- Follow the on-screen instructions to complete the process.
- Once done, head to the official website or the Microsoft Store, and download the app again.
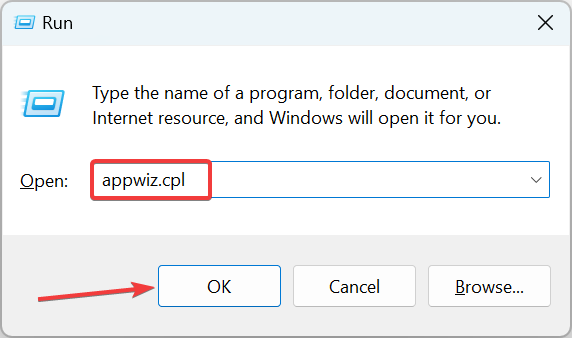
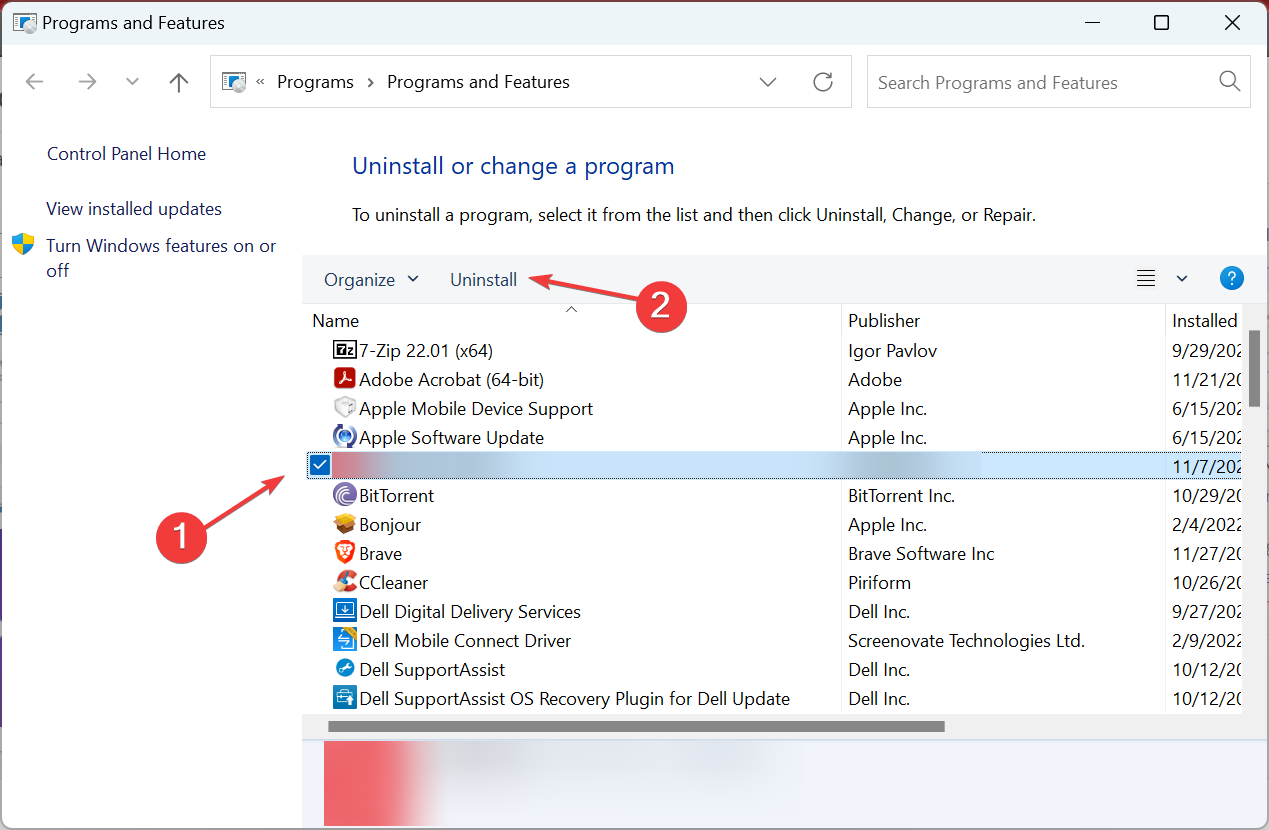
If nothing else worked, the last option is to reinstall the app that’s throwing the LoadLibrary failed with error 1114 dialog in Windows. And this should get things up and running.
Also, find out how to fix things when DLL files are missing in Windows, and prevent such errors from reappearing.
Tell us which fix worked for you in the comments section below.
Still experiencing troubles? Fix them with this tool:
SPONSORED
Some driver-related issues can be solved faster by using a tailored driver solution. If you’re still having problems with your drivers, simply install OutByte Driver Updater and get it up and running immediately. Thus, let it update all drivers and fix other PC issues in no time!
![]()
С ошибкой «LoadLibrary Failed with the Error 1114: Произошел сбой в программе инициализации библиотеки динамической компоновки (DLL)» чаще всего пользователи сталкиваются при запуске игр. Также она может препятствовать запуску программ обработки анимации и изображений, таких как Photoshop и Autodesk 3ds Max. Иногда из-за этой ошибки не удается использовать Вайбер или некоторые приложения Windows.
Самые распространенные причины связаны с настройками питания видеокарты или повреждением файлов DLL.
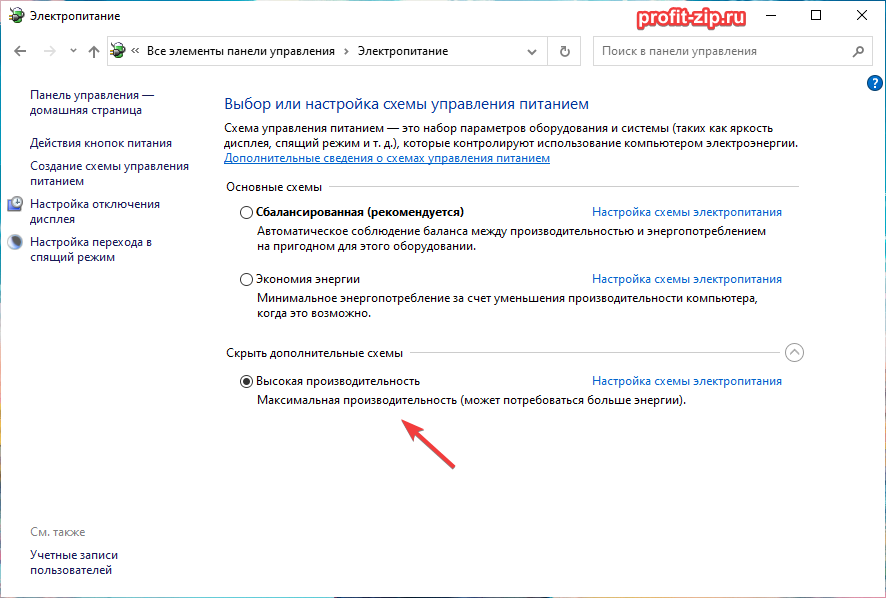
Изменения параметров электропитания
В большинстве случаев ошибку «LoadLibrary Failed with the Error 1114» удается исправить изменением параметров питания видеокарты. Процесс заключается в изменении настроек с оптимальной на максимальную производительность. В сбалансированном режиме Windows пытается снизить энергопотребление путем замедления или остановки некоторых процессов, которые требуются для работы программ.
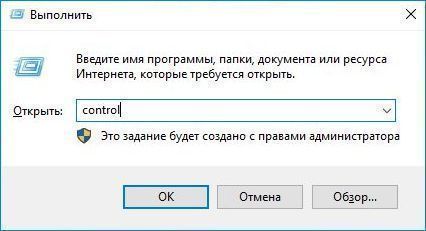
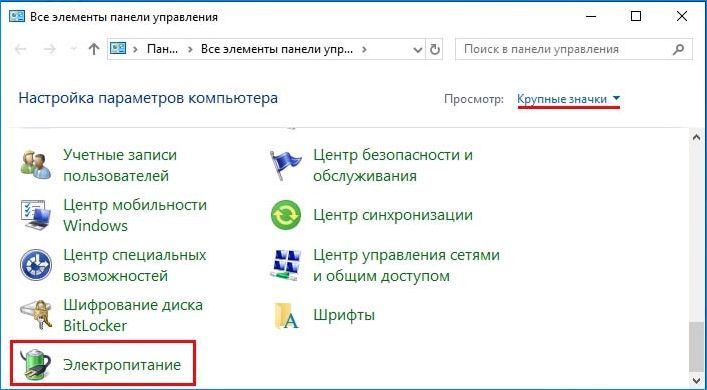
Откройте Панель управления командой control, запущенной из окна Win + R.
Переключите просмотр на крупные значки и перейдите в раздел Электропитания.
Нажмите на кнопку настройки схемы электропитания в соответствии с используемым планом.
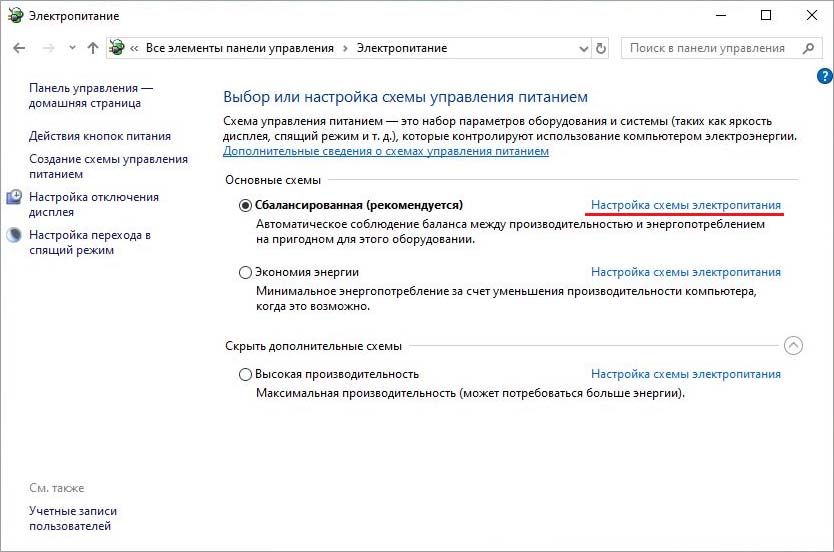
В следующем окне кликните на «Изменить дополнительные параметры питания».
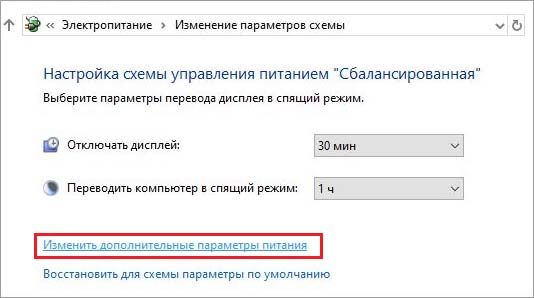
В списке разверните вкладки: Переключаемые графические адаптеры – Глобальные параметры. Щелкните поочередно на раскрывающие списки от батареи и то сети и измените значение из оптимальной на максимальную производительность.

Примените правки, и перезагрузите компьютер. Попробуйте запустить то приложение, которое вызывало сбой в программе инициализации библиотеки с кодом 1114.
Примечание: Если вкладка «Переключаемые графические адаптеры» отсутствует в списке, попробуйте активировать схему электропитания «Высокая производительность» и проверьте, решена ли проблема.
Установите автоматический запуск службы политики диагностики
Служба политики диагностики позволяет обнаруживать неполадки и устранять их. Поэтому она должна быть включена, чтобы разрешить операционной системе выполнять диагностику и предоставлять решения для устранения имеющихся проблем. В этом случае активируем этот процесс, чтобы автоматически ОС попыталась исправить сбой в программе инициализации LoadLibrary Failed with Error 1114.
Откройте системные службы командой services.msc, запущенной из окна Win + R.

Найдите службу политики диагностики, щелкните на ней правой кнопкой мыши и выберите «Свойства». Затем щелкните на раскрывающий список типа запуска и выберите значение «Автоматически». Нажмите на кнопку «Запустить» и примените изменения.
Перезапустите ПК и откройте программное обеспечение, которое вызывало ошибку с кодом 1114.
Проверка системных файлов
Ошибку могут вызвать поврежденные файлы Windows, в частности библиотеки динамической компоновки DLL. Для проверки целостности системы используем утилиты SFC и DISM, которые работают через консоль командной строки.
Запустите командную строку от имени администратора с помощью поиска Windows.

Запустите в консоли сканирование sfc /scannow и дождитесь его завершения.
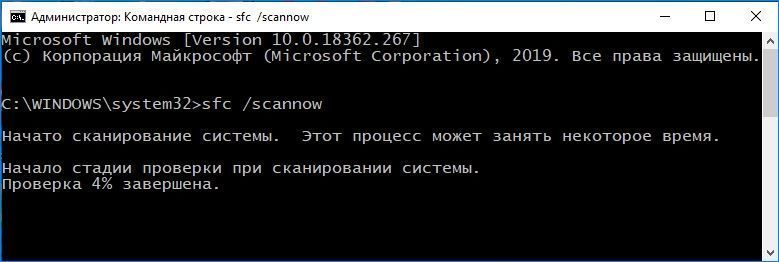
Обычно этой команды достаточно, чтобы исправить ошибку 1114. Если проблема остается, после перепуска компьютера вернитесь в командную строку (администратор) и выполните следующую команду:
dism /online /cleanup-image /restorehealth
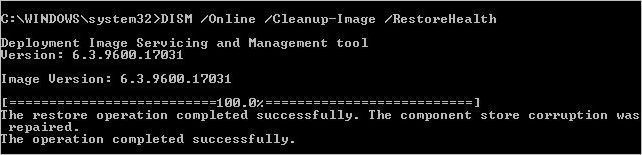
Перед выполнением проверьте подключение к интернету. Не прерывайте сканирование, пока процесс не достигнет 100%.
После завершения перезапустите ПК и выполните то действие, которое приводило к ошибке LoadLibrary Failed with Error 1114.
The LoadLibrary Error 1114 is an Error associated with the Dynamic link library (DLL) initialization routine. When the initialization routine fails, it will prevent you from opening certain game files, Adobe Lightroom/Photoshop, and Windows File Explorer. The major cause of this error is conflicting graphics drivers.
In this guide, we will be showing how the methods you must perform to fix the following error.
Prerequisites: Check the System Requirements
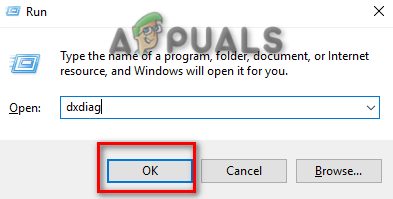
One of the reasons why this error has occurred is that your system doesn’t meet the requirements to run programs like Adobe Lightroom and Photoshop. Therefore, before using the programs, you must check your system specifications. Below is how you can check your system specifications:
- Open the Run Command by pressing the Win + R keys together.
- Type “dxdiag” in the search box and click OK.

Opening the DirectX Diagnostics Tool - Click on the “System” tab to check your system specifications under “System Information.

Checking System Specifications on the Diagnostics Tool - Click on the “Display” tab to check your Display specifications.

Checking Display Specifications on the Diagnostics Tool
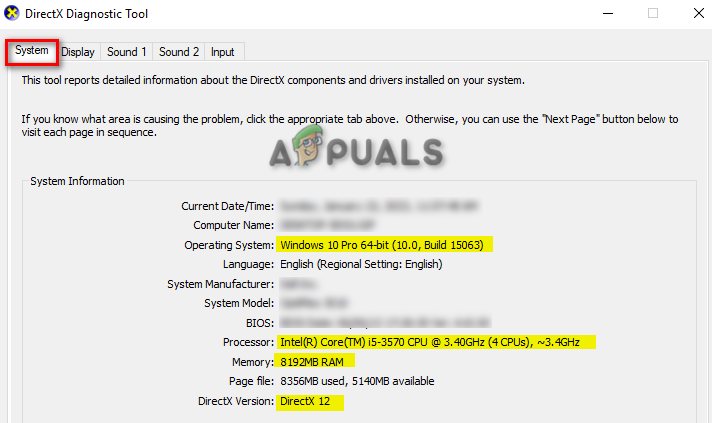
Minimum Display Requirement
- Windows 10 (1909 64-bit) or later
- DirectX 12-capable GPU.
- Intel GPUs: Skylake or later.
1. Set Global Settings to Maximize Performance
This error is most commonly caused by the use of the wrong Global Settings of the graphics card. The error occurs due to issues with the graphics. So, you must change the Global Settings to “Maximize-performance” to enhance the overall performance of the system. Below we have given the steps to set the Global Settings to a Maximize-performance:
- Open the Run Command by pressing the Win + R keys together.
- Type “control panel” in the search box and click OK.

Opening the Control Panel - Click on the drop menu of “view by” and select “Large icons.”

Settings Icons at Large Font Size - Open the Power Options settings.

Opening Power Options - Click on the “Change plan settings” of the Preferred Plans.

Changing Plan Settings of Preferred Plans - Open the advanced power settings by clicking on the “Change advanced power settings” option.

Changing Advanced Power Settings - On the Advanced Settings Box, scroll down and click on the ” Switchable Dynamic Graphics” option.
- Select the “Global Settings” and change both “On battery and “Plugged in” settings to “Maximize-performance”
- Make the changes by clicking Apply and OK.

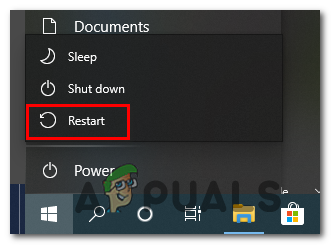
Setting Global Settings to Maximize performance - Now, open the Windows Start Menu by pressing the Win key.
- Restart your computer by clicking on the Power option and selecting “Restart”

Restarting the Windows computer

2. Run the System Scans
Having corrupted system files will prevent you from accessing certain programs and files on the system. Therefore, you must make sure to perform System Scans that will detect and repair any corruption found in the system files. Perform the System Scans by following the steps listed below:
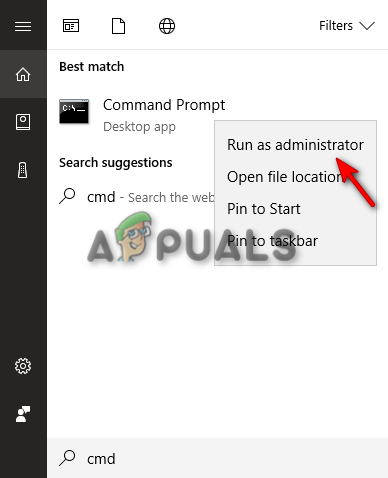
- Open the Windows Start Menu by pressing the Win key.
- Type “cmd” in the Windows Search bar.
- Right-click on it and select the “Run as an administrator” option.

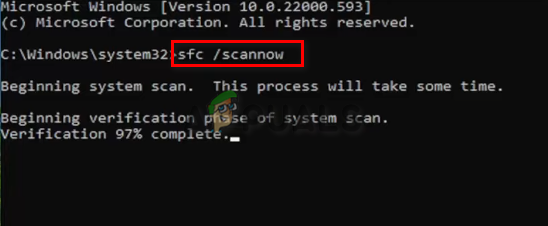
Running the Command Prompt as an administrator. - Ru the system file checker by typing the following command in the Command Prompt while giving a space between “sfc” and “/.”
sfc /scannow

Running system file checker on the command prompt. - After completing the scan, the file checker will automatically repair the defective files.
Note: After the System File Checker, you must run the DISM Command as well to Restore the Health of your system.
- Run the DISM command with the following commands while making sure to press the Enter key after each command:
Dism /Online /Cleanup-Image /CheckHealth
Dism /Online /Cleanup-Image /ScanHealth
Dism.exe /online /cleanup-image /restorehealth
- Restart your computer to make the necessary changes.
3. Set Diagnostic Policy Service Startup to Automatic
A disabled Diagnostic Policy Service Startup is also known to cause this error. This service helps to detect the problems and repairs programs at fault. Therefore, you must enable the Diagnostic Policy Service Startup by setting it to Automatic. You can enable the Diagnostic Policy Service Startup with the instructions below:
- Open the Run Command by pressing the Win + R keys together.
- Type “services.msc” in the search box and click OK.

Opening Windows Services - Find the “Diagnostics Policy” service by scrolling down the page.
- Right-click on the Service and select the “Properties” option.

Opening the Diagnostic Policy Service Properties - Set the Startup to Automatic by clicking on the “Startup type” drop-down menu and selecting the “Automatic” option.
- Make the necessary changes by clicking on Apply and OK.

Setting Diagnostic Policy Service to Automatic - Restart your computer to make the changes.
- Run the program at fault.

4. Download and Install the Display Driver Uninstaller
An outdated display driver interferes with the function of certain programs and prevents them from starting. So, you can uninstall your current Display driver and manually reinstall the latest version on your system. These are the steps to use the Display Driver Uninstaller:
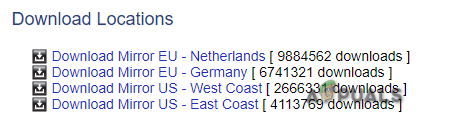
- Open the Display Driver Uninstaller Website.
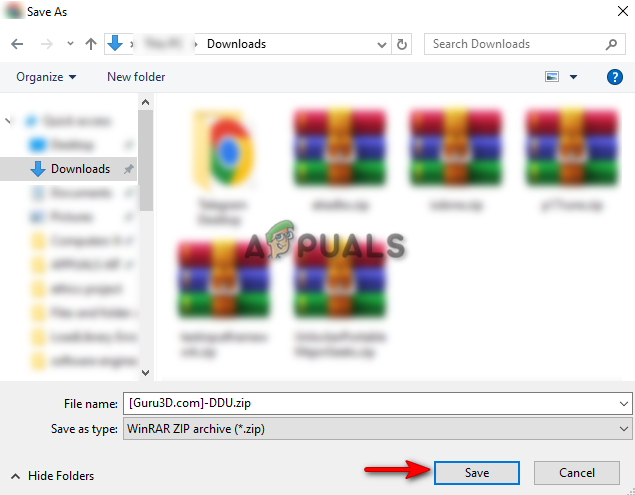
- Download the Zip file by scrolling down to the bottom and selecting the Download Location as per your choice.

Downloading the latest Display Driver Uninstaller - Select the location where you want to download the file and click the Save option.

Selecting Download Location - Click on the three dots on the browser and open the “Downloads” page.

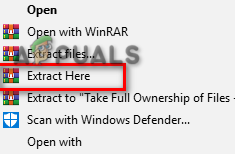
Opening the Downloads tab - Locate the file with the “Show in Folder” option.

Showing zip file in the folder - Right-click on it and select the “Extract here” option.

Extracting the File

After Extracting the file, disable the automatic Windows Update and reboot the system in Safe Mode.
Disabling the automatic Windows Update
- Open the Run Command by pressing the Win + R keys together.
- Type “control panel” in the search box and click OK.
Opening the Control Panel - Click on the drop menu of “view by” and select “Large icons.”
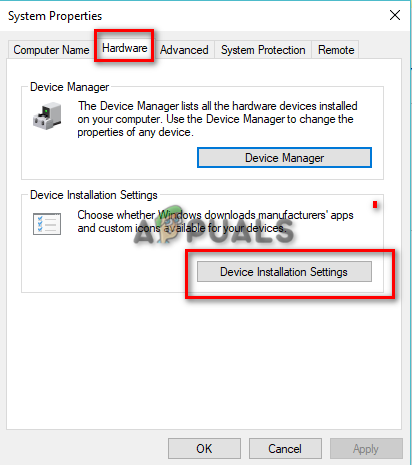
Settings Icons at Large Font Size - Navigate to System > Advanced system settings.
- On the System Properties page, click on the Hardware tab and open the Device Installation Settings.

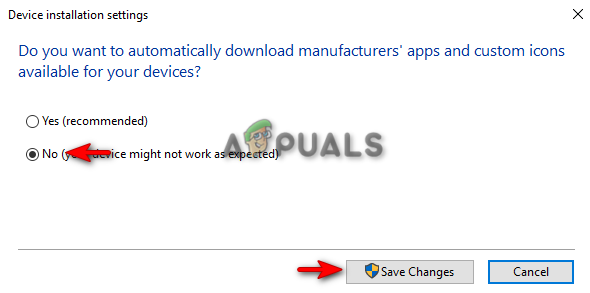
Opening Device Installation Settings - Disable Automatic Windows updates by selecting No and Save Changes.

Disabling Automatic Windows Updates
Rebooting in Safe Mode
- Now, you must Reboot the system on Safe Mode.
- Open the Run Command by pressing the Win + R keys together.
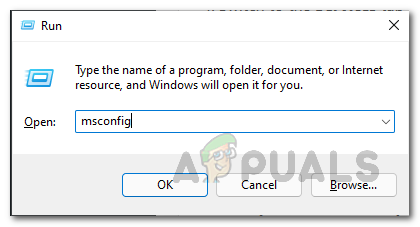
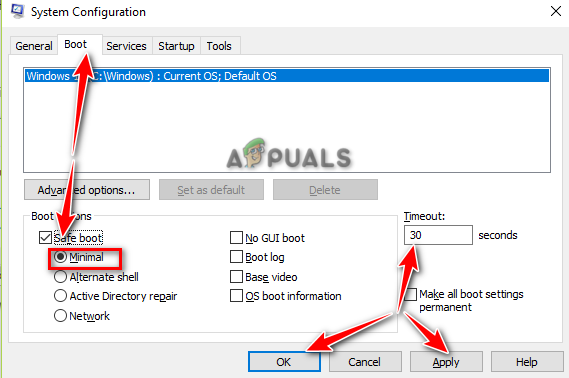
- Type “msconfig” in the search box and click OK.

Opening System Configuration - Open the Boot tab and check the “Safe Mode” box.
- Click and select the “Minimal” option under Safe Mode.
- Set the “Timeout” as per your preference.
- Make the changes by clicking Apply and OK.

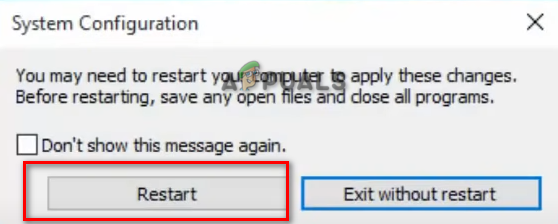
Booting System on Safe Mode - Restart your computer by selecting the “Restart” option on the System Configuration Prompt.

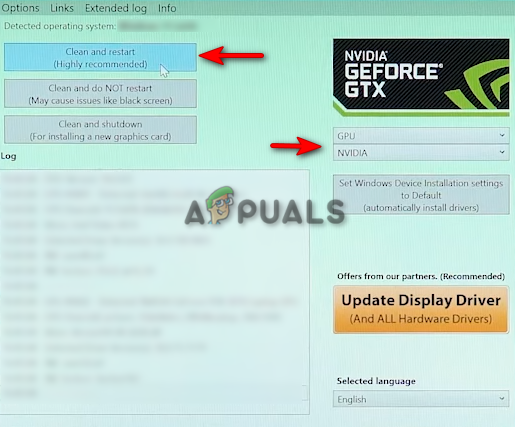
Restarting computer - On Safe Mode, open the Display Driver Uninstaller and select your GPU Type.
- Uninstall the driver by clicking on Clear and Restart.

Cleaning and Restarting
Note: After the system is rebooted, manually install the latest version of the Display Driver.
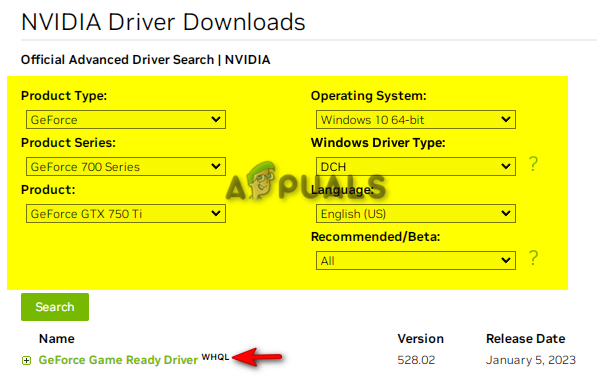
- Open the Official NVIDIA Drivers Website.
- Select the product type installed on your system.
- Search for the latest display driver by clicking on the Search Option.
- Download the Driver by clicking on the top search.

Manually searching the latest Display Driver - Start installing the Driver by double-clicking on the EXE file.
- After the Driver has been installed, restart your computer.
5. Perform a Clean Boot
If the error still occurs in the Normal State, then as a last resort, you must Perform a Clean Boot on your system. This is a built-in feature that boots the system on a minimal set of drivers and startup programs. However, do note that, in case your data gets deleted, you must have a backup copy of your files on the system.

Muhammad Zubyan
Muhammad Zubyan is a certified Google IT Support Professional with over 7 years of extensive experience. He has worked on more than 1500 computers, gaining valuable insights that enable him to detect and troubleshoot any complicated root cause of Windows-related issues and errors. In addition to managing Appuals as a Senior Editor, he is currently developing his own Game Optimization program that caters to both gamers and casual users alike.
SUMMARY
You receive a’Specified driver could not load due to a system error 1114 (Pervasive ODBC Client Interface)’ error message when you try tocreate, test or connect to a Pervasive ODBC connection.
CAUSE
The \PVSW\Bin or the install directory for Pervasive.SQL components is not in the system path.
RESOLUTION
This frequently occursif a Novell/Windows login script overwrites the system path. You will have to modify the Novell/Windows Login script to include the C:\PVSW\BIN directory. Steps to update the Environment variables to include this path are available for the Windows XP, Windows 2000, Windows ME, Windows NT, Windows 98, and Windows 95 operating systems.
To change the Environment variables in
Windows XP, follow these steps:
1. Click Start, click Control Panel, and then double-click System.
2. In System Properties,click theAdvanced Tab, and then click Environment Variables.
3.Type a semicolon (;) at the end of the Path value, and then typeC:\PVSW\BIN.
Example If the Path value is Path=C:\Windows, after you make the changes in step 3, the Path value will bePath=C:\Windows;C:\PVSW\BIN.
NoteMake sure that you edit the Path variable in Systems Variables.System Variables is a global change where as User Variables is only for that user.
To change the Environment variables in
Windows 2000, follow these steps:
1. Click Start, click Settings, click Control Panel, and then double-click System.
2. In System Properties, click the Advanced tab,click Environment Variables,click to select the Path variables from the System Variables list, and then click Edit.
3.Type a semicolon (;) at the end of the Path value, and then typeC:\PVSW\BIN.
Example If the Path value is Path=C:\Windows, after you make the changes in step 3, the Path value will bePath=C:\Windows;C:\PVSW\BIN.
NoteMake sure that you edit the Path variable in Systems Variables.System Variables is a global change where as User Variables is only for that user.
To change the Environment variables in
Windows ME, follow these steps:
1. Click Start, click Run,typemsconfig.exe, and then click OK.
2. In the System Configuration Utility, click the Environment tab, click to select the Path variable, and then click Edit.
3. Type a semicolon (;) at the end of the Path value, and then typeC:\PVSW\BIN.
Example If the Path value is Path=C:\Windows, after you make the changes in step 3, the Path value will bePath=C:\Windows;C:\PVSW\BIN.
To change the Environment variables in
Windows NT, follow these steps:
1. Click Start, click Settings, click Control Panel, and then double-click System.
2. In Sytem Properties, click theEnvironment tab,click to select the Path variables from the System Variables list, and then click Edit.
3.Type a semicolon (;) at the end of the Path value, and then typeC:\PVSW\BIN.
Example If the Path value is Path=C:\Windows, after you make the changes in step 3, the Path value will bePath=C:\Windows;C:\PVSW\BIN.
NoteMake sure that you edit the Path variable in Systems Variables.System Variables is a global change where as User Variables is only for that user.
To change the system path in
Windows 95 and
Windows 98, follow these directions:
Note — If a Novell/Windows login script is not run, you must edit the Autoexec.bat file on the drive C.
1. Open the Autoxec.bat file in Notepad and add the following line directly below thePath= statement:
Set Path = «C:\PVSW\BIN; %PATH%»
Note — Make sure to include the quotation marks.
2. Restart the workstation.
This article was TechKnowledge Document ID:27581
TechKnowledge Content
В статье разберём, что делать с ошибкой: «LoadLibrary failed with error 1114: Произошёл сбой в программе инициализации библиотеки динамической компоновки (DLL).»
Ошибка возникает в результате невозможности загрузки библиотеки, необходимой для работы программы.
Часто такая ошибка возникает на устройствах, в которых используется несколько графических адаптеров, например ноутбуки с процессорами Intel, имеющими встроенную графику Intel HD Graphics и с дискретным GPU, или же на стационарных компьютерах с процессорами Intel или AMD Ryzen с припиской G (что означает наличие встроенной графики) в комплекте с дискретным графическим адаптером. В нашем случае это произошло с программой Viber.
Причина появления данной проблемы – включенный режим энергосбережения.
Первым делом перейдите в Панель управления – Электропитание. Установите схему производительности: «Высокая производительность» или «AMD Ryzen™ High Performance» (для процессоров AMD Ryzen).
Если планов «Высокая производительность» или «AMD Ryzen™ High Performance» нет – необходимо установить драйвер ACPI.
Так же, если у Вас установлена дискретная графика от AMD, примените режим высокой производительности в настройках Catalyst Control Center: Питание – Глобальные параметры переключаемой графики, установите «Максимальная производительность». Если это ноутбук, то установите «Максимальная производительность» и в графе «Подключено», и в графе «Батарея», для того, чтобы эти схемы питания применялись и при питании от сети, и при питании от батареи.
Так же в Catalyst Control Center удостоверьтесь, что в разделе «Параметры приложений переключаемой графики» проблемное приложение имеет схему «Максимальная производительность».
В том случае, если дискретная видеокарта – NVIDIA, откройте Панель управления NVIDIA – Параметры 3D – Управление параметрами 3D. В разделе «Глобальные параметры» найдите параметр «Режим управления электропитанием» и установите «Предпочтителен режим максимальной производительности». Так же удостоверьтесь, что в разделе «Программные настройки» для проблемной программы установлена схема максимальной производительности.