Some users while playing Warframe got the “An Existing Connection Was Forcibly Closed by the Remote Host: Warframe Error 10054” issue and we decided to fix it by using some methods that you can implement on your computer for free. We will also list the reasons due to which the issue occurs in the first place and then provide you with solutions in this guide.

What Causes the Warframe Error 10054: An Existing Connection Was Forcibly Closed by the Remote Host?
After having to go through most of the solutions that worked for our test benches, we came to the conclusion that the following must be the most prominent reasons behind it.
- Firewall/Antivirus: Sometimes, the Antivirus or the Firewall that has been installed on your computer might be blocking certain network packets due to which the game might not be able to communicate with its servers. Therefore, we suggest that you try to fix the Firewall by blocking it temporarily or adding an exception.
- Region: The region that you have selected in the game might be causing the Warframe Error 10054 on your computer. Therefore, we suggest that you try to change it and then check to see if doing so fixes this issue on your computer.
- DNS Configuration: The DNS configuration that has been set for your internet connection might sometimes trigger connectivity errors. Therefore, we recommend that you try to configure this properly and then check if the Warframe Error 10054 is fixed.
Now that you have been taken through most of the reasons behind its occurrence, we can finally start implementing the fixes for the Warframe Error 10054.
Before you Start:
- Try to contact your ISP and ask them if a Firewall has been installed on the Router that is preventing some traffic from connecting to your computer.
- Try to Disconnect from your Proxy or VPN if you have activated it.
- Restart your router and try to use the LAN cable to connect to the computer.
- Try to change the network that you have connected to.
- Try to create a new Warframe account and check to see if doing so fixes the issue.
Fixing the Warframe Error 10054:
Fix 1: Perform a Clean Boot
- Press “Windows + R” to launch into run prompt, type in “msconfig” and press “enter” to launch into the configuration panel.

Typing in “Msconfig” - Click on the “Services” tab from the top of the window and check the “Hide All Microsoft Services” option and click on the “Disable All” option.

Hide All Microsoft Services - After this, click on the Startup tab and select “Open Task Manager”
- Select all of the items that are configured to run on startup and click on the “Disable” option.
- Restart to perform a clean boot and check to see if the error still occurs.
- If it doesn’t, start enabling the services and apps bunch by bunch and narrow down the service that is causing the Warframe Error 10054.


Fix 2: Disable Firewall
- Press the “Windows + R” keys on your keyboard, type in “Firewall.cpl” and press “Enter” to launch into the Firewall control panel.

Typing in “firewall.cpl” - Click on the “Turn Windows Defender ON or OFF” option and from there, click on the “Turn off Windows Defender Firewall” option for both the private and public options.

Turn off Windows defender firewall - Save the changes, click on “OK” and exit out of the window.
- Check to see if doing so fixes the Warframe Error 10054.


Fix 3: Disable Antivirus
- Press the “Windows + I” keys on your keyboard, click on the “Update & Security” button and from the left side, click on the “Windows Security” option.

Windows Security - Select the “Virus & Threat Protection” option and from the right side, click on the “Manage Settings” button under the “Virus & Threat Protection” heading.
- Turn off the “Real-Time Protection” toggle to disable the Defender on your computer.

Disable Real-Time Protection - Check to see if doing so fixes the Warframe Error 10054 issue.


Fix 4: Switch In-Game Region
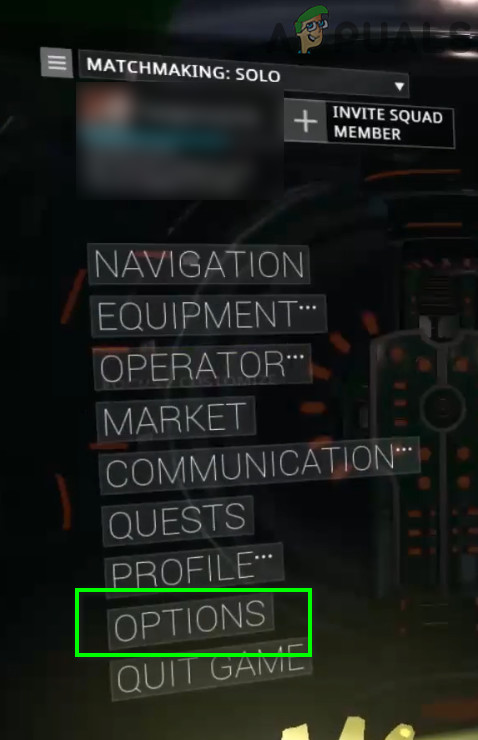
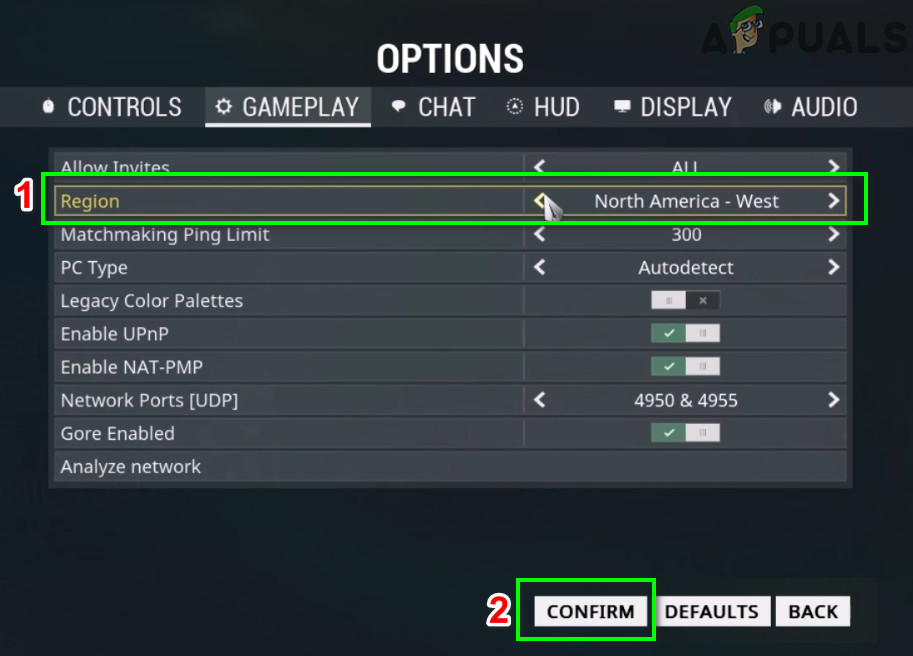
- Launch Warframe on your computer and click on the “Options” button.
- From there, click on the “Gameplay” tab and now from the “Region” change your region and click on “Confirm”.

Changing Warframe Region to fix Warframe Error 10054 - Now, check to see if you still get the Warframe Error 10054 while connecting to the match.
- You can switch the region back and check again.

Fix 5: Enabling IPV6
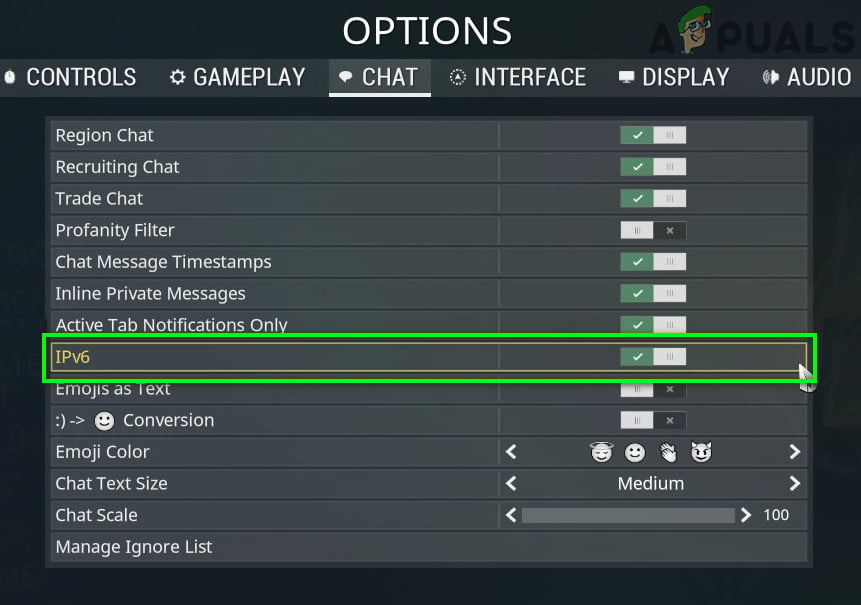
- Launch Warframe on your computer, press “Esc” to open the menu and click on the “Options” button.
- From the tabs, click on “Chat” and make sure to turn on the “IPV6” toggle.
- Press “Windows + R” to launch into the Run prompt, type in “ncpa.cpl” and press “Enter” to launch into the network control panel.

Typing in “ncpa.cpl” - Right-click on the Wi-Fi connection that you are using and select the “Properties” option.
- From here, make sure to check the “Internet Protocol Version 6(TCP/IPv6)” option and click on “Ok” to exit out of the window.
- Also, make sure that the IPV6 is enabled on your router as well.
- Check to see if doing so fixes the Warframe Error 10054 issue.

Fix 6: Refresh Windows Network Settings
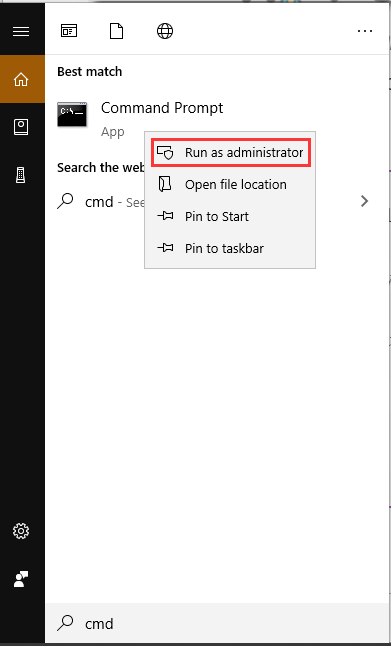
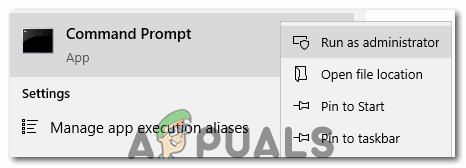
- Press “Windows + R” to launch the Run prompt, type in “cmd” and press “Shift + CTRL + Enter” to launch with admin permissions.

Typing in cmd - Type in the following commands one by one and press “Enter” to execute them on your computer.
netsh int ip reset c:\resetlog.txt

ipconfig /release

ipconfig /renew

ipconfig/flushdns

netsh winsock reset

- From here, restart your computer and check to see if doing so fixes the Warframe Error 10054 issue.
Fix 7: Change DNS
- Press “Windows + R” to launch into the Run prompt, type in “ncpa.cpl” and press “Enter” to launch into the network control panel.
- Right-click on the Wi-Fi connection that you are using and select the “Properties” option.
- Double click on the “Internet Protocol Version 4(TCP/IPv4)” option.

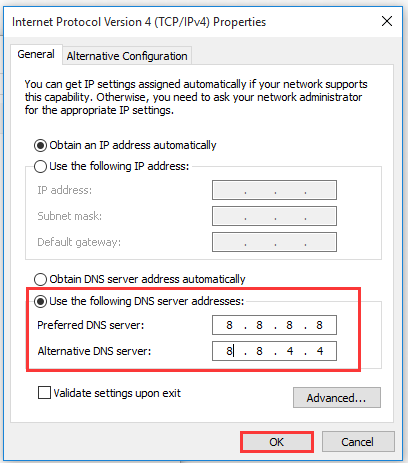
Internet Protocol Version 4 (TCP/IPv4) - From here, check the “Use the following DNS server addresses” and type in the following DNS addresses.
Primary DNS Address: 8.8.8.8

Secondary DNS Address: 8.8.4.4
- Restart your computer and check to see if doing so fixes the Warframe Error 10054.

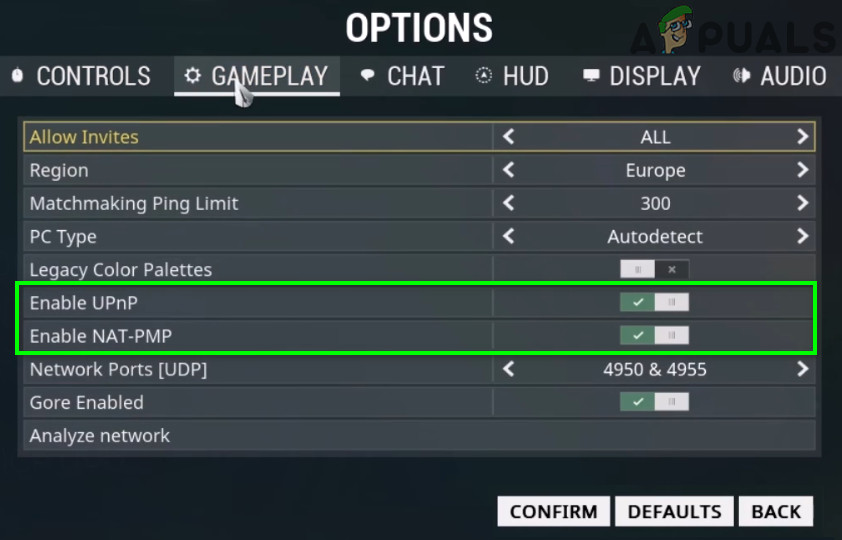
Fix 8: Disabling UPnP and NAT-PMP
UPnP (Universal plug n Play) and NAT-PMP (Port Mapping Protocol) are services of the network that helps devices and software to configure when both are connecting to a network.
- First, launch “Warframe” open the “menu” and go to “Option”.
- From the above tabs click on the “Gameplay” option.
- Now uncheck the “Enable UPnP” and uncheck the “Enable NAT-PMP” and click on “CONFIRM“.

Disabling UPnP and PMP - Restart Warframe and check to see if you have been able to fix the Warframe Error 10054.

Fix 9: Set up Static IP on Router
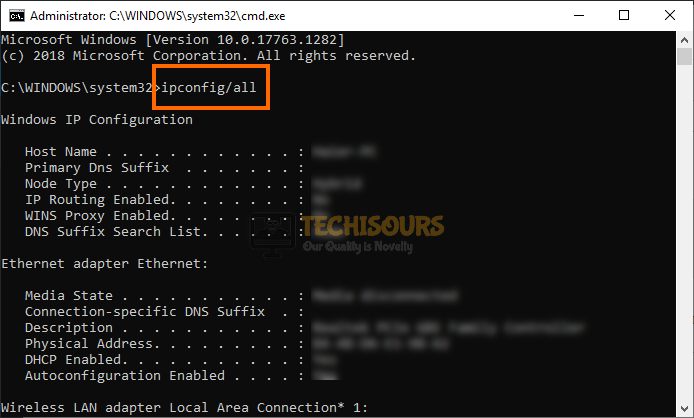
- Press “Windows + R” to launch the Run prompt and type in “cmd” to launch the command prompt.
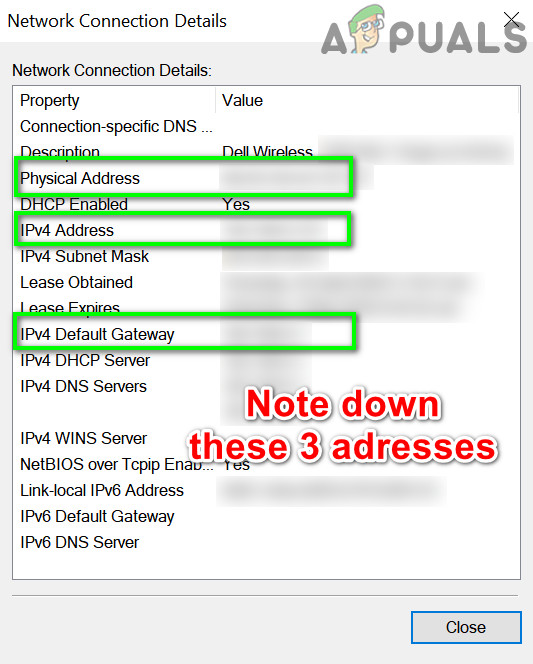
- Type in “ipconfig /all” and note down the Physical Address, IPV4 Address and the IPV4 Default Gateway Address.

ipconfig/all - Now, paste the IPV4 Address in your browser to open the login page of your router.
- Type in the “Username” and the “Password” to log in to the page. (NOTE: It can usually be found on the back of the router).
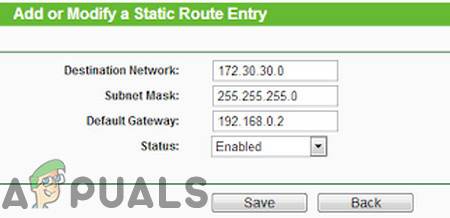
- Now in “Advanced Setup” look for “Address Reservation” or the “Static Route” option.
- After that fill up the information by typing the “Physical Address” and “IPv4 Address” in the given boxes and click on “Save”.
- At last open Warframe and check to see if the Warframe Error 10054 is fixed.
Fix 10: Disabling TCP/IP Using Regedit
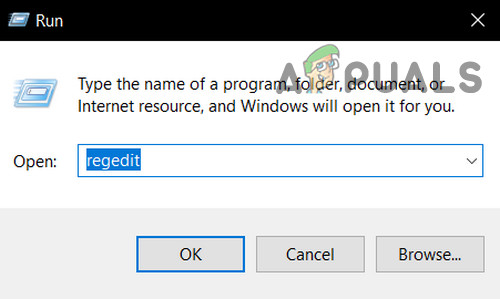
- Press “Windows + R” to launch into the Run prompt, type in “regedit” and press “Enter”.
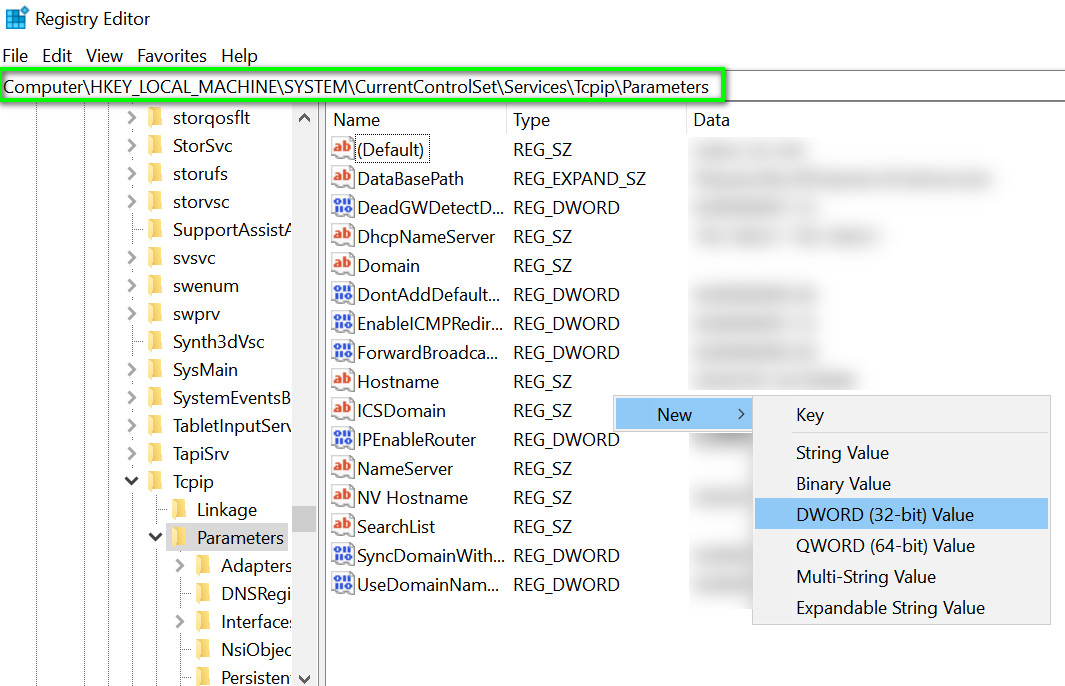
Typing “regedit” - Navigate through the following address in the registry editor:
HKEY_LOCAL_MACHINE\SYSTEM\CurrentControlSet\services\Tcpip\Parameter
- After that right-click on the empty area and then click on “New”, now choose “DWORD (32-bit) value”.
- You will see a new registry. Set its name to “TdxPrematureConnectIndDisabled” and set its value to “1”.
- Finally, restart your PC and see if the issue is resolved or not.

Fix 11: Router Settings & Port Forwarding
- First, enter the IP address of your router that we found in the 9th fix.
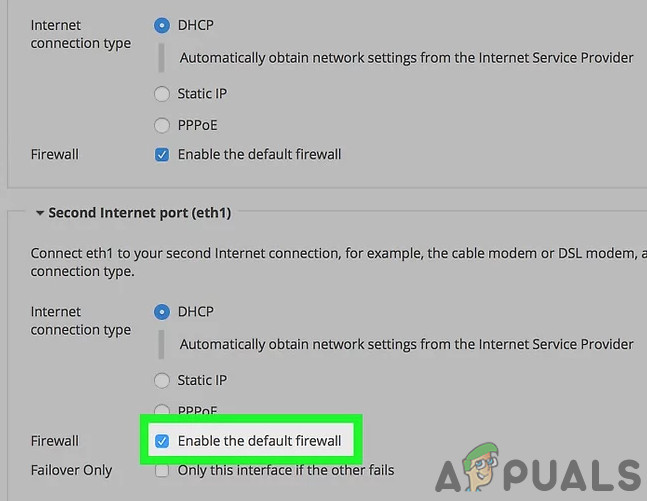
- Now go to the “Enable the default firewall” and disable it.
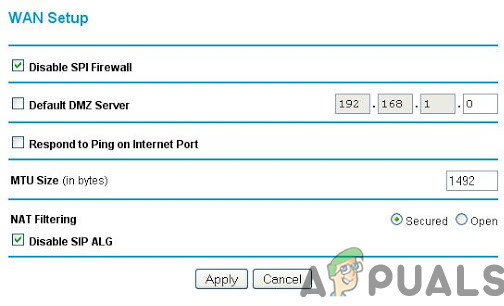
- Go to the “WAN Setup” and disable the “Disable SPI Firewall” option if your router supports Stateful Packet Inspection.
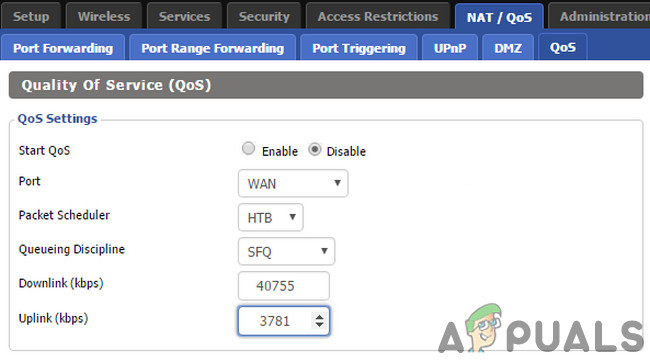
- After that, click on the “Advanced” tab and then select “Qos” and disable the “Start Qos”.
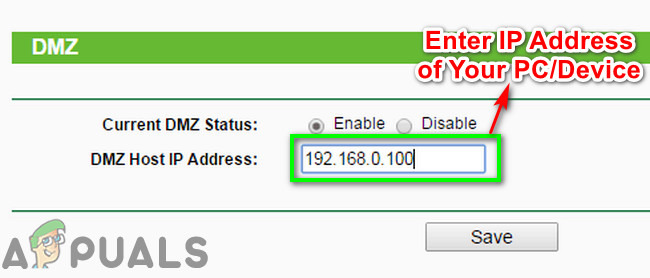
- Now click on “DMZ”
- If “Current DMZ Status “is enabled, “disable” it, and enter your PC IP in “DMZ Host IP Address” and click on “Save’.
- Finally, launch “Warfare” and check if the error is resolved.
- If after all this the issue still occurs, enter the IP address of your router on the browser and open the routers administrator page.
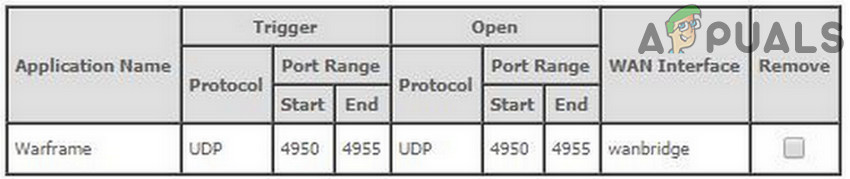
- Now click on “NAT” setup and open the “Port Triggering Setup”
- You will see some ports below. Make changes as mentioned,
UDPports: 4950 & 4955

TCP/UDP port: 443

TCP/UDP port range: 6695 to 6699
- Now open “WAN Settings” in your router and enable “SIP-ALG“, and if your router also has “IGMP Proxying” then you must enable it as well.
- Add the ports that are mentioned above in this method to your “Antivirus/Firewall”.
- Check that your router is not connected to another router if it is connected then use your modem in the bridge mode.
Fix 12: Update Router Firmware
- Launch into the Router’s Login page from the browser and log in with your credentials as we have done in the fixes above.
- From here, look for a firmware update option that should be present in the administrator’s region.
- Update your Firmware as per the instructions from your ISP and check to see if the Warframe Error 10054 is fixed.
If the Error has still not been fixed, contact us for further troubleshooting.

Alan is a hardcore tech enthusiast that lives and breathes tech. When he is not indulged in playing the latest video games, he helps users with technical problems that they might run into. Alan is a Computer Science Graduate with a Masters in Data Science.
Back to top button
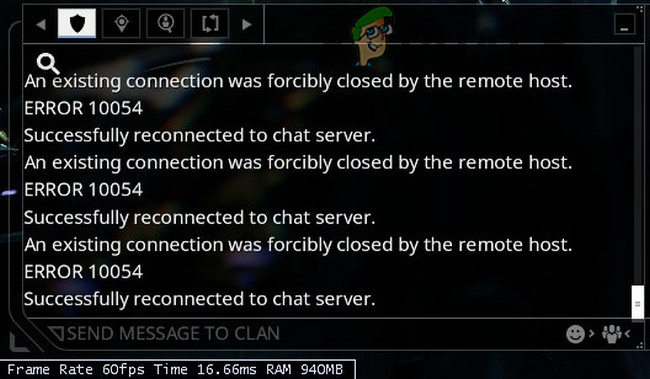
Ошибка Warframe 10054 может быть вызвана проблемами с маршрутизатором, интернет-провайдерами или игровыми сетевыми настройками. Warframe показывает ошибку 10054 с сообщением «Существующее соединение было принудительно закрыто удаленным хостом. ОШИБКА 10054.
Ошибка WarFrame 10054
Вы не сможете получать сообщения при возникновении этой ошибки. После повторного подключения после имени пользователя может отображаться «_1» (число может варьироваться в зависимости от того, как часто это отключение происходит с пользователем), и поэтому игроки не смогут приглашать пользователя на матчи. Это может стать большей проблемой в личных сообщениях / шепотах, так как пользователь не сможет увидеть, отправил ли ему кто-то сообщение. Вот некоторые общие обходные пути, которые вы должны попробовать, прежде чем переходить к подробным решениям:
- Чистая загрузка вашей системы, чтобы проверить, если другое приложение / драйвер создает проблему.
- Отключите антивирус и выключите брандмауэр, чтобы проверить, не создают ли они проблему. Не забудьте добавить Warframe.exe, Warframe.x64.exe и Launcher.exe в исключения антивируса / брандмауэра.
- Убедитесь, что вы не используете какой-либо тип прокси.
- Временно измените сеть, чтобы проверить, работает ли Warframe. Если это так, то проблема связана с вашим маршрутизатором или провайдером.
- Подключите вашу систему напрямую к модему / интернет-кабелю и проверьте, работает ли Warframe нормально. Если это так, то проблема связана с вашим маршрутизатором. В этом случае следуйте решениям в этой статье, связанным с настройками маршрутизатора.
Чтобы исправить / исправить чат в Warframe, следуйте приведенным ниже решениям:
Решение 1: переключите свой игровой регион
Ошибка 10054 может быть просто ошибкой связи между регионом вашей игры и серверами Warframe. Это можно просто проверить, просто перейдя в другой регион, а затем вернувшись обратно в свой регион.
- Откройте меню Warframe и нажмите «Опции».
Опции открытого варфрейма
- Затем перейдите на вкладку Gameplay и измените регион игры по своему вкусу.
- Теперь нажмите «Подтвердить», чтобы сохранить изменения.
Изменить свой игровой регион
- Теперь вернитесь в свой регион.
- Затем выйдите из меню Warframe и проверьте, нормально ли оно работает.
Решение 2. Включите IPv6 для игры, Windows и маршрутизатора
IPv6 (Интернет-протокол версии 6) является последней версией стандарта IP. Интернет-протокол – это протокол связи, который используется для обеспечения механизма идентификации и определения местоположения компьютеров в сетях и маршрутизации веб-трафика через Интернет. Warframe лучше связывается с IPV6. Включив этот протокол в игре, Windows и ваш роутер могут решить проблему.
- Запустите Warframe и откройте его меню.
- Теперь перейдите на вкладку Чат.
- Затем включите переключатель IPV6.
Включить IPV6 в Warframe
- Теперь включите IPV6 вашего ПК с Windows. Вы также можете включить IPv6 на вашем компьютере с Windows.
- Затем включите IPv6 в настройках вашего роутера.
- Теперь запустите Warframe и проверьте, нет ли ошибок.
Решение 3. Обновите сетевые настройки Windows
Если сетевые настройки вашей системы Windows повреждены или не оптимальны для Warframe, то это может вызвать текущую ошибку Warframe. В этом случае изменение / сброс этих настроек может решить проблему.
- Нажмите клавишу Windows и в поле поиска введите Командная строка. Затем в списке результатов щелкните правой кнопкой мыши командную строку и выберите «Запуск от имени администратора».
Запуск командной строки от имени администратора
- Введите следующие команды одну за другой и нажмите ввод после каждого onenetsh int ip reset c: resetlog.txtipconfig / release (пропустите, если вы используете статический IP).
ipconfig / renew (пропустите, если вы используете статический IP).
ipconfig / flushdns
netsh winsock reset
- Теперь перезагрузите вашу систему.
- После перезагрузки запустите Warframe и проверьте, работает ли он нормально.
Решение 4. Используйте Google DNS
DNS-сервер используется для перевода названия веб-сайта в IP-адрес их хостов. Если у вашего DNS-сервера возникают проблемы с запросом серверов Warframe, игра может выдать ошибку 10054. В этом случае использование DNS-сервера Google может решить эту проблему.
- Измените DNS-сервер на DNS от Google. Убедитесь, что вы вошли в систему как администратор.
- После смены DNS-сервера запустите Warframe и проверьте, нет ли в нем ошибки 10054.
источник: https://forums.warframe.com/topic/950444-error-10054/
Текущая ошибка Warframe может произойти из-за проблемы с вашей учетной записью. Вы можете проверить это, создав другую учетную запись Warframe. Но имейте в виду, что пользователю разрешено иметь несколько учетных записей, но ему запрещено торговать, дарить подарки или взаимодействовать между счетами. Если он это сделает, DE заблокирует оба своих аккаунта.
- Выйдите из своего текущего аккаунта Warframe.
- Создайте новую учетную запись Warframe.
- Теперь войдите в систему с новой учетной записью и проверьте, работает ли игра нормально.
Решение 6. Отключите UPnP и NAT-PMP в настройках игры
В игре могут быть разные параметры, которые могут вызвать обсуждаемую проблему. Изменение этих параметров может решить проблему.
- Откройте меню Warframe и нажмите «Опции».
- Затем перейдите на вкладку Gameplay.
- Теперь выключите переключатель Enable UPnP.
- Затем выключите переключатель Enable NAT-PMP.
Включить UPnP и NAT-PMP
- Теперь подтвердите, чтобы сохранить изменения.
- Затем выйдите из меню Warframe и проверьте, нормально ли оно работает.
Решение 7. Используйте статический IP-адрес в маршрутизаторе
Обычно схема IP домашней сети поддерживается автоматически с использованием DHCP. У этого есть свои преимущества, но связь Warframe использует IP-адрес вашего ПК, который может автоматически изменяться DHCP и, таким образом, вызывать проблему. В этом случае установка статического IP-адреса для вашего ПК может решить проблему.
- Нажмите клавишу Windows и в поле поиска введите Панель управления. Затем в списке результатов нажмите на панель управления.
Открытая панель управления
- Теперь откройте Просмотр состояния сети и задач.
Открыть Просмотр состояния сети и задач
- Затем в правой части окна нажмите на название вашего соединения (рядом с Соединениями).
Нажмите на название соединения
- Теперь нажмите на Детали.
Открыть детали вашего подключения
- Затем запишите свой шлюз по умолчанию IPV4, адрес IPV4 и физический адрес (MAC) вашего соединения.
Запишите детали своей сети
- Теперь откройте браузер и введите шлюз по умолчанию IPV4, который откроет страницу настроек вашего маршрутизатора.
- В расширенной настройке или DHCP (это будет зависеть от марки и модели вашего маршрутизатора), найдите Address Reservation (или что-то подобное).
- Затем введите вышеуказанный MAC-адрес и IPV4-адрес в соответствующие поля.
Добавить статический IP
- Затем примените и сохраните изменения.
- Теперь запустите Warframe и проверьте, работает ли он нормально.
Решение 8. Отключите UPnP / NAT-PMP / Strict NAT в маршрутизаторе
Универсальный Plug and Play (UPnP) – это сетевой протокол, который позволяет подключать проводные / беспроводные соединения к Интернету с минимальной конфигурацией. Но из-за открытого характера этого протокола у Warframe есть проблемы со связью при использовании этого протокола. Отключение UPnP может решить проблему, с которой вы сейчас столкнулись.
- Отключите UPnP вашего роутера. Если ваш маршрутизатор использует NAT-PMP, отключите его.
- Отключите строгий NAT, если он включен.
- Затем запустите Warframe и проверьте, работает ли он нормально.
Решение 9. Используйте Regedit для отключения TCP / IP
Протокол управления передачей по интернет-протоколу, обычно известный как TCP / IP, представляет собой набор правил, которые используются для соединения различных систем через Интернет. Если связанные с ним записи реестра Windows повреждены, то Warframe может выдать обсуждаемую ошибку. В этом случае отключение разделов реестра Windows, относящихся к TCP / IP вашего компьютера, может решить эту проблему.
- Нажмите клавиши Windows + R и введите Regedit.
Открыть Regedit
- Теперь перейдите по следующему пути:
HKEY_LOCAL_MACHINE SYSTEM CurrentControlSet Services Tcpip Parameters
- Щелкните правой кнопкой мыши в пустой области правой панели окна редактора реестра. Затем наведите курсор мыши на Новый и в подменю щелкните значение DWORD (32-разрядное).
Создать новое значение реестра DWORD в параметрах TCP / IP
- Назовите этот раздел реестра как TdxPrematureConnectIndDisabled, а затем измените его значение на 1.
- Теперь перезагрузите вашу систему.
- После перезагрузки запустите Warframe и проверьте, нормально ли он работает.
Решение 10. Измените настройки вашего маршрутизатора
Если настройки вашего маршрутизатора не настроены должным образом для Warframe, то Warframe может выдать текущую обсуждаемую ошибку. В этом случае изменение этих настроек может решить проблему. Проблема может быть вызвана межсетевым экраном вашего маршрутизатора, включенным QoS, отключенной DMZ
- Откройте страницу администратора вашего маршрутизатора.
- Перейдите на вкладку «Брандмауэр» (она может отличаться в зависимости от марки и модели вашего маршрутизатора) и отключите его (или установите на минимально возможное значение).
Отключите межсетевой экран вашего маршрутизатора
- Если ваш маршрутизатор поддерживает Stateful Packet Inspection (SPI), отключите его.
Отключить брандмауэр SPI
- Затем перейдите на вкладку «Дополнительно» (это может варьироваться в зависимости от марки и модели вашего маршрутизатора).
- Откройте настройку QoS и отключите ее.
Отключить QoS
- Перейдите к DMZ (опция будет отличаться в зависимости от марки и модели вашего маршрутизатора).
- Затем включите текущий статус DMZ и введите IP-адрес вашего ПК / консоли в поле IP-адрес хоста DMZ.
Введите IP-адрес вашего устройства в DMZ Host IP
- Сохраните изменения и перезагрузите маршрутизатор.
- Теперь запустите Warframe и проверьте, нет ли ошибок.
Если у вас все еще есть проблемы, то проблема может быть вызвана настройками NAT вашего маршрутизатора. NAT играет важную роль в переназначении пространства IP-адресов. Возможно, ваши настройки протокола NAT не настроены должным образом для Warframe и, следовательно, вызывают ошибку 10054. В этом случае настройка этих параметров может решить проблему.
- Откройте страницу администратора вашего роутера.
- Перейдите к настройке NAT и откройте настройку запуска порта.
- Зарегистрируйте порты, как указано на изображении ниже:
Настройки порта Warframe NAT
- Порты UDP: 4950 и 4955 (если вы изменили эти значения по умолчанию, используйте эти измененные значения).
- Диапазон портов TCP / UDP: от 6695 до 6699 (если 4950 и 4955 не работают в диапазоне портов, используйте их).
- Порт TCP / UDP: 443
- В настройках WAN вашего роутера: включите SIP-ALG или ALG. (Если ваш маршрутизатор имеет больше параметров, чем просто включить / отключить, включите все параметры)
- Если у вашего роутера есть опция IGMP Proxying, включите ее.
- Не забудьте также добавить эти порты в ваш антивирус / брандмауэр.
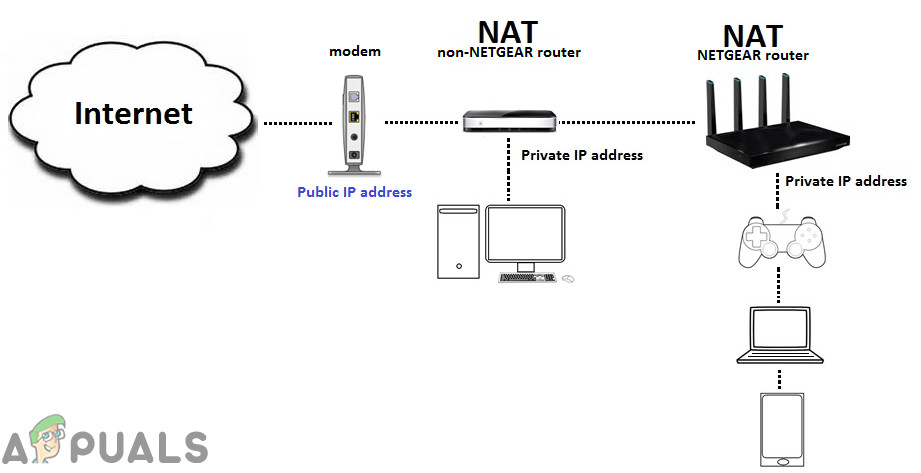
- Убедитесь, что ваша связь не ограничена двойным NAT (интернет-трафик проходит через модем и Wi-Fi, в то время как оба работают в качестве маршрутизаторов). Если так, то ухудшите ваш модем до режима моста.
Двойной NAT
Если у вас ничего не получилось, попробуйте остаться в региональном чате, если это не решено. Также вам следует обратиться к вашему провайдеру для решения проблемы. Если вы используете любую форму мобильного интернета, то, возможно, ваш трафик направляется через APN, так как эти интернет-провайдеры используют APN. Но эти APN запрещены NAT (изменение настроек NAT на вашем маршрутизаторе не повлияет на блокировку провайдера) и может вызвать проблему. Интернет-провайдер может предоставить вам APN, где NAT не запрещен (но обычно это не так).
-
Home
-
Partition Manager
- How to Fix Warframe Error 10054 – Here Are Top 5 Solutions
By Ariel | Follow |
Last Updated
Are you troubled by Warframe error 10054? This error is accompanied by the pop-up message “An existing connection was forcibly closed by the remote host. Error 10054”. Don’t worry. This post of MiniTool summarizes 5 solutions to fix the issue.
Solution 1. Adjust the In-Game Region
If there are any issues between the Warframe servers and your game’s region, you may encounter the error 10054. To get rid of the error, you can try changing your current region. Here’s how to do that:
Step 1. Locate to the Warframe Menu and click on Options from the left pane.
Step 2. Go to the Gameplay tab and click on Region from the listed options. Then select another region from the drop-down menu and click on the Confirm button.
Step 3. Revert back to your region.
Step 4. Close the Warframe Menu and see if error 10054 Warframe still persists.
Solution 2. Enable the IPv6 Internet
As you might know, IPv6 is the latest IP standard that provides an identification and location mechanism for your computers on routers and networks. With enabled IPv6 internet, Warframe can access its servers more quickly, which may fix Warframe chat not working. Follow the steps below to enable IPv6.
Step 1. Open the Warframe Menu again and navigate to the Chat tab.
Step 2. Navigate to the Ipv6 section and switch it on.
Step 3. Now, you need to enable IPv6 access on your Windows PC. Right-click the Network icon in the Notification Area and select Open Network and Sharing Center.
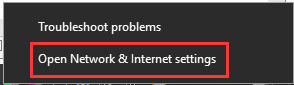
Step 4. Click on Change adapter options (Settings) in the pop-up window.
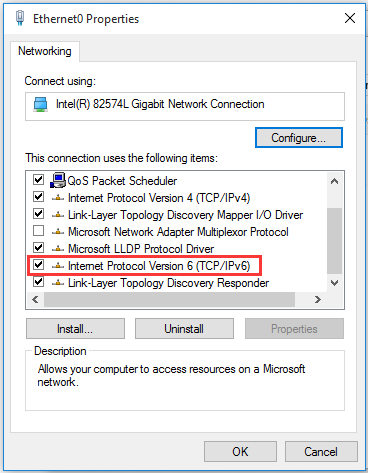
Step 5. Right-click the active network connection and select Properties from the pop-up window.
Step 6. Tick the checkbox next to Internet Protocol Version 6 (TCP/IPv6) and click on OK to save the changes.
After that, launch the program and check to see if the Warframe failed to connect to chat server issue has been fixed.
Solution 3. Switch to Google DNS
If there are any problems in querying the DNS server, then it may trigger the Warframe error 10054. Under this situation, you can try switching to the Google DNS server. Here’s how:
Step 1. Type control in the search box and select the Control Panel app.
Step 2. Change the View by to Category type and click on View network status and tasks.
Step 3. Click on Change adapter settings, and then right-click the network adapter and select Properties.
Step 4. Go to the Networking tab, and then select the Internet Protocol Version 4 (TCP/IPv4) and click on Properties.
Step 5. In the pop-up window, select Obtain an IP address automatically and Use the following DNS server addresses. Then enter 8.8.8.8 to replace the initial IP address for the Preferred DNS server and enter 8.8.4.4 for the Alternate DNS server. After that, click on OK to save the changes.
Now, launch the client and see if you get rid of the Warframe error 10054.
Solution 4. Refresh the Network Settings
It is reported that corrupt network settings of the Windows system can cause Warframe error 10054. To fix it, you can try resetting the network settings.
Step 1. Type cmd in the search box, and then right-click Command Prompt and select Run as administrator from the context menu.
Step 2. Type the following commands one by one and hit Enter after typing each one.
- netsh int ip reset c:resetlog.txt
- ipconfig /release (Skip if you are using static IP)
- ipconfig /renew (Skip if you are using static IP)
- ipconfig /flushdns
- netsh winsock reset
Step 3. Reboot your computer and see if error 10054 Warframe still persists.
Solution 5. Disable UPnP and NAT-PMP
Some users reported that disabling UPnP and NAT-PMP can help fix the Warframe error 10054. Here it’s worth having a try.
Step 1. Open the Warframe Menu and click on Options, and then navigate to the Gameplay tab.
Step 2. Toggle off the switch to Enable UPnP and Enable NAT-PMP.
Step 3. Click on Confirm to save the changes.

Now, check if the error 10054 Warframe is resolved or not.
About The Author

Position: Columnist
Ariel has been working as a highly professional computer-relevant technology editor at MiniTool for many years. She has a strong passion for researching all knowledge related to the computer’s disk, partition, and Windows OS. Up till now, she has finished thousands of articles covering a broad range of topics and helped lots of users fix various problems. She focuses on the fields of disk management, OS backup, and PDF editing and provides her readers with insightful and informative content.
Warframe is a free shooting game available to play on Windows, PS4, XBOX, and Nintendo. This multi-platform ability has given this game worldwide popularity. However, the gamers still face issues with this game. Warframe error 10054 is one of the common errors faced by these gamers who don’t know how to fix it. This error 10054 Warframe causes gamers to not receive any messages in their chat. Keep reading this article to know more about error 10054 an existing connection was forcibly closed by the remote host and fix it completely.
Table of Contents
Some of the reasons for this error arising on your PC are:
- The current game region may create complications with the game servers and game region.
- Faulty Windows game registry entries may instigate this error to arise.
- DNS querying issues can also be responsible for such Warframe errors.
- If the Windows registry entries for the TCP/IP protocols have glitches, this error can make its way to your PC screen.
Now, let us dive into the methods to fix Warframe login failed or error 10054.
Method 1: Basic Troubleshooting Steps
Let us first see the basic troubleshooting steps that can help you fix the said Warframe error. You should perform these steps before getting into more complex methods.
1. Restart PC
It is the very first step every PC user should perform after encountering any issues with the PC and software installed on it.
1. Press the Windows key to open the Start menu.
2. Click on the Power option.
3. Then, select the Restart option to reboot the PC.

2. Restart Router/Modem
Before troubleshooting the network, you should Restart router or modem to fix the configuration issues. After restarting the router or modem, the PC will connect to the network without any issues, which may fix Warframe error 10054 right there.

Method 2: Run Network Troubleshooter
Sometimes the network your PC is connected to may be having problems configuring correctly. So, in this case, the configuration issues can be solved with the help of network troubleshooting. You can run a network troubleshooter on your Windows PC and get rid of any network issues to fix the Warframe error 10054. Read and follow our guide on How to Troubleshoot Network Connectivity Problems on Windows 10 to understand the steps required to run the network troubleshooter on Windows PC.

Also Read: Fix Warframe Update Failed
Method 3: Switch Ingame Region
If there are communication issues between the game servers and game region, you may face this error 10054 Warframe. You can fix it by changing your Warframe in-game region. Follow the upcoming steps to do just that.
1. Open the Warframe game menu and click on Option from the list.

2. Click on the Gameplay tab.
3. Change the region from the Region option, as shown below.

4. Click CONFIRM from the bottom to save the change.

5. Relaunch the Warframe game to see if the issue has been fixed or not.
Method 4: Enable IPv6 for Game & Windows
Warframe performs better when Internet Protocol version 6 (IPv6) is enabled for the game and PC. Read and follow the steps below to enable it for both.
Option I: For Warframe Game
You can enable IPv6 in the Warframe game by following these steps.
1. Open the Warframe game menu and click on the Options menu.

2. Now, click on the Chat tab from the top, as shown.

3. Toggle on the switch for IPv6 from the list.

4. Restart the game to check if the issue is fixed or not.
Also Read: Fix AMD Error Windows Cannot Find Bin64 –Installmanagerapp.exe
Option II: For Windows
You can also enable the IPv6 from your Windows PC to fix the network issues which is causing the Warframe error 10054.
1. Press the Windows key, type Control Panel and click on Open.

2. Set View by > Category, then click on Network and Internet.

3. Click on Network and Sharing Center.

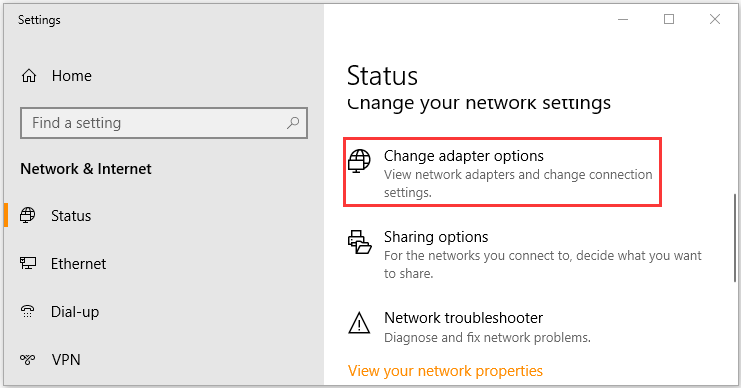
4. From the left panel, click on the Change adapter settings option.

5. Now, right-click on your active network adapter from the Network Connection window, as shown below.
6. Click on the Properties option.

7. Uncheck the checkbox for the Internet Protocol Version 6 in the list and click OK.

Method 5: Disable TCP/IP using Regedit
If the Windows registry entries for the TCP/IP protocols have glitches, the error 10054 an existing connection was forcibly closed by the remote host may arise on your PC. You can fix this by disabling the registry keys for the TCP/IP protocols with the help of upcoming steps.
1. Press Windows + R keys together to launch the Run dialog box.
2. Type regedit and press the Enter key to open Registry Editor.

3. Click on Yes in the User Account Control prompt.
4. Navigate to the following location path in the Registry Editor:
HKEY_LOCAL_MACHINE\SYSTEM\CurrentControlSet\services\Tcpip\Parameters

5. Right-click in the empty area from the right pane and click the New > DWORD (32-bit) Value options from the context menu.

6. Type TdxPrematureConnectIndDisabled in the name field and press Enter key.
7. Double click on the newly created value and change the value to 1 under the Value data field.

8. Restart your PC and see if the Warframe error 10054 has been fixed or not.
Also Read: Fix Warframe Launcher Update Failed Error
Method 6: Disable UPnP & NAT-PMP in Game Options
UPnP allows the Warframe game to configure minimally with the wired or wireless internet connections. But this can sometimes cause the game configuration issues. Follow the steps below to disable the UPnP and NAT-PMP settings in the Warframe game.
1. Open the Warframe game menu and click on Option from the list.

2. Click on the Gameplay tab.
3. Toggle off the Enable UPnP and Enable NAT-PMP switch options.

4. Click on the CONFIRM option from the bottom to save the changes you made.

5. Relaunch the game to see if the error 10054 Warframe is fixed or not.
Method 7: Use Google DNS
The Warframe error 10054 can transpire on your PC if DNS is having querying issues with the Warframe servers. In this case, the DNS server will not be able to fetch the IP address to the desired website, which will result in a communication failure between the two. This can be fixed by switching the current DNS server to the Google DNS server. Read and follow our guide on 3 Ways to change DNS settings on Windows 10 to learn how to switch to the Google DNS server and fix the said Warframe error.

Also Read: Fix Event 1000 Application Error in Windows 10
Method 8: Use Static IP Address
The Warframe game uses the IP address of your PC. So, if there is a configuration issue with the current Dynamic IP address, as it keeps changing. You can fix this by using the Static IP address for your PC to eventually also resolve the error 10054 an existing connection was forcibly closed by the remote host.
1. Type Command Prompt in the Windows search bar and click on the Run as administrator option.
2. Type the following commands one by one and press the Enter key after each command.
ipconfig /release
ipconfig /renew

3. Write down the IPv4 Address, Subnet Mask, and Default Gateway address.
4. Now, press Windows + R keys together to launch the Run dialog box.
5. Type ncpa.cpl, and press the Enter key from the keyboard.

6. Now, right-click on your network and click on the Properties option.

7. Select the Internet Protocol Version 4 (TCP/IPv4) field and click on Properties, as shown below.

8. Now, type the IPv4 Address, Subnet Mask, and Default Gateway address which you have noted down in Step 2.

9. Lastly, click on the OK option to save the changes.
Method 9: Reset Network Settings
From the start of this article, we have seen methods that are listed to fix the Windows network issues. This method also mentions the network settings. Sometimes, the corrupt Windows network settings can also create complications and produce the error 10054 Warframe. If you reset the current network settings, you may get this error fixed immediately. Follow our guide on How to Reset Network Settings on Windows 10 to learn how to reset the network settings step by step.

Also Read: Fix Network Error 0x00028001 on Windows 10
Method 10: Create New Warframe Account
If nothing has worked out for you to fix this Warframe error 10054, you can make a new Warframe account. Follow the upcoming steps to do that.
1. Visit the Warframe official website and click on the PLAY FREE NOW from the top right corner, as shown.

2. Click on the PC tab for the question: WHAT WILL YOU BE PLAYING ON?

3. Enter all the required fields and click on JOIN NOW.

4. You will receive a Registration email to complete the account registration. Open the email and click on the Registration link.
5. Now, open the Warframe game application on your PC.
6. Enter the new EMAIL and PASSWORD and click on LOGIN.

This way, you have created a new Warframe account and logged into it.
Recommended:
- How to Use .estrongs on Android
- Fix Overwatch Not Launching on Windows 10
- Fix Error Code 118 Steam in Windows 10
- Fix Elder Scrolls Online Stuck on Loading Screen
We hope you have understood the steps to fix Warframe error 10054 on Windows 10. You can drop your queries about this article and topic suggestions for future articles in the comments section below.
The Warframe Error 10054 can be caused because of issues with your router, ISPs’, or because of in-game network settings. Warframe shows Error 10054 with the message “An existing connection was forcibly closed by the remote host. ERROR 10054“.
You will not be able to get messages when this error occurs. Upon reconnecting, an ‘_1’ may show up after the user’s name (number may vary as it depends on how frequently this disconnection happens to a user) and thus players will not be able to invite the user into matches. This can become a bigger problem in private messages/whispers as the user will not be able to see if someone has sent a message to him. Here are some common workarounds which you should try before moving on with the detailed solutions:
- Clean boot your system to check if another application/driver is creating the issue.
- Disable your antivirus and turn off your firewall to check if they are creating the issue. Remember to add Warframe.exe, Warframe.x64.exe, and Launcher.exe to the antivirus/firewall exceptions.
- Make sure you are not using any type of proxy.
- Temporarily change your network to check if Warframe works fine. If so, then the issue is with your router or ISP.
- Connect your system directly to the modem/internet cable and check if Warframe is working fine. If so, then the issue is with your router. In that case, follow the solutions in this article related to the router’s settings.
To fix/repair chat in Warframe, follow the solutions below:
Solution 1: Switch Your In-Game Region
The error 10054 could be just a communication glitch between your game’s region and Warframe servers. It can be simply checked by simply changing to another region and then reverting back to your region.
- Open the Warframe menu and click on Options.

Open Warframe Options - Then navigate to the Gameplay tab and change the region of the game as per your liking.
- Now click on Confirm to save the changes.

Change Your In-game Region - Now revert to your region.
- Then exit the Warframe menu and check if it is operating fine.
Solution 2: Enable IPv6 for the Game, Windows, and Router
IPv6 (Internet Protocol version 6) is the latest version of the IP standard. The Internet Protocol is the communications protocol that is used to provide an identification and location mechanism for computers on networks and routes web traffic across the Internet. Warframe communicates better with IPV6. Enabling this protocol in the game, Windows and your router may solve the problem.
- Launch Warframe and open its menu.
- Now navigate to the Chat tab.
- Then toggle the switch of IPV6 to enable.

Enable IPV6 in Warframe - Now enable IPV6 of your Windows PC. You can also enable IPv6 on your Windows computer.
- Then enable IPv6 in your router’s settings.
- Now launch Warframe and check if it is clear of the error.
Solution 3: Refresh Windows Network Settings
If network settings of your Windows system are corrupt or are non-optimal for Warframe, then it can cause the current Warframe error. In that case, changing/resetting these settings may solve the problem.
- Press Windows key and in the search box, type Command Prompt. Then in the results list, right-click on Command Prompt and click on Run as Administrator.

Running Command Prompt as an administrator - Type the following commands one by one and press enter after each one
netsh int ip reset c:\resetlog.txt

ipconfig /release (Skip if you are using static IP).

ipconfig /renew (Skip if you are using static IP).

ipconfig /flushdns

netsh winsock reset
- Now restart your system.
- Upon restart, launch Warframe and check if it is working fine.
Solution 4: Use Google DNS
DNS server is used to translate the name of the website to the IP address of their hosts. If your DNS server is having issues in querying the Warframe servers, then the game may throw the error 10054. In that case, using the Google DNS server may solve the problem.
- Change the DNS server to Google’s DNS. Make sure that you are logged in as an administrator.
- After changing the DNS server, launch Warframe and check if it is clear of the error 10054.
Solution 5: Create a New WarFrame Account
The current Warframe error could be happening due to an issue with your account. You can check that by creating another Warframe account. But keep in mind that a user is allowed to have multiple accounts but he is forbidden from trading, gifting, or interacting between the accounts. If he does, then DE will ban both of his accounts.
- Sign-out of your current Warframe account.
- Create a new Warframe account.
- Now sign-in with the new account and check if the game is working fine.
Solution 6: Disable UPnP and NAT-PMP in Game Options
There can be different in-game options that can cause the issue under discussion. Changing these options may solve the problem.
- Open the Warframe menu and click on Options.
- Then navigate to the Gameplay tab.
- Now toggle off the switch of Enable UPnP.
- Then toggle off the switch of Enable NAT-PMP.

Enable UPnP and NAT-PMP - Now confirm to save the changes.
- Then exit the Warframe menu and check if it is working fine.
Solution 7: Use Static IP in the Router
Usually, the IP scheme of the home network is maintained automatically by the use of DHCP. It has its advantages, but Warframe communication uses the IP address of your PC, which can change automatically by DHCP and thus cause the issue. In that case, setting a static IP address for your PC may solve the problem.
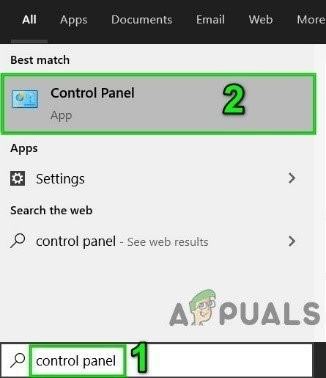
- Press Windows key and in the search box, type Control Panel. Then in the list of results, click on Control Panel.

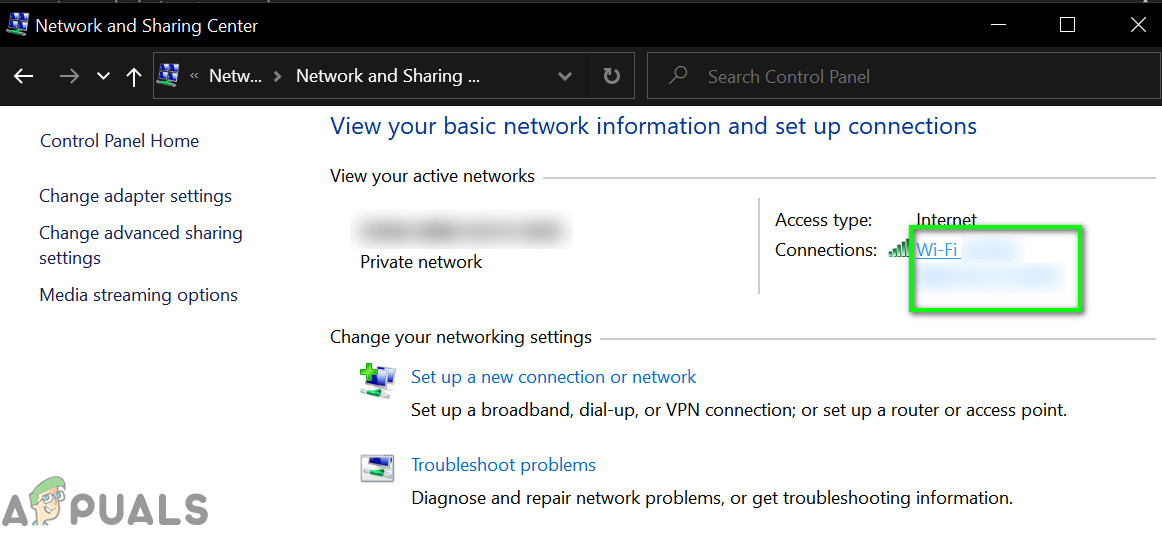
Open Control Panel - Now open View network status and tasks.

Open View Network Status and Tasks - Then in the right pane of the window, click on your connection name (just beside the Connections).

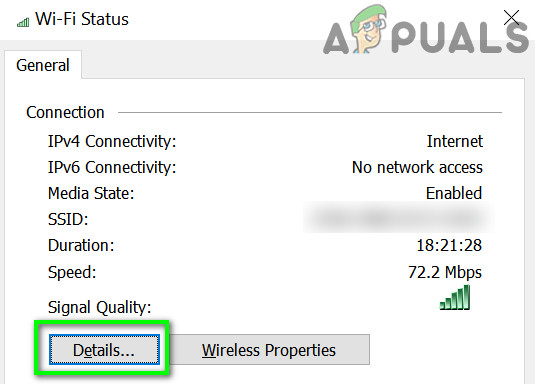
Click on the Connection Name - Now click on Details.

Open Details of Your Connection - Then note down your IPV4 Default Gateway, IPV4 address, and physical address (MAC) of your connection.

Note down your network details - Now open your browser and type in your IPV4 Default Gateway, which will open your router’s settings page.
- In the advanced setup or DHCP (this will vary depending on make and model of your router), find Address Reservation (or something similar).
- Then type the above-noted MAC address and IPV4 address in the relevant fields.

Add Static IP - Then apply and save the changes.
- Now launch Warframe and check if it is working fine.

Solution 8: Disable UPnP/ NAT-PMP/Strict NAT in the Router
Universal Plug and Play (UPnP) is a networking protocol that allows communication of wired/wireless connections to the internet with minimal configuration. But due to the open nature of this protocol, Warframe has communication issues in using this protocol. Disabling UPnP can solve the issue you are currently facing.
- Disable UPnP of your router. If your router uses NAT-PMP, then disable it as well.
- Disable the strict NAT if enabled.
- Then launch Warframe and check if it is working fine.
Solution 9: Use Regedit to Disable TCP/IP
Transmission control protocol over internet protocol commonly known as TCP/IP is a set of rules that are used to interconnect different systems over the internet. If the Windows registry entries relating to it are corrupt, then Warframe can throw the error under discussion. In that case, disabling the Windows registry keys relating to TCP/IP of your PC can solve the issue.
- Press Windows+R keys and type Regedit.

Open Regedit - Now navigate to the following path:
HKEY_LOCAL_MACHINE\SYSTEM\CurrentControlSet\services\Tcpip\Parameters
- Right-click in the empty area of the right pane of the registry editor window. Then hover over New and in the sub-menu click on DWORD (32-bit) value.

Create New DWORD Registry Value in TCP /IP Parameters - Name this registry key as TdxPrematureConnectIndDisabled and then change its value to 1.
- Now restart your system.
- Upon restart, launch Warframe and check if it is operating fine.
Solution 10: Change Your Router Settings
If your router settings are not configured properly for Warframe, then Warframe may throw the current error under discussion. In that case, changing these settings may solve the problem. The issue can be caused by your router’s firewall, enabled QoS, disabled DMZ
- Open your router’s administrator page.
- Navigate to the Firewall tab (this may differ as per make and model of your router) and switch it off (or set to the lowest setting possible).

Disable Your Router’s Firewall - If your router supports Stateful Packet Inspection (SPI), then disable it as well.

Disable SPI Firewall - Then navigate to the Advanced tab (this may vary as per make and model of your router).
- Open QoS setup and Disable it as well.

Disable QoS - Navigate to DMZ (option will be different depending upon the make and model of your router).
- Then enable the current DMZ Status and enter the IP address of your PC/console in the DMZ Host IP address box.

Enter the IP Address of Your Device in DMZ Host IP - Save your changes and reboot your router.
- Now launch Warframe and check if it is clear of the error.
If you are still having issues then the issue could be caused by the NAT settings of your router. NAT plays a vital role in remapping an IP address space. Maybe your NAT protocol settings are not configured properly for Warframe and thus causing the error 10054. In that case, configuring these settings may solve the problem.
- Open the administrator page of your router.
- Go to the NAT setup and open port triggering setup.
- Register the ports as mentioned in the image below:

Warframe NAT Port Settings - UDP ports: 4950 & 4955 (if you have changed these Warframe defaults, then use those changed values).
- TCP/UDP port range: 6695 to 6699 (if 4950 & 4955 are not working in the port range, then use these).
- TCP/UDP port: 443
- In your router WAN settings: Enable SIP-ALG or ALG. (If your router has more options than just enable/disable, then enable all the options)
- If your router has the option of IGMP Proxying, then enable it.
- Remember to add these ports to your antivirus/firewall as well.
- Make sure your communications are not limited by double NAT (internet traffic going through modem and Wi-Fi while both work as routers). If so, then degrade your modem to bridge mode.

Double NAT
If nothing has worked for you, then try to stay in the region chat unless it is solved. Also, you should contact your ISP to solve the issue. If you are using any form of mobile internet, then maybe your traffic is being routed through APN as these ISPs use APNs. But these APNs are NAT prohibited (changing NAT settings on your router will not affect the ISP’s blockage) and thus can cause the issue. ISP can provide you with an APN where NAT is not prohibited (but usually they do not).

Kevin Arrows
Kevin Arrows is a highly experienced and knowledgeable technology specialist with over a decade of industry experience. He holds a Microsoft Certified Technology Specialist (MCTS) certification and has a deep passion for staying up-to-date on the latest tech developments. Kevin has written extensively on a wide range of tech-related topics, showcasing his expertise and knowledge in areas such as software development, cybersecurity, and cloud computing. His contributions to the tech field have been widely recognized and respected by his peers, and he is highly regarded for his ability to explain complex technical concepts in a clear and concise manner.