На чтение 3 мин. Просмотров 10.5k. Опубликовано
Сообщение об ошибке 0xC0000188 – это ошибка, специфичная для Windows, которая обычно встречается в современных версиях Windows, особенно в Windows 7, Windows 8/8.1 и Windows 10. Она в основном связана с программой просмотра событий на уязвимом ПК, которая обеспечивает контроль ошибок , действия и приложения, работающие на вашем компьютере.
Для решения этой проблемы и восстановления вашего прежнего (нормального) рабочего состояния ПК решения этого руководства покажут вам несколько обходных путей, особенно те, которые можно применять в Windows 10. Читайте дальше!
Как исправить ошибку 0xC0000188? Эта проблема может возникнуть, если служба Superfetch не запущена, поэтому обязательно включите ее, установив для параметра Тип запуска значение Автоматически. Если это не сработает, запустите командную строку и запустите сканирование DISM или попробуйте запустить компьютер в состоянии чистой загрузки.
Содержание
- Как я могу исправить ошибку 0xC0000188 Windows 10?
- 1. Включите службу Superfetch
- 2. Запустите DISM Health Scan
- 3. Запустите компьютер в чистом состоянии загрузки
Как я могу исправить ошибку 0xC0000188 Windows 10?
- Включить службу Superfetch
- Запустите проверку работоспособности DISM
- Запустите компьютер в состоянии чистой загрузки
1. Включите службу Superfetch
Если вы столкнулись с ошибкой 0xC0000188, в первую очередь необходимо проверить, включена ли служба Superfetch. В случае, если он отключен, вам не нужно смотреть дальше, так как отключенная служба, вероятно, является причиной ошибки. В этом случае окончательное решение – просто включить его.
Чтобы включить службу Superfetch в Windows 10, следуйте приведенным ниже инструкциям.
- На рабочем столе вашего ПК нажмите клавиши Windows Key + R , чтобы открыть диалоговое окно «Выполнить».
-
В поле введите services.msc и нажмите Enter. . Откроется окно Услуги .

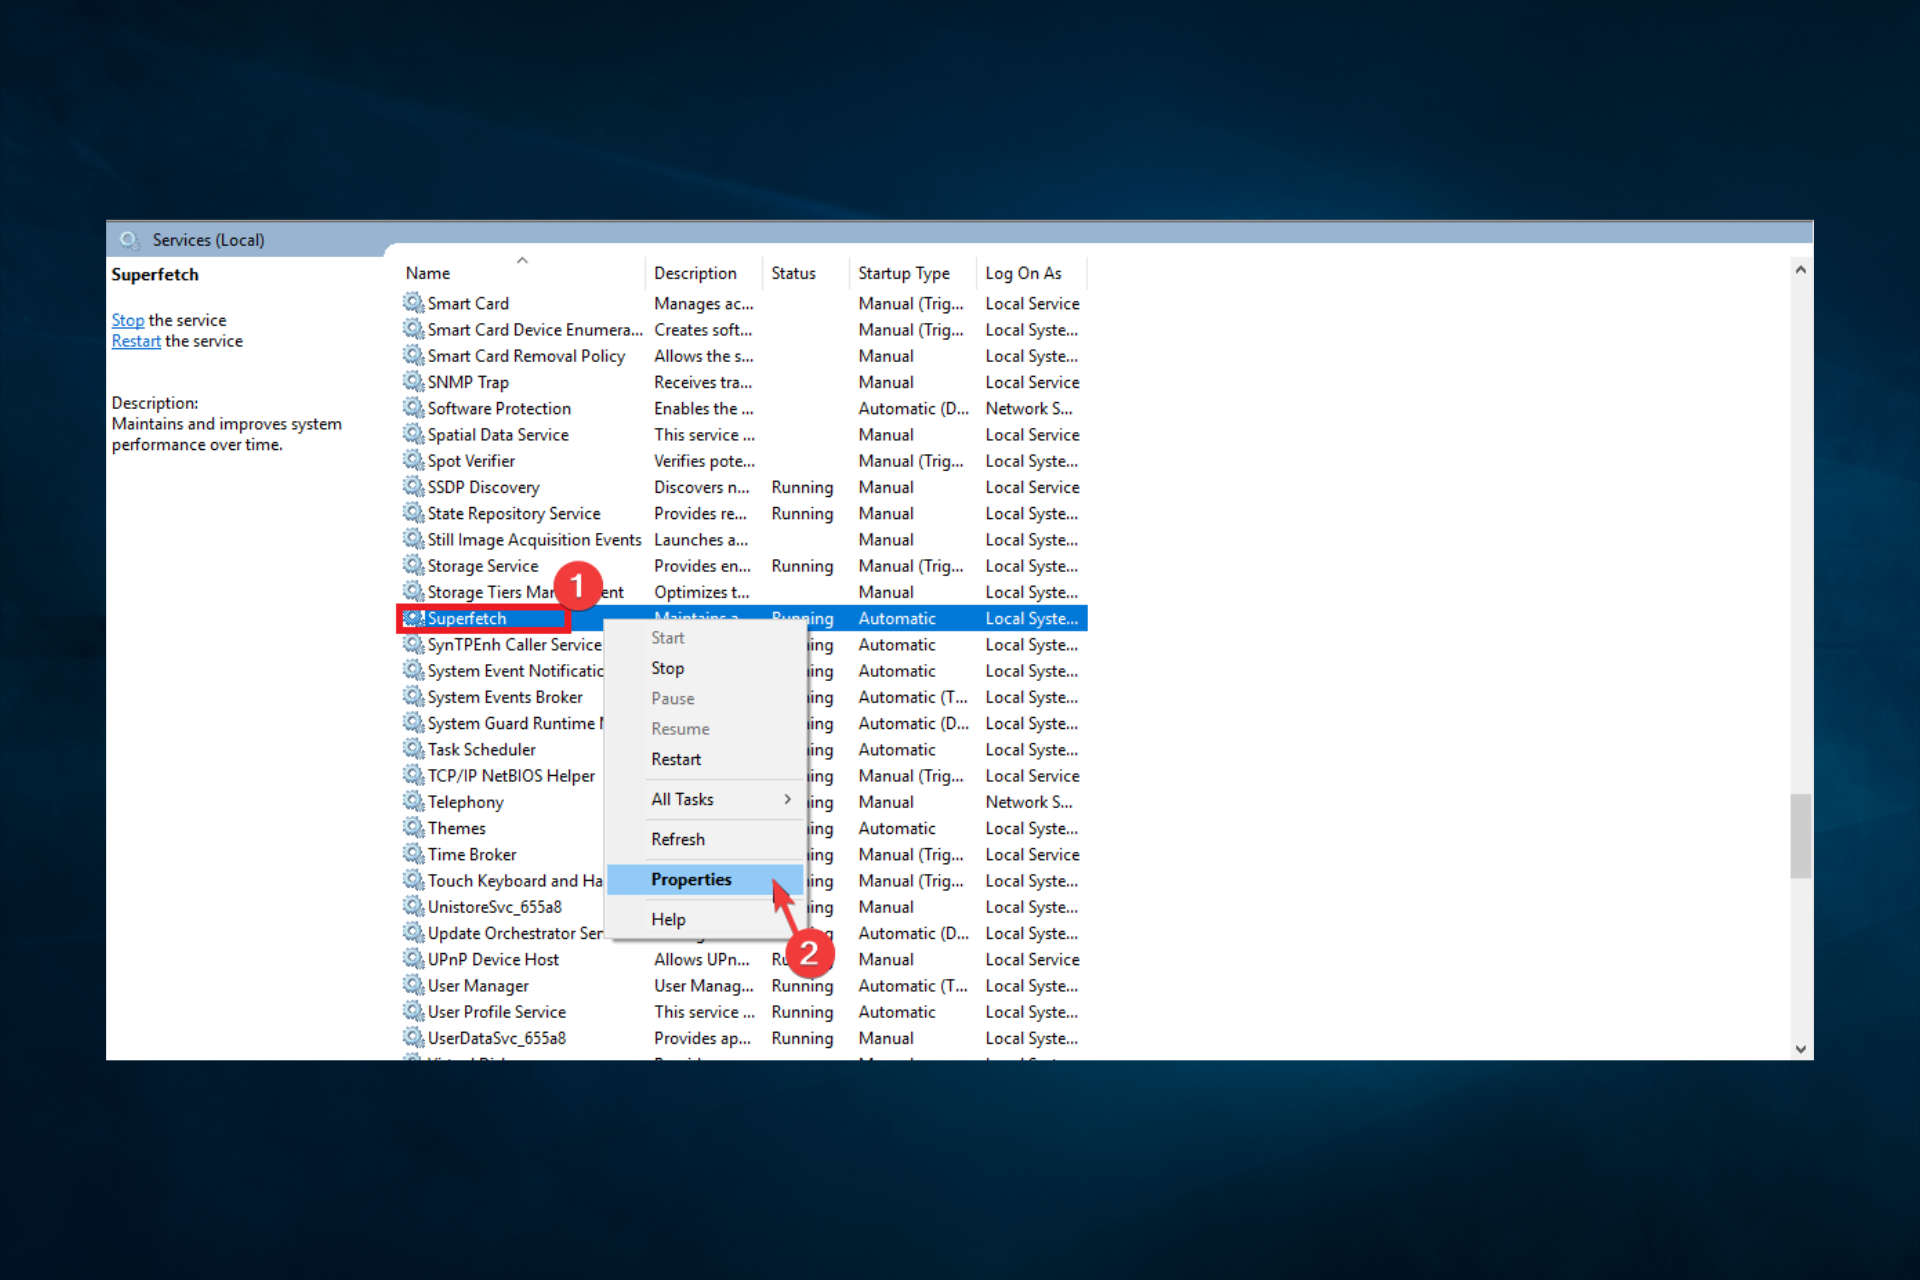
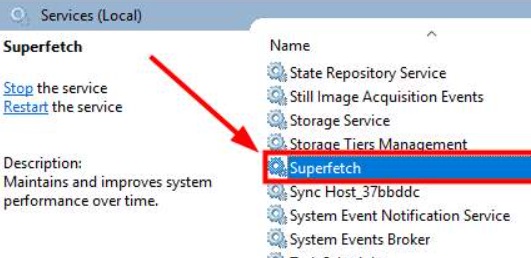
- Найдите и щелкните правой кнопкой мыши службу Superfetch .
-
В отображаемых параметрах выберите Свойства .
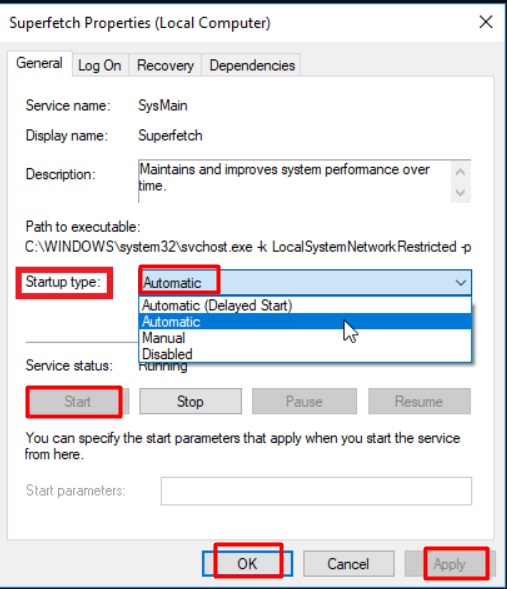
-
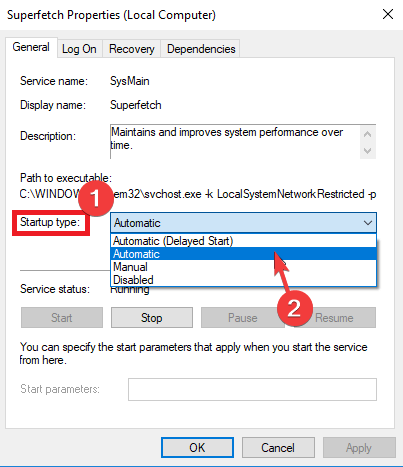
Перейдите в подраздел Тип запуска и установите для него значение Автоматически .
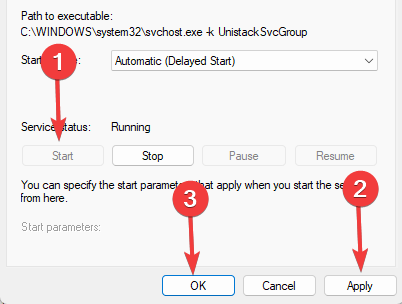
- Нажмите ОК в нижней части окна.
- Нажмите Пуск , чтобы запустить службу (если она работает в данный момент, просто перейдите к следующему шагу).
- Нажмите Применить> ОК.
- Выйдите из программы и перезагрузите компьютер.


Как только это будет сделано, сообщение об ошибке должно перестать появляться на вашем компьютере. Однако, если ошибка остается нефиксированной, просто попробуйте следующее решение.
- ЧИТАЙТЕ ТАКЖЕ : как исправить проблемы Legacy Boot в Windows 10
2. Запустите DISM Health Scan
В случае, если ошибка 0xC0000188 вызвана набором поврежденных системных файлов, вы можете попробовать выполнить команду DISM через командную строку.
Чтобы запустить этот процесс, выполните действия, описанные ниже:
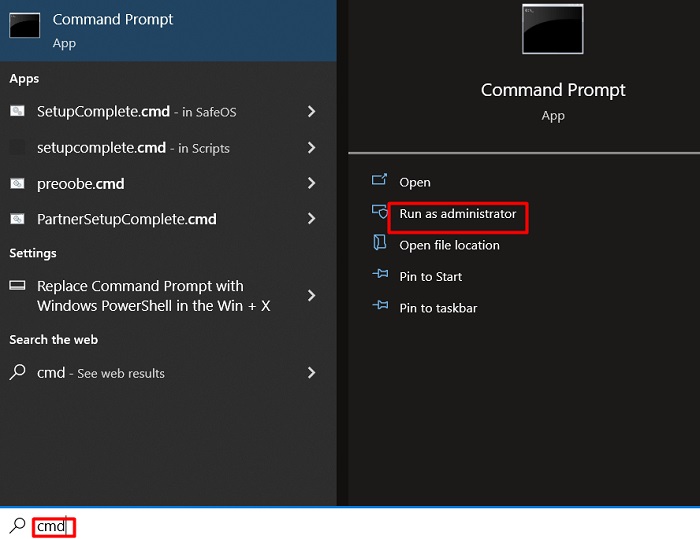
- В окне рабочего стола нажмите значок Windows , чтобы открыть Пуск.
-
В меню «Пуск» введите CMD и щелкните правой кнопкой мыши CMD .
- Выберите Запуск от имени администратора .
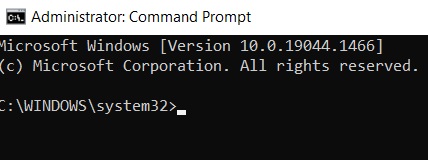
-
В окне командной строки введите следующие командные клавиши: DISM.exe/Online/Cleanup-image/Scanhealth , а затем нажмите клавишу Ввод .
-
Теперь введите DISM.exe/Online/Cleanup-image/Restorehealth и нажмите клавишу Ввод .
- Выйдите из командной строки и перезагрузите компьютер.


После того, как вы успешно перезагрузили систему, проверьте, решена ли проблема. Если нет, вы можете попробовать следующее исправление.
3. Запустите компьютер в чистом состоянии загрузки
Запуск чистой загрузки помогает определить, вызвана ли ошибка 0xC0000188 сторонней программой. Чтобы проверить и устранить эту проблему в чистом состоянии загрузки, следуйте инструкциям, изложенным ниже:
- Откройте окно Выполнить .
-
В поле «Выполнить» введите msconfig и нажмите Enter . Вы попадете в окно Конфигурация системы .
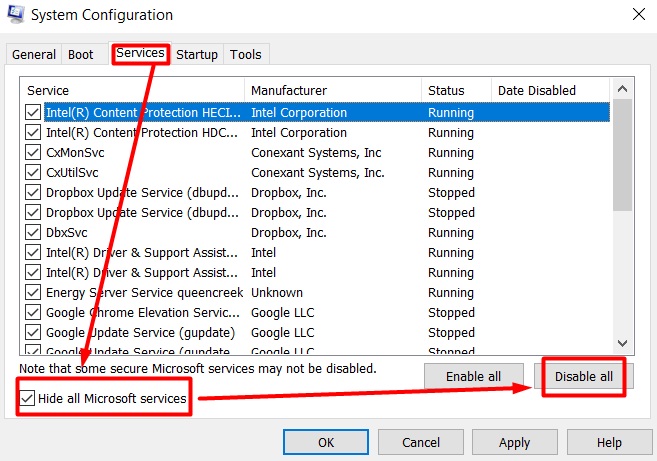
- Перейдите в раздел Услуги ; найдите и выберите Скрыть все службы Microsoft .
-
Найдите и нажмите Отключить все .
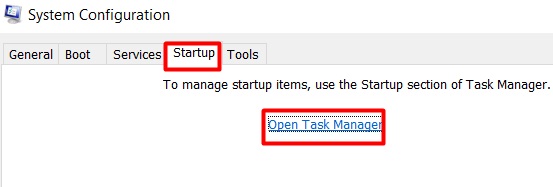
- Перейдите в раздел «Автозагрузка»; найдите и нажмите Открыть Диспетчер задач .
-
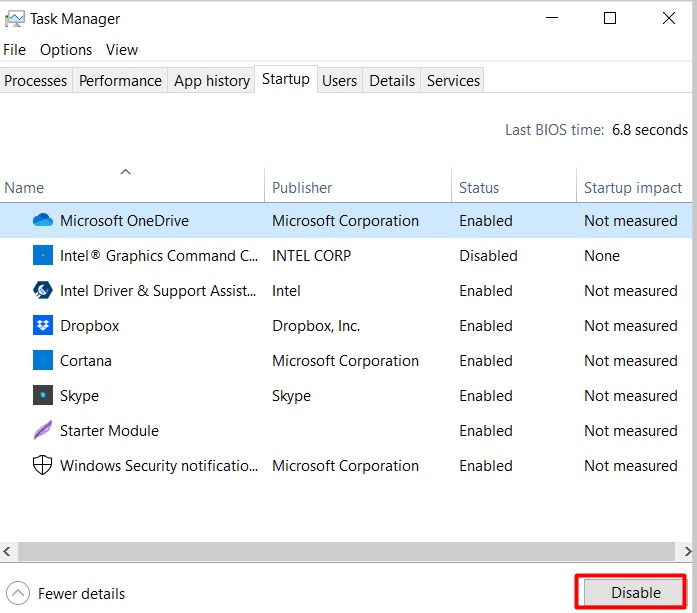
Отключите все элементы автозагрузки на вкладке Автозагрузка .
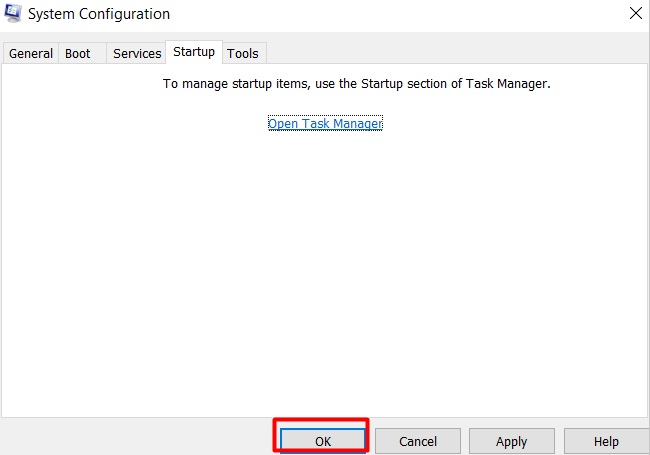
- Нажмите ОК , чтобы завершить процесс.
- Выйдите из программы и перезапустите вашу систему.


Ошибка 0xC0000188 может быть проблематичной, но мы надеемся, что вам удалось исправить ее после использования одного из наших решений.
Enabling Superfetch mostly will be effective
by Ivan Jenic
Passionate about all elements related to Windows and combined with his innate curiosity, Ivan has delved deep into understanding this operating system, with a specialization in drivers and… read more
Updated on
- Note that this error will be triggered for most users if the Superfetch Service is disabled.
- The error will mostly be evident on the Event Viewer but can be fixed using some easy solutions highlighted in this guide.
XINSTALL BY CLICKING THE DOWNLOAD FILE
To fix Windows PC system issues, you will need a dedicated tool
SPONSORED
Fortect is a tool that does not simply clean up your PC, but has a repository with several millions of Windows System files stored in their initial version. When your PC encounters a problem, Fortect will fix it for you, by replacing bad files with fresh versions. To fix your current PC issue, here are the steps you need to take:
- Download Fortect and install it on your PC.
- Start the tool’s scanning process to look for corrupt files that are the source of your problem
- Right-click on Start Repair so the tool could start the fixing algorythm
- Fortect has been downloaded by 0 readers this month, rated 4.4 on TrustPilot
The error message 0xC0000188 is a Windows-specific error commonly encountered on modern Windows versions, notably Windows 10.
It is associated with an affected PC’s Event Viewer, which oversees errors, activities, and apps running on your PC. The complete error message writes Session ‘Circular Kernel Context Logger’ Stopped Due to the Following Error: 0xc0000188.
What causes the 0xc0000188 error?
People who have encountered this error code have remarked on various triggers. From our research, on top of this list are the following:
- Superfetch configuration – Windows’ built-in Superfetch function automatically loads your most frequently used programs ahead of time. If Superfetch is disabled, you may get the 0xc0000188 error code.
- Startup Event problems – In some cases, if the max File Size of your Startup Event Trace Sessions is small, the error may be triggered.
This error appears in more apps so you may find it as Session perfdiag logger stopped due to the following error: 0xc0000188 or as Session readyboot stopped due to the following error: 0xc0000188.
However, all of these errors will be fixed by following the solutions below.
How can I fix error 0xc0000188?
- What causes the 0xc0000188 error?
- How can I fix error 0xc0000188?
- 1. Enable the Superfetch Service
- 2. Expand the maximum file size for Startup Event Trace Sessions
- 3. Run DISM and SFC scans
- 4. Run PC in Clean Boot State
1. Enable the Superfetch Service
- Press the Windows + R keys on your PC’s desktop window to open the Run dialog box.
- In the box, type in services.msc and press Enter.

- Locate and right-click on the Superfetch service, and on the displayed options, select Properties.

- Go under the Startup type subsection and set it to Automatic.

- Click on Start to run the service (if it’s currently running, move to the next step), then click on Apply and OK.

- Exit the program and reboot your PC.


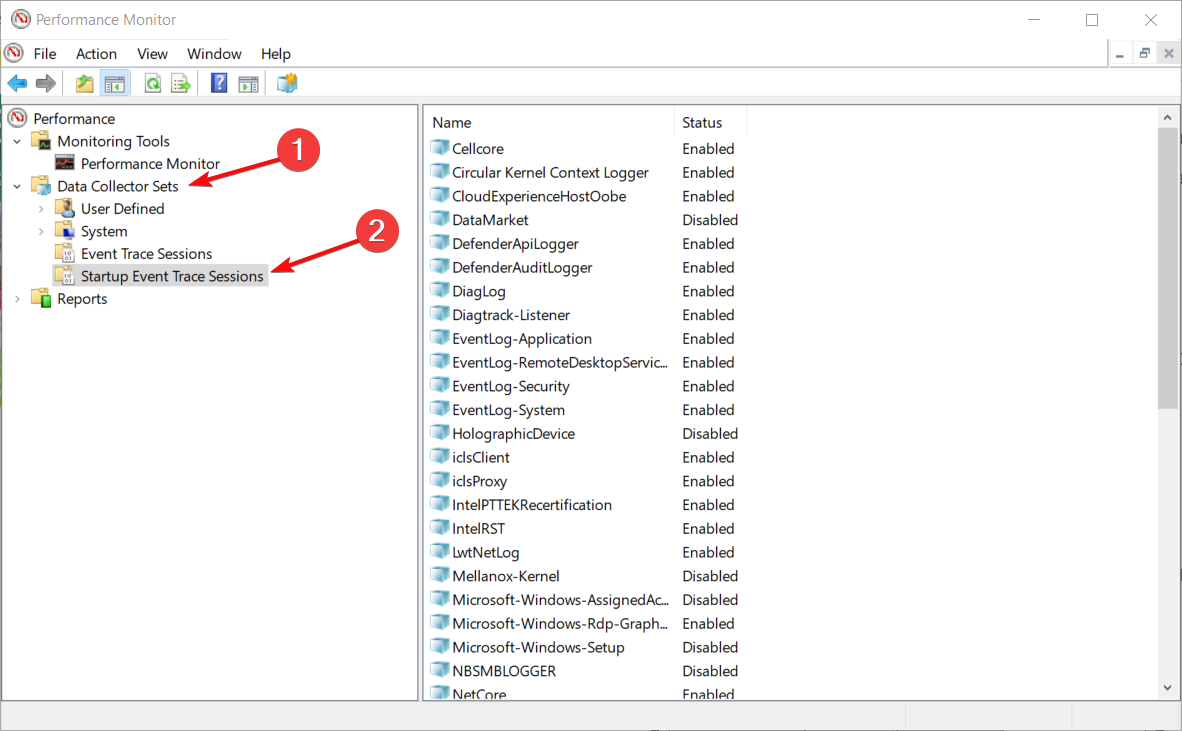
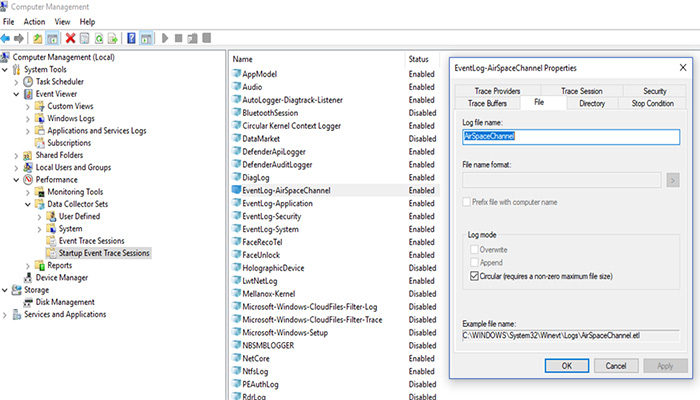
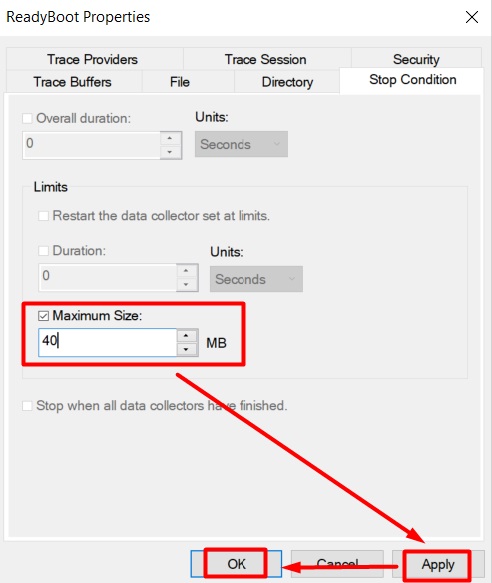
2. Expand the maximum file size for Startup Event Trace Sessions
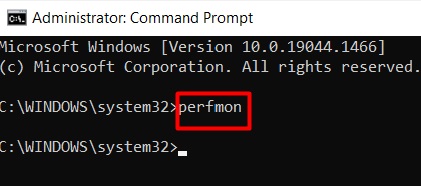
- Click the Start button, type cmd, and click on Run as administrator to start Command Prompt with full privileges.
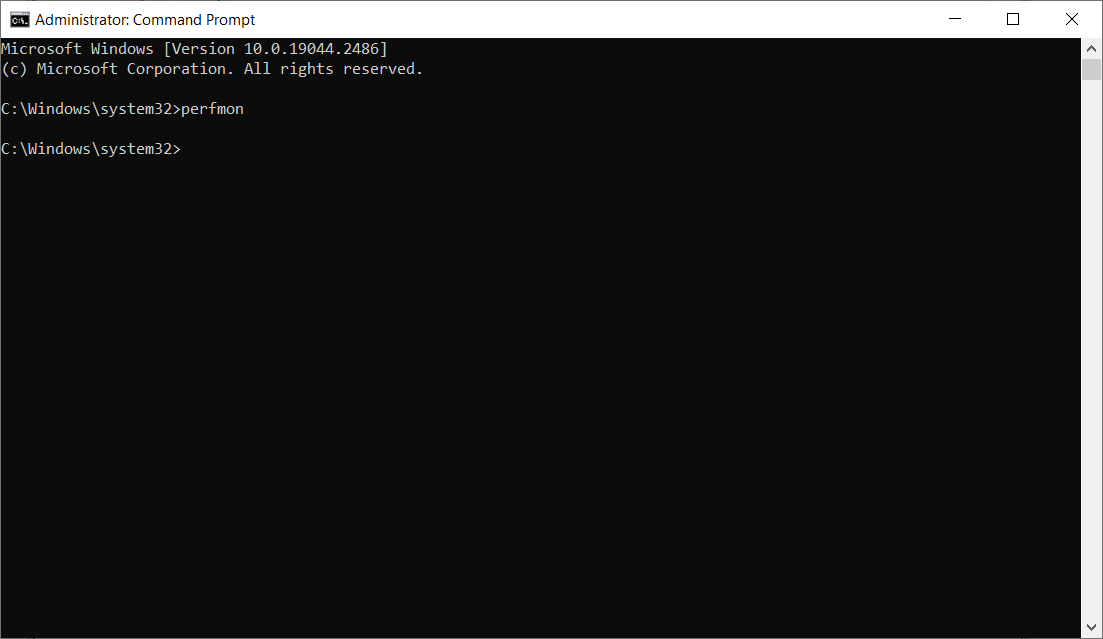
- Type the following command and press Enter to start the Performance Monitor app:
perfmon
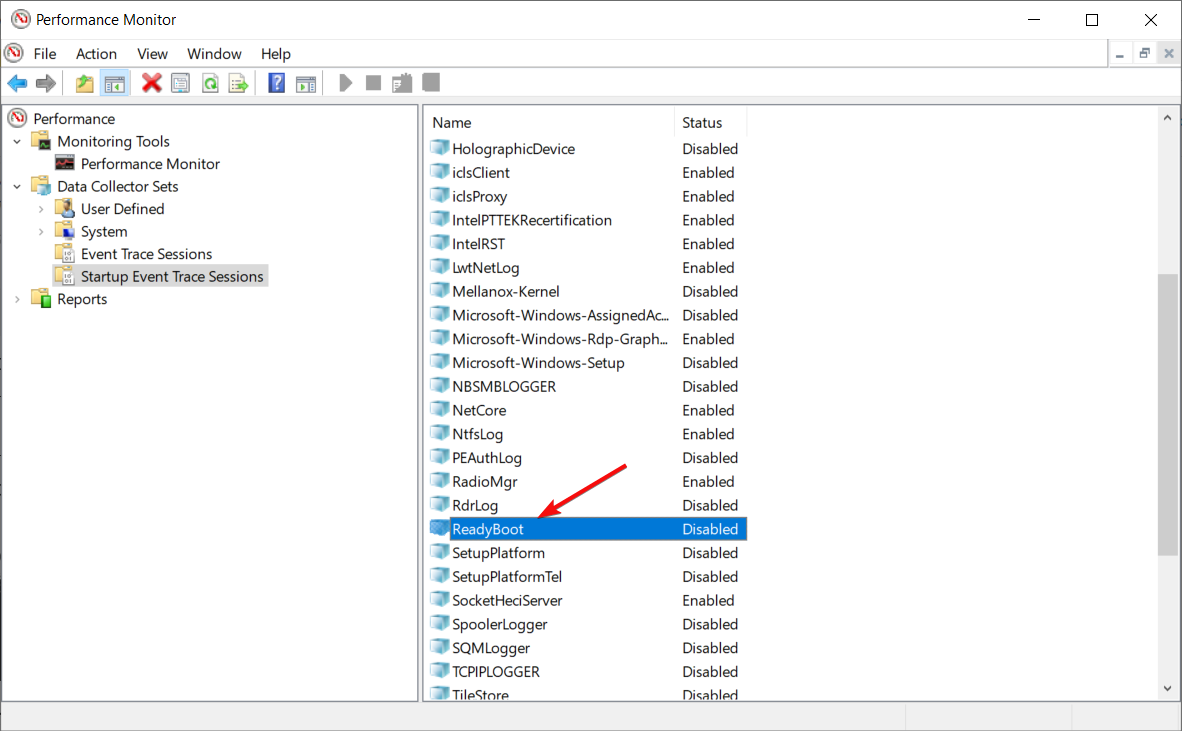
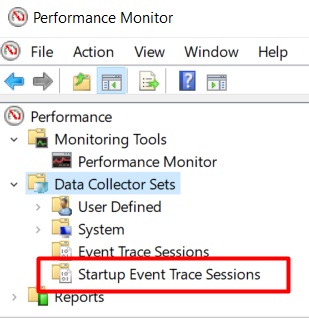
- Double-click on the Data Collector Sets to expand it, then select Startup Event Trace Sessions.

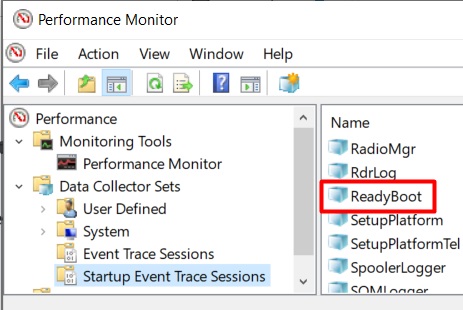
- Now, double-click Ready Boot from the right pane.
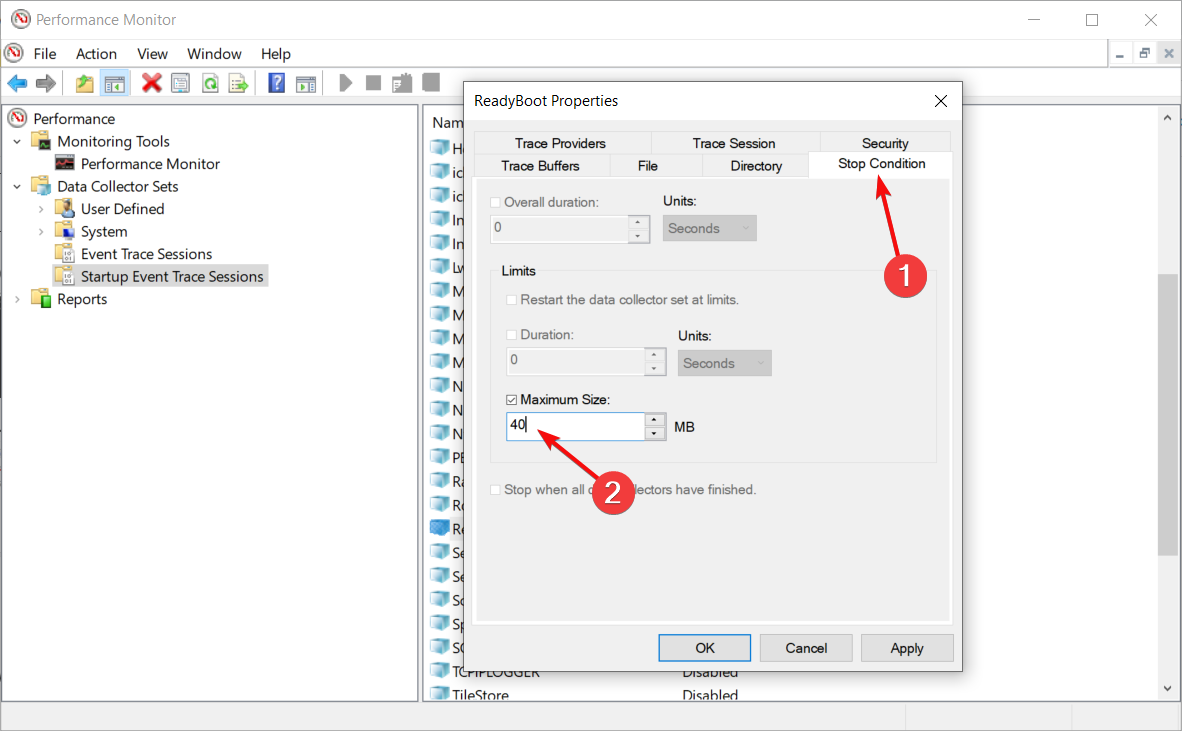
- Go to the Stop Condition tab and replace the value in the Maximum Size field with 40.
- Hit the Apply and OK buttons to acknowledge the change, then restart your PC.
3. Run DISM and SFC scans
- On your desktop window, click the Windows icon, type cmd, and select Run as administrator.
- In the Command Prompt window, type the following command keys and hit Enter:
DISM.exe /Online /Cleanup-image /Scanhealth
- Now, type the following code and hit Enter:
sfc /scannow - Exit Command Prompt and reboot the PC.

If you want to try other methods for the above procedure, there is dedicated software to detect corrupt or missing OS files and automatically find healthy elements as replacements.
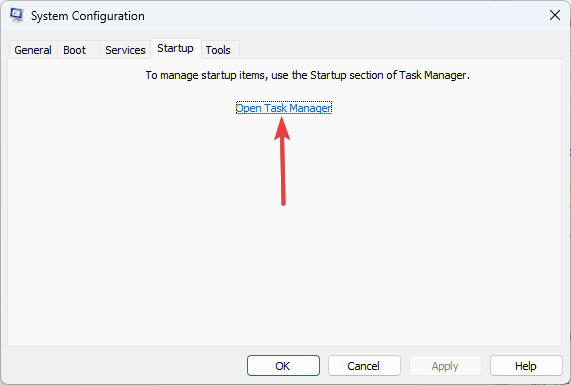
4. Run PC in Clean Boot State
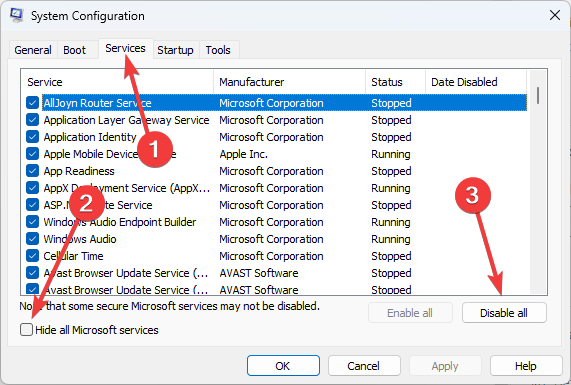
- Press Windows + R to open the Run dialog, type msconfig, and press Enter.
- Navigate to the Services section, tich Hide all Microsoft services, and click on Disable all.

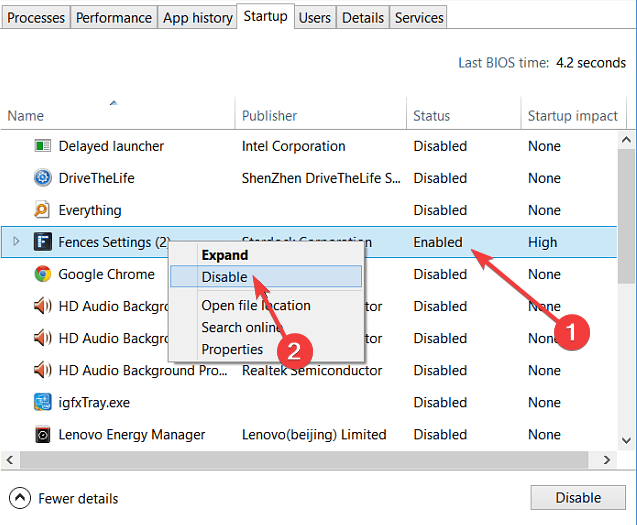
- Navigate to the Startup section; locate and click on Open Task Manager.
- Right-click on any task that is enabled, and select Disable.

- Click OK to finish up the process.
- Exit the program and restart your system.

That is as far as we will go with solutions to this error. If you have followed the guide, we hope you have successfully fixed it.
Some users have reported the error message Session perfdiag logger stopped due to the following error: 0xc0000188. You should note that the solutions we have given will also come in handy. If you also got a PerfDiag Logger 0xC0000188 error, you should try any of the above fixes.
Let us know in the comments what has worked for you.
![]()
Currently, you are facing a delay in starting the PC. For so, whenever you have checked the Event Viewer, it is showing the message that ‘Session “PerfDiag Logger” stopped due to the following error: 0xC0000188′.
This is an OS (Operating System) component issue that commonly arises for some anonymous reasons. And if you are facing the same, you’re not alone. We’re here to help you.
You can easily solve this issue. In fact, I am writing this article to assist you fix the issue. Let’s explore this in details below.
Whenever the issue happens, you can apply a couple of things to fix it. Before diving into the details, let’s check the list of fixes first.
- Fix 1: Enable Superfetch Service
- Fix 2: Run DISM Health Scan
- Fix 3: Maximize Startup Event Trace Sessions File Size
- Fix 4: Recreate ‘setup.etl’ File
- Fix 5: Execute A Clean Boot
Fix 1: Enable Superfetch Service
When you face the issue, you can enable the Superfetch service. It will help you to get rid of the issue. I will attach the process below with some chronological steps.
Step 1: Tap the Windows key and type ‘services’. Accordingly, the app preface will be visible. You have to click on it.
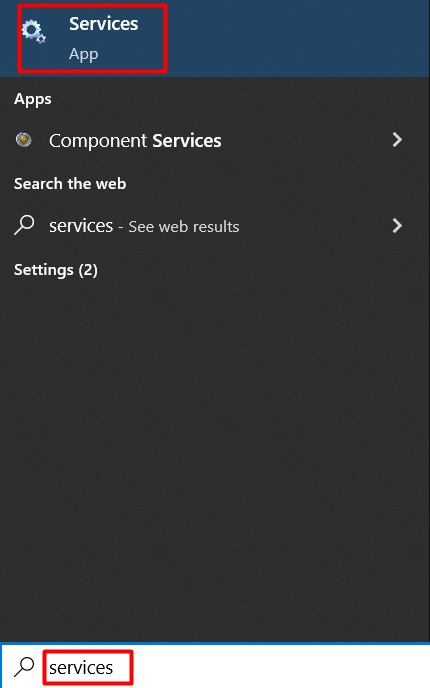
Step 2: Consequently, the ‘Services’ window will appear. You have to find the ‘Superfetch’ from the services list. While finding, double-click on it.
Step 3: As a result, you will get the ‘Superfetch’ properties window. Here, you have to change ‘Startup type’ into ‘Automatic’. Then click on the ‘Start’ if the ‘Service status’ remains ‘Stop’. After that, press the ‘Apply’ tab and ‘Ok’ then.
In the end, close the ‘Services’ window and restart the PC.
Finally, check the error. Will it exist or not? If the fix doesn’t match your PC condition, you will have some other fixes to apply.
Fix 2: Run DISM Health Scan
Another way to resolve the issue is to run the DISM (Deployment Image Servicing and Management) health scan. You can try the process. I will attach the details below.
Step 1: Tap the Windows key and type ‘cmd’. Accordingly, the app preface will appear with some options. You have to click on the ‘Run as administrator’.
Step 2: Consequently, the ‘Command Prompt’ window will appear. You need to copy the below commands one by one and paste them into the window. You have to hit ‘enter’ each time you paste a command to execute it.
DISM.exe /Online /Cleanup-image /Scanhealth
DISM.exe /Online /Cleanup-image /Restorehealth
The process may take a couple of moments to complete successfully. After completing it, you have to restart the PC as soon as possible.
Fix 3: Maximize Startup Event Trace Sessions File Size
Maximizing the ‘Startup Event Trace Sessions’ file size can fix the issue. The process will be given below.
Step 1: To apply the fix, you need the help of the ‘Command Prompt’ window. To do so, you need to follow the step 1 from the previous fix. Whenever you access the ‘Command Prompt’ window, type ‘perfmon’ into it. Then hit the ‘enter’ button.
Step 2: Consequently, the ‘Performance Monitor’ window will become evident on the screen. Here, you have to expand the ‘Data Collector Sets’ from the left menu pane.

Step 3: Then you have to click on the ‘Startup Event Trace Sessions’ option from the appeared list.
Step 4: After that, look at the right pane. From here, you have to find out the ‘ReadyBoot’. While finding it, double click on it.
Step 5: As a result, you will get the ‘ReadyBoot Properties’ window on the screen. Here you need to tap the ‘Stop Condition’ tab from the upper menu.
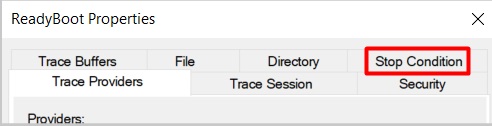
Step 6: Next, you need to change the ‘Maximum Size’ into ’40’ MB. Then, click on ‘Apply’ first and ‘Ok’ at the last.
In the end, close the ‘Performance Monitor’ and ‘Command Prompt’ windows.
After that, you have to restart the PC and check the existence of the issue.
Fix 4: Recreate ‘setup.etl’ File
The fix is rare but may work better for you. You need to follow the process step by step and be sincere while applying. I will include the process below.
Step 1: Tap the Windows and ‘R’ keys together. As a result, the ‘Run’ window will appear. You have to copy the below path and past it into ‘Open’ bar.
%windir%\panther
Then click on ‘Ok’.
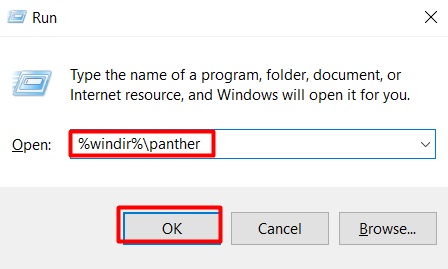
Step 2: Consequently, you will reach the path destination. From here, you have to find out the ‘setup.etl’ file and rename it ‘setup.old’.
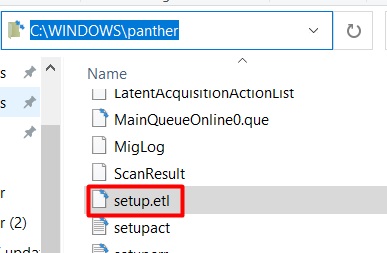
Step 3: After that, restart the PC. Accordingly, a new ‘setup.etl’ will be created automatically ignoring the ‘setup.old’ file.
Finally, check the issue. If somehow you still face it, the last option you will have in hand to resolve it.
Fix 5: Execute A Clean Boot
You have to execute clean boot to identify the reason and recover the issue permanently when none of the upper fixes work for you. You can follow the below steps to do so.
Step 1: Tap the Windows key and type ‘msconfig’. Accordingly, you will see the preface of the ‘System Configuration’ app with a couple of options. You have to click on ‘Run as administrator’.
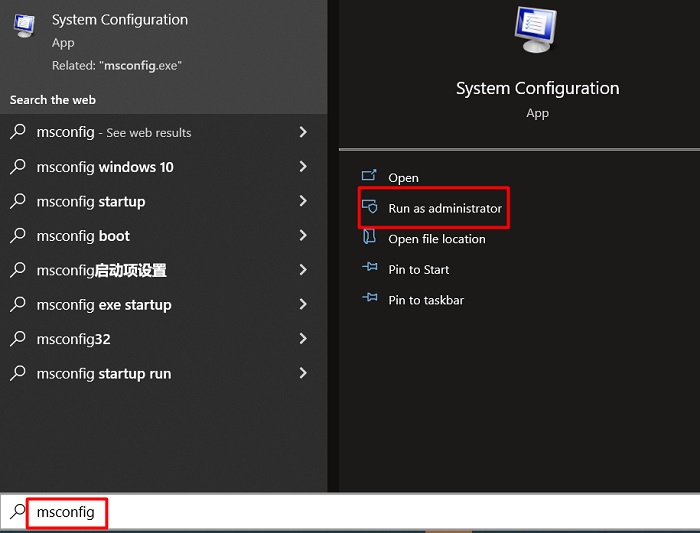
Step 2: As a sequence, the ‘System Configuration’ window will appear. From here, you have to tap the ‘Services’ tab that stays on the top of the window. Then tick mark on the ‘Hide all Microsoft services’ box. After that, click on the ‘Disable all’ option.
Step 3: Next, tap the ‘Startup’ tab. From here, click on the ‘Open Task Manager’ option.
Step 4: While the ‘Task Manager’ appears, you need to tap the ‘Startup’ tab. Then, disable all the existed items from the list. After completing the task, close the window.
Step 5: As a result, you will be back on the ‘System Configuration’ window. Press ‘Ok’ to confirm the changes.
In the end, restart the PC.
Frequently Asked Questions
What Is Code 0x C0000188?
The error message 0xC0000188 is known as the Windows-specific error that commonly happens in Windows 10. It mainly happens due to a system error. You can fix this error by maximizing the file size of Startup Event Trace Sessions or by performing a clean boot.
What Is the Max File Size for Perf Diag Logger?
Max File Size for PrefDiag Logger is a Kkernel-Event Tracking error that can be found into the Event Viewer. You may find there that the Maximum file size for Pref Diag Logger is currently set to 209715200 bytes.
Final Words
Hopefully, the ‘Session “PerfDiag Logger” stopped due to the following error: 0xC0000188’ issue won’t arise anymore. I would like to request that you have just keep calm and apply the fixes one after another until success comes.
Сообщение об ошибке 0xC0000188 — это ошибка, специфичная для Windows, которая обычно встречается в современных версиях Windows, особенно в Windows 7, Windows 8 / 8.1 и Windows 10. Она в основном связана с программой просмотра событий на уязвимом ПК, которая обеспечивает контроль ошибок и действий. и приложения, работающие на вашем компьютере.
Для решения этой проблемы и восстановления вашего прежнего (нормального) рабочего состояния ПК решения этого руководства покажут вам несколько обходных путей, особенно те, которые можно применять в Windows 10. Читайте дальше!
Как исправить ошибку 0xC0000188? Эта проблема может возникнуть, если служба Superfetch не запущена, поэтому обязательно включите ее, установив для параметра «Тип запуска» значение «Автоматический». Если это не сработает, запустите командную строку и запустите сканирование DISM или попробуйте запустить компьютер в состоянии чистой загрузки.
- Включить службу Superfetch
- Запустите DISM Health Scan
- Запустите компьютер в чистом состоянии загрузки
1. Включите службу Superfetch
Если вы столкнулись с ошибкой 0xC0000188, в первую очередь необходимо проверить, включена ли служба Superfetch. В случае, если он отключен, вам не нужно искать дальше, так как отключенная служба, вероятно, является причиной ошибки. В этом случае окончательное решение — просто включить его.
Чтобы включить службу Superfetch в Windows 10, следуйте приведенным ниже инструкциям.
- На рабочем столе вашего ПК нажмите клавиши Windows + R, чтобы открыть диалоговое окно «Выполнить».
- В поле введите services.msc и нажмите Enter. Это приведет вас к окну Сервисы
- Найдите и щелкните правой кнопкой мыши сервис Superfetch.
- В отображаемых параметрах выберите « Свойства».
- Перейдите в подраздел « Тип запуска» и установите для него значение « Автоматический».
- Нажмите кнопку ОК в нижней части окна.
- Нажмите « Пуск», чтобы запустить службу (если она в данный момент запущена, просто перейдите к следующему шагу).
- Нажмите Применить> ОК.
- Выйдите из программы и перезагрузите компьютер.


Как только это будет сделано, сообщение об ошибке должно перестать появляться на вашем компьютере. Однако, если ошибка остается нефиксированной, просто попробуйте следующее решение.
- Читайте также: Как исправить проблемы Legacy Boot в Windows 10
2. Запустите DISM Health Scan
В случае, если ошибка 0xC0000188 вызвана набором поврежденных системных файлов, вы можете попробовать запустить команду DISM через командную строку.
Чтобы запустить этот процесс, выполните действия, описанные ниже:
- В окне рабочего стола нажмите на значок Windows, чтобы открыть Пуск.
- В меню «Пуск» введите CMD и щелкните правой кнопкой мыши CMD.
- Выберите Запуск от имени администратора.
- В окне командной строки введите следующие командные клавиши: DISM.exe / Online / Cleanup-image / Scanhealth и нажмите клавишу Enter.
- Теперь введите DISM.exe / Online / Cleanup-image / Restorehealth и нажмите клавишу Enter.
- Выйдите из командной строки и перезагрузите компьютер.


После того, как вы успешно перезагрузили систему, проверьте, решена ли проблема. Если нет, вы можете попробовать следующее исправление.
3. Запустите компьютер в чистом состоянии загрузки
Запуск чистой загрузки помогает определить, вызвана ли ошибка 0xC0000188 сторонней программой. Чтобы проверить и устранить эту проблему в чистом состоянии загрузки, следуйте инструкциям, изложенным ниже:
- Откройте окно « Выполнить».
- В поле «Выполнить» введите msconfig и нажмите Enter. Это приведет вас к окну конфигурации системы
- Перейдите в раздел « Услуги »; найдите и установите флажок Скрыть все службы Microsoft.
- Найдите и нажмите Отключить все.
- Перейдите в раздел «Автозагрузка»; найдите и щелкните « Открыть диспетчер задач».
- Отключите все элементы автозагрузки на вкладке « Автозагрузка ».
- Нажмите OK, чтобы завершить процесс.
- Выйдите из программы и перезапустите вашу систему.


Ошибка 0xC0000188 может быть проблематичной, но мы надеемся, что вам удалось исправить ее после использования одного из наших решений.
ЧИТАЙТЕ ТАКЖЕ:
- Вам было отказано в доступе к этой папке
- Произошла ошибка при создании отчета WSUS
- Как я могу исправить ошибку загрузки приложения 65432 в Steam
ReadyBoot is a mechanism to help you speed up your computer’s boot time. Each time you turn on your computer, Windows keeps track of the way your computer starts and the programs which are usually accessed in the startup process. Windows readily save this information in the form of small files in the “Prefetch” folder. The next time you turn on your computer, Windows refers to these files to speed up the startup process.
The Prefetch folder is located under the Windows system directory and is self-maintaining. There is no need to erase its contents as it will only slow down the boot process as Windows will not be able to access the files it saved and will boot in the traditional way.
What is the main Difference between ReadyBoot and ReadyBoost?
Let’s start by defining the mechanics of both the processes. On systems with more than 700MB of RAM, ReadyBoot uses information from 5 previous boots to create a plan for a boot-time memory cache. It will try to prefetch the files needed in the future onto the RAM beforehand. The memory used by ReadyBoot is freed up after around 90 seconds or immediately if another process needs the memory.
To put it in simple terms, if you have a system where your system is booted from an SSD, ReadyBoot may not improve the boot time by a lot. However, it will try to utilize your fast RAM so it can serve as a fast cache for the disk. At this moment, even the fastest SSD’s are slower than your RAM so it does improve the boot time by a little.
ReadyBoost, on the other hand, is meant for utilizing the flash memory for the swap file. If you have an SSD, there is no point in using the ReadyBoost utility as it will be slower. You may see a message pop-up whenever you plug in a fast USB flash into your computer about whether you want to use it for ReadyBoost or not.
What does the Error Condition under Discussion mean?
This error mainly occurs if the memory allocated to the ReadyBoot service is less than the service actually needs. Therefore it is unable to make the small files which we discussed earlier and your computer is forced into not using the service to its potential. The default size of ReadyBoot in most computers is 20MB which may prove to be less over time. We can try changing the allocation size and see if this solves the error message.
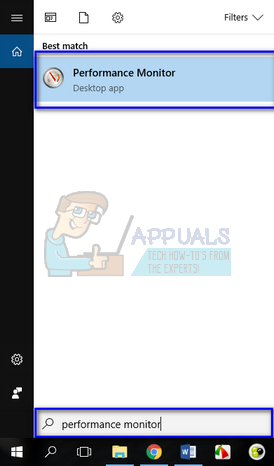
- Press Windows + S, type “performance monitor” in the dialogue box and open the application.
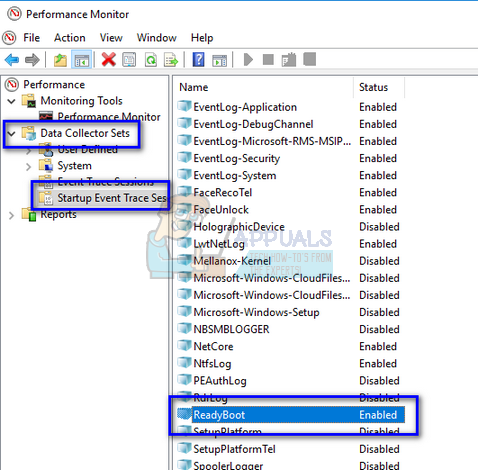
- Expand “Data Collector Sets” and click on “Startup Event Trace Sessions”. Look for “ReadyBoot” using the navigation pane present at the right-side of the screen and double-click it.
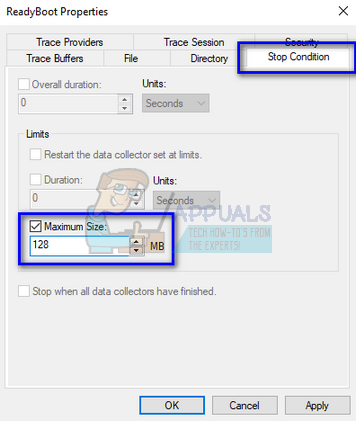
- Select the tab “Stop Condition”. Now increase the size located at the near bottom of the screen. The ideal size if 128 MB. It isn’t much space but it suffices for the application to function normally.
- Press Apply to save changes and exit.
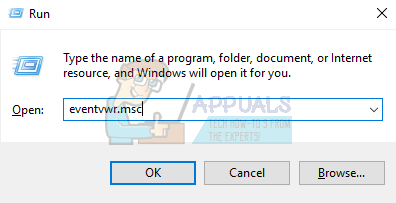
Now restart your computer. To check if the error condition got fixed, follow the steps listed below.
- Press Windows + R, type “eventvwr.msc” in the dialogue box and press Enter.
- Now you can check in the event viewer if the error message happened recently. Furthermore, you can also navigate to the directory “C:\Windows\Prefetch\ReadyBoot” and check if space is more than the 20MB which we defined earlier.
What are the Side effects on my Computer if the Error Message is Still there?
According to an official statement by Microsoft:
The logging of this error will not affect the operation of your computer.
So to sum up, this error will not in any way affect the way your computer operates or will cause any loss of functionality. It is only used to speed up your computer by increasing its boot time. If Windows is unable to access this utility, it will switch to booting the traditional way and boot the operating system without consulting the memory table which was built because of this service. Do note it will slightly increase the boot time but that’s all there is.

Kevin Arrows
Kevin Arrows is a highly experienced and knowledgeable technology specialist with over a decade of industry experience. He holds a Microsoft Certified Technology Specialist (MCTS) certification and has a deep passion for staying up-to-date on the latest tech developments. Kevin has written extensively on a wide range of tech-related topics, showcasing his expertise and knowledge in areas such as software development, cybersecurity, and cloud computing. His contributions to the tech field have been widely recognized and respected by his peers, and he is highly regarded for his ability to explain complex technical concepts in a clear and concise manner.