Ошибка с номером 0x00000139 появляется при запуске системы, после установки обновлений или подключения нового устройства. Среди распространённых причин синего экрана с указанным кодом — несовместимость драйверов, нарушение целостности системных файлов, проблемы с оперативной памятью и жёстким диском.
Установка обновлений
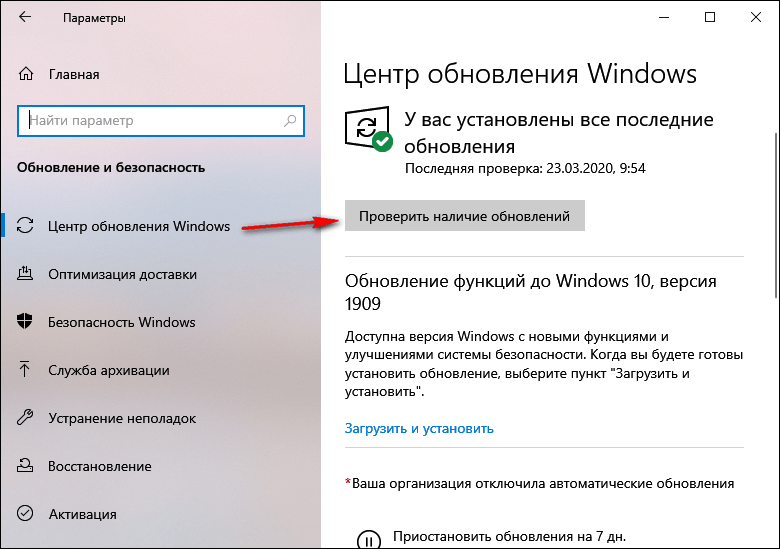
Синий экран смерти с ошибкой 0x00000139 не блокирует вход в систему. Поэтому мы можем без проблем запустить Windows и установить доступные обновления. Это первый шаг, который следует выполнить при появлении сообщения об ошибке.
- Открываем «Параметры» Windows 10.
- Переходим в раздел «Обновление и безопасность».
- На вкладке «Центр обновления Windows» нажимаем на кнопку «Проверить обновления». Если в настройках включено автоматическое скачивание апдейтов, то проверять ничего не придётся — обновления будут уже готовы к установке.

Устанавливаем все доступные обновления
- При обнаружении доступных апдейтов скачиваем их на компьютер, а затем запускаем инсталляцию. Можно сделать это сразу или в определённое время — например, ночью. Если обновления уже скачаны, но вы не запланировали их установку, то инсталляция начнётся автоматически при выключении или перезагрузке компьютера.
В ходе установки обновлений система несколько раз перезагрузится. Если вы используете ноутбук, подключите к нему адаптер питания. Аварийное выключение системы во время обновления может привести к повреждению файлов и появлению новых ошибок.
![]() Загрузка …
Загрузка …
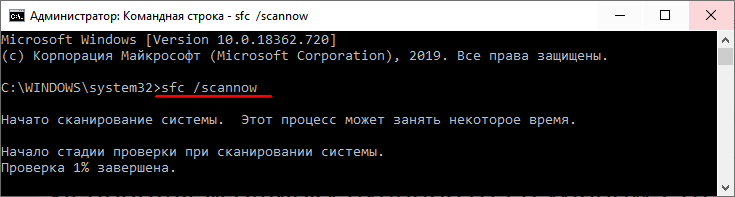
Проверка целостности системных файлов
Синие экраны часто появляются из-за повреждения системных файлов. Ошибка 0x00000139 тоже относится к числу таких сбоев. Решение проблемы простое — нужно проверить системные файлы и восстановить их целостность. Для этого мы используем встроенную утилиту SFC.
- Запускаем командную строку с правами администратора.
- Выполняем команду sfc /scannow.
- Ждем завершения проверки.

Проверяем состояние системных файлов
Если утилита SFC не справилась с ошибкой, можно попробовать DISM. Это более мощное средство для проверки целостности системных файлов. Подробнее о работе с DISM вы можете узнать из этой статьи.
![]() Загрузка …
Загрузка …
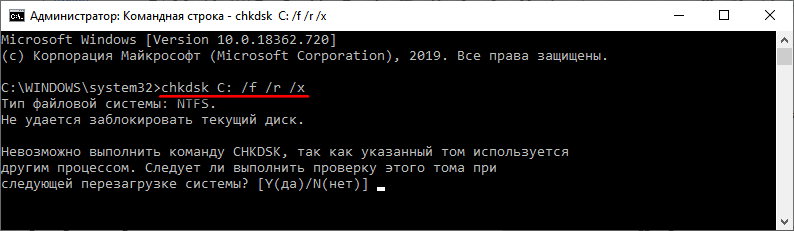
Проверка диска на ошибки
Ошибка в работе диска — тоже частая причина появления синего экрана смерти. Чтобы исключить этот фактор, выполним проверку диска.
- Открываем командную строку с правами администратора.
- Выполняем команду chkdsk C: /f /r /x.
- Соглашаемся на перезагрузку компьютера — Y.

Проверяем состояние диска
Проверку системного раздела диска можно выполнить только вне среды Windows, поэтому без перезагрузки обойтись не получится. Сканирование накопителя на ошибки занимает несколько десятков минут, так что запасаемся терпением.
![]() Загрузка …
Загрузка …
Удаление или обновление повреждённого драйвера
Ошибка 0x00000139 может появиться из-за повреждения драйвера устройства. Главная сложность — определить, какое конкретно ПО вызывает сбой. Для этого нужно настроить в системе создание дампа памяти.
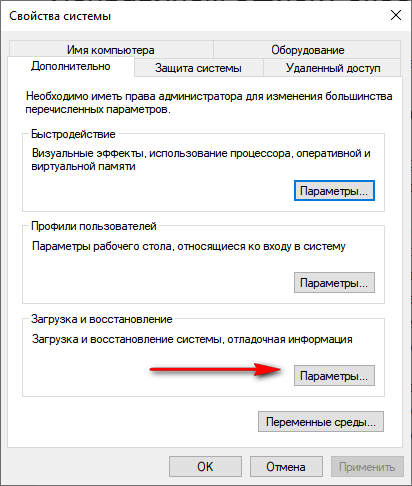
- Запускаем «Панель управления» и переходим в раздел «Система».
- Открываем «Дополнительные параметры системы».

Открываем дополнительные параметры системы
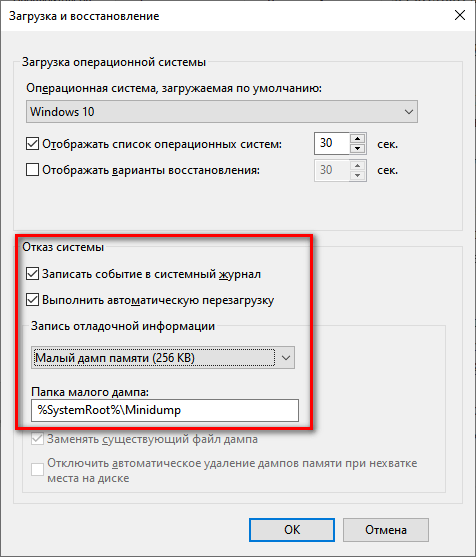
- В поле «Загрузка и восстановление» нажимаем на кнопку «Параметры».

Переходим к настройкам загрузки и восстановления
- Отмечаем опцию «Записать событие в системный журнал».
- В записи отладочной информации выбираем значение «Малый дамп памяти».
- Применяем изменения и перезагружаем компьютер.

Сведения об ошибках будут теперь сохраняться в системном журнале

Чтобы в системном журнале сохранилась информация об ошибке, должен снова появиться синий экран смерти. Как только это происходит, загружаемся в Windows и устанавливаем программу BlueScreenView. Запускаем её и видим свежий дамп памяти с сообщением об ошибке. Значимая информация выделена красным цветом, найти её можно в нижней части окна.

Информация об ошибке в программе BlueScreenView
Нам нужно посмотреть, на что ругается система. При необходимости уточняем смысл через поисковики и форумы. В итоге мы получим название поврежденного драйвера, который нужно удалить или обновить. После устранения сбоя ошибка с номером 0x00000139 должна исчезнуть.
![]() Загрузка …
Загрузка …
Проверка оперативной памяти
К появлению синего экрана смерти могут также привести ошибки в работе оперативной памяти. Обнаружить и устранить их помогает встроенное средство Windows:
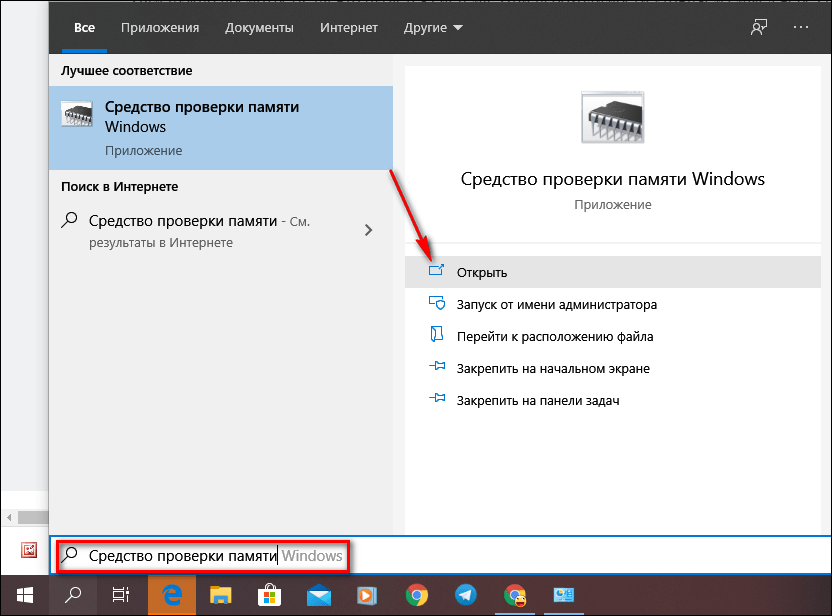
- Запускаем поиск Windows (сочетание клавиш Win+S).
- Находим и запускаем «Средство проверки памяти».
- В появившемся окне выбираем опцию «Выполнить перезагрузку и проверку (рекомендуется)».

Используем встроенное средство проверки оперативной памяти
![]() Загрузка …
Загрузка …
Без перезагрузки проверить оперативную память на ошибки нельзя. Если встроенное средство WIndows не обнаружило причину появления синего экрана смерти, используем для проверки другие инструменты — например, программу Memtest86+. Подробнее об этом мы рассказывали в статье о том, как проверить оперативную память.
![]() Загрузка …
Загрузка …
Post Views: 9 440
Ensure your PC is not suffering from memory issues
by Claire Moraa
Claire likes to think she’s got a knack for solving problems and improving the quality of life for those around her. Driven by the forces of rationality, curiosity,… read more
Updated on
- If you experience a kernel Security Check Failure, it may be a variation of a BSoD error that could cause instability issues with your PC.
- Like most BSoD errors, your PC will be rendered unusable, and you have to find a way to resolve it before it becomes catastrophic.
- You can check for memory errors and viruses or start your PC in a clean boot state to isolate the issue.
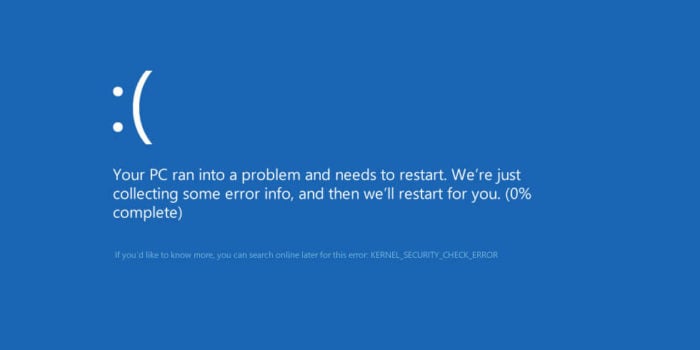
0x00000139 Kernel_security_check_failure is a blue screen error that can appear under different circumstances. You may be trying to upgrade to a newer Windows version or update an application.
Since various issues can cause this problem, it’s important to identify the cause before attempting to fix it. If you’re unsure what’s causing this problem, use this guide to help determine what might be causing it so that you can act accordingly.
What is blue screen bug check code 0x00000139?
The blue screen bug check code 0x00000139 is a hardware-related error that can occur on all versions of Microsoft Windows. If you receive this message, your computer may be unstable and crash again shortly after rebooting.
The error code is caused by a hardware malfunction that causes the operating system to crash and display a blue screen error message.
Other causes include:
- Overheated hardware or software failure – A PC component may fail due to excessive heat and cause blue screens, system crashes, and other issues.
- Memory issues – If your PC is having issues with allocating memory, you may experience frequent crashes due to instability.
- Driver issues – A lot of the time, most BSoD errors are caused by either corrupt, malfunctioned, or incompatible drivers.
- Malware – A virus or other malware may have corrupted the operating system files or registry data required for Windows to run properly.
How do I fix 0x00000139?
Try the following before attempting any advanced steps:
- Check your hard drive for disk errors using the CHKDSK command.
- Run a memory test on your PC to check if there are any issues with your RAM.
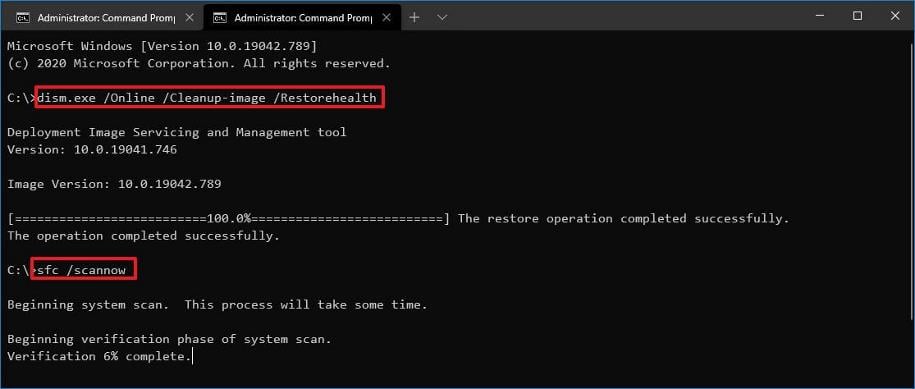
1. Run the DISM and SFC scans
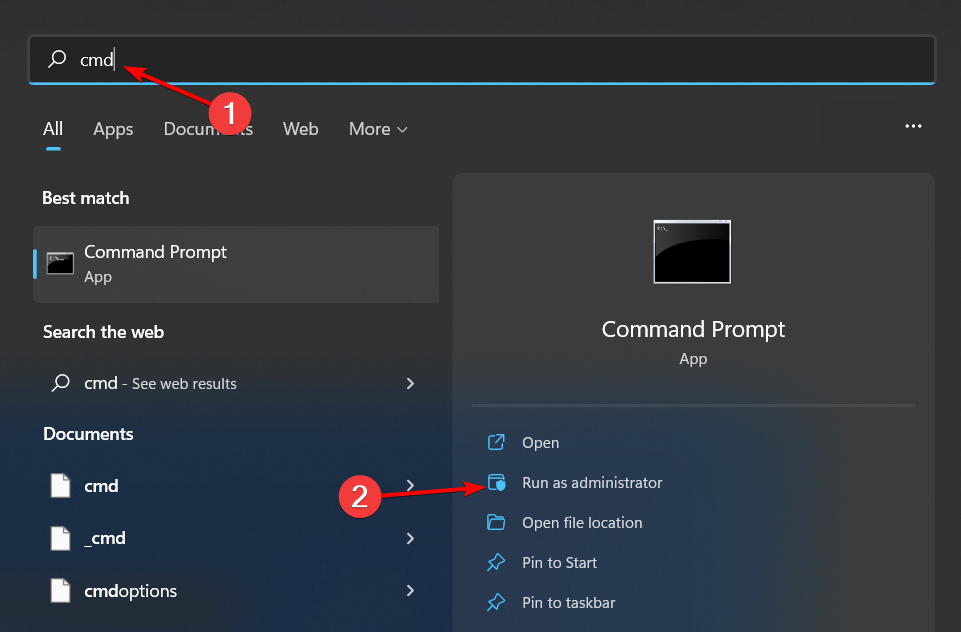
- Click on the Search icon on your taskbar, type cmd in the search bar, and click Run as administrator.

- Type the following commands and press Enter after each one:
DISM.exe /Online /Cleanup-Image /Restorehealthsfc /scannow
- Restart your PC.
Sometimes running the DISM and SFC scans may not repair all of your computer’s stability issues, and for that, we strongly suggest you try a specialized program.
Fortect is a reliable option because it helps you detect all malfunctioning operating system files and repair them by finding healthy replacements from its database.
⇒ Get Fortect
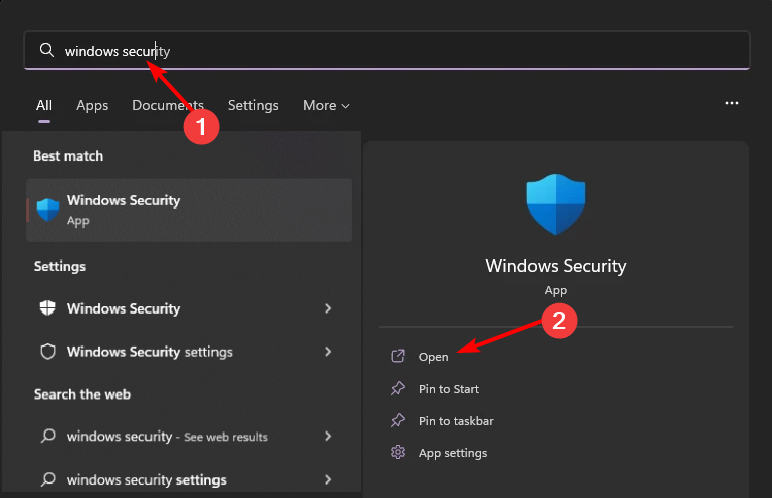
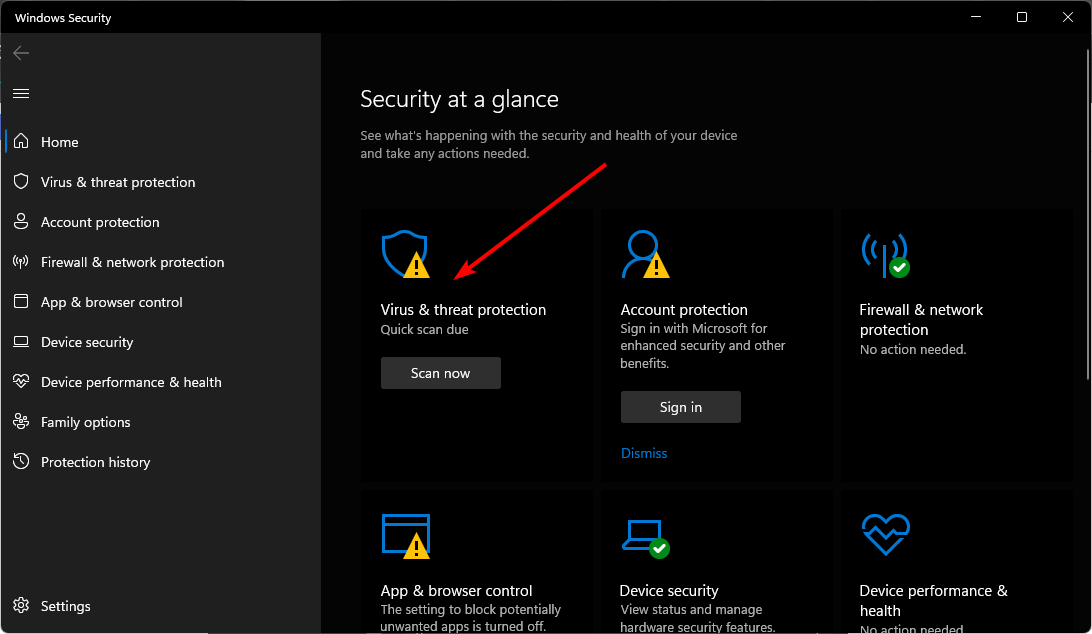
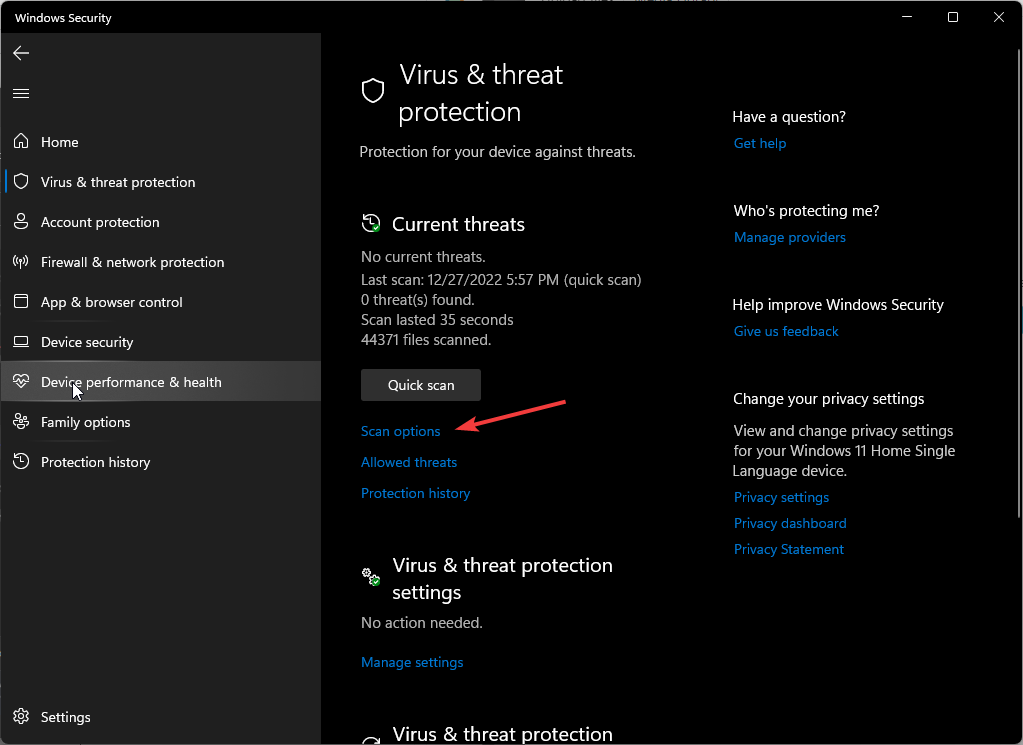
2. Scan for malware
- Press the Windows key, search Windows Security, and click Open.

- Select Virus & threat protection.

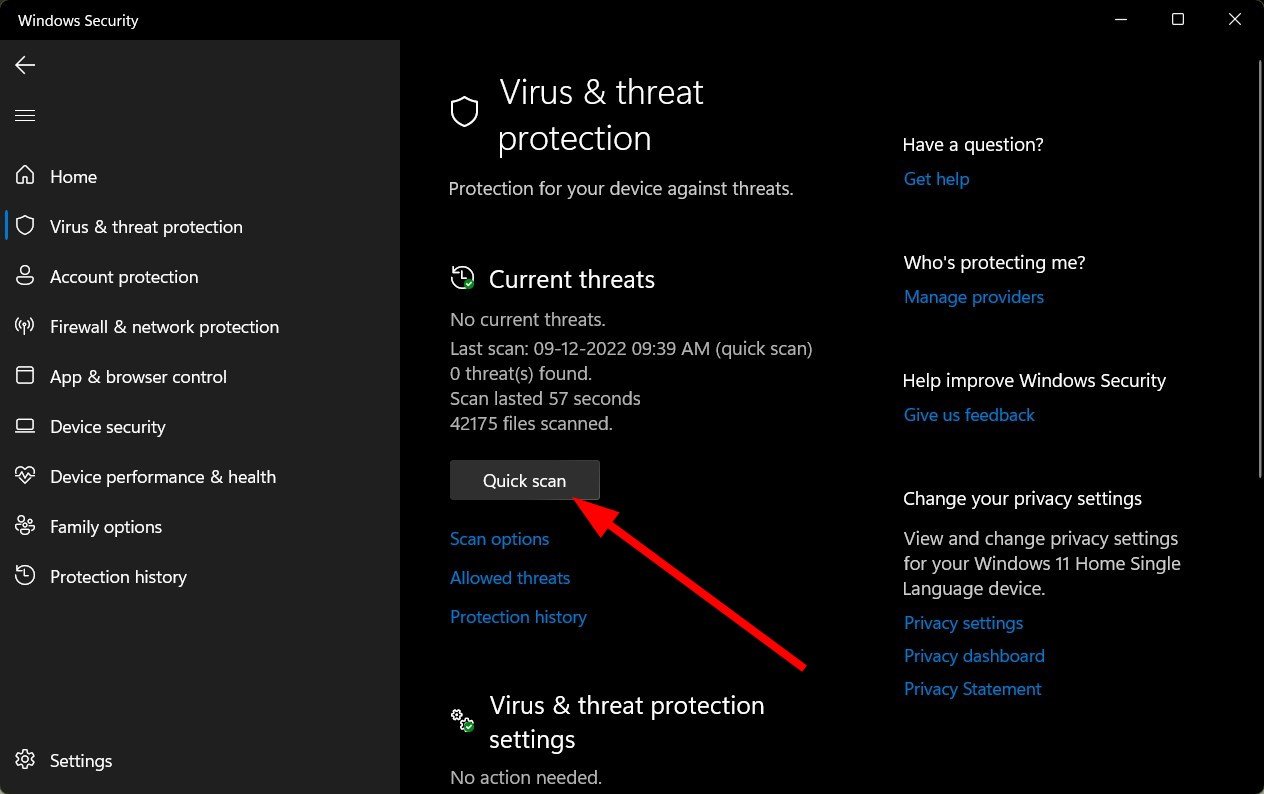
- Next, press Quick scan under Current threats.

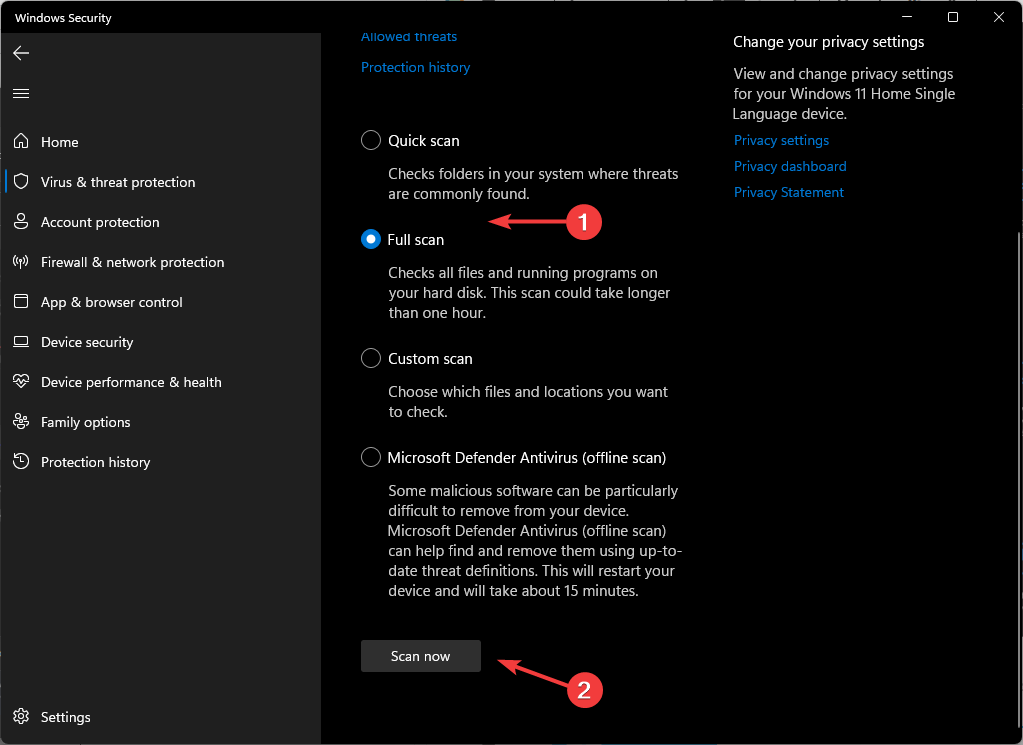
- If you don’t find any threats, proceed to perform a full scan by clicking on Scan options just below Quick scan.

- Click on Full scan to perform a deep scan of your PC.
- Wait for the process to finish and restart your system.
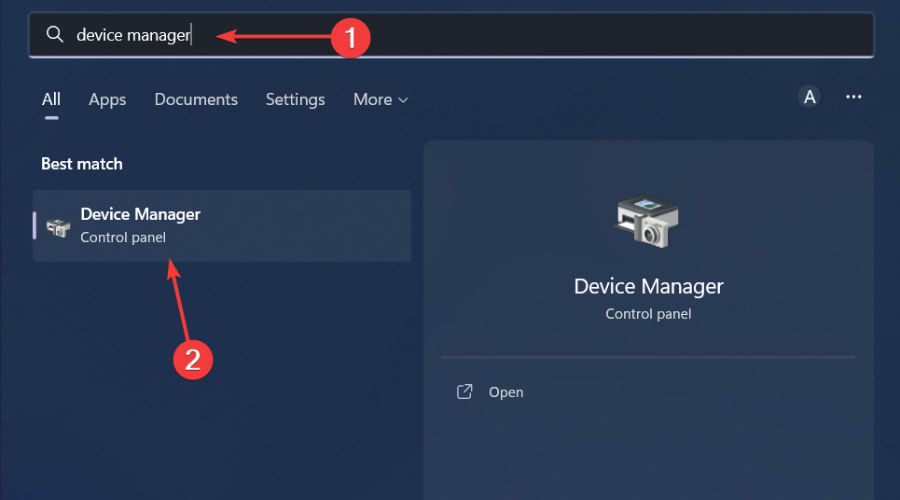
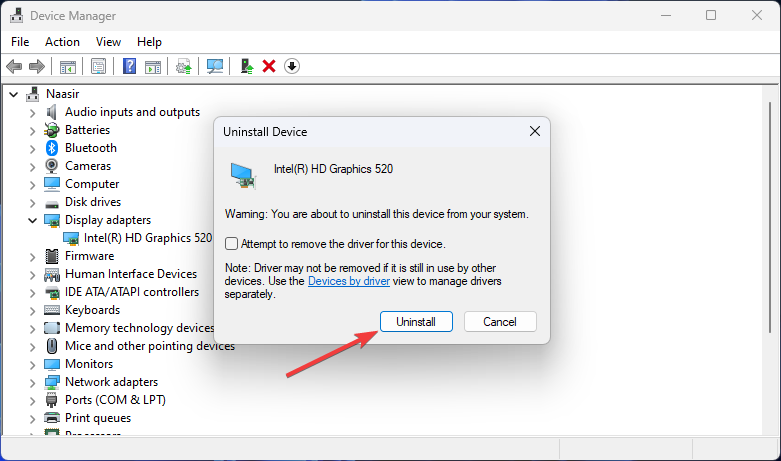
3. Reinstall your GPU drivers
- Click on the Start Menu icon, type Device Manager in the search bar, and click Open.

- Navigate to your Graphic driver, right-click, and select Uninstall device.

- Confirm the uninstallation by clicking Uninstall in the next dialog box.

- Restart your PC, and the driver will automatically reinstall.
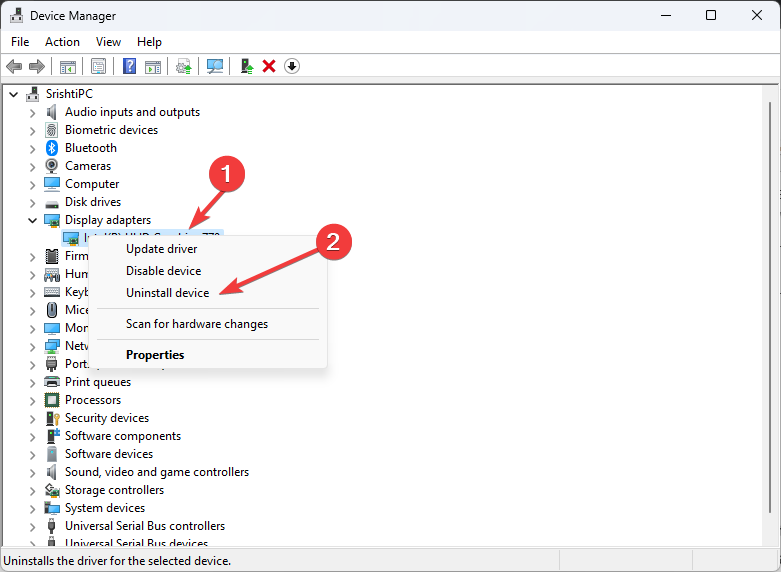
For users who found their graphics card to be the culprit, the NvLddmkm display driver was found to be at the center stage of all this chaos. This is a NVIDIA driver that may have stopped responding.
If so, you first need to address this issue by either updating your NVIDIA driver from the manufacturer’s site or roll back to a previous driver version.
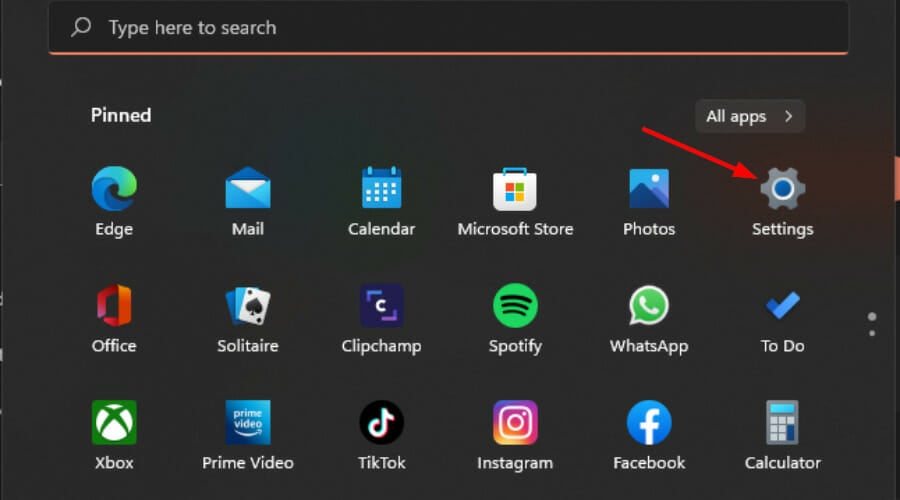
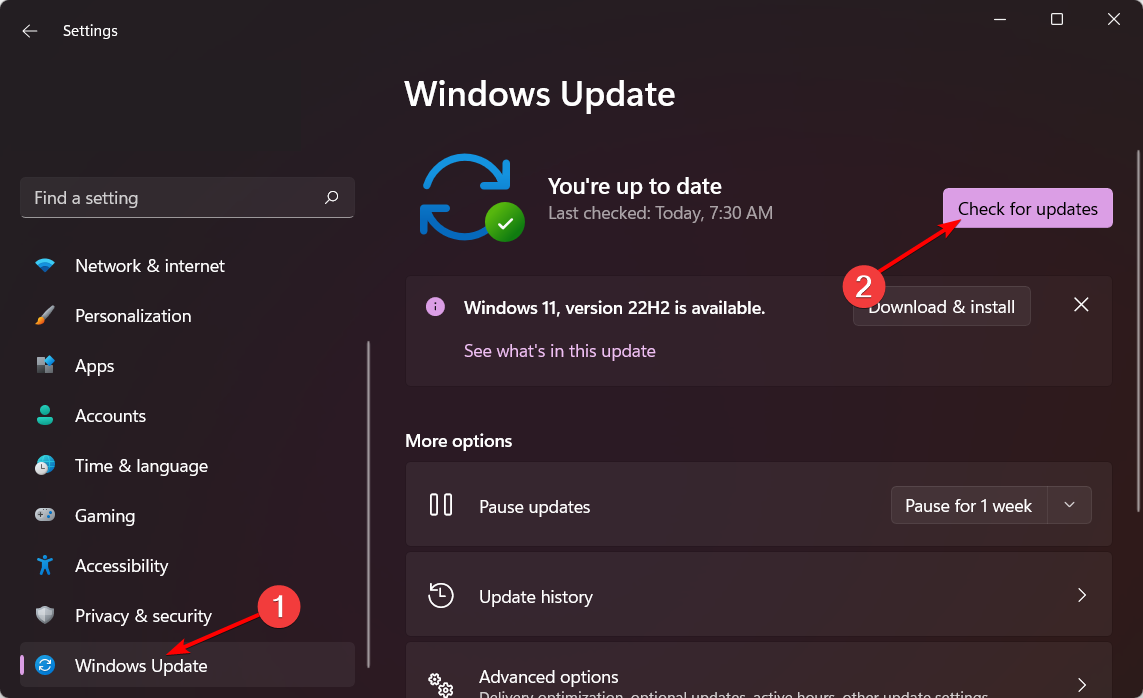
4. Check for Windows updates
- Click on the Start Menu icon and click on Settings.
- Hit Windows Update on the left pane, then select Check for updates.

- If available, download and install.
- Fix: No Internet, Secured Error on Windows 11
- Fix: Keyboard Shortcuts are Not Working in Photoshop
- Fix: Keyboard Shortcuts Are Not Working in Chrome
- Fix: NAS Drive Not Showing in Windows 11
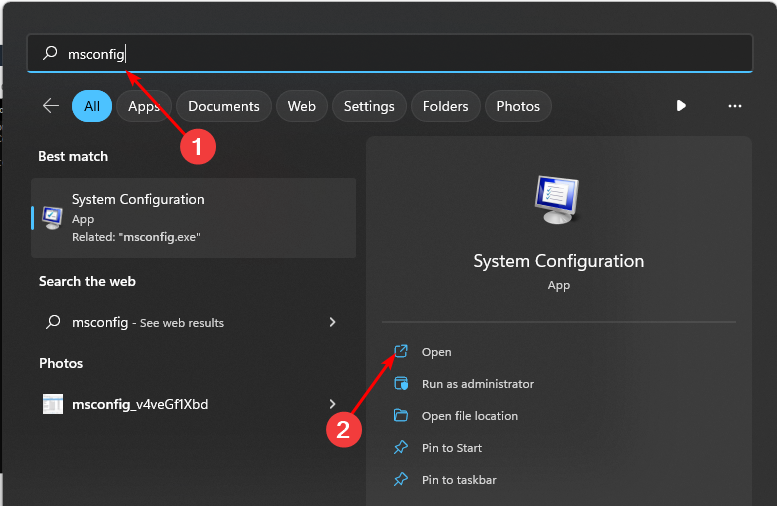
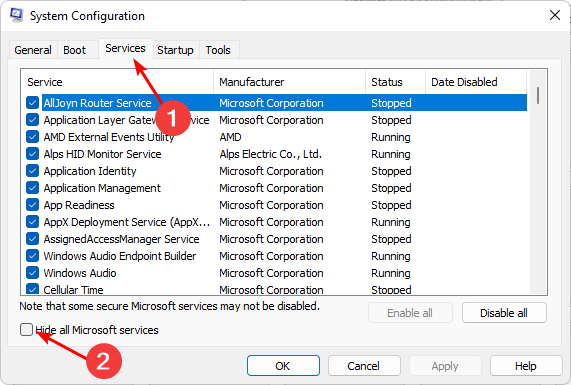
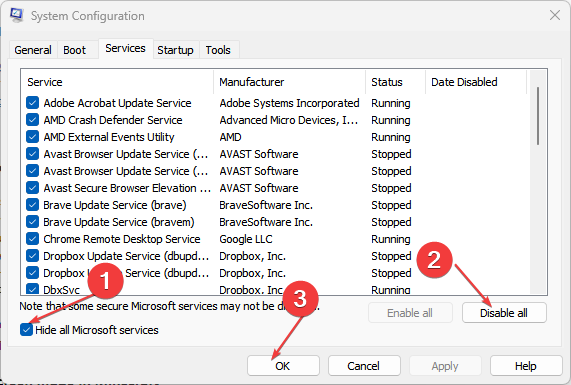
5. Perform a clean boot
- Hit the Windows key, type msconfig, and open System Configuration.

- Switch to the Services tab and select Hide all Microsoft services.

- Click on the Disable all button, then hit the Apply button to save the changes.
- Go back and click on the Startup tab, select Open Task Manager then click OK.
- In the Startup tab of the Task Manager, Disable all the Enabled startup items.

- Close Task Manager and restart your PC.


Is Kernel Security Check Failure serious?
Kernel Security Check Failure occurs when your computer’s kernel, the core of all Windows operating systems, fails to perform certain tests that ensure its integrity.
It manages all activities related to hardware and software resources for applications and drivers. When there’s a problem with its security, it will disable itself from allowing any other process to access resources until you fix it.
The most common symptom of this problem is the blue screen of death (BSOD). It could be a hardware problem or a software issue. Both components are critical in the smooth running of your OS, so you need to address this issue as soon as possible.
We have also devised a guide on how to steer clear of Kernel Security Check Failure errors. If you cannot avoid such errors, knowing how to deal with them is important. To that effect, we have compiled a kernel debugging article to help you find your way.
Hopefully, these steps have been instrumental in helping you fix the Kernel Security Check Failure issue.
For any additional thoughts, feel free to leave a comment down below.
![]()
Синий экран смерти с кодом 0x00000139 появляется при запуске компьютера после обновления ОС, установки нового аппаратного или программного обеспечения. На более современных версиях Windows, например, 8.1 и 10, данный BSoD идет без номера: он подписан как Kernel Security Check Failure.
Причины появления 0x00000139
- Несовместимость драйверов.
- Повреждение системных файлов.
- Проблемы с оперативной памятью компьютера.
- Неполадки с аппаратным обеспечением.
Методы решения 0x00000139
Метод №1 Обновление ОС Windows
Учитывая, что данный BSoD не блокирует доступ к системе — мы рекомендуем провести установку всех доступных обновлений для своей Windows. В довольно редких случаях отсутствие тех или иных апдейтов может вызывать появление BSoD’ов в определенных условиях.
Чтобы обновить свою Windows, вам нужно сделать следующее:
- нажмите ПКМ на Пуск и выберите пункт «Параметры»;
- перейдите в раздел «Обновление и безопасность»;
- далее перейдите в подраздел «Центр обновления Windows»;
- кликните на кнопку «Проверка наличия обновлений»;
- следуйте инструкциям на экране для установки всех доступных апдейтов;
- перезагрузите компьютер по окончанию процесса обновления.
Внимательно наблюдайте за загрузкой компьютера — ждите появления синего экрана смерти 0x00000139.
Метод №2 Запуск System File Checker
Повреждение системных файлов однозначно может привести к появлению BSoD’ов на компьютере пользователя. Чтобы восстановить поврежденные системные файлы, вам стоит воспользоваться системной утилитой System File Checker.
Для запуска SFC вам нужно сделать следующее:
- нажмите правой кнопкой мыши на Пуск;
- выберите из списка пункт «Командная строка (администратор)»;
- напишите команду sfc /scannow и нажмите Enter;
- подождите завершения сканирования (вы поймете, были ли что-то повреждено или нет);
- перезагрузите компьютер.
Ну что, получилось избавиться от 0x00000139? Если нет, то давайте двигаться дальше.
Метод №3 Проверка диска на ошибки
Синие экраны смерти частенько возникают из-за различных ошибок на диске пользователя. На подобные случаи как раз существует системное средство проверки диска, которое можно запустить через Командную строку. Попробуйте сделать следующее:
- откройте Командную строку теми же шагами, что были показаны ранее;
- напишите команду chkdsk C: /f /r /x и нажмите Enter;
- нажмите Y для согласия на перезагрузку компьютера и начала проверки диска.
На работу данного средства потребуется какое-то время. По завершению сканирования, исправления потенциальных ошибок и восстановления информации с поврежденных секторов вы войдете в Windows — посмотрите, появится ли BSoD 0x00000139.
Метод №4 Удаление проблемного драйвера
Некорректно работающие драйвера могут вызвать появление синего экрана смерти. Вам нужно проверить дамп памяти после возникновения BSoD с кодом 0x00000139 и понять, какой конкретно драйвер вызывает проблемы.
Для начала вам нужно убедиться, что в вашей системе настроено создание дампа памяти при возникновении критических ошибок. Сделайте следующее:
- нажмите Windows+S;
- пропишите запрос «Панель управления» и выберите найденный результат;
- перейдите в раздел «Система» (выберите в просмотре крупные значки);
- кликните на строчку «Дополнительные параметры системы»;
- нажмите на кнопку «Параметры…» в разделе «Загрузка и восстановление»;
- поставьте галочку возле опции «Записать событие в системный журнал»;
- в записи отладочной информации выберите «Малый дамп памяти»;
- примените изменения, перезагрузите компьютер и дождитесь появления BSoD 0x00000139.
Теперь давайте попытаемся прочитать с вами созданный дамп памяти. Для этого вам потребуется скачать небольшую утилиту BlueScreenView. Запустите ее и выберите свежий дамп памяти. Осмотрите выделенные красным элементы в нижней части окошка программы.
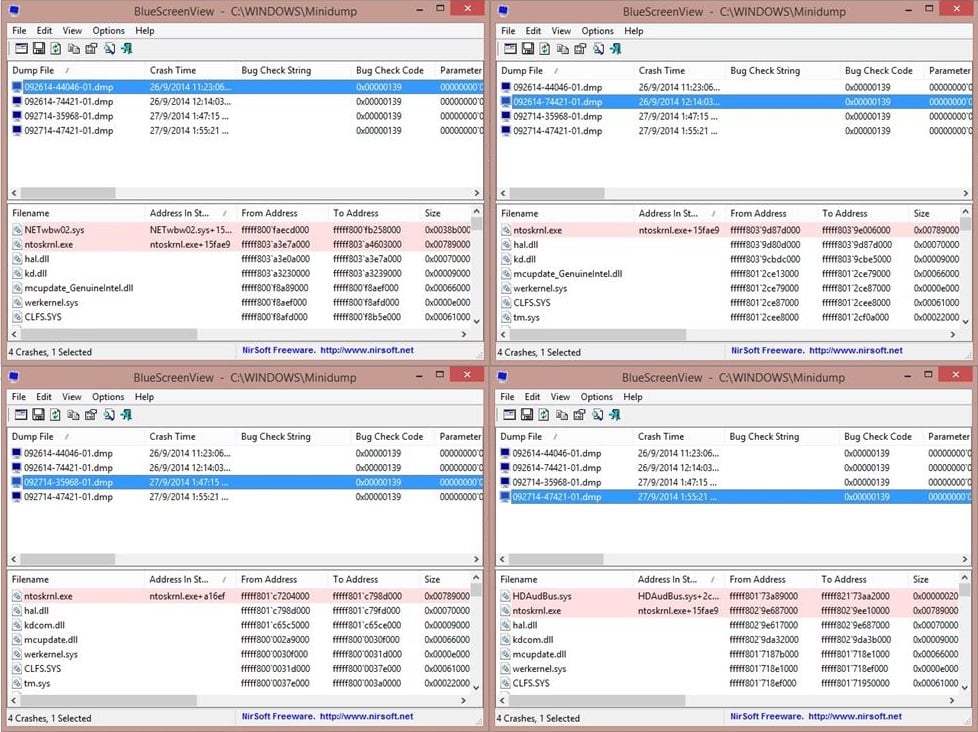
Все, что вам остается сделать — это пробить находку в Интернете и понять, чем конкретно она является. Возможно, это будет драйвер для вашего графического ускорителя или же драйвер для какого-то иного устройства, например, USB-колонок. Далее вам нужно переустановить, обновить или же и вовсе избавиться от этого драйвера. Тогда 0x00000139 должен исчезнуть.
Метод №5 Проверка оперативной памяти
Проблемы с оперативной памятью могут привести к самым разным ошибкам во время работы ОС. Вам необходимо проверить свою RAM при помощи средства проверки памяти Windows. Выполните следующее:
- нажмите Windows+S;
- пропишите «Средство проверки памяти» и выберите найденный результат;
- в появившемся окошке выберите опцию «Выполнить перезагрузку и проверку (рекомендуется)».
Далее ваш ПК перезагрузится и начнется проверка оперативной памяти. Данный процесс может занять довольно продолжительное время — все зависит исключительно от самого типа RAM и ее объема. Спокойно можете рассчитывать на 10 или 15 минут.
Как только проверка завершится, ваш компьютер перезагрузится еще раз и вы войдете в систему. В области уведомлений панели задач появится сводка проведенной проверки RAM. По ней вы поймете, появляется ли 0x00000139 из-за оперативки или нет.
Contents
- What is the BSOD 0x00000139 error?
- How to fix the Windows 10 BSOD error 0x00000133
- Enable the legacy advanced boot menu (specific fix users who experienced boot problems due to Error 0x00000133):
- Follow these instructions:
- Run quick preliminary checks and perform complementary tasks:
- Disable the Automatic restart function:
- Fix the problem with drivers by rolling them back:
- Follow these instructions to roll back the required driver:
- Fix the problem with the drivers by updating them:
- Run scans using SFC and DISM:
- Use the Memory Diagnostic tool to test your temporary memory:
- Enable the legacy advanced boot menu (specific fix users who experienced boot problems due to Error 0x00000133):

Since you are here, we must assume you saw a problem description or notification where Error 0x00000139 appeared as a key term on a blue screen. Given the manifestation of the blue screen of death (commonly abbreviated as BSOD), we can also infer that your computer crashed and restarted. In this guide, we intend to examine Error 0x00000139 and the issues that revolve around it.
What is the BSOD 0x00000139 error?
Error 0x00000139 – which is similar to Error 0x00000133 – is a special error code that defines specific events that lead to a blue screen of death. The events in this case probably have something to do with a hardware (physical) device or driver (software) that malfunctioned and caused Windows to shut down.
Typically, when a computer experiences a severe crash that results in a blue screen, the affected system displays some information (such as the error code) about the issue that occurred. The error code for a BSOD is more or less associated with the issues that trigger the crash, the factors, the conditions or the events causing the crash to play out, and so on.
The vast majority of BSODs – given their nature – are down to issues with physical hardware components or drivers for those devices. In any case, the error code is still supposed to help you narrow down things.
If your computer suffered the crash defined by Error 0x00000133 while you were surfing the web, for example, then the issues were probably triggered by a faulty network adapter or its drivers. If the BSOD manifests itself only when you are playing games or running graphics-intensive programs, then the driver for your graphics card is likely to have played some role in causing the problem. In any of those cases, you will have to resolve issues with the drivers to fix the problem.
On the other hand, if your computer goes down with the crash for which Error 0x00000133 comes up to inform you of a problem when you are booting Windows, then other factors or variables are likely to be in play. You have to do things a bit differently – since you cannot even log in to your computer to perform regular tasks.
Some users reported that the KERNEL_SECURITY_CHECK_ FAILURE crash manifested itself after they tried to wake their computer from sleep, while others stated that the issue came up after a RAM upgrade.
How to fix the Windows 10 BSOD error 0x00000133
Here, we intend to provide complete descriptions for the procedures used to resolve the blue screen of death defined by Error 0x00000133 on Windows 10 devices. We took all the cases or scenarios where the issue manifests itself into account and will be providing fixes for all categories of users.
Even if you cannot get your computer to boot normally and reach your desktop, you will still learn how to resolve Windows 10 Error 0x00000133 in this guide. Users who experience the BSOD crash only when they are performing certain tasks – especially those who can start up Windows normally (without issues) – will also find fixes for the issues in their case.
You have to start with the first procedure on the list and then work your way through the rest accordingly. You must skip fixes or operations that do not apply to you and move on to the next task on the list.
Trigger Startup Repair and boot Windows into safe mode (specific procedure for users whose computers refuse to boot normally):
If you cannot get to the regular Windows operating system environment due to the issues represented by the KERNEL_SECURITY_CHECK_ FAILURE error message, then you have to trigger Startup Repair and get your computer into safe mode. Startup Repair is a special recovery tool (or platform for accessing utilities) used to fix problems that prevent Windows from starting up normally.
Meanwhile, Safe mode is an advanced boot technique or process that allows you to start up Windows while your system loads a minimal set of drivers and programs. Your computer will run the minimum components (that it needs). Since unnecessary drivers and third-party programs are not allowed to run in the environment resulting from a safe boot, the issues that trigger the BSOD are unlikely to manifest themselves there.
In other words, your computer should not crash after you get it into safe mode. Well, in safe mode, you will be able to troubleshoot Error 0x00000133 and apply fixes to resolve the BSOD issue. You have to get to Startup Repair first, though.
Your computer is programmed to bring up Startup Repair automatically if something disrupts the Windows boot sequence three times (or more) consecutively. These are the instructions you must follow to launch Startup Repair on Windows 10:
- Press (and hold) the power button on your machine’s keyboard, wait for the device to lose power (and go off), and then give the power button a tap to turn your device back on.
- Repeat the step (above) at least two times.
- This time, after you press the power button on your machine’s keyboard, you must wait until you see the Preparing Automatic Repair message.
- You might be asked to select an account and use it to log into your computer. In that case, you will have to enter the password for the selected account.
- You must choose the admin account (an account that possesses administrative privileges) and sign in with it.
Automatic Repair will eventually come up and try to diagnose the issues affecting your computer.
- Follow the on-screen instructions. Perform the appropriate tasks – if this step applies.
- On the screen that follows, you have to choose Advanced options.
- Click on Troubleshoot.
- Click on Startup Settings.
If you do not see Startup settings, you have to click on the See more recovery options link. On the screen that follows, you will then have to click on Startup Settings.
- Click on the Restart button.
Your computer is now supposed to reboot itself and take you into the recovery environment.
Go through the options on your screen. You have to press the 5 or F5 button on your machine’s keyboard to boot into Safe Mode with Networking.
Alternatively, you can press the 5 or F5 button on your device’s keyboard to select Safe Mode with Command Prompt.
Note: if you cannot get your computer to boot into safe mode from the recovery environment or if you cannot even trigger Automatic repair, then you have to create a bootable Windows 10 flash drive, insert the drive into your computer and then force your machine to boot from the drive. You will be able to access recovery, diagnosis, and repair utilities in the resulting environment.
If you cannot log in to your computer due to the issues defined by the error or BSOD in view, then you have to enable the legacy advanced boot menu. Here, we are assuming you have gotten your computer into safe mode (or booted Windows from a flash drive to access recovery tools), which means you will be able to use Command Prompt. If you selected Safe Mode with Command Prompt earlier, then things will be easier for you.
Follow these instructions:
- First, you have to launch the Command Prompt application – if this program window is not on your screen currently.
Skip the next three steps if you already opened Command Prompt.
- Click on the Windows icon in the bottom-left corner of your machine’s display (or give the Windows logo button on your device’s keyboard a tap).
- Input CMD into the text field (that appears the moment you begin to type) to perform a search task using that keyword as the query.
- Once Command Prompt (App) appears as the main entry on the results list, you have to do a right-click on it to see the options available and then choose Run as administrator.
- Assuming you are now on the Command Prompt window, you have to run this code there (type in the command first and then hit the Enter button):
C:
- At this point, you must run this command to enable the legacy advanced boot menu:
BCDEDIT /SET {DEFAULT} BOOTMENUPOLICY LEGACY
- Finally, you must run this code to close or dismiss the Command Prompt window:
EXIT
You will be directed back to the Choose an option screen.
- Click on Continue. Now, you have to restart your computer normally.
- Check and confirm that your computer no longer blue screens like before.
Run quick preliminary checks and perform complementary tasks:
Before you get bogged down working on long operations, you might want to run quick checks on your computer to troubleshoot the issue and perform complementary tasks (where applicable) to fix the problem. Go through these troubleshooting tips (which have been shortened for ease and accessibility):
- If you recently connected a peripheral or new hardware component to your machine, then you must remove it (or replace it) to see if things improve.
- If you recently installed a new driver or application, then you have to disable or uninstall it completely.
In general, you will do well to reverse whatever change you made in recent times to your computer in terms of new software (be it applications or drivers) or new settings or configurations (for applications, setups, or even Windows itself).
- Check the System log in Event Viewer to see additional error messages and problem descriptions that might help you narrow down the cause of the problem or assist you in figuring out the device or driver that is responsible for the BSOD.
- If you know your way around the Device Manager app, then you have to launch this application to see if there are device drivers marked with an exclamation symbol.
Well, Windows typically places the exclamation mark beside a troubled driver, so you will know which device to check for problems.
Disable the Automatic restart function:
Here, we want you to configure your computer to allow the error screen to stay up for longer than usual after the crash occurs. Currently, your system is programmed to show the blue screen only briefly before restarting or even restart itself immediately (without showing an error screen). By forcing your computer to keep the error screen up, you will be able to examine the error for as long as necessary and learn some things about it.
Once you gather enough details on a specific blue screen error, you will find it easier to resolve the problems, especially the issues that lead to or trigger the crash. Follow these instructions to disable the Automatic restart function:
- Give the Windows logo button on your device’s keyboard a tap to see the Windows Start menu screen (or click on the Windows icon in the bottom-left corner of your computer’s display).
- Input Advanced settings into the text box (that appears the moment you begin to type) to perform a search task using those keywords as the query.
- Once View advanced system settings (Control Panel) gets brought up as the main entry on the results list, you have to click on it to launch the needed program.
The System Properties window will be brought up now.
- Click on the Advanced tab (close to the top of the window) to go there – if you are not there currently.
- Click on the Settings button under the Startup and Recovery section to continue.
Windows will bring up the Startup and Recovery window now.
- Click on the box for Automatic restart (under the System failure section) to get this parameter deselected.
- Click on the OK button to save the new configuration for Startup and Recovery.
- Close all the windows and then restart your computer.
- Do your best to trigger the blue screen of death or recreate the event where your computer goes with a crash.
After the blue screen of death comes up again, you have to check the error code and other important details under Technical information. Windows will probably ask you to search for a specific error.
If abcd.sys appears in the details (where abcd can be any name with the .sys extension), then it means the blue screen of death you are dealing with has something to do with driver issues. You can easily google the driver’s name (abcd.sys) to get information about the driver. You must find out what type of driver it is – for example, it could be a driver for a network adapter or driver for a graphics card or similar component.
Fix the problem with drivers by rolling them back:
Earlier, we established the link between driver issues and blue screens of death, such as the one defined by Error 0x00000133. Here, we want to address the problems with the drivers. If you recently installed updates for a driver, then the new driver is probably responsible for the problem, which means you will have to remove it to make things right. Driver updates are supposed to improve your device’s capabilities, but they sometimes do more harm than good, especially when they cause computers to go down with blue screens.
You can easily get rid of the current driver and bring back the old driver software through the rollback function provided in Windows. Here, we are assuming you can log into your computer and get to your desktop (either through safe mode or the regular startup process).
Follow these instructions to roll back the required driver:
- Press and hold the Windows logo on your machine’s keyboard and then give the letter R key a tap.
- Once the small Run window appears, you have to fill the text field there with the following code:
devmgmt.msc
- Hit the Enter button on your machine’s keyboard to run the code.
The Device Manager application window will be brought up now.
- Go through the categories listed, locate the category housing the driver that you want to work on, and then click on the expansion icon for that category to see its contents.
For example, if the BSOD manifests itself when you are surfing the web, then you have to access your network adapter drivers – and this means you have to click on the expansion icon beside the Network adapters category.
If the BSOD manifests itself when you are playing games or running graphics-intensive applications, then you have to access the drivers for your graphics card – and this means you have to click on the expansion icon beside the Display Adapters category.
- Assuming the device driver that you want to work on is now visible, you have to double-click on it.
The Properties window for the chosen device driver will be brought up now.
- Click on the Driver tab (close to the top of the window) to go there. Click on the Roll Back Driver button.
If the Roll Back Driver button appears to be greyed out – which means you cannot use it – then you will be unable to perform the rollback task for the driver you selected. Your computer cannot access or find the old driver software. Perhaps, your system is yet to install a new driver. In other words, there is no old driver for your computer to reinstall.
- Click on the Roll Back button to confirm the operation – if this step applies.
Windows is now supposed to roll back the driver (as you requested).
- Close the Device Manager window and then restart your computer.
If you did the work in safe mode, then you have to restart your PC to force it to go into the regular Windows operating system environment.
- After Windows boots up and settles down, you have to check and test things to confirm that the KERNEL_SECURITY_CHECK_ FAILURE blue screen error has been resolved.
- Try to recreate the event or scenario where the crash occurred earlier. Play the same game you were on previously or reattempt the same task on the graphics-intensive application.
Fix the problem with the drivers by updating them:
If you could not get your computer to roll back the problematic driver – because the Roll Back Driver button was grayed out – or if your computer continued to go down with blue screens of death even after you brought back the old drivers successfully to replace the problematic drivers, then you have to install driver updates. The issues that trigger the BSOD are likely to become a nonfactor once your computer starts using a new driver.
Here too, you have to use some functions accessed from the Device Manager application and perform the necessary tasks from its window. First, you might want to check the driver version currently installed on your computer. Follow the instructions below:
- Open the Device Manager program. You can do a right-click on the Windows logo button in the bottom-left corner of your display to see the Power User menu programs and options and then select Device Manager.
- Assuming you are now on the Device Manager window, you have to go through the categories listed there.
- You must identify the category housing the device driver for which you seek information and then click on the expansion icon beside it to see the items that it contains.
- Assuming the device driver is now visible, you have to double-click on it.
The Properties window for the chosen driver will appear on your screen now.
- Click on the Driver tab (close to the top of the window) to go there.
- You must make a note of the information displayed. Ideally, you should write or copy the details down somewhere.
The value for the Driver Version field, in particular, is very important. Those digits represent your driver version.
Now, you have to search online for information on the driver. You need to know if your computer is running the latest version of the driver or if a new driver build has been released. Continue with the instructions below:
- Open your web browser by clicking on the browser icon on your taskbar or the browser shortcut on your desktop.
- Once the browser window comes up, you have to fill the text field with a query formed from your device driver name and manufacturer and then hit the Enter button to run a search task on Google.
- After the Google Search results page comes up, you have to go through the entries there and then click on the appropriate link to a good webpage.
Alternatively, you can head to the device manufacturer’s website and check the driver versions there and their release dates.
- If the numbers do not match, then your computer is probably not running the latest driver.
- Download the newest driver. Save the package. Do not run it.
In any case, after you confirm that there is a new driver for the problematic device, then you have to remove the current driver and then install the latest driver available. These are the instructions you must follow to get rid of the current driver:
- Here too, you have to open the Device Manager application (as you did earlier). You can go through the steps (above) we provided on performing the task. All you have to do is scroll up a bit to see them again.
- You have to expand the relevant category, locate the device driver, and then double-click on it to see its Properties window.
- Go to the Driver tab. There, this time, you have to click on the Uninstall button.
Windows is supposed to bring up a dialog or window asking you if you want to proceed with the driver removal operation.
- Click on the Uninstall button again to affirm things.
Your system is now supposed to get rid of the selected driver.
Assuming you are done removing the current driver (which is problematic), you must move to install the new driver. Continue with the steps below:
- Open the Device Manager application, navigate through the appropriate category, locate the device driver, and then click on it to get it highlighted.
- Right-click on the highlighted driver to see the options available. Choose Update Driver Software.
Your computer is now supposed to bring up a window asking you how you want to go about the driver update operation.
- Click on the second option (Browse my computer for driver software).
- Now, you have to navigate through the appropriate directories to get to the folder where the driver you downloaded earlier got stored.
You will probably have to go to the Downloads folder used by your browser.
- Locate the downloaded driver package and then click on it to get it highlighted. Click on OK or click on the appropriate button to force Windows to select the driver.
- Click on the Next button. Follow the on-screen instructions and guidelines. Perform the relevant tasks to install the new driver.
- Once the driver installation processes reach completion, you have to close all the programs currently running on your PC and then restart your machine.
- Verify that the KERNEL_SECURITY_CHECK_ FAILURE blue screen of death error has been resolved for good.
If the BSOD defined by Error 0x00000139 continues to bother you even after you updated the troubled driver or if you could not update the problematic driver (for any reason), then we recommend you download and run Auslogics Driver Updater. With this program, you can perform the driver update tasks differently, which means you might get better results. In the previous processes, there is a good chance you missed something or made mistakes.
The recommended application will run a scan to detect or identify the faulty, malfunctioning, outdated or old, broken, and corrupted drivers on your computer and also gather the relevant information on them. After the driver detection/identification phase, the app will move on to search online for replacements for the bad drivers. The latest manufacturer-recommended driver versions will be downloaded and installed to make things right.
Since the driver update processes are initiated and managed automatically – and with you not having to do anything – your computer will end up running the newest drivers for almost all its devices in no time. This way, nothing (or no driver) gets left out in your quest to resolve all driver problems.
Here too, after the driver installation operations reach completion, you have to close all the applications currently open on your computer and then restart your PC to round up the work. Wait for Windows to boot up and settle down. You must then test things to confirm that the blue screen of death error can no longer be triggered.
Other things you can try to resolve the Error 0x00000139 blue screen of death on a Windows 10 PC
If you are yet to find a way to stop your computer from going down with blue screen of death crashes, then you have to attempt the solutions on our final list of fixes and workarounds to the problem.
Run scans using SFC and DISM:
With the System File Checker (SFC) and Deployment Image Servicing and Management (DISM) utilities, you can run both standard and top-level scans to check for corruption in system files and important Windows installation packages. You will also be able to fix the detected issues using those tools.
Use the Memory Diagnostic tool to test your temporary memory:
Since an ideal fix to the BSOD has eluded you till this point, it is time you started testing the hardware components in your machine (its physical parts) for damages or faults. The Memory Diagnostic tool is the utility built into Windows that users can employ to run checks on the temporary memory. Well, it is far from perfect, so you will have to confirm the results of its tests (whether positive or negative) through more extensive procedures, techniques, or programs.
- Use the CHKDSK tool to test your hard drive.
- Download and install all the Windows updates ever released for your computer or system configuration.
- Scan your computer for viruses and malware using antiviruses or antimalware applications.
- Use System Restore.
- Reset or repair Windows.
- Install a clean version of Windows 10 (if all else fails).
Ошибка с номером 0x00000139 появляется при запуске системы, после установки обновлений или подключения нового устройства. Среди распространённых причин синего экрана с указанным кодом — несовместимость драйверов, нарушение целостности системных файлов, проблемы с оперативной памятью и жёстким диском.
Установка обновлений
Синий экран смерти с ошибкой 0x00000139 не блокирует вход в систему. Поэтому мы можем без проблем запустить Windows и установить доступные обновления. Это первый шаг, который следует выполнить при появлении сообщения об ошибке.

Устанавливаем все доступные обновления
В ходе установки обновлений система несколько раз перезагрузится. Если вы используете ноутбук, подключите к нему адаптер питания. Аварийное выключение системы во время обновления может привести к повреждению файлов и появлению новых ошибок.
Проверка целостности системных файлов
Синие экраны часто появляются из-за повреждения системных файлов. Ошибка 0x00000139 тоже относится к числу таких сбоев. Решение проблемы простое — нужно проверить системные файлы и восстановить их целостность. Для этого мы используем встроенную утилиту SFC.

Проверяем состояние системных файлов
Если утилита SFC не справилась с ошибкой, можно попробовать DISM. Это более мощное средство для проверки целостности системных файлов. Подробнее о работе с DISM вы можете узнать из этой статьи.
Проверка диска на ошибки
Ошибка в работе диска — тоже частая причина появления синего экрана смерти. Чтобы исключить этот фактор, выполним проверку диска.

Проверяем состояние диска
Проверку системного раздела диска можно выполнить только вне среды Windows, поэтому без перезагрузки обойтись не получится. Сканирование накопителя на ошибки занимает несколько десятков минут, так что запасаемся терпением.
Удаление или обновление повреждённого драйвера
Ошибка 0x00000139 может появиться из-за повреждения драйвера устройства. Главная сложность — определить, какое конкретно ПО вызывает сбой. Для этого нужно настроить в системе создание дампа памяти.

Открываем дополнительные параметры системы

Переходим к настройкам загрузки и восстановления

Сведения об ошибках будут теперь сохраняться в системном журнале
Чтобы в системном журнале сохранилась информация об ошибке, должен снова появиться синий экран смерти. Как только это происходит, загружаемся в Windows и устанавливаем программу BlueScreenView. Запускаем её и видим свежий дамп памяти с сообщением об ошибке. Значимая информация выделена красным цветом, найти её можно в нижней части окна.

Информация об ошибке в программе BlueScreenView
Нам нужно посмотреть, на что ругается система. При необходимости уточняем смысл через поисковики и форумы. В итоге мы получим название поврежденного драйвера, который нужно удалить или обновить. После устранения сбоя ошибка с номером 0x00000139 должна исчезнуть.
Проверка оперативной памяти
К появлению синего экрана смерти могут также привести ошибки в работе оперативной памяти. Обнаружить и устранить их помогает встроенное средство Windows:

Используем встроенное средство проверки оперативной памяти
Без перезагрузки проверить оперативную память на ошибки нельзя. Если встроенное средство WIndows не обнаружило причину появления синего экрана смерти, используем для проверки другие инструменты — например, программу Memtest86+. Подробнее об этом мы рассказывали в статье о том, как проверить оперативную память.
Что делать, если на Windows 10 появляется ошибка KERNEL SECURITY CHECK FAILURE?
Хочу разобрать очередную ошибку, которая относится к критическим в операционной системе Windows. Так я ее назвал, потому что ошибки BSoD (синие экраны смерти) всегда критичны. Самое интересное, что часто сразу выявить причину не выходит, так как их может быть огромное количество.
В данной статье мы будем рассматривать ошибку Kernel Security Check Failure Windows 10. Вообще, ошибки подобного рода в Windows 10 имеет более информативный характер, то есть там написано, что нужно делать, а еще система сама попытается ее исправить. К сожалению, ошибку KERNEL SECURITY CHECK FAILURE придется исправлять самостоятельно.

Как исправить синий экран смерти Kernel Security Check Failure?
Эта ошибка еще имеет код 0x00000139, может быть эта информация поможет вам в решении проблемы. Итак, причинами SECURITY CHECK FAILURE могут быть следующие моменты:
На самом деле эти причины не единственные, их гораздо больше, но все их здесь перечислить не получится.
Исправляем
Так как определить ошибку по-хорошему не выходит, мы можем применять только действия, которые в принципе могут устранить ее, например, восстановить целостность файлов, через безопасный режим удалить драйвер, возможно, виновный в появлении BSoD.
Хочу напомнить, что у меня есть статья на тему анализа дампа памяти, который позволяет выявить причину ошибки. Если система не запускается, то проделывать процедуру придется в безопасном режиме. Прочитайте эту статью и скорее всего вы определите, кто виновник «синего экрана смерти».
Проверка диска на ошибки
В этом случае системная утилита проверить жесткий диск на наличие проблем и попытается их устранить, либо появится сообщение, что их нет.
Откройте командную строку от имени администратора, для этого нажмите по меню Пуск правой кнопкой мыши и выберите там соответствующий пункт.
Введите там команду: chkdsk /f C:

В том случае, если у вас не один накопитель, то придется применять команду к каждому. После этого вы перезагружаете компьютер начинается проверка, которая может быть довольно длительной.
Проверка системных файлов на целостность
Ну тут из заголовка понятно, что мы будем делать. Нам также понадобится командная строка, в которую нужно ввести эту команду:

Если все будет нормально, то команда строка скажет об этом, если есть поврежденные файлы, то система попытается их восстановить.
Проверка оперативной памяти
Бывают случаи, что Kernel Security Check Failure появляется из-за ошибок в ОЗУ. В этом случае можно сделать следующее – вытащить по очереди модули памяти по одному и проверять работоспособность системы. Если все нормально, то попробуйте проверить оперативку на ошибки. Перейдите по ссылке, чтобы прочитать об этом статью.
Проблемы с реестром
Причиной может быть и реестр, который был поврежден самим пользователем, либо вирусами. Конечно не всегда изменения в реестре могут выявить такую проблему, но есть и вот такие случаи. Вам нужно попытаться восстановить реестр, но перед этим вам нужно было делать резервную копию. Хотя в Windows 10 они уже есть, поэтому волноваться не стоит. Как восстановить реестр написано здесь.
Проблемные драйвера
Хоть этот пункт и является почти последний, он не менее важен. При обновлении драйверов видеокарты или другого устройства с большой вероятностью вы получите ошибку Kernel Security Check Failure. Либо же ошибка моет появляться из-за старой версии. Поэтому здесь два варианта, как поступить – обновить драйвера до последней версии, либо откатить их на версию или две назад.
Для профилактики вы еще можете сбросить BIOS, но это на ваш страх и риск.
Насчет физического повреждения компонентов сказать ничего не могу. Вспомните, может ноутбук или компьютер подвергался ударам, может быть у вас при отключении света выключался и компьютер, были скачки напряжения. Тогда тот или иной компонент придется заменить, например, тот же модуль оперативной памяти или жесткий диск.
Надеюсь это поможет вам в решении проблемы. Конечно, можно рассматривать и переустановку Windows, она то 100% поможет, но мало кто решиться на то действие.
Источники:
https://tehnichka. pro/error-0x00000139-windows-10/
https://computerinfo. ru/kernel-security-check-failure/