![]() При попытке выполнить установку устаревшей операционной системы Windows Server 2012 R2 на новую серверную платформу HPE ProLiant DL560 Gen10 с RAID-контроллером HPE Smart Array P408i-a SR Gen10 можно столкнуться с тем, что инсталлятор ОС не может обнаружить диски, пригодные для установки ОС. В этой заметке рассмотрим пару простых примеров решения подобной проблемы.
При попытке выполнить установку устаревшей операционной системы Windows Server 2012 R2 на новую серверную платформу HPE ProLiant DL560 Gen10 с RAID-контроллером HPE Smart Array P408i-a SR Gen10 можно столкнуться с тем, что инсталлятор ОС не может обнаружить диски, пригодные для установки ОС. В этой заметке рассмотрим пару простых примеров решения подобной проблемы.
Практика показала, что в зависимости от комплектации сервера, мы можем получать от инсталлятора ОС разные сообщения и ошибки, но чаще всего смысл их сводится к тому, что программа установки не может получить доступ к диску, который мог бы выступать в качестве загрузочного диска для устанавливаемой ОС.
В частности, в самом типичном случае, мы получим сообщение инсталлятора ОС:
We couldn't find any drives. To get a storage driver, click Load driver
При этом в окне выбора дисков для установки ОС не будет видно логических дисков на RAID-массивах, созданных до начала установки ОС на контроллере Smart Array.
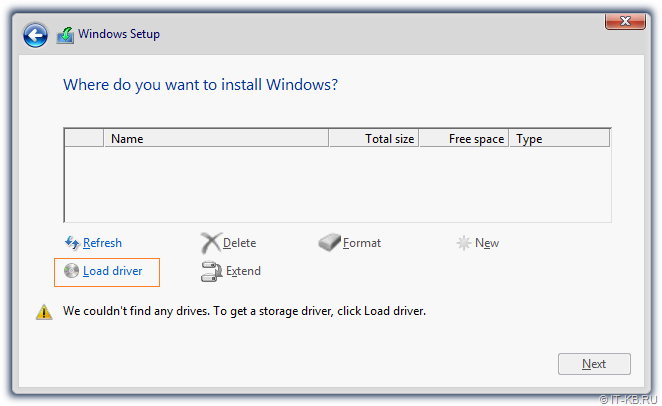
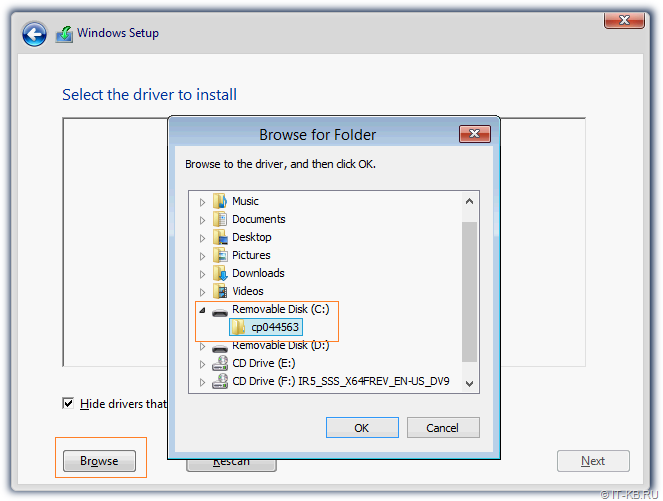
Решение данной проблемы в данной ситуации, что называется «на поверхности». В случае с контроллером Smart Array P408i-a SR нам потребуется с сайта HPE скачать драйвер HPE Smart Array Gen10 and Gen10Plus Controller Driver for Windows Server 2012 R2, Windows Server 2016, and Windows Server 2019. Загруженную актуальную версию программы установки (в нашем случае файл cp044563.exe – версия 106.278.0.1043 от 19.04.2021) распаковываем любым архиватором, как архив. Каталог с распакованным драйвером записываем на съёмный USB-накопитель и подключаем этот накопитель к серверу. Возвращаемся в программу установки ОС и, используя последовательно кнопки «Load driver» > «Browse«, указываем размещение каталога с распакованным драйвером на съёмном носителе.
В списке совместимых с нашим оборудованием драйверов выберем драйвер RAID-контроллера
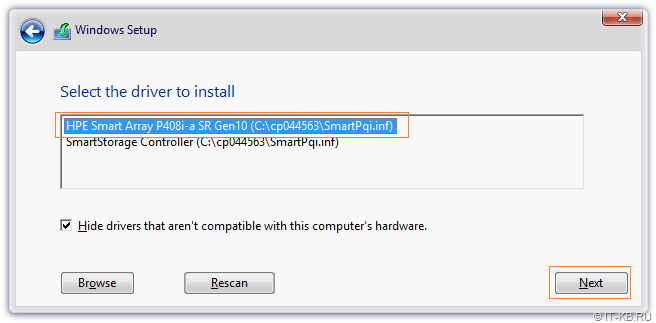
После этого в перечне накопителей, на которые может быть установлена ОС, должны появиться логические диски на RAID-массивах, созданных на контроллере Smart Array.

Однако, моя практика нескольких развёртываний ОС показала, что и на данном этапе нас могут ожидать некоторые непонятные ситуации.
Например, может получиться так, что даже после загрузки драйвера RAID-контроллера без явного появления каких-либо ошибок, список дисков, пригодных для установки ОС, может оставаться пустым. В таком случае можно попробовать воспользоваться кнопкой возврата на предыдущий шаг инсталлятора (синяя стрелка в левом верхнем углу окна) и повторить процедуру загрузки драйвера. Пару раз такой странный способ помогал.
В другом примере можно отметить ситуацию, когда драйвер RAID-контроллера Smart Array был успешно загружен, в перечне дисков появились логические диски для установки ОС, но при их выборе возникала ошибка (при этом дальнейшая установка ОС была невозможна):
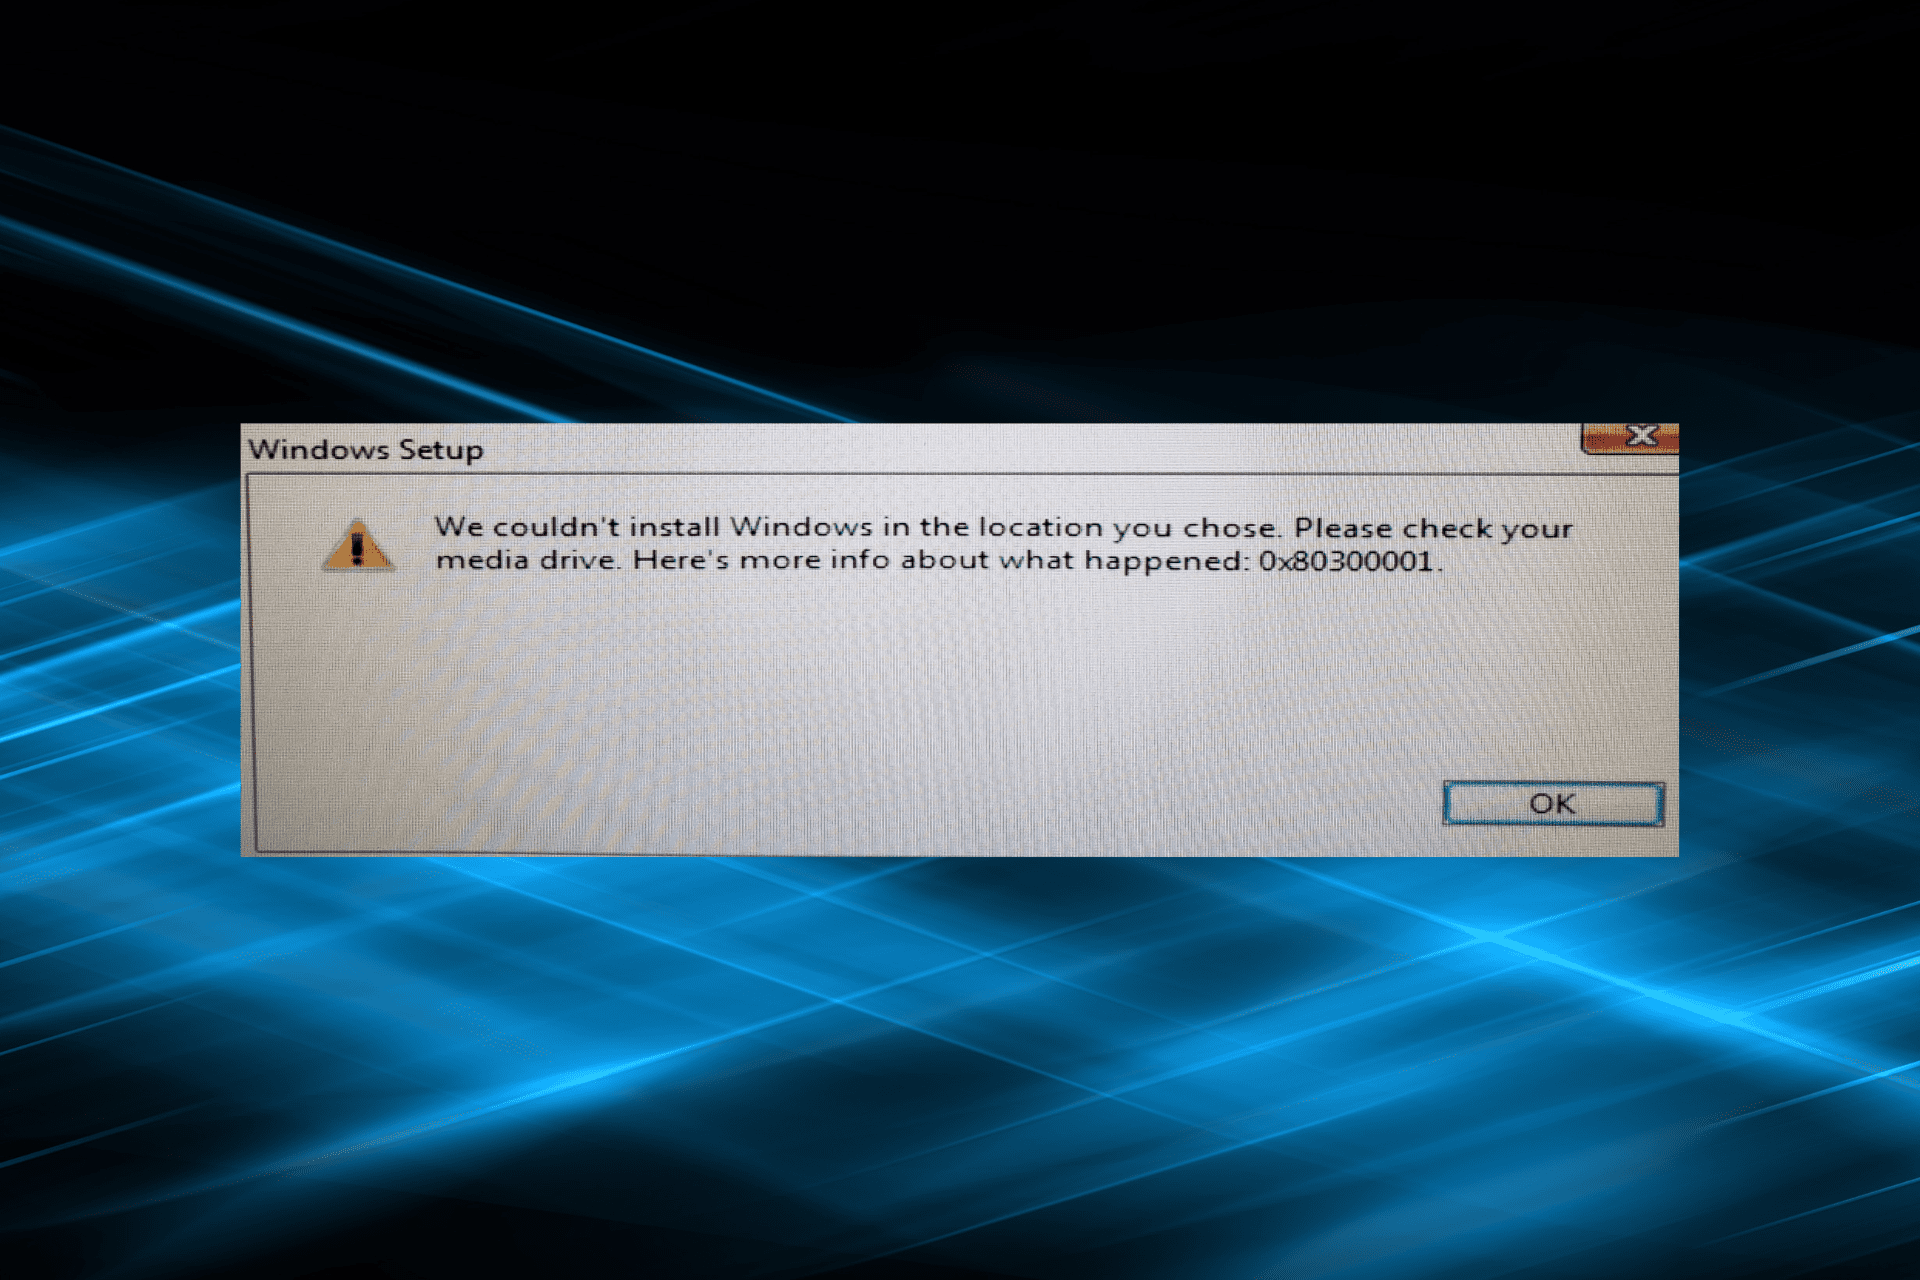
We couldn't install windows in the location you chose 0x80300001
Эксперименты показали, что данная ошибка в инсталляторе ОС может проявляться плавающим образом на разных серверах однотипной аппаратной конфигурации. В случае возникновения подобной ошибки можно проанализировать то, какие ещё в сервере есть Storage-контроллеры, с которыми может быть связана загрузка ОС. Например, в моём случае в сервере был дополнительно установлен оптический контроллер PCI-E HPE StoreFabric SN1200E FC HBA (Emulex LPe31002). Свидетельства ещё одного странного способа решения проблем с инсталлятором Windows Server говорят о том, что в такой ситуации перед началом установки ОС можно попробовать исключить из конфигурации сервера подобный Storage-контроллер, оставив в сервере RAID-контроллер Smart Array в «гордом одиночестве». FC-контроллер можно извлечь из сервера на время установки как физически, так и просто временно отключив его в настройках BIOS сервера. Для этого перейдём в раздел BIOS/Platform Configuration (RBSU) > PCIe Device Configuration, выберем соответствующее устройство…
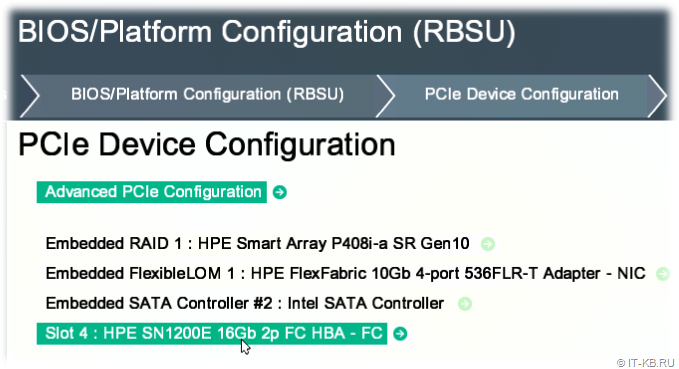
… и выполним его отключение.
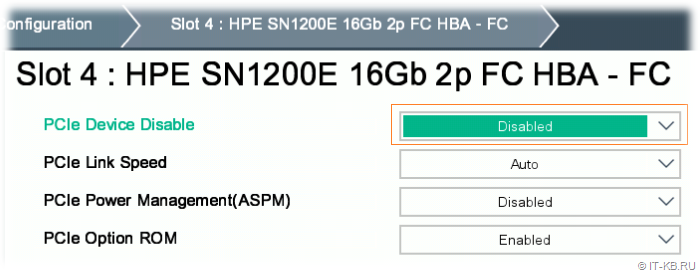
Сохраним настройки BIOS, снова запустим программу установки Windows Server и, возможно, уже не столкнёмся с ошибкой 0x80300001. А уже после успешного окончания процедуры установки ОС, можно вернуть в работу FC-контроллер в настройках BIOS.
При установке операционной системы Windows могут возникать различные ошибки, которые становятся причиной неудачной установки. Одна из таких ошибок — 0x80300001, которая обычно возникает при попытке установить систему на новый жесткий диск. Эта ошибка может быть вызвана различными причинами, такими как неправильная конфигурация BIOS или неполадки в самом жестком диске. В этой статье мы рассмотрим несколько способов, которые помогут исправить ошибку 0x80300001 и успешно установить операционную систему Windows на жесткий диск.

- Что означает ошибка 0x80300001?
- Что важно сделать перед исправлением ошибки 0x80300001?
-
Как исправить ошибку 0x80300001 при установке Windows?
- Способ 1: Проверьте целостность носителя установки
- Способ 2: Отключите все лишние устройства
- Способ 3: Измените настройки SATA-контроллера
- Как восстановить нужные файлы в случае удаления?HOT
- Часто задаваемые вопросы
Ошибка 0x80300001 является одной из наиболее распространенных проблем, возникающих при установке операционной системы Windows. Обычно она происходит во время попытки установки системы на новый жесткий диск, и ее сообщение гласит: «Windows не может установить выбранные разделы диска. Причина ошибки 0x80300001». В такой ситуации установка системы останавливается, и пользователь не может продолжить работу с компьютером.
Основной причиной ошибки 0x80300001 является неправильная конфигурация BIOS. BIOS отвечает за управление жестким диском и его разделами. Если он настроен неправильно, то система не сможет определить жесткий диск и его разделы, что приведет к ошибке.
Также, данная ошибка может быть вызвана неполадками в самом жестком диске, например, если на диске есть поврежденные сектора или он не отформатирован.
Что важно сделать перед исправлением ошибки 0x80300001?
Перед тем, как исправить ошибку 0x80300001, важно сделать несколько ключевых действий. В первую очередь, необходимо убедиться, что все пользовательские данные и файлы на компьютере были сохранены и скопированы на другой носитель, такой как внешний жесткий диск или облачное хранилище. Это особенно важно, если есть подозрения на неисправность диска, так как исправление ошибки может потребовать форматирования жесткого диска, что приведет к удалению всех файлов.
Также перед исправлением ошибки 0x80300001, необходимо проверить жесткий диск на наличие повреждений и ошибок. Для этого можно воспользоваться специальными программами для проверки диска, такими как CHKDSK. Это позволит определить, есть ли какие-либо проблемы с диском, такие как поврежденные секторы или ошибки файловой системы. Если такие проблемы обнаружены, то их необходимо решить перед продолжением установки операционной системы.
Если же ошибки 0x80300001 вызваны неправильной конфигурацией BIOS, то перед исправлением необходимо убедиться, что настройки заданы правильно. Для этого можно воспользоваться инструкцией к материнской плате или обратиться за помощью к специалисту.
Наконец, если ни один из вышеперечисленных методов не помогает, то можно попробовать выполнить установку операционной системы с использованием другого установочного диска или USB-накопителя. Иногда проблемы возникают из-за повреждений на диске или некорректно записанного образа операционной системы.
В целом, перед исправлением ошибки 0x80300001 важно провести все необходимые проверки и сохранить важные файлы, чтобы избежать их потери. Если проблему не удается решить самостоятельно, то лучше обратиться к профессионалам, которые помогут исправить ошибку и установить систему на компьютере.
Как исправить ошибку 0x80300001 при установке Windows?
Ошибка 0x80300001 во время установки Windows может возникать по разным причинам, но, как правило, связана с проблемами чтения диска или USB-накопителя, на котором располагается образ операционной системы. Ниже приведены три способа, которые могут помочь исправить эту ошибку.
Способ 1: Проверьте целостность носителя установки
1.Если у вас установочный диск или USB-накопитель, проверьте их на наличие повреждений или ошибок чтения. Для этого можно воспользоваться инструментом проверки диска, который доступен в настройках BIOS или UEFI. Если обнаружены ошибки, попробуйте скопировать образ операционной системы на новый носитель или скачайте новый образ с официального сайта Microsoft.
Способ 2: Отключите все лишние устройства
2.Иногда проблема может быть связана с неправильной работой дополнительных устройств, подключенных к компьютеру. Попробуйте отключить все USB-устройства, кроме необходимых для установки операционной системы, и повторите попытку установки.
Способ 3: Измените настройки SATA-контроллера
3.Некоторые пользователи сообщают, что удалось убрать ошибку 0x80300001 путем изменения настроек SATA-контроллера в BIOS. Вам может потребоваться включить режим совместимости SATA или изменить режим работы контроллера на AHCI. Однако перед изменением настроек SATA-контроллера убедитесь, что у вас есть все необходимые драйверы для вашего жесткого диска.
Часть 4: Как восстановить нужные файлы в случае удаления?
Если в процессе установки или в другом случае были удалены важные файлы, не стоит паниковать. Существуют различные программы, которые помогают восстановить удаленные данные. Одной из таких программ является 4DDiG Windows Data Recovery. 4DDiG Windows Data Recovery – это универсальная программа для восстановления данных, которая помогает вернуть удаленные файлы с жестких дисков, USB-накопителей, карт памяти и других устройств хранения информации. Эта программа имеет простой и интуитивно понятный интерфейс, что делает процесс восстановления данных максимально удобным для пользователей.
С помощью 4DDiG Windows Data Recovery вы можете быстро сканировать диск или другое устройство хранения информации и найти все удаленные файлы. Программа поддерживает различные типы файлов, такие как документы, фотографии, видео, аудио, архивы и многие другие. Особенностью 4DDiG Windows Data Recovery является возможность выборочного восстановления файлов. Это значит, что вы можете выбрать только те файлы, которые вам нужны, а не восстанавливать все найденные данные. Кроме того, программа предоставляет возможность предварительного просмотра файлов перед их восстановлением, что помогает убедиться в том, что найденные файлы соответствуют тем, которые были удалены.
4DDiG Windows Data Recovery также обеспечивает защиту данных, которые были восстановлены, путем сохранения их на другом диске или накопителе, чтобы избежать случайного удаления в будущем. В целом, 4DDiG Windows Data Recovery – это мощный инструмент для восстановления удаленных данных, который может помочь вам быстро вернуть потерянные файлы. Однако, чтобы увеличить шансы на успешное восстановление данных, не забывайте про регулярное создание резервных копий важных файлов.
- Восстановление поврежденных / удаленных / потерянных / отформатированных файлов с SD-карты / USB-накопителя / внешних устройств и т.д.
- Восстановление потерянных файлов с компьютеров Windows и Mac.
- Поддержка более 1000 типов файлов, таких как фотографии, видео, аудио, документы и многое другое.
- Быстрое сканирование со 100% безопасностью.
- После загрузки и установки 4DDiG Windows Data Recovery на свой компьютер, запустите программу и выполните сканирование или всего диска, на котором находились удаленные файлы.
- Если необходимо восстановить определенный тип файлов, то укажите его и нажмите на кнопку “Сканирование выбранных типов файлов”; В результатах сканирования находим удаленные файлы – для проверки возможности восстановления используем предпросмотр:
- Выбираем файлы и жмем «Восстановить», Указываем место для сохранения файлов.
Часть 5: Часто задаваемые вопросы
Рассмотрим самые распространенные вопросы, возникающие у пользователей при установке операционной системы.
1. Что значит ошибка 0x8007025d?
Ошибка 0x8007025d в операционной системе Windows обычно указывает на проблему с установкой или копированием файлов, возможно, вызванную повреждением диска или неправильным подключением к компьютеру. Также проблема может возникнуть из-за нерабочего образа системы или простой нехватки места для установки.
2. Как исправить ошибку 0x8007045d?
Ошибка 0x8007045d может возникать при копировании файлов из-за проблем с жестким диском или USB-накопителем. Чтобы ее исправить, можно попробовать изменить настройки BIOS или заменить некачественный накопитель.
3. Что делать если при установке Windows выдает ошибку?
Если при установке Windows появляется ошибка, можно попробовать перезагрузить компьютер, проверить наличие повреждений на диске или USB-накопителе, отключить ненужные устройства и использовать инструменты для восстановления системы. Если проблема не устраняется, можно обратиться за помощью к специалистам.
Заключение
Ошибка 0x80300001 при установке Windows может возникать по разным причинам, таким как неисправность диска, неправильные настройки BIOS или неподдерживаемый формат диска. Для исправления этой ошибки можно использовать различные методы, такие как замена некачественного носителя, отключение ненужных устройств, изменение настроек BIOS и использование инструментов для восстановления системы. В любом случае, перед выполнением каких-либо действий рекомендуется сделать резервную копию важных данных и обратиться к специалистам, если необходимо. Если вы случайно потеряете или удалите файлы данных компьютера во время этого процесса, мы рекомендуем вам использовать Tenorshare 4DDiG data recovery для восстановления ваших данных.
Tenorshare 4DDiG Data Recovery
4DDiG — это ваш непревзойденный выбор для восстановления всех потерянных данных на компьютере Windows / Mac после различных сценариев потери, таких как удаление, форматирование, RAW и т.д. с более высокой вероятностью успеха.
Скачать Бесплатно
Скачать Бесплатно
Купить Сейчас
Купить Сейчас
The Windows error 0x80300001 probably happens when you are installing Windows on your computer. To help you solve this error, MiniTool Partition Wizard provides you with a couple of feasible methods in this post. You can have a try.
When you are trying to install Windows OS on another hard drive instead of the system partition, you are likely to get the Windows installation error 0x80300001. This error often comes out with either of the following error messages:
- Windows is unable to install to the selected location
- we couldn’t install Windows in the location you chose
Note:
If you receive the “we couldn’t install Windows in the location you chose 0x80300001” error message, just click here to find out some solutions.
Once you run into Windows error 0x80300001, you will be prevented from completing the Windows installation process successfully. Therefore, you’d better work this error out as soon as possible. Here, we summarize several useful methods for fixing the error 0x80300001. Just keep reading and figure out how to solve it.
Method 1: Remove All the Unnecessary Hard Drives
If you have other hard drives connected to your PC, certain conflicts between hard drives will be caused. That’s why you get stuck in the Windows installation error 0x80300001. To solve this error, you ought to disconnect all the hard drives (except the one you determine to install the OS) including the HHDs, SSDs, SATA DVD-ROM drives as well as any removable USB devices (other than your mouse and keyboard).
Once done, restart your PC to see if the installation can be finished. If the “Windows is unable to install to the selected location error 0x80300001” persists, then you should go on with other solutions.
Method 2: Use Another USB Port
If you receive the Windows installation error 0x80300001 while attempting to install Windows with a Windows installation USB drive, it may indicate that you use the wrong USB port. In this case, you can try fixing this error by inserting the USB drive into a different USB port.
Method 3: Modify the Boot Order
It’s possible for you to experience the “Windows is unable to install to the selected location error 0x80300001” if the hard drive where you are trying to install the Windows OS is not at the top of the system’s boot order. To fix this error, you should get into BIOS and change the boot order. The following is a step-by-step guide for this operation.
Step 1: Reboot your computer and enter BIOS.
Step 2: Go to the Boot tab. Then locate the destination hard drive and set it as the first boot order with the on-screen instructions.
Step 3: After that, press F10 to save the changes and exit BIOS.
Step 4: Restart your PC and try the Windows installation again to see if the Windows error 0x80300001 disappears.
Method 4: Change Your BIOS Settings
The Windows installation error 0x80300001 may appear due to incorrect BIOS settings as well. Therefore, to solve this error, you need to modify certain settings in the BIOS setup.
- Enable the AHCI or RAID mode: This error will happen if the SATA controller mode is misconfigured. So, you can try fixing it easily by changing the mode to AHCI or RAID. To figure out the difference between AHCI and RAID, read this post: AHCI VS RAID: Which One Should I Choose for Better Performance?
- Disable CSM support: The CSM (Compatibility Support Module) support is not required while installing a new Windows OS. Hence, you’d better disable it to avoid unnecessary issues.
- Enable Secure Boot: By doing so, you are likely to fix the Windows installation error too.
After you apply the above changes, reboot your system and try the installation once more. The operation may finish smoothly this time.
Method 5: Format the Partition
If the partition you choose to install the Windows OS contains some data, the Windows installation process will be disrupted and shows you an error message like “we couldn’t install Windows in the location you chose 0x80300001” or “Windows is unable to install to the selected location error 0x80300001”.
On this occasion, you should format the target partition to solve this annoying error. To do this, follow the steps below.
Step 1: Start your computer normally to make a backup of the destination partition. This will help you avoid data loss.
Step 2: Insert the Windows installation media and boot your system into the Windows Setup screen.
Step 3: Follow the on-screen instructions to advance the installation process.
Step 4: When you reach the screen asking you “Where do you want to install Windows?”, select the partition you want to format and then click Format.
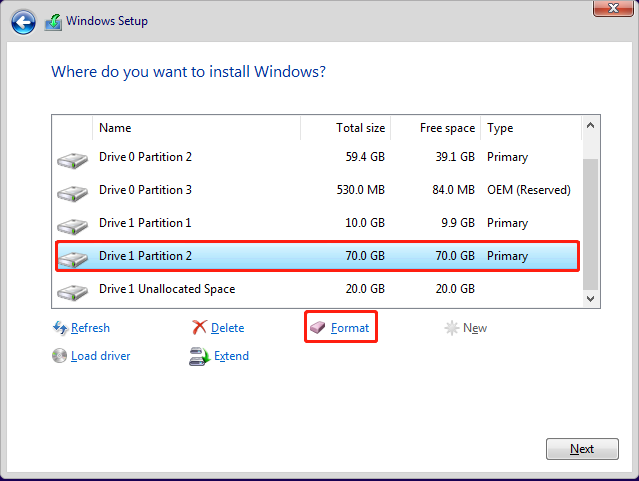
Step 5: Click OK to confirm the operation when a warning window pops up.
Step 6: Wait for the end of the formatting process. Then click Next to continue installing Windows to see if the error is resolved.
Method 6: Recreate the Partition
Be faced with the Windows error 0x80300001, you can also try deleting the destination partition and recreating a new partition. In case of data loss, you need to back up the partition in advance. After that, follow the guide below.
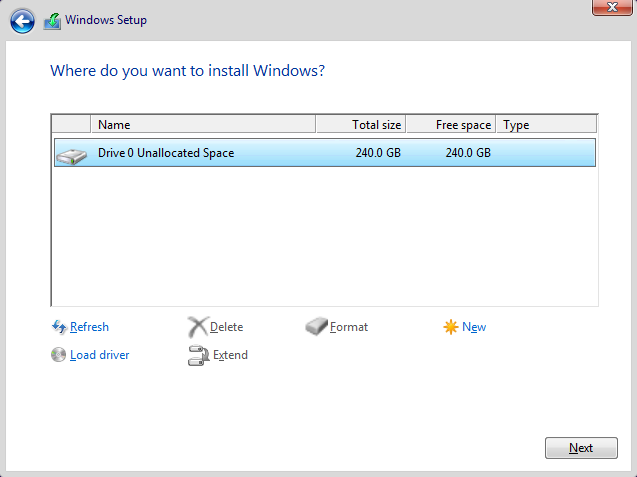
Step 1: Go to the Where do you want to install Windows? screen and select the partition you want to delete.
Step 2: Click Delete and then OK to remove this partition.
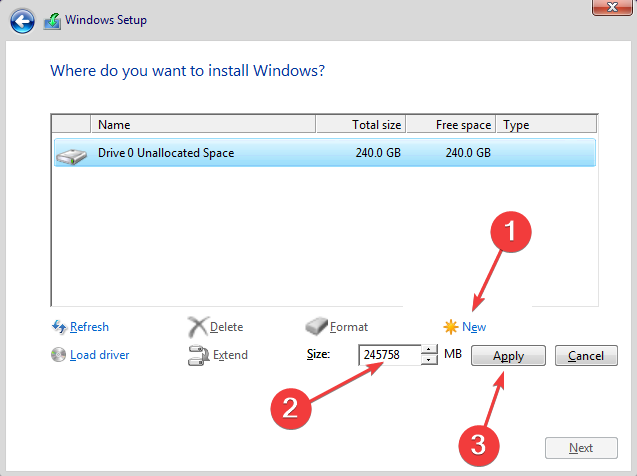
Step 3: The partition will become the unallocated space after it is deleted. Select the unallocated space and then click New.
Tips:
You can try selecting the unallocated space to install Windows to see if the error 0x80300001 disappears.
Step 4: Decide the size of the partition. Then click Apply to execute the operation. 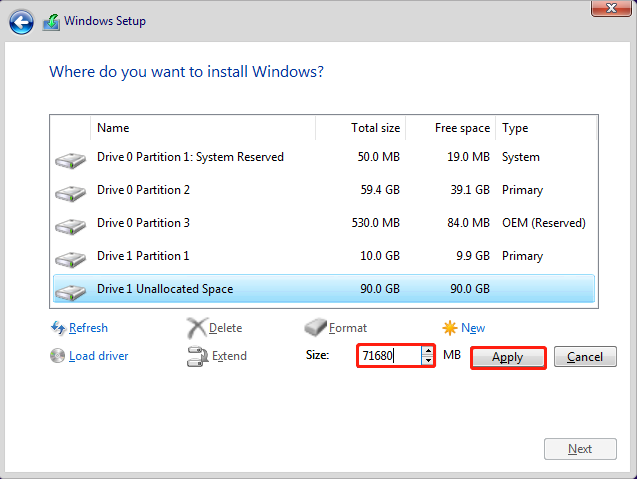
Step 5: Once the new partition is created, perform a format for it. Then select the partition and click Next to carry out the Windows installation.
Method 7: Delete All Partitions
After the “Windows is unable to install to the selected location error 0x80300001” happens, another method you can try is to delete all partitions on the disk where the selected Windows installation partition is located. To ensure you can finish this operation, there are two ways available.
Note: This operation will clean your disk. So, you’d better make a backup too before the process begins.
Way 1: Use Diskpart
Diskpart is a Windows built-in utility that allows you to manage your hard drives using command lines. Here is how to delete all partitions with diskpart.
Step 1: On the Windows Setup screen, press Shift + F10 to open Command Prompt.
Step 2: Once the Command Prompt window prompts, type diskpart to open this utility.
Step 3: Type the following commands and then press Enter after each to execute them:
- list disk
- select disk * (* is the number of the disk you select to install Windows)
- clean
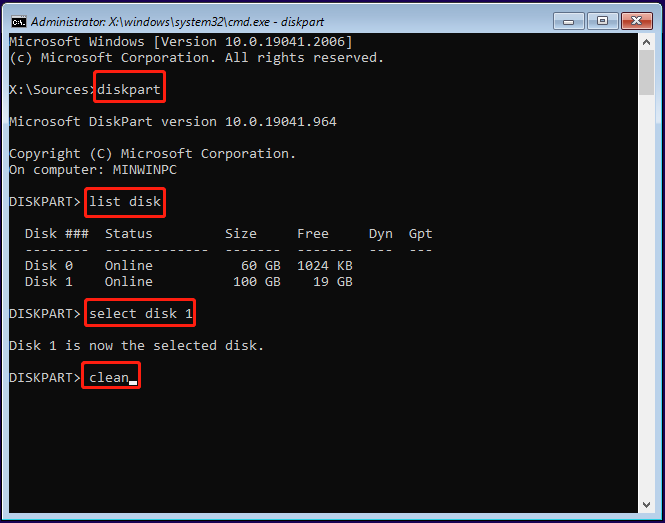
Step 4: After the process ends, exit Command Prompt. You will see the whole disk is shown as unallocated space.
Way 2: Use MiniTool Partition Wizard
Diskpart is a convenient tool to perform operations on your partitions and disks. However, sometimes it may trouble you with certain issues like Diskpart Clean not working. In such cases, maybe you should consider using an easy-to-use third-party partition manager. Here, we’d like to recommend MiniTool Partition Wizard to you.
MiniTool Partition Wizard is a professional partition managing program that enables you to create/format/delete partitions, copy/wipe disks, migrate OS to SSD/HD, and more. With this program, you are able to delete all partitions on the disk with a few clicks. The following are detailed steps.
Delete All Partitions
Step 1: Download and install MiniTool Partition Wizard. Then launch it to enter the main interface.
MiniTool Partition Wizard FreeClick to Download100%Clean & Safe
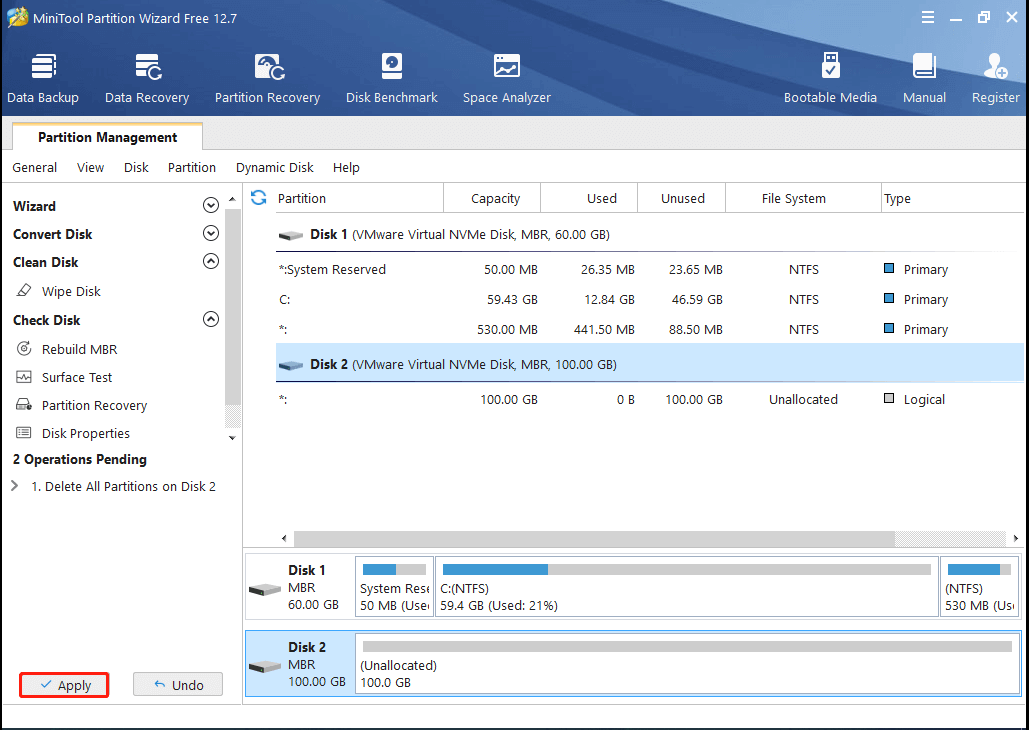
Step 2: Highlight the target disk and then select Delete All Partitions from the left action panel. Alternatively, just right-click the target disk and select Delete All Partitions.
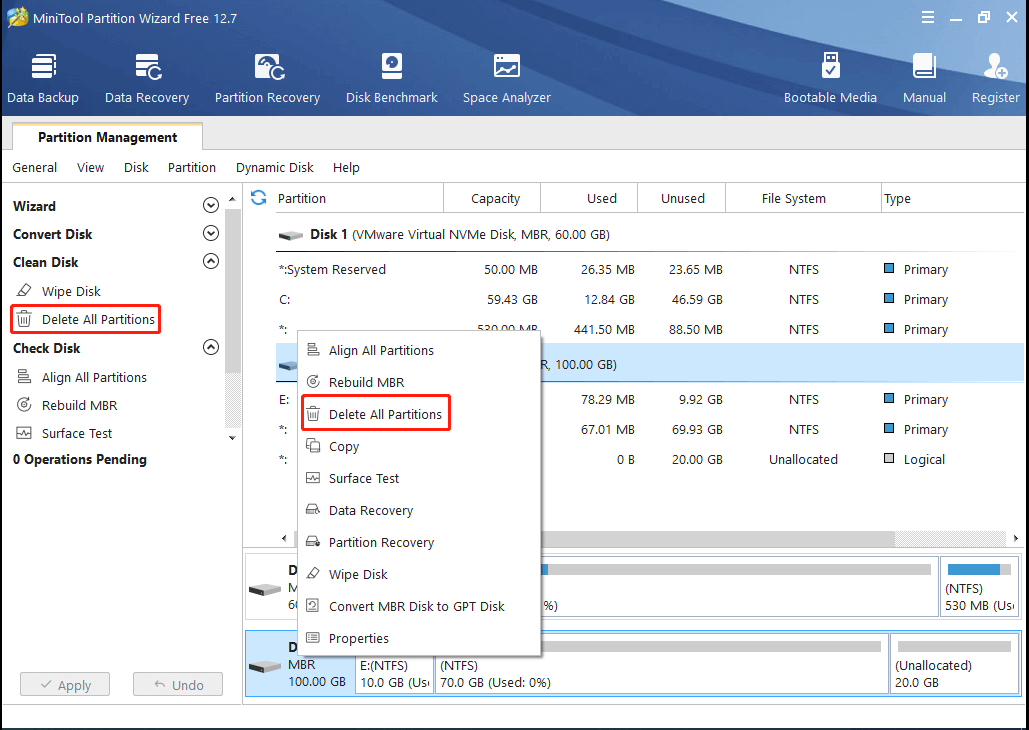
Step 3: Click Yes in the pop-up window to continue.
Step 4: Finally, click Apply to carry out the operation.
Wipe Disk
Step 1: Launch MiniTool Partition Wizard to get into its main interface.
Step 2: Right-click the disk where you want to install Windows. Then select Wipe Disk from the list.
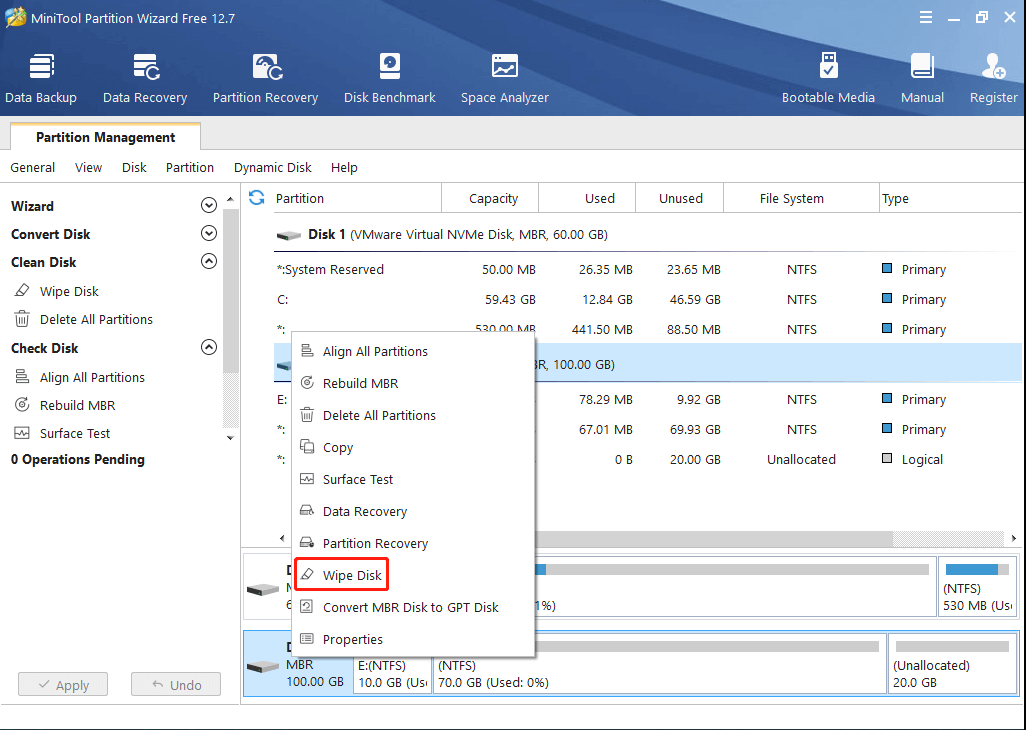
Step 3: In the next window, select a wiping method and then click OK.
Tips:
You are suggested to choose the former two options because they will take less time.
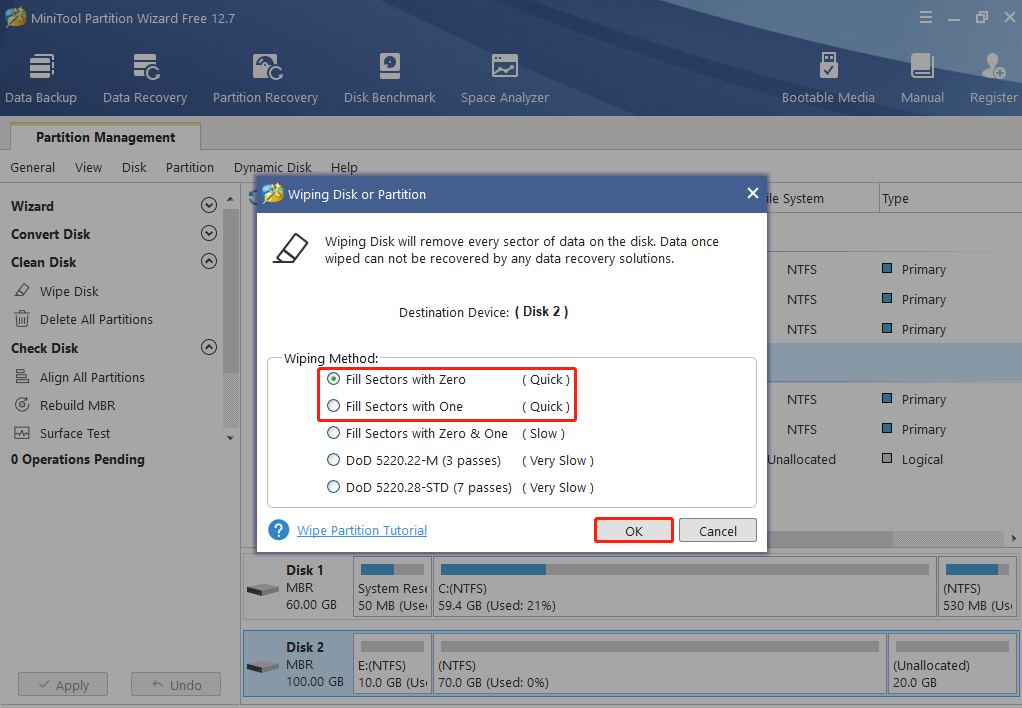
Step 4: You can see the target disk is presented as unallocated space. Click Apply to perform the changes.
Method 8: Re-insert the Windows DVD
During the Windows installation process, you may be required to insert another disk to install the needed drivers. If you forget to connect the Windows installation DVD back, you will probably experience the Windows error 0x80300001. On this occasion, you can fix this error simply by reinserting the Windows installation media.
Step 1: After loading and installing the required drivers from the driver CD, remove it.
Step 2: Re-insert the Windows installation DVD and then click Refresh.
Step 3: After that, click New to create a new partition for the Windows installation.
Step 4: Select the newly created partition and click Next to go ahead and process the Windows installation.
I failed to install Windows with the error 0x80300001. I surfed the Internet for effective solutions and eventually resolved this error after reading this post. I’d like to share it with you if you are stumped by the same error.Click to Tweet
Bottom Line
Are you bothered by the Windows installation error 0x80300001? If so, you can find out some workable solutions in this post. If you have any problems with this error, you can leave a message in the following comment part.
With anything confused while using MiniTool Partition Wizard, you can contact us via [email protected]. We will make reply to you as soon as possible.
Check expert advice to install Windows
by Kazim Ali Alvi
Kazim has always been fond of technology, be it scrolling through the settings on his iPhone, Android device, or Windows. And at times, unscrewing the device to take… read more
Updated on
- The 0x80300001 error prevents users from installing a fresh copy of Windows or upgrading to the latest iteration.
- It generally appears due to problems with the installation media or the USB port.
- To fix things, connect the bootable USB to another port, update the SATA drivers, or format the partitions, amongst other solutions.
XINSTALL BY CLICKING THE DOWNLOAD FILE
Get rid of malfunctioning drivers on your PC
SPONSORED
Drivers can often become corrupt as they can interfere with malfunctioning system files, thus arriving to be installed but not running correctly. To keep your drivers running smoothly, your Windows OS must run even smoother. Get it in perfect shape by following the steps below:
- Download Fortect and install it on your PC.
- Start the tool’s scanning process to look for corrupt files that are the source of your problem
- Right-click on Start Repair so the tool can start the fixing algorithm
- Fortect has been downloaded by 0 readers this month, rated 4.4 on TrustPilot
The process to install Windows is usually seamless, with no error messages popping up, given your PC is configured correctly. But that’s not always the case. Many have reported the 0x80300001 Windows installation error.
The complete message reads, We couldn’t install Windows in the location you chose. Please check your media drive. Here’s more info about what happened: 0x80300001. The problem has been faced in all iterations of the OS with no effective solutions available. So, let’s find out about it!
What is the 0x80300001 installation error?
The error can be encountered when installing Windows on a PC and usually has to do with a trivial issue at the user’s end. It appears when choosing a partition and proceeding with the installation.
Here are a few reasons you encounter 0x80300001 error in Windows 10:
- Issues with the installation media: Oftentimes, the installation media was missing certain critical files, which led to the error, and creating the bootable USB again works.
- Problems with port: In some cases, it was a problem with the port the bootable USB was connected to, which could be malfunctioning or not offer support for the flash drive.
- Drivers not loaded: You need several drivers on the PC to be able to install Windows, and for many users, this was the underlying cause.
- Misconfigured BIOS settings: The BIOS settings, often overlooked, play a critical role in the effective functioning of the PC as well as the OS installation, and any unwanted changes here could trigger the 0x80300001 Windows 7 error.
How do I fix error code 0x80300001?
Before we head to the slightly tricky solutions, try these quick ones first:
- Disconnect any additional storage devices from the PC, including disk drives, USB drives, and SD cards.
- For those using a CD, put the Windows installation CD instead of the driver CD in the drive and proceed with the installation.
- In case you are using a bootable USB to install Windows, connect it to another port on the PC. Say, if you are using a USB 2.0 port, switch to USB 3.0, and vice-versa.
If none work, move to the fixes listed next.
1. Update the SATA controller driver
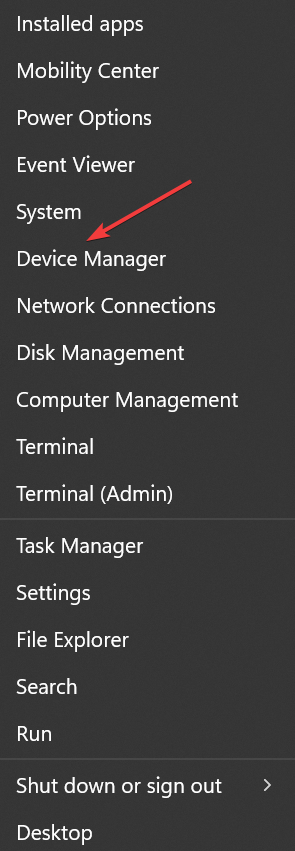
- Press Windows + X to open the Power User menu, and select Device Manager from the list.

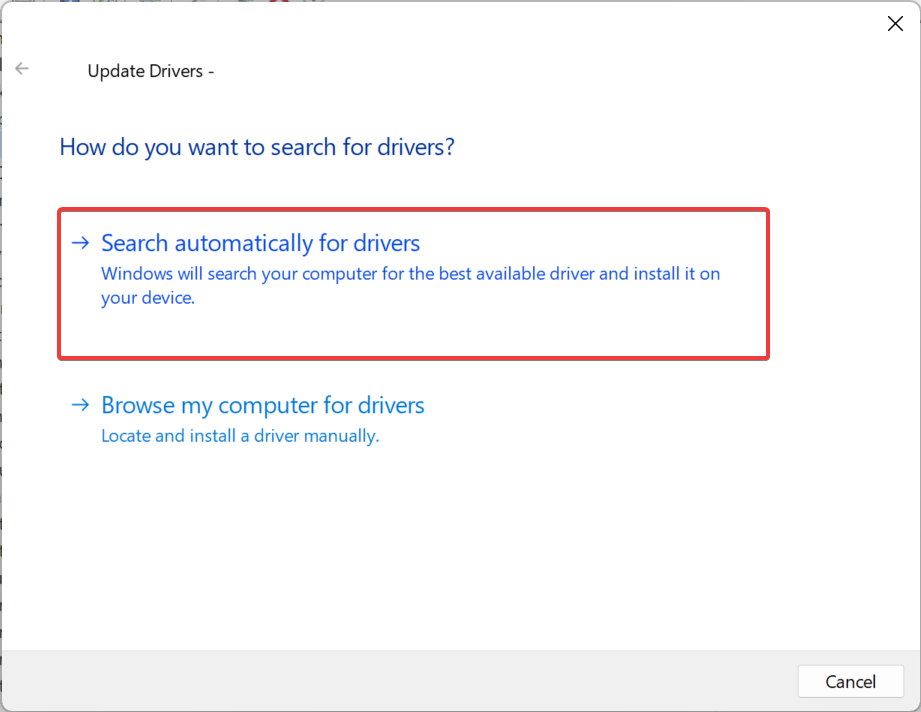
- Expand the IDE ATA/ATAPI controllers entry, right-click on the Standard SATA ACHI Controller, and select Update driver.
- Now, choose Search automatically for drivers and wait for Windows to install the best one.

Often the quickest solution to fixing 0x80300001 in Windows 11 is updating the driver that’s triggering the error. And in case the OS is unable to find one, you can always look it up on the manufacturer’s website and manually install the latest driver.
If Windows is not presently installed, load the drivers from the installation disc or add them to the bootable USB. This also helps with 0x80300001 in VMware.
2. Change BIOS settings

Tip
While in the BIOS, do not make any changes other than the one listed here, as it could result in system instability or even cause the PC to abruptly crash.
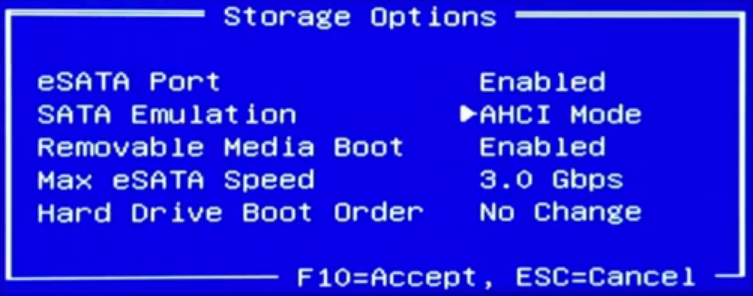
- Turn off the computer, then hold the power button to turn it on, and as soon as the display lights, hit the F1, F10, F12, Esc, or Del key, depending on the manufacturer, to access the BIOS.
- Now, look through the various available options to find the SATA settings, and make sure AHCI is selected.

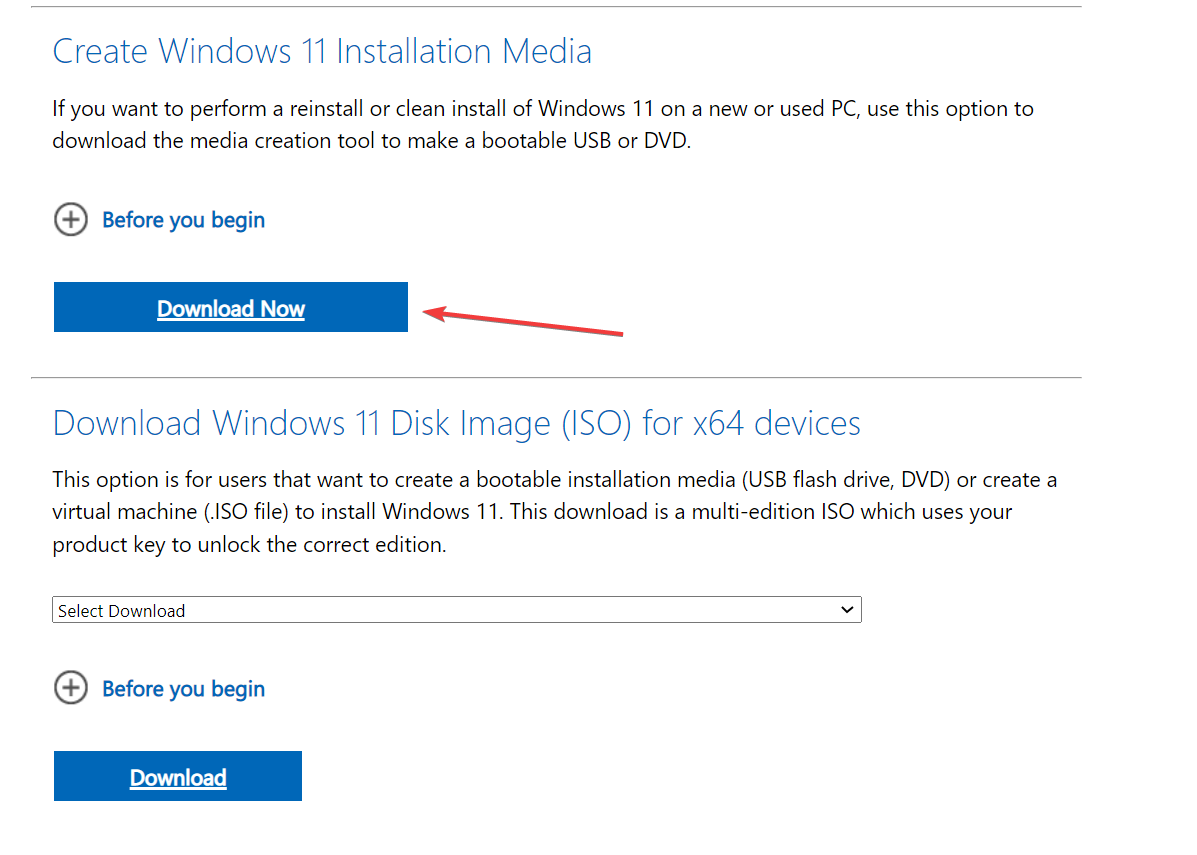
3. Create another installation media
- Go to Microsoft’s official website and download the Media Creation Tool for Windows 11. For users running the previous iteration, the Windows 10 media creation tool also be downloaded from the official page.

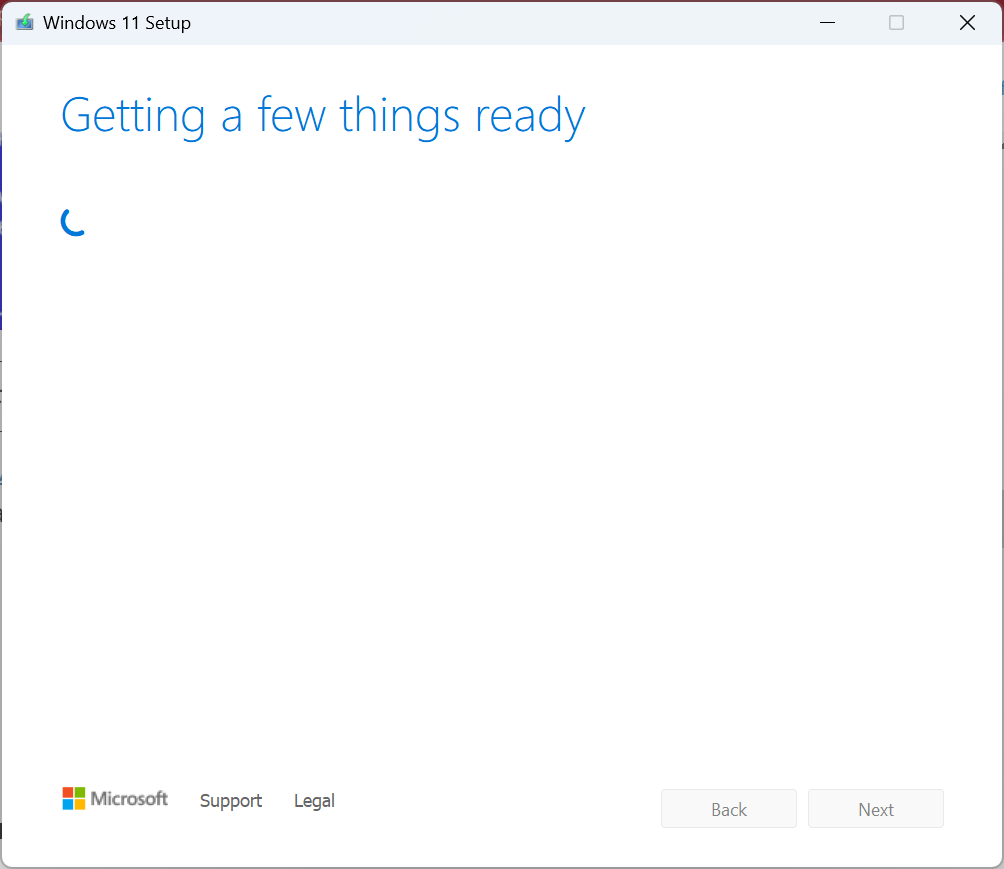
- Now, run the downloaded setup and wait for it to initialize things.

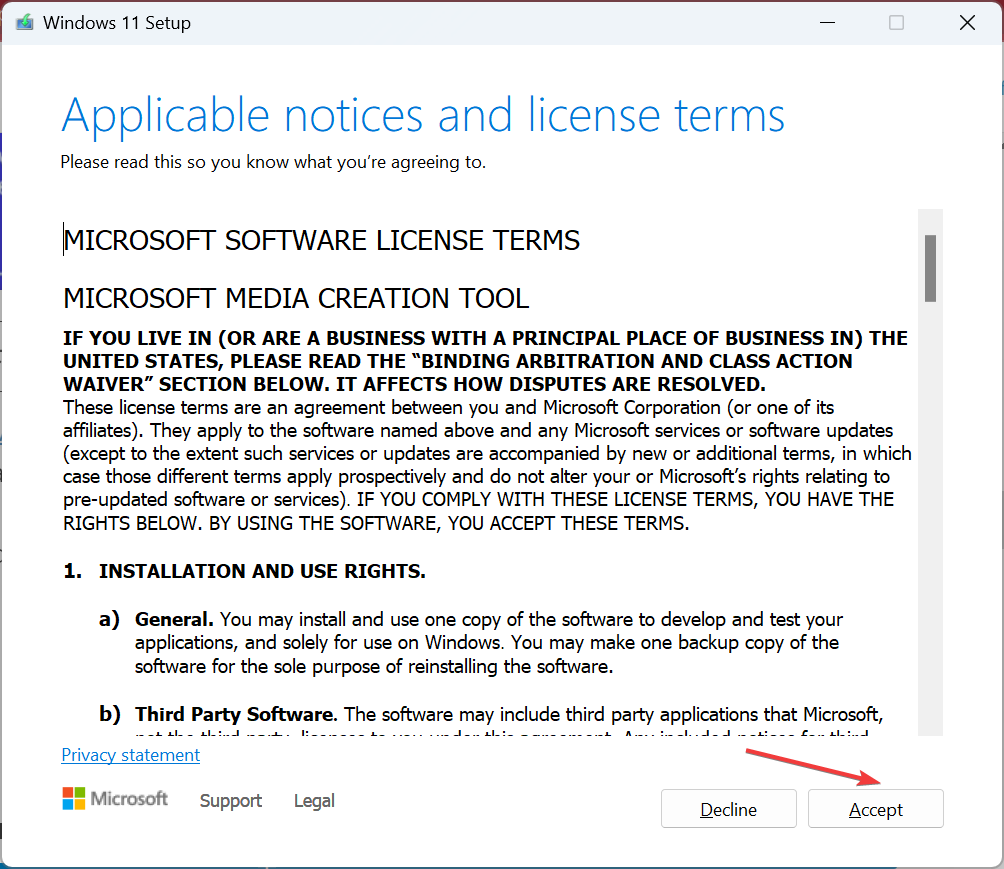
- Click on Accept to agree to Microsoft’s license terms.
- Don’t change the recommended settings, and click on Next to proceed.
- Select USB flash drive from the options, and then click Next.
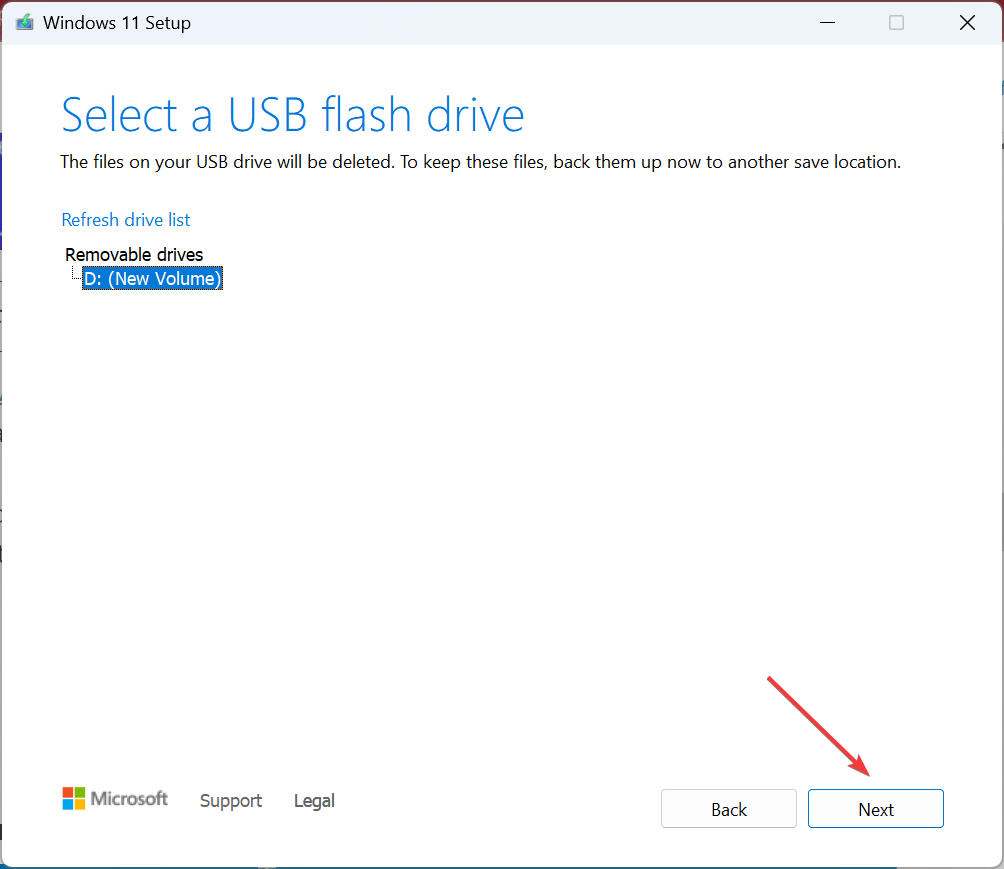
- Choose the connected USB drive where you want to download the installation files, and click on Next.
- Wait for the setup to create a bootable USB.
- Once done, plug the USB drive into the computer throwing the error, and try installing Windows again.

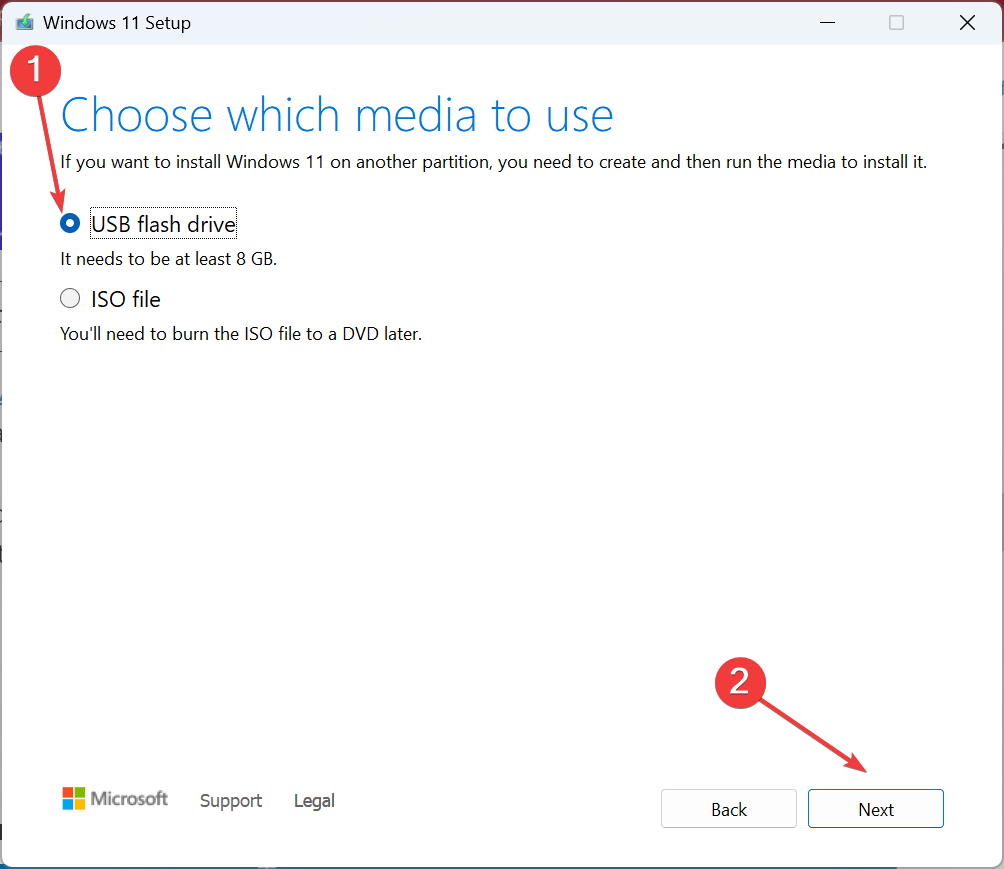
Oftentimes, it’s an issue with the installation media you created. This usually happens when using a third-party utility. So, this time around, use the Windows Media Creation Tool to create a bootable USB drive, and you shouldn’t get the 0x80300001 install error.
- Fix: Secure Boot is Greyed Out on Windows 11
- Fix: Touchpad Clicks but Doesn’t Move on Windows 11
- Fix: No Internet, Secured Error on Windows 11
4. Format the partition
- Run the installation setup and proceed until you reach the Where do you want to install Windows section.
- Select the partition you want to install Windows on and click Format.

- Choose the appropriate response in case a confirmation prompt appears.
- Once done with the format, proceed with the installation.
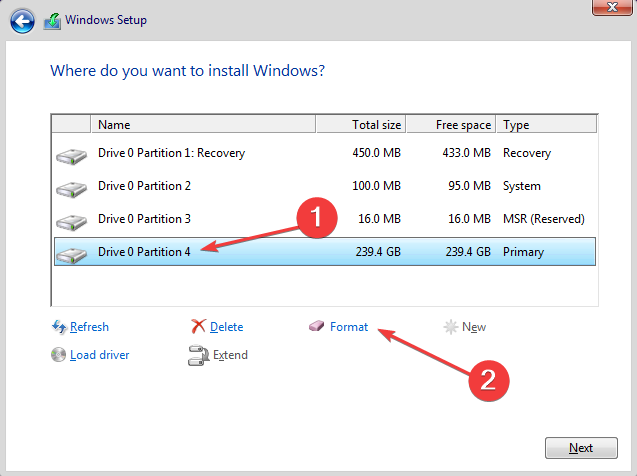
In case it’s the partition that’s to blame for the 0x80300001 error, formatting the partition should do the trick. Remember, any stored data will be lost, so make sure to create a backup beforehand if Windows is already installed on the device.
5. Delete the existing partitions
- Run the setup, and proceed with it until you get to the Where do you want to install Windows section.
- Now, select any partition and click on Delete.
- Similarly, remove the other partitions on the disk, and it should now be listed as unallocated.

- Now, select the disk, click on New, enter the desired partition size in the text field, and click on Apply. You can also create multiple partitions this way or split the disk later on.
- Click OK in the confirmation prompt.

- Once done, proceed with the installation.
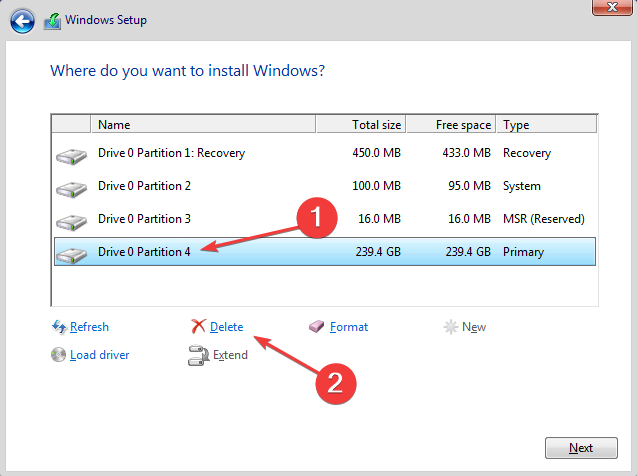

If none of the solutions worked, the last option is to delete all the partitions on the drive and then create new ones to install Windows. Here, too, you will lose the stored files, so it’s recommended that you transfer them to an external storage device or use a cloud backup service.
After you have fixed the 0x80300001 error, check the best security settings to configure and some quick tips to make Windows faster than ever.
For any queries or to share what worked for you, drop a comment below.
Still experiencing troubles? Fix them with this tool:
SPONSORED
Some driver-related issues can be solved faster by using a tailored driver solution. If you’re still having problems with your drivers, simply install OutByte Driver Updater and get it up and running immediately. Thus, let it update all drivers and fix other PC issues in no time!
![]()
-
#1
Hi,
Trying to install windows server 2019 trial version on proxmox 6.2 with Virtio 18.5, always getting:

Any ideas please?
Tried several virtio drivers, downloaded the trial iso also several times: always the same error.
Thanks in advance
![]()
aaron
Proxmox Staff Member
-
#2
Can you show the VM config? On the CLI: qm config <vmid>
-
#3
Hi,
here is the config:
root@express:~# qm config 102
agent: 1
balloon: 1024
bootdisk: scsi0
cores: 4
ide0: local:iso/virtio-win-0.1.185.iso,media=cdrom,size=402812K
ide2: local:iso/17763.737.190906-2324.rs5_release_svc_refresh_SERVER_EVAL_x64FRE _en-us_1.iso,media=cdrom
memory: 8192
name: Hosting1
net0: virtio=32:43: DA:90:05:69,bridge=vmbr0,firewall=1
numa: 0
onboot: 1
ostype: l26
scsi0: local-lvm:vm-102-disk-0,size=500G
scsihw: virtio-scsi-pci
smbios1: uuid=eaac61e0-6554-4e4e-a997-310aa85e333f
sockets: 1
startup: order=3
vmgenid: d8d2cdea-5174-4072-bd03-b0169935b867
![]()
oguz
Proxmox Retired Staff
-
#4
hi,
can you try setting these variables in the config and try again:
Code:
ostype: win10
machine: q35
-
#5
How and where to change please?
In the OS tab, there is 10/2016/2019 and that was chosen from the beginning.
![]()
oguz
Proxmox Retired Staff
-
#6
you can modify the config file directly in /etc/pve/qemu-server/102.conf (make sure the VM is turned off during this)
-
#7
tried and the same Error message.
Tried with virtio18.5.
Last edited:
![]()
aaron
Proxmox Staff Member
-
#9
Yes that’s it.
I tried also the 18.9 and 17.1
![]()
aaron
Proxmox Staff Member
-
#10
Interesting as that usually works fine for me.
Maybe try the older 171 iso?
As a workaround you can detach the disk and reattach it as either ide or sata. Then do the install. To install the VirtIO scsi drivers on the installed and booted system you can temporarily add a second HDD which is virtio scsi. It can be as small as 1GB is it only needs to be recognized by Windows so it will ask for the drivers. Once the drivers are installed, you can change the boot disk back to virtio scsi.
![]()
tom
Proxmox Staff Member
-
#11
Yes that’s it.
I tried also the 18.9 and 17.1
Always works here. Are your sure that your windows ISO is not corrupted, e.g. during upload?
Based on the history of such issues, this was the reason for problems in more than 90 % of the windows install problems.
-
#12
Even IDE or SATA are not working. What could be the issue?
it couldn’t be an upload problem as it was copied directly in the server.
![]()
tom
Proxmox Staff Member
-
#13
Even IDE or SATA are not working. What could be the issue?
it couldn’t be an upload problem as it was copied directly in the server.
Did you verified the ISO after you uploaded it (e.g. sha-256 checksums)?
-
#14
ISO verified and worked fine with wmware or direct installlation.
Any other ideas?
-
#15
I have the same problem. Exactly the same message as the screenshot from the OP. I have several other VMs running off a zfs pool, and I cannot install Windows 10 2004 .iso. The virtio drivers just won’t succeed during installation. I verified SHA’s several times between the host sha and Microsoft’s own expected sha. So this is not a corrupt ISO. Same with Windows 10 1909. Running Proxmox 6.2 with latest non-subscription updates and kernel.
Here’s my VM config (redacted the virtio MAC as it injects unwanted images and doesn’t add value). I tried all — scsi (below), virtio, even sata. Watched Proxmox’s narrated video example and read the best practices several times. There has to be some bug or non-obvious misconfiguration here.
agent: 1
bios: ovmf
bootdisk: ide2
cores: 32
efidisk0: aorus:vm-102-disk-1,size=1M
ide0: local:iso/virtio-win-0.1.189.iso,media=cdrom,size=488766K
ide2: local:iso/Win10_2004_English_x64.iso
machine: q35
memory: 32768
name: win10
net0: virtio=[redacted],bridge=vmbr0,firewall=1
numa: 0
ostype: win10
scsi0: aorus:vm-102-disk-0,cache=unsafe,discard=on,size=250G,ssd=1
scsihw: virtio-scsi-pci
smbios1: uuid=5de116e6-4f0c-498e-982b-b5fafbfa13cc
sockets: 1
vga: vmware
vmgenid: 06c83d97-8ca7-4ff8-8645-b3d8be43de5e
Last edited:
-
#16
I see the same issue if I use SATA or IDE instead of scsi or virtio. No disk is recognized. How is Windows VM installation supposed to work?
![]()
tom
Proxmox Staff Member
-
#18
Arrived here after experiencing the same issue.
I know the post is a little old but thought I’d post my solution for anyone experiencing the same problem.
The solution for me was very simple. After swapping the ISO image from Windows to VirtIO to load the drivers, change back to the Windows ISO and click the refresh button. The error message will disappear.
Hope that helps someone.
Craig
![]()
aaron
Proxmox Staff Member
-
#19
The solution for me was very simple. After swapping the ISO image from Windows to VirtIO to load the drivers, change back to the Windows ISO and click the refresh button. The error message will disappear.
You could also go ahead and add a second CD drive with the VIrtIO iso before starting the VM the first time.
-
#20
Arrived here after experiencing the same issue.
I know the post is a little old but thought I’d post my solution for anyone experiencing the same problem.
The solution for me was very simple. After swapping the ISO image from Windows to VirtIO to load the drivers, change back to the Windows ISO and click the refresh button. The error message will disappear.
Hope that helps someone.
Craig
This also solves the error «Windows can’t install on that drive 0x80300001» after loading the virtio driver and selecting the disk.
OMG! What a stupid error message. How about «Please re-insert the Windows installation disk»? That would have saved me 40 minutes.
Thanks Craig, I was getting very cranky.