Download Windows Speedup Tool to fix errors and make PC run faster
If when you attempt to sign in to the Microsoft Store or any other service with your Microsoft Account on your Windows 11/10 PC and you encounter the error code 0x801901f4, you can try the solutions we will present in this post to successfully remediate this issue.

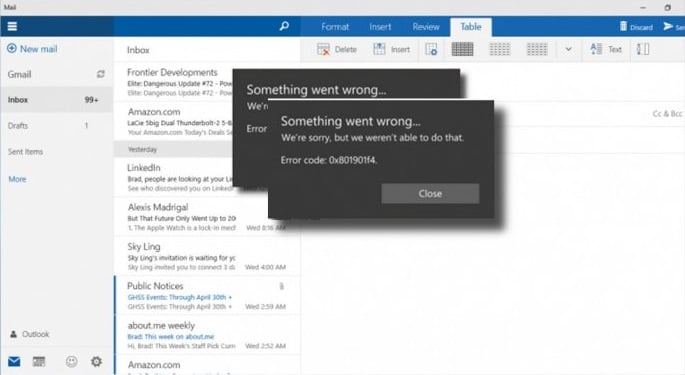
When you encounter this issue, you’ll receive the following error message;
Something went wrong
Please try again later.
0x801901f4
User profile cannot be loaded.
If you’re faced with this Microsoft Account sign-in error 0x801901f4, try our following suggestions and see if it helps to resolve the issue.
- Reset the Microsoft Store cache via Settings
- Create a new User Account
- Run SFC and DISM scan
- Re-register Microsoft Store
- Perform System Restore.
Let’s take a look at the description of the process involved concerning each of the listed solutions.
2] Reset Windows Store
If your particular issue is being caused by some type of corruption among the Windows Store’s files, you should be able to resolve the issue quite effectively by running a PowerShell command capable of resetting the entire Windows Store package. You can also reset the Store app via Settings.
2] Create a new User Account
You may have a corrupted user account and that might be triggering the error 0x801901f4. In which case, you can try creating a new user account and then use it to sign in to the Windows Store and see if the issue will persist.
3] Run SFC scan
If you have system file errors, you may encounter this issue.
This solution requires you run the SFC scan and see if the issue will be resolved or not. If the latter is the case, continue with the next solution.
4] Re-register Microsoft Store
This solution requires you to re-register the Microsoft Windows Store app and see if the error will be resolved.
Here’s how:
- Press Windows key + X to open Power User Menu and then press A on the keyboard to launch PowerShell in admin/elevated mode.
- In the PowerShell console, copy and paste in the command below and hit Enter:
PowerShell -ExecutionPolicy Unrestricted -Command “& {$manifest = (Get-AppxPackage Microsoft.WindowsStore).InstallLocation + '\\AppxManifest.xml' ; Add-AppxPackage -DisableDevelopmentMode -Register $manifest}”
- Restart the computer.
5] Perform System Restore
If you noticed that the error started to occur recently, it’s entirely possible that the issue was facilitated by a change that your system has gone through recently. In this case, perform System Restore, and see if the issue is resolved.
Hope this helps!
Obinna has completed B.Tech in Information & Communication Technology. He has worked as a System Support Engineer, primarily on User Endpoint Administration, as well as a Technical Analyst, primarily on Server/System Administration. He also has experience as a Network and Communications Officer. He has been a Windows Insider MVP (2020) and currently owns and runs a Computer Clinic.
Обычно неисправность с кодом ошибки 0x801901f4 возникает во время использования стандартного приложения Почта. Иногда она появляется и в других программах, в которых применяются пользовательские аккаунты. Причина — некорректная установка обновлений ПО, когда сбиваются системные настройки, конфигурация программ и процессов.
Как исправить ошибку 0x801901f4
Устраняют проблему следующим образом:
- Обновить магазин приложений. Следуйте по пути: «Пуск» => «Microsoft Store» => «Подробнее» => «Загружаемые …» => «Получить обновления».
- Сбросить настройки. Следуйте по пути: «Пуск» => «Параметры» => «Приложения» => «Приложения и компоненты». Кликните на сбойной программе, выберите «Дополнительные параметры» => «Восстановление».
- Переустановить проблемную программу.
- Очистить кеш магазина приложений. Зажмите Win+S, введите wsreset, кликните дважды на найденном сервисе и запустите его от имени администратора.
- Перерегистрировать магазин приложений. Зажмите Win+X, запустите оттуда Командную строку (Администратор), введите и выполните (нажав на Enter) по очереди следующие запросы:
- PowerShell -ExecutionPolicy Unrestricted
- $manifest = (Get-AppxPackage Microsoft.WindowsStore).InstallLocation + ‘\AppxManifest.xml’ ; Add-AppxPackage -DisableDevelopmentMode -Register $manifest.
- Использовать штатное средство исправления проблем. Скачайте и запустите официальное решение от Microsoft. Оно создано для того, чтобы исправлять ошибку 0x801901f4 и подобные проблемы.
The topic of discussion here is such a problem that may occur while working with with auto Windows update, upgrade, Outlook, Mail app, and store. 0x801901f4 is the error code that can appear with all of these processes and apps. When trying to install a Windows update, upgrade the system, add an account to Mail app, or get a game or application from Microsoft Store this code shows up.
Corrupted system files are one of the likely causes of error 0x801901f4 Windows 10 or 11, although the exact cause is still under investigation. Furthermore, glitches in the configuration, settings, registry, update components might equally be responsible to generate this code. Because we haven’t yet received an official fix for this 0x801901f4 PC error manual actions are necessary to find alternative solutions. See fixes for another common issue 0x800f0831 Windows 11/10 Update Error.
Here is how to fix Error 0x801901f4 in Windows 11 or 10 –
Way-1: Run Windows Update Troubleshooter
After making attempt to install a patch or build when process failed, the integrated Fixit tool Windows Update troubleshooter could fix any issues that may arise. As Microsoft is keen to release installer files frequently, bugs and errors are quite closely related to updating in Windows 10 or 11. Positively, you can solve it using the below steps –
For Windows 10:
- Go to Windows Settings (Win+I).
- Click – Update & Security.
- Click – Troubleshoot.
- Navigate towards the right-hand side.
- Select – Additional troubleshooters.
- Choose – Windows update after moving to the following page.
- Click – Run the troubleshooter from the popup menu.
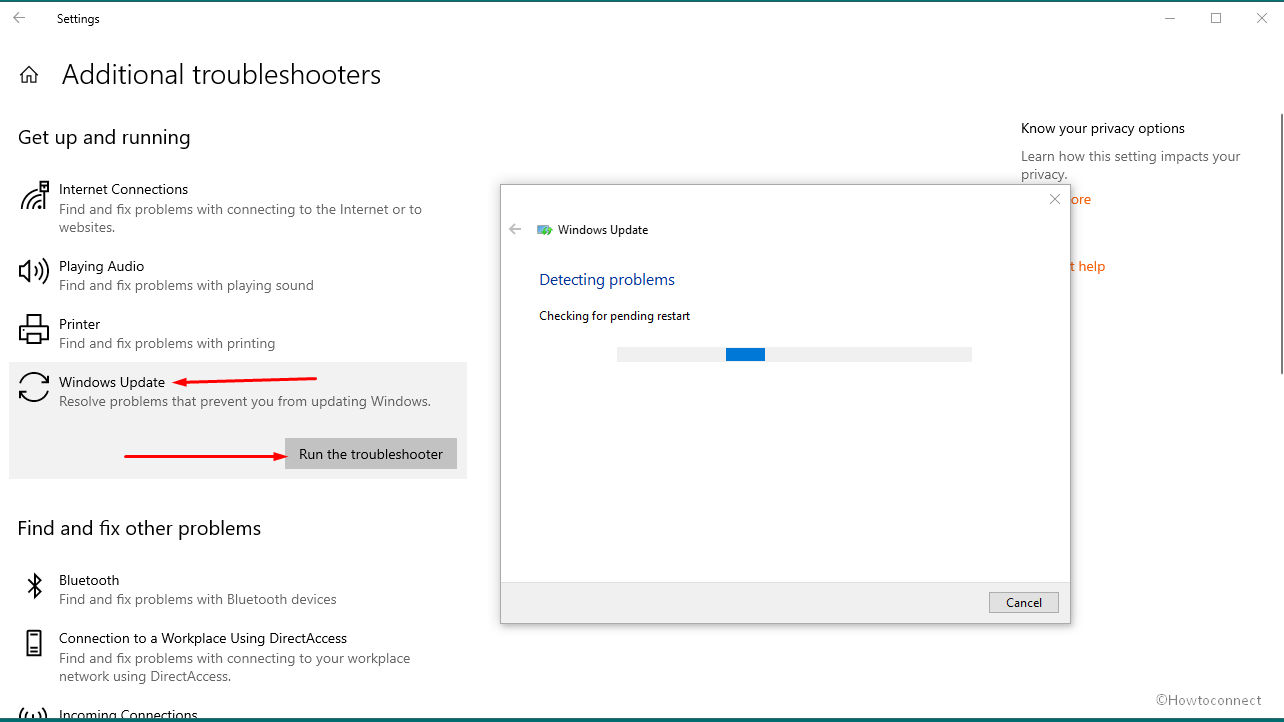
- To finish the process, follow the instructions displayed on the screen.
For Windows 11:
- Hit – Windows + I keys.
- Go to Settings’ right panel and Choose – Troubleshoot.
- From the options, click –Other troubleshooters.
- Click –Run next to the Windows update.
- The utility will now start looking for faults.
- Click – Apply this fix if the utility offers a fix. If not, follow the tool’s instructions.
- Restart Windows after closing the troubleshooter.
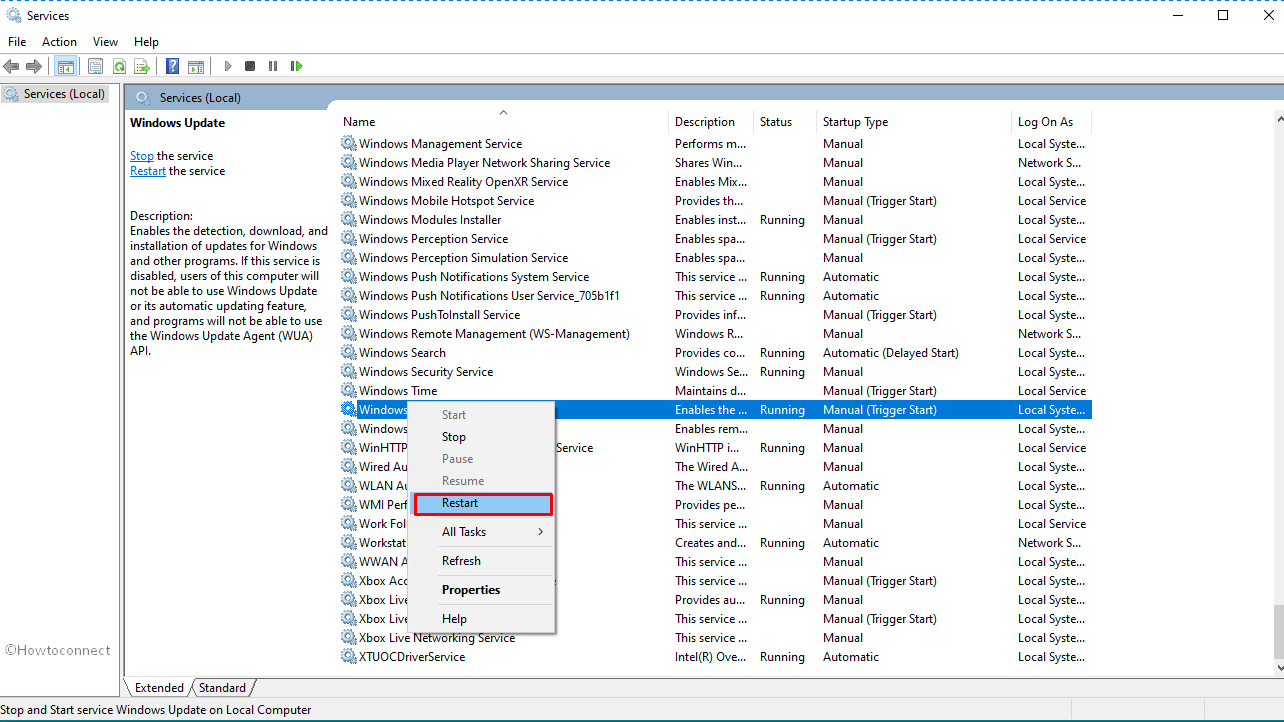
Way-2: Restart Wuauserv
The ability to download updates and then install them makes Windows 11/10/8/7 fully secure and feature-rich. Unfortunately, Windows Update frequently experiences service-related problems. The system comes with the wuauserv, often known as Windows Update service which is usually pre-enabled, however, the default settings can be inadvertently changed by a user or by third-party software. Therefore, in order to resolve error 0x801901f4 Windows 11 or 10, check the service and restart it.
- Hit – Windows + R.
- Type – services.msc.
- Select – OK.
- Locate Windows Update in the list that appears.
- Right-click on it and select – Restart.
Way-3: Fix faulty System Files and Use DISM
Windows 11 and 10 function effortlessly and run without a hitch; thanks to some essential files that are always working on the computer. These are considered system files but since they are so delicate, they are easily compromised by nefarious intruders. Error 0x801901f4 Windows 11 might result from missing or corrupted “system files”, which restricts the concerned procedure. A tool called SFC can fix these components and recover any missing files.
Sometimes malfunctions in .wim or Windows image might also trigger 0x801901f4 Windows 10 or 11 error code. So along with SFC you will also have to run DISM utility as a precaution. Follow the guide below to run the scan:
- Go to the Start button and click on it.
- Inside the search box, type – cmd.exe.
- Now Press – Ctrl+Shift+Enter.
- Click – “Yes” when User Account Control appears.
- On Command prompt, type –
SFC /Scannow. - Press – Enter.
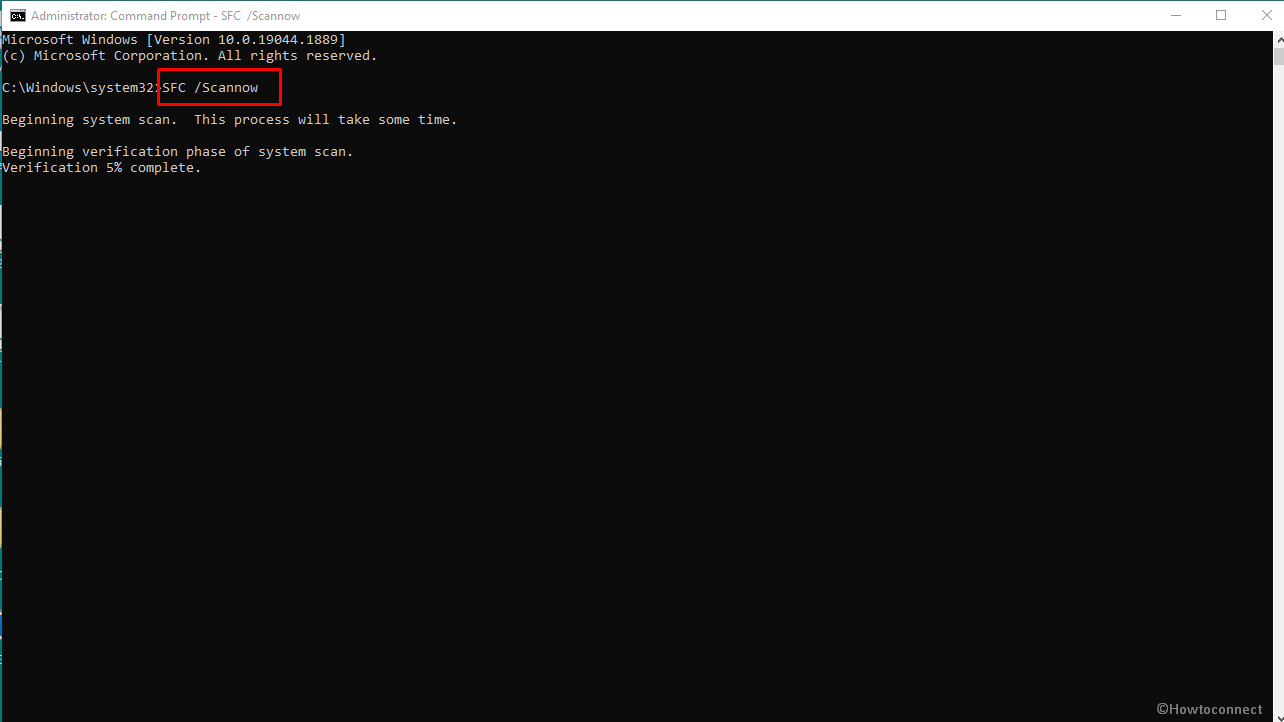
- Allow the process to complete by reaching 100%.
- Restart Windows after the scanning process is finished.
- If the error still persists, again open Command Prompt as administrator.
- Type –
DISM /Online /Cleanup-Image /RestoreHealth. - Press – Enter.
- After logging back in, try updating again.
See – SFC /Scannow, DISM.Exe, CHKDSK Windows 10.
Way-4: Remove Third-party Anti-virus
Since these errors are constantly affecting to compromise the security interface, it is really impossible to think of ignoring malware today. Without a robust anti-virus running round-the-clock, spyware, worms, rootkit, and trojan from the internet can easily compromise a security system. The best tool ever for this purpose is Windows security, it is a sophisticated program that comes installed by default.
Users occasionally want to install antivirus software from other parties to increase security, but they find that this is ineffective. As opposed to doing so, they block Windows update installer files by mistaking them for suspicious files. Furthermore, there is a chance of a dangerous software clash when using Windows and comparable products. Therefore, to fix a nefarious problem like 0x801901f4 Windows 10 or error, delete the third-party antivirus programs.
- Launch Run Dialog (Win+I).
- Type – appwiz.cpl in the command box.
- Click – OK.
- Find the installed third-party antimalware program from the Window that pops up.
- Once located, right-click it and select – “Uninstall.”
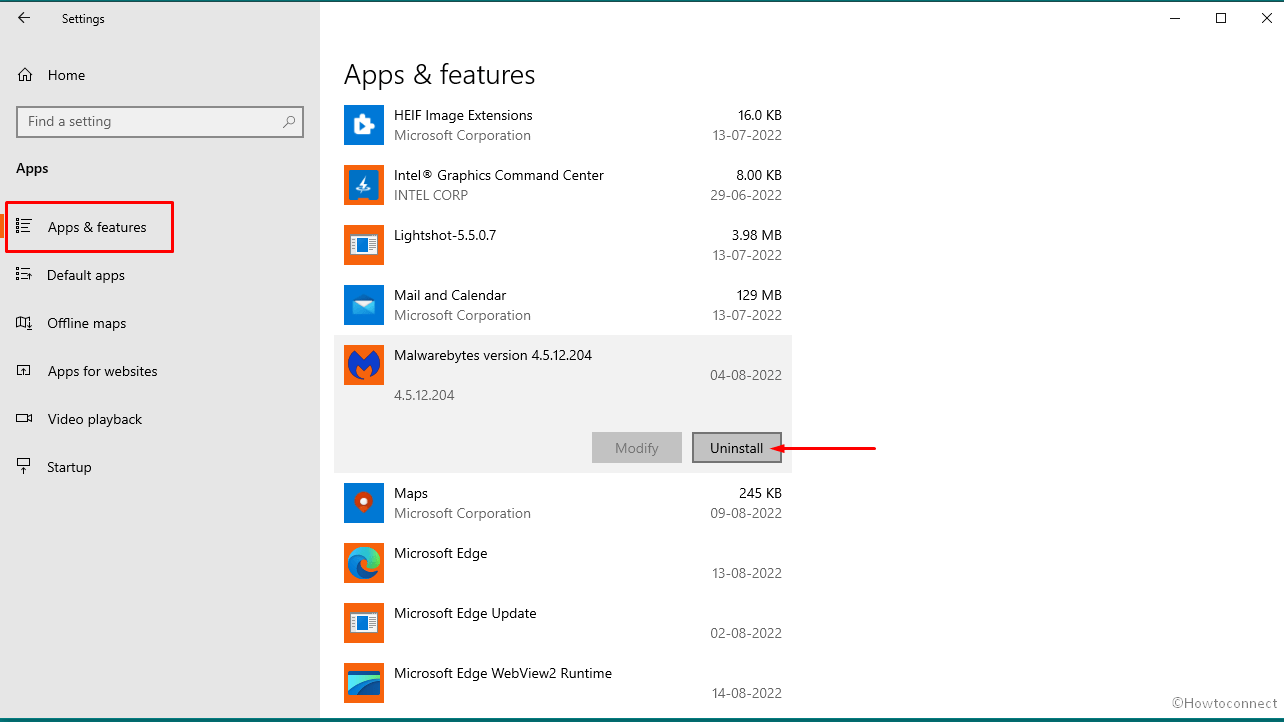
- Follow the on-screen directions exactly to remove the program completely.
- To make the deletions take effect, restart the system.
Way-5: Reset Update Components
System must be updated and safeguarded against existing and future threats as well as bugs, which is why Windows Update is so important. Unluckily, Users who seek to install the releases, frequently encounter issues and get error codes.
Resetting Update Components action will bring the default settings for the MSI installer, BITS, Cryptographic, and WSUS back. Two very significant folders SoftwareDistribution and Catroot2 will simultaneously get new names with this method. The folders temporarily store the specialized components linked to the update. Use the following steps below to resolve windows update error 0x801901f4 –
- Click – Search.
- In the box, Type – cmd.
- Next, select – Run as administrator.
- Select – Yes when the User Account Control prompts.
- Copy-paste each of the lines below into the elevated Command Prompt separately and press Enter successively.
net stop bits
net stop wuauserv
net stop appidsvc
net stop cryptsvc
Ren %systemroot%\SoftwareDistribution SoftwareDistribution.bak
Ren %systemroot%\system32\catroot2 catroot2.bak
net start bits
net start wuauserv
net start appidsvc
net start cryptsvc- Next, close Command Prompt.
- Reboot the system.
Alternatively, you can follow – How to Reset Windows Update to Default in Windows 10.
Way-6: Turn off the Windows Defender Firewall
Windows Defender Firewall is a vital program that filters incoming internet data and effectively prevents potentially hazardous content from entering the system. There is no substitute for keeping the program activated and running if you want to guarantee the maximum security of the system.
The application is so effective that it frequently flags and filters Windows installer files as suspicious resulting in failed updating process. You can temporarily switch off Windows Firewall and turn it back on after the update is complete to solve the issue. Follow these steps to do this:
- Press – Windows + R.
- Type – control firewall.cpl.
- Select – OK.
- Click – Turn Windows Defender Firewall on or off.
- Check the options, Turn off Windows Defender Firewall (not recommended) for both Private and Public network settings.
- Now, click – “OK”.
Way-7: Modify Registry
Another cause of error 0x801901f4 Windows 10 or 11 might be some flaws in the Windows Update Download path. You may have to remove some keys in the Windows Registry to make this right. As a result, with a clear path and there won’t be any more problems when updating.
Windows registry adjustments require expertise, and even the smallest error might result in long-term system harm. Making a comprehensive backup of the essential items is therefore advised before using this workaround; it is also preferable to seek professional assistance. To remove Registry keys, carefully follow the steps below:
- Press – “Windows + S“.
- Type – regedit in Windows search.
- Press – Enter.
- Select – Yes for the User Account Control that appears.
- When Registry Editor opens, go to the directory listed below:
HKEY_LOCAL_MACHINE\SOFTWARE\Policies\Microsoft\Windows\WindowsUpdate- Right click on – WUServer.
- Select – “Delete“.
- Similarly, delete the WIStatusServer key as well.
- Next, reboot the Windows.
0x801901f4 Mail App, Outlook login, Microsoft Store
Way-8: Run Windows Store apps troubleshooter
When you are using Mail app and try to add another account from Gmail, Yahoo, iCloud, or any other POP or IMAP you might find 0x801901f4 error code. To fix this move ahead with the steps –
- Right-click on – Start.
- <>Type – Troubleshooter.
- Hit – Enter.
- Go to the right and select – Additional troubleshooters.
- Click on – Windows Store Apps.
- Click on – Run the troubleshooter.
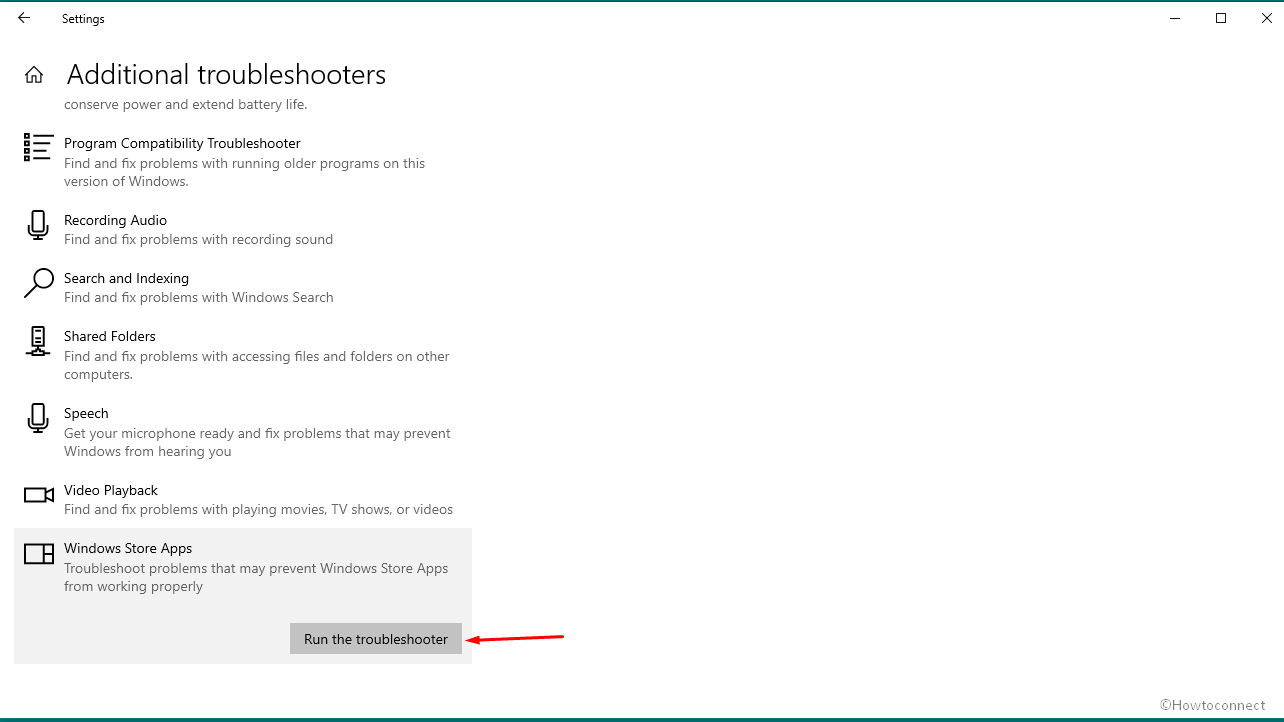
- Once the tool is working follow the instructions provided.
Way-9: Reregister the apps
To solve 0x801901f4 Mail error that generally occurs when trying to add an account to email client you need to again register the application using PowerShell or Command Prompt: Here are the steps:
- Open Elevated Windows PowerShell.
- Copy-paste the following cmdlet at a time and hit Enter.
PowerShell -ExecutionPolicy Unrestricted

$manifest = (Get-AppxPackage Microsoft.WindowsStore).InstallLocation + '\AppxManifest.xml' ; Add-AppxPackage -DisableDevelopmentMode -Register $manifest- See if the issue is fixed.
Way-10: Fix 0x801901f4 Microsoft Store through Reset
When the same code appears during app update or installation in Microsoft store resetting the Store will fix the problem. So follow the method –
- Right-click on – Start.
- Select – Run.
- Type – WSReset.exe.
- Hit Enter and allow the process to complete through the command prompt.
- Restart the system and hopefully, the error will be fixed.
Methods:
Way-1: Run Windows Update Troubleshooter
Way-2: Restart Wuauserv
Way-3: Fix faulty System Files and Use DISM
Way-4: Remove Third-party Anti-virus
Way-5: Reset Update Components
Way-6: Turn off the Windows Defender Firewall
Way-7: Modify Registry
Way-8: Run Store app troubleshooter
Way-9: Reregister Store app
Way-10: Fix 0x801901f4 Microsoft Store through Reset
That’s all!!
Repair any Windows problems such as Blue/Black Screen, DLL, Exe, application, Regisrty error and quickly recover system from issues using Reimage.
Что такое ошибка 0x801901f4 в Windows (09.22.23)
Windows 10 — сложная платформа с полным набором функций. Однако иногда пользователи сталкиваются с проблемами, от незначительных до серьезных. Независимо от серьезности проблемы, это может вызвать странный пользовательский опыт и даже снизить производительность. Вот почему такие проблемы следует решать как можно скорее.
В последнее время многие пользователи жаловались на менее распространенную проблему, которая генерирует код ошибки 0x801901f4. Это неприятная проблема, поскольку она не позволяет затронутым пользователям получать доступ к таким приложениям, как Gears of War, Mail, а также Groove Music. При возникновении этой проблемы затронутые приложения не открываются и не закрываются вскоре после того, как были открыты.
У этой проблемы много причин. Естественно, большинство людей могут разочароваться, найдя реальное решение этой проблемы. Тем не менее, главный виновник — неисправная служба Центра обновления Windows. Когда эта утилита неисправна, она в конечном итоге выполняет проблемную установку обновлений, которая приводит к неверно настроенным приложениям, повреждению системных файлов, а также служб, если не упомянуть некоторых.
Службы Windows являются неотъемлемой частью вашей работы система. Они контролируют как ручные, так и автоматические службы, настроенные на непрерывную работу в фоновом режиме. Если есть расхождения с конфигурациями служб Windows, обязательно появятся несколько кодов ошибок, включая ошибку 0x801901f4.
Совет для профессионалов: просканируйте свой компьютер на наличие проблем с производительностью, нежелательных файлов, вредоносных приложений и угроз безопасности < br />, которые могут вызвать проблемы в системе или снизить производительность.
Проблемы с бесплатным сканированием для ПК.Специальное предложение. Об Outbyte, инструкции по удалению, лицензионное соглашение, политика конфиденциальности.
Теперь, если некоторые компоненты Центра обновления Windows повреждены, приложения Магазина Windows показывают признаки неисправности. В таких случаях, прежде чем продолжить работу с доступными исправлениями в этой статье, лучше сначала проверить, установлены ли все ожидающие обновления.
Другие виновники, которые могут способствовать возникновению ошибки Windows 0x801901f4 при входе в систему в приложение Microsoft включают устаревшие драйверы или кэш Магазина Windows. С учетом сказанного, мы собрали несколько решений, которые вы можете попробовать, чтобы облегчить проблему. Эти исправления помогут вам справиться с ошибкой 0x801901f4, которая возникает при попытке войти в MS Store или другие службы.
Как исправить ошибку 0x801901f4 в WindowsFix # 1: проверьте наличие ожидающих обновлений Windows
Чтобы проверить для получения обновлений выполните следующие действия:
Исправление №2: повторно зарегистрируйте MS Store
Чтобы повторно зарегистрировать Магазин, следуйте простым инструкциям ниже:
PowerShell -ExecutionPolicy Unrestricted -Command «& amp; {$ manifest = (Get-AppxPackage Microsoft.WindowsStore) .InstallLocation + ‘\\ AppxManifest.xml’; Добавить-AppxPackage -DisableDevelopmentMode -Register $ manifest}
Исправление №3: обновите драйверы
Поскольку драйверы устройств также являются возможной причиной проблемы, лучше всего проверить, все ли они обновлены. Чтобы сэкономить время и избавить себя от необходимости просматривать драйверы один за другим, идеально использовать надежное программное обеспечение для обновления драйверов. Этот тип программного обеспечения будет стабильно работать в фоновом режиме, проверяя наличие последних версий драйверов. Верхние также дают вам возможность установить все ожидающие обновления драйверов одним щелчком мыши. Поэтому мы советуем вам мудро выбирать лучшее программное обеспечение для обновления драйверов.
Исправление №4: Удалите кэш Магазина Windows
Вот как избавиться от кеша Магазина:
Исправление №5: сбросьте настройки ОС Windows
Если все исправления не помогли, вероятно, вы имеете дело с углубленный вопрос. Следующая ставка — выполнить сброс Windows. Этот процесс не приведет к удалению ваших файлов, но мы советуем создать их резервную копию на случай, если что-то пойдет не так. Есть некоторые приложения, которые вам нужно будет переустановить после выполнения процедуры. Итак, убедитесь, что все ваши игровые данные и другая информация о приложении сохранены в облаке. Чтобы начать процесс, выполните следующие действия:
Если ни один из этих вариантов не подходит, мы рекомендуем использовать надежный инструмент для ремонта ПК, чтобы выполнить углубленную диагностику системы Windows. Такой инструмент также поможет поддерживать работоспособность компьютера практически без проблем со стабильностью.
YouTube видео: Что такое ошибка 0x801901f4 в Windows
09, 2023
Contents
- What Is the Error 0x801901f4 on Windows 10?
- How to Fix the Microsoft Store Sign-In Error 0x801901f4
- Fix 1: Run the System File Checker (SFC) and Deployment Image Servicing and Management (DISM) Command-Line Utilities
- Fix 2: Run the Store App Troubleshooter
- Fix 3: Clear the Microsoft Store Cache
- Fix 4: Re-Register Microsoft Store
- Here is how to re-register Store:
- Fix 5: Reset the Store App to Fix the Error 0x801901f4
- Fix 6: Try Restoring Windows to a Previous Working State
- Here is how to run System Restore:
- Fix 7: Create a New Microsoft Account
- How to Fix the ‘Can’t verify MS Account on Win10 Clean Installs’ Issue
- Method 1: Verify Account via Account Settings
- Method 2: Verify Account Online
- Conclusion

While Windows 10 is mostly a reliable operating system, users often face unexpected issues on the OS. The Microsoft Store Sign-In Error 0x801901f4 may not be common but it still poses a challenge to a considerable number of users. This post will show you how to resolve it.
We will also look at what to do if you can’t verify your Microsoft account after clean installing your OS.
What Is the Error 0x801901f4 on Windows 10?
When you have a Microsoft account, you get to enjoy an all-access pass to premier services from Microsoft, including Windows, Outlook, Skype, Store, One Drive, Office, Xbox Live, and MSN. Your account enables you to manage all these services across all your devices, including Android and iOS.
However, the Error 0x801901f4 prevents you from using your Microsoft account to sign into Store or any other service. When you try, you are presented with the following error message:
“Something went wrong
Please try again later.
0x801901f4
User profile cannot be loaded.”
Fortunately, there are solutions that can help you remediate the issue. Keep reading to discover them.
How to Fix the Microsoft Store Sign-In Error 0x801901f4
You can resolve the Microsoft Store Sign-In Error 0x801901f4, using any one these methods:
- Run the System File Checker (SFC) and Deployment Image Servicing and Management (DISM) command-line utilities
- Run the Store app troubleshooter
- Clear the Store cache
- Re-register Microsoft Store
- Reset the Store app to fix the Error 0x801901f4
- Try restoring Windows to a previous working state
- Create a new Microsoft account
Let us now go through the procedure for these fixes.
Fix 1: Run the System File Checker (SFC) and Deployment Image Servicing and Management (DISM) Command-Line Utilities
The DISM and SFC are built-in command-line tools in Windows that help to fix issues with system files.
You have to run the DISM scan first, especially if you are using Windows 8, Windows 8.1, or Windows 10. The command line scans and repairs the ‘install.wim’ image, which then enables the SFC command line to successfully replace any corrupt or missing system files.
Follow the procedure below to run the utilities. They may help resolve the error you are dealing with.
- Turn on your Internet connection.
- Press the Windows logo + X combination on your keyboard to open the Power-user menu.
- Locate Command Prompt (Admin) and click on it.
- Click the ‘Yes’ button when the UAC (User Access Control) prompt requests confirmation to allow Windows Command Processor to make changes to your computer.
- When the elevated Command Prompt window opens, run the DISM scan first by entering the following line:
DISM.exe /Online /Cleanup-image /Restorehealth
- Wait for the scan to complete. It may take a few minutes.
- When the DISM scan is complete, you can now run the System File Checker to fix any inconsistencies with your system files. It will replace any corrupt or missing files with fresh copies from the local archive (Namely, C:\Windows\System32\dllcache). Type in or copy and paste the following command and then press Enter to run SFC:
sfc /scannow
Note: When typing the command, make sure to leave a space between ‘sfc’ and ‘/scannow.’
- Wait for the scan to complete.
If you still face the error when you try signing in with your Microsoft account, simply move on to the next fix.
Fix 2: Run the Store App Troubleshooter
The Store apps troubleshooter is a built-in tool in Windows that help fix issues with the Microsoft Store or any of its apps. It will scan your system to detect problems that prevent Store from working correctly. It automatically repairs any problems it finds.
Here is how to run the tool:
- Open the Windows Settings by pressing the Win key + I on your keyboard.
- Open the Update & Security option.
- Click on Troubleshoot on the left pane of the next page.
- Locate Store in the list of apps displayed on the right page. Click on it and click Run the Troubleshooter.
- The tool will begin detecting problems. Wait for it to complete the process. This only takes a few minutes.
- After detecting issues, the troubleshooter will attempt to resolve them. It could also show you the steps to resolve them yourself. If there are multiple solutions, you can see them by clicking ‘Next.’
Fix 3: Clear the Microsoft Store Cache
Clearing the cache helps resolve issues with your app. It is a very simple process:
- Open the Run command accessory. To do this, go to the Start menu and type “Run” (no quotes) in the search bar. Then, click on the option from the search results. Alternatively, you can use the keyboard combination to quickly open the utility. Press the Windows icon key +R combination.
- Type “exe” (no quotes) in the text field and click ‘OK’ on the screen or press the Enter key on your keyboard. This opens a blank Command Prompt window. After the cache has been cleared, the CMD window closes and Store opens automatically. Try signing in and see if the error has been resolved.
Fix 4: Re-Register Microsoft Store
When an app is misbehaving, you can fix it by doing a reinstallation. But since the Store app comes with Windows, reinstalling it is not an option. Instead, you can re-register it. This is done by running a command line in PowerShell (Admin). PowerShell is a scripting environment for running automated tasks.
Here is how to re-register Store:
- Go to the Start menu and type “Powershell” (no quotes) in the search menu. When the option appears in the results, right-click on it and select Run as Administrator.
- Click ‘Yes’ when prompted by UAC (User Account Control) to allow the program to make changes to your computer.
- Once the PowerShell (Admin) window opens, enter (type or copy and paste) the command below and press Enter on your keyboard to run it:
PowerShell -ExecutionPolicy Unrestricted -Command “& {$manifest = (Get-AppxPackage sMicrosoft.WindowsStore).InstallLocation + ‘\\AppxManifest.xml’ ; Add-AppxPackage -DisableDevelopmentMode -Register $manifest}”
- Close the PowerShell window and restart your computer. Then try signing in to Store. See if the sign-in error has been resolved.
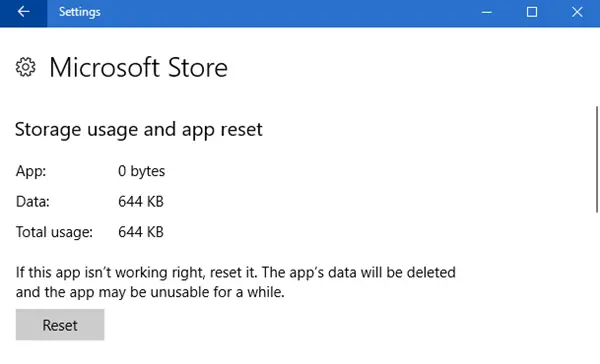
Fix 5: Reset the Store App to Fix the Error 0x801901f4
Resetting the Store app clears all its stored data and sets the program back to its default state. Your settings will be cleared but your installed apps or purchases will remain.
Here is how to reset Microsoft Store:
- Go to the Windows Settings app by pressing this keyboard combination: Windows key + I key.
- Click the ‘Apps & features’ option.
- Locate Store in the list of apps and click on it.
- Click on Advanced Options.
- Now, scroll down and click Reset. A prompt will be displayed. Click Reset to confirm that you want to delete the app’s data.
Fix 6: Try Restoring Windows to a Previous Working State
If the Error 0x801901f4 is a new issue on your computer, you can try restoring your OS to a point in time when you did not experience the issue. It is likely that the problem was precipitated by recent changes in your OS.
Here is how to run System Restore:
- Open the Start menu and type “Create a restore point” (no quotes).
- Click the option from the search results to open the System Properties window.
- Switch to the ‘System Protection’ tab and click the ‘System Restore’ button.
- Click Next when the System Restore window opens.
- Choose a restore point. You can then click the ‘Scan for affected programs’ button to see the installed apps that will be removed on your system when you go ahead with the restore. They will no longer be available because they were installed after the restore point you chose was created.
- Click Next and confirm that you want to execute the restore point. Then, click Finish.
Fix 7: Create a New Microsoft Account
If none of the above fixes worked for you, another option you have is to create a new Microsoft account. It is likely that your current user account is corrupt and causing the sign-in error.
Visit account.microsoft.com and click on Sign in > Create one. After creating a new account, use it to sign in to MS Store and see if it will be successful.
How to Fix the ‘Can’t verify MS Account on Win10 Clean Installs’ Issue
Now, we will look at what to do if you cannot verify your new Microsoft account, especially after clean installing your operating system. First, let us outline two methods you can use to verify your Microsoft account:
- Verify account via Account Settings
- Verify account online
Method 1: Verify Account via Account Settings
Follow these steps:
- Sign in to Windows with your Microsoft account.
- Open the Start menu and open Settings. Then, click on Accounts.
- On the next page that opens, click on Your Account.
- On the right pane, scroll to the ‘Manage my Microsoft account’ section.
- Click the Verify link. The link is under the ‘You need to verify your identity on this PC’ section.
- Enter the password for your Microsoft account and click OK.
- Click the drop-down menu to choose how you would like to receive the security code for your verification.
- Click Next.
- Enter the security code you received and submit it.
Method 2: Verify Account Online
- Visit ‘https://login.live.com/’ and sign in with your MS account.
- Click on Security and Privacy > More Security Settings to verify your device.
- Click the ‘Verify’ link under ‘Security info helps keep your account safe.’
- Enter the security code you received and click the ‘Verify’ button.
If you used any of the above methods to try verifying your Microsoft account without making any headway, visit ‘https://support.microsoft.com/en-us/help/12401/microsoft-account-get-help-by-email’ to report the issue to Microsoft.
Pro Tip: If there is a problem with your Windows registry, you will face all sorts of issues. To ensure that your registry is in good condition, we recommend running a scan with Auslogics BoostSpeed. The registry cleaner in BoostSpeed will safely resolve errors so that your system can function optimally once more. Auslogics products have been certified by experts and backed by Microsoft. You can rest easy knowing that your PC is in safe hands.
Conclusion
The Sign-In Error 0x801901f4 prevents Windows users from accessing any Microsoft service, including Store, with their Microsoft account. The issue can be quite discomfiting. However, we’re certain that one or more of the solutions we shared in this article will help you.
If you have clarifications or comments regarding our instructions, feel free to comment below!