В сети всё чаще фигурирует ошибка с кодом 0x800f0954. Она появляется при попытке добавить в Windows 10 различные дополнительные компоненты. Чаще всего она наблюдается во время добавления .NET Framework разных версий. Неудачно закончится может и один из встроенных инструментов командной строки – DISM. Вместо сканирования системы или выполнения других системных задач может отобразиться окно со сбоем. Способы исправления, а также причины ошибки 0x800f0954 в Windows 7-10 описаны ниже.
Что вызывает ошибку 0x800f0954?
Чтобы понять источник появления проблемы, эксперты изучили около 30 отчётов пользователей. Затем подобное состояние Windows было воспроизведено на тестовых машинах. Результат – появилась та же самая ошибка.
Удалось установить следующих виновников неисправностей:
- Компьютер не в состоянии подключиться к серверам Windows, отвечающим за передачу обновлений. Очень вероятно, что системе самостоятельно не удалось связаться с серверами WU. Проблема является типичной для компьютерных сетей, которые подключаются к доменам и настроены на автоматическую загрузку обновлений с сервера WSUS. Для фикса ошибки достаточно скачать обновление в обход службы WSUS.
- Проблему вызывают журналы DISM CBS. Утилита DISM может создавать журналы CBS с отчётами об ошибках, которые в реальности отсутствуют. Удаление журналов обслуживания помогает убрать глюк системы. Скорее всего при повторном запуске сканирования Windows через DISM, утилита покажет корректный результат.
- Неудачное обновление .NET Framework через встроенный компонент ОС. Чтобы загрузить и поставить более новую версию .NET Framework без ошибки, лучше использовать Powershell;
- Настройки групповой политики блокируют выполнение действия. Существует одна настройка в групповой политике, которая в неактивном состоянии может вызывать ошибку 0x800f0954. Решением проблемы станет включение одной опции в редакторе.
Способы исправления были подобраны согласно перечисленным проблемам. Каждую неисправность по-отдельности можно устранить, заменив всего одну настройку или выполнив несколько ручных действий. Однако, чтобы понять, в чём истинная первопричина проблемы, порой нужно выполнить несколько манипуляций. Все способы размещены в том порядке, в котором их целесообразно использовать с точки зрения эффективности и простоты применения.
Способ 1: обход WSUS
Очевидно, что для получения дополнительных компонентов Windows обязателен доступ к серверам корпорации Microsoft. Если нужного подключения система установить не может, как раз и появляется ошибка 0x800f0954. Приблизительно 35% всех отчётов от серверных машин о сбое вызваны проблемами с подключением к серверу. Всё из-за того, что они настроены на загрузку обновлений с серверов WSUS.
Если у читателя аналогичная проблема, скорее всего когда-то компьютер состоял в доменной сети, поэтому в нём сохранились старые настройки групповой политики. При этом сценарии следует установить временный костыль, позволяющий обойти сервер WSUS. Для этого нужно изменить настройки реестра.
Важно! Перед работой с реестром лучше сделать точку восстановления Windows. Изменив не тот параметр или задав неправильное значение, можно нарушить правильность работы системы.
Что нужно сделать:
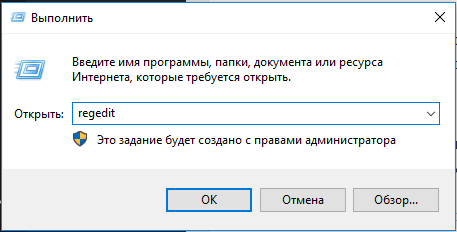
- Нажать сочетание кнопок Win + R на клавиатуре.
- В диалоговое окно «Выполнить» вставить слово regedit и нажать Ctrl + Shift + Enter (позволяет запустить редактор реестра с администраторскими правами). Если появится уведомление от приложения «Контроль учётных записей пользователей», следует подтвердить действие кнопкой «Да».

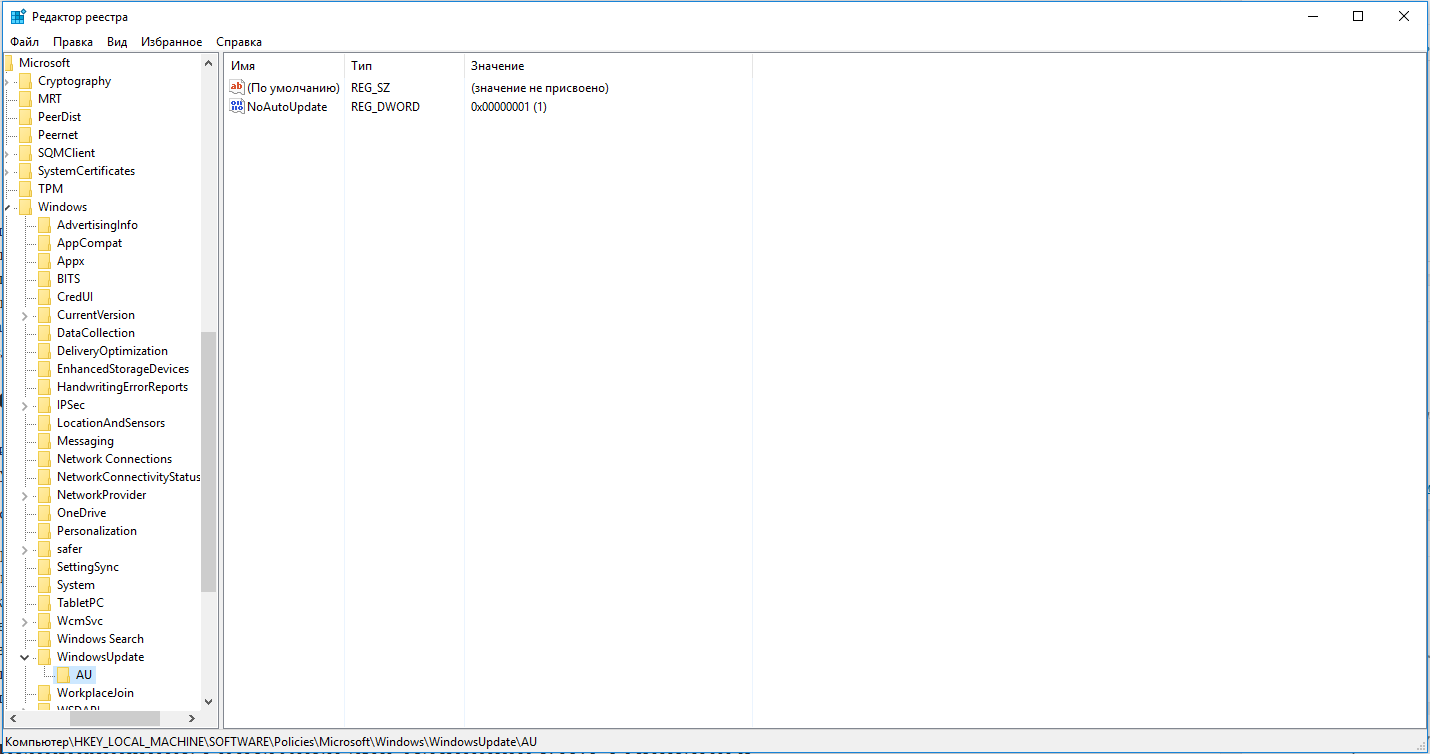
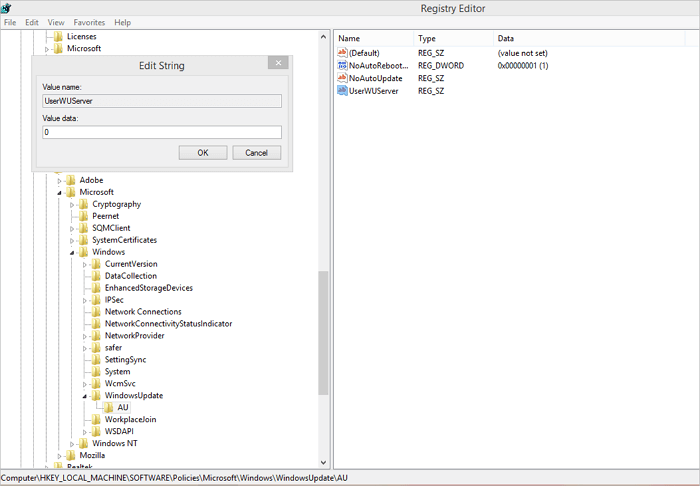
- На вертикальной панели последовательно открыть HKEY_LOCAL_MACHINE\SOFTWARE\Policies\Microsoft\Windows\WindowsUpdate\AU или вставить ссылку в навигационную панель. Возможно, «WindowsUpdate» не удастся найти, в этом случае стоит нажать ПКМ по рабочему окну и создать данный ключ. То же самое сделать с ключом «AU».

- В конечной папке в панели справа щёлкнуть ПКМ и выбрать «Создать» — «Строковый параметр». Значение нужно переименовать в «UserWUServer».
- Двойным нажатием открыть только что созданный параметр и задать ему значение 0.
- Выйти из редактора реестра и перезагрузить компьютер.
Способ 2: Очистка журналов CBS
Исходя их личного опыта и опыта многих пользователей, можно сказать, что в борьбе с ошибкой 0x800f0954 может помочь удаление журнала CBS (Component Based Servicing). Он создан DISM. Следующий этап – заново запустить DISM и воспроизвести действие по установке компонента Windows, ранее вызывавшего ошибку.
Пошаговое руководство:
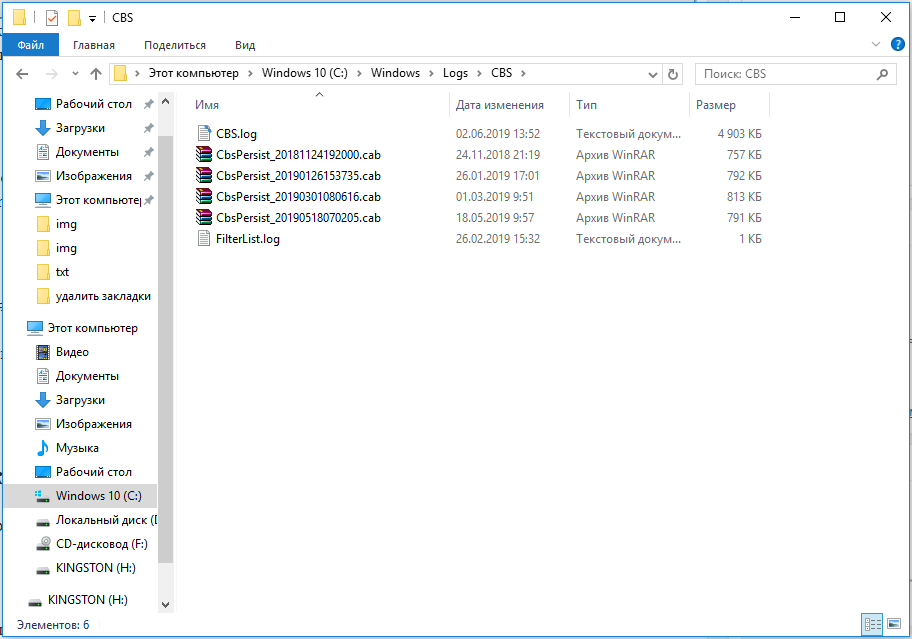
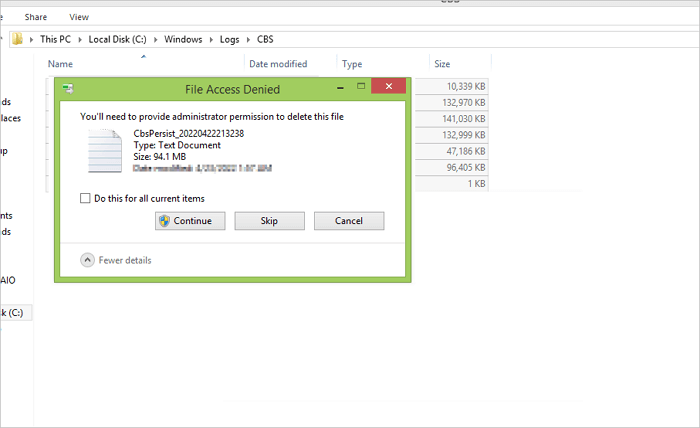
- Открыть «Проводник» и перейти по пути C:\Windows\Logs\CBS.

- Попав в папку CBS, нажать Ctrl + A для выделения всего содержимого и Del – для его удаления. Как только все файлы с расширением .log и .cab удалятся, можно закрыть «Проводник».
- Нажать ПКМ по «Пуску» и выбрать «Командная строка (Администратор). Если появится уведомление UAC, в нём нажать «Да» для подтверждения выдачи прав.
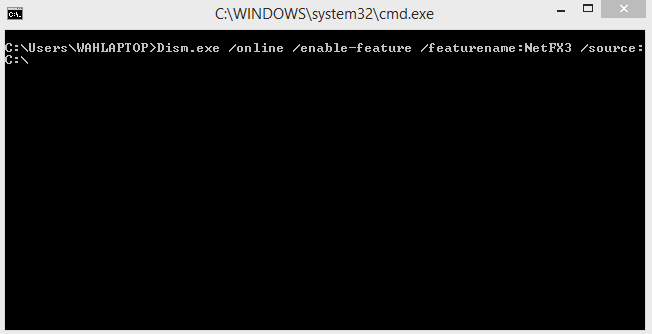
- В консоль с полными правами вставить команду — Dism.exe /online /enable-feature /featurename:NetFX3 /source:C:\ и нажать Enter.
- Выполнить перезапуск системы.
Способ 3: использование PowerShell для инсталляции .NET Framework
Если проблема возникла при установке .NET Framework при помощи DISM, стоит обратиться к другому инструменту – Powershell. Он работает по иному принципу, и с большей долей вероятности установит подходящий компонент.
Инструкция:
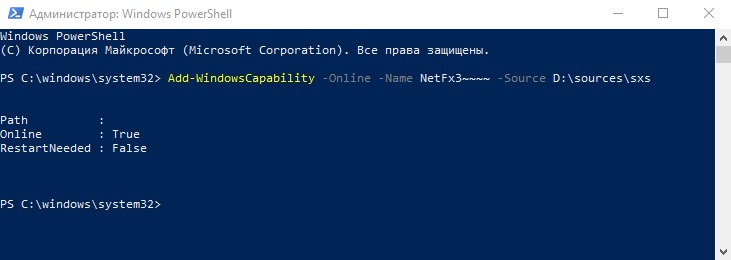
- Нажать сочетание Win + R, вставить в строку powershell и щёлкнуть по клавишам Ctrl + Shift + Enter.
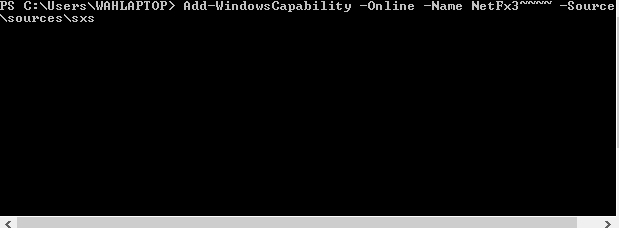
- После запуска Powershell в режиме повышенных прав вставить запись Add-WindowsCapability -Online -Name NetFx3 ~ ~ ~ ~ — Source D: \sources\sxs и применить действие кнопкой Ввод.

- Закрыть консоль, и перезапустить компьютер.
- Проверить всё ли работает правильно.
Способ 4: изменение настроек редактора групповой политики
Метод применим в ситуации, когда ошибка 0x800f0954 сопровождает попытку добавить инструментарий RSAT. В такой ситуации пользователю придётся внести пару изменений в настройки групповой политики.
Важно! Редактор групповой политики доступен не во всех версиях Windows. Если установлена «десятка» в редакции Home, по умолчанию не будет доступа к данному инструменту. Придётся дополнительно установить редактор.
При наличии доступа к групповым политикам, следует:
- Щёлкнуть по значку лупы возле «Пуска», вставить название файла gpedit.msc и открыть его.
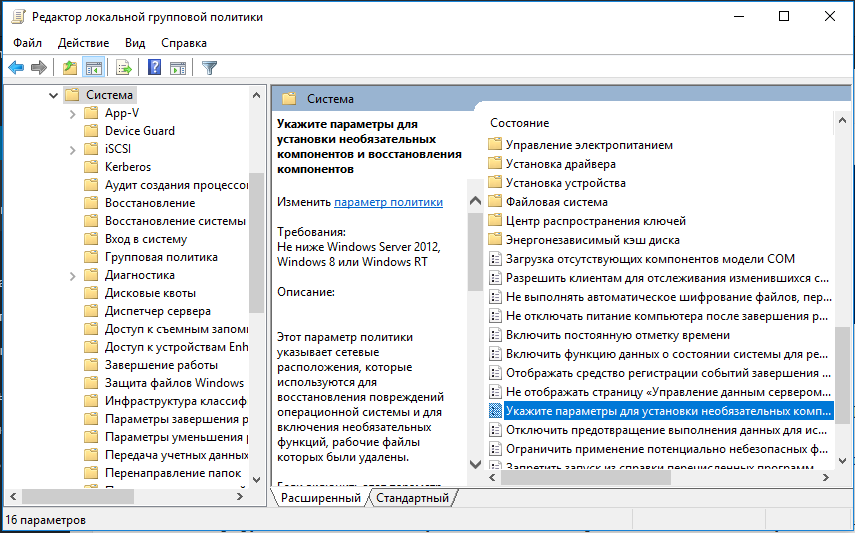
- Внутри редактора перейти в раздел «Административные шаблоны\Система».
- В правой области найти параметр «Укажите параметры для установки необязательных компонентов…» и дважды щёлкнуть по нему.

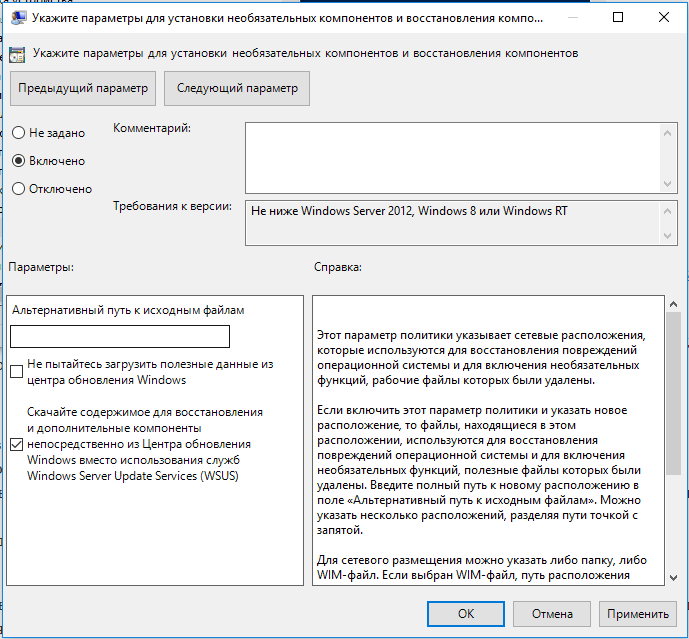
- Перевести её в состояние «Включено».
- Установить флажок напротив «Скачайте содержимое для восстановления…».

- Нажать на кнопку «Применить» и закрыть редактор.
На этом всё, какой-то из способов должен помочь исправить ошибку 0x800f0954 и всё-таки установить нужный компонент Windows. Изначально стоит выбрать свою ситуацию и перейти к решению, разработанному под неё. Если не получается определить свою проблему, можно выполнить все действия последовательно.
Deployment Image Servicing and Management aka DISM.exe is a useful command-line tool to repair Windows images and Windows RE. When sfc /scannow does not perform the job, DISM can solve the issue. But sometimes, you might come across a message “Error: 0x800f0954 DISM failed. no operation was performed” when running this tool in Windows 11 and 10.
This issue commonly occurs when a third-party antivirus program interferes with the command line tool during execution. Furthermore, corrupted Windows update components and registry may cause DISM error 0x800f0954.
Here is how to Fix Error: 0x800f0954 DISM failed. No operation was performed in Windows 10/11 –
Way-1: Uninstall third-party antivirus program
Most of the cases indicate that this DISM error is triggered by conflict between third party programs and system files. Therefore, the very first method you need to follow is to check whether any antivirus or other programs are installed on your computer.
Windows 10 and 11 include a stalwart and efficient built-in utility to protect the system called Windows Security. You don’t need outsider antivirus tool for the same purpose (this way you can also avoid the risk of errors because some of them are not trustworthy). But by chance, If any program of this kind is installed and DISM failed occurs then remove it using the following guidelines –
- Press – Windows+R.
- Type – appwiz.cpl.
- Hit – Enter.
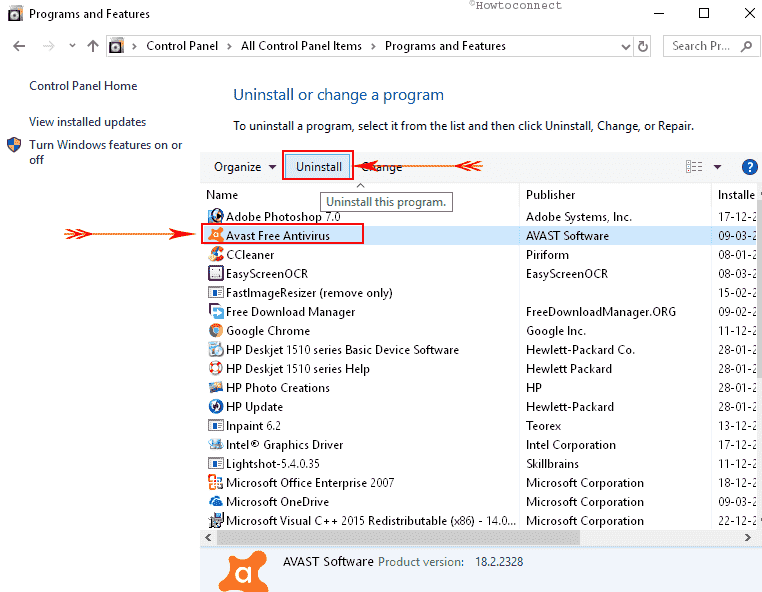
- Once the Programs and features window opens up, find the app.
- Right click on the program.
- Select – Uninstall.
- Follow if any prompt appears.
- Repeat the same process if more programs are installed to solve the DISM issue.
See – How to Uninstall Software From Windows 10 After Creators Update.
Way-2: Reset the services related to Windows update
DISM failed, no operation was performed error 0x800f0954 is generated when the services associated with Windows update are not correctly configured. Services like Windows Update (wuauserv), Background Intelligent Transfer Service (BITS) Cryptographic Services (CryptSvc) are in supportive roles to complete the process. To perform the successful automatic Windows update these services must be having Automatic Startup type and Start Status.
When an update is started downloading, the services don’t support and finally disturb the normal operations of the system resulting in DISM error. So simply resetting the services might fix the problem –
- Click – Start.
- Type – cmd.
- Press – Ctrl + Shift + Enter.
- Click Yes on User account control pop up.
- Once the command prompt appears, type one of the following lines at a time and press enter –
net stop wuauserv
cd %systemroot%SoftwareDistribution
ren Download Download.old
net start wuauserv
net stop bits
net start bits
net stop cryptsvc
cd %systemroot%system32
ren catroot2 catroot2.old
net start cryptsvc- Restart the computer.
- See if 0x800f0954 DISM does still persists and if it is, follow the next method.
Way-3: Specify the correct location of Install.wim file
Oftentimes, the DISM fails and shows a message “Source files couldn’t be found” when this error code appears. This glitch indicates that you will have to mount the ISO file of Windows 10 and set forth the location of the Install.wim file. For this follow the guidelines –
- Open command prompt as administrator.
- Copy-paste
DISM /Online /Cleanup-Image /RestoreHealth /source:WIM:S:SourcesInstall.wim:1 /LimitAccess
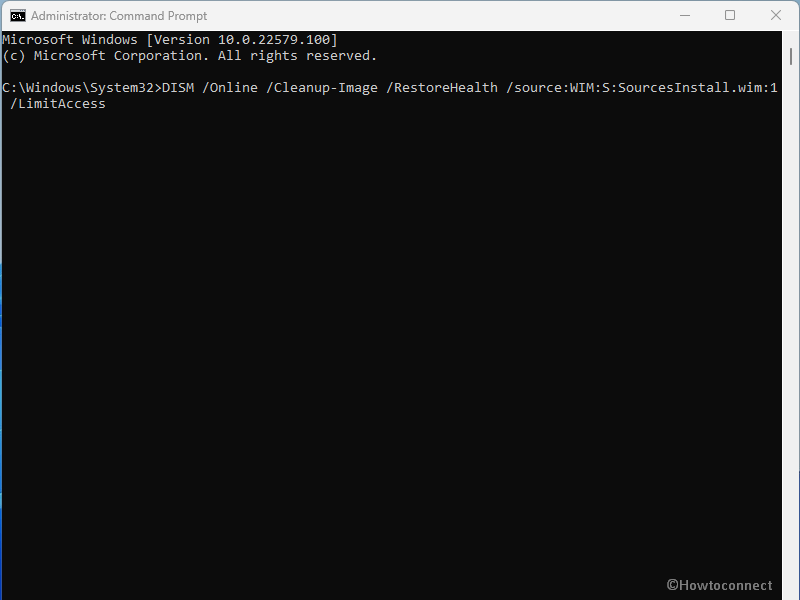
- Remember to replace S with a drive where Windows 10 ISO file is mounted.
- Copy the Install.wim file and paste it to your hard drive.
- You can also try to copy Install.wim to the root directory of your hard drive.
- If you need to Install.wim file, simply download Windows 10 ISO, mount it, and determine the location of the Install.wim file.
- Now copy Install.wim and enter it accurately in the DISM command-line tool.
A few things to have in mind are you should not mistake between uppercase and lowercase because the commands are case sensitive and avoid putting space between the syntax.
Way-4: Clean up image components to solve 0x800f0954 DISM failed
“Error 0x800f0954 dism failed. no operation was performed.” occurs generally when Windows images are required to be cleaned. Windows 10 and 11 provide specific command line repair tools to clean the images –
- Launch the Command prompt with administrative privileges as in the previous method.
- Enter the below commands one after another –
Dism.exe /online /Cleanup-Image /StartComponentCleanup
DISM /Online /Cleanup-Image /StartComponentCleanup
DISM /Online /Cleanup-Image /AnalyzeComponentStore
Dism.exe /online /Cleanup-Image /StartComponentCleanup
Dism.exe /online /Cleanup-Image /StartComponentCleanup /ResetBase
Way-5: Use Windows Update troubleshooter
This seems weird but true that the DISM failed error occurs because of Windows update problems. Multiple users confirm that troubleshooting the update solved error code 0x800f0954 in Windows 10 or 11. Unlike Blue Screen errors Windows 10, as well as 11, provide a default tool within your system to troubleshoot Windows Update. This will detect problems, check for pending restart, missing or corrupt files, service registration, status, configurations, etc and repair them.
So, use Windows update troubleshooter and fix the problems to ultimately solve the DISM error by following the guidelines –
- Click on Search from the taskbar.
- Type troubleshoot.
- Press Enter.
- When Settings app opens up, click on Additional troubleshooters.
- In the list, find and click on Windows update.
- Select Run the troubleshooter.
- After a while, you may see some suggestions on the tool, follow that.
Way-6: Turn off proxy to fix 0x800f0954 DISM failed
When DISM can not run and generate any error code then Proxy is probably a reason. You may be using proxy to keep your privacy intact which prevents Deployment Image Servicing and Management command-line tools from completing their work. Therefore turn off the proxy and check once if DISM is working fine –
- Click Windows and I keys simultaneously.
- Select – Network & internet.
- On the next Settings page, click on – Proxy.
- From the right pane, turn off the Proxy using the toggle there.
Way-7: Uncheck Read-only for install.wim
Several people copy install.wim file from Windows 10 installation ISO to run the DISM scan offline. Furthermore, many instances suggest that DISM failed error occurs due to the install.wim file that is set as a read-only. Windows allows you to set 2 attributes for a file Read-only and Hidden. The first one prevents the system from editing a file as a result when you try to run the DISM command it fails. To solve follow the instructions –
- Right-click on install.wim file.
- Select – Properties.
- Uncheck the Read-only box.
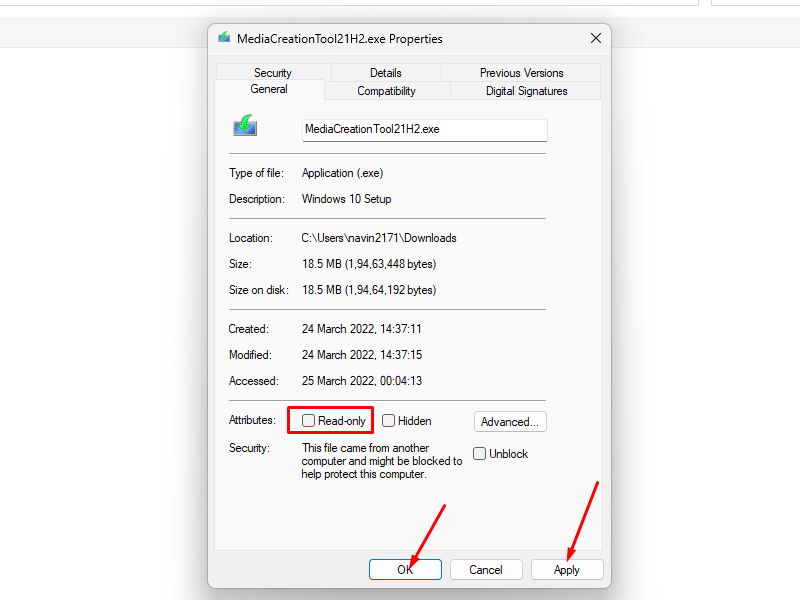
- Finally, click Apply and OK.
- After making these changes, try to run DISM command again.
Way-8: Complete an in-place upgrade
In-place upgrade is a method that will not only reinstall the Operating system but simultaneously update it to the most recent version. When DISM failed with error code 0x800f0954 this is one of the best options to fix the issue. Most of all, this will conserve the files and apps and don’t affect or lose your personal data so follow the steps and perform the upgrade –
- Click on Media Creation Tool.
- From the navigated pages, click on Download tool now button from Create Windows installation media section.
- Double click on MediaCreationTool.exe.
- Select – Upgrade this PC now.
- Wait for a while.
- Click on – Download and install updates (recommended).
- Click – Next.
- Again wait until the updates are completely downloaded.
- Now follow the steps on the Setup.
- On Ready to install screen, select – Change what to keep.
- Check the option – Keep personal files and apps.
- Click Next.
- Follow the remaining guidelines on the screen to perform the in-place upgrade.
Read the solutions to same error code that occurred for .Net Framework – How to Fix Error Code 0x800f0954 in Windows 10 (.Net Framework).
Methods list:
Way-1: Uninstall third-party antivirus program
Way-2: Reset the services related to Windows update
Way-3: Specify the correct location of Install.wim file
Way-4: Clean up image components
Way-5: Use Windows Update troubleshooter
Way-6: Turn off proxy
Way-7: Uncheck Read-only for install.wim
Way-8: Complete an in-place upgrade
That’s all!!
Repair any Windows problems such as Blue/Black Screen, DLL, Exe, application, Regisrty error and quickly recover system from issues using Reimage.
Содержание
- 1 [Исправить] Ошибка 0x800F0954 Установка .NET Framework 3.5 или любой дополнительной функции
- 1.1 Шаг 1. Обход WSUS для установки компонентов / обновлений непосредственно из Центра обновления Windows
- 1.2 Шаг 2. Установите .NET Framework (или дополнительные функции) из Windows 10 ISO или DVD
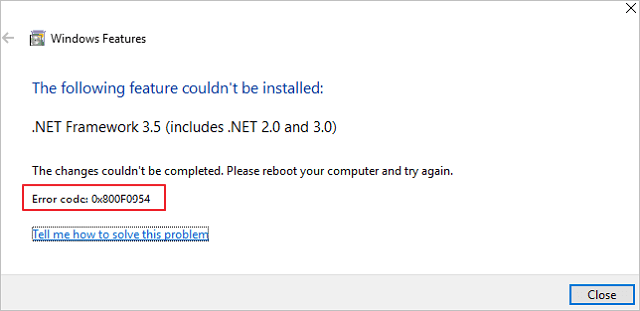
При попытке установить .NET Framework 3.5 или любую другую дополнительную функцию, используя «Функции Windows» (optionalfeatures.exe) диалог или использование командной строки DISM, ошибка 0x800F0954 может всплывающее окно
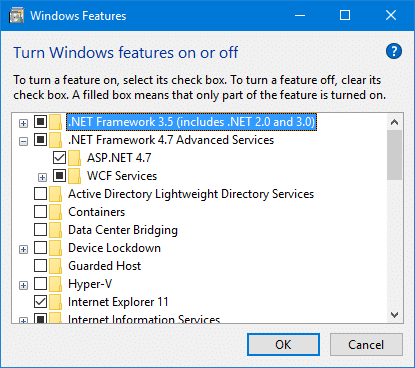
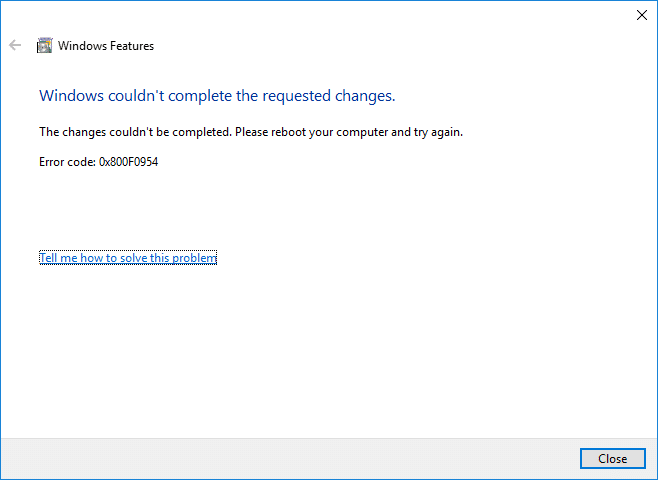
После включения .NET Framework 3.5 и нажатия кнопки «ОК» может появиться следующая ошибка:
Windows не может выполнить запрошенные изменения.
Изменения не могут быть завершены. Пожалуйста, перезагрузите компьютер и попробуйте снова.
Код ошибки: 0x800F0954
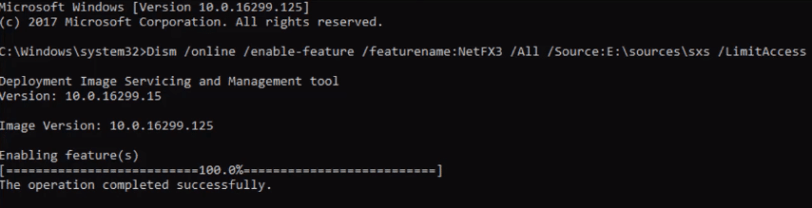
Та же ошибка может возникнуть при попытке установить дополнительное распознавание речи или дополнительные шрифты с помощью дополнительных функций на странице настроек или с помощью командной строки DISM. Например, вы запускаете следующую команду для установки .NET Framework 3.5 из командной строки администратора или администратора.
DISM /Online /Enable-Feature /FeatureName:NetFx3 /All
После нажатия ENTER вы увидите полное сообщение об ошибке:
Средство обслуживания образов развертывания и управления ими
Версия: 10.0.16299.15
Версия изображения: 10.0.16299.192
Включение функции (ий)
[========================== 100,0% ===================== =====]
Ошибка: 0x800f0954
DISM не удалось. Операция не была выполнена.
Для получения дополнительной информации просмотрите файл журнала.
Файл журнала DISM находится по адресу C: \ Windows \ Logs \ DISM \ dism.log
DISM.log файл будет показывать эти записи / ошибки:
xxxx, Info                  DISM   DISM Package Manager: PID=12956 TID=12296 Further logs for online package and feature related operations can be found at %WINDIR%\logs\CBS\cbs.log - CPackageManagerCLIHandler::ExecuteCmdLine
xxxx, Error                 DISM   DISM.EXE: DISM Package Manager processed the command line but failed. HRESULT=800F0954
И CBS.log файл записал бы эти ошибки:
xxxx, Info                  CBS    DWLD:Failed to do Windows update search [HRESULT = 0x800f0954 - CBS_E_INVALID_WINDOWS_UPDATE_COUNT_WSUS]
xxxx, Info                  CBS    FC:   WindowsUpdateDownloadFromUUP returns. [0x800F0954]
Обратите внимание, что ошибка 0x800f0954 относится к CBS_E_INVALID_WINDOWS_UPDATE_COUNT_WSUS Это означает, что ваша система могла быть настроена на использование сервера WSUS (в вашей доменной сети) для получения обновлений вместо прямого подключения к серверам Центра обновления Windows.
[Исправить] Ошибка 0x800F0954 Установка .NET Framework 3.5 или любой дополнительной функции
Если ошибка 0x800f0954 происходит установка дополнительных функций Windows, это может быть связано с тем, что система не может получить доступ к серверу Центра обновления Windows. Это особенно верно в случае компьютеров, подключенных к домену, которые настроены для загрузки обновлений с сервера WSUS. Также возможно, что ваш компьютер когда-то был частью, корпоративной или доменной сетью, а параметр групповой политики все еще действует.
Шаг 1. Обход WSUS для установки компонентов / обновлений непосредственно из Центра обновления Windows
Чтобы устранить эту проблему, временно обойдите сервер WSUS, используя следующее редактирование реестра (требуются права администратора).
- Щелкните правой кнопкой мыши «Пуск» и выберите «Выполнить».
- Тип
regedit.exeи нажмите ОК - Перейти к следующему разделу реестра:
HKEY_LOCAL_MACHINE\SOFTWARE\Policies\Microsoft\Windows\WindowsUpdate\AU
- На правой панели, если значение
UseWUServerсуществует, установите его данные0 - Выход из редактора реестра
- Перезагрузите Windows.
Посмотрите, сможете ли вы установить .Net Framework 3.5 или какие-либо дополнительные функции сейчас. В большинстве случаев вышеуказанные шаги должны решить проблему.
Шаг 2. Установите .NET Framework (или дополнительные функции) из Windows 10 ISO или DVD
Если процедура, описанная в шаге 1, не помогла, вы можете использовать следующую команду DISM (с указанием пути источника установки), чтобы установить дополнительные функции с Windows 10 ISO или DVD. Однако вы должны убедиться, что версия Windows 10 на вашем DVD или ISO соответствует версии Windows 10, установленной в вашей системе.
Вот шаги для установки .NET Framework 3.5 с установочного диска Windows 10 или ISO:
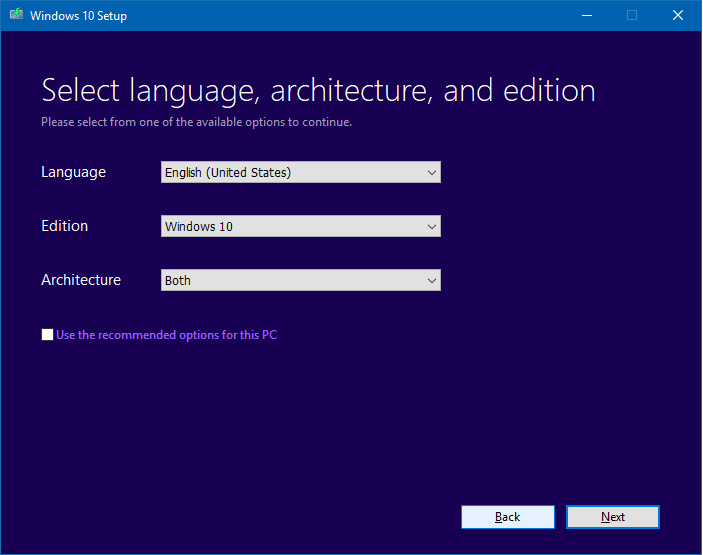
- Получите последнюю версию ISO 10 для Windows (при условии, что в вашей системе Windows 10 установлена новейшая сборка) с помощью средства создания мультимедиа.
 Загрузите Windows 10 ISO, используя Media Creation Tool
 - Смонтируйте образ ISO, дважды щелкнув файл ISO.
- Запишите букву вашего DVD или смонтированного диска, скажем,
H:\
- Откройте окно командной строки с повышенными правами (администратор).
- Введите следующую команду и нажмите клавишу ВВОД
dism /online /enable-feature /featurename:NetFX3 /Source:H:\sources\sxs /LimitAccess

 Загрузите Windows 10 ISO, используя Media Creation Tool
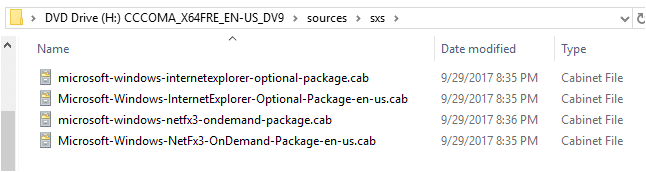
Заметка: Если вам нужно установить «Активацию Windows Communication Foundation (WCF) HTTP» и «Активацию без связи Windows Communication Foundation (WCF)», обязательно добавьте /All параметр, как видно на скриншоте выше. Как было сказано ранее, эти два компонента обычно не требуются большинству пользователей.
Аналогично, чтобы установить другие дополнительные функции с помощью DISM, см. Сообщение в блоге Добавление функций (включая .NET 3.5) в Windows 10 — статьи о развертывании Windows и Office Майкла Нихауса, а также статьи в Microsoft Docs. Опции командной строки для обслуживания пакетов DISM Capabilities Доступные функции по запросу
Надеюсь, что эта статья помогла вам установить .NET Framework 3.5 или любые другие дополнительные функции Windows, без ошибок 0x800F0954.
| Workable Solutions | Step-by-step Troubleshooting |
|---|---|
| 1. Bypass the WSUS Server | Open Run Window by pressing Windows + R key. In the Run Window, type regedit…Full steps |
| 2. Install the .NET Framework | Open PowerShell using Run Window. In PowerShell, type Add-WindowsCapability…Full steps |
| 3. Clean the CBS logs | Go to the location C.\Windows\Logs\CBS through Windows 10 file explorer…Full steps |
| 4. Run Group Policy Editor | Open Run Window, type gpedit.msc inside it, and click the OK button…Full steps |
Overview — Error Code 0x800F0954
Windows 10 users have recently begun to face the strange error code 0x800F0954. They have encountered this error while installing .NET framework 3.5 or installing any optional Windows updates. The error code 0x800F0954 seems strange, and if you face such errors for the first time, it can be a highly frustrating experience. But, the good news is that you can fix this error using four simple methods mentioned in this article.
Before you diagnose and fix the error code 0x800F0954, you need to know the causes of this error. Therefore, the next section will introduce you to the causes of error code 0x800F0954.
Causes — Error Code 0x800F0954
The 0x800F0954 error code isn’t new in Windows 10. Below is the compiled list of reasons that caused this error in Windows 10. Let’s see each reason one by one.
DISM CBS Logs Issue
DISM (Deployment Image Servicing and Management) utility helps manage and repair your Windows 10 image. Sometimes, the DISM utility can generate logs related to CBS (Component Based Servicing). These logs indicate that your system has some problem that does not exist in reality. Hence, it causes the error code 0x800F0954. You can fix this by deleting CBS logs.
Older .NET Framework Version
You should only install the latest version of the .NET Framework for your Windows 10. Suppose you are installing any previous or older version due to any reason. In that case, you must do it through the PowerShell window. Otherwise, it will result in a 0x800F0954 or 0x80240034 error code on Windows 10.
Windows Update Server Issue
WSUS (Windows Server Update Services) allows your computer to update Windows on a computer network. If your system cannot find WSUS, it will cause a 0x800F0954 error code while installing optional updates. But don’t worry, as you can fix this by bypassing the WSUS.
Local Group Policy Editor
Group policy editor settings allow you to manage many basic settings on your Windows computer. Some local group policy editor settings can conflict with your system and throw a 0x800F0954 error code. As a result, you need to disable them to eliminate the 0x800F0954 error code.
The above listed are common reasons to trigger the 0x800F0954 error code in Windows 10.
Solutions — Fix Error Code 0x800F0954
Now you know the reasons that cause the 0x800F0954 error code on Windows 10. It is mainly due to policy editor issues, CBS logs, older .NET framework, or WSUS server. Luckily, you can fix the error code 0x800F0954 on Windows 10 by following four easy methods. Let’s see each solution one by one with detailed guidelines below. Make sure you follow the method by reading it carefully.
Fix 1. Bypass the WSUS Server to Fix Error Code 0x800F0954
As stated earlier, if your Windows system is unable to locate Windows Update Server, it will not allow you to install optional Windows updates. Therefore, you will have to face the error code 0x800F0954 on your Windows 10 computer.
Mainly WSUS server issues appear when a network of computers update their Windows using common WSUS (Windows server update service). You can fix the error code 0x800F0954 in Windows 10 by bypassing the WSUS server.
Follow the below steps to bypass the WSUS server to fix error code 0x800F0954 in Windows 10.
Step 1. Open Run Window by pressing Windows + R key.
Step 2. In the Run Window, type regedit and press the Ctrl + Shift + Enter key.
Using these keys, you can open the Registry Editor in Windows 10 with administrator rights which is critical to proceed with this method. While opening with administrator rights, your system will throw a prompt indicating if you wish to grant admin privileges or not. Here, you have to press the Yes button to proceed further.
Step 3. Navigate to the following access from your Registry Editor.
HKEY_LOCAL_MACHINE\SOFTWARE\Policies\Microsoft\Windows\WindowsUpdate\AU
You can do that through the left side menu. Alternatively, you can paste the address directly into the navigation bar to access it. If there is no Windows Update key, you must create it manually. You can make the Windows Update key «New > Key» and rename it to «WindowsUpdate». Once done, right-click on that key and select «New > Key» again. Here, give the new key the value of «AU».
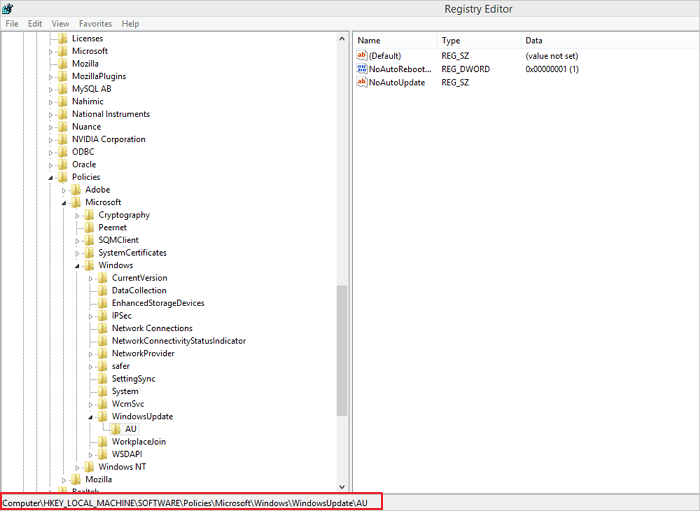
Step 4. Select the AU key, right-click on the right side, and click on the «New > String value» pair. It will create a new string value. Please rename it to UserWUServer.
Step 5. Change the UserWUServer key value to 0 by double-clicking.
Step 6. Restart your computer. After performing all the steps correctly, restart your computer and check if the error persists or not.
Fix 2. Install the .NET Framework with PowerShell
Installing .NET Framework using DISM can result in 0x800F0954 error code. You can fix this by using PowerShell to install the .NET Framework.
Follow the below steps to install the .NET Framework with PowerShell in Windows 10.
Step 1. Open PowerShell using Run Window.
You can do that by pressing Windows + R key to open Run Windows. Type PowerShell in it and click on the OK button.
Step 2. In PowerShell, type Add-WindowsCapability –Online -Name NetFx3~~~~ –Source D.\sources\sxs
After entering the command, restart your computer.
Step 3. Install .NET Framework again. You will not see the 0x800F0954 error code while installing the .NET framework.
Fix 3. Clean the CBS logs to Fix Error Code 0x800F0954
DISM generates the CBS logs resulting in error code 0x800F0954 on Windows 10. The quickest fix is to delete the CBS logs to fix the error code 0x800F0954.
Follow the below steps to clean the CBS logs to fix error code 0x800F0954 in Windows 10.
Step 1. Go to the location C.\Windows\Logs\CBS through Windows 10 file explorer.
Step 2. Press Ctrl + A to select all the files inside the CBS folder and delete them.
Step 3. After deleting the CBS logs, you need to rerun the DISM command. Open CMD and type the following command Dism.exe /online /enable-feature /featurename.NetFX3 /source.C.\
After running the above command, you will be able to install the .NET framework without the 0x800F0954 error.
Fix 4. Run Group Policy Editor
Operational features and some repair content fails to download in Windows 10 due to issues regarding group policies. You can amend your group policies to fix the error code 0x800F0954 in Windows 10.
Follow the below steps to run the group policy editor in Windows 10 to fix the error code 0x800F0954.
Step 1. Open Run Window, type gpedit.msc inside it, and click the OK button.
Step 2. Navigate to Computer Configuration\Administrative Templates\System location from your Local Group Policy Editor using the left side menu. You will see the system selected. In the right-side menu, double-click on the Specify settings for optional component installation and component repair.
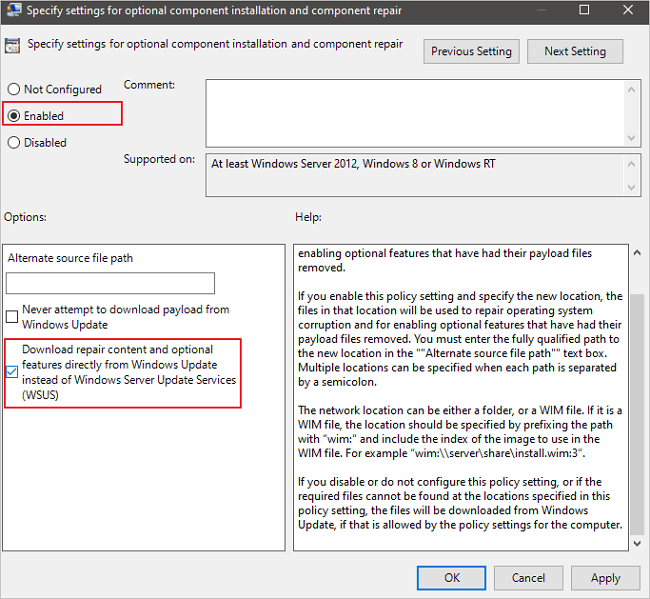
Step 3. You need to enable the policy and check the repair content option.
Step 4. Click on Apply button to save the settings.
Restart your computer, and hopefully, you will not see the 0x800F0954 error again.
How to Restore Data After Fixing Error Code 0x800F0954
Although following the above methods can fix the error code 0x800F0954 in Windows 10, there is still a problem that needs your attention. Users have also reported losing their essential data due to the 0x800F0954 error code in Windows 10. The good news is that you can use free data recovery software to restore your data efficiently.
EaseUS free data recovery software allows you to quickly and easily restore data from Windows 11/10/8/7. The software can help restore data from any data loss scenario, regardless of the cause of data loss.
- Recover data that you accidentally destroyed.
- Quickly recover your lost partitions.
- Recover lost data during Windows updates.
- Perform data recovery from a NAS.
- Recover data from any external medium, such as an SD card.
Step 1. Select a location and start scanning
Launch EaseUS Data Recovery Wizard and choose the partition where you lost data. Then, click «Scan».

Step 2. Filter and preview files
Use the file format filter on the left or upper right corner to find the files you need. Then, you can click the «Preview» button or double-click a file to preview its content.

Step 3. Recover lost data or files
Click the checkbox next to the file and click «Recover» to restore the lost data to a secure place.

Conclusion
0x800F0954 error code mainly appears in Windows 10 when .NET Framework fails to install, or there is a problem with the optional Windows update. The causes of this error include policy issues, .NET failure, CBS logs, and WSUS. You can 0x800F0954 error code in Windows 10 by following the methods mentioned in this article. When you delete CBS logs, bypass WSUS, enable specific policies or install .NET Framework through PowerShell, you can fix the 0x800F0954 error code.
Also, suppose you have lost your data due to the 0x800F0954 error code. In that case, you can restore that using EaseUS Data Recovery Wizard software. It is free and reliable, and you can restore your data with simple steps.
Рассказываем, из-за чего возникает и как исправить ошибку 0x800f0954 в Windows 10.
Что это за ошибка?
Этот сбой связан с программным обеспечением .NET Framework. Ошибка появляется во время установки и не дает ее завершить, жалуясь на необходимость подключиться к интернету (даже если он и так есть).
А .NET Framework — это очень нужный инструмент для разработчиков, на базе которого построены многие приложения для Windows. Эти же приложения полагаются на Фреймворк при запуске. Проще говоря, обойтись без него никак нельзя. Поэтому ошибку 0x800f0954 придется как-то исправлять. Иначе есть шанс лишиться кучи программ и видеоигр.
Далее рассмотрим методы решения проблемы, которые уже доказали свою эффективность.
Меняем параметры реестра
Иногда ошибка возникает из-за проблем при подключении к внешнему серверу обновлений. В этом случае можно попытаться установить .NET Framework, игнорируя хранилища Microsoft Update.
Для этого:
- Кликаем по иконке в виде лупы в левом нижнем углу.

Жмем сюда
- В открывшееся поисковое поле вводим название программы regedit и запускаем ее от имени администратора.

Обязательно выбираем этот пункт
- Когда появится запрос от системы безопасности, нажимаем «Да».

Возможно, для внесения изменений понадобится пароль администратора
- Откроется реестр. Переходим в нем в папку Windows по пути HKEY_LOCAL_MACHINE\SOFTWARE\Policies\Microsoft\Windows.
- Кликаем по этой папке правой кнопкой мыши.

Создаем подпапку в этой директории
- В появившемся контекстном меню наводим курсор на пункт «Создать», а потом выбираем опцию «Раздел».
- Даем ему название WindowsUpdate.

Сначала нажимаем вот сюда
- Потом кликаем правой кнопкой мыши по папке WindowsUpdate и повторяем то же самое. То есть создаем еще один раздел. На этот раз с названием AU.

Внимательно указывайте названия папок и файлов
- Открываем вновь созданный раздел AU. Получится вот такой путь HKEY_LOCAL_MACHINE\SOFTWARE\Policies\Microsoft\Windows\WindowsUpdate\AU.
- Кликаем правой кнопкой мыши по пустому пространству в правой части редактора реестра.
- В появившемся контекстном меню выбираем опцию «Создать параметр DWORD (32 бита)».

Создаем новую опцию
- Даем параметру название UseWUServer.
- Кликаем по нему дважды.

Скорее всего, у вас тут будет всего лишь один параметр
- Появится окошка с настройками. Заменяем «Значение» на 0.

Остальные значения оставляем прежними
- После этого перезагружаем компьютер и заново пытаемся установить .NET Framework. Ошибка должна исчезнуть.
Удаляем файлы CBS
Второй способ — удаление временных файлов CBS. Это журнал данных Component-Based Servicing. Иногда их наличие мешает установке тех или иных системных компонентов и сторонних приложений.
Чтобы их удалить:
- Открываем встроенный файловый менеджер Windows.
- Переходим в папку _Локальный диск (С:)\Windows\Logs\CBS_
- Удаляем все содержимое. Просто выделяем и жмем на клавишу Delete.
- А потом очищаем корзину.

У меня тут всего один файл, но у вас их может быть с десяток разных. Удаляем все сразу. Они не нужны
После удаления журналов пробуем установить .NET Framework через систему выгрузки образов Microsoft. Для этого:
- Открываем поисковик Windows, кликнув по соответствующей иконке.
- Ищем там программу cmd.exe и запускаем от имени администратора.
.jpg")
Командную строку тоже надо включать от имени администратора. И тоже может понадобиться пароль
- Затем вводим команду _Dism.exe /online /enable-feature /featurename:NetFX3 /source:C:_
- Дождавшись окончания работы программы, перезапускаем компьютер.
- А потом еще раз пробуем установить .NET Framework. В этот раз должно получиться.
Устанавливаем .NET Framework через командную строку
Еще один способ обойти ошибку 0x800f0954 — установка .NET Framework прямо с образа системы через командную строку.
Чтобы это сделать:
- Создаем флэшку с установочными файлами Windows (перед этим, вероятно, придется скачать образ Windows 10 с официального сайта Microsoft).
- Вставляем ее в компьютер и запоминаем букву диска, под которой она отображается в системе.
- Открываем поисковик Windows.
- Ищем там командную строку и запускаем ее от имени администратора.
- Сразу же вводим туда команду Add-WindowsCapability -Online -Name NetFx3~~~~ -Source буква диска, под которым записана флэшка с Windows:\sources\sxs

В моем случае выбран диск с буквой F. Вот как он вписывается в команду
- Дожидаемся, пока завершится процесс загрузки и установки нужных компонентов.
- Затем перезагружаем компьютер и заново пробуем установить .NET Framework стандартным способом.
Устанавливаем дополнительные компоненты
Если у вас установлена Windows 10 Pro (или Enterprise), то есть еще один вариант исправления ошибки. Для этого надо поменять параметры групповой политики в системе.
Чтобы это сделать:
- Одновременно нажимаем клавиши Win + R.
- В окне программы «Выполнить» набираем gpedit.msc и кликаем по кнопке ОК.

Это короткий путь к редактору групповых политик
- Откроется редактор групповых политик. Переходим там по пути «Конфигурация компьютера»\«Административные шаблоны»\«Система».
- Затем ищем политику под названием «Укажите параметры для установки необязательных компонентов и восстановления компонентов». Кликаем по ней два раза.
- Ставим галочки напротив пункта «Включено» и напротив пункта «Скачайте содержимое для восстановления и дополнительные компоненты непосредственно из центра обновления Windows вместо использования служб Windows Server Update Services (WSUS)»
- После этого перезагружаем компьютер и пробуем заново установить .NET Framework.
![]() Загрузка …
Загрузка …
Post Views: 3 643