- Remove From My Forums
-
Вопрос
-
So I’ve been trying to add the RSAT for AD LDS by using either Powershell or Server Manager>Add Roles and Features, and the result is the same. «The referenced assembly could not be found. Error: 0x80073701.» I’ve seen in multiple posts where
they found a referenced language package in the CBS log at c:\windows\Logs\CBS\CBS.log and once they either remove the references in the registry key or install/re-install the language pack, the issue then goes away. I’m looking in my CBS.log and I don’t see
anything about a language package missing. I do see some things about a different package though called «Microsoft-Windows-Foundation-Package~31bf3856ad364e35~amd64~~10.0.14393.0» and immediately following that is errors about «ERROR_SXS_ASSEMBLY_MISSING.»
When I do a «DISM /Online /Get-Package» that exact package shows up at the top of the list and says it is installed. Below is a screen shot of the error:
All of that to say, other posts I’ve seen mentioning to do a «sfc /scannow» and a «DISM /Online /Cleanup-Image /RestoreHealth.» When I tried the DISM command, it gave me another error that just simply outputs «0x800f0907»
and that more can be found in the DISM.log. So I went there. It’s less helpful than the other log. All I can find there is this:That’s all that looks relevant out of those two logs. An SFC /Scannow reports back that everything is fine… I’d copy and paste the text from the log, but I’m having issues pasting into this box right now and I don’t want to scrap this post. I’ll probably
post it in a comment.
- Remove From My Forums
-
Question
-
So I’ve been trying to add the RSAT for AD LDS by using either Powershell or Server Manager>Add Roles and Features, and the result is the same. «The referenced assembly could not be found. Error: 0x80073701.» I’ve seen in multiple posts where
they found a referenced language package in the CBS log at c:\windows\Logs\CBS\CBS.log and once they either remove the references in the registry key or install/re-install the language pack, the issue then goes away. I’m looking in my CBS.log and I don’t see
anything about a language package missing. I do see some things about a different package though called «Microsoft-Windows-Foundation-Package~31bf3856ad364e35~amd64~~10.0.14393.0» and immediately following that is errors about «ERROR_SXS_ASSEMBLY_MISSING.»
When I do a «DISM /Online /Get-Package» that exact package shows up at the top of the list and says it is installed. Below is a screen shot of the error:All of that to say, other posts I’ve seen mentioning to do a «sfc /scannow» and a «DISM /Online /Cleanup-Image /RestoreHealth.» When I tried the DISM command, it gave me another error that just simply outputs «0x800f0907»
and that more can be found in the DISM.log. So I went there. It’s less helpful than the other log. All I can find there is this:That’s all that looks relevant out of those two logs. An SFC /Scannow reports back that everything is fine… I’d copy and paste the text from the log, but I’m having issues pasting into this box right now and I don’t want to scrap this post. I’ll probably
post it in a comment.
Earlier, we have seen how to enable .NET Framework in Windows 10, in following article:
How to enable .NET Framework 3.5 on Windows 10
However the PowerShell method discussed in above mentioned article requires you to specify the source files using Windows 10 ISO file. But if you’ve upgraded your earlier version of Windows to Windows 10, you may not have the source files with you. In that case, you can try enabling .NET Framework via Turn Windows Features On or Off page in Control Panel. However, when we tried to enable .NET 3.5 from there, we got this message:
Page Contents
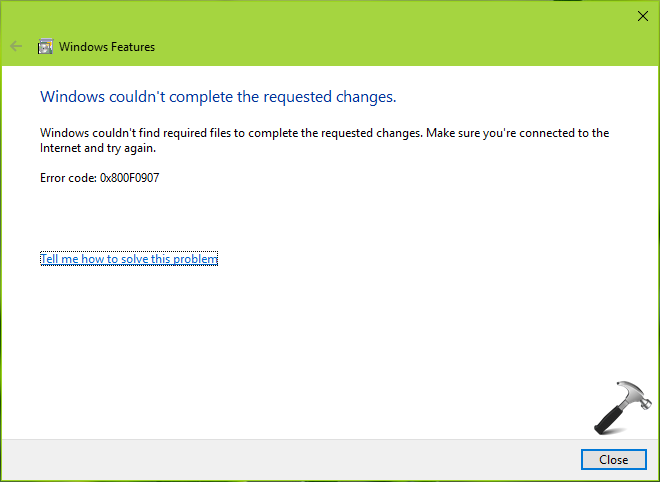
Windows couldn’t complete the requested changes.
Windows couldn’t find required files to complete the requested changes. Make sure you’re connected to the Internet and try again.
Error: 0x800F0907
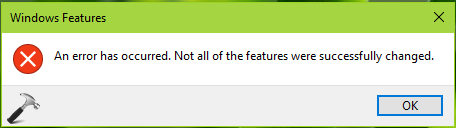
Closing the message ends operation with this message:
An error has occurred. Not all of the features were successfully changed.
When you try to enable the .NET 3.5 from Control Panel, Windows 10 try to activate the feature by installing some required Windows Updates. This issue can be easily solved by configuring the alternative source path which can help Windows to enable the feature without much relying on Windows Update. If you’ve source path located on some network share, you can use it here. This issue can also occur if your system is configured to get upgrades via Windows Server Update Services (WSUS) instead Windows Updates. Whatever is the case, the steps mentioned below will help you to fix this error.
FIX : Error 0x800F0907 While Installing .NET Framework 3.5 In Windows 10
FYI: Local Group Policy Editor is not available in Windows 10 Home editions. If you’re on Windows 10 Home and want to use Group Policy, go here and upgrade to Pro edition.
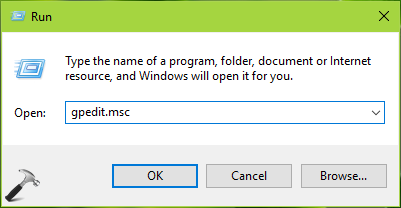
1. Press  + R and put gpedit.msc in Run dialog box to open Local Group Policy Editor. Click OK.
2. Next, in the Local Group Policy Editor window, navigate here:
Computer Configuration > Administrative Templates > System
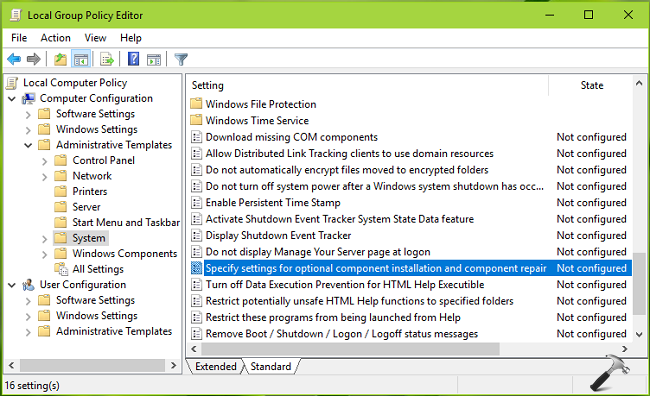
3. In the right pane of System, look for Setting named Specify settings for optional component installation and component repair. Double click on this setting to modify it:
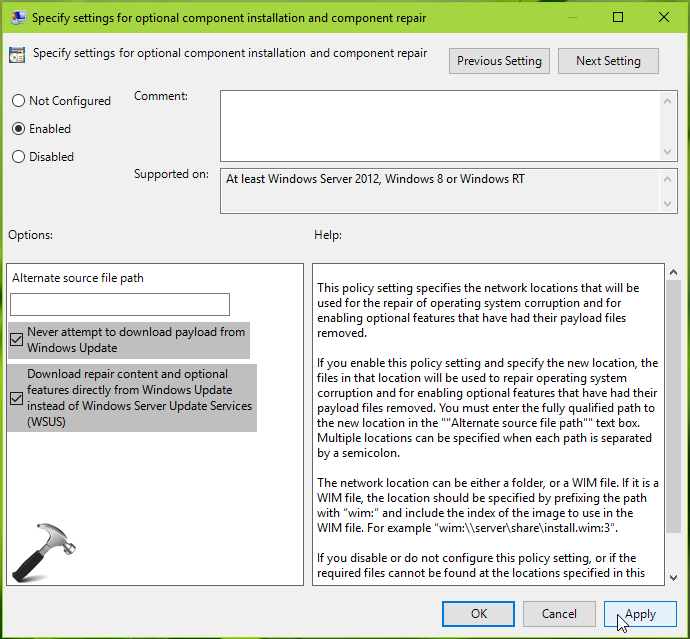
4. In the policy configuration window shown above, click on Enabled to activate the policy. Then in Options, you can specify valid alternate source file path which could have .NET Framework feature files which we’re required to enable it. You can refer policy explanation for detailed info about adding alternative source here. Also make sure Never attempt to download payload from Windows Update and Download repair content optional features directly from Windows Update instead of Windows Server Update Services (WSUS) options are checked here. Click Apply followed by OK. Close Local Group Policy Editor.
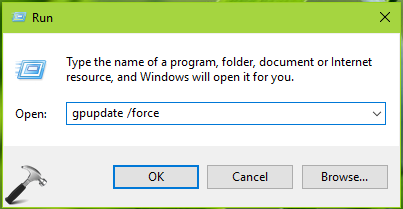
5. Press + R and put gpupdate /force in Run dialog box to update Group Policy engine. Click OK.
After updating policies, re-try to enable .NET Framework and this time it should get activated without pushing any error code.
Hope this helps!
READ THESE ARTICLES NEXT
- How to enable .NET Framework 3.5 in Windows 11
- Fix: .NET Framework 3.5 installation error 0x800F0922
- Install .NET Framework 4.8 offline in Windows 10
- Fix: The .NET Framework 4.7 is not supported on this operating system
- [FIX] .NET Framework 3.5/DISM Error 0x800F0954 In Windows 10
- [FIX] The Referenced Assembly Is Not Installed On Your System
- Download Microsoft .NET Framework Repair Tool For Windows 10
- Enable .NET Framework 3.5 On Windows 10
Ошибка «Исходные файлы могут быть найдены» после выполнения команды «DISM / Online / Cleanup-Image / RestoreHealth» является распространенной проблемой на компьютерах под управлением Windows 10 и 8. (Исходные файлы DISM могут быть найдены с кодами ошибок: 0x800f081f или 0x800f0906 или 0x800f0907)

Ошибка «Исходные файлы не найдены» в средстве DISM обычно возникает по следующим причинам:
Причина 1 Инструмент DISM не могу найти онлайн (в Центре обновления Windows или WSUS) файлы, необходимые для восстановления, при использовании этой команды: «DISM / Online / Cleanup-Image / RestoreHealth»
Причина 2 Вы указали неправильный образ Windows (install.wim) файл в качестве источника восстановления при использовании этой команды: «DISM / Online / Cleanup-Image / RestoreHealth / Source«
Причина 3 install.wim или install.esd файл, который вы используете в качестве источника восстановления, содержит несколько файлов install.wim.
Причина 4 Файл Windows.ISO, который вы используете в качестве источника восстановления, может быть поврежден или неверен {это не та же версия Windows, редакция Архитектура (32 или 64-битная) как установленная Windows}.
В этом руководстве по устранению неполадок вы найдете несколько способов устранения следующих ошибок DISM: «Исходные файлы не найдены», «0x800f081f», «0x800f0906», «0x800f0907».
Как ИСПРАВИТЬ: DISM / RestoreHealth не удалось найти исходные файлы для восстановления Windows 10 или Windows 8 / 8.1.
Способ 1. Очистите и проанализируйте папку WinSXS.
Способ 2. Укажите альтернативный источник восстановления в DISM с помощью переключателя / Source.
Способ 3. Укажите альтернативный источник восстановления с помощью редактора политик или реестра.
Способ 4. Исправление ошибки при обнаружении исходных файлов DISM с помощью Windows Repair Upgrade
Способ 5. Исправьте ошибки DISM, изучив файл CBS.LOG.
Способ 6. Восстановить (переустановить) Windows 10.
Способ 1. Очистите и проанализируйте папку WinSXS.
Папка хранилища компонентов Windows, также называемая WinSXS (C: \ Windows \ winsxs), содержит все файлы, необходимые для обслуживания операций в Windows, таких как установка обновлений, исправлений и т. Д. Кроме того, папка WinSXS содержит все необходимые файлы. для установки или ремонта Windows.
Со временем размер папки WinSXS становится большим или поврежденным из-за обновлений и новых функций, добавляемых в установку, поэтому ее необходимо очистить перед запуском средства DISM. Для этого:
1. Щелкните правой кнопкой мыши на Начало меню ![]() и выберите Командная строка (Admin).
и выберите Командная строка (Admin).
2. Введите следующие команды по порядку:
- DISM / Online / Cleanup-Image / StartComponentCleanup
- SFC / SCANNOW
- DISM / Online / Cleanup-Image / AnalyzeComponentStore
- SFC / SCANNOW
3. Перезапуск твой компьютер.
4. После перезагрузки снова откройте командную строку (от имени администратора) и запустите DISM.
- DISM / Online / Cleanup-Image / RestoreHealth
Способ 2. Укажите альтернативный источник восстановления в DISM с помощью переключателя / Source.
По умолчанию DISM ищет в Интернете необходимые файлы для восстановления образа Windows. Но в большинстве случаев это не работает, поэтому вам нужно указать локальный источник для известных хороших файлов с помощью параметра / Source.
Требования: Для выполнения этой задачи вам нужно install.wim файл (X: \ sources.install.wim) или install.esd файл (X: \ sources.install.wim) с установочного носителя Windows (USB, DVD или ISO), который имеет ту же версию, редакцию и язык Windows, что и установленная версия.
Если у вас нет установочного носителя Windows (USB, DVD или ISO), вы можете получить его, используя следующие параметры:
- Вариант А. Загрузите Windows с помощью инструмента Media Creation или
- Вариант Б. Загрузите Windows в файле ISO с помощью средства загрузки ISO-файлов Windows, следуя инструкциям, приведенным в этой статье: Как загрузить любую версию Windows или Office без ключа продукта (юридически Свободный)
Чтобы указать альтернативный источник восстановления в DISM:
1. Подключите установочный носитель Windows (или смонтируйте файл ISO) к своей системе и обратите внимание на букву диска в проводнике Windows. (например, «D:»)
2. Откройте проводник Windows, изучите содержимое каталога «sources» и посмотрите, содержит ли он файл с именем «install.wim» или файл с именем «install.esd».
3. Далее откройте Командная строка от имени администратора.
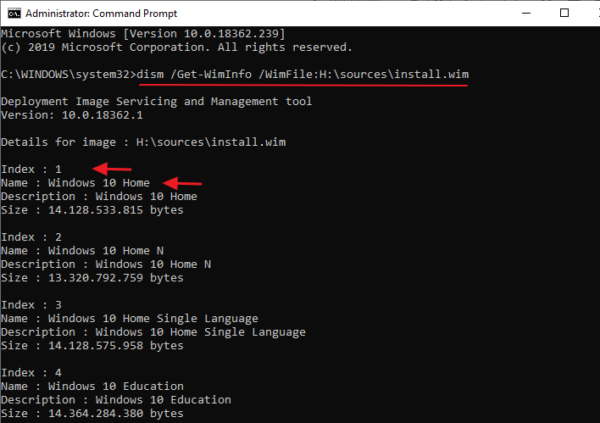
4. В соответствии с типом файла «install»: (.wim или .esd), дайте соответствующую команду, чтобы получить список всех включенных версий Windows:
а. Если вы видите файл «install.wim» в папке «sources», введите следующую команду:
- dism / Get-WimInfo /WimFile:X:\sources\install.wim
б. Если вы видите файл «install.esd» в папке «sources», введите следующую команду:
- dism / Get-WimInfo /WimFile:X:\sources\install.esd
* Заметка: Замените букву «X» в соответствии с буквой диска на прилагаемом установочном носителе. Например, если установочный носитель Windows находится на диске «H», а папка «sources» содержит файл «install.wim», то команда будет выглядеть так:
- dism / Get-WimInfo /WimFile:H:\sources\install.wim
5. В соответствии с установленной версией Windows 10 запишите номер индекса. *
* Например: если вы установили Windows 10 Home edition в вашей системе, то индекс будет «1».
6. Как только вы узнаете номер индекса установленной версии Windows, продолжите и восстановите Windows 10 с помощью соответствующей команды ниже:
а. Если папка sources содержит файл «install.wim», введите следующую команду:
- DISM / Online / Cleanup-Image / RestoreHealth /Source:WIM:X:\sources\install.wim:IndexNumber / LimitAccess
б. Если папка sources содержит файл «install.esd», введите следующую команду:
- DISM / Online / Cleanup-Image / RestoreHealth /Source:ESD:X:\sources\install.esd:IndexNumber / LimitAccess
* Заметка: Замените букву диска «X» и индексный номер, в зависимости от вашего случая. Например, если установочный носитель Windows находится на диске «D» и содержит файл «install.wim» в папке «sources», а номер индекса — «1» (для Windows 10 Home), то команда будет :
- DISM / Online / Cleanup-Image / RestoreHealth /Source:WIM:D:\sources\install.wim:1 / LimitAccess

7. Будьте терпеливы, пока DISM не восстановит хранилище компонентов образа Windows.
8. Когда операция завершена, вы должны быть проинформированы о том, что «операция успешно завершена». *
* Примечание. Если инструмент DISM снова выходит из строя с сообщением «Ошибка 0x800f081f: файлы источников не найдены», то:
- Извлеките соответствующий установочный файл Windows «install.wim» с установочного носителя. **
- Используйте извлеченный файл «install.wim» в качестве источника восстановления в DISM с помощью приведенной ниже команды (см. Подробные инструкции здесь).
- DISM / Online / Cleanup-Image / RestoreHealth /Source:WIM:c:\install.wim:1 / LimitAccess
** Для извлечения файла, соответствующего вашей версии Windows «install.wim», следуйте приведенным ниже инструкциям в зависимости от вашего случая:
1. Если вы использовали инструмент создания мультимедиа (вариант A), чтобы загрузить Windows 10, то экстракт в соответствии с вашей версией Windows install.wim файл из install.esd файл (X: \ sources \ install.esd), используя инструкции в этой статье: Как извлечь Install.ESD в Install.WIM (Windows 10/8)
2. Если вы использовали инструмент Windows ISO Downloader (вариант B), чтобы загрузить Windows 10/8 ISO, то экстракт в соответствии с вашей версией Windows install.esd файл из install.wim файл (X: \ sources \ install.esd), используя инструкции из этой статьи: Как извлечь файл INSTALL.WIM, содержащий несколько файлов INSTALL.WIM.
9. Наконец, для завершения ремонта запустите SFC / SCANNOW команда:
- SFC / SCANNOW

10. Когда сканирование SFC успешно завершено, все готово!
Способ 3. Укажите альтернативный источник восстановления с помощью политик или реестра.
1. Подключите установочный носитель Windows к вашей системе и выполните шаги 1–5 описанного выше способа 2, чтобы узнать номер индекса для установленной версии Windows 10.
2. Скопируйте файл install.wim с установочного носителя Windows (например, (X: \ sources.install.wim) на диск C: \ (корневая папка).
3. В соответствии с вашей версией Windows (Pro или Home) следуйте приведенным ниже инструкциям, чтобы указать файл C: \ install.wim в качестве источника по умолчанию для восстановления образа Windows.
2А. Windows 10 Pro Windows 8 / 8.1 Pro
— Укажите DISM / Source в редакторе локальной групповой политики:
1. Нажмите Windows ![]() + р клавиши на клавиатуре, чтобы загрузить Бег чат.
+ р клавиши на клавиатуре, чтобы загрузить Бег чат.
2. Введите gpedit.msc и нажмите Войти открыть редактор локальной групповой политики.

3. В редакторе групповой политики перейдите (с левой стороны) к:
- Конфигурация компьютера> Административные шаблоны> Система
4. На правой панели откройтеУкажите настройки для дополнительной установки компонента и ремонта компонента«настройка.

5. Примените следующие настройки:
1. Проверьте Включено
2. На «Альтернативный путь к исходному файлу» тип: *
Wim: C: \ install.wim: IndexNumber
3. Проверьте Никогда не пытайтесь загрузить полезные данные из Центра обновления Windows
* Примечание: замените IndexNumber в соответствии с вашим регистром. Например, если номер индекса равен «1», введите: «wim: C: \ install.wim: 1»

6. Нажмите хорошо и закройте редактор политик.
7. Перезапуск твой компьютер.
8. После перезагрузки снова запустите команду «DISM / Online / Cleanup-Image / RestoreHealth».
10. После завершения ремонта отмените изменения в Политике.
2B. Windows 10 Home Windows 8 / 8.1 Home
— Укажите DISM / Source в реестре Windows:
1. Нажмите «Windows» ![]() + «рmsgstr «ключи для загрузки диалогового окна Run.
+ «рmsgstr «ключи для загрузки диалогового окна Run.
2. Тип смерзаться и нажмите Войти открыть редактор реестра Windows.

3. На левой панели перейдите к этой клавише:
- HKEY_LOCAL_MACHINE \ SOFTWARE \ Microsoft \ Windows \ CurrentVersion \ Policies
4. Щелкните правой кнопкой мыши на полисы ключ и выберите новый > ключ
5. Дайте новому ключу имя: Обслуживание

6. Выделите порция ключ.
7. Щелкните правой кнопкой мыши на правой панели и выберите новый > Расширяемое строковое значение
8. Дайте при новом значении имя: LocalSourcePath

9. Дважды щелкните «LocalSourcePath» и в поле «Значение» введите: Wim: C: \ install.wim: IndexNumber
* Примечание: замените IndexNumber в соответствии с вашим регистром. Например, если номер индекса равен «1», введите: «wim: C: \ install.wim: 1»
10. Нажмите ХОРОШО.

11. Снова щелкните правой кнопкой мыши на правой панели и выберите новый > DWORD (32-битное) значение.
12. Дайте при новом значении имя: UseWindowsUpdate

13. Дважды щелкните «UseWindowsUpdate» и в поле «Значение» введите: 2
14. Нажмите хорошо
* 2 = Не использовать Центр обновления Windows
")
15. близко редактор реестра и перезапуск твой компьютер.
16. После перезагрузки снова запустите команду «DISM / Online / Cleanup-Image / RestoreHealth».
17. После завершения ремонта отмените изменения в реестре Windows.
Способ 4. Исправление ошибки при обнаружении исходных файлов DISM при обновлении Windows Repair.
Другой способ исправить ошибки DISM — выполнить обновление для восстановления Windows 10.
Шаг 1. Восстановите / обновите Windows 10 с помощью Media Creation Tool.
1. Скачайте и запустите инструмент создания медиа в соответствии с вашей версией ОС.
- Скачать Windows 10
- Загрузить Windows 8.1
2. принимать Условия лицензии.
3. Выберите опцию Обновите этот компьютер сейчас и нажмите Следующий.

4. Подождите, пока Windows не будет обновлена.
Шаг 2. Используйте инструменты DISM и SFC для завершения ремонта.
— После обновления Windows:
1. Щелкните правой кнопкой мыши на Начало меню ![]() и выберите Командная строка (Admin).
и выберите Командная строка (Admin).
2. В окне командной строки введите следующую команду для завершения ремонта:
- DISM / Online / Cleanup-Image / StartComponentCleanup
- Dism / Онлайн / Очистка-Image / RestoreHealth
- SFC / SCANNOW
Способ 5. Исправьте ошибки DISM, изучив файл CBS.LOG.
(ОБНОВЛЕНО 17.05.2017)
После выполнения DISM создает файл журнала с именем «CMS.log» в каталоге «C: \ Windows \ Log \ CBS» (например, C: \ Windows \ Log \ CBS \ CBS.log), который фиксирует любые обнаруженные проблемы, когда Командный инструмент DISM выполнен.
Итак, последний способ исправить ошибку DISM «Исходные файлы не могут быть найдены» — это изучить файл CBS.LOG, чтобы найти и удалить установленные пакеты, которые вызывают проблему.
Шаг 1. Проверьте файл журнала DISM (CBS.LOG).
1. Перейдите к C: \ Windows \ Log \ CBS каталог и открыто CBS файл.

2. Используя найти инструмент («Просмотр»> «Найти»), поиск «Проверка готовности обновления системы».

3. Теперь просмотрите строку «Проверка готовности обновления системы», чтобы найти поврежденные пакеты. *
* Например, как видно на скриншоте ниже, поврежденный пакет называется: «Microsoft-Windows-TestRoot-and-FlightSigning-Package ~ 31bf3856ad364e35 ~ amd64 ~~ 10.0.15063.0»

4. Как только вы узнаете имя поврежденного пакета, перейдите к следующему шагу.
Шаг 2. Удалите запись реестра поврежденного пакета.
1. Одновременно нажмите Windows ![]() + р ключи, чтобы открыть окно команды RUN.
+ р ключи, чтобы открыть окно команды RUN.
2. Тип смерзаться и нажмите Войти открыть редактор реестра Windows.
ВАЖНЫЙ: Прежде чем продолжить изменение реестра, сначала сделайте резервную копию. Чтобы выполнить резервное копирование реестра:
а. Из главного меню перейдите в файл Выбрать экспорт.
б. Укажите место назначения (например, ваш рабочий стол), укажите имя файла (например, «RegistryBackup») и нажмите Сохранить.
3. На левой панели перейдите и выберите этот ключ:
- HKEY_LOCAL_MACHINE \ SOFTWARE \ Microsoft \ Windows \ CurrentVersion \ Компонентное обслуживание

5. С Компонентное обслуживание ключ выделены, перейти к редактировать > найти (из меню) и найдите поврежденное имя пакета в реестре. Для этого просто копия а также вставить в поле поиска — имя поврежденного пакета из CBS.LOG. (например, «Microsoft-Windows-TestRoot-and-FlightSigning-Package ~ 31bf3856ad364e35 ~ amd64 ~~ 10.0.15063.0»)

6. В этом случае имя поврежденного пакета было найдено в следующих двух (2) разделах / ключах реестра:
-
- HKEY_LOCAL_MACHINE \ ПРОГРАММНОЕ ОБЕСПЕЧЕНИЕ \ Microsoft \ Windows \ CurrentVersion \ Компонентное обслуживание \ PackageIndex \ Microsoft-Windows-TestRoot-and-FlightSigning-Package ~ 31bf3856ad364e35 ~ amd64 ~~ 0.0.0.0
- HKEY_LOCAL_MACHINE \ ПРОГРАММНОЕ ОБЕСПЕЧЕНИЕ \ Microsoft \ Windows \ CurrentVersion \ Компонентное обслуживание \ Пакеты \ Microsoft-Windows-TestRoot-and-FlightSigning-Package ~ 31bf3856ad364e35 ~ amd64 ~~ 10.0.15063.0
7. Теперь по соображениям безопасности резервный все ключи реестра, которые вы нашли, щелкнув правой кнопкой мыши на каждом из них (в левой панели) и выберите Экспорт. *
* Заметка: Сохраните ключи реестра на рабочем столе, чтобы легко импортировать их резервные копии, если что-то пойдет не так. (Дважды щелкните по экспортированному ключу (ключам) и Объединить).

8. Затем назначьте полный контроль разрешения, для всех ключей, которые вы нашли, чтобы Администраторы. Для этого:
1. Щелкните правой кнопкой мыши на каждой клавише и выберите права доступа.

2. Выделите Администраторы, поставить галочку на Полный контроль установите флажок и нажмите хорошо.

9. В заключение, удалять все ключи реестра, которые вы нашли. (Щелкните правой кнопкой мыши на каждой клавише и удалять)

10. близко Редактор реестра.
Шаг 3. Переместите поврежденные пакеты в другое место на диске.
1. Перейдите к C: \ Windows \ Сервис \ Packages папки.
2. Теперь найдите и переместите на свой рабочий стол все пакеты, название которых начинается с имени поврежденного пакета в CBS.LOG.
например В этом случае я обнаружил (и переместился на свой рабочий стол) следующие четыре (4) файла, их имя начинается с имени поврежденного пакета: Microsoft-Windows-TestRoot-and-FlightSigning-Package
-
- Microsoft-Windows-TestRoot-и-FlightSigning-пакет ~ 31bf3856ad364e35 ~ amd64 ~~ 10.0.15063.0
- Microsoft-Windows-TestRoot-и-FlightSigning-пакет ~ 31bf3856ad364e35 ~ amd64 ~~ 10.0.15063.0.mum
- Microsoft-Windows-TestRoot-и-FlightSigning-WOW64-пакет ~ 31bf3856ad364e35 ~ amd64 ~~ 10.0.15063.0
- Microsoft-Windows-TestRoot-и-FlightSigning-WOW64-пакет ~ 31bf3856ad364e35 ~ amd64 ~~ 10.0.15063.0.mum
 ,
,
3. Restarт твой компьютер.
4. Снова выполните команду «DISM / Online / Cleanup-Image / RestoreHealth».
5. Если DISM завершен без ошибок, тогда продолжайте и окончательно удалите экспортированные разделы реестра и перемещенные пакеты с вашего рабочего стола.
Способ 6. Ремонт Windows 10.
Если после применения всех вышеперечисленных методов вы по-прежнему получаете сообщение об ошибке «Исходные файлы не могут быть найдены» в DISM, я предлагаю выполнить ремонтную установку Windows 10.
Удачи! Дайте мне знать, если это руководство помогло вам, оставив свой комментарий о вашем опыте. Пожалуйста, любите и делитесь этим руководством, чтобы помочь другим.
«The source files could be found» error, after running the «DISM /Online /Cleanup-Image /RestoreHealth» command, is a common problem on Windows 10 and 8 based computers. ( DISM’s source files could be found error codes: 0x800f081f or 0x800f0906 or 0x800f0907 )

The error «The Sources files could not be found files» in DISM tool, is commonly caused because of the following reasons:
Reason 1. DISM tool cannot find online (in Windows Update or WSUS) the files needed to perform the repair, when using this command: «DISM /Online /Cleanup-Image /RestoreHealth»
Reason 2. You have specified a wrong Windows Image (install.wim) file as the repair source, when using this command: «DISM /Online /Cleanup-Image /RestoreHealth /Source«
Reason 3. The install.wim or the install.esd file, that you ‘re using as a repair source, contains multiple install.wim files.
Reason 4. The Windows.ISO file that you ‘re using as the repair source may be damaged or wrong {it is not the same Windows Version, Edition & Architecture (32 or 64-bit) as the installed Windows}.
Related articles:
- FIX DISM 0x800f081f Error in Windows 10/8
- How to Extract Install.ESD to Install.WIM (Windows 10/8)
- How to Extract an INSTALL.WIM file that contains several INSTALL.WIM files.
In this troubleshooting guide you will find several methods to resolve the following DISM errors: «The Source Files Could not be Found», «0x800f081f», «0x800f0906», «0x800f0907».
How to FIX: DISM /RestoreHealth Could not Find Source Files to Repair Windows 10 or Windows 8/8.1.
Method 1. Clean and Analyze the WinSXS folder.
Method 2. Specify an alternative Repair Source in DISM by using the /Source switch.
Method 3. Specify an alternative Repair Source by using Policy Editor or Registry.
Method 4. Fix DISM Source Files Cannot be Found Error with Windows Repair Upgrade
Method 5. Fix DISM errors by examine the CBS.LOG file.
Method 6. Repair (Reinstall) Windows 10.
Method 1. Clean and Analyze the WinSXS folder.
The Windows Component Store folder, aka WinSXS (C:\Windows\winsxs), contains all the files needed during servicing operations in Windows, such as the installation of updates, hotfixes, etc. Additionally, the WinSXS folder, contains all the files needed for a Windows installation or repair.
In time, the size of WinSXS folder becomes large or corrupted, because of updates and new features that are added to the installation, so it needs cleaning before running the DISM tool. To do that:
1. Right click at Start menu ![]() and select Command Prompt (Admin).
and select Command Prompt (Admin).
2. Type the following commands in order:
- DISM /Online /Cleanup-Image /StartComponentCleanup
- SFC /SCANNOW
- DISM /Online /Cleanup-Image /AnalyzeComponentStore
- SFC /SCANNOW
3. Restart your computer.
4. After the restart, open command prompt (as admin) again and run DISM.
- DISM /Online /Cleanup-Image /RestoreHealth
Method 2. Specify an alternative Repair Source in DISM by using the /Source switch.
By default DISM looks online to find the required files to repair the Windows Image. But in most cases, this doesn’t work, so you need to specify a local source for the known good files by using the /Source switch.
Requirements: To accomplish this task you need the install.wim file (X:\sources.install.wim) or the install.esd file (X:\sources.install.wim) , from a Windows installation media (USB, DVD or ISO), that has the same Windows version, edition and language with the installed version.
If you don’t own a Windows installation media (USB, DVD or ISO), then you can obtain one, by using these options:
- Option A. Download Windows by using the Media Creation tool, or
- Option B. Download Windows in a ISO file by using the Windows ISO Downloader tool, by following the instructions on this article: How to Download Any Version of Windows or Office w/o a Product Key (Legally & Free)
To specify an alternative Repair Source in DISM:
1. Attach the Windows installation media (or mount the ISO file), on your system and notice the drive letter in Windows Explorer. (e.g. «D:»)
2. Open Windows Explorer and explore the contents of «sources» directory, and see if it contains a file named «install.wim» or a file named «install.esd».
3. Next, open Command Prompt as Administrator.
4. According the file type of the «install» file: (.wim or .esd), give the corresponding command to list all the included Windows versions:
a. If you see an «install.wim» file in «sources» folder, give this command:
- dism /Get-WimInfo /WimFile:X:\sources\install.wim
b. If you see an «install.esd» file in «sources» folder, give this command:
- dism /Get-WimInfo /WimFile:X:\sources\install.esd
* Note: Replace the «X» drive letter according the drive letter of the attached installation media. For example, if the Windows installation media is at drive «H» and the «sources» folder contains an «install.wim» file, then the command will be:
- dism /Get-WimInfo /WimFile:H:\sources\install.wim
5. According to your Windows 10 installed version take note of the index number. *
* e.g.: If you have installed the Windows 10 Home edition on your system, then the Index number is «1».

6. Once you find out the index number of your installed Windows version, proceed and repair Windows 10, with the corresponding command, below:
a. If the sources folder contains an «install.wim» file, give this command:
- DISM /Online /Cleanup-Image /RestoreHealth /Source:WIM:X:\sources\install.wim:IndexNumber /LimitAccess
b. If the sources folder contains an «install.esd» file, give this command:
- DISM /Online /Cleanup-Image /RestoreHealth /Source:ESD:X:\sources\install.esd:IndexNumber /LimitAccess
* Note: Replace the «X» drive letter and the index number, according to your case. For example, if the Windows installation media is at drive «D», and contains an «install.wim» file on «sources» folder, and the index number is «1» (for Windows 10 Home), then the command will be:
- DISM /Online /Cleanup-Image /RestoreHealth /Source:WIM:D:\sources\install.wim:1 /LimitAccess

7. Be patient until DISM repairs the Windows image component store.
8. When the operation is completed, you should be informed that the «operation is completed successfully». *
* Note: If the DISM tool fails again with «Error 0x800f081f: The Sources files could not be found», then:
- Extract a corresponding to your Windows version «install.wim» file from the installation media. **
- Use the extracted «install.wim» file as the repair source in DISM, with the below command (see the detailed instructions here).
- DISM /Online /Cleanup-Image /RestoreHealth /Source:WIM:c:\install.wim:1 /LimitAccess
** To extract the corresponding to your Windows version «install.wim» file, follow the instructions below according your case:
1. If you have used the Media creation tool (option A), to download Windows 10, then extract the according to your Windows version install.wim file from the install.esd file (X:\sources\install.esd), by using the instructions in this article: How to Extract Install.ESD to Install.WIM (Windows 10/8)
2. If you have used the Windows ISO Downloader tool (option B), to download Windows 10/8 ISO, then extract the according to your Windows version install.esd file from the install.wim file (X:\sources\install.esd) file, by using the instructions on this article: How to Extract an INSTALL.WIM file that contains several INSTALL.WIM files.
9. Finally, to complete the repairs run the sfc /scannow command:
- SFC /SCANNOW

10. When the SFC scan is completed successfully, you ‘re done!
Method 3. Specify an alternative Repair Source by using Policies or Registry.
1. Attach the Windows installation media on your system and use the steps 1-5 from the method 2 above, to find out the index number for the installed Windows 10 version.
2. Copy the install.wim file from the Windows installation media (e.g. (X:\sources.install.wim) to the C:\ drive (root folder).
3. According to your Windows version (Pro or Home), follow the instructions below to specify the C:\install.wim file, as the default source to repair the Windows Image.
2A. Windows 10 Pro & Windows 8/8.1 Pro
– Specify DISM /Source in Local Group Policy Editor:
1. Press Windows ![]() + R keys on your keyboard to load the Run dialog box.
+ R keys on your keyboard to load the Run dialog box.
2. Type gpedit.msc and press Enter to open the Local Group Policy Editor.

3. In Group Policy Editor navigate (from the left side) to:
- Computer Configuration > Administrative Templates > System
4. At the right pane open the «Specify settings for optional component installation and component repair» setting.

5. Apply the following settings:
1. Check Enabled
2. At «Alternate source file path» type: *
wim:C:\install.wim:IndexNumber
3. Check Never attempt to download payload from Windows Update
* Note: Replace the IndexNumber according your case. For example, if the index number is «1», type: «wim:C:\install.wim:1″

6. Click OK and close Policy Editor.
7. Restart your computer.
8. After the restart, run the «DISM /Online /Cleanup-Image /RestoreHealth» command again.
10. When the repair is completed, then undo the changes in Policies.
2B. Windows 10 Home & Windows 8/8.1 Home
– Specify DISM /Source in Windows Registry:
1. Press “Windows” ![]() + “R” keys to load the Run dialog box.
+ “R” keys to load the Run dialog box.
2. Type regedit and press Enter to open the Windows Registry Editor.

3. At the left pane, navigate to this key:
- HKEY_LOCAL_MACHINE\SOFTWARE\Microsoft\Windows\CurrentVersion\Policies
4. Right click at Policies key and select New > Key
5. Give at the new key the name: Servicing

6. Highlight the Serving key.
7. Right click at the right pane and choose New > Expandable String Value
8. Give at the new value the name: LocalSourcePath

9. Double click at «LocalSourcePath» and at the value data box, type: wim:C:\install.wim:IndexNumber
* Note: Replace the IndexNumber according your case. For example, if the index number is «1», type: «wim:C:\install.wim:1″
10. Click OK.

11. Right click again at the right pane, and choose New > DWORD (32-bit) Value.
12. Give at the new value the name: UseWindowsUpdate

13. Double click at «UseWindowsUpdate» and at the value data box, type: 2
14. Click OK
* 2 = Do Not use Windows Update
")
15. Close registry editor and restart your computer.
16. After the restart, run the «DISM /Online /Cleanup-Image /RestoreHealth» command again.
17. When the repair is completed, then undo the changes in Windows Registry.
Method 4. Fix DISM Source Files Cannot be Found Error with Windows Repair Upgrade.
The other method to fix DISM errors is to perform a repair upgrade of Windows 10.
Step 1. Repair/Upgrade Windows 10 by using the Media Creation Tool.
1. Download and run the media creation tool according to your OS Version.
- Download Windows 10
- Download Windows 8.1
2. Accept the License Terms.
3. Choose the option Upgrade this PC now and press Next.

4. Wait until Windows is upgraded.
Step 2. Use DISM and SFC tools to complete repairs.
– After Windows upgrade:
1. Right click at Start menu ![]() and select Command Prompt (Admin).
and select Command Prompt (Admin).
2. At the command prompt window give the following command in order to complete the repairs:
- DISM /Online /Cleanup-Image /StartComponentCleanup
- Dism /Online /Cleanup-Image /RestoreHealth
- sfc /scannow
Method 5. Fix DISM errors by examine the CBS.LOG file.
(UPDATED on 17/5/2017)
After it’s execution, DISM creates a log file named «CMS.log» at «C:\Windows\Log\CBS» directory (e.g. C:\Windows\Log\CBS\ CBS.log), that captures any issues found, when DISM command tool is executed.
So, the last method to fix DISM’s «Source Files Cannot be Found» error, is to examine the CBS.LOG file, in order to find out and remove the installed package(s) that causes the problem.
Step 1. Examine DISM’s log file (CBS.LOG).
1. Navigate to C:\Windows\Log\CBS directory and open the CBS file.

2. Using the Find tool (View > Find), search for «Checking System Update Readiness».

3. Now look under the «Checking System Update Readiness» line, to find out the corrupted package(s). *
* e.g As you can see at the below screenshot, the corrupted package is named: «Microsoft-Windows-TestRoot-and-FlightSigning-Package~31bf3856ad364e35~amd64~~10.0.15063.0«

4. Once, you find out, the name of the corrupted package, then continue to the next step.
Step 2. Remove the corrupted package’s registry entry.
1. Simultaneously press the Windows ![]() + R keys to open the RUN command box.
+ R keys to open the RUN command box.
2. Type regedit and press Enter to open the Windows Registry Editor.
IMPORTANT: Before you continue to modify the registry, first take a backup. To perform a registry backup:
a. From the main menu, go to File & select Export.
b. Specify a destination location (e.g. your Desktop), give a filename (e.g. “RegistryBackup”) and press Save.
3. From the left pane navigate and select this key:
- HKEY_LOCAL_MACHINE\SOFTWARE\Microsoft\Windows\CurrentVersion\Component Based Servicing

5. With the Component Based Servicing key highlighted, go to Edit > Find (from the menu) and search for the corrupted package name in the registry. To do that, just copy and paste in the search box, the name of the corrupted package from the CBS.LOG. (e.g. «Microsoft-Windows-TestRoot-and-FlightSigning-Package~31bf3856ad364e35~amd64~~10.0.15063.0«)

6. At this occasion, the name of the corrupted package was found at the following two (2) registry locations/keys:
-
- HKEY_LOCAL_MACHINE\SOFTWARE\Microsoft\Windows\CurrentVersion\Component Based Servicing\PackageIndex\Microsoft-Windows-TestRoot-and-FlightSigning-Package~31bf3856ad364e35~amd64~~0.0.0.0
- HKEY_LOCAL_MACHINE\SOFTWARE\Microsoft\Windows\CurrentVersion\Component Based Servicing\Packages\Microsoft-Windows-TestRoot-and-FlightSigning-Package~31bf3856ad364e35~amd64~~10.0.15063.0
7. Now, for safety reasons, backup all the registry key(s) you found, by right-clicking on each of them (on the left pane) and choose Export. *
* Note: Save the registry keys on your desktop, in order to easy import them backup if something goes wrong. (Double click at the exported key(s) and Merge).

8. Then, assign full control permissions, to the all key(s) you found, to Administrators. To do that:
1. Right click on each key and select Permissions.

2. Highlight Administrators, place a check mark on Full Control checkbox and click OK.

9. Finally, delete all the registry key(s) you found. (Right click on each key and Delete)

10. Close Registry Editor.
Step 3. Move the corrupted packages to other location on disk.
1. Navigate to C:\Windows\Servicing\Packages folder.
2. Now find and move to your desktop, all the packages that their name begins with the name of the damaged package in the CBS.LOG.
e.g. At this occasion I found (and moved to my desktop) the following four (4) files, that their name begins with the name of the corrupted package: Microsoft-Windows-TestRoot-and-FlightSigning-Package
-
- Microsoft-Windows-TestRoot-and-FlightSigning-Package~31bf3856ad364e35~amd64~~10.0.15063.0
- Microsoft-Windows-TestRoot-and-FlightSigning-Package~31bf3856ad364e35~amd64~~10.0.15063.0.mum
- Microsoft-Windows-TestRoot-and-FlightSigning-WOW64-Package~31bf3856ad364e35~amd64~~10.0.15063.0
- Microsoft-Windows-TestRoot-and-FlightSigning-WOW64-Package~31bf3856ad364e35~amd64~~10.0.15063.0.mum
 ,
,
3. Restart you computer.
4. Run the «DISM /Online /Cleanup-Image /RestoreHealth» command again.
5. If DISM is completed without errors, then proceed and delete permanently the exported registry key(s) and the moved packages from your desktop.
Method 6. Repair Windows 10.
If after applying all the above methods, you still receive the error «Source Files Could not be Found» in DISM, then I suggest to perform a Repair Installation of Windows 10.
Good luck! Let me know if this guide has helped you by leaving your comment about your experience. Please like and share this guide to help others.