Faulty system updates may be a primary cause for this error
by Henderson Jayden Harper
Passionate about technology, Crypto, software, Windows, and everything computer-related, he spends most of his time developing new skills and learning more about the tech world. He also enjoys… read more
Updated on
- The 0x800f0906 DISM error mainly occurs when running the DISM commands on PCs.
- It can occur due to a recently installed faulty update and corrupt system files.
- Try to run the DISM fix commands or running the SFC scan should help troubleshoot it.

XINSTALL BY CLICKING THE DOWNLOAD FILE
Repair all Windows Updates Errors with Fortect:
SPONSORED
Windows update failures can be annoying! With Fortect, you will get rid of errors caused by missing or corrupted files after an update. The utility maintains a repository of the original Windows system file versions, and it uses a reverse algorithm to swap out the damaged ones for good ones.
- Download Fortect and install it on your PC
- Start the tool’s scanning process to look for corrupt files that are the source of the issues
- Right-click on Start Repair to resolve security and performance issues with your computer
- Fortect has been downloaded by 0 readers this month, rated 4.4 on TrustPilot
Many users have reported error code 0x800f0906 when running the DISM command in an elevated Command Prompt. It makes it impossible to use the DISM command-line utility on your computer.
However, this guide will discuss fixing the 0x800f0906 DISM error on Windows PCs. Also, you can check our article for what to do if Command Prompt keeps crashing on Windows 11.
What causes the 0x800f0906 DISM error?
Several factors may be responsible for the DISM error on your computer. Some notable ones are:
- Windows updates issues – Running an outdated Windows operating system on your computer prevents it from installing patches and builds for fixing bugs liable to cause errors like 0x800f0906.
- Corrupt system files – When the essential system files are corrupted, it can make the system file responsible for the DISM (Deployment Image Servicing and Management) command-line utility inaccessible.
- Network-related issues – Because the DISM tool requires a stable network connection to run, it’s important that your connection is stable.
These factors may vary on different devices depending on the circumstances. Regardless, we’ll take you through basic steps for resolving the error and getting DISM to work again.
How can I fix the 0x800f0906 DISM error?
Before trying any advanced troubleshooting steps, observe the following preliminary checks:
- Restart your computer – Restarting the PC is the quickest way to fix temporary functionality issues and refresh its processes.
- Perform a clean boot – A clean boot will start your computer with minimal drivers and programs, allowing you to determine if a third-party program is interfering with the Windows installer.
- Remove recent updates – Uninstalling the recent Windows updates may help troubleshoot the issues causing the error when using the DISM command.
- Update Windows OS – Updating Windows helps fix the bugs causing issues with the DISM utility tool. Fix Windows not connecting to update service if the error occurs on your PC.
If you still can resolve the problem, proceed with the solutions below:
1. Run the SFC scan
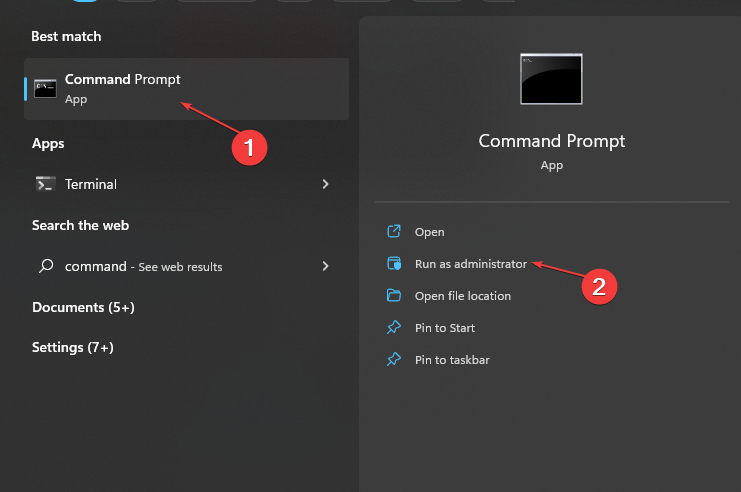
- Left-click the Start button, type Command Prompt, and click the Run as administrator option.

- Click Yes on the User Account Control (UAC) prompt.
- Type the following and press Enter:
sfc /scannow
- Restart your PC and check if the error persists.
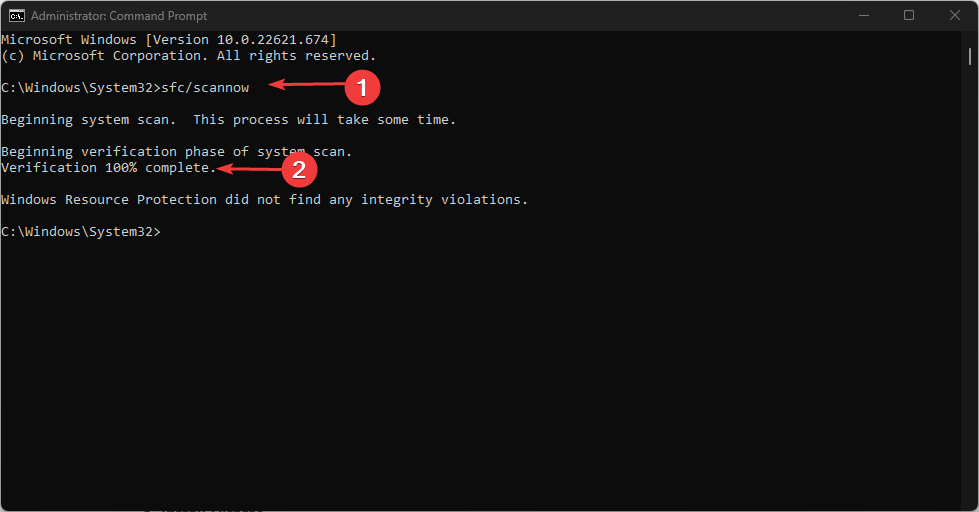
Running an SFC scan will detect and repair corrupt system files causing the errors. You can check our article on fixing SFC scannow not working on your PC.
As an alternative, we encourage anyone who experiences Windows issues to use an all-in-one tool for solving all the PC issues in no time.
2. Via the DISM fix commands
- Download the Windows Disk Image and create an Installation media.
- Press Windows + E keys to open File Explorer.
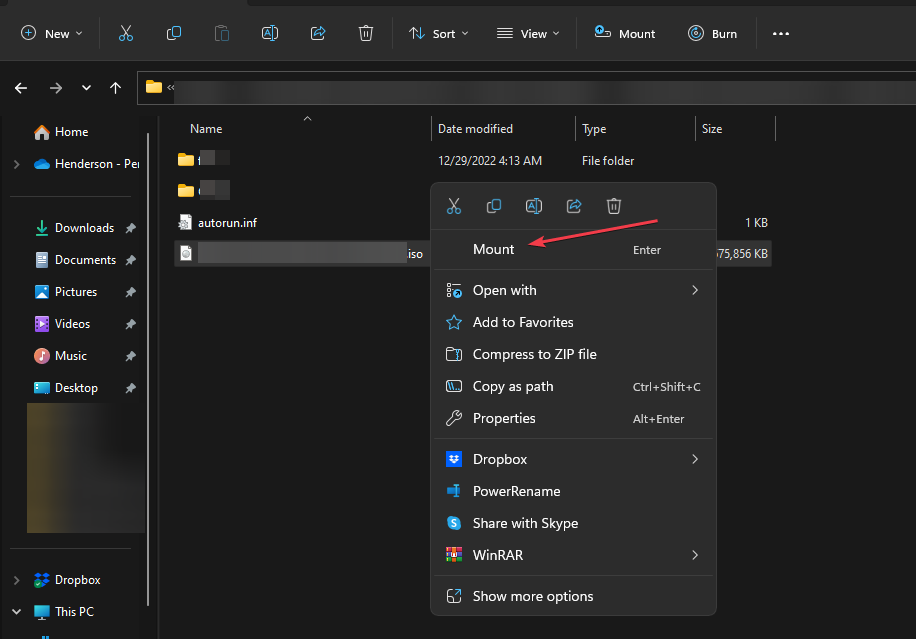
- Click the Downloads folder, locate the downloaded file, right-click on it, and select Mount.

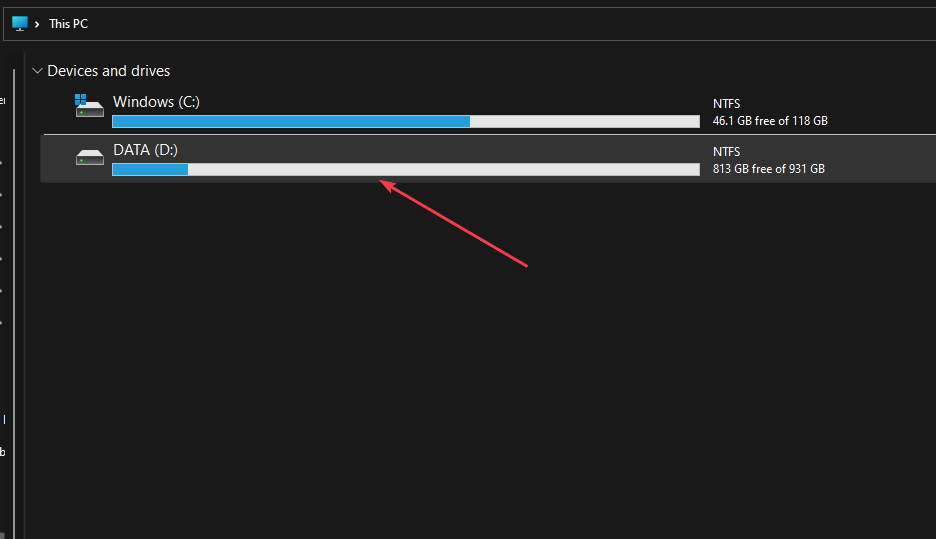
- After mounting the ISO, a new drive in This PC section on your File Explorer.

- Get the drive name, left-click the Start button, type CMD, and click Run as administrator.
- Input the following command and press Enter:
DISM /Online /Cleanup-Image /RestoreHealth /source:WIM:X:\Sources\Install.wim:1 /LimitAccess - The name of the file should replace X in the code above.
- Close the command prompt and restart your PC to take effect.

Users claim they could solve the error immediately by running the above codes. However, if not, you can also run the following code: DISM /Online /Cleanup-Image /StartComponentCleanup /ResetBase
- Fix: Secure Boot is Greyed Out on Windows 11
- Fix: Touchpad Clicks but Doesn’t Move on Windows 11
- Fix: No Internet, Secured Error on Windows 11
- Fix: Keyboard Shortcuts are Not Working in Photoshop
- Fix: Keyboard Shortcuts Are Not Working in Chrome
Alternatively, you may be interested in our comprehensive article about using DISM Commands to repair Windows PCs.
Likewise, we have a detailed overview of the diverse error codes that can accompany the DISM source files could not be found error.
Feel free to leave your suggestions or questions in the comments section.
![]()
Numerous Windows 10 users have reported seeing error code 0x800f0906 when running the following command in an elevated Command Prompt: Dism.exe /Online /Cleanup-Image /RestoreHealth
The DISM (Deployment Image Servicing and Management) command-line utility is an incredibly nifty little tool that can be used to service and repair a Windows installation. The DISM.exe command failing can be a pretty significant issue, especially if this happens when you desperately need the utility to work its magic. When the DISM command-line tool fails with error code 0x800f0906, the accompanying error message either states that the source files could not be downloaded or that the files required to repair the store could not be found.
In most cases, this issue is either caused by some kind of a corruption or, in some cases, one or more of the latest Windows updates available for the affected computer not being installed. Thankfully, though, there is a lot you can do to try and fix this problem. The following are the most effective solutions that you can use to try and get rid of this issue and get the DISM tool to successfully perform repairs:
Solution 1: Uninstall the KB3022345 Update
Getting a 0x800f0906 error when you’re trying to use the Deployment Image Servicing and Management tool’s restore health function happens for users with the KB3022345 update, due to a bug that is well known to Microsoft, and allegedly fixed in later updates.
The KB3022345 update broke both DISM and SFC for users of Windows, causing them to give this kind of errors all the time when you try to use them. Solving this issue is as easy as uninstalling the update, so read on to see how you can do this in a fairly simple way, and use DISM and SFC again when you need them.
- Press the Windows key on your keyboard to open the Start menu, and either click Control Panel, or type in Control Panel and open the result, depending on which version of Windows you’re using.
- Switch to Icons view, in the top right corner of Control Panel, and open Programs and Features from the list.
- On the left side, click on the View installed updates
- You will see a search box in the top right corner, type KB3022345 to find the update with less effort.
- When you’ve found it, right-click it, and choose
- Once everything is done, reboot your device.
Even though updates are supposed to bring fixes and improvements, it often happens that an update breaks something instead of fixing it, or fixes one thing and breaks three others. Fortunately, pinpointing which update caused this issue was easy, and Microsoft confirmed that this is the case, so if you simply follow the steps above to uninstalling the update, you won’t have this issue with the Deployment Image Servicing and Management tool anymore.
Solution 2: Run an SFC scan
Since corruptions are some of the most common causes of this issue, running an SFC scan is most definitely a good idea. An SFC scan is capable of scanning all of the system files on your computer for corruptions and fixing any that it finds. To run an SFC scan on a Windows 10 computer, you can use this guide.
Solution 3: Manually repair corruptions
- Right-click on the Start Menu button to open the WinX Menu.
- Click on Command Prompt (Admin) in the WinX Menu to launch an elevated Command Prompt.
- One by one, type each of the following commands into the elevated Command Prompt, pressing Enter after typing in each command and waiting for one command to be fully executed before typing in the next one:
net stop wuauserv
cd %systemroot%\SoftwareDistribution
ren Download Download.old
net start wuauserv
net stop bits
net start bits
net stop cryptsvc
cd %systemroot%\system32
ren catroot2 catroot2old
net start cryptsvc
- Close the elevated Command Prompt.
- Restart your computer.
- When your computer boots up, try running the DISM utility and see if it runs successfully.
Solution 4: Install any and all available Windows updates for your computer
If you are suffering from this issue because one or more of the Windows updates available for your computer is not installed, you can resolve this issue by simply installing any and all available Windows updates for your computer. In order to do so, you need to:
- Open the Start Menu.
- Click on Settings.
- Click on Update & security.
- Click on Windows Update in the left pane.
- In the right pane, click on Check for updates.
- Wait for Windows Update to check for and retrieve any and all available updates for your computer.
- If there are any updates available for your computer, download and install them.
Once all available updates for your computer have been successfully installed, restart the computer. As soon as the computer boots up, try running the DISM utility and check to see whether or not the problem has been fixed.

Kevin Arrows
Kevin Arrows is a highly experienced and knowledgeable technology specialist with over a decade of industry experience. He holds a Microsoft Certified Technology Specialist (MCTS) certification and has a deep passion for staying up-to-date on the latest tech developments. Kevin has written extensively on a wide range of tech-related topics, showcasing his expertise and knowledge in areas such as software development, cybersecurity, and cloud computing. His contributions to the tech field have been widely recognized and respected by his peers, and he is highly regarded for his ability to explain complex technical concepts in a clear and concise manner.
Если во время работы DISM Tool вы увидите сообщение DISM Ошибка 0x800f0906, Исходные файлы не могут быть загружены , то это сообщение поможет вам. Несколько дней назад мы опубликовали сообщение о восстановлении поврежденного образа Windows с помощью инструмента восстановления компонентов Deployment Imaging and Servicing Management (DISM). Сегодня, когда я пробовал метод из нашей статьи на компьютере, я получил ошибку и, таким образом, не смог полностью восстановить образ Windows.
Ошибка 0x800f0906

Вот подробности полного сценария, с которым я столкнулся после запуска компонента Windows:
DISM/Online/Cleanup-Image/RestoreHealth
Средство обслуживания образов развертывания и управления ими
Версия: 6.2.9200.16384Версия изображения: 6.2.9200.16384
[========================== 100,0% ===================== =====]
Ошибка: 0x800f0906
Не удалось загрузить исходные файлы.
Используйте параметр «источник», чтобы указать расположение файлов, необходимых для восстановления функции. Для получения дополнительной информации об указании исходного местоположения см. Http://go.microsoft.com/fwlink/?LinkId=243077.Файл журнала DISM находится по адресу C: \ Windows \ Logs \ DISM \ dism.log
Восстановление поврежденного образа Windows
Проведя некоторое исследование об этой ошибке, я обнаружил, что в этой ситуации может работать следующее решение. Вам необходимо сбросить папки SoftwareDistribution и Catroot2. Исправление ошибки выглядит следующим образом:
1. Откройте командную строку администратора.
2. Скопируйте следующий код и вставьте его правой кнопкой мыши в командную строку:
 net stop wuauserv
cd% systemroot% \ SoftwareDistribution
ren Скачать Download.old
чистый старт wuauserv
стоповые биты
чистые стартовые биты
чистая остановка cryptsvc
cd% systemroot% \ system32
ren catroot2 catroot2old
net start cryptsvc

3. Вот и все! Закройте командную строку. Перезагрузитесь и попробуйте снова запустить DISM/Online/Cleanup-Image/RestoreHealth , и на этот раз вы не получите код ошибки.
Пожалуйста, следуйте инструкциям, и если проблема не устранена, вернитесь назад, и мы будем рады помочь вам!
Просмотрите этот пост, если вам нужно больше информации по таким темам:
- Исправьте ошибки DISM 87, 112, 11, 50, 2, 3, 87,1726, 1393, 0x800f081f
- Сбой DISM в Windows 10. Исходные файлы не могут быть найдены ошибки.
Ошибка DISM 0x800f0906: не удалось загрузить исходные файлы, возникла на компьютере под управлением Windows 10 после выполнения команды «DISM / Online / Cleanup-Image / RestoreHealth».
Сообщение об ошибке указывает на то, что Windows не может подключиться к Интернету для загрузки необходимых файлов для восстановления образа Windows 10, несмотря на тот факт, что система уже имеет доступ к Интернету и серверам Microsoft без каких-либо проблем.

DISM Ошибка 0x800f0906 в деталях:
«C: \ WINDOWS \ system32> DISM / Online / Cleanup-Image / RestoreHealth
Средство обслуживания образов развертывания и управления ими
Версия: 10.0.15063.0
Версия изображения: 10.0.15063.0
[========================== 100,0% ===================== =====]
Ошибка: 0x800f0906
Исходные файлы не могут быть загружены.
Используйте параметр «источник», чтобы указать расположение файлов, необходимых для восстановления функции. Для получения дополнительной информации об указании исходного местоположения см. Http://go.microsoft.com/fwlink/?LinkId=243077.
Файл журнала DISM находится по адресу C: \ WINDOWS \ Logs \ DISM \ dism.log «
Это руководство по устранению неполадок содержит подробные инструкции по устранению ошибки DISM 0x800f0906 в Windows 10/8 / 8.1
Как FiX DISM RestoreHealth Ошибка 0x800f0906.
Способ 1. Запустите команду DISM снова.
Способ 2. Проверьте настройки даты и времени.
Способ 3. Запустите средство устранения неполадок Центра обновления Windows.
Способ 4. Заставьте Windows заново создать папку Магазина обновлений Windows.
Другие методы, чтобы исправить ошибки DISM / RestoreHealth.
Способ 1. Запустите команду DISM снова.
На компьютере под управлением Windows 10 Home я обнаружил, что DISM завершается с ошибкой 0x800f0906, на 100% процесса восстановления работоспособности. Итак, я решил снова запустить команду «DISM / Online / Cleanup-Image / RestoreHealth» и, к счастью, проблема DISM «Исходные файлы не удалось загрузить» исчезла.
Поэтому, прежде чем вы перейдете к остальным методам, еще раз выполните команду «DISM / Online / Cleanup-Image / RestoreHealth», чтобы проверить, сохраняется ли ошибка DISM 0x800f0906.
Способ 2. Проверьте настройки даты и времени.
Убедитесь, что дата и время вашего компьютера (или телефона) указаны правильно. Для этого
1. Одновременно нажмите Windows ![]() + р ключи, чтобы открыть окно запуска команды.
+ р ключи, чтобы открыть окно запуска команды.
2. Тип панель управления и нажмите Войти.

2. Изменить вид: на Маленькие иконки.

3. открыто Дата и время.

4. Нажмите Изменить дату и время.

4а. Установите текущую дату / время / год и нажмите хорошо.
5. нажмите Изменить часовой пояс кнопка.

5а. Установите текущий часовой пояс и нажмите хорошо.

6. Выбрать Интернет время вкладку и нажмите Изменить настройки кнопка.

6а. Проверить Синхронизировать с интернет-сервером времени флажок затем выберите сервер времени из списка (например, time.windows.com).
6b. Когда закончите, нажмите Обновить сейчас.

6с. Когда время обновится, нажмите хорошо дважды, чтобы закрыть все открытые окна.
7. Перезапуск и снова запустите команду «DISM / Online / Cleanup-Image / RestoreHealth».
Способ 3. Запустите средство устранения неполадок Центра обновления Windows.
1. Загрузите и сохраните на своем компьютере средство устранения неполадок обновления Windows 10/8.
2. Запустить Устранение неполадок Центра обновления Windows и нажмите следующий.

3. выберите Попробуйте устранить неполадки в качестве администратора.

4. Нажмите следующий и выполните остальные шаги мастера, чтобы устранить проблемы с обновлением Windows.

5. Когда ремонт будет завершен, близко Мастер.

6. Перезапуск и снова запустите команду «DISM / Online / Cleanup-Image / RestoreHealth».
Способ 4. Заставьте Windows заново создать папку Магазина обновлений Windows.
Папка Windows Update Store (обычно называемая папкой «SoftwareDistribution») — это место, где Windows хранит загруженные обновления.
-Если папка SoftwareDistribution повреждена, это вызывает проблемы с Центром обновления Windows. Таким образом, одним из наиболее эффективных решений для решения проблем с Центром обновления Windows является воссоздание папки SoftwareDistribution. Для этого:
1. Одновременно нажмите Windows ![]() + р ключи, чтобы открыть окно запуска команды.
+ р ключи, чтобы открыть окно запуска команды.
2. В командной строке запуска введите: services.msc и нажмите Войти.

3. Щелкните правой кнопкой мыши на Центр обновления Windows обслуживание и выберите Стоп.

4. Откройте проводник Windows и перейдите к C: \ Windows папки.
5. Выберите и удалять «SoftwareDistribution«папка. *
(Нажмите Продолжать в окне «Доступ к папке запрещен»).
* Примечание. При следующем запуске Центра обновления Windows для хранения обновлений автоматически создается новая пустая папка SoftwareDistribution.

6. Перезапуск и снова запустите команду «DISM / Online / Cleanup-Image / RestoreHealth».
Другие методы, чтобы исправить ошибки DISM / RestoreHealth.
Если вы по-прежнему сталкиваетесь с проблемами при запуске DISM, после применения вышеупомянутых методов, продолжите и попробуйте инструкции из следующих статей:
Это оно! Дайте мне знать, если это руководство помогло вам, оставив свой комментарий о вашем опыте. Пожалуйста, любите и делитесь этим руководством, чтобы помочь другим.
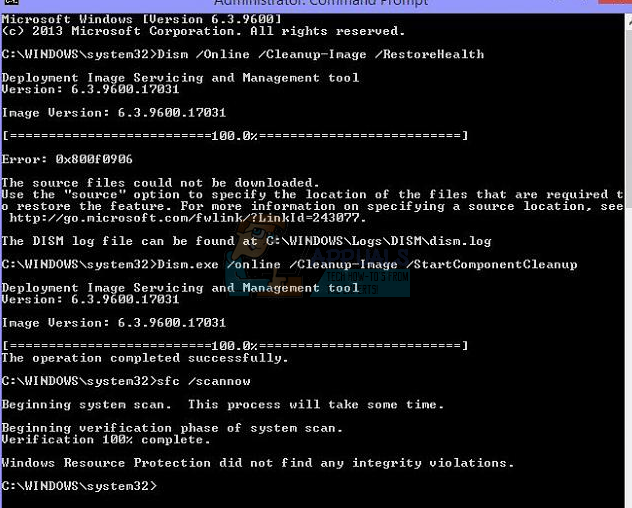
The DISM error 0x800f0906: Source files could not be downloaded, occurred on a Windows 10 based computer after running the «DISM /Online /Cleanup-Image /RestoreHealth» command.
The error message indicates that Windows cannot connect online to download the required files to repair the Windows 10 image, despite the fact that the system has already access to the Internet and to Microsoft servers without any problem.

DISM Error 0x800f0906 in details:
«C:\WINDOWS\system32>DISM /Online /Cleanup-Image /RestoreHealth
Deployment Image Servicing and Management tool
Version: 10.0.15063.0
Image Version: 10.0.15063.0
[==========================100.0%==========================]
Error: 0x800f0906
The source files could not be downloaded.
Use the «source» option to specify the location of the files that are required to restore the feature. For more information on specifying a source location, see http://go.microsoft.com/fwlink/?LinkId=243077.
The DISM log file can be found at C:\WINDOWS\Logs\DISM\dism.log«
This troubleshooting guide contains detailed instructions to fix the DISM Error 0x800f0906 in Windows 10/8/8.1
How to FiX DISM RestoreHealth Error 0x800f0906.
Method 1. Run DISM command again.
Method 2. Check your date and time settings.
Method 3. Run the Windows Update troubleshooter.
Method 4. Force Windows to re-create the Windows Update Store folder.
Other Methods to fix DISM /RestoreHealth Errors.
Method 1. Run DISM command again.
On a Windows 10 Home based computer, I realized that DISM fails with error 0x800f0906, at 100% of the Restore Health process. So, I decided to run «DISM /Online /Cleanup-Image /RestoreHealth» command again and fortunately the DISM problem «The source files could not be downloaded» disappeared.
So, before you continue to the rest methods, execute the «DISM /Online /Cleanup-Image /RestoreHealth» command once more, to verify if the DISM error 0x800f0906 persists.
Method 2. Check your date and time settings.
Ensure that your computer’s (or phone) date and time are correct. To do that
1. Simultaneously press the Windows ![]() + R keys to open run command box.
+ R keys to open run command box.
2. Type control panel and press Enter.

2. Change the View by: to Small icons.

3. Open Date and Time.

4. Press Change date and time.

4a. Set the current date/time/year and click OK.
5. Press the Change time zone button.

5a. Set your current Time Zone and press OK.

6. Choose the Internet Time tab and click the Change settings button.

6a. Check the Synchronize with an Internet time server checkbox & then choose a Time Server from the list (e.g. time.windows.com).
6b. When done, click Update Now.

6c. When the time is updated, press OK twice to close all open windows.
7. Restart your computer and run the «DISM /Online /Cleanup-Image /RestoreHealth» command again.
Method 3. Run the Windows Update troubleshooter.
1. Go to Start > Settings > Update & Security > Troubleshoot > Windows Update.

2. Choose Try troubleshooting as an administrator.

3. Press Next and follow the rest of the steps in the wizard to repair problems with Windows update.

4. When the repair is completed, Close the wizard.

5. Restart your computer and run the «DISM /Online /Cleanup-Image /RestoreHealth» command again.
Method 4. Force Windows to re-create the Windows Update Store folder.
The Windows Update Store folder (commonly known as «SoftwareDistribution» folder) is the location where Windows stores the downloaded updates.
-If the SoftwareDistribution folder becomes corrupted then it causes problems with Windows Update. So, one of the most efficient solutions to resolve problems with Windows Update is to recreate the SoftwareDistribution folder. To do that:
1. Simultaneously press the Windows ![]() + R keys to open run command box.
+ R keys to open run command box.
2. In run command box, type: services.msc and press Enter.

3. Right click on Windows Update service and select Stop.

4. Open Windows Explorer and navigate to C:\Windows folder.
5. Select and Delete the “SoftwareDistribution” folder.*
(Click Continue at «Folder Access Denied» window).
* Note: The next time the Windows Update run, a new empty SoftwareDistribution folder will be created automatically by Windows to store updates.

6. Restart your computer and run the «DISM /Online /Cleanup-Image /RestoreHealth» command again.
Other Methods to fix DISM /RestoreHealth Errors.
If you still face problems when running DISM, after applying the above mentioned methods, then proceed and try the instructions from the following articles:
- How to fix DISM Source Files Could not be Found error on Windows 10/8
- How to fix DISM 0x800f081f Error on Windows 10/8
That’s it! Let me know if this guide has helped you by leaving your comment about your experience. Please like and share this guide to help others.