14.08.2020
Просмотров: 8179
Во время установки обновления для Windows 10 пользователь может столкнуться с ошибкой: код 0x800f0831. Возникает такая неполадка по нескольким причинам: отключена служба обновления, проблемы с сервером, повреждены системные файлы, помехи со стороны VPN или прокси. Кроме того, что ошибка 0x800f0831 появляется на Виндовс 10, она встречается и в Windows 7. Чтобы её исправить, существует несколько рекомендаций.
Читайте также: Ошибка 0x8024a105 при обновлении Windows 10: причины и решения
Исправляем ошибку 0x800f0831 на Windows 10
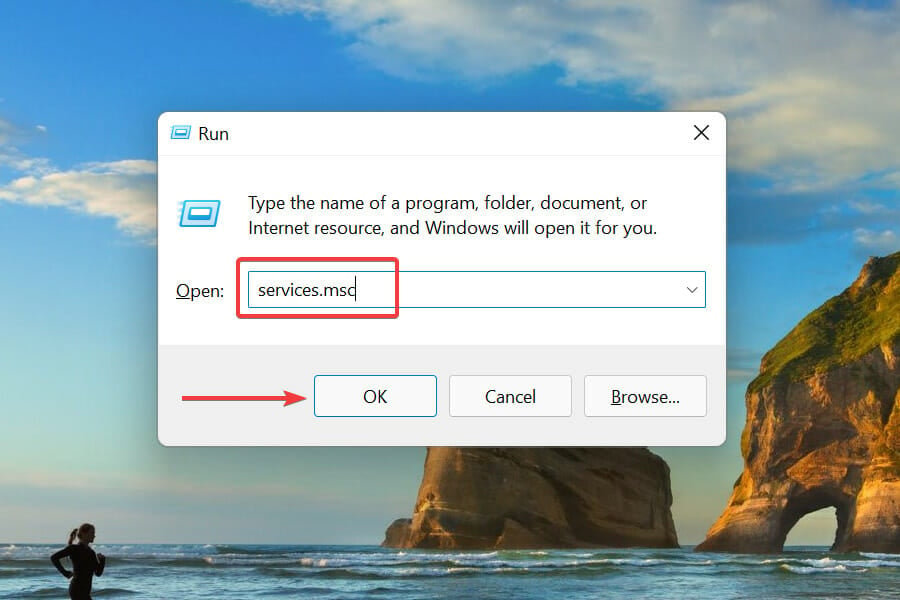
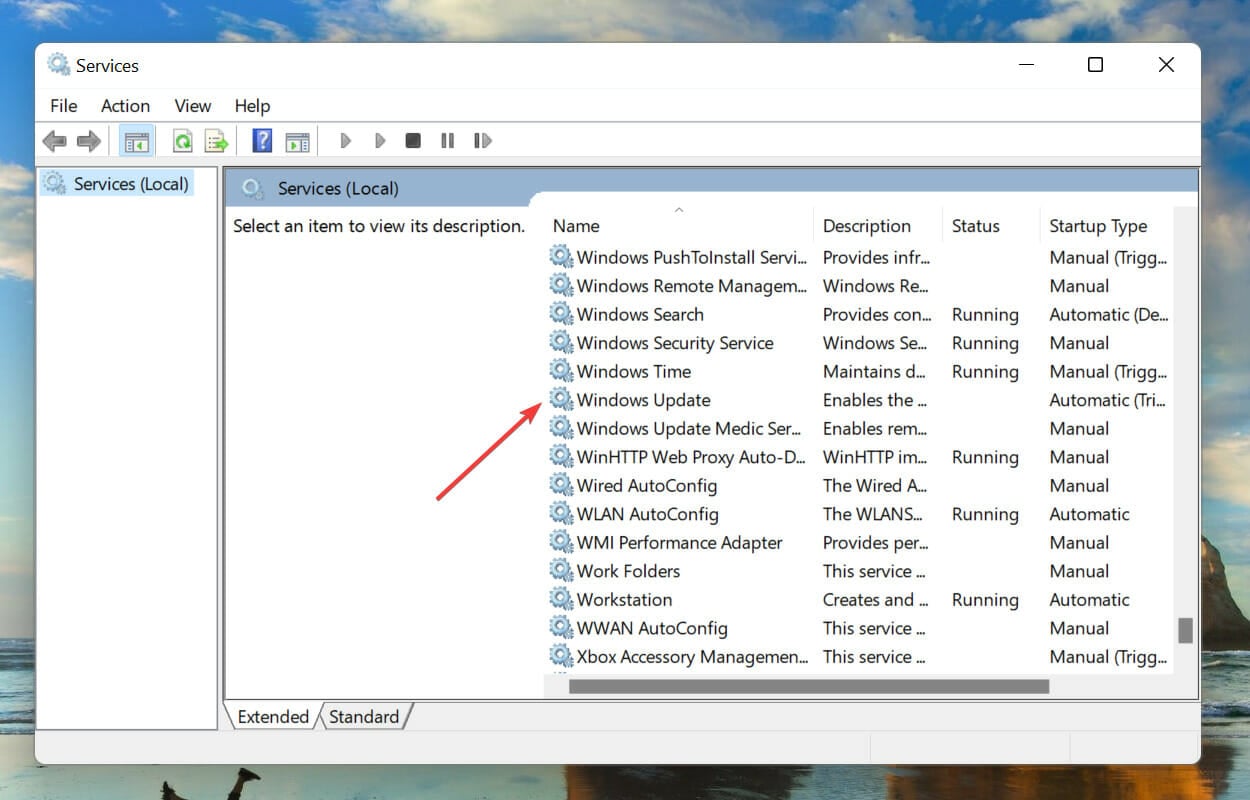
Если во время обновления операционной системы появилась ошибка 0x800f0831, то стоит проверить, включен ли Центр обновления Windows и его служба. Для этого нужно нажать «Win+R» и ввести «services.msc».
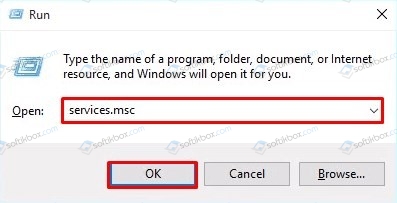
Откроется окно служб. Нужно найти службу «Центр обновления Windows». Смотрим, чтобы она была включена и её запуск был «Автоматическим».
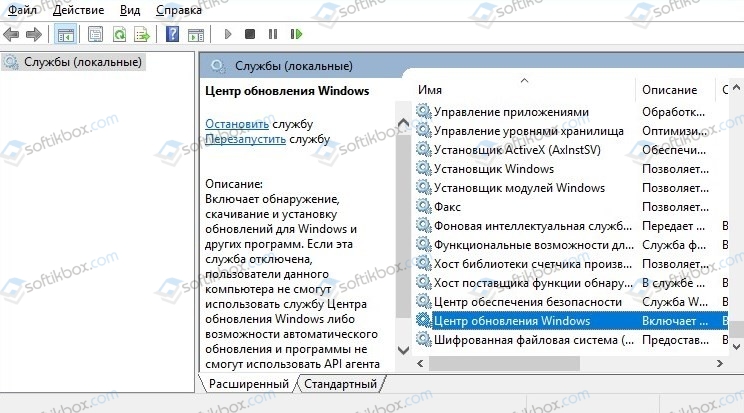
Можно попробовать перезапустить службу.
В случае, если служба работает, то стоит обратить внимание, какой пакет обновления не удается установить. Чаще всего, это пакеты KB4512489 и KB4565483. Можно перейти на сайт Майкрософт и найти их через каталог и установить обновления вручную.

Если вручную установить пакеты обновлений не удается, то этому процессу что-то мешает. Если у вас включен VPN или прокси-сервер, то нужно на время апдейта их отключить.
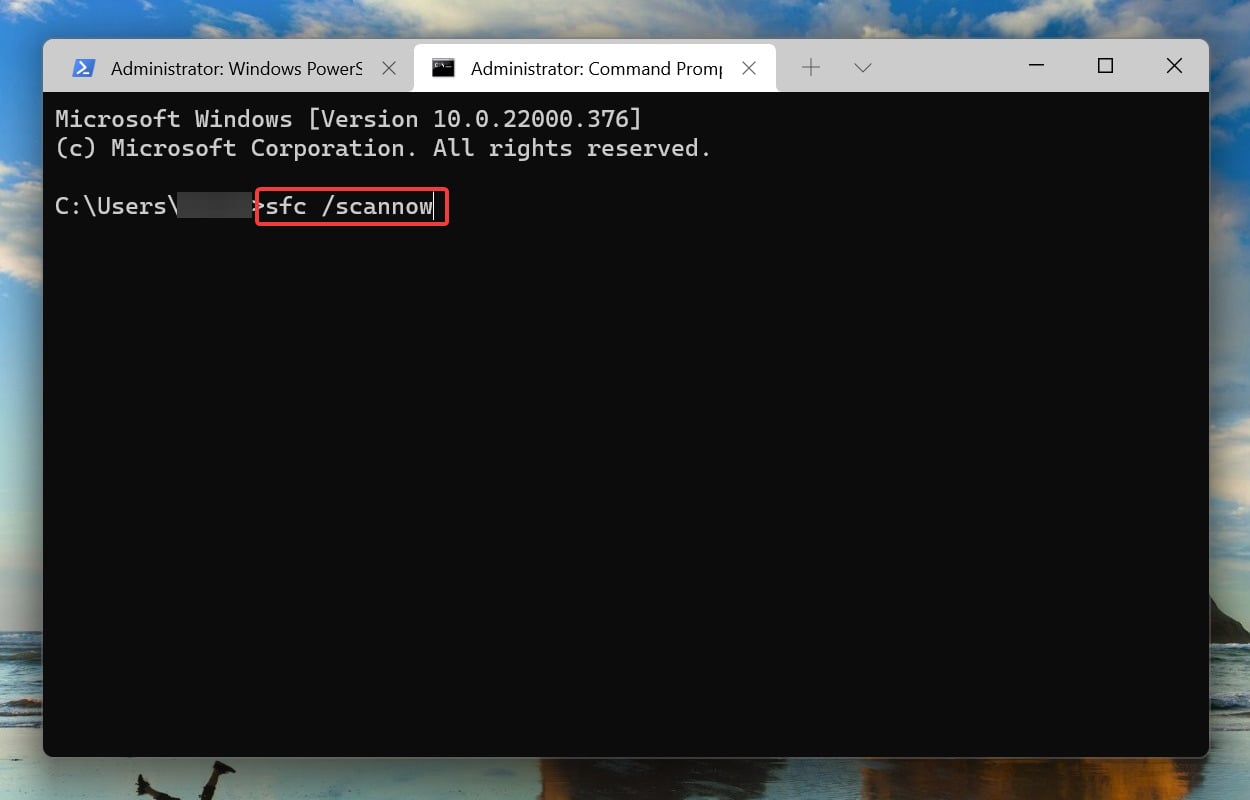
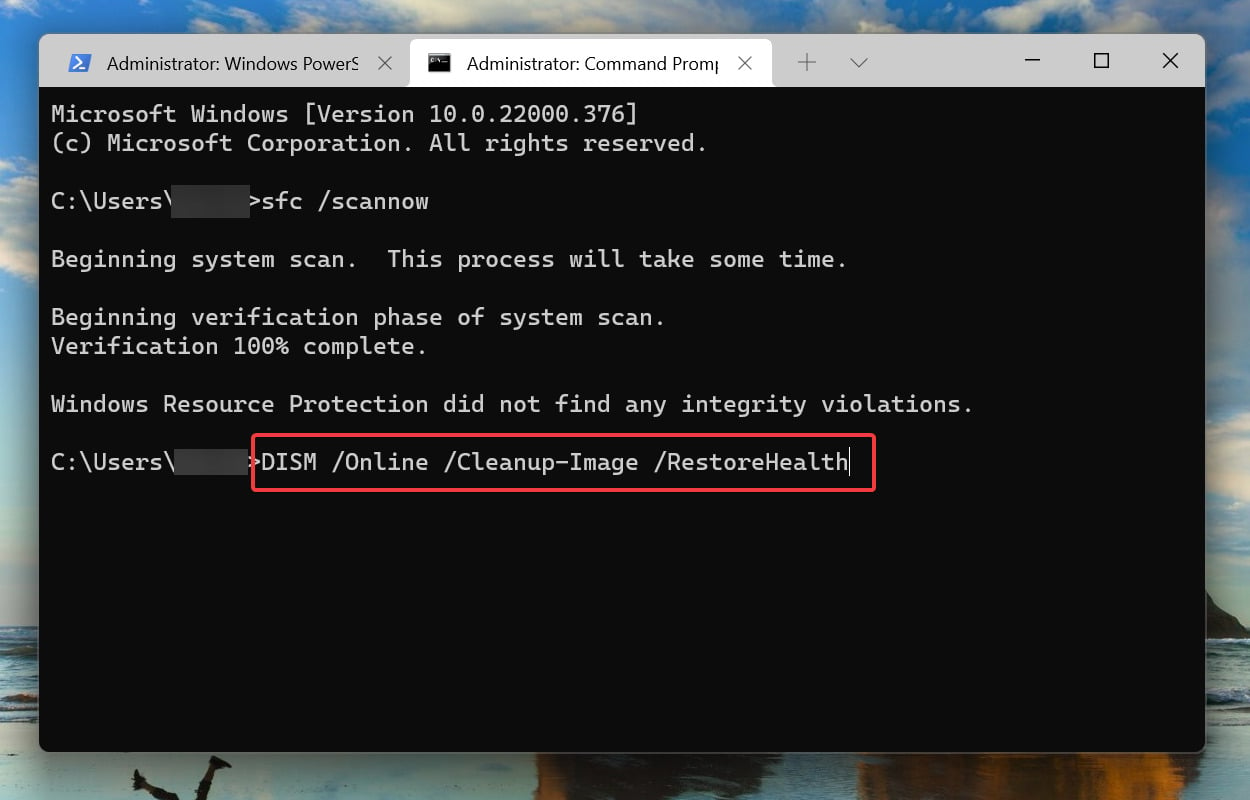
Системные файлы, а также компоненты хранилища, могут быть повреждены. Из-за этого могут возникнуть трудности с процессом обновления Windows 10. Для того, чтобы их проверить и исправить есть команды:
- sfc / scannow
- dism /online /cleanup-image /restorehealth
Их запуск нужно выполнять с правами Администратора.
В случае, если ошибка 0x800f0831 в Windows 10 не может быть исправлена вышеуказанными способами, то рекомендуем обратиться в службу поддержки Майкрософт и выполнить диагностику компонентов ПК. Как вариант, можно попробовать в безопасном режиме удалить все содержимое папки SoftwareDistribution, что по пути C:\Windows\SoftwareDistribution и повторить процесс обновления.
Ошибка 0x800f0831 на Windows 7
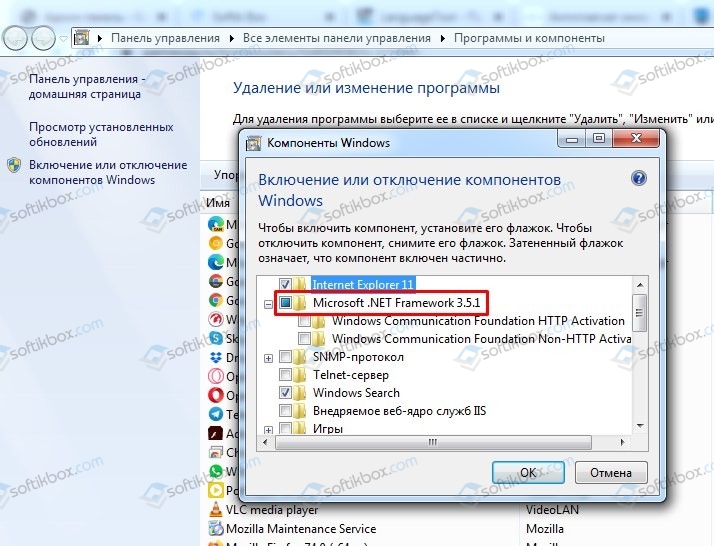
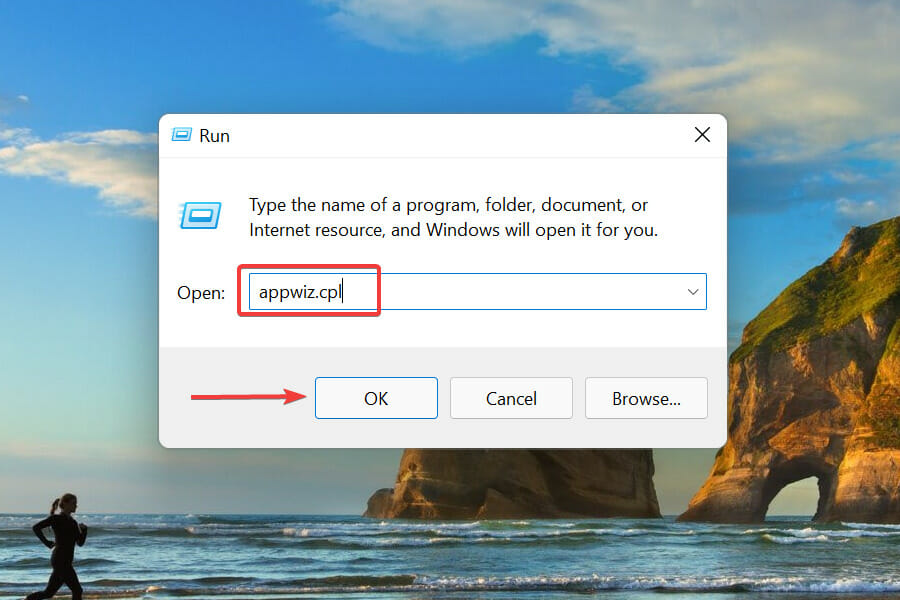
На Windows 7 частой причиной ошибки 0x800f0831 становятся неправильно установленные фреймворки. Если Microsoft .NetFramework 3.5 деактивирован, то это может вызвать неполадку. Чтобы её исправить, стоит выполнить следующие действия:
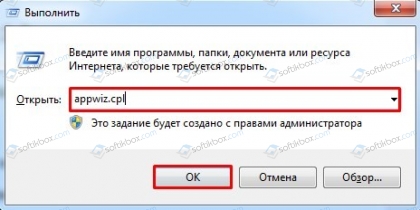
- Жмем «Win+R» и вводим «appwiz.cpl».
- Откроется окно «Панели управления», «Программы и компоненты». В меню слева выбираем «Включение и отключение компонентов Windows». Включаем фреймворки, поставив специальную отметку.
Если же перезапустить NetFramework 3.5 не удалось, то советуем выполнить следующие рекомендации:
- Создаем установочный носитель по рекомендациям Майкрософт.
- Теперь запускаем Блокнот и вставляем такой набор команд. Их можно скопировать по ссылке.
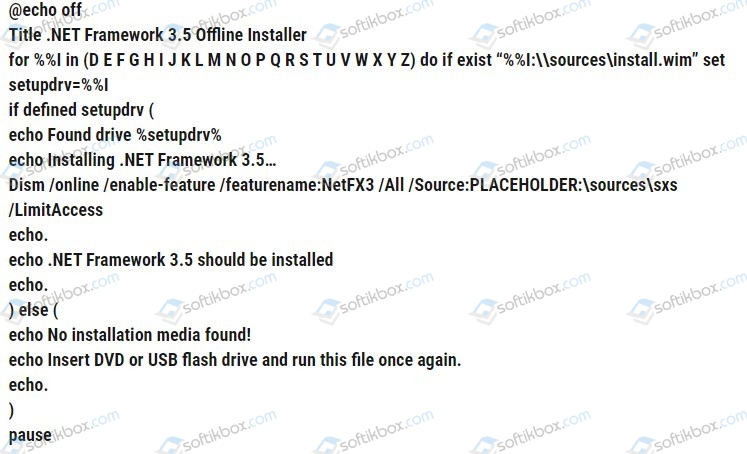
- В команде нужно фразу PLACEHOLDER или NETFX3 заменить на букву, которой присвоен установочный носитель Windows.
- Сохраняем файл с любым названием, только с расширением .cmd. В типе файлов нужно задать «Все типы».
- Двойным кликом запускаем файл. Перезагружаем ПК, чтобы изменения вступили в силу.
Важно отметить, что если и после такой манипуляции с фреймворками ошибка 0x800f0831 продолжает появляться на вашем ПК, стоит вовсе удалить Microsoft .NetFramework 3.5 и установить их заново, вручную установить все обновления или откатить систему до более раннего состояния, а далее заново повторить процесс обновления системы.
Updated September 2023: Stop these error messages and fix common problems with this tool. Get it now at this link
- Download and install the software.
- It will scan your computer for problems.
- The tool will then fix the issues that were found.

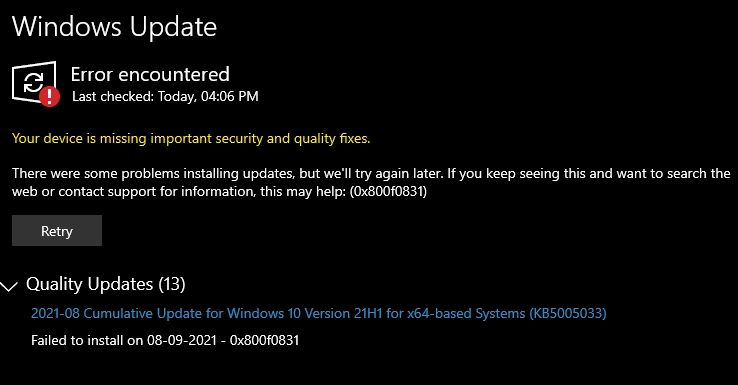
Error code 0x800f0831 is an error message that can occur when using the Windows Update service. Indeed, seeing this line is unpleasant because it doesn’t mean anything promising other than that none of the Windows updates you tried to install could be successfully installed.
In most cases, Microsoft responds immediately to reports of Windows Update failures and either fix the problem automatically or provides manual instructions on how to fix it.
However, since there are no official fixes for error 0x800f0831, we will try to help you. It is very important to install the latest updates to maintain system performance and security.
Table of Contents:
What causes the error 0x800f0831?

- Adware
- Corrupted files
- Internet access
- Windows registry
- Windows file system
- Viruses and malware
- Improper configuration
- Windows Update service
How to repair the error 0x800f0831?
Updated: September 2023
This tool is highly recommended to help you fix your error. Plus, this tool offers protection against file loss, malware, and hardware failures, and optimizes your device for maximum performance. If you already have a problem with your computer, this software can help you fix it and prevent other problems from recurring:
- Step 1 : Install the PC Repair and Optimizer Tool. (Windows 10, 8, 7, XP, Vista).
- Step 2 : Click Start Scan to determine what problems you are experiencing with your computer.
- Step 3 : Click Repair Allto resolve all problems.


Launch the Windows Update troubleshooter
- Open the Control Panel, press Window + X, and select Control Panel.
- Find Troubleshooter using the search box and click Troubleshooter.
- In the System and Security section, click Troubleshoot Windows Update.
Turn off proxy server
- Press Windows + R to open the Run dialog box, type inetcpl.cpl in the Run field, and press Enter.
- Select Connections, then open LAN Settings.
- Find the Autodetect options field and check the box.
- Finally, uncheck the Proxy Server box.
Cleanly run Windows 10
- Press the Windows+R keys.
- Type MSConfig and press Enter.
- Go to the Services tab, select Hide all Microsoft services and uncheck them.
- Go to the Startup tab and disable it.
- Reboot the system
Temporarily disable the antivirus
- Click on the Windows icon.
- Go to Settings -> Update and Security -> Windows Security -> Virus and Threat Protection -> Manage Settings.
- Disable real-time protection
APPROVED: To fix Windows errors, click here.
Frequently Asked Questions
- Download the missing KB package.
- Run the Windows Update troubleshooter.
- Run the SFC and DISM scans.
- Try again.
- Delete temporary files and browser cache.
- Turn off your firewall and antivirus software.
- Run the SFC and DISM.
- Run the Windows Update troubleshooter.
- Manually reset Windows Update components to default settings.
- Use FixWU.
- Empty the folder with the software distribution.
- Run the Windows Update troubleshooter.
- Run the DISM tool.
- Manually reset the Windows Updates components.
- Run a system file scan.
- Temporarily turn off your antivirus security program.
- Manually download updates.
- Make sure you have enough memory on your device.
- Run Windows Update several times.
- Check for third-party drivers and download any updates.
- Disable any additional hardware.
- Check the Device Manager for errors.
- Uninstall any third-party security programs.
- Troubleshoot hard drive errors
- Perform a clean Windows reboot.
Post Views: 1,676
Get rid of this Windows Installation error in a few minutes with our guide
by Kazim Ali Alvi
Kazim has always been fond of technology, be it scrolling through the settings on his iPhone, Android device, or Windows. And at times, unscrewing the device to take… read more
Updated on
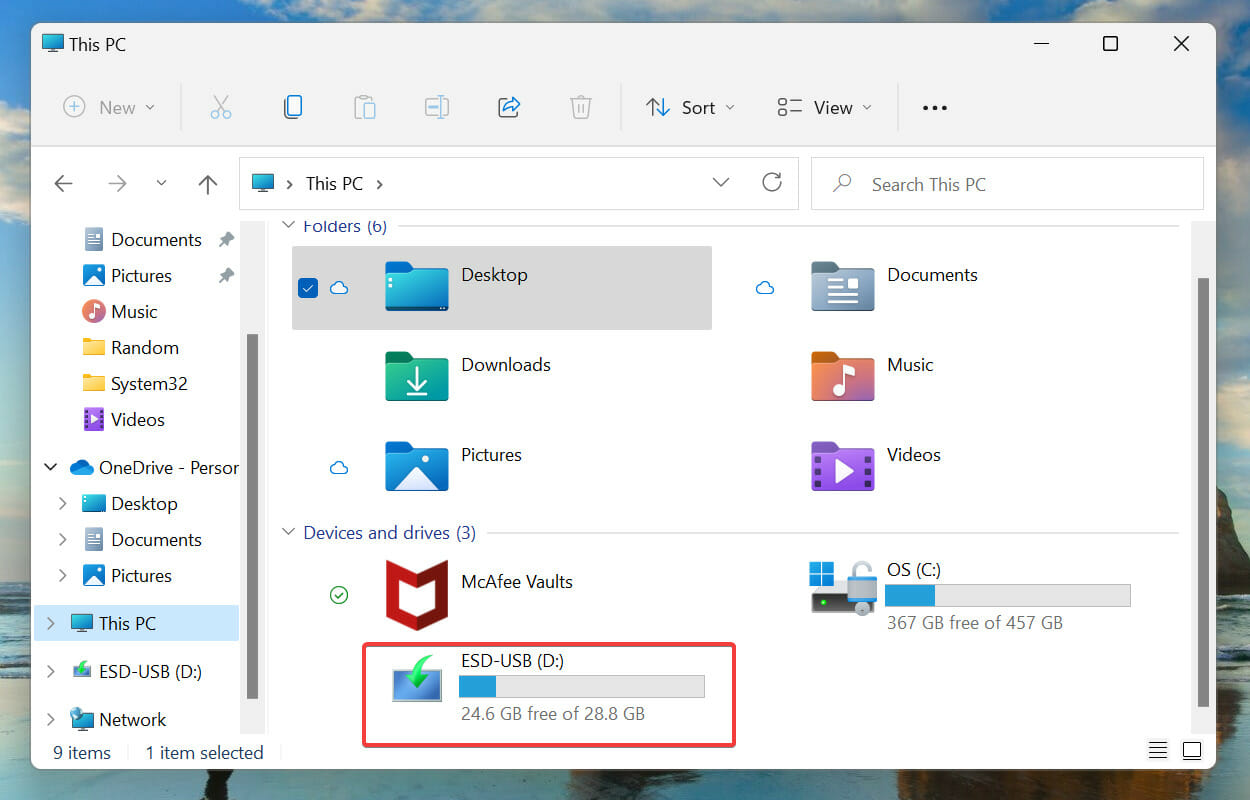
- A lot of users have reported encountering the 0x800f0831 installer error.
- Note that it doesn’t allow the process to complete.
- The Windows Update error 0x800f0831 could be due to corrupt system files, misconfigured VPN, or problems with the Windows Update service, amongst other issues.
- Also, learn how to fix the other Windows installation errors, in case you come across any.
XINSTALL BY CLICKING THE DOWNLOAD FILE
To fix Windows PC system issues, you will need a dedicated tool
SPONSORED
Fortect is a tool that does not simply clean up your PC, but has a repository with several millions of Windows System files stored in their initial version. When your PC encounters a problem, Fortect will fix it for you, by replacing bad files with fresh versions. To fix your current PC issue, here are the steps you need to take:
- Download Fortect and install it on your PC.
- Start the tool’s scanning process to look for corrupt files that are the source of your problem
- Right-click on Start Repair so the tool could start the fixing algorythm
- Fortect has been downloaded by 0 readers this month, rated 4.4 on TrustPilot
Windows 10, like the previous iterations, is prone to errors and ever since it was released, we have come across a bunch of them.
And, the worst are the ones that prevent you from updating the OS. One of these is the 0x800f0831, a Windows 10 install error.
Note that it is encountered while updating Windows and doesn’t allow the process to complete. We all know how important it is to keep up-to-date with the latest version of the OS.
When running an outdated version, you don’t just miss out on several new features but the PC is also exposed to threats and the chances of encountering errors are high.
Before we delve into the solutions, let’s first walk you through the underlying issues that may cause the install error – 0x800f0831.
What causes the install error 0x800f0831?
There are numerous underlying issues that are known to cause this Windows installation error. Some of these occur more frequently than others, and we have listed them in the same sequence:
- Missing files from the previous update
- Corrupt system files
- Antivirus conflicting with Windows Update
- Misconfigured VPN
- Issues with the Windows Update service

With a basic understanding of the problem, you are now in a far better position to proceed to troubleshoot the error. First, we recommend reverting any change that you made in the recent past on your Windows PC.
If that doesn’t fix the 0x800f0831 Windows 10 install error, execute the fixes listed here as given.
How can I fix the Windows Update error 0x800f0831?
- What causes the install error 0x800f0831?
- How can I fix the Windows Update error 0x800f0831?
- 1. Use a PC repairing software
- 2. Run the Windows Update troubleshooter
- 3. Run the SFC and DISM scan
- 4. Restart the Windows Update service
- 5. Reset Windows Update components
- 6. Disable VPN
- 7. Enable .Net Framework 3.5
- 8. Perform an in-place upgrade to repair Windows
- Are there other Windows 11 installation errors?
1. Use a PC repairing software
If you require a faster and more effective method to bypass the 0x800f0831 Windows Update install error, you can use a specialized repair tool.
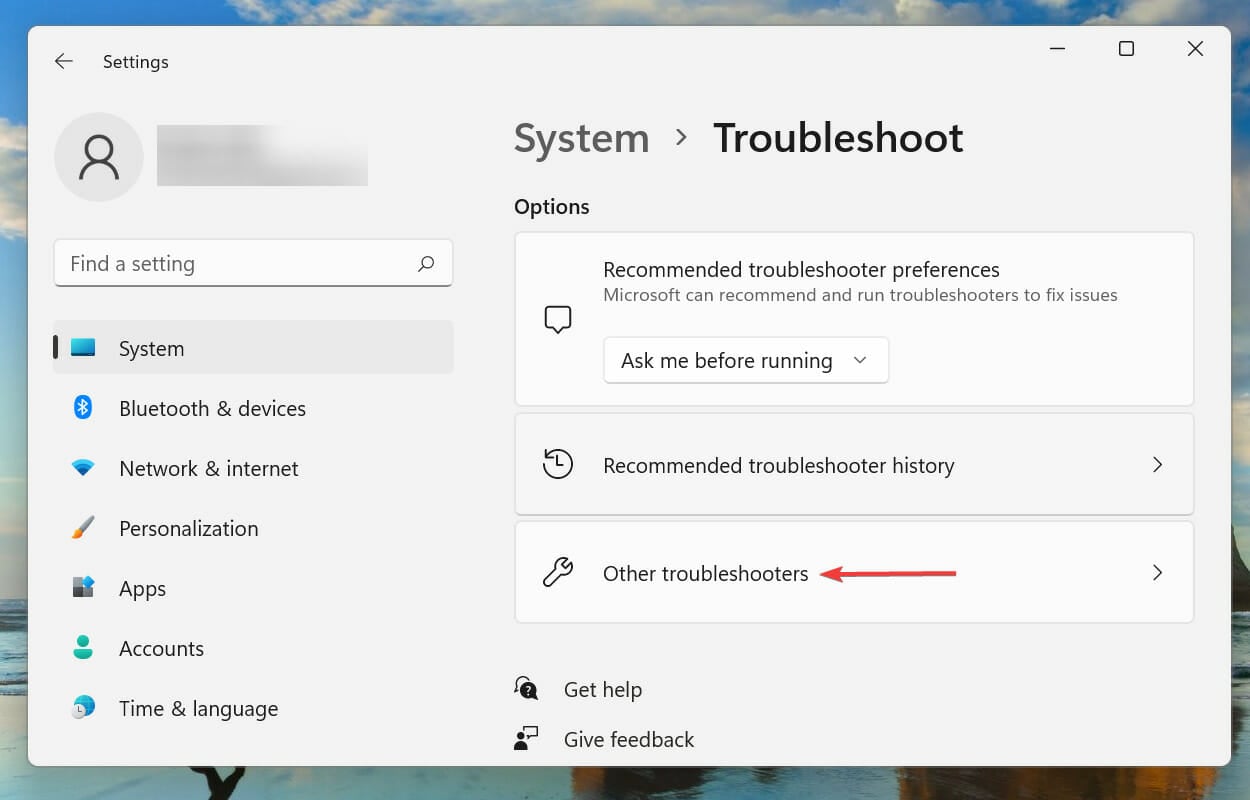
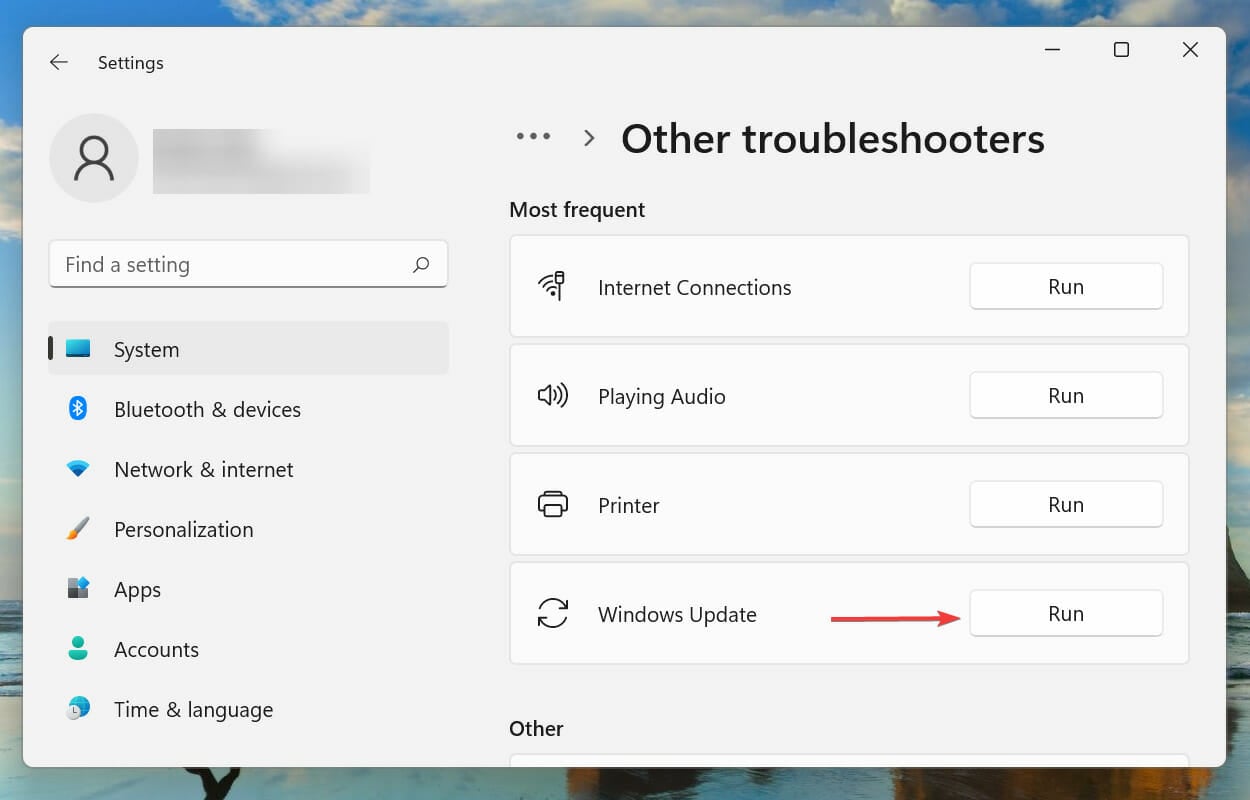
2. Run the Windows Update troubleshooter
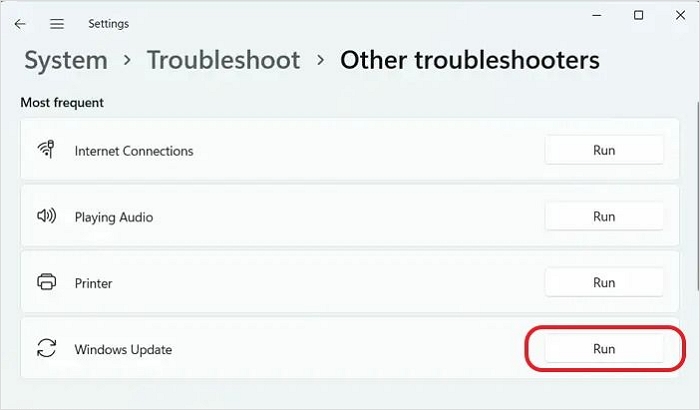
- Press Windows + I to launch the Settings app, then click on Troubleshoot on the right in the System tab.

- Click on Other troubleshooters.
- Next, locate the Windows Update troubleshooter and click on the Run button next to it.
- Wait for the troubleshooter to diagnose the issue, and choose the appropriate repsonse, when prompted, to fix them.
Whenever you encounter an error in Windows, it’s recommended that you first look for a relevant troubleshooter. These are more than capable of fixing a wide variety of errors, both hardware, and software, and do not require much effort from your end.
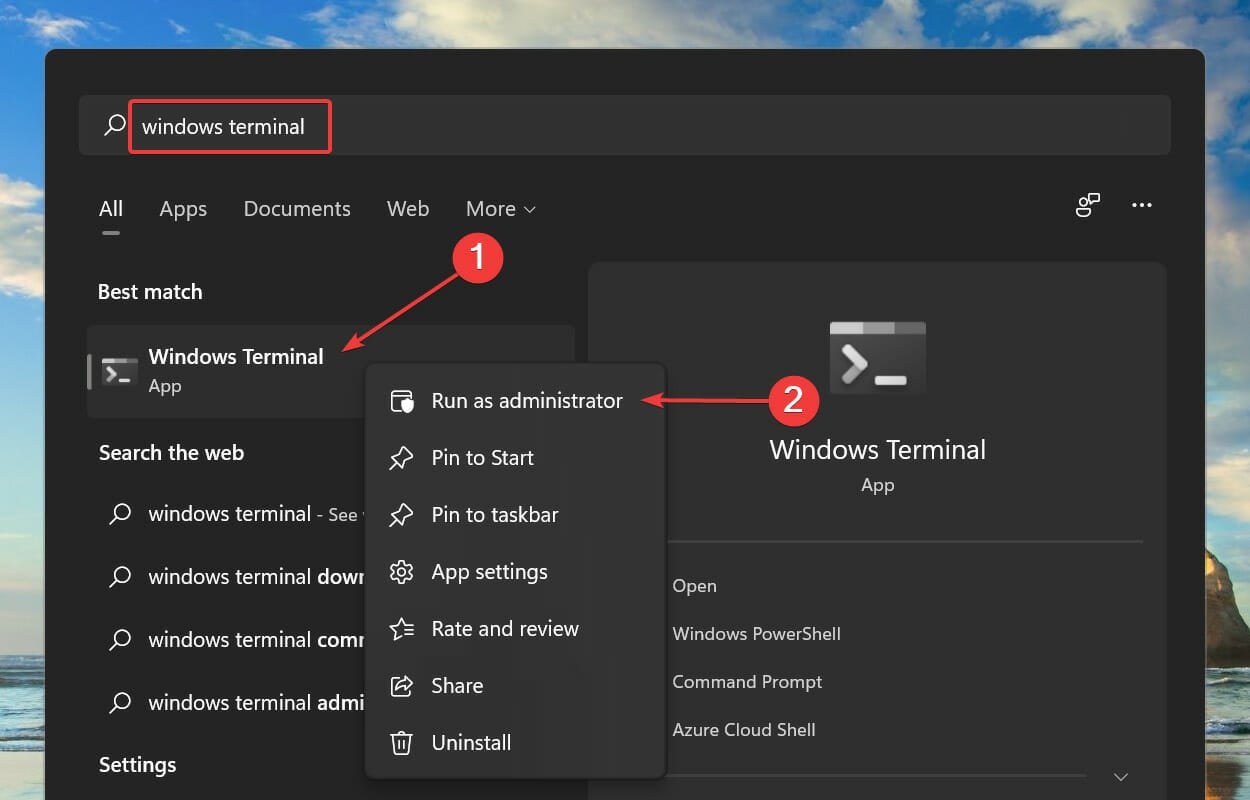
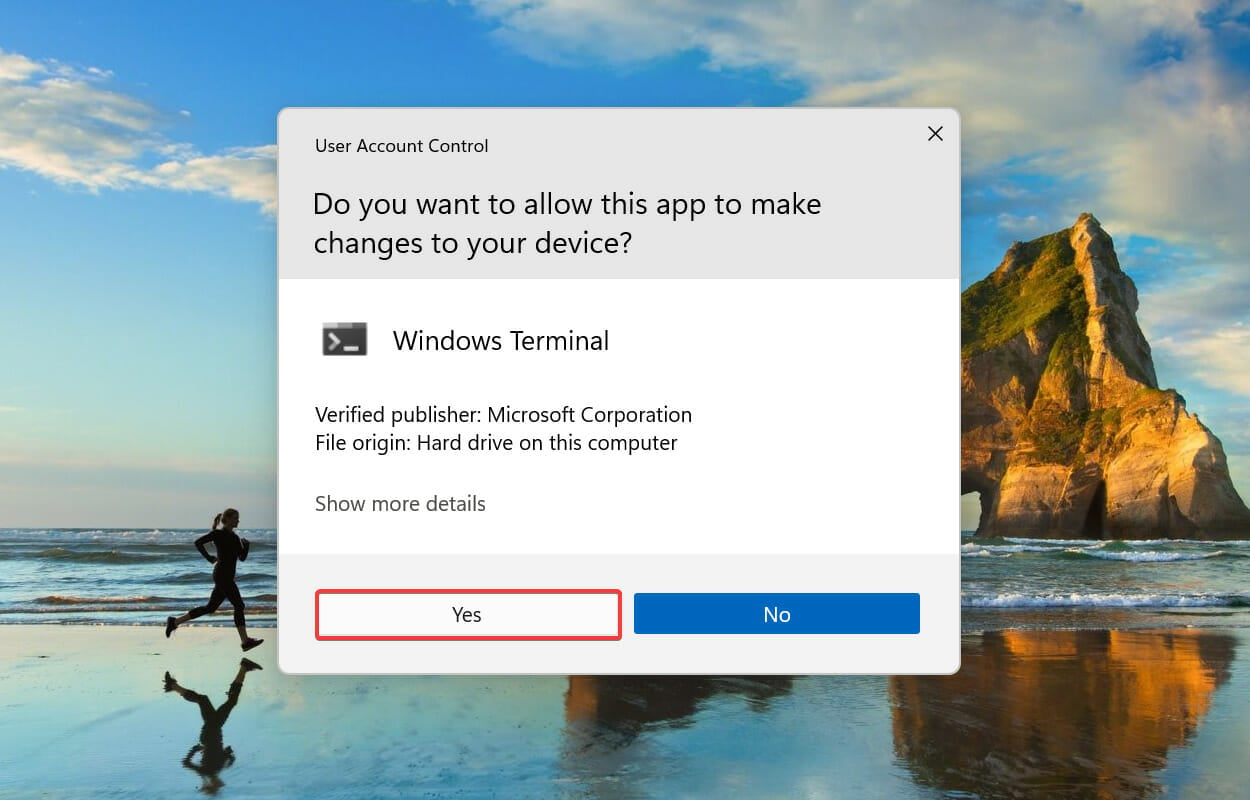
3. Run the SFC and DISM scan
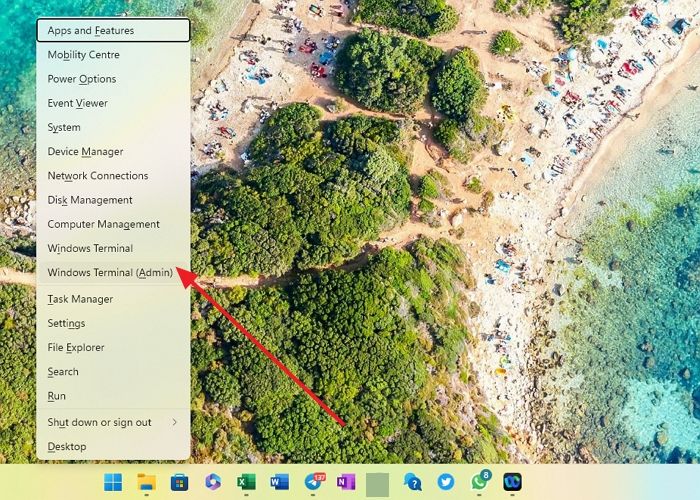
- Press Windows + S to launch the Search menu. Enter Windows Terminal in the text field at the top, right-click on the relevant search result, and select Run as administrator from the context menu.
- Click Yes on the UAC (User Account Control) prompt that pops up.
- Next, click on the down arrow at the top, and select Command Prompt from the list of options. Alternatively, you can press Ctrl + Shift + 2 to launch the Command Prompt tab.
- Now, type/paste the following command and hit Enter to run the SFC scan:
sfc /scannow - Once it’s complete, paste the following command and hit Enter to run the DISM tool:
DISM /Online /Cleanup-Image /RestoreHealth - Wait for the scan to complete, then restart the computer and check if the 0x800f0831 Windows 10 install error is fixed.

Both the SFC and DISM are critical in detecting problems with the update process. The SFC (System File Checker) scan identifies corrupt system files, and if any are found, replaces them with their cached copy stored on the system.
The DISM (Deployment Image Servicing & Management) tool, on the other hand, looks for problems with the Windows image and can modify the installation media, if required.
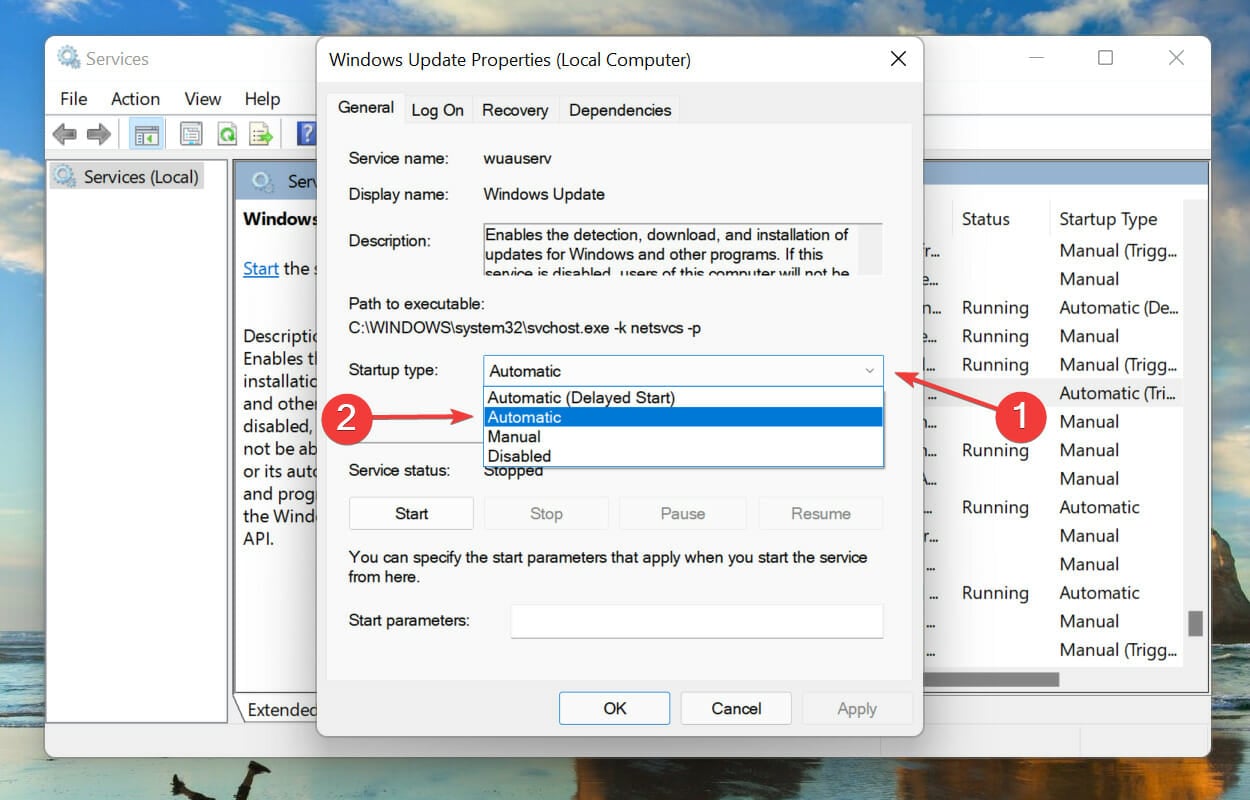
4. Restart the Windows Update service
- Press Windows + R to launch the Run command. Type services.msc in the text field, and either click on OK or hit Enter to launch the Services app.

- Locate and double-click on the Windows Update service to launch its Properties.
- Click on the Startup type dropdown menu, and select Automatic from the list of options.
- Next, click on the Start button under Service status, and then click on OK to save the changes.
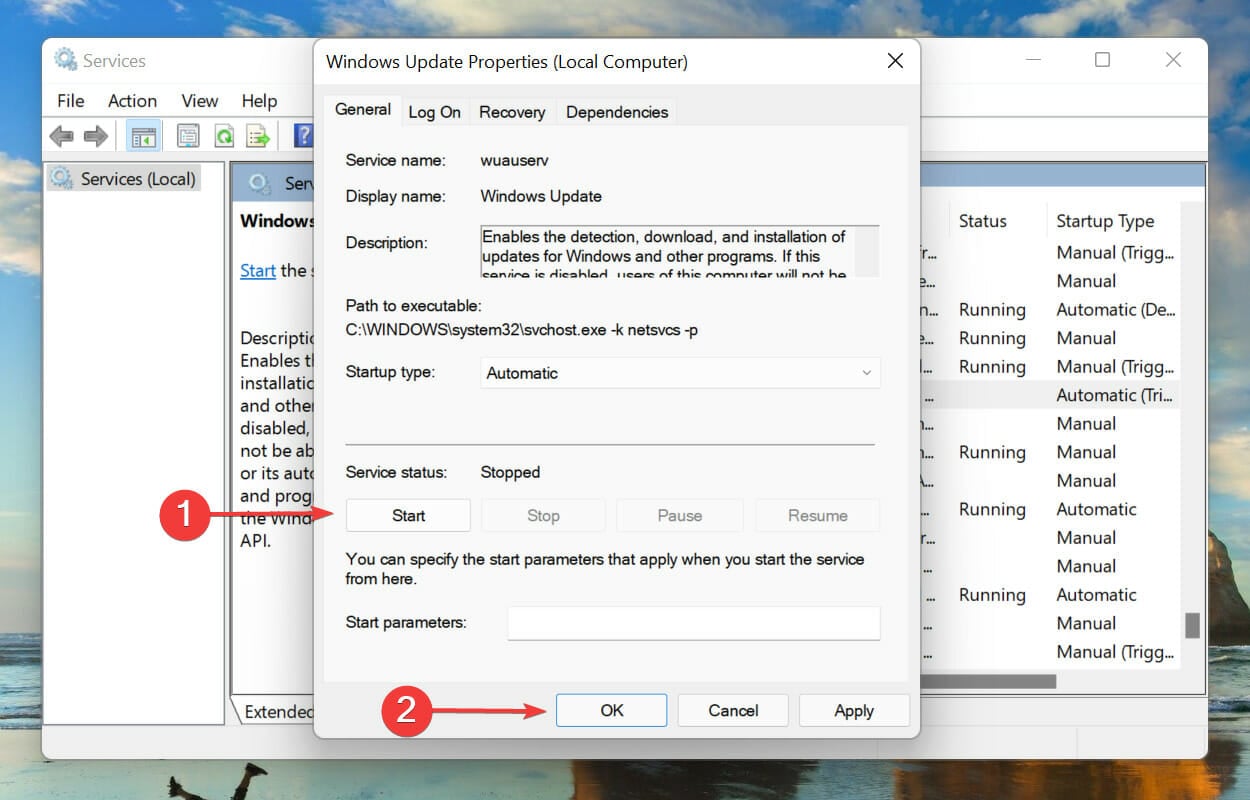
After starting the Windows Update service, check if the 0x800f0831 install error is fixed.
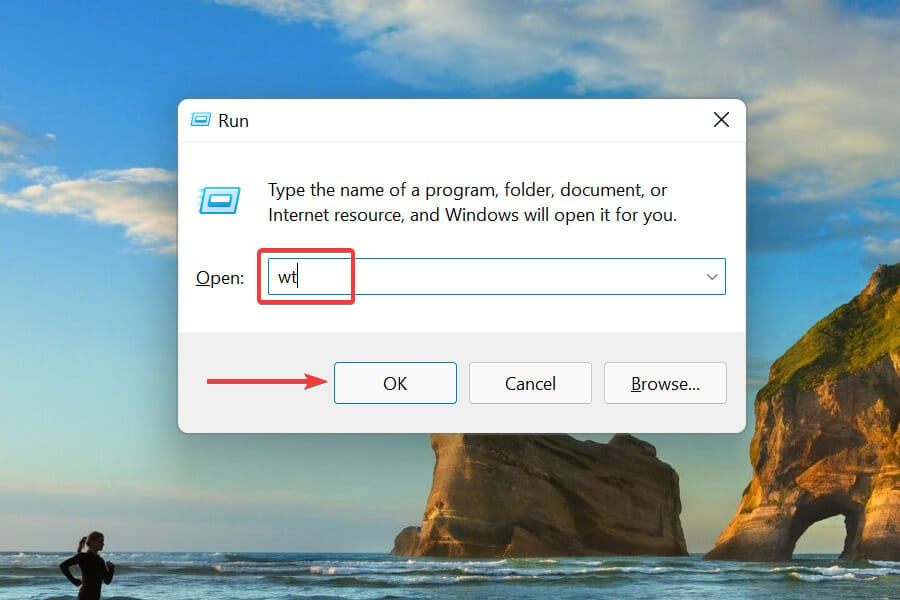
5. Reset Windows Update components
- Press Windows + R to launch the Run command. Type wt in the text field, hold the Ctrl + Shift, and either click on OK or hit Enter to launch an elevated Windows Terminal.
- Click on the downward arrow at the top, and select Command Prompt from the menu to open it in a new tab.
- Now, type/paste each of the following commands and hit Enter after each to reset the Windows Update components and fix the 0x800f0831 Windows Update error.
- Execute the following two commands to stop the BITS and Windows Update services:
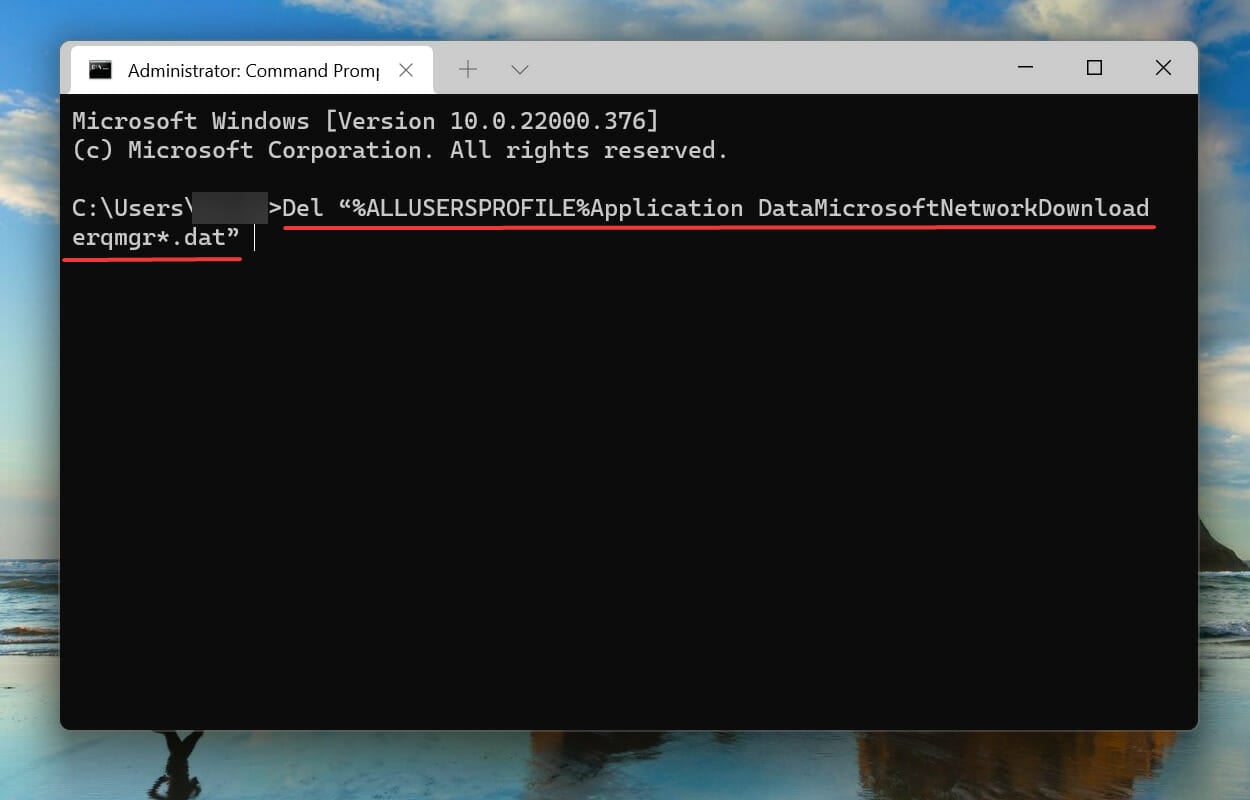
net stop bitsnet stop wuauserv - Next, execute the following command to delete the qmgr*.dat files:
Del “%ALLUSERSPROFILE%Application DataMicrosoftNetworkDownloaderqmgr*.dat” - The following commands will rename some critical folders. Though if you are attempting the reset the process for the first time, skip this step, and if the process doesn’t go through, try it the next time.
Ren %Systemroot%\SoftwareDistribution\DataStore DataStore.bakRen %Systemroot%\SoftwareDistribution\Download Download.bakRen %Systemroot%\System32\catroot2 catroot2.bak - Execute the following two commands to reset the BITS and Windows Update service:
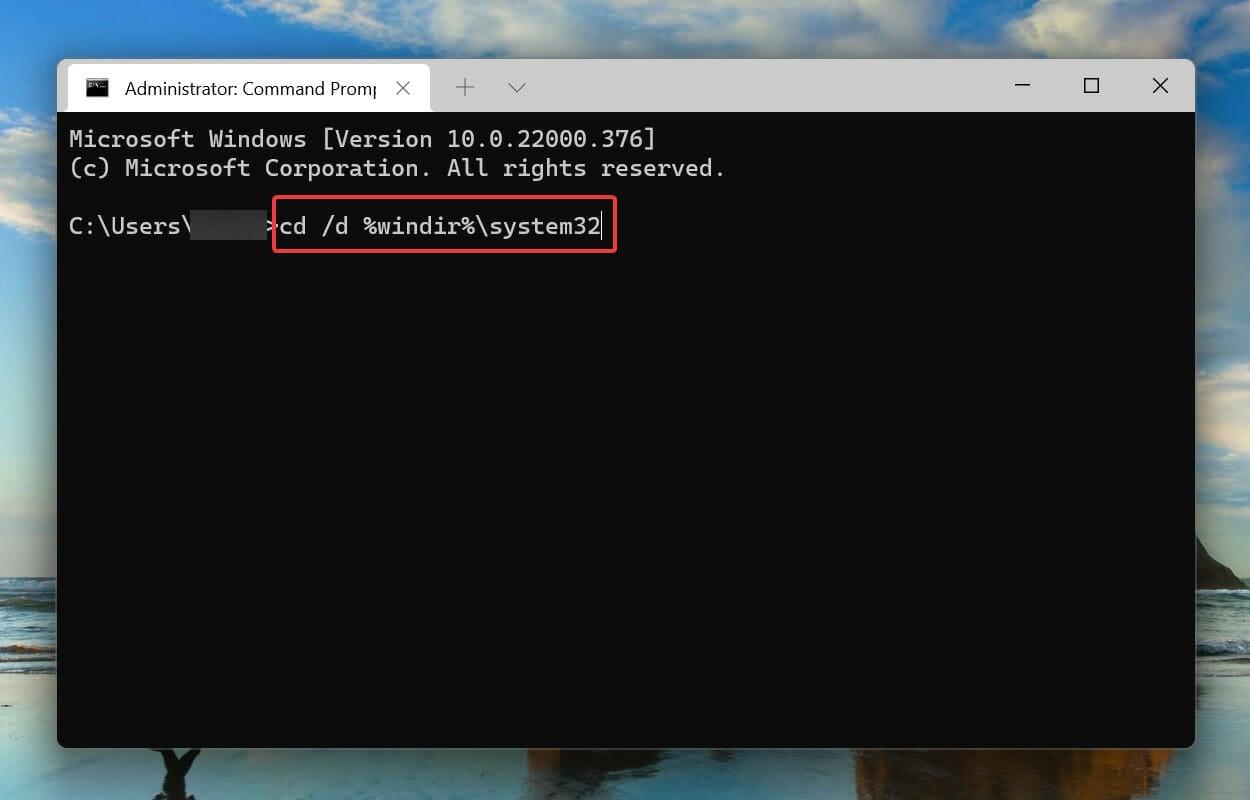
sc.exe sdset bits D:(A;;CCLCSWRPWPDTLOCRRC;;;SY)(A;;CCDCLCSWRPWPDTLOCRSDRCWDWO;;;BA)(A;;CCLCSWLOCRRC;;;AU)(A;;CCLCSWRPWPDTLOCRRC;;;PU)sc.exe sdset wuauserv D:(A;;CCLCSWRPWPDTLOCRRC;;;SY)(A;;CCDCLCSWRPWPDTLOCRSDRCWDWO;;;BA)(A;;CCLCSWLOCRRC;;;AU)(A;;CCLCSWRPWPDTLOCRRC;;;PU) - Next, type/paste the following command and hit Enter to execute it:
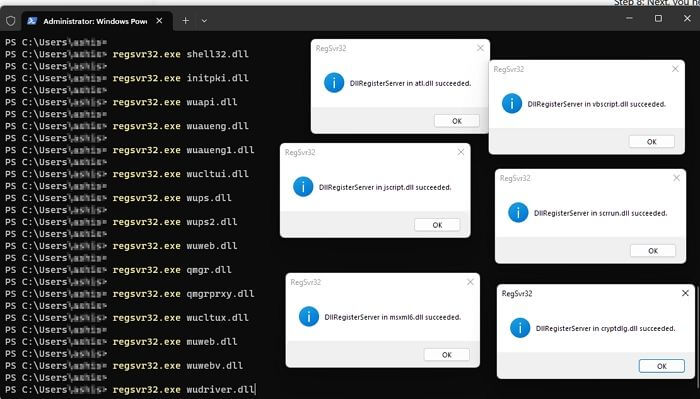
cd /d %windir%\system32 - Now, execute each of the following commands individually to re-register the BITS and Windows Update files:

regsvr32.exe atl.dll
regsvr32.exe urlmon.dll
regsvr32.exe mshtml.dll
regsvr32.exe shdocvw.dll
regsvr32.exe browseui.dll
regsvr32.exe jscript.dll
regsvr32.exe vbscript.dll
regsvr32.exe scrrun.dll
regsvr32.exe msxml.dll
regsvr32.exe msxml3.dll
regsvr32.exe msxml6.dll
regsvr32.exe actxprxy.dll
regsvr32.exe softpub.dll
regsvr32.exe wintrust.dll
regsvr32.exe dssenh.dll
regsvr32.exe rsaenh.dll
regsvr32.exe gpkcsp.dll
regsvr32.exe sccbase.dll
regsvr32.exe slbcsp.dll
regsvr32.exe cryptdlg.dll
regsvr32.exe oleaut32.dll
regsvr32.exe ole32.dll
regsvr32.exe shell32.dll
regsvr32.exe initpki.dll
regsvr32.exe wuapi.dll
regsvr32.exe wuaueng.dll
regsvr32.exe wuaueng1.dll
regsvr32.exe wucltui.dll
regsvr32.exe wups.dll
regsvr32.exe wups2.dll
regsvr32.exe wuweb.dll
regsvr32.exe qmgr.dll
regsvr32.exe qmgrprxy.dll
regsvr32.exe wucltux.dll
regsvr32.exe muweb.dll
regsvr32.exe wuwebv.dll
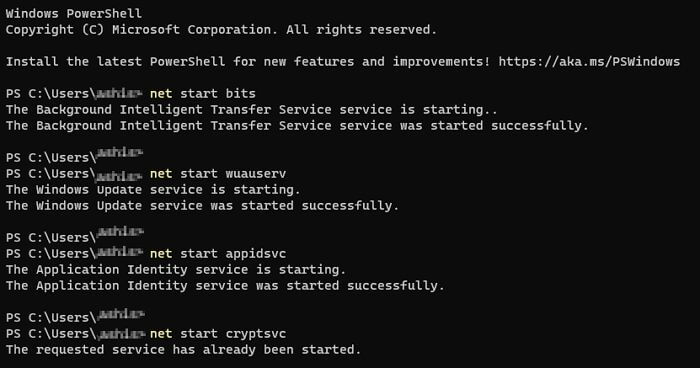
11. Now, paste the following command and hit Enter to reset Winsock:netsh winsock reset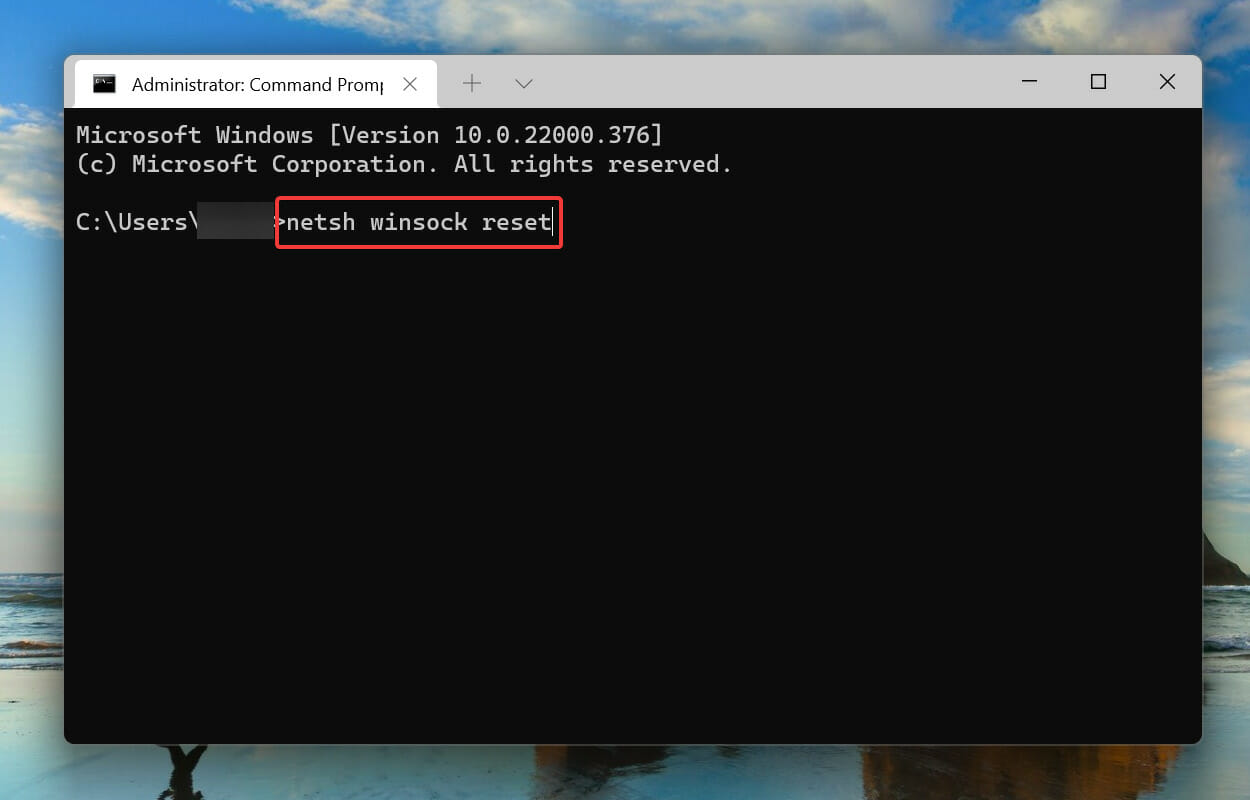
12. The last step is to restart the BITS and Windows Update service, so execute the following commands to do that:net start bits net start wuauserv
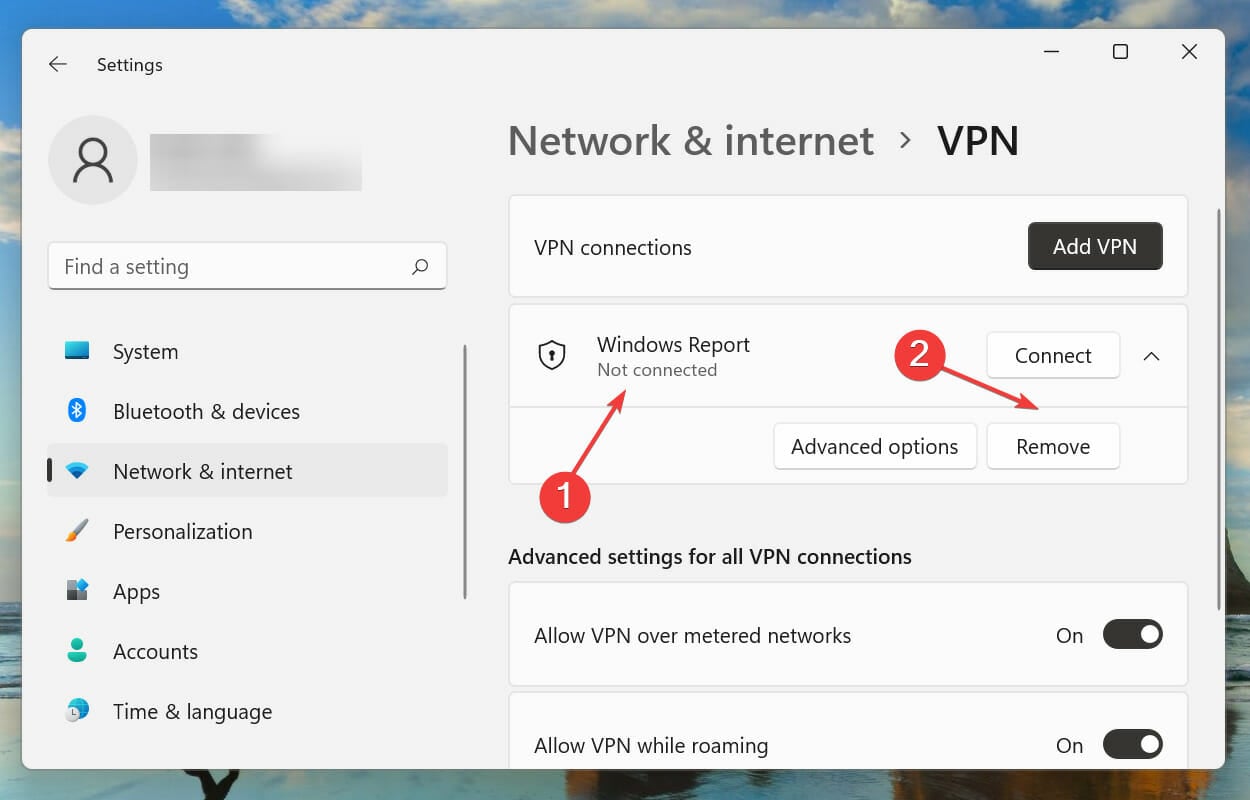
6. Disable VPN
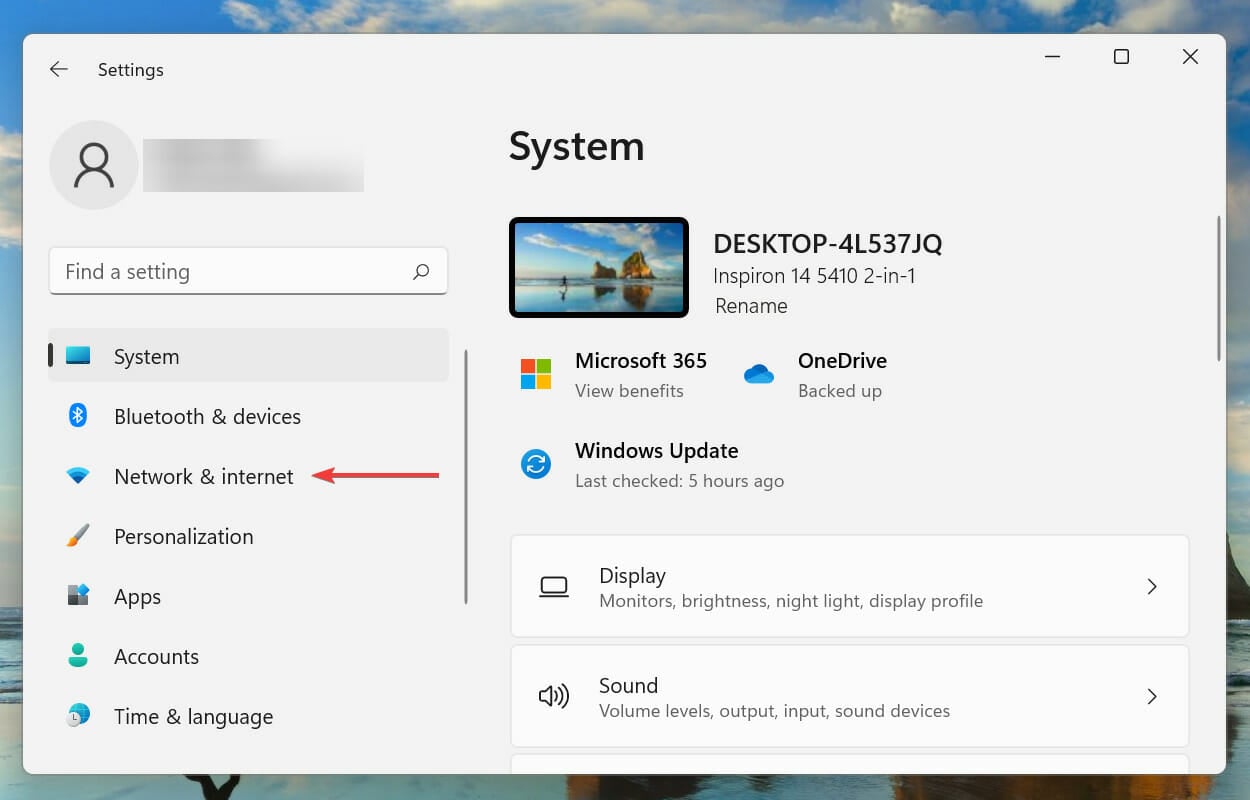
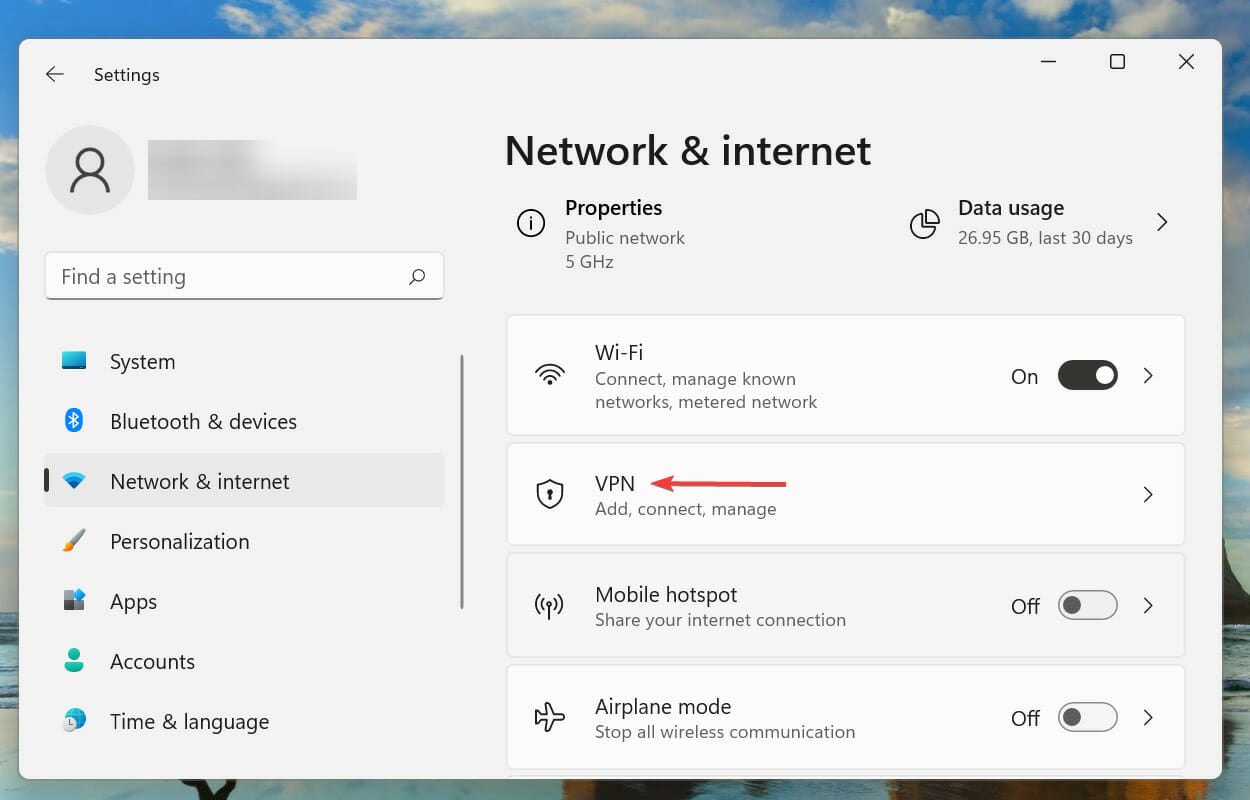
- Press Windows + I to launch the Settings app, and select Network & Internet from the navigation pane on the left.
- Click on VPN on the right.
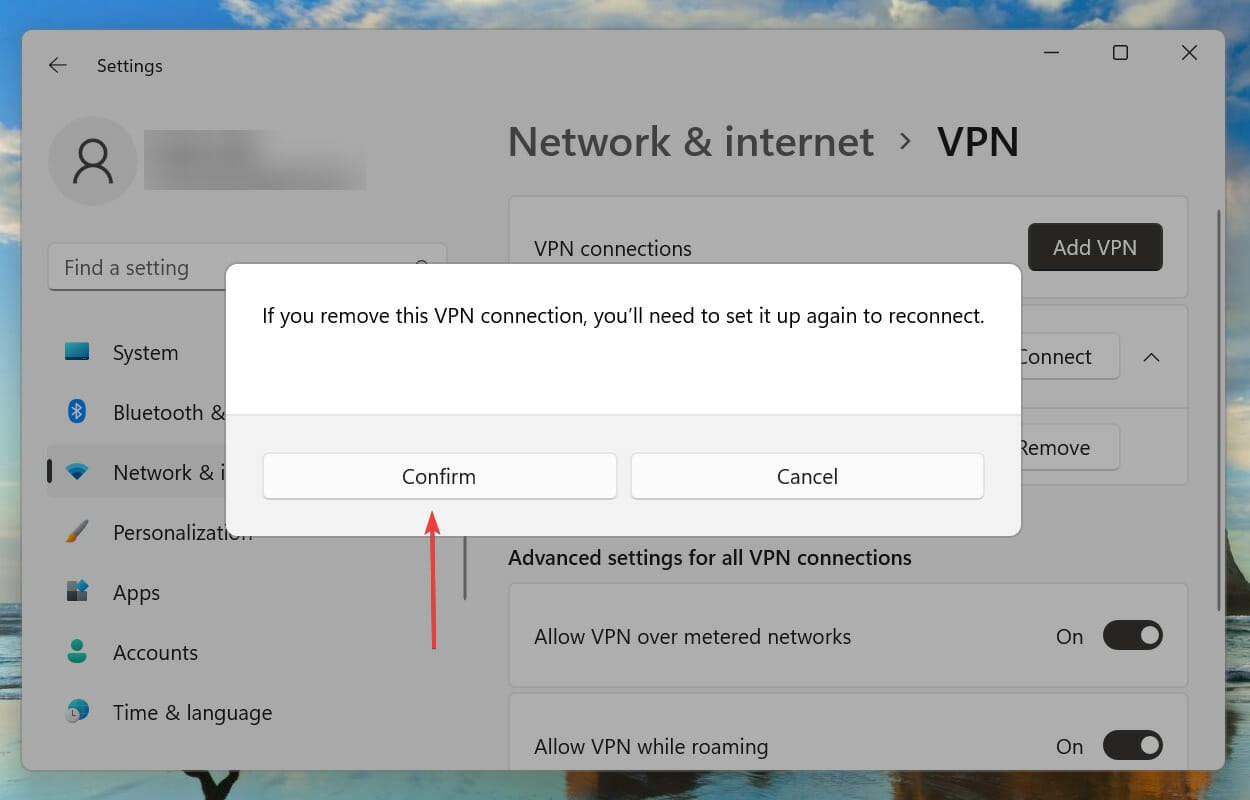
- Next, click on the configured VPN, and select Remove from the options that appear.
- Click Confirm on the pop up.
7. Enable .Net Framework 3.5
- Press Windows + R to launch the Run command. Type appwiz.cpl in the text field, and click on OK or hit Enter to launch the Programs and Features window.
- Click on Turn Windows features on or off from the left.
- Now, tick the checkbox for .Net Framework 3.5 (includes .Net 2.0 and 3.0), and click on OK to save the changes.
- If required, follow the on-screen instructions to download the relevant files.

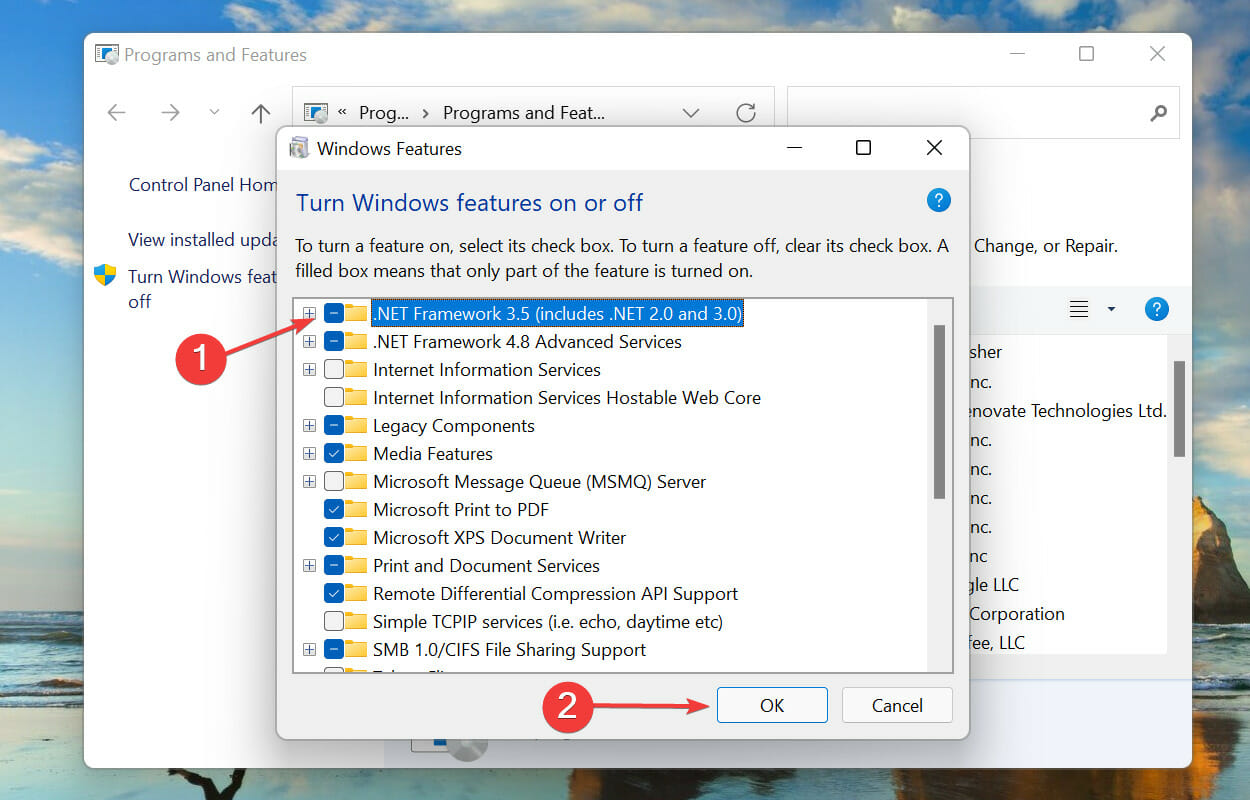
Now, restart the computer and check if the 0x800f0831 install error is fixed.
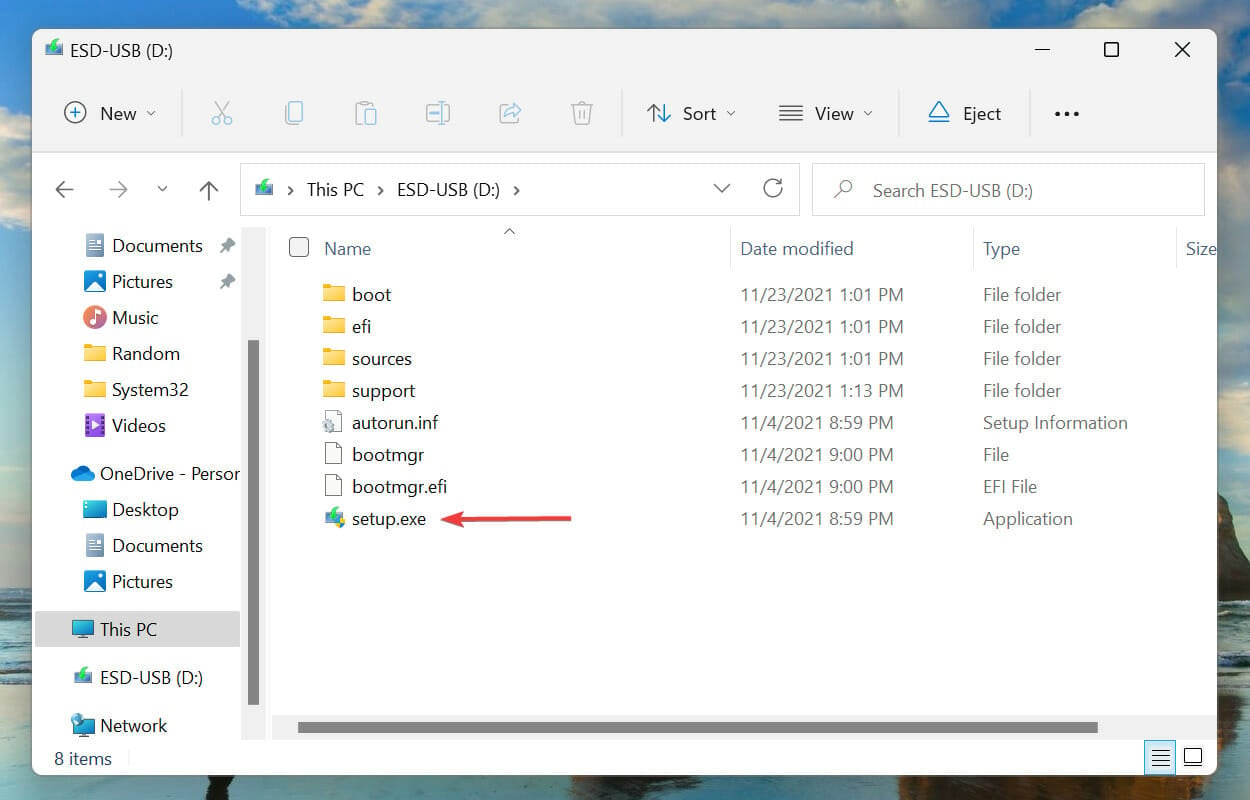
8. Perform an in-place upgrade to repair Windows
- Create a bootable USB drive for Windows.
- Connect the USB drive and double-click on it in the File Explorer to view its contents.
- Double-click on the setup.exe file.
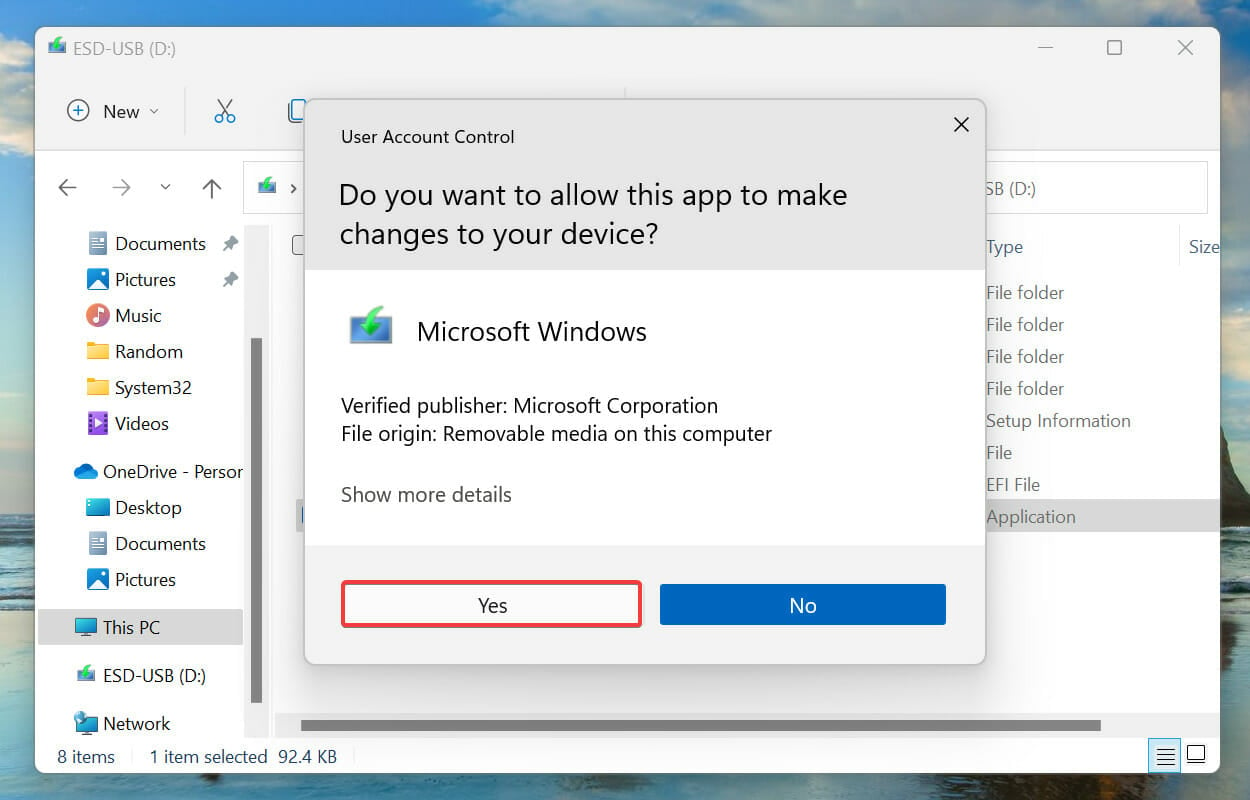
- Click Yes on the UAC (User Account Control) prompt that pops up.
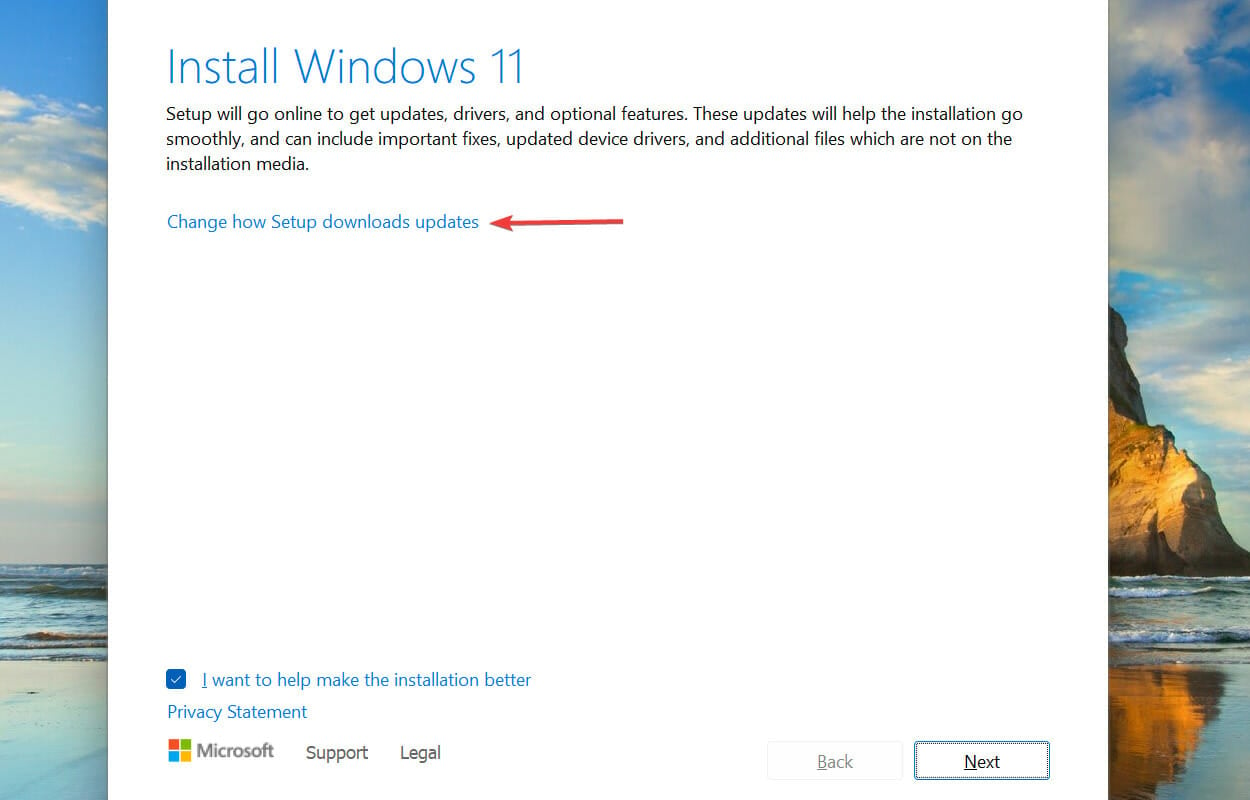
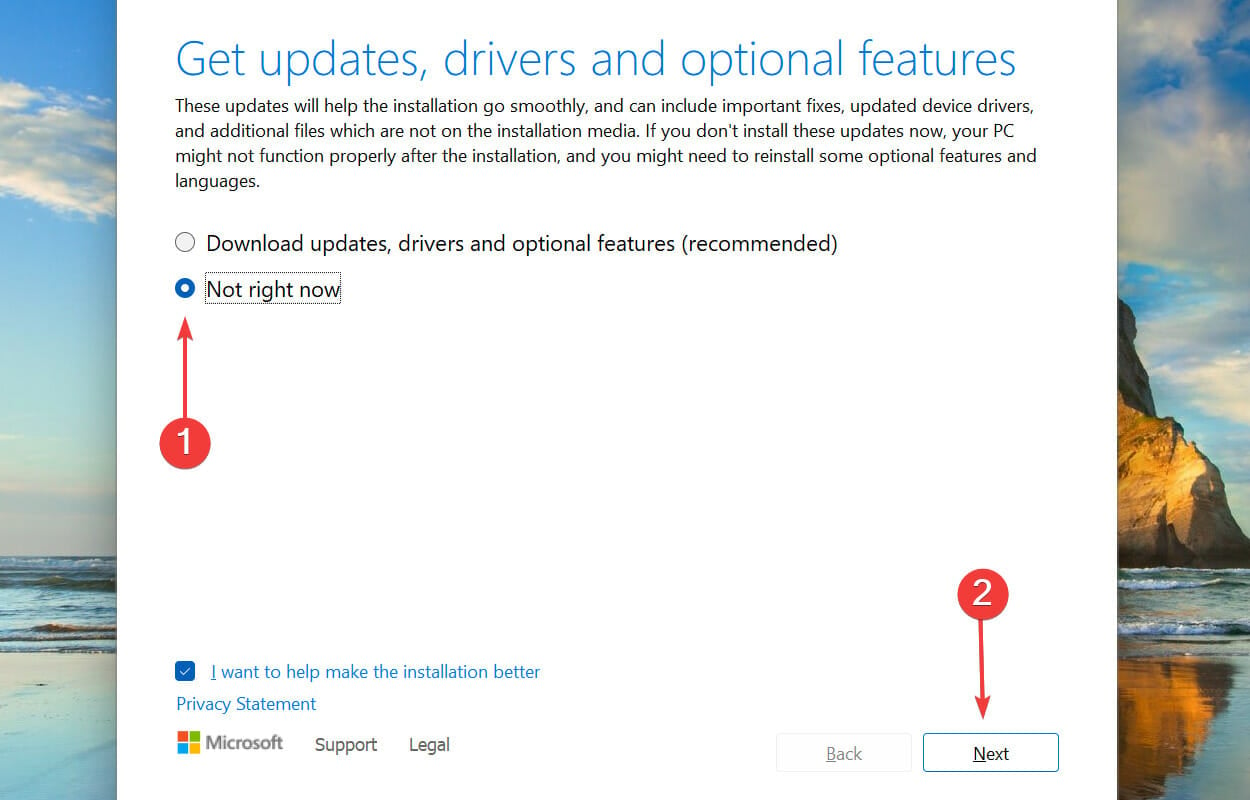
- Then, click on Change how Setup downloads updates.
- Select the Not right now option and click on Next. We choose this option to keep the repair process as straighfortward as possible.
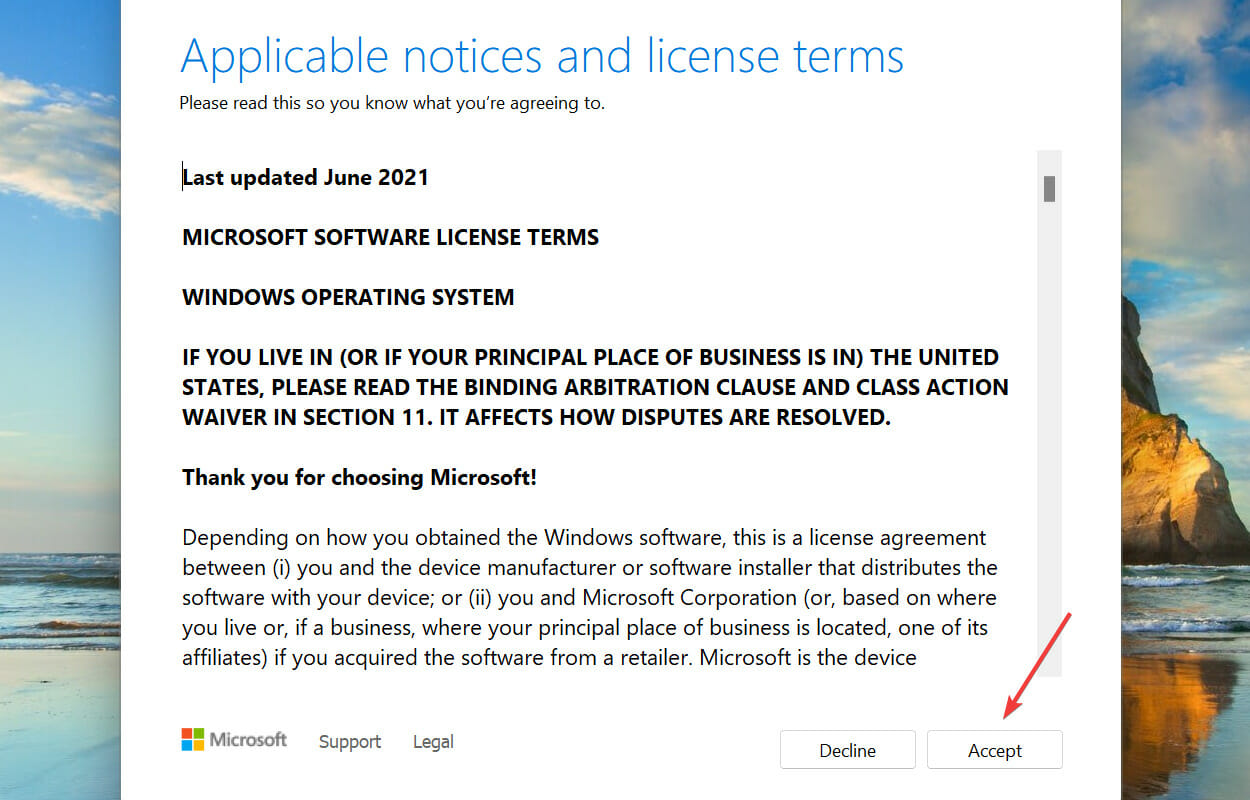
- Click on Accept.
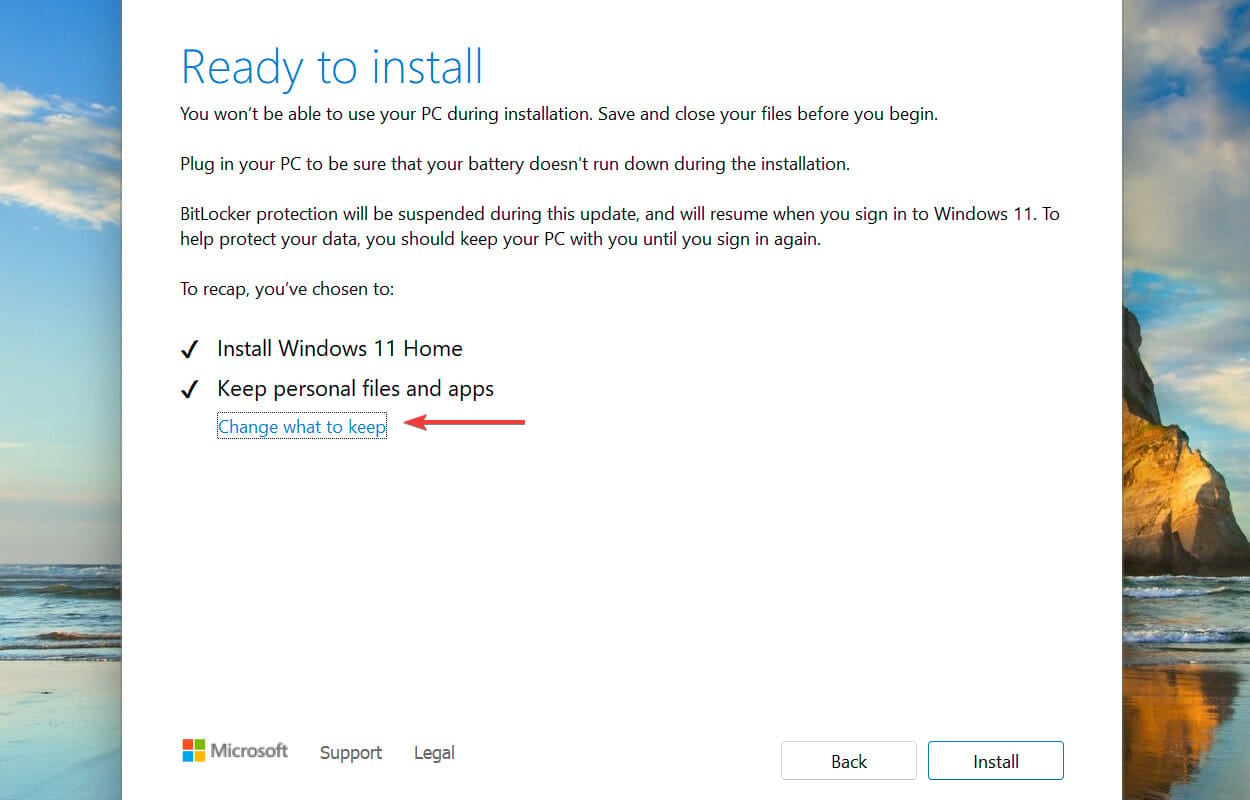
- Click on Change what to keep.
- Select Keep personal files and apps and click on Next.
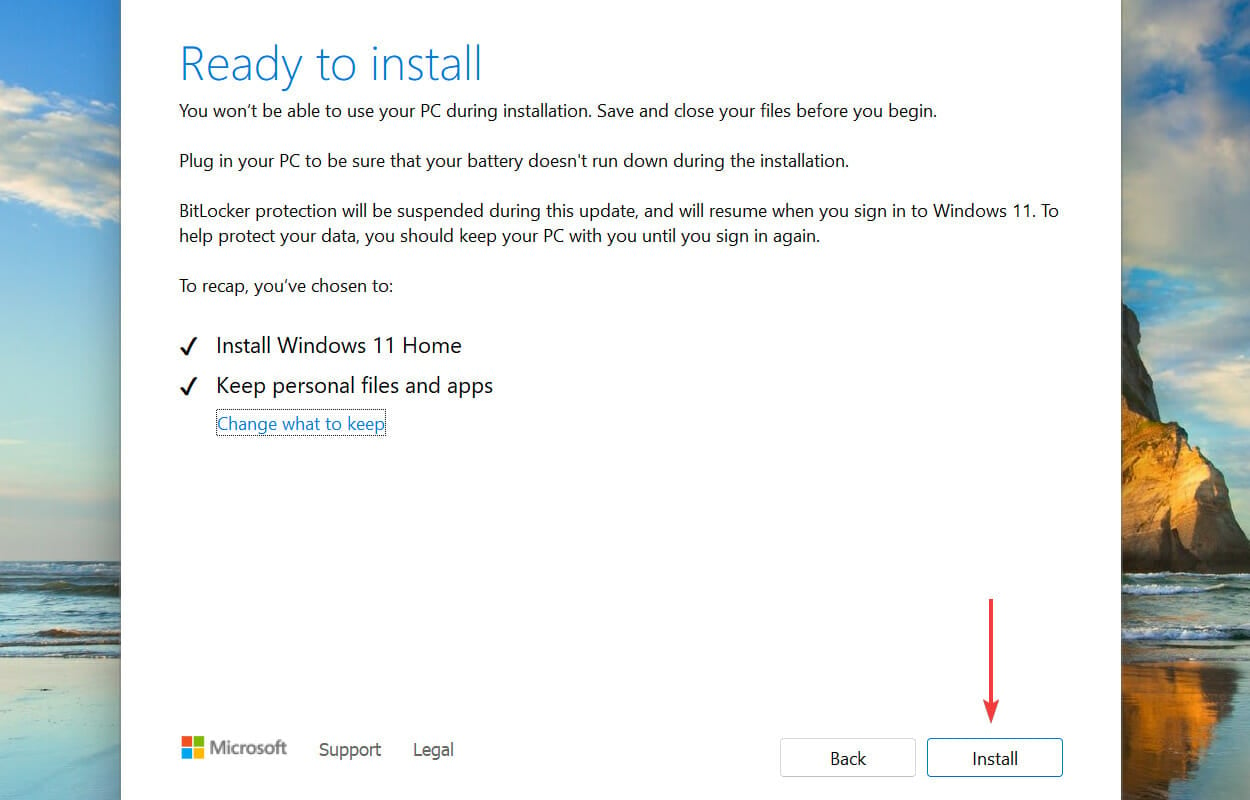
- Finally, click on Install to start the process.

We also have a dedicated guide on how to fix the 0x800f0831 install error in Windows 11 that you can check out for more info.
Are there other Windows 11 installation errors?
There are various installation issues, apart from 0x800f0831, in Windows 11. To help you fix these, we have a dedicated set of guides that you should know about.
For example, learn how to fix Windows 11 installation error 0xc1900101 or what to do if the Windows 11 installation has failed.
Also, note that there are a few elements that need to be set up properly before starting the OS upgrade process, or else you risk getting an error saying Windows 11 update stuck at 100%.
As you can see, if you ever encounter an installer error, just find the relevant guide, and get your system back up and running in no time.
That’s all there is to the 0x800f0831 installer error in Windows 11, along with the most relevant fixes for it. If these don’t work, you can reset Windows 11 to its factory settings.
Tell us which fix worked and your experience of Windows 11 thus far, in the comments section below.
![]()
With Windows, it is pretty common to encounter random errors from time to time. One such error is error 0x800f0831. It occurs when you try to install or update a specific Windows component or feature. However, the good part is fixing the issue is not as complicated as it may seem.
To help you out, we have mentioned several fixes for the Windows update error 0x800f0831:
| Workable Solutions | Step-by-step Troubleshooting |
|---|---|
| Fix 1. Fix 0x800f0831 Error with DISM Commands | Press Windows Key + X to access Quick Menu. Select Windows Terminal (Admin)…Full steps |
| Fix 2. Run Windows Update Troubleshooter to Fix | Press Windows Key + I to launch Settings. Navigate to System > Troubleshoot > Other…Full steps |
| Fix 3. Reset Windows Update Components with Command Lines | Press Windows Key + X to access the quick menu. Select Windows Terminal (Admin)…Full steps |
| Fix 4. Disable VPN and Antivirus Software to Fix | If you have any VPN running on your Windows PC, turn it off, as it can prevent Windows…Full steps |
| Fix 5. Restart Windows Update Service to Troubleshoot | Press Windows Key + R to launch Run. Type services.msc and Press Enter key. Locate…Full steps |
What Causes Windows Update Error 0x800f0831
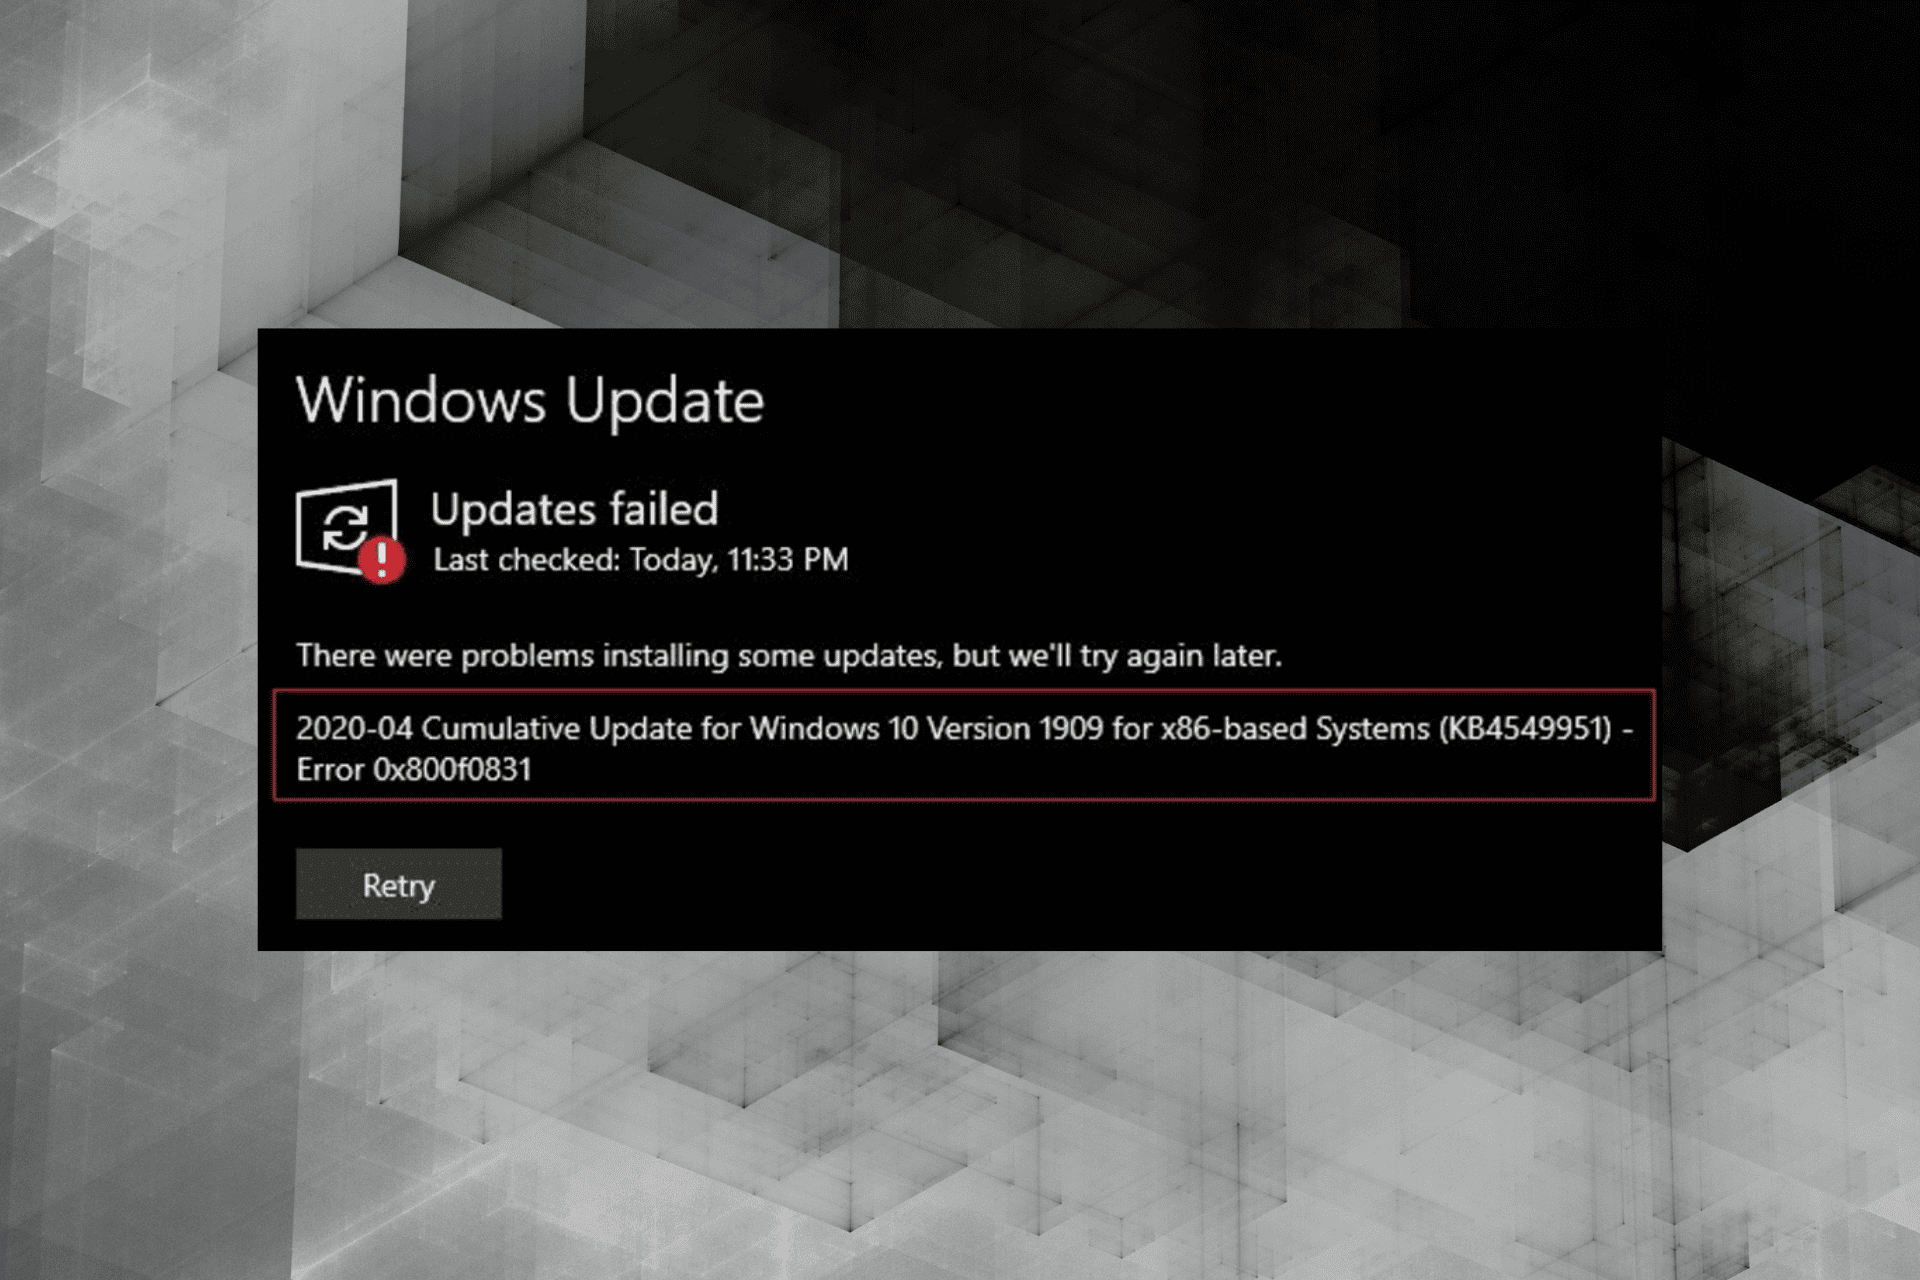
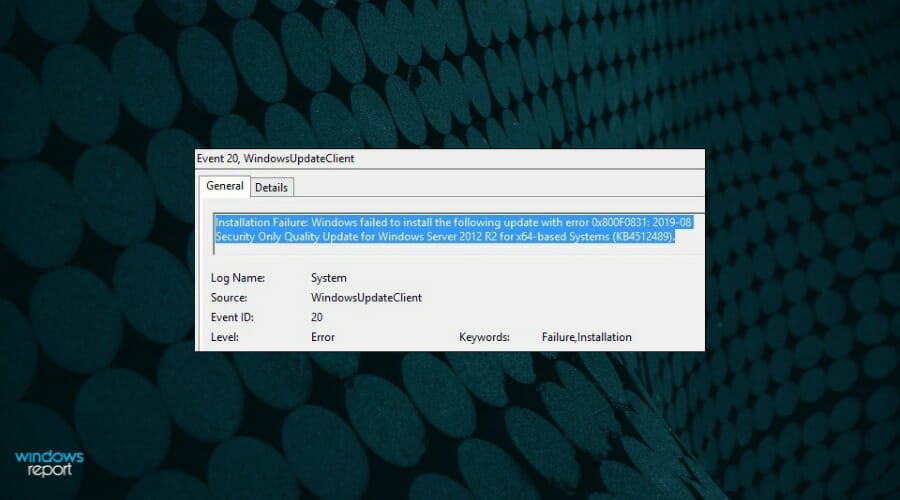
Most commonly, the 0x800f0831 error and other errors like Windows update error 0x80070422 occur when you try to install pending system updates on your Windows computer. Also, it can occur when you are trying to install or update a particular Windows component or feature. You may see an error code like this:
Some of the reasons why the error occurs are:
- 🗂️File Corruption: There is a good chance that some of your System files are corrupted, which is preventing the updates from being installed.
- 📈Update services are disabled: You have probably turned off update services on Windows. As a result, Windows cannot complete any tasks related to Windows updates.
- 📶VPN: If you are using a VPN, then there is a chance that it is blocking the protocols used by Windows Update to download and install the latest updates. Also, in a similar way, the culprit can be any security software installed on your computer.
After learning the causes of Windows update error 0x800f0831, you can keep reading to learn five detailed methods.
- Tip
- To avoid unnecessary data loss, you may need to back up essential files or download EaseUS Data Recovery Wizard to recover lost files in Windows.
How to Fix Windows Update Error 0x800f0831
Now that you know what can be the causes behind the Error 0x800f0831 code, let’s now talk about the solutions.
If you need video help, check the video below to eliminate the Error 0x800f0831. Here are some essential timestamps to help you navigate quicker:
- 00:20 Disable Proxy Services
- 00:47 Restart Background intelligent transfer services
- 01:33 Advanced services
Fix 1. Fix 0x800f0831 Error with DISM Commands
First, you can give a try to DISM commands. DISM stands for Deployment Image Servicing and Management. It’s a built-in Windows tool that can modify and repair Windows 11 system images.
And since the 0x800f0831 error mostly occurs because of corrupted system files, running DISM will help you fix those corrupted files. To run DISM, follow the below steps:
Step 1. Press Windows Key + X to access Quick Menu.
Step 2. Select Windows Terminal (Admin).
Step 3. Now run the SFC Sacannow command (sfc /scannow), which will scan for critical operating system files that might be having the issues. If the tool finds any problem, it will replace the file with a functional cached counterpart.
Step 4. If the SFC scan fails to fix the problem, do run the DISM tool to repair System image files. You should type in DISM /Online /Cleanup-Image /RestoreHealth.

Step 5. Once you are done running both the commands, try running the Windows update and see if it worked. If the problem is solved, don’t hesitate to share this method with your friends!
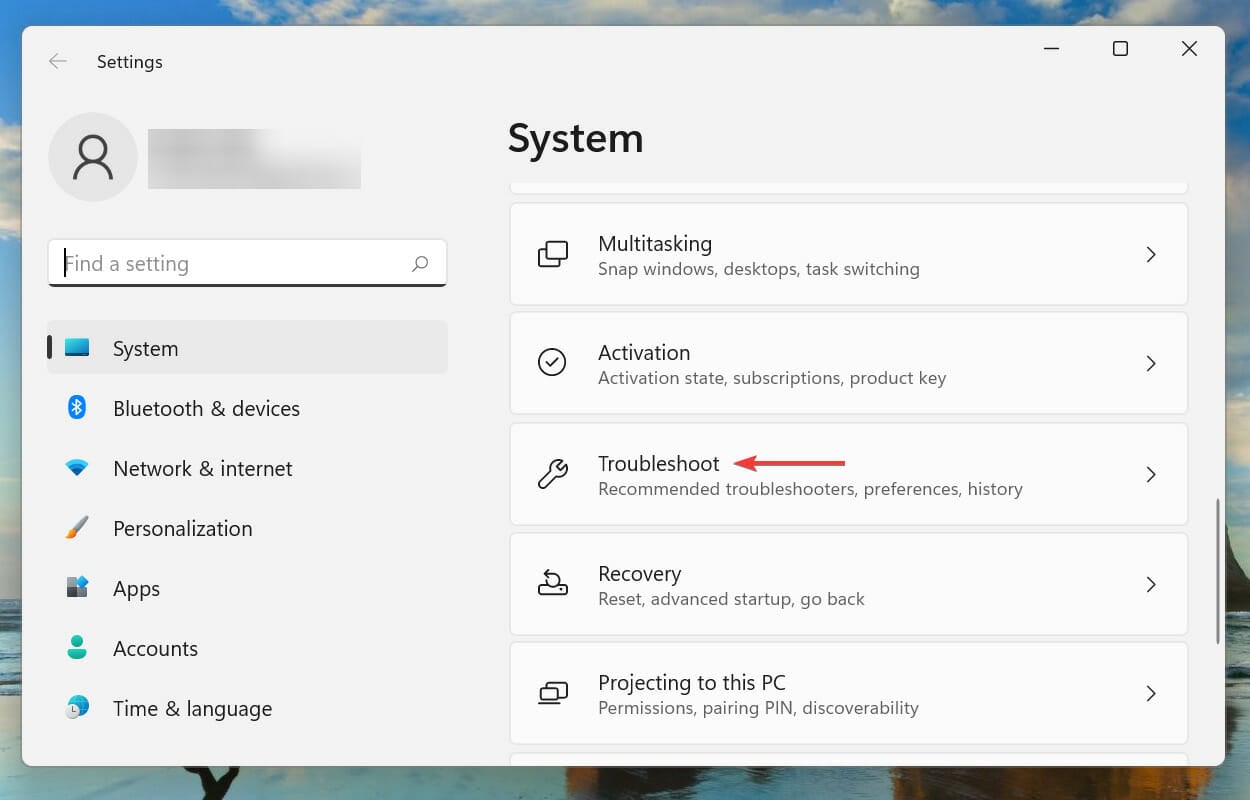
Fix 2. Run Windows Update Troubleshooter
Apart from DISM, you can also consider running Windows Update troubleshooter. In Windows, the Troubleshooter tool is designed to automatically diagnose and resolve common issues related to various areas of the operating system. To run it, follow these steps:
Step 1. Press Windows Key + I to launch Settings.
Step 2. Navigate to System > Troubleshoot > Other troubleshooters.
Step 3. Click the Run button next to Windows update troubleshoot and follow the onscreen steps.
Step 4. Once the Troubleshooter completes its job, try running the Windows update and see if you are still facing the same error. If the Windows Update Troubleshooter is not working, try to fix the problem with the methods in this passage:

Windows Update Troubleshooter Not Working in Windows 10/11
Windows Update Troubleshooter is one of the most intriguing utilities in a Windows PC. But, when that stops working, users face extra issues. Read more >>
Fix 3. Reset Windows Update Components with Command Lines
Resetting Windows Update components is another way to fix any update-related issues on Windows.
When you reset the Windows update component, you stop the Windows update services, rename specific folders, and restart the service.
This helps in recreating the necessary components from scratch. So in case there is any corrupted file inside the Windows update component that is causing the issue, it will get fixed.
To reset Windows Update components, go through the below steps:
Step 1. Press Windows Key + X to access the quick menu.
Step 2. Select Windows Terminal (Admin).
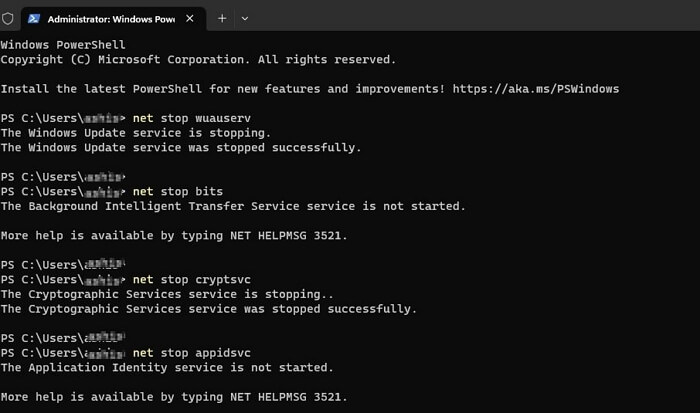
Step 3. Now run the below commands one by one to stop the Windows update service, Cryptographic service, and BITS from running:
net stop wuauserv
net stop bits
net stop cryptsvc
net stop appidsvc
Step 4. Next, type in and run Del «%ALLUSERSPROFILE%\Application Data\Microsoft\Network\Downloader\*.*» to delete all the qmgr*.dat files created by BITS on your PC.
Step 5. Now, you must rename the SoftwareDistribution and catroot2 folder. You can do so by running these two commands one by one:
Ren %systemroot%\SoftwareDistribution SoftwareDistribution.bak
Ren %systemroot%\system32\catroot2 catroot2.bak
Step 6. Now you need to run the below commands one by one to reset the BITS and Windows update service to the default security descriptor:
sc.exe sdset bits D:(A;;CCLCSWRPWPDTLOCRRC;;;SY)(A;;CCDCLCSWRPWPDTLOCRSDRCWDWO;;;BA)(A;;CCLCSWLOCRRC;;;AU)(A;;CCLCSWRPWPDTLOCRRC;;;PU)
sc.exe sdset wuauserv D:(A;;CCLCSWRPWPDTLOCRRC;;;SY)(A;;CCDCLCSWRPWPDTLOCRSDRCWDWO;;;BA)(A;;CCLCSWLOCRRC;;;AU)(A;;CCLCSWRPWPDTLOCRRC;;;PU)
Step 7. Next, type in cd /d %windir%\system32.
Step 8. Next, you need to re-register the BITS files and Windows update-related DLL files. For this, run the below commands one by one:
Step 9. Now you have to reset Winsock, so use Windows Terminal to type in and run netsh winsock reset.
Step 10. Finally, you need to restart all the services we have disabled in the first step by running the below commands one by one:
net start bits
net start wuauserv
net start appidsvc
net start cryptsvc
To help you memorize the command lines, you can share this passage on social media.
Fix 4. Disable VPN and Antivirus Software
If you have any VPN running on your Windows PC, turn it off, as it can prevent Windows from reaching its servers and downloading necessary update files.
Apart from VPN, you should also turn off any security software like antivirus on your PC, as antivirus is known for interfering with the Windows update process and preventing updates from being installed. Also, it can prevent any of the Windows updates background processes from running.

So disable VPN and antivirus if you have these installed and are in use, and then try running a Windows update and see if it resolves the error for you.
Fix 5. Restart Windows Update Service
In the end, you can try restarting the Windows update service. Restarting the Windows Update service can resolve various issues related to the Windows Update process. When you restart the service, it stops and restarts the components responsible for managing Windows updates.
To restart the service, follow these steps:
Step 1. Press Windows Key + R to launch Run.
Step 2. Type services.msc and Press Enter key.
Step 3. Locate and double-click on Windows update services.
Step 4. Next, set the Startup type to Automatic.
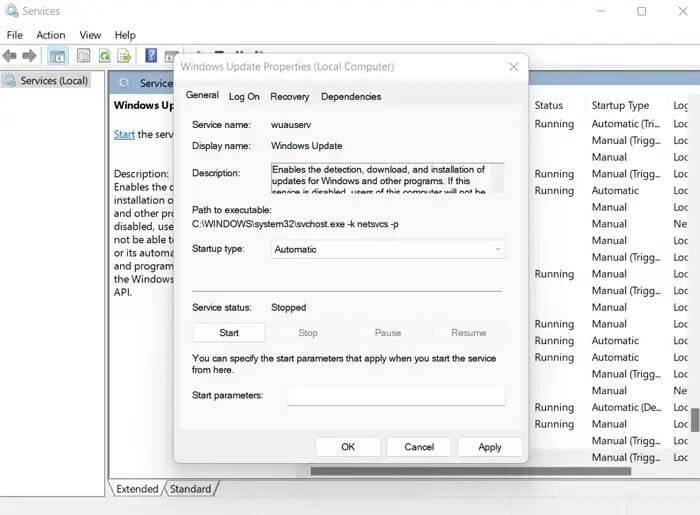
Step 5. Finally, click on the Start button and click on Apply > OK.
The above methods should help you get rid of the error. If it did help you out, make sure to share the post with others through your social media.
Restore Lost Files with Recovery Software After Windows Update
Many users would go on the hard way and reset their Windows, which helps fix the Error 0x800f0831 or Windows update error 0x80080005. However, it also results in data losses.
If you have lost any files while following the above fixes or reinstalled Windows and faced data loss, then you should try the EaseUS Data Recovery Wizard software. How to get a trial version of this software? Clicking the following button will start downloading EaseUS Data Recovery Wizard right away.
The EaseUS Data Recovery Wizard is reliable software that can recover deleted files from various storage devices. You can record accidentally deleted documents, format hard drives, system crashes, and recover data from other cases.
Should I Download EaseUS Data Recovery Wizard
Expert’s Rating:
![]() Pros
Pros
- Safe and reliable to use this software to recover lost files after Windows 10 update.
- Support most file formats, including MP4, MOV, JPEG, PNG, GIF, DOC, AVI, etc.
- Support various storage devices, and it can recover formatted hard drives.
![]() Cons
Cons
- Can only recover 2GB files for free
- Bit expensive than its competitors
Bottom Line
So that was all for how to fix Windows Update Error 0x800f0831. You can quickly fix the issue by running DISM or resetting the Windows Update component folder. So go ahead and try the methods out and see if they help you.
Also, if you did face any data loss while following the methods, download EaseUS Data Recovery Wizard software to recover your lost data in easy steps. If you are still hesitate to download this software, check the following review to learn more.

Is EaseUS Safe | Is EaseUS Data Recovery Safe
This article will discuss whether EaseUS is safe. EaseUS products are 100% secure and reliable. Read more >>
Windows Update Error 0x800f0831 FAQs
Now let’s look at some of the commonly asked questions related to Error 0x800f0831:
1. What are the differences between Windows update errors 0x80240034 and 0x800f0831?
The Windows update error 0x80240034 usually occurs when there is a problem with the Windows Update service or the update components. Conversely, the error 0x800f0831 refers to a failure in installing or updating a specific Windows component or feature.
2. How to fix error 0x800f0831 on Windows 11?
To fix error 0x800f0831 on Windows 11, you can try running the Windows Update troubleshooter. If you still face the same issue, you can reset the Windows Update components using Command Prompt. Ultimately, you can consider resetting Windows if the issue still exists.
3. What causes error code 0x800f0831?
The error code 0x800f0831 on Windows usually occurs due to issues with installing or updating specific Windows components or features. It can be caused by missing or corrupted files, conflicts with existing software, or problems with the Windows Update service.
4. Why is the Windows update not working?
There are various reasons why Windows updates may not work, such as network connectivity issues, insufficient disk space, corrupted system files, conflicts with antivirus or firewall settings, etc. Also, sometimes, the reason could be anything else you can figure out using the error code.
0x800f0831 — это ошибка Windows 11, с которой можно столкнуться при попытке загрузить и установить новое накопительное обновление в систему. В большинстве случаев пользователи сообщали об этой проблеме при работе с обновлениями KB5008212, KB5005033 или KB5005190. Хотя причина этой конкретной проблемы неоднозначна, собранная информация указывает на то, что она может быть связана с поврежденными/отсутствующими элементами системы, внутренними ошибками или конфликтами, вызванными сторонним программным обеспечением. Что бы это ни было, рекомендуем попробовать каждое решение из руководства ниже, от более простого до более сложного. В какой-то момент одно из них должно окончательно решить проблему.

Скачать средство восстановления Windows
Скачать средство восстановления Windows

Существуют специальные утилиты для восстановления Windows, которые могут решить проблемы, связанные с повреждением реестра, неисправностью файловой системы, нестабильностью драйверов Windows. Мы рекомендуем вам использовать Advanced System Repair Pro для исправления «Ошибка Центра обновления Windows 0x800f0831» в Windows 11, Windows 10, Windows 8, Windows 7, Vista или XP.
1. Воспользуйтесь средством устранения неполадок Центра обновления Windows
Встроенные функции устранения неполадок Windows, которые часто считаются неэффективными, иногда все же могут решить проблемы с обновлениями. В Windows есть собственный набор утилит для устранения неполадок, предназначенных для поиска и устранения существующих проблем в различных областях системы. Вы можете воспользоваться им для обнаружения и исправления проблем с обновлением. Вот что вы можете сделать:
- Открытые Настройки из нижней панели задач.
- Выберите Система слева и перейдите в Устранение неполадок > Другие средства устранения неполадок на правой панели.
- Затем найдите Центр обновления Windows и нажмите Run рядом с ним.
- Завершите процесс, следуя инструкциям на экране, и перезагрузите компьютер.
После этого попробуйте выполнить обновление еще раз. Если это не сработает, попробуйте другие решения ниже.
2. Проверьте целостность системных файлов.
Как было сказано выше, одной из причин возникновения таких ошибок является отсутствие в системе важных файлов. Мы рекомендуем использовать утилиты SFC (System File Checker) и DISM (Deployment Image Servicing and Management) для обнаружения и восстановления отсутствующих компонентов, если таковые имеются. Обязательно попробуйте обе утилиты, так как они могут по-разному влиять на решение проблемы. Вот как:
С помощью SFC
- Открытые Командная строка , введя
cmdв поиск рядом с Меню Пуск кнопку. - Щелкните правой кнопкой мыши по Командная строка , а затем выбрать Запуск от имени администратора.
- После открытия консоли введите
sfc /scannowкоманду и нажмите Enter. - Когда процесс восстановления будет завершен, перезагрузите компьютер.
С помощью DISM
- Открытые Командная строка как мы это делали на предыдущем шаге.
- Скопируйте и вставьте эту команду
DISM.exe /Online /Cleanup-image /Restorehealth. - Нажмите Enter и подождите, пока Windows закончит сканирование и исправление.
- После этого перезагрузите компьютер и попробуйте открыть проблемную программу снова.
После выполнения обоих этих сканирований попробуйте снова установить обновление.
3. Включите Чистый запуск Windows.
Возможно, какое-то стороннее ПО вызывает конфликт с вашей системой. Если вы не знаете, что бы это могло быть, то можно войти в так называемый режим чистой загрузки. Этот режим позволяет пользователям загружать свою систему только со встроенными службами и приложениями, чтобы предотвратить проблемы несовместимости. В результате это позволит узнать, действительно ли проблема связана со сторонним программным обеспечением или нет. Если вы уже подозреваете, что какое-то стороннее приложение (возможно недавно установленное) является причиной проблемы, попробуйте отключить или полностью удалить его. В противном случае выполните шаги, чтобы войти в режим чистой загрузки:
- Нажмите Windows Key + R кнопки одновременно и вставьте
msconfig. - Затем в открывшемся окне перейдите в Услуги сверху.
- Установите флажок рядом с Не отображать службы Майкрософт и нажмите на Отключить все кнопку.
- Теперь перейдите в Общие и выберите Выборочный запуск вариант. Удостоверься что Загружать системные службы и Загружать элементы автозагрузки выбраны.
- Нажмите Применить и OK. Затем перезагрузите компьютер.
Теперь вы можете попробовать обновить систему, находясь в режиме чистой загрузки. Вне зависимости от того, удалось вам добиться того, что хотели, следует вернуть Windows к настройкам обычного запуска. Для этого просто повторите все шаги, которые вы выполнили выше, включив отключенные службы и изменив параметр запуска с Выборочный запуск в нормальная.
4. Сбросьте компоненты Центра обновления Windows.
Вы также можете попробовать сбросить настройки Центра обновления Windows. Статистически этот метод доказал свою эффективность при решении широкого круга проблем с обновлением. Вся процедура включает перезапуск служб BITS, Cryptographic, MSI Installer и Windows Update, а также переименование некоторых папок обновлений (SoftwareDistribution и Catroot2). Эти папки содержат временные файлы, необходимые для реализации обновлений Windows. Исходя из этого, мы заставим Windows удалить поврежденные элементы и создать компоненты, связанные с обновлением, с нуля. Ниже мы покажем два способа выполнения этого метода. Первый требует ввода и выполнения каждой консольной команды в последовательности вручную. Другой делается с помощью так называемого пакетного сценария, написанного в Блокноте и сохраненного как WUReset.bat. Нет никакой реальной разницы в том, какой из них вы выберете. Хоть вся процедура и может показаться немного сложной, она не потребует у вас слишком много времени и знаний. Просто следуйте последовательности шагов, указанной ниже:
Вручную
- Открытые Командная строка , введя
cmdв поле поиска рядом с Меню Пуск кнопку. - Щелкните правой кнопкой мыши по Командная строка , а затем выбрать Запуск от имени администратора.
- Скопируйте и вставьте этот список команд одну за другой, нажимая Enter после каждой. (Это действие отключит службы, ответственные за Обновления Windows)
- Затем мы должны переименовать вышеупомянутые папки. Просто вставьте эти команды, нажимая Enter после каждой.
- Наконец, все, что осталось сделать, это вернуть отключенные службы. Введите эти команды так же, как мы делали ранее.
- На этом все. Перейдите в центр обновления Windows и попробуйте выполнить установку снова.
net stop wuauserv

net stop cryptSvc

net stop bits

net stop msiserver
ren C:\Windows\SoftwareDistribution SoftwareDistribution.old

ren C:\Windows\System32\catroot2 Catroot2.old
net start wuauserv

net start cryptSvc

net start bits

net start msiserver
С помощью Пакетного файла
Это альтернативный метод вышеописанному. Пакетный сценарий используется для выполнения того же набора команд для сброса всех компонентов Центра обновления Windows, служб шифрования и папок, таких как SoftwareDistribution. Это не так сложно, как может показаться на первый взгляд — даже проще, чем предыдущий способ. Все, что вам нужно, это Блокнот Windows и немного магии копирования-вставки. Пакетные сценарии лучше ручного ввода тем, что позволяют выполнять все необходимые команды одновременно. Если вы когда-нибудь столкнетесь с подобными проблемами в будущем, вы можете выполнить уже созданный .bat файл и для сброса компонентов обновления:
- Откройте новый Блокнот . Для этого щелкните правой кнопкой мыши на любую свободную область на рабочем столе, выберите Новая и Текстовый документ.
- Затем вставьте этот список команд в блокнот:
- После вставки всех команд, нажмите Файл > Сохранить как и назовите файл WUReset.bat, Обязательно установите Кодирование в ANSI и сохраните файл в любом месте.
- Наконец, нажмите на файл правой кнопкой мыши и выберите Запуск от имени администратора и наслаждайтесь автоматическим сбросом компонентов обновлений Windows.
@ECHO OFF

echo Simple Script to Reset / Clear Windows Update

echo.

PAUSE

echo.

attrib -h -r -s %windir%system32catroot2

attrib -h -r -s %windir%system32catroot2*.*

net stop wuauserv

net stop CryptSvc

net stop BITS

ren %windir%system32catroot2 catroot2.old

ren %windir%SoftwareDistribution sold.old

ren "%ALLUSERSPROFILE%\Application Data\Microsoft\Network\Downloader" downloader.old

net Start BITS

net start CryptSvc

net start wuauserv

echo.

echo Task completed successfully...

echo.

PAUSE
5. Загрузите конфликтующее обновление из каталога Microsoft.
Если вы все еще хотите, чтобы обновление было установлено и исчезло естественным образом, тогда можно загрузить проблемное обновление из каталога Microsoft и установить его вручную. Для этого просто выполните шаги, перечисленные ниже:
- Открытые Настройки из нижней панели задач.
- Затем перейдите в Центр обновления Windows на левой панели.
- В правой части окна выберите История обновлений.
- После этого найдите и запишите название самого последнего обновления (обычно начинается с «KB» и находится вверху списка).
- Вы также можете узнать это, записав имя неудачного обновления (если оно отображается).
- После этого найдите и загрузите нужное обновление из Microsoft Update Catalog.
6. Используйте Media Creation Tool.
Если по-прежнему нет никаких сигналов в пользу решения проблемы, то наша последняя рекомендация сводится к тому, чтобы попробовать Media Creation Tool — отличную утилиту Microsoft, предназначенную для переустановки Windows, а также выступающую в качестве альтернативного инструмента для получения последних доступных обновлений в обход различных проблем. Следуйте инструкциям ниже:
- Сначала вам нужно скачать утилиту с веб-сайта Microsoft.
- Затем запустите загруженный файл.
- После того, как вы согласитесь с Условиями использования, вам будет предложено два варианта на выбор. Выберите Обновить этот компьютер сейчас.
- Выберите Сохранить личные файлы чтобы они не пострадали.
- Наконец, запустите процесс и дождитесь его завершения.
- Надеемся, этот метод помог вам избавиться от ошибки 0x800f0831.
Итоги
Надеемся, что этих 6 методов или даже меньше было достаточно, чтобы устранить ошибку 0x800f0831 и позволить наконец установить обновление. Если вам нужна помощь в чем-то еще, можете поискать соответствующую статью на нашем сайте, чтобы получить инструкции по решению других проблем или удалению вирусов.