Как удалить неудаляемые обновления, и стоит ли так делать?
Windows давно признаёт тот факт, что некоторые из обновлений могут причинять неудобства для пользователей вплоть до отказа системы, давая возможность «проблемные» обновления удалять. Прямо из специального для этого апплета, вызываемого из строки поиска или Выполнить (WIN + R):
appwiz.cpl
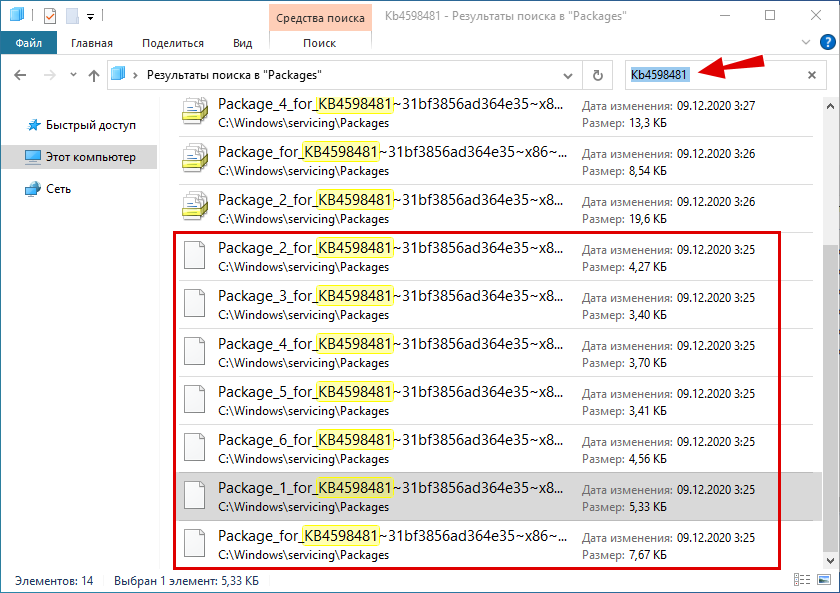
Выберем Просмотр установленных обновлений:
 Вариантов удаления обновлений в Windows немало. Однако некоторые уже успешно установленные в Windows 10 помечаются системой как постоянные и не имеют опции Удаления. Microsoft опубликовала документ на странице, в которой описывается, какие обновления удалить не получится и почему. Но кривоколенный машинный перевод для типичного русскоязычного пользователя малопонятен, и иногда юзер остаётся наедине с проблемой после обновлений. В итоге удаление некоторых обновлений становится невозможным ни через системный апплет, ни через командную строку.


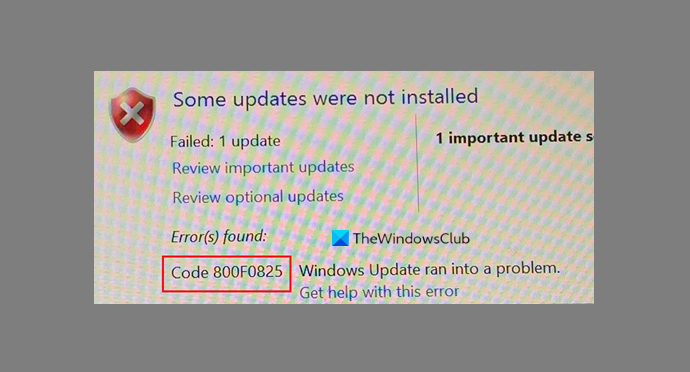
та самая ошибка удаления обновления 0x800f0825
Как проверить установленные обновления?
Подходов к просмотру системный патчей несколько. От общих (в составе другой информации) с помощью команды
systeminfo

и графического (при помощи уже знакомого вам графического апплета) командой
appwiz.cpl

до более подробных:
wmic qfe list brief /format:table

Можно конкретнее:
dism /online /get-packages /format:table

А если «что-то пошло не так»? У вас остаётся только один вариант: надеяться на восстановление системы. Все помнят, что в Windows 10 оно отключено по умолчанию? Далее. Очередная точка восстановления создаётся Windows перед применением всякого важного для системы обновления. И не дай бог восстановление системы не сработает…
Как проверить историю обновлений в Windows? Все способы.
Почему нельзя удалить некоторые обновления?
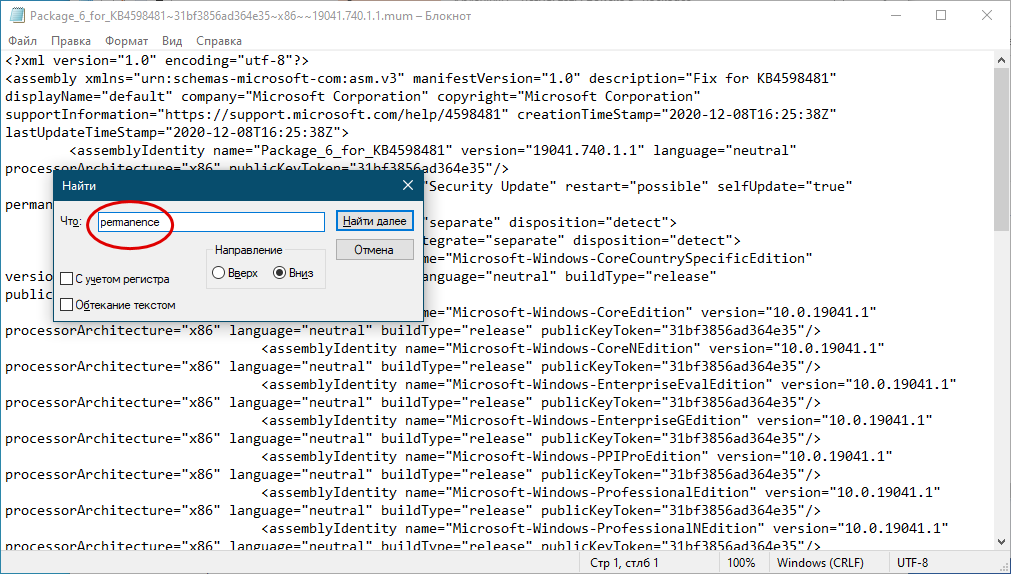
Некоторые из обновлений крайне для Windows необходимы и пронизывают систему насквозь. Они служат опорой для обновлений последующих. Но свойства у всех пакетов абсолютно одинаковые. Равно как и в возможности их удалить. Всё дело (это же Windows) в правах на совершаемые действия. Обновление помечается системой в качестве удаляемого или постоянного прежде всего в части файлов Манифеста (Microsoft Update Manifest) внутри пакетов .msu. Эти файлы с расширением .mum обнаруживаются после удачного обновления по адресу:
C:\Windows\servicing\Packages\
 Это типовые XML-файлы, содержимое которых представляет собой описание обновления (в том числе его KB-номер, языковые условия, запрос на перезагрузку системы после установки и т.п.). В том числе и запись (возможная), что обновление в системе прописалось навсегда:

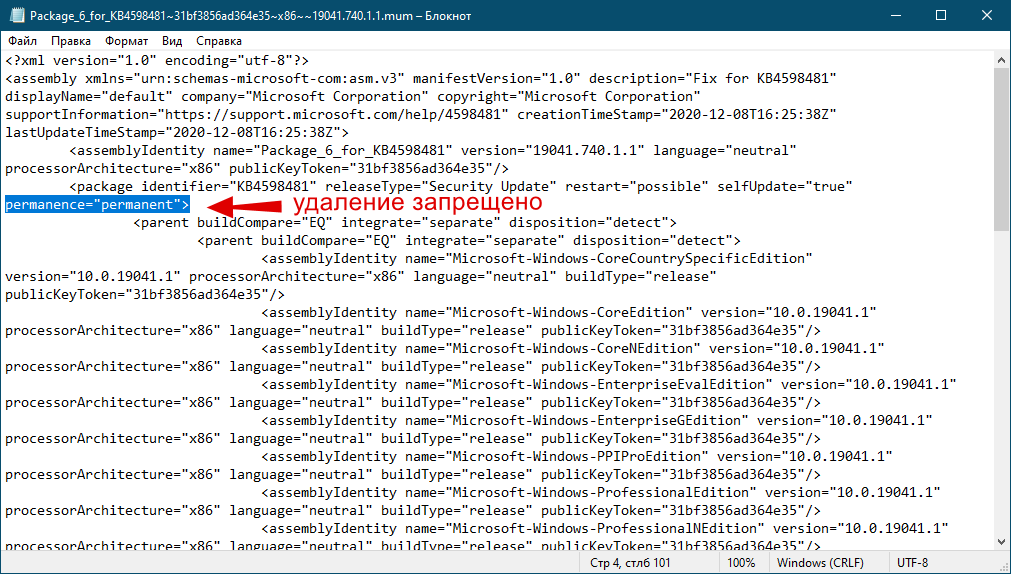
запись permanence=»permanent» и не даёт вам избавиться от обновления
Читаются те легко с помощью любого текстового редактора. Обнаруженный атрибут «permanence=» расскажет о характере пакета. Если в строке он выглядит как permanence=”permanent”, удалить привычным способом обновление не получится. Ежели атрибута вовсе нет или он с пояснением permanence=”removable”, возможностей удалить его у нас больше. Так что отсюда и решение для тех, кто хочет удалить неудаляемые обновления. Однако предостерегаю: независимо от успеха операции с удалением таких патчей, вам лучше сразу продумать вариант отхода, ибо с проблемами обновлений Windows в дальнейшем вы почти ГАРАНТИРОВАНО столкнётесь. Так что логичным завершением всех описанных действий была бы повторная постановка Windows в очередь за обновлениями.
Как удалить неудаляемые обновления?
Ещё раз предлагаю задуматься перед тем, как продолжить. Но, раз уж все инструменты опробованы, а точка восстановления систему с колен не подняла, пробуем удалить неудаляемые обновления. Для этого
- создаём точку восстановления
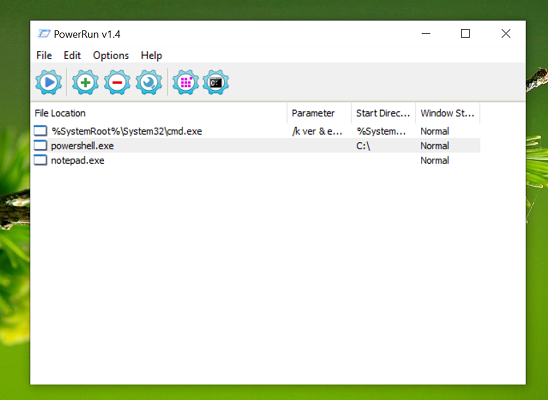
- качаем программу PowerRun, позволяющую запускать приложения от имени System и Trusted Installer (последний-то нам и нужен). Установки не потребует, говорит по-русски. Это — наиболее подходящий для широкого круга пользователей вариант.
- как вы будете искать цель для удаления, нужно было решить ещё до прочтения этой статьи. Наиболее короткий путь — сопоставить даты возникновения проблемы с Windows и установкой обновлений:

- в отдельном окне проводника группируем обновления в указанной папке по имени, обнаружив все файлы, принадлежащие выбранному пакету; для облегчения задачи воспользуйтесь поиском по имени:

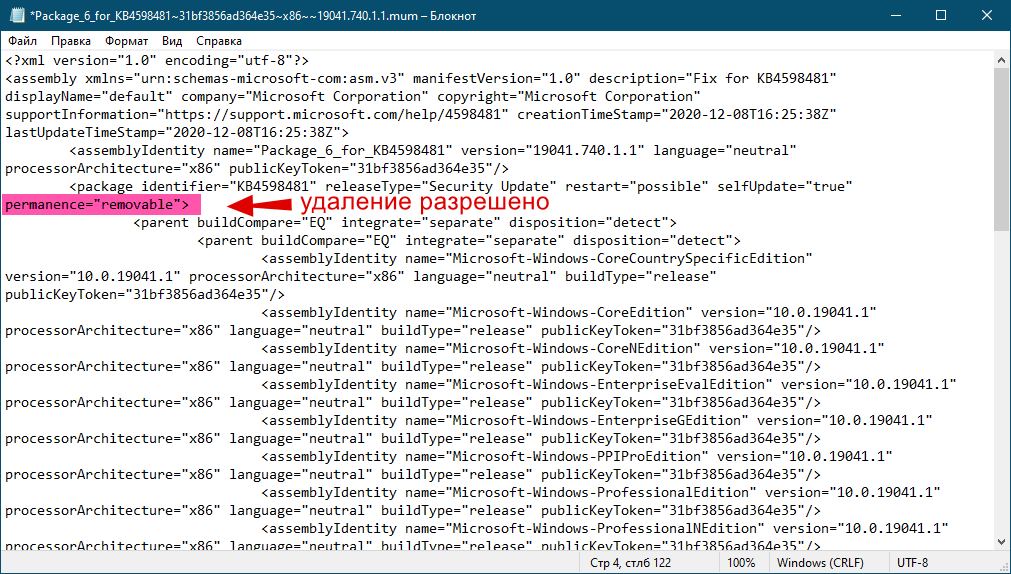
- открываем каждый файл mum Блокнотом (notepad.exe) из PowerRun и подменяем части permanence=”permanent” на permanence=”removable”;

нажмите, чтобы увеличить
- делаем это для всех XML-файлов, связанных с пакетом. Обратите внимание на дату изменения файла: она должна соответствовать дате изменений, проделанных вами же.
- сразу запускаем консоль cmd от имени администратора с командой проверки системных файлов
sfc /scannow
Запускаем повторно апплет Windows
appwiz.cpl
с переходом на обновления. Кнопка Удалить должна появиться:

Успехов.
by Tashreef Shareef
Tashreef Shareef is a software developer turned tech writer. He discovered his interest in technology after reading a tech magazine accidentally. Now he writes about everything tech from… read more
Published on March 25, 2021
- The 0x800f0825 permanent package cannot be uninstalled error usually occurs due to a corrupted Windows update.
- If you are unable to uninstall package KB5000802 Windows update, try modifying the .mum file.
- Alternatively, use an existing restore point to restore your PC to an earlier point.
- To see how to uninstall uninstallable Windows updates, be sure to closely follow the solutions from this guide.

Windows may install a corrupted update package when updating your system. When you try to uninstall the update, you may encounter the 0x800f0825 permanent package cannot be uninstalled error.
This error usually occurs when you manually try to remove an update using the Command Prompt or from the Control Panel. You may not be able to uninstall this update because of a component cleanup that has occurred.
To fix the error, you may have to enable the uninstall feature by modifying the update file manually. We have a few more troubleshooting steps to help you resolve this error below.
How do I fix the 0x800f0825 package cannot be uninstalled?
1. Perform a System Restore
- Press the Windows key and type system restore.
- Click on Create a Restore Point.

- Click the System Restore button.
- Choose Next.

- Choose the most recent restore point available.
- Click Next.
- Read the description and then click Finish.

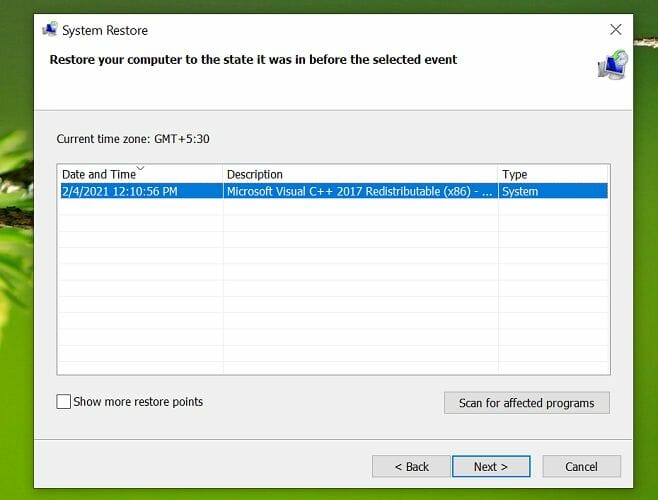
Wait for Windows to restore your PC to the selected point. After the restart, open the Control Panel and check if the 0x800f0825 permanent package cannot be uninstalled error is resolved.
2. Make the update removable
- Download PowerRun from the official website. Unpack the zip archive to a local folder.
- Launch PowerRun. Click Run if prompted by UAC.

- Right-click on Notepad.exe and choose Run File in the PowerRun window.
- In the Notepad window, click File and choose Open. Set file Filter to all files.

- Next, navigate to the following path using the Open window:
C:WindowsservicingPackages - In the search field, enter the update code that you are trying to uninstall. For example, enter KB5000802.mum.
- Note that we need to find all the .mum files associated with the update. You may see more than one .mum file for the same update.
- Select the first .mum file and click Open.
- Press Ctrl + F to open the Find dialogue box. Enter permanency=”permanent” in the field and click Next.
- Once you locate permanency=”permanent”, change it to permanency=”removable”.
- Click Ctrl + S to save the changes. Click Yes if prompted by UAC again.
- Repeat the steps of changing permanency=”permanent” to permanency=”removable” for all the .mum files associated with the KB update you are trying to uninstall.

Once you have made the changes to KB Update files, you can uninstall the KB update causing the error 0x800f0825 permanent package cannot be uninstalled.
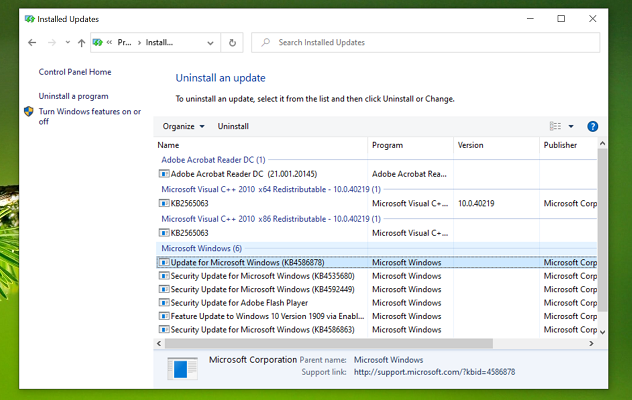
Uninstall the KB Update
- Press the Windows key + R to open Run.
- Type control and click OK to open the Control Panel.
- Click on Uninstall a Program under Programs.

- From the left pane, click on View installed updates.
- Choose the KB update that you want to uninstall and click Uninstall.
- Click Yes to confirm the action when prompted by UAC.
Uninstall update using Command Prompt
- Press the Windows key, type cmd, and click on Run as Administrator. This will open the Command Prompt as administrator.

- To uninstall the KB Update, enter the following command and hit enter. Make sure to replace the KB update number below with the update that you are trying to uninstall.
wusa /uninstall /kb:KB5000802/quiet /norestart - Wait for the update to uninstall and until you see a success message. Close the Command Prompt window and reinstall the essential updates.

Some PC issues are hard to tackle, especially when it comes to corrupted repositories or missing Windows files. If you are having troubles fixing an error, your system may be partially broken.
We recommend installing Restoro, a tool that will scan your machine and identify what the fault is.
Click here to download and start repairing.
This is an advanced solution, but it will help you fix Windows KB5000802 – Unable to uninstall package error.
3. Run System File Checker
- Press the Windows key, and type cmd.
- Right-click on Command Prompt and choose Run as Administrator.

- In the Command Prompt window, type the following command and hit enter:
Sfc /scannow - The scanning process may take some time, so wait till it is 100% complete.
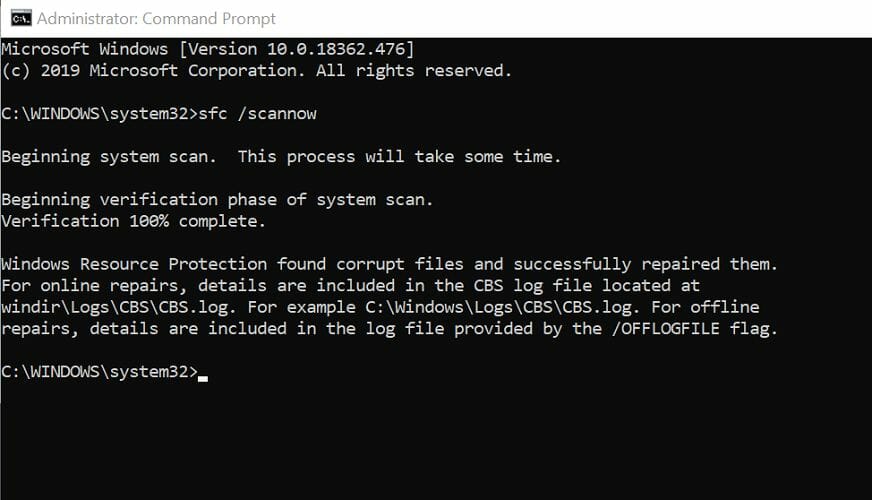
System File Checker tool is a built-in repair tool that scans for missing or corrupted system files and repairs them if required. However, if you are still unable to fix them, try resetting your PC.
4. Go back to the previous version of Windows 10
- Click on Start and choose Settings.
- Click on Update & Security.

- Open the Recovery tab from the left pane.
- Click the Get Started button under Go back to the previous version of the Windows 10 section.

- Follow the on-screen instructions to restore your PC back to the last update.

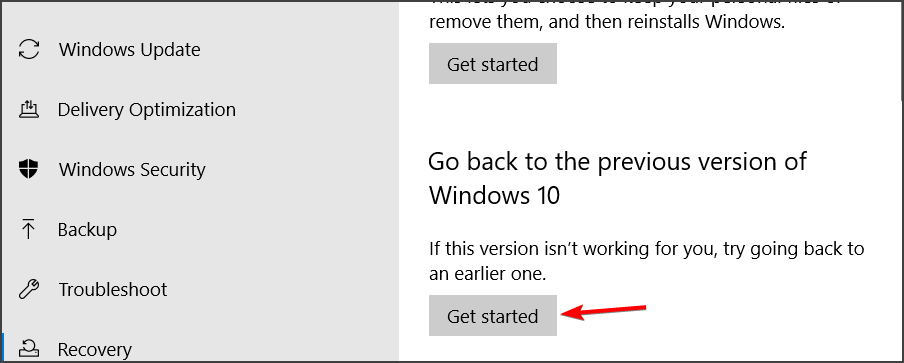
However, this option is only available before 10 days of installing the update. If the Get started button is greyed out, this option is not available for you.
This isn’t the best solution, but it’s a one way to fix Windows 10 package for rollup issue.
5. Refresh or reset your PC
- Press the Windows key + I.
- Go to Update & Security.
- Open the Recovery tab.
- Click the Get Started button under Reset this PC.

- Under Choose an Option, choose to Keep my files. This option will keep your personal files but delete all the installed third-party programs and reinstall Windows.

- Follow on-screen instructions and complete the reset process.


Refreshing or resetting your PC will help you uninstall uninstallable Windows updates. If the error persists, you may have to clean install Windows 10 to resolve the issue.
The 0x800f0825 permanent package cannot be uninstalled usually occurs if you have installed an essential Windows update that is corrupted.
We hope that our guide helped you fix this issue on your PC. If you managed to find the solution on your own, share it with us in the comments section.
![]()
Newsletter
by Tashreef Shareef
Tashreef Shareef is a software developer turned tech writer. He discovered his interest in technology after reading a tech magazine accidentally. Now he writes about everything tech from… read more
Published on March 25, 2021
- The 0x800f0825 permanent package cannot be uninstalled error usually occurs due to a corrupted Windows update.
- If you are unable to uninstall package KB5000802 Windows update, try modifying the .mum file.
- Alternatively, use an existing restore point to restore your PC to an earlier point.
- To see how to uninstall uninstallable Windows updates, be sure to closely follow the solutions from this guide.
Windows may install a corrupted update package when updating your system. When you try to uninstall the update, you may encounter the 0x800f0825 permanent package cannot be uninstalled error.
This error usually occurs when you manually try to remove an update using the Command Prompt or from the Control Panel. You may not be able to uninstall this update because of a component cleanup that has occurred.
To fix the error, you may have to enable the uninstall feature by modifying the update file manually. We have a few more troubleshooting steps to help you resolve this error below.
How do I fix the 0x800f0825 package cannot be uninstalled?
1. Perform a System Restore
- Press the Windows key and type system restore.
- Click on Create a Restore Point.
- Click the System Restore button.
- Choose Next.
- Choose the most recent restore point available.
- Click Next.
- Read the description and then click Finish.
Wait for Windows to restore your PC to the selected point. After the restart, open the Control Panel and check if the 0x800f0825 permanent package cannot be uninstalled error is resolved.
2. Make the update removable
- Download PowerRun from the official website. Unpack the zip archive to a local folder.
- Launch PowerRun. Click Run if prompted by UAC.
- Right-click on Notepad.exe and choose Run File in the PowerRun window.
- In the Notepad window, click File and choose Open. Set file Filter to all files.
- Next, navigate to the following path using the Open window:
C:WindowsservicingPackages - In the search field, enter the update code that you are trying to uninstall. For example, enter KB5000802.mum.
- Note that we need to find all the .mum files associated with the update. You may see more than one .mum file for the same update.
- Select the first .mum file and click Open.
- Press Ctrl + F to open the Find dialogue box. Enter permanency=”permanent” in the field and click Next.
- Once you locate permanency=”permanent”, change it to permanency=”removable”.
- Click Ctrl + S to save the changes. Click Yes if prompted by UAC again.
- Repeat the steps of changing permanency=”permanent” to permanency=”removable” for all the .mum files associated with the KB update you are trying to uninstall.
Once you have made the changes to KB Update files, you can uninstall the KB update causing the error 0x800f0825 permanent package cannot be uninstalled.
Uninstall the KB Update
- Press the Windows key + R to open Run.
- Type control and click OK to open the Control Panel.
- Click on Uninstall a Program under Programs.
- From the left pane, click on View installed updates.
- Choose the KB update that you want to uninstall and click Uninstall.
- Click Yes to confirm the action when prompted by UAC.
Uninstall update using Command Prompt
- Press the Windows key, type cmd, and click on Run as Administrator. This will open the Command Prompt as administrator.
- To uninstall the KB Update, enter the following command and hit enter. Make sure to replace the KB update number below with the update that you are trying to uninstall.
wusa /uninstall /kb:KB5000802/quiet /norestart - Wait for the update to uninstall and until you see a success message. Close the Command Prompt window and reinstall the essential updates.
Some PC issues are hard to tackle, especially when it comes to corrupted repositories or missing Windows files. If you are having troubles fixing an error, your system may be partially broken.
We recommend installing Restoro, a tool that will scan your machine and identify what the fault is.
Click here to download and start repairing.
This is an advanced solution, but it will help you fix Windows KB5000802 – Unable to uninstall package error.
3. Run System File Checker
- Press the Windows key, and type cmd.
- Right-click on Command Prompt and choose Run as Administrator.
- In the Command Prompt window, type the following command and hit enter:
Sfc /scannow - The scanning process may take some time, so wait till it is 100% complete.
System File Checker tool is a built-in repair tool that scans for missing or corrupted system files and repairs them if required. However, if you are still unable to fix them, try resetting your PC.
4. Go back to the previous version of Windows 10
- Click on Start and choose Settings.
- Click on Update & Security.
- Open the Recovery tab from the left pane.
- Click the Get Started button under Go back to the previous version of the Windows 10 section.
- Follow the on-screen instructions to restore your PC back to the last update.
However, this option is only available before 10 days of installing the update. If the Get started button is greyed out, this option is not available for you.
This isn’t the best solution, but it’s a one way to fix Windows 10 package for rollup issue.
5. Refresh or reset your PC
- Press the Windows key + I.
- Go to Update & Security.
- Open the Recovery tab.
- Click the Get Started button under Reset this PC.
- Under Choose an Option, choose to Keep my files. This option will keep your personal files but delete all the installed third-party programs and reinstall Windows.
- Follow on-screen instructions and complete the reset process.
Refreshing or resetting your PC will help you uninstall uninstallable Windows updates. If the error persists, you may have to clean install Windows 10 to resolve the issue.
The 0x800f0825 permanent package cannot be uninstalled usually occurs if you have installed an essential Windows update that is corrupted.
We hope that our guide helped you fix this issue on your PC. If you managed to find the solution on your own, share it with us in the comments section.
![]()
Newsletter
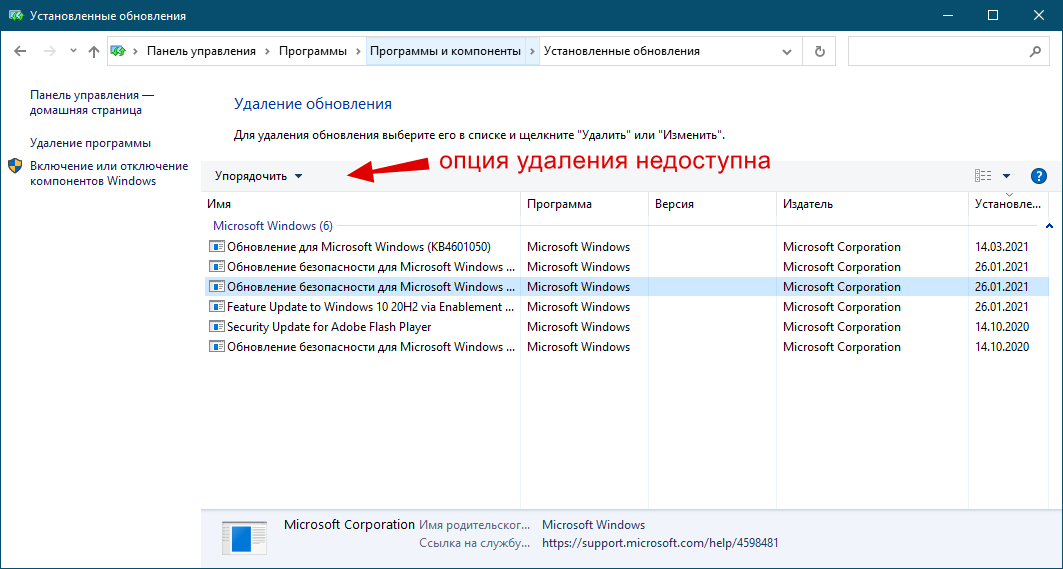
Возникающие после установки накопительных обновлений ошибки в работе Windows не такая уже редкость, с подобными проблемами пользователям приходится сталкиваться едва ли не каждые полгода. В Microsoft предусмотрели возможность удаления апдейтов из интерфейса классического апплета Программы и компоненты -> Просмотр установленных обновлений, но здесь вас может поджидать неприятный сюрприз.
Не все патчи можно удалить таким способом, так как кнопка удаления для них попросту недоступна.
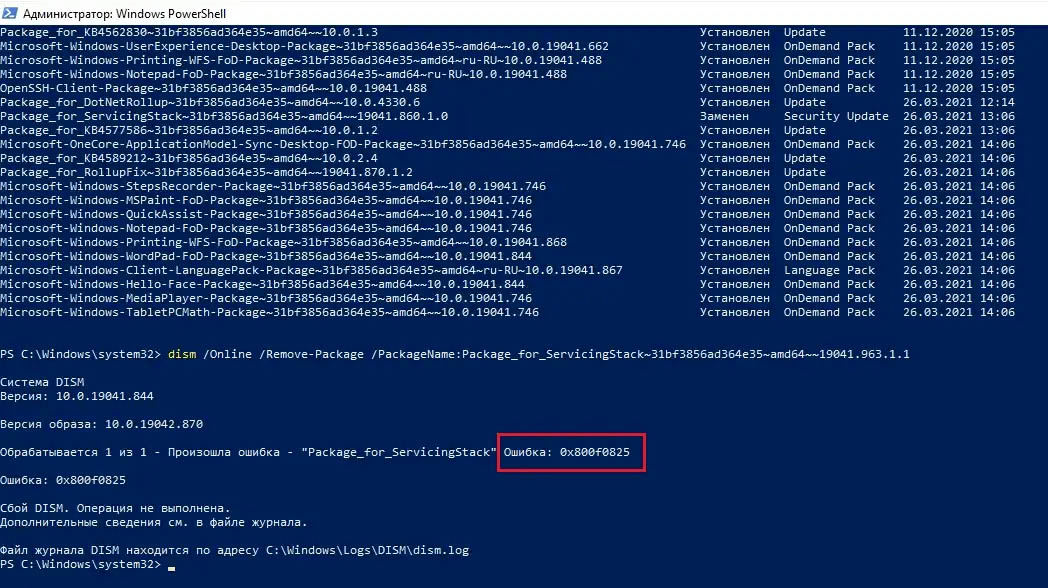
Бессильной оказывается и командная строка, используемая для деинсталляции пакета команда:
dism /online /remove/package
Выдает ошибку 0x800f0825.
Почему так происходит? Некоторые обновления являются более важными, чем другие, например, одни из них закрывают критические уязвимости в системе безопасности, другие сами обеспечивают возможность обновления прочих компонентов операционной системы и тому подобное. Поэтому они помечаются как постоянные или неудаляемые, в то же время как их базовые свойства остаются такими же, как и у прочих пакетов обновлений. То есть удалить их всё же можно. Всё дело в правах, прописанных в MUM-файле манифеста, находящегося внутри пакета обновления MSU.
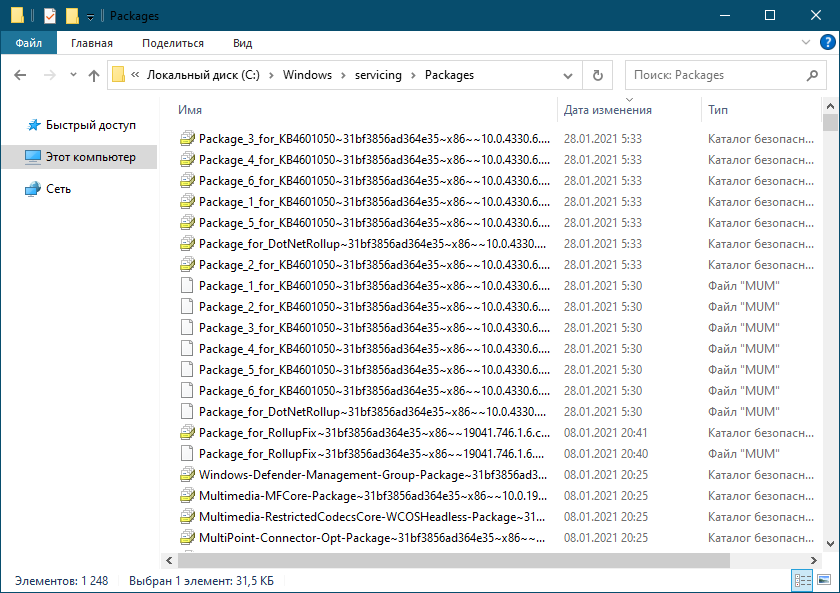
Когда пакет устанавливается в системе, файл манифеста MUM сохраняется в расположение %windir%servicingPackages. Их там может быть сотни, но найти соответствующий проблемному обновлению файл обычно не составляет труда, — в его названии будет указан номер пакета обновления. Не исключено, что версий MUM-файла будет несколько, в этом случае внести указанные ниже изменение нужно во все файлы манифеста, связанные с пакетом обновления.
Редактирование файла манифеста обновления
Файл MUM — этот тот же документ XML, открыть который можно с помощью любого текстового редактора, даже Блокнота.
Открываем файл текстовым редактором, ищем в нем атрибут permanence и смотрим его значение.
Если в качестве значения параметра указано permanent, это знак того, что удаление пакета запрещено.
Если атрибут отсутствует или его значением является removable, значит удаление апдейта возможно.
Соответственно, чтобы включить опцию деинсталляции, нужно заменить значение permanent на removable.
Выполнив эту манипуляцию, запустите апплет «Программы и компоненты» повторно.
Опция «Удаление» для неударяемого обновления должна стать доступной.

Использовать данный метод деинсталляции мы, однако, не рекомендуем без особой нужды.
Если Microsoft сочла нужным пометить обновления как постоянные, значит у нее есть на это все основания. Удаление постоянных пакетов с высокой долей вероятности приведет к проблемам с обновлением системы, поэтому, если вы всё же решитесь на этот трюк, перед проведением манипуляций создайте как минимум точку восстановления, а еще лучше выполните резервное копирование системного тома.
![]() Загрузка…
Загрузка…
Обновления Windows важны по многим причинам. С каждым обновлением вы получаете доступ либо к новым функциям Windows 10, либо ваш компьютер, по крайней мере, становится более безопасным. Однако иногда Windows загружает или устанавливает поврежденный пакет обновления в вашу операционную систему, и когда вы пытаетесь установить или удалить обновление, вы получаете ошибку Центра обновления Windows 0x800F0825. Если вы столкнулись с тем же самым, пожалуйста, прочтите эту статью, чтобы узнать о решении.
0x800f0825 — CBS_E_CANNOT_UNINSTALL — Пакет не может быть удален.
Попробуйте следующие решения, чтобы устранить ошибку Центра обновления Windows 0x800f0825:
- Запустите средство устранения неполадок обновлений Windows
- Очистите содержимое папок SoftwareDistribution и catroot2 и повторите попытку.
- Загрузите пакет обновлений прямо с веб-сайта каталога Microsoft
1]Средство устранения неполадок обновлений Windows
Средство устранения неполадок Центра обновления Windows может быть чрезвычайно полезным при решении и проверке проблем, связанных с обновлениями Windows. Выполните следующие действия, чтобы запустить средство устранения неполадок Центра обновления Windows.
Запустите «Настройки», нажав Windows + X, и нажмите «Настройки».
Выберите «Настройки»> «Обновление и безопасность»> «Устранение неполадок»> «Дополнительное средство устранения неполадок»> «Центр обновления Windows»> «Запустить средство устранения неполадок».
Средство устранения неполадок Центра обновления Windows найдет причину проблемы и, если возможно, решит ее. В противном случае вы можете перейти к дальнейшим решениям.
2]Очистите содержимое папок SoftwareDistribution и Catroot2 и повторите попытку.
В папке SoftwareDistribution хранятся временные файлы, необходимые для процесса обновления Windows, а в папке Catroot 2 хранятся подписи пакета обновления Windows.
Хотя это необходимо, если какие-либо файлы в этих папках отсутствуют или повреждены, это может прервать процесс обновления Windows. В этом случае вам придется очистить содержимое папок SoftwareDistribution и Catroot2.
Как только это будет сделано, вы можете перезагрузить компьютер и снова запустить процесс обновления Windows.
3]Загрузите пакет обновления прямо с веб-сайта каталога Microsoft.
Если вышеупомянутые решения не срабатывают, единственным обходным решением для обновления вашей Windows будет загрузка последнего обновления вручную с веб-сайта каталога Центра обновления Майкрософт. После загрузки последней версии КБ дважды щелкните ее, чтобы установить упомянутое обновление.
Если вам известно какое-либо другое решение, которое может помочь в устранении ошибки Центра обновления Windows 0x800f0825, сообщите нам об этом в разделе комментариев.
.
by Tashreef Shareef
Tashreef Shareef is a software developer turned tech writer. He discovered his interest in technology after reading a tech magazine accidentally. Now he writes about everything tech from… read more
Updated on March 25, 2021
- The 0x800f0825 permanent package cannot be uninstalled error usually occurs due to a corrupted Windows update.
- If you are unable to uninstall package KB5000802 Windows update, try modifying the .mum file.
- Alternatively, use an existing restore point to restore your PC to an earlier point.
- To see how to uninstall uninstallable Windows updates, be sure to closely follow the solutions from this guide.
XINSTALL BY CLICKING THE DOWNLOAD FILE
This software will repair common computer errors, protect you from file loss, malware damage, hardware failure and optimize your PC for maximum performance. Fix PC issues and remove virus damage now in 3 easy steps:
- Download and Install Fortect on your PC
- Launch the tool and Start scanning to find broken files that are causing the problems
- Right-click on Start Repair to fix issues affecting your computer’s security and performance
- Fortect has been downloaded by 0 readers this month.
Windows may install a corrupted update package when updating your system. When you try to uninstall the update, you may encounter the 0x800f0825 permanent package cannot be uninstalled error.
This error usually occurs when you manually try to remove an update using the Command Prompt or from the Control Panel. You may not be able to uninstall this update because of a component cleanup that has occurred.
To fix the error, you may have to enable the uninstall feature by modifying the update file manually. We have a few more troubleshooting steps to help you resolve this error below.
How do I fix the 0x800f0825 package cannot be uninstalled?
1. Perform a System Restore
- Press the Windows key and type system restore.
- Click on Create a Restore Point.
- Click the System Restore button.
- Choose Next.
- Choose the most recent restore point available.
- Click Next.
- Read the description and then click Finish.
Wait for Windows to restore your PC to the selected point. After the restart, open the Control Panel and check if the 0x800f0825 permanent package cannot be uninstalled error is resolved.
2. Make the update removable
- Download PowerRun from the official website. Unpack the zip archive to a local folder.
- Launch PowerRun. Click Run if prompted by UAC.
- Right-click on Notepad.exe and choose Run File in the PowerRun window.
- In the Notepad window, click File and choose Open. Set file Filter to all files.
- Next, navigate to the following path using the Open window:
C:WindowsservicingPackages - In the search field, enter the update code that you are trying to uninstall. For example, enter KB5000802.mum.
- Note that we need to find all the .mum files associated with the update. You may see more than one .mum file for the same update.
- Select the first .mum file and click Open.
- Press Ctrl + F to open the Find dialogue box. Enter permanency=”permanent” in the field and click Next.
- Once you locate permanency=”permanent”, change it to permanency=”removable”.
- Click Ctrl + S to save the changes. Click Yes if prompted by UAC again.
- Repeat the steps of changing permanency=”permanent” to permanency=”removable” for all the .mum files associated with the KB update you are trying to uninstall.
Once you have made the changes to KB Update files, you can uninstall the KB update causing the error 0x800f0825 permanent package cannot be uninstalled.
Uninstall the KB Update
- Press the Windows key + R to open Run.
- Type control and click OK to open the Control Panel.
- Click on Uninstall a Program under Programs.
- From the left pane, click on View installed updates.
- Choose the KB update that you want to uninstall and click Uninstall.
- Click Yes to confirm the action when prompted by UAC.
Uninstall update using Command Prompt
- Press the Windows key, type cmd, and click on Run as Administrator. This will open the Command Prompt as administrator.
- To uninstall the KB Update, enter the following command and hit enter. Make sure to replace the KB update number below with the update that you are trying to uninstall.
wusa /uninstall /kb:KB5000802/quiet /norestart - Wait for the update to uninstall and until you see a success message. Close the Command Prompt window and reinstall the essential updates.
Some PC issues are hard to tackle, especially when it comes to missing or corrupted system files and repositories of your Windows.
Be sure to use a dedicated tool, such as Fortect, which will scan and replace your broken files with their fresh versions from its repository.
This is an advanced solution, but it will help you fix Windows KB5000802 – Unable to uninstall package error.
3. Run System File Checker
- Press the Windows key, and type cmd.
- Right-click on Command Prompt and choose Run as Administrator.
- In the Command Prompt window, type the following command and hit enter:
Sfc /scannow - The scanning process may take some time, so wait till it is 100% complete.
System File Checker tool is a built-in repair tool that scans for missing or corrupted system files and repairs them if required. However, if you are still unable to fix them, try resetting your PC.
4. Go back to the previous version of Windows 10
- Click on Start and choose Settings.
- Click on Update & Security.
- Open the Recovery tab from the left pane.
- Click the Get Started button under Go back to the previous version of the Windows 10 section.
- Follow the on-screen instructions to restore your PC back to the last update.
However, this option is only available before 10 days of installing the update. If the Get started button is greyed out, this option is not available for you.
This isn’t the best solution, but it’s a one way to fix Windows 10 package for rollup issue.
5. Refresh or reset your PC
- Press the Windows key + I.
- Go to Update & Security.
- Open the Recovery tab.
- Click the Get Started button under Reset this PC.
- Under Choose an Option, choose to Keep my files. This option will keep your personal files but delete all the installed third-party programs and reinstall Windows.
- Follow on-screen instructions and complete the reset process.
Refreshing or resetting your PC will help you uninstall uninstallable Windows updates. If the error persists, you may have to clean install Windows 10 to resolve the issue.
The 0x800f0825 permanent package cannot be uninstalled usually occurs if you have installed an essential Windows update that is corrupted.
We hope that our guide helped you fix this issue on your PC. If you managed to find the solution on your own, share it with us in the comments section.
![]()
Do you receive error 0x800f0825 Permanent package cannot be uninstalled when removing an update manually from Control Panel or Command Prompt? If so, please read through this post on MiniTool Website to get more feasible solutions.
Windows Update 0x800f0825
It is important to install the latest Windows update because it can make the computer safer and make the performance smoother. However, Windows might install a corrupted update package when updating the system. Uninstalling this update might be effective but infeasible due to a component cleanup.
The complete error message reads:
0x800f0825 – CBS_E_CANNOT_UNINSTALL – Package cannot be uninstalled.
If you are one such user, let’s explore the solutions in detail together.
Preparations Before Performing a Windows Update
Theoretically, updating your Windows 10/11 will preserve the files, settings, and apps on your computer. However, like any other process, updating Windows can also cause some problems. Some Windows users reported that their files disappear after updating Windows.
As a result, you had better make adequate preparation to avoid such data loss accidents. To protect your data, it is strongly recommended to back up your files with a reliable backup software – MiniTool ShadowMaker before performing a Windows update. This tool is aimed to satisfy your needs on backing up files, folders, systems, partitions, and disks on Windows system. Follow these steps to make a backup of your files:
Step 1. Launch this tool and go to the Backup page.
Free Download
Step 2. In this section, you can choose the backup source and destination.
- Backup source – go to SOURCE > Folders and Files.
- Backup destination – go to DESTINATION.
Step 3. Press Back Up Now to start the backup task in no time.

Also see: How to Back up Windows to Safeguard Your Computer? Try MiniTool!
How to Fix Windows Update 0x800f0825?
Fix 1: Download and Install Windows Update Manually
Whenever there comes a Windows update, Microsoft will also upload the corresponding package on the official website. To fix 0x800f0825 Windows 10, you can try downloading and installing the relevant update patch manually.
Step 1. Go to the Microsoft Update Catalog page.
Step 2. In the search box, type the KB number to show all the available updates.
Step 3. Find the update you need according to the Windows version you are currently using and hit Download.

Step 4. You will be prompted by a download link. Hit it to download the offline installer.
Step 5. Open the installer to install the optional update on your computer.
Fix 2: Run Windows Update Troubleshooter
Since Windows update 0x800f0825 is related to Windows update, you can run the Windows Update troubleshooter to see if it does the trick.
Step 1. Type settings in the search bar and hit Enter to open Windows Settings.
Step 2. In the setting menu, choose Update & Security > Troubleshoot > Additional troubleshooters.
Step 3. Scroll down to find Windows Update, hit it and press Run the troubleshooter. Then the troubleshooter will either fix Windows update error 0x800f0825 or provide you with some suggestions.

Step 4. Hit Apply this fix and reboot your computer.
Fix 3: Clear SoftwareDistribution and Catroot2 Folder
The SoftwareDistribution and Catroot folders contain all the relevant information about Windows updates. When the size of the two folders is too big, it will trigger some issues including error 0x800f0825.
Step 1. Press Win + R to open the Run box.
Step 2. Type services.msc and hit OK.
Step 3. Find the following services and right-click on them one by one to select Stop.
- Windows Update
- Background Intelligent Transfer Service
- Cryptographic Services

Step 4. Open File Explorer > navigate to the following locations > delete all the contents inside it:
C:WindowsSoftwareDistribution
C:WindowsSystem32Catroot2
Step 5. After all the contents in the SoftwareDistribution and Catroot2 folders are deleted, reboot your computer to see if Windows update 0x800f0825 persists.
Fix 4: Perform System Restore
Performing a system restore can also help you to get rid of DISM remove package 0x800f0825. Follow these steps to revert your system back to a state where everything was running smoothly.
Step 1. Type system restore in the search bar to locate Create a restore point and hit it.
Step 2. Under System Properties, hit System Restore > Next.
Step 3. In the System Restore window, choose one of the recent restore point and hit Next.

Step 4. After the restoring process is done, hit Finish and restart your system.
Fix 5: Reset this PC
If everything fails and error 0x800f0825 Windows 10 is still there, the last option is to reset your PC.
Step 1. Press Win + I to open Settings.
Step 2. Go to Update & Security > Recovery > Get started under Reset this PC.

Step 3. There are two options for you – Keep my files and Remove everything. Choose either of them and follow the guidelines on the screen to reset your PC.
Возникающие после установки накопительных обновлений ошибки в работе Windows не такая уже редкость, с подобными проблемами пользователям приходится сталкиваться едва ли не каждые полгода. В Microsoft предусмотрели возможность удаления апдейтов из интерфейса классического апплета Программы и компоненты -> Просмотр установленных обновлений, но здесь вас может поджидать неприятный сюрприз.
Не все патчи можно удалить таким способом, так как кнопка удаления для них попросту недоступна.
Бессильной оказывается и командная строка, используемая для деинсталляции пакета команда:
dism /online /remove/package
Выдает ошибку 0x800f0825.
Почему так происходит? Некоторые обновления являются более важными, чем другие, например, одни из них закрывают критические уязвимости в системе безопасности, другие сами обеспечивают возможность обновления прочих компонентов операционной системы и тому подобное. Поэтому они помечаются как постоянные или неудаляемые, в то же время как их базовые свойства остаются такими же, как и у прочих пакетов обновлений. То есть удалить их всё же можно. Всё дело в правах, прописанных в MUM-файле манифеста, находящегося внутри пакета обновления MSU.
Когда пакет устанавливается в системе, файл манифеста MUM сохраняется в расположение %windir%servicingPackages. Их там может быть сотни, но найти соответствующий проблемному обновлению файл обычно не составляет труда, — в его названии будет указан номер пакета обновления. Не исключено, что версий MUM-файла будет несколько, в этом случае внести указанные ниже изменение нужно во все файлы манифеста, связанные с пакетом обновления.
Редактирование файла манифеста обновления
Файл MUM — этот тот же документ XML, открыть который можно с помощью любого текстового редактора, даже Блокнота.
Открываем файл текстовым редактором, ищем в нем атрибут permanence и смотрим его значение.
Если в качестве значения параметра указано permanent, это знак того, что удаление пакета запрещено.
Если атрибут отсутствует или его значением является removable, значит удаление апдейта возможно.
Соответственно, чтобы включить опцию деинсталляции, нужно заменить значение permanent на removable.
Выполнив эту манипуляцию, запустите апплет «Программы и компоненты» повторно.
Опция «Удаление» для неударяемого обновления должна стать доступной.
Использовать данный метод деинсталляции мы, однако, не рекомендуем без особой нужды.
Если Microsoft сочла нужным пометить обновления как постоянные, значит у нее есть на это все основания. Удаление постоянных пакетов с высокой долей вероятности приведет к проблемам с обновлением системы, поэтому, если вы всё же решитесь на этот трюк, перед проведением манипуляций создайте как минимум точку восстановления, а еще лучше выполните резервное копирование системного тома.
![]() Загрузка…
Загрузка…
Download PC Repair Tool to quickly find & fix Windows errors automatically
Windows Updates are important for many reasons. With each update, you get access either to new features of Windows 10 or your computer at least becomes more secure. However, at times Windows downloads or installs a corrupt update package to your operating system, and when you try to install or uninstall the update you get Windows Update error 0x800F0825. If you encounter the same, kindly read through this article for the resolution.
0x800f0825 – CBS_E_CANNOT_UNINSTALL – Package cannot be uninstalled.
Try the following solutions to resolve the Windows Update error 0x800f0825:
- Run Windows Updates Troubleshooter
- Clear contents of SoftwareDistribution & catroot2 folders and try again
- Download update package directly from Microsoft Catalog website
1] Windows Updates Troubleshooter
The Windows Update troubleshooter can be extremely useful in resolving and checking for problems related to Windows Updates. Follow the steps below to run the Windows Update troubleshooter.
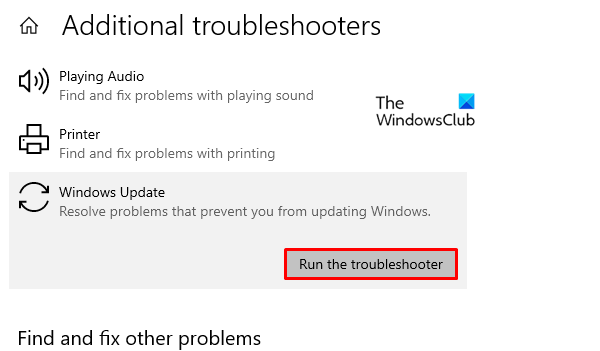
Launch Settings by pressing Windows + X and click on settings.
Go to Settings > Update & Security > Troubleshoot > Additional Troubleshooter > Windows Update > Run the troubleshooter.
The Windows Update troubleshooter will find the cause of the issue and solve it if possible. Else, you can proceed with further solutions.
2] Clear contents of SoftwareDistribution & Catroot2 folders and try again
The SoftwareDistribution folder stores temporary files needed for the Windows Update process and the Catroot 2 folder stores the signatures of the Windows Update package.
While these are necessary, if any files within these folders go missing or corrupt, it can interrupt the Windows update process. In this case, you would have to clear the contents of the SoftwareDistribution & Catroot2 folders.
Once this is done, you can restart your computer and initiate the Windows Update process once again.
3] Download update package directly from Microsoft Catalog website
If the above-mentioned solutions fail, the only workaround the update your Windows would be to download the latest update manually from the Microsoft Update Catalog website. Once you download the latest KB, double-click on it to install the mentioned update.
If you know of any other solution which could be helpful in resolving Windows Update error 0x800f0825, please let us know in the comments section.

Karan is a B.Tech, with several years of experience as an IT Analyst. He is a passionate Windows user who loves troubleshooting problems and writing about Microsoft technologies.
Как удалить неудаляемые обновления, и стоит ли так делать?
Windows давно признаёт тот факт, что некоторые из обновлений могут причинять неудобства для пользователей вплоть до отказа системы, давая возможность «проблемные» обновления удалять. Прямо из специального для этого апплета, вызываемого из строки поиска или Выполнить (WIN + R):
appwiz.cpl
Выберем Просмотр установленных обновлений:
Вариантов удаления обновлений в Windows немало. Однако некоторые уже успешно установленные в Windows 10 помечаются системой как постоянные и не имеют опции Удаления. Microsoft опубликовала документ на странице, в которой описывается, какие обновления удалить не получится и почему. Но кривоколенный машинный перевод для типичного русскоязычного пользователя малопонятен, и иногда юзер остаётся наедине с проблемой после обновлений. В итоге удаление некоторых обновлений становится невозможным ни через системный апплет, ни через командную строку.
та самая ошибка удаления обновления 0x800f0825
Как проверить установленные обновления?
Подходов к просмотру системный патчей несколько. От общих (в составе другой информации) с помощью команды
systeminfo
и графического (при помощи уже знакомого вам графического апплета) командой
appwiz.cpl
до более подробных:
wmic qfe list brief /format:table
Можно конкретнее:
dism /online /get-packages /format:table
А если «что-то пошло не так»? У вас остаётся только один вариант: надеяться на восстановление системы. Все помнят, что в Windows 10 оно отключено по умолчанию? Далее. Очередная точка восстановления создаётся Windows перед применением всякого важного для системы обновления. И не дай бог восстановление системы не сработает…
Как проверить историю обновлений в Windows? Все способы.
Почему нельзя удалить некоторые обновления?
Некоторые из обновлений крайне для Windows необходимы и пронизывают систему насквозь. Они служат опорой для обновлений последующих. Но свойства у всех пакетов абсолютно одинаковые. Равно как и в возможности их удалить. Всё дело (это же Windows) в правах на совершаемые действия. Обновление помечается системой в качестве удаляемого или постоянного прежде всего в части файлов Манифеста (Microsoft Update Manifest) внутри пакетов .msu. Эти файлы с расширением .mum обнаруживаются после удачного обновления по адресу:
C:WindowsservicingPackages
Это типовые XML-файлы, содержимое которых представляет собой описание обновления (в том числе его KB-номер, языковые условия, запрос на перезагрузку системы после установки и т.п.). В том числе и запись (возможная), что обновление в системе прописалось навсегда:
запись permanence=»permanent» и не даёт вам избавиться от обновления
Читаются те легко с помощью любого текстового редактора. Обнаруженный атрибут «permanence=» расскажет о характере пакета. Если в строке он выглядит как permanence=”permanent”, удалить привычным способом обновление не получится. Ежели атрибута вовсе нет или он с пояснением permanence=”removable”, возможностей удалить его у нас больше. Так что отсюда и решение для тех, кто хочет удалить неудаляемые обновления. Однако предостерегаю: независимо от успеха операции с удалением таких патчей, вам лучше сразу продумать вариант отхода, ибо с проблемами обновлений Windows в дальнейшем вы почти ГАРАНТИРОВАНО столкнётесь. Так что логичным завершением всех описанных действий была бы повторная постановка Windows в очередь за обновлениями.
Как удалить неудаляемые обновления?
Ещё раз предлагаю задуматься перед тем, как продолжить. Но, раз уж все инструменты опробованы, а точка восстановления систему с колен не подняла, пробуем удалить неудаляемые обновления. Для этого
- создаём точку восстановления
- качаем программу PowerRun, позволяющую запускать приложения от имени System и Trusted Installer (последний-то нам и нужен). Установки не потребует, говорит по-русски. Это — наиболее подходящий для широкого круга пользователей вариант.
- как вы будете искать цель для удаления, нужно было решить ещё до прочтения этой статьи. Наиболее короткий путь — сопоставить даты возникновения проблемы с Windows и установкой обновлений:
- в отдельном окне проводника группируем обновления в указанной папке по имени, обнаружив все файлы, принадлежащие выбранному пакету; для облегчения задачи воспользуйтесь поиском по имени:
- открываем каждый файл mum Блокнотом (notepad.exe) из PowerRun и подменяем части permanence=”permanent” на permanence=”removable”;
нажмите, чтобы увеличить
- делаем это для всех XML-файлов, связанных с пакетом. Обратите внимание на дату изменения файла: она должна соответствовать дате изменений, проделанных вами же.
- сразу запускаем консоль cmd от имени администратора с командой проверки системных файлов
sfc /scannow
Запускаем повторно апплет Windows
appwiz.cpl
с переходом на обновления. Кнопка Удалить должна появиться:
Успехов.
by Tashreef Shareef
Tashreef Shareef is a software developer turned tech writer. He discovered his interest in technology after reading a tech magazine accidentally. Now he writes about everything tech from… read more
Updated on March 25, 2021
- The 0x800f0825 permanent package cannot be uninstalled error usually occurs due to a corrupted Windows update.
- If you are unable to uninstall package KB5000802 Windows update, try modifying the .mum file.
- Alternatively, use an existing restore point to restore your PC to an earlier point.
- To see how to uninstall uninstallable Windows updates, be sure to closely follow the solutions from this guide.
XINSTALL BY CLICKING THE DOWNLOAD FILE
This software will repair common computer errors, protect you from file loss, malware damage, hardware failure and optimize your PC for maximum performance. Fix PC issues and remove virus damage now in 3 easy steps:
- Download and Install Fortect on your PC
- Launch the tool and Start scanning to find broken files that are causing the problems
- Right-click on Start Repair to fix issues affecting your computer’s security and performance
- Fortect has been downloaded by 0 readers this month.
Windows may install a corrupted update package when updating your system. When you try to uninstall the update, you may encounter the 0x800f0825 permanent package cannot be uninstalled error.
This error usually occurs when you manually try to remove an update using the Command Prompt or from the Control Panel. You may not be able to uninstall this update because of a component cleanup that has occurred.
To fix the error, you may have to enable the uninstall feature by modifying the update file manually. We have a few more troubleshooting steps to help you resolve this error below.
How do I fix the 0x800f0825 package cannot be uninstalled?
1. Perform a System Restore
- Press the Windows key and type system restore.
- Click on Create a Restore Point.
- Click the System Restore button.
- Choose Next.
- Choose the most recent restore point available.
- Click Next.
- Read the description and then click Finish.
Wait for Windows to restore your PC to the selected point. After the restart, open the Control Panel and check if the 0x800f0825 permanent package cannot be uninstalled error is resolved.
2. Make the update removable
- Download PowerRun from the official website. Unpack the zip archive to a local folder.
- Launch PowerRun. Click Run if prompted by UAC.
- Right-click on Notepad.exe and choose Run File in the PowerRun window.
- In the Notepad window, click File and choose Open. Set file Filter to all files.
- Next, navigate to the following path using the Open window:
C:WindowsservicingPackages - In the search field, enter the update code that you are trying to uninstall. For example, enter KB5000802.mum.
- Note that we need to find all the .mum files associated with the update. You may see more than one .mum file for the same update.
- Select the first .mum file and click Open.
- Press Ctrl + F to open the Find dialogue box. Enter permanency=”permanent” in the field and click Next.
- Once you locate permanency=”permanent”, change it to permanency=”removable”.
- Click Ctrl + S to save the changes. Click Yes if prompted by UAC again.
- Repeat the steps of changing permanency=”permanent” to permanency=”removable” for all the .mum files associated with the KB update you are trying to uninstall.
Once you have made the changes to KB Update files, you can uninstall the KB update causing the error 0x800f0825 permanent package cannot be uninstalled.
Uninstall the KB Update
- Press the Windows key + R to open Run.
- Type control and click OK to open the Control Panel.
- Click on Uninstall a Program under Programs.
- From the left pane, click on View installed updates.
- Choose the KB update that you want to uninstall and click Uninstall.
- Click Yes to confirm the action when prompted by UAC.
Uninstall update using Command Prompt
- Press the Windows key, type cmd, and click on Run as Administrator. This will open the Command Prompt as administrator.
- To uninstall the KB Update, enter the following command and hit enter. Make sure to replace the KB update number below with the update that you are trying to uninstall.
wusa /uninstall /kb:KB5000802/quiet /norestart - Wait for the update to uninstall and until you see a success message. Close the Command Prompt window and reinstall the essential updates.
Some PC issues are hard to tackle, especially when it comes to missing or corrupted system files and repositories of your Windows.
Be sure to use a dedicated tool, such as Fortect, which will scan and replace your broken files with their fresh versions from its repository.
This is an advanced solution, but it will help you fix Windows KB5000802 – Unable to uninstall package error.
3. Run System File Checker
- Press the Windows key, and type cmd.
- Right-click on Command Prompt and choose Run as Administrator.
- In the Command Prompt window, type the following command and hit enter:
Sfc /scannow - The scanning process may take some time, so wait till it is 100% complete.
System File Checker tool is a built-in repair tool that scans for missing or corrupted system files and repairs them if required. However, if you are still unable to fix them, try resetting your PC.
4. Go back to the previous version of Windows 10
- Click on Start and choose Settings.
- Click on Update & Security.
- Open the Recovery tab from the left pane.
- Click the Get Started button under Go back to the previous version of the Windows 10 section.
- Follow the on-screen instructions to restore your PC back to the last update.
However, this option is only available before 10 days of installing the update. If the Get started button is greyed out, this option is not available for you.
This isn’t the best solution, but it’s a one way to fix Windows 10 package for rollup issue.
5. Refresh or reset your PC
- Press the Windows key + I.
- Go to Update & Security.
- Open the Recovery tab.
- Click the Get Started button under Reset this PC.
- Under Choose an Option, choose to Keep my files. This option will keep your personal files but delete all the installed third-party programs and reinstall Windows.
- Follow on-screen instructions and complete the reset process.
Refreshing or resetting your PC will help you uninstall uninstallable Windows updates. If the error persists, you may have to clean install Windows 10 to resolve the issue.
The 0x800f0825 permanent package cannot be uninstalled usually occurs if you have installed an essential Windows update that is corrupted.
We hope that our guide helped you fix this issue on your PC. If you managed to find the solution on your own, share it with us in the comments section.
![]()
Newsletter
Возникающие после установки накопительных обновлений ошибки в работе Windows не такая уже редкость, с подобными проблемами пользователям приходится сталкиваться едва ли не каждые полгода. В Microsoft предусмотрели возможность удаления апдейтов из интерфейса классического апплета Программы и компоненты -> Просмотр установленных обновлений, но здесь вас может поджидать неприятный сюрприз.
Не все патчи можно удалить таким способом, так как кнопка удаления для них попросту недоступна.
Бессильной оказывается и командная строка, используемая для деинсталляции пакета команда:
dism /online /remove/package
Выдает ошибку 0x800f0825.
Почему так происходит? Некоторые обновления являются более важными, чем другие, например, одни из них закрывают критические уязвимости в системе безопасности, другие сами обеспечивают возможность обновления прочих компонентов операционной системы и тому подобное. Поэтому они помечаются как постоянные или неудаляемые, в то же время как их базовые свойства остаются такими же, как и у прочих пакетов обновлений. То есть удалить их всё же можно. Всё дело в правах, прописанных в MUM-файле манифеста, находящегося внутри пакета обновления MSU.
Когда пакет устанавливается в системе, файл манифеста MUM сохраняется в расположение %windir%servicingPackages. Их там может быть сотни, но найти соответствующий проблемному обновлению файл обычно не составляет труда, — в его названии будет указан номер пакета обновления. Не исключено, что версий MUM-файла будет несколько, в этом случае внести указанные ниже изменение нужно во все файлы манифеста, связанные с пакетом обновления.
Редактирование файла манифеста обновления
Файл MUM — этот тот же документ XML, открыть который можно с помощью любого текстового редактора, даже Блокнота.
Открываем файл текстовым редактором, ищем в нем атрибут permanence и смотрим его значение.
Если в качестве значения параметра указано permanent, это знак того, что удаление пакета запрещено.
Если атрибут отсутствует или его значением является removable, значит удаление апдейта возможно.
Соответственно, чтобы включить опцию деинсталляции, нужно заменить значение permanent на removable.
Выполнив эту манипуляцию, запустите апплет «Программы и компоненты» повторно.
Опция «Удаление» для неударяемого обновления должна стать доступной.
Использовать данный метод деинсталляции мы, однако, не рекомендуем без особой нужды.
Если Microsoft сочла нужным пометить обновления как постоянные, значит у нее есть на это все основания. Удаление постоянных пакетов с высокой долей вероятности приведет к проблемам с обновлением системы, поэтому, если вы всё же решитесь на этот трюк, перед проведением манипуляций создайте как минимум точку восстановления, а еще лучше выполните резервное копирование системного тома.
![]() Загрузка…
Загрузка…
Приветствую!
Необходимо из системы удалить обновление KB3000850, однако сделать это не получается ни из-под системы, ни из-под MsDART’а.
Возникает вопрос почему? Дистрибутив ОС формировался через аудит, где была выполнена команда оптимизации папки WinSxS:
Dism.exe /Online /Cleanup-Image /StartComponentCleanup
, которая не подразумевает
удаление всех предыдущих версий компонентов: «После применения ключа
/ResetBase обновления удалить уже невозможно. Для установленных обновлений в списке appwiz.cpl пропадает кнопка «Удалить», потому что откатываться уже некуда.»
, а ключ /ResetBase мною не использовался.
Тогда я решил обратиться к оригинальному дистрибутиву ОС. Оказалось, что данное обновление интегрировано, и я попытался его оттуда удалить, но не получилось: 0x800f0825 (dism.log).
Хотелось бы понять, почему невозможно удалить данное обновление. Или интегрированные обновления в принципе удалить невозможно? Тогда не ясно, как происходило удаление в вышеуказанной теме.
Спасибо!
P.S. В логе я никаких объяснений не нашел. Единственное, что подметил это вот это:
2015-05-23 17:08:02, Info                  CBS    Appl: detect Parent, Package: Package_for_KB3000850~31bf3856ad364e35~amd64~~6.3.1.8, Parent: Microsoft-Windows-Common-Foundation-Package~31bf3856ad364e35~amd64~~6.3.9600.16384, Disposition = Detect, VersionComp: EQ, ServiceComp: GE, BuildComp: EQ, DistributionComp: GE, RevisionComp: GE, Exist: present
2015-05-23 17:08:02, Info                  CBS    Appl: detectParent: package: Package_for_KB3000850~31bf3856ad364e35~amd64~~6.3.1.8, parent found: Microsoft-Windows-Common-Foundation-Package~31bf3856ad364e35~amd64~~6.3.9600.16384, state: Installed
Т.е. у KB3000850 есть родитель. Но как это мешает ему удалиться?
-
Изменено
23 мая 2015 г. 15:42
-
Изменен тип
Dmitriy VereshchakMicrosoft contingent staff
8 июня 2015 г. 7:49
Windows updates have become a regular occurrence in our digital lives. They are frequent and have become quite necessary. Most of the time they bring us quality content like fixed security, resolved bugs, and even new features but from time to time update itself can be not downloaded properly or it can have some issues when installing. Windows Update Error 0x800F0825 is one of these update errors that will be reported seemingly after applying the update.
Altho annoying error it is nothing system breaking and can be easily resolved.
Hello and welcome everyone, today we will provide you with solutions on how to resolve error 0x800F0825 when trying to complete a Windows update.
Run Windows troubleshooter
Built-in Windows troubleshooter can help a lot in resolving these issues and we will try it as a first solution because of its simplicity and ease of use.
- Click on START
- Click on settings

- Navigate to Update & Security > Troubleshoot > Additional Troubleshooter > Windows Update
- Click on Run the troubleshooter
- Follow onscreen instructions and let the troubleshooter try to solve the issue
Clear contents of SoftwareDistribution & Catroot2 folders
Altho SoftwareDistribution and Catroot2 folders are essential for the update process it can happen that badly downloaded updates or similar corruption can be stored there and thus producing this error.
- Open file explorer and locate these two folders, go inside and delete content inside them
- Try updating again to see if corruption inside folders was the issue.
Update manually
If the previous two solutions have not produced a result and the error is still present then go to the official Microsoft Update Catalog and download the update manually
The catalog is here.
Search for updates from the Windows Update Catalog In the Search box, type your search terms. You can carry out a full-text search, using a keyword, KB article, MSRC bulletin, driver manufacturer, driver model, driver version, product, and a classification. Select the appropriate version of Windows. Search or click on Advanced Search if you want to refine your search. A list will be displayed. Select the updates that you want to download. Click Add for each selection to add it to the download basket.
- Download the updates. You may be asked to install an Active-X download control to be able to download files from this site
- Double-click on the downloaded updates to install them
Administrators can download updates from the Microsoft Download Center or the Windows Update Catalog to deploy to multiple computers
If you are running Windows Server Update Services (WSUS) 3.0, System Center Essentials (SCE), or System Center Configuration Manager (SCCM) you can import updates directly into these applications. Security updates, critical updates, service packs, update rollups, definition updates, and critical drivers can be configured to synchronize with your server automatically. You can still import these updates into your application by using Microsoft Update Catalog; however, depending on how you configure WSUS, SCE, and SCCM, you may not need to import the updates.
Disable system protection
In some rare cases, antivirus or firewall could interfere with both downloads and execution of certain files. If each previous solution failed disable temporarily your security software and try executing the update again.
Do You Need Help with Your Device?
Our Team of Experts May Help

Troubleshoot.Tech Experts are There for You!
GET HELP
Troubleshoot.Tech experts work with all versions of Microsoft Windows including Windows 11, with Android, Mac, and more.
Share this article:
You might also like
The Windows Subsystem for Linus, also known as WSL, is a useful and excellent tool for developers. However, it isn’t without flaws as users can still encounter some errors when using it. One of these errors is the error code WslRegisterDistribution, 0x8007019e,0x8000000d. Although it seems like the error is have something to do with the installation of WSL, it could be a false positive since some users who’ve installed WSL still encountered the same problem. Here’s the context of the error:
“Installing, this may take a few minutes…
WslRegisterDistribution failed with error: 0x8007019e/0x8000000d
Error: 0x8007019e/0x8000000d The parameter is incorrect.
Press any key to continue.”
Error code 0x8007019e or 0x8000000d could be due to the absence of supporting Windows 10 features since the error does not even let one use the WSL-based command line. If you are one of the users facing this problem, then you’ve come to the right place as this post will provide you with a couple of suggestions to fix it.
There are two options you can check out to fix the problem, but before you do that, you need to make sure that the Windows Subsystem for Linux feature is enabled. The two options include enabling WSL using the “Turn Windows features on or off” option and using the Windows PowerShell.
Option 1 – Try to enable the WSL using the “Turn Windows features on or off” option
- To get started, search for “Turn Windows Features on or off” in the Start Search and click on the appropriate result to open a dialog box.
- After that, you will see a populated list in the dialog box and from there, look for the “Windows Subsystem for Linux” option.
- Once you find it, select OK. This will search and install the system files needed and ask you to restart your computer.
- Restart your computer. The Linux distro should now work without any trouble.
Option 2 – Try to use Windows PowerShell
The next thing you can do to fix the error code 0x8007019e or 0x8000000d is to use Windows PowerShell.
- Tap the Win + X keys and click on the “Windows PowerShell (Admin)” option to open Windows PowerShell as admin.
- After that, execute this command to enable the Windows Subsystem for Linux feature: Enable-WindowsOptionalFeature -Online -FeatureName Microsoft-Windows-Subsystem-Linux
- The command you entered will start to search for the required system files and install them.
- If prompted, type “Y” to restart your computer. This should fix the problem.
Read More
Enter Cooler Master XG850 PLUS PLATINUM, a new, in-house designed power supply from Cooler Master. I will admit that in last years I was a big fan of Cooler Master and their components, well not all but power supply and PC cases were always products from them that I liked and used. The latest power supply from them does not disappoint and I must say that I like it very much, it is hi-quality, it is silent, it has a large LCD display where you can see its current state and also has some RGB lights so it looks cool in your case.

Technical specifications
So without further detours here are the technical specifications and then we will talk a little about it.
| Model: MPG-8501-AFBAP-X |
| ATX Version: Intel ATX 12V Ver. 2.53 |
| PFC: Active PFC |
| Input Voltage: 100-240V |
| Input Current: 12-6A |
| Input Frequency: 50-60Hz |
| Dimensions (L x W x H): 160 x 150 x 86 mm |
| Fan Size: 135mm |
| Fan Speed: 1800 RPM |
| Noise Level @ 100%: ≤ 25 dBA |
| Efficiency: ≥ 92% @ Typical Load |
| 80 PLUS Rating: 80 PLUS Platinum |
| ErP 2014 Lot 3: Yes |
| Operating Temperature: 0-50°C |
| Power Good Signal: 100 — 150 ms |
| Hold Up Time: ≥ 16ms |
| MTBF: >100,000 Hours |
| Protections: OPP, OVP, OCP, UVP, SCP, OTP, Surge, and Inrush Protection |
| Regulatory: TUV, cTUVus, CE, BSMI, FCC, CCC, EAC, UKCA |
| ATX 24 Pin Connectors: 1 |
| EPS 4+4 Pin Connectors: 1 |
| EPS 8 Pin Connector: 1 |
| SATA Connectors: 12 |
| Peripheral 4 Pin Connectors: 4 |
| PCI-e 6+2 Pin Connectors: 6 |
| USB Protocol 10P: 1 |
| Series: XG Series |
| 80 Plus: Platinum |
| Modular: Full Modular |
| Wattage: Above 750W |
Opinion about Cooler Master XG850 PLUS PLATINUM
If we put aside the technical characteristics of the power supply itself we are left with visual and real working experience. Now real working experience will not be covered here since yea it is working great but it needs some time and a long period of testing in order to be able to say that it is indeed reliable and great but considering I have never had any issues personally with power supplies from Cooler Master I will assume that this one is also very reliable and hi-quality.
That leaves us basically with looks and feels of supply itself and I must say that I like it, and I mean I like it a lot. It feels hi-quality and it looks hi-quality. The LCD display is very good looking and it is very crisp and readable. With power supply some proprietary software so you can choose what you want on display on the screen and also you can control RGB and display colors with it.
I have not opened the power supply to see how it looks inside but from what I could see I think this would be my new power supply if I were building a new PC now. I recommend it and if you decide to get it I hope it will serve you long long time.
Thank you for reading and I hope to see you next time.
Read More
On September 18th, 2017, Cisco’s Talos announced that CCleaner, a popular utility with billions of worldwide users, had been compromised by hackers, and was used to unwittingly distribute hidden malware in its installer. Later in the day, Piriform, the publisher of CCleaner, confirmed the problem.
Undetected by all but 1 major antivirus including CCleaner’s own parent company, this occurred for over a month and impacted over 2.7 million users. Users of CCleaner v5.33.6162 and CCleaner Cloud v1.07.3191 for 32-bit Windows are affected. These downloads were live on CCleaner’s official site from August 15th to September 12th, 2017. Anyone who downloaded the program during this time could be affected.
The company claims that while the hackers set up the backdoor and many users were impacted, that the perpetrators have been arrested and that the malware never successfully performed its full task and compromised user’s PCs or sent out their data; in the wake of recent security breaches such as Equifax, users are understandably worried. Given the severity of the threat of hacking and data theft, users should take action immediately if they have CCleaner.
Technical Details of CCleaner Malware Injection
First reported by Talos, the malware, which was hidden in the CCleaner installer without the publisher noticing (despite them being owned by Avast, a massive Anti-virus company), modified a core program DLL file to evade detection, and creates several registry keys. Not only were these files not flagged by any major Anti-Virus, but they were also even digitally signed by Piriform via their Symantec certificate, meaning your PC and security program would likely whitelist and trust the malicious installer. The malware gathers personal information on a user’s PC, including IP address and running programs, and sends it to a remote server. In our testing, the program sent data to IP 216.126.225.148.
Restore Your PC (If Possible)
As of the publication of this article, there have been no assurances given that updating or even uninstalling CCleaner will remove the malware is installed. The only action thus far has been shutting down the remote server where user data was being sent has been shut down by authorities. For this reason, it is best to remove the underlying malware separately, as its presence represents a serious security threat. Unfortunately, as this could have been installed as far back as August 15th, 2017, your System Restore points may not go back that far, or even if they do, restoring to such an outdated point may cause unintended problems with other programs you use and potentially lost files and data. Manually backing up files and doing a full format or clean Windows installation would likely be successful in fully removing the malware, but is extremely time-consuming and can be difficult for many PC users. Unfortunately, this makes a PC Restore or format an unattainable option for many.
Update CCleaner to the Latest Version
While CCleaner has told users to update to the latest version of the program. Prior to doing so, we recommend fully uninstall CCleaner, ensuring you check its program files folders and registry keys, manually deleting any remnants, and then re-downloading the latest version from the official site and reinstalling clean.
Read More
As you know, the Windows Firewall is designed not just to protect your computer from viruses and malware, and other security threats but it’s also designed to block any program from accessing the internet. Users are given the option to block both inbound and outbound traffic for any apps on their computers. However, this kind of option can often lead to not being able to access the internet.
In such cases, when you try to run the Windows Firewall Troubleshooter or the Windows Network Diagnostic troubleshooter, it will throw an error message that says, “Windows Firewall is preventing connections to your computer. The Windows Firewall rule HSS DNS Leak Rule may be blocking your connection”. If you are in this kind of scenario, then you’ve come to the right place as this post will guide you on how exactly you can fix this error.
When you encounter this kind of error, there are several options you can check out to fix it. You can try to allow an app or feature through the Windows Firewall or uncheck the HSS DNS leak rule in both private and public. For more details, refer to the suggestions provided below.
Option 1 – Try to allow an app or feature through Windows Firewall
The first thing you can do to get rid of the error is to allow a feature or app through the Windows Firewall. To do this, follow these steps:
- Open the Windows Defender Security Center.
- From there, select the Firewall and Network Protection option.
- Next, click on the “Allow an app through firewall” option and then click on the “Change Settings” button and make sure that you have administrative privileges.
- After that, select the app or feature you want to allow through the Firewall from the menu. You also have the option to manually add the app by using the “Add an App” option.
- Then select the between the type of network an app can access such as:
- Private Network will allow the app to connect to the internet only at home or work.
- Public Network will allow the app to connect to the internet from anywhere, including Public WiFi hotspots.
- Once done, restart your computer and see if it fixed the error or not.
Option 2 – Try to uncheck the HSS DNS leak rule in both private and public
The next thing you can do to fix the error is to uncheck the HSS DNS leak rule in both private and public. You can do this by following these steps:
- Open the Windows Defender Security Center.
- From there, select the Firewall and Network Protection option.
- After that, click on the “Allow an app through firewall” option and then click on the “Change Settings” button and make sure that you have administrative privileges.
- Next, scroll down until you see the HSS DNS leak rule in both private and public option and then uncheck it.
- Now restart your computer and check if the error is now gone.
Read More
A copy of Windows gets into a grace period when it is installed on a computer which means that you can use your Windows computer without any constraints on its feature. However, if you suddenly encounter an error code 0xC004F009 then this means that the grace period has already expired. In such cases, you will see the following error message on your screen:
“Error Code 0xC004F009, The Software Licensing Service reported that the grace period expired.”
One of the possible causes of this error is that it could be that the grace period has already expired way before the system was activated which is a result of which the system is in the Notifications state at this moment.
The error code 0xC004F009 has something to do with MAK-enabled computers in an enterprise when it comes to Volume Licensing. One of the reasons that this error pops up is due to the possibility that the computer was not activated yet even when it was already connected to the Enterprise. Another most likely cause of the error is when the system was never connected with the Enterprise at all and the given grace period has expired before your computer system is activated. Whatever the real cause of this error, this post will guide you in fixing it. Just refer to the instructions given below to fix it.
Option 1 – Try activating Windows using the command-line tool
- First, you need to obtain your MAK key from the IT administrator.
- Once you have it, tap the Win + R keys on your keyboard and then type “cmd” in the field and hit Enter to open an elevated Command Prompt.
- After that, type this command and hit Enter to install the product key or replace the existing one: Slmgr.vbs –ipk <your mak key>
- Next, type another command and hit Enter: slmgr.vbs –ato
- Once you’ve executed the given commands, Windows should be activated after it connects to Microsoft servers and then gives it some time and try to check if error code 0xC004F009 is now fixed or not.
Option 2 – Try activating Windows using your mobile phone
Activating Windows 10 can also be done using your phone. Just note that you have to call Microsoft to do so.
- In the Start Search box, type in “Slui 4” and tap Enter.
- Next, select your country and click on Next.
- Keep the window open and call the toll-free number of the country you’re from.
- Afterward, a confirmation ID should be given by the automated system which you must take a note of.
- Finally, in the box on the window, type in the confirmation ID and click on the Activate button. That should do it.
Option 3 – Try to prolong the grace period
On the other hand, it is also possible for you to prolong the grace period but you might have to get another genuine Windows key for that. Before you proceed, you need to create a System Restore point first afterwards, refer to the steps given below to increase the grace period of the Software Licensing Service on your Windows 10 computer.
- Tap the Win + R keys to open the Run dialog box and type “Regedit” in the field then hit Enter to open the Registry Editor.
- After that, navigate to this registry key: HKEY_LOCAL_MACHINESOFTWAREMicrosoftWindowsCurrentVersionSetupOOBEmediabootinstall
- Next, change the value of the “mediabootinstall” key to “0”.
- Now open Command Prompt with admin privileges and then type this command and hit Enter: slmgr –rearm
- The command you just entered will add another grace period to your system activation. After that, you have to obtain a new key and then activate Windows.
Option 4 – Try running the Windows 10 Activation Troubleshooter
You can also try to run the Windows 10 Activation troubleshooter to help resolve the error code 0xC004F009.
- Go to Settings and then select Activation.
- After that, click on the Windows Activation and then troubleshoot. This will help you address most of the commonly found activation issues in Windows devices.
Read More
Program and features are Control panel section where once accessed contains all programs installed on the operating system. From these windows, any logged-in user can modify applications, uninstall them, etc. If for whatever reason you want to limit this access to users and remove this group from the control panel please do keep reading as we show you how you can achieve this desired result using two methods: via policy editor or registry editor. Feel free to use any provided method as both works (except on Windows 10 Home edition) and achieve the same thing, it all comes down to preferred preference on how you wish to do things.
Local group policy editor method
This method is more straightforward and easier perhaps than its counterpart but it has one significant drawback, it will not work on Windows 10 Home edition which does not have in itself a policy editor included. If you are using Windows 10 Home edition then feel free to skip this method and do it via registry editor. That being said let’s start:
- Press ⊞ WINDOWS + R to open the run dialog
- Inside run dialog type in gpedit.msc followed by ENTER to open Group policy editor
- Go to User Configuration Administrative Templates Control Panel Programs
- Double-click on the setting named Hide Programs and Features page
- Change the toggle option from Not Configured to Enabled
- Click on the Apply button and then the Ok button to save the changes
- at this point, everything is supposed to be applied and your changes should take effect immediately. However, it has come to our attention that sometimes this is not the case. If you are one of these users which for whatever reason have not experienced applying to set momentarily do not despair and follow this quick guide on how to refresh settings and apply them right away.
- Press ⊞ WINDOWS + X to open the hidden menu
- Click on command prompt (admin)
- In command prompt type in gpupdate /force and press ENTER in order to force update and set setting right away
Registry editor method
The registry editor method is a more complex one but it will be your only way of doing it if as mentioned you are running Windows 10 Home edition. As always it is highly recommended to make a backup of the Windows registry before tempering with it.
- Press ⊞ WINDOWS + R to open the run dialog
- Inside run dialog type in regedit and press ENTER to open the registry editor
- If you would like to make a backup of the Windows registry go to File > Export and save the backup on a secure location naming it as you wish
- Locate the following key inside the registry editor HKEY_CURRENT_USERSoftwareMicrosoftWindowsCurrentVersionPoliciesPrograms
- Right-click on the right pane of the Programs key and choose the New > DWORD (32-bit) Value option
- Name the value as NoProgramsAndFeatures
- Double-click on the NoProgramsAndFeatures value to open it
- Change the value data to 1
- Save the changes
- Reboot the computer in order for changes to take effect.
note: you can always change values back in order to show again panel by changing the value to 0 in registry editor or choosing Not Configured or Disabled in the local group policy editor
Read More
Blinking or Flashing Desktop After login — What does it mean?
Upon updating to Windows 10, some users might encounter a blinking or flashing desktop after logging in. This will result in a repetitive restarting of explorer or you won’t be able to make the start menu and shortcut keys work. In addition, the network icon might not appear in your taskbar as well. Other Windows 10 error messages include error code 0xc000021a.
Solution
 Error Causes
 Error Causes
Your blinking or flashing desktop after logging in might be the result of problems with the bushell.dll shell extension, which is a part of the Norton Security Suite. Another possible cause for this annoying problem is an issue with your display driver since not all systems will use the same display driver and will depend on what graphics card you use.
Further Information and Manual Repair
In fixing the bothersome blinking or flashing desktop after logging in problem, you can do a manual repair method to address the root problem. You need to be familiar with the Windows command line to successfully go through the process. However, if you are not knowledgeable or confident enough to do this on your own, it would be best to seek help from a professional. Or, you might want to consider using an automated tool to solve the issue.
You need to identify first what’s causing the blinking or flashing of your desktop after login to properly address the issue. The following methods can be done if your issue is caused by bushell.dll shell extension issue:
Method One: Forcefully Terminate Process
- Press on Ctrl+Alt+Del then select Task manager
- Start a Command Prompt as an administrator by choosing the File menu then Run New Task.
- Type exe. Make sure to tick the checkbox “Create this task with administrative privileges.”
NOTE: Text input is most probably affected by the explorer restarts so you might need to repeatedly type some letters or to carefully input texts.
- In the Command Prompt, type taskkill /f /im explorer.exe. This will stop the blinking or flashing.
- Type cd “Program Files” afterward, type dir /s bushell.dll to locate where the dll is. (For example, purposes, use c:program filesNorton Security SuiteEngine6422.5.2.15 as the location)
- If the dll file is not found, you can try repeating step 5 but this time, use “Program Files (x86)” However, you can proceed with the next step if you already located where the bushell.dll is.
- Type cd ”c:program filesNorton Security SuiteEngine 6422.5.2.15” to change the name of the directory you found the dll in.
- Type ren bushell.dll bushell-crash.dll
- Restart now the system by typing shutdown /r /f /t o in the command line.
Method Two: Uninstall Programs
- Log out then go to the sign in screen
- Press the Shift key as you simultaneously click on the Power button on the screen.
- Continue pressing on the Shift key as you click
- Continue pressing on the Shift key as you wait for the Advanced Recovery Options menu to appear.
- Once the Advance Recovery Options menu appears, click on Troubleshoot then select Advanced options.
- Click on the Startup Settings then select
- Boot on Safe Mode by pressing 4 on your keyboard.
- Log in then press Windows key + X.
- Select the Device Manager then expand Display Adapter.
- On your Display Adapter, right-click then select
- Exit Device Manager
- If in case you also have an older Antivirus utility, you should uninstall it as well.
- Restart
NOTE: You might need to download the latest Video Driver on a working computer. Save it in a thumb drive then copy and install it on your computer. If in case there is no native Windows 10 driver, you can also download the latest Windows 7 or Windows 8.1 video driver. Afterward, install it in compatibility mode.
Method Three: Use Microsoft System Configuration Utility
- Log out then go to the sign in screen
- Press the Shift key as you simultaneously click on the Power button on the screen.
- Continue pressing on the Shift key as you click
- Continue pressing on the Shift key as you wait for the Advanced Recovery Options menu to appear.
- Once the Advance Recovery Options menu appears, click on Troubleshoot then select Advanced options.
- Click on the Startup Settings then select
- Boot on Safe Mode but this time, choose 5 to start in Safe Mode with networking.
- Check if your problem is present or not in Safe Mode. If not, then you are on the right track.
- Press on the Windows key + R then type msconfig to start up your exe file.
- Click on the Services tab then choose Disable All. Afterward, click on
- Once you’re prompted to reboot your computer, go ahead and reboot in Normal Mode. Check if the issue is still present.
- If the blinking or flashing desktop after login is gone, then you can just do a process of elimination.
- Start-up on your exe again then begin bringing up services a few at a time.
- You can turn on all other services except for the following which causes the blinking or flashing desktop after login problem:
Problem Reports and Solutions Control Panel Support
•Windows Error Reporting Service.
Read More
If you encounter an error saying, “error accessing the registry” when you try to merge a registry key on your Windows 10 computer, you’re not alone as some users also experienced the same problem. According to these users, they encounter the error after they’ve re-installed their Windows version and tried to open a .reg file.
Based on the reports, this error could occur if the registry file does not have administrative privileges. Meaning to say, the program does not have the necessary permission to merge the .reg file. This is common with fresh installs as well as reinstalls. Moreover, this kind of issue could also occur due to system file corruption. Whichever the case may be, here are some troubleshooting tips you can check out to resolve the error.
Option 1 – Try to import the .reg file with admin privileges
As pointed out, the error may be due to a lack of admin privileges. It could be that the Registry Editor does not have admin privileges to merge the registry file. This is common with new Windows installations especially since the Registry Editor hasn’t been opened before. So you need to import the .reg file again and this time, with admin privileges.
- Tap the Win + R keys to open the Run dialog box.
- Then type “Regedit” in the field and tap the Ctrl + Shift + Enter keys to open the Registry Editor with admin privileges.
- A User Account Control or UAC prompt will appear where you have to click Yes to proceed.
- After opening the Registry Editor, go to File > Import using the ribbon bar at the top.
- Next, use the import menu to go to the location of the file you were trying to merge. Once you’ve found it, click Open to merge it with your current registry. This should fix the problem. If not, refer to the next options below.
Option 2 – Try performing a System Restore
Running System Restore can also help you fix the error when accessing the Registry. You can do this option either by booting into Safe Mode or in System Restore. If you are already in the Advanced Startup Options, just directly select System Restore and proceed with the next steps. And if you have just booted your PC into Safe Mode, refer to the steps below.
- Tap the Win + R keys to open the Run dialog box.
- After that, type in “sysdm.cpl” in the field and tap Enter.
- Next, go to the System Protection tab then click the System Restore button. This will open a new window where you have to select your preferred System Restore point.
- After that, follow the on-screen instructions to finish the process and then restart your computer and check if the problem is fixed or not.
- Once the next startup is complete, you have to merge or import the file again and see if the error is now fixed or not.
Option 3 – Try to perform repair install by creating a Windows 10 installation media
- Click this link and then click the Download Tool Now button.
- Next, click the “Use the tool to create installation media (USB flash drive, DVD, or ISO file)…” option and follow the next given instructions on the screen.
- Now select the ISO file option in step 5.
- After that, you should now have an ISO file.
- Next, go to the location where you’ve downloaded the ISO file.
- Then right-click on the Windows 10 ISO file and select the Open with option and then select File Explorer.
- Now click on “setup.exe” and follow the next instructions that appear on the screen. When asked, you have to select either Nothing (clean install) or Keep personal files only option. Take note that you must not select the “Keep personal files, apps, and Windows settings since it doesn’t really work.
Option 4 – Try running the System File Checker Scan
As mentioned, the error when accessing the Registry might be caused by file corruption. And that’s where the SFC scan comes in. The SFC or System File Checker scan could detect and automatically repair damaged system files. SFC is a built-in command utility that helps in restoring corrupted files as well as missing files. It replaces bad and corrupted system files with good system files. To run the SFC command, follow the steps given below.
- Tap Win + R to launch Run.
- Type in cmd in the field and tap Enter.
- After opening Command Prompt, type in sfc /scannow
The command will start a system scan which will take a few whiles before it finishes. Once it’s done, you could get the following results:
- Windows Resource Protection did not find any integrity violations.
- Windows Resource Protection found corrupt files and successfully repaired them.
- Windows Resource Protection found corrupt files but was unable to fix some of them.
- Now restart your computer.
Read More
 Windows Terminal is a new free Microsoft terminal sort of application. When you open either Power Shell or Command Prompt in Windows they will be opened in different windows, and if you want several of each you will have several windows of each on your screen.
Windows Terminal fixes this by opening each of the Instances of Command Prompt and Power Shell as separate tabs inside itself making it much easier to manage multiple instances of named applications.
You can also run both Power Shell and Command prompt tabs in the same Windows Terminal. Luckily running command prompt and power shell in different tabs is not the only thing you can do. Windows Terminal lets you choose your own theme, it has emoji support, GPU rendering, split panes, and many more customizable options.
Windows 11 will have Terminal as the default command-line environment for opening Power Shell or Command prompt, even Windows Subsystem for Linux (WSL)
Setting Windows Terminal as the default application
If I was successful I have managed to show you that Windows Terminal is something that you should use even if you do not or cannot upgrade to Windows 11. You can use it inside Windows 10 also.
First thing is to download and install it. You can get Windows Terminal from the official Microsoft website here: Windows Terminal page
After download and installation are completed, open the Terminal app and select the down arrow menu, click Settings. Alternatively, you can use CTRL + + shortcut.
Inside Settings by default Default Terminal application would be set to Windows Console Host
Click on the Default Terminal application to bring a drop-down menu and choose Windows Terminal from the list.
Now by default once opened Windows Terminal will use Power Shell as the default profile, however, you can change this by clicking on the drop-down for the default profile where you can choose between Command Prompt, Power Shell, Windows Power Shell, or Azure Cloud Shell. Pick one that you prefer, click on Save and it will be opened as default on the next run.
Read More
As you know, Diskpart is a useful utility that helps in managing the disks in a computer. It is a very useful tool that even when the GUI-based disk management tools in Windows 10 operating system fails, the Diskpart utility still tends to work. However, it also does not mean that this utility does not experience issues as it still does, from time to time. One of the issues you may encounter when using the Diskpart utility is when you encounter an error message that says, “DiskPart has encountered an error, Access is denied”.
This kind of error in the Diskpart utility could be caused by a number of factors. For one, it could be that the Write-Protection is enabled on the drive where the operating is being performed or it could also be that the Command Prompt terminal does not have administrator-level permissions to carry out the command. Thus, you can try to run the Diskpart utility again but this time with admin privileges or you could also remote the Write-Protection from the concerned drive. For more details, refer to the instructions given below.
Option 1 – Try running Command Prompt with Administrator-level permissions
- In the Start Search, type “command prompt” and from the search results that appear, look for Command Prompt.
- Once you found it, right-click on it and select the “Run as administrator” option.
- After that, try to execute the Diskpart operation once again and see if you still encounter the same error.
Option 2 – Try to remove the Write Protection from the drive
As mentioned, removing the Write-Protection on the concerned drive could also help you fix the problem and there are two ways to get rid of the write protection – you can either use the Diskpart utility or the Registry Editor. How? Refer to the following steps.
Via Diskpart utility:
- Open Command Prompt with admin privileges and then type the “diskpart” command and tap Enter to execute it.
- Next, type “list disk” and tap Enter to get the list of all the Disk connects or all the partitions that are formed on those disks.
- After that, you need to choose one command depending on the list of commands you entered. Type “select disk #” and tap Enter to select the disk or partition you want to select.
- Then type “attribute disk clear readonly” and tap Enter to Disable the Write Protection on the selected disk or partition.
Via Registry Editor:
- Tap the Win + R keys to open the Run utility and type “Regedit” in the field and then tap Enter to open the Registry Editor.
- Next, navigate to the following registry key:
ComputerHKEY_LOCAL_MACHINESYSTEMCurrentControlSetControlStorageDevicePolicies
- After that, look for the DWORD named “WriteProtect” and double click on it, and then set its Value Data to “0”.
- Now restart your computer and see if the problem is now fixed or not.
Read More
![]()
Copyright © 2022, ErrorTools. All Rights Reserved
Trademarks: Microsoft Windows logos are registered trademarks of Microsoft. Disclaimer: ErrorTools.com is not affiliated with Microsoft, nor claim direct affiliation.
The information on this page is provided for information purposes only.
![]()
Repair your PC with one click
Please be aware that our software needs to be installed on a PC system with Windows on it, Open this website on a desktop PC and download the software for easy and quick elimination of your issues.
Give a try to these quick solutions now
by Tashreef Shareef
Tashreef Shareef is a software developer turned tech writer. He discovered his interest in technology after reading a tech magazine accidentally. Now he writes about everything tech from… read more
Updated on
- The 0x800f0825 permanent package cannot be uninstalled error usually occurs due to a corrupted Windows update.
- If you are unable to uninstall package KB5000802 Windows update, try modifying the .mum file.
- Alternatively, use an existing restore point to restore your PC to an earlier point.
- To see how to uninstall uninstallable Windows updates, be sure to closely follow the solutions from this guide.
Windows may install a corrupted update package when updating your system. When you try to uninstall the update, you may encounter the 0x800f0825 permanent package cannot be uninstalled error.
This error usually occurs when you manually try to remove an update using the Command Prompt or from the Control Panel. You may not be able to uninstall this update because of a component cleanup that has occurred.
To fix the error, you may have to manually enable the uninstall feature by modifying the update file. Below are a few more troubleshooting steps to help you resolve this error.
How do I fix the 0x800f0825 package cannot be uninstalled?
1. Perform a System Restore
- Press the Windows key and type system restore.
- Click on Create a Restore Point.
- Click the System Restore button.
- Choose Next.
- Choose the most recent restore point available.
- Click Next.
- Read the description and then click Finish.
Wait for Windows to restore your PC to the selected point. After the restart, open the Control Panel and check if the 0x800f0825 permanent package cannot be uninstalled error is resolved.
2. Make the update removable
- Download PowerRun from the official website. Unpack the zip archive to a local folder.
- Launch PowerRun. Click Run if prompted by UAC.
- Right-click on Notepad.exe and choose Run File in the PowerRun window.
- In the Notepad window, click File and choose Open. Set file Filter to all files.
- Next, navigate to the following path using the Open window:
C:\Windows\servicing\Packages - In the search field, enter the update code that you are trying to uninstall. For example, enter KB5000802.mum.
- Note that we need to find all the .mum files associated with the update. You may see more than one .mum file for the same update.
- Select the first .mum file and click Open.
- Press Ctrl + F to open the Find dialogue box. Enter permanency=”permanent” in the field and click Next.
- Once you locate permanency=”permanent”, change it to permanency=”removable”.
- Click Ctrl + S to save the changes. Click Yes if prompted by UAC again.
- Repeat the steps of changing permanency=”permanent” to permanency=”removable” for all the .mum files associated with the KB update you are trying to uninstall.
Once you have made the changes to KB Update files, you can uninstall the KB update causing the error 0x800f0825 permanent package cannot be uninstalled.
Uninstall the KB Update
- Press the Windows key + R to open Run.
- Type control and click OK to open the Control Panel.
- Click on Uninstall a Program under Programs.
- From the left pane, click on View installed updates.
- Choose the KB update that you want to uninstall and click Uninstall.
- Click Yes to confirm the action when prompted by UAC.
Uninstall update using Command Prompt
- Press the Windows key, type cmd, and click on Run as Administrator. This will open the Command Prompt as administrator.
- To uninstall the KB Update, enter the following command and hit enter. Make sure to replace the KB update number below with the update that you are trying to uninstall.
wusa /uninstall /kb:KB5000802/quiet /norestart - Wait for the update to uninstall and until you see a success message. Close the Command Prompt window and reinstall the essential updates.
This is an advanced solution, but it will help you fix Windows KB5000802 – Unable to uninstall package error.
3. Run System File Checker
- Press the Windows key, and type cmd.
- Right-click on Command Prompt and choose Run as Administrator.
- In the Command Prompt window, type the following command and hit enter:
Sfc /scannow - The scanning process may take some time, so wait till it is 100% complete.
System File Checker tool is a built-in repair tool that scans for missing or corrupted system files and repairs them if required. However, if you are still unable to fix them, try resetting your PC.
4. Go back to the previous version of Windows 10
- Click on Start and choose Settings.
- Click on Update & Security.
- Open the Recovery tab from the left pane.
- Click the Get Started button under Go back to the previous version of the Windows 10 section.
- Follow the on-screen instructions to restore your PC back to the last update.
However, this option is only available before 10 days of installing the update. If the Get Started button is greyed out, this option is not available for you.
This isn’t the best solution, but it’s a one way to fix Windows 10 package for rollup issue.
5. Refresh or reset your PC
- Press the Windows key + I.
- Go to Update & Security.
- Open the Recovery tab.
- Click the Get Started button under Reset this PC.
- Under Choose an Option, choose to Keep my files. This option will keep your personal files but delete all the installed third-party programs and reinstall Windows.
- Follow on-screen instructions and complete the reset process.
Refreshing or resetting your PC will help you uninstall uninstallable Windows updates. If the error persists, you may have to clean install Windows 10 to resolve the issue.
The 0x800f0825 permanent package cannot be uninstalled usually occurs if you have installed an essential Windows update that is corrupted.
We hope that our guide helped you fix this issue on your PC. If you managed to find the solution on your own, share it with us in the comments section.
![]()
- Постоянный пакет 0x800f0825 не может быть удален. Ошибка обычно возникает из-за поврежденного обновления Windows.
- Если вам не удается удалить пакет KB5000802 Windows update, попробуйте изменить файл .mum.
- Или используйте существующую точку восстановления, чтобы восстановить ваш компьютер до более ранней точки.
- Чтобы узнать, как удалить удаляемые обновления Windows, обязательно внимательно следуйте решениям из этого руководства.

Для решения различных проблем с ПК мы рекомендуем Restoro PC Repair Tool:Это программное обеспечение исправит распространенные компьютерные ошибки, защитит вас от потери файлов, вредоносных программ, сбоев оборудования и оптимизирует ваш компьютер для достижения максимальной производительности. Исправьте проблемы с ПК и удалите вирусы прямо сейчас, выполнив 3 простых шага:
- Скачать Restoro PC Repair Tool который поставляется с запатентованными технологиями (патент доступен здесь).
- Нажмите Начать сканирование чтобы найти проблемы с Windows, которые могут вызывать проблемы с ПК.
- Нажмите Починить все для устранения проблем, влияющих на безопасность и производительность вашего компьютера
- Restoro был загружен 0 читатели в этом месяце.
Windows может установить поврежденный пакет обновления при обновлении вашей системы. При попытке удалить обновление вы можете столкнуться с 0x800f0825 постоянный пакет не может быть удален ошибка.
Эта ошибка обычно возникает, когда вы пытаетесь вручную удалить обновление с помощью командной строки или панели управления. Возможно, вы не сможете удалить это обновление из-за выполненной очистки компонента.
Чтобы исправить ошибку, вам может потребоваться включить функцию удаления, изменив файл обновления вручную. У нас есть еще несколько шагов по устранению неполадок, которые помогут вам устранить эту ошибку ниже.
Как исправить, что пакет 0x800f0825 не может быть удален?
1. Выполните восстановление системы
- нажмите Клавиша Windows и введите восстановление системы.
- Нажмите на Создайте точку восстановления.

- Щелкните значок Кнопка восстановления системы.
- Выбирать Следующий.
- Выберите самую последнюю доступную точку восстановления.
- Нажмите Следующий.
- Прочтите описание и нажмите Заканчивать.
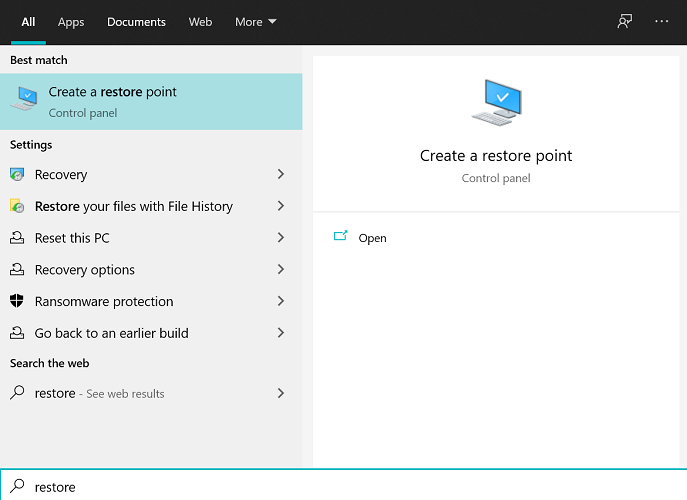
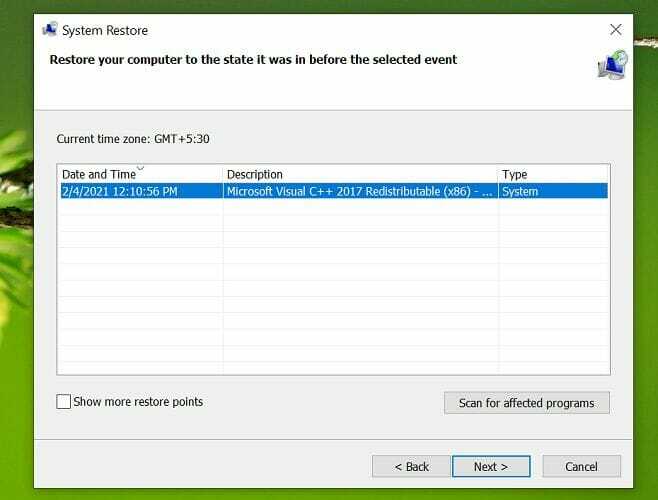
Подождите, пока Windows восстановит ваш компьютер до выбранной точки. После перезагрузки откройте Панель управления и проверьте, 0x800f0825 постоянный пакет не может быть удален ошибка устранена.
2. Сделайте обновление съемным
- Скачать PowerRun с официального сайта. Распаковать zip-архив в локальную папку.
- Запустите PowerRun. Нажмите Запустить если запросит UAC.
- Щелкните правой кнопкой мыши на Notepad.exe и выберите Запустить файл в окне PowerRun.
- В окне Блокнота щелкните Файл и выберите Открыть. Установите фильтр файлов для всех файлов.
- Затем перейдите по следующему пути, используя окно Открыть:
C: \ Windows \ обслуживание \ Пакеты - В поле поиска введите код обновления, которое вы пытаетесь удалить. Например, введите KB5000802.mum.
- Обратите внимание, что нам нужно найти все файлы .mum, связанные с обновлением. Вы можете увидеть несколько файлов .mum для одного и того же обновления.
- Выберите первый файл .mum и нажмите Открыть.
- Нажмите Ctrl + F, чтобы открыть диалоговое окно «Найти». Входить постоянство = «постоянный» в поле и нажмите Далее.
- Как только вы найдете постоянство = «постоянный», измените его на постоянство = «съемный».
- Нажмите Ctrl + S чтобы сохранить изменения. Нажмите да при повторном запросе UAC.
- Повторите шаги по замене permanency = «постоянный» на постоянный = «съемный» для всех файлов .mum, связанных с обновлением базы знаний, которое вы пытаетесь удалить.

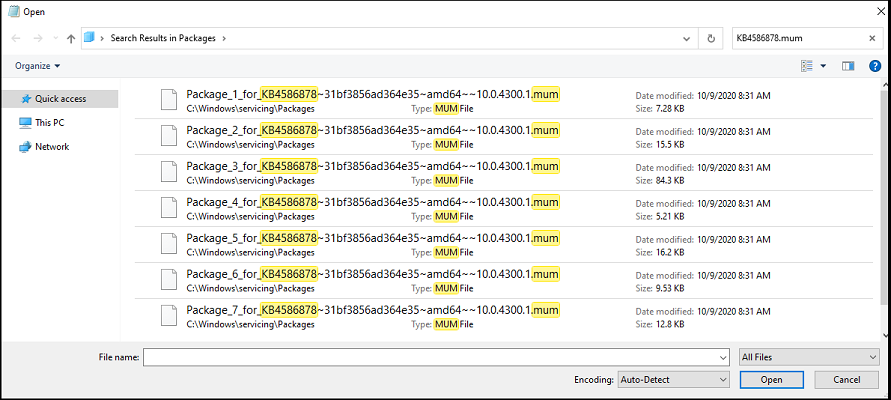
После того, как вы внесли изменения в файлы обновления КБ, вы можете удалить обновление КБ, из-за которого возникает ошибка 0x800f0825, постоянный пакет не может быть удален.
Удалите обновление KB
- нажмите Клавиша Windows + R, чтобы открыть Run.
- Тип контроль и нажмите ОК , чтобы открыть Панель управления.
- Нажмите на Удалить программу под Программ.
- На левой панели нажмите Просмотрите установленные обновления.
- Выберите обновление KB, которое вы хотите удалить, и нажмите Удалить.
- Нажмите Да, чтобы подтвердить действие при появлении запроса от UAC.

Удалите обновление с помощью командной строки
- Нажмите клавишу Windows, введите cmdи нажмите Запустить от имени администратора. Это откроет командную строку от имени администратора.
- Чтобы удалить обновление KB, введите следующую команду и нажмите Enter. Обязательно замените указанный ниже номер обновления KB на обновление, которое вы пытаетесь удалить.
wusa / uninstall / kb: KB5000802 / тихий / norestart - Подождите, пока обновление будет удалено, и пока вы не увидите сообщение об успешном завершении. Закройте окно командной строки и переустановите необходимые обновления.

Запустите сканирование системы, чтобы обнаружить потенциальные ошибки

Скачать Restoro
Инструмент для ремонта ПК

Нажмите Начать сканирование чтобы найти проблемы с Windows.

Нажмите Починить все для устранения проблем с запатентованными технологиями.
Запустите сканирование ПК с помощью Restoro Repair Tool, чтобы найти ошибки, вызывающие проблемы с безопасностью и замедление. После завершения сканирования в процессе восстановления поврежденные файлы заменяются новыми файлами и компонентами Windows.
Это продвинутое решение, но оно поможет вам исправить Windows KB5000802 — Невозможно удалить пакет. ошибка.
3. Запустить проверку системных файлов
- Нажмите клавишу Windows и введите cmd.
- Щелкните правой кнопкой мыши на Командная строка и выберите Запустить от имени администратора.
- В окне командной строки введите следующую команду и нажмите ввод:
Sfc / scannow - Процесс сканирования может занять некоторое время, поэтому подождите, пока он не будет завершен на 100%.
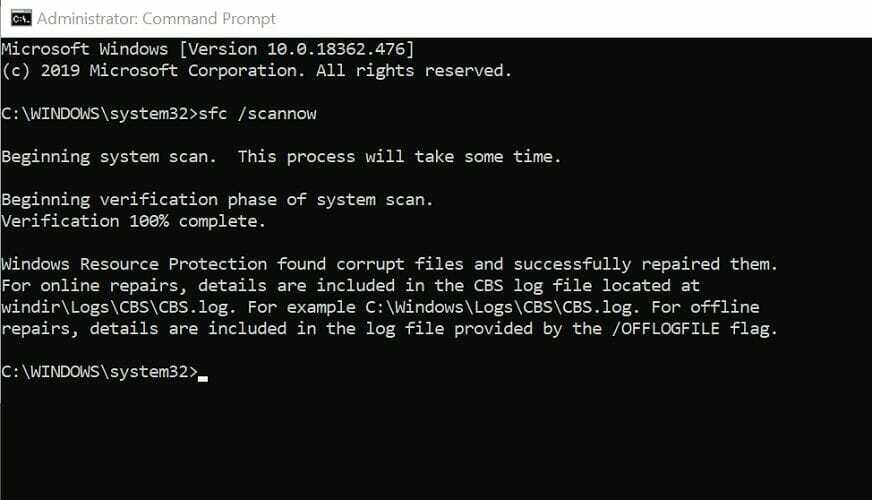
Средство проверки системных файлов — это встроенный инструмент восстановления, который сканирует отсутствующие или поврежденные системные файлы и при необходимости восстанавливает их. Однако, если вы по-прежнему не можете их исправить, попробуйте перезагрузить компьютер.
4. Вернуться к предыдущей версии Windows 10
- Нажмите на Начинать и выберите Настройки.
- Нажмите на Обновление и безопасность.
- Открой Восстановление вкладка на левой панели.
- Щелкните значок Начать под кнопкой Вернуться к предыдущей версии раздела Windows 10.
- Следуйте инструкциям на экране, чтобы восстановить компьютер до последнего обновления.
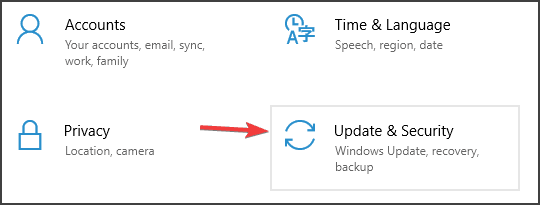

Однако этот вариант доступен только до 10 дней с момента установки обновления. Если кнопка «Начать» неактивна, этот параметр для вас недоступен.
Это не лучшее решение, но это единственный способ исправить пакет Windows 10 для проблемы с накоплением.
5. Обновите или перезагрузите компьютер
- нажмите Клавиша Windows + I.
- Перейти к Обновление и безопасность.
- Открой Восстановление таб.
- Щелкните значок Начать кнопка под Перезагрузите этот компьютер.
- Под Выберите опцию, выберите Сохраните мои файлы. Этот вариант сохранит ваши личные файлы, но удалит все установленные сторонние программы и переустановит Windows.
- Следуйте инструкциям на экране и завершите процесс сброса.
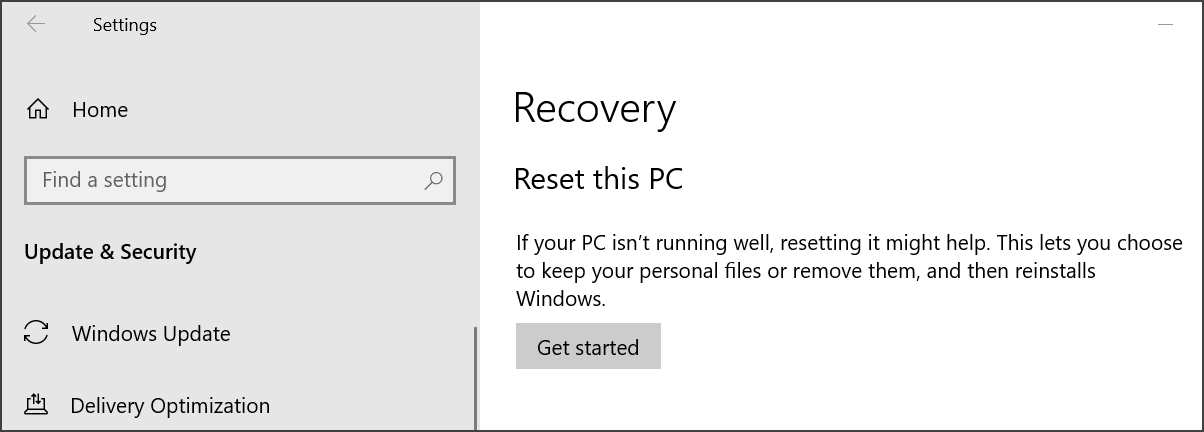
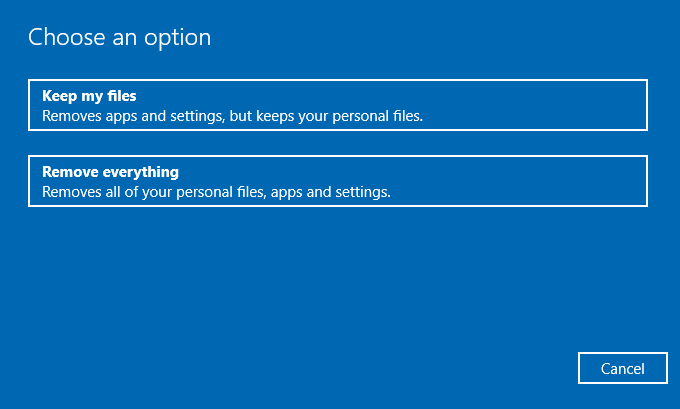
Обновление или сброс настроек вашего компьютера поможет вам удалить не устанавливаемые обновления Windows. Если ошибка не исчезнет, возможно, вам придется выполнить чистую установку Windows 10, чтобы решить эту проблему.
Постоянный пакет 0x800f0825 не может быть удален. Обычно это происходит, если вы установили важное обновление Windows, которое повреждено.
Мы надеемся, что наше руководство помогло вам решить эту проблему на вашем компьютере. Если вам удалось найти решение самостоятельно, поделитесь им с нами в разделе комментариев.
 По-прежнему возникают проблемы?Исправьте их с помощью этого инструмента:
- Загрузите этот инструмент для ремонта ПК получил рейтинг «Отлично» на TrustPilot.com (загрузка начинается на этой странице).
- Нажмите Начать сканирование чтобы найти проблемы с Windows, которые могут вызывать проблемы с ПК.
- Нажмите Починить все исправить проблемы с запатентованными технологиями (Эксклюзивная скидка для наших читателей).
Restoro был загружен 0 читатели в этом месяце.