by Ivan Jenic
Passionate about all elements related to Windows and combined with his innate curiosity, Ivan has delved deep into understanding this operating system, with a specialization in drivers and… read more
Updated on
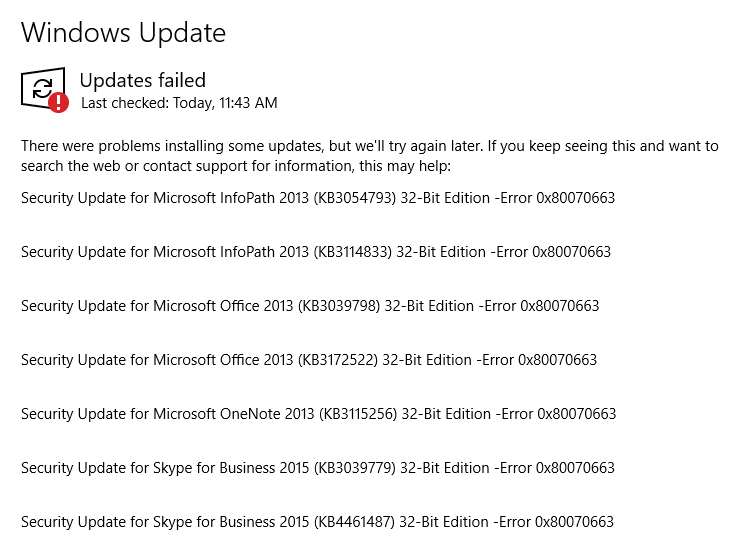
- Error 0x80070663 is associated with the Windows Update installer package or with an Office update failure.
- This issue can be fixed by checking and repairing system files, resetting Office, or installing cumulative updates.
- Stay on top of the news and see the latest guides similar to this by visiting the Windows Updates Errors area with curated content.
- Learn to fix Windows Errors by following the step by step instruction from our articles in the Windows 10 Errors Troubleshooting Hub.

XINSTALL BY CLICKING THE DOWNLOAD FILE
Repair all Windows Updates Errors with Fortect:
SPONSORED
Windows update failures can be annoying! With Fortect, you will get rid of errors caused by missing or corrupted files after an update. The utility maintains a repository of the original Windows system file versions, and it uses a reverse algorithm to swap out the damaged ones for good ones.
- Download Fortect and install it on your PC
- Start the tool’s scanning process to look for corrupt files that are the source of the issues
- Right-click on Start Repair to resolve security and performance issues with your computer
- Fortect has been downloaded by 0 readers this month, rated 4.4 on TrustPilot
Since the beginning, new Windows updates have been bringing a lot of issues to users. Moreover, with the introduction of Windows 10 and the mandatory updates, the problems vastly increased.
Nonetheless, the importance of updates is unchanged: your security and overall performance are substantially improved with updates.
But, what to do if the updates won’t install and you are prompted with a certain error code, in this case, 0x80070663?
Well, this code seems to show up because of, either Microsoft Office package corruption or a general update failure. So, if you have any of the 2 mentioned issues, we prepared some workarounds for you.
How can I fix the 0x80070663 error?
- How can I fix the 0x80070663 error?
- 1. Use SFC to check the integrity of the system file
- 2. Disable antivirus
- 3. Reinstall Office
- 4. Hide the corrupted update with Show and Hide troubleshooter
- 5. Manually download cumulative updates from MicrosoftCatalogue
- 6. Run DISM
- 7. Run the Windows Update Troubleshooter
- 8. Uninstall previous updates
- 9. Restart Windows Update components
- 10. Restart the BITS service
- 11. Make sure Windows Update service is running
1. Use SFC to check the integrity of the system file
SFC tool is a valuable built-in tool with the main purpose to scan and resolve system files corruption. Due to a virus infection or misuse, certain files can get corrupted or even deleted.
That can heavily affect update features and cause errors like the one we are sorting out today.
You can use the SFC tool easily by following these instructions:
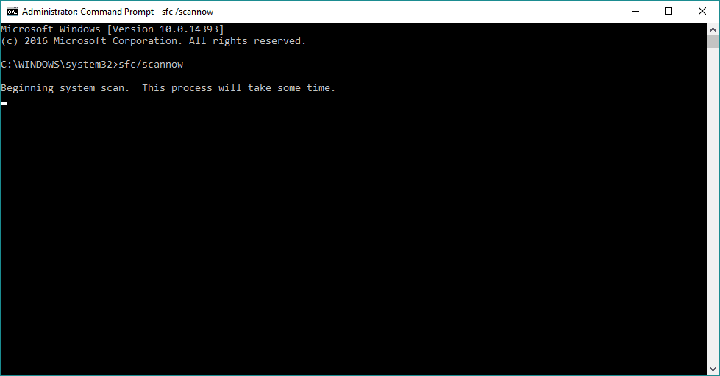
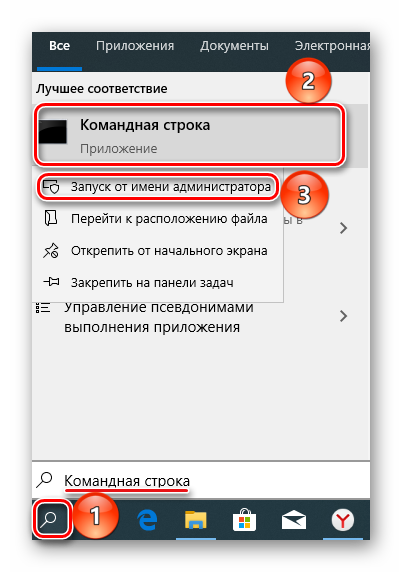
- Right-click Start and run Command Prompt (Admin).
- In the command line, type (or copy-paste) sfc/scannow

- Press enter to start the scanning.
- After the process is finished, you’ll be informed of possible errors.
If you are looking for a safest and faster solution; Fortect is the tool for you, it will scan, detect and replace any missing or corrupted file on your device with a new one one
2. Disable antivirus
You’ve probably already read numerous times that third-party antivirus programs can block Windows updates.
To make sure that’s not the case, temporarily disable your antivirus, and try to install updates.
If you can install your updates after disabling your antivirus, we recommend you try another security tool that won’t interfere with your system.
We recommend you to get one of the antivirus software with the highest detection rates because these have good threat databases and will most likely not detect false positives.
3. Reinstall Office
As we already stated, this specific error can occur due to Office update files corruption. As you are probably aware of, updates for Microsoft Office come through standard update procedure.
And they can, as same as other cumulative updates, get corrupted. Because of that, we advise you to uninstall and reinstall Office. At least temporarily, before some of the future patches fix this issue permanently.
Here’s how to do that:
- Open Control Panel.
- Choose Add or Remove programs.
- Find Microsoft Office and choose Uninstall.
- You may as well repair the installation. but that’s not your safest bet.
- Once the uninstalling task is finished, use CCleaner to clean remaining registry files.
- Restart the PC.
- Install Office again and check for updates.
Once it’s done, you should be able to download and install the latest Microsoft Office updates.
4. Hide the corrupted update with Show and Hide troubleshooter
Even though updates are forced in Windows 10, you can at least prevent certain, individual updates from downloading.
There so, you’ll temporarily resolve the issue and continue with the seamless updating process. Follow these steps to utilize this tool:
- Download Show or Hide Update tool.
- Save the file.
- Once you run the tool, it will search for available updates.
- Choose to hide the update file that provokes the error.
- Install updates.
Have in mind that some security updates are essential. So, it’s not recommended to restrict them from updating. Luckily, we have another solution that will address that sensitive update issue.
5. Manually download cumulative updates from MicrosoftCatalogue
When online updates don’t work because of various reasons, you can download and install those files manually. Microsoft Catalogue is the collection of all of the files used in updates.
Starting with small cumulative updates and leading to the major updates and patches. In case you’ve tried previous workarounds and the problem with certain files is persistent, follow these steps:
- Copy the name of the issued file.
- Go to Microsoft Catalogue here.
- Paste the name into the search box.
- Download the file. Keep mind on your system architecture (x86 or x64).
- Install the update file.
- Restart your PC.
- Check for additional updates to make sure the update is up and running.
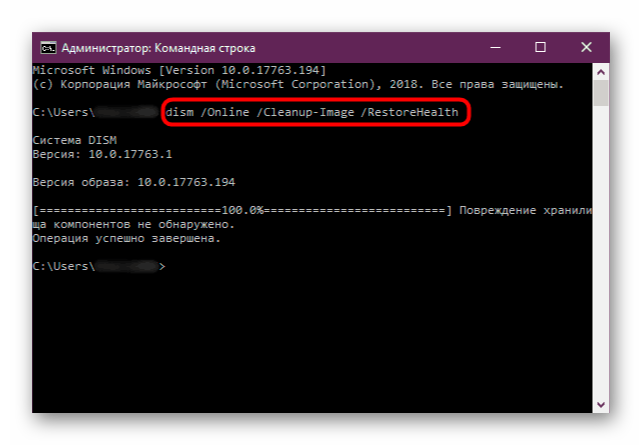
6. Run DISM
If the aforementioned SFC scan didn’t get the job done, we’re going to try a perhaps more advanced troubleshooting tool. You guessed it, we’re talking about DISM.
DISM stands for Deployment Image Servicing and Management, and as its name says, it deploys the system image all over again. Hopefully, the potential issue will vanish along the way.
Here’s how to run DISM in Windows 10:
- Open the Command Prompt as shown above.
- Enter the following command and press Enter:
- DISM.exe /Online /Cleanup-image /Restorehealth

- DISM.exe /Online /Cleanup-image /Restorehealth
- Wait for the process to finish.
- Restart your computer.
- In case the DISM can’t obtain files online, try using your installation USB or DVD. Insert media and type following command:
- DISM.exe /Online /Cleanup-Image /RestoreHealth /Source:C:RepairSourceWindows /LimitAccess
- Make sure to replace ”C:RepairSourceWindows” path of your DVD or USB.
- Follow further on-screen instructions.

- Windows 11 23H2: Top Features, coming September 26
- Adding layers in Windows 11’s Paint greatly increases RAM usage
- How to copy texts from images with Snipping Tool’s Text Action
- The Windows 11’s weather widget now offers a detailed weather forecast
7. Run the Windows Update Troubleshooter
The third troubleshooter we’re going to try and mention in this article is Windows 10’s built-in troubleshooting tool. You can use this tool for resolving all kinds of issues, including update problems.
Here’s how to run Windows 10’s built-in troubleshooter:
- Go to Settings.
- Head over to Updates & Security > Troubleshoot.
- Select Windows Update, and go to Run the Troubleshooter.

- Follow further on-screen instructions and let the process finish.
- Restart your computer.

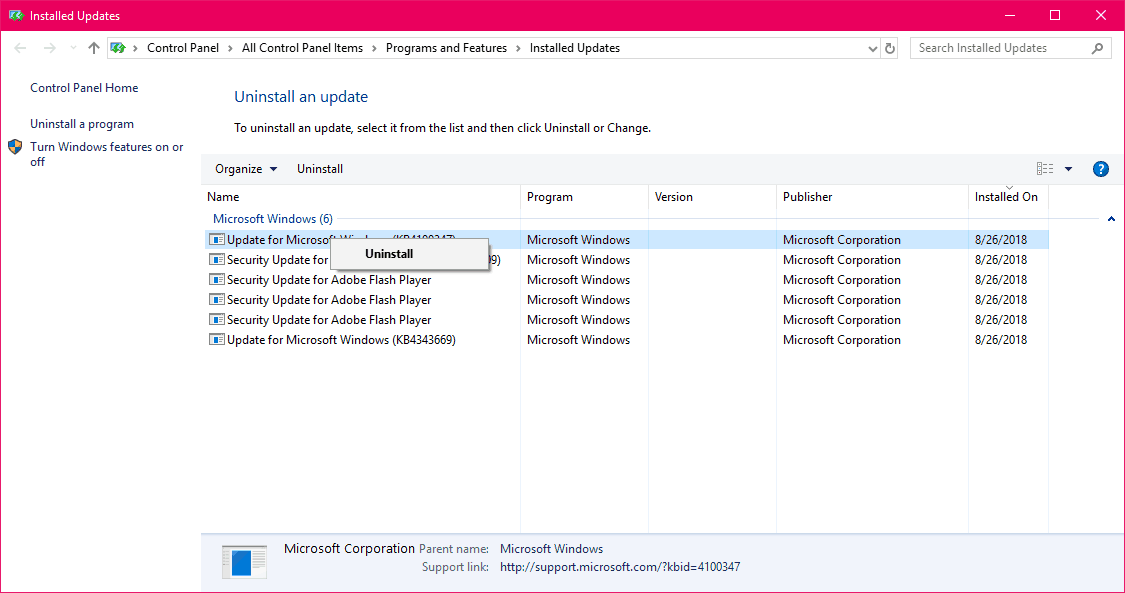
8. Uninstall previous updates
It’s also possible that the previous update you installed actually messed up your system. For example, it may disrupt the update mechanism, preventing you from installing future updates, thus leading to the error code 0x80070663.
If you doubt the legitimacy of the previous Windows update you installed on your computer, go and uninstall it.
Here’s how to do that:
- Go to Settings.
- Head over to Updates & Security > Windows Update.
- Go to Update history > Uninstall updates.

- Now, find the latest update installed on your computer (you can sort updates by date), right-click it, and go to Uninstall.
- Restart your computer.
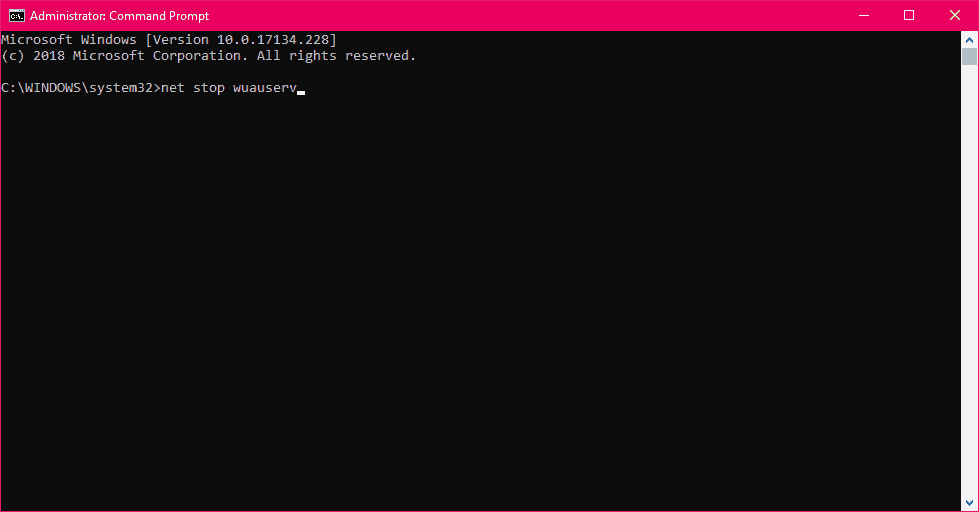
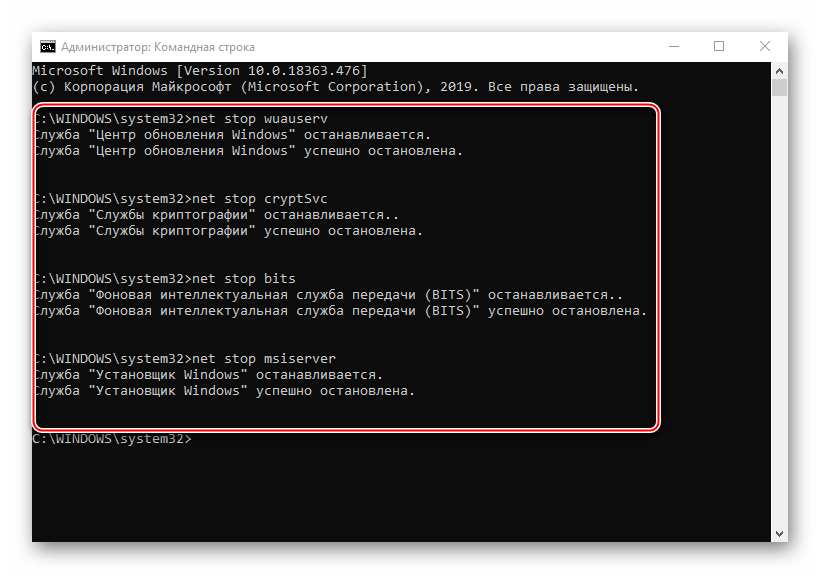
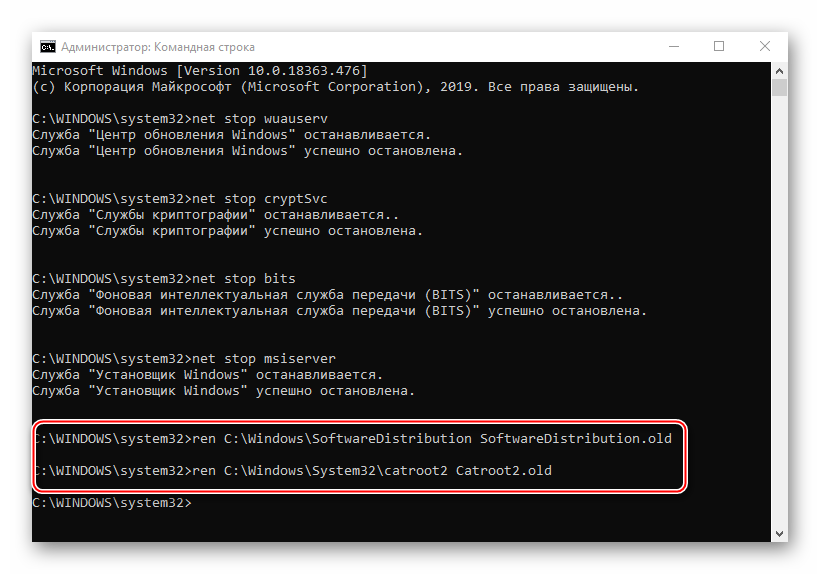
9. Restart Windows Update components
Another thing we’re going to try is resetting crucial Windows Update components inside your system. Here’s what you need to do:
- Start Command Prompt as administrator.
- When Command Prompt starts, run the following commands:
- net stop wuauserv
- net stop cryptSvc
- net stop bits
- net stop msiserver
- ren C:WindowsSoftwareDistribution SoftwareDistribution.old
- ren C:WindowsSystem32catroot2 Catroot2.old
- net start wuauserv
- net start cryptSvc
- net start bits
- net start msiserver
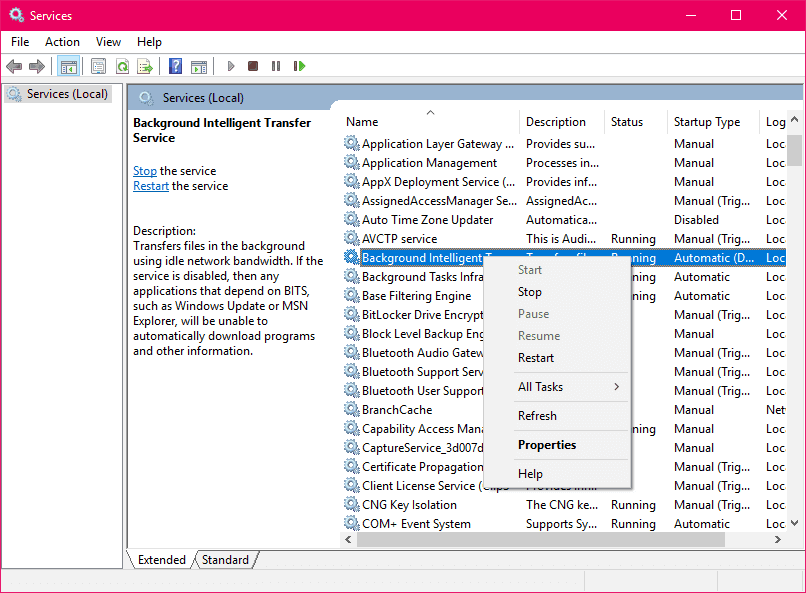
10. Restart the BITS service
Speaking of crucial Windows Update components, the BITS service is one of the most important ones. If this service isn’t running, well, you won’t be able to install any updates.
So, make sure the BITS service is on:
- Go to Search, type services.msc, and open Services.
- Find Background Intelligent Transfer Service. Right-click and open Restart.

- Wait for the process to restart.
- Now, on the General tab, find Startup type and choose Automatic.
- If the BITS is not running, right-click and choose Start.
- Confirm selection and close window.
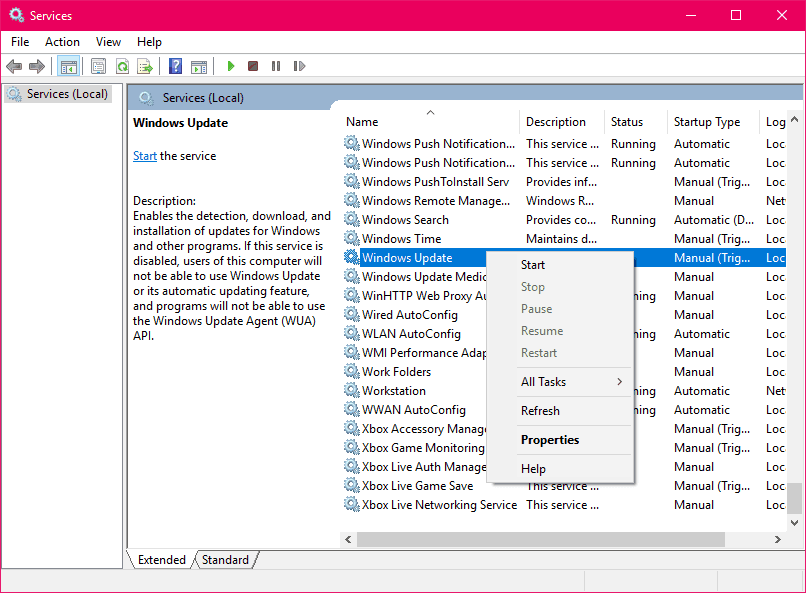
11. Make sure Windows Update service is running
The same goes for the Windows Update service:
- Go to Search, type services.msc, and open Services.
- Find the Windows Update service. Right-click and open Properties.
- On the General tab, find Startup type and choose Automatic.
- If the service is not running, right-click and choose Start.
- Confirm selection and close window.
With this, we complete the list of fixes for the 0x80070663 error. In case you have any alternative workarounds, questions, or suggestions, please tell us in the comments section.
![]()
Код ошибки 0x80070663 часто появляется, когда в Windows 10 не удается установить обновления для Microsoft Office 2013 или 2016. Это может быть связано с нелицензионной установкой Microsoft Office, но в некоторых случаях служба обновлений Windows также может быть к этому причастна. Обновления Windows обычно обеспечивают лучшую безопасность и стабильную работу наряду с обновлениями для программного обеспечения, связанного с Microsoft, например, уже упомянутый Microsoft Office.
К счастью, проблемы, связанные с обновление операционной системы Windows, достаточно просто решить, причем за довольно короткий срок. В данной статье вы сможете найти причины появления и несколько решений для ошибки 0x80070663.
Что вызывает ошибку Windows Update 0x80070663 в Windows 10?

Вот некоторые факторы, ответственные за появление ошибки обновления окна 0x80070663:
- Некорректная установка Office: код ошибки может иногда возникать из-за проблем, возникших во время предыдущей установки Microsoft Office. В таких случаях придется восстановить его из панели приложений и встроенных функций Windows.
- Служба Windows Update. Служба Windows Update отвечает за обновление вашей системы. Если она не запущена, вы столкнетесь со многими проблемами, связанными с обновлением, типа этой.
Чтобы устранить проблему, вы можете выполнить действия, представленные ниже.
Решение 1. «Ремонт» установки Microsoft Office
Как было упомянуто выше, основной причиной кода ошибки является последняя установка Microsoft Office, которая прошла не совсем корректно. С данной проблемой можно легко справиться, и беспокоиться определенно не стоит. Вам просто нужно будет «отремонтировать» установку, следуя инструкциям ниже:
- Нажмите Windows Key + X и нажмите «Приложения и возможности» вверху списка.
- После появления окна выполните поиск Microsoft Office, введя в строку поиска или пройдя по списку.
- Как только вы нашли его, выделите и нажмите «Изменить».
- Сначала зайдите в «Быстрый Ремонт» и посмотрите, решит ли это проблему. Если действие не поможет, попробуйте «онлайн-ремонт». «Онлайн ремонт» займет немного больше времени, поэтому обязательно наберитесь терпения.
- Запустите обновление снова.
Решение 2. Проверьте службу Центра обновления Windows
Другим потенциальным фактором кода ошибки 0x80070663 является служба обновления Windows. Как мы уже упоминали, данная служба должна быть запущена для установки обновлений вашей системы. В случае ее остановки вы столкнетесь с рядом ошибок обновления во время установки или загрузки. Убедитесь, что служба работает, выполнив следующие действия:
- Нажмите клавиши Windows + R, чтобы открыть диалоговое окно «Выполнить».
- Введите «services.msc» и нажмите кнопку Enter.
- В списке служб найдите Windows Update.
- Дважды щелкните по ней, чтобы открыть ее «Свойства».
- Если статус службы «приостановлен», нажмите «Пуск», чтобы запустить службу.
- Попробуйте запустить обновление снова.
Решение 3. Установка обновления вручную
Вы можете исправить эту проблему в виде ошибки 0x80070663, загрузив и установив нужное обновление вручную. Для этого вам понадобится KB-код обновления, которое вы пытаетесь установить. Данную информацию можно найти в сообщении об ошибке обновления Windows. Получив код базы , выполните следующие действия, чтобы установить обновление вручную:
- Откройте браузер и перейдите на веб-сайт каталога Центра обновления Майкрософт.
- Там найдите обновление, которое вы хотите установить, введя код KB.
- Загрузите обновление для вашей системы (x86 или x64).
- После того, как обновление загрузится на ваш ПК — просто запустите его.
Рассказываем, из-за чего возникает ошибка с кодом 0x80070663 и как ее можно исправить.
Этот код ошибки появляется, когда пользователь пытается обновить операционную систему. Происходит это по двум причинам:
- После неудачной установки Microsoft Office. Иногда в ходе инсталляции пакета приложений возникает сбой и часть файлов записывается на диск некорректно. Потом не удается обновить соответствующую программу и ОС в целом.
- Из-за проблем в центре обновлений Windows. Служба обновлений Windows и ее компонентов нередко работает со сбоями сама по себе и генерирует кучу ошибок. Включая ту, что мы обсуждаем в статье.
Восстанавливаем файлы Microsoft Office
Так как наша проблема иногда связана с обновлением Microsoft Office, то начать стоит с исправления ошибок в нем.
Для этого попытаемся запустить автоматическую службу починки поврежденных файлов «офиса».
- Кликаем по меню «Пуск».

Или же активируем его клавишей Win
- Переходим в основные параметры Windows.

Нам нужные новые настройки Windows 10
- Внутри выбираем раздел «Приложения».

Вот и нужный раздел меню. Сюда же можно попасть, одновременно нажав клавиши Win + X
- Переходим во вкладку «Приложения и возможности» (должна быть открыта по умолчанию).
- В списке программ находим Microsoft Office. Кликаем по нему левой кнопкой мыши.
- Затем нажимаем на кнопку «Изменить».
- А потом выбираем пункт «Онлайн Ремонт».
Система попытается найти испорченные файлы и заменить их новыми. Спустя какое-то время «офис» будет «пересобран» заново.
- Перезагружаем компьютер.
- Снова пытаемся обновить систему.
Перезапускаем службу обновления Windows
Иногда проблема кроется не в пакете приложений Microsoft Office, а в самом механизме обновления ОС. В этом случае стоит выключить ключевую службу установки патчей и включить ее заново.
Чтобы это сделать, действуем следующим образом:
- Открываем встроенный поисковик (тот, что справа от меню «Пуск»).
- Вводим в поисковую строку слово «Службы».
- Запускаем соответствующую программу от имени администратора.

Для запуска может потребоваться пароль администратора
- Ищем в списке служб «Центр обновления Windows» и кликаем по ней дважды.

Вот и нужный пункт
- Откроется окно управления параметрами службы. Жмем на кнопку «Остановить».

Выключаем…
- Ждем, когда служба завершит работу. Когда станет активна кнопка «Запустить», нажимаем на нее.

Включаем…
Устанавливаем обновления вручную
Если ошибка продолжает появляться, можно установить сбойное обновление вручную.
Для этого:
- Узнаем код обновления, которое надо установить (его можно посмотреть в настройках Windows).
- После этого заходим в каталог центра обновлений Майкрософт.
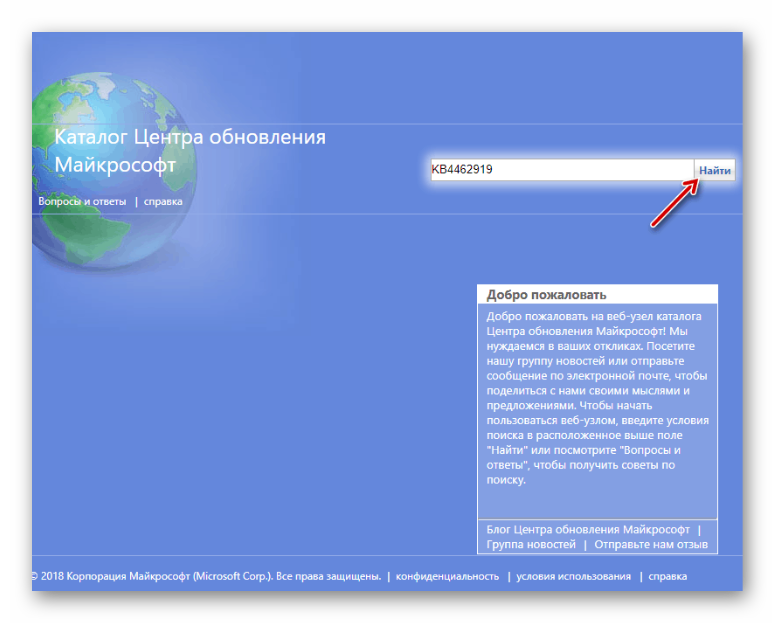
- Кликаем по поисковому полю.

Поиск справа вверху
- Вписываем сюда код обновления (обычно он указывается в скобках и имеет формат типа KB4528760)
- После этого нажимаем на кнопку «Найти» или просто на клавишу Enter.

Вот как примерно это должно выглядеть
- Появится список обновлений, подходящих под наши критерии. Выбираем необходимое и нажимаем на кнопку «Загрузить» справа от него.

Здесь есть вся нужная информация об обновлениях
- Потом запускаем установку патча двойным кликом (как и любое другое приложение).
![]() Загрузка …
Загрузка …
Post Views: 1 656
-
Home
-
News
- How to Fix Windows Update Error 0x80070663 in Windows 10?
By Sonya |
Last Updated
Microsoft has released new updates and you want to download them to keep your system up to date. However, you meet the error 0x80070663 when updating your system, so what should you do? In this post, MiniTool has listed several methods to get rid of the error.
Microsoft often releases updates to offer some new features or fix bugs. But you can meet different error codes (0x80070003 and 0xca00a000) when updating your Windows system. If you are troubled with the error 0x80070663, then this post is what you need. You can find multiple methods to fix it.
Method 1: Run Windows Update Troubleshooter
If you meet error codes when you are updating your Windows system, don’t worry because there is a powerful built-in feature in Windows – Windows Update Troubleshooter, which is designed to fix different update errors.
Therefore, you should run the Windows Update Troubleshooter to get rid of error 0x80070663. Here is the tutorial:
Step 1: Press the Win + I keys at the same time to open the Settings. Choose Update & Security.
Step 2: Go to the Troubleshoot tab, click Windows Update, and then click Run the troubleshooter.

Step 3: Then you just need to wait for the process to complete and follow the instructions to fix the error.
Step 4: Reboot your computer to check if the 0x80070663 error is gone.
Related post: Fixed: Windows Update Error 0x80246019 on Windows 10
Method 2: Restart Windows Update Components
You can try to restart Windows Update components to get rid of error 0x80070663. Here is the way to do:
Step 1: Type cmd in the Search bar and then right-click Command Prompt to choose Run as administrator.
Step 2: Type the following commands in the window and press Enter after each command.
net stop wuauserv
net stop cryptSvc
net stop bits
net stop msiserver
ren C:\Windows\SoftwareDistribution SoftwareDistribution.old
ren C:\Windows\System32\catroot2 Catroot2.oldnet start wuauserv
net start cryptSvc
net start bits
net start msiserver
Step 3: Close Command Prompt, and try to update your system again to check if the 0x80070663 error still exists.
Related post: 3 Solutions for Windows Update Components Must Be Repaired
If you keep meeting error 0x80070663, then you should run DISM and SFC tools to check the issue that is causing the error, and then fix it. Follow the guide below to do that:
Step 1: Open Command Prompt as an administrator.
Step 2: Type DISM.exe /Online /Cleanup-image /Restorehealth in the window, then press Enter. Wait for the process to complete.
Step 3: Type sfc /scannow in the windows and then press Enter. Wait for the process to complete.
Step 4: Restart your PC to see whether error 0x80070663 is fixed.
Method 4: Repair Microsoft Office
You may meet error 0x80070663 when the Microsoft Office installation files are corrupted, therefore, you can try to repair Microsoft Office to fix it. Follow the guide below to do it:
Step 1: Press the Win + I keys at the same time to open Settings.
Step 2: Click Apps, and then go to the Programs & features tab.
Step 3: Find Microsoft Office entry, click it to choose Modify.
Step 4: Choose the Quick Repair option and then click Repair to repair the Office installation files.
Step 5: Restart your computer to check if the error is fixed.
Bottom Line
To sum up, if you meet the 0x80070663 error when updating your system, and want to find some methods to get rid of it, then you should try the methods mentioned above.
About The Author
Position: Columnist
Author Sonya has been engaged in editing for a long time and likes to share useful methods to get rid of the common problems of Windows computers, such as Windows Update error. And she aims to help more people to protect their data. What’s more, she offers some useful ways to convert audio and video file formats. By the way, she likes to travel, watch movies and listen to music.
Содержание
- 1 Что вызывает ошибку Windows Update 0x80070663 в Windows 10?
- 2
Решение 1. «Ремонт» установки Microsoft Office - 3
Решение 2. Проверьте службу Центра обновления Windows - 4
Решение 3. Установка обновления вручную - 5 Исправляем ошибку 0x80070643 в Windows 10
- 6 How to resolve update error 0x80070663 in Windows 10
Код ошибки 0x80070663 часто появляется, когда в Windows 10 не удается установить обновления для Microsoft Office 2013 или 2016. Это может быть связано с нелицензионной установкой Microsoft Office, но в некоторых случаях служба обновлений Windows также может быть к этому причастна. Обновления Windows обычно обеспечивают лучшую безопасность и стабильную работу наряду с обновлениями для программного обеспечения, связанного с Microsoft, например, уже упомянутый Microsoft Office.
К счастью, проблемы, связанные с обновление операционной системы Windows, достаточно просто решить, причем за довольно короткий срок. В данной статье вы сможете найти причины появления и несколько решений для ошибки 0x80070663.
Вот некоторые факторы, ответственные за появление ошибки обновления окна 0x80070663:
- Некорректная установка Office: код ошибки может иногда возникать из-за проблем, возникших во время предыдущей установки Microsoft Office. В таких случаях придется восстановить его из панели приложений и встроенных функций Windows.
- Служба Windows Update. Служба Windows Update отвечает за обновление вашей системы. Если она не запущена, вы столкнетесь со многими проблемами, связанными с обновлением, типа этой.
Чтобы устранить проблему, вы можете выполнить действия, представленные ниже.
Решение 1. «Ремонт» установки Microsoft Office
Как было упомянуто выше, основной причиной кода ошибки является последняя установка Microsoft Office, которая прошла не совсем корректно. С данной проблемой можно легко справиться, и беспокоиться определенно не стоит. Вам просто нужно будет «отремонтировать» установку, следуя инструкциям ниже:
- Нажмите Windows Key + X и нажмите «Приложения и возможности» вверху списка.
- После появления окна выполните поиск Microsoft Office, введя в строку поиска или пройдя по списку.
- Как только вы нашли его, выделите и нажмите «Изменить».
- Сначала зайдите в «Быстрый Ремонт» и посмотрите, решит ли это проблему. Если действие не поможет, попробуйте «онлайн-ремонт». «Онлайн ремонт» займет немного больше времени, поэтому обязательно наберитесь терпения.
- Запустите обновление снова.
Решение 2. Проверьте службу Центра обновления Windows
Другим потенциальным фактором кода ошибки 0x80070663 является служба обновления Windows. Как мы уже упоминали, данная служба должна быть запущена для установки обновлений вашей системы. В случае ее остановки вы столкнетесь с рядом ошибок обновления во время установки или загрузки. Убедитесь, что служба работает, выполнив следующие действия:
- Нажмите клавиши Windows + R, чтобы открыть диалоговое окно «Выполнить».
- Введите «services.msc» и нажмите кнопку Enter.
- В списке служб найдите Windows Update.
- Дважды щелкните по ней, чтобы открыть ее «Свойства».
- Если статус службы «приостановлен», нажмите «Пуск», чтобы запустить службу.
- Попробуйте запустить обновление снова.
Решение 3. Установка обновления вручную
Вы можете исправить эту проблему в виде ошибки 0x80070663, загрузив и установив нужное обновление вручную. Для этого вам понадобится KB-код обновления, которое вы пытаетесь установить. Данную информацию можно найти в сообщении об ошибке обновления Windows. Получив код базы , выполните следующие действия, чтобы установить обновление вручную:
- Откройте браузер и перейдите на веб-сайт каталога Центра обновления Майкрософт.
- Там найдите обновление, которое вы хотите установить, введя код KB.
- Загрузите обновление для вашей системы (x86 или x64).
- После того, как обновление загрузится на ваш ПК — просто запустите его.
Нашли опечатку? Выделите текст и нажмите Ctrl + Enter
 При обновлении операционной системы довольно часто происходят сбои. Один из самых распространенных – ошибка 0x80070643. О ней известно было еще до выхода «десятки», поэтому уже выработано несколько рабочих методов, с помощью которых ее можно исправить.
Исправляем ошибку 0x80070643 в Windows 10
Ошибка не сопровождает какой-то определенный компонент и может относится к обновлениям разной степени важности, а значит, нет конкретной причины ее появления. Способов решения проблемы, следовательно, тоже много — начиная с устранения неполадок в службе, которая обеспечивает обновление Виндовс 10, и заканчивая предотвращением конфликтов с уже установленным на устройстве ПО. Рассмотрим каждый из них по порядку.
Способ 1: Устранение проблем в системе обновления
У Microsoft есть свой инструмент устранения подобных ошибок, поэтому в первую очередь воспользуемся им.
Скачать средство устранения неполадок Центра обновления Windows с официального сайта
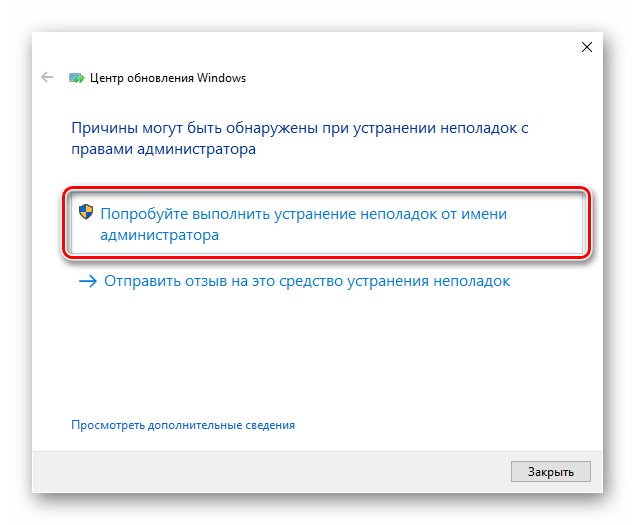
- Скачиваем, запускаем утилиту и нажимаем «Далее».
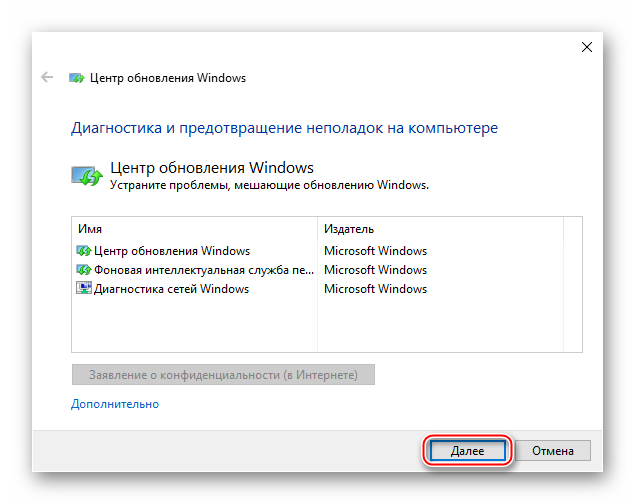
После анализа системы выбираем вариант «Попробуйте выполнить устранение неполадок от имени администратора». Утилита перезапустится и повторит диагностику, чтобы найти и устранить дополнительные ошибки.</li>
Когда процесс завершится, закрываем средство устранения неполадок.</li>
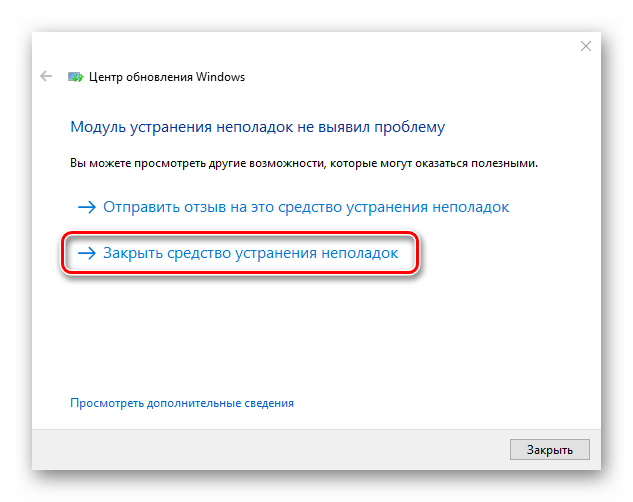
Перезагружаем устройство и повторно запускаем проверку обновлений.</li>
</ol>
Способ 2: Загрузка обновлений вручную
Корпорацией Microsoft также разработан «Каталог Центра обновления Виндовс», в котором можно найти актуальные драйвера, обновления и исправления. Например, если какой-нибудь файл некорректно загрузился на компьютер, то он вряд ли установится. В этом случае можно загрузить его повторно.
Подробнее: Устанавливаем обновления для Windows 10 вручную
Способ 3: Восстановление поврежденных файлов системы
В OS Windows 10 есть два инструмента – dism.exe и sfc.exe, благодаря которым можно проверить и восстановить целостность системных файлов. С помощью первой утилиты восстанавливается хранилище системных компонентов. С помощью второй сканируются все системные защищенные файлы, а поврежденные меняются кэшированной копией.
Подробнее: Проверка и восстановление целостности системных файлов в Windows 10
Способ 4: Устранение проблем с НЕТ Фреймворк
NET Framework – это программная платформа, предназначенная для запуска приложений и игр. Когда она повреждена, есть высокий риск, что при обновлении произойдет сбой. Для начала воспользуемся специальным средством, которое проверит программную платформу и, если найдет ошибки, исправит их.
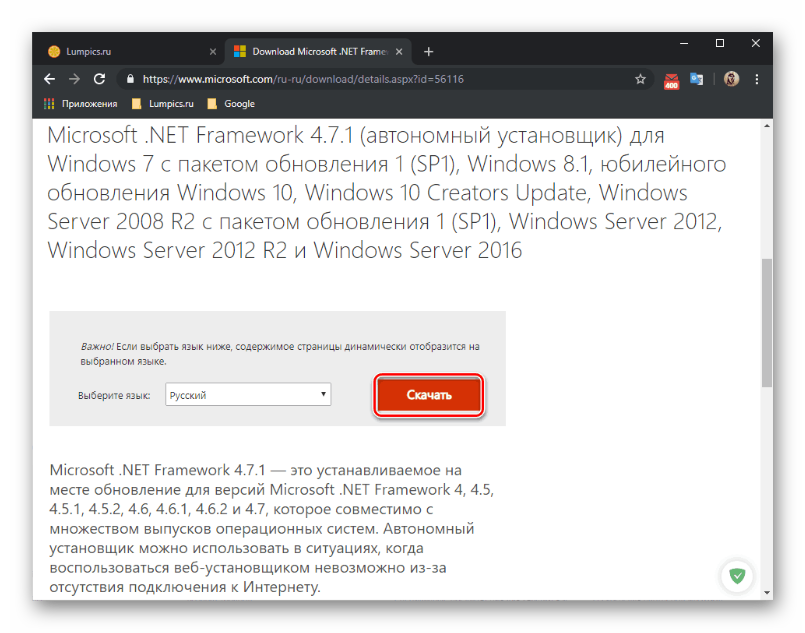
Скачать NET Framework Repair Tool с официального сайта
- Запускаем утилиту, принимаем условия разработчиков и нажимаем «Next».
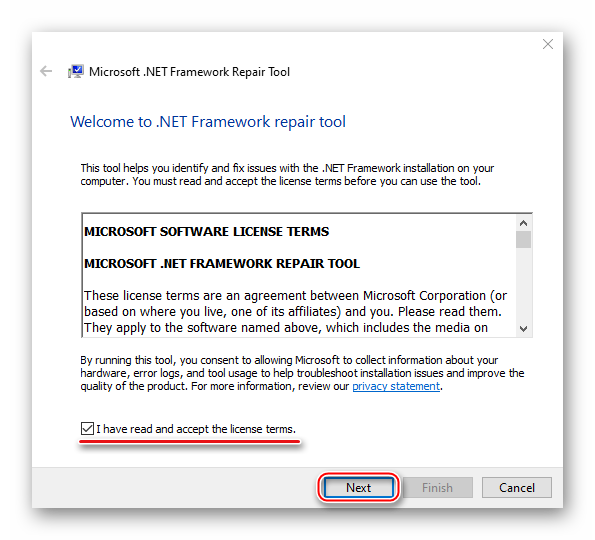
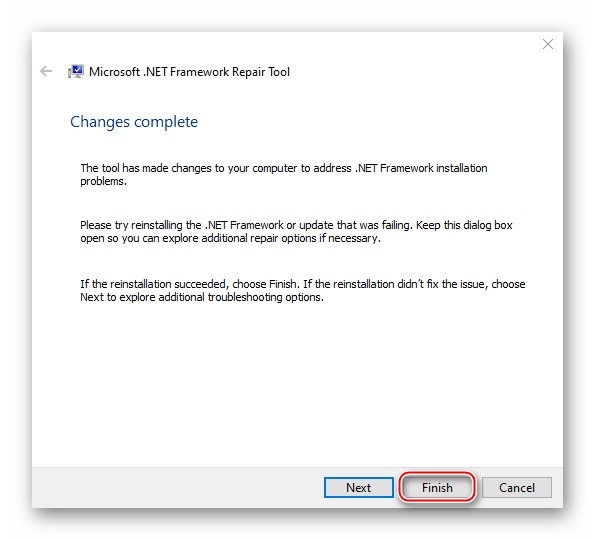
Если инструмент найдет неполадки, связанные с функционированием платформы, то предложит их исправить. Щелкаем «Next».</li>

Когда утилита внесет необходимые изменения, жмем «Finish».</li>
</ol>
Если проблема осталась, пробуем обновить НЭТ Фреймворк. Другой вариант — переустанавливаем ПО, предварительно удалив его старую версию.
Подробнее:Как обновить .NET FrameworkУдаление программного компонента Microsoft .NET Framework
Способ 5: Очистка компонентов обновлений Виндовс 10
В системе есть две важные служебные директории – «SoftwareDistribution» и «Catroot2». Первый каталог используется для загрузки обновлений перед их установкой. Они хранятся там какое-то время, а затем система автоматически удаляет некоторые из них. В папке «Catroot2» лежат файлы, которые также используются во время обновления. Сбросить компоненты можно очисткой или переименованием этих каталогов.
- Открываем консоль с правами администратора.
Последовательно вписываем указанные ниже команды и выполняем их нажатием «Enter». Это отключит службы, которые могут помешать выполнять дальнейшие действия. net stop msiservernet stop wuauservnet stop bitsnet stop cryptsvc</li>
Делаем резервные копии указанных выше папок. Для этого прописываем сначала
ren C:WindowsSoftwareDistribution SoftwareDistribution.old
а затем
ren C:WindowsSystem32catroot2 Catroot2.old
По этим путям потом можно будет найти созданные каталоги.</li>
Снова по очереди запускаем остановленные службы с помощью кодов: net start msiservernet start wuauservnet start bitsnet start cryptsvc.</li>Вписываем в строку Exit и закрываем консоль.</li>
Читайте также: Запуск «Командной строки» от имени администратора в Windows 10
В принципе, после остановки служб эти папки можно просто удалить. При следующей загрузке обновлений система все равно создаст новые. В данном случае были сохранены резервные копии, чтобы если что-то пойдет не так, можно было бы их восстановить.</ol>
Способ 6: Удаление вирусов, отключение антивируса
Вирусы негативно влияют на работу системы в целом, поэтому глубокое сканирование ее антивирусом может устранить ошибку. В свою очередь антивирусное ПО и Защитник Виндовс могут блокировать установку программ, и файлы обновления системы часто не являются исключением. Чтобы проверить этот вариант, можно на время отключить брандмауэр и антивирус. Главное, помнить, что в этот момент Виндовс будет уязвима для вирусов, поэтому независимо от результата защитное ПО следует снова запустить.
Подробнее:Отключение антивирусаОтключение Защитника в Windows 10
Другой вариант – по очереди удалить недавно установленное программное обеспечение и игры, так как именно они могут вызывать ошибку. Иногда есть смысл подождать, когда придут очередные обновления, особенно если проблема возникает при установке двух-трех компонентов, которые не являются критическими. Бывали случаи, когда последующий апдейт завершился успешно.
Выше нами были рассмотрены наиболее распространенные способы устранения ошибки 0x80070643. Если вы знаете иные методы решения проблемы, напишите об этом. Возможно, эта информация поможет другим пользователям, которые уже задумались о переустановке системы. Мы рады, что смогли помочь Вам в решении проблемы.Опишите, что у вас не получилось. Наши специалисты постараются ответить максимально быстро.
Помогла ли вам эта статья?
Since the beginning, new Windows updates have been bringing a lot of issues to users.
Moreover, with the introduction of Windows 10 and the mandatory updates, the problems vastly increased.
Nonetheless, the importance of updates is unchanged: your security and overall performance are substantially improved with updates.
Furthermore, without those updates, your system can lack some important features.
But, what to do if the updates won’t install and you are prompted with a certain error code, in this case, 0x80070663?
Well, this code seems to show up because of, either Microsoft Office package corruption or a general update failure. So, if you have any of the 2 mentioned issues, we prepared some workarounds for you.
Looking for the best tools to fix Windows update errors? Here are our top picks.
How to resolve update error 0x80070663 in Windows 10
Table of contents:
Fix – Windows 10 update error 0x80070663
Solution 1 – Use SFC to check the integrity of the system files
SFC tool is a valuable built-in tool with the main purpose to scan and resolve system files corruption. Due to a virus infection or misuse, certain files can get corrupted or even deleted.
That can heavily affect update features and cause errors like the one we are sorting out today.
You can use the SFC tool easily by following these instructions:
- Right-click Start and run Command Prompt (Admin).
- In the command line, type (or copy-paste) sfc/scannow
- Press enter to start the scanning.
- After the process is finished, you’ll be informed of possible errors.
Learn to use System File Checker like an expert! Read our guide to see how!
Solution 2 – Reinstall Office
As we already stated, this specific error can occur due to Office update files corruption. As you are probably aware of, updates for Microsoft Office come through standard update procedure.
And they can, as same as other cumulative updates, get corrupted. Because of that, we advise you to uninstall and reinstall Office. At least temporarily, before some of the future patches fix this issue permanently.
Here’s how to do that:
- Open Control Panel.
- Choose Add or Remove programs.
- Find Microsoft Office and choose Uninstall.
- You may as well repair the installation. but that’s not your safest bet.
- Once the uninstalling task is finished, use CCleaner to clean remaining registry files.
- Restart the PC.
- Install Office again and check for updates.
Once it’s done, you should be able to download and install the latest Microsoft Office updates.
Solution 3 – Hide the corrupted update with Show and Hide troubleshooter
Even though updates are forced in Windows 10, you can at least prevent certain, individual updates from downloading.
There so, you’ll temporarily resolve the issue and continue with the seamless updating process. Follow these steps to utilize this tool:
- Download the Show or Hide Update tool from here.
- Save the file.
- Once you run the tool, it will search for available updates.
- Choose to hide the update file that provokes the error.
- Install updates.
Have in mind that some security updates are essential. So, it’s not recommended to restrict them from updating. Luckily, we have another solution that will address that sensitive update issue.
Solution 4 – Manually download cumulative updates from Microsoft Catalogue
When online updates don’t work because of various reasons, you can download and install those files manually. Microsoft Catalogue is the collection of all of the files used in updates.
Starting with small cumulative updates and leading to the major updates and patches. In case you’ve tried previous workarounds and the problem with certain files is persistent, follow these steps:
- Copy the name of the issued file.
- Go to Microsoft Catalogue here.
- Paste the name into the search box.
- Download the file. Keep mind on your system architecture (x86 or x64).
- Install the update file.
- Restart your PC.
- Check for additional updates to make sure the update is up and running.
Is my Windows up to date? Find out from our constantly updated article!
Solution 5 – Run DISM
If the aforementioned SFC scan didn’t get the job done, we’re going to try a perhaps more advanced troubleshooting tool. You guessed it, we’re talking about DISM.
DISM stands for Deployment Image Servicing and Management, and as its name says, it deploys the system image all over again. Hopefully, the potential issue will vanish along the way.
Here’s how to run DISM in Windows 10:
- Open the Command Prompt as shown above.
- Enter the following command and press Enter:
-
- DISM.exe /Online /Cleanup-image /Restorehealth
-
- Wait for the process to finish.
- Restart your computer.
- In case the DISM can’t obtain files online, try using your installation USB or DVD. Insert media and type following command:
-
- DISM.exe /Online /Cleanup-Image /RestoreHealth /Source:C:RepairSourceWindows /LimitAccess
-
- Make sure to replace ”C:RepairSourceWindows” path of your DVD or USB.
- Follow further on-screen instructions.
Epic guide alert! Everything you need to know about using DISM is right here!
Solution 6 – Run the Update Troubleshooter
The third troubleshooter we’re going to try and mention in this article is Windows 10‘s built-in troubleshooting tool. You can use this tool for resolving all kinds of issues, including update problems.
Here’s how to run Windows 10‘s built-in troubleshooter:
- Go to Settings.
- Head over to Updates & Security > Troubleshoot.
- Select Windows Update, and go to Run the Troubleshooter.
- Follow further on-screen instructions and let the process finish.
- Restart your computer.
Solution 7 – Disable antivirus
You’ve probably already read numerous times that third-party antivirus programs can block Windows updates.
To make sure that’s not the case, temporarily disable your antivirus, and try to install updates.
Solution 8 – Uninstall previous updates
It’s also possible that the previous update you installed actually messed up your system. For example, it may disrupt the update mechanism, preventing you from installing future updates.
If you doubt the legitimacy of the previous Windows update you installed on your computer, go and uninstall it.
Here’s how to do that:
- Go to Settings.
- Head over to Updates & Security > Windows Update.
- Go to Update history > Uninstall updates.
- Now, find the latest update installed on your computer (you can sort updates by date), right-click it, and go to Uninstall.
- Restart your computer.
Need more ideas on how to uninstall Windows updates? Check out this guide.
Solution 9 – Restart Windows Update components
Another thing we’re going to try is resetting crucial Windows Update components inside your system. Here’s what you need to do:
- Start Command Prompt as administrator.
- When Command Prompt starts, run the following commands:
- net stop wuauserv
- net stop cryptSvc
- net stop bits
- net stop msiserver
- ren C:WindowsSoftwareDistribution SoftwareDistribution.old
- ren C:WindowsSystem32catroot2 Catroot2.old
- net start wuauserv
- net start cryptSvc
- net start bits
- net start msiserver
Solution 10 – Restart the BITS service
Speaking of crucial Windows Update components, the BITS service is one of the most important ones. If this service isn’t running, well, you won’t be able to install any updates.
So, make sure the BITS service is on:
- Go to Search, type services.msc, and open Services.
- Find Background Intelligent Transfer Service. Right-click and open Restart.
- Wait for the process to restart.
- Now, on the General tab, find Startup type and choose Automatic.
- If the BITS is not running, right-click and choose Start.
- Confirm selection and close window.
Solution 11 – Make sure Windows Update service is running
The same goes for the Windows Update service:
- Go to Search, type services.msc, and open Services.
- Find the Windows Update service. Right-click and open Properties.
- On the General tab, find Startup type and choose Automatic.
- If the service is not running, right-click and choose Start.
- Confirm selection and close window.
With this, we complete the list. In case you have any alternative workarounds, questions, or suggestions, please tell us in the comments section.
Editor’s Note: This post was originally published in August 2017 and has been since completely revamped and updated for freshness, accuracy, and comprehensiveness.
RELATED STORIES YOU NEED TO CHECK OUT:
- Windows 10 Update Error 0x8007001F [Fix]
- Windows 10 Update Error 0x80080008 [Fix]
- “You need to fix your Microsoft account” message on Windows 10 [Fix]
- 0xC1900101 driver errors in Windows 10 Creators Update [FIX]
Используемые источники:
- https://gamesqa.ru/kompyutery/0x80070663-13703/
- https://lumpics.ru/how-fix-0x80070643-error-in-windows-10/
- https://windowsreport.com/windows-10-update-error-0x80070663/