Произошла ошибка при попытке запуска выбранной виртуальной машины структура идентификатора безопасности является недопустимой (0x80070539)
Я недавно работал с некоторыми действительно старыми виртуальными машинами в среде разработки, которая пришла из другой организации. Одна конкретная виртуальная машина выдала мне сообщение об ошибке, когда я попытался запустить ее “ » произошла ошибка при попытке запустить выбранную виртуальную машину… структура идентификатора безопасности недопустима (0x80070539)”. Когда это происходит, Hyper-V в основном не имеет разрешения на запуск выбранных виртуальных машин от имени пользователя. Быстрый административный командлет PowerShell предоставит мне или пользователю разрешение и позволит нам запустить виртуальную машину;
Grant-VMConnectAccess -VMName "имя виртуальной машины, не запускающейся" - имя пользователя
"Домен\имя пользователя текущего пользователя"
Изменение-VMName в соответствии с виртуальной машиной, дающей вам ошибку, и доменом\именем пользователя, от имени которого вы сейчас вошли в систему.
Как только вы выполните эту команду, виртуальная машина запустится без каких-либо проблем.
- Remove From My Forums
-
Question
-
I haven’t seen any mention of this in any of the forums. I’m attempting to import a virtual machine to a Server 2012 R2 Hyper-V system. Normally this is fairly straight-forward. However, the imported virtual machine will not start. I’m getting the following
error message:[Window Title]
Hyper-V Manager[Main Instruction]
An error occurred while attempting to start the selected virtual machine(s).[Content]
‘Unnamed VM’ could not initialize.An attempt to read or update virtual machine configuration failed.
[Expanded Information]
‘Unnamed VM’ could not initialize. (Virtual machine ID )‘Unnamed VM’ could not read or update virtual machine configuration: The security ID structure is invalid. (0x80070539). (Virtual machine ID 223C7883-08C2-43ED-B5D1-7ABFC0940F64)
I’m not familiar with what is going on here. Any ideas?
Thank you.
Answers
-
-
Marked as answer by
Monday, January 27, 2014 7:21 AM
-
Marked as answer by
Что такое Гипер-В?
Microsoft Hyper-V используется для создания виртуальных машин, как 32-битных, так и 64-битных, в операционной системе Windows. В версиях Windows 8 и более поздних версиях Hyper-V взял на себя функции Windows Virtual PC и стал основным компонентом виртуализации оборудования для устройств Windows.
Hyper-V облегчает создание виртуальных машин в Windows, будь то клиентские или серверные системы. Процедура создания виртуальной машины в Hyper-V довольно проста. Помимо других преимуществ, предлагаемых виртуальными машинами, одной из примечательных особенностей этой технологии является возможность переноса или импорта виртуальных машин из одной системы в другую.
При импорте или миграции виртуальной машины вы получите ошибку Hyper-V 0x80070539. Проблема может возникнуть во время импорта или при запуске или инициализации виртуальной машины.
Как исправить ошибку Hyper-V 0x80070539
Проблема возникает из-за различий между средами (на одном и том же компьютере или на другом ПК), из которых копируется виртуальная машина и куда она импортируется. Из-за этой разницы главный компьютер не может импортировать или использовать сертификаты безопасности или данные гостевого компьютера.
В этом случае вы можете увидеть любую из следующих ошибок:
Структура идентификатора безопасности недействительна (0x80070539). Не удалось инициализировать виртуальную машину. 0x80070539. Произошла ошибка при попытке запуска выбранных виртуальных машин. «имя-VM» не удалось инициализировать. Не удалось прочитать или обновить конфигурацию виртуальной машины. Не удалось прочитать или обновить конфигурацию виртуальной машины. «имя-VM» не удалось инициализировать. (Идентификатор виртуальной машины) «vm-name» не удалось прочитать или обновить конфигурацию виртуальной машины: структура идентификатора безопасности недействительна. (0x80070539). (Идентификатор виртуальной машины: your-vm-ID)
Как исправить ошибку Hyper-V 0x80070539
Обычно Hyper-V автоматически назначает идентификатор безопасности вновь созданной виртуальной машине, но это не относится к импортированным машинам. Для импортированных виртуальных машин добавление идентификатора безопасности вручную в конфигурации виртуальной машины поможет.
Решение 1. Добавьте действительный идентификатор пользователя в виртуальную машину.
На хост-машине:
- Нажмите «Windows» и найдите PowerShell.
- Щелкните его правой кнопкой мыши и выберите «Запуск от имени администратора».
Откройте Windows PowerShell.
- Выполните следующее, но не забудьте заменить имя виртуальной машины, домена и имя пользователя фактическими данными вашей виртуальной машины: Grant-VMConnectAccess -VMName <имя виртуальной машины, которая не запускается> -UserName <домен и имя пользователя текущего пользователя>
Запустите команду VMConnectAccess.
- Запустите виртуальную машину и проверьте, решена ли проблема.
Например, если у вас есть виртуальная машина с именем appuals, выполните следующую команду:
Grant-VMConnectAccess -VMName “appuals” -UserName “.\Администратор”
Избегайте ошибок в будущем
Правильная миграция виртуальной машины Hyper-V — это способ предотвратить повторение ошибки. Ты можешь
- Выполните живую миграцию Hyper-V
- Используйте диспетчер Hyper-V
- Экспорт и импорт виртуальной машины Hyper-V
- Используйте PowerShell
- Используйте стороннее приложение или сервис
1. Выполните живую миграцию Hyper-V.
- Запустите Диспетчер серверов и выберите Инструменты > Диспетчер Hyper-V.
- Щелкните правой кнопкой мыши Диспетчер Hyper-V и выберите «Подключиться к серверу».
Подключитесь к серверу в диспетчере Hyper-V.
- Введите имя сервера и нажмите «ОК».
- Выберите сервер и перейдите на панель «Виртуальные машины».
- Щелкните правой кнопкой мыши нужную виртуальную машину и выберите «Переместить».
Переместите виртуальную машину в диспетчере Hyper-V.
- Следуйте инструкциям мастера перемещения, чтобы завершить процесс.
2. Используйте PowerShell для перемещения виртуальной машины.
- Запустите PowerShell от имени администратора и выполните следующее: Move-VM VMTest TestServer -IncludeStorage -DestinationStoragePath D:\VMTest
- Не забудьте заменить VMTest на необходимую виртуальную машину, а TestServer — на целевой сервер.
3. Экспорт и импорт виртуальной машины.
Экспорт виртуальной машины
- Запустите диспетчер Hyper-V и щелкните правой кнопкой мыши виртуальную машину.
Экспорт виртуальной машины в диспетчере Hyper-V
- Нажмите «Экспорт» и выберите место назначения экспортированной виртуальной машины.
- Нажмите «Экспорт» и дождитесь завершения процесса.
Импортировать виртуальную машину
- Откройте диспетчер Hyper-V и щелкните правой кнопкой мыши целевой хост.
Импортируйте виртуальную машину в диспетчере Hyper-V.
- Нажмите «Импортировать виртуальную машину» и следуйте инструкциям на экране, чтобы завершить процесс.
4. Используйте диспетчер Hyper-V.
Добавьте целевой сервер
- Запустите диспетчер Hyper-V и щелкните его правой кнопкой мыши.
- Откройте «Подключение к серверу» и добавьте необходимые исходные/целевые серверы.
Миграция виртуальной машины Hyper-V:
- Щелкните правой кнопкой мыши нужную виртуальную машину и нажмите «Переместить».
- Следуйте инструкциям на экране, чтобы завершить процесс.
5. Используйте другое приложение или сервис.
Интернет — ваш лучший друг, позволяющий найти тот вариант, который соответствует вашим потребностям и позволяет правильно перенести виртуальную машину Hyper-V.
Если у вас есть вопрос или предложение, мы доступны в разделе комментариев.
- Remove From My Forums
-
Вопрос
-
Trying to install SCOM 2012 in a SBS2011 domain (if that matters). The (virtual) server on which the Beta will be installed is a Windows 2008 R2 Standard with SP1 and 4GB memory. SQL 2008 SP2 CU5 is installed (10.0.4316).
I have choosen to install all 4 options on 1 server (Management Server, Management Console, Web console and Reporting Server). There are (domain) accounts created for the Act, DR and DW roles. The SDK role uses the Local System account The Initial and
database configuration seems to go OK, but fails on the Management server part.Here is a part of the logfile where it goes wrong;
[19:55:31]: Info: :Info:Connecting to Local SQL server w2k8scom
[19:55:31]: Always: :FirstManagementServer: ConfigureDBForSQLLoginsSetRoles.
[19:55:31]: Info: :Info:Using DB command timeout = 1800 seconds.
[19:55:32]: Info: :Info:Using DB command timeout = 1800 seconds.
[19:55:32]: Info: :Info:Using DB command timeout = 1800 seconds.
[19:55:32]: Always: :FirstManagementServer: CreateOMSecurityKeys.
[19:55:32]: Always: :FirstManagementServer: SetACLForSDKComponents.
[19:55:32]: Always: :FirstManagementServer: AddManagementGroup.
[19:55:32]: Debug: :SetRootHealthService: There is no existing Root Management Server in the Database
[19:55:32]: Debug: :SetRootHealthService: existingRootManagementServer is
[19:55:33]: Always: :FirstManagementServer: PopulateUserRoles.
[19:55:34]: Error: :PopulateUserRoles: failed : Threw Exception.Type: System.Runtime.InteropServices.COMException, Exception Error Code: 0x80070539, Exception.Message: The security ID structure is invalid. (Exception from HRESULT: 0x80070539)
[19:55:34]: Error: :StackTrace: at Microsoft.Mom.Sdk.UserRoleSetup.SetupProgram.populateUserRoles(String adminRoleGroup, String sdkAccount, InstallTypes installType, String installDirectory, Boolean overwriteExistingUsers)
at Microsoft.EnterpriseManagement.OperationsManager.Setup.ServerConfiguration.PopulateUserRoles(String adminRoleGroup, String sdkAccount, String installDirPath)
[19:55:34]: Error: :Error:PopulateUserRoles failed
[19:55:34]: Error: :ProcessInstalls: Running the PostProcessDelegate returned false.
[19:55:34]: Always: :SetErrorType: Setting VitalFailure. currentInstallItem: Management Server
[19:55:34]: Error: :ProcessInstalls: Running the PostProcessDelegate for OMSERVER failed…. This is a fatal item. Setting rollback.Anyone a clue?
Ответы
-
Solved my own issue.
The machine was first installed in Domain-A and then SQL 2008 was installed. Then it was moved to Domain-B and SQL Reporting Services and the Full txt search were installed, after that SCOM 2012 Beta.
I guess the domain move caused (security related) issues with the SQL installation (although SQL was running fine).
After removing SQL 2008 and installing SQL 2008 R2, the SCOM 2012 Beta installation went OK without problems.
-
Помечено в качестве ответа
9 августа 2011 г. 20:25
-
Помечено в качестве ответа
Windows update error 0x80070539 occurs when you try to update your system. It affects various Windows systems including Windows 11 and Windows 10. Then you can go to MiniTool to get the methods to fix the error code.
Windows users often encounter update errors such as Windows 11 update error 0x800f081f, install error 0x80070103, etc. Today, we will talk about another error – Windows update error 0x80070539. This error means that Windows fails to install or update.
In this guide, we will help you resolve this update error.
Suggestion: Back up Your PC in Advance
Before any operations to fix the Windows update error 0x80070539, it is advised to back up your PC since these operations may lead to some issues. Besides, you can choose to back up your important data regularly to keep files safe.
To do this work, MiniTool ShadowMaker is a good computer backup software that can be compatible with Windows 11/10/8/8.1/7. With it, you can perform data backup and recovery including folders, disks, partitions, and Windows systems. Besides, you can use it to perform sector by sector cloning.
This backup software offers a Trial Edition that allows a 30-day free trial for all backup features. If you want to use it permanently, get its Pro Edition. Now you can download and try MiniTool ShadowMaker to back up your system.
MiniTool ShadowMaker TrialClick to Download100%Clean & Safe
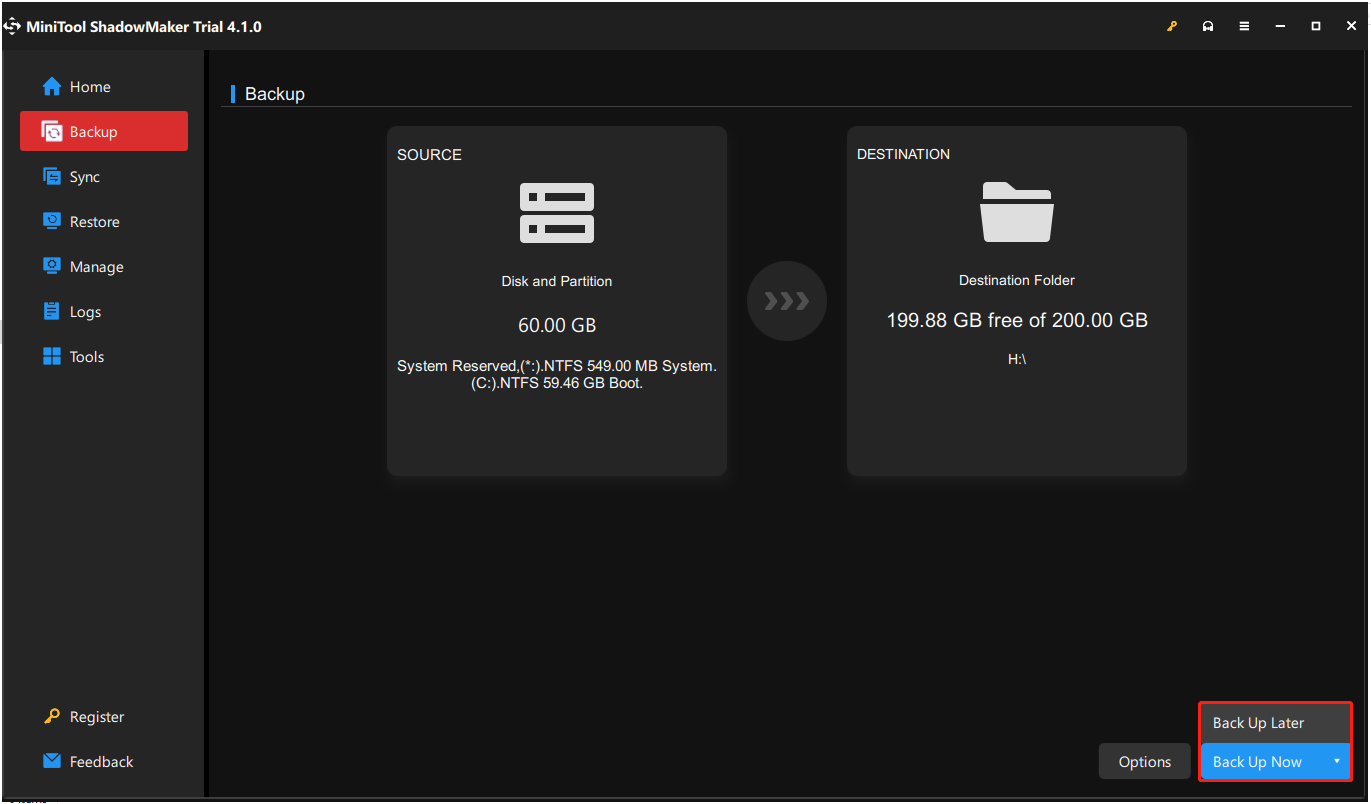
1. Go to the Backup tab and the system and related partitions have been set by default in the SOURCE section. Besides, you can select your other backup sources when you need them, including disk and partitions, and folders and files.
2. Go to the DESTINATION part and you can see four options containing the Users, Libraries, Computer, and Shared. Then choose your destination path.
3. Click the Back Up Now option to start the process immediately or the Back Up Later option to delay the backup. The delayed backup task is on the Manage page.
Fix 1: Restart Windows Update Service
The first solution is to restart your Windows Update Service and see if that fixes the Windows 11 update error 0x80070539. The steps are as follows:
1. Press the Windows and R keys at the same time to open the Run dialogue box.
2. Type services.msc and click OK to open the Services application.
3. From the list of applications, right-click Windows Update to select Restart.
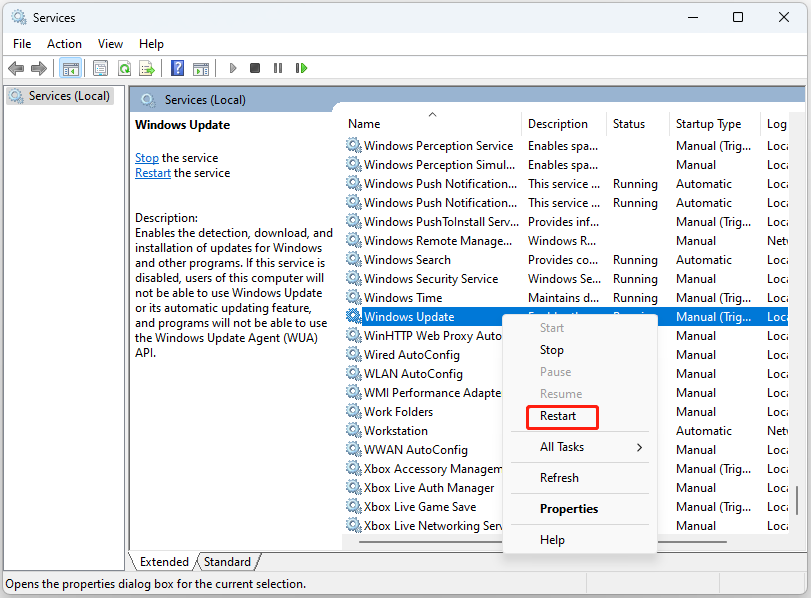
4. Then update your Windows again and check to see if the Windows 11 update error 0x80070539 has gone. If not, try the next solution.
Fix 2: Run Windows Update Troubleshooter
You can try to run the Windows Update Troubleshooter tool to remove the Windows 11 update error 0x80070539.
1. Press Windows + I to open the Settings window.
2. Then, go to System > Troubleshoot.
3. Click Other troubleshooters and click Run next to the Windows Update section.

4. Now, this troubleshooter will scan issues associated with the Windows Update components. If any fixes are identified, click Apply this fix and follow the on-screen instructions to complete the repair.
Fix 3: Clean the Windows Update Temporary Cache
To fix the Windows update error 0x80070539, you can also clean the Windows update temporary cache. Here is how to do that:
1. Press the Windows + R keys together to open the Run dialogue box.
2. Type %windir%\SoftwareDistribution\DataStore in this new window and click OK.
3. This will open File Explorer in the correct location.
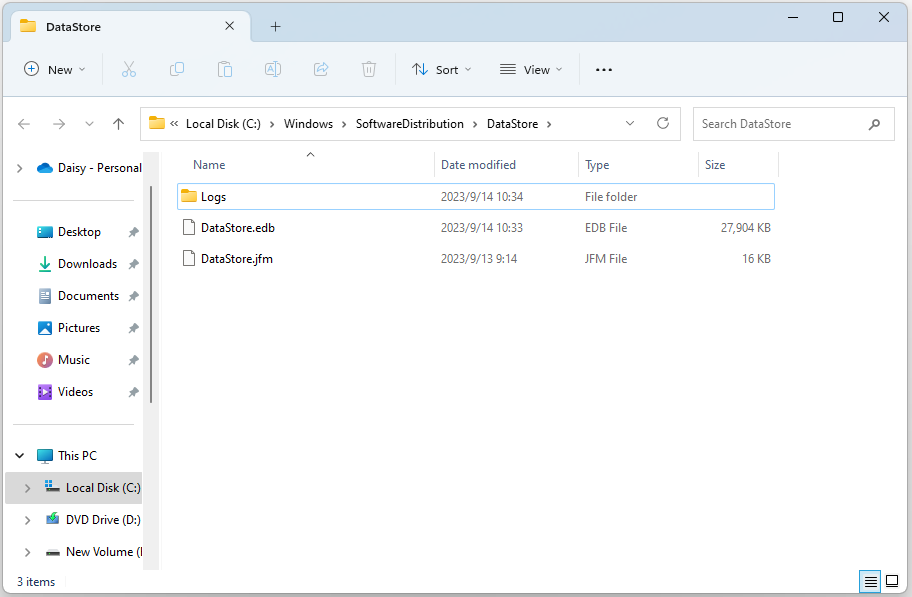
4. Delete all contents of this folder.
Fix 4: Reset Update Components
In this section, we walk through the fourth method – delete the SoftwareDistribution folder to fix the update issue. To do that, you can follow the steps.
1. Type Command Prompt in the Search box. Then right-click it to choose Run as administrator:
2. Run the following commands and press Enter one by one:
net stop wuauserv
net stop cryptSvc
net stop bits
net stop msiserver
3. Now go to the C:\Windows\SoftwareDistribution folder and delete all the files & folders inside by pressing the Ctrl+A keys to select all and then right-clicking to choose Delete.
4. After emptying this folder, you can either restart your computer or type the following commands one by one in Command Prompt and press Enter to restart Windows Update related services:
net start wuauserv
net start cryptSvc
net start bits
net start msiserver
5. Now, run Windows Update again and check to see if you still meet the Windows 11 update error 0x80070539.
If the error still exists, try the next fix – repair corrupted system files.
Fix 5: Run SFC and DISM
Windows system file corruption can cause the issue. In such an event, you can use two command-line utilities – SFC (System File Checker) and DISM (Deployment Image Servicing and Management) to fix your Windows system files. Here is how to use SFC to fix corrupt system files:
1. Input Command Prompt in the search bar and click Run as administrator from the context menu.
2. Type the following command and press Enter.
sfc /scannow
3. After the verification is 100% completed, you can check the scan results to see if there are some errors found. Then Read this post – Repair Windows 10 Image with DISM and Other Useful Tips for DISM to get detailed steps.
Bottom Line
In this post, you can know the 0x800703f1 error code occurs in the process of updating your operating system and you can find several feasible methods to solve the error. And you should back up your data regularly in case of data loss. If you have any better advice or have any confusion about the method, send us an email to [email protected].