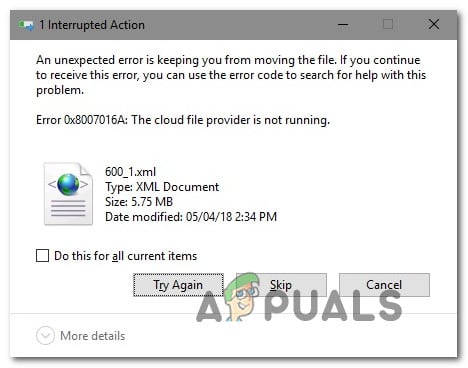
При удалении, переносе или копировании файлов из папки OneDrive можно столкнуться с уведомлением об ошибке 0x8007016A: поставщик облачного файла не работает. В большинстве случаев возникает на обновленной версии OneDrive в Windows 10.

Причина возникновения ошибки 0x8007016A
По сообщениям пользователей можно выделить несколько основных причин, через которые не работает поставщик облачных файлов:
- Обновление Windows 10 с ошибкой (KB4457128). Обновление безопасности KB4457128 нарушает работу функции автоматической синхронизации службы OneDrive.
- Активирована функция «Файлы по запросу». В некоторых случаях ошибка может возникнуть после включения функции в меню настройки.
- Выключена синхронизация OneDrive. Ручное вмешательство пользователя или сторонняя программа, которая пытается снизить электропотребление также может нести ответственность за эту ошибку, если она в конечном итоге отключает эту функцию.
- Действие функции синхронизации ограничено планом электропитания. Экономный план питания также может привести к ошибке на ноутбуке, нетбуке и ультрабуке, поскольку может полностью отключить функцию синхронизации. Проблему можно решить переключением на сбалансированный или высокопроизводительный план питания.
- Поврежденные файлы OneDrive также могут стать причиной ошибки. В этом случае проблему можно исправить путем сброса облачного приложения.
- Зависание папки OneDrive в полу синхронизированном состоянии. Эту неполадку можно исправить с помощью команды в Powershell для принудительного удаления папки, либо путем восстановления системы.
Теперь перейдем непосредственно к решениям ошибки с кодом 0x8007016.
Обновление Windows 10 до последней версии
В Windows 10 к ошибке привело обновление, предоставленное 12 октября, которое нарушило работу функции синхронизации. Однако корпорация Майкрософт довольно быстро выпустила исправление и сделала его доступным через Центр обновления Windows.
Но если обновляете систему время от времени вручную и обновление, исправляющее ошибку, не установлено, выполните следующие действия:
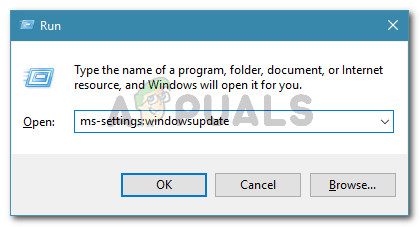
Нажмите сочетание клавиш Win + R, чтобы открыть диалоговое окно «Выполнить». Затем введите ms-settings:windowsupdate для входа в раздел Центра обновления Windows.
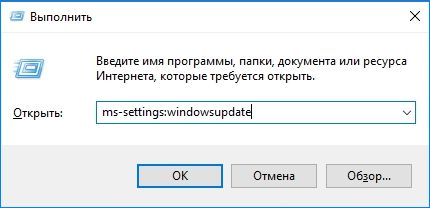
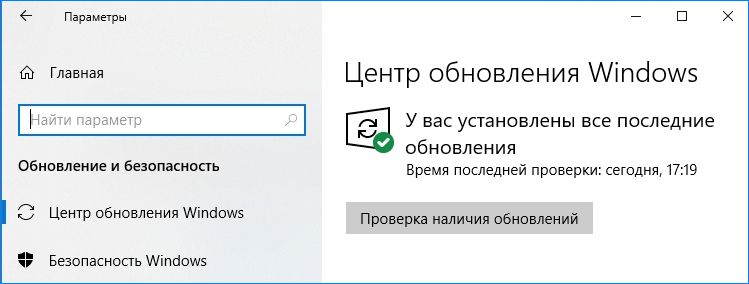
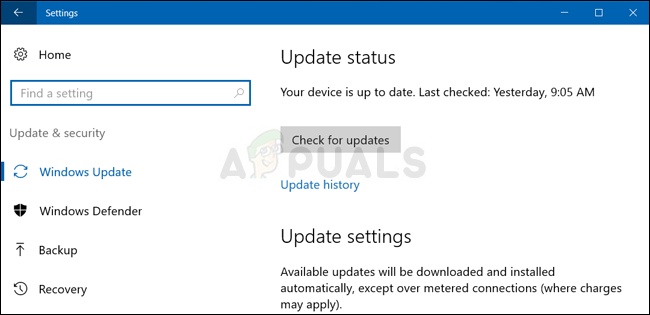
В правой части окна кликните на кнопку «Проверить наличие обновлений». При обнаружении ожидающих обновлений, следуйте инструкциям на экране по их установке. Если будет предложено перезапустить компьютер в ходе этого процесса, то система вернется к этому месту после перезагрузки и продолжит установку остальных обновлений.
В завершение процесса перезапустите ПК еще раз. Если все еще сталкиваетесь с ошибкой 0x8007016A, что поставщик облачных файлов не работает с определенными файлами и папками, расположенными в OneDrive, перейдите к следующему решению.
Отключение функции «Файлы по запросу»
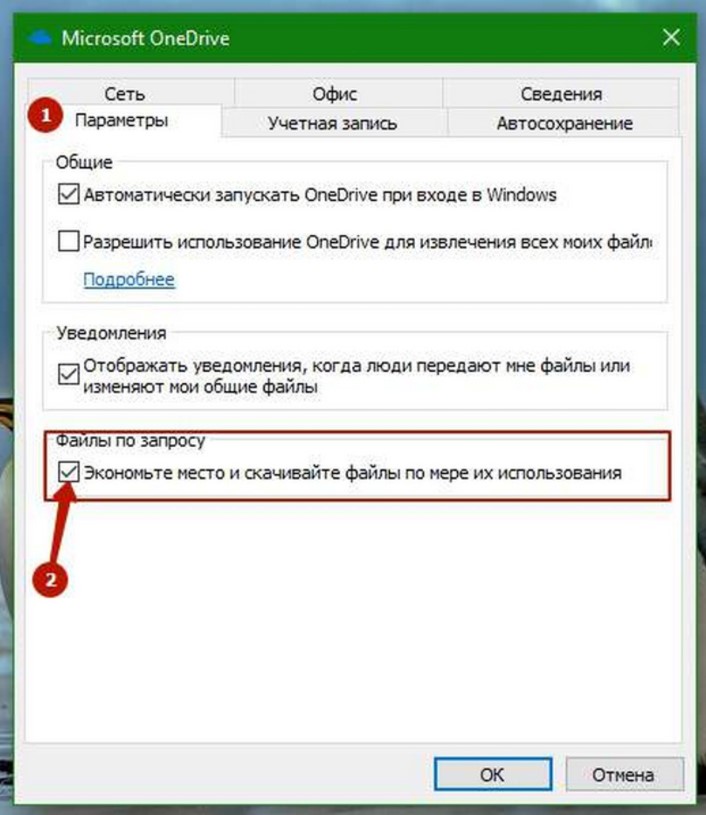
Проблемы с «поставщиком» можно обойти путем отключения функции «Файлы по запросу» в настройках облачного хранилища и последующим удалением полу синхронизированного файла из OneDrive. Решение эффективно в случаях, когда файл не полностью синхронизирован – у него есть миниатюра, но размер отображается 0 КБ. При попытке его открыть или удалить, OneDrive выбрасывает уведомление, что не работает поставщик с кодом 0x8007016A.
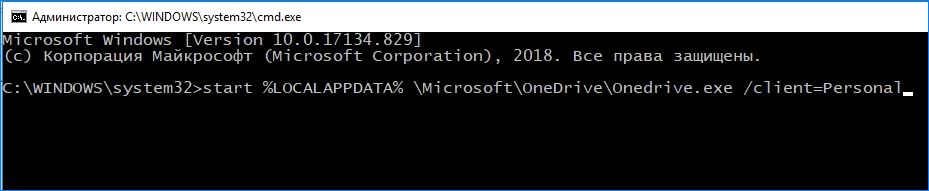
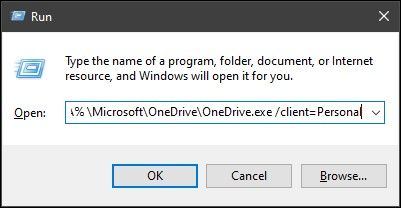
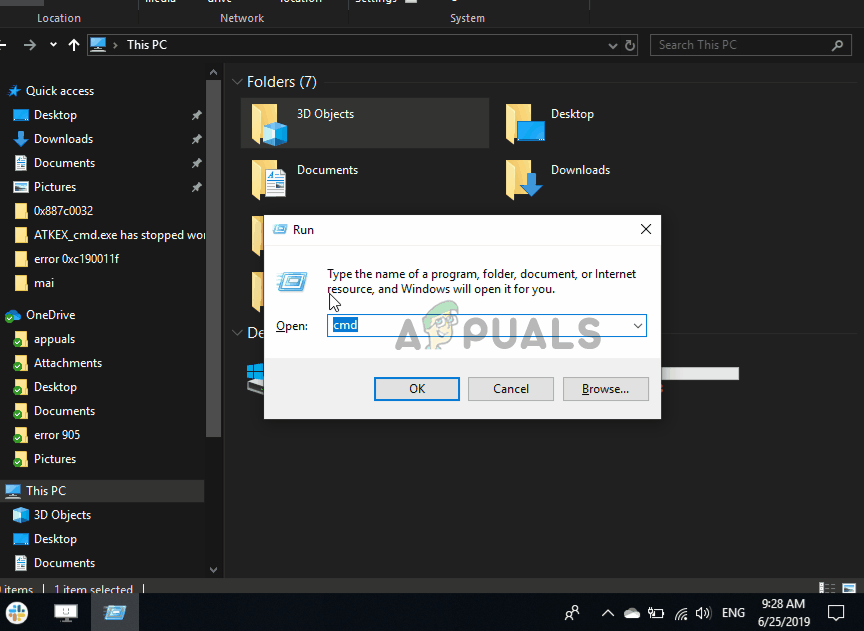
Прежде проверьте, что служба OneDrive запущена. В противном случае перезагрузите компьютер, откройте окно «Выполнить» (клавиши Win + R). Введите команду cmd и нажмите Ctrl + Shift + Enter для входа в командную строку с правами администратора.
Для автоматического запуска основной службы введите команду:
start %LOCALAPPDATA% \Microsoft\OneDrive\OneDrive.exe /client=Personal
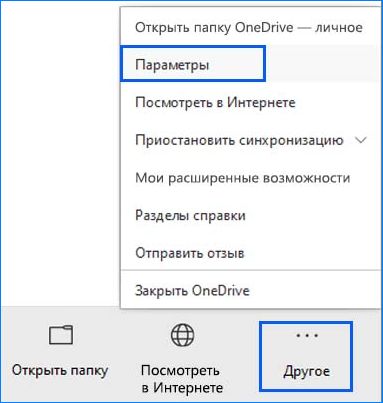
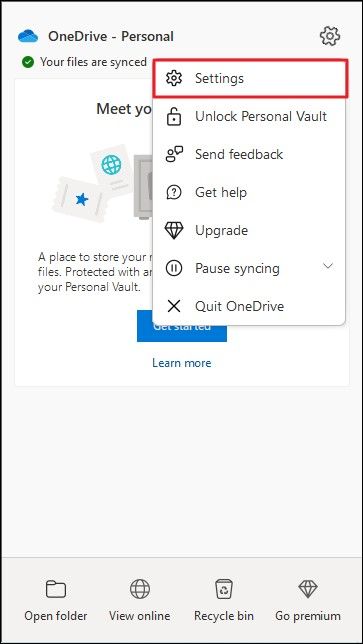
Когда служба запущена, кликните значок OneDrive, расположенный на панели задач в правой нижней части экрана. Затем нажмите на кнопку «Другое» и перейдите в «Параметры».
В свойствах откройте вкладку Параметры и снимите флажок «Экономьте место и скачивайте файлы по мере их использования». Сохраните изменения на «ОК» и дождитесь перезапуска службы.
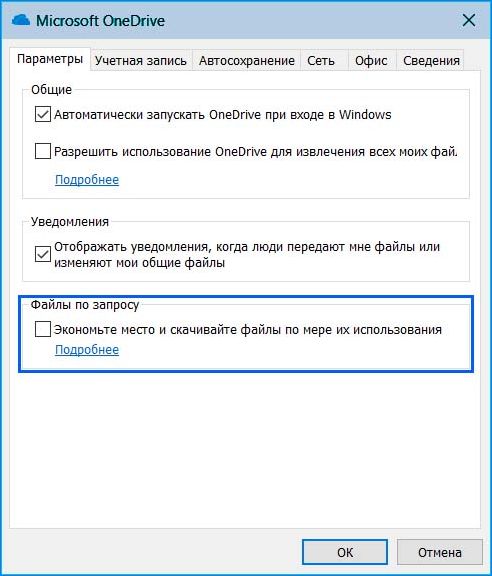
Перейдите на проблемный файл (подкаталог), при действии над которым выбрасывало ошибку 0x8007016A, кликните правой кнопкой мыши и выберите «Удалить».
После успешного удаления перезагрузите компьютер, чтобы полностью перезапустились службы и зависимости в OneDrive. Проверьте, возникает ли ошибка при удалении, копировании и перемещении файлов в облачном хранилище. При ее отсутствии можно опять активировать «Файлы по запросу».
Возобновление синхронизации
Также поставщик файлов может не работать в случае, если синхронизация временно отключена в настройках хранилища. Это происходит в результате вмешательства пользователя или когда план питания или другое стороннее приложение отключило процесс синхронизации для экономии энергии. Для ее возобновления выполните следующие действия:
В диалоговом окне «Выполнить» (клавиши Win + R) наберите команду cmd для входа в командную строку. В консоли наберите следующую команду и нажмите на Enter, чтобы проверить, запущена ли служба хранилища:
start %LOCALAPPDATA% \Microsoft\OneDrive\OneDrive.exe /client=Personal
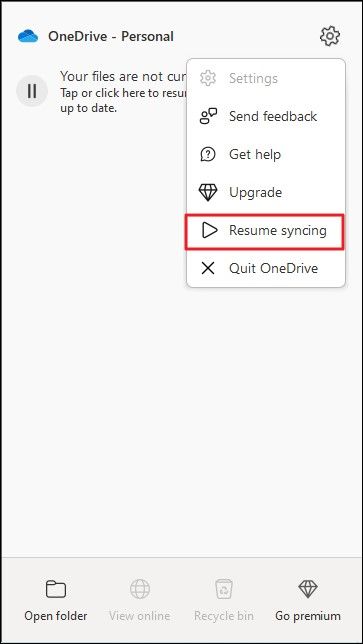
Когда служба запущена кликните на значок OneDrive на панели задач и нажмите «Другое». В контекстном меню отмените действие «Приостановить синхронизацию».

После перейдите в папку, которая вызывала ошибку с кодом 0x8007016A. Если ошибку не удалось исправить, смотрите следующее решение.
Изменение плана электропитания
Если используется экономная схема электропитания, то она фактически останавливает функцию синхронизации для экономии заряда батареи на ноутбуках и других портативных ПК. Для решения проблемы попробуйте перейти на план электропитания, который не ограничивает синхронизацию.
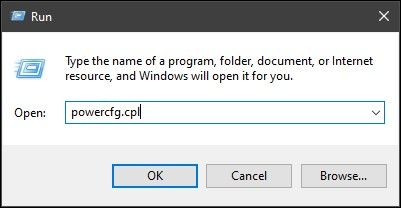
Откройте окно «Выполнить» нажатием на Windows + R, наберите в текстовом поле команду powercfg.cpl для входа в раздел Электропитание.

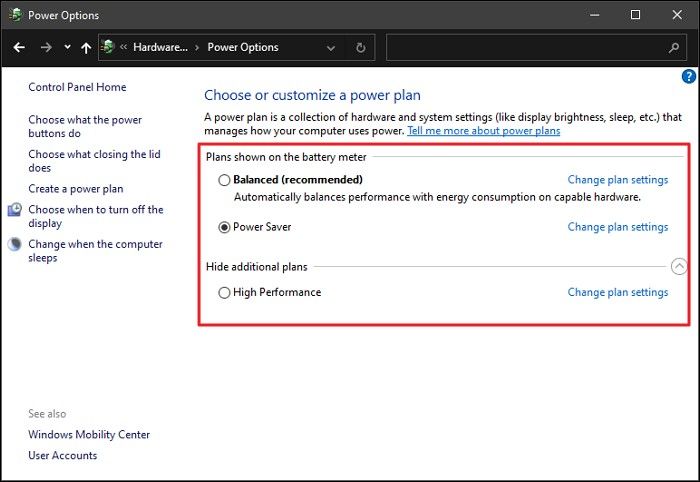
В правой части окна измените активный план питания с энергосберегающего на сбалансированный или высокопроизводительный.

Перезагрузите компьютер и проверьте, исправлена ли ошибка Onedrive 0x8007016A.
Сброс OneDrive
Для исправления неполадки облачного хранилища 0x8007016A попробуйте сделать сброс Onedrive к заводским настройкам. При использовании этого решения будут удалены сохраненные учетные и другие локально кэшированные данные, которые используются для сохранения настроек пользователя. После этой процедуры нужно заново синхронизировать свои файлы из OneDrive.
В диалоговом окне «Выполнить» (Win + R) наберите следующую команду и нажмите на Enter, чтобы сбросить настройки облачного хранилища:
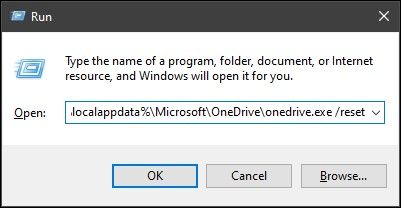
%localappdata%\Microsoft\OneDrive\onedrive.exe /reset
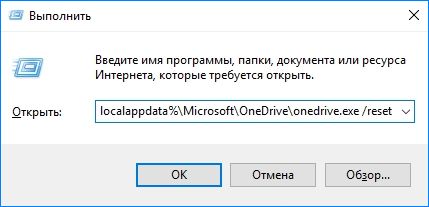
Через пару секунд «облако» будет сброшено. Если служба не перезапускается автоматически, запустите ее вручную путем открытия окна «Выполнить» и введением следующей команды:
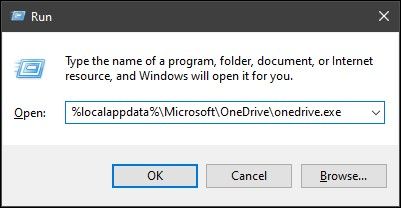
%localappdata%\Microsoft\OneDrive\onedrive.exe
После перезапуска службы попробуйте удалить или переместить файл, который вызывал ошибку 0x8007016A, и посмотрите, устранена ли проблема.
Принудительное удаление папки с помощью Powershell
Этот способ позволяет очистить папку OneDrive от сбойных файлов и подкаталогов, которые вызывают ошибку поставщика облачных данных 0x8007016A при попытке их удалить, переименовать или скопировать.
В окне «Выполнить» (клавиши Win + R) наберите powershell и нажмите Ctrl + Shift + Enter для входа с правами администратора. При отображении запроса контроля учетных записей, нажмите «Да».
Введите следующую команду и нажмите Enter для удаления проблемной папки:
Remove-Item «имя проблемной папки в OneDrive» -Recurse -Force
После успешного завершения перезагрузите компьютер.
Восстановление системы
Если перечисленными способами не удалось решить проблему, возможны случаи, когда уведомление с ошибкой OneDrive 0x8007016A возникает в результате сбоя или повреждения системы. Попробуйте запустить восстановление системы, которая обновит все компоненты Windows, включая облачное хранилище, не затрагивая ваших личных данных (документов, приложений, игр, пользовательских настроек).
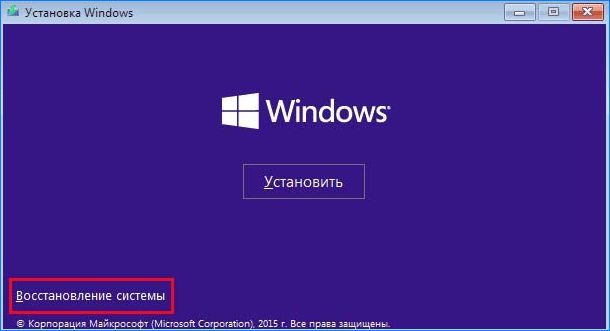
Восстановление предпочтительнее чистой установки Windows, которая в конечном итоге имеет такую же степень эффективности, когда дело доходит до исправления поврежденных файлов.
Используя очень удобную функцию OneDrive под названием «Файлы по запросу», любой из нас может увидеть сообщение 0x8007016a. Это связано с настройками данной опции. В рамках этого руководства мы предложим исправления данной проблемы. Однако, до начала конкретных действий мы рекомендуем обновить систему, нажав на кнопку «Проверить наличие обновлений» в «Параметрах» в разделе «Обновление и безопасность».
Что такое «Файлы по запросу»? OneDrive включает функцию, которая позволяет просматривать все файлы на облачном хранилище так, как будто они присутствуют на жестком диске компьютере. Главная ее особенность – их вовсе не обязательно для этого загружать. OneDrive скачивает файлы только тогда, когда к ним напрямую обращаются, то есть пытаются открыть. Это экономит много трафика и места на диске.
Исправление ошибки с кодом 0x8007016a в OneDrive
Сообщение с кодом ошибки 0x8007016a появляется тогда, когда пользователь пытается удалить, переместить или переименовать любой файл в облачной папке. Во всплывающем окне отмечено, что запрашиваемое действие нельзя выполнить. Единственным способом решения, которое там предлагается, является включение или отключение возможности загрузки файлов по запросу. Это действительно работает, но есть и кое-что другое.
Шаг 1: отключить «Файлы по запросу»
Для этого следует:
- Щелкнуть правой кнопкой мыши по иконке OneDrive в панели задач.
- Выбрать параметр «Справка и настройки», а затем – «Настройки».
- Убрать галочку в блоке «Файлы по запросу».
Шаг 2: сбросить OneDrive
Это сделать несложно, вот пошаговая инструкция:
- Клавишами Win + R запустить строку «Выполнить».
- Вставить строку %localappdata%\Microsoft\OneDrive\onedrive.exe /reset
- Запустить OneDrive из меню Пуск или рабочего стола и необходимые временные файлы будут сгенерированы повторно.
Шаг 3: включить «Файлы по запросу»
Выполнив сброс данных OneDrive, стоит включить функцию повторно. Скорее всего в этот раз она будет работать нормально, позволяя редактировать удаленные файлы на своем компьютере.
Инструкция:
- Кликнуть ПКМ по OneDrive на панели задач и перейти в «Настройки».
- Установить флажок возле пункта «Файлы по запросу».
- Подождать, пока установится синхронизация с серверами.
Больше не должна появляться ошибка с кодом 0x8007016a, а файлы на серверах OneDrive обязаны быть доступны для перемещения, удаления, переименовать и прочих изменений.
Cloud services have played a significant role in storing and maintaining data across devices. Microsoft OneDrive is one of the most renowned platforms, featuring its cloud services across Windows devices. While many users consider using this storage service provided by Microsoft, they have reported several issues relative to cloud operations.
Error 0x8007016a is referred to the error where the cloud file provider does not operate properly. Users can neither open nor copy files that are stored across the local machine as well as the cloud-based service. Usually, such errors occur when users attempt to delete or relocate OneDrive folders or files. This OneDrive Cloud Provider error has indicated this error with their OneDrive installed across their device.
For this article, we shall be reviewing the issue involving the OneDrive error code 0x8007016a properly across the device and figure out the tentative remedies that can help you get out of such miserable conditions.
PAGE CONTENT:
- 1. Why OneDrive Cloud Shows Error Code 0x8007016a
- 2. How to Fix OneDrive Error 0x8007016a — 6 Ways
- 3. OneDrive Backup Alternative – EaseUS Todo Backup
Part 1: Why OneDrive Cloud Shows Error Code 0x8007016a
There are multiple possibilities involving the non-operational OneDrive Cloud File Provider. If you find the error 0x8007016a displayed across your desktop, you should be aware that it might happen because of any of the following reasons:
1. Synchronization is Deactivated
One of the basic reasons for such an error across OneDrive is the disabled or paused synchronization. If OneDrive is unable to resume syncing across the desktop, such problems can occur. Considering you might not be doing it yourselves, you may have some third-party power-saving tools installed across the desktop that are deactivating the synchronization of OneDrive.
2. System Files May Have Corrupted
Since OneDrive is installed across your desktop, there is a chance that the system file across the computer may have gotten corrupt, which is leading to the Error 0x8007016a. Such cases require you to remove OneDrive and all related files from the computer.
3. File On-Demand Feature Enabled on Desktop
If you have the File On-Demand feature enabled across your OneDrive’s Settings, such errors can occur while managing your files across OneDrive. Having this feature enabled across OneDrive has led to certain errors across the cloud service, which includes the Error 0x8007016a.
4. Battery Saving Enabled
The cause of the Error 0x8007016a can be because of the desktop’s power-saving settings. While this is a basic reason for such a situation, this can prevent you from functioning OneDrive properly across your desktop. With the battery saver turned on, it will disrupt the synchronization process, leading to such errors across the device.
![]()
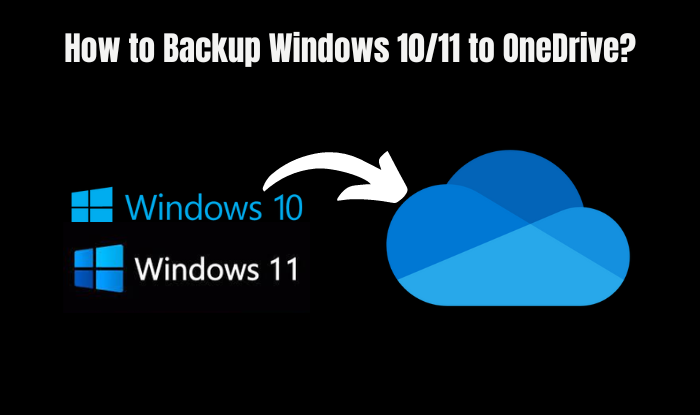
How to Backup Windows 10/11 to OneDrive?
This post will show you different ways to back up your important files and your entire computer system. You will also learn about the EaseUS Todo backup, the best choice for backing up your Windows computer.
Part 2: How to Fix OneDrive Error 0x8007016a — 6 Ways
We have gone through a detailed overview of the causes of error 0x8007016a. Once you have understood the reasons, it is time to figure out the remedies that would resolve the OneDrive error code.
- 1. Update Windows to the Latest Version
- 2. Disable the Files On-Demand Feature
- 3. Enable OneDrive Sync Process
- 4. Turn-off Power Saving Mode
- 5. Reset OneDrive
- 6. Reinstall OneDrive
Method 1: Update Windows to The Latest Version
Outdated OS can be a primary reason for such errors across your desktop. Not only the system processes are disturbed due to outdated OS, but cloud-based services and other third-party procedures are equally affected. We shall look into the steps that can be practiced for updating your Windows to the latest version:
Step 1: Access the «Search» icon from the taskbar and type «Settings» in the field to open the desktop’s settings.
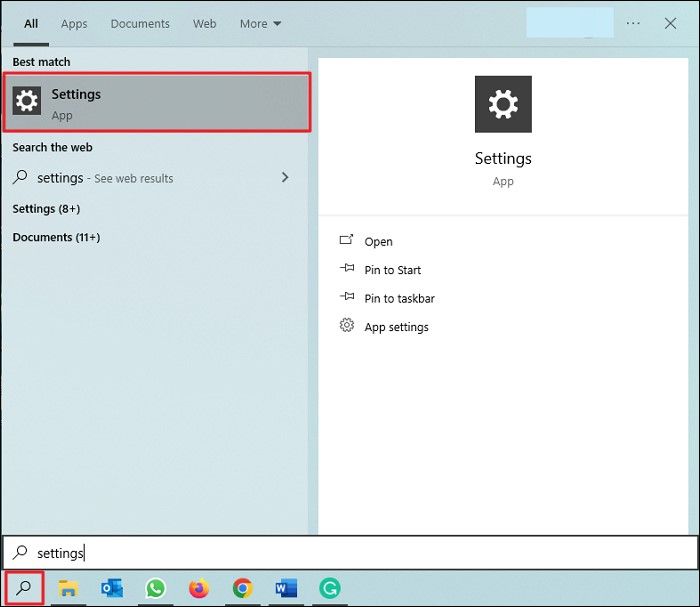
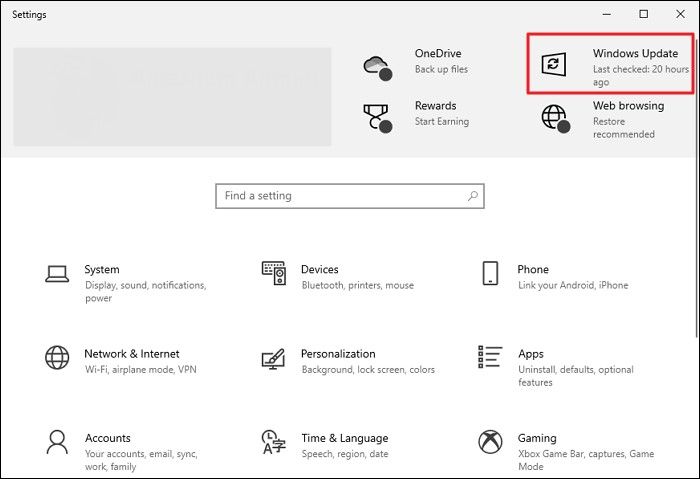
Step 2: Open the «Settings» screen and proceed to the «Windows Update» option on the top-right section of the window.
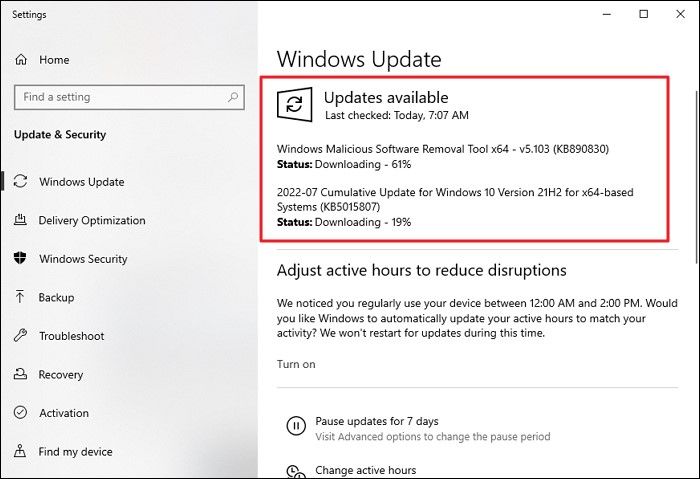
Step 3: To check for updates, click on the «Check for Updates» button. If there are updates available, they will be displayed on the screen. You can click on «Download and Install» to update your Windows to the latest version.
Method 2: Disable The Files On-Demand Feature
As discussed before, the Files On-Demand feature has brought much pain for OneDrive users in settling with the functionality of the service. To get rid of error 0x8007016a, it is best to disable this feature on OneDrive. Go through the steps featured as follows:
Step 1: Use the shortcut keys of «Win + R» to launch Run on your desktop. Proceed to launch CMD and type in the following command:
«Start %LOCALAPPDATA% \Microsoft\OneDrive\OneDrive.exe /client=Personal»
Step 2: As the OneDrive services are enabled across your desktop, proceed to the taskbar to find the OneDrive icon in the list.
Step 3: As you open OneDrive through the respective icon, click on the «Gear’ icon on the top-right section of the screen and open «Settings» from there.
Step 4: In the «Settings» tab, find the ‘File On-Demand’ section and uncheck the option across the section and click «OK» to save the settings. The error is now resolved across OneDrive.

Method 3: Enable OneDrive Sync Process
There is an evident chance that the synchronization process of OneDrive may be disabled across your desktop. Disabled synchronization can lead to many issues, including the Error 0x8007016a. It would be perfect to enable this process by following the steps shown below:
Step 1: Access the «OneDrive» icon from the taskbar and open the pop-up menu showing different settings for your OneDrive.

Step 2: Click on the «Gear» icon on the top-right corner of the menu and select the «Resume syncing» option to enable the sync process.
Method 4: Turn-Off Power Saving Mode
As discussed before, the power-saving mode can cause issues with your OneDrive. To avoid the error 0x8007016a, you need to turn off the Power Saving Mode across your device, which is done as follows:
Step 1: Use the «Win + R» button to open the Run project. Type in the command «powercfg.cpl» and hit «OK.»
Step 2: This will open the «Power Options» for your device. Shift the plan between «Balanced» or «High performance» according to your requirements.
Method 5: Reset OneDrive
If none of the above methods work properly, you may have to reset all your OneDrive settings to restart the complete cloud service from the start. To avoid errors such as these, resetting OneDrive can give you optimal results. Follow the steps to reset OneDrive on your computer with ease:
Step 1: Open the Run program by going across the «Search» icon from the taskbar. Type the following command across the Run program:
«%localappdata%\Microsoft\OneDrive\onedrive.exe /reset»
Step 2: This will reset and restart OneDrive across your system. If it doesn’t restart, use the following command to reset OneDrive manually:
«%localappdata%\Microsoft\OneDrive\onedrive.exe»
Method 6: Reinstall OneDrive
This method is conventionally effective but quite basic in operation. If the above methods have not worked properly, it would be perfect for reinstalling OneDrive on your system. To do this, you need to follow the steps as follows:
Step 1: Tap on the «Search» icon on the taskbar and type in «Add or remove programs» to open a new window.
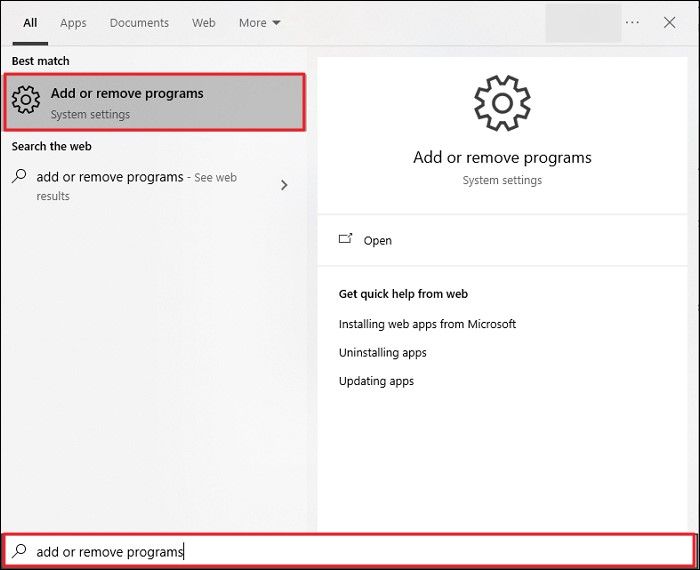
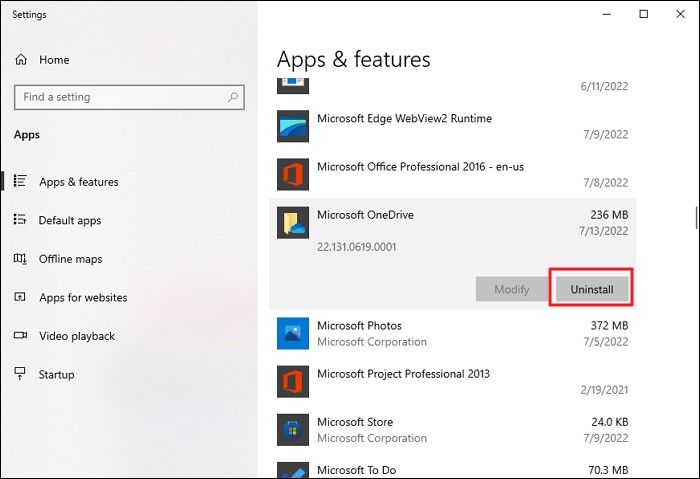
Step 2: Search for «Microsoft OneDrive» in the list and select it. Click on «Uninstall» to delete OneDrive from your system.
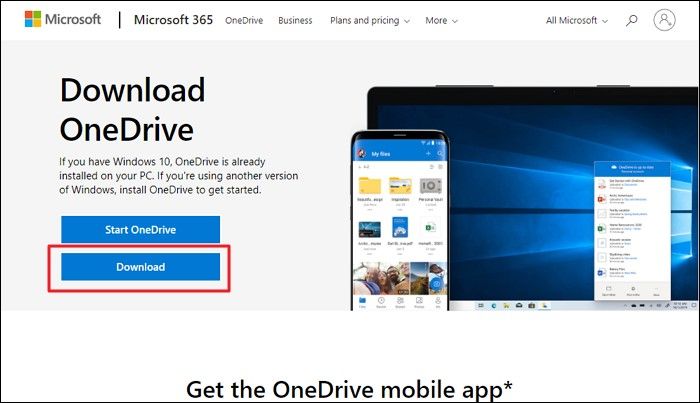
Step 3: Lead back to the browser and search for OneDrive to download it across your computer. Go across it once again.
Part 3: OneDrive Backup Alternative – EaseUS Todo Backup
To be honest, OneDrive is not the best backup and sync software, there is quite a lot users even want to stop OneDrive backup on their computers. If you are facing difficulty in managing your OneDrive for desktop and facing errors such as the one discussed above, you always deserve better. EaseUS Todo Backup promises a smoother, better, and quicker system of backing up data from your computer. Combining with one-click backup functionality, you can expect high efficiency across the platform.
EaseUS Todo Backup features one of the best systems for cloud backup, as it not only backs up everything but it also keeps the process simple and quick with no associated complications. There are many reasons to consider EaseUS Todo Backup, out of which a few reasons have been discussed as follows:
- There are multiple backup options and modes available across the platform, which includes backing up on events, scheduled backups, and incremental and differential backups.
- It provides 250 GB of free space across EaseUS Cloud Storage (AWS-based).
- It offers the utility of backing up data to third-party cloud services, NAS, local drives, and EaseUS Cloud.
- Allows users to create WinPE Bootable Disk for exquisite computer recovery.
Steps to Backup Data With EaseUS Todo Backup
We shall now look across the simple steps that can be used to backup data with EaseUS Todo Backup as a OneDrive alternative:
Step 1. For the first time you use EaseUS Todo Backup to back up files, click Create backup on the home screen and then mouse click the big question mark to select backup contents.

Step 2. Since you’re going to back up files and folders on your computer, go on with the «File» backup mode, where you can select pictures, videos, documents and all other types of files to back up.

Step 3. Follow the paths to locate the files, folders or directories you want to back up, select them all and click «OK«.

Step 4. Now you need to select a backup location to save and retain the backup.

Step 5. EaseUS Todo Backup allows users to save the backup files to every device that is handy for you, like a local hard drive, external USB drive, SD card, network drive, or a NAS drive, plus a cloud drive of the EaseUS brand. We personally recommend users to choose the cloud drive prior to a physical drive to save important backups due to the greater accessibility, flexibility and safety.

To be able to access to EaseUS cloud, all you need is an email registration and login.

Step 6. If you’re interested in an automatic and intelligent backup schedule for the next file backup task, go on with the «Options» setting. There you can encrypt a confidential file backup, compress the backup image size, or customize a backup scheme to tell the software in what time to start the next backup.
Customize an advanced and automatic backup task here:

Step 7. Click «Backup Now» to start the file backup process. Your completed backup files are visible on the left area in a card style.

Conclusion
This article has featured extensive details about Error 0x8007016a and the causes associated with it. With clear methods provided in chronological order, users have been provided an alternative in the form of EaseUS Todo Backup to avoid issues such as the OneDrive cloud file provider is not running.
Several Windows users have been encountering the Error 0x8007016A when trying to delete or move folders or files located inside the OneDrive folder. The error code is accompanied by the message ‘Cloud File Provider Is Not Working’. Most affected users have reported that this error message is occurring with an up-to-date version of OneDrive. In most cases, the issue is reported to occur on Windows 10.
What is causing the Error 0x8007016A: The Cloud File provider is not running?
We investigated this particular issue by looking at various user reports and the repair strategies that are most commonly used to fix this particular issue. As it turns out, there are several different culprits that might lead to the apparition of this issue:
- Bad Windows 10 update (KB4457128) – As it turns out, a bad Windows 10 update can also be responsible for this particular error. For some users, the KB4457128 security update ended up breaking the auto-syncing feature of OneDrive completely. If this scenario is applicable, you should be able to resolve the issue by installing the hotfix for the error.
- File on Demand is enabled – In some cases, the issue only seems to occur while the OneDrive’s feature File On-demand is enabled from the Settings menu. Several affected users have managed to resolve the issue by accessing the Settings options and disabling File on Demand.
- Syncing is disabled for OneDrive – Manual user intervention or a 3rd party utility that tries to conserve power might also be responsible for this error in the event that it ends up disabling the syncing feature of OneDrive. In this case, you will be able to resolve the issue by accessing OneDrive’s settings and re-enabling the syncing feature.
- PowerPlan is limiting the syncing feature – A conservative power plan can also be responsible for this problem on a laptop, notebook or ultrabook, as it has the potential of disabling the syncing feature completely. If this scenario is applicable, you should be able to resolve the issue by switching to a Balanced or High Performance-oriented power plan.
- Corrupted OneDrive files – File corruption inside the OneDrive installation folder can also be responsible for the apparition of this error code. In this case, the error will be resolved after you reset the OneDrive application by running a CMD command.
- Glitched OneDrive folder – Another possible cause for this error is a Onedrive folder get stuck inside a semi-synced state. Most affected users that encountered this particular scenario have managed to resolve the issue either by using a POwershell command to remove the folder forcibly or by performing a repair install.
If you’re currently searching for a fix for the Error 0x8007016A: The Cloud File provider is not running, this article will provide you with several different troubleshooting steps. Down below, you’ll find a collection of potential fixes that other users in a similar situation have successfully used to resolve this issue and resume the normal functionality of OneDrive.
To ensure that you remain as efficient as possible, we encourage you to follow the methods in the order that they are presented and ignore those potential fixes that are not applicable to your current situation. One of the methods below is bound to resolve the issue regardless of the culprit that’s causing it.
Method 1: Updating Windows 10 to the latest build (if applicable)
As it turns out, if you’re using Windows 10, chances are the issue is being caused by a bad update introduced on October 12. This update effectively ended up breaking the syncing feature of Onedrive for a lot of users. Fortunately, Microsoft was fairly quick in releasing a hotfix for the issue and made it available for everyone via WU (Windows Update).
However, if you installed the bad update (KB4457128) but failed to install the hotfix for it, you might be encountering this issue as a result. If this particular case is applicable to your current situation, you should be able to resolve the issue by installing the hotfix. The simplest way to do this is to leave WU to install every pending update that is available.
Here’s a quick guide on forcing WU to install every pending update on Windows 10:
- Press Windows key + R to open up a Run dialog box. Then, type ‘ms-settings:windowsupdate’ inside the text box and press Enter to open up the Windows Update tab of the Settings app.

Run dialog: ms-settings:windowsupdate - Once you’re inside the Windows Update tab, move over to the right-hand side and click on Check for Updates to inspect if any pending updates are available.

Checking for updates in Windows 10 - If new updates are identified, follow the on-screen prompts to install every pending update.
Note: If you’re prompted to restart during this procedure do so, but make sure to return to this screen after the next restart sequence and continue with the installation of the remaining Windows updates. - Once every available update is installed, restart your computer once again and see if the issue has been resolved once the next startup sequence is complete.
If you’re still encountering the Error 0x8007016A: The Cloud File provider not working with certain files or folders located in the OneDrive service, move down to the next method below.
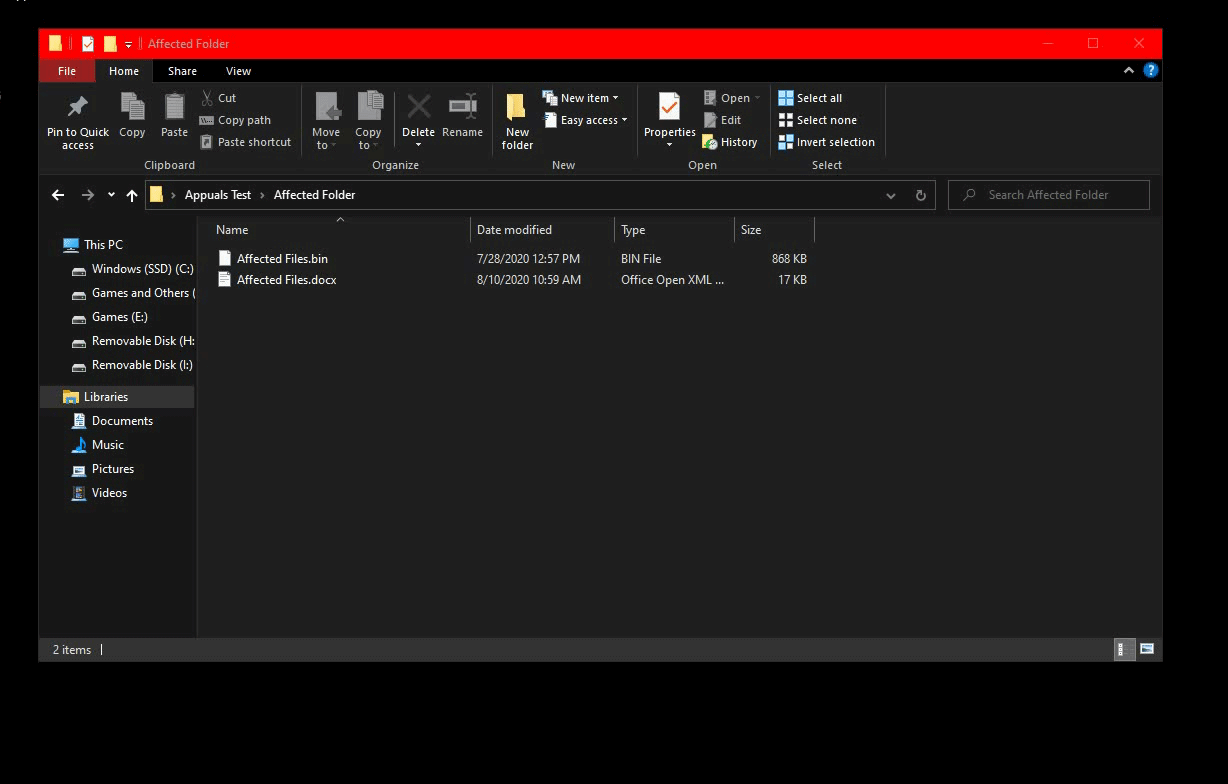
Method 2: New Folder workaround
There is a little trick/workaround you can try in order to delete these files. Basically, you will create a new folder and delete that because when you create a new folder it’s not immediately synced with OneDrive, So it will make your files offline and you will be able to delete them, Follow these steps:-
- Open the folder containing affected files.
- Right-click on the empty area and hover your mouse on the option “New“.
- Now select “Folder“. Once you create a new folder. Move the affected files into that folder.
- Now delete that new folder and your files should be removed.

Folder Trick/Workaround - Check if the issue is resolved.
Method 3: Disabling File-On Demand
Most affected users have reported that they managed to resolve the issue by disabling Files On-Demand from the OneDrive’s Settings menu and then deleting the semi-synced file from OneDrive. This procedure is effective in instances where a file is not fully synced – it has a thumbnail, but the file-size reads 0 KB.
After doing this and restarting their computer, most affected users have reported that the Error 0x8007016A: The Cloud File provider not working no longer occurred when they tried to open or delete a file or folder located inside OneDrive. This has been a recurring bug with OneDrive for a couple of years now, and it still remains unpatched at the time of writing this.
Here’s a quick guide on demanding File-On Demand from OneDrive’s Settings and deleting the semi-synced file from the shared folder:
- Make sure that the main service of OneDrive is running. If it isn’t, restart your computer or press Windows key + R to open up a Run dialog box. Then, type ‘cmd” and press Enter to open up a Command Prompt window.
- Inside the elevated Command Prompt, type the following command to start the main OneDrive service automatically:
start %LOCALAPPDATA% \Microsoft\OneDrive\OneDrive.exe /client=Personal
Note: If the OneDrive service is already enabled, skip the first two steps and jump straight to step 3.
- Once you’ve ensured that the OneDrive service is enabled, go to the bottom-right section of the screen and find the OneDrive icon. When you see it, right-click on it, then click on the More icon and then click on Settings from the context menu.
Note: If you can’t see the OnDrive icon from the get-go, click on the Show hidden icons arrow on your taskbar to make the OneDrive icon visible. - Once you’re inside the Microsoft OneDrive properties, select the Settings tab, then scroll down to the Files On-Demand section and check the box associated with Save space and download files as you use them.
- Click Ok to save the changes & wait for the OneDrive service to restart.
- Click on the OneDrive taskbar icon, then click on Open folder from the newly appeared menu.
- Locate the folder that you’re encountering the issue with (the one that is throwing the 0x8007016A error). When you see it, right-click on it and choose Delete.
- When the semi-synced folder has been deleted, restart your computer to force your OS to fully restart the services and dependencies of OneDrive.
- Once the next startup is complete, see if the issue has been resolved by trying to move, delete or rename files inside the OneDrive folder.
If you’re still encountering the same error message even after following the instructions above, move down to the next method below.
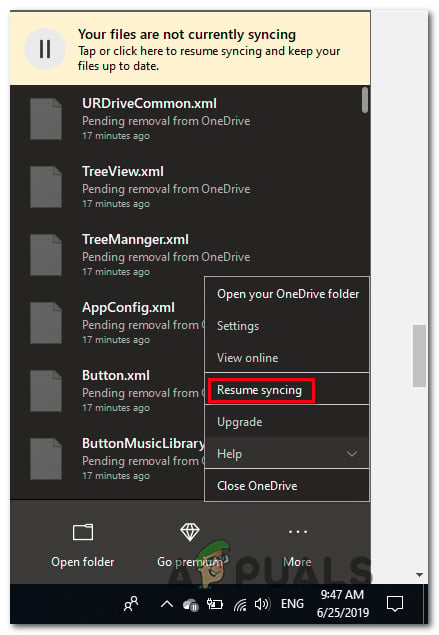
Method 4: Resume syncing
It’s also possible that you’re encountering this issue because of the fact that OneDrive syncing is temporarily disabled in the settings menu. This can happen as a result of manual user intervention or after a power plan or another 3rd party application has disabled the syncing process in order to conserve power.
Several affected users have managed to resolve the issue by accessing OneDrive’s settings and resuming the syncing process. After doing so and restarting the service, most affected users have reported that the issue has been resolved.
Here’s a quick guide on resuming OneDrive syncing on Windows 10:
- Press Windows key + R to open up a Run dialog box. Then, type “cmd” and press Enter to open up a Command Prompt.

Running CMD from a Run box - Inside the Command prompt window, type the following command and press Enter to ensure that the OneDrive service is running:
start %LOCALAPPDATA% \Microsoft\OneDrive\OneDrive.exe /client=Personal
- Once the process is started, click on the Onedrive taskbar icon, then click on More from the newly appeared menu.
- From the newly appeared context menu, click on Resume Syncing to resume the normal functionality of OneDrive and allow it to sync the file freely.

Resuming automatic syncing on OneDrive - After you’ve done this, open the folder that was previously triggering the 0x8007016A error and try to replicate the issue.

If the same error message is still appearing even after you’ve ensured that syncing is enabled, move down to the next method below.
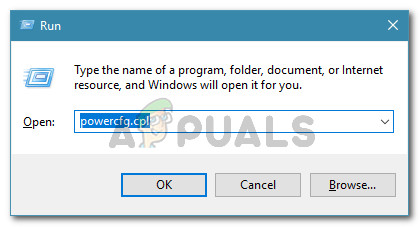
Method 5: Modifying the power plan (if applicable)
As several different users have reported, this particular issue can also occur if you’re using a restrictive power plan that is actually stopping the syncing feature in order to conserve battery power. Obviously, this can only occur on laptops and other portable PCs.
Several affected users have reported that they managed to resolve the issue by accessing the Power Options menu and making the switch to a power plan that doesn’t include the stoppage of file syncing.
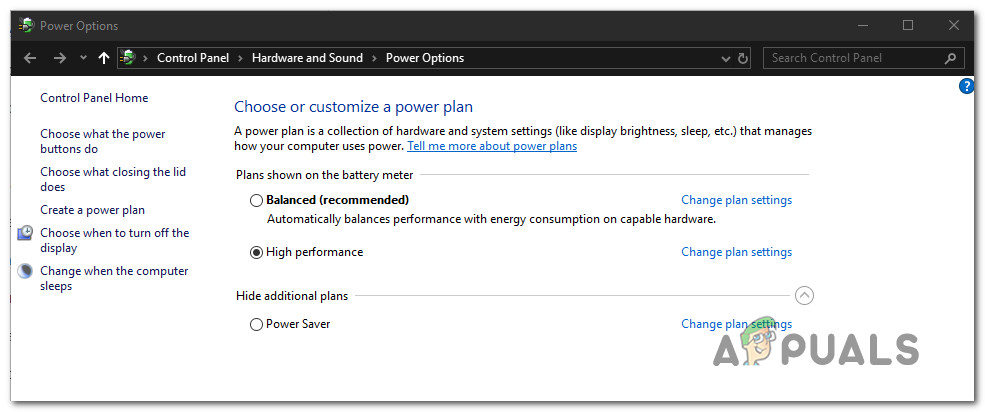
Here’s a quick guide on modifying the power plan on your Windows computer to ensure that your OS is not blocking the syncing feature of OneDrive:
- Press Windows key + R to open up a Run dialog box. Then, type “powercfg.cpl” inside the text box and press Enter to open up the Power Options menu.
Running dialog: powercfg.cpl - Once you’re inside the Power options plan, move over to the right-hand pane and change the active power plan from Power Saver to Balanced or High Performance.

Changing the active power plan to Balanced or High Performance - Once the active power plan has been changed, restart your computer and see if the issue has been resolved once the next startup sequence is complete.
If the same 0x8007016A error is still occurring, move down to the next method below.
Method 6: Resetting OneDrive
Another method but one that might make you lose some user preferences is to reset the Onedrive to the factory settings. This can be done easily from a Run dialog box, but keep in mind that after doing so you will lose your saved login credentials and any other locally cached data is used to save user setting preferences.
Several affected users have reported that they managed to resolve the issue by using a series of commands to reset and restart the OneDriver service. But keep in mind that this procedure will also re-sync all your OneDrive files.
If you decide to go this route, here’s a quick guide on performing a OneDrive reset:
- Press Windows key + R to open up a Run dialog box. Then type the following command and press Enter to reset the OneDrive service:
%localappdata%\Microsoft\OneDrive\onedrive.exe /reset
- After a couple of seconds, your OneDrive will be reset. In case the service doesn’t restart automatically, launch it manually by opening another Run dialog box and running the following command:
%localappdata%\Microsoft\OneDrive\onedrive.exe
- With the service restarted, try to delete, move or edit the file that was previously throwing the Error 0x8007016A: The Cloud File provider and see if the issue has been resolved.
If the same error is still occurring, move down to the next method below.
Method :7 Removing the glitched folder forcibly with Powershell
If you’re a tech-savvy user and none of the methods above have helped you to get rid of the 0x8007016A error, this method should allow you to forcibly remove the folder that ends up triggering the error inside the OneDrive folder.
Several affected users have confirmed that this method was effective in allowing them to clean the OneDrive folder of glitched folders that we’re producing the Error 0x8007016A: The Cloud File provider everytime they tried to delete, move or rename them.
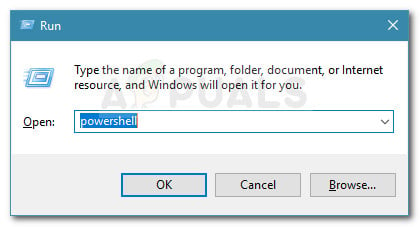
Here’s a quick guide on removing a glitched folder forcibly with an elevated Powershell window:
- Press Windows key + R to open up a Run dialog box. Then, type “powershell” inside the text box and press Ctrl + Shift + Enter to open up an elevated Powershell window. When you’re prompted by the UAC (User Account Control) prompt, click Yes to grant administrative privileges to the Powershell window.
Run dialog: powershell Then press Ctrl + Shift + Enter - Once you’re inside the elevated Powershell window, type the following command and press Enter to get rid of the Onedrive folder that is causing the issue:
Remove-Item "OneDrive folder name" -Recurse -Force
Note: Keep in mind that “OneDrive folder name” is just a placeholder for the exact name of the folder that you’re trying to delete. Make the changes accordingly before running this command.
- Once the command is successfully completed, restart your computer and see if the issue has been resolved at the next system startup.
If the same Error 0x8007016A: The Cloud File provider is still occurring, move down to the final method below.
Method 8: Performing a repair install
If none of the methods above have helped you to resolve the issue, the final method should resolve every possible instance in which the error will occur as a result of a bug, glitch or system corruption. A couple of users have confirmed that performing a repair install on their Windows 10 computer has helped them to resolve the Error 0x8007016A: The Cloud File provider.
This procedure will refresh all Windows components including OneDrive without touching any of your personal files (personal data, applications, games, user preferences and anything else). It’s superior to a clean install but ultimately has the same degree of efficiency when it comes to resolving corrupted files that might be causing errors of this kind.
To perform a repair install on your Windows 10 computer, follow the steps on this article (here).

Содержание
- Что вызывает ошибку 0x8007016A: поставщик облачных файлов не работает?
Несколько пользователей Windows сталкивались с ошибкой 0x8007016A при попытке удалить или переместить папки или файлы, расположенные внутри папки OneDrive. Код ошибки сопровождается сообщением «Поставщик облачных файлов не работает». Большинство затронутых пользователей сообщили, что это сообщение об ошибке возникает в последней версии OneDrive. В большинстве случаев проблема возникает в Windows 10.

Мы исследовали эту конкретную проблему, просмотрев различные пользовательские отчеты и стратегии восстановления, которые наиболее часто используются для решения этой конкретной проблемы. Как оказалось, есть несколько разных виновников, которые могут привести к появлению этой проблемы:
- Плохое обновление Windows 10 (KB4457128) — Как оказалось, плохое обновление Windows 10 также может быть причиной этой конкретной ошибки. Для некоторых пользователей обновление безопасности KB4457128 привело к полному нарушению функции автосинхронизации OneDrive. Если этот сценарий применим, вы сможете решить проблему, установив исправление для ошибки.
- Файл по запросу включен — В некоторых случаях проблема возникает только тогда, когда функция OneDrive «Файл по запросу» включена в меню «Настройки». Нескольким затронутым пользователям удалось решить проблему, открыв параметры настроек и отключив «Файл по запросу».
- Синхронизация отключена для OneDrive — Ручное вмешательство пользователя или сторонняя утилита, которая пытается сэкономить электроэнергию, также может нести ответственность за эту ошибку в том случае, если она в конечном итоге отключает функцию синхронизации OneDrive. В этом случае вы сможете решить проблему, зайдя в настройки OneDrive и повторно включив функцию синхронизации.
- PowerPlan ограничивает функцию синхронизации — Консервативный план питания также может быть причиной этой проблемы на ноутбуке, ноутбуке или ультрабуке, так как он может полностью отключить функцию синхронизации. Если этот сценарий применим, вы сможете решить проблему, переключившись на сбалансированный или высокопроизводительный план управления питанием.
- Поврежденные файлы OneDrive — Повреждение файла в папке установки OneDrive также может быть причиной появления этого кода ошибки. В этом случае ошибка будет устранена после сброса приложения OneDrive с помощью команды CMD.
- Сбой в папке OneDrive — Другой возможной причиной этой ошибки является застревание папки Onedrive в полусинхронизированном состоянии. Наиболее затронутым пользователям, столкнувшимся с этим конкретным сценарием, удалось решить проблему либо с помощью команды POwershell для принудительного удаления папки, либо путем выполнения восстановительной установки.
Если вы сейчас ищете исправление для Ошибка 0x8007016A: поставщик облачных файлов не запущен, эта статья предоставит вам несколько различных шагов по устранению неполадок. Ниже вы найдете набор потенциальных исправлений, которые другие пользователи в аналогичной ситуации успешно использовали для решения этой проблемы и восстановления нормальной работы OneDrive.
Чтобы обеспечить максимальную эффективность, мы рекомендуем вам следовать методам в том порядке, в котором они представлены, и игнорировать те потенциальные исправления, которые не применимы к вашей текущей ситуации. Один из приведенных ниже методов обязательно решит проблему независимо от виновника, который ее вызывает.
Метод 1. Обновление Windows 10 до последней сборки (если применимо)
Как оказалось, если вы используете Windows 10, скорее всего, проблема вызвана плохим обновлением, выпущенным 12 октября. Это обновление фактически привело к нарушению функции синхронизации Onedrive для многих пользователей. К счастью, Microsoft довольно быстро выпустила исправление для этой проблемы и сделала его доступным для всех через WU (Центр обновления Windows).
Однако, если вы установили плохое обновление (KB4457128) но не удалось установить исправление для него, в результате вы можете столкнуться с этой проблемой. Если этот конкретный случай применим к вашей текущей ситуации, вы сможете решить проблему, установив исправление. Самый простой способ сделать это — оставить WU для установки всех доступных ожидающих обновлений.
Вот краткое руководство по принудительной установке WU всех ожидающих обновлений в Windows 10:
- Нажмите Клавиша Windows + R открыть Бегать диалоговое окно. Затем введите ‘Ms-settings: windowsupdate’ внутри текстового поля и нажмите Войти открыть Центр обновления Windows вкладка Настройки приложение.

- Как только вы окажетесь на вкладке Windows Update, перейдите в правую часть и нажмите Проверить наличие обновлений чтобы проверить, доступны ли ожидающие обновления.
- Если обнаружены новые обновления, следуйте инструкциям на экране, чтобы установить каждое ожидающее обновление.
Примечание: Если во время этой процедуры вам будет предложено перезагрузить компьютер, сделайте это, но обязательно вернитесь к этому экрану после следующей последовательности перезапуска и продолжите установку оставшихся обновлений Windows. - После установки всех доступных обновлений перезагрузите компьютер еще раз и посмотрите, решена ли проблема после завершения следующей последовательности запуска.


Если вы все еще сталкиваетесь с Ошибка 0x8007016A: поставщик облачных файлов не работает с определенными файлами или папками, расположенными в службе OneDrive, перейдите к следующему способу ниже.
Метод 2: отключение файлов по запросу
Большинство затронутых пользователей сообщили, что им удалось решить проблему, отключив Файлы по запросу в меню настроек OneDrive, а затем удалив полусинхронизированный файл из OneDrive. Эта процедура эффективна в случаях, когда файл не полностью синхронизирован — у него есть эскиз, но размер файла составляет 0 КБ.
После этого и перезагрузки компьютера большинство пострадавших пользователей сообщили, что Ошибка 0x8007016A: поставщик облачных файлов не работает больше не возникало, когда они пытались открыть или удалить файл или папку, расположенную внутри OneDrive. Это повторяющаяся ошибка OneDrive в течение нескольких лет, и на момент написания этой статьи она все еще не исправлена.
Вот краткое руководство по запросу File-On Demand в настройках OneDrive и удалению полусинхронизированного файла из общей папки:
- Убедитесь, что основная служба OneDrive запущена. Если это не так, перезагрузите компьютер или нажмите Клавиша Windows + R открыть Бегать диалоговое окно. Затем введите «Cmd» и нажмите Войти открыть Командная строка окно.
- В командной строке с повышенными привилегиями введите следующую команду, чтобы автоматически запустить основную службу OneDrive:
запустите% LOCALAPPDATA% Microsoft OneDrive OneDrive.exe / client = Personal
Примечание: Если служба OneDrive уже включена, пропустите первые два шага и сразу перейдите к шагу 3.
- Убедившись, что служба OneDrive включена, перейдите в правую нижнюю часть экрана и найдите значок OneDrive. Когда вы его увидите, щелкните его правой кнопкой мыши, затем щелкните Больше значок и затем щелкните Настройки из контекстного меню.
Примечание: Если вы не видите значок OnDrive с самого начала, нажмите стрелку Показать скрытые значки на панели задач, чтобы значок OneDrive стал видимым. - Оказавшись в свойствах Microsoft OneDrive, выберите Настройки вкладка, затем прокрутите вниз до Файлы по запросу раздел и установите флажок, связанный с Экономьте место и загружайте файлы по мере их использования.
- Нажмите Хорошо чтобы сохранить изменения и дождаться перезапуска службы OneDrive.
- Щелкните значок панели задач OneDrive, затем щелкните Открыть папку из недавно появившегося меню.
- Найдите папку, с которой у вас возникла проблема (та, которая выбрасывает 0x8007016A ошибка). Когда вы его увидите, щелкните его правой кнопкой мыши и выберите Удалить.
- После удаления полусинхронизированной папки перезагрузите компьютер, чтобы ОС полностью перезапустила службы и зависимости OneDrive.
- После завершения следующего запуска проверьте, была ли решена проблема, попытавшись переместить, удалить или переименовать файлы в папке OneDrive.
Если вы по-прежнему получаете то же сообщение об ошибке даже после выполнения приведенных выше инструкций, перейдите к следующему способу ниже.
Метод 3: возобновить синхронизацию
Также возможно, что вы столкнулись с этой проблемой из-за того, что синхронизация OneDrive временно отключена в меню настроек. Это может произойти в результате ручного вмешательства пользователя или после того, как схема управления питанием или другое стороннее приложение отключили процесс синхронизации в целях экономии энергии.
Нескольким затронутым пользователям удалось решить проблему, открыв настройки OneDrive и возобновив процесс синхронизации. После этого и перезапуска службы большинство затронутых пользователей сообщили, что проблема решена.
Вот краткое руководство по возобновлению синхронизации OneDrive в Windows 10:
- Нажмите Клавиша Windows + R , чтобы открыть диалоговое окно «Выполнить». Затем введите «Cmd» и нажмите Войти , чтобы открыть командную строку.
- В окне командной строки введите следующую команду и нажмите Войти чтобы убедиться, что служба OneDrive работает:
запустите% LOCALAPPDATA% Microsoft OneDrive OneDrive.exe / client = Personal
- После запуска процесса щелкните значок на панели задач Onedrive, затем щелкните Больше из недавно появившегося меню.
- В появившемся контекстном меню нажмите на Возобновить синхронизацию , чтобы возобновить нормальную работу OneDrive и позволить ему свободно синхронизировать файл.
- После этого откройте папку, которая ранее вызывала ошибку 0x8007016A, и попробуйте воспроизвести проблему.

Если то же сообщение об ошибке продолжает появляться даже после того, как вы убедились, что синхронизация включена, перейдите к следующему способу ниже.
Метод 4: изменение схемы электропитания (если применимо)
Как сообщили несколько разных пользователей, эта конкретная проблема также может возникнуть, если вы используете схему с ограниченным питанием, которая фактически останавливает функцию синхронизации для экономии заряда батареи. Очевидно, это может произойти только на ноутбуках и других портативных компьютерах.
Несколько затронутых пользователей сообщили, что им удалось решить проблему, открыв Варианты питания меню и переключитесь на схему управления питанием, которая не включает остановку синхронизации файлов.
Вот краткое руководство по изменению схемы управления питанием на вашем компьютере с Windows, чтобы ваша ОС не блокировала функцию синхронизации OneDrive:
- Нажмите Клавиша Windows + R открыть Бегать диалоговое окно. Затем введите «powercfg.cplВнутри текстового поля и нажмите Войти открыть Варианты питания меню.
- Как только вы окажетесь внутри Варианты питания план, перейдите на правую панель и измените активную схему электропитания с Энергосбережение к Сбалансированный или Высокая производительность.
- После изменения активной схемы электропитания перезагрузите компьютер и посмотрите, была ли решена проблема после завершения следующей последовательности запуска.


Если то же самое 0x8007016A ошибка все еще возникает, перейдите к следующему способу ниже.
Метод 5: сброс OneDrive
Другой метод, но тот, который может привести к потере некоторых пользовательских настроек, — это сбросить Onedrive до заводских настроек. Это можно легко сделать из диалогового окна «Выполнить», но имейте в виду, что после этого вы потеряете свои сохраненные учетные данные для входа, а любые другие локально кэшированные данные будут использоваться для сохранения пользовательских настроек.
Несколько затронутых пользователей сообщили, что им удалось решить проблему, используя серию команд для сброса и перезапуска службы OneDriver. Но имейте в виду, что эта процедура также повторно синхронизирует все ваши файлы OneDrive.
Если вы решите пойти по этому пути, вот краткое руководство по выполнению сброса OneDrive:
- Нажмите Клавиша Windows + R открыть Бегать диалоговое окно. Затем введите следующую команду и нажмите Войти чтобы сбросить службу OneDrive:
% localappdata% Microsoft OneDrive onedrive.exe / сброс
- Через пару секунд ваш OneDrive будет сброшен. Если служба не перезапускается автоматически, запустите ее вручную, открыв другое диалоговое окно «Выполнить» и выполнив следующую команду:
% localappdata% Microsoft OneDrive onedrive.exe
- После перезапуска службы попробуйте удалить, переместить или отредактировать файл, который ранее выбрасывал Ошибка 0x8007016A: поставщик облачных файлов и посмотрите, решена ли проблема.
Если та же ошибка все еще возникает, перейдите к следующему способу ниже.
Метод 6: принудительное удаление папки с ошибками с помощью Powershell
Если вы технически подкованный пользователь и ни один из вышеперечисленных методов не помог вам избавиться от 0x8007016A error, этот метод должен позволить вам принудительно удалить папку, которая в конечном итоге вызывает ошибку внутри папки OneDrive.
Несколько затронутых пользователей подтвердили, что этот метод был эффективным, позволяя им очистить папку OneDrive от ошибочных папок, которые мы создаем Ошибка 0x8007016A: поставщик облачных файлов каждый раз, когда они пытались удалить, переместить или переименовать их.
Вот краткое руководство по принудительному удалению папки, в которой произошел сбой, с помощью окна Powershell с повышенными привилегиями:
- Нажмите Клавиша Windows + R открыть Бегать диалоговое окно. Затем введите «PowerShell» внутри текстового поля и нажмите Ctrl + Shift + Enter открыть возвышенный Powershell окно. Когда вам будет предложено UAC (Контроль учетных записей пользователей) подсказка, нажмите да чтобы предоставить административные привилегии окну Powershell.
- Оказавшись внутри окна Powershell с повышенными привилегиями, введите следующую команду и нажмите Войти чтобы избавиться от папки Onedrive, которая вызывает проблему:
Remove-Item «Имя папки OneDrive» -Recurse -Force
Примечание: Имейте в виду, что «Имя папки OneDrive» является просто заполнителем для точного названия папки, которую вы пытаетесь удалить. Внесите соответствующие изменения перед запуском этой команды.
- После успешного выполнения команды перезагрузите компьютер и посмотрите, решена ли проблема при следующем запуске системы.

Если то же самое Ошибка 0x8007016A: поставщик облачных файлов все еще происходит, перейдите к последнему методу ниже.
Метод 7. Выполнение ремонтной установки
Если ни один из вышеперечисленных методов не помог вам решить проблему, последний метод должен разрешить все возможные случаи, когда ошибка возникнет в результате ошибки, сбоя или повреждения системы. Несколько пользователей подтвердили, что выполнение ремонтной установки на их компьютере с Windows 10 помогло им решить проблему Ошибка 0x8007016A: поставщик облачных файлов.
Эта процедура обновит все компоненты Windows, включая OneDrive, не затрагивая ваши личные файлы (личные данные, приложения, игры, пользовательские настройки и другие данные). Он превосходит чистую установку, но в конечном итоге имеет такую же степень эффективности, когда дело доходит до исправления поврежденных файлов, которые могут вызывать подобные ошибки.
Чтобы выполнить ремонтную установку на вашем компьютере с Windows 10, выполните действия, описанные в этой статье. (Вот).