Большая часть пользователей, которые жалуются на ошибку 0x800700b7, сталкиваются с ней в момент попытки выполнить откат системы или создать бекап. Обе процедуры крайне необходимы для обеспечения стабильной работы операционной системы. Отказываться от них точно не стоит, лучше разобраться с причинами проблемы и устранить саму ошибку. Все подробности описаны далее.
Причины ошибки 0x800700b7
Вот самые частые источники неполадок:
- Сторонние антивирусы. Они могут блокировать доступ к системным файлам или обнаруживают их в качестве угрозы и добавляют в карантин. Редко, но порой даже встроенный антивирус вызывает проблемы.
- Повреждение файлов Windows.
- Некорректно установленная программа.
- Последствия изменения настроек после инсталляции приложений.
Как устранить ошибку 0x800700b7?
Мы подобрали 3 самых эффективных способа которые чаще всего помогают преодолеть ошибку 0x800700b7 и полностью от нее избавиться.
Способ 1: обновление системы и приложений
Часто исправить ошибку 0x800700b7 позволяет запуск обновления системы. Апгрейды довольно часто откладывают на будущее, что и вызывает проблему. Для этого стоит открыть «Центр обновления Windows» и проверить его на наличие завершенных обновлений.
К сожалению, способ помогает не всегда, поэтому может потребоваться дополнительное действие. Следующим этапом мы рекомендуем удалять программы, после установки которых и начались неполадки в качестве появления ошибки 0x800700b7.
Способ 2: восстановление системных файлов
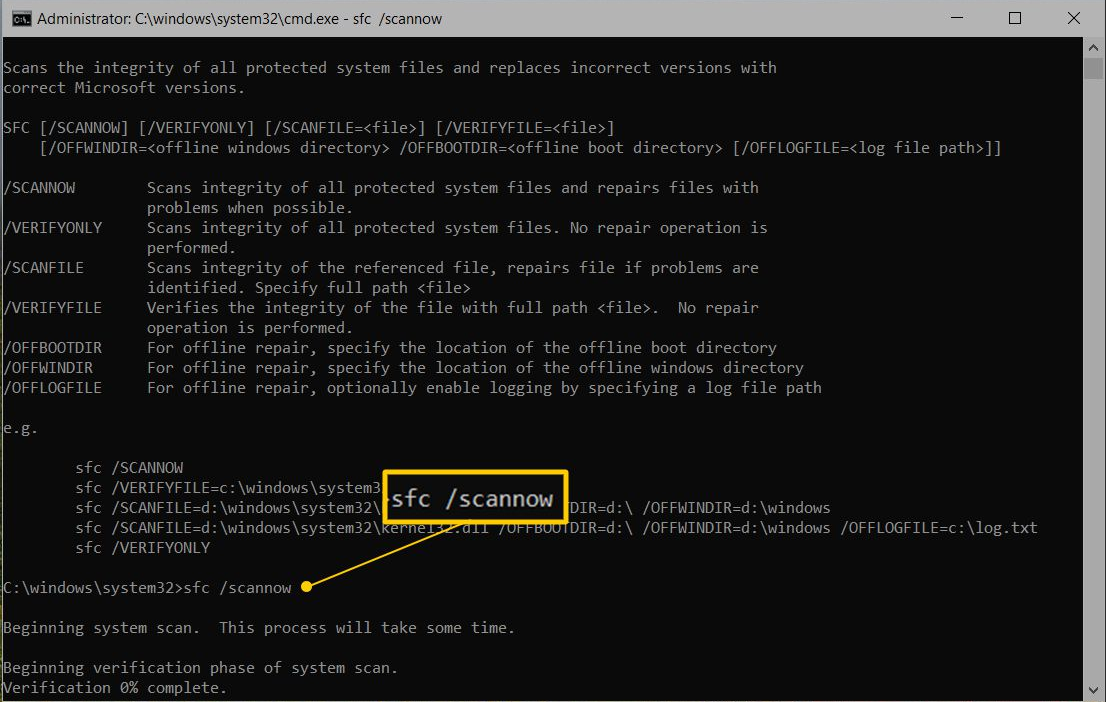
Встроенная в Windows 10 утилита под названием SFC умеет сканировать систему на предмет поврежденных файлов. Однако, главное ее достоинство в том, что она автоматически исправляет поврежденные элементы. Это скорее всего поможет убрать ошибку 0x800700b7.
Инструкция:
- В поиск вводим cmd и открываем одноименный файл с exe-расширением.
- Вводим в консоль sfc/scannow и нажимаем на кнопку «Ввод».

- Ждем завершения процедуры и перезагружаем компьютер.
Способ 3: удаляем кэш через редактор реестра
Постоянное использование Windows приводит к скоплению временных файлов, одной из разновидностей которых является кэш. Его избыточное количество может вызывать проблемы в работе операционной системы.
Как исправить ошибку 0x800700b7:
- С помощью поиска находим и открываем файл regedit.exe
- Используя древо слева идем по следующему пути.

- Нажимаем правой кнопкой мыши на параметр «IconStreams» и выбираем «Удалить».
- Повторяем действие с «PastIconsStream».
- Через ПКМ по панели задач открываем «Диспетчер задач», кликаем ПКМ по «Проводнику» и выбираем «Снять задачу».

Результатом выполнения процедуры будет обновление области уведомлений и возврат иконок к нормальному виду. Нередко это приводит к решению ошибки 0x800700b7. Она только визуально кажется простой, но на практике может заблокировать возможность отката системы, которая так нужна после выхода Windows из строя.
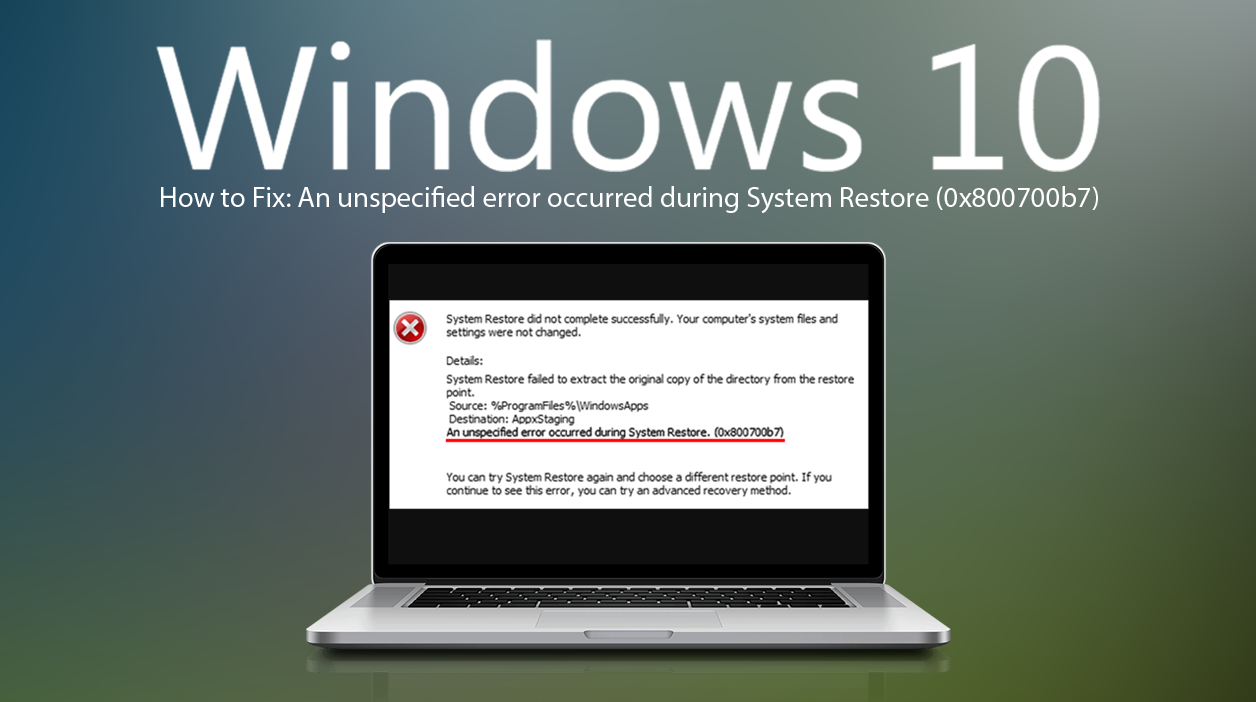
В этом руководстве содержатся инструкции по устранению следующей ошибки при попытке восстановить компьютер под управлением Windows 10, 8 или 7: «Восстановление системы не завершилось успешно. Файлы и параметры вашего компьютера не были изменены. Во время восстановления системы произошла неизвестная ошибка. (0x800700b7 ) в ОС Windows 10, 8 или 7.

Ошибка восстановления системы 0x800700b7, как правило, вызвана тем, что антивирус или программа безопасности препятствуют правильному запуску восстановления системы. В других случаях ошибка 0x800700b7 в восстановлении системы вызвана тем, что файловая система Windows повреждена, после сбоя питания или после неудачной установки обновления Windows.
Как устранить ошибку восстановления системы Unspecified 0x800700b7.
Примечание. В некоторых случаях ошибки восстановления системы могут быть устранены после перезагрузки системы. Итак, когда вы сталкиваетесь с ошибкой в System Restore, выключите вашу систему, а затем попробуйте нормально загрузиться в Windows и посмотрите, устранена ли ошибка.
Случай А. Если вы можете войти в Windows (Windows запускается нормально).
- Способ 1. Запустите восстановление системы в безопасном режиме.
- Способ 2. Отключите или удалите антивирус / программу безопасности.
- Способ 3. Восстановление системных файлов Windows.
- Способ 4. Изменить реестр Windows.
- Переименуйте папку «WindowsApps» из WinRE (Метод-7)
Случай B. Если вы не можете войти в Windows (Windows не запускается).
- Способ 5. Запустите восстановление системы из WinRE.
- Способ 6. Восстановление системных файлов Windows из Windows RE.
- Способ 7. Переименуйте папку «WindowsApps» (Windows 10)
Случай А. Если вы можете войти в Windows (Windows запускается нормально).
Способ 1. Запустите восстановление системы в безопасном режиме.
Первым способом решения проблем восстановления системы является запуск восстановления системы в безопасном режиме Windows.
1. Нажмите Windows ![]() + р ключи для загрузки Бег чат.
+ р ключи для загрузки Бег чат.
2. Введите msconfig и нажмите Войти.

3. Перейдите на вкладку Boot и затем проверьте Безопасный ботинок вариант.
4. щелчок хорошо а также перезапуск твой компьютер.
Заметка: Когда вы закончите свою работу, снова откройте утилиту настройки системы и снимите флажок «Безопасный ботинок«возможность запустить Windows нормально.
![окна-8-безопасного mode_thumb [2]](https://komputer03.ru/wp-content/uploads/2019/11/sboj-sostojanija-pitanija-drajvera-fix-v-windows_1.jpg "окна-8-безопасного mode_thumb [2]")
5. Одновременно нажмите Windows ![]() + р ключи, чтобы открыть окно «Выполнить».
+ р ключи, чтобы открыть окно «Выполнить».
6. Тип rstrui и ударил хорошо открыть Восстановление системы ..

7. Нажмите следующий на первом экране, а затем выберите более старую точку восстановления, чтобы восстановить компьютер.
Способ 2. Отключите или удалите антивирус / программу безопасности.
Следующий способ обойти ошибку 0x800700b7 при восстановлении системы — отключить или полностью удалить защиту от вирусов и безопасности перед запуском восстановления системы.
Способ 3. Восстановление системных файлов.
В некоторых случаях ошибка восстановления системы 0x800700b7 возникает из-за повреждения системных файлов Windows. Чтобы восстановить системные файлы:
1. Откройте командную строку от имени администратора. Для этого:
1. В поле поиска введите: CMD или командная строка
2. Щелкните правой кнопкой мыши на командная строка (результат) и выберите Запустить от имени администратора.

2. В окне командной строки введите следующую команду Нажмите Войти:
- SFC / SCANNOW

3. Когда сканирование SFC завершено, перезапуск твой компьютер.
4. Попробуйте восстановить систему еще раз.
Способ 4. Изменить реестр Windows.
1. Одновременно нажмите Windows ![]() + р ключи, чтобы открыть окно запуска команды.
+ р ключи, чтобы открыть окно запуска команды.
2. Тип смерзаться и нажмите Войти.

3. На левой панели перейдите к этой клавише:
- HKEY_LOCAL_MACHINE \ ПРОГРАММНОЕ ОБЕСПЕЧЕНИЕ \ Microsoft \ Windows NT \ CurrentVersion \ Schedule \ TaskCache \ Tree \ Microsoft
4. Щелкните правой кнопкой мыши наWindowsключ и выберите экспорт, сделать резервную копию содержимого ключа на случай, если что-то пойдет не так.

5. Введите имя для экспортируемого реестра (например, «RegistryBackup») и Сохранить файл на рабочий стол. 
6. Затем щелкните правой кнопкой мыши «Windows» и выберите удалять.

7. Закройте редактор реестра и Перезапуск твой компьютер.
8. После перезагрузки запустите Восстановление системы. Если ошибка не устранена, дважды щелкните файл резервной копии реестра, чтобы восстановить раздел реестра и перейти к способу 7 ниже.
Случай B. Если вы не можете войти в Windows (Windows не запускается).
Если Windows не запускается, вам необходимо загрузить компьютер с установочного носителя Windows *, чтобы устранить ошибки восстановления системы из среды восстановления Windows (WinRE).
* Примечание. Если у вас нет установочного носителя Windows, то (с другого рабочего компьютера) вы можете создать его (в соответствии с версией Windows) с помощью инструмента «Создание носителя».
Способ 5. Запустите восстановление системы из WinRE.
1. Загрузите компьютер с установочного носителя Windows.
2. На экране настройки языка Windows нажмите СДВИГ + F10 для доступа к командной строке или нажмите следующий -> Почини свой компьютер -> Troubleshoot -> Расширенные опции -> Командная строка.

3. В командной строке введите следующую команду, чтобы запустить восстановление системы.
- rstrui

4. Попробуйте восстановить вашу систему.
Способ 6. Восстановление системных файлов Windows из Windows RE.
1. Загрузите компьютер с установочного носителя Windows.
2. На экране настройки языка Windows нажмите СДВИГ + F10 чтобы получить доступ к командной строке.
3. В командной строке введите следующие команды, чтобы найти букву диска Windows.
- DiskPart
- объем списка
4. Обратите внимание на букву диска тома Windows. *
* Том Windows — это раздел, в котором установлены Windows, и обычно это самый большой том по размеру (ГБ).
например В этом примере буква диска тома Windows — «D».

5. Тип выход закрыть утилиту DiskPart.
6. В командной строке введите следующую команду для восстановления файловой системы Windows:
- sfc / SCANNOW / OFFBOOTDIR = D: \ / OFFWINDIR = D: \ windows
* Примечание: заменить буквуD«по вышеуказанной команде, в соответствии с вашим делом.

7. Когда сканирование SFC завершено, перезапуск твой компьютер.
8. Попробуйте восстановить систему еще раз.
Способ 7. Переименуйте папку WindowsApps. *
* Заметка: Этот метод применяется только в ОС Windows 10.
1. Выполните шаги 1-5 из метода 6 выше, чтобы запустить командную строку в WinRE и найти букву диска Windows.
2. Затем перейдите к диску Windows, введя его букву (например, «D») и нажмите Войти.
3. Затем дайте команду ниже (и нажмите Войти) для перехода в папку «Program Files»:
- CD Program Files
4. Дайте следующую команду, чтобы показать WindowsApps папки.
- attrib –h WindowsApps
5. Затем введите следующую команду, чтобы переименовать WindowsApps папки.
- ren WindowsApps WindowsApps.BAK

6. Тип rstrui запустить Восстановление системы и попробуйте восстановить систему снова.
Это оно! Дайте мне знать, если это руководство помогло вам, оставив свой комментарий о том, какой метод работает для вас. Пожалуйста, любите и делитесь этим руководством, чтобы помочь другим.
Using specialized repair tools will be the easiest fix
by Matthew Adams
Matthew is a freelancer who has produced a variety of articles on various topics related to technology. His main focus is the Windows OS and all the things… read more
Updated on
- The System Restore error 0x800700b7, like any other Windows issues with that code, is related to missing or corrupted system files.
- Other possible causes might be incomplete uninstalling of software or components.
- File and system corruption may also be caused in turn by hardware problems or malware.
XINSTALL BY CLICKING THE DOWNLOAD FILE
Get rid of malfunctioning drivers on your PC
SPONSORED
Drivers can often become corrupt as they can interfere with malfunctioning system files, thus arriving to be installed but not running correctly. To keep your drivers running smoothly, your Windows OS must run even smoother. Get it in perfect shape by following the steps below:
- Download Fortect and install it on your PC.
- Start the tool’s scanning process to look for corrupt files that are the source of your problem
- Right-click on Start Repair so the tool can start the fixing algorithm
- Fortect has been downloaded by 0 readers this month, rated 4.4 on TrustPilot
In this article, we explore the error code 0x800700b7. System Restore is an invaluable tool that restores Windows to an earlier date. The utility enables you to undo system changes.
However, System Restore doesn’t always work for some Windows users and returns an error message stating: System Restore did not complete successfully. This can include the 0x800700b7 code.
What does error code 0x800700b7 mean?
This error means that there has been a problem with the Restore process. It is usually followed by the message: Windows couldn’t complete the requested changes, and it appears that certain Windows components are damaged.
This code can also appear as a Windows Update error and, more recently, as a Windows Subsystem for Android in Windows 11.
There are a few triggers for this error, and on top of the list are the following:
- Antivirus software – The 0x800700b7 error can be due to antivirus software interfering with System Restore or incomplete software installations, leaving invalid registry entries.
- Damaged installation – If your installation is damaged, then you might encounter the System Restore did not complete successfully message when trying to restore your PC, and this is a trigger for error code 0x800700b7.
- Bad system files – Being so diverse, it’s hard to pinpoint this error to a single cause, but most are related to corrupted system files that need fixing to resolve the 0x800700b7 error.
- Update problems – This critical error appears when you’re trying to update your OS, when you want to restore it to a different point, or now, in Windows 11, when installing a subsystem.
Here are a few potential fixes for the 0x800700b7 error for your Windows devices.
How can I fix the System Restore error 0x800700b7?
1. Use specialized software
If you’re dealing with system errors such as 0x800700b7 then specialized software might be able to help you.
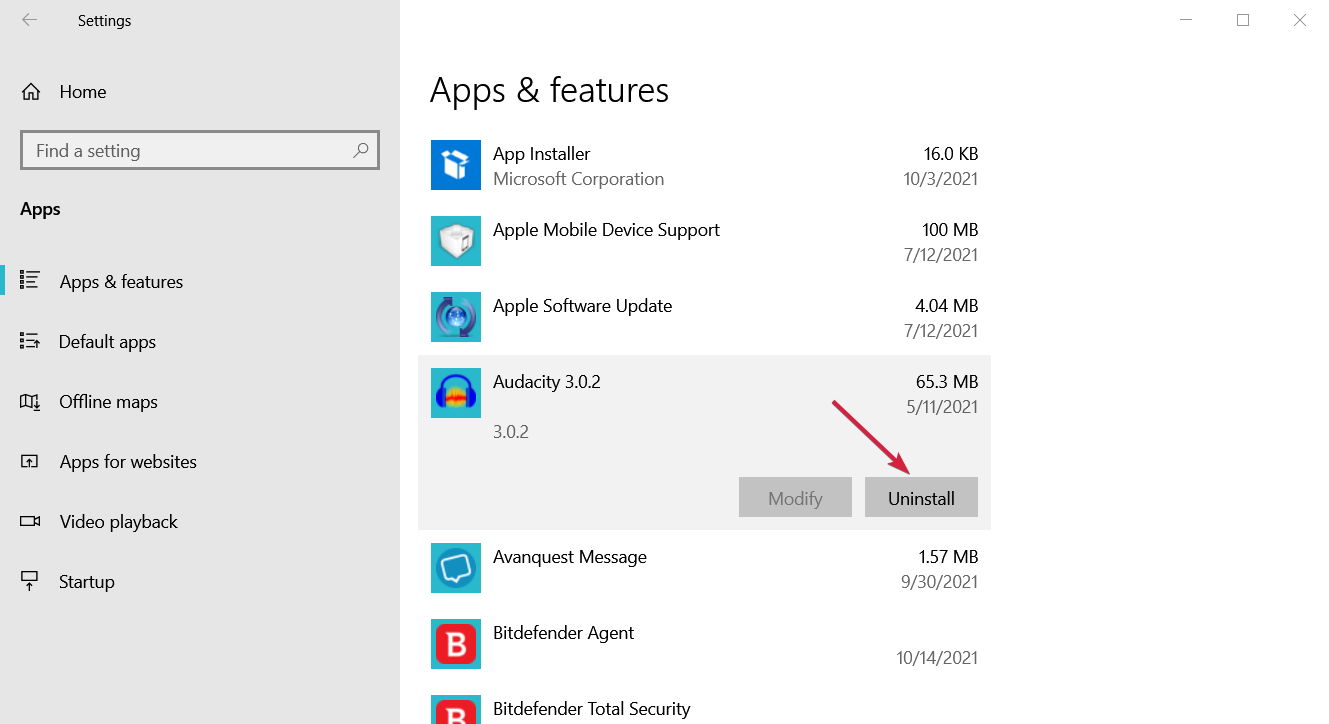
2. Uninstall and reinstall software
- Click the Start button and select Settings.

- Select Apps from the list.

- Click on the recently installed app and choose Uninstall.

- Next, check if the error persists and if not, try reinstalling the app, with full settings.
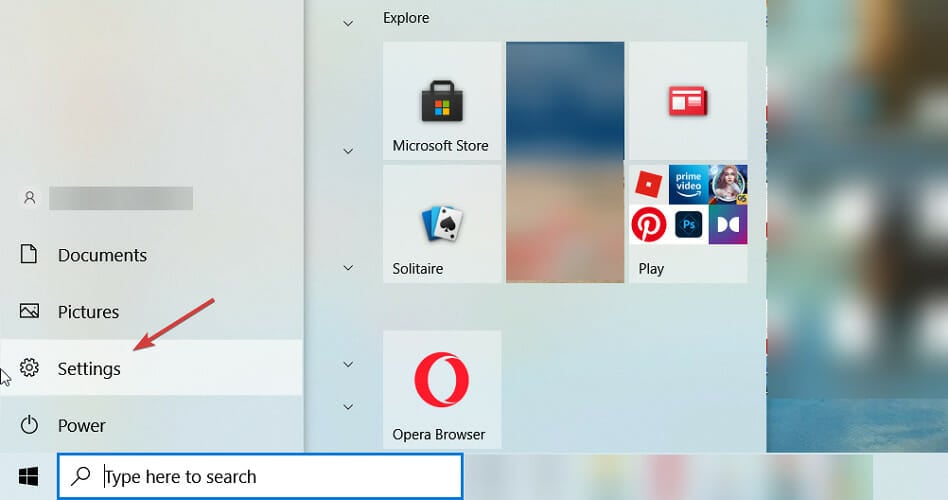
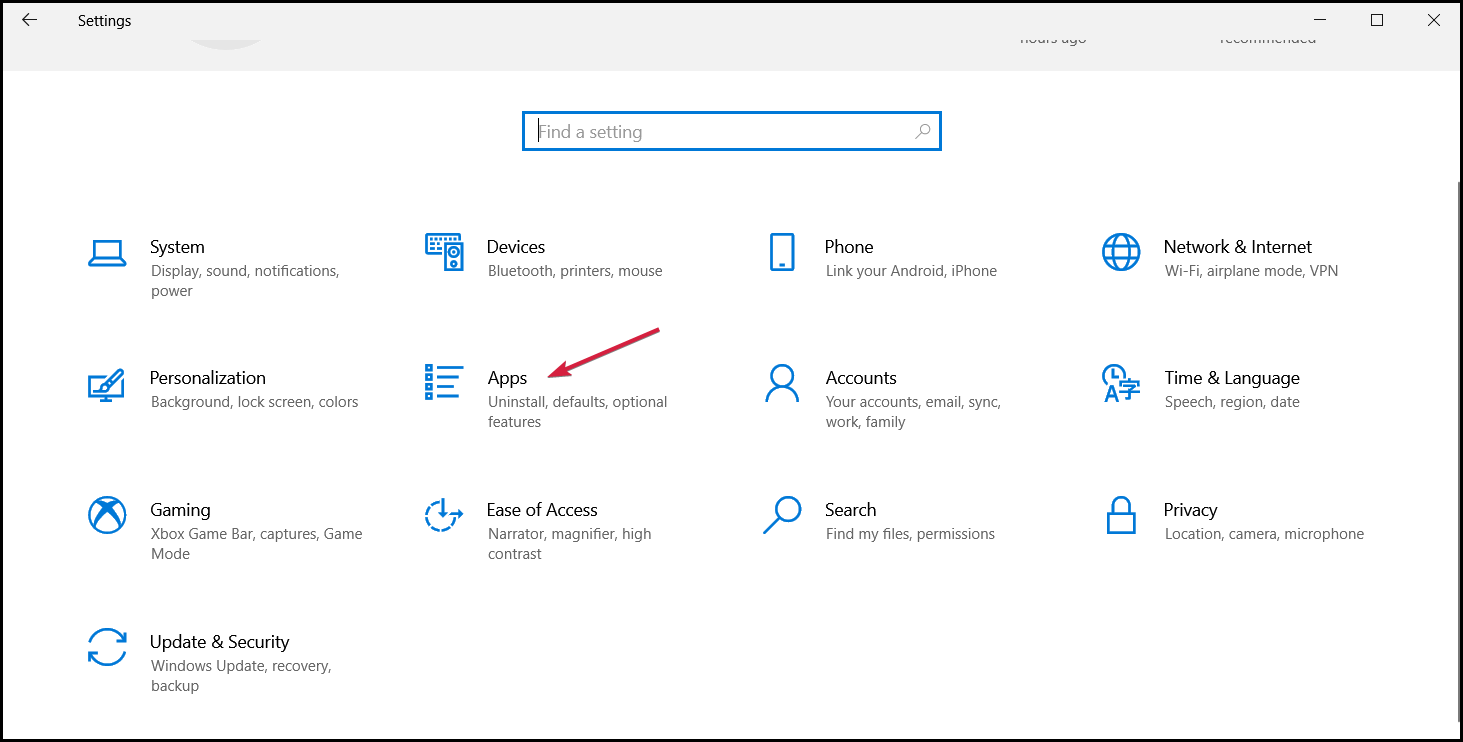
This problem might be caused by apps not being installed properly because the process was somehow interrupted.
So, make sure you uninstall the ones you’ve recently installed and restart the process. Also, if they have some optional components you’ve left out, this time, include them.
- System Restore failed due to antivirus error [Full Fix]
- Fix System Restore error 0xc0000020 on Windows 10/11
- Fix: Restore Point not working in Windows 10/11
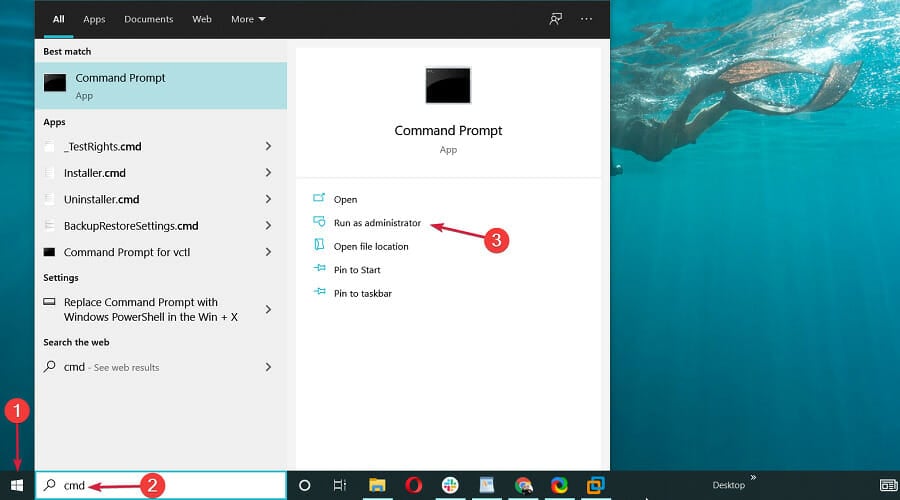
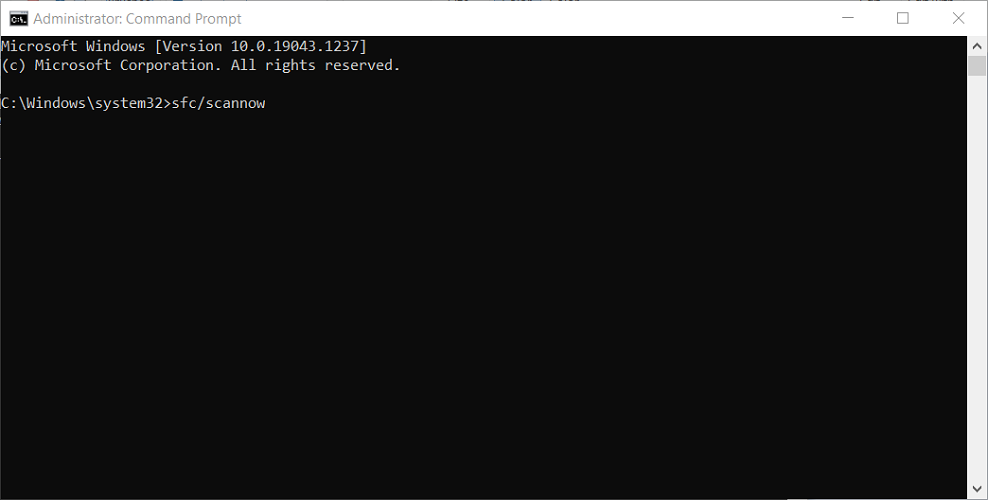
3. Run a System File Checker scan
- Click the Windows button, type cmd, and select Run as administrator to run Command Prompt with administrative privileges.

- Next, paste the following command and press Enter:
sfc /scannow
- If SFC repairs files, the Command Prompt will state: Windows Resource Protection found corrupt files and successfully repaired them. Restart Windows if the SFC does fix something.
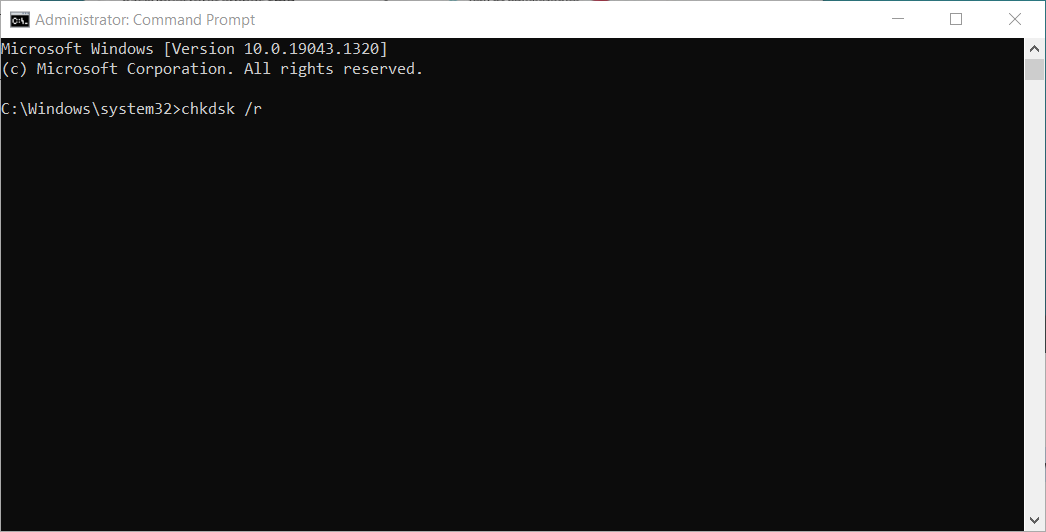
4. Run the Check Disk utility
- Select the Start button, type cmd, and click on Run as administrator to run Command Prompt with full privileges.
- Paste the following command and press Enter to run it:
chkdsk /r
- Check Disk might then fix some corrupt entries. If it does, it might also request that you restart Windows.
Outdated drivers are the main reason for errors & system issues. If some of your drivers are missing or needs updating, an automated tool like OutByte Driver Updater can solve these problems in just a couple of clicks. Plus, it’s also lightweight on your system!
This procedure will check any disk errors and attempt to repair them, but it will take a little while, depending on your drive size, so wait until the procedure finishes.
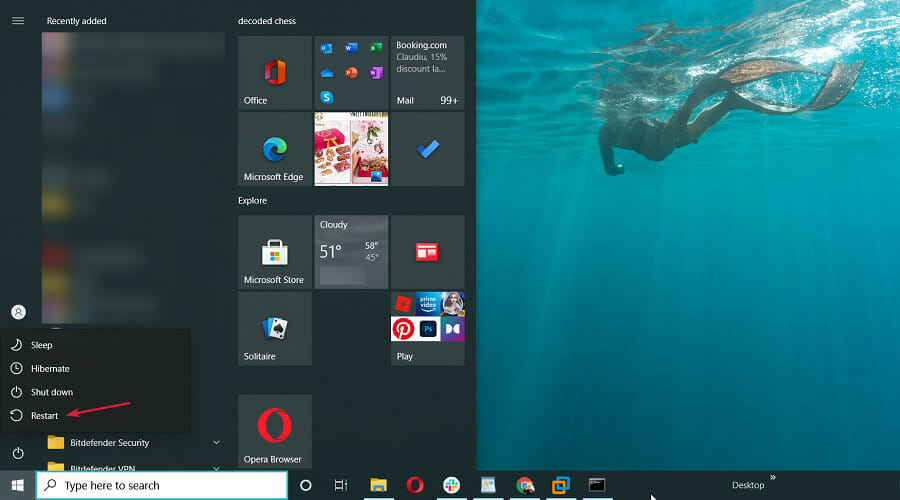
5. Restore Windows 10 in Safe Mode
- First, press the Power button on the Start menu.
- Hold the Shift key and then select Restart.
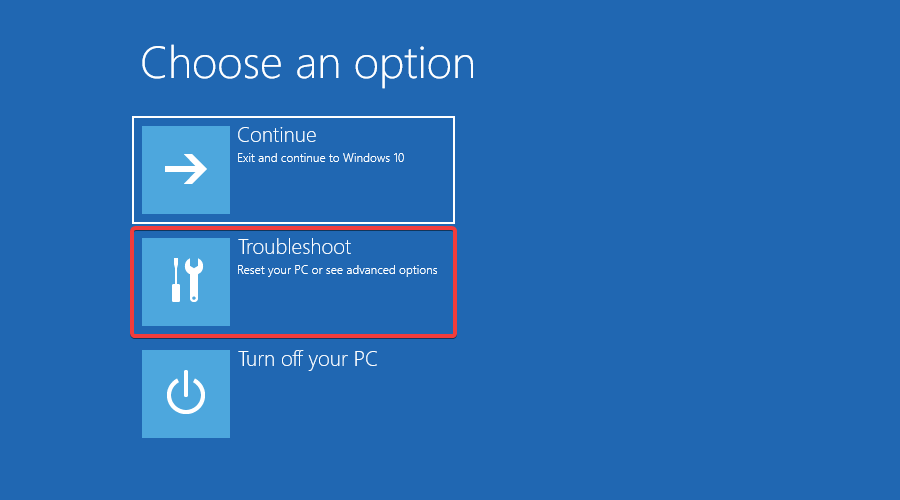
- Windows will reboot and open its Advanced Startup options. Press the Troubleshoot button.
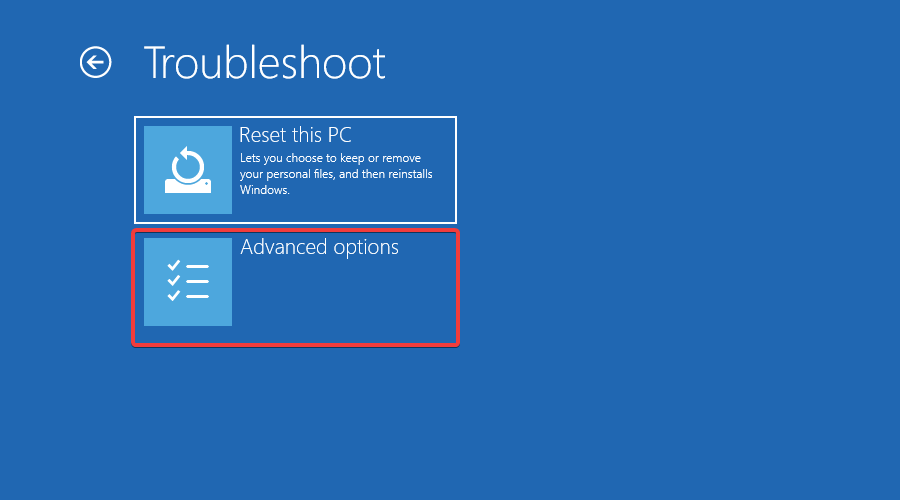
- Now, select Advanced options to open further settings.
- Select Startup Settings and press the Restart button to reboot.

- Press the 4 key to start Windows in Safe Mode.
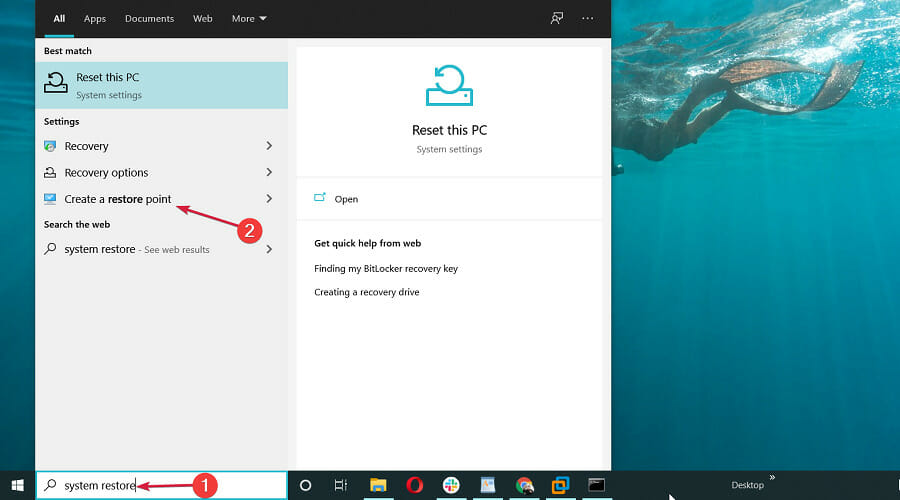
- After restarting, type system restore in Cortana’s search box. Select Create a restore point.
- Press the System Restore button.

- Now select Choose a different restore point if available, and click the Next button.

- Select a listed system restore point and press the Next and Finish buttons.


Safe Mode is a great troubleshooting mode for Windows. System Restore might work in Safe Mode. In this case, you can restore Windows to a date when you experienced no issues in System Restore.
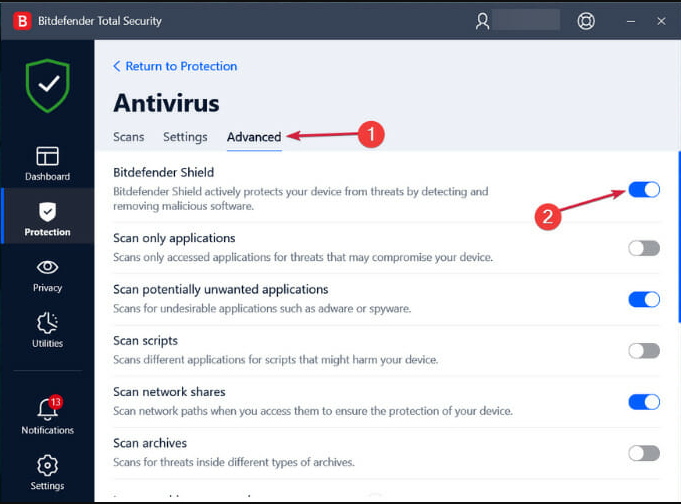
6. Turn off the antivirus software
- First, right-click the third-party antivirus icon and click the required option to start the tool. In our example, it’s Bitdefender, and the option is Show.

- Press the Protection button from the left pane and click on Open from the Antivirus section.

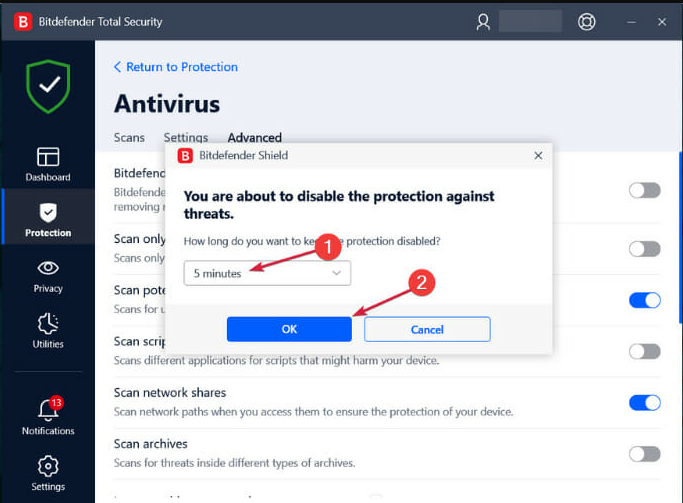
- Select the Advanced tab and toggle off the Bitdefender shield button from the right.

- Then select the duration of the deactivation and hit the OK button. 5 or 15 minutes would be more than enough to confirm that System Restore works without antivirus protection.

- Try to see if System Restore works now.

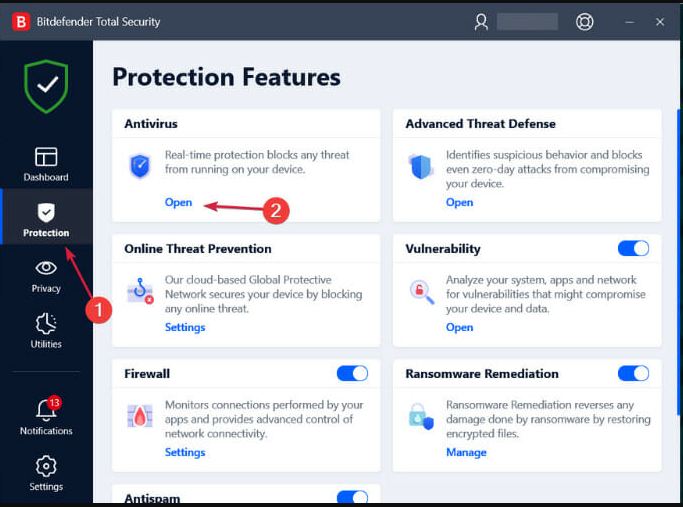
Third-party anti-virus software can block System Restore from accessing flagged files. As such, disabling the antivirus can also be a potential fix for the 0x800700b7 error.
The solution above is just an example of how to deactivate an antivirus temporarily. With your antivirus, the settings to do that might be completely different
Some of our readers reported that the Norton antivirus software blocks System Restore from making any changes to the utility so try deactivating it temporarily.
Alternatively, you can remove the anti-virus software from the Windows startup with the Task Manager’s Start-up tab.
7. Delete the Task Cache key from the Registry
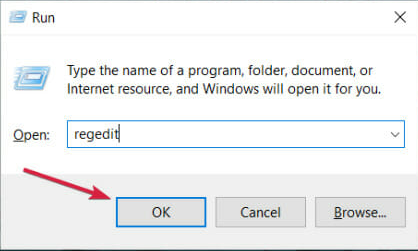
- Press the Windows key + R to start Run, type regedit, and press Enter to launch the Registry Editor.

- Navigate to this registry path:
Computer\HKEY_LOCAL_MACHINE\SOFTWARE\Microsoft\Windows NT\CurrentVersion\Schedule\TaskCache
- First, back up the TaskCache registry key. Right-click TaskCache and select Export on its context menu.

- Enter a title for the backup file, select a folder for it, and press the Save button.
- Next, navigate to the following path:
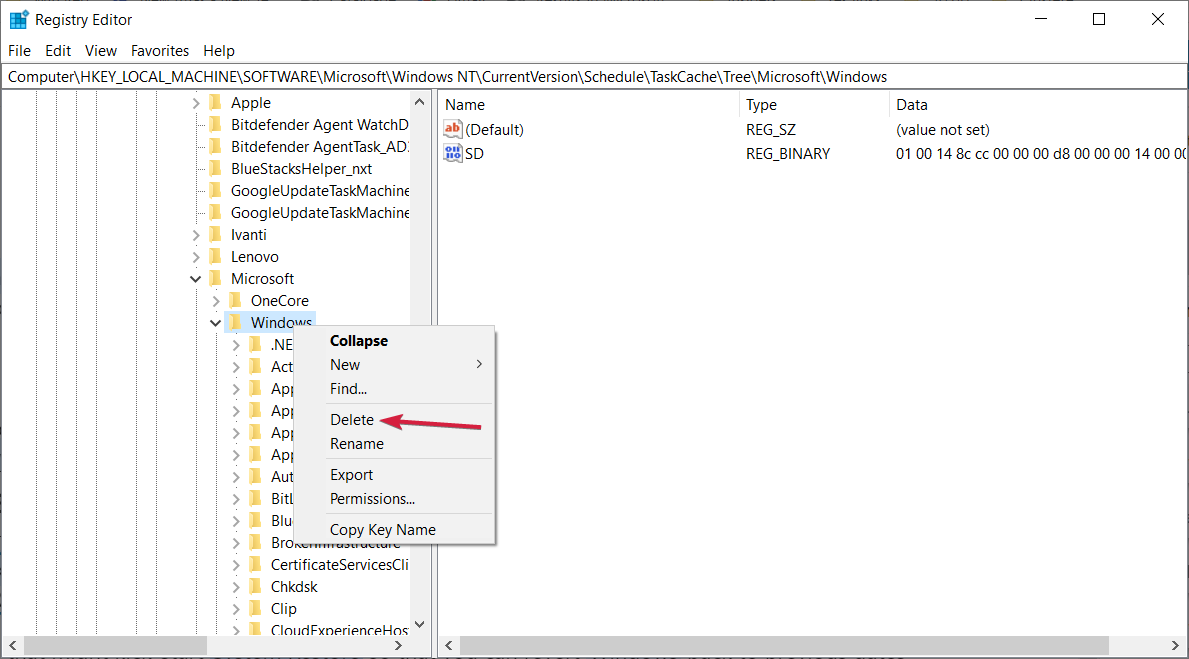
Computer\HKEY_LOCAL_MACHINE\SOFTWARE\Microsoft\Windows NT\CurrentVersion\Schedule\TaskCache\Tree\Microsoft\Windows
- Right-click the Windows key and click Delete on its context menu.
- Press the Yes button to confirm, and then close the Registry Editor.
- Restart your laptop or desktop.


Deleting the Task Cache key from the registry has fixed the 0x800700b7 error for some Windows users.
Those are a few remedies that might kick-start System Restore so you can revert Windows to previous dates. All the errors with the code 0x800700b7 have a common ground in missing or corrupted system files.
In case you need further solutions, check out our article on how to fix other System Restore issues.
If you’ve had this problem or you have any good solutions, leave us a line in the comments section below.
![]()
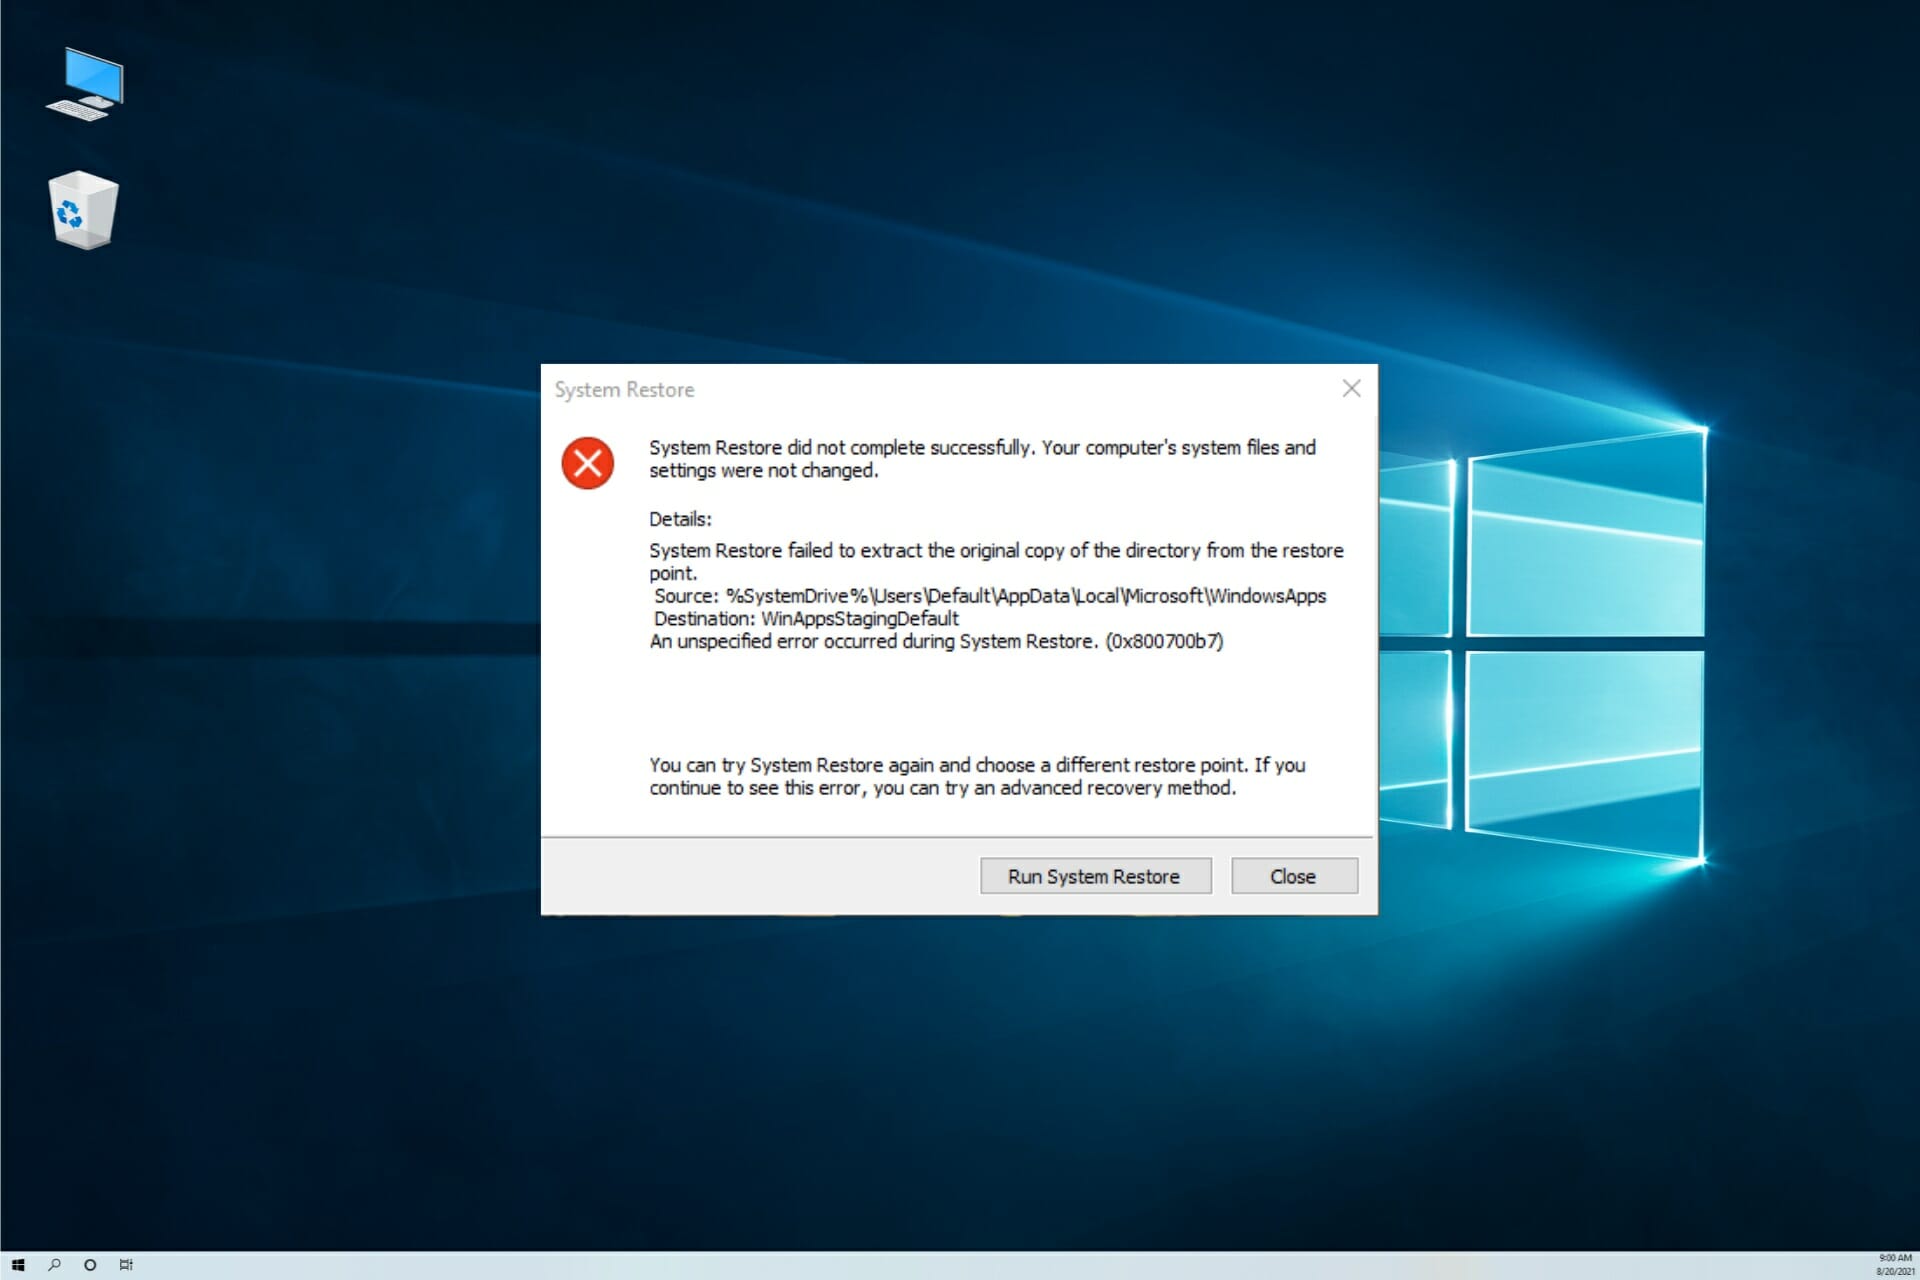
This tutorial contains instructions to fix the following error when trying to restore a Windows 10, 8 or 7 based PC: «System Restore did not complete successfully. Your computer’s files and settings were not changed. An Unspecified error occurred during System Restore. (0x800700b7)» in Windows 10, 8 or 7 OS.

The System Restore error 0x800700b7, is commonly caused because an antivirus or security program prevents the system restore to run properly. In other cases the error 0x800700b7 in system restore is caused because the Windows file system is corrupted, after a power outage or after an unsuccessful installation of a Windows update.
How to Resolve System Restore Unspecified Error 0x800700b7.
Notice: In some cases, the System Restore errors can be solved after a system restart. So, when you face the error in System Restore, Power Off you system and then try to boot to Windows normally and see if the error is resolved.
Case A. If you can sign in to Windows (Windows Starts Normally).
- Method 1. Run System Restore in Safe Mode.
- Method 2. Disable or Uninstall the Antivirus/Security Program.
- Method 3. Repair Windows System Files.
- Method 4. Modify Windows Registry.
- Rename the ‘WindowsApps’ folder from WinRE (Method-7)
Case B. If you cannot sign in to Windows (Windows Cannot Start).
- Method 5. Run System Restore from WinRE.
- Method 6. Repair Windows System files from Windows RE.
- Method 7. Rename the ‘WindowsApps’ folder (Windows 10)
Case A. If you can sign in to Windows (Windows Starts Normally).
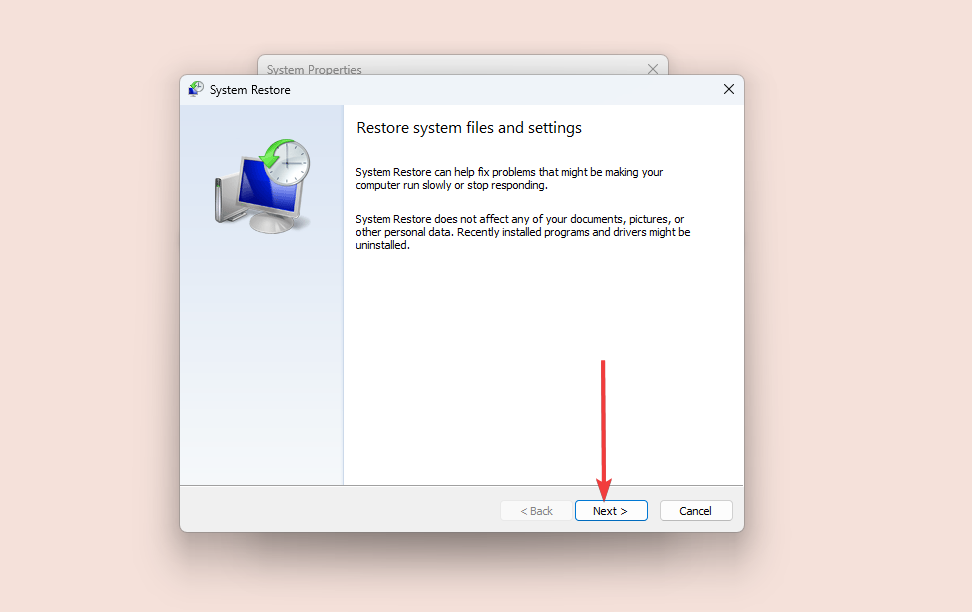
Method 1. Run System Restore in Safe Mode.
The first method to resolve System Restore problems, is to run the System Restore in Windows Safe Mode.
1. Press Windows ![]() + R keys to load the Run dialog box.
+ R keys to load the Run dialog box.
2. Type msconfig and press Enter.

3. Click the Boot tab and then check the Safe Boot option.
4. Click OK and restart your computer.
Note: When you finish your job, open the System Configuration utility again and uncheck the “Safe Boot” option to start Windows normally.
![windows-8-safe-mode_thumb[2]](https://www.wintips.org/wp-content/uploads/2014/04/windows-8-safe-mode_thumb2_thumb.jpg "windows-8-safe-mode_thumb[2]")
5. Simultaneously press the Windows ![]() + R keys to open the Run box.
+ R keys to open the Run box.
6. Type rstrui and hit OK to open System Restore..

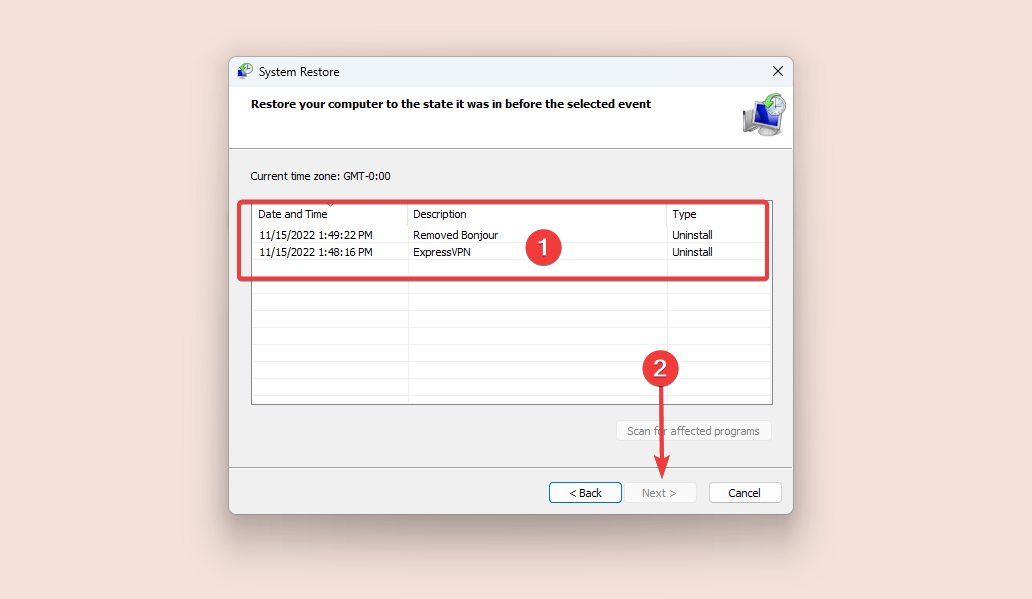
7. Press Next at the first screen and then select an older restore point to restore your computer.
Method 2. Disable or Uninstall the Antivirus/Security Program.
The next method to bypass the Error 0x800700b7 in System Restore, is to turn off or to completely uninstall the Antivirus/Security protection before running System Restore Restore.
Method 3. Repair System Files.
In some case the System Restore error 0x800700b7, is caused because the Windows System Files are corrupted. To repair the system files:
1. Open command prompt as administrator. To do that:
1. In the Search box type: cmd or command prompt
2. Right click on the command prompt (result) and select Run as Administrator.

2. At the command prompt window, type the following command & press Enter:
- SFC /SCANNOW

3. When SFC scan is completed, restart your computer.
4. Try System Restore again.
Method 4. Modify Windows Registry.
1. Simultaneously press the Windows ![]() + R keys to open run command box.
+ R keys to open run command box.
2. Type regedit and press Enter.

3. At the left pane, navigate to this key:
- HKEY_LOCAL_MACHINE\SOFTWARE\Microsoft\Windows NT\CurrentVersion\Schedule\TaskCache\Tree\Microsoft
4. Right click at ‘Windows‘ key and select Export, to backup the key contents in case that something goes wrong.

5. Type a name for the exported registry (e.g. «RegistryBackup») key and Save the file to your desktop. 
6. Then right click to «Windows» key and select Delete.

7. Close Registry Editor and Restart your computer.
8. After the restart, run System Restore. If the error persists, then double click at the registry backup file, to restore the delete registry key and continue to Method-7 below.
Case B. If you cannot sign in to Windows (Windows Cannot Start).
If Windows cannot start, then you have to boot your PC, from a Windows Installation Media*, in order to troubleshoot the System Restore errors, from the Windows Recovery Environment (WinRE).
* Note: If you don’t own a Windows installation media, then (from another working pc) you can create one (according your Windows Version) by using the Media Creation tool.
Method 5. Run System Restore from WinRE.
1. Boot your computer from the Windows Installation Media.
2. At the Windows Language Setup screen press SHIFT + F10 to access command prompt, or click Next –> Repair your computer –> Troubleshoot –> Advanced Options –> Command Prompt.

3. At command prompt type the following command to launch System Restore.
- rstrui

4. Try to restore your system.
Method 6. Repair Windows System files from Windows RE.
1. Boot your computer from the Windows Installation Media.
2. At the Windows Language Setup screen press SHIFT + F10 to access command prompt.
3. At command prompt give the following commands to locate the Windows drive letter.
- diskpart
- list volume
4. Notice the drive letter of the Windows volume. *
* The Windows volume is the partition where the Windows are installed and commonly is the largest volume in size (GB).
e.g. In this example, the drive letter of the Windows volume is “D“.

5. Type exit to close DiskPart utility.
6. At command prompt type the following command to repair the Windows file system:
- sfc /SCANNOW /OFFBOOTDIR=D:\ /OFFWINDIR=D:\windows
* Note: Replace the letter «D« at the above command, according to your case.

7. When SFC scan is completed, restart your computer.
8. Try System Restore again.
Method 7. Rename the WindowsApps folder. *
* Note: This method applies only in Windows 10 OS.
1. Follow the steps 1-5 from the method-6 above, to launch Command Prompt in WinRE and to locate the Windows drive letter.
2. Then, navigate to the Windows drive, by typing its drive letter (e.g. «D») and press Enter.
3. Next, give the bellow command (and press Enter) to navigate to the «Program Files» folder:
- cd Program Files
4. Give the following command to unhide the WindowsApps folder.
- attrib –h WindowsApps
5. Then type the following command to Rename the WindowsApps folder.
- ren WindowsApps WindowsApps.BAK

6. Type rstrui to launch System Restore and try to restore your system again.
That’s it! Let me know if this guide has helped you by leaving your comment about which method is worked for you. Please like and share this guide to help others.
- Remove From My Forums
-
Question
-
I’ve tried several fixes offered on this site after having used seceral update fix programs offered by ms. Nothing helpos much. the 800700B7 code began after stopping and restarting update service and softwar distribution service.
Answers
-
Hi,
Before you try to perform Clean Install, we may still have the chance to remove and reinstall Microsoft Security Essentials for a test. I suspect the issue is more related to MSE as you can install Windows 7 SP1 successfully.
1. Click Start, type in “appwiz.cpl” and press Enter.2. Find out MSE and remove it.
3. Reboot the system and download the latest MSE installation file form here.
http://windows.microsoft.com/en-US/windows/products/security-essentials
4. Then, try to install it and launch Windows Updates check if the issue persists.
Kim Zhou
TechNet Community Support

-
Marked as answer by
Friday, August 3, 2012 1:54 AM
-
Marked as answer by