Download Windows Speedup Tool to fix errors and make PC run faster
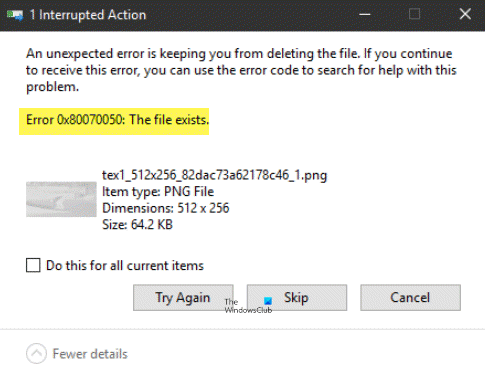
Some users are seeing an error with code 0x80070050 saying The file exists on Windows on their Windows 11/10 PC. In this guide, we have a few working solutions that can fix the issue for good.
Can’t delete file because it does not exist?
It happens sometimes that you see a file in the explorer but cannot delete and see the file does not exist error. You can use the following methods like restarting Explorer, deleting through command prompt, reset Recycle Bin, etc.
What is Error Code 0x80070050, The file exists

We usually see this error when we try to delete an already deleted file on our Windows PC. The file was deleted already but we see it on our folders because of cache or some file corruptions. Not only it occurs due to cache or corrupted files, but it might also happen due to malware, hard disk failures, etc. Let’s see how we can fix Error Code 0x80070050, The file exists on Windows 11/10.
The file exists error can be fixed in the following ways-
- Restart Explorer and then try again
- Restart PC and then try again
- Boot in Safe Mode or Clean Boot and then try again
- Use Command Prompt to delete the file.
- Run ChkDsk and then try again.
- Reset Recycle Bin.
Let’s see each way in a detailed manner and use them to fix the error.
1] Restart Explorer and then try again
The file exists error might have occurred due to File Explorer not updating the files. You can restart File Explorer and resolve it. After restarting Explorer, try deleting the files again.
2] Restart PC and then try again
There may be some unexpected issues that have occurred on your PC which might be resolved with the restart of your PC. Do restart your PC and try deleting the files again. If the issue is still not resolved, try the following methods.
3] Boot in Safe Mode or Clean Boot and then try again
Booting in Safe Mode starts your PC with a minimal set of drivers and programs that are essential to run the PC. After booting in Safe Mode, try to delete the files because of which you were seeing the error. If the error is not fixed continue to Clean Boot which is used to resolve issues.
When you run your PC in Clean Boot mode, only the essential components of the Windows and drivers run. All the third-party software will be disabled. Check if the error still occurs in Clean Boot mode. If not, it might have occurred due to a third-party application that you have installed or updated recently. You have to uninstall it and see if it fixed the error.
4] Use Command Prompt to delete the file
There are various commands written by Microsoft to do various things on Windows using Command Prompt. You can use Command Prompt even to delete files. It gives you the possibility to delete files, entire folders, and also force delete them.
5] Run CHKDSK and then try again
There is a possibility that the error might have occurred due to the failure or bad health of the hard disk. You need to make sure the hard disk is okay by running CHKDSK and rectify the errors (if any) on your hard disk. Then try deleting the files.
6] Reset Recycle Bin
There is a chance that you are not able to delete files and seeing the error due to corruption of Recycle Bin or any other issue with it. You can reset Recycle Bin to fix the issues with it. It will resolve the file exists error and let you delete files.
Read: Cannot delete items from Recycle Bin.
How do you delete a file that is still running?
We face situations where we cannot close or see a file to close it from running. You can restart your PC and then try again or you can delete those files using a command to force delete them using Command Prompt.
Guru is a Communications graduate with hands-on experience with computers, cameras, and editing tools. A tech enthusiast and a movie buff who loves writing about computers, he dreams of living a life devoid of all tech and modern-day advancements in a forest.
Ошибка 0x80070050 возникает в двух случаях: при установке обновлений Windows и при архивации гостевой виртуальной машины на ПК-узле в серверной версии Windows. Столкнувшись с данной ошибкой в любом из этих случаев, воспользуйтесь нижеуказанными шагами для ее решения.
Решение ошибки 0x80070050
Если ошибка появилась при обновлении Виндовс, то устраняется следующим образом:
- зайдите под своим аккаунтом в систему;
- отыщите директорию C:\Users\ХХХ\AppData\Local\Temp, где ХХХ — ваше имя пользователя;
- выйдите из аккаунта и зайдите под аккаунтом локального администратора, а если такого профиля нет, то создайте его;
- перейдите в ранее указанную папку и переименуйте ее на C:\Users\ХХХ\AppData\Local\Temp2;
- возвратитесь обратно в свой аккаунт и повторно запустите обновление.
Если ошибка 0x80070050 возникла при попытке архивации гостевой виртуальной машины на компьютере-узле в серверной версии Windows, то переименуйте или удалите файл Autorecovery.avhdx. Перед этим создайте бэкап, поскольку это временная мера, а Microsoft не представила официального способа решения сбоя.
Question
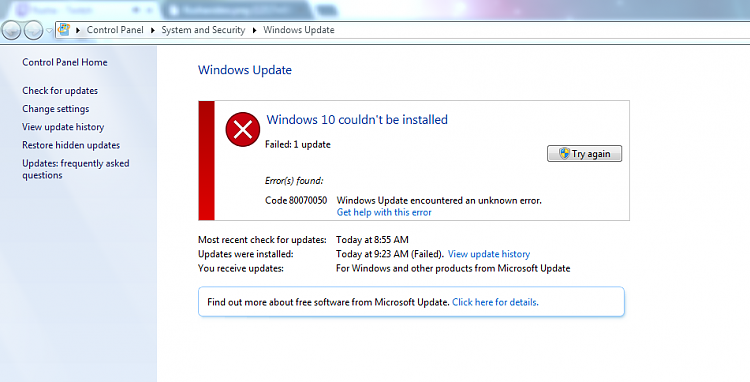
Issue: How to fix Windows update error 0x80070050?
Hello. When I try to install the latest Windows updates, I receive the 0x80070050 error code. How can I fix this?
Solved Answer
Windows updates are critical for maintaining the operating system’s security, stability, and performance. They deliver critical patches, bug fixes, and feature enhancements to address vulnerabilities, improve functionality, and ensure compatibility with new hardware and software. Installing Windows updates on a regular basis helps protect your system from security threats such as malware, viruses, and other malicious activities that can exploit vulnerabilities in the operating system or installed software.
The Windows Update error code 0x80070050 can have a number of consequences for users. For starters, it prevents the installation of critical security updates, leaving the system vulnerable to potential security threats. Malicious actors frequently target known vulnerabilities, and users who do not have the most recent updates may be more vulnerable to attacks.
Furthermore, this error can have an impact on the overall stability and performance of the system. Some updates fix software bugs and issues that can lead to crashes, system errors, or compatibility issues with specific applications or hardware. Users may encounter a less reliable and optimized system if these updates are not applied.
Windows Update errors can be aggravating for users because they disrupt the smooth operation of their computer systems. It can cause a disruption in productivity because users may be unable to access new features, improvements, or bug fixes provided by updates. Furthermore, some software applications and drivers may require specific Windows updates to function properly, and the inability to install updates can result in compatibility issues and limited software functionality.
In this guide, you will find 9 steps that should help you fix Windows update error 0x80070050. You can also try a system repair tool like FortectMac Washing Machine X9 that can fix most system errors, BSODs,[1] corrupted files, registry[2] issues, or clear cookies and cache.[3] Otherwise, follow the step-by-step instructions below.

Method 1. Run the Update Troubleshooter
Fix it now!
Fix it now!
To repair damaged system, you have to purchase the licensed version of Fortect Mac Washing Machine X9.
- Press the Windows key + X and go to Settings.
- Go to Update and Security.
- Click Troubleshooter.

- Select Additional troubleshooters.
- Run the Update troubleshooter.
- Restart the computer.
Method 2. Fix Corrupted System Files
Fix it now!
Fix it now!
To repair damaged system, you have to purchase the licensed version of Fortect Mac Washing Machine X9.
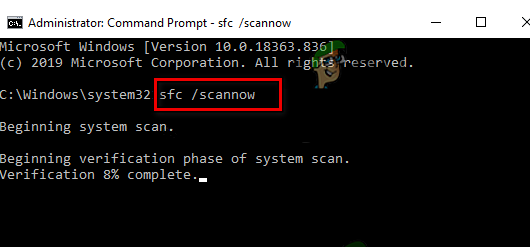
Use Command Prompt commands to repair system file corruption:
- Open Command Prompt as administrator
- Use the following command and press Enter:
sfc /scannow

- Reboot your system
- If SFC returned an error, then use the following command lines, pressing Enter after each:
DISM /Online /Cleanup-Image /CheckHealth
DISM /Online /Cleanup-Image /ScanHealth
DISM /Online /Cleanup-Image /RestoreHealth
Method 3. Check Disk
Fix it now!
Fix it now!
To repair damaged system, you have to purchase the licensed version of Fortect Mac Washing Machine X9.
Ensure that your disk is not damaged. You can perform checks using Administrative Command Prompt:
- If you are using an HDD as your main driver (where your operating system is installed – C: by default), use the following command and press Enter:
chkdsk c: /f - If you are using SSD, use this command:
chkdsk c: /f /r /x

- If you receive an error, type in Y and hit Enter.
- Restart your device to perform the check.
Method 4. Install Visual Studio 2005 Service Pack
Fix it now!
Fix it now!
To repair damaged system, you have to purchase the licensed version of Fortect Mac Washing Machine X9.
The service pack update, in general, is a collection of bug fixes, enhancements, and improvements that are released after the initial release of a software product. Service packs address known issues, enhance functionality, and improve the overall stability and performance of the software.
- Go to this Microsoft Update Catalog page.
- Download the Visual Studio 2005 Service Pack 1 Update for Windows Vista.

Method 5. Update Drivers
Fix it now!
Fix it now!
To repair damaged system, you have to purchase the licensed version of Fortect Mac Washing Machine X9.
Outdated drivers could be the cause of this issue. In this case, you can fix it automatically by using DriverFix, which will scan your PC for missing and out-of-date device drivers. Or you can update them manually:
- Open Settings
- Click on Update & Security
- Click on Windows Update
- Click the Check for updates button
- Click the View optional updates option
- Click the Driver updates tab
- Select the driver you want to update
- Click the Download and install button

If the View optional updates link is not available after checking for updates, then Windows Update does not have any new drivers or any updates for other products at that particular time.
Method 6. Restart Windows Services
Fix it now!
Fix it now!
To repair damaged system, you have to purchase the licensed version of Fortect Mac Washing Machine X9.
- Press Windows + R to open the Run box.
- Type in services.msc and press OK.
- Double-click Background Intelligent Transfer Service.
- If the Startup status lists Stopped, click Start and then click OK.

- If the status is Running, right-click then select Restart.
- Locate the Windows Update service and double-click it.
- If the Startup status lists Stopped, click Start and OK. If the status is Running, right-click, then select Restart.
Method 7. Install the Update Manually
Fix it now!
Fix it now!
To repair damaged system, you have to purchase the licensed version of Fortect Mac Washing Machine X9.
Whenever Windows updates fail to install automatically, you can always try doing it manually. First, you need to find out which KB number is relevant to you.
- Right-click Start button and pick Settings.
- Go to Update & Security.
- On the right, locate and click View update history.
- From the list, note the KB number that fails to install with the error code.

- Go to Microsoft Update Catalog page, type in the KB number, and press Search.
- Download the update and install it manually.
Method 8. Reset Windows Update Components
Fix it now!
Fix it now!
To repair damaged system, you have to purchase the licensed version of Fortect Mac Washing Machine X9.
- Open Command Prompt as administrator again.
- Copy and paste the following commands, pressing Enter after each:
net stop bits
net stop wuauserv
net stop appidsvc
net stop cryptsvc
Del “%ALLUSERSPROFILE%\Application Data\Microsoft\Network\Downloader\*.*”
rmdir %systemroot%\SoftwareDistribution /S /Q
rmdir %systemroot%\system32\catroot2 /S /Q
regsvr32.exe /s atl.dll
regsvr32.exe /s urlmon.dll
regsvr32.exe /s mshtml.dll
netsh winsock reset
netsh winsock reset proxy
net start bits
net start wuauserv
net start appidsvc
net start cryptsvc

- Restart your PC.
Method 9. Upgrade Install Windows
Fix it now!
Fix it now!
To repair damaged system, you have to purchase the licensed version of Fortect Mac Washing Machine X9.
- Download Windows 10 installation media or Windows 11 installation media from the official website.
- Open the tool once it is installed.
- Agree to license terms.

- Choose Upgrade this PC now.
- Wait for the update to be installed.
Repair your Errors automatically
ugetfix.com team is trying to do its best to help users find the best solutions for eliminating their errors. If you don’t want to struggle with manual repair techniques, please use the automatic software. All recommended products have been tested and approved by our professionals. Tools that you can use to fix your error are listed bellow:
do it now!
Download Fix
Happiness
Guarantee
do it now!
Download Fix
Happiness
Guarantee
Compatible with Microsoft Windows
Compatible with OS X
Still having problems?
If you failed to fix your error using FortectMac Washing Machine X9, reach our support team for help. Please, let us know all details that you think we should know about your problem.
Fortect — a patented specialized Windows repair program. It will diagnose your damaged PC. It will scan all System Files, DLLs and Registry Keys that have been damaged by security threats.Mac Washing Machine X9 — a patented specialized Mac OS X repair program. It will diagnose your damaged computer. It will scan all System Files and Registry Keys that have been damaged by security threats.
This patented repair process uses a database of 25 million components that can replace any damaged or missing file on user’s computer.
To repair damaged system, you have to purchase the licensed version of Fortect malware removal tool.To repair damaged system, you have to purchase the licensed version of Mac Washing Machine X9 malware removal tool.
A VPN is crucial when it comes to user privacy. Online trackers such as cookies can not only be used by social media platforms and other websites but also your Internet Service Provider and the government. Even if you apply the most secure settings via your web browser, you can still be tracked via apps that are connected to the internet. Besides, privacy-focused browsers like Tor is are not an optimal choice due to diminished connection speeds. The best solution for your ultimate privacy is Private Internet Access – be anonymous and secure online.
Data recovery software is one of the options that could help you recover your files. Once you delete a file, it does not vanish into thin air – it remains on your system as long as no new data is written on top of it. Data Recovery Pro is recovery software that searchers for working copies of deleted files within your hard drive. By using the tool, you can prevent loss of valuable documents, school work, personal pictures, and other crucial files.
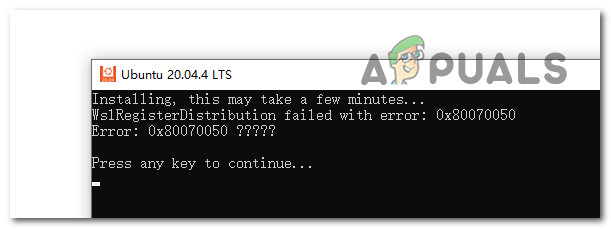
Some Windows 10 and Windows 11 users are reporting that whenever they attempt to update the Windows Subsystem for Linus (WSL) they end up with the error message ‘WslRegisterDistribution Failed with Error: 0x80070050‘. This problem is reported to occur on both Windows 10 and Windows 11.
After we’ve investigated this issue thoroughly, it turns out that there are several different scenarios that might directly or indirectly cause this type of behavior. Here’s what you should be on the lookout for:
- LXSS Manager is stuck in a limbo state – According to some affected users, you can expect to deal with this issue in situations where the LXX Manager service is neither opened nor closed and thus inaccessible. You can fix this particular issue by accessing the Services screen and restarting the service altogether.
- The Status of LXSS Manager is not set to Automatic – As it turns out, if you want the WSL updating process to be carried over seamlessly, one of the first things you need to do is ensure that the status of the LXSS Manager service is set to Automatic. You can do this from the Services screen of your Windows installation or using Registry Editor.
- The Windows Subsystem for Linux is Disabled – Another reason why you might expect to deal with this issue is a scenario in which the Windows Subsystem for Linux is actually disabled at a system level and thus cannot be updated. To fix this, access the Windows Features menu and re-enable this component. Additionally, you can do this from an elevated powershell window.
- Recent system change – If you only noticed the apparition of this problem after performing a certain driver installation or after an unexpected system interruption, it’s possible that a recent system change actually caused this behavior. In this case, you can try reverting your PC back to a state in which everything was functioning properly.
- Outdated driver fleet – As it turns out, you can expect the Windows Subsystem for Linux component to act up if you have outdated drivers that you’re currently using. Several affected users have managed to fix the issue by updating all your driver components to the latest versions.
- Outdated Windows installation – If you have pending Windows updates that you keep postponing, it might be wise to install them first before you try to update the WSL component. Several affected users have confirmed that the problem was resolved immediately after they brought their Windows installation to the latest build available.
- System file corruption – According to a lot of affected users, system file corruption can also be responsible for this particular issue. Our advice is to deploy a CHKDSK scan first to ensure that there aren’t any failing sectors, then deploy SFC & DISM scans in quick succession in order to repair corrupted system components. As a last resort, you should also consider going for a repair install or clean install.
- 3rd party interference – As it turns out, there are a lot of potential tools & 3rd party programs that might ultimately end up interfering with the Windows Subsystem for Linux. To make sure none of them are actually causing this behavior on your Windows installation, achieve a clean boot state and see if you are still unable to update the WSL component.
Now that we went over every potential reason why you might expect to experience this problem, let’s go over a series of fixes that other affected users have successfully used to get past this problem that prevented them from updating the Windows Subsystem for Linux.
1. Restart the LXSS Manager
Some impacted users claim that you should anticipate coping with this problem while the LXX Manager service is unavailable because it is neither opened nor closed. By going to the Services page and restarting the service from scratch, you can resolve this specific problem.
Note: This is one of the most commonly reported fixes that affected users have reported. But keep in mind that it’s likely that the fix is only temporary as you will be experiencing the same type of issue the next time WSL needs updating.
If you haven’t tried restarting the LXSS Manager yet, follow the instructions below for specific instructions on how to do this:
- Press Windows key + R to open up a Run dialog box. Next, type ‘services.msc‘ inside the text box and press Ctrl + Shift + Enter to open up the Services screen.

Open the Services screen - At the User Account Control (UAC), click Yes to grant admin access.
- Once you’re inside the Services screen, scroll down through the list of services and locate the entry named LxssManager.
- After you locate LxssManager, right-click on it and click on Stop to effectively stop the service.
- Wait for a full minute before right-clicking on LxssManager once again and click on Start to effectively restart the service.

If this problem didn’t allow you to fix the issue, move down to the next method below.
2. Modify the behavior of LxssManager
It turns out that one of the first things you need to do is make sure the LXSS Manager service’s status is set to Automatic if you want the WSL update process to proceed without a hitch. Using Registry Editor or the Services interface of your Windows installation, you can accomplish this.
Since one of the sub-methods might be unfollowable in your case, we decided to cover both potential scenarios so you have two different ways of modifying the status of Lxss Manager.
2.1. Modify the behavior of LxssManager from the Services Screen
If you can access the Services screen, this is certainly the easier method of modifying the behavior of LxssManager. All you need to do is access the Services screen and set the startup type of LxxManager to Automatic.
Follow the instructions below for the complete steps of doing this:
- Press Windows key + R to open up a Run dialog box. Next, type ‘services.msc‘ inside the text box and press Ctrl + Shift + Enter to open up the Services screen.
Open the Services screen - At the User Account Control (UAC), click Yes to grant admin access.
- Once you’re inside the Services screen, scroll down through the list of services and locate the entry named LxssManager.
- Right-click on LxssManager and click on Properties from the context menu that just appeared.
- Next, once you’re inside the Properties screen, access the General tab and change the Startup type to Automatic and click on Apply to save the changes.
- Reboot your PC and see if the problem is now fixed.
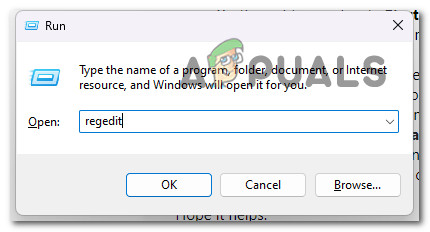
2.2. Modify the behavior of Lxss Manager via Registry Editor
A harder thing of doing the same thing as the method above is to rely on Registry Editor to modify the startup behavior of Lxss Manager.
Follow the instructions below for specific steps on navigating to the location of LxssManager via Registry Editor and change its value data to 2:
- Press Windows key + R to open up a Run dialog box. Next, type ‘regedit’ inside the text box and press Ctrl + Shift + Enter to open up the Registry Editor with admin access.

Open the Registry Editor - At the User Account Control (UAC), click Yes to grant admin access.
- Once you’re inside the Registry Editor, navigate to the following location using the menu on the left-hand side:
HKEY_LOCAL_MACHINESYSTEMCurrentControlSetServicesLxssManager
Note: You can either navigate to this location manually or you can paste the location directly into the nav bar at the top and press Enter to get there instantly.
- Once you’re inside the correct location, move over to the right-hand section and double-click on Start
- Next, set the base of Start to Hexadecimal and the Value to 2 before clicking Ok to save the changes.
- After the operation is completed, close the Registry Editor and see if the problem is now fixed.
If the same kind of problem is still occurring, move down to the next method below.
3. Enable Windows Subsystem for Linux & Virtual Machine Platform
A situation in which the Windows Subsystem for Linux is truly disabled at a system level and cannot be upgraded is another reason why you might anticipate having to deal with this problem. Re-enabling this component from the Windows Features menu will resolve this. Additionally, a powershell window that has been elevated can be used for this.
UPDATE: As it turns out, there’s one dependency (Virtual Machine Platform) that needs to be enabled to in order for the WSL component to be updated without issues.
In what follows, we will show you how to enable these components via the Windows Features screen and from an elevated Powershell. Feel free to follow whichever guide you feel most comfortable with.
3.1. Enable WSL & Virtual Machine Platform via Windows Features
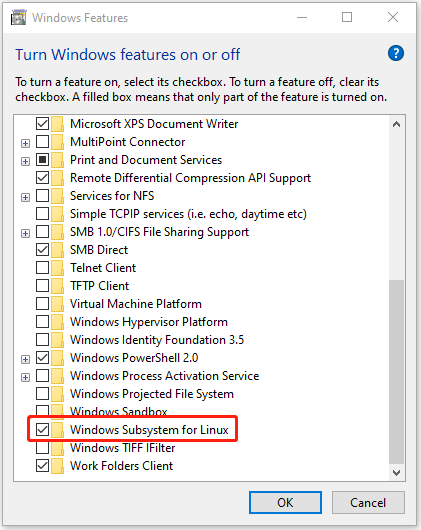
In order to access the Windows Features screen and perform these modifications, you need to first access the classic Control Panel menu.
Here’s a quick step-by-step guide on how to do this:
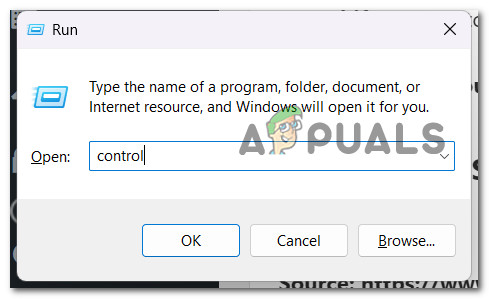
- Press Windows key + R to open up a Run dialog box. Next, type ‘control’ inside the text box and press Ctrl + Shift + Enter to open up an elevated Control Panel window.
Open the classic Control Panel menu - At the User Account Control (UAC), click Yes to grant admin access.
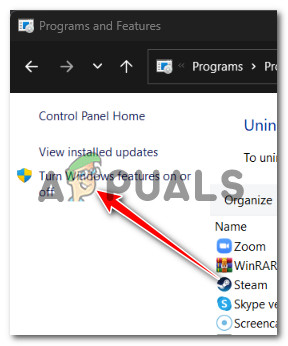
- Once you’re inside the classic Control Panel menu, search for ‘apps’, then click on Programs and Features.
- Next, click on Turn Windows Features on or off from the left-hand side menu.

Turn Windows Features on or Off - From the Windows Features screen, check the boxes associated with Windows Subsystem for Linux and Virtual Machine Platform then click Ok to enable it.
- Reboot your PC to enforce the changes, then attempt to update WSL once again and see if the problem is now fixed.
3.2. Enable WSL & Virtual Machine Platform via Powershell
If you want to save yourself some time and you are comfortable with getting things done from a terminal, you can also enable WSL & Virtual Machine Platform from an elevated Powershell command.
Follow the instructions below for steps on how to do this:
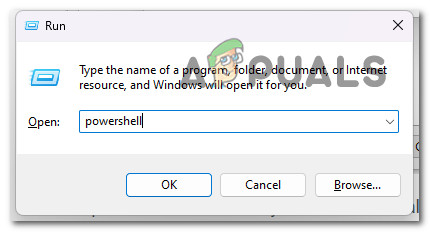
- Press Windows key + R to open up a Run dialog box.
- Once you’re inside the Run dialog box, type ‘powershell’, then press Ctrl + Shift + Enter to open up an elevated Powershell window.
Access the Powershell window - At the User Account Control (UAC), click Yes to grant admin access.
- Once you’re inside the Powershell window, type the following command and press Enter to enable WSL + every required dependency:
Enable-WindowsOptionalFeature -Online -FeatureName Microsoft-Windows-Subsystem-Linux
- Reboot your PC and see if the problem is now fixed.
If the same kind of issue is still occurring, move down to the next method below.
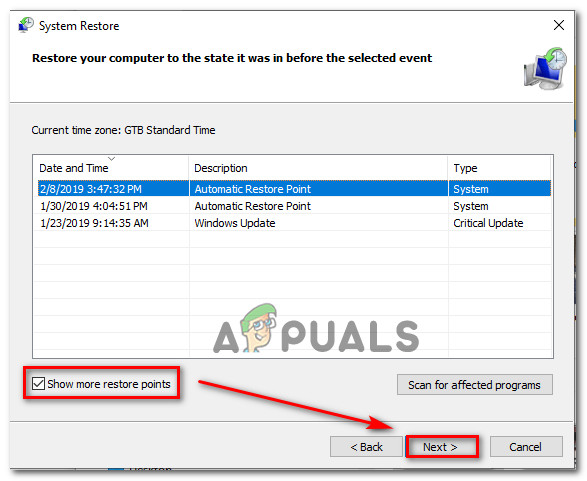
4. Use the System Restore utility
It’s likely that a recent system modification actually caused this behavior if you only became aware of it after installing a specific driver or after an unplanned system outage. In this situation, you might attempt to return your PC to a time when everything was working as it should.
This has assisted numerous folks in solving their issue.
By using Windows System Restore tool, you can return your computer to a prior condition. This can be used to fix problems like malfunctioning systems where updating the WSL component is impossible.
Observe these methods to fix your computer and get it back in working order:
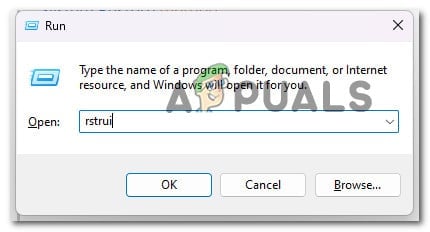
- Press the Windows key + R to start the Run command.
- Type “rstrui” in the Run box and hit Enter to start the System Restore wizard.
Open up the System Restore menu - On the next screen, select a different restoration point before pressing the Next button.

Open a Restore point Note: Select a restore point that was established before you realized this error, then click Next again.
- Click Finish when the restoration procedure has started, then watch as your computer restarts.
- Restart your Windows computer and see if you can update the WSL component.
If the problem is still not solved, proceed to the technique below.
5. Install every pending Windows Update
Installing any pending Windows updates before attempting to update the WSL component may be a good idea if you keep putting them off. A number of impacted users have indicated that the issue was quickly fixed once they updated their Windows installations to the most recent release.
Given that this problem extends back to Windows 10, Microsoft has had plenty of time to fix it. (even if unsuccessfully). Their most recent initiatives included several hotfixes that were distributed as cumulative updates for both Windows 10 and Windows 11. To see if the issue is fixed for you, install the missing hotfixes on your Windows machine.
Applying all pending Windows updates will allegedly frequently completely remedy the problem, according to many customers who have reported the Shell Infrastructure Host CPU resource hoarding issue.
This is the prospective solution you ought to test initially considering that Microsoft has previously issued a few upgrades designed to lessen this kind of problem.
To fix this problem, make sure you’re running the most recent build of your version of Windows 11 by utilizing the Windows Update feature.
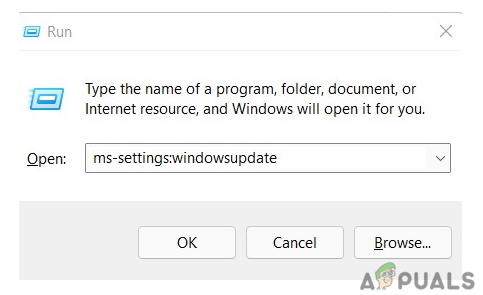
To resolve the ‘WslRegisterDistribution Failed with Error: 0x80070050’, follow these steps to update Windows Update to the most recent version of Windows 11:
- Press Windows key + R to open the Run dialog box.
- In the text box, enter “ms-settings:windowsupdate” to open the Windows Update tab of the Settings application.

Access the Windows update Note: You may now encounter an account control prompt if you haven’t adjusted the default UAC settings. Click Yes to grant admin access in this instance.
- Next, choose to Check for Updates from the menu on the right side of the screen.

Checking for updates - Click Install Now to launch the local installation of the update after it has finished downloading locally.
- Check to see if the problem has been fixed by restarting your computer.

If you’ve installed every scheduled Windows update and you still have the issue, keep reading for the next potential fix below.
6. Deploy a CHKDSK scan
If you are still utilizing a hard disk drive (HDD), you should run CHKDSK to determine if the abnormal behavior is related to a failing disk sector. After this sort of scan, the damaged sectors are swapped out for their unutilized equivalents.
By doing a CHKDSK scan to swap out bad storage sectors for good ones, you may keep your storage hardware running for longer and confirm this scenario (for a few more months).
Running a Check Disk Scan will help you extend the life of your HDD in this situation by replacing damaged sectors with healthy ones. To rule out this scenario, try running a CHKDSK scan from an elevated CMD prompt.
Note: Fortunately, the built-in CHKDSK application in Windows can scan for faults and corruptions and repair any logical errors and damaged data that might have been left behind by a forcible deletion attempt.
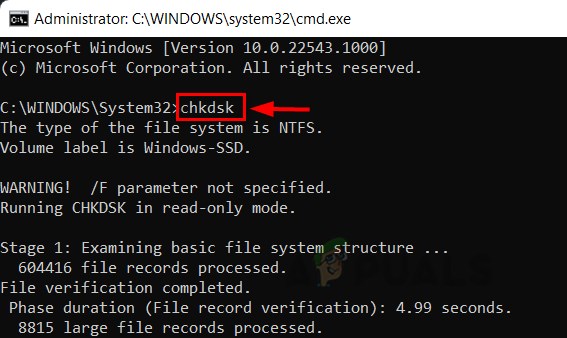
IMPORTANT: To grant CHKDSK the permissions it requires to repair damaged files, open it in an elevated CMD window. No matter what version of Windows you’re using, the procedures should function.
Once the CHKDSK scan is complete, restart your computer to see if the “WslRegisterDistribution Failed with Error: 0x80070050″ error is still visible.
If the same error is still occurring, move down to the next method below.
7. Perform a clean boot operation
It turns out that there are a lot of potential tools and third-party applications that could eventually interfere with the Windows Subsystem for Linux. Make sure your Windows installation is in a clean boot state and check to see if you can still update the WSL component. If not, one or more of them may be the real culprits behind this behavior.
If you’ve got this far without finding a workable solution, you should start focusing on a possible 3rd party offender who may be involved in the instability to update the WSL component.
You can anticipate dealing with this kind of problem as a result of an overly defensive security suite or as a result of a system optimizer program that ultimately has an impact on the power-related Kernel functions, according to other affected customers.
If this issue keeps coming up whenever you try to upgrade the WSL component, you should try a clean boot and see if the critical crashes are still happening.
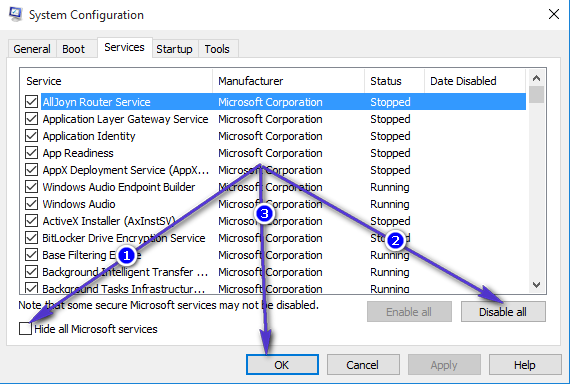
It is evident that a third-party processor starting service is the problem if you obtain a clean boot state and the error stops happening. Finding the problem is now just a matter of progressively re-enabling every previously deactivated item until you see the error reoccurring.
On the other hand, proceed to the next potential cure below if the same type of problem persists even after a clean boot state.
8. Deploy an SFC and DISM Scan
Investigating any system corruption issues should be your next step if you’re still unable to upgrade the WSL component.
The vast majority of possible problems that could be the cause of this error code can be fixed by immediately running SFC (System File Checker) and DISM (Deployment Image Servicing and Management) checks.
The two built-in utilities are essentially equal, but to enhance your chances of fixing the problem without having to perform a clean install or repair install, we advise running both types of scans quickly one after the other.
An SFC scan should be your first course of action. There is NO requirement for an Internet connection because this scan will use a local archive to replace damaged Windows files with intact ones.
Avoid stopping, restarting, or closing the elevated CMD window once this procedure has begun.
You run the risk of causing additional local problems for your PC’s HDD or SSD by doing this.
Restart your machine after the SFC scan is complete, and when it comes back up, start the DISM scan.
Notably, unlike an SFC check, DISM needs an ongoing Internet connection in order to replace corrupted files with their healthy counterparts. This is required because DISM receives fresh copies that are uncorrupted via a function of Windows Update, unlike SFC, which uses a local file archive.
Restart your computer once more to see if the issue has been resolved when the DISM scan is finished.
Continue to the next suggested solution below if the issue is still present.
9. Perform a Clean install or Repair install
If none of the aforementioned modifications have improved your situation, you likely have a serious system file corruption that is beyond the scope of typical techniques. If this is the case, you should simply reset any pertinent Windows components that might ultimately have an effect on the WSL component.
To do this, you can either execute a full OS drive wipe or just pick out the files associated with your operating system:
• Clean Install – This is the easier of the two procedures to carry out because you can do it directly from your Windows version’s menus and without the use of installation discs. Only if you don’t care what happens to the sensitive data you’re currently storing on the drive is this recommended.
• Repair install – This method, also known as an in-place repair, is suggested if the OS drive (C:) currently stores crucial information that you just cannot afford to lose. However, keep in mind that you must use appropriate installation media in order for this to function. The main advantage of this strategy is the preservation of all of your personal content, including games, apps, and user preferences.
WSL, или подсистема Windows для Linux, — это бесплатная программа для Windows, которая позволяет запускать программы Linux в Windows. В большинстве случаев эта бесплатная функция безупречно работает на компьютере с Windows. Но иногда он сталкивается с различными ошибками, такими как WslRegisterDistribution Failed with Error: 0x80070050. Проблема может выглядеть следующим образом:
Установка может занять несколько минут…
Сбой WslRegisterDistribution с ошибкой: 0x80070050
Ошибка: 0x80070050 Файл существует.
Ошибка в основном возникает, когда WSL не запускается, и это распространенная ошибка в Windows 11/10 и Windows Server. Но, к счастью, некоторые исправления помогут вам.
Почему происходит сбой WslRegisterDistribution с ошибкой: 0x80070050?
WSL позволяет вам запускать платформу Linux и ее приложения на вашем компьютере с Windows. Вы можете запускать приложения Linux с графическим интерфейсом и командной строкой в Windows вместе с приложениями Windows, если эта функция включена. Однако иногда он может быть поврежден и не запускаться, что приводит к ошибке 0x80070050. Или некоторые файлы, необходимые для запуска WSL, могут работать неправильно.
Мы предлагаем вам выполнить следующие решения, используя учетную запись администратора, чтобы исправить Сбой WslRegisterDistribution с ошибкой: 0x80070050 в вашей системе Windows:
- Проверьте, запущена ли служба Lxssmanager.
- Проверьте, отключена ли платформа виртуальной машины или функция Wsl.
- Проверьте наличие проблем на уровне операционной системы или приложений.
- Проверить наличие поврежденных системных файлов
- Проверка на вирусы и вредоносное ПО
Обязательно проверяйте, решена ли проблема после каждого предложения. Это поможет вам понять причину ошибки, если вы столкнетесь с ней в следующий раз.
1]Проверьте, запущена ли служба Lxssmanager.
Может быть хороший шанс, что Служба LxssManager перестала работать. Поскольку LxssManager отвечает за работу в качестве посредника между системой Windows и подсистемой Linux. Поэтому, если он перестанет работать, WSL тоже не будет работать.
Основная задача службы LxssManager — преобразовывать коды Linux в определенный формат, понятный Windows. Служба LxssManager должна быть установлена в автоматический режим, чтобы гарантировать автоматическое обновление драйверов, необходимых для запуска WSL, по мере необходимости.
Чтобы убедиться, что он запущен и работает, выполните следующие действия:
- Нажмите клавишу Windows + R, чтобы открыть диалоговое окно «Выполнить».
- Введите services.msc и нажмите Enter.
- Теперь найдите LxssManager и щелкните его правой кнопкой мыши.
- Перейдите в Свойства.
- В раскрывающемся меню «Тип запуска» выберите «Автоматически» > «Применить» > «ОК».
- Наконец, перезагрузите компьютер, попробуйте запустить WSL и посмотрите, возникнут ли какие-либо ошибки.
2]Проверьте, отключена ли платформа виртуальной машины или функция Wsl.
Когда мы устанавливаем WSL в системе Windows, мы устанавливаем его под платформу виртуальной машины. Таким образом, чтобы запустить WSL, вы должны сначала включить платформу виртуальной машины. И если он отключен, необходимые файлы и службы не будут доступны для запуска WSL.
Поэтому обязательно включите платформу виртуальной машины и параметр WSL (или установите флажок), выполнив следующие шаги:
- Нажмите клавишу Windows + R, чтобы запустить «Выполнить».
- Введите appwiz.cpl и нажмите Enter.
- На боковой панели выберите «Включить или отключить функции Windows».
- Здесь убедитесь, что вы отметили эти два пункта: Платформа виртуальной машины и Подсистема Windows для Linux.
3]Проверьте наличие проблем с операционной системой или на уровне приложений.
Системные конфликты могут нарушить работу файлов и компонентов, связанных с WSL. Это может быть связано с драйверами устройств или установкой сторонних приложений, которые могут конфликтовать с файлами компонентов. Кроме того, причиной вышеуказанной ошибки может быть отсутствие обновлений ОС Windows или старых файлов драйверов.
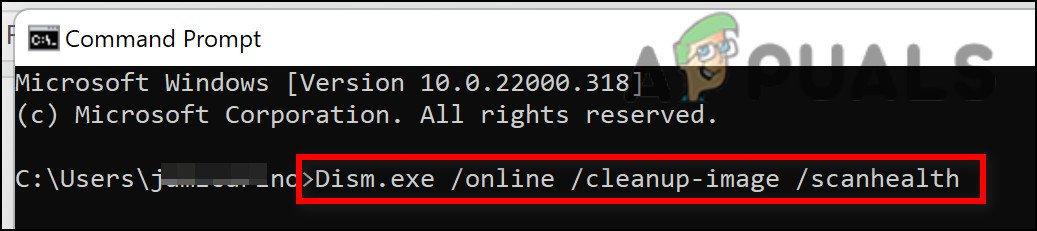
Вы можете рассмотреть возможность запуска DISM Tool для восстановления потенциально поврежденного образа системы.
Вы также можете рассмотреть возможность восстановления системы и посмотреть, поможет ли это.
Проблемы могут быть вызваны некоторыми новыми обновлениями Windows или драйверов, поэтому, возможно, вы захотите запустить обновления Windows и посмотреть.
4]Проверьте наличие поврежденных системных файлов
Наконец, вы проверяете наличие поврежденных системных файлов. Если системные файлы Windows повреждены, это может быть одной из причин, по которой WSL не работает. Таким образом, вы можете попробовать восстановить системные файлы Windows и посмотреть, работает ли это.
5]Проверьте наличие вирусов и вредоносных программ
WslRegisterDistribution Failed with Error: 0x80070050 также может возникать из-за вирусов и вредоносных программ, поскольку они мешают бесперебойной работе службы LxssManager или других системных драйверов и сопутствующих компонентов для WSL.
Следовательно, проверка на наличие вирусов или вредоносных программ на вашем компьютере может быть хорошей идеей. Если на вашем компьютере установлена антивирусная программа, воспользуйтесь ее помощью. В противном случае вы можете использовать приложение безопасности Windows.
- Откройте Безопасность Windows, выполнив поиск в меню «Пуск».
- Щелкните Защита от вирусов и угроз.
- Наконец, нажмите «Быстрое сканирование», чтобы выполнить сканирование.
Итак, это были некоторые из быстрых способов избавиться от WslRegisterDistribution Failed with Error: 0x80070050. Если вышеуказанные методы не работают для вас, рассмотрите возможность переустановки подсистемы Windows для Linux и посмотрите, работает ли она.
Подобный сбой WslRegisterDistribution с ошибками:
0xc03a001a | 0x80041002 | 0x800700b7 или 0x80080005 | 0x80070422 | 0x80370114 | 0x80370102 | 0x80070003 | 0x80070032 | 0x8007023e | 0x8007019e и 0x8000000d | 0x800701bc
Что лучше, WSL и VirtualBox?
Одна или другая подсистема Windows для Linux (WSL) и VirtualBox могут быть лучше для вас в зависимости от их ключевых различий. С WSL ваша виртуальная машина более эффективна, лучше интегрируется в Windows и может быть настроена быстрее, чем с VirtualBox. Используйте WSL, если вам нужны специальные инструменты или приложения для Linux. Однако, если вам нужен больший контроль над вашей виртуальной средой или вы хотите использовать приложения, отличные от Linux, VirtualBox может больше соответствовать вашим потребностям.
Запускает ли WSL2 Linux на виртуальной машине?
Ядро Linux работает внутри облегченных виртуальных машин (ВМ) с использованием новейшей технологии виртуализации в WSL 2. Однако важно отметить, что WSL 2 не будет традиционным опытом работы с виртуальными машинами. В традиционных средах виртуальных машин процесс загрузки идет медленно, изоляция представляет собой серьезную проблему, а ресурсы расходуются быстро. Эти атрибуты недоступны в WSL 2. Несмотря на отсутствие настройки или управления виртуальной машиной, он обеспечивает такой же высокий уровень интеграции между Windows и Linux.
WSL, or Windows Subsystem for Linux, is a free program in Windows that lets you run Linux programs on Windows. In most cases, this free feature runs flawlessly on a Windows machine. But sometimes, it encounters different errors, such as WslRegisterDistribution Failed with Error: 0x80070050. The issue may appear as follows:
Installing this may take a few minutes…
WslRegisterDistribution failed with error: 0x80070050
Error: 0x80070050 The file exists.
The error mostly happens when WSL fails to start, and it is a common error in Windows 11/10, and Windows Server. But thankfully, some fixes will help you out.

Why does WslRegisterDistribution Failed with Error: 0x80070050 occur?
WSL allows you to run the Linux platform and its apps on your Windows computer. You can run both GUI and command-line Linux applications in Windows alongside Windows apps when the feature is enabled. However, it can sometimes get corrupted and may not start, leading to the 0x80070050 error. Or some of the essential files to run WSL may not run properly.
We suggest you execute the following solutions using an Admin account, to fix WslRegisterDistribution Failed with Error: 0x80070050 on your Windows system:
- Check if Lxssmanager Service is running
- Check if the Virtual Machine Platform or Wsl feature is disabled
- Check for Operating system or application-level problems
- Check for corrupt System Files
- Check for Viruses and Malware
Make sure to check if the issue is resolved after each suggestion. It will help you understand the reason behind the error if you ever face it the next time.
1] Check if Lxssmanager Service is running

There might be a good chance that the LxssManager service has stopped working. As the LxssManager is responsible for acting as an intermediary between the Windows system and the Linux subsystem. So if it stops working, WSL won’t work too.
The main job of the LxssManager service is to convert Linux codes into a specific format that Windows can understand. The LxssManager service should be set on the Automatic mode to ensure that the drivers needed for running WSL are updated automatically when needed.
To make sure it is up and running, follow these steps:
- Press the Windows key + R to launch the Run dialog.
- Type services.msc and press enter.
- Now search for LxssManager and right-click on it.
- Go to Properties.
- From the Start type dropdown menu, set it to Automatic > Apply > OK.
- Finally, reboot your computer, try to launch WSL, and see if you encounter any errors.
2] Check if the Virtual Machine Platform or Wsl feature is disabled
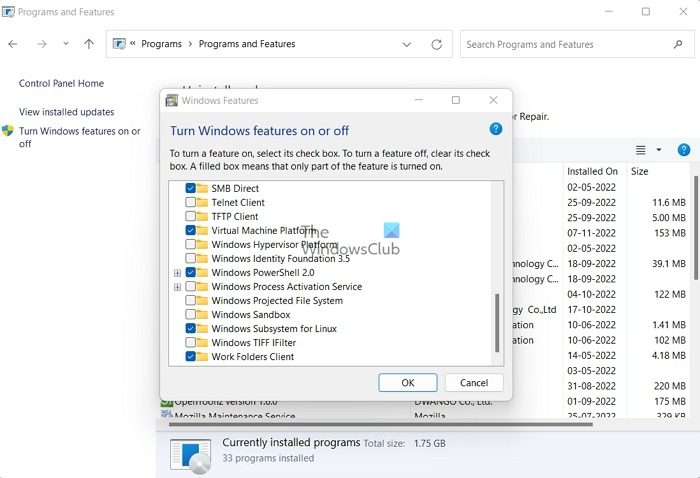
When we install WSL on a Windows system, we install it under a virtual machine platform. So to run WSL, you must first enable the virtual machine platform. And if it is disabled, the required files and services won’t be available for running WSL.
So make sure to turn on the Virtual Machine platform and WSL option( or click on the checkbox) by following the below steps:
- Press Windows Key + R to launch Run.
- Type appwiz.cpl and press enter.
- From the sidebar, select Turn Windows features on or off.
- Over here, ensure that you have ticked these two: Virtual Machine Platform & Windows Subsystem for Linux.
3] Check for Operating system or application-level problems
System conflicts may disrupt the functioning of the files and components associated with WSL. This could result from device drivers or 3rd party application installation, which could conflict with the component files. Also, the absence of Windows OS updates or old driver files could contribute to the above error.
You may want to consider running the DISM Tool to repair a potentially corrupted system image.
You could also consider performing a System Restore and see if that helps.
Some new updates from Windows or Drivers may be causing the problem – so maybe you want to run Windows Updates and see.
4] Check for corrupt System Files
Finally, you check for corrupt system files. If Windows system files are damaged, it can be one of the reasons why WSL isn’t working. So you can try repairing your Windows system files and see if it works.
5] Check for Viruses and Malware
WslRegisterDistribution Failed with Error: 0x80070050 can also occur because of viruses and malware, as they prevent LxssManager service or other system drivers and allied components for WSL from running smoothly.
Hence, checking if your PC has any viruses or malware can be a good idea. If you have an antivirus program installed on your computer, take its help. Otherwise, you can use the Windows Security app.
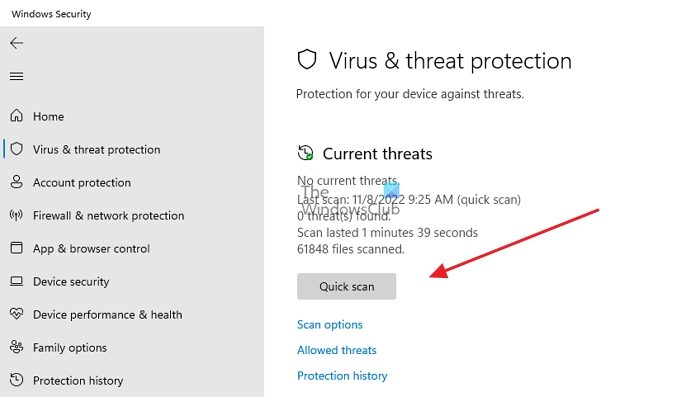
- Open Windows Security by searching it in the Start menu
- Click on Virus & threat protection.
- Finally, click on Quick Scan to perform a scan.
So those were some of the quick methods to get rid of the WslRegisterDistribution Failed with Error: 0x80070050. If the above methods don’t work for you, consider reinstalling Windows Subsystem for Linux and see if it works.
Similar WslRegisterDistribution failed with errors:
0xc03a001a | 0x80041002 | 0x800700b7 or 0x80080005 | 0x80070422 | 0x80370114 | 0x80370102 | 0x80070003 | 0x80070032 | 0x8007023e | 0x8007019e and 0x8000000d | 0x800701bc
Which is better, WSL and VirtualBox?
One or the other of Windows Subsystem for Linux (WSL) and VirtualBox may be better for you based on their key differences. With WSL, your virtual machine is more efficient, integrates into Windows better, and can be configured more quickly than with VirtualBox. Use WSL if you need Linux-specific tools or applications. However, if you need more control over your virtual environment or want to use non-Linux-based applications, VirtualBox may be more suited to your needs.
Does WSL2 run Linux in a virtual machine?
Linux Kernel runs inside lightweight virtual machines (VMs) using the latest virtualization technology in WSL 2. However, it is critical to note that WSL 2 will not be a traditional VM< experience. In traditional VM environments, the boot process is slow, isolation is a significant problem, and resources are used up quickly. These attributes are not available in WSL 2. Despite not having virtual machine configuration or management, it will provide the same high levels of integration between Windows and Linux.
-
Home
-
News
- How to Fix WslRegisterDistribution Failed with Error: 0x80070050
By Daisy | Follow |
Last Updated
Some users report that when they try to update WSL, they encounter the “WslRegisterDistribution failed with error: 0x80070050” issue. How to fix the issue? Don’t worry! This post from MiniTool tells you how to fix the error.
WSL stands for Windows Subsystem for Linux for Windows 10. It allows developers to run Linux platforms on Windows devices. However, sometimes when they try to update WSL, the “WslRegisterDistribution failed with error: 0x80070050” message appears. This indicates that WSL failed to start. The following is the full error message:
Installing, this may take a few minutes…
WslRegisterDistribution failed with error: 0x80070032
Error: 0x80070032 The request is not supported.
Press any key to continue…
What Causes WslRegisterDistribution failed with error: 0x80070050
What causes the “WslRegisterDistribution failed with error: 0x80070050” issue? If your virtual machine platform is disabled, the issue can appear. Besides, the virus and malware can also trigger the issue. If WSL lacks basic support for Windows 10 features, the issue can also be caused.
Now, this post provides 5 solutions for you to get rid of the “error code 0x80070050”.
Method 1: Check for Virus and Malware
Since the “WSL error code 0x80070050” can be caused by virus and malware, it’s recommended to check for virus and malware via Windows Defender.
Step 1: Open Settings by pressing Windows + I keys. Click Updater & Security.
Step 2: Click the Windows Security part. Then, click Open Windows Security.
Step 3: Choose the Virus and threat protection option and click Quick Scan. Or, you can choose Scan options based on your needs. and there are four options – Quick scan, Full scan, Custom scan, and Microsoft Defender Offline scan.

Step 4: Then, it will start to scan for virus and malware.
Method 2: Enable WSL Via Control Panel
You can also choose to enable WSL via Control Panel to fix the “WslRegisterDistribution failed with error: 0x80070050”. Follow the guide:
Step 1: Type Turn Windows Features on or off in the Search box to open it.
Step 2: Check the Windows Subsystem for Linux box and click OK.
Step 3: It will automatically search and install some required system files. Then, you need to
restart your PC to take effects.
Method 3: Enable Virtual Machine Platform via Control Panel
You can also choose to enalbe Virtual Machine Platform via Control Panel to fix the “WslRegisterDistribution failed with error: 0x80070050”. Follow the guide:
Step 1: Type Turn Windows Features on or off in the Search box to open it.
Step 2: Check the Virtual Machine Platform box and click OK.

Method 4: Restart the LxssManager Service
If the “WslRegisterDistribution failed with error: 0x80070050” issue still appears, you can try to restart the LxssManager service.
Step 1: Type Services in the Search box to open the application.
Step 2: Find LxssManager and click it to choose Stop.
Step 3: After several minutes, you can click it again to choose Start.
Method 5: Launch WSL from Microsoft Store
If the above methods are not working, you can try to launch WSL from Microsoft Store.
Step 1: Type Microsoft Store in the Search boxand press the Enter button to open it.
Step 2: In the upper-right corner of the window, click the three-dotted menu. Select My Library.
Step 3: Go to the left pane of the window and click Installed.
Step 4: Next, go back to the right pane and choose your Linux Distribution app.
Step 5: Click the Launch button and see if the problem is resolved.
Final Words
This post introduces 5 ways for you to get rid of the “WslRegisterDistribution failed with error: 0x80070050” issue. You can try them one by one until you fix the issue. I hope that this post can be helpful to you.
About The Author

Position: Columnist
Having been an editor at MiniTool since graduating college as an English major, Daisy specializes in writing about data backups, disk cloning, and file syncing as well as general computer knowledge and issues. In her free time, Daisy enjoys running and going with friends to the amusement park.