Download Windows Speedup Tool to fix errors and make PC run faster
At times while trying to update Windows, the process might get stuck and return the error code 0x80070032. If you encounter the Windows Update error 0x80070032, then read through this article for the resolution.

We’re having trouble restarting to finish the install (0x80070032)
The error is caused when a specific Windows update is stuck, and you need to pass through it. To resolve Windows Update error 0x80070032, try the following solutions sequentially:
- Restart the computer
- Uninstall the latest update
- Reset Windows Update components
- Run the Windows Update troubleshooter
1] Restart the computer
The first approach the solving this problem should be to simply restart the computer. If this helps, it could save you a lot of time.
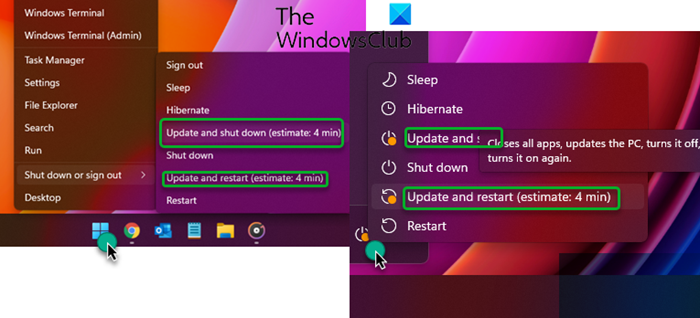
You could use the Restart button that you see in Settings or use the Update and shut down or Update and restart options from the WinX Menu or the Start Menu.
2] Uninstall the latest update
In case the latest update is problematic, or the file is corrupt, it will cause the Windows Update error 0x80070032. To resolve this error, simply uninstalling the current update will be helpful for most users. The procedure to uninstall updates on Windows 11 is as follows:
- Right-click on the Start button and select Settings.
- In the Settings window, go to the Windows Update tab on the list on the left-hand side.
- In the right pane, click on Update history. The Update history page will show the list of recent updates.
- If you scroll down a little, you will find the option to Uninstall updates.
- Click on it to open the page to open the Installed updates page in the Control Panel.
- Simply right-click on the latest updates and select uninstall.
3] Reset Windows Update components
If uninstalling the latest update doesn’t work, then you can consider resetting Windows Update components. Doing so will change the settings related to Windows Updates to default.
4] Run the Windows Update troubleshooter
The Windows Update troubleshooter is an excellent tool for diagnosing issues related to Windows Updates and resolving them if possible. The procedure to run the Windows update troubleshooter in Windows 11 is as follows:
- Right-click on the Start button and select Settings.
- In the Settings window, go to the System tab on the list on the left-hand side.
- In the right pane, scroll down and select Troubleshoot. In the next window, select Other troubleshooters.
- This will open the list of built-in troubleshooters for Windows 11.
- From the list, click on Run corresponding to the Windows Update troubleshooter.
The troubleshooter will start detecting problems and resolve them if in scope.
Please let us know if this helped you in the comment section.
NOTE: Error 0x80070032 can also be seen for – WslRegisterDistribution failed | Microsoft Store | When copying files | Windows Backup.
How do I fix Windows Update failed to install?
If Windows Update fails to install or will not download on Windows PC, then first, run the System File Checker and DISM tool, delete temporary files, use Windows Update troubleshooter, and try again. If that doesn’t help in any way, reset the Catroot folder, delete the SoftwareDistribution folder, and set the Windows Update service to Automatic or Manual, Background Intelligence Transfer Service to Manual, etc.
What is 0x80070032 file history?
Error 0x80070032 for File History occurs when you try to turn on the Automatic backup my files option. So, if you receive this error and want to fix the 0x80070032 backup error on your Windows PC, then delete the old backups, and then try again. You may also need to reset or delete all backup settings and reconfigure the File History backup to fix this error.
Hope this is helpful.
Anand Khanse is the Admin of TheWindowsClub.com, a 10-year Microsoft MVP (2006-16) & a Windows Insider MVP (2016-2022). Please read the entire post & the comments first, create a System Restore Point before making any changes to your system & be careful about any 3rd-party offers while installing freeware.
Windows 10 attracts users in large numbers because of its amazing GUI and prominent features. Although there’s no doubt when it comes to its popularity; however, it is not the best version of Windows.
This version comes with various flaws, such as error 0x80070032, which are worth noting by Microsoft. Microsoft claims that Windows 10 will revolutionize the Operating System world.
However, most users are unable to take this. This is because users experience problems with Windows 10 in some way or another.
What Is Error 0x80070032? How Does It Happen?
After you install Windows 10, the PIN sometimes stops working, showing an error 0x80070032. If it occurs, you cannot log in to Windows using your PIN passcode and don’t know what to do. Keep on reading further.
Windows 10 OS comes with a feature called Windows Hello for the sake of protection. It is an access control and biometric identity which enables logging into Windows through fingerprint, facial recognition, iris, or PIN passcode.
Unfortunately, Hello is not available for Windows 10 users. Older devices, which do not have the necessary hardware elements, like iris or fingerprint scanners, have to buy biometric USB iris/fingerprint scanners or forget about Windows Hello.
Normally, iris, facial, or fingerprint recognition login is accompanied by PIN passcodes. This is the most protected way to sign in to Windows 10 as a PIN passcode is simpler to memorize, while the facial contours, fingerprint, or iris of the user are very hard to counterfeit.
On Windows Hello, users come across problems like PIN passwords or fingerprints that would not work. The most common login error is the PIN 0x80070032 error. Most users claim that this issue occurred after they installed Windows 10 Fall Creators Update when compromised fingerprint or PIN login.
The most common issue with Windows 10 is “Apps won’t sync in Windows 10“, which shows up along with the error 0x80070032 code.
It even flashes a message which says, “We can’t sync at the moment. But you may find more info about this error code at www.windowsphone.com.”
The most affected application by this error code is Windows 10 Mail application. As per records, users cannot synchronize their accounts using the Mail application as this app turns non-operational. Here, you will get to learn how to resolve this issue.
Microsoft has investigated the error 0x80070032, but they have not announced the official approval of this bug or its patch. There are various reasons why your PIN stops working while flashing the error 0x80070032.
It shows up on your computer screen as “Something went wrong. Try again later. Error code: 0x80070032.” So, look at various solutions to eliminate this annoying error code.

PS: Regarding the Windows Update Error 0x80070020, here are your top solutions.
Reasons Why the Error Code 0x80070032 Occurs
Microsoft servers are the main reason for initiating this issue with the Mail application. Here, the accounts of users do not sync with servers properly.
Besides, here is the full review of Unsecapp.exe for the WMI Client Application for your reference.
Remove the NGC Folder’s Content to Eliminate 0x80070032
If you cannot log into Windows 10 using your PIN, try signing into your account and removing the NGC folder’s content.
Before you do that, you need to take the folder’s ownership. To perform this action, go through the instructions listed below.
Steps to get rid of the error 0x80070032:
- 1: First, you must log into Windows 10 with your password.
- 2: Tap Windows + X keys and choose ‘File Explorer.’
- 3: Now, go to C:WindowsServiceProfilesLocalServiceAppDataLocalMicrosoft.
- 4: Next, right-tap on the folder NGC and choose ‘Properties.’
- 5: Navigate to the tab ‘Security,’ select ‘Advanced,’ and then look for the section ‘Owner.’

- 6: Tap on the link ‘Change‘ and type in the user or administrator and object names.
- 7: Choose ‘Check Names‘ and hit ‘O.K.’
- 8: Check against the option ‘Replace Owner on subcontainers and Objects,’ After this, select ‘Apply‘ and press O.K. to save the changes.
- 9: Next, see if you can access this NGC folder. Mark all the stored files in the folder if you can and remove those files.
- 10: Tap Windows + I keys to open Settings.
- 11: Now, open the ‘Account Settings‘ tab and choose ‘Sign-in Options.’
- 12: Select ‘Add a PIN‘ by following the on-screen instructions to set a PIN.
Resolve the 0x80070032 Error Using ‘I Forgot My PIN.’
Another method to eliminate the error 0x80070032 is by choosing the option ‘I forgot my PIN.’ To perform this action, you have to follow the following procedure.
Steps to eliminate the error 0x80070032:
- 1: Tap Windows + I keys to open Settings on your system.
- 2: Select the section ‘Accounts‘ and then choose ‘Sign-in options.’
- 3: Find the ‘PIN‘ tab and tap on ‘I forgot my PIN.’

- 4: Tap on ‘Continue‘ to confirm your action.
- 5: Now, you need to type in a new PIN. Once you have entered the passcode, press O.K.
- 6: You could be asked to type your Microsoft account passcode. In that case, change the account type from Microsoft to Local and try all the steps again.
Resolve the Error 0x80070032 Through PIN Recreation
This is another effective way to get rid of the error code 0x80070032. It is performed by recreating the PIN.
By the way, if you are facing an issue with ERR_CERT_DATE_INVALID, click to read more.
Steps to get rid of the error 0x80070032:
- 1: Tap Windows + I keys to open Settings.
- 2: Go to the section ‘Accounts‘ and then ‘Sign-in Options.’
- 3: Navigate to the PIN section and choose ‘Remove.’

- 4: Tap on ‘Remove‘ to confirm your action.
- 5: Type in your account’s password and hit O.K.
- 6: Once done, tap on ‘Add‘ and enter a new PIN.
- 7: Tap O.K. to save it and see if the issue persists or not;
Note: If you are a Dell user facing the error 0x80070032 on your system, try eliminating the security tools from Dell Data Protection. Also, remove their leftovers or temporary files through Windows Registry or Reimage.
Solutions for Fixing the Error 0x80070032 on Mail
Here are various fixes that can assist you in resolving the issue with the Mail application on Windows 10 systems.
Method 1: Switch to Microsoft from a Local Account
This method is great for resolving the error code problem on Windows. Follow the instructions to get rid of this annoying Error.
1: Firstly, you have to switch from Microsoft to a local account. To do so, visit ‘Settings‘ with the help of Cortana. Within the ‘Settings‘ tab, look for ‘Accounts‘ to open the settings associated with the user accounts.

2: Next, you have to choose ‘Sign in with a local account‘ instead, which you will find under the account’s right-pane window. After that, enter the password of the present Microsoft account. Tap on ‘Next‘ to create a new local account.

3: Type in the local account’s details, such as username and passcode. Next, tap on the tab ‘Next‘ again. In the next tab, you will see a button branded as ‘Sign out and finish.’ Select this button to sign out of your Microsoft account.

4: Next, repeat the steps. Visit ‘Settings‘ and choose ‘Accounts.’ Then, select ‘Sign in‘ with a Microsoft account instead. Type in the local account’s password, along with the username and password of the Microsoft account, for signing in again. See if you could check Mail by syncing the account.

Method 2: Reinstall Mail
Try this one out if the primary method cannot offer you a proper fix to the error code problem. Here, you have to reinstall Mail to fix the syncing problem. To perform this action, follow some simple steps listed below.
1: Visit PowerShell from the search results once you have searched for it. Right-tap on this tab and choose ‘Run as Administrator.’ Please note that opening this tab as an administrator is significant, or you will face an error.

2: Within the PowerShell tab, type the command.
Get-appxprovisionedpackage – online | where-object {$ .packagename – like “*windowscommunicationsapps*”} |remove – appxprovisionedpackage – online

Once you have executed this command, close PowerShell and install the Mail application again from Windows Store.
After you have installed this application, run the same, and check whether the error 0x80070032 has been resolved.
Repair Errors Automatically
Here, we have tried our best to offer the best solutions to fix this annoying error code 0x80070032. Users can fix this issue using the solutions mentioned here.
Automatic software is best if you do not like to struggle with repair techniques. There are lots of repair tools available online for fixing Windows-related errors.
So, choose the best one and eliminate your issue. However, it is recommended to use the above-listed methods to fix the Error.
Download PC Repair Tool to quickly find & fix Windows errors automatically
At times while trying to update Windows, the process might get stuck and return the error code 0x80070032. If you encounter the Windows Update error 0x80070032, then read through this article for the resolution.
We’re having trouble restarting to finish the install (0x80070032)
The error is caused when a specific Windows update is stuck, and you need to pass through it. To resolve Windows Update error 0x80070032, try the following solutions sequentially:
- Restart the computer
- Uninstall the latest update
- Reset Windows Update components
- Run the Windows Update troubleshooter
1] Restart the computer
The first approach the solving this problem should be to simply restart the computer. If this helps, it could save you a lot of time.
You could use the Restart button that you see in Settings or use the Update and shut down or Update and restart options from the WinX Menu or the Start Menu.
2] Uninstall the latest update
In case the latest update is problematic, or the file is corrupt, it will cause the Windows Update error 0x80070032. To resolve this error, simply uninstalling the current update will be helpful for most users. The procedure to uninstall updates on Windows 11 is as follows:
- Right-click on the Start button and select Settings.
- In the Settings window, go to the Windows Update tab on the list on the left-hand side.
- In the right pane, click on Update history. The Update history page will show the list of recent updates.
- If you scroll down a little, you will find the option to Uninstall updates.
- Click on it to open the page to open the Installed updates page in the Control Panel.
- Simply right-click on the latest updates and select uninstall.
3] Reset Windows Update components
If uninstalling the latest update doesn’t work, then you can consider resetting Windows Update components. Doing so will change the settings related to Windows Updates to default.
4] Run the Windows Update troubleshooter
The Windows Update troubleshooter is an excellent tool for diagnosing issues related to Windows Updates and resolving them if possible. The procedure to run the Windows update troubleshooter in Windows 11 is as follows:
- Right-click on the Start button and select Settings.
- In the Settings window, go to the System tab on the list on the left-hand side.
- In the right pane, scroll down and select Troubleshoot. In the next window, select Other troubleshooters.
- This will open the list of built-in troubleshooters for Windows 11.
- From the list, click on Run corresponding to the Windows Update troubleshooter.
The troubleshooter will start detecting problems and resolve them if in scope.
Please let us know if this helped you in the comment section.
NOTE: Error 0x80070032 can also be seen for – WslRegisterDistribution failed | Microsoft Store | When copying files | Windows Backup.
How do I fix Windows Update failed to install?
If Windows Update fails to install or will not download on Windows PC, then first, run the System File Checker and DISM tool, delete temporary files, use Windows Update troubleshooter, and try again. If that doesn’t help in any way, reset the Catroot folder, delete the SoftwareDistribution folder, and set the Windows Update service to Automatic or Manual, Background Intelligence Transfer Service to Manual, etc.
What is 0x80070032 file history?
Error 0x80070032 for File History occurs when you try to turn on the Automatic backup my files option. So, if you receive this error and want to fix the 0x80070032 backup error on your Windows PC, then delete the old backups, and then try again. You may also need to reset or delete all backup settings and reconfigure the File History backup to fix this error.
Hope this is helpful.

Anand Khanse is the Admin of TheWindowsClub.com, a 10-year Microsoft MVP (2006-16) & a Windows Insider MVP (2016-2022). Please read the entire post & the comments first, create a System Restore Point before making any changes to your system & be careful about any 3rd-party offers while installing freeware.
Windows 10 attracts users in large numbers because of its amazing GUI and prominent features. Although there’s no doubt when it comes to its popularity; however, it is not the best version of Windows.
This version comes with various flaws, such as error 0x80070032, which are worth noting by Microsoft. Microsoft claims that Windows 10 will revolutionize the Operating System world.
However, most users are unable to take this. This is because users experience problems with Windows 10 in some way or another.
What Is Error 0x80070032? How Does It Happen?
After you install Windows 10, the PIN sometimes stops working, showing an error 0x80070032. If it occurs, you cannot log in to Windows using your PIN passcode and don’t know what to do. Keep on reading further.
Windows 10 OS comes with a feature called Windows Hello for the sake of protection. It is an access control and biometric identity which enables logging into Windows through fingerprint, facial recognition, iris, or PIN passcode.
Unfortunately, Hello is not available for Windows 10 users. Older devices, which do not have the necessary hardware elements, like iris or fingerprint scanners, have to buy biometric USB iris/fingerprint scanners or forget about Windows Hello.
Normally, iris, facial, or fingerprint recognition login is accompanied by PIN passcodes. This is the most protected way to sign in to Windows 10 as a PIN passcode is simpler to memorize, while the facial contours, fingerprint, or iris of the user are very hard to counterfeit.
On Windows Hello, users come across problems like PIN passwords or fingerprints that would not work. The most common login error is the PIN 0x80070032 error. Most users claim that this issue occurred after they installed Windows 10 Fall Creators Update when compromised fingerprint or PIN login.
The most common issue with Windows 10 is “Apps won’t sync in Windows 10“, which shows up along with the error 0x80070032 code.
It even flashes a message which says, “We can’t sync at the moment. But you may find more info about this error code at www.windowsphone.com.”
The most affected application by this error code is Windows 10 Mail application. As per records, users cannot synchronize their accounts using the Mail application as this app turns non-operational. Here, you will get to learn how to resolve this issue.
Microsoft has investigated the error 0x80070032, but they have not announced the official approval of this bug or its patch. There are various reasons why your PIN stops working while flashing the error 0x80070032.
It shows up on your computer screen as “Something went wrong. Try again later. Error code: 0x80070032.” So, look at various solutions to eliminate this annoying error code.
PS: Regarding the Windows Update Error 0x80070020, here are your top solutions.
Reasons Why the Error Code 0x80070032 Occurs
Microsoft servers are the main reason for initiating this issue with the Mail application. Here, the accounts of users do not sync with servers properly.
Besides, here is the full review of Unsecapp.exe for the WMI Client Application for your reference.
Remove the NGC Folder’s Content to Eliminate 0x80070032
If you cannot log into Windows 10 using your PIN, try signing into your account and removing the NGC folder’s content.
Before you do that, you need to take the folder’s ownership. To perform this action, go through the instructions listed below.
Steps to get rid of the error 0x80070032:
- 1: First, you must log into Windows 10 with your password.
- 2: Tap Windows + X keys and choose ‘File Explorer.’
- 3: Now, go to C:WindowsServiceProfilesLocalServiceAppDataLocalMicrosoft.
- 4: Next, right-tap on the folder NGC and choose ‘Properties.’
- 5: Navigate to the tab ‘Security,’ select ‘Advanced,’ and then look for the section ‘Owner.’
- 6: Tap on the link ‘Change‘ and type in the user or administrator and object names.
- 7: Choose ‘Check Names‘ and hit ‘O.K.’
- 8: Check against the option ‘Replace Owner on subcontainers and Objects,’ After this, select ‘Apply‘ and press O.K. to save the changes.
- 9: Next, see if you can access this NGC folder. Mark all the stored files in the folder if you can and remove those files.
- 10: Tap Windows + I keys to open Settings.
- 11: Now, open the ‘Account Settings‘ tab and choose ‘Sign-in Options.’
- 12: Select ‘Add a PIN‘ by following the on-screen instructions to set a PIN.
Resolve the 0x80070032 Error Using ‘I Forgot My PIN.’
Another method to eliminate the error 0x80070032 is by choosing the option ‘I forgot my PIN.’ To perform this action, you have to follow the following procedure.
Steps to eliminate the error 0x80070032:
- 1: Tap Windows + I keys to open Settings on your system.
- 2: Select the section ‘Accounts‘ and then choose ‘Sign-in options.’
- 3: Find the ‘PIN‘ tab and tap on ‘I forgot my PIN.’
- 4: Tap on ‘Continue‘ to confirm your action.
- 5: Now, you need to type in a new PIN. Once you have entered the passcode, press O.K.
- 6: You could be asked to type your Microsoft account passcode. In that case, change the account type from Microsoft to Local and try all the steps again.
Resolve the Error 0x80070032 Through PIN Recreation
This is another effective way to get rid of the error code 0x80070032. It is performed by recreating the PIN.
By the way, if you are facing an issue with ERR_CERT_DATE_INVALID, click to read more.
Steps to get rid of the error 0x80070032:
- 1: Tap Windows + I keys to open Settings.
- 2: Go to the section ‘Accounts‘ and then ‘Sign-in Options.’
- 3: Navigate to the PIN section and choose ‘Remove.’
- 4: Tap on ‘Remove‘ to confirm your action.
- 5: Type in your account’s password and hit O.K.
- 6: Once done, tap on ‘Add‘ and enter a new PIN.
- 7: Tap O.K. to save it and see if the issue persists or not;
Note: If you are a Dell user facing the error 0x80070032 on your system, try eliminating the security tools from Dell Data Protection. Also, remove their leftovers or temporary files through Windows Registry or Reimage.
Solutions for Fixing the Error 0x80070032 on Mail
Here are various fixes that can assist you in resolving the issue with the Mail application on Windows 10 systems.
Method 1: Switch to Microsoft from a Local Account
This method is great for resolving the error code problem on Windows. Follow the instructions to get rid of this annoying Error.
1: Firstly, you have to switch from Microsoft to a local account. To do so, visit ‘Settings‘ with the help of Cortana. Within the ‘Settings‘ tab, look for ‘Accounts‘ to open the settings associated with the user accounts.
2: Next, you have to choose ‘Sign in with a local account‘ instead, which you will find under the account’s right-pane window. After that, enter the password of the present Microsoft account. Tap on ‘Next‘ to create a new local account.
3: Type in the local account’s details, such as username and passcode. Next, tap on the tab ‘Next‘ again. In the next tab, you will see a button branded as ‘Sign out and finish.’ Select this button to sign out of your Microsoft account.
4: Next, repeat the steps. Visit ‘Settings‘ and choose ‘Accounts.’ Then, select ‘Sign in‘ with a Microsoft account instead. Type in the local account’s password, along with the username and password of the Microsoft account, for signing in again. See if you could check Mail by syncing the account.
Method 2: Reinstall Mail
Try this one out if the primary method cannot offer you a proper fix to the error code problem. Here, you have to reinstall Mail to fix the syncing problem. To perform this action, follow some simple steps listed below.
1: Visit PowerShell from the search results once you have searched for it. Right-tap on this tab and choose ‘Run as Administrator.’ Please note that opening this tab as an administrator is significant, or you will face an error.
2: Within the PowerShell tab, type the command.
Get-appxprovisionedpackage – online | where-object {$ .packagename – like “*windowscommunicationsapps*”} |remove – appxprovisionedpackage – online
Once you have executed this command, close PowerShell and install the Mail application again from Windows Store.
After you have installed this application, run the same, and check whether the error 0x80070032 has been resolved.
Repair Errors Automatically
Here, we have tried our best to offer the best solutions to fix this annoying error code 0x80070032. Users can fix this issue using the solutions mentioned here.
Automatic software is best if you do not like to struggle with repair techniques. There are lots of repair tools available online for fixing Windows-related errors.
So, choose the best one and eliminate your issue. However, it is recommended to use the above-listed methods to fix the Error.
Порой, когда пользователь пытается улучшить операционную систему, он сталкивается с зависанием и появлением ошибки с кодом 0x80070032. Для многих это уведомление не значит ровным счетом ничего, поэтому оно ставит их в тупик. Поэтому сегодня мы разберемся, как же быть.
Что это такое?
Ошибка 0x80070032 означает проблемы с перезапуском для завершения установки обновления операционной системы. Возникает она тогда, когда начинает подвисать конкретный центр обновлений Windows. Получается, что пользователь не может ни вперед пройти, ни назад вернуться.
Как избавиться от ошибки?
Чтобы решить проблему, можно попробовать несколько способов:
- Выполнить перезагрузку устройства.
- Удалить последние установленные файлы.
- Сбросить компоненты.
- Осуществить запуск службы устранения неполадок Центра обновления Windows
Перезагрузка устройства
Это самый простой и доступный для всех вариант. Иногда этого хватает, чтобы все заработало, как надо.
Для того, чтобы перезагрузить устройство, достаточно просто нажать на кнопку перезапуска, сделать это можно или через меню Пуск (это более желательный вариант), либо через экстренную перезагрузку (но так лучше не делать).

Удаление последних установленных файлов
При условии, что последнее обновление оказалось проблематичным или файл был поврежден, это будет приводить к возникновению ошибки 0x80070032. Для ее устранения достаточно удаления текущего обновления. Делается это следующим способом:
- Вызвать меню Пуск.
- Перейти к настройкам.
- Найти раздел Центра обновления Windows (в списке слева).
- Зайти в журнал.
- Просмотреть список.
- Прокрутить вниз.
- Удалить нужное обновление. Сделать это можно нажав на необходимый файл правой кнопкой мыши, а затем выбрать пункт «Удалить».


При условии, что не сработало удаление обновления, можно попробовать сбросить компоненты. Это обеспечит изменение настроек, что связаны с операционной системой на значения, стоящие по умолчанию.
Запуск средства устранения неполадок
Средство устранения неполадок представляет собой простой и понятный инструмент, который позволит провести диагностику возникших проблем. После того, как данная задача будет решена, служба предложит возможные варианты действий для того, чтобы ошибка более не возникала.
При обновлении или загрузке приложений из Microsoft Store вы можете столкнуться с сообщением об ошибке, в котором говорится, что произошло непредвиденное событие с кодом ошибки 0x80070032. Может быть множество причин, по которым вы получаете эту ошибку, и в этой статье объясняются почти все возможные решения, которые вам нужно предпринять, чтобы устранить эту проблему.
Чтобы исправить ошибку Microsoft Store 0x80070032 в Windows 11/10, выполните следующие действия:
- Проверить интернет-соединение
- Запустите средство устранения неполадок приложений Магазина Windows
- Очистить кеш Microsoft Store
- Восстановить или сбросить Microsoft Store
- Переустановите Microsoft Store
Чтобы узнать больше об этих шагах, продолжайте читать.
1]Проверьте подключение к Интернету
Это первое, что вам нужно проверить, прежде чем переходить к другим решениям. По очевидным причинам Microsoft Store требует действующего подключения к Интернету для загрузки или обновления приложений. Однако, если у вас возникли проблемы с подключением к Интернету, возможно, вы не сможете их загрузить и вместо этого столкнетесь с этой проблемой. Поэтому рекомендуется проверить наличие потери пинга или любых других проблем с подключенным интернет-источником.
2]Запустите средство устранения неполадок приложений Магазина Windows.
Чтобы исправить такие распространенные проблемы, как эта, средство устранения неполадок приложений Магазина Windows работает как шарм. Что касается Microsoft Store, вам пригодится именно этот инструмент для устранения неполадок. Это не занимает много времени и предоставляется вам по умолчанию.
Чтобы запустить средство устранения неполадок приложений Магазина Windows, выполните следующие действия:
- Нажмите Win + I, чтобы открыть настройки Windows.
- Перейдите в Система> Устранение неполадок> Другие средства устранения неполадок.
- Найдите средство устранения неполадок приложений Магазина Windows.
- Щелкните кнопку «Выполнить».
- Следуйте инструкциям на экране, чтобы сделать это.
После этого вам может потребоваться перезагрузить компьютер. После этого вы сможете использовать Microsoft Store как обычно.
3]Очистить кеш Microsoft Store
На вашем компьютере есть инструмент командной строки, который поможет вам очистить кеш Microsoft Store за считанные секунды. Однако вам необходимы права администратора, чтобы запустить его на вашем компьютере. Чтобы начать работу, щелкните значок поиска на панели задач и найдите wsreset.exe. Когда появится результат поиска, нажмите кнопку «Запуск от имени администратора».
Затем нажмите «Да». После этого он будет запущен на вашем компьютере через командную строку. Не закрывайте окно командной строки, пока оно не будет завершено. После этого вам необходимо перезагрузить компьютер.
4]Восстановить или сбросить Microsoft Store
Хотя очистка кеша затрагивает множество вопросов, она не делает всего, что вам нужно. Вот почему вы можете сначала восстановить приложение Microsoft Store. Однако, если это не поможет, вы можете сбросить приложение Microsoft Store. Лучше всего то, что вам не нужны какие-либо инструменты командной строки или что-либо еще, поскольку в настройках Windows есть такие параметры. Чтобы восстановить и сбросить приложение Microsoft Store в Windows 11, выполните следующие действия:
- Откройте на своем компьютере настройки Windows.
- Перейдите на вкладку Приложения.
- Перейдите в Приложения и функции.
- Найдите Microsoft Store> щелкните значок с тремя точками и выберите Дополнительные параметры.
- Щелкните кнопку Восстановить.
- Проверьте, решает ли это проблему.
- Если нет, дважды нажмите кнопку «Сброс».
После этого рекомендуется перезагрузить компьютер и проверить, сохраняется ли проблема.
5]Переустановите Microsoft Store
Можно повторно зарегистрировать и переустановить приложение Microsoft Store с помощью Windows PowerShell. Если ничего не работает и у вас есть действующее подключение к Интернету, вы можете переустановить приложение Microsoft Store с помощью этого руководства.
Читайте: исправьте код ошибки Microsoft Store 0x80070141.
Как исправить код ошибки 0x80070032?
Чтобы исправить код ошибки 0x80070032 в Microsoft Store, вам необходимо сначала проверить подключение к Интернету. После этого используйте средство устранения неполадок приложений Магазина Windows. Затем вам нужно очистить кеш Microsoft Store. Однако, если ничего не работает, вы можете сбросить приложение и, наконец, переустановить его на свой компьютер. Вы также можете увидеть тот же код ошибки при сбое WslRegisterDistribution или при сбое операции с файлом с сообщением «Запрос не поддерживается».
Надеюсь, это руководство помогло
Windows 10 attracts users in large numbers because of its amazing GUI and prominent features. Although there’s no doubt when it comes to its popularity; however, it is not the best version of Windows.
This version comes with various flaws, such as error 0x80070032, which are worth noting by Microsoft. Microsoft claims that Windows 10 will revolutionize the Operating System world.
However, most users are unable to take this. This is because users experience problems with Windows 10 in some way or another.
What Is Error 0x80070032? How Does It Happen?
After you install Windows 10, the PIN sometimes stops working, showing an error 0x80070032. If it occurs, you cannot log in to Windows using your PIN passcode and don’t know what to do. Keep on reading further.
Windows 10 OS comes with a feature called Windows Hello for the sake of protection. It is an access control and biometric identity which enables logging into Windows through fingerprint, facial recognition, iris, or PIN passcode.
Unfortunately, Hello is not available for Windows 10 users. Older devices, which do not have the necessary hardware elements, like iris or fingerprint scanners, have to buy biometric USB iris/fingerprint scanners or forget about Windows Hello.
Normally, iris, facial, or fingerprint recognition login is accompanied by PIN passcodes. This is the most protected way to sign in to Windows 10 as a PIN passcode is simpler to memorize, while the facial contours, fingerprint, or iris of the user are very hard to counterfeit.
On Windows Hello, users come across problems like PIN passwords or fingerprints that would not work. The most common login error is the PIN 0x80070032 error. Most users claim that this issue occurred after they installed Windows 10 Fall Creators Update when compromised fingerprint or PIN login.
The most common issue with Windows 10 is “Apps won’t sync in Windows 10“, which shows up along with the error 0x80070032 code.
It even flashes a message which says, “We can’t sync at the moment. But you may find more info about this error code at www.windowsphone.com.”
The most affected application by this error code is Windows 10 Mail application. As per records, users cannot synchronize their accounts using the Mail application as this app turns non-operational. Here, you will get to learn how to resolve this issue.
Microsoft has investigated the error 0x80070032, but they have not announced the official approval of this bug or its patch. There are various reasons why your PIN stops working while flashing the error 0x80070032.
It shows up on your computer screen as “Something went wrong. Try again later. Error code: 0x80070032.” So, look at various solutions to eliminate this annoying error code.
PS: Regarding the Windows Update Error 0x80070020, here are your top solutions.
Reasons Why the Error Code 0x80070032 Occurs
Microsoft servers are the main reason for initiating this issue with the Mail application. Here, the accounts of users do not sync with servers properly.
Besides, here is the full review of Unsecapp.exe for the WMI Client Application for your reference.
Remove the NGC Folder’s Content to Eliminate 0x80070032
If you cannot log into Windows 10 using your PIN, try signing into your account and removing the NGC folder’s content.
Before you do that, you need to take the folder’s ownership. To perform this action, go through the instructions listed below.
Steps to get rid of the error 0x80070032:
- 1: First, you must log into Windows 10 with your password.
- 2: Tap Windows + X keys and choose ‘File Explorer.’
- 3: Now, go to C:WindowsServiceProfilesLocalServiceAppDataLocalMicrosoft.
- 4: Next, right-tap on the folder NGC and choose ‘Properties.’
- 5: Navigate to the tab ‘Security,’ select ‘Advanced,’ and then look for the section ‘Owner.’
- 6: Tap on the link ‘Change‘ and type in the user or administrator and object names.
- 7: Choose ‘Check Names‘ and hit ‘O.K.’
- 8: Check against the option ‘Replace Owner on subcontainers and Objects,’ After this, select ‘Apply‘ and press O.K. to save the changes.
- 9: Next, see if you can access this NGC folder. Mark all the stored files in the folder if you can and remove those files.
- 10: Tap Windows + I keys to open Settings.
- 11: Now, open the ‘Account Settings‘ tab and choose ‘Sign-in Options.’
- 12: Select ‘Add a PIN‘ by following the on-screen instructions to set a PIN.
Resolve the 0x80070032 Error Using ‘I Forgot My PIN.’
Another method to eliminate the error 0x80070032 is by choosing the option ‘I forgot my PIN.’ To perform this action, you have to follow the following procedure.
Steps to eliminate the error 0x80070032:
- 1: Tap Windows + I keys to open Settings on your system.
- 2: Select the section ‘Accounts‘ and then choose ‘Sign-in options.’
- 3: Find the ‘PIN‘ tab and tap on ‘I forgot my PIN.’
- 4: Tap on ‘Continue‘ to confirm your action.
- 5: Now, you need to type in a new PIN. Once you have entered the passcode, press O.K.
- 6: You could be asked to type your Microsoft account passcode. In that case, change the account type from Microsoft to Local and try all the steps again.
Resolve the Error 0x80070032 Through PIN Recreation
This is another effective way to get rid of the error code 0x80070032. It is performed by recreating the PIN.
By the way, if you are facing an issue with ERR_CERT_DATE_INVALID, click to read more.
Steps to get rid of the error 0x80070032:
- 1: Tap Windows + I keys to open Settings.
- 2: Go to the section ‘Accounts‘ and then ‘Sign-in Options.’
- 3: Navigate to the PIN section and choose ‘Remove.’
- 4: Tap on ‘Remove‘ to confirm your action.
- 5: Type in your account’s password and hit O.K.
- 6: Once done, tap on ‘Add‘ and enter a new PIN.
- 7: Tap O.K. to save it and see if the issue persists or not;
Note: If you are a Dell user facing the error 0x80070032 on your system, try eliminating the security tools from Dell Data Protection. Also, remove their leftovers or temporary files through Windows Registry or Reimage.
Solutions for Fixing the Error 0x80070032 on Mail
Here are various fixes that can assist you in resolving the issue with the Mail application on Windows 10 systems.
Method 1: Switch to Microsoft from a Local Account
This method is great for resolving the error code problem on Windows. Follow the instructions to get rid of this annoying Error.
1: Firstly, you have to switch from Microsoft to a local account. To do so, visit ‘Settings‘ with the help of Cortana. Within the ‘Settings‘ tab, look for ‘Accounts‘ to open the settings associated with the user accounts.
2: Next, you have to choose ‘Sign in with a local account‘ instead, which you will find under the account’s right-pane window. After that, enter the password of the present Microsoft account. Tap on ‘Next‘ to create a new local account.
3: Type in the local account’s details, such as username and passcode. Next, tap on the tab ‘Next‘ again. In the next tab, you will see a button branded as ‘Sign out and finish.’ Select this button to sign out of your Microsoft account.
4: Next, repeat the steps. Visit ‘Settings‘ and choose ‘Accounts.’ Then, select ‘Sign in‘ with a Microsoft account instead. Type in the local account’s password, along with the username and password of the Microsoft account, for signing in again. See if you could check Mail by syncing the account.
Method 2: Reinstall Mail
Try this one out if the primary method cannot offer you a proper fix to the error code problem. Here, you have to reinstall Mail to fix the syncing problem. To perform this action, follow some simple steps listed below.
1: Visit PowerShell from the search results once you have searched for it. Right-tap on this tab and choose ‘Run as Administrator.’ Please note that opening this tab as an administrator is significant, or you will face an error.
2: Within the PowerShell tab, type the command.
Get-appxprovisionedpackage – online | where-object {$ .packagename – like “*windowscommunicationsapps*”} |remove – appxprovisionedpackage – online
Once you have executed this command, close PowerShell and install the Mail application again from Windows Store.
After you have installed this application, run the same, and check whether the error 0x80070032 has been resolved.
Repair Errors Automatically
Here, we have tried our best to offer the best solutions to fix this annoying error code 0x80070032. Users can fix this issue using the solutions mentioned here.
Automatic software is best if you do not like to struggle with repair techniques. There are lots of repair tools available online for fixing Windows-related errors.
So, choose the best one and eliminate your issue. However, it is recommended to use the above-listed methods to fix the Error.
Код ошибки 0x80070032 — Что это?
Код ошибки 0x80070032 — это команда, которая чаще всего относится к кодам или командам, которые были введены неправильно или не относятся к данной программе. Он также может появляться, когда почтовые папки в Почте Windows не могут синхронизироваться так, как между локальным устройством и серверами, принадлежащими Microsoft.
Общие симптомы включают в себя:
- Невозможность получить доступ к вашей электронной почте
- Письма не синхронизируются между устройствами правильно
- Невозможность использовать определенные команды в определенных программах
Основные методы, используемые для устранения кода ошибки 0x80070032, довольно просты и просты для выполнения. Большинство пользователей должны иметь возможность выполнить эти методы самостоятельно, и им не требуется много времени для этого. Однако, если вы не чувствуете, что у вас есть опыт, навыки или знания, необходимые для выполнения шагов, перечисленных ниже, рассмотрите возможность обратиться к квалифицированному специалисту по ремонту Windows, чтобы помочь вам.
Решения
 Причины ошибок
 Причины ошибок
Двумя основными причинами для кода ошибки 0x80070032 являются команды, введенные в программы, которые не могут быть завершены или несовместимы с имеющейся программой, и папки в Почте Windows, которые не могут синхронизироваться должным образом.
Дополнительная информация и ручной ремонт
Есть три основных метода, которые пользователи могут попробовать, чтобы устранить код ошибки 0x80070032 на своем компьютере. Это довольно просто и легко завершить. Однако если приведенные ниже методы не помогли устранить код ошибки или если вы не уверены, что можете их использовать, обратитесь к сертифицированному специалисту по ремонту Windows, который поможет вам.
Если вы считаете, что видите ошибку из-за ввода неработающей команды, сначала воспользуйтесь первым методом. Если вы считаете, что это связано с ошибкой синхронизации почты, используйте методы два или три.
Вот лучшие методы для решения кода ошибки 0x80070032:
Метод первый: переустановите рассматриваемую программу
Если вы считаете, что у вас возникла ошибка с кодом 0x80070032 из-за введенной вами команды, лучшим решением будет переустановить программу, в которой вы вводили команду. Вы также можете попробовать обновить свою программу, если сможете, перед ее переустановкой. Не забудьте перезагрузить компьютер перед повторной попыткой ввести команду, вызвавшую ошибку.
Метод второй: загрузка и установка обновлений системы Windows
Для многих пользователей код ошибки 0x80070032 появляется из-за ошибки в одной из версий Windows 10. Если вы считаете, что это так, откройте обновления Windows и проверьте, есть ли какие-либо обновления, которые можно установить.
Для пользователей, которые видят код ошибки 0x80070032 только из-за упомянутой выше ошибки, Windows выпустила обновление, которое должно самостоятельно устранять код ошибки. Если ваш компьютер полностью обновлен, ошибка может быть решена самостоятельно. Не забудьте перезагрузить компьютер после установки обновлений, чтобы изменения вступили в силу.
Метод третий: измените свою почту Windows на локальный доступ
Если описанные выше способы не помогли решить проблему, вы можете переключиться на локальный доступ к Почте Windows, а не полагаться на доступ Microsoft. Для этого выполните следующие шаги:
- Зайдите в настройки Windows и выберите опцию «Учетные записи».
- Выберите учетную запись, к которой вы хотите получить доступ, и выберите вариант входа в систему с использованием локальной учетной записи.
- Введите пароль для подтверждения локального доступа.
- Добавьте свое имя пользователя, пароль и подсказку к паролю.
- Выйдите из локальной учетной записи, чтобы закончить.
Как только это будет сделано, вы можете вернуться к своей учетной записи Microsoft, которая должна сбросить ваши возможности синхронизации. Выполните следующие шаги, чтобы переключиться обратно:
- Вернитесь в настройки, выберите «Учетные записи» и выберите подходящую учетную запись.
- Измените параметр, чтобы войти с учетной записью Microsoft.
- Введите свой пароль, затем снова введите имя пользователя и пароль.
- Выберите «Переключить», чтобы вернуться к учетной записи Microsoft.
Метод четвертый: использование автоматизированного инструмента
Если вы хотите всегда иметь в своем распоряжении утилиту для исправления этих Windows 10 и других связанных с ними проблем, когда они возникают, Загрузить и установить мощный автоматизированный инструмент.
Вам нужна помощь с вашим устройством?
Наша команда экспертов может помочь

Специалисты Troubleshoot.Tech всегда готовы помочь вам!
Замените поврежденные файлы
Восстановить производительность
Удалить вредоносные программы
ПОЛУЧИТЬ ПОМОЩЬ
Специалисты Troubleshoot.Tech работают со всеми версиями Microsoft Windows, включая Windows 11, с Android, Mac и другими.
Поделиться этой статьей:
Вас также может заинтересовать
Недавно Meta распространила вирусную информацию о том, что работает над алгоритмом создания видео на основе ИИ под названием Make a Video. ИИ понравится изображение, заставляющее ИИ вводить текст и создавать из него видео.
Теперь на поле битвы видео AI выходит новый игрок, его зовут GOOGLE!

Исследовательский проект Google Imagen Video также является генератором текста в видео, похожим на Make a Video компании Meta, с одним небольшим отличием. в отличие от предложения Meta, которое включает только регистрацию, Google пока приостанавливает доступ под предлогом проблем с безопасностью.
Google уже был в области искусственного интеллекта со своим Imagen, генератором стиля DALL-E, способным генерировать фотореалистичные изображения на основе текстовых подсказок. Новый инструмент Google работает аналогично, но с лучшими функциями. ИИ может создавать широкий спектр высококачественных видео в различных эстетических стилях и с глубоким пониманием 3D-моделей, создавая видео высокой четкости с частотой 24 кадра в секунду.
«С помощью прогрессивной дистилляции Imagen Video может создавать высококачественные видео, используя всего восемь шагов распространения на подмодель. Это существенно ускоряет время создания видео примерно в 18 раз»,
Джонатан Хо, автор исследовательской работы
Несмотря на фильтрацию «нежелательного контента», команда признает, что «существует риск того, что Imagen закодировал вредные стереотипы и представления». Таким образом, пока ИИ и его пользователям нельзя доверять, Google отказывается выпускать Imagen Video без дополнительных мер безопасности.
Узнать больше
При попытке бежать Управление компьютером, или при беге mmc.exe or compmgmt.msc из командной строки вы получаете сообщение об ошибке, что приложение было заблокировано для вашей защиты, а затем продолжайте читать, чтобы решить проблему. Это проблема с разрешением, при которой, если обычный пользователь попытается запустить такие системные инструменты, сообщит, что они заблокированы. Наряду с этим у вас может быть проблема с групповой политикой. Это можно исправить, но для этого вам потребуется разрешение администратора. Это потому, что когда они запускаются из командной строки с повышенными привилегиями, это работает.
-
Изменить параметры групповой политики
Если ваша учетная запись является учетной записью администратора, и вы все еще сталкиваетесь с проблемой, измените параметры групповой политики:
Откройте Настройки групповой политики , введя gpedit.msc в командной строке с последующим нажатием ENTER
Перейдите в Конфигурация пользователя> Административные шаблоны> Компоненты Windows> Консоль управления Microsoft> Ограниченные / разрешенные оснастки
Найдите Политика управления компьютером, и дважды щелкните, чтобы открыть его
Включите это, выйдите из групповой политики.
Когда включено: Оснастка разрешена и может быть добавлена в консоль управления Microsoft или запущена из командной строки как автономная консоль.
Когда отключено: Оснастка запрещена, ее нельзя добавить в консоль управления Microsoft или запустить из командной строки как отдельную консоль. Отображается сообщение об ошибке о том, что политика запрещает использование этой оснастки. -
Временно отключить UAC
UAC — это панель управления доступом пользователей, и если вам нужно сразу запустить команду, вы можете отключить ее на некоторое время. Нажать на Start кнопку, а затем введите UAC найти Настройки контроля учетных записей пользователей. Нажмите, чтобы открыть, а затем сдвиньте вниз настройки уведомлений внизу. Это временно разрешит запуск приложения, так как нет проверки. Тем не менее, не забудьте переключиться на значение по умолчанию, когда закончите.
Узнать больше
 Valve анонсировала первую портативную игровую консоль для ПК: Steam Deck. По своей сути Stead Deck — это просто портативный небольшой ПК в маленьком корпусе. Он использует процессор AMD Zen 2 и архитектуру графического процессора RDNA 2, имеет 16 ГБ оперативной памяти, Wi-Fi и Bluetooth. Это портативное устройство с сенсорной панелью и джойстиком, оснащенное семидюймовым экраном с разрешением 1280×800 (соотношение сторон 16:10). На экране есть датчик внешней освещенности для автоматической регулировки освещенности, такой же, как на вашем современном мобильном устройстве. Заявленная на Valve батарея будет держать от двух до восьми часов в зависимости от активности пользователя и того, чем именно он занимается. К КПК также прилагается чехол для переноски.
Операционная система и программное обеспечение Steam Deck
По умолчанию Steam Dock поставляется с последней версией SteamOS 3 от Valve. Просто для сравнения: Steam Box поставляется с SteamOS 2, поэтому эта новая ОС на базе Linux предназначена для обеспечения лучшей производительности и лучшей совместимости. Естественно, все игры для Linux в вашей библиотеке Steam будут работать прямо из коробки, но у Valve внутри ОС есть что-то под названием PROTON, это программное обеспечение для эмуляции, основанное на Wine, которое предположительно позволит вам играть во все игры из вашей библиотеки на данной ОС. Здесь следует упомянуть одну важную вещь: в конце концов, это ПК, а это означает, что если вам не нравится наличие на нем SteamOS, вы можете установить вместо него Windows, и, насколько нам известно, он будет поддерживать Windows 11. Теперь с Windows 11 вы сможете чтобы играть во все ваши игры Steam и запускать на нем любое программное обеспечение Windows, включая EPIC store, battle.net и другие.
Стоимость и дата выпуска
Первоначальная дата выпуска назначена на декабрь 2021 года, а сегодня — 16 июля.th Valve открывается, вы можете зарезервировать свою копию, если хотите сделать предварительную покупку. Перейдите по этой ссылке, если хотите зарезервировать свою копию. Зарезервируйте свое устройство Steam Deck
Цена устройства будет зависеть от объема памяти, который вы хотели бы иметь. Обратите внимание, что у каждого из 3 предложенных устройств будет одинаковое железо, разница будет только в доступной памяти, а самая дорогая версия будет иметь еще и антибликовый экран, все остальное идентично. Модель на 64 ГБ будет стоить 399 долларов, модель на 256 ГБ будет стоить 529 долларов, а самая большая модель с 512 ГБ будет стоить 649 долларов.
Заключение
Valve снова выходит на рынок цифрового оборудования, но не уверена, что на этот раз у них это получится. И машина Steam, и их контроллер долгое время были неисправными, а затем неподдерживаемыми продуктами, поэтому, возможно, клиентам рекомендуется проявлять некоторую осторожность. Хотя наличие портативного ПК заманчиво, я бы посоветовал посмотреть, как рынок в целом воспримет это изобретение, прежде чем вкладывать в него деньги.
Узнать больше
Если вы столкнулись с ошибкой DRIVER_UNLOADED_WITHOUT_CANCELLING_PENDING_OPERATION «синий экран» с кодом ошибки 0x000000CE, это означает, что драйверу не удалось отменить ожидающие операции перед выгрузкой. Некоторые из файлов драйверов, которые могут быть виновниками, включают intelppm.sys, intcdaud.sys, tmxpflt.sys, mrxsmb.sys и asusptpfilter.sys. Этот тип ошибки «синий экран» возникает, когда драйверу не удалось отменить резервные списки, рабочие потоки, DPC и другие элементы перед выгрузкой. Обычно вы можете определить, какой файл драйвера вызывает ошибку BSOD, по самой ошибке BSOD, поскольку ее имя будет напечатано на синем экране и сохранено в памяти в месте (PUNICODE_STRING) KiBugCheckDriver. Обратитесь к возможным решениям, приведенным ниже, чтобы исправить ошибку DRIVER_UNLOADED_WITHOUT_CANCELING_PENDING_OPERATIONS.
Вариант 1. Выполните восстановление системы
Выполнение восстановления системы может помочь вам исправить ошибку синего экрана SYNTP.SYS. Вы можете сделать эту опцию либо загрузкой в безопасном режиме, либо восстановлением системы. Если вы уже находитесь в разделе «Дополнительные параметры запуска», просто выберите «Восстановление системы» и перейдите к следующим шагам. И если вы только что загрузили свой компьютер в безопасном режиме, следуйте инструкциям ниже.
- Нажмите клавиши Win + R, чтобы открыть диалоговое окно «Выполнить».
- После этого введите «sysdm.cpl» в поле и нажмите «Ввод».
- Затем перейдите на вкладку «Защита системы» и нажмите кнопку «Восстановление системы». Откроется новое окно, в котором вы должны выбрать предпочитаемую точку восстановления системы.
- После этого следуйте инструкциям на экране, чтобы завершить процесс, а затем перезагрузите компьютер и проверьте, устранена ли проблема.
Вариант 2 — отключить параметры памяти BIOS
Отключение параметров памяти BIOS, таких как кэширование и теневое копирование, может помочь вам исправить ошибку «синий экран» DRIVER_UNLOADED_WITHOUT_CANCELLING_PENDING_OPERATIONS. Все, что вам нужно сделать, это сначала войти в BIOS, а затем с помощью клавиш со стрелками и ввода выбрать варианты. И если вы не можете найти его, обратитесь к конкретным инструкциям вашего OEM-производителя, или вы также можете обратиться к инструкциям производителя вашей материнской платы.
Вариант 3. Обновите или откатите драйверы вашего устройства.
Если первый вариант вам не подошел, то пора либо обновить, либо откатить драйверы устройств. Скорее всего, после того, как вы обновили свой компьютер с Windows, ваш драйвер также нуждается в обновлении. С другой стороны, если вы только что обновили драйверы устройства, вам необходимо откатить драйверы до их предыдущих версий. В зависимости от того, что применимо к вам, следуйте приведенным ниже инструкциям.
- Откройте Диспетчер устройств из меню Win X.
- Затем найдите драйверы устройств и щелкните их правой кнопкой мыши, чтобы открыть окно «Свойства».
- После этого перейдите на вкладку «Драйвер» и нажмите кнопку «Удалить устройство».
- Следуйте опции экрана, чтобы полностью удалить его.
- Наконец, перезагрузите компьютер. Это просто переустановит драйверы устройства автоматически.
Примечание: Вы можете установить специальный драйвер на свой компьютер, если он у вас есть, или вы также можете найти его прямо на веб-сайте производителя.
Вариант 4 — Попробуйте запустить утилиту CHKDSK
Запуск утилиты CHKDSK также может помочь устранить ошибку «синий экран» DRIVER_UNLOADED_WITHOUT_CANCELLING_PENDING_OPERATIONS. Если на вашем жестком диске есть проблемы с целостностью, обновление действительно завершится сбоем, так как система будет считать, что она неработоспособна, и именно здесь появляется утилита CHKDSK. Утилита CHKDSK исправляет ошибки жесткого диска, которые могут вызывать проблему.
- Откройте командную строку с правами администратора.
- После открытия командной строки выполните следующую команду и нажмите Enter:
CHKDSK / F / R
- Дождитесь завершения процесса и перезагрузите компьютер.
Вариант 5. Запустите средство диагностики памяти для проверки утечек памяти.
- Нажмите клавиши Win + R, чтобы открыть Run и введите ехе и нажмите Enter, чтобы открыть средство диагностики памяти Windows.
- После этого он даст два варианта, таких как:
- Перезапустите сейчас и проверьте наличие проблем (рекомендуется)
- Проверьте проблемы при следующем запуске компьютера
- После перезагрузки компьютера выполните базовое сканирование, или вы также можете воспользоваться опциями «Advanced», такими как «Test mix» или «Pass count». Просто нажмите клавишу F10, чтобы начать тестирование.
Примечание: После того, как вы выберете эту опцию, ваш компьютер перезагрузится и проверит наличие проблем с памятью. Если он обнаружит какие-либо проблемы, он автоматически их исправит, а если проблем не обнаружено, то, скорее всего, это не проблема, связанная с памятью, поэтому вам следует попробовать другие варианты, указанные ниже.
Вариант 6. Попробуйте проанализировать файлы дампа памяти.
Вы также можете попробовать проанализировать файлы дампа памяти, так как это поможет вам определить основную причину ошибки DRIVER_UNLOADED_WITHOUT_CANCELLING_PENDING_OPERATIONS.
Вариант 7. Попробуйте проверить настройки реестра.
Вы также можете попробовать отключить соответствующий файл драйвера, если он упоминается в ошибке Stop. Например, если в ошибке остановки упоминается файл драйвера «intelppm.sys», необходимо отключить этот файл драйвера, поскольку он, скорее всего, является виновником. Для этого выполните следующие действия.
- Нажмите клавиши Win + R, чтобы открыть диалоговое окно «Выполнить».
- Затем введите «Regedit» в поле и нажмите Enter, чтобы открыть редактор реестра.
- После этого перейдите по этому пути реестра: HKEY_LOCAL_MACHINE> SYSTEM> CurrentControlSet> Services> Processor
- Оттуда, дважды щелкните Start и измените его значение на «4».
- Теперь перейдите по этому пути: HKEY_LOCAL_MACHINE> SYSTEM> CurrentControlSet> Services> Intelppm.
- Установите для него значение «4», а затем перезагрузите компьютер, чтобы применить сделанные изменения.
Вариант 8. Запустите средство устранения неполадок синего экрана
Средство устранения неполадок с синим экраном — это встроенный инструмент в Windows 10, который помогает пользователям исправлять ошибки BSOD, такие как DRIVER_UNLOADED_WITHOUT_CANCELLING_PENDING_OPERATIONS. Его можно найти на странице средств устранения неполадок настроек. Чтобы использовать его, выполните следующие действия:
- Нажмите клавиши Win + I, чтобы открыть панель «Настройки».
- Затем перейдите в Обновление и безопасность> Устранение неполадок.
- Оттуда найдите опцию «Синий экран» с правой стороны, а затем нажмите кнопку «Запустить средство устранения неполадок», чтобы запустить средство устранения неполадок «Синий экран», а затем перейдите к следующим параметрам на экране. Обратите внимание, что вам может потребоваться загрузить ваш компьютер в безопасном режиме.
Узнать больше
Код ошибки 0x801901F7 — что это?
Код ошибки 0x801901F7, также известный как ошибка «Сервер остановился», потому что он показывает сообщение «Сервер остановился. У всех нас бывают плохие дни» связано с Магазином Windows. Server Stumbled Error 0x801901F7 — это ошибка, связанная с сервером MS. Ошибка возникает из-за поврежденных файлов реестра, вредоносных программ, вирусов и поврежденных данных. Вы должны исправить эту ошибку, чтобы предотвратить сбой системы или ошибку BSOD. Есть некоторые вещи, которые вы можете сделать, чтобы это исправить. Это не так сложно. Таким образом, любой может попробовать эти методы, чтобы исправить ошибку 0x801901F7. Общие симптомы ошибки 0x801901F7:
- Проблемы с запуском Windows
- Система становится очень медленной или система зависает
- Появляется синий экран смерти
- Windows не запускает какой-либо процесс из-за ошибки Stop код 0x801901f7
Решения
Причины ошибок
- Эта ошибка обычно вызвана поврежденными файлами реестра.
- Вирусная инфекция может вызвать эту проблему.
- Устаревший драйвер, отсутствующие файлы .DLL также могут вызывать эту ошибку.
- Перегрузка сервера Microsoft может также вызвать эту проблему.
- Неправильная конфигурация может вызвать эту проблему.
Дополнительная информация и ручной ремонт
Чтобы исправить ошибку 0x801901f7, есть четыре метода, перечисленных ниже. Некоторые могут работать для вас, а некоторые нет. Пожалуйста, попробуйте все из них, чтобы исправить эту ошибку.
Метод 1:
Основной метод исправления кода ошибки 0x801901F7: сброс кэша Магазина Windows В большинстве случаев помогает очистка или сброс кэша. Это не всегда работает, но вы должны сначала попробовать это, прежде чем переходить к некоторым продвинутым методам, которые упомянуты ниже. Чтобы сбросить кэш Магазина Windows, выполните следующие простые действия.
- Откройте RUN, выполнив поиск или нажав «Windows Key + R».
- Введите «wsreset.exe» и нажмите «Ввод» или нажмите «ОК».
- Магазин Windows откроется автоматически вместе с командной строкой.
- Это приведет к перезагрузке Магазина Windows, и вы можете увидеть, что он загружается как следует.
Этот метод может работать, но если он не может решить ошибку 0x801901F7, следуйте приведенному ниже методу.
Метод 2:
Расширенный метод исправления кода ошибки 0x801901F7: удаление файла базы данных Магазина Windows. Используя этот метод, вы удалите файл базы данных для Магазина Windows. Этот файл находится на вашем диске C или на диске, на котором вы установили операционную систему. Следуйте инструкциям ниже.
- Перейдите к C: WindowsSoftwareDistributionDataStoreDataStore.edb.
- Удалите файл DataStore.edb оттуда.
- Теперь откройте Магазин Windows и посмотрите, по-прежнему ли вы получаете код ошибки 0x801901F7.
Удаленный вами файл Datastore.edb будет автоматически создан после выполнения шага 3, запускающего Магазин Windows. Если вы по-прежнему не можете избавиться от этой ошибки, закройте Магазин Windows и перезагрузите компьютер, а затем снова запустите Магазин Windows.
Способ доставки 3:
Изменение свойств обновления Windows. Выполняйте описанные ниже шаги только в том случае, если вышеуказанные методы не помогли. Вы будете настраивать несколько вещей в обновлении Windows, чтобы посмотреть, поможет ли это.
- Откройте диспетчер задач, щелкнув правой кнопкой мыши на панели задач, затем нажмите Диспетчер задач.
- Перейдите на Услуги Tab. Нажмите на Открытые услуги в самом низу окна.
- Теперь появится новое окно. Прокрутите вниз и найдите «Центр обновления Windows«из списка.
- Дважды щелкните обновление Windows, чтобы открыть его Предложения.
- Теперь в раскрывающемся списке Тип запуска выберите Автоматически. Нажмите Применить, начать, а затем ОК.
Теперь вам нужно выполнить еще один шаг. Снова сбросьте Windows Store (см. Способ 1 для получения информации о шагах). Это должно исправить вашу ошибку Windows Store, которая показывает, что Сервер наткнулся с кодом ошибки 0x801901F7.
Метод 4:
Если ошибка вызвана проблемой с драйвером, выполните следующие действия, чтобы удалить текущий драйвер:
- Откройте приложение Run введите команду и введите «sysdm.cpl» в текстовое поле.
- Нажмите Enter.
- Откройте приложение аппаратные средства вкладка в диалоговом окне свойств системы.
- Затем нажмите на Диспетчер устройств.
- Двойное нажатие на Тип устройства а затем нажмите на устройстве, которое сообщает код ошибки 0x801901F7.
- Перейдите в Драйвер нажмите и нажмите на Удалить кнопку, чтобы полностью удалить драйвер устройства.
- Теперь установите новый драйвер на свой компьютер.
- Перезагрузите компьютер.
- Запустите проверку на вирусы на вашем ПК
- Попробуйте использовать другой порт USB.
Если вы не обладаете техническими знаниями, необходимыми для выполнения этого самостоятельно, или не чувствуете себя комфортно, загрузите и установите мощный автоматизированный инструмент, чтобы получить работу.
Узнать больше
Как известно, одной из полезных и эффективных утилит в Windows 10 является инструмент DISM. Его можно использовать с командной строкой командной строки, которая позволяет пользователям выполнять различные задачи. Однако бывают случаи, когда инструмент DISM может столкнуться с некоторыми ошибками при попытке выполнить команду. Одна из этих ошибок гласит: «Хранилище компонентов повреждено». Такая ошибка DISM возникает из-за ошибки в файле образа. Когда вы столкнетесь с ошибкой DISM 14098 при запуске инструмента DISM, вы увидите следующее содержимое в командной строке:
«C:> Dism / Online / Cleanup-Image / RestoreHealth / Source: c: testmountwindows / LimitAccess.
Инструмент обслуживания изображений и управления развертыванием
Версия: 10.0.10586.0
Версия изображения: 10.0.10586.0
[========================== 100.0%
Ошибка: 14098
Хранилище компонентов повреждено.
Файл журнала DISM можно найти по адресу C: WINDOWSLogsDISMdism.log
C:> ”
Существует несколько исправлений, которые можно проверить, чтобы исправить ошибку DISM 14098 «Хранилище компонентов повреждено». Вы можете попробовать выполнить команду «Восстановить работоспособность» или сбросить компоненты Центра обновления Windows или внести в белый список файл dism.exe в антивирусной программе, а также попытаться удалить все недавно установленные обновления. Следуйте приведенным ниже параметрам для получения более подробной информации.
Вариант 1. Запустите команду восстановления работоспособности в состоянии чистой загрузки.
- Во-первых, вам нужно перевести компьютер в состояние чистой загрузки.
- Введите MSConfig в Начальном поиске, чтобы открыть утилиту конфигурации системы.
- Оттуда перейдите на вкладку Общие и нажмите «Выборочный запуск».
- Снимите флажок «Загрузить элементы запуска» и убедитесь, что установлены флажки «Загрузить системные службы» и «Использовать исходную конфигурацию загрузки».
- Затем щелкните вкладку «Службы» и установите флажок «Скрыть все службы Microsoft».
- Нажмите Отключить все.
- Нажмите Apply / OK и перезагрузите компьютер. (Это переведет ваш компьютер в состояние чистой загрузки. И настройте Windows на обычный запуск, просто отмените изменения.)
- Теперь откройте командную строку с правами администратора.
- Затем введите и введите эту команду, чтобы выполнить ее: Dism / Online / Очистка-изображение / RestoreHealth
- Дождитесь завершения процесса и перезагрузите компьютер.
Примечание: Если команда Restore Health не работает, вы можете использовать параметр «/ StartComponentCleanup», выполнив эту команду: Dism / Online / Cleanup-Image / StartComponentCleanup
Вариант 2. Попробуйте сбросить компоненты Центра обновления Windows.
Если по какой-либо причине второй вариант не сработал, сброс компонентов Центра обновления Windows также может помочь решить проблему. Как? Обратитесь к следующим шагам:
- Откройте командную строку с правами администратора.
- После этого введите каждую из следующих команд и нажмите Enter после ввода одной за другой.
- net stop wuauserv
- net stop cryptsvc
- чистые стоповые бит
- net stop msiserver
Примечание: Введенные вами команды остановят компоненты Центра обновления Windows, такие как служба Центра обновления Windows, Криптографические службы, BITS и установщик MSI.
- После отключения компонентов WU необходимо переименовать папки SoftwareDistribution и Catroot2. Для этого введите каждую из следующих команд ниже и не забудьте нажать Enter после ввода одной команды за другой.
- ren C: /Windows/SoftwareDistribution/SoftwareDistribution.old
- ren C: /Windows/System32/catroot2/Catroot2.old
- Затем перезапустите службы, которые вы остановили, введя другую серию команд. Не забудьте нажать Enter после ввода одной команды за другой.
- net start wuauserv
- net start cryptsvc
- чистые стартовые биты
- net start msiserver
- Закройте командную строку и перезагрузите компьютер.
Вариант 3. Внесите файл «DISM.exe» в белый список антивирусной программы.
Ошибка DISM 14098 также может быть вызвана антивирусной программой, которая может мешать ее работе. Чтобы это исправить, вы должны внести белый список dism.exe. Как? Обратитесь к этим шагам:
- Откройте Центр безопасности Защитника Windows в области уведомлений.
- Затем выберите «Защита от вирусов и угроз» и откройте «Настройки защиты от вирусов и угроз».
- После этого прокрутите вниз, пока не найдете «Исключения» и нажмите «Добавить или удалить исключения».
- Затем нажмите кнопку «плюс» и выберите тип исключения, которое вы хотите добавить, и в раскрывающемся списке выберите «Папка».
- Далее перейдите по этому пути и выберите папку WinSxS: C: / Windows / WinSxS
- Когда появится запрос контроля учетных записей или контроля учетных записей, просто нажмите «Да», чтобы продолжить.
Вариант 4. Попробуйте удалить недавно установленные обновления.
Иногда при обновлении компьютера с Windows 10 некоторые обновления Windows влияют на какой-либо механизм. В результате это вызывает проблемы с другими компонентами операционной системы, которые могут быть причиной возникновения ошибки DISM 14098.
- Зайдите в Настройки и выберите Обновление и безопасность> Центр обновления Windows.
- Оттуда, нажмите на «Просмотр истории обновлений», а затем нажмите «Удалить обновления».
- Откроется новое окно со списком установленных обновлений Windows.
- Теперь щелкните правой кнопкой мыши на Windows Update, который вы хотите удалить, и нажмите «Удалить».
Узнать больше
Что такое ошибка 106?
Ошибка 106 — распространенная ошибка, с которой сталкиваются пользователи Windows 7. Генерируется в результате неправильно настроенных, поврежденных или испорченных системных файлов на компьютере, это не является критической ошибкой. Тем не менее, устранение этой ошибки важно, чтобы избежать нежелательных неудобств. По сути, ошибка 106 — это один из кодов ошибок, используемых Windows и другими поставщиками совместимых драйверов и программного обеспечения. 106 в этой ошибке, по сути, является адресом памяти или местом, где находились инструкции на момент возникновения ошибки.
Решения
Причины ошибок
В первую очередь ошибка 106 вызвана поврежденными, неправильно сконфигурированными или поврежденными системными файлами. Сначала ошибка может показаться безобидной. Однако, если допустить упорство, это может привести к тяжелым последствиям. Допустить, чтобы ошибка процветала в вашей системе, равносильно тому, чтобы поставить под угрозу благополучие вашей системы. Что касается событий, условий или сценариев, которые приводят к возникновению ошибки 106, они перечислены ниже. Важно понимать, что эти условия в большинстве случаев приводят к повреждению системных файлов.
- Неправильная или неполная установка или удаление
- Неправильное или неполное удаление оборудования или приложений
- Неправильное, непреднамеренное или внезапное отключение системы
- Существование рекламное, шпионское, вредоносное ПО, или вирус на вашем компьютере
Стоит отметить, что любое из перечисленных выше условий может привести к повреждению системных файлов или записей реестра в системе. Поскольку для правильного функционирования системе нужны правильные и полные файлы, которые система не сможет найти, это приведет к необъяснимому поведению. Это также происходит из-за того, что система будет приводить к неправильной связи или отсутствию информации.
Дополнительная информация и ручной ремонт
Существуют различные способы исправления этой ошибки, но два наиболее полезных из них кратко перечислены ниже.
- Это решение для опытного пользователя. Прежде всего, включите вашу систему. Войдите в систему как администратор. Теперь нажмите кнопку «Пуск» и следуйте этой последовательности: «Все программы» -> «Стандартные» -> «Системные инструменты» -> «Восстановление системы». Перед вами появится новое окно. В этом окне выберите вариант «Восстановить мой компьютер до более раннего времени». Теперь нажмите Далее, перед вами появится список точек восстановления. Из этого списка выберите самую последнюю точку восстановления и нажмите «Далее». Нажмите Далее в окнах подтверждения. После завершения восстановления перезагрузите компьютер.
- Это решение для начинающего пользователя. Скачать ошибка 106 утилита восстановления окон. Теперь установите эту программу на свой компьютер и используйте ее для сканирования вашего компьютера. Попробуйте найти вариант исправления ошибок сразу после завершения сканирования. Воспользуйтесь этой опцией. Как только все ошибки будут исправлены, перезагрузите компьютер еще раз. Теперь вы поймете, что ошибка исчезла, и теперь на вашем компьютере отсутствует ошибка 106.
Используйте любое из решений, перечисленных выше, в соответствии с вашим уровнем квалификации.
Узнать больше
Если у вас есть несколько продуктов с Windows, скопировать и вставить текст между ними очень просто, как 1,2,3, и мы будем рады рассказать вам, как вы можете это сделать. Привет и добро пожаловать всем, сегодня мы увидим, как мы можем мгновенно обмениваться текстовой информацией между двумя устройствами с помощью Windows 2. Чтобы вы могли обмениваться текстовой информацией между устройствами, необходимо выполнить два предварительных условия. Во-первых, все устройства должны быть подключены к Интернету, во-вторых, у вас должна быть учетная запись Microsoft. Если у вас есть обе эти вещи, продолжите обучение, если у вас нет учетной записи Microsoft, перейдите к Веб-сайта Microsoft и создать его бесплатно. Кроме того, знайте, что эта опция должна быть включена на всех устройствах, чтобы работать. Поэтому шаги, которые мы объясним, необходимо будет выполнить на каждом устройстве. Если у вас уже есть какое-то устройство, на котором выполнен вход в систему и подключено к учетной записи Microsoft, вы можете пропустить его настройку. Нажмите на ⊞ ОКНА и нажмите на настройки.
![]() Затем нажмите на on Система.
Затем нажмите на on Система.
 Как только вы войдете в систему, на оставил вкладки найдите и нажмите Буфер обмена.
 Если вы не вошли в свою учетную запись Microsoft, сделайте это на правой панели, указав Синхронизация между устройствами и нажмите на войдите в систему.
 Когда вы вошли в систему нажмите на на возможность повернуть это on.
 Один вариант повернут ON, вам будет предложено два варианта: автоматически скопировать все из буфера обмена или выбрать текст, который вы хотите синхронизировать, и вставить его с помощью ⊞ ОКНА + V. Выберите то, что лучше соответствует вашим потребностям, и готово.
Повторить этим шагам для других устройств и все готово.
Узнать больше
Что такое ошибка 1713?
Ошибка 1713 по сути является ошибкой программирования. Он был специально разработан для приложений Microsoft. Это сделано для того, чтобы клиенты могли продолжать использовать соответствующий инструмент настройки. Ошибка может быть довольно раздражающей и используется производителями для определения причины ошибки, чтобы можно было использовать методы противодействия. Число 1713 — это просто шестнадцатеричный код, сообщающий, где была загружена инструкция при возникновении ошибки.
Решения
Причины ошибок
Что касается причин ошибки 1713, то основной причиной являются поврежденные, неправильно настроенные или поврежденные системные файлы Windows. Есть несколько других факторов, которые приводят к возникновению ошибки 1713. Например, если приложения или оборудование в вашей системе были неправильно удалены, установлены или удалены, возникнет ошибка 1713. Точно так же ошибка 1713 возникает, когда компьютер восстанавливается после атаки со стороны некоторых вирусы, шпионское ПО, вредоносное или рекламное ПО только недавно. Эта атака повреждает файл, поэтому появляется ошибка. В этой ошибке также может быть виновато неправильное завершение работы системы. Все перечисленные выше сценарии на самом деле повреждают записи реестра в системных файлах Windows. Поврежденные или поврежденные файлы затем приведут к неправильной связи или отсутствию информации. Само собой разумеется, что такие проблемы будут мешать приложениям работать должным образом, и это делает еще более важным исправить эту ошибку, как только она появится.
Дополнительная информация и ручной ремонт
Два наиболее полезных обходных пути для ошибки 1713 перечислены ниже.
- Это решение для опытных пользователей. Перезагрузите компьютер. Войдите в него как администратор в безопасном режиме. Теперь нажмите кнопку «Пуск» и пройдите по этому пути Все программы-> Стандартные-> Системные инструменты-> Восстановление системы. Теперь появится опция с просьбой «Восстановить ваш компьютер до более раннего времени». Выберите это. Эта опция фактически появится в новом окне. Нажмите «Далее. Вам будет показан список точек восстановления. Выберите самую последнюю точку восстановления до возникновения ошибки и нажмите Далее. Теперь нажмите кнопку «Далее», которая появится в окне подтверждения. Перезагрузите компьютер, как только восстановление будет завершено.
- Это решение для начинающих пользователей. Скачайте утилиту для ремонта 1713, доступную онлайн. Установите эту программу и используйте ее для сканирования вашей системы. После завершения сканирования нажмите «Восстановить», чтобы исправить ошибку.
Узнать больше
Каждый раз, когда вы подключаете внешние устройства, такие как сканеры, принтеры и тому подобное, к компьютеру с Windows 10, устройство либо передает драйверы через USB или любой другой порт, либо вы должны установить драйверы через внешний носитель. В обоих случаях драйвер будет загружен в систему, что позволит вам использовать устройство. Однако это не всегда проходит гладко, так как вы можете столкнуться с некоторыми ошибками, такими как «Windows не может загрузить драйвер устройства для этого оборудования, поскольку предыдущий экземпляр драйвера устройства все еще находится в памяти (код 38)». Если вы столкнулись с такой ошибкой в диспетчере устройств, это означает, что предыдущая версия драйвера устройства все еще находится в памяти и что каждый раз, когда устройство используется, эта предыдущая версия загружается в память, а затем выгружается, что вызывает «Windows не удается загрузить драйвер устройства для этого оборудования, поскольку предыдущий экземпляр драйвера устройства все еще находится в памяти (код 38)». Такая ошибка возникает, если операционная система загружает нежелательный драйвер или не может выгрузить драйвер. Возможно, в системе все еще установлена устаревшая версия драйвера, или вам необходимо обновить драйверы USB, поскольку они могут быть устаревшими, или проблема также может быть связана с какой-либо сторонней программой, которая мешает установке. Какой бы ни была причина, вот несколько советов, которые вы можете использовать для решения проблемы.
Вариант 1. Удалите ранее установленные драйверы и переустановите их последнюю рабочую версию с сайта производителя.
Первое, что вы можете сделать, это удалить драйверы, которые в настоящее время установлены на вашем компьютере, а затем переустановить их последние рабочие версии с официальных сайтов. Этот вид ошибок часто встречается при загрузке драйверов для сканеров и принтеров. Это связано с тем, что их драйверы и программное обеспечение поставляются вместе с пакетом, который обычно находится на внешнем носителе, таком как CD или DVD. Поэтому, когда вы устанавливаете программный пакет, есть вероятность, что его производитель выпустил более новую версию. В этом случае вам необходимо удалить ранее установленный пакет драйверов, а затем загрузить драйверы с веб-сайта производителя и установить их.
Вариант 2 — Запустите средство устранения неполадок оборудования и устройств
- Первое, что вам нужно сделать, это нажать на Пуск, а затем на иконку в виде шестеренки, чтобы открыть окно настроек.
- После открытия настроек найдите параметр «Обновление и безопасность» и выберите его.
- Оттуда перейдите к варианту устранения неполадок, расположенному в левой части списка.
- Далее выберите «Оборудование и устройства» из списка, откройте средство устранения неполадок и запустите его. Когда он выполнит свою работу, подождите, пока он завершит процесс, а затем перезапустите систему.
- После перезагрузки системы проверьте, не устранена ли проблема. Если нет, обратитесь к следующей опции, приведенной ниже.
Вариант 3. Обновите или переустановите драйвер универсального контроллера последовательной шины.
Поскольку это может быть проблема с драйвером, вы можете попробовать обновить или переустановить драйверы контроллера универсальной последовательной шины с помощью диспетчера устройств. Обратитесь к следующим шагам:
- Сначала нажмите кнопку «Пуск» и введите «диспетчер устройств».
- Затем нажмите «Диспетчер устройств» в результатах поиска, чтобы открыть его.
- Оттуда найдите параметр «Контроллеры универсальной последовательной шины», затем щелкните правой кнопкой мыши каждый из драйверов USB и выберите в меню «Обновить драйвер».
Примечание: Если это обычный USB-накопитель, он будет указан как USB-накопитель большой емкости, но если у вас есть устройство USB 3.0, ищите расширяемый хост-контроллер USB 3.0.
- Перезагрузите компьютер и нажмите «Автоматически искать обновленное программное обеспечение драйвера».
Примечание: Если обновление драйверов USB-контроллера не помогло, вы можете попробовать переустановить их.
Вариант 4. Перезагрузите компьютер в состоянии чистой загрузки.
Если первые три заданных параметра не сработали, и вы по-прежнему видите ошибку при подключении внешних устройств, вы можете попробовать перевести компьютер в состояние чистой загрузки, а затем попробовать подключить их снова.
- Войдите на свой компьютер как администратор.
- Введите MSConfig в Начальном поиске, чтобы открыть утилиту конфигурации системы.
- Оттуда перейдите на вкладку Общие и нажмите «Выборочный запуск».
- Снимите флажок «Загрузить элементы запуска» и убедитесь, что установлены флажки «Загрузить системные службы» и «Использовать исходную конфигурацию загрузки».
- Затем щелкните вкладку «Службы» и установите флажок «Скрыть все службы Microsoft».
- Нажмите Отключить все.
- Нажмите Apply / OK и перезагрузите компьютер. (Это переведет ваш компьютер в состояние чистой загрузки. И настройте Windows на обычный запуск, просто отмените изменения.)
- Теперь попробуйте подключить внешние устройства и проверьте, исчезла ли ошибка.
Узнать больше
![]()
Авторское право © 2022, ErrorTools, Все права защищены
Товарные знаки: логотипы Microsoft Windows являются зарегистрированными товарными знаками Microsoft. Отказ от ответственности: ErrorTools.com не аффилирован с Microsoft и не претендует на прямую аффилированность.
Информация на этой странице предоставлена исключительно в информационных целях.
![]()
Ремонт вашего ПК одним щелчком мыши
Имейте в виду, что наше программное обеспечение необходимо установить на ПК с ОС Windows. Откройте этот веб-сайт на настольном ПК и загрузите программное обеспечение для простого и быстрого устранения ваших проблем.
Windows 10 attracts users in large numbers because of its amazing GUI and prominent features. Although there’s no doubt when it comes to its popularity; however, it is not the best version of Windows.
This version comes with various flaws, such as error 0x80070032, which are worth noting by Microsoft. Microsoft claims that Windows 10 will revolutionize the Operating System world.
However, most users are unable to take this. This is because users experience problems with Windows 10 in some way or another.
What Is Error 0x80070032? How Does It Happen?
After you install Windows 10, the PIN sometimes stops working, showing an error 0x80070032. If it occurs, you cannot log in to Windows using your PIN passcode and don’t know what to do. Keep on reading further.
Windows 10 OS comes with a feature called Windows Hello for the sake of protection. It is an access control and biometric identity which enables logging into Windows through fingerprint, facial recognition, iris, or PIN passcode.
Unfortunately, Hello is not available for Windows 10 users. Older devices, which do not have the necessary hardware elements, like iris or fingerprint scanners, have to buy biometric USB iris/fingerprint scanners or forget about Windows Hello.
Normally, iris, facial, or fingerprint recognition login is accompanied by PIN passcodes. This is the most protected way to sign in to Windows 10 as a PIN passcode is simpler to memorize, while the facial contours, fingerprint, or iris of the user are very hard to counterfeit.
On Windows Hello, users come across problems like PIN passwords or fingerprints that would not work. The most common login error is the PIN 0x80070032 error. Most users claim that this issue occurred after they installed Windows 10 Fall Creators Update when compromised fingerprint or PIN login.
The most common issue with Windows 10 is “Apps won’t sync in Windows 10“, which shows up along with the error 0x80070032 code.
It even flashes a message which says, “We can’t sync at the moment. But you may find more info about this error code at www.windowsphone.com.”
The most affected application by this error code is Windows 10 Mail application. As per records, users cannot synchronize their accounts using the Mail application as this app turns non-operational. Here, you will get to learn how to resolve this issue.
Microsoft has investigated the error 0x80070032, but they have not announced the official approval of this bug or its patch. There are various reasons why your PIN stops working while flashing the error 0x80070032.
It shows up on your computer screen as “Something went wrong. Try again later. Error code: 0x80070032.” So, look at various solutions to eliminate this annoying error code.
PS: Regarding the Windows Update Error 0x80070020, here are your top solutions.
Reasons Why the Error Code 0x80070032 Occurs
Microsoft servers are the main reason for initiating this issue with the Mail application. Here, the accounts of users do not sync with servers properly.
Besides, here is the full review of Unsecapp.exe for the WMI Client Application for your reference.
Remove the NGC Folder’s Content to Eliminate 0x80070032
If you cannot log into Windows 10 using your PIN, try signing into your account and removing the NGC folder’s content.
Before you do that, you need to take the folder’s ownership. To perform this action, go through the instructions listed below.
Steps to get rid of the error 0x80070032:
- 1: First, you must log into Windows 10 with your password.
- 2: Tap Windows + X keys and choose ‘File Explorer.’
- 3: Now, go to C:\Windows\ServiceProfiles\LocalService\AppData\Local\Microsoft.
- 4: Next, right-tap on the folder NGC and choose ‘Properties.’
- 5: Navigate to the tab ‘Security,’ select ‘Advanced,’ and then look for the section ‘Owner.’
- 6: Tap on the link ‘Change‘ and type in the user or administrator and object names.
- 7: Choose ‘Check Names‘ and hit ‘O.K.’
- 8: Check against the option ‘Replace Owner on subcontainers and Objects,’ After this, select ‘Apply‘ and press O.K. to save the changes.
- 9: Next, see if you can access this NGC folder. Mark all the stored files in the folder if you can and remove those files.
- 10: Tap Windows + I keys to open Settings.
- 11: Now, open the ‘Account Settings‘ tab and choose ‘Sign-in Options.’
- 12: Select ‘Add a PIN‘ by following the on-screen instructions to set a PIN.
Resolve the 0x80070032 Error Using ‘I Forgot My PIN.’
Another method to eliminate the error 0x80070032 is by choosing the option ‘I forgot my PIN.’ To perform this action, you have to follow the following procedure.
Steps to eliminate the error 0x80070032:
- 1: Tap Windows + I keys to open Settings on your system.
- 2: Select the section ‘Accounts‘ and then choose ‘Sign-in options.’
- 3: Find the ‘PIN‘ tab and tap on ‘I forgot my PIN.’
- 4: Tap on ‘Continue‘ to confirm your action.
- 5: Now, you need to type in a new PIN. Once you have entered the passcode, press O.K.
- 6: You could be asked to type your Microsoft account passcode. In that case, change the account type from Microsoft to Local and try all the steps again.
Resolve the Error 0x80070032 Through PIN Recreation
This is another effective way to get rid of the error code 0x80070032. It is performed by recreating the PIN.
By the way, if you are facing an issue with ERR_CERT_DATE_INVALID, click to read more.
Steps to get rid of the error 0x80070032:
- 1: Tap Windows + I keys to open Settings.
- 2: Go to the section ‘Accounts‘ and then ‘Sign-in Options.’
- 3: Navigate to the PIN section and choose ‘Remove.’
- 4: Tap on ‘Remove‘ to confirm your action.
- 5: Type in your account’s password and hit O.K.
- 6: Once done, tap on ‘Add‘ and enter a new PIN.
- 7: Tap O.K. to save it and see if the issue persists or not;
Note: If you are a Dell user facing the error 0x80070032 on your system, try eliminating the security tools from Dell Data Protection. Also, remove their leftovers or temporary files through Windows Registry or Reimage.
Solutions for Fixing the Error 0x80070032 on Mail
Here are various fixes that can assist you in resolving the issue with the Mail application on Windows 10 systems.
Method 1: Switch to Microsoft from a Local Account
This method is great for resolving the error code problem on Windows. Follow the instructions to get rid of this annoying Error.
1: Firstly, you have to switch from Microsoft to a local account. To do so, visit ‘Settings‘ with the help of Cortana. Within the ‘Settings‘ tab, look for ‘Accounts‘ to open the settings associated with the user accounts.
2: Next, you have to choose ‘Sign in with a local account‘ instead, which you will find under the account’s right-pane window. After that, enter the password of the present Microsoft account. Tap on ‘Next‘ to create a new local account.
3: Type in the local account’s details, such as username and passcode. Next, tap on the tab ‘Next‘ again. In the next tab, you will see a button branded as ‘Sign out and finish.’ Select this button to sign out of your Microsoft account.
4: Next, repeat the steps. Visit ‘Settings‘ and choose ‘Accounts.’ Then, select ‘Sign in‘ with a Microsoft account instead. Type in the local account’s password, along with the username and password of the Microsoft account, for signing in again. See if you could check Mail by syncing the account.
Method 2: Reinstall Mail
Try this one out if the primary method cannot offer you a proper fix to the error code problem. Here, you have to reinstall Mail to fix the syncing problem. To perform this action, follow some simple steps listed below.
1: Visit PowerShell from the search results once you have searched for it. Right-tap on this tab and choose ‘Run as Administrator.’ Please note that opening this tab as an administrator is significant, or you will face an error.
2: Within the PowerShell tab, type the command.
Get-appxprovisionedpackage – online | where-object {$ .packagename – like “*windowscommunicationsapps*”} |remove – appxprovisionedpackage – online
Once you have executed this command, close PowerShell and install the Mail application again from Windows Store.
After you have installed this application, run the same, and check whether the error 0x80070032 has been resolved.
In addition, chart your course to liberation with our roadmap on how to unlock a keyboard on your Dell laptop, converting a challenging scenario into a quick fix.
FAQs
Q1: Can I ignore Error 0x80070032?
A1: Ignoring the error could lead to more serious system issues over time. It’s recommended to resolve it as soon as possible.
Q2: Is error 0x80070032 a virus?
A2: No, it’s a system error, not a virus. However, some viruses might cause similar errors.
Q3: Can I prevent error 0x80070032?
A3: Regular system updates and checks can help prevent this error.
Q4: What if the methods mentioned don’t work?
A4: If the issue persists, consider contacting Windows support or a professional technician.
Q5: Does error 0x80070032 affect all Windows versions?
A5: This error can occur in different versions of Windows, although the causes might vary.
Conclusion
Here, we have tried our best to offer the best solutions to fix this annoying error code 0x80070032. Users can fix this issue using the solutions mentioned here.
Automatic software is best if you do not like to struggle with repair techniques. There are lots of repair tools available online for fixing Windows-related errors.
So, choose the best one and eliminate your issue. However, it is recommended to use the above-listed methods to fix the Error.
Question
Issue: How to fix Windows update error 0x80070032?
Hello. I tried to install the Windows update that was recently released but I could not. I received the 0x80070032 error. What can I do?
Solved Answer
Windows is the most popular operating system. It offers a user-friendly interface, customization abilities, built-in troubleshooters, and many other functions. Microsoft regularly releases updates to add new functions and increase the security of the OS. That is why it is extremely important to install the updates as soon as they come out.[1]
However, quite often users face issues when trying to install Windows updates. Recently, people started seeing the 0x80070032 error. Users describe seeing this error code when trying to install the latest updates. While it is unknown why exactly this error appears, there are some general reasons this could be happening.
Windows updates can fail to install because of corrupted files, Windows update components, and services, outdated drivers, etc. In this guide, you will find 7 steps that should definitely help you take care of this problem. Users should fix update error issues immediately to not put their operating system at risk.
Manual troubleshooting can be a lengthy process, so you can also use a maintenance tool like FortectMac Washing Machine X9 to scan your machine. This powerful software can fix most system errors, BSODs,[2] corrupted files, and registry[3] issues. Otherwise, follow the step-by-step instructions below.

Solution 1. Repair Corrupted System Files
Fix it now!
Fix it now!
To repair damaged system, you have to purchase the licensed version of Fortect Mac Washing Machine X9.
Use Command Prompt commands to repair system file corruption:
- Open Command Prompt as administrator
- Use the following command and press Enter:
sfc /scannow

- Reboot your system
- If SFC returned an error, then use the following command lines, pressing Enter after each:
DISM /Online /Cleanup-Image /CheckHealth
DISM /Online /Cleanup-Image /ScanHealth
DISM /Online /Cleanup-Image /RestoreHealth
Solution 2. Run the Update Troubleshooter
Fix it now!
Fix it now!
To repair damaged system, you have to purchase the licensed version of Fortect Mac Washing Machine X9.
- Press the Windows + X keys and go to Settings
- Go to Update and Security
- Click Troubleshooter
- Select Additional troubleshooters

- Run the Update troubleshooter
- Restart
Solution 3. Reset Windows Update Components
Fix it now!
Fix it now!
To repair damaged system, you have to purchase the licensed version of Fortect Mac Washing Machine X9.
- Open Command Prompt as administrator again
- Copy and paste the following commands, pressing Enter after each:
net stop bits
net stop wuauserv
net stop appidsvc
net stop cryptsvc
Del “%ALLUSERSPROFILE%\Application Data\Microsoft\Network\Downloader\*.*”
rmdir %systemroot%\SoftwareDistribution /S /Q
rmdir %systemroot%\system32\catroot2 /S /Q
regsvr32.exe /s atl.dll
regsvr32.exe /s urlmon.dll
regsvr32.exe /s mshtml.dll
netsh winsock reset
netsh winsock reset proxy
net start bits
net start wuauserv
net start appidsvc
net start cryptsvc

- Restart your PC
Solution 4. Set Windows Services to Run Automatically
Fix it now!
Fix it now!
To repair damaged system, you have to purchase the licensed version of Fortect Mac Washing Machine X9.
- Press the Windows key + R to open the Run box
- Type cmd and press Ctrl + Shift + Enter to open up an elevated Command Prompt
- If you’re prompted by the User Account Control (UAC), click Yes at the window
- Type the following commands and hit Enter after each one:
SC config trustedinstaller start=auto
SC config bits start=auto
SC config cryptsvc start=auto

- Perform a system reboot and check if the issue persists
Solution 5. Install the Update Manually
Fix it now!
Fix it now!
To repair damaged system, you have to purchase the licensed version of Fortect Mac Washing Machine X9.
Whenever Windows updates fail to install automatically, you can always try doing it manually. First, you need to find out which KB number is relevant to you.
- Right-click Start button and pick Settings
- Go to Update & Security
- On the right, locate and click View update history

- From the list, note the KB number that fails to install with the error code
- Go to Microsoft Update Catalog page, type in the KB number and press Search

- Download the update and install it manually
Solution 6. Update Drivers
Fix it now!
Fix it now!
To repair damaged system, you have to purchase the licensed version of Fortect Mac Washing Machine X9.
- In the search box on the taskbar, enter device manager, then select Device Manager
- Select a category to see the names of devices, then right-click the one you’d like to update
- Select Search automatically for updated driver software
- Select Update Driver

- If Windows doesn’t find a new driver, you can try using an automatic tool like DriverFix which can find the best drivers for your system
Solution 7. Update via Media Creation Tool
Fix it now!
Fix it now!
To repair damaged system, you have to purchase the licensed version of Fortect Mac Washing Machine X9.
- Download Windows 10 installation media from the official website
- Open the tool once it installed
- Agree to license terms
- Choose Upgrade this PC now

- Wait for the update to be installed
Repair your Errors automatically
ugetfix.com team is trying to do its best to help users find the best solutions for eliminating their errors. If you don’t want to struggle with manual repair techniques, please use the automatic software. All recommended products have been tested and approved by our professionals. Tools that you can use to fix your error are listed bellow:
do it now!
Download Fix
Happiness
Guarantee
do it now!
Download Fix
Happiness
Guarantee
Compatible with Microsoft Windows
Compatible with OS X
Still having problems?
If you failed to fix your error using FortectMac Washing Machine X9, reach our support team for help. Please, let us know all details that you think we should know about your problem.
Fortect — a patented specialized Windows repair program. It will diagnose your damaged PC. It will scan all System Files, DLLs and Registry Keys that have been damaged by security threats.Mac Washing Machine X9 — a patented specialized Mac OS X repair program. It will diagnose your damaged computer. It will scan all System Files and Registry Keys that have been damaged by security threats.
This patented repair process uses a database of 25 million components that can replace any damaged or missing file on user’s computer.
To repair damaged system, you have to purchase the licensed version of Fortect malware removal tool.To repair damaged system, you have to purchase the licensed version of Mac Washing Machine X9 malware removal tool.
Private Internet Access is a VPN that can prevent your Internet Service Provider, the government, and third-parties from tracking your online and allow you to stay completely anonymous. The software provides dedicated servers for torrenting and streaming, ensuring optimal performance and not slowing you down. You can also bypass geo-restrictions and view such services as Netflix, BBC, Disney+, and other popular streaming services without limitations, regardless of where you are.
Malware attacks, particularly ransomware, are by far the biggest danger to your pictures, videos, work, or school files. Since cybercriminals use a robust encryption algorithm to lock data, it can no longer be used until a ransom in bitcoin is paid. Instead of paying hackers, you should first try to use alternative recovery methods that could help you to retrieve at least some portion of the lost data. Otherwise, you could also lose your money, along with the files. One of the best tools that could restore at least some of the encrypted files – Data Recovery Pro.