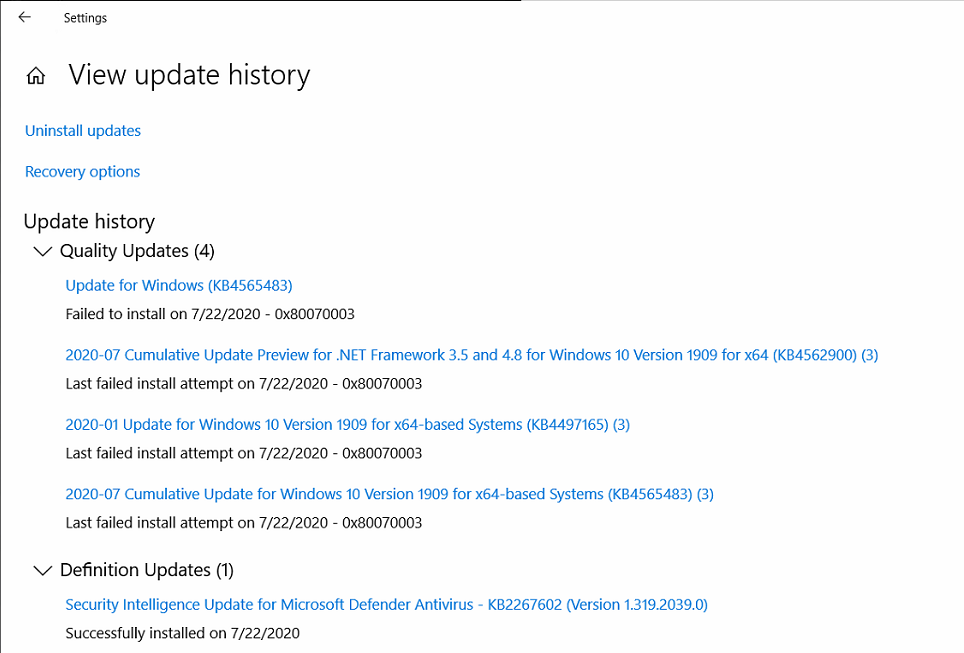
My Windows 10 client meets trouble with Windows update. It shows that failed install update as below
I tried:
-
Re-update many time, Windows just rollback after the restart. The update process still fails
-
Rename & Clean data update folder C:\Windows\SoftwareDistribution
-
Download & try to install offline these packages from Microsoft
-
Restart all related services: Windows update, Cryptographic services, Background intelligent transfer service, msiserver
-
Run DISM command (no error)
-
Re-install all .Net on Programs and Features
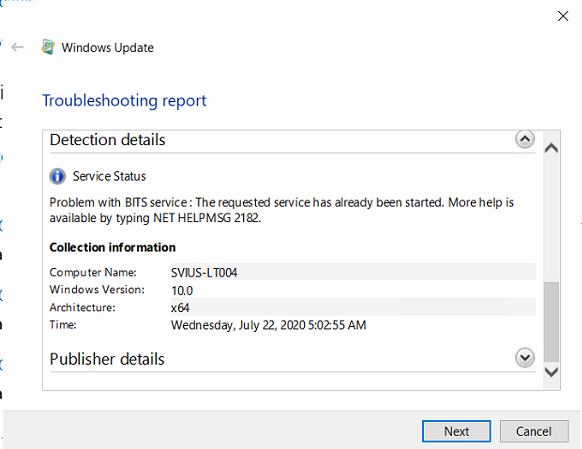
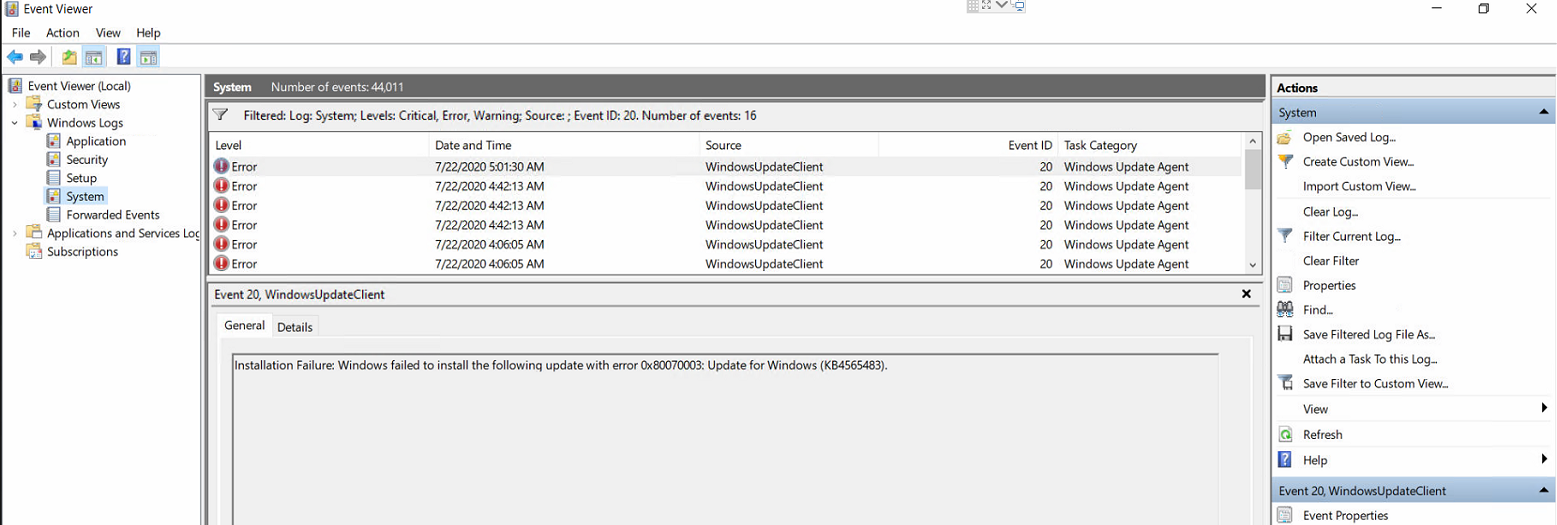
I attach more bug log that I collected:

After a month or more of trying all the standard fixes I was finally able to solve my Windows Update failure problem that displayed error code 0x80070003. I am posting here in case others may benefit. It appears if you use Macrium Reflect software this may help you but I could not confirm that the problem was caused by Macrium. So whether you use Macrium or not see if this helps you.
-
In the Registry Editor (click the Start Menu icon and type regedit), go to this location: HKEY_LOCAL_MACHINE\SYSTEM\CurrentControlSet\Services\WIMMount
-
FIrst thing to do is make a backup of this entry in case anything goes wrong. Right click on WIMMount and select Export and save the backup somewhere.
-
Now click on the top level WIMMount entry (if you expand it you will see Instances and WIMMount sub-directories but we will not be using those) and in the right side panel you should see 11 or so entries.
-
Find the entry with the name “ImagePath” and make sure the Data column shows this: system32\drivers\wimmount.sys
-
If it does not say this, click on “ImagePath” and change the Value data field to system32\drivers\wimmount.sys
In my WIndows 10 registry, this entry showed something different so I changed it. I confirmed this entry on my two other Windows 10 PC’s. -
Finally, check to make sure the wimmount.sys file is in this location: C:\Windows\System32\drivers\wimmount.sys
If you didn’t have the problem stated above, I suggest using the SetupDiag tool located here:
https://docs.microsoft.com/en-us/windows/deployment/upgrade/setupdiag?mc_cid=25e3a26841&mc_eid=[6921c9c1f0]
This is what I used to find my problem with wimmount.sys above. You just double click SetupDiag.exe and after it runs it will create 3 files in the same folder as SetupDiag.exe. Open the SetupDiagResults.log file in Notepad and it should give you a clue as to why Windows Update failed.
Method 2 : Instructions to fix error 0x80070003
First, disconnect all peripherals connected to your computer.
Restart your machine.
Then go to Settings.
Select Update and Security.
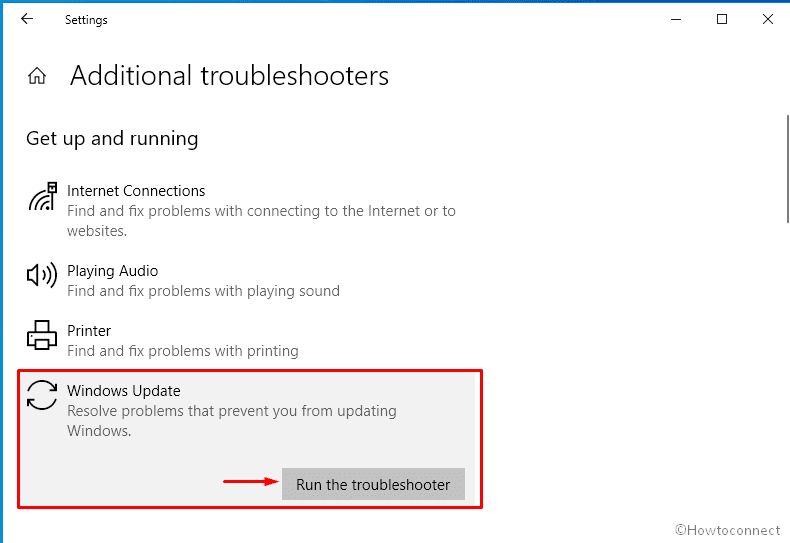
Click Troubleshoot (left side).
Then click View additional troubleshooters.
Locate and run the Update troubleshooter
.
- Check again for updates.
Restart updated components
Restart the Windows Update component to establish a new connection with the Microsoft server. Check if this solution solves the problem.
Launch Command Prompt with Admin rights.
Then run the commands below one by one (press Enter after each command):
-
-
net stop wuauserv -
net stop cryptSvc -
net stop bits -
net stop msiserver -
Ren C:\Windows\SoftwareDistribution SoftwareDistribution.old -
Ren C:\Windows\System32\catroot2 Catroot2.old -
net start wuauserv -
net start cryptSvc -
net start bits -
net start msiserver
-
- Check again for updates.
⇒ Note: If the error persists, unplug the network modem for two minutes. Then plug it back into the wall outlet. Connect your computer to the network and check for updates again..
Turn off your anti-virus software
Apps and programs installed on your device can interfere with the Windows update process. Third-party antivirus, anti-malware, and firewall solutions often block the Windows Update service. The fastest way to solve the problem is to disable all unnecessary third-party programs running on your computer. This also includes security tools. Do it using Task Manager or clean boot your device. Then check if error 0x80070003 persists.
Repair and restore corrupted system files
If your system files are corrupted or your computer cannot access them, you will not be able to install the latest updates. Run SFC and DISM to resolve the issue.
Launch Command Prompt with admin rights.
Run the following commands one by one:
-
-
SFC /scannow -
DISM /Online /Cleanup-Image /CheckHealth -
DISM /Online /Cleanup-Image /ScanHealth -
DISM /Online /Cleanup-Image /RestoreHealth
-
- Khởi động lại máy tính của bạn và kiểm tra lại các bản cập nhật.
Restart your computer and check for updates again.
Manually download updates
Download the latest Windows updates manually and check if error code 0x80070003 still pops up on the screen. If you’re trying to install a feature update, use Update Assistant to get the job done. If you are trying to install a specific update or a security patch, download it from the Microsoft Update Catalog website.
Conclusion
To fix error code 0x80070003 on Windows, first run the Update Troubleshooter. Then, restart the updated components, disable your anti-virus software and repair the corrupted system files. If the error persists, manually download the problematic updates.
Good luck.
- Remove From My Forums
-
Question
-
Hello, I am trying to install Windows8-RT-KB2869923-x64.cab on several servers using PowerShell command «Invoke-Command -ComputerName (Get-Content C:\KB\blades.txt) -FilePath C:\kb\KB2869923.ps1».
The PS1 consists of «dism.exe /online /add-package /packagepath:\\XXX.XXX.XXX.XXX\install\Patches\Windows8-RT-KB2869923-x64\Windows8-RT-KB2869923-x64.cab /Quiet /NoRestart»
For some reason it won’t go through and I am getting the error 0x80070003 (Error 3). I tried searching online but can’t find anything about it. Anyone has a clue how to get about it?
Answers
-
-
Marked as answer by
Wednesday, November 6, 2013 3:33 PM
-
Marked as answer by
узнай меня Как исправить ошибку Центра обновления Windows 0x80070003 с помощью 5 методов.
Пользователи Windows часто сталкиваются с ошибками Центра обновления Windows время от времени. Нет конкретной ошибки, которая появляется при использовании инструмента Центр обновления Windows ; В зависимости от причины ваш компьютер может время от времени показывать вам различные ошибки.
В последнее время многие пользователи сообщают о Ошибка 0x80070003 при обновлении их устройств с Windows 10. Появляется ошибка 0x80070003 Только в том случае, если инструменту Центра обновления Windows не удается загрузить или установить обновление на ваше устройство.
К сожалению, Microsoft ничего не сообщает вам об ошибке. Появляется ошибка и просит вас снова попробовать Центр обновления Windows. Если у вас ограниченный интернет-пакет, эта ошибка может истощить все ваши данные и оставить вас в неведении.
Исправить ошибку Центра обновления Windows 0x80070003
Если вы не можете обновить компьютер с Windows 10 из-за ошибки 0x80070003 , вы попали на правильную страницу. Потому что мы поделились некоторыми из них с вами Лучшие способы исправить ошибку Центра обновления Windows 0x80070003. Итак, приступим.
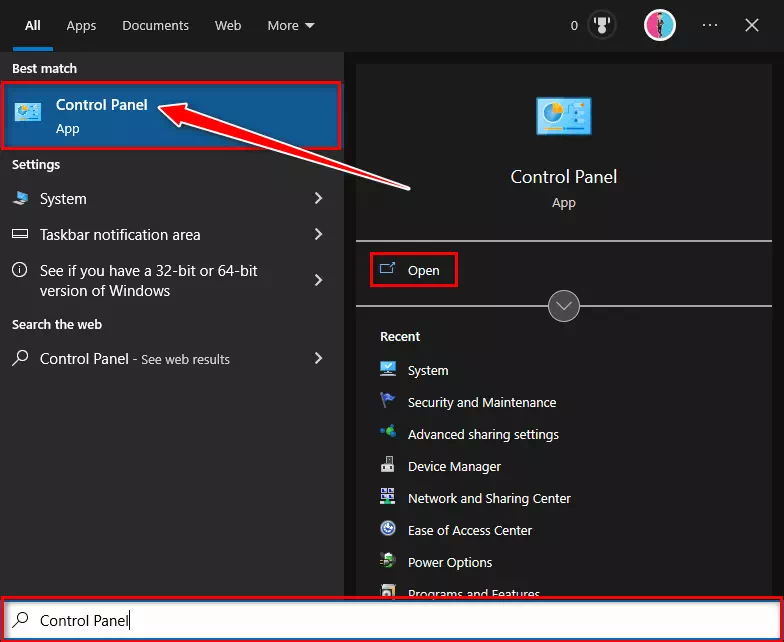
1. Запустите средство устранения неполадок обновления.
Windows 10 предоставляет средство устранения неполадок при обновлении, которое утверждает, что решает многие проблемы и ошибки, которые мешают вам обновлять Windows. Вы можете запустить средство устранения неполадок обновления, чтобы автоматически найти и устранить проблему. Вот что вам нужно сделать, чтобы запустить средство устранения неполадок Центра обновления Windows:
- Нажмите на поиск Windows и введите «Панель управлениядля доступа к панели управления.

Доступ к панели управления - Затем откройте панель управления и выберите «Система и безопасностьдля доступа к системе и безопасности.
- Затем в «Система и безопасность» нажмите на ссылку «Устранение проблем с обновлениями WindowsЧтобы исправить проблемы с Центром обновления Windows.
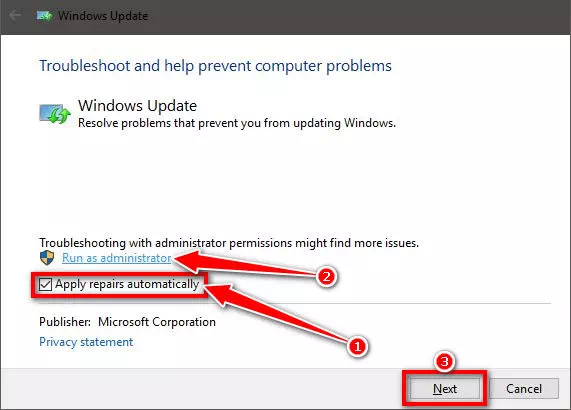
- Это запустит средство устранения неполадок Центра обновления Windows. Вам нужно проверитьАвтоматически применять исправлениядля автоматического применения ремонта и нажмитеЗапуск от имени администраторазапускать от имени администратора. Сделав это, нажмите кнопку Следующая.

Автоматически применять исправления - Средство устранения неполадок Центра обновления Windows запустится и попытается обновить ваше устройство. Если вы обнаружите какую-либо проблему с помощью инструмента Центра обновления Windows, она будет устранена автоматически.
2. Временно отключите Защитник Windows.
Несколько пользователей утверждали, что исправили ошибку 0x80070003, отключив Защитник Windows. Хотя вы не можете полностью отключить Защитник Windows, вы можете отключить параметры брандмауэра и сканирования в реальном времени. Тебе Как отключить Защитник Windows.
- Сначала нажмите «Поиск Windows» и введите «Безопасность Windows». Затем откройте приложение «Безопасность Windows» из списка параметров.

Безопасность Windows - Затем в разделе «Безопасность Windows» нажмите «Защита от вирусов и угрозЧто означает защиту от вирусов и угроз.

Защита от вирусов и угроз - Далее на экране Защита от вирусов и угроз нажмите на ссылку «Управление настройкамидля управления настройками.
- Затем отключите следующие параметры:
1. Защита в реальном времениЗащита в реальном времени».
2. Безопасность в облаке»Облачная защита».
3. Автоматическая отправка формыАвтоматическая подача образца».
4. Защита от взлома»Защита от саботажа».

Параметры Диспетчера защиты от вирусов и угроз Защитника Windows
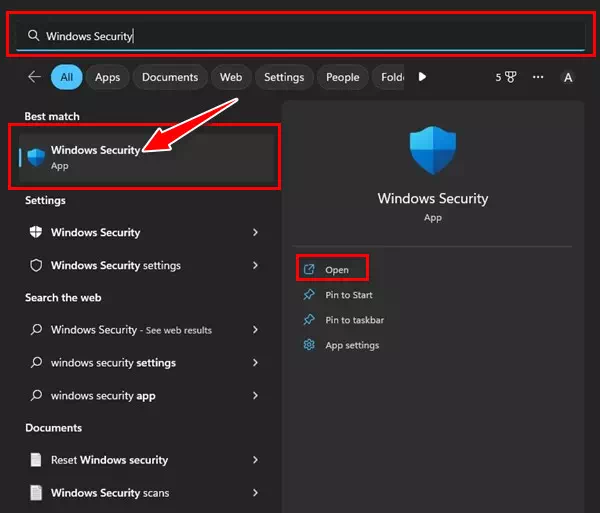

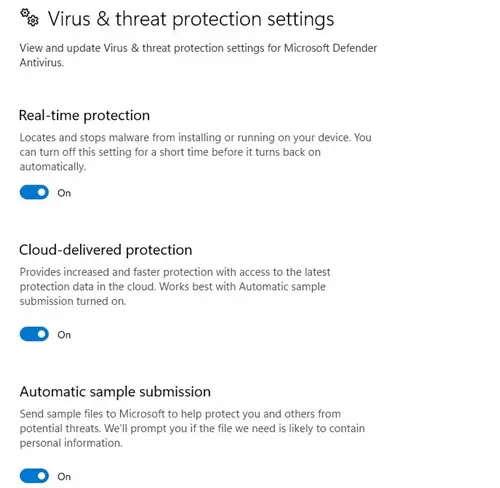
Вот и все! После отключения четырех параметров вам необходимо снова запустить средство Центра обновления Windows. На этот раз вы не получите ошибку 0x80070003.
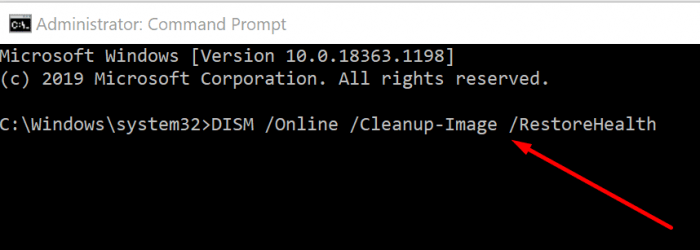
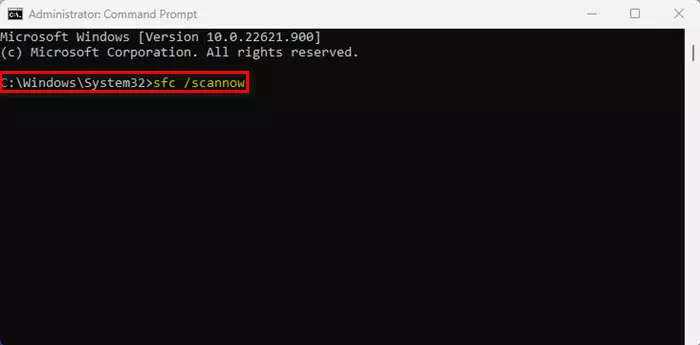
3. Запустите команду SFC и DISM.
Вы выполняете заказы SFC و DISM Сканирует и восстанавливает поврежденные установочные файлы системы. Ошибка 0x80070003 также может появиться во время обновления Windows из-за повреждения системных файлов. Таким образом, вы можете попробовать запустить эти две команды, чтобы решить проблему.
- Открыть Стартовое меню , и найдитеКомандная строка, и запустите его от имени администратора.

CMD - Затем введите следующую команду ПФС / SCANNOW и нажмите кнопку. Enter выполнить команду.

ПФС / SCANNOW - Приведенная выше команда запустит инструмент Средство проверки системных файлов. Этот инструмент просканирует и восстановит все поврежденные системные файлы.
- Теперь закройте командную строку и перезагрузите компьютер.
- Если команда SFC возвращает ошибку, выполните следующую команду:
DISM / Online / Cleanup-Image / RestoreHealth
Запустите инструмент DISM
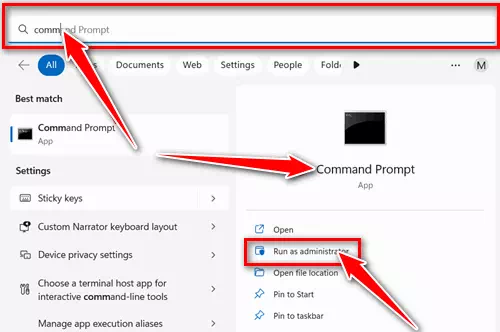

Вот и все, и таким образом вы можете запускать команды SFC и DISM в своей операционной системе Windows для устранения ошибки 0x80070003.
4. Перезапустите компоненты Центра обновления Windows.
Поскольку ваша Windows 10 не может установить определенное обновление, вы можете перезапустить компоненты обновления. Компоненты Центра обновления Windows легко перезапустить, поэтому выполните следующие действия:
- Открыть Стартовое меню , и найдитеКомандная строка, и запустите его от имени администратора.
Командная строка - Когда откроется командная строка, выполните следующие команды одну за другой:
net stop wuauserv
net stop cryptSvc
чистые стоповые бит
net stop msiserver
Ren C: \ Windows \ SoftwareDistribution SoftwareDistribution.old
Ren C: \ Windows \ System32 \ catroot2 Catroot2.old
net start wuauserv
net start cryptSvc
чистые стартовые биты
net start msiserver
- После этого откройте Центр обновления Windows и снова проверьте наличие обновлений.
Вот как вы можете перезапустить компоненты обновления на вашем ПК с Windows.
5. Установите обновления Windows вручную
В Windows 10 и 11 вы можете загружать и устанавливать обновления Windows вручную. Вы можете следовать этому руководству, если все методы не помогли устранить ошибку Центра обновления Windows 0x80070003.
Вам просто нужно знать обновленную версию (сборку, версию и т. д.), которую не удается загрузить и установить на ваше устройство. Если вы это знаете, то вам нужно зайти на сайт Microsoft Update Catalog в Интернете и загрузите пакет обновления.
После загрузки вы можете установить его прямо на свое устройство и перезапустить. Мы уже поделились подробным руководством о том, как загрузить и установить обновления Windows вручную. Обязательно ознакомьтесь с этим руководством для шагов.
Это были одни из лучших и самых простых способов исправить ошибку Центра обновления Windows 0x80070003. Если вам нужна дополнительная помощь в устранении ошибки 0x80070003 в Windows, сообщите нам об этом в комментариях. Также, если статья вам помогла, поделитесь ею с друзьями.
Вам также может быть интересно узнать о:
- Как исправить проблему черного экрана в Google Chrome
- Как исправить невозможность подключения к Steam (полное руководство)
Мы надеемся, что эта статья окажется для вас полезной. Как исправить ошибку Центра обновления Windows 0x80070003. Поделитесь своим мнением и опытом с нами в комментариях.
-
Home
-
News
- Full Guide to Fix the Windows Update Error 0x80070003
By Sonya |
Last Updated
Windows Update error 0x80070003 is a very common error that often appears on Windows 10, and it is not difficult to fix. If you want to find a way to get rid of this error code, then this post from MiniTool is what you need.
The Windows Update service is a built-in feature on Windows systems, and you can use it to get better protection and new features. However, you may meet the Windows Update error 0x80070003 when running this service.
So how to deal with the Windows Update error 0x80070003? Here are four useful methods you can try.
Related post: Fixed: Windows Update Error 0xca00a000 on Windows 10
Method 1: Run the Windows Update Troubleshooter
If you meet the Windows Update error 0x80070003, running the Windows Update Troubleshooter is the quickest and easiest method to solve the problem. Windows Update Troubleshooter is a built-in feature that aims to resolve every update error code.
Follow the guide to run the Windows Update Troubleshooter:
Step 1: Click the Start button and then click Settings. Choose Update & Security.
Step 2: Go to the Troubleshoot tab, click Windows Update, and then click Run the troubleshooter.
Step 3: Wait until the process to finish and then follow the instructions on the screen to fix error code 0x80070003.
Step 4: Update your system again to check if the error is fixed.
Related post: Fixed: Windows Update Error 0x80246019 on Windows 10
Method 2: Use the Command Prompt
You can also use the Command Prompt to get rid of the Windows Update error 0x80070003. Here is the tutorial:
Step 1: Type cmd in the Search box and then right-click Command Prompt to choose Run as administrator.
Step 2: Type the following commands one by one and press Enter after each one.
net stop wuauserv
ren c:\windows\SoftwareDistribution softwaredistribution.old
net start wuauserv
exit
Step 3: Restart your computer and update your system to see if the error 0x80070003 is fixed.
Method 3: Check Date and Time Settings
You could meet the Windows Update error 0x80070003 when the date and time are set incorrectly, therefore, you can check the Date and Time settings. Here is a quick guide:
Step 1: Type control panel in the Search box and then click Control Panel to open it. Set View by: Category.
Step 2: Choose Clock and Region, then click Date and Time.
Step 3: Go to the Internet Time tab, then click Change settings….
Step 4: Check the box next to Synchronize with an Internet time server and then click Update now. Click OK to save changes.

Step 5: Restart your computer and then update your system to see whether the error is gone.
The last method you can try to get rid of the Windows Update error 0x80070003 is to run DISM and SFC tools. Follow the guide to do that:
Step 1: Open Command Prompt as an administrator.
Step 2: Type DISM.exe /Online /Cleanup-image /Restorehealth in the window, then press Enter. Wait for the process to complete.
Step 3: Type sfc /scannow in the windows and then press Enter. Wait for the process to complete.
Step 4: Reboot your computer to check if the error is fixed.
Related post: Quickly Fix – SFC Scannow Not Working (Focus on 2 Cases)
Final Words
If you are troubled with the Windows Update error 0x80070003, then you can refer to the methods mentioned in this post to get rid of it. If you have any questions about the method, leave a comment below and we’ll reply to you as soon.
About The Author
Position: Columnist
Author Sonya has been engaged in editing for a long time and likes to share useful methods to get rid of the common problems of Windows computers, such as Windows Update error. And she aims to help more people to protect their data. What’s more, she offers some useful ways to convert audio and video file formats. By the way, she likes to travel, watch movies and listen to music.
Windows update is pretty significant for the OS as it comes with security patches that keep you safe online and offline as well. Such updates not only ensure safety but also let you experience additional feature enhancements moreover improve PC performance. The process of getting an update in Windows 11 and 10 is independent if you haven’t changed the related default settings earlier. But oftentimes, the procedure gets stuck in the middle due to some error codes.
Error 0x80070003 generally occurs when the Windows update fails to install. Though the exact reason behind this Windows issue is yet to be known, there are some potential causes that are often found to be culprit. In most cases, the incorrect status of update related services causes such an error. Additionally, missing update files, malware infection, corrupted system components, old Spupdsvc.exe file, and incorrect time zone can prompt the same issue.
Here is how to fix Windows 11 or 10 update Error 0x80070003 –
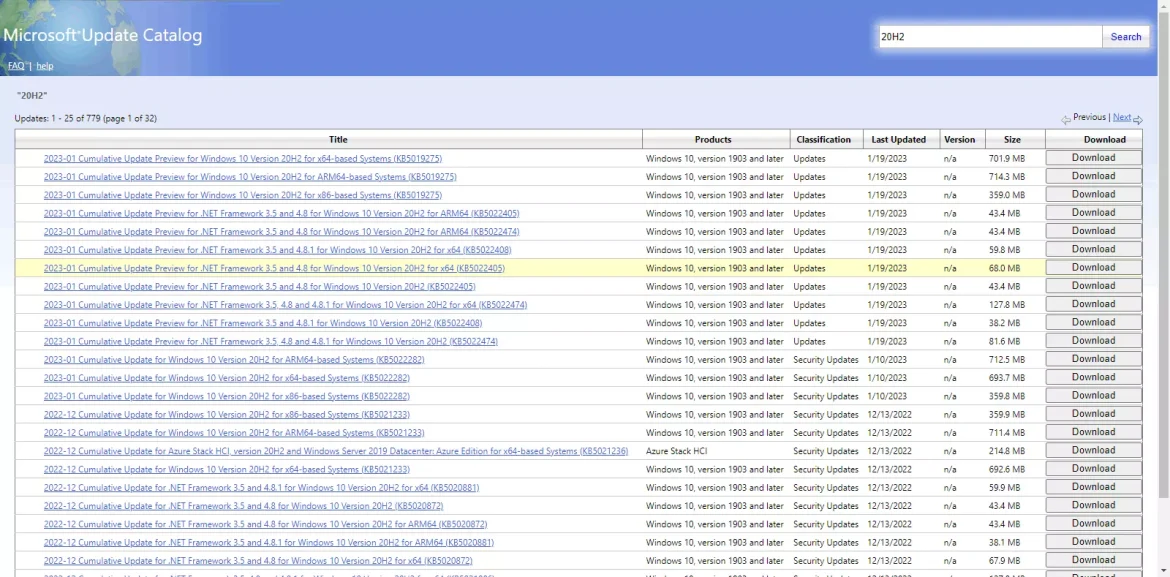
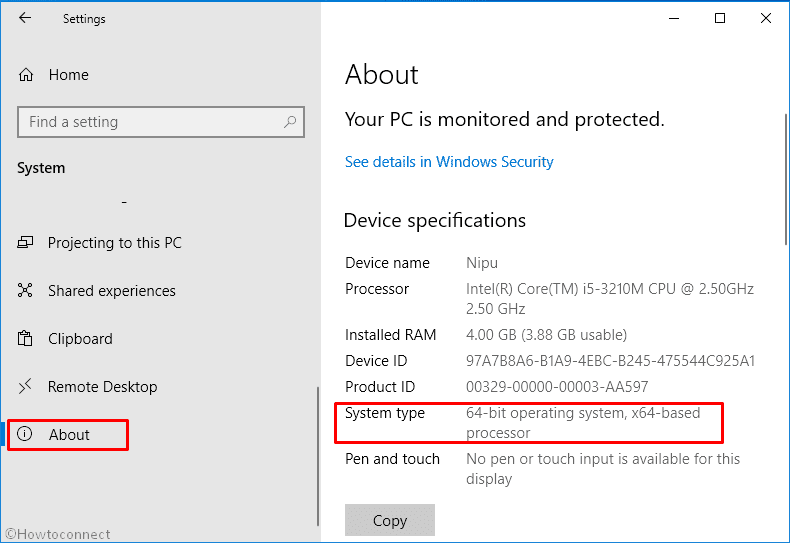
1] Download Servicing Stack Update manually
For any update to install successfully Windows 10 and 11 requires having SSU already installed. So before proceeding ahead to the next methods install the Servicing stack update and check if the error is fixed.
- Press – Windows + I.
- Click – System.
- From the left, select – About.
- Note down the System type present on the right-hand side.
Windows 11 users, open Settings=> Choose About from left to check System type.
- After that, visit the official webpage of update catalog.
- Click the search bar and type in the KB number of the Servicing Stack update.
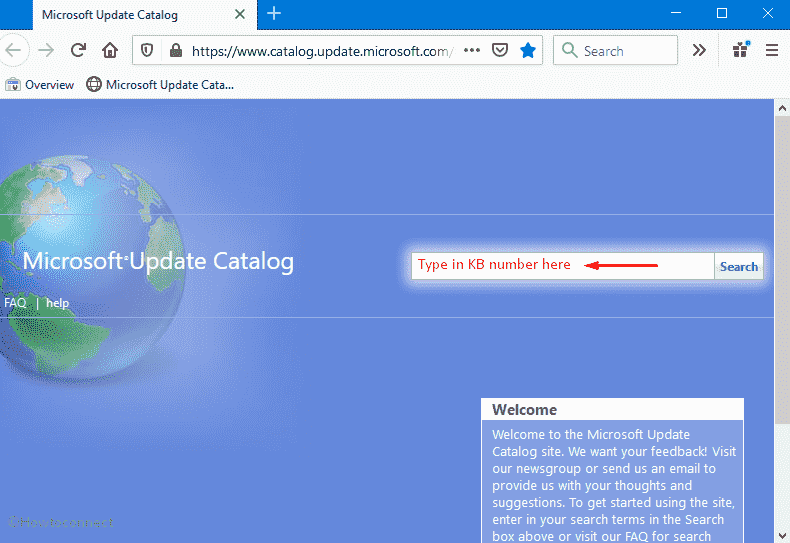
- Hit – Enter.
- Look for the Servicing Stack Update that matches the system type you noted.
- Click Download present next to the desired KB number.
- Double-click the downloaded item and install it following on-screen instructions.
- Restart Windows and check if the error still exists.
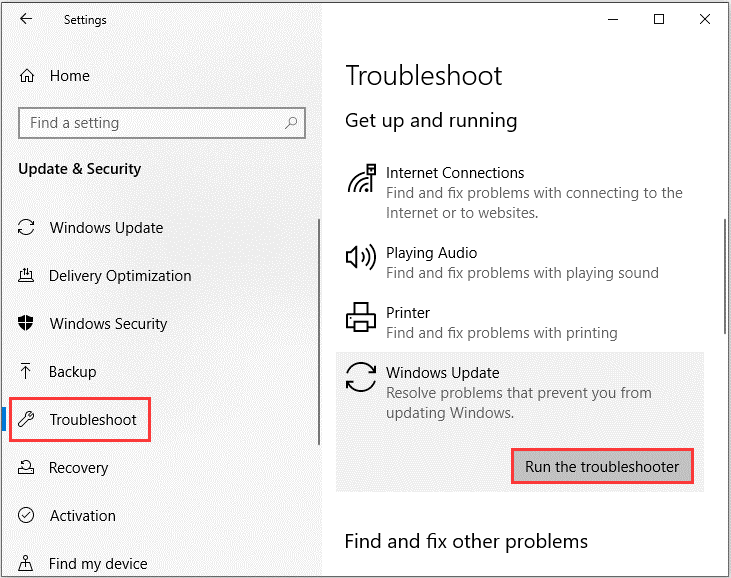
2] Run Windows Update troubleshooter to fix 0x80070003
To fix any kind of update error, Microsoft offers a troubleshooter that scans the full system to diagnose the real cause. Furthermore, it put forward automatic fix to resolve the error that you are getting while downloading or installing the new patch. Before running the troubleshooter, make sure you are connected with an active internet connection and then go through the below steps –
For Windows 10
- Press – Windows + S.
- Type in – troubleshoot.
- Hit – Enter.
- From the right-pane, click – Additional troubleshooters.
- Select – Windows update.
- Click – Run the troubleshooter.
- Follow on-screen guidelines if any.
- When the utility suggests a resolution, click – Apply this fix.
- Close the troubleshooter and check for update error 0x80070003.
For Windows 11
- Press – Windows + I.
- Move to the right of appearing Settings page.
- Scroll down to find – Troubleshoot.
- Once you get it, select the same.
- From next page, click – Other troubleshooters.
- Hit – Run set beside Windows update.
3] Check the Windows update related services
Windows update service runs in the background and allows the system to download and install new patches automatically. Some other services like BITS, RPC helps in this procedure too. To get any update error-free, these services must run properly. Here are the steps to check the same –
- Press – Windows key.
- Type – services.
- Hit – Enter.
- From Services window, double-click – Windows Update.
- Set the Startup type to Automatic.
- If the service is not running, click – Start.
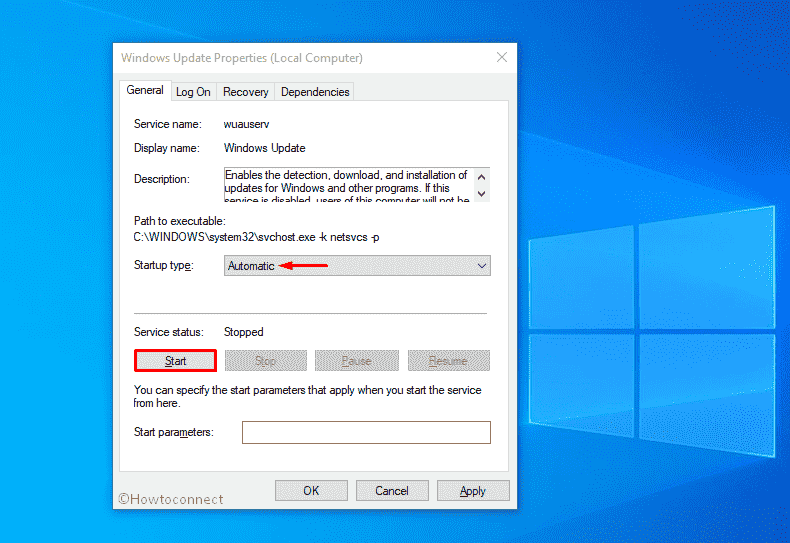
- Shift to – Log on tab.
- Click the radio button set before Local System account.
- Make sure the checkbox of Allow service to interact with desktop is unchecked.

- Click Apply and then OK.
- Do the exact same for Background Intelligent Transfer Service, Event Log, and Remote Procedure Call (RPC) services too.
4] Reset Spupdsvc.exe folder
Spupdsvc.exe is a genuine executable file from Microsoft and a part of RunOnce service. When a new patch becomes available, another process gets a notification and the system adds a RunOnce entry to the registry for spupdsvc.exe. This happens to perform necessary updates to Windows PC. The process is executed when the device restarts and the user logs on. If the system finds anything unusual with Spupdsvc.exe folder, update error 0x80070003 may appear. To fix it out –
- Click – Start icon.
- Type – cmd.
- Press – Ctrl + Shift + Enter.
- When a User Account Control shows up, click – Yes.
- In the elevated Command Prompt, insert the following –
cmd /c ren %systemroot%\System32\Spupdsvc.exe Spupdsvc.old
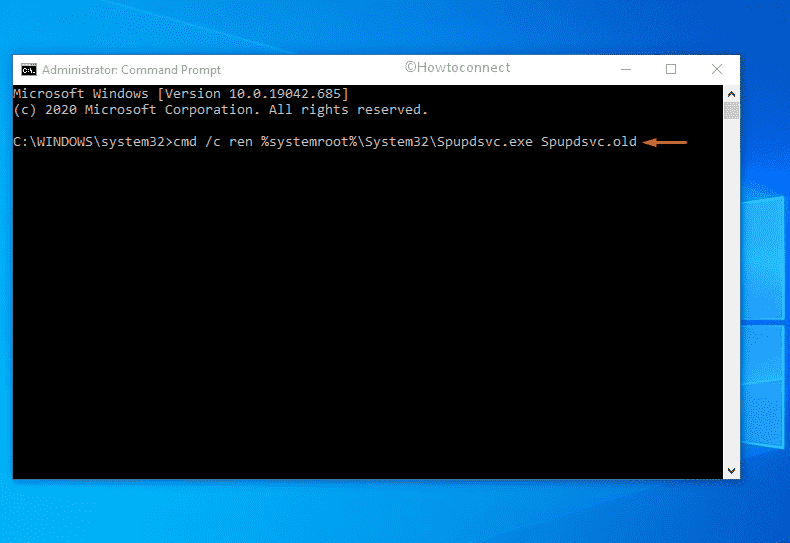
- Hit – Enter.
- Restart the device.
5] Restart Windows update services to fix error 0x80070003
As we said earlier, Windows update service is pretty crucial as it ensures the smooth functioning of the update process. After downloading an update, those files are being saved in the Software distribution folder for the time being. Sometimes if something wrong happens during the installation of update files, many of us try to download the same file again and again. As a result, they conflict with the existing one and end up causing update error 0x80070003. In order to fix the issue, you will have to restart Windows update service moreover replace the current Software Distribution folder with a fresh one. Here is how to proceed –
- Open Command Prompt as admin.
- In the prompt, insert the bellow command one after another and hit Enter after each one –
net stop wuauserv
ren c:\windows\SoftwareDistribution softwaredistribution.old
net start wuauserv
exit
- Reboot the system and check for update error 0x80070003.
6] Resolve existing system corruption
System File checker resolves the existing corruption as well as recover missing components. On the other hand, DISM is used to repair and make Windows image including Windows RE, Windows Setup, and Windows PE ready. Many people reported that, after running this utility, error 0x80070003 didn’t occur anymore and they were able to install the update without a hitch.
- Press – Windows + S.
- Type in – cmd.exe.
- Opt for – Run as administrator.
- To grant access, click – Yes.
- Type in – sfc /scannow.
- Hit – Enter.
- Once the procedure hits 100%, check the report thoroughly.
- If the corruption is fixed, restart the PC.
- Else, run DISM /Online /Cleanup-Image /RestoreHealth command in the same console.
- After completion of the scanning process, close Command Prompt.
- Reboot Windows PC.
7] Ensure correct Time and Date settings to resolve 0x80070003
Incorrect time zone many times gives rise to error 0x80070003 while installing a new patch. Therefore, it’s necessary to check if your current settings reflect the correct time zone. For that –
- Open Control Panel.
- Set the View by option to Category.
- Click – Clock and Region.
- From the right pane, hit – Date and Time.
- Shift to Internet Time tab.
- Click – Change settings.
- Check the box present before Synchronize with an Internet time server.
- Click – Update now.
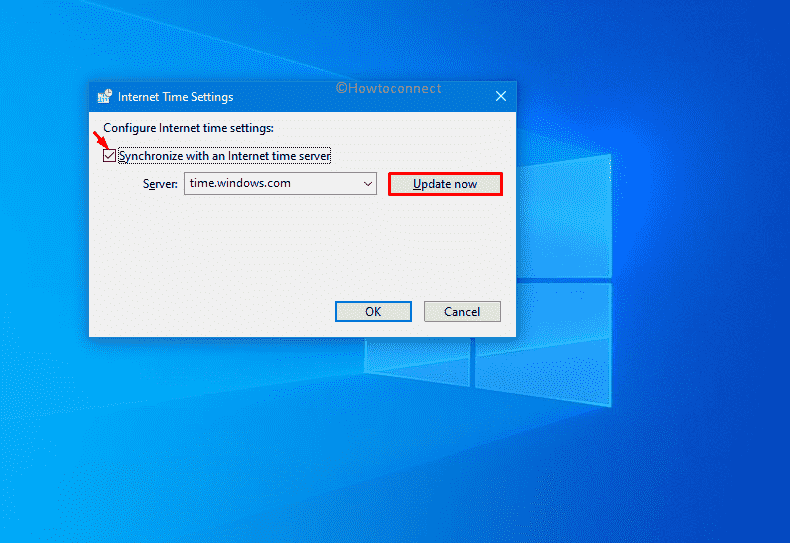
- Hit – OK to save the changes.
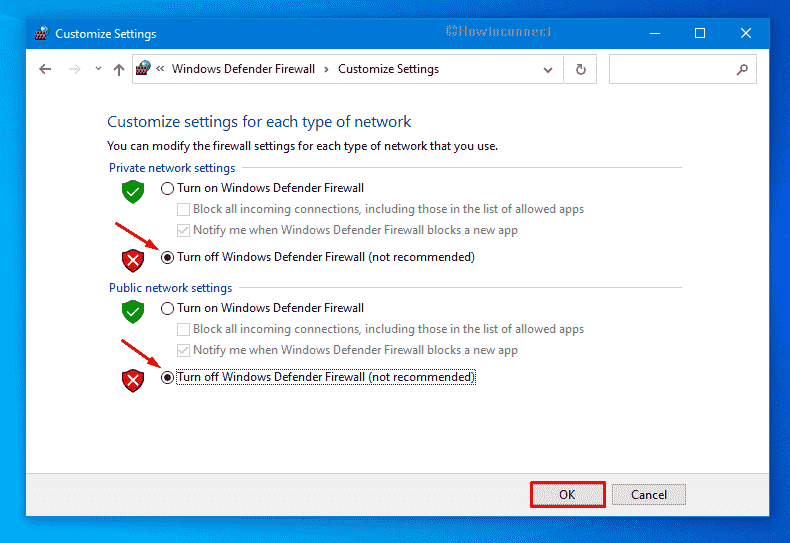
8] Disable the running antivirus program
On many occasions, the antimalware program you are using get a wrong idea about the update files and consider them as a threat. For that reason, the utility blocks the updates from being downloaded. To settle down the issue, you can put the antivirus program out of action. However, don’t forget to turn it on after installing the updates successfully.
Turn Windows Defender Firewall off
- Press – Windows + S.
- Type in – firewall.cpl.
- Hit – Enter.
- From the left column, click – Turn Windows Defender Firewall on or off.
- Select – Turn off Windows Defender Firewall (not recommended) for both Private network settings and Public network settings.
- Click – OK.
Disable third-party antimalware program
- Click the up arrow icon from the notification bar.
- Right-click on the icon of your antivirus software.
- Choose – Disable.
- Set a period of time that decides how long the tool will remain disabled.
9] Clean boot Windows to install updates without 0x80070003
All third-party software and services are not trustworthy and often create problems on Windows 11 and 10. When we end up installing too many similar programs, they conflict with each other which gives rise to several fatal codes. Update error 0x80070003 can be a result of the same. Clean boot lets the system start with basic programs and services, as a result, you will get to know if any third-party component really causing the issue. To clean boot –
- Click – Start icon.
- Type in – MSConfig.
- Hit – Enter.
- Select the radio button set for Selective startup.
- Uncheck – Load startup items.
- Shift to – Services tab
- Check the box present next to Hide all Microsoft services.
- Select – Disable all.
- Go to the Startup tab.
- Click – Open Task Manager.
- Right-click on each program that exists there and choose – Disable.
- Close Task Manager and go back to the System Configuration window.
- Click Apply first and then OK.
- Restart the PC.
Methods list
1] Download Servicing Stack Update manually
2] Run Windows Update troubleshooter
3] Check the Windows update related services
4] Reset Spupdsvc.exe folder
5] Restart Windows update services
6] Resolve existing system corruption
7] Ensure correct Time and Date settings
8] Disable the running antivirus program
9] Clean boot Windows
That’s all!!
Repair any Windows problems such as Blue/Black Screen, DLL, Exe, application, Regisrty error and quickly recover system from issues using Reimage.